

Page 1
[3000V High-voltage Resistant Isolation Type]
Interface Converter
USB
⇔
Serial Conversion Model
Instruction Manual
SI-35USB / SI-35USB-2
The latest instruction manual is in the attached CD as PDF format.
(2nd edition)
Page 2
Notice
Under the copyright laws, it is prohibited to reprint or duplicate any part or the whole
of this instruction manual without prior permission from LINEEYE CO., LTD.
(“LINEEYE”)
All company and product names in this manual are trademarks or registered trademarks
of their respective companies.
The contents of this manual and specifications of the products are subject to change
without any notice.
This manual has been designed and edited with great care to give you all necessary
information. If you have any questions, feel free to direct your inquiries to LINEEYE.
LINEEYE makes no warranty or guarantee, either expressed or implied with respect to
its quality, performance, merchantability, or tness for a particular purpose. LINEEYE
shall not be liable for direct, in-direct, special, incidental, or consequential damages
resulting from any defect in the product. The warranty and remedies set forth above are
exclusive and in lieu of all others.
Copyright © 2006-2017 LINEEYE CO., LTD. All right reserved.
Thank you for your purchase of SI series. To use it correctly, you are
advised to read and understand this instruction manual thoroughly. Keep
this together with the warranty.
Introduction
Page 3
Be sure to read the following.
LINEEYE has developed and manufactured this product for purpose of using with
electrical devices such as a computer, a personal device, a measurement device,
semiconductor manufacturing equipment, a vending machine, a sequencer, display
equipment and so on. LINEEYE does not manufacture this product under the
purpose of using with equipment, which may cause malfunction to do harm to the
human body: control equipment for nuclear, aircraft equipment, life maintenance
equipment, traffic signals, etc. Therefore, LINEEYE makes no guarantee with
the mentioned-above use. If you use this product for the purposes mentioned
above, please contact LINEEYE considering safety like Fail Safe under your
responsibilities.
Danger Level
Warning
There is a possibility of getting a serious injury or a death if the
device is not used properly.
Caution
There is a possibility of getting an injury or material damage if
the device is not used properly.
* “Injury” indicates injury, burn, an electric shock, or the like which does not
require hospitalization or the extended hospital visit. “Material damage”
indicates damage related to a house, a building, furniture, apparatus, livestock
or a pet.
Safety Information
Page 4
■ Do not disassemble or modify the converter .
This may cause overheating, a re, an electric shock, injury or unit malfunction.
■ Stop using the converter immediately when smoke, smells, or unusual sound emanates from
itself.
Continuous use may cause a burn, re, or electric shock.
■ Keep the products dry. Keep them away from water.
Failure to do so may cause overheating, an electric shock, or unit malfunction.
■ Do not insert the metal scrap or the rubbish such as lead wires into the opening.
Doing so may cause overheating, an electric shock, or unit malfunction.
■ Never touch the converter and AC adapter with wet hands.
Doing so may cause an electric shock.
■ Never use the converter in the place where an inammable gas leaks.
Doing so may cause ignition.
■ Do not conduct the installation or wiring work when power is applied.
Doing so may cause an electric shock or unit malfunction.
■ Do not use the damaged cables.
Doing so may cause re by overheating.
■ Do not install the converter in the unstable or vibrating place.
Doing so may cause unit malfunction or injury.
■ Do not install the converter in any temperature and humid places, or any places which has the
extreme temperature change.
Doing so may cause unit malfunction.
■ Do not install the converter in any places exposed to direct sunlight.
Doing so may cause a burn or unit malfunction by overheating.
■ Be sure not to short-circuit the pins on the connector.
Doing so may cause unit malfunction or injury.
Page 5

■■■
Contents
■■■
Chapter 1 Before Using the Product ....................................................1
1-1. Overview ..........................................................................................................1
1-2. Specication .....................................................................................................1
1-3. Unpacking and Product Composition ...............................................................2
1-4. CD-ROM Included ...........................................................................................2
1-5. Mounting Arrangement ...................................................................................2
Chapter 2 Driver Installation and Usage ..............................................4
2-1. Driver Installation for Windows 10/8.1/8/7 (32bit/64bit) ................................4
2-2. Manual Installation of the Driver for Windows ...............................................4
2-3. The Way to Conrm the Installed Driver ..........................................................7
2-4. Usage of Virtual COM Port Driver ...................................................................8
Chapter 3 Usage ..................................................................................9
3-1. Overview and Features .....................................................................................9
3-2. Panel Explanation ...........................................................................................10
3-3. Hardware Setup ..............................................................................................12
3-4 .Cable Connection ...........................................................................................14
Chapter 4 Warranty and After-sales Service .....................................16
4-1. Troubleshooting ..............................................................................................16
4.2. Loop-back Test by Communication Software ................................................16
4.3 Warranty and Repair ........................................................................................19
4.4. After-Sales Service .........................................................................................19
Page 6
-1-
Chapter 1 Before Using the Product
1-1. Overview
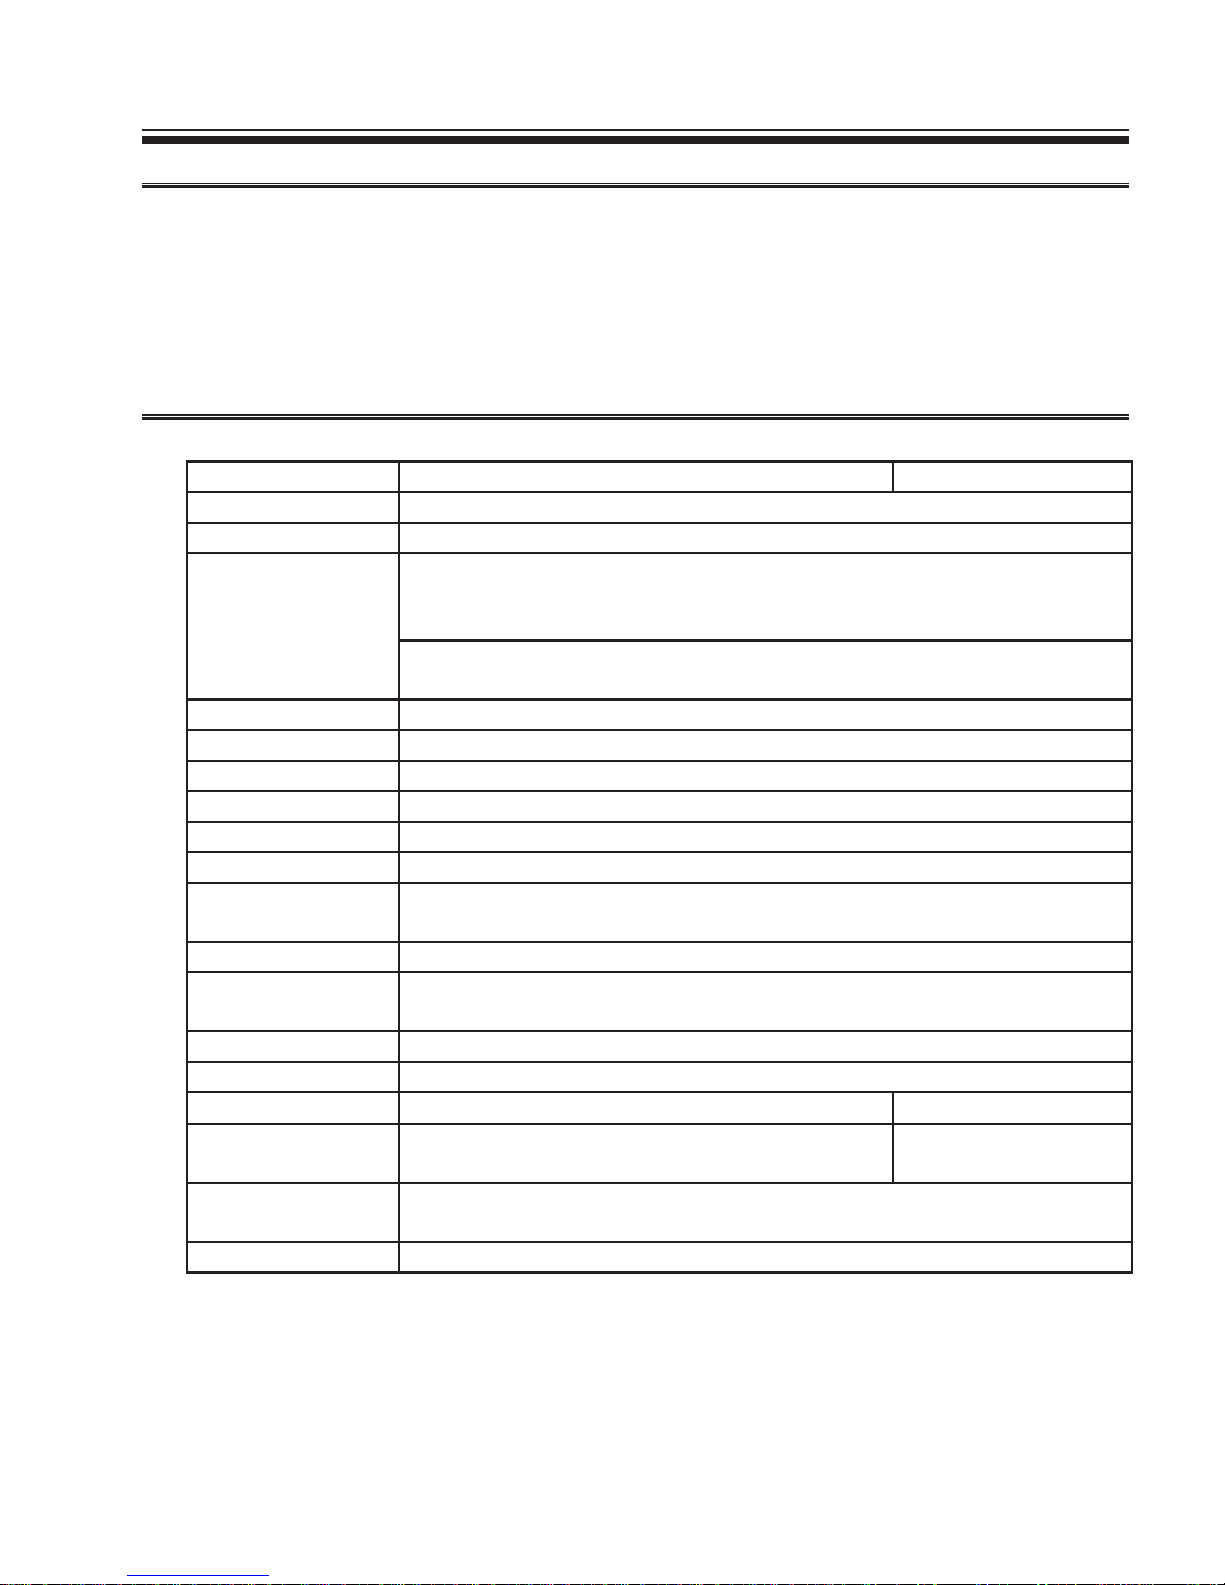
This unit is an interface converter that converts PC’s USB port to an RS-422, or RS-485
port. A photo coupler and an isolation transformer electrically isolate the USB port from
the conversion port, which is ideal for FA equipment and medical equipment that require
high safety and reliability. It is able to access the USB port as a COM port using the
application software by virtual COM port driver.
1-2. Specication
Specications
SI-35USB-2 SI-35USB
Conversion USB⇔RS-422/485
USB Interface USB1.1/2.0, full speed transmission B onnector
Serial Interface RS-422/485
5 pole terminal block (5.08mm press-to-screw pitch type*1) Rated torque/ Screw
size: 0.25Nm/M3
Built-in terminater ON/OFF.
Line monitor, Auto driver control.
Asynch Type Asynch
Baud Rate 300 to 3Mbps
*2
Data Frame Data bits[7or8] + Parity[Even/Odd/none] + Stop bits[1/2]
Flow Control Xon/off, RTS/CTS
*3
(supported by COM port emulator)
Surge Protection 15KV ESD
Isolation Protection 3000Vdc
System Requirements PC: PC/AT compatible with USB port (DOS/V PC)
OS:Microsoft Windows 10/8.1/8/7
*4
LED Transmission: TXD, Reception: RXD, Power: PWR
Power USB Bus power, DC5V±10%,
Max. 100mA
Temperature In operation: -20 to 60°C, In storage: -20 to 75°C
Humidity 10 to 90%RH (No condensation)
Standard CE (Class A), EMC (EN61326-1:2013) -
Dimension
& Weight
58(W)×80(D)×22.5(H)mm
Approx. 160g
65(W)×90(D)×22(H)mm
Approx. 200g
Mounting Method Attachement using M3 screw hole on the bottom face, installation to a DIN rail by
SI-DIN70, magnet attachment by SI-MG70, or wall-hanging by SI-WM1.
Composition USB cable (1.8m), Utility CD, Instruction manual, Warranty.
*1: Single wire: 0.2-2.5 mm2. Stranded wire: 0.2-1.5 mm2, AWG24 to 14. Refer to [3-4 Cable Connection] for more details.
*2: Speed is established in application software. Certain speed beyond 1.2Mbps cannot be established.
*3: Tuis unit can control the transmission timing by using the line monitor function (refer to [3-1])
*4: Supports 32bit/64bit of Windows 10/8.1/8/7. We do not support any problems occurred on Windows Vista/XP.
Page 7
-2-
1-3. Unpackin g an d Product Composi tion
Make sure of the following when unpacking the product:
Converter : 1
USB cable
: 1
Utility CD-ROM : 1
Instruction Manual : 1
Warranty : 1
Please let your LINEEYE distributor or LINEEYE know if you nd any damage to the
product caused by transportation, or if there are accessories lacking.
1-4. CD-ROM Included
This CD-ROM includes the document le such as the instruction manual, and driver for
Windows to connect it to the PC, and software for communication loop-back test. There
are two folders for Windows driver for your appropriate OS.
Folder name Supported OS
/siusb_drivers/new Windows 10/8.1/8/7
/siusb_drivers/old Windows Vista/XP (we conrmed the driver
works on these OSs but will not support them.)
1-5. Mounting Arrangement
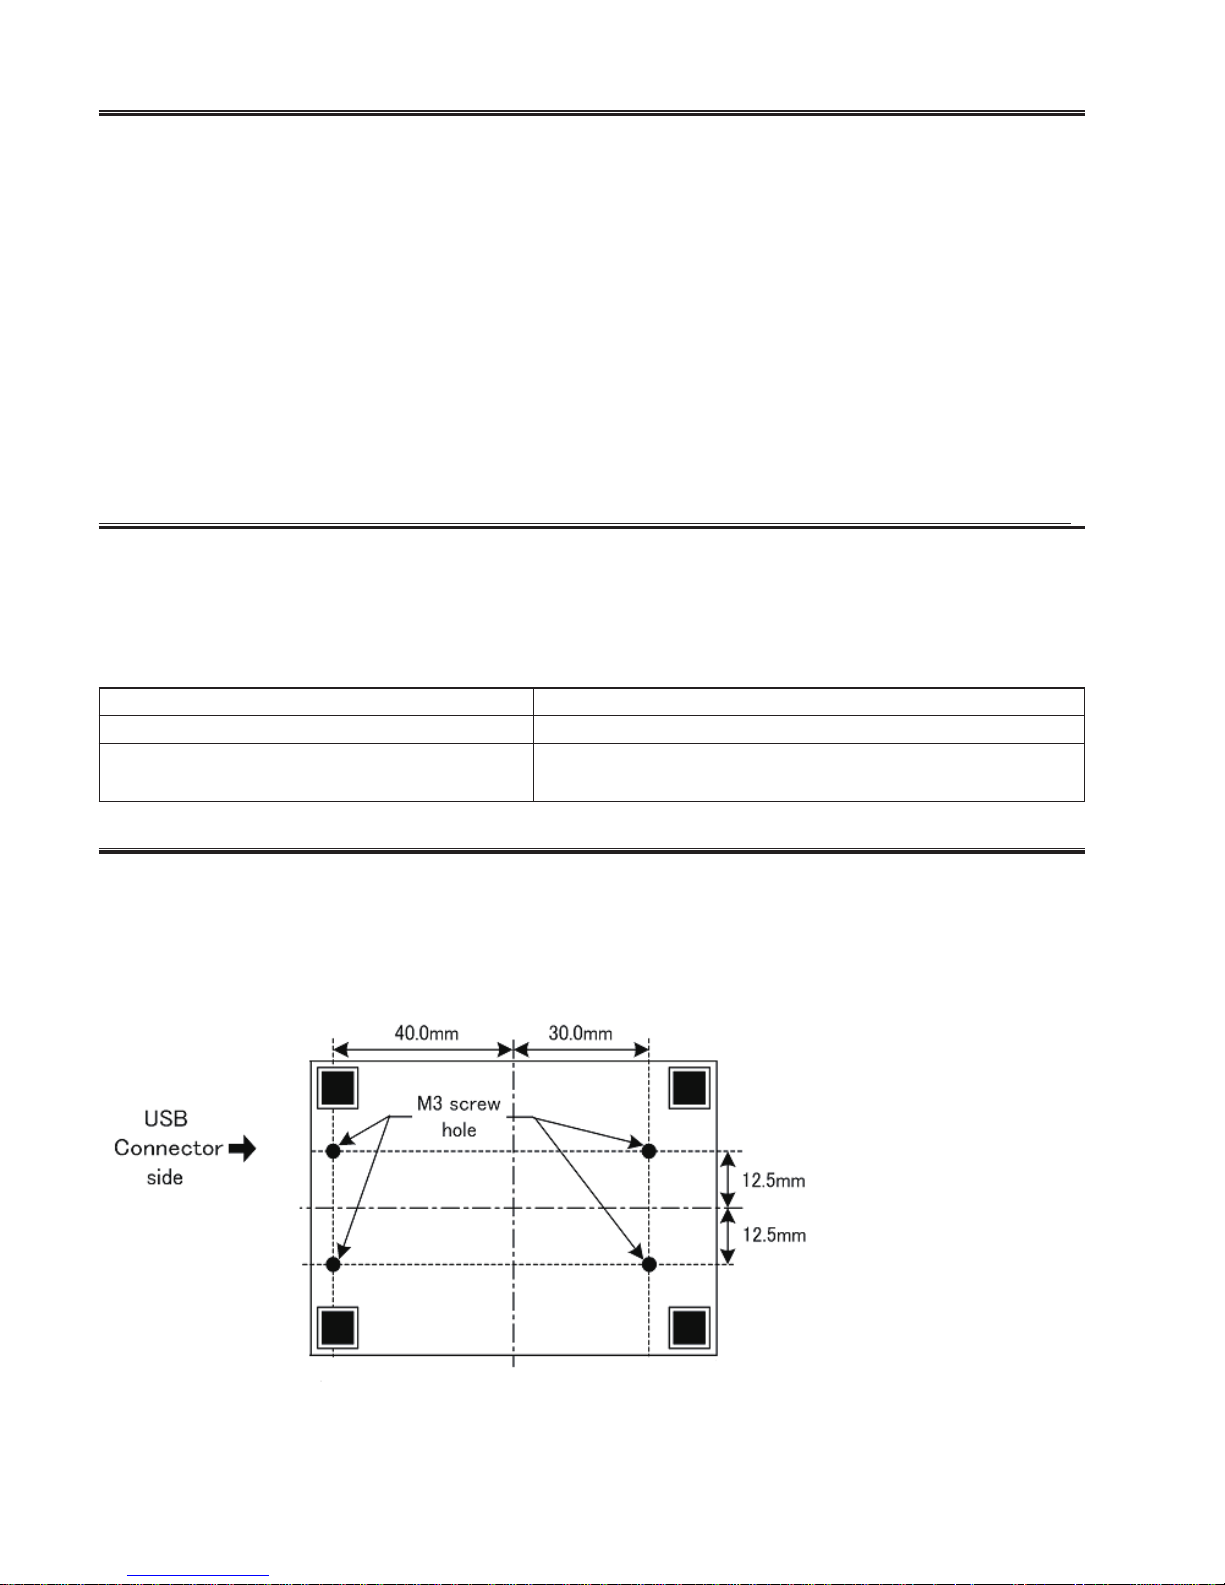
Place this unit in the at and stable place. To mount it onto the other device, use the M3
screw holes in the bottom face. To mount it on a DIN rail (SI-DIN70 is required), use the
M3 screw holes and tight it together with DIN rail mounting plate (SI-DIN70).
Notice: Use the screws that can be inserted less than 6mm from the surface line.
If it is inserted deeper, it may damage the circuit.
Page 8
-3-
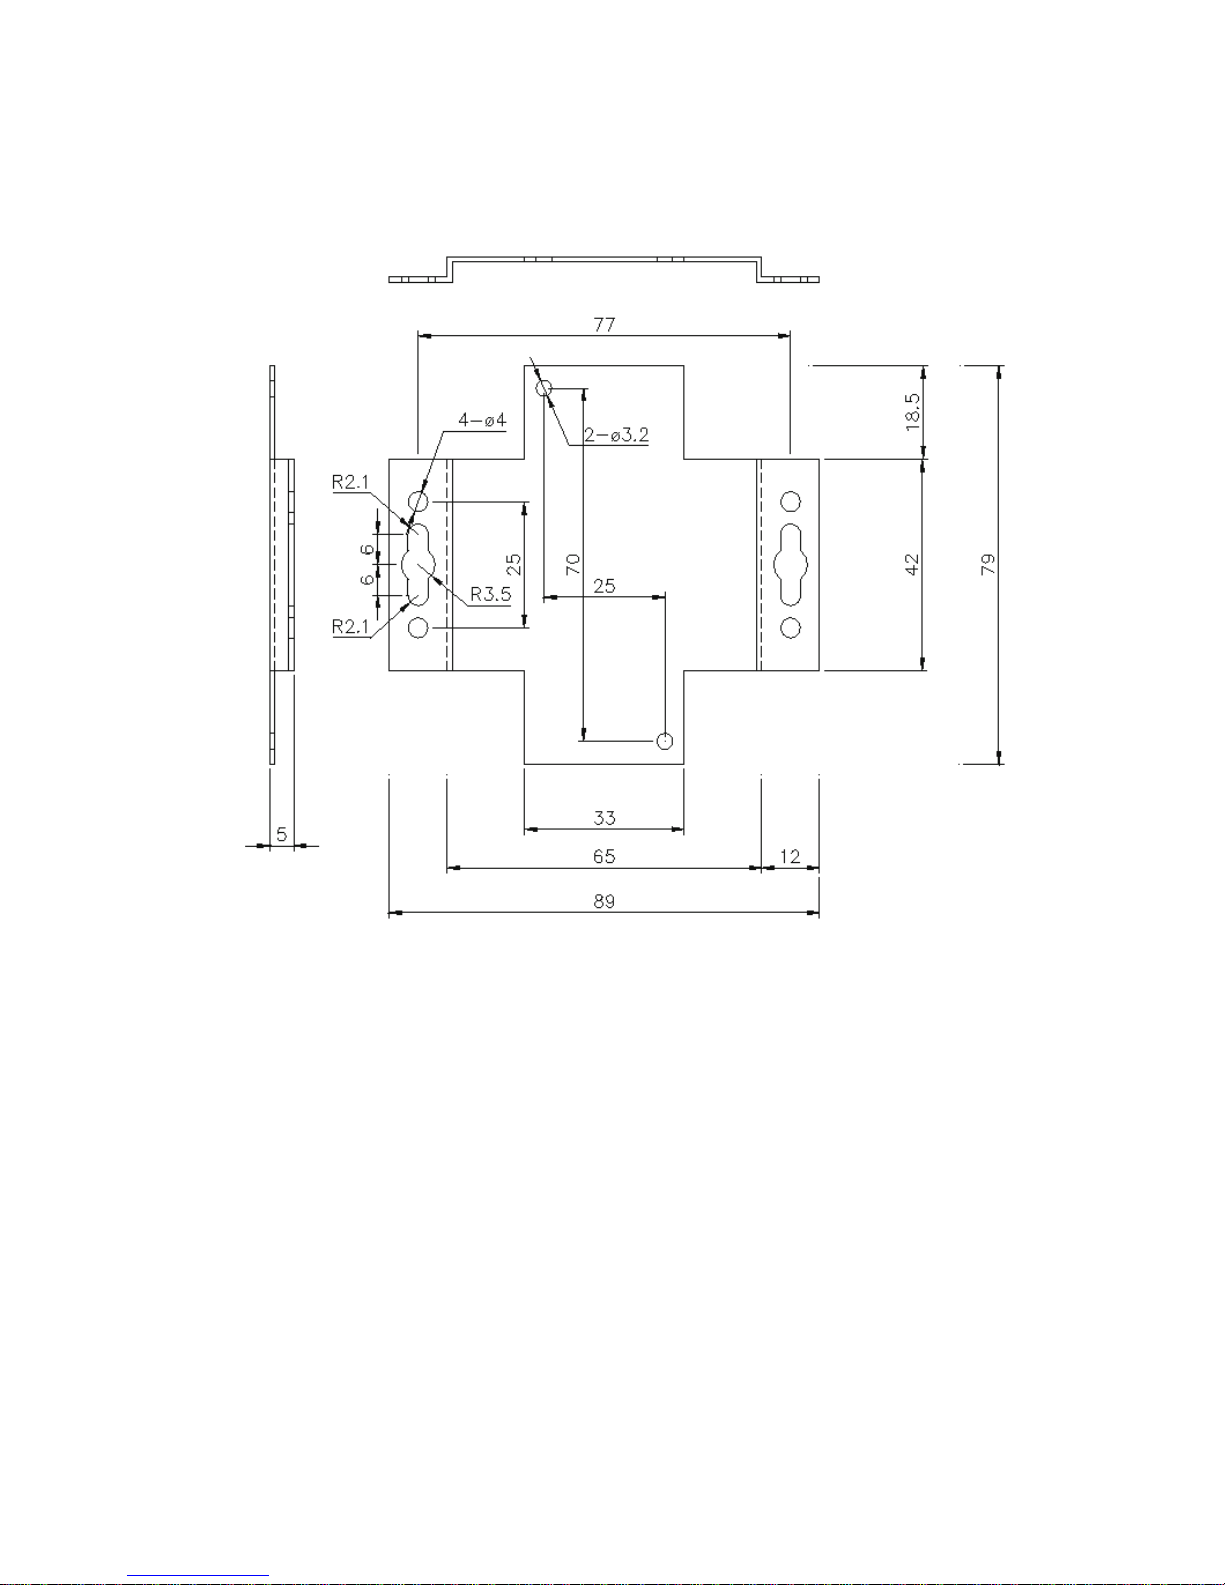
With a wall bracket (SI-WM1, optional), you can x the converter to a wall by screwing
from the upper side of the bracket or hooking it to screws or nails hammered into the
wall.
Wall bracket (SI-WM1)
Two φ3.2 holes are for attaching this bracket on the backside of the converter,
other holes on each side of the bracket are for attaching on the wall.
Using the magnet to x
With the magnet (SI-MG70, optional), you can x the converter to a metal wall such as
steel wall. The magnet is attached to the converter by screwing the two magnet plates to
the bottom side of converter.
Page 9

-4-
Chapter 2 Driver Installation and Usage
When connecting this converter to a USB port of the PC for the rst time, an installation
of the driver is necessary for the USB port.
If your PC has several USB ports, it is recommend using the specic USB port. Because
driver installation is necessary for each USB port to which you connect this converter for
the rst time.
2 - 1 . D r i v er I n st a l l a ti o n f or Wi n do w s 1 0/ 8 . 1 / 8/ 7 ( 32 b i t / 64 b i t )
When you connect the converter by USB cable with a PC which is connected with Internet, automatically the driver will be installed.
Note: When the installation does not start automatically, use Windows Update and renew
the OS of the PC.
2-2. Manual Installation of the Driver for Windows
When the PC is not connected with Internet or the installation does not start automatically,
install the drivers in the CD-ROM (the USB driver and the virtual COM port driver).
Note: Only when you use it with Windows Vista or XP, use the drivers in the folder
¥
siusb_drivers¥old. (Please note that we do not support for Windows Vista and
XP.)
Note: Please do not connect the converter to the USB port and PC until the procedure6 is
completed.
1. Insert the attached CD-ROM into the CD-ROM Drive of PC.
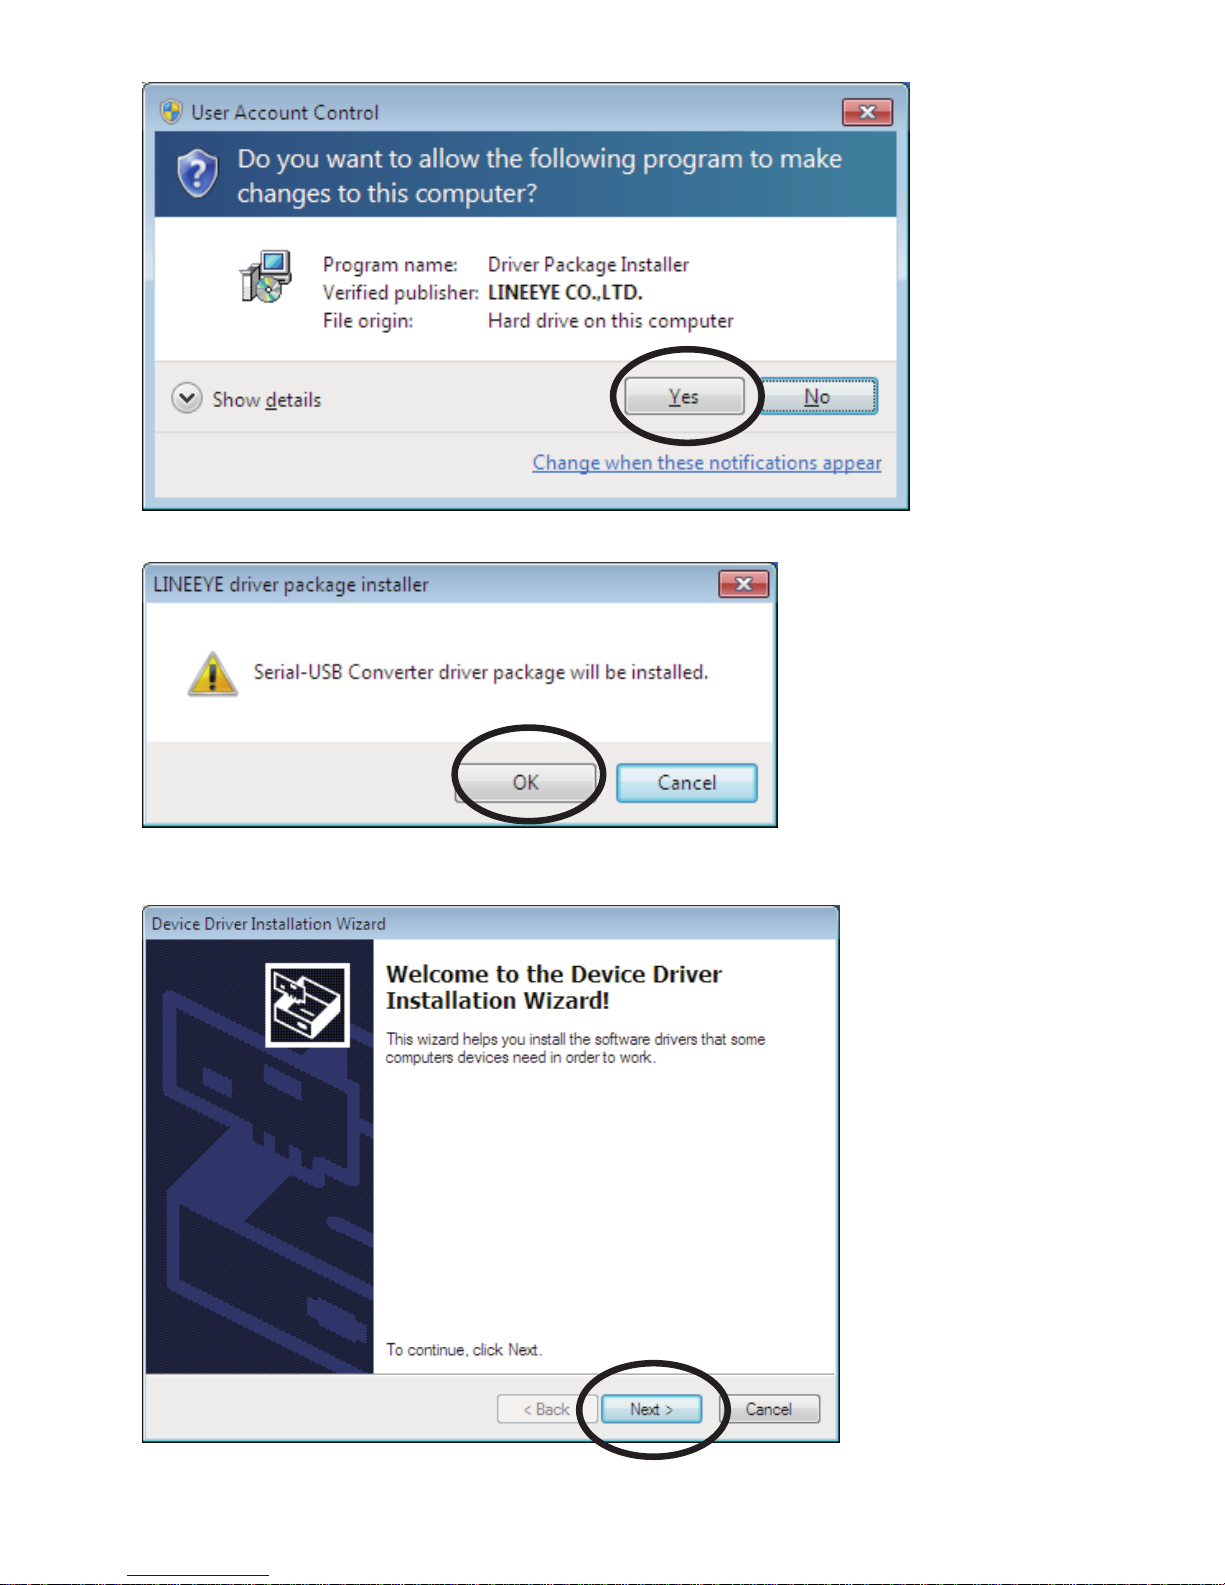
2. Run “setup.exe” le in “/siusb_drivers/new” folder in the CD-ROM. The following
message appears, and then click “Yes” button.
Page 10
-5-
3. Click “OK” to start install of the driver package.
4. Then the installation wizard runs. Click “Next” button.
Page 11
-6-
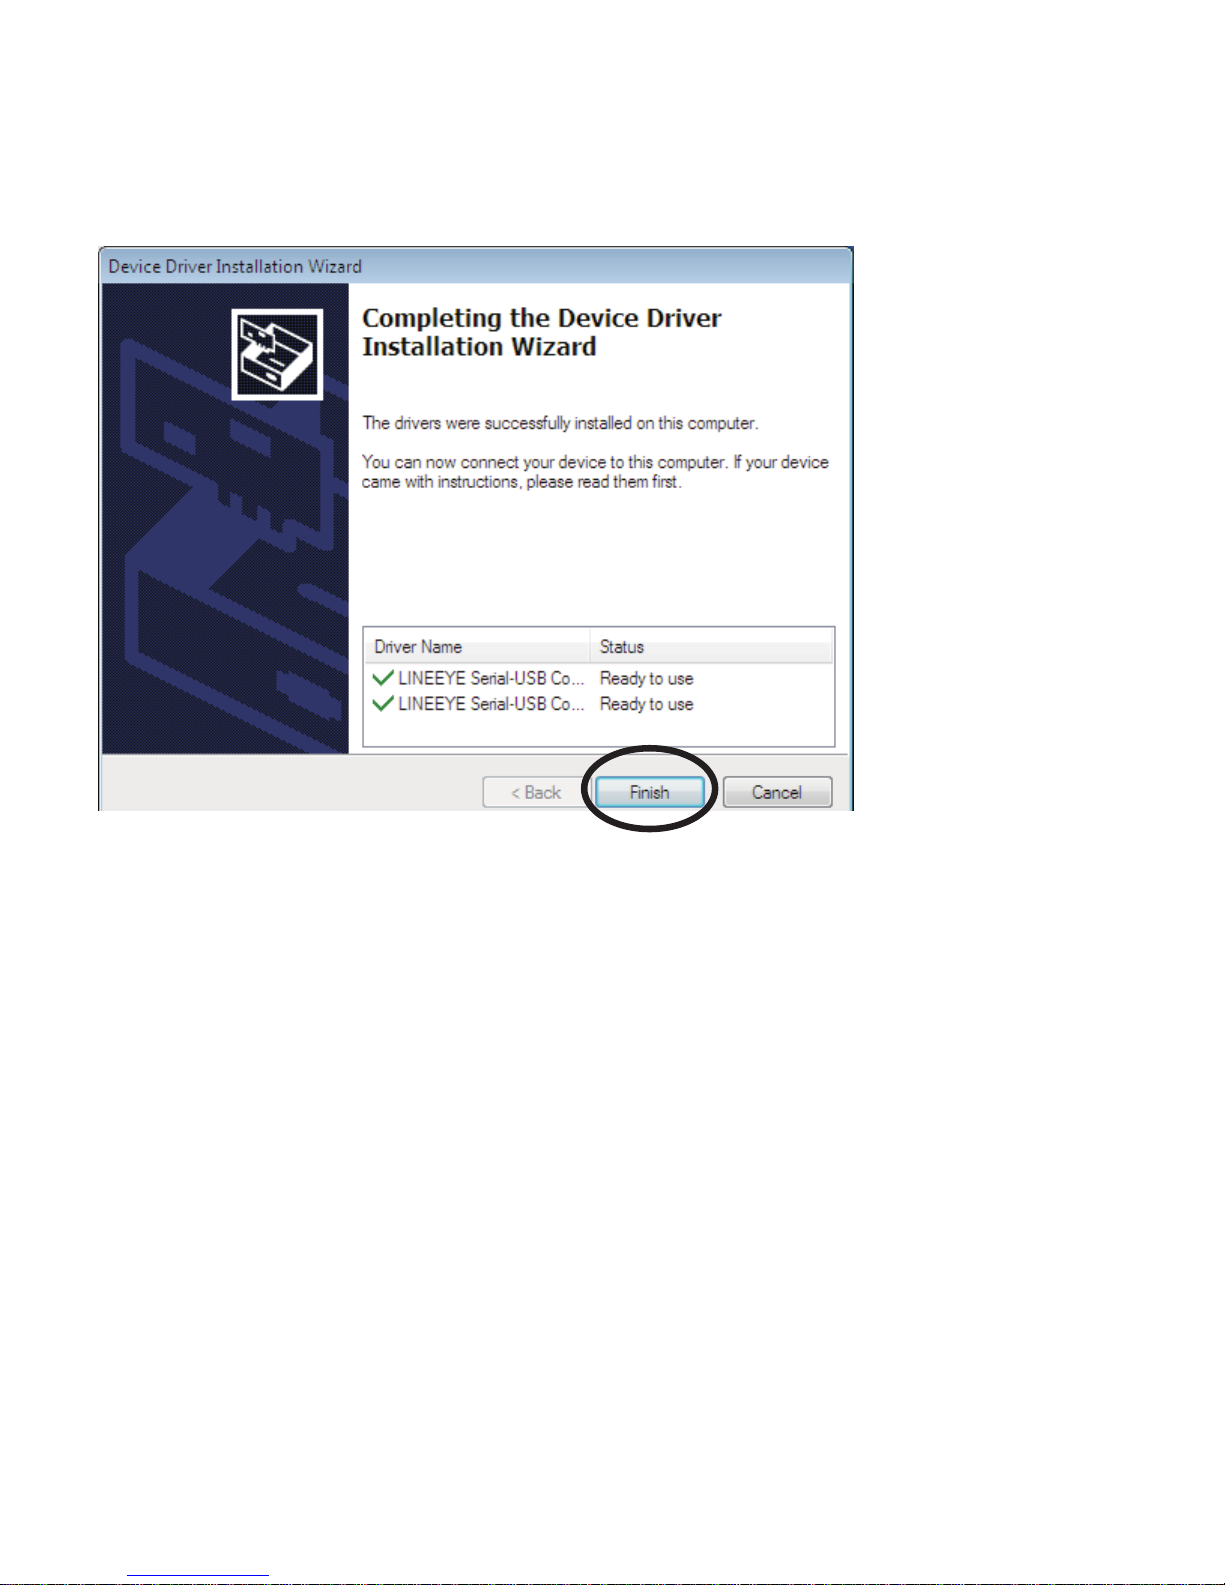
Two drivers are installed automatically.
5. Click “Finish ” button to nish the installation of the driver package.
6. Connect the USB connector to the USB port.
The driver Installation has completed.
Page 12
-7-
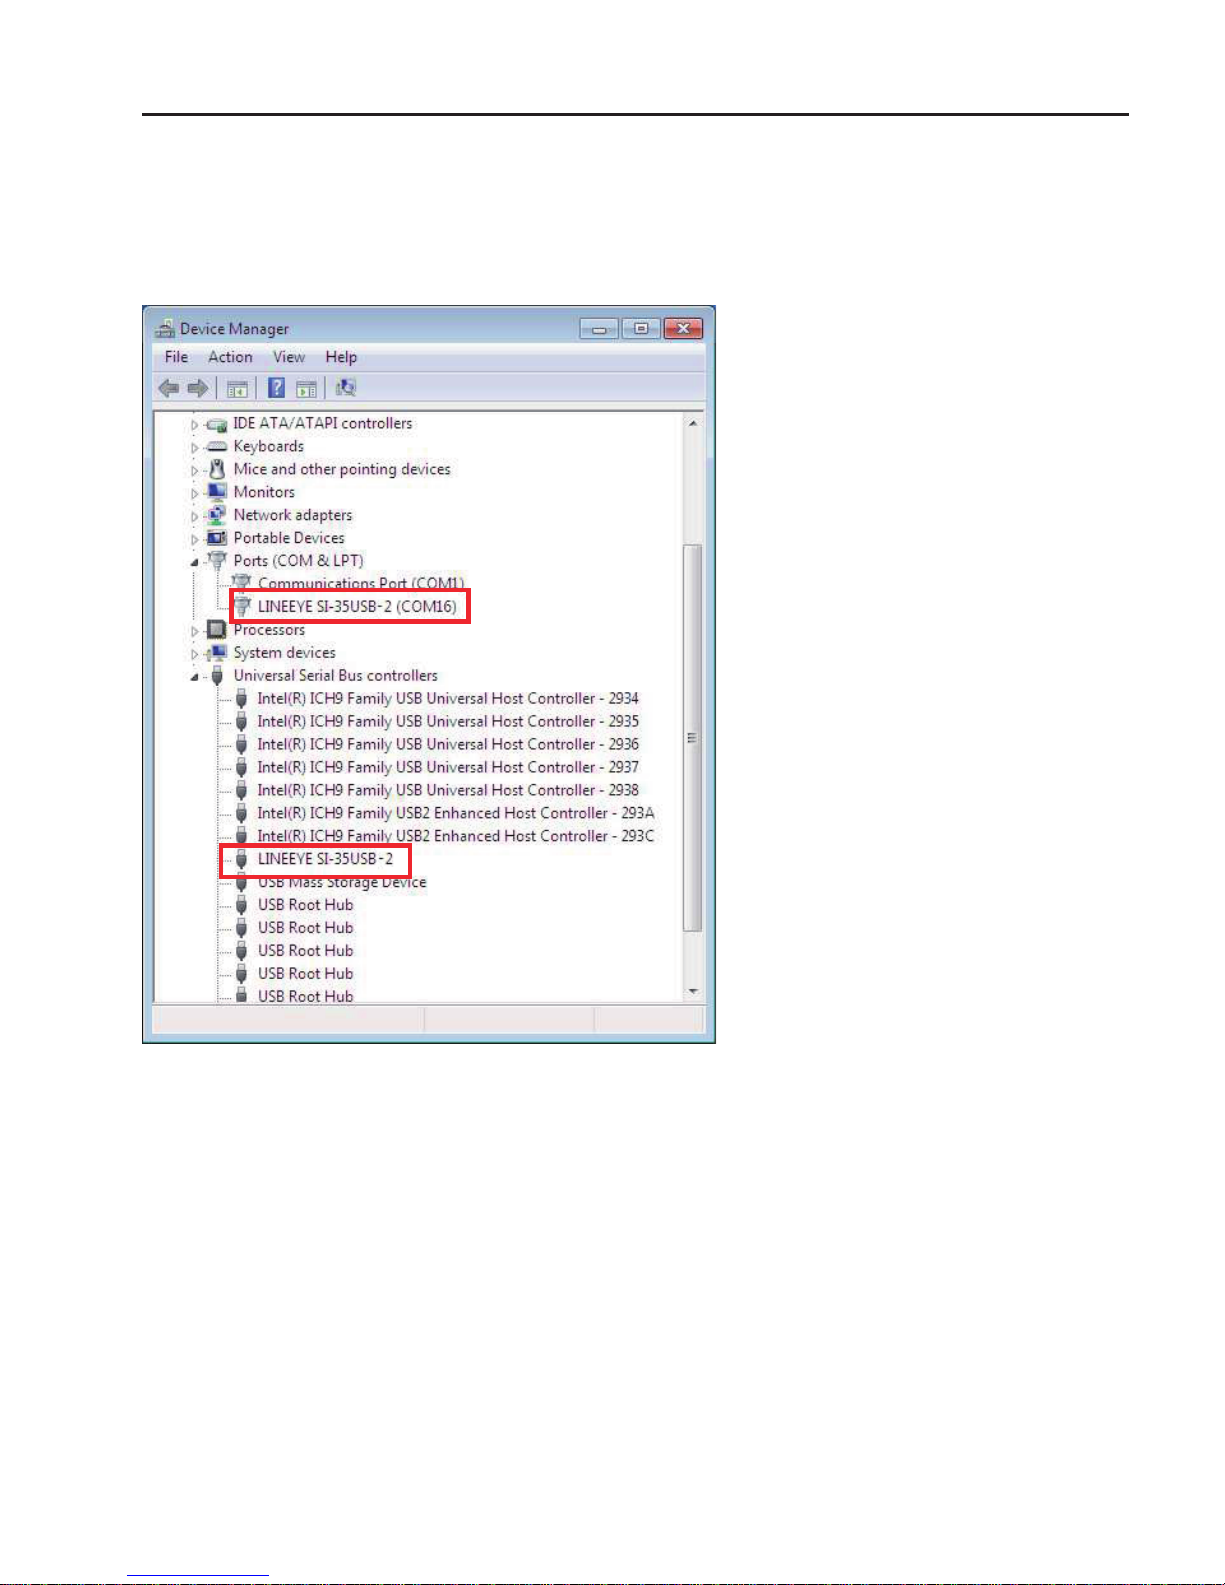
2-3. The Way to Conrm the Installed Driver
From “Start” menu -> “Control Panel ” -> (“Hardware and Sound” in case of Windows7),
run “Device Manager”.
Conrm that the name of the converter is shown in the items of Ports (COM & LPT) and
Universal Serial Bus Controllers.
Page 13

-8-
2-4. Usage of Virtual COM Port Driver
After the installation of the drivers, the serial port of the converter can be accessed from
application software in the same way as Windows standard COM port.
[ Precautions for usage ]
*Virtual COM port number is the number shown in the Ports (COM & LPT) items of the
device manager when this converter is connected with PC.
*Soon after the connection of this converter to a USB port or when starting PC, conditions
of RTS and DTR of virtual COM port vary for several seconds depending on the OS.
This situation occurs because of “Plug and Play” recognition procedure of Windows. In
actual use, please conrm the inuence for connected devices.
Virtual COM port number and ON/OFF of “Plug and Play” recognition can be changed
from virtual COM port property of device manager. For further detail, please refer to
technical guides of Windows.
Page 14
-9-
Chapter 3 Usage
3-1. Overview and Features
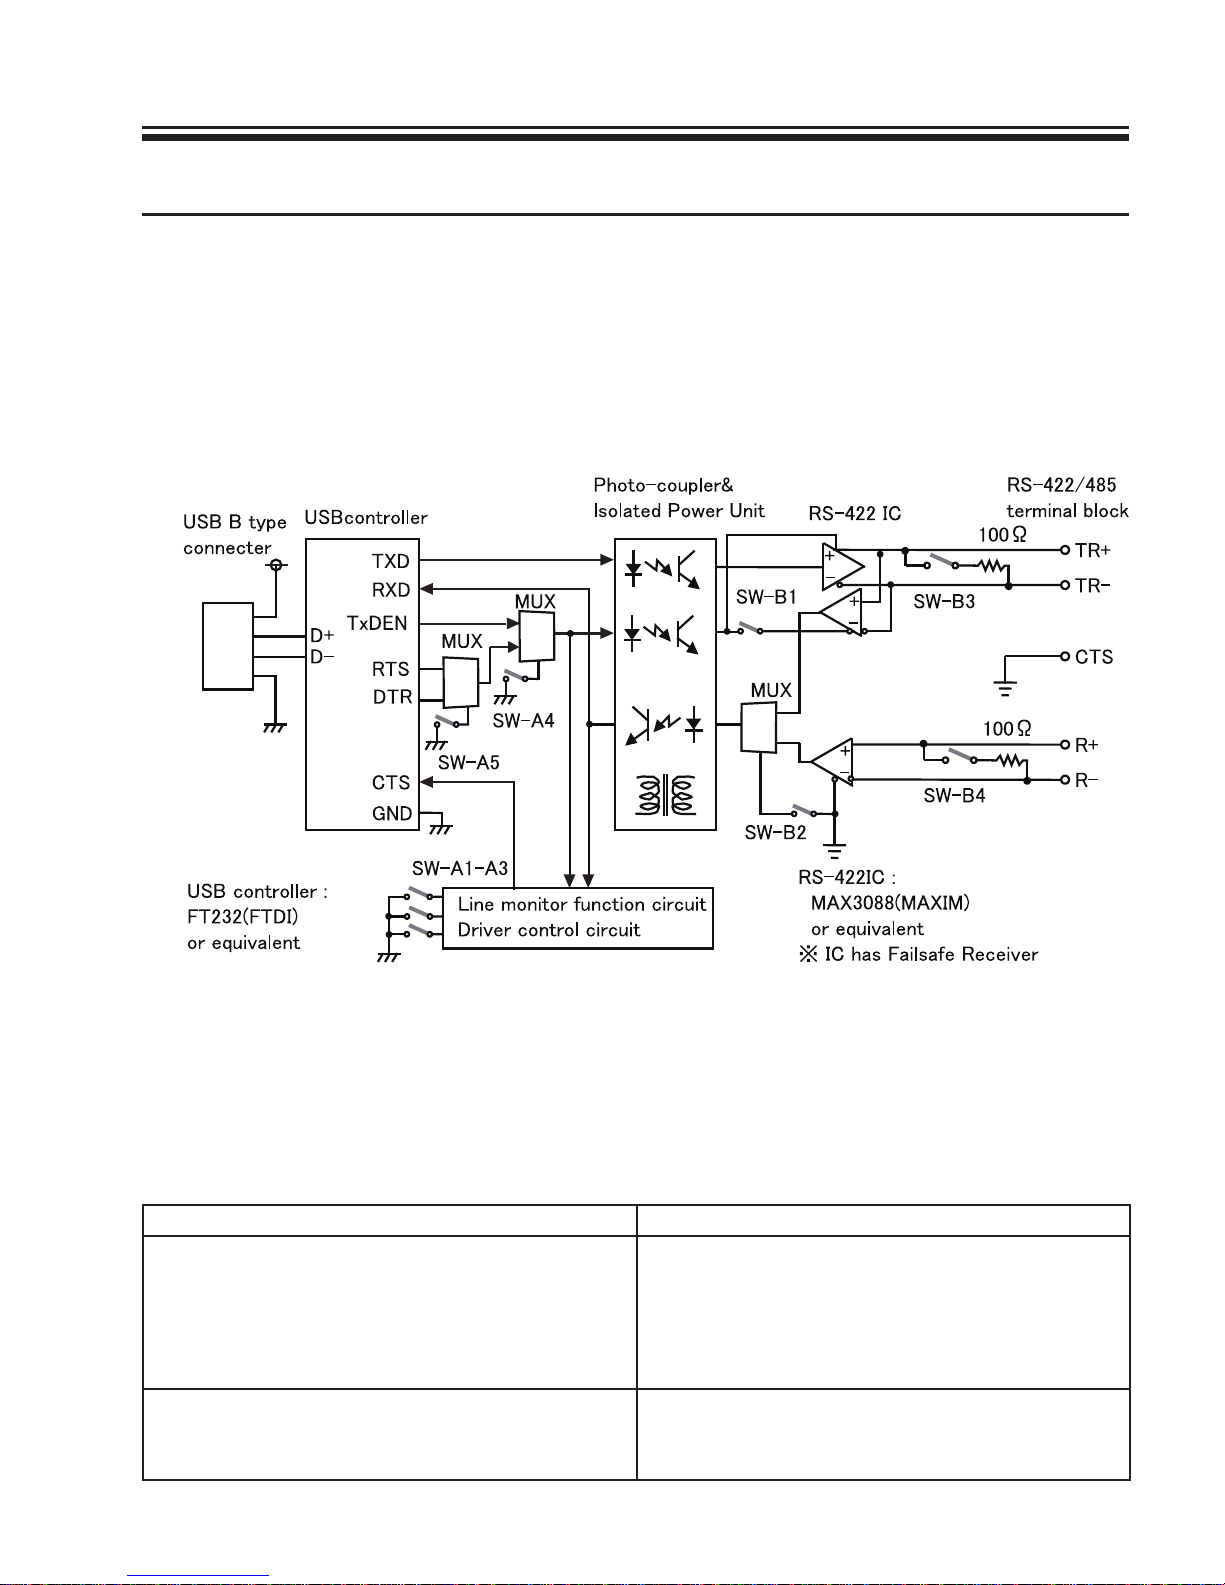
SI-35USB/SI-35USB-2 is a USB converter that converts USB port of PC into RS-422/
RS-485, which enables to transmit for a long distance and multi-drop bus connection.
This device is suitable for use in situations in which security and reliability are needed
because the GND of the port of RS-422/485 and the GND of the USB port are electrically
isolated with high-voltage resistant insulation
Block diagram
< Line Monitoring Function >
RS-485 communications of two-wire half duplex is required to send data after conrming
that any devices have not sent data into the RS-485 line.
The line monitoring function detects that any devices have not sent data into the RS-485
line, and allows CTS signal to be active and inform it.
RS-485 Line Condition Flow Control Condition
The period of time from when to detect a space bit of
the data in the RS-485 line sent by another device, to
when not to get to continuously detect a space bit over
internal timer time of the converter, while the converter
is not sending data.
While the RTS/CTS ow control of virtual COM
port is activated, CTS signal will be non-active.
Transmission from the converter to RS-485 line will be
prohibited.
Other conditions While the RTS/CTS ow control of virtual COM port
is activated, CTS signal will be active. Transmission
from the converter to RS-485 line will be permitted.
Page 15
-10-
3-2. Panel Explanation
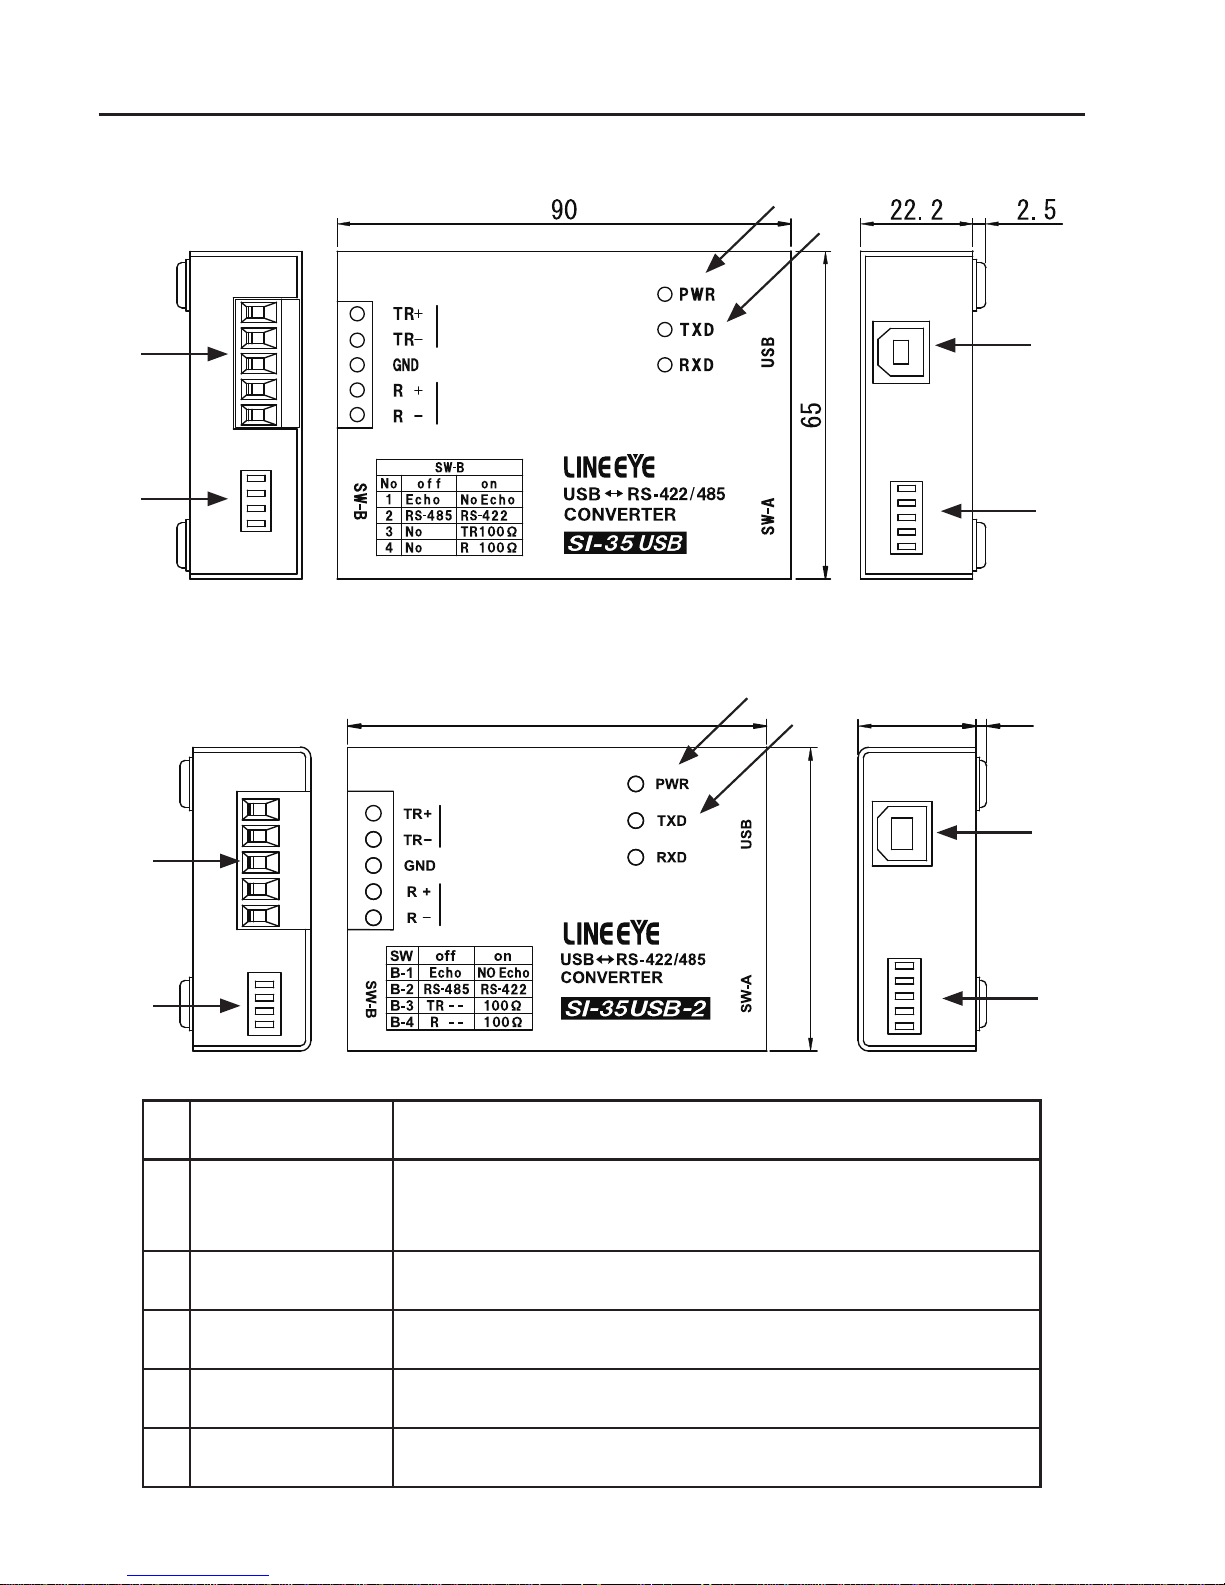
■ SI-35USB
■ SI-35USB-2
(1)
Power
Supply LED
Lights when USB bus power is supplied
(2)
Data Status
LED
Indicates a data transmission/ reception status for RS-422/485.Blinks
the TXD LED if there is data from USB to RS-422/485.Blinks the RXD
LED if there is data from RS-422/485 to USB.
(3)
Dip Switch
(SW-A)
Selects the line monitoring function and driver control.
(4)
Dip Switch
(SW-B)
Selects the communication method, terminator, etc.
(5)
USB
Connector
Standard B Connect to USB port of PC
(6)
RS-422/485
Terminal Block
5.08mm pitch 5 pole terminal block (Press-to-screw type)
株式会社ラインアイ
80
58
22.5 2.5
単位 : mm
①
②
③
⑤
④
⑥
株式会社ラインア
①
②
③
⑤
④
⑥
Page 16
-11-
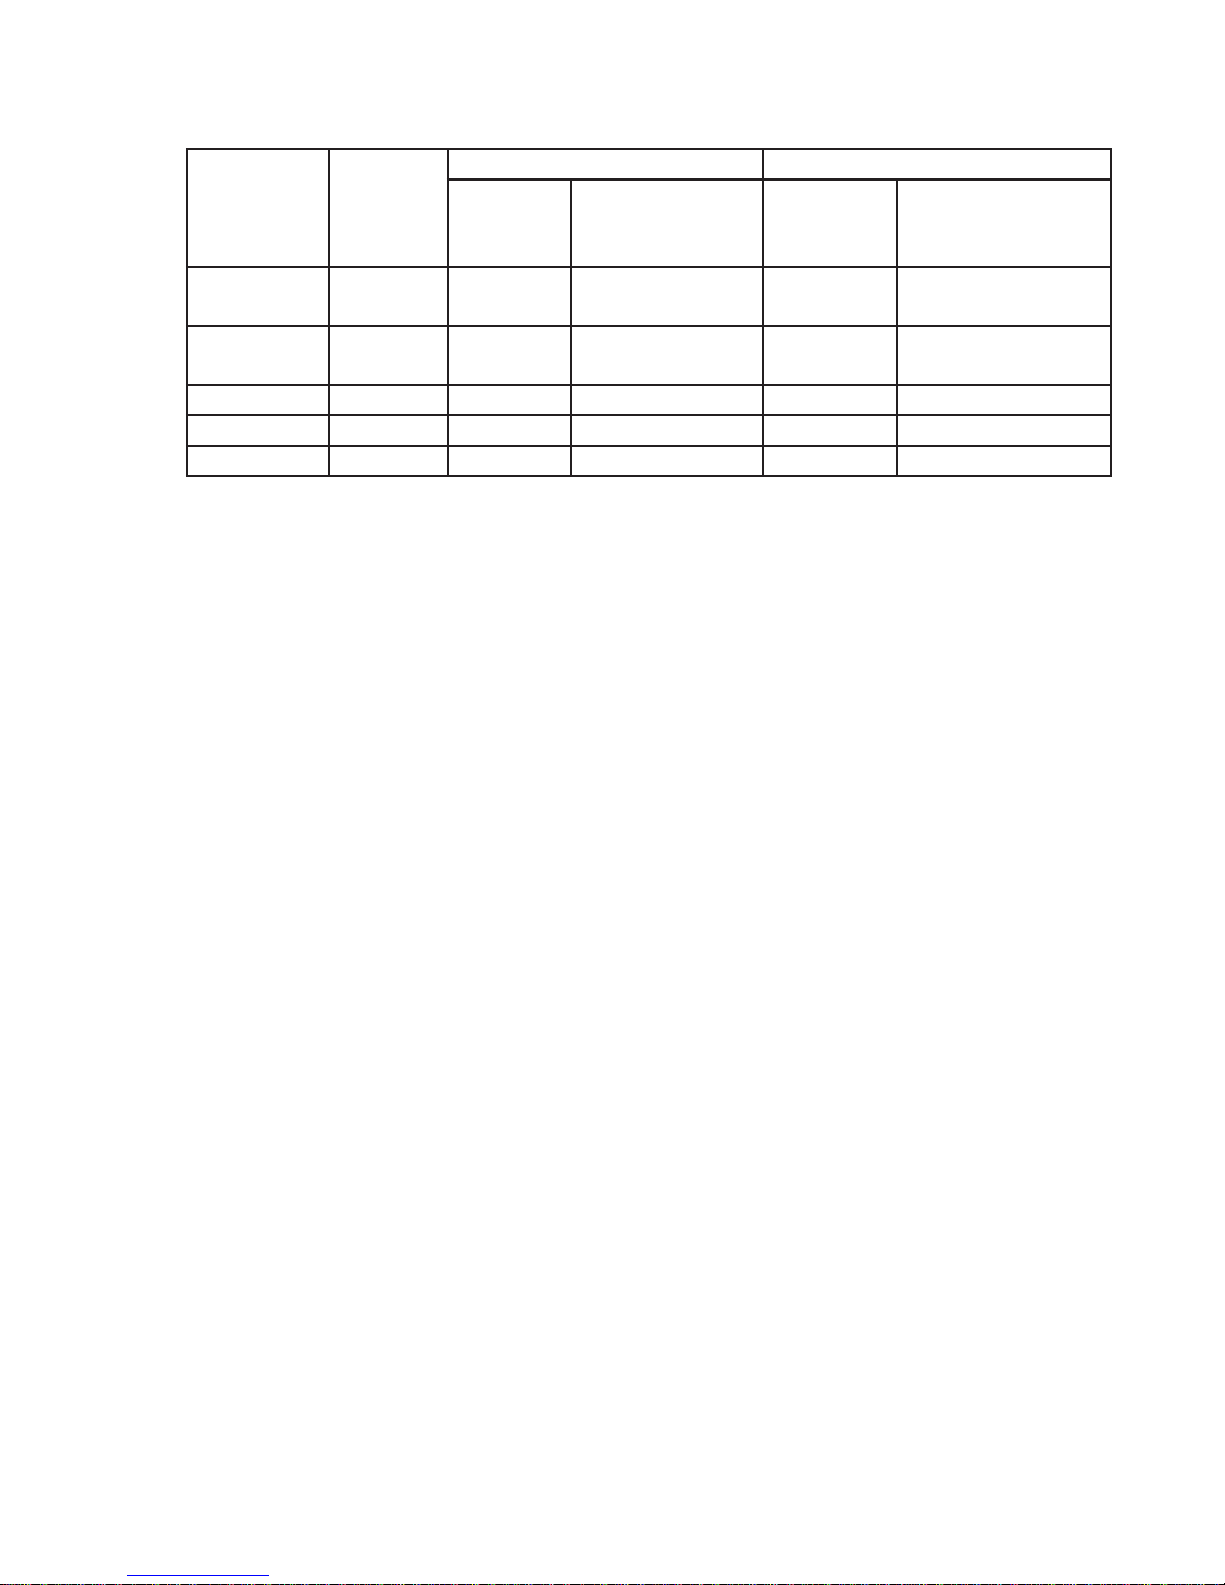
5 Pole Terminal Block Pin Assignment for RS-422/485
Terminal
No.
Name
Full Duplex Mode *1 Half Duplex Mode *1
I/O
Direction
*2
Description
I/O
Direction
*2
Description
1 TR+ Out Transmission Data + I/O
Transmission/
Reception Data +
2 TR- Out Transmission Data – I/O
Transmission/
Reception Data –
3 GND - Signal Grand *4 - Signal Grand *4
4 R+ In Reception Data + - Cannot use *3
5 R– In Reception Data – - Cannot use *3
*1 Can switch by the dip switch.
*2 “Out” means a direction to output signals from the converter.
“In” means a direction to input signals to the converter.
“I/O” means both directions to input and output.
*3 Do not connect anything when using the half duplex mode.
*4 Connect GND to prevent devices from over voltage damage.
Page 17
-12-
3-3. Hardware Setup
The two dip switches on the converter allows you to conduct the following setups: the
line monitoring function, the driver control method, terminator enable/disable, and echo
back enable/disable.
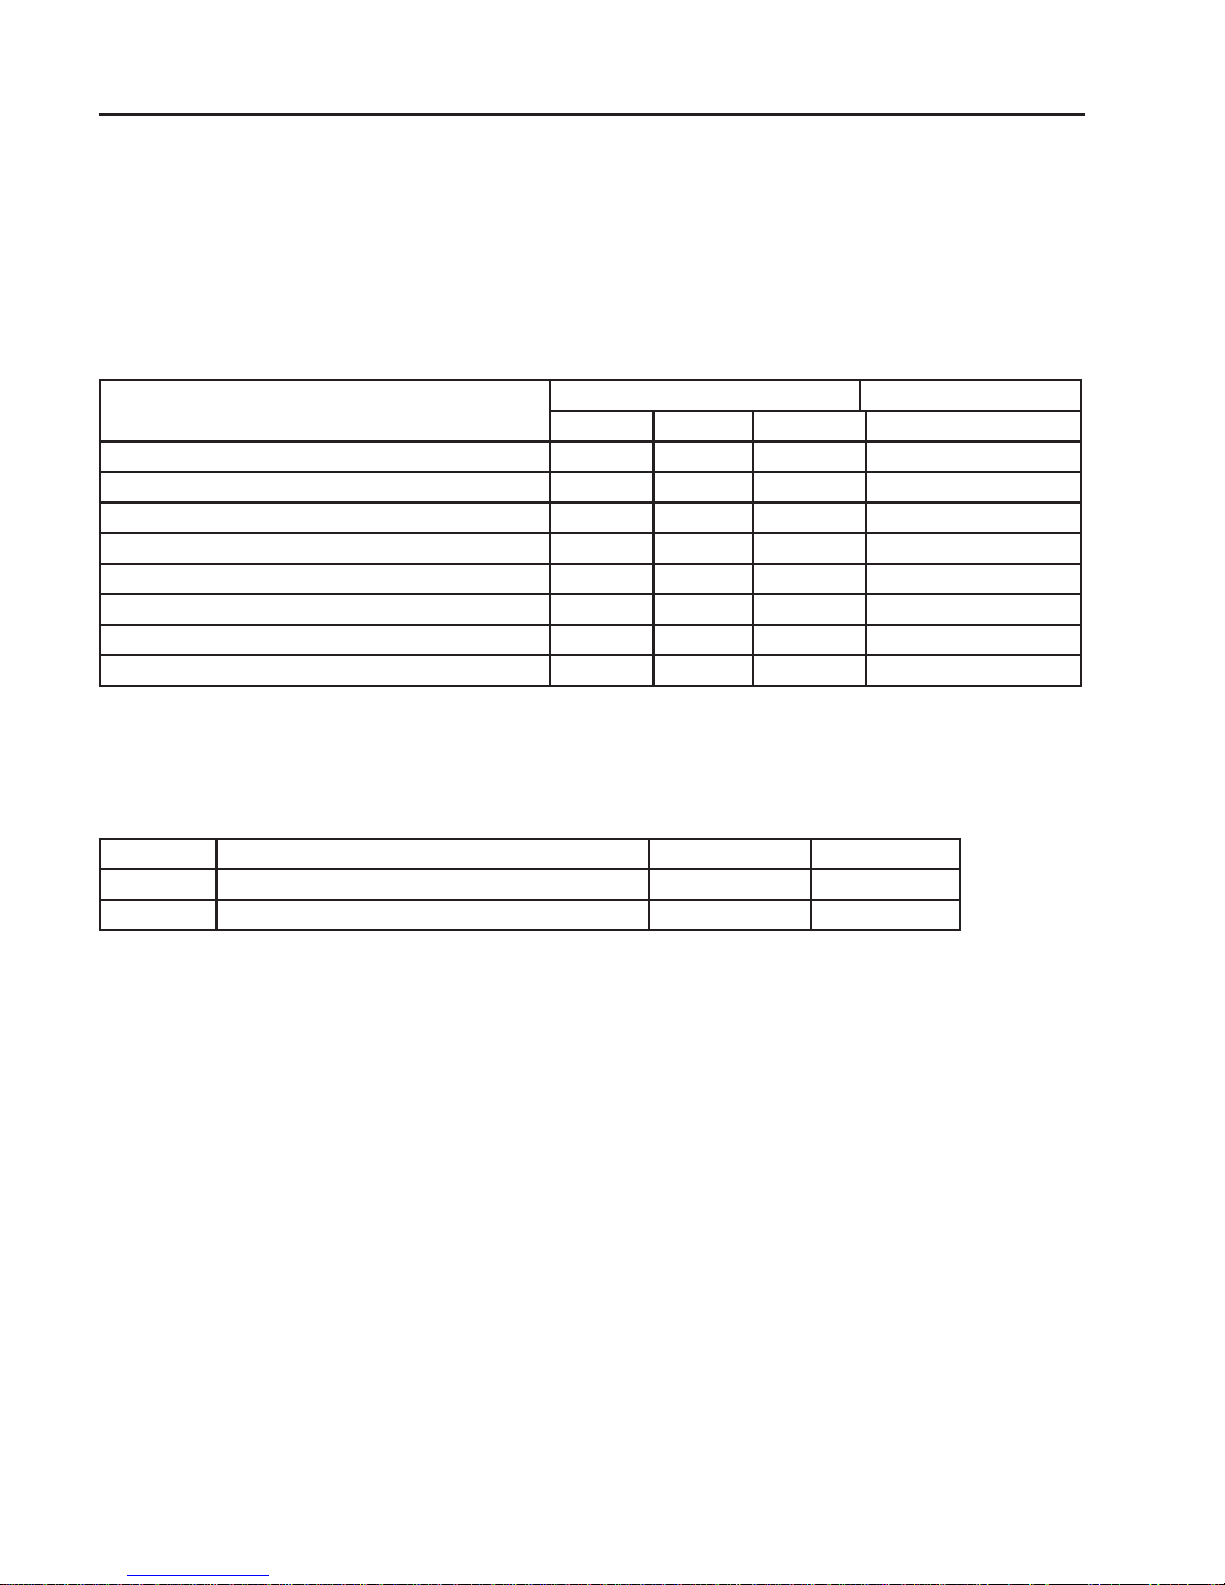
■ SW-A No. 1-3 (Baud Rate Setup)
When using the line monitoring function or RS-485 driver control by RTS/DTS signal
(when SW-A No.4 is ON), set this converter referring to the table below depending on the
speed.
Speed (bps) [ ] indicates a representative example.
SW-A Internal Timer *1(usec)
No.1 No.2 No.3
Over 9600 [9600] OFF OFF OFF 1350
Over 19200 [19200] ON OFF OFF 677
Over 38400 [38400, 57600] OFF ON OFF 338
Over 76800 [76800, 115.2k] ON ON OFF 169
Over 150k OFF OFF ON 85
Over 300k ON OFF ON 42
Over 300 [300, 600, 1200] OFF ON ON 43200
Over 2400 [2400, 4800] ON ON ON 5400
*1 The internal timer is accurate at +10 to -10%.
■ SW-A No.4-5 (Driver control)
Selects the control method in the RS-422/485 driver control line of the converter:
manual or auto.
SW-A Meaning OFF ON
No.4 RS-422/485 transmission driver control Auto Manual
No.5 Driver control signal (Manual mode) DTR RTS
□ When SW-A No.4 is OFF (Auto mode)
When using RS-485 (half duplex mode) normally set it as Auto mode. Right before
starting the transmission of data string from the converter to RS-485 line, the driver turns
to active. After nishing the transmission, the driver promptly turns to non-active.
□When SW-A No.4 is ON (Manual mode)
Control the sending driver by RTS/DTR signal from virtual COM port selected by SW-A
No.5. By activating RTS/DTR signal before sending data, the driver immediately turns to
active. After nishing the transmission of data and turning RTS/DTR into non-active, the
driver turns to non-active after reaching the time of internal timer. Use this mode to keep
the driver active on the RS-422 line.
□When SW-A No.5 is OFF (DTR)
Control the driver by DTR signal when SW-A No.4 is ON (Manual mode).
□When SW-A No.5 is ON (RTS)
Control the driver by RTS signal when SW-A No.4 is ON (Manual mode).
Page 18
-13-
* When SW-A No.4 is off, both on and off are acceptable for No.5.
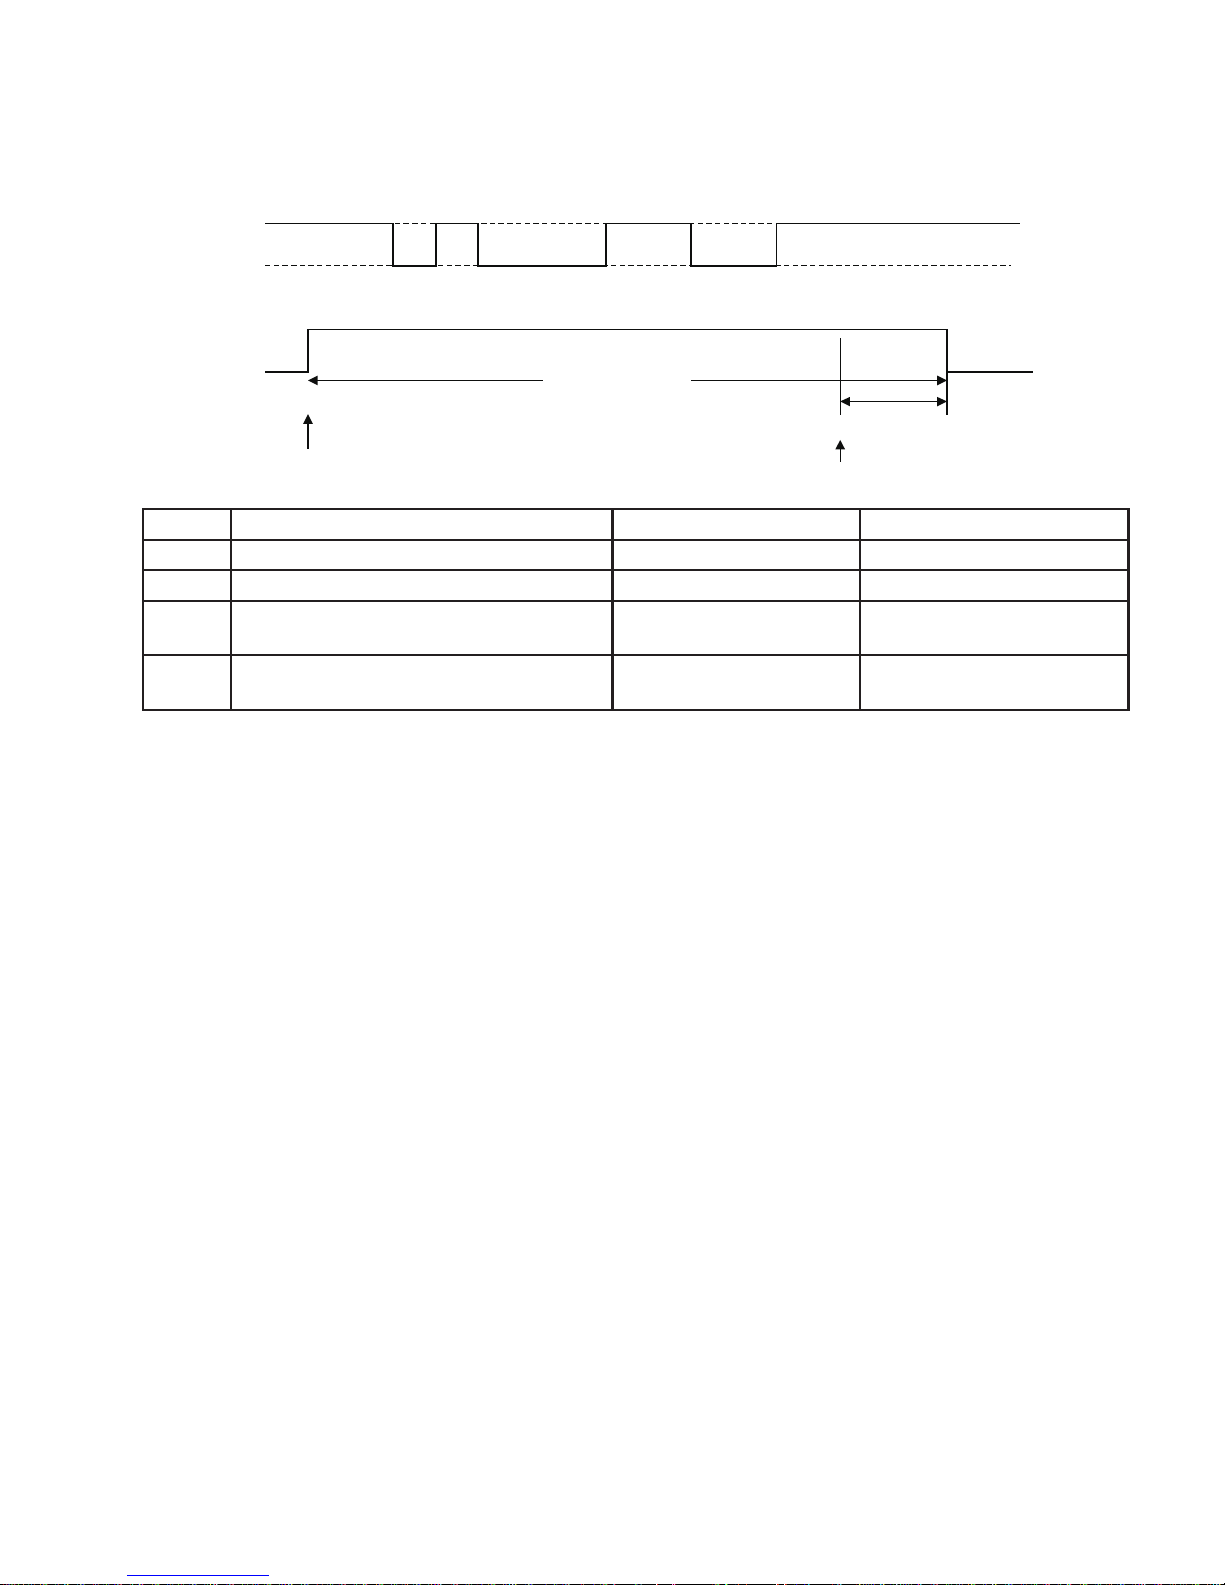
Example: The driver control for the data of 31H, 9600bps, SW-A No.1-4 off/off/
off(1.35mS)/on is as the following gure.
* RTS and DTR for driver control should be selected by SW-A No.5.
SW-B Meaning OFF ON
No.1 Echo reception of transmission data With echo back Without echo back
No.2 Select a line mode RS-485 (half duplex) RS-422(full duplex)
No.3 Terminal control between TR+ and TR-. TR signalWithout terminal
control
TR signalWith terminal
control(100 ohm)
No.4 Terminal control between R+ and R-. R signal Without terminal
control
R signalWith terminal
control(100 ohm)
■ SW-B No.1 (Echo Back Setup)
When you communicate in the half duplex RS-485 mode, setting this switch to ON
prohibits the data, which is sent from the converter to the RS-485 line,from being echoed
back to the USB host.
Therefore, while the driver is active, the ON setting makes the receiver non-active. The
full duplex RS-422 mode does not echo back data even when this switch is in the OFF
setting.
■ SW-B No.2 (Line Mode)
Selects the RS-422/485 line specication which is connected to the converter.
・
OFF (Half Duplex) Setting
This setting makes the converter operate in the half duplex RS-485 mode.
Communicated data is sent and received through TR+ and TR- terminals.
・
ON (Full Duplex) Setting
This setting makes the converter operate in the full duplex RS-422 mode.
Communicated data is sent from TR+ and TR- terminals, and is received to R+ and Rterminals.
■ SW-B No.3 (Terminal End Between TR+ and TR-)
Setting this switch to ON inserts the terminator 100 ohm between TR+ and TR- in a
direction of parallel.
■ SW-B No.4 (Terminal End Between R+ and R-)
Setting this switch to ON inserts the terminator 100 ohm between R+ and R- in a direction
of parallel.
Start
Bit
1 0 1 0 00 11 00
b0
(LSB)
b1 b6b5b4
Stop
Bit
b2 b3
b7
(MSB)
1
Mark
Space
Idle(Mark)Data
Driver
Control
off
on
Control Signal
RTS/DTR
Active Non-Active
Internal Timer( 1.35 m S )
Driver Active Time
Page 19
-14-
Note: For RS-485 communication, terminating registers on both sides of the line
should be on. When the line is connected by multi-point connection, turn on
only the terminating registers of the devices on both end of the line. For RS-422
communication, turn on only the terminating register of differential receiver (R+
and R- ). When multiple receivers are connected with a driver by daisy chain, turn
on only the terminating register of the farthest receiver. The terminating registers
prevent the signal reection of long-distance transmission and enhance noise
immunity of the line.
3-4 .Cable Connection
■ USB
Conrm the USB port you connected when installing the attached driver, and connect
the converter to the port with attached USB cable or USB cable compliant with USB
standard. (Refer to “Chapter 2”)
The driver for this converter is needed for each USB port with which you connect the
converter for the rst time. Please do not connect to the different USB port.
Please do not connect to a USB hub, which only uses bus power, and do not have any
other power supply. It may cause the insufcient of power and LINEEYE cannot have
operation guarantee.
■ RS-422/485
After conrming the RS-422/485 specication (signal denition, inverse signal/non-
inverse signal, I/O and so on) of the target device, connect to the device by using proper
cable.
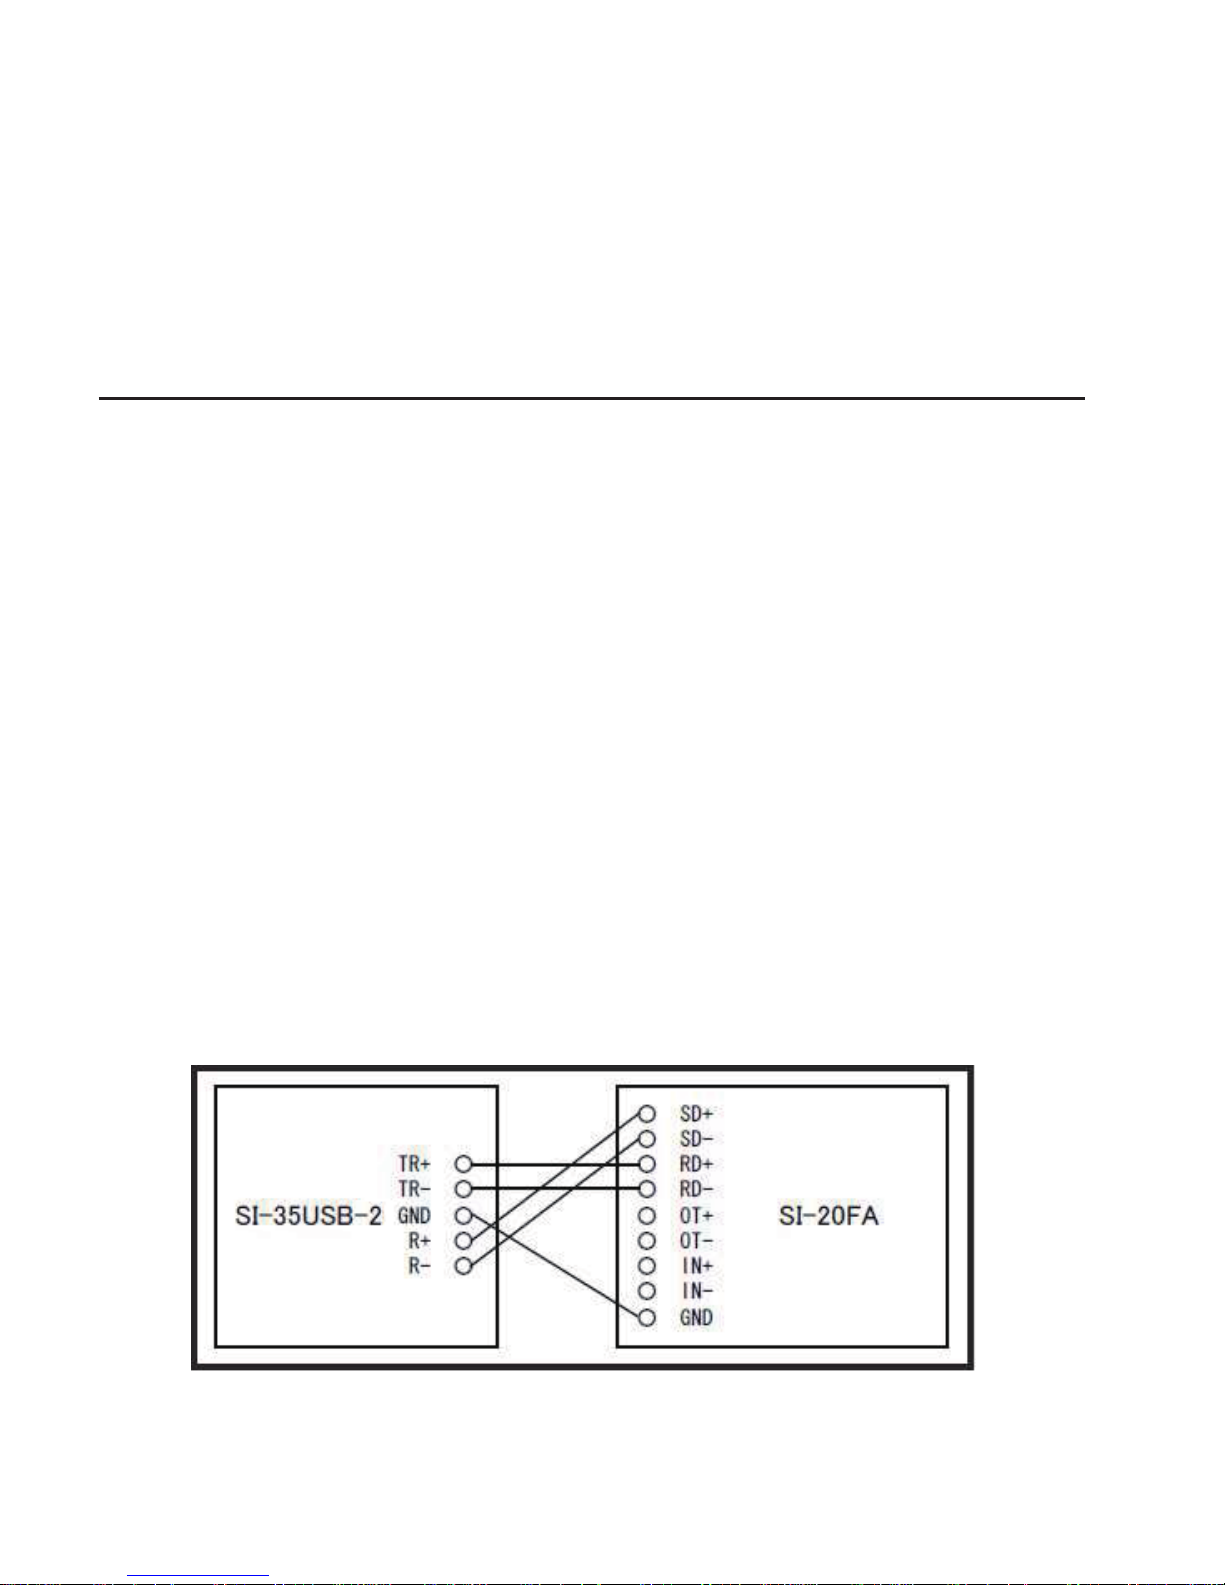
An example of 1:1 full duplex mode connection with RS-422 device (LINEEYE SI20FA).
Page 20
-15-
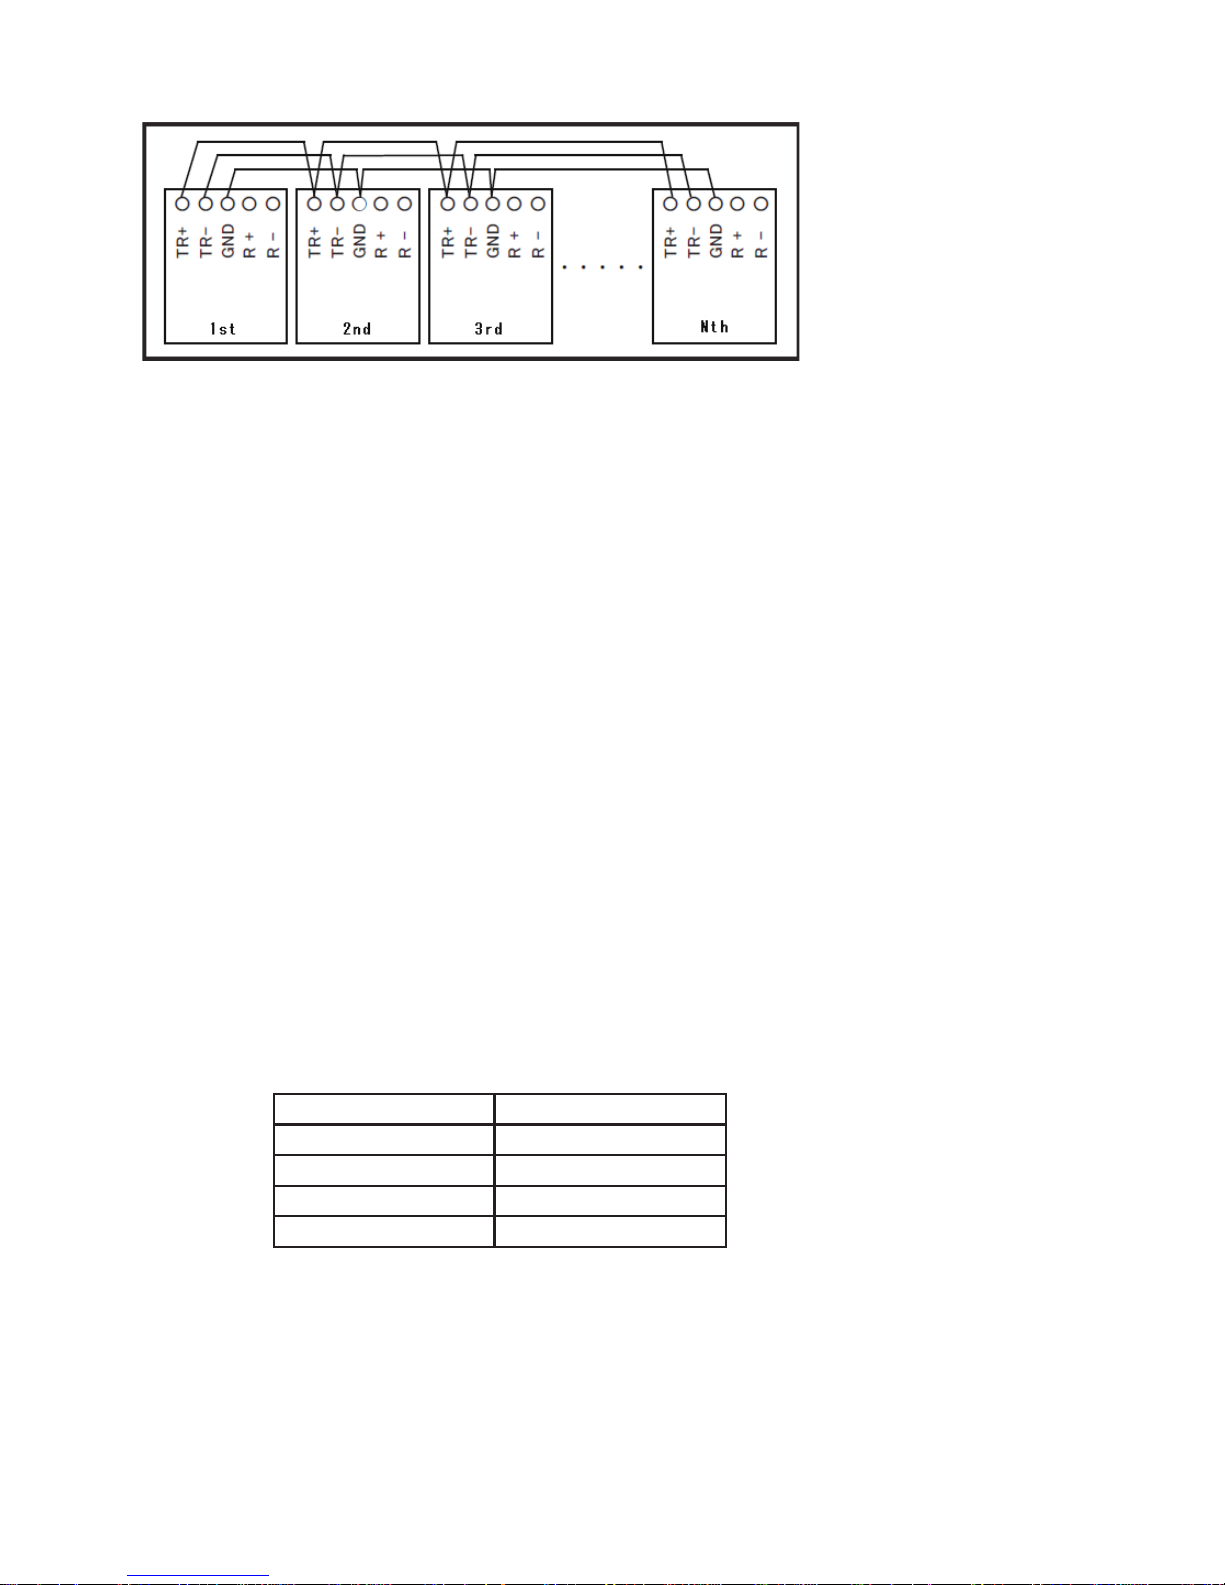
An example of N:N connection between RS-485 devices (between SI-35USB-2)
*Maximum of 128 devices can be connected if constituted only by SI-35USB/SI-
35USB-2. (tested by LINEEYE)
[ Applicable RS-422/485 cable]
Cable of which conductor size should be AWG24-14, single wire 0.2- 2.5mm2, twisted
cable 0.12- 1.5mm2, L=6mm can be removed. If using the ferrule terminal, ferrule
diameter should be 1.5mm or less. Following are the recommendation
Cable: UL2464 signal cable shield twisted pair AWG24-22.
Ferrule terminal: Phoenix Contact Inc. “AI0.25-8YE AWG24”, “AI0.75-8GY AWG18”
JST Mfg. Co., Ltd.” TUB-05 AWG26-22”
[ Precautions for connection ]
When using twisted pair cable, make pairs with cables of same signal pairs (for example,
pair like TR+ and TR-). To prevent the devices from over voltage damage, be sure to
connect GND.
<Transfer Distance>
The faster communication speed is, the shorter the transfer distance for RS-422/485 is.
See the table below and set communication speed following the actual distance.
Distance (m) Speed (bps)
200 ~230.4K
600 ~115.2
1200 ~57.6K
2400 ~9600
Note: the maximum of the actual communication speed changes depending on conditions:
environments like noise, cable features used, etc. For actual use, be sure to conduct
a communication test to check.
SI-35USB-2
SI-35USB-2
SI-35USB-2
SI-35USB-2
Page 21
-16-
Chapter 4 Warranty and After-sales Service
4-1. Troubleshooting
If you have any trouble in actual use of this converter in your system, please check the
connections of cables and the setting of COM port number. In case you still do not nd
the cause of the trouble, please prepare the software (LEcom Test) with which you can
check sending and receiving of data. Then run a loop-back test like following example to
nd if there is defect or not. (“LEcom Test” supports only Japanese Windows)
4-2. Loop -back Te st b y Com muni ca tion S oftwa re
The following example is a case by Tera Term (freeware).
(Note: Tera Term is not supported by LINEEYE. Procedure may be different depending
on the version of the software.)
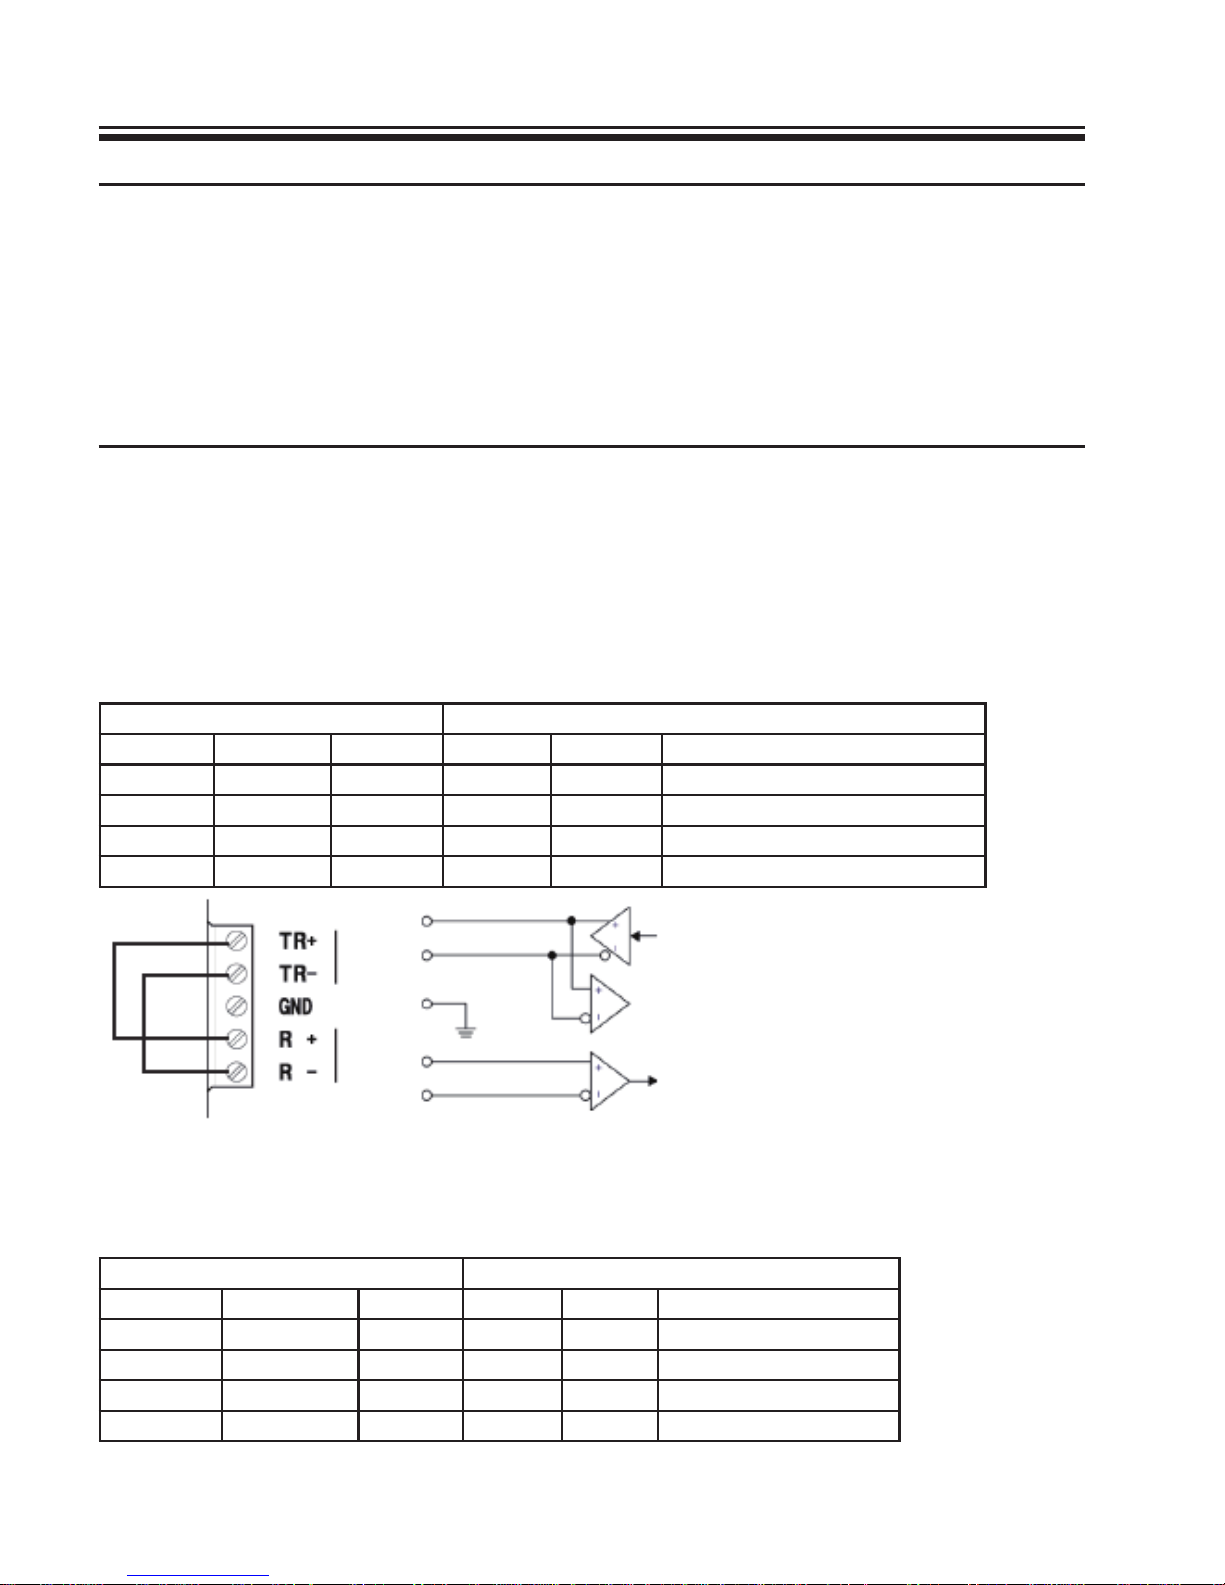
1. Make a loop-back setting referring to following tables depending on the model of the
converter.
■ RS-422 (full duplex) loop-back test
SW-A SW-B
No.1 OFF No.1 ON With echo back
No.2 OFF No.2 ON RS-422
No.3 OFF No.3 ON TR with terminal control
No.4 OFF Auto No.4 ON R with terminal control
No.5 OFF
In case you do the test when SW-A No.4 is on, you need to make DTR signal active by
the communications software before sending data.
■ RS-485 (half duplex) loop-back test.
SW-A SW-B
No.1 OFF No.1 OFF With echo back
No.2 OFF No.2 OFF RS-485
No.3 OFF No.3 ON TR with terminal control
No.4 OFF Auto No.4 OFF R without terminal control
No.5 OFF
Page 22
-17-
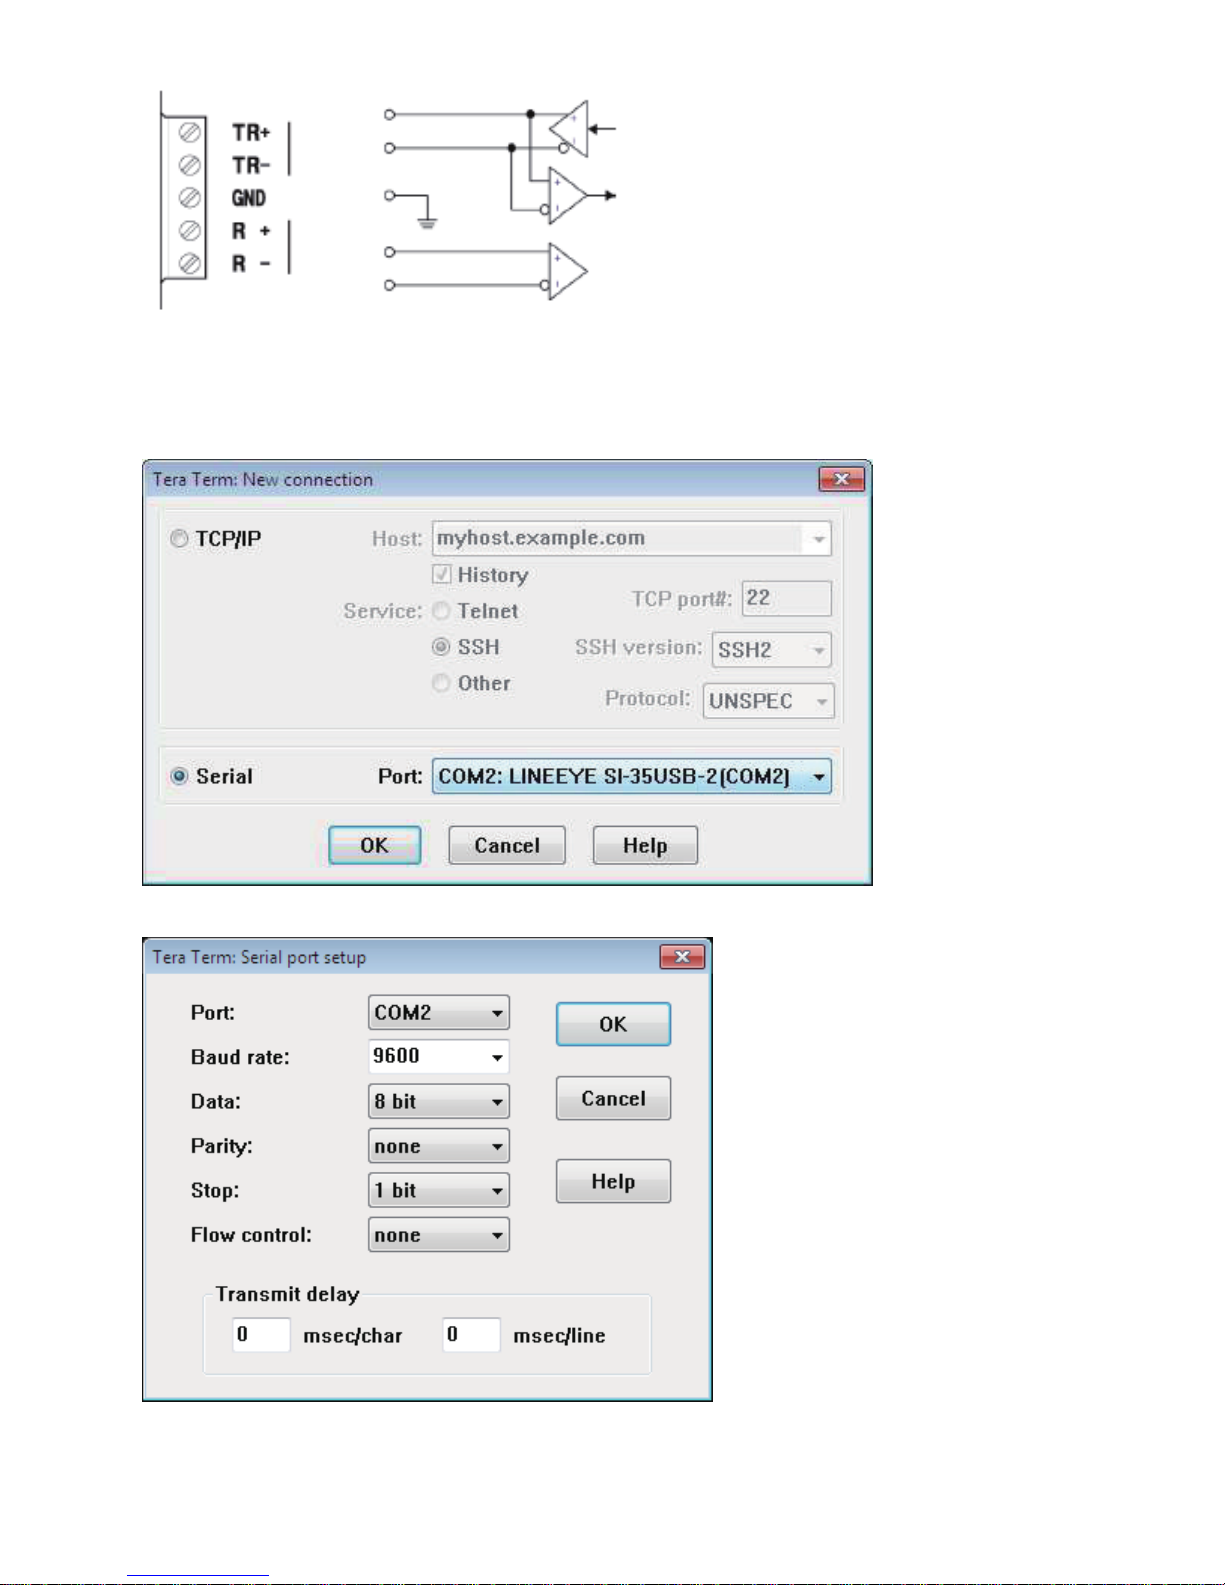
2. Run Tera Term and select the serial port of the converter. And set the communication
speed if you need.
3. Conrm the box “Local echo” is not checked.
Page 23
-18-
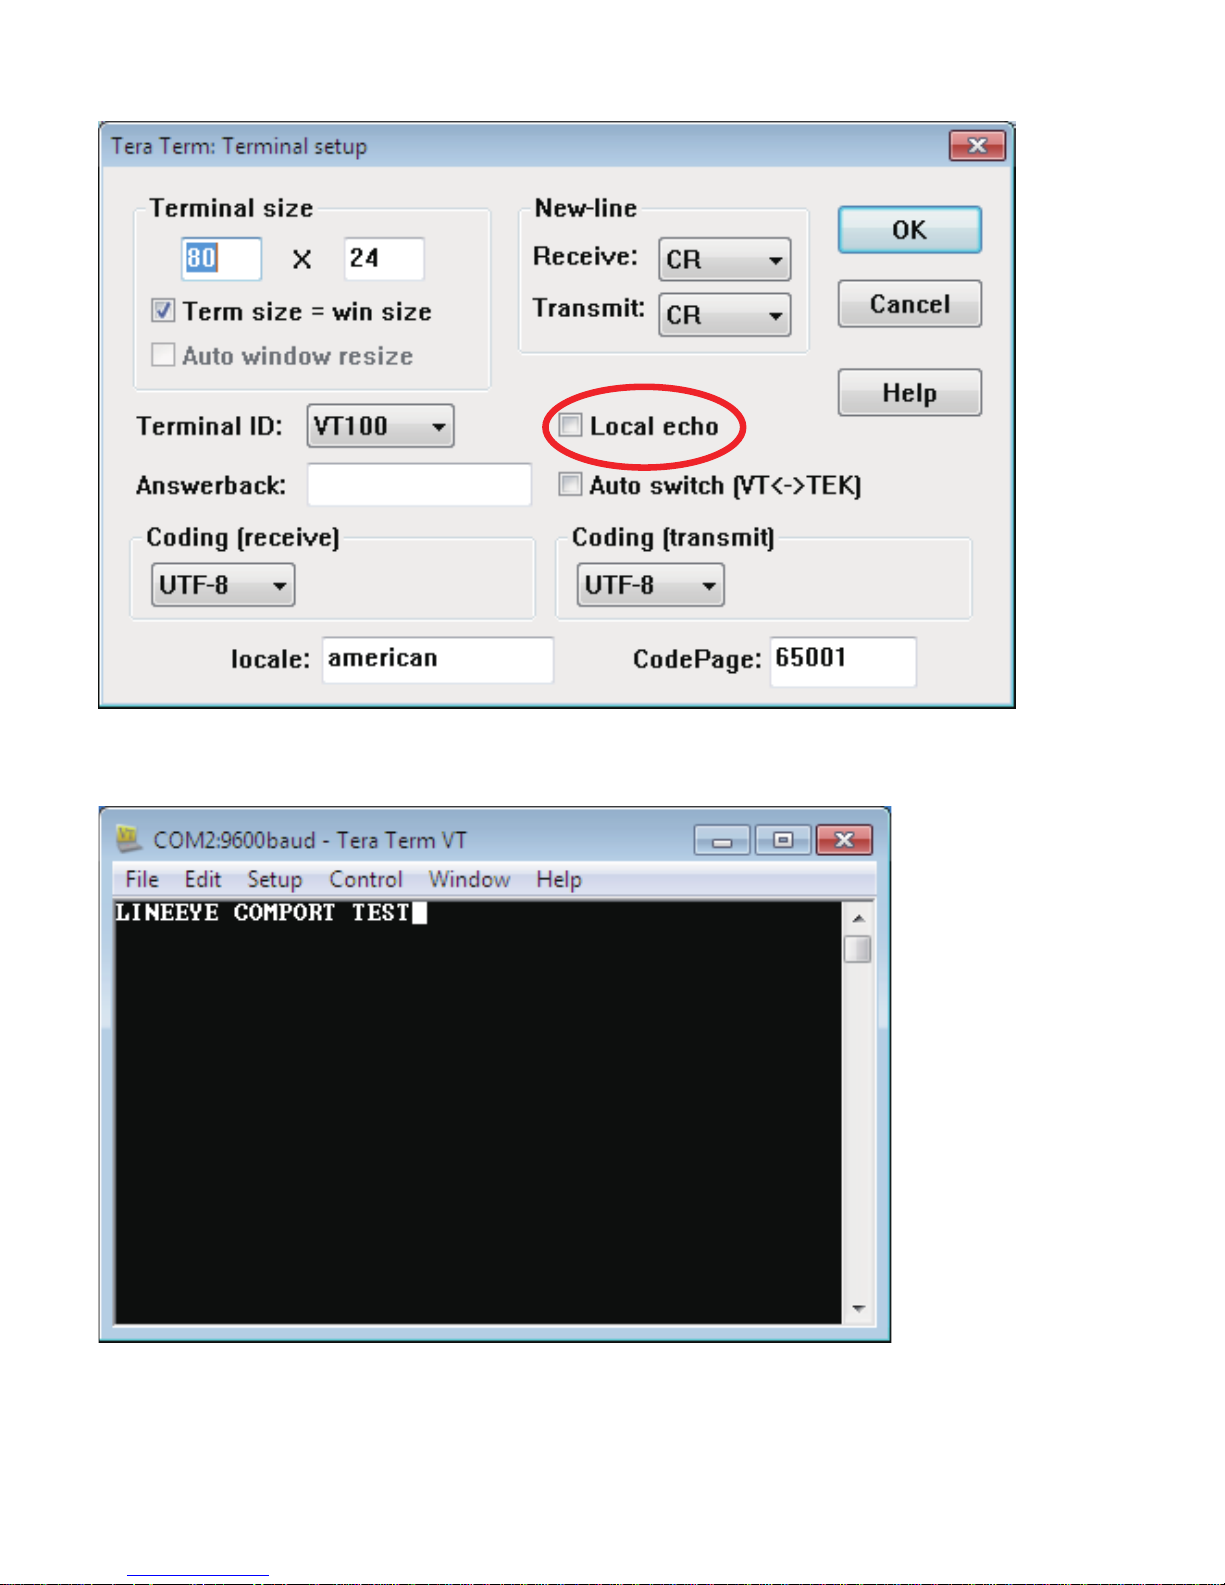
4. Conrm that characters entered from the keyboard are displayed.
Page 24

-19-
4-3 Warranty and Repair
■ Warranty
Within a period of 12 months from the date of shipment, LINEEYE warrants that your
purchased products (excepting consumable parts such as the batteries and software) are
free of charge from any defects in material and workmanship, only when the products
are operated in accordance with procedures described in the documents supplied by
LINEEYE.
If the defects exist during the Warranty period, please send back the products to
LINEEYE distributors or LINEEYE ofce. LINEEYE will repair or exchange them at no
charge. In this case, the shipping charge will be at your own expense.
◆
The foregoing warranties are the sole warranties given by LINEEYE. Above
warranties shall not be applied to the products that have been modied, repaired or altered
(excepting by LINEEYE employees) or that have been subjected to unusual physical or
electrical stress, misuses, abuse, negligence or accidents.
LINEEYE disclaims all other warranties including the warranties of merchantability,
tness for some particular purposes and noninfringement of third party right. LINEEYE
cannot promise that the software is error-free or will operate without any interruption.
When you have some errors while operating the software, please refer to the contents and
modied programs shown on our web page (http://www.lineeye.com). Please download it
from there.
□ Repair
LINEEYE will repair the products at your own expense. For malfunction, please contact
the LINEEYE distributors where you purchased at. Or, contact us directly. If your
product needs to be repaired, please read details about a repair on our web page and ask
for a repair.
4-4. After-Sales Service
Our web site contains information about this product. In addition, LINEEYE provides a
support for technical questions by Mail Form (click “contact us” on our web site).
For supports, the user registration is required. Please be sure to register from the
registration page on our web site.
Page 25
-20-
The card packed with the product is the user
registration card for Japanese customers.
For overseas customers, there is a registration page on
our web site.(www.lineeye.com)
4F., Marufuku Bldg.,39-1, Karahasi, Nishihiragaki-cho, Minami-ku, Kyoto, 601-8468, Japan
TEL: 81-75-693-0161
FAX: 81-75-693-0163
URL: http://www.lineeye.com
Printed in JAPAN
M-27935UE/SI
 Loading...