

HM_InnerBalance_Quick-Start_7.indd 1 12/5/16 4:46 PM
Hello
HM_InnerBalance_Quick-Start_7.indd 2 12/5/16 4:46 PM
Welcome to your new
Inner Balance® tech product.
This brief guide shows you how to
pair your Inner Balance product with
your device. Once you start the Inner
Balance app, we’ll be right there with
you giving you a quick video tour
of the app’s features and what
you can expect.
Add Heart.
Inner Balance
1
®
2
3
4
5
6
HM_InnerBalance_Quick-Start_7.indd 3 12/5/16 4:46 PM

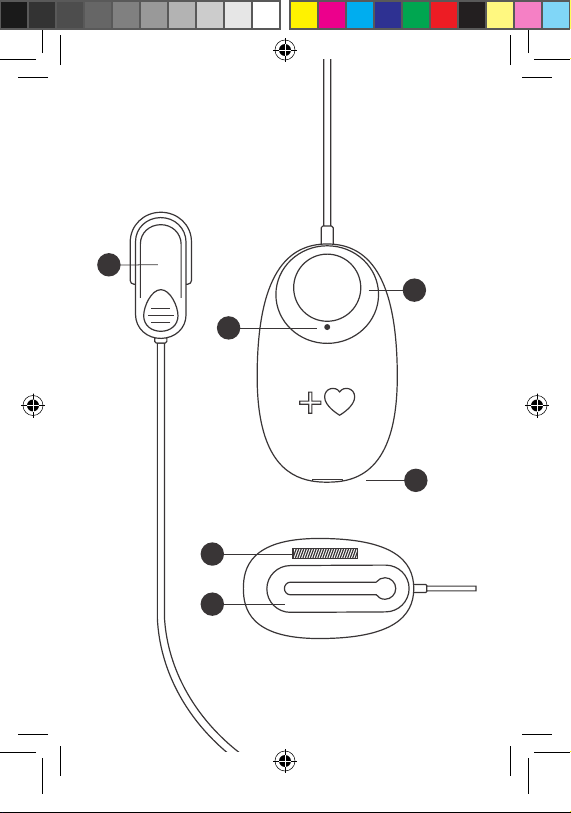
Ear clip / Ohrclip / Oorclip /
1
Sujeción para la oreja / 耳夾
Power button / Einschalttaste /
2
Aan-uit knop / Botón de encendido /
電源按鈕
LED light / LED-Licht / Led-lampje /
3
Luz LED / LED 燈
USB port / USB-Anschluss / USB-poort /
4
Puerto USB / USB 連接埠
Identifier label /
5
Identifikationskennzeichnung /
Identificatielabel /
Etiqueta de identificador / 識別標籤
Clothing clip / Clip zur Befestigung an
6
der Kleidung / Kledingclip / Sujeción para
la ropa / 衣夾
HM_InnerBalance_Quick-Start_7.indd 4 12/5/16 4:46 PM

Pairing Instructions
1. Attach the USB cord to your Bluetooth®
sensor and charge for 2 hours before use.
2. Download and install the Inner Balance App
from Google Play for your Android device
or from the App Store for your iOS device.
3. With your sensor charged, open the app.
4. Once the Inner Balance app is open, press the
power button on the sensor and attach the ear
clip to your earlobe. Make sure the LED on the
sensor is lit.
5. Select the Inner Balance sensor from the list
(ie: HeartMath-HRV-A123). If you are in the
vicinity of other HeartMath sensors, make
sure you select the one whose last 4
characters correspond to the identifier label
located on the back of your sensor.
6. In the app, if you do not see the scan dialog,
tap the Start icon on the bottom toolbar to
prompt it. If the Start icon is not visible, tap
once on the display to bring the toolbar
into view.
Now you’re ready to begin your Inner Balance
experience. Your Inner Balance will automatically
pair with your phone in future sessions.
HM_InnerBalance_Quick-Start_7.indd 5 12/5/16 4:46 PM

Anschlusshinweise
1. Befestigen Sie das USB-Kabel an Ihrem
Bluetooth
Gebrauch für 2 Stunden.
2. Wenn Sie ein Android-Gerät besitzen, können
Sie die Inner Balance-App über Google Play
herunterladen und installieren, oder wenn Sie
ein iOS-Gerät besitzen über den App Store.
3. Wenn Ihr Sensor aufgeladen und bereit ist,
öffnen Sie die App.
4. Drücken Sie die Einschalttaste auf dem
Sensor und befestigen Sie den Ohrclip an
Ihrem Ohrläppchen. Stellen Sie sicher, dass die
LED-Diode auf dem Sensor leuchtet.
5. Wenn der Scan-Dialog sichtbar ist, wählen
Sie den Inner Balance-Sensor auf der Liste
aus (d.h. HeartMath-HRV-A123). Wenn Sie
sich in der Nähe anderer HeartMath-Sensoren
befinden, stellen Sie sicher, dass Sie den
Sensor auswählen, dessen letzte 4 Zeichen
mit der Identifikationskennzeichnung
übereinstimmen, die sich auf der Rückseite
des Sensors befindet.
6. Wenn Sie den Scan-Dialog nicht in der App
sehen, tippen Sie auf das Startsymbol auf der
unteren Symbolleiste, um ihn aufzurufen.
Wenn das Startsymbol nicht sichtbar ist,
tippen Sie einmal auf die Anzeige, um die
Symbolleiste anzuzeigen.
®
-Sensor und laden Sie ihn vor dem
HM_InnerBalance_Quick-Start_7.indd 6 12/5/16 4:46 PM

Aansluit-instructies
1. Bevestig de USB-kabel aan uw Bluetooth®sensor en laad hem vóór gebruik 2 uur op.
2. Download en installeer de Inner Balance app
van Google Play voor uw Android-apparaat, of
van de App Store voor uw iOS-apparaat
3. Als uw sensor opgeladen en klaar is, opent u
de app.
4. Druk op de aan-uit knop op de sensor en
bevestig de oorclip aan uw oorlel. Controleer of
het led-lampje op de sensor brandt.
5. Selecteer de Inner Balance-sensor uit de lijst
(bijv. HeartMath-HRV-A123). Als u in de buurt
van andere HeartMath-sensoren bent, zorg dan
dat u diegene kiest waarvan de laatste 4 tekens
overeenkomen met het identificatielabel op de
achterkant van uw sensor.
6. Als u geen lijst (scandialoogvenster) op de
app ziet, dan tikt u op het Start-icoontje op de
onderste werkbalk om deze op te roepen.
Als het Start-icoontje niet zichtbaar is, tikt u
eenmaal op het scherm zodat de werkbalk
tevoorschijn komt.
HM_InnerBalance_Quick-Start_7.indd 7 12/5/16 4:46 PM

Instrucciones de conexión
1. Conecte el cable USB a su sensor Bluetooth®
y cárguelo durante 2 horas antes de usarlo.
2. Descargue e instale la aplicación Inner Balance
de Google Play para su dispositivo Android, o
de App Store para su dispositivo iOS
3. Con su sensor cargado y listo, abra
la aplicación.
4. Presione el botón de encendido en el sensor
y conecte la sujeción para la oreja al lóbulo de
su oreja. Asegúrese de que la luz LED del
sensor esté encendida.
6. Cuando vea un cuadro de diálogo de
escanear, seleccione el sensor Inner Balance
de la lista (es decir: HeartMath-HRV-A123).
Si se encuentra próximo a otros sensores de
HeartMath, asegúrese de seleccionar aquel
cuyos 4 últimos caracteres correspondan a
la etiqueta del identificador ubicada en la
parte posterior de su sensor.
5. En la aplicación, si no ve el cuadro de diálogo
de escanear, presione el ícono Inicio (Start)
en la barra de herramientas inferior para
que aparezca. Si el ícono Inicio no está visible,
presione una vez sobre la pantalla para qué
aparezca la barra de herramientas.
HM_InnerBalance_Quick-Start_7.indd 8 12/5/16 4:46 PM

配對說明
1. 使用之前,請將 USB 線插入您的 Bluetooth® 傳
感器,充電 2 小時。
2. 下传並安裝 Inner Balance 應用程式:安卓裝置,
請從 百度 (Baidu) 下传;iOS 裝置,請從 App
Store 下传。
3. 在傳感器已充電且準備好的情況下,開啟應用程
式 。
4. 按傳感器上的電源按鈕,並將耳夾夾在您的耳垂
上。確保傳感器上的 LED 亮起。
5. 當您看到掃描對話方塊時,從清單中選擇 Inner
Balance 傳感器(即:HeartMath-HRV-A123)。如
果您在其他 HeartMath 傳感器附近,請確保您所
選擇的傳感器的最後 4 個字元對應於您的傳感器
背面的識別標籤。
6. 在應用程式中,如果看不到掃描對話方塊,請輕擊
底部工具欄上的開始圖示,進行提示。如果開始圖
示不可見,輕擊一下顯示屏,讓工具欄進入畫面。
HM_InnerBalance_Quick-Start_7.indd 9 12/5/16 4:46 PM

Warranty Statement
Limited Warranty
The pulse sensor and peripheral accessories are warranted to the original owner for a period of
One Year from the date of purchase against defects in manufacturing by HeartMath, and not by the
dealer from whom the equipment was purchased.
This Limited Warranty is void if failure of the hardware has resulted from accident, abuse, or
misapplication.
What HeartMath will do:
If the pulse sensor develops a defect within the one year period, the sensor will be repaired or
replaced with a new or thoroughly reconditioned and inspected unit. Proof of purchase is required.
If proof of purchase is missing or product was not purchased new, the warranty will be based on the
manufacture date of the pulse sensor. For peripheral accessories, a One Year warranty only applies if
purchased new and proof of purchase is provided.
For HeartMath’s product knowledge base, technical or warranty assistance, please go to http://www.
heartmath.com/support.
FCC Statement
Changes or modifications not expressly approved by the party responsible for compliance could void
the user’s authority to operate the equipment.
This device complies with Part 15 of the FCC Rules. Operation is subject to the following two conditions:
(1) this device may not cause harmful interference, and (2) this device must accept any interference
received, including interference that may cause undesired operation.
This equipment has been tested and found to comply with the limits for a Class B digital device,
pursuant to Part 15 of the FCC Rules. These limits are designed to provide reasonable protection against
harmful interference in a residential installation. This equipment generates, uses and can radiate radio
frequency energy and, if not installed and used in accordance with the instructions, may cause harmful
interference to radio communications. However, there is no guarantee that interference will not occur
in a particular installation.
If this equipment does cause harmful interference to radio or television reception, which can
be determined by turning the equipment off and on, the user is encouraged to try to correct the
interference by one or more of the following measures:
-- Reorient or relocate the receiving antenna.
-- Increase the separation between the equipment and receiver.
-- Connect the equipment into an outlet on a circuit different from that to which the receiver is
connected.
-- Consult the dealer or an experienced radio/TV technician for help.
HeartMath • 14700 West Park Avenue, Boulder Creek, CA 95006
www.heartmath.com • info@heartmath.com
HeartMath is a registered trademark of Quantun Intech, Inc.
HM_InnerBalance_Quick-Start_7.indd 10 12/5/16 4:46 PM
 Loading...