

Page 1

INSTALLATION AND
OWNER’S MANUAL
HDSLG 1000
Heavy Duty Vehicular Slide Gate Operator
As of date of manufacture,
meets all ANSI/UL 325
Safety Requirements for
Vehicular gate operators
Serial #:
Date Installed:
Your Dealer:
104888
READ THIS MANUAL
CAREFULLY BEFORE
INSTALLATION OR USE
1
Page 2

TABLE OF CONTENTS
Pre-Installation Notes ............................................................................ 3
Section A: Installation Notes ................................................................ 4
Section B: Preparing the Site ............................................................... 6
The Concrete Operator Pad ....................................................... 6
Electrical Power Requirements ................................................ 6
Attaching the Chain Bracket ...................................................... 7
Placing the Vehicle Detector Loops .......................................... 8
Section C: Installing the Operator ....................................................... 9
Placing the Operator .................................................................. 9
Electrical Hookup ....................................................................... 9
Accessory Equipment Hookup ................................................ 10
Bi-Parting Application .............................................................. 12
Wiring Diagram ......................................................................... 13
Terminal Strip Reference Chart ............................................... 14
Section D: Starting the Operator ....................................................... 15
Left or Right Hand Installations ............................................... 15
Setting the Limit Switches ....................................................... 16
Setting the Obstruction Detection ........................................... 16
Setting the Switch Selectable Options .................................... 17
Final Setting of Limit Switches ................................................ 19
Setting the Close Timer ........................................................... 19
Final Setting of the Obstruction Detection ............................. 19
Testing the Operator Lock ....................................................... 19
Maximum Run Timer ................................................................ 19
Final Setting for Bi-Parting Installations ................................. 19
Fuses ......................................................................................... 20
Section E: Auxiliary Equipment ......................................................... 20
Section F: Safety Guide ...................................................................... 21
Operator Exploded View & Parts List ................................................. 23
Technical Specifications ..................................................................... 24
READ THESE STATEMENTS CAREFULLY AND FOLLOW THE
The Warning and Caution boxes throughout this manual are there to protect you and
your equipment. Pay close attention to these boxes as you follow the manual.
WARNING
Indicates a MECHANICAL
hazard of INJURY OR
DEATH. Gives instructions
to avoid the hazard.
INSTRUCTIONS CLOSELY.
CAUTION
Indicates a MECHANICAL hazard
of DAMAGE to your gate, gate
operator, or equipment. Gives
instructions to avoid the hazard.
WARNING
Indicates an ELECTRICAL
hazard of INJURY OR
DEATH. Gives instructions
to avoid the hazard.
2
Indicates an ELECTRICAL hazard
CAUTION
of DAMAGE to your gate, gate
operator, or equipment. Gives
instructions to avoid the hazard.
Page 3

PRE INSTALLATION NOTES
The Allstar HDSLG 1000 Vehicular Gate Operator will provide
convenience and assurance to the ultimate users for many years. It is
ruggedly built of the finest materials and has been thoroughly inspected
and tested at the Allstar factory. It has many features that will aid in the
installation and testing of the complete gate system. The HDSLG has
been evaluated by Underwriters Laboratory, Inc. (UL) and is certified
to comply with UL Standard for Safety 325, as evidenced by the UL
symbol on the name plate.
Because the HDSLG (as well as gate operators sold by other
NOTICE
BEFORE ATTEMPTING INSTALLATION,
READ THIS MANUAL CAREFULLY SO YOU
WILL BE THOROUGHLY FAMILIAR WITH THE
FEATURES OF THE LEADER AND ITS PROPER
INSTALLATION PROCEDURES.
manufactures) is designed to start and move gates weighing as much as
1200 pounds, or more,---the HDSLG is capable of producing high
levels of force. It is important in the design of the total gate system that
designers, installers and users be aware of the hazards that may be
associated with the IMPROPER design, installation and use of
vehicular gate systems and gate operators.
The gate operator is only one part of a complete automatic gate
operating system. As each location and usage is different, a properly
designed system will include all applicable safety devices.
As the designer and installer of the GATE SYSTEM, you must
advise the purchaser on the proper use of the gate system. You also
have the primary responsibility of insuring that ALL possible
operational hazards have been considered and eliminated. YOU
MUST ADVISE AND WARN the purchaser and the ultimate user of
ANY HAZARDS
The HDSLG has several features that can help reduce the hazards
of your gate system.
The Allstar HDSLG has a built-in "overload detector" that can help
reduce the hazards of your gate system. This device, however, must not
be considered as the primary obstruction sensing system. Consider all
available options (electric leading edges, photoelectric sensors,
protective screen mesh, etc) to eliminate hazards in your gate system
design.
The HDSLG built-in overload detector will activate if there is an abrupt
that you have not been able to eliminate.
increase in motor current above that normally required to move the
gate. THE OVERLOAD DETECTION POINT IS AN ADJUSTABLE
SETTING THAT MUST BE DETERMINED AT THE TIME OF
INSTALLATION. THIS SETTING MUST BE TESTED
PERIODICALLY TO ENSURE PROPER OPERATION. THE MORE
FREELY THE GATE WILL MOVE THE MORE SENSITIVE THIS
SETTING CAN BE MADE. See Page 17.
ADVISE THE PURCHASER TO CHECK THE SENSITIVITY
NOTICE
THE IMPORTANT SAFEGUARDS AND
INSTRUCTIONS IN THIS MANUAL CANNOT
COVER ALL POSSIBLE CONDITIONS AND SITUATIONS
WHICH MAY OCCUR DURING ITS USE. IT MUST BE
UNDERSTOOD THAT COMMON SENSE AND CAUTION
MUST BE EXERCISED BY THE PERSON(S) INSTALLING,
MAINTAINING AND OPERATING THE EQUIPMENT
DESCRIBED HEREIN. DO NOT USE THIS EQUIPMENT FOR
ANY OTHER THAN ITS INTENDED PURPOSE —
OPERATING A SLIDE GATE.
OF THE OVERLOAD PERIODICALLY AND RECORD THE DATE
TESTED ON THE LOG PROVIDED BELOW (See Figure 1).
The HDSLG has a maximum motor current trip mechanism. If the
motor current is maintained at or near maximum for a period of
approximately two seconds the power will be turned off to the motor.
(This situation could occur if the gate becomes jammed.)
The HDSLG has a Maximum Run Timer. If the gate is activated and
no other command is given or an end limit (open or close) is not
reached in approximately 45 seconds, the operator will be turned off.
(See Page 19)
The HDSLG has an auxiliary “alarm” relay that can be used to give a
WARNING when the gate is opening or closing or if the OVERLOAD
has been activated. TO USE THIS ALARM FEATURE WILL
REQUIRE THAT THE INSTALLER PROVIDE THE ALARM
MECHANISM AND THE ELECTRICAL POWER FOR THE
ALARM. See Page 17.
WARNING HIGH VOLTAGE
ONLY A QUALIFIED TECHNICIAN SHOULD SERVICE THIS GATE OPERATOR
PERIODICALLY TEST SENSITIVITY OF OVERLOAD
*** READ MANUAL ***
LOG DATE OVERLOAD TEST
DATE TESTED DATE TESTED DATE TESTED DATE TESTED
3
DATES
OPERATOR
SERVICED
Figure 1
Page 4
: IMPORTANT INSTALLATION NOTES
A
TO REDUCE THE RISK OF SEVERE
INJURY OR DEATH: READ AND FOLLOW
WARNING!
ALL INSTALLATION INSTRUCTIONS AND
GATE SYSTEM DESIGN PARAMETERS!
GATE SYSTEM DESIGN AND INSTALLATION
SAFETY CHECK LIST:
•
DO NOT locate any device (key switch, switch, key pad, card
reader, etc.) in a position where it may be activated by a person
reaching through the gate or while touching the gate in any
manner.
•
Install all devices that will open or close the gate in such a
manner that THE GATE WILL BE IN FULL VIEW WHEN
THE DEVICE IS OPERATED.
•
SECURELY ATTACH THE WARNING SIGNS provided with
the HDSLG on the gate (one on the outside and one on the inside)
where they can be seen by persons in the area of the gate to alert
them of automatic gate operation. (If the user refuses to have the
warning signs installed, Allstar recommends you note this on
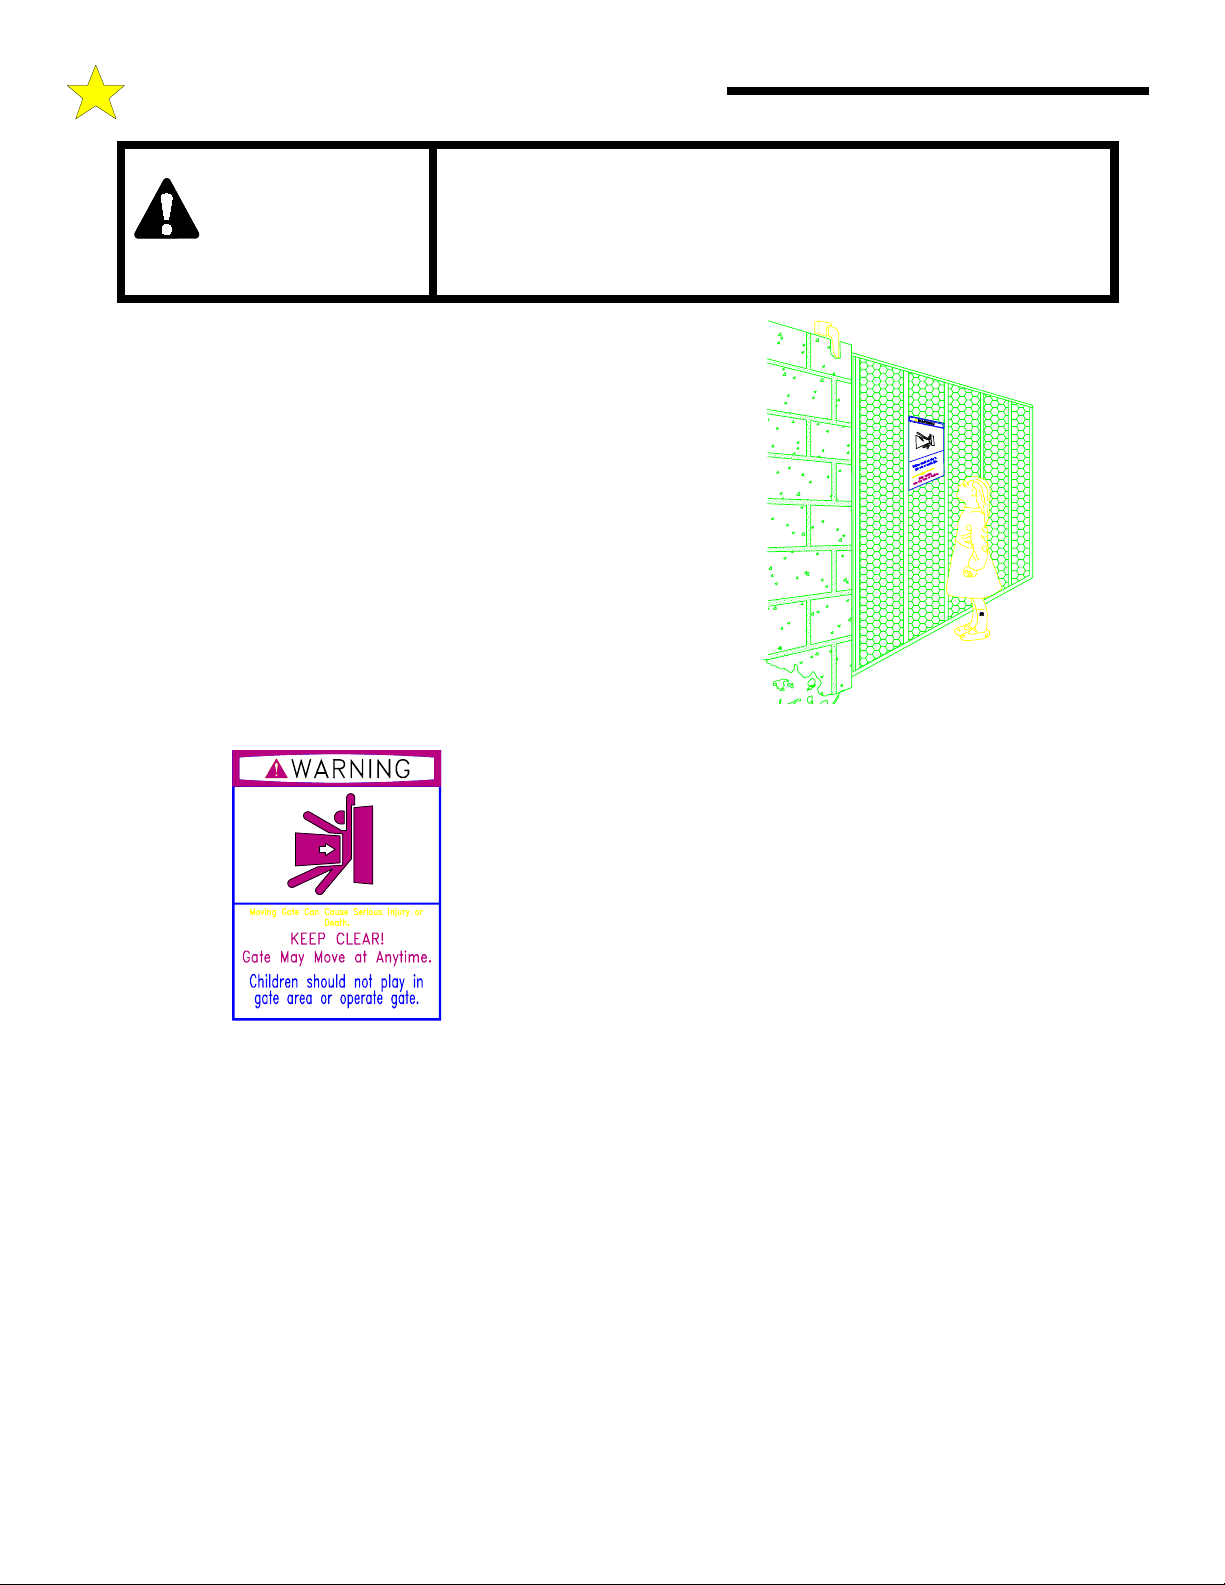
your records and have the user sign a disclaimer.) See Figure 2.
104949
Figure 3
•
CANTILEVERED ROLLER GATES WITH OPEN ROLLERS
HAVE THE POTENTIAL HAZARD OF HANDS AND
FINGERS BEING PINCHED between the open roller and the
pole that the roller rides upon. PROTECT THIS "PINCH
POINT" SO THIS HAZARD IS AVERTED. See Figure 4.
Figure 2
•
FOR INSTALLATIONS WHERE IT IS LIKELY CHILDREN
WILL BE PRESENT NEAR THE AUTOMATIC GATE,
PLACE A WARNING SIGN SPECIFICALLY DIRECTED TO
PARENTS AND VISITORS TO KEEP CHILDREN AWAY
FROM THE GATE AND NOT ALLOW CHILDREN TO PLAY
ON THE GATE. (If the user refuses to have the sign installed,
Allstar recommends you note this on your records and have the
user sign a disclaimer.) See Figure 2.
•
For ORNAMENTAL “GRILL TYPE” GATES, injuries may occur
when people put arms through the openings or children “ride” the gate
by standing on the chain and holding on to the gate. THIS
POTENTIAL HAZARD CAN BE MINIMIZED BY INSTALLING
A MESH SCREEN ON THE GATE. See Figure 3.
•
The HDSLG 1000 is a VEHICULAR GATE OPERATOR and as
such is NOT RECOMMENDED FOR PEDESTRIAN traffic. In
installations where pedestrians are likely to be nearby, install a
pedestrian gate and use leading edge detectors and/or photocells
in your design to protect system entrapment zones. Allstar can
provide these products for incorporation in your gate installation.
104880
•
CONSIDER ALL OTHER "PINCH POINTS" IN YOUR
DESIGN of the gate system, such as the “pocket” of a sliding
gate. Use protective measures to reduce hazards at these
locations. See Figure 4.
•
When using the “timer to close” option of the HDSLG, install
VEHICLE DETECTOR LOOPS, VEHICLE DETECTORS,
REVERSING EDGE SYSTEMS AND/OR PHOTOCELLS.
Read the manual for information on the installation of these
devices. IF VEHICLE DETECTOR LOOPS HAVE BEEN
INSTALLED TO PREVENT THE GATE FROM CLOSING ON
A VEHICLE, INSTRUCT THE USER TO PERIODICALLY
CHECK THE OPERATION OF THE DETECTORS.
•
Outdoor or easily accessible controls must be of the security type
to prevent unauthorized use of the system.
•
Make sure the gate operating system is placed far enough back
from the road to eliminate traffic backup. The distance from the
road, size of the gate, usage level and gate cycle/speed must be
taken into consideration to eliminate potential hazards.
•
Check the operator manufacturer’s specification to ensure the
operator is proper for the cycles per hour, size and type of gate.
•
USE EXTREME CAUTION WHEN WORKING NEAR BELTS
AND PULLEYS when the operator cover is removed. Apply
power to the operator only when instructed to do so.
•
Before activating the "timer to close" option of the operator,
ENSURE THE PERSONAL ENTRAPMENT DEVICES
4
Page 5
: IMPORTANT INSTALLATION NOTES
A
(operator reversing feature, edges, photocells) ARE
OPERATING and install VEHICLE DETECTOR LOOPS AND
VEHICLE DETECTORS for protection of user vehicles. Read
the manual for information on the installation of these devices. IF
VEHICLE DETECTOR LOOPS HAVE BEEN INSTALLED TO
PREVENT THE GATE FROM CLOSING ON A VEHICLE,
INSTRUCT THE USER TO PERIODICALLY CHECK THE
OPERATION OF THE DETECTORS.
•
Make sure the gate moves freely, all hinges are in good working
order, the gate does not bind in any manner and the gate swing
area is clean and free of irregularities.
•
The HDSLG 1000 is shipped from the factory with the sprocket
guard in place. When operating the gate with the operator’s outer
cover removed, STAY CLEAR OF THE DRIVE SPROCKET
AND IDLER PULLEYS. THESE PINCH POINTS WILL NOT
BE PROTECTED WHEN THE COVER IS REMOVED.
NEVER LEAVE THE INSTALLATION WHEN THE COVER
IS REMOVED AND THE GATE MAY BE OPERATED.
•
NEVER LEAVE THE INSTALLATION WHEN THE
SPROCKET GUARD IS REMOVED.
•
When the metal cover of the control box is removed, 115 Volts
AC will be exposed on the control board AS LONG AS THE
MAIN POWER SWITCH IS ON. EVEN IF THE RED POWER
LIGHT ON THE CONTROL BOARD IS NOT LIGHTED, 115
VOLTS AC WILL STILL BE PRESENT ON THE CONTROL
BOARD. NEVER LEAVE THE INSTALLATION WITH THE
COVER OF THE CONTROL BOX REMOVED.
•
ALWAYS TURN OFF THE POWER BEFORE REPLACING
THE SNAP-IN FUSES ON THE CONTROL BOARD.
•
DO NOT TRIM THE PLASTIC SPROCKET GUARD COVER
MORE THAN IS NECESSARY TO CLEAR THE ENTRANCE
AND EXIT OF THE CHAIN. THERE ARE SCORE MARKS
ON THE COVER FOR THE PROPER “CUT-OUT”. UL Listing
was obtained with the sprocket guard cover trimmed as marked
on the cover. You may void the UL Listing and increase the
pinch hazard if the trim lines are not followed..
106709
Figure 4
•
DO NOT INSTALL THE OPERATOR UNTIL ALL GATE
PROBLEMS HAVE BEEN CORRECTED.
•
DO NOT consider the built in overload detector as the primary
obstruction sensing system. Consider all options in the gate
system design.
•
DO NOT connect any auxiliary equipment to the operator
(detectors, card readers, etc.) until the gate operator and all its
functions are fully tested. Only connect one device at a time and
ensure its proper function(s) before moving on to the next device.
•
Install the operator on the inside of the property/fence line. DO
NOT install an operator on the public side of the fence line or
gate.
•
IDENTIFY THE ENTRAPMENT ZONES AND PINCH POINT
AREAS PER FIGURE 4. Design the gate installation to
minimize the risk of entrapment in these areas. Install additional
safety equipment such as four wire edges and photocells to
further minimize risk. All entrapment zones are required to be
protected.
AS THE INSTALLER YOU ARE RESPONSIBLE FOR:
• ASSURING THAT THE OWNER/END USER OF THE
SYSTEM UNDERSTANDS ITS BASIC OPERATION AND
SAFETY FEATURES. IN PARTICULAR, BE SURE THE
OWNER/END USER UNDERSTANDS THE LOCATION AND
OPERATION OF A MANUAL DISCONNECT (WHERE
PROVIDED) OR HOW TO OPERATE THE GATE
MANUALLY.
• POINTING OUT TO THE OWNER/END USER OF THE
GATE SYSTEM THAT CHILDREN OR PETS ARE NOT
ALLOWED TO PLAY ON OR NEAR THE GATE, FENCE OR
ANY PART OF THE SYSTEM, AND THAT THE SAFETY
INSTRUCTIONS SUPPLIED WITH THIS OPERATOR AND
THEIR IMPLEMENTATION ARE THE RESPONSIBILITY
OF THE OWNER/END USER.
• LEAVING THE INSTALLATION AND MAINTENANCE
MANUAL FOR THIS OPERATOR AS WELL AS ANY
ADDITIONAL SAFETY INFORMATION SUPPLIED WITH
THIS OPERATOR OR OTHER COMPONENTS OF THE
GATE SYSTEM WITH THE OWNER/END USER.
• NOT PLACING IN SERVICE THIS OPERATOR IF YOU
HAVE ANY QUESTIONS ABOUT THE SAFETY OF THE
GATE OPERATING SYSTEM. CONSULT THE OPERATOR
MANUFACTURER.
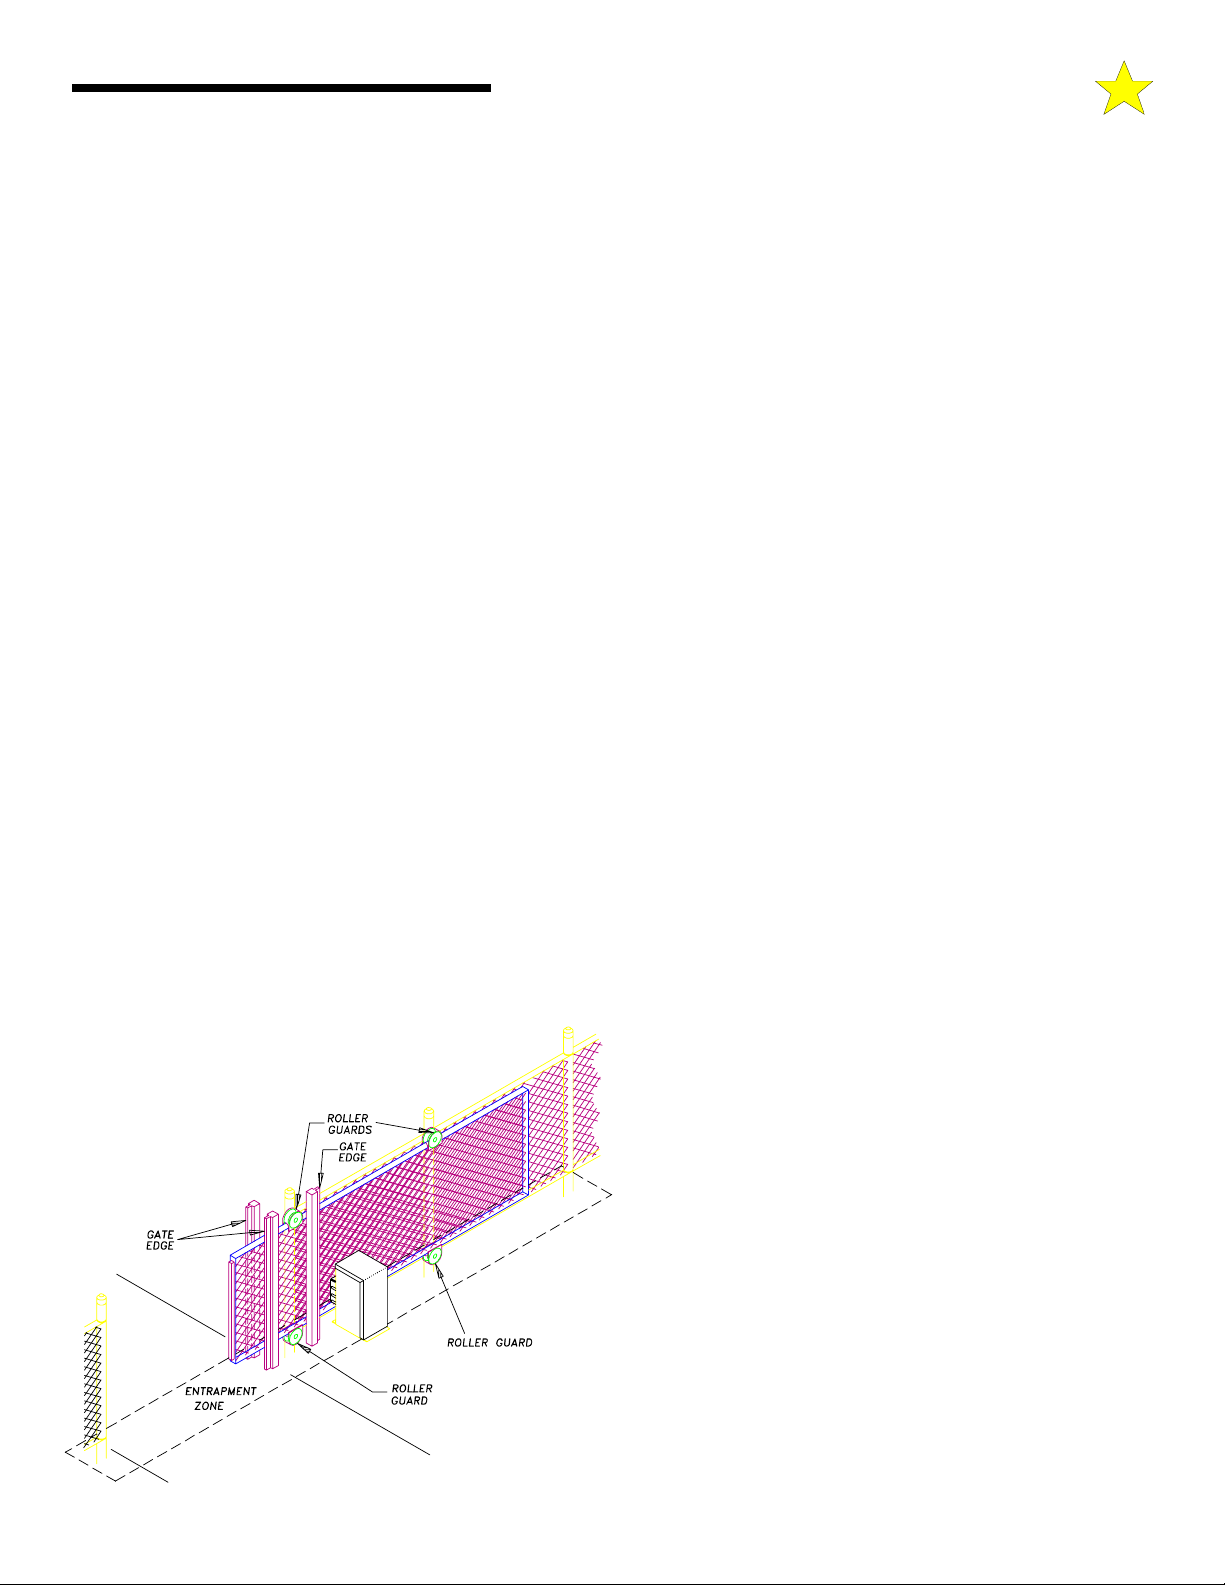
SLIDE GATE ENTRAPMENT PROTECTION
Use the illustration at left to minimize the risk of injury in your design
of the swing gate operator system.
Entrapment Zones: Design in personal entrapment protection devices
to protect people from entrapment in the zones shown. Install vertical
posts with gate edges attached on both sides of the gate to prevent body
entrapment. Gate edges should be wired to stop the gate upon contact.
Pinch Points: Attach roller guards in cantilevered gate systems to
minimize the risk of hands being caught between the top of the gate and
the roller.
5
Page 6
: PREPARING THE SITE
B
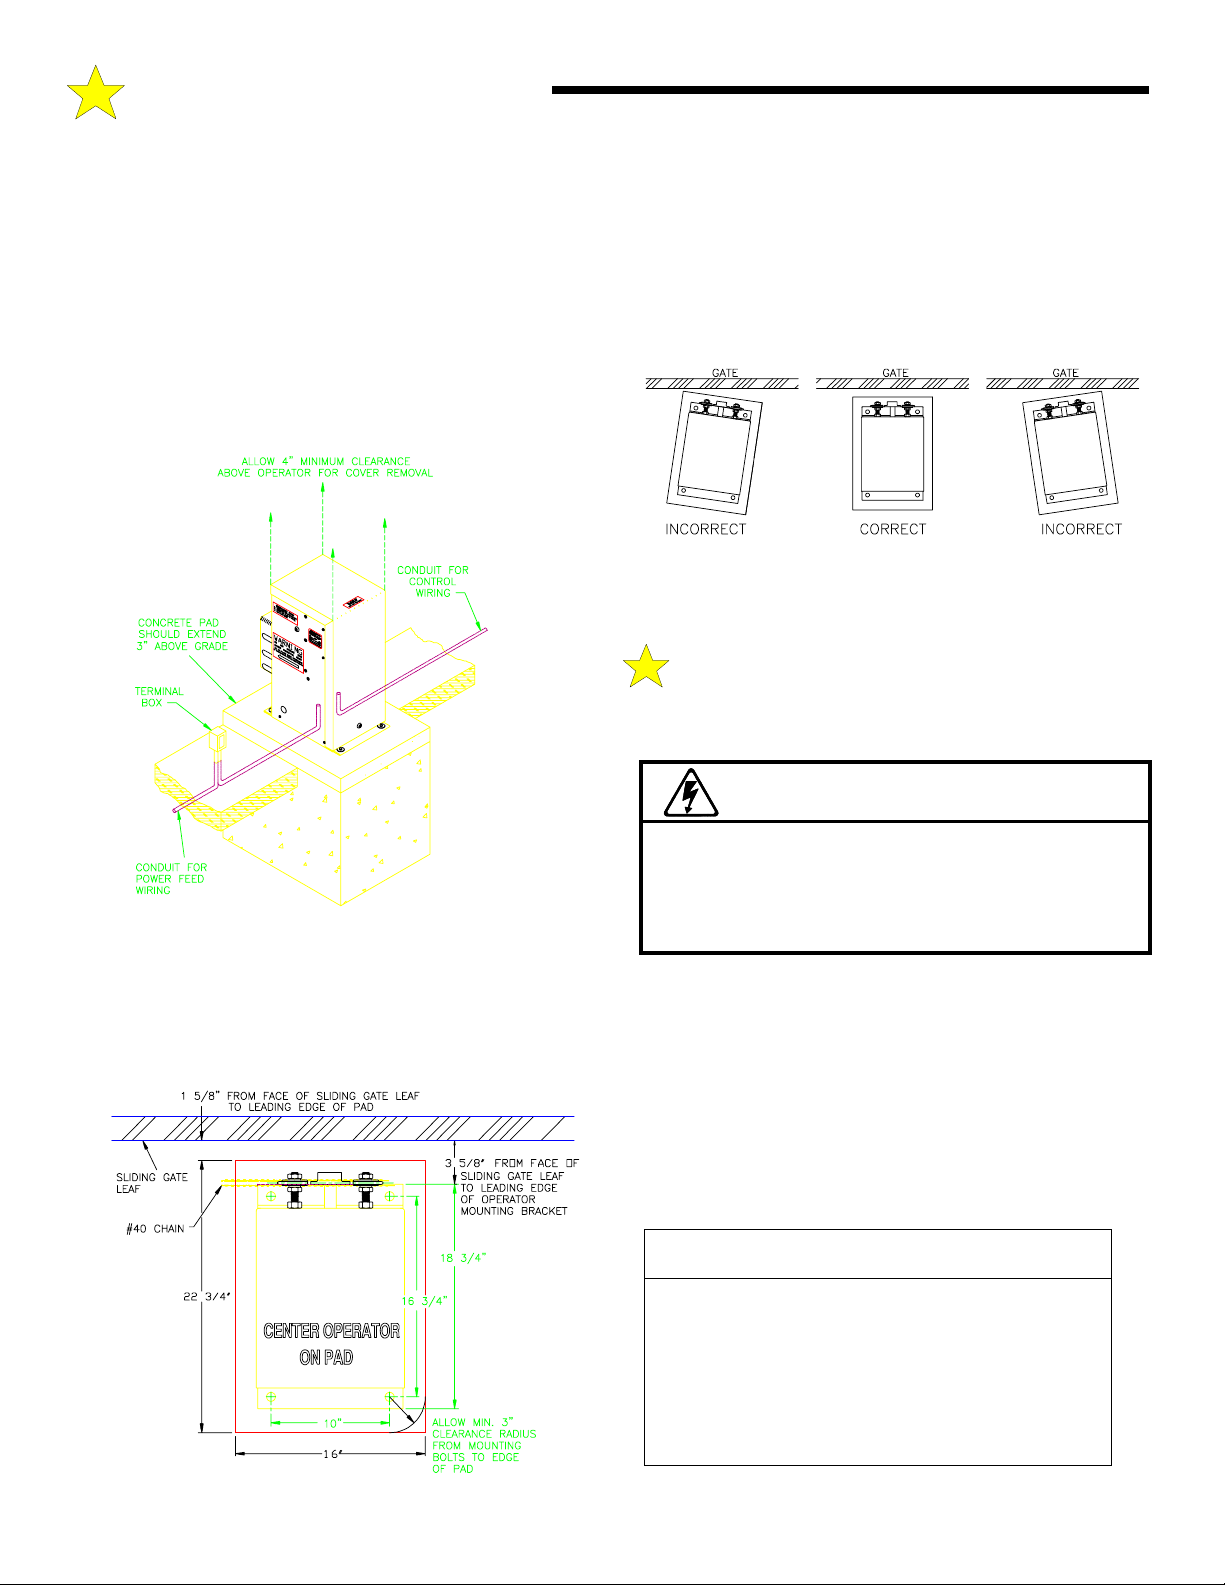
THE CONCRETE OPERATOR PAD
Installation requires the presence of a suitable concrete pad as a base for
the operator. The dimensions of this pad should be sufficient to allow
at least 6" of clearance from each edge of the pad to the nearest
operator mounting hole. The top of the pad should be 3" above grade to
raise the operator above any standing water, while the depth of the pad
below grade is dependent on the weight and size of the gate and the soil
conditions at the site of the installation. THE SITE FOR THE
OPERATOR SHOULD BE CHOSEN WITH AT LEAST 5" OF
CLEARANCE ABOVE THE TOP OF THE UNIT.
If a suitable concrete base already exists for mounting the operator it
will be necessary only to drill mounting holes. 3/4" mounting holes are
located on each side of the operator. Four redhead bolts, 3/8" or 1/2" in
diameter, should be used for mounting the operator. The bolt pattern is
10" wide by 16-3/4" long. The two rear bolts, (closest to the gate),
should be no closer than 3-5/8" from the near side of the gate to allow
sufficient clearance for the operator's cover.
104883
Figure 6a: Parallel Placement
ELECTRICAL POWER REQUIREMENTS
NOTE: Before connecting the operator, use a voltmeter to insure
that the electrical service is 115 VAC. Connection to 220 VAC
service is the most common cause of board failure in new
104881
Figure 5: Pad Configuration
If no suitable concrete base exists, a pad must be poured. See Figures 5
and 6 for plans for this pad. Consult local building codes for depth of
base. Typical depths range from 24 to 36 inches. In either case, if
vehicles are going to be operated in the vicinity of the operator,
consider installation of protection posts in front of the operator.
104882
Figure 6: Operator Footprint
WARNING!
AVOID ELECTROCUTION:
DO NOT ROUTE LOW VOLTAGE WIRES IN SAME
CONDUIT AS HIGH VOLTAGE WIRES. FOLLOW
ALL LOCAL ELECTRICAL CODES OR THE
NATIONAL ELECTRICAL CODE.
installations and is NOT covered by the warranty.
The operator requires a 3-wire (Hot, Common, Ground), 115 VAC,
electrical circuit with a 15 Amp breaker for proper operation. In
installations with more than one operator, each operator must have a
separate service from the breaker panel. Powering multiple operators
from the same service can result in having to "de-sensitize" the
WIRE SIZE NOMINAL
DISTANCE
#14 100’ 200’
#12 150’ 300’
#10 250’ 500’
#8 400’ 800’
#6 600’ 1200’
#4 1000’ 2000’
#2 1600’ 3200’
MAXIMUM
DISTANCE
6
Page 7
: PREPARING THE SITE
B
obstruction sensing adjustment to prevent
one operator from overloading the other.
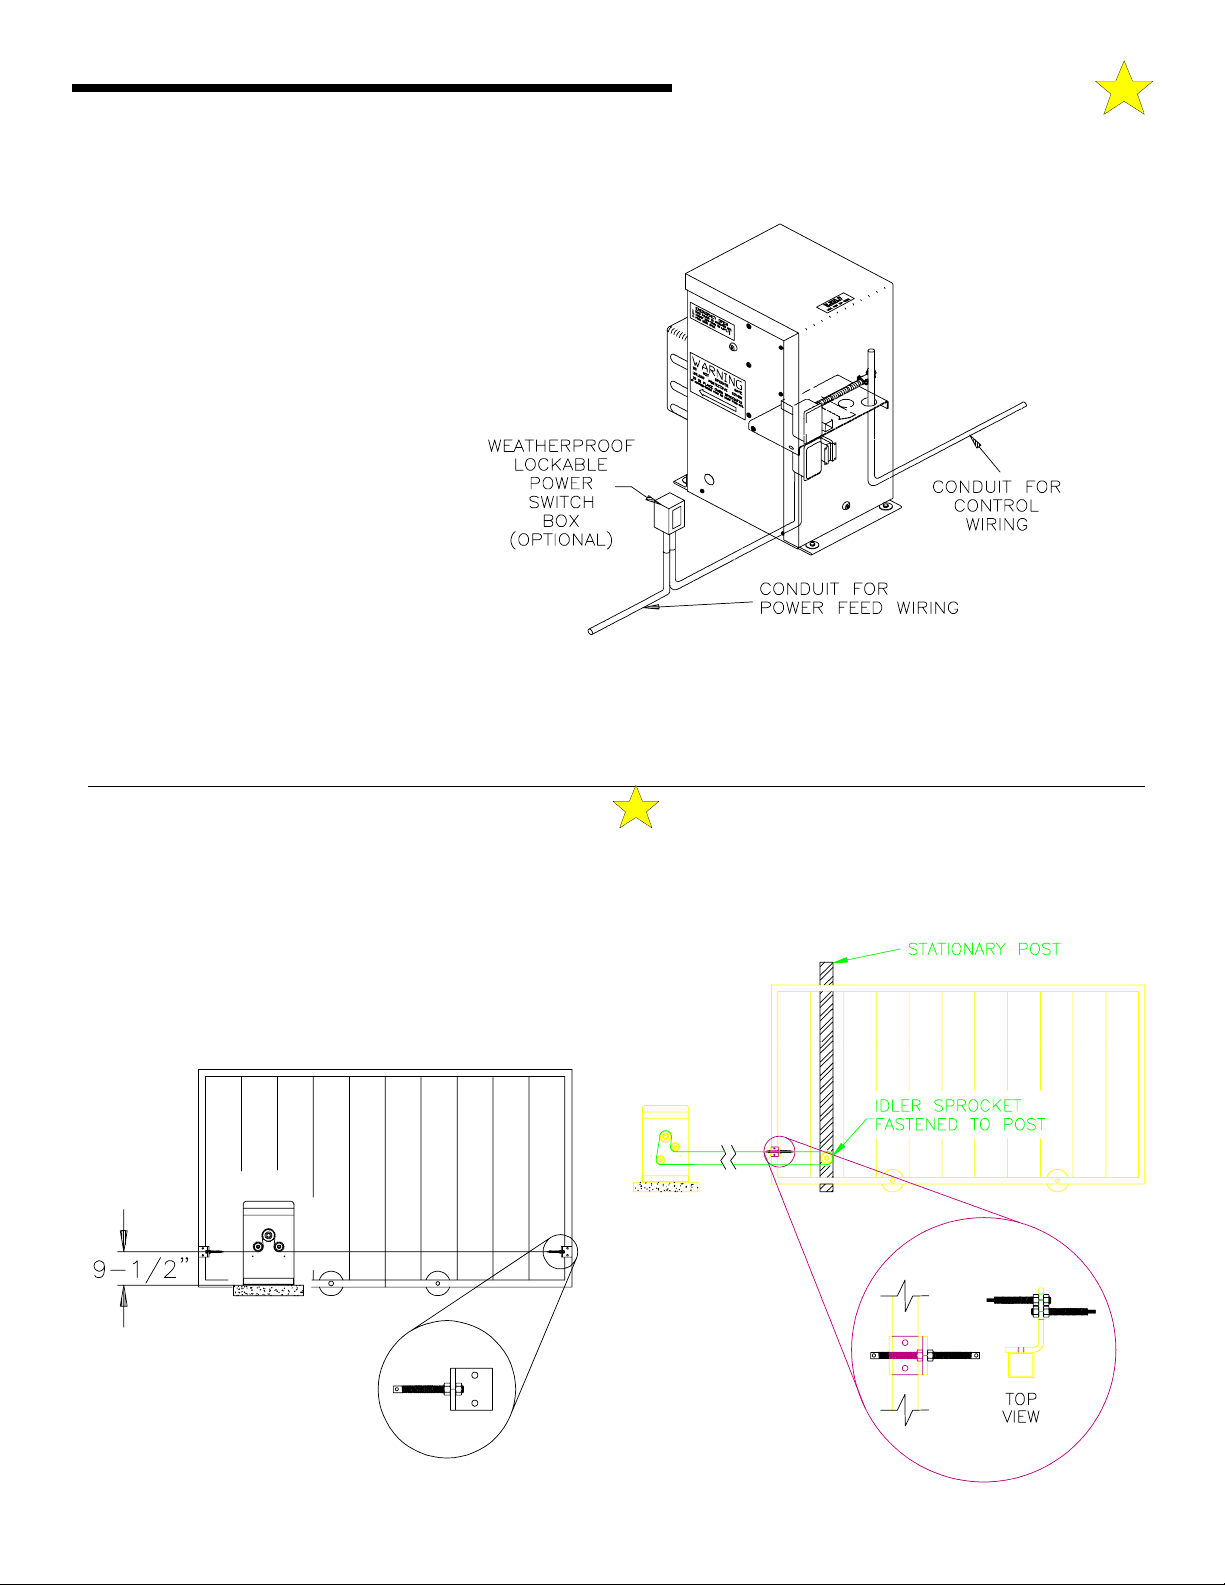
The electrical hookup is made in the
junction box located in the right front
corner of the frame. See Figure 7, Page 7.
104888
Figure 7: Service Conduit
The AWG wire size for the electrical service depends on the distance of
the operator from the breaker panel. Refer to the table below to
determine the correct wire size. The NOMINAL column is the ideal
distance from the breaker panel to the operator for a given wire size.
The distances shown in the MAXIMUM column should never be
exceeded. For distances greater than 3200', it is recommended that your
local utility be contacted to install a service feeder for the installation.
106728
NOTICE: The Installer is responsible for guarding the
post mounted Idler Sprocket in back drive installations.
106729
Figure 8: Chain Configuration - Normal Drive
Figure 9: Chain Configuration - Back Drive
7
Page 8
: PREPARING THE SITE
B
Figure 10: Loop Diagrams
Wiring from external controls such as guard shack, telephone entry,
keypad or card reader systems should be brought to the operator by a
conduit separate from the 115 VAC electrical hookup. Low voltage
control wires MUST NEVER be routed in the same conduit as A.C.
power wires. Always consult and follow all local electrical codes.
104886
WARNING!
RISK OF ENTRAPAMENT
VEHICLE DETECTOR LOOPS WILL NOT DETECT
SMALLER VEHICLES SUCH AS MOTORCYCLES
OR GOLF CARTS, OR BICYCLES OR
PEDESTRIANS. PHOTOELECTRIC DETECTORS,
EDGE DETECTORS AND SEPARATE
PEDESTRIAN ACCESS MUST BE INSTALLED.
ATTACHING THE CHAIN BRACKET
The chain brackets provided with the operator should be mounted on
the the gate with the centerline of the slot 8" above the top of the
operator pad. Attach one end of the chain to the gate and thread the
other end through the idler pulleys and drive sprocket. Attach the free
end to the bracket on the gate and tension the chain. You will normally
require a welder, or an electric drill with a 3/8" bit, for attaching the
chain brackets to the gate. See Figures 8 and 9.
8
Page 9

: INSTALLING THE OPERATOR
C
TOOLS REQUIRED
The following tools and materials are required for proper
installation of the operator:
Two 3/4" wrenches. (For tightening hex nuts on the chain
take-up bolts.)
2. Chain cutting tool. (For adjusting chain length.)
3. Wire cutter, stripper and crimping tools. (For attaching
accessory equipment to the control box barrier strip.)
4. Standard screwdriver. (For junction box face plate.)
5. Very small standard screw driver. (For adjusting
controller board trimmer potentiometers.)
6. Phillips head screwdriver. (For control box face plate.)
UNPACKING CHECKLIST
The following is a check list of the various parts included with the operator:
1. 1 HDSLG 1000 Gate Operator w/Cover
2. 2 Cover Lock Keys
3.
3. 2 Gate Warning Sign
4. s
4. 2 Chain Brackets
5. 1 Chain Take-up Bolt Kit
6.
PLACING THE OPERATOR
The recommended procedure for attaching the operator to the concrete
pad is first to locate and drill the hole for the right rear redhead.
Review Figure 6, Page 6. After placing the redhead in the hole, remove
the cover and lower the operator over the redhead. Make sure the two
rear mounting holes on the operator are exactly the same distance from
the gate. (Improper alignment of the operator will cause premature
chain and idler sprocket failure.) With the operator properly aligned
with the gate, drill the remaining three holes with the operator in place.
Before inserting the remaining redhead bolts, make sure the operator is
sitting level. If any corners of the operator are resting above the pad,
slide flat washers under the operator and insert the redhead through the
washers. Place the flat washers, lock washers and nuts on the redhead
bolts and tighten down the operator securely.
WARNING!
RISK OF ELECTROCUTION
DO NOT BEGIN THE ELECTRICAL CONNECTION
PROCEDURES UNTIL THE POWER IS TURNED OFF
AT THE CIRCUIT BREAKER
ELECTRICAL HOOKUP
The operator requires a 3-wire, 115 VAC electrical hook-up for proper
operation. Ideally, the conduit containing the hook-up wires should exit
the concrete pad under the operator. Run flexible conduit from the
point where the conduit exits the pad and attach it to the bottom of the
junction box at the front of the frame. Review Figure 7, Page 7.
If the hook-up exits the pad external to the operator, there's a 7/8"
diameter hole in each side of the frame near the front of the operator.
Review Figure 7, Page 7.
Remove the junction box face plate. Using the wire nuts provided,
attach the three lead wires to the electrical hook-up wires in the
following manner:
1. The BLACK wire attaches to the 115 VAC HOT wire.
2. The WHITE wire to the 115 VAC NEUTRAL wire.
3. The GREEN wire to the GROUND wire.
9
Page 10
: INSTALLING THE OPERATOR
C
NOTE: The control board comes equipped with a built-in surge
protector which MAY prevent damage to the controller board in the
event of a nearby lightning strike or a surge in the power lines. For the
surge protector to function, and as a general precaution, the operator
must be properly grounded. The third wire for the ground must be
installed .
WARNING!
TO REDUCE THE RISK OF DAMAGE DUE TO
LIGHTNING, ENSURE A SOLID GROUND FROM THE
GROUND WIRE IN THE SERVICE ENTRANCE 2 x 4
HANDY BOX TO THE ELECTRICAL SERVICE GROUND
OR TO A EARTH GROUND STAKE NEAR THE LEADER
ADDITIONAL LIGHTNING PROTECTION
For those areas where a high probability of ground lightning strikes
exists (Florida, Georgia, etc.), additional lightning protection should be
installed. Although it may not be possible to protect against all strikes,
additional protection will substantially reduce the occurrence of
lightning damage. Allstar’s lightning data indicates that the most
strikes enter the operator through the power lines. Effective protection
requires that the surge current from the lightning strike be shunted to
ground. This must be done without raising the potential of the circuitry
in the operator, with respect to ground, to the levels that will damage
the solid state circuitry. Lightning strikes generate enormous currents
for very short periods of time. Unfortunately, the period of time is long
enough to damage solid state components and many times, other
components. The key to success is a very low resistance path from the
surge protector to ground for these currents in addition to a surge
protector that will act fast enough to protect the solid state circuitry.
Several manufacturers offer suitable surge protectors.
107847
Figure 11: Terminal Strip
WARNING!
IMPROPER WIRING COULD CAUSE
ELECTROCUTION OR DAMAGE TO CIRCUITRY.
FOLLOW LOCAL BUILDING AND ELECTRICAL
10
Page 11

ACCESSORY EQUIPMENT HOOK-UP
104890
Figure 11: Wiring a 3-Wire Receiver
All accessory equipment is hooked-up to the 11 position terminal strip
located in the control box. See Figure 11. NO ACCESSORY
EQUIPMENT SHOULD BE INSTALLED IN THE CONTROL BOX!
If local electrical codes permit, use the operator's bottom plate for
mounting accessory components. Otherwise, install the accessory
equipment in an appropriate electrical box.
The command inputs for the operator require a switch closure to
COMMON of less than 100 OHMS resistance and for more than 100
milliseconds duration. The inputs - HOLD OPEN, REVERSING &
STOP - can be continuous signals. A label on the control box lists the
function of each of the terminals on the barrier strip. See the Reference
Chart on Page 14.
WIRING VEHICLE DETECTORS
Place the detector on the bottom plate of the frame or in a remote
electrical box, NEVER in the control box. Hook-up the power and loop
wires on the detector harness according to the manufacturer's
instructions. Crimp 1/4" quick disconnect lugs to the RELAY
COMMON and PRESENCE OUTPUT wires on the detector harness.
The RELAY COMMON wire is connected to terminal #1, COMMON,
on the control box 11 position terminal strip. The PRESENCE
OUTPUT wire is connected to terminal #8, REVERSING. See Figure
10, for a typical installation.
Set the detector frequency and sensitivity switches on the detector
according to the manufacturer's instructions.
WIRING FREE EXIT DETECTORS
The installation of a free exit loop detector is identical to
a vehicle loop detector with the following exceptions:
Connect the PRESENCE OUTPUT wire of the detector
wiring harness to terminal #2, HOLD OPEN, on the
terminal strip. The RELAY COMMON wire is
connected to terminal #1.
WARNING!
: INSTALLING THE OPERATOR
C
104891
igure 12: Wiring a 4-Wire Receiver
F
RISK OF ENTRAPMENT!
TO REDUCE THE RISK OF INJURY OR DEATH:
LOCATE KEYPAD, CARD READER, KEY
SWITCH OR SIMILAR ENTRY DEVICES IN A
LOCATION WHERE A USER CAN NOT REACH
THROUGH THE GATE OR FENCE TO ACTIVATE
THE GATE OPERATOR. THE RECOMMENDED
DISTANCE BETWEEN THE GATE OR FENCE
11
Page 12
: INSTALLING THE OPERATOR
C
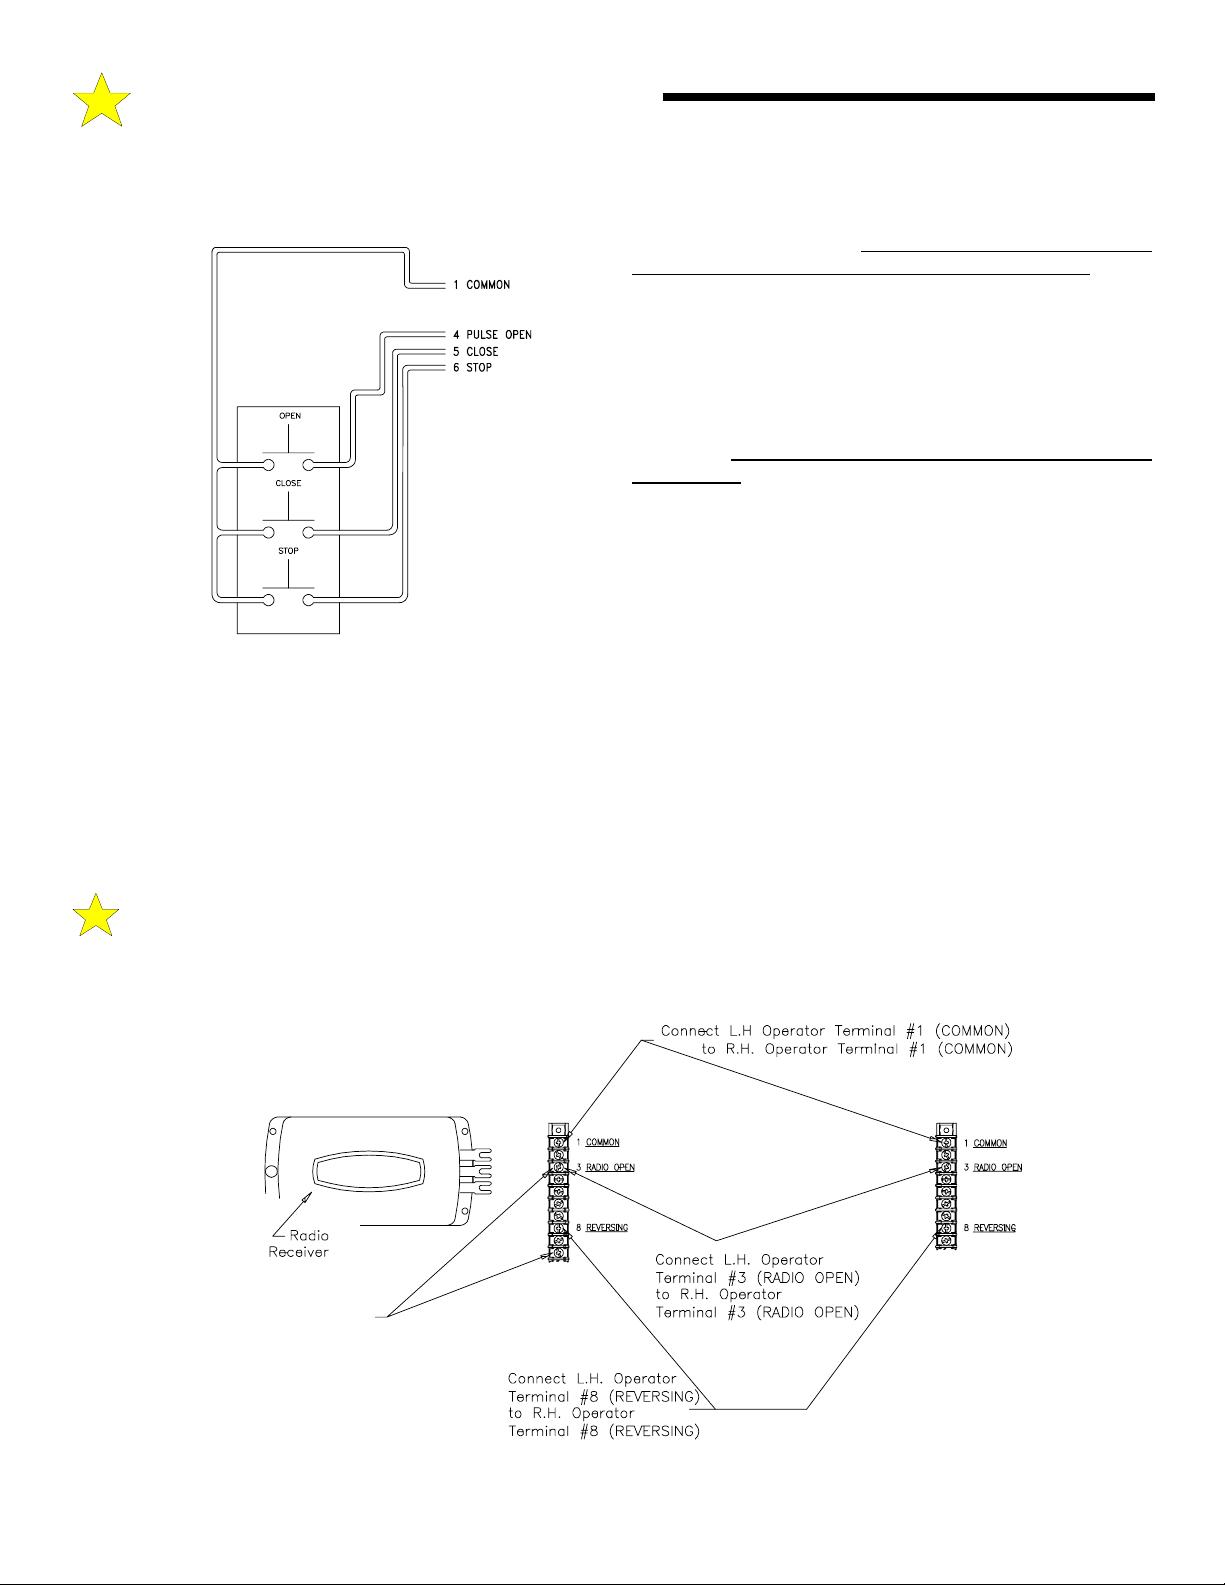
WIRING RADIO RECEIVERS
An auxiliary transformer mounted on the AC input junction box
107035
Figure 13: Wiring 3-Button Station
is used to power ancillary
equipment. THIS IS A CLASS II TRANSFORMER AND IS
EQUIPPED WITH AN INTERNAL FUSIBLE LINK. IF THIS
LINK IS "BLOWN" THE TRANSFORMER MUST BE
REPLACED. The transformer is powered at all times when the
operator main power switch is ON. It is not fused by any of the
fuses on the Control Board. The maximum power that can be
supplied by this auxiliary transformer is 25VA or about 1
ampere at 24VAC. This is usually sufficient to supply most
NOTICE: A separate 3-wire (HOT, NEUTRAL and
GROUND), 115 VAC electrical connection is required for
each operator in a bi-parting installation
ancillary equipment such as a radio, loop detector or card or key
pads.
IF THE AUXILIARY TRANSFORMER IS USED TO POWER A
RADIO RECEIVER, THEN, NO OTHER EQUIPMENT MAY BE
CONNECTED TO THE AUXILIARY TRANSFORMER. When
a radio receiver is connected to the transformer for power, one
end of the receiver relay must be connected to the common
terminal on the barrier strip. This will effectively ground one
side of the auxiliary transformer even if it is a "4-wire" receiver-
--in most cases. Many other auxiliary devices, such as card
readers and key pads, (using bridge rectifiers) require that both
sides of the transformer supplying power be "floating" and not
grounded. Failure to observe this restriction will damage the
added device.
WIRING RADIO RECEIVERS TO THE TERMINAL
STRIP.
Radio Receivers may be either 3-wire (terminal) or 4 wire units.
THE 4 WIRE VERSION OF THE RECEIVER IS PREFERRED
SINCE NO ADDITIONAL CONNECTIONS TO THE
RECEIVER WILL BE REQUIRED.
THREE WIRE RECEIVERS
If a three terminal receiver is to be used, the #1 terminal is
COMMON (sometimes labeled as 24VAC on the radio) to both
the power input and the relay contact. This applies to radios
from most manufacturers. A wire must be connected from
terminal #1 of the receiver to terminal #1 (COMMON) of the
terminal strip. Another wire must be connected between
terminal #1 of the terminal strip and one side of the
(Right)
(Left)
Connect radio
as shown on
Page 11 of this
Figure 14: Bi-Parting Wiring
manual.
107036
12
Page 13

: INSTALLING THE OPERATOR
C
107788
Figure 15: Schematic & Wiring Diagram
13
Page 14

: INSTALLING THE OPERATOR
C
TERMINAL STRIP REFERENCE CHART
# NAME
1 COMMON Common provided on the terminal strip
2 HOLD OPEN Continuous or pulsed signal. Usually used with an external toggle switch or a
3 RADIO OPEN Pulsed signal. Once activated the gate will open fully. Activation while the gate
4 PULSE OPEN Pulsed signal. Identical to operation of RADIO OPEN input. Used for access
5 CLOSE Pulsed signal. CLOSE overrides all other signals except HOLD OPEN, STOP,
6 STOP Continuous or pulsed signal. Overrides all other signals. Once activated, the
7 ALTERNATE Pulsed signal. This input is used for "COMMAND OPEN/COMMAND CLOSE"
DESCRIPTION
free exit vehicle detector. Once activated, the gate will open fully and remain
control devices such as telephone entry, keypads, card readers and 3-button
and REVERSING. Once activated, the gate will close immediately, or begin to
gate will immediately stop and await a new command. If the STOP input is
continuously activated, the gate will not move. Gate will move briefly if RADIO
or PULSE is activated, Gate will run open if HOLD OPEN is activated.
applications. The 1st signal will cause the gate to begin opening. A 2nd signal
received during the open cycle will stop the gate immediately. From a 3rd signal
the gate will start closing. Connect appropriate access control device to this
8 REVERSING This input is active only when the gate is closing or when it's fully open and the
Close Timer is operative. All stand-alone vehicle detectors, photo-eyes and
active edges should be connected here and to terminals #1 or 9 COMMON.
Multiple devices may be connected in parallel. Active REVERSING must be
9 RELAY COMMON Common terminal of the on-board relay. The relay contacts are rated at
10 RELAY N.O. Normally Open terminal of the on-board relay.
11 RELAY N.C. Normally Closed terminal of the on-board relay.
14
Page 15

: STARTING THE OPERATOR
D
107033
Figure 16: Left Hand vs. Right Hand Installation
AUXILIARY transformer. (See Figure 11.) Terminal #2 of the
receiver is normally the relay contact in the receiver. Connect a
wire from terminal #2 of the receiver to terminal #3 (RADIO
OPEN). A wire from terminal #3 of the receiver (sometimes
labeled RADIO PWR) is connected to the opposite side of the
auxiliary transformer winding that is labelled 24 VAC. See
Figure 11 for wiring a 3-wire receiver.
FOUR WIRE RECEIVERS
Four wire receivers replace the "spade" terminals on the
RECEIVER with 4 wires. These wires are typically color coded.
The instructions with the receiver must be carefully followed to
WARNING!
THE MOTOR WIRE CONNECTOR AND THE BLACK
SLIDER SWITCH MUST BOTH ALWAYS BE IN EITHER
THE RIGHT OR LEFT POSITIONS. IF ONE IS IN THE
RIGHT POSITION AND THE OTHER IN THE LEFT
POSITION, THE OPERATOR WILL NOT STOP THE
GATE WHEN IT REACHES THE END OF TRAVEL.
properly connect the receiver. For any 4-wire receiver, two of
the wires will be for power input and two will be for the relay
contacts. Locate the AUXILIARY Transformer on the Limit
Plate. Connect the two wires for the power input to each side of
the 24VAC winding of the AUXILIARY transformer. Connect
one of the two wires for the "RELAY" to terminal #3 (RADIO
OPEN) and the other wire to terminal #1 (COMMON). See
15
107034
Figure 17: Control Board Settings for LH/RH Operation
Page 16

: STARTING THE OPERATOR
D
Figure 12 for connecting 4-wire receivers.
WARNING!
RISK OF ELECTROCUTION
DO NOT BEGIN TO SET THE FOLLOWING
ADJUSTMENTS UNTIL THE POWER IS TURNED
OFF AT THE LEADER CONTROL BOX
NOTE: IF THE 4 WIRE RECEIVER INSTRUCTIONS SHOW
THAT TWO OF THE WIRES ARE OF THE SAME COLOR
AND ARE COMMON CONNECTIONS INSIDE THE
RECEIVER, ONE OF THESE WIRES SHOULD BE
CONNECTED TO TERMINAL #1 (COMMON) AND THE
OTHER TO ONE SIDE OF THE TRANSFORMER.
WIRING A 3-BUTTON STATION
See Figure 13 for instructions on wiring a 3-button station. NOTE:
The STOP button is normally OPEN.
WIRING A KEYPAD OR TELEPHONE ENTRY
SYSTEM
Install according to the manufacturer's instructions.
104895
BI-PARTING APPLICATION
In a bi-parting application, two operators are required, one operating in
a left-hand mode, the other in a right-hand mode. Both must be wired
for AC power (as previously described) but share a common set of
input controls. In general, all of the preceding instructions concerning
installation of individual operators can be followed in a bi-parting
application except the following:
Choose one of the operators to be the PRIMARY and the other to be
the SECONDARY. Route all of the control wiring to the PRIMARY
operator first. This will prevent grounding looping problems which can
occur when more than one COMMON or ground wire is attached
between separate operators. All accessory equipment should also be
wired to the PRIMARY.
From each of the control inputs with accessory equipment attached, run
a separate wire to its counterpart terminal on the SECONDARY
operator . 1/4" disconnect terminals for each command input are
provided for this purpose. Use conduit SEPARATE from AC power
service. See Figure 14 for the correct wiring.
FINAL INSTALLATION CHECKLIST
1. Use a voltmeter to assure the service voltage to the
operator is 115 VAC. Connection to 220 VAC service is
the most common cause of board failure in new
installations and is NOT COVERED BY WARRANTY!
2. No accessory equipment is installed in the control box.
3. All wires attached to the 11 position terminal strip or
the 3-terminal connector on the control box are well
clear of the motor V-belt and the limit switches.
4. The junction box cover is securely fastened .
Figure 18: Setting Limits - Left Hand Installation
WARNING!
RISK OF ENTRAPMENT.
THE OVERLOAD POTENTIOMETER MUST BE
SET MORE PRECISELY PRIOR TO COMPLETING
THE OPERATOR INSTALLATION
16
Figure 18: Setting the Limits
Page 17

: STARTING THE OPERATOR
D
LEFT- OR RIGHT-HAND INSTALLATIONS
The operator can be configured for left- or right-hand gate installations.
See Figure 16. On a normal drive installation, when standing inside the
gate and facing outwards, if the operator is on the right side of the gate,
it's a right-hand installation. If the operator is on the left side of the
gate, it's a left-hand installation.
The operator is shipped from the factory configured for left-hand
installations. If it is installed in a left-hand installation, make sure the
main power switch on top of the control box is off and locate the 8-pin,
107034
MORE
LESS
—
—
MORE
LESS
Figure 19: Control Board Settings for
motor wire connector in the upper left corner of the controller board.
See Figure 17.
—
Sensitivity, Options & Obstruction
SWITCH 1 - OBSTRUCTION DETECTION
• Switch 1 OFF
Open Direction - The gate will stop, move in the close
direction for 1/2 second and park.
Close Direction - The gate will stop, move in the open
direction for 1/2 second and park.
SWITCH 2 - CLOSE TIMER ENABLE SELECT
Switch 2 OFF (CLOSE TIMER NOT ENABLED)
•
When the Close Timer is not enabled, the gate will open and
park. A CLOSE or an ALTERNATE command must then be
issued to close the gate. This mode is used for “COMMAND
OPEN/COMMAND CLOSE” installations.
Switch 2 ON (CLOSE TIMER ENABLED)
•
With the Close Timer enabled, the gate, when fully open, will
always time-out and close. A continuous signal present on
the HOLD OPEN or the SAFETY input will inhibit and reset
the Close Timer and prevent the gate from timing out until
the signal is not longer present. (See SETTING THE CLOSE
TIMER, P. 18)
SWITCH 3 - ON BOARD RELAY TRIGGER MODE SELECT
Switch 3 OFF (ALARM RELAY MODE)
•
In this mode, the On Board Relay will be triggered by any
one of two alarm conditions:
1. Obstruction has been detected.
2. Maximum Run Timer has timed-out
Switch 3 ON (GATE-IN-MOTION RELAY MODE)
•
The On Board Relay will be triggered whenever the gate
moves off either limit switch and will remain energized until
the gate arrives at another limit switch. By wiring the power
source for a flashing light or an audible buzzer across
terminals RELAY COMMON and RELAY N.O., the operator
will give a warning whenever the gate is in motion.
By using the terminals RELAY COMMON and RELAY N.C.,
the On Board Relay can also be used in conjunction with a
magnetic gate lock. The On Board Relay will be energized
1/4 second before the motor begins moving the gate,
thereby giving the magnetic lock time to release.
Pinch the locking tabs on the two sides of the connector and remove it
from the connector labeled, "RIGHT". Then plug it into the connector
labeled, "LEFT".
Locate the small, black slider switch midway down the left side of the
controller board. Switch it to the position labeled, "LEFTHAND". The
operator is now configured for a lefthand installation.
SETTING THE LIMIT SWITCHES
SETTING THE LIMIT SWITCHES FOR LEFT-HAND
OPERATION
USE CAUTION! MAKE SURE THE POWER SWITCH IS
TURNED OFF AT THE OPERATOR.
Identify the limit nut detent plate and the limit nuts. See Figure
18. Depress the limit nut plate and rotate the limit nuts until
they are close to touching each other near the center of the
threaded area on the limit nut shaft.
Unlock the MANUAL OPEN on the side of the operator. The
gate should be able to move freely. Manually push the gate to
the desired open position. Push down the limit nut detent plate
17
Page 18

: STARTING THE OPERATOR
D
until it disengages the slots on the limit nut. Then, rotate the
open limit nut until it engages the leaf on the open limit switch
when approached from the center of the threads on the limit nut
threaded shaft. Listen carefully for the "snap action" of the limit
switch. It may be necessary to try this operation several times
until the "click" of the limit switch is clearly identified. Once
the exact position of the click is noted, rotate the limit nut about
two or three slots on the limit nut (each slot on the limit nut
equals approximately 1" of gate travel) more in the direction to
the back of the operator away from the gate. This will give the
operator time to stop the gate after the limit switch has been
activated and prevent banging of the gate on its mechanical stop.
Now, manually push the gate to the desired closed position. The
closed limit switch and limit nut will be the closest to the front
of the operator. Repeat the limit nut adjustment described
previously. In this case, the limit nut will be rotated towards the
front of the operator. Again, after carefully noting the position
of the click on the engagement of the limit switch, rotate the
limit nut two or three slots on the nut toward the front of the
operator toward the gate.
When the setting of the limit nuts has been completed, manually
move the gate to the center of its travel.
The final setting of the limit nuts will be accomplished after the
operator has been powered up.
SETTING THE LIMIT SWITCHES FOR RIGHT HAND
OPERATION
The wiring must be configured for right hand operation as
described on Page 15. Follow the same procedure as listed
above, EXCEPT NOTE that the Open and Close limit switches
are REVERSED.
SETTING THE OBSTRUCTION DETECTION
SENSITIVITY
The
operator is equipped with an obstruction
detection circuit which will detect MOST
obstructions in the gate's path. See Figure
19. The sensitivity can be adjusted with the
rightmost trimmer potentiometer on the
controller board labeled, "OVERLOAD".
Turning the potentiometer clockwise
decreases the sensitivity and turning it
counterclockwise increases the sensitivity.
Figure 20: Control Board Indicator L.E.D.’s
operator is
The
WARNING!
RISK OF ENTRAPMENT
OVERLOAD SENSITIVITY HAS NOT BEEN SET.
DO NOT ALLOW ANYONE NEAR THE GATE AND DO NOT
LEAVE GATE AND LEADER UNATTENDED UNTIL
FOLLOWING PROCEDURES HAVE BEEN COMPLETED.
USE CAUTION DURING THIS FINAL ADJUSTMENT
PERIOD.
107034
LABEL EXPLANATION
HOLD OPEN Hold Open Input is active
OPEN RADIO Radio Open Input is active
OPEN PULSE Pulse Open Input is active
CLOSE Close Input is active
STOP Stop Input is active
ALT. Alternate Input is active
GATE OPEN Open Limit Switch is active
GATE CLOSED Close Limit Switch is active
OPENING Motor is being commanded to open the
gate
CLOSING Motor is being commanded to close the
gate
OVERLOAD Motor Overload Circuit is being tripped
LOCK ACTION Operator Lock is being triggered.
FINAL SETTING OF THE LIMIT SWITCHES
If the gate stops short of being fully open or closed or if it bangs against
the end stops, turn off the main power and reset the appropriate limit
switch nut. Each slot on the limit nuts represents about 1" of gate travel.
The nuts should only have to be turned one or two slots in either direction
to fine tune the gate's limits of travel. When final adjustment has been
completed, insure that the detent plate is firmly seated in the slots.
Review Figure 18, Page 16.
18
Page 19

: STARTING THE OPERATOR
D
SETTING THE CLOSE TIMER
To adjust the amount of time the close timer will hold the gate open,
use the lower leftmost trimmer potentiometer next to the relay on the
controller board. Review Figure 19, Page 17.
Close timer delay is adjustable between 2 and 100 seconds. Turning
the potentiometer counterclockwise increases the delay; turning it
clockwise decreases the delay.
FINAL SETTING OF THE
OBSTRUCTION DETECTION
SENSITIVITY
The obstruction detection sensitivity was preset before turning on the
main power to prevent the operator from "self-tripping" during testing.
To set the sensitivity, start the gate in motion and turn the overload
potentiometer counterclockwise until the OVERLOAD light turns on.
Then back the potentiometer off 10 degrees in the clockwise direction.
Review Figure 19, Page 17.
Restart the gate and give the leading edge a firm blow with the heal of
your palm. Don't stand directly in the gate's path while testing the
obstruction sensitivity. The obstruction detection should respond
immediately to the blow. The overload potentiometer must be adjusted
to the most sensitive setting possible without causing "self-tripping"
due to the gate's inherent friction or to variations in the track. Try
readjusting the potentiometer several times by small increments, testing
the gate in both directions of travel, until you are satisfied.
tuned to insure that the gates stop in their open positions at the same
time.
SWITCH SELECTABLE OPTIONS - Make sure the three dip
switches are set identically on both control boards.
CLOSE TIMER - If the close timers are enabled, set the adjustment
potentiometers to approximately the same position on each control
board. Cycle the gates several times making slight adjustments to one
of the potentiometers until the gates timeout and begin closing at
exactly the same time.
When properly adjusted, the two operators will perform as if they were
a Master/Slave installation. If the motor overload circuit in one
operator should respond to an obstruction not encountered by the other,
the gates will temporarily get out of sync. If Switch 1 is in the OFF
position in both operators, synchronization will be restored after the
next input command cycle
WARNING!
RISK OF ELECTROCUTION
TURN OFF THE MAIN POWER SWITCH BEFORE
REPLACING FUSES.
TESTING THE OPERATOR LOCK
STANDARD LOCK
The Operator is equipped with an operator locking mechanism. The
lock is engaged when the gate is stopped and the lock action light is on.
When the main power is off, the operator lock remains engaged. The
key lock on the side of the operator may be used to disengage the lock
to allow the gate to be pushed open manually.
DROP OUT LOCK
The operator lock is engaged when the gate is stopped and the lock
action light is on. When the main power is off, the lock is not
energized and the gate may be pushed open manually.
MAXIMUM RUN TIMER (MRT)
The control board has a non-adjustable maximum run timer circuit.
The MRT is preset to approximately 45 seconds maximum run time at
the factory. If the operator initiates an OPEN or CLOSE cycle and for
any reason that cycle is not completed within this time, the MRT will
immediately stop the gate. Valid commands received during the cycle,
such as activation of the SAFETY input or a new input command, will
automatically reset and restart the MRT. If the MRT has stopped the
gate, the operator will respond to a new input command.
BI-PARTING INSTALLATION FINAL SETTINGS
LIMIT SWITCHES - Push both gates together in the center of the
driveway to set the closed limits. Push each gate open an equal amount
to set the open limits. After cycling the gates the settings can be fine
107034
FUSES
T h e operator uses three
Slo-Blo, size 3AG, glassb o d y fuses. The fuses
and their respective ratings
a r e listed below:
1. FUSE F1 3/10 Amp, 250
Volt.
2.
1 5 Amp, 125 Volt.
4.
Figure 21: Control Board Fuses
3. FUSE F2 -
WARNING!
RISK OF ELECTROCUTION
REPLACING ANY OF THE FUSES WITH A HIGHER-
CURRENT-RATED FUSE OR WITH ANY FOREIGN
MATTER WILL VOID ALL WARRANTIES ON THE
OPERATOR CONTROL BOARD.
19
Page 20

: STARTING THE OPERATOR
D
5. FUSE F3 - 1 Amp, 250 Volt.
INSTALLING THE SPROCKET GUARD
The sprocket guard must be properly installed before leaving
the installation. It is designed to be trimmed by the installer as
needed to best fit the type of installation.
WARNING: DO NOT TRIM THE SPROCKET GUARD
COVER MORE THAN IS NECESSARY TO CLEAR THE
ENTRANCE AND EXIT OF THE CHAIN.
There are score marks on the sides of the sprocket cover for
proper cut-outs. Do not remove any more material than is
absolutely necessary for the chain to pass through the cover.
Do not make the cuts any larger than indicated by the score
line. Making cuts in the guard larger than indicated by the
score lines will increase the pinch hazard and voids the UL
Listing.
If the operator is installed per these instructions, use the cutouts indicated in Figure at right.
NOTE: Fuse F3 is a Buss Fuse MWO-15. Do not replace it with a
common automotive 15 Amp, 32V fuse or the U.L. Listing for the
operator will be voided.
For standard installations
use this cut-out, one
each side. Remove
shaded area only.
For left hand back drive
installations, use these
cut-outs, THIS SIDE
ONLY. Remove shaded
area only.
For right hand back
drive installations use
these cut-outs, THIS
SIDE ONLY. Remove
shaded area only.
Figure 22: Sprocket Guard Cut-Outs
INSTALLATION NOTES FOR AUXILIARY EQUIPMENT
E:
You are now ready to install and connect the auxiliary
equipment. INSTALLATION STEPS DETAILED IN
SECTIONS A, B, C AND D MUST BE COMPLETE BEFORE
PROCEEDING.
1. Vehicle Detectors: If a Vehicle Detector (Reversing
Loop) is to be a part of this installation, start with this
first. Connect the vehicle detector to AC power and the
loop in accordance with the manufacturer's instructions
and the information contained in this manual. Do not
connect to the terminal strip of the Operator at this time.
Test the vehicle detector independently using the presence
lamp on the front panel of the detector and a metal plate
over the loop. When you are satisfied that the detector is
working properly, connect the output wires to terminal #8,
"REVERSING", on the control panel of the Operator.
Give the gate an open command and allow the close timer
to start the gate to close. Place the metal plate over the
loop and observe that the "VEHICLE DETECTOR" light
comes ON and the gate reopens.
2. Free Exit: If a "FREE EXIT" detector is installed, connect the
20
output wires of this detector to the HOLD OPEN Terminal. (It is
acceptable to have more than one device connected to the same
terminal.) Place the metal plate over the FREE EXIT LOOP and
observe that the gate opens to the fully open position. Leave the
metal plate on the loop for at least one minute. Observe that the
gate does not close. Remove the plate from the loop and observe
that the gate closes. (Some vehicle detectors will "tune out" a
constant obstruction to the loop after 15 to 30 minutes.)
3. Installing other entry devices: After you are satisfied that all the
loops are functioning properly, proceed with the installation of the
additional devices, such as a radio receiver, telephone entry or key
pad. Connect the radio receiver to the radio terminal. Observe the
precautions regarding radio receivers described on page 11. Other
entry devices MUST be connected to the HOLD OPEN #2
terminal.
Page 21

: GATE OPENER SYSTEM OPERATION & SAFETY GUIDE
F
To the Owner/End User of Allstar’s Gate Operator:
Thank you for choosing an Allstar product. We are confident you
will have many years of use and satisfaction with your gate operator.
Our Gate Operator is part of your unique gate operating system,
which may consist of a variety of components, including the gate, the
gate tracks, posts, and electronic features. These components
combined present certain risks and safety issues of which you, the
end user, must be aware.
Each unique system presents a unique set of hazards which we
cannot possibly address individually. These instructions will help
you to identify the potential risks and safety issues your gate operator
system presents, and guide you as you make your system as safe as
possible for everyone who uses it.
Your first step is to consider the intended use of the gate system,
who will be using the gate system, and in what manner the system is
installed. You should have a clear understanding of how often the
gate will be opened, who will be opening it, whether children and the
general public will be near the gate system, and how close the gate
system is to public property. Once you have answered these
questions, you are ready to decide what safety measures must be
taken to prevent injury.
To minimize the risk of entrapment in your gate system, install the
following safety features:
•
Electric gate edges
•
Enclosed tracks
•
Vertical guard posts
•
Protective screen mesh
•
Photoelectric sensors
•
Instructional and precautionary signs
•
Covers for exposed rollers
ALL APPROPRIATE SAFETY FEATURES MUST BE
INCORPORATED INTO YOUR GATE SYSTEM.
Each safety feature is a separate component in your gate system.
Read and follow all intructions for each of the components of your
unique system. Ensure that all instructions for mechanical
components, safety features and the Allstar Gate Operator are
available for everyone who will be using your gate system.
The two warning signs shipped with your Gate Operator (See
Figurez2, Page 4 of this manual) must be installed in prominant
positions on both sides of your gate. Keep them clean and legible.
Read and follow the safety points on the following page which
present the basic guidelines for the safest operation of your gate
operator system.
PRECAUTIONS FOR PEDESTRIAN TRAFFIC OR RESIDENTIAL AREAS
The internal operator overload sensor may not be adequate entrapment protection in all situations to prevent arm, leg, or hand injuries.
Padded electric gate edges, roller guards, pneumatic gate edges, or photoelectric sensors are therefore necessary when automatic gates
are used near pedestrian traffic. See the figure below. Use of pedestrian walk gate is mandatory where there is nearby pedestrian
traffic.
107037
21
Figure 23: Entrapment Protection
Page 22

: GATE OPENER SYSTEM OPERATION & SAFETY GUIDE
F
AVOID ENTRAPMENT:
and all moving parts (gate arms, etc.) at all times. Keep clear of the
pinch points identified below.. Install guards or other safety features to
prevent access to pinch point areas. Install guards on open rollers.
PREVENT PERSONAL INJURY OR DEATH:
near or on the gate. Gate may be activated without notice. Do not
allow anyone to “ride” the gate, or place arms or legs through the gate. The
force of the gate can cause serious personal injury or death.
NO CHILDREN OR PETS ALLOWED:
operate gate controls, “ride” a gate, or play in the area of a gate.
Install and store all controls out of children’s reach. Also, pets must be
kept away from the gate. Install a pedestrian gate in applications where
children or pets need access.
KEEP GATE IN SIGHT: Never activate the gate unless it is in
sight. Install mounted controls in full view of the gate. Be sure the
gate area is clear before activating the gate, and watch the gate and gate area
as the gate is in motion.
LOCATE MANUAL CONTROLS SAFELY: A manual
control such as a pushbutton or keyswitch must be included in
your gate system design to be used if automatic controls such as radio
controls or loop detectors do not function. Carefully consider the placement
of the manual control:
It must be out of reach
of the gate so that no
one pushing the button
or inserting the card is
in the path of the gate
or moving parts; it
must also be within
Stay away from the path of the gate
Do not stand
Never allow a child to
INSTALL SAFETY DEVICES:
areas where pedestrians may be present, or if your gate closes
automatically, be sure an electric edge(s) and/or a photoelectric sensor(s)
has (have) been installed and is/are operating properly. These features are
intended to detect pedestrian traffic and prevent injury or entrapment.
Loop detectors may be installed to detect vehicular traffic and prevent
vehicular damage.
MAINTAIN THE GATE AND GATE HARDWARE:
damaged gate or one that cannot be easily opened and closed
manually must be repaired before installing a gate operator. A poorly
operating gate may cause the load sensing device of the operator to fail,
causing a risk of entrapment. Never overtighten the clutch or load sensing
device to compensate for a poorly operating slide gate. Correct all
mechanical problems on the gate and gate hardware before installing the
gate operator.
MAINTAIN ALL COMPONENTS OF GATE SYSTEM:
Follow the maintenance instructions included with the gate, the
gate operator, and the safety features and/or accessories that make up your
gate operator system. Have a professional service technician perform any
adjustments or maintenance to the components. Fully test all safety
features routinely. If faulty equipment is discovered or suspected,
discontinue the use of the gate operator SYSTEM immediately, and
have the equipment replaced.
In residential applications or in
A
106709
22
Figure 24: Pinch Points
Page 23

OPERATOR EXPLODED VIEW
104914
STANDARD #40 CHAIN HDSLG OPERATOR
ITEM # PART # DESCRIPTION QTY ITEM # PART # DESCRIPTION QTY
3 010206 Sprocket, Drive, 22T #40 1 ea. 16 102813 Plate Assy, Limit, HDSLG
4 010289 Cover, Sprocket, HDSLG 1 ea. 17 010606 Nut, Limit, 1-16 UN
5 010025 Screw, SQ HD, Knurled, 5/16-18 x 3/4 2 ea. 18 00E063 Switch, SPDT, w/Lever
6 102833 Cover Assy, Operator, HDSLG 1 ea. 19 102806 Plate Assy, Lock, HI PERF, HDSLG
7 010192 Bearing, Pillow BLK, 3/4" BORE 1 ea. 19a 010148 Solenoid, 24VDC, 16W, Coil INTR
8 010191 Bearing, Pillow Block, 1" Bore 1 ea. 19b 101754 Backplate, U Frame, HDSLG
9 010201 Belt, Timing, 360L100 1 ea. 19c 102807 Lock Assy, HI PERF, HDSLG
10 010195 Pulley, Timing Belt, 9.54 PD, 60 GR 1 ea. 20 102832 Cover, Control Box, HDSLG
11 010605 Shaft, Lower, HDSLG 1 ea. 21 102828 Control Box, HDSLG
12 010198 Bushing, Taper-Lock, 3/4 Bore 1 ea. 22 107786 Motor Control Board, HDSLG, 120VAC
13 010193 Pulley, Timing Belt, 10.03 PD, 84GR 1 ea. 23 010194 Pulley, 14FL075, 5/8 Shaft
14 010200 Belt, Timing, 480L075
15 010172 Motor, 1/2HP
HIGH SPEED OPTION
ITEM # PART # DESCRIPTION QTY
1 010645 Frame, 2 Ft/Sec, HDSLG
3 010456 Sprocket, 22T, Drive, #50
6 103371 Cover Assy, Oper, HISPD, HDSLG
23 010599 Pulley, TL20L075 Type 3F TL1008
1 ea.
1 ea.
1 ea.
1 ea.
1 ea.
1 ea.
24 107750 Power Supply, 120VAC - 24VDC,
DROP OUT LOCK OPTION
ITEM # PART # DESCRIPTION QTY
19 103003 Plate Assy, DOL, HDSLG
19c 103004 Lock Assy, DOL, HDSLG
#50 CHAIN OPTION
ITEM # PART # DESCRIPTION QTY
3 010208 Sprocket, Drive, 17T #50
1 ea.
2 ea.
2 ea.
1 ea.
1 ea.
1 ea.
1 ea.
1 ea.
1 ea.
1 ea.
1 ea.
1 ea.
1 ea.
1 ea.
1 ea.
23
Page 24

TECHNICAL SPECIFICATIONS
PAD:
OVERHEAD CLEARANCE:
UNIT SIZE:
FRAME:
COVER:
SHIPPING WEIGHT:
PRIMARY VOLTAGE:
ELECTRICAL SOURCE:
CONTROL VOLTAGE:
RADIO RECEIVER POWER:
MOTOR:
AUTO TIMER-TO-CLOSE:
PHYSICAL
22” W x 29”D x 3”H Elevation
Minimum 4” Required
13”W x 15-3/8”D x 28-3/8” H
Welded, Uni-Body; Phosphatized And
Painted to UL Standards
Welded, Phosphatized And Painted to
UL Standards. Key lock to prevent
unauthorized access
150 lbs.
ELECTRICAL
115 VAC, 60 Hz, Single Phase
One 3-Wire, 15-Amp Service From
Breaker Panel Required Per Operator
12/24 VDC
24 VAC, 20 mA
1/2 HP, 4.4 Amp, PSC, Instant
Reversing, Thermally Protected (Manual
Reset)
Built-In, Adjustable From 3-90 Seconds
Specifications subject to change without notice. Consult the factory.
DRIVE SYSTEM:
TOTAL SPEED REDUCTION:
OUTPUT SHAFT:
DRIVE MECHANISM:
LIMITS:
OPERATOR LOCK:
MAX. GATE WEIGHT:
MAX. GATE WIDTH:
MAX. CYCLES PER HOUR:
GATE SPEED:
DRIVE
Two-Stage; High Efficiency Timing
Belts and Pulleys
22.5:1
1” dia., Ball-Bearing Mounted
22-Tooth Sprocket; #41 Roller Chain,
#50 Chain Optional
Independent Open & Close;
Displaced Cam With Micro-Switch
Contacts; Adjustable Without Tools
Electro-Mechanical, DC Solenoid;
Key Release (Standard). Drop Out
Lock Option (releases if power is
interrupted)
CAPACITIES
1575 lbs., Level Grade (Standard)
45 ft. (Standard)
60 Open/Close Per Hour; 1200 Open/
Close Per Day (All Calculations
Based On Typical 25’ Gate On Level
Grade for Standard Operators)
13 inches/second
Manufacturer’s Limited Warranty
Allstar warrants its gate operators to be free from defect in material and workmanship for a period of five (5) years from the date of purchase
for single family home use and three (3) years from the date of purchase for multi-family and commercial use. This warranty covers all
components except the electronic circuit boards which are warranted for three (3) years from the date of purchase for single family home use
and two (2) years from the date of purchase for multi-family and commercial use. To obtain service contact your dealer.
To obtain service under this warranty the buyer must obtain authorization instructions for the return of any goods from Allstar before
returning the goods. The goods must be returned with complete identification, with copy of proof-of-purchase, freight prepaid and in
accordance with Allstar’s instructions or they will not be accepted. In no event will Allstar be responsible for goods returned without proper
authorization or identification.
Goods returned to Allstar for warranty repair within the warranty period, which upon receipt by Allstar are confirmed to be defective and
covered by this limited warranty, will be repaired or replaced at Allstar’s sole option, at no cost and returned pre-paid. Defective parts will
be repaired or replaced with new or factory rebuilt parts at Allstar’s sole option.
This limited warranty does not cover non-defect damage, damage caused by unreasonable use, damage caused by improper installation or
care, vandalism or lightning, fire or excessive heat, flood or other acts of God (including, but not limited to misuse, abuse or alterations,
failure to provide reasonable and necessary maintenance), labor charges for dismantling or reinstalling a repaired or replaced unit, or
replacement batteries.
These warranties are in lieu of all other warranties, either expressed or implied. All implied warranties of merchantability and/or fitness for a
particular purpose are hereby disclaimed and excluded. Under no circumstances shall Allstar be liable for consequential, incidental or
special damages arising in connection with the use or inability to use this product. In no event shall Allstar’s liability for breach of warranty,
breach of contract, negligence or strict liability exceed the cost of the product covered hereby. No person is authorized to assume for Allstar
any other liability in connection with the sale of this product.
This warranty gives you specific legal rights. You may also have other rights which vary from state to state. Warranty effective after May
15th, 1997.
c.p. Allstar Corporation
Downingtown, PA 19335
For Information:
Phone 610-436-6190 FAX 610-344-0210
This Gate Operator is built in the USA and
complies with all requirements of
Underwriters' Laboratories Standard UL-325.
P/N 107659 Rev. A, 7/97
24
 Loading...