

Page 1
®
POD® HD300
Pilot’s Handbook
Manuel de pilotage
Pilotenhandbuch
Pilotenhandboek
Manual del Piloto
取扱説明書
Go to www.line6.com/manuals and download the Advanced User Guide
40-00-0241 Advanced Users Guide available @ www.line6.com/manuals Rev A
Page 2
Important Safety Instructions
C AUTI O N
RISK OF ELECTRIC
SHOCK DO NOT OPEN
WARNING : TO REDUCE THE RISK OF FIRE OR ELECTRIC SHOCK, DO NOT REMOVE SCREWS. NO USER-SERVICEABLE PARTS INSIDE.
REFER SERVICING TO QUALIFIED SERVICE PERSONNEL.
WARNING : TO REDUCE THE RISK OF FIRE OR ELECTRIC SHOCK, DO NOT EXPOSE THE APPLIANCE TO RAIN OR MOISTURE.
CAUTION: This equipment has been tested and found to comply with the limits for a Class B digital device pursuant to Part 15 of FCC Rules. Operation is subject to the
following two conditions: (1) This device may not cause harmful interference, and (2) this device must accept any interference received, including interference that may
cause undesired operation.
The lightning symbol within a triangle means “electrical caution!” It indicates the presence of information about operating voltage and potential
risks of electrical shock.
Please Note:
Line 6 and POD are trademarks of Line 6, Inc. registered in the U.S. and other countries. DT50 is a trademark of Line 6, Inc. All rights reserved.
SERIAL NO:
The exclamation point within a triangle means “caution!” Please read the
information next to all caution signs.
Page 3
You should read these Important Safety Instructions. Keep these instructions in a safe place
• Read these instructions.
• Keep these instructions.
• Heed all warnings.
• Follow all instructions.
• Do not use this apparatus near water.
• Clean only with dry cloth.
• Do not block any ventilation openings. Install in accordance with the manufacturer’s instructions.
• Do not install near any heat sources such as radiators, heat registers, stoves, or other apparatus (including amplifiers) that produce heat.
• This apparatus shall be connected to a MAINS socket outlet with a protective earthing connection.
• Do not defeat the safety purpose of the polarized or grounding-type plug. A polarized plug has two blades with one wider than the other. A grounding type plug
has two blades and a third grounding prong. The wide blade or the third prong are provided for your safety. If the provided plug does not fit into your outlet,
consult an electrician for replacement of the obsolete outlet.
• Protect the power cord from being walked on or pinched particularly at plugs, convenience receptacles, and the point where they exit from the apparatus.
• Only use attachments/accessories specified by the manufacturer.
• Use only with the cart, stand, tripod, bracket, or table specified by the manufacturer, or sold with the apparatus. When a cart is used, use caution when moving
the cart/apparatus combination to avoid injury from tip-over.
• Unplug this apparatus during lightning storms or when unused for long periods of time.
• Refer all servicing to qualified service personnel. Servicing is required when the apparatus has been damaged in any way, such as power-supply cord or plug is damaged, liquid has been spilled or objects have fallen into the apparatus, the apparatus has been exposed to rain or moisture, does not operate normally, or has been
dropped.
• The apparatus shall not be exposed to dripping or splashing and that no objects filled with liquids, such as vases, shall be placed on the apparatus.
• WARNING: To reduce the risk of fire or electric shock do not expose this apparatus to rain or moisture.
• The appliance coupler is used as the disconnect device, the disconnect device shall remain readily operable.
• Connect only to AC power outlets rated: 100/120V 220/240V 50/60Hz (depending on the voltage range of the included power supply).
• Prolonged listening at high volume levels may cause irreparable hearing loss and/or damage. Always be sure to practice “safe listening.”
• Service is required when the apparatus has been damaged in any way, such as:
• power-supply cord or plug is damaged.
• liquid has been spilled or objects have fallen into the apparatus.
• the unit has been exposed to rain or moisture.
• the unit is dropped or the enclosure is damaged.
• the unit does not operate normally or changes in performance in a significant way.
Page 4
Welcome to PoD HD300
Thank you for inviting POD HD300 home with you! Our engineers have
worked long and hard to bring you the new POD HD series of multi-effects
processors. Featuring brand new HD Amp modeling, POD HD300 also
features effects taken from our industry standard M series of products, M9
& M13. But that’s not all! POD HD processors are the first products to
feature L6 LINK, an exclusive connectivity protocol that opens up a whole
new world of features and control for serious musicians when used with
other compatible products (for example, DT50 series guitar amplifiers from
Line 6!)
ront Panel controls
F
When you’re ready to get deeper, we recommend you get the Advanced
User Guide & Model Gallery for POD HD300 by visiting us online at
www.line6.com/manuals. And while you are online, be sure and download
the free POD HD300 Edit software application from our Downloads page.
Basic operations are covered here in this user manual, so let’s get started.
6
TAP
HOLD FOR TUNER
5
FX ONLY
GAIN
HOLD FOR MANUAL MODE
BOUTIQUE
BLUES
PAWNSHOP
CLEAN
14 13
OFF
CLASS A
CRUNCH
HI GAIN
METAL
1 2 12
AMP
MODE
PRE/
POST
A
VARIOUS
PITCH
4
FX2
FILTER
MOD
OFF
TREMOLO SWEEP ECHO
FX1
B
DELAY
REC/
OVERDUB
OFF
FX3
TAPE ECHO
3
REVERBFX1
WAH
8 9
PRESETS
CH VOLTREBLEMIDBASSDRIVE
10
FX2
PLAY/
STOP
C
PUSH TO EDIT
FX3
D
SAVE
11
PLAY
ONCE
VOL
7
Page 5

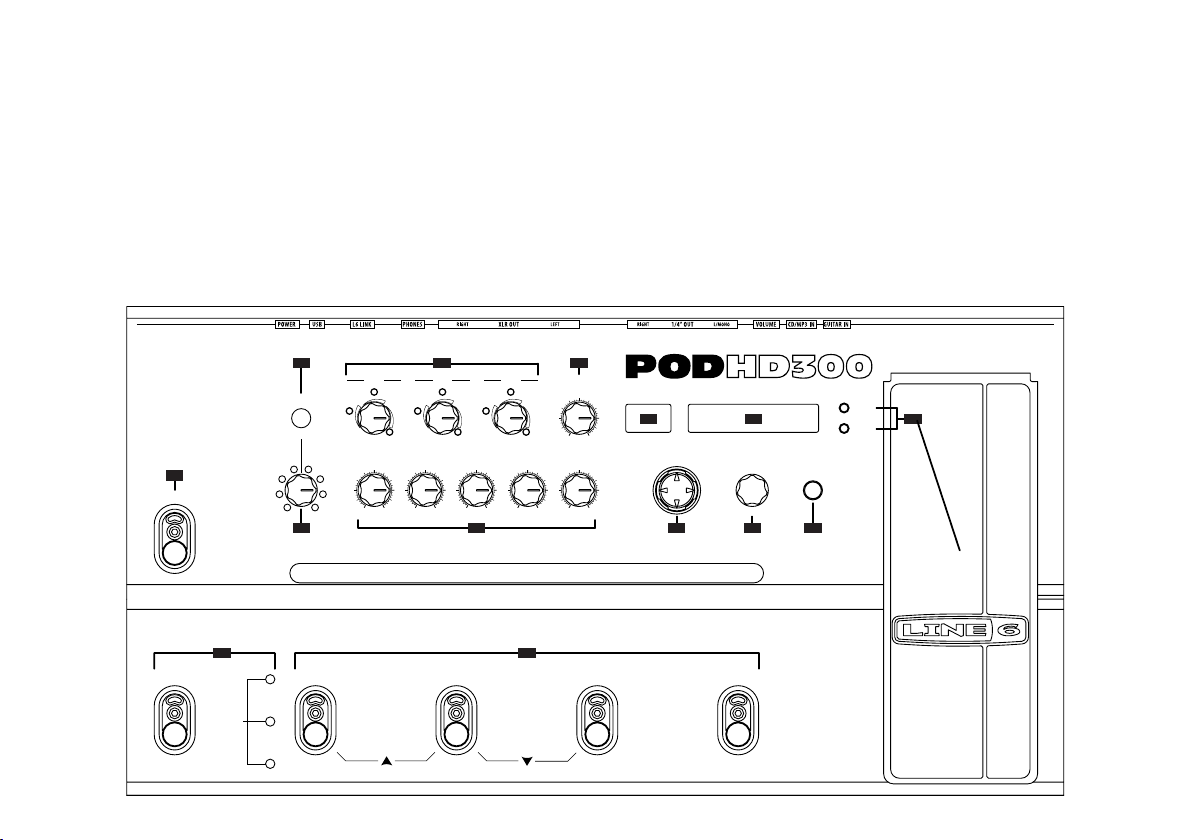
1. Amp Models - Spin this knob to select one of 16 Amp Models. The
LED will show red or green giving you two model types in each model
category. All the guitar tone and FX controls will automatically be set
to sound great with that Amp Model, so you can just play! When you
turn this knob the
Model name, along with the current settings of the
TREBLE, CH VOL and REVERB knobs. Amp Models get progressively
Display will briefly show the currently loaded Amp
DRIVE, BASS, MID,
heavier and distorted as you turn the model knob clockwise.
2. Tone Controls - DRIVE is like the gain knob on other amps; controlling
how much dirt or distortion you get in the sound.
TREBLE controls are customized for each Amp Model to give you
BASS, MID, and
optimal tonal control. When you turn any of these knobs, the display
will briefly show the current settings of the
TREBLE, CH VOL and REVERB knobs.
3. Reverb - Dial in more or less virtual room or other reverb type. While
DRIVE, BASS, MID,
turning the knob, the display will show you the current setting. While
bars are displayed, select any of the 9 Reverb Models from
Echo by turning the PRESETS Knob.
4. Smart Control FX - Spin one of these knobs to get great FX. Important
Note: Each Smart Effect (or swoosh!) has alternate effects "behind" it.
While bars are displayed in the LCD, turn the
PRESETS knob to select
Plate to
an alternate effect for that swoosh.
FX1 picks GAIN, VARIOUS, or PITCH with a range of settings "from
subtle to extreme" for each effect. Whenever you turn this knob, the
Display shows the active effect. Turn the FX1 knob all the way down
to turn this effect off.
FX2 knob selects from a range of MOD, FILTER, or TREMOLO effects
with settings evolving "from subtle to extreme" with the turn of a knob.
As before, the
selected with the
the
FX2 knob all the way down to turn this effect off.
FX3 picks DELAY, TAPE ECHO, or SWEEP ECHO effects with
Display shows the current active effect which can be
PRESETS knob as long as the bars are visible. Turn
settings from low to high. Turn this knob to display the active effect,
and the
stomp the
TAP LED flashes your delay time. To change the delay time,
TAP footswitch a few times to the desired tempo. Turn the
knob all the way down to turn this effect off.
5. FX Only (Manual Mode) - You can choose to use your POD HD300 as
a multi-fx unit without adding the character of the POD HD300 Amp
Modeling. You might prefer this when using your POD HD300 in front
of your guitar amp. Pressing the
LED and globally disables Amp Modeling. Now, only
REVERB will be applied to the guitar signal.
Manual Mode: Press and hold this button to bypass current presets
FX ONLY button illuminates the red
Smart FX and
shown in your display. Now your physical knob positions, where each
knob is set, will determine settings and sounds. When in
your
7 Segment Display will read ---. Selecting or saving any preset will
automatically return you to
Preset mode, where all effects and settings
Manual Mode
are loaded per preset.
6. Tap Tempo - Stomping the TAP button a few times sets the tempo of
your
FX2 modulation and FX3 delay effects. (Remember, most time-
based effects in POD HD300 can have the
Control- more on that in the Edit section!)
Press and hold
Bank/Preset Display, and the Tuning meter is shown in the Main
Display.
7. Expression Pedal - The lights to the left of this pedal show whether the
pedal will operate as a
are lit)
TAP to enter Tuner Mode. Your note is shown in the
Wah effect, Volume Pedal, or (when both lights
FX1 Pitch Glide effect. Press the toe down to change modes.
TAP set to Control or Don’t
Also, see the advanced guide for calibration instructions.
8. Bank/Preset Display - POD HD300 comes preloaded with a minimum
of 128 presets. Presets (
A,B,C & D) are stored in Banks (1-32).
This segmented display always shows the currently loaded preset or
--- when in Manual Mode. We'll talk more about presets later in this
guide.
9. Main Display - This display shows various pages as you work the
controls.
Page 6
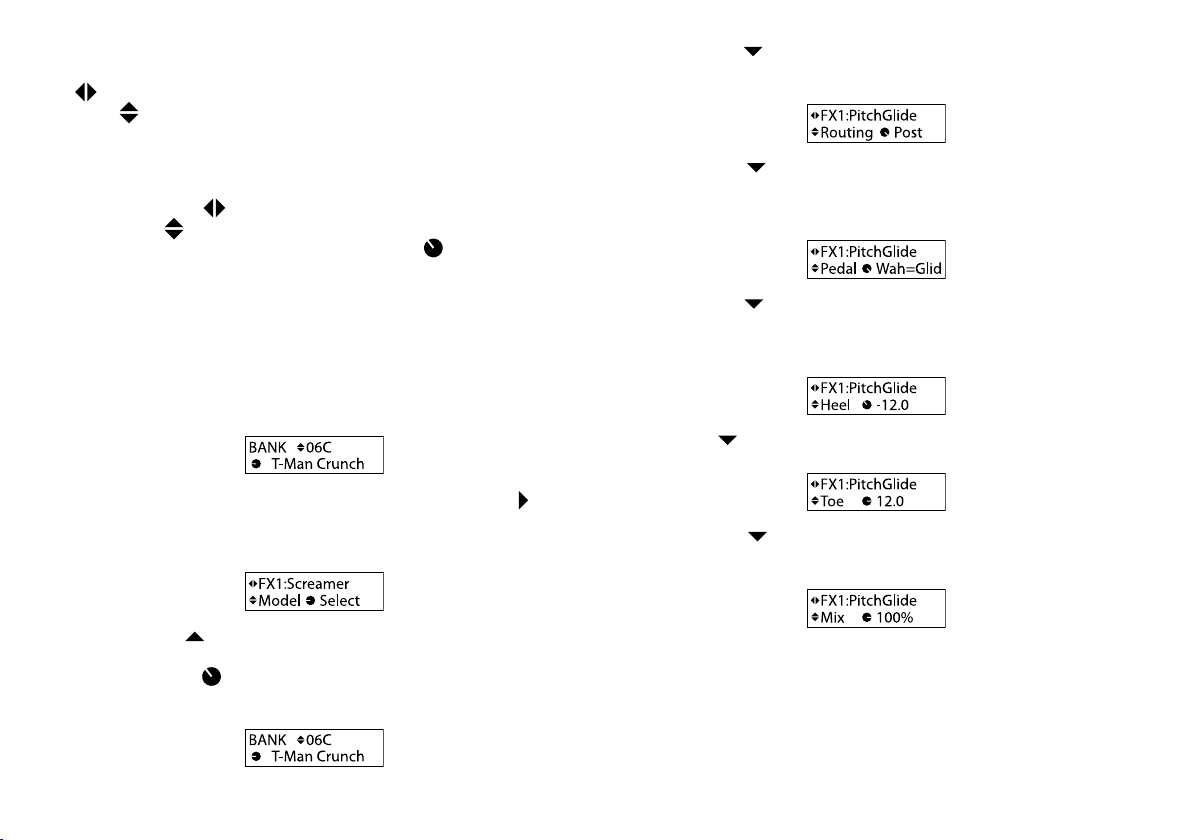
10. 4 Way Nav Disc - Used to move through options on certain pages in
your
Main Display. Press the left or right side of the 4 Way Nav when
is displayed next to an item to change settings. Press up and down
when
11. Presets Knob - Turn this knob to scroll through all of the stored presets.
Press the
is displayed next to an item.
PRESETS knob to enter Edit Mode. Here you'll discover the
power to deep edit effects as you make your way through the various
edit pages. Press
pages. Press
page. To edit a parameter, turn the Presets Knob
on the 4-WAY NAV to scroll through the edit
to move through the available edit parameters of each
to change values or
settings.
Let’s practice editing a preset (just because we can)! We’re going to
Pitch Glide effect to our preset, and assign the pedal to control
add a
it. It’s easy- promise!
• Spin the PRESETS Knob to preset location 06C. (You can also use
a combination of
to get there) You are in
should read
• Press the PRESETS Knob to enter Edit Mode. Press on the
4-way Nav until you see FX1 in the upper left hand corner of the
Display. The currently loaded Effect to the right of FX1 should
say
Screamer.
Bank Up/Down commands via the footswitches
bank 6, location C. The Main Display
T-Man Crunch as the preset name.
• Press the on the 4-Way Nav to see Routing. Turn the PRESETS
knob to select
Post. (You’ve just put the Pitch Glide effect Post
amp modeling.)
• Press the on the 4-Way Nav to see Pedal. Turn the PRESETS
knob to display
on the pedal to switch modes, instead of the
controlling the
• Press the on the 4-Way Nav to see Heel. This sets the amount
Wah=Glide. (Now, when you press the toe down
Wah effect you’ll be
Pitch Glide)
of pitch shift when the pedal is in the heel down position. Let’s
turn the
PRESETS knob to select -12.0 (semi-tones, or an octave
down)
• Press on the 4-Way Nav to Toe. Turn the PRESETS knob to
+12.0 (semi-tones, or an octave up)
• Press the on the 4-Way Nav to see Mix. Turn the PRESETS
knob to set the
MIX level to 100%. (Tip: Hold down the PRESETS
knob as you turn it to scroll through values more quickly!)
• Press the on the 4-way Nav until you see Model displayed on
the left in the lower line of the
right of the
icon. Turn the PRESETS knob, and you’ll notice
you are scrolling through the available effects in the
Keep turning until you select
Display. It will say Select to the
FX1 slot.
Pitch Glide.
• Press the toe switch on the Expression Pedal so both WAH and
VOL LEDs are lit next to the pedal.
You’ve just created a preset that glides from an octave down to an
octave up when you rock the pedal. You are amazing! If you are in love
with this sound (and who wouldn’t be!), be sure to name and save as
described below.
Page 7
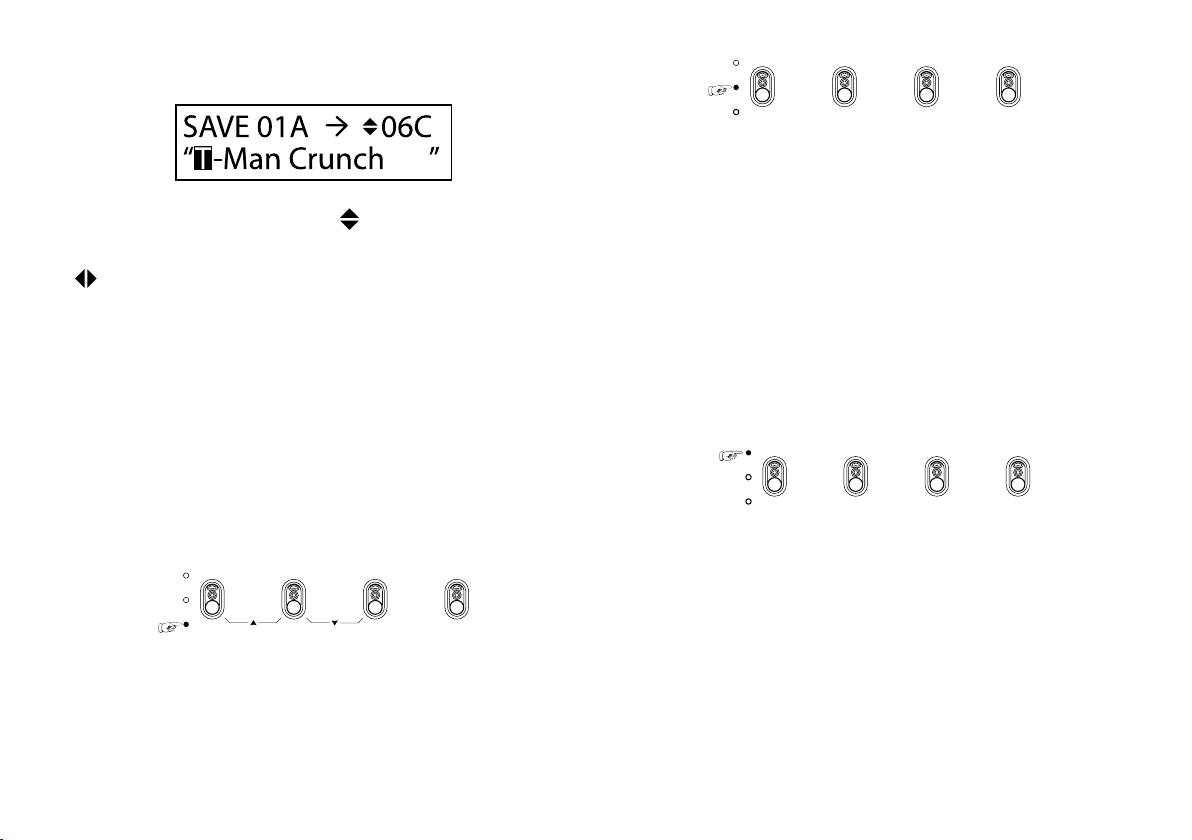
12. Save - You can save your custom sounds or modifications by overwriting
AMP FX1 FX2 FX3
any of the existing presets. Press the
SAVE button, your display will
appear similar to this:
The preset location shown above left is your current location. To save to
a new preset memory location, press
a new preset location (shown as
on your 4-WAY NAV to access
06C above). You can personalize the
preset name you are saving (shown as PRESET NAME above). Press
on the 4-WAY NAV to move the flashing black cursor over the
character you want to edit, then turn the
the character. Press
abort your save, press the
has a free software editor,
SAVE when finished to save your changes. To
TAP footswitch. Remember: POD HD300
POD HD300 Edit, available for download
PRESETS knob to change
at Line6.com. This app (Windows and Mac) makes it easy to see and
edit the signal flow, save presets individually or in bundles, and share
presets online at CustomTone.com.
13. Multi Use Footswitches - Hands free control access to all presets,
looper function and stomp box style on/off operation for live and
studio situations. There are 3 modes of operation described below.
14. Mode Footswitch/LEDs - Use this switch to toggle through the 3
available footswitch modes.
Preset Mode (Green LED):
A B C D
Press a footswitch to load its preset (A, B, C or D). Press both A and B
switches to bank up (1-32) or press both
B and C to bank down (32-1)
from your current bank.
Looper Mode (Red LED):
PRE/
POST
REC/
OVERDUB
PLAY/
STOP
PLAY
ONCE
Equips your POD HD300 with 24 seconds of looping capability.
The
PRE/POST footswitch allows you to set your loop recording
and playback either before amp and effects modeling or after (LED
off=
PRE, LED on=POST). Recording in PRE mode (LED off) let’s you
record your guitar, then audition various effects with your loop playing
back, while recording in
POST mode (LED on) captures your amp and
effects in the loop and then layer different sounds by changing presets.
Note: changing the state of the PRE/POST footswitch while the loop
is playing back can dramatically change the volume, so be careful!)
Stomp
REC/OVERDUB to start recording a loop then stomp PLAY/
STOP
to end loop and immediately start playback. You can overdub
additional parts by again, stomping the
REC/OVERDUB switch. Stomp
PLAY/STOP to stop or start playback. You can exit Looper Mode even
when a loop is still playing to switch presets or turn amps and effects
on/off and return back to add additional loops. How cool is that?
Pedal On/Off Mode (Amber LED):
Gain total control of your preset tone in Pedal On/Off mode. There are
4 components to your signal path -
AMP, FX1, FX2 and FX3. Use the
appropriately labeled switch to turn any of these on (LED lit) or off.
Just like a real pedalboard full of stompboxes!
Page 8
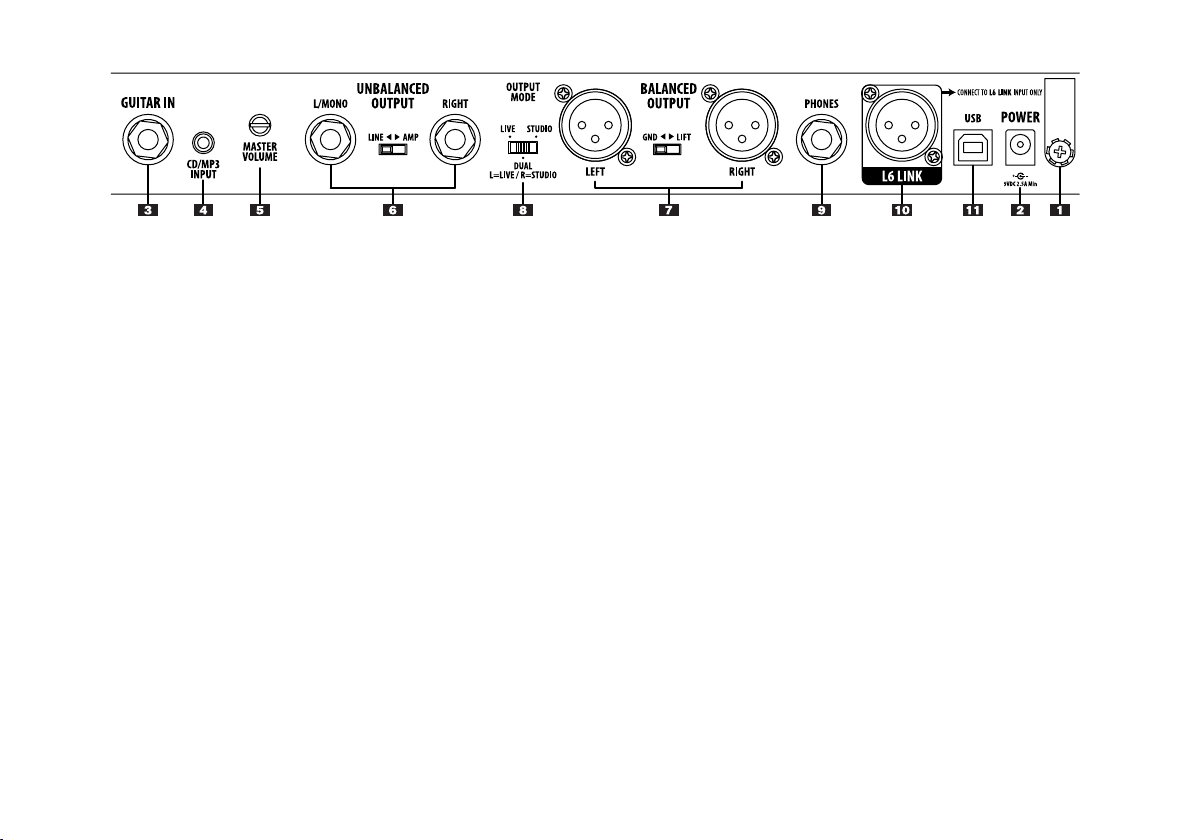
rear connections
1. Cable Retainer - Insert your power supply cable through this once or
twice to prevent an accidental disconnect.
2. Power - Connect your Line 6 Power Supply here to power the unit.
Unplug to turn it off
3. Guitar In - Plug your guitar cable in here.
4. CD/MP3 Input - Connect a CD player, MP3 player, drum machine
or other device here, and you’ll hear it through the
UNBALANCED OUTPUT and BALANCED OUTPUT. Use your
PHONES,
device’s output control to adjust the volume relative to your guitar
tone. Start with the volume on your device at its lowest setting and
bring it up to the volume you desire.
5. Master Volume - This controls the overall output level of POD HD300
and also sets the headphone level. Changing the
MASTER VOLUME
level does not change your tone, so you can get the tone you want at
any volume level. This setting is not saved when you store settings into
one of the POD HD300 memory locations.
6. Unbalanced Output - connect 1/4" cables here to send your sound to a
guitar amplifier, recorder, mixer or PA system. Set the switch between
these connectors to
AMP when sending to a guitar amp or LINE for
devices with -10dBV inputs typical of mixers and recorders.
7. Balanced Output - connect balanced XLR cables here for an ideal
connection to digital recorders or as direct sends to the house mixer or
PA when playing live. If you are experiencing hums and buzzes, set the
switch between these connectors to
LIFT to eliminate ground loops
between your equipment.
8. Output Mode - Optimize your tone for the application. Use STUDIO
to apply a direct signal complete with microphone and cabinet
simulations to recorders and mixers. Use
LIVE when connecting to
a guitar amplifier speaker combination for a natural more direct guitar
tone. When set to
LEFT outputs to a guitar amp and a studio quality mic and speaker
cabinet simulated signal through the
DUAL, you can send a direct signal through the
RIGHT outputs to a mixer or
recorder.
9. Phones - Plug headphones in here. The volume is set by the MASTER
VOLUME knob. Always use safe listening practices, so we recommend
setting the
MASTER VOLUME knob at 10 o'clock, then turn up from
there if you need more volume.
10. L6 LINK – is a powerful, proprietary connection developed by Line 6
to enable easy, reliable, one-cable connectivity between various Line 6
products. In the case of the DT50 Series guitar amplifiers and POD HD
(300/400/500) series multi-effects processors, this connection allows
both products to sync and communicate uniquely with each other.
L6 LINK passes both audio and control data in a single cable, and
the resulting operation allows users to plug a single cable from their
POD HD family processor into a DT50 series amp and receive many
incredible benefits:
• No additional cables are required to connect a POD HD
(300/400/500) to a DT50 series guitar amplifier.
• Changing Tone settings (for example) on either the POD HD or
DT50 immediately updates the other, with the result that both
units stay perfectly in sync.
Page 9

• Edit a preset on a POD HD by simply turning knobs on the DT50
as one would any other guitar amp, then save it on the POD HD
to perfectly recall every time the preset is selected.
• This one is crazy cool! Calling up a particular amp model
or preset on the POD HD enables the DT50 to dynamically
reconfigure itself in the analog realm to optimize its components
to match the source amplifier. Change your preset on a POD
HD, and the DT50 will immediately align itself in the analog
realm to such things as the appropriate Class A or A/B operation,
Biasing method, B+ voltage, Feedback topology, Triode/Pentode
operation of the power tubes and more!
• Automatic sensing allows linked multiple (daisy chained) amps
to operate in a variety of ways, depending on which POD HD
is connected. At minimum, all POD HD multi-effects support
stereo operation with linked DT50s, and POD HD500 supports
up to four uniquely linked amps with configurations like wet/dry
mode easily available.
11. USB - The USB jack lets you connect directly to a USB equipped
computer for direct recording and to take advantage of many computerpowered features including free, downloadable editor/librarian software,
POD HD300 Edit. Read the Advanced Guide available online to learn
more.
Visit Us online
Get the Advanced Guide and more online at www.line6.com/manuals
Get up to speed on your POD HD300 deep editing features with our
Advanced User Guide available online. While you’re online be sure to
register your POD or simply fill out and mail us your included registration
card. Registering gets you all set up for warranty service should you have an
issue with your amp, and also qualifies you for contests, special offers and
more.
 Loading...