

Page 1
LINDY VGA Converter Plus
Manual English
Benutzerhandbuch Deutsch
Manuel Français
Manuale Uso Italiano
LINDY Art. Nr. 32561
© LINDY ELECTRONICS LIMITED & LINDY-ELEKTRONIK GMBH - FIRST EDITION (Oct 2000)
Page 2

Page 3

Contents, Inhalt, Contenu, Contenuto
ABOUT THIS MANUAL……………………………………………………………………………1
SAFETY INFORMATION ……………………………………………………………………………………………1
WARRANTY…………………………………………………………………………………………………………..1
FEDERAL COMMUNICATION COMMISSION (FCC) NOTICE………………………………2
INTRODUCTION……………………………………………………………………………………3
FEATURES…………………………………………………………………………………………………………...3
SYSTEM REQUIREMENTS……………………………………………………………………….4
PACKAGE CONTENTS……………………………………………………………………………………………..4
OPTIONAL ACCESSORIES………………………………………………………………………………………..4
INSTALLATION…………………………………………………………………………………….5
Connecting the LINDY VGA Converter Plus to graphic video output ………………………………………5
Connecting the LINDY VGA Converter Plus to a TV or VCR ……………………………………………….6
Connecting the Power Adaptor…………………………………………………………………………………6
USING THE LINDY VGA CONVERTER PLUS…………………………………………………7
ENGLISH DEUTSCH
LINDY VGA CONVERTER PLUS REMOTE CONTROL BUTTON FUNCTIONS ……………………………7
LINDY VGA CONVERTER PLUS MAIN UNIT BUTTON FUNCTIONS………………………………………..8
QUESTIONS AND ANSWERS……………………………………………………………………9
TROUBLESHOOTING GUID E……………………………………………………………………………………..9
ÜBER DIESES HANDBUCH…………………………………………………………………….11
INFORMATIONEN ZUR SICHERHEIT…………………………………………………………………………..11
GARANTIE…………………………………………………………………………………………………………..11
GRUNDLEGENDE ANMERKUNGEN………………………………………………………….12
SPEZIFIKATIONEN………………………………………………………………………………………………..13
SYSTEMANFORDERUNGEN…………………………………………………………………...14
LIEFERUMFANG …………………………………………………………………………………………………14
OPTIONALES ZUBEHÖR: …………………………………………………………………………………………1 4
INSTALLATION……………………………………………………………………………………15
Anschluß des LINDY VGA Converter Plus an die Graffikkarte ……………………………………………15
Der Anschluß des LINDY VGA Converter Plus an einen Monitor ………………………………………16
Anschluß des LINDY VGA Converter Plus an ein TV- oder Video-Gerät ……………………………….16
Anschluß des Tastaturkabels (nur für PCs) …………………………………………………………………16
VERWENDUNG DES LINDY VGA CONVERTER PLUS……………………………………17
FUNKTIONEN DER LINDY VGA CONVERTER PLUS FERNBEDIENUNG ………………………………..17
FUNKTIONEN DES LINDY VGA CONVERTER PLUS ………………………………………………………..18
FRAGEN UND ANTWORTEN / FEHLERBEHEBUNG ………………………………………19
LINDY ELECTRONICS LTD Contents, Inhalt, Cont enu, Contenuto Page i
Page 4

A PROPOS DE CE MANUEL……………………………………………………………………21
INFORMATIONS DE SÉCURITÉ…………………………………………………………………………………21
GARANTIE…………………………………………………………………………………………………………..21
FRÉQUENCE RADIO……………………………………………………………………………..22
INTRODUCTION…………………………………………………………………………………..23
CARACTÉRISTIQUES…………………………………………………………………………………………….23
CONFIGURATION NÉCESSAIRE………………………………………………………………24
CONTENU DU COFFRET…………………………………………………………………………………………24
ACCESSOIRES OPTIONNEL S : …………………………………………………………………………………24
INSTALLATION……………………………………………………………………………………25
Connexion du LINDY VGA Converter Plus à la sortie graphique…………………………………………25
Connexion du LINDY VGA Converter Plus à un écran d’ordinateur. ……………………………………..25
Connexion du LINDY VGA Conv erter Plus à la TV ou à un magnétoscope ……………………………..26
Connexion de l’adaptat eur d’alimentation……………………………………………………………………26
UTILISER LE LINDY VGA CONVERTER PLUS………………………………………………27
TOUCHES DE FONCTIONS DE LA TÉLÉCOMMANDE DU LINDY VGA CONVERTER …………………27
LINDY VGA CONVERTER PLUS : FONCTIONS PRINCIPALES…………………………………………….28
QUESTIONS ET RÉPONSES……………………………………………………………………29
DÉPANNAGE……………………………………………………………………………………………………….29
MANUALE D’USO………………………………………………………………………………...31
PRECAUZIONI……………………………………………………………………………………………………...31
GARANZIA………………………………………………………………………………………………………….31
FRANÇAIS
INTERFERENZE SU FREQUENZE RADIO……………………………………………………32
INTRODUZIONE…………………………………………………………………………………..33
CARATTERISTICHE……………………………………………………………………………………………….33
REQUISITI DEL SISTEMA………………………………………………………………………..34
CONTENUTO DELLA CONFEZIONE……………………………………………………………………………34
ACCESSORI OPZIONALI: …………………………………………………………………………………………34
INSTALLAZIONE …………………………………………………………………………………35
Collegamento del LI NDY VGA Converter Plus ad un’uscita video grafica ………………………………35
Collegament o del LINDY VGA Converter Plus al monitor di un comput er ……………………………….36
Collegamento dell’alimentatore……………………………………………………………………………….36
Collegamento del cavo tastiera (solo per PC)……………………………………………………………….36
UTILIZZO DEL LINDY VGA CONVERTER PLUS ……………………………………………37
FUNZIONI DEI TASTI DEL TELECOMANDO DEL LINDY VGA CONVERTER PLUS …………………….37
FUNZIONI DEI TASTI SUL LINDY VGA CONVERTER PLUS………………………………………………..38
DOMANDE E RISPOSTE………………………………………………………………………...39
GUIDA ALLA SOLUZIONE ………………………………………………………………………………………..39
ITALIANO
Page ii Contents, Inhalt, Cont enu, Contenuto © LINDY ELECTRONICS LTD
Page 5

About this manual
LINDY VGA Converter Lite - Installation and Use
First Edition (Sep 2000)
LINDY VGA Converter Lite – LINDY Art.No. 32 565
© 2000 LINDY Electronics Ltd.
All rights reserved. Whilst every precaution has been taken in the preparation of this manual,
LINDY Electronics Ltd assumes no responsibility for errors or omissions. Neither is any liability
assumed for damages resulting from the use of the information contained herein. We reserve the
right to change the specificati ons, functions and circuitry of the product without notice. All
trademarks acknowledged.
Safety information
• For use in dry, oil free indoor environments only.
• Warning - live parts contained within power adapter.
• No user serviceable parts within power adapter - do not dismantle.
• Plug the power adapter into a socket outlet close to the LINDY VGA Converter Lite.
• Do not use power adapter if power adapter case becomes damaged, cracked or broken or if
you suspect that it is not operating properly.
Warranty
LINDY Electronics Ltd warrants that this product shall be free from defects in workmanship and
materials for a period of one year from the date of original purchase. If the product should fail to
operate correctly in normal use during the warranty period, LINDY will replace or repair it free of
charge. No liability can be accepted for damage due to misuse or circumstances outside LINDY’s
control. Also LINDY will not be responsible for any loss, damage or injury arising directly or
indirectly from the use of this product. LINDY’s total liability under the terms of this warranty shall
in all circumstances be limited to the replacement value of this product.
If any difficulty is experienced in the installati on or use of this product that you are unable to
resolve, please contact your suppli er.
LINDY ELECTRONICS LTD About this manual Page 1
Page 6

Federal Communication Commission (FCC) Notice
This equipment has been tested and found to comply with the limits of a Class B digital device,
pursuant to Part 15 of the FCC Rules. These limits are designed to provide reasonable protection
against harmful interference in a residential installation. This equipment generates, uses and can
radiate radio frequency energy and, if not i n stalled and used in accordance with the instructions,
may cause harmful interference to radio communications. However, there is no guarantee that the
interference will not occur in particular installations. If this equipment does cause harmful
interference to radio or television reception, which can be determined by turning the equipment off
and on, the user is encouraged to try to correct the interference by one or more of following
measures:
• Reorient or relocate the receiving antenna.
• Increase the separation between the equipment and receiver.
• Connect the equipment into an outlet on a circuit different from what the receiver is
connected
• Consult an experienced radio TV technician for help.
CAUTIONS:
The change or modifications not expressly approved by the party responsible for compliance could
void the user's authority to operate the equipment.
Shielded interface cables and AC power adapter, if any, must be used in order to comply with the
emission limits.
Page 2 FCC Notice © LINDY ELECTRONI CS LTD
Page 7

Introduction
The Enhanced LINDY VGA Converter Plus is a professional computer graphic to TV video
converter. With it you can create powerful, impressive presentations. For instance, you can
customise the settings to get the optimal TV display in true colour. The Enhanced LINDY VGA
Converter Plus can work with different platforms. You can just plug in and present with any
personal computer - IBM PC or MAC … etc.
You can fully control the delivery and adjustment of your presentations, using a combination of
either the remote control or the front panel buttons provided. Reveal all details on your monitor and
squeeze or expand the screen to fit onto your display device.
The Enhanced LINDY VGA Converter Plus offers superb image quality. Up to 1280 X 1024 true
colour resolution is displayable. With our latest “ Flicker Resistor” technology, your audience can
view graphic images on TV clearly and comfortably.
Features
• Remote control with built-in laser pointer & page up/down function
(Page Up/Down function not compatible with the Mac)
• “Plug and Play” – no software required
• Simultaneous display on both the PC monitor and the TV
• Flicker reduction technology
• Vertical and horizontal scal ing to fit TV display
• Zoom & Pan function
• Freeze frame control
• Area spotlight and hide/reveal function
• On screen display
• Excellent support for DVD and Cdi
• Supports multiple resolutions up to 1280 x 1324
• Refresh rates up to 150Hz
• Composite, S-VHS and RGB SCART video output
• Supports PAL format
© LINDY ELECTRONICS LTD Installation & Use English – English Guide Page 3
Page 8

System Requirements
• Any 286 or higher model of IBM PC/AT compatible computer with a VGA graphics card
• Any Apple Macintosh computer with video output. Optional adapters may be required
• PAL TV with Composite, S-VHS or RGB SCART with sound cable
Package Contents
! LINDY VGA Converter Plus unit
! Remote control unit
! Operation manual (this manual)
! AC-DC power adaptor
! VGA extension cable
! Composite video cable
! Y cable connector
! S-VHS video cable
! RGB SCART video/audio cable with keyboard interface adaptor (to support Page Up/Down
function on IBM PC’s only)
Optional Accessories
! Switchable Mac computer to PC video adapter
! PC video to Mac monitor adapter
Page 4 I nstal lation & Use English – English Guide © LINDY ELECTRONICS LTD
Page 9
Installation
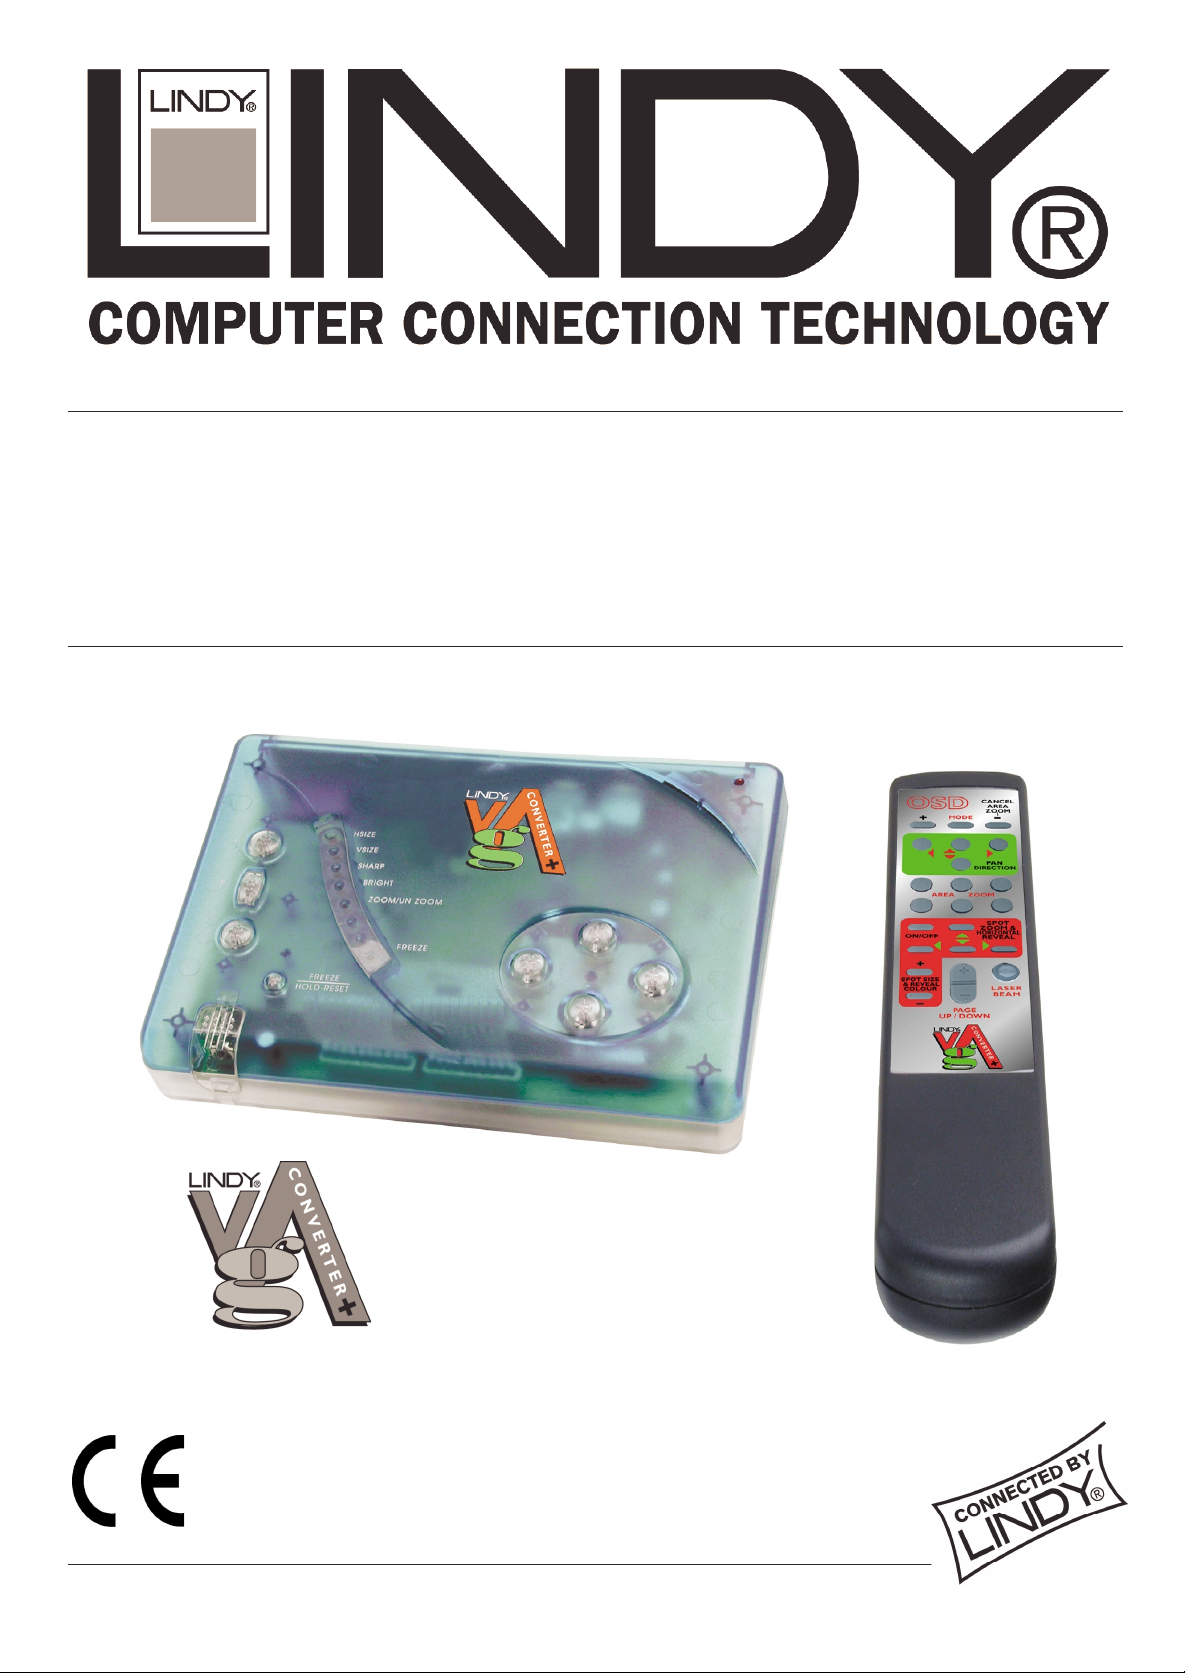
The system configuration of the LINDY VGA Converter Plus is shown below:
Rear view of the LINDY VGA Converter Plus
CONNECTOR DESCRIPTION
DC 9V
SCART
Power supply jack to provide power to the LINDY VGA Converter Plus
Input: DC 9V
Video output option for connecting to TV (Also provides PC keyboard
interface cable to support for Page Up/Down functions)
S-VHS S-VHS video output option for connection to TV
COMPOSITE
VIDEO
C.V. output option for connection to Video or TV
VIDEO Composite video output for connection to TV
VGA OUT Connect the Y cable to this connector
Connecting the LINDY VGA Converter Plus to graphic video output
♦ Turn off your computer and its peripherals
♦ Place the LINDY VGA Converter Plus next to your computer
♦ Attach the end of the Y-cable marked “MONITOR” to your monitor cable.
♦ Plug the end of the Y-cable marked “VGA CARD” into you computers PC Graphic output.
♦ Plug the end of the Y-cable marked “ENCODER” into the VGA Converter Plus
For Macintosh:
An optional Mac to PC adapter may be required with some models of Macintosh computers.
Special Note for Laptop users
Some notebooks or laptops with LCD display screens can’t
support simultaneous LCD and external monitor display.
When connecting to an external computer monitor, you
should switch the display to external monitor port. Please
check your computer documentation regarding how to
enable the external monitor port.
© LINDY ELECTRONICS LTD Installation & Use English – English Guide Page 5
Page 10

Connecting the LINDY VGA Converter Plus to a TV or VCR
♦ Composite Video to TV
Connect one end of the Composite video cable into the LINDY VGA Converter Plus Composite
Video connector and the other end into the Video input port on the TV.
♦ S-VHS to TV
Plug one end of the S-VHS cable into the LINDY VGA Converter Plus S-VHS connector and
the other end into the S-VHS input port on the TV.
♦ RGB SCART Video to TV
If you want to use special equipment that requires RGB SCART video output, connect the RGB
SCART cable to the RGB SCART Video Out connector.
♦ For VCR
If you want to use a VCR with a TV, connect one end of the Composite video cable to the
Composite Video connector on the LINDY VGA Converter Plus and the other end to the Video
input port of the VCR. You can use the S-VHS connector for better quality if your VCR supports
S-VHS. Also you can connect the VCR video output to a TV for video monitoring.
Connecting the Power Adaptor
♦ Connect one end of the power adaptor to the Power Jack on the LINDY VGA Converter Plus
and the other end into a power outlet source.
Page 6 I nstal lation & Use English – English Guide © LINDY ELECTRONICS LTD
Page 11

Using the LINDY VGA Converter Plus
LINDY VGA Converter Plus Remote Control Button Functions
Picture
Button Description of Function
Mode
Pan
Direction
Area
Zoom
This button is used to set the Brightness, Col our , Sharpness and
flicker on the monitor
Place the captured comput er gr aphic data on to the TV screen. There
could be some minor differ enc es between the T V and the monitor
displays so these buttons allow slight adjustments to be made.
This is a fast zoom function. This is divided into 6 quadrants. When
each corresponding key is pressed, the related port ion will be
enlarged and it will occupy the full screen of the T V . This portion will
overlap the other portions.
Zoom Off
Beam
Page Up
Page
Down
Spot
Zoom &
Horizontal
Reveal
Spot Size
& Reveal
Colour
Once the zoom function is used you must press the cancel area
zoom butt on to rev er t to the norm al display.
Produces a laser beam output (red in colour) to assist in pointing to
specific areas of your pr esentation
When used i n conjuncti on with certain software such as Microsoft
Powerpoint the user can set t his button to go back a slide
When used i n conjuncti on with certain software such as Microsoft
Powerpoint the user can set t his button to go to t he next slide
Spotli ght an area on the screen and then using t he buttons move the
spotlight over t he ar ea y ou r equire to highlight The hor izontal Reveal
is used to reveal fr om the top to the bottom of the screen, ideal for
presentations.
Use this button to increase or decrease the size of the spotlight and
to change the col our of the reveal.
© LINDY ELECTRONICS LTD Installation & Use English – English Guide Page 7
Page 12
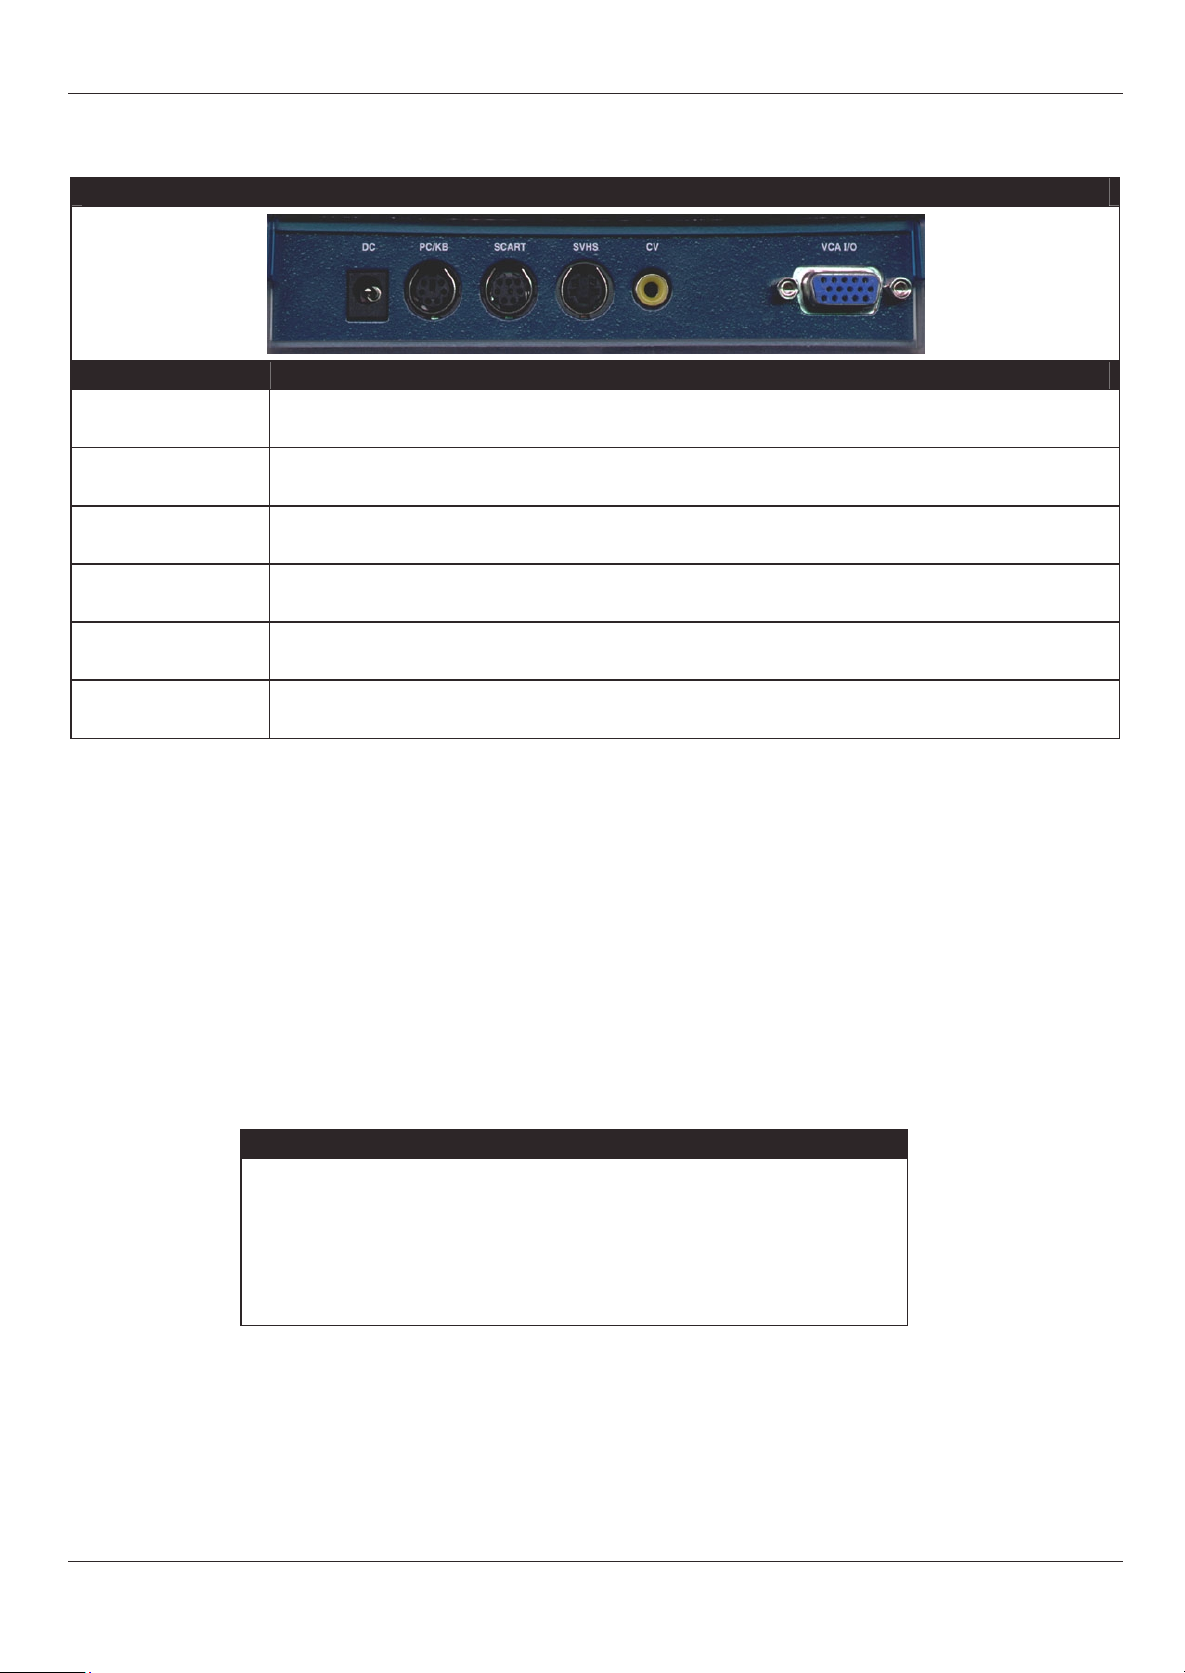
LINDY VGA Converter Plus Main Unit Button Functions
Picture
Button Description of Function
F key ‘Function key’
ZOOM
HORIZONTAL/
VERTICAL SIZE
SHARP
BRIGHT
Direction Keys
Scans through the possible options to select. E ac h time the F key is pressed the LED
display cycles through the opt ions listed below
Press ‘+’ Zooms in the display on the T V
Press ‘-‘ Zooms out to normal display on the TV
Press ‘+’ Increases display size
Press ‘-‘ Decreases display si z e
Press ‘+’ Enables flicker reduc tion
Press ‘-‘ Disables flick er reduction
Press ‘+’ Increase bright nes
Press ‘-‘ Decrease brightness
→
←
↑
Moves the display right
Moves the display left
Moves the display up
↓
Press &
release
Freeze/Hold-Reset
Press &
Hold
Page 8 I nstal lation & Use English – English Guide © LINDY ELECTRONICS LTD
Moves the display down
Freezes the displ ay on the TV and turns on the freeze LED. Onc e this LED is on
pressing the button again unfreezes the display and turns off the freeze LED.
When the freeze LED is off, pressing and holding this button for several seconds
resets the VGA Converter Plus. W hen the reset has been performed all t he
LEDs on the unit flash (exc ept the SCART LED) and upon r eleasing the button
the LINDY VGA Converter P lus is reset.
Page 13

Questions and Answers
Troubleshooting Guide…
Here are some helpful hints to diagnose problems that you may have with your LINDY VGA
Converter Plus. Most of the problems can be corrected with littl e effort.
Problem
No display on the
television when using
the LINDY VGA
Converter Plus
The LINDY VGA
Converter Plus can’t
operate at higher
resolutions
Solution
♦ Check all the connections agai n as shown in thi s manual.
♦ Check to see if the LINDY VGA Convert er P lus power is ON.
♦ Verify that the c or r ec t AV channel i s selected. Some m oder n TV’s have several AV
channels.
♦ If you ar e using a notebook, refer to your notebook ’s documentation to switch to
the exter nal moni tor mode.
♦ As specified by IBM, som e systems may requi r e that the monitor is present and
connected when the system is powered up.
♦ The comput ers refresh rate or resol ution is set too high. Try l oweri ng the refresh
rate first. If this fails then tr y lowering the resolut ion.
Computer graphic
doesn’t fit the TV
screen
The picture on my
TV is distor ted.
♦ Each graphic's video out put is slightly dif ferent from other s. Use the Directi on or
Size Keys on the main unit or remote c ontrol.
♦ Before doing any adjustm ents, reset all t he picture att ributes to the default sett ing
by pressing and holding down the F r eez e button for several seconds.
♦ Each graphic boar d' s video output is slightly dif ferent from ot her s. Use the
Direction or Size Key s on the main unit or remote c ontrol.
♦ Use the VGA Converter Plus or TV brightness controls to reduce any distor tion.
© LINDY ELECTRONICS LTD Installation & Use English – English Guide Page 9
Page 14

Page 10 Installation & Use English – English Guide © LINDY ELECTRONICS LTD
Page 15

Über dieses Handbuch
LINDY VGA Converter Plus - Installati on und Bedienung
First Edition (Oktober 2000)
LINDY VGA Converter Plus – LINDY Art. No. 32 561
© 2000 LINDY Elektronik GmbH.
Alle Rechte vorbehalten. Obwohl dieses Handbuch mit größter Sorgfalt erstellt wurde, kann
LINDY-Elektronik GmbH keinerlei Verantwortung für Fehler oder fehlende Informationen
übernehmen. Ferner sind wir nicht haftbar für Schäden, die aus der Verwendung der in diesem
Manual enthaltenen Informationen entstehen. Wi r behalten uns das Recht vor, Änderungen an
den Spezifikationen, Funktionen oder Schaltkrei sen des Gerätes ohne Hinweis darauf
vorzunehmen. Alle Warenzeichen sind eingetragen.
Informationen zur Sicherheit
• Bitte beachten Sie, daß Laserlicht dem menschlichen Auge Schaden zufügen kann. Schauen
Sie niemals direkt in den Laserstrahl oder die Laserdiode!
• Benutzung nur in trockenen, ölfreien Innenräumen.
• Innerhalb des Netzteiles können keinerlei Einstellungen vorgenommen werden – nicht öffnen.
• Sollte das Gehäuse des Netzteiles beschädigt werden oder Sie vermuten, daß das Netzteil
nicht ordnungsgemäß arbeitet, verwenden Sie es nicht.
Garantie
LINDY-Elektronik GmbH gibt auf dieses Produkt eine Garantie von einem Jahr ab Verkaufsdatum
über Material- und Produktionsfehler. Sollte das Produkt innerhalb dieses Jahres Ausfälle zeigen,
die nicht auf fehlerhaften Umgang mit dem Gerät zurückzuführen sind, so wird LINDY das Gerät
kostenfrei ersetzen oder reparieren. Keine Haftung können wir für Schäden übernehmen, die aus
falschem Gebrauch, Gewalteinwirkung oder anderen Umständen resultieren, die sich unserer
Kontrolle entziehen. Ferner ist LINDY nicht verantwortlich für jegliche Schäden, Verluste oder
Verletzungen, die direkt oder indirekt aus der Verwendung des Produktes resultieren. In jedem Fall
ist LINDY’s Garantieleistung begrenzt auf den Wiederbeschaffungswert des Produktes.
LINDY-ELEKTRONIK GmbH Über dieses Handbuch Seite 11
Page 16

Grundlegende Anmerkungen
Elektromagnetische Kompatibilität
Dieses Gerät erfüllt die vorgeschriebenen Grenzwerte für elektromagnetische Kompatibilität der
Europäischen Gemeinschaft und trägt die vorgeschriebene CE Kennzeichnung für diese Geräte.
Wir weisen darauf hin, dass dieses Gerät nur mit den beiliegenden Kabeln und Netztei l verwendet
werden darf. Bei der Verwendung anderer Kabel ist darauf zu achten, dass diese abgeschirmt
sind. Nur für diesen fall kann mit Sicherheit davon ausgegangen werden, dass die
elektromagnetischen Kompatibilitätseigenschaften nicht beeinflusst werden.
Bildqualität
Grundsätzlich weisen wir darauf hin, dass ein Fernseher oder Fernsehmonitor gerätebdingt eine
Auflösung aufweist, die geringer ist als die VGA Auflösung von 640x480 Bildpunkten.
Ferner arbeitet ein Fernseher oder Fernsehmonitor zwar mit 50Hz Bildwechselfrequenz aber nur
im sogenannten Interlaced Bildverfahren.
Interlaced heißt, dass er Halbbilder mit einer Frequenz von 50Hz darstellt. Ein Halbbild enthält nur
die geraden oder nurt die ungeraden Zeil en eines Vollbildes; die Halbbilder werden jeweils mit
25Hz immer abwechselnd dargestellt. Ein moderner Computermonitor kann heutzutage Vollbilder
mit einer Bildwechselfrequenz von über 100Hz darstellen.
Daher kann ein Fernseher oder Fernsehmonitor trotz größerer Bildschirmdiagonale nie Bildqualität
und Auflösung eines modernen Computermonitors erreichen. Dies ist eine grundsätzliche nicht zu
ändernde Einschränkung.
Wir haben jedoch diesen Konverter mit größter Sorgfalt entwickelt und stellen Ihnen hiermit
ein Spitzenprodukt im nicht-professionellen Videobreich zur Verfügung.
Seite 12 Installation und B edienung – Deutsches Handbuch LINDY-ELEKTRONIK G mbH
Page 17

Einführung
Mit dem LINDY VGA Converter Plus haben Sie einen professionellen Video-TV-Converter für
Ihren PC erworben. Es können damit eindrucksvolle Präsentationen durchgeführt werden; für
diesen Zweck kann das Gerät so konfiguriert werden, daß eine optimale Darstellungsqualität im
True-Colour-Modus erzielt wird. Der LINDY VGA Converter Plus arbeitet als reine HardwareLösung unter den verschiedensten Plattformen – PC, MAC etc.
Darstellung und Einstellungen der Bildschirmausgabe können durch Verwendung entweder der
Fernbedienung oder der geräteinternen Bedieneinheiten an die jeweiligen Bedürfnisse
angeglichen werden. Alle Einzelheiten können auf dem Monitor dargestellt und das Bild gestaucht
oder gedehnt werden, um sie der Bildschirmgröße entspechend anzupassen.
Der LINDY VGA Converter Plus bietet hervorragende Bildqualität; darstellbar sind bis zu 1152 x
864 Pixeln im True-Colour-Modus. Mit Hilfe unserer neuen Technologie zur Flimmerunterdrückung
kann Ihr Publikum klare und angenehm lesbare Darstellungen auf TV-Bildschirmen genießen.
Spezifikationen
• Fernbedienung mit eingebautem Laserpointer und Seitenweiterschaltung (nicht in Verbindung
mit MAC-Rechnern)
• ‘Plug and Present’ – keine Software erforderlich
• Kompakte Abmessungen sorgen für hohe Portabilität
• Verschiedenste Systemstandards werden unterstützt – IBM PC, Apple MAC etc.
• Folgende Bildschirmauflösungen werden unterstützt:
• Für PC:
• VGA 640 x 480 True colour
• VGA 800 x 600 True colour
• VGA 1024 x 768 True colour
• VGA 1280 x 1024 True colour
• Für MAC
• VGA 640 x 480 true colour
• SVGA 800 x 600 true colour
• XGA 1024 x 768 true colour
• Bildwiederholfrequenzen bis 150 Hz
• Flimmerunterdrückung
• Ausgänge für Composite Video, S-VHS und RGB-SCART
• Gleichzeiti ge Anzeige auf dem PC-Monitor und dem TV-Bildschirm
• Zoomfunktion
• Feineinstell ung, um Bildgröße und –position an den TV-Monitor anzupassen
• Bildgröße, Bildposition, Helligkeit, Zoomfunktion und Bildausschnitt können entweder über die
geräteinternen Schalter oder über die Fernbedienung eingestellt werden.
LINDY-ELEKTRONIK GmbH I nstallation und Bedienung – Deutsches Handbuch Seite 13
Page 18

Systemanforderungen
• IBM PC, AT 286 oder höher mit einer VGA Grafikkarte, oder
• Apple MAC Computer mit Videoausgang. Es können hier optional Adapter
(LINDY Art. Nr 70168) erforderlich sein
• TV-Gerät mit PAL System und S-VHS, Composite Video oder RGB SCART Eingang.
Lieferumfang
! LINDY VGA Converter Plus
! Fernbedienung
! Dieses Handbuch
! Netzteil
! VGA-Verlängerungskabel
! Anschlußkabel für Composite video
! S-VHS video cable
! RGB SCART-Kabel mit Tastatur-Interfacekabel für die Page Up/Down-Funktion auf IBM PCs)
Optionales Zubehör:
! Konfigurierbarer Adapter MAC – PC-Monitor
! Adapter PC – MAC-Monitor
Seite 14 Installation und B edienung – Deutsches Handbuch LINDY-ELEKTRONIK G mbH
Page 19

Installation
Die Anschlüsse des LINDY VGA Converter Plus:
Rückansicht des LINDY VGA Converter Plus
Anschluß Beschreibung
On / Off
DC 9V
SCART
Power on/off. Die LED auf der Oberseite des Gerätes leuchtet bei korrekter
Spannungsversorgung
Anschluß für dieSpannungsversorgung des LINDY VGA Converter Plus
Spannung: DC 9V
Video-Ausgang zum TV-Gerät / Recorder. Den Audio-Anschluß des SCART
Kabels verbinden Sie mit der Grafikkarte Ihres Computers
S-VHS S-VHS Video-Ausgang zum TV-Gerät
VIDEO Composite Video-Ausgang zum TV-Gerät
VGA OUT VGA-Ausgang zum Monitor
VGA IN VGA-Eingang
Anschluß des LINDY VGA Converter Plus an die Graffikkarte
♦ Schalten Sie den Rechner und alle angeschlo ssenen Peripheriegeräte aus.
♦ Stellen Sie den LINDY VGA Converter Plus in der Nähe des Rechners auf.
♦ Verbinden Sie den Ausgang der Grafikkarte mit dem „VGA CARD“ Anschluß des mitgelieferten
Y-Kabels und stecken Sie den „ENCODE“ beschrifteten VGA Stecker in den LINDY VGA
Converter Plus.
♦ Schließen Sie and das freie Ende den Computermonitor an.
Für ältere Macintosh-Rechner und Monitore:
Ein optionaler VGA-Adapter MAC-PC kann bei einigen Macintosh-Modellen erforderlich sein.
Ein optionaler VGA-Adapter PC-MAC kann bei älteren Macintosh-Monitoren erforderlich sein.
Hinweis für Laptop-User
Einige Notebooks oder Laptops mit LCD Bildschirmen
unterstützen keinen gleichzei tigen Betrieb von LCD-Display
und externem Monitor. In diesem Fall muß die Anzeige beim
Anschließen an einen externen Computermonitor auf den
externen Monitor-Port geschaltet werden. Bitte schauen Sie
in der Dokumentation des Rechners nach einer Anleitung für
diesen Vorgang.
LINDY-ELEKTRONIK GmbH I nstallation und Bedienung – Deutsches Handbuch Seite 15
Page 20

Der Anschluß des LINDY VGA Converter Plus an einen Monitor
♦ Schließen Sie Ihren Monitor über ein VGA-Kabel an den VGA-OUT Anschluß des LINDY VGA
Converter Plus.
Für Macintosh-Rechner:
Ein optionaler VGA-Adapter PC - MAC kann bei einigen Macintosh-Modellen erforderlich sein.
Anschluß des LINDY VGA Converter Plus an ein TV- oder Video-Gerät
♦ Composite Video an TV
Verbinden Sie über das Composite Video-Kabel den Composite Video-Ausgang des LINDY
VGA Converter Plus mit dem Video-Eingang des TV-Gerätes.
♦ S-VHS an TV
Verbinden Sie über das S-VHS-Kabel den Composite Video-Ausgang des LINDY VGA
Converter Plus mit dem S-VHS-Eingang des TV-Gerätes
♦ RGB SCART Video an TV
Wenn Sie Geräte verwenden, die einen RGB Video-SCART Eingang besitzen, verbinden Sie
diesen über das SCART-Kabel mit dem RGB SCART Video-Ausgang des LINDY VGA
Converter Plus.
♦ Video-Gerät
Wenn Sie ein Video-Gerät in Verbindung mit einem TV-Gerät verw enden wollen, verbinden Sie
den Video-Eingang des Video-Gerätes über das Composite Video-Kabel mit dem Composite
Video-Anschluß des LINDY VGA Converter Plus. Um eine noch bessere Qualität des
Videosignales zu erzielen, können Sie auch den S-VHS-Anschluß verwenden, falls Ihr VideoGerät S-VHS unterstützt. Ferner kann der Video-Ausgang des Video-Gerätes an das TV-Gerät
angeschlossen werden, um die Aufnahmen überwachen zu können.
Anschluß des Tastaturkabels (nur für PCs)
Schließen Sie das Tastaturkabel mit dem Durchgangsstecker an den Tastaturport Ihres PCs an
und verbinden Sie es ebenfalls mit dem Orginal PC-Tastaturkabel. Das andere Ende verbinden
Sie mit dem LINDY VGA Konnverter
Seite 16 Installation und B edienung – Deutsches Handbuch LINDY-ELEKTRONIK G mbH
Page 21

Verwendung des LINDY VGA Converter Plus
Funktionen der LINDY VGA Converter Plus Fernbedienung
Abbildung
Taste Funktionsbeschreibung
Size Schaltet die Bil dgr öße passend auf den Bildschirm des TV-Gerätes.
Bright Verändert die He lligkeit der TV-Bilddars tellung.
Aktivier t oder deaktiviert die Flimm erunterdrückung. In manchen
Sharp
Fällen erscheint das Bil d etwas klarer, wenn diese Funktion
ausgeschaltet ist.
Direction
‘Positionierung’
Zoom
‘Quadrant
Zoom’
Zoom Off
Beam
Page Up
Page
Down
Positioniert das übertragene Computerbil d auf dem T V -Bildschi r m.
Es können zwischen der Bil dposi tion am Monitor und am TV-Gerät
leicht e Differenzen auf treten, die hier ausgeglichen werden .
Schnellzoomf unk tion. Der Bildschirminhalt wir d in 4 Quadranten
aufgeteilt. Beim Druck auf eine der 4 Zoomtasten wird der zugehörige
Quadrant auf den ganzen TV-Bildschirm vergr ößert.
Deaktiviert die Zoom funkti on und stellt den standardmäßigen
Bildschirminhalt wieder her.
Aktivier t einen roten Laserpointer, der f ür Ihre Präsentati on
verwendet werden kann.
In Verbindung mit diverser Pr äsentationssoftware (z. B .) Microsoft
Powerpoint kann di ese Taste verwendet werden, um im Kont ext eine
Seite zurückzublätt er n.
In Verbindung mit diverser Pr äsentationssoftware (z. B .) Microsoft
Powerpoint kann di ese Taste verwendet werden, um im Kont ext eine
Seite vorzubl ättern.
LINDY-ELEKTRONIK GmbH I nstallation und Bedienung – Deutsches Handbuch Seite 17
Page 22

Funktionen des LINDY VGA Converter Plus
Abbildung
Taste Funktionsbeschreibung
F-Taste
Beim Dr uck auf di ese Taste werden nacheinander all e E instellungsm öglichkei ten des
Gerätes durchl aufen und deren kurzzeitige Aktivit ät durch die entsprechende LED
angezeigt.
ZOOM
SIZE
SHARP
V-SEL
Direction Keys
‘+’ Einzoom en in den Bil dschirminhalt des TV-Ger ätes
‘-‘ Auszoomen aus dem Bildschirminhalt des TV -Gerätes
‘+’ Vergrößert die Bilddar stellung
‘-‘ Verkleinert die Bilddarstellung
‘+’ Aktivier t die Flimm er unterdrückung
‘-‘ Deaktiviert die Flimm er unterdrückung
‘+’
‘-‘
→
←
↑
↓
Kurz
drücken
Aktivier t die Ausgänge Composit e V ideo, S-VHS und deaktiviert den
RGB-SCART-Ausgang
Deaktiviert die Ausgänge Composit e V ideo, S-VHS und aktiviert den
RGB-SCART-Ausgang
Verschiebt den komplett en B ildschirminhalt nach rechts
Verschiebt den komplett en B ildschirminhalt nach links
Verschiebt den komplett en B ildschirminhalt nach oben
Verschiebt den komplett en B ildschirminhalt nach unten
Friert den Bildschi r minhalt ein und setzt di e LE D ‘freeze’. Noc hmaliges
Drücken gibt das Bild wieder frei.
Freeze
Gedrückt
halten
Seite 18 Installation und B edienung – Deutsches Handbuch LINDY-ELEKTRONIK G mbH
Ist die freeze-Funkt ion ausgeschaltet, kann dur c h Gedrückthal ten für ei nige
Sekunden am Ger ät ein Reset durchgeführt werden. Nach diesem Vorgang
blinken alle LEDs mit Ausnahme der SCART LED. Anschli eßend ist der Reset
vollzogen.
Page 23

Fragen und antworten / Fehlerbehebung
Zum Schluß noch einige hilfreiche Tips, um Schwierigkeiten zu begegnen, die mit Ihrem LINDY
VGA Converter auftreten könnten, sich in den allermeisten Fällen jedoch mit wenig Aufwand
beseitigen lassen.
Problem
In Verbindung mit dem
LINDY VGA Converter
Plus keine Anz eige auf
dem Bildschirm des
TV-Gerätes
Der LINDY VGA
Converter Plus kann
keine hohen Auflösungen darstellen.
Lösung
♦ Überprüfen Sie nochmals alle Verbi ndungen wie oben beschrieben .
♦ Überprüfen Sie die Spannungsversorgung und alle dafür notwendigen
Kabelverbindungen.
♦ Überzeugen Sie sic h, daß der richtige AV-Kanal am TV- Gerät angewählt ist.
Einige moderne Geräte besi tzen mehrere AV - K anäle.
♦ Sollt en S ie ein Notebook verwenden, überprüfen Sie mit Hilfe dessen
Dokumentat ion, ob die externe VGA- A usgabe akt iviert ist.
♦ Auf manchen IBM-kompatiblen Systemen kann es erforderlich sein, daß bei m
Booten ein Monitor angeschlossen ist.
♦ Die Bildwiederholfrequenz der Grafikkart e ist zu hoch. Versuchen sie z unäc hst,
diese herabzusetzen. Sollte das nicht helfen, setzten sie die A uflösung herab.
Das Monitorbi ld paßt
nicht auf den TVBildschirm.
Das Bild auf dem TVGerät erschei nt
verzerrt
♦ Die Grafikausgabe eines jeden Computers unterscheidet sich lei c ht von der
anderer Rechner. Ver wenden Si e die ‘Direction’- oder ‘Size’- Tasten am Gerät
oder auf der F ernbedienung.
♦ Bevor Sie irgendwelche Einstellungen vornehmen, führen Sie einen Reset mittels
der ‘freeze’-Tasten durch, wie oben beschri eben.
♦ Die Grafikausgabe eines jeden Computers unterscheidet sich lei c ht von der
anderer Rechner. Ver wenden Si e die ‘Direction’- oder ‘Size’- Tasten am Gerät
oder auf der F ernbedienung.
Noch Fragen? Hilfe?
www.lindy.de
email: support@lindy.com
LINDY-ELEKTRONIK GmbH I nstallation und Bedienung – Deutsches Handbuch Seite 19
Page 24

Seite 20 Installation und B edienung – Deutsches Handbuch LINDY-ELEKTRONIK G mbH
Page 25

A propos de ce Manuel
LINDY VGA Converter Plus - Installation et Utilisation
Première Edition (Octobre 2000)
LINDY VGA Converter Plus – LINDY Art. No. 32 561
© 2000 LINDY FRANCE.
Tous droits réservés. Bien que chaque précaution a été amenée dans la préparation de ce
manuel, LINDY ne suppose aucune responsabilité pour les erreurs ou les omissions. Ni l'un ni
l'autre est toute responsabilité supposée pour dégâts qui résultent de l'usage de l'information
contenues ici. Nous réservons le droit de changer les spécifications, foncti onnement et ensemble
de circuits du produit sans avis. Toutes les marques sont reconnues.
Informations de Sécurité
• Veuillez notez que la radiation laser est malfaisante à l'oeil. N'examinez pas la diode laser
directement. Ne pointez pas le faisceau laser sur une personne.
• A utiliser dans un endroit sec, environnnements non humides.
• Attention – Contient un adaptateur secteur.
• Garantie annulée si l’adaptateur est démonté.
• Connectez l’adaptateur d’alimentation dans une prise proche du LINDY VGA Converter Plus.
• N’utilisez pas l’adaptateur secteur si le boitier est endommagé ou fendu ou que vous pensez
qu’il est défectueux.
Garantie
LINDY garantie que ce produit sera libre de défauts de production et matières pour une période
d'une année de la date d'achat original. Si le produit devrait manquer à son rôle dans usage
normal pendant la période de la garantie, LINDY remplacera ou le réparera gratuitement. Aucune
responsabilité ne peut être acceptée pour dégâts dû à un mauvais emploi ou circonstances à
l'extérieur du contrôle de LINDY. Aussi LINDY ne sera pas responsable pour toute perte, dégâts
ou blessures qui surviennent de l'usage de ce produit directement ou indirectement. La
responsabilité totale de LINDY selon les termes de cette garantie doit dans toutes les
circonstances été limité à la valeur du remplacement de ce produit.
Si toute difficulté est éprouvée dans l'installation ou usage de ce produit que vous êtes incapable à
résolution, contactez votre fournisseur.
LINDY FRANCE A propos de ce Manuel Page 21
Page 26

Fréquence Radio
Les câbles protégés doivent être utilisés avec ce matériel pour maintenir l'acquiescement
avec fréquence radio. Les règlements de l'émission d'énergie et assurent une immunité
convenable haut niveau aux troubles électromagnétiques.
European E MC directive 89/ 336/EEC
This equipment has been tested and found to comply
with the limits for a class B computing device in
accordance with t he specific ations in the European
standard EN55022. These limits are designed to
provide reasonable protection against harmful
interference. This equipment gener ates, uses and can
radiate radio frequency ener gy and if not installed and
used in accordance with the instructions may cause
harmful int er ference to radio or television reception.
However, t here is no guarantee that har mful
interference will not occur in a particular installation. If
this equipment does cause interference to radi o or
television rec eption, which can be det er mined by
turning the equipment on and off, the user is
encouraged to correc t the interference with one or
more of the following measures: (a) Reor ient or
relocate t he receiving antenna. ( b) Increase the
separation between the equi pment and the receiver .
(c) Connect t he equipment t o an outlet on a ci r c uit
different from t hat to which the receiver is connected.
(d) Consult the suppl ier or an experienced radio / TV
technician for help.
FCC Compliance Statement ( United States)
This equipment generates, uses and can radiat e r adio
frequency energy and if not install ed and used properly,
that is, in strict ac c or danc e with the manufacturer’s
instructions, may cause interference to radio
comm unication. It has been tested and f ound to comply
with the limits for a class A computing device in
accordance with t he specific ations in Subpart J of part
15 of FCC rules, which are designed to provide
reasonable protect ion against such inter ference when
the equipment is operated in a commercial environment.
Operation of this equipment i n a r esi dential area may
cause interference, in whic h c ase the user at his own
expense will be required to take whatever measures
may be necessary to cor r ec t the interference. Changes
or modifications not expressly appr oved by the
manuf ac turer could void t he user’s authority to operate
the equipm ent.
Canadian Department of Communications RFI
statement
This equipment does not exceed the class A limits f or
radio noise emissions from digital apparatus set out in
the radio i nterferenc e r egulations of the Canadian
Department of Communications.
Le présent appareil numérique n’émet pas de
bruits rad ioélectriques dépassant les limites
applicables aux app areils numériques de la classe
A prescrites dans l e règlement sur l e brouillage
radioélect riques pu blié par le ministère des
Communications du Canada.
Page 22 Fréquence Radio © LINDY FRANCE
Page 27

Introduction
Le LINDY VGA Converter Plus est un convertisseur professionnel d’images graphiques
d’ordinateur vers un écran de télévision. Avec lui vous pouvez créer des présentations puissantes,
impressionnantes. Par exemple, vous pouvez personnaliser les réglages pour obtenir des
performances optimales en True Color sur votre téléviseur. Le LINDY VGA Converter Plus peut
fonctionner avec des plate-formes différentes. Il suffit de le brancher et faire vos présententations
avec tout ordinateur - IBM PC ou MAC… etc.
Vous pourrez ainsi contrôler et ajuster vos présentations et utiliser une combinaison avec la
télécommande ou les boutons du panneau frontal de l’appareil. Essayez toutes les options pour
obtenir un affichage optimal sur votre périphérique d’affichage.
Le LINDY VGA Converter Plus offre une qualité d'i mage superbe. Il est possible d’afficher une
résolution jusqu'à 1280 x 1024 True Color. Avec notre technologie de réduction de scintillement,
votre présentation permettra d’obtenir des images graphiques à la télé claires et confortables.
Caractéristiques
• Contrôle à distance avec pointeur laser intégré et fonction page up/page down
(Page Up/Down non compatible avec le Mac)
• “Plug and Play” – pas de logiciel nécessaire
• Affichage simultané sur le moniteur du PC et l’écran de télévision
• Technologie de réduction de scintillement
• Réglage vertical et horizontal pour un bon réglage de l’affichage TV
• Fonction Zoom & Pan
• Fonction gel d’image
• Pointage de zone et fonction cacher/révéler
• Menu OSD
• Excellent support pour DVD et CDi
• Support de résolutions multiples jusqu’à 1280 x 1024
• Taux de raffraichissement jusqu’à 150Hz
• Sortie Composite, S-VHS, RGB Scart
• Support du format PAL
© LINDY FRANCE Installation & Utilisation Manuel en Françai s Page 23
Page 28

Configuration Nécessaire
• Tout 286 ou modèle supérieur IBM PC/AT avec une carte graphique VGA.
• Tout Apple Macintosh avec une sortie vidéo. Adaptateurs optionnel s nécessaires.
• PAL TV avec Composite, S-VHS ou connecteur vidéo RGB SCART.
Contenu du coffret
! LINDY VGA Converter Plus
! Télécommande
! Manuel d’utilisation (Ce manuel)
! Adaptateur d’alimentation AC-DC
! Câble d’extension VGA « Y »
! Câble Vidéo Composite
! Câble Clavier avec entrée/sortie
! Câble Vidéo S-VHS
! Câble Vidéo RGB SCART avec câble audio/vidéo pour entrée audio (d’une carte son)
Accessoires Optionnels :
! Adaptateur Video PC vers Mac
! Adaptateur pour moniteur Mac vers PC
Page 24 Installation & Utilisation Manuel en Françai s © LINDY FRANCE
Page 29

Installation
La configuration système du LINDY VGA Converter Plus est indiquée ci-dessous :
Coté Arrière du LINDY VGA Converter Plus
CONNECTEUR DESCRIPTION
On / Off
DC 9V
Bouton on/off. La LED au dessus a droite du convertisseur s’allume lorsqu’il
est alimenté.
Connecteur d’alimentation
Entrée : DC 9V
SCART Option de sortie vidéo pour la connexion de la TV
S-VHS Sortie S-VHS pour la connexion à la TV
VIDEO Sortie Vidéo Composite pour la connexion de la TV
VGA OUT
Connectez votre moniteur à cette sortie
VGA IN Connectez le câble VGA de votre carte vidéo à ce connecteur.
Connexion du LINDY VGA Converter Plus à la sortie graphique
♦ Eteignez votre ordinateur et ses périphériques.
♦ Placez le LINDY VGA Converter Plus près de votre ordinateur.
♦ Connectez le bout du câble Y nommé “MONITOR” à votre câble moniteur.
♦ Connectez le bout du câble Y nommé “GRAPHIC” à votre carte graphique.
Connectez le bout du câble Y nommé “ENCODER ” au VGA Converter Plus.
Remarques spéciales pour les utilisateurs de Laptop
Certains Notebooks ou Laptops avec un affichage LCD ne
supportent pas un affichage simultané du LCD et du
moniteur externe. Lorsque vous connectez un moniteur
externe, veillez bien à commuter sur le port de ce moniteur.
Vérifiez votre doccumentation concernant l’activation d’un
moniteur externe.
Connex ion du LINDY VGA Converter Plus à un écran d’ordinateur.
♦ Connexion votre moniteur au LINDY VGA Converter Plus avec un câble moniteur en le
connectant sur la sortie “VGA OUT” du LINDY VGA Converter Plus.
© LINDY FRANCE Installation & Utilisation Manuel en Françai s Page 25
Page 30

Pour Macintosh:
Un adapatateur optionnel de l’écran PC au Mac peut être nécessaire avec certains modèles
d’écrans Macintosh.
Connexion du LINDY VGA Converter Plus à la TV ou à un magnétoscope
♦ Vidéo Composite à TV
Connectez un coté du câble vidéo Composite au LINDY VGA Converter Plus et l’autre coté
dans l’entrée de votre téléviseur.
♦ S-VHS à TV
Connectez un coté du câble S-VHS dans le LINDY VGA Converter Plus et l’autre coté dans
l’entrée S-VHS du téléviseur.
♦ RGB SCART Video à TV
Si vous utilisez un équipement spécial nécessitant une sortie RGB SCART, connectez le câble
RGB SCART à la sortie vidéo RGB SCART.
♦ Pour le magnétoscope
SI vous souhaitez utiliser votre magnétoscope avec la TV, connectez un coté du câble
composite à la sortie Video Composite du LINDY VGA Converter Plus et l’autre coté à votre
magnétoscope. Vous pouvez utiliser un connecteur S-VHS pour une meilleure qualité d’image
si votre magnétoscope supporte le S-VHS. Vous pouvez également connecter la sortie vidéo
de votre magnétoscope à la télévision pour un contrôle vi déo.
Connexion de l’adaptateur d’alimentation
♦ Connectez le Jack d’alimentation au LINDY VGA Converter Plus et l’autre à la source
d’alimentation.
Page 26 Installation & Utilisation Manuel en Françai s © LINDY FRANCE
Page 31

Utiliser le LINDY VGA Converter Plus
Touches de fonctions de la télécommande du LINDY VGA Converter
Image
Bouton Description de la Fonction
Mode
Pan
Direction
Area
Zoom
Ce bouton est utilisé pour régler le contr aste, la couleur, la netteté et
la réduction de scintillement sur le moniteur.
Sert à placer les graphiques correct ement sur l’affichage TV. Il se
peut qu’il y ait certaines différences entre des moniteurs et des
téléviseurs différent s. Ces boutons servent donc à régler ce
problème.
Ceci est une f onction de zoom rapide. Elle se divise en 6 parti es
zoomables, chacune correspondant à une touche de la
télécommande. Des qu’une partie sera sélectionnée, elle occupera
l’écran entièrement.
Zoom Off
Beam
Page Up
Page
Down
Spot
Zoom &
Horizontal
Reveal
Spot Size
& Reveal
Colour
Cette touche permet d’annuler la fonct ion zoom et de r evenir en
mode d’af fichage standar d.
Active le pointeur laser de couleur rouge pour vous assister dans vos
presentations, vous permet tant de montr er des zones précises
Cette fonction est utilisée avec des logiciels comme Microsoft
PowerPoint pour faire défiler vos diaposit ives à l’écran.
Cette fonction est utilisée avec des logiciels comme Microsoft
PowerPoint pour faire défiler vos diaposit ives à l’écran.
Eclaircit une zone zoomée de l’écran. La seconde fonction permet de
se déplacer du haut vers le bas de l’écran, idéal pour les
présentations.
Utilisez ce bouton pour augmenter ou diminuer la taille de la zone
visée et pour changer la couleur de ce dernier.
© LINDY FRANCE Installation & Utilisation Manuel en Françai s Page 27
Page 32

LINDY VGA Converter Plus : Fonctions Principales
Image
Bouton Description de la Fonction
F Lorsque vous appuyez sur l a touche F, la LED sélectionnera une option après l ’autre
ZOOM
SIZE
SHARP
V-SEL
Direction Keys
Freeze
Pressez ‘+’ Zoome une part ie de l’écran
Pressez ‘-‘ Désactive la fonct ion Zoom
Pressez ‘+’ Augmente la taille d’affichage
Pressez ‘-‘ Diminue la taille d’affichage
Pressez ‘+’ Active la r éduc tion de scintillement
Pressez ‘-‘ Désactive la réduction de scintillement
Pressez ‘+’
Pressez ‘-‘
→
←
↑
↓
Pressez &
relâchez
Pressez &
Gardez
Active la vidéo Composite et le mode S-VHS et désactive la sortie RGB
SCART
Active la sortie RGB SCART et désactive la vidéo Composi te et le m ode S VHS
Déplace l’affichage v er s l a dr oite
Déplace l’affichage v er s l a gauc he
Déplace l’affichage v er s l e haut
Déplace l’affichage v er s l e bas
En appuyant sur ce bouton, vous pouvez activer le mode Freeze qui
immobilisera l’affichage à l’écran. Si vous réappuyez à nouveau sur le bouton
Freeze, vous pourrez continuer à travailler normalement.
En restant appuyant sur ce bouton lorsque la LED Fr eez e est éteinte vous
permet de réinitialiser le V GA Conver ter Plus. Lorsque la r éiniti alisation est
effectuée, tout es l es LED excepté la LE D S CA RT, ensuite le LINDY VGA
Converter Plus sera réinitialisé.
Page 28 Installation & Utilisation Manuel en Françai s © LINDY FRANCE
Page 33

Questions et Réponses
Dépannage…
Vous trouverez dans cette section plusieurs solutions pour résoudre les pannes éventuelles du
LINDY VGA Converter Plus. La plupart des problèmes peuvent être résolus sans effort.
Problème
Pas d’aff ichage sur
le téléviseur lors de
l’utilisation du LIND Y
VGA Converter Pl us
Solution
♦ Vérifiez bien les connexions comme décri tes dans le manuel.
♦ Vérifiez que le LINDY VGA Converter Plus est bien alimenté.
♦ Vérifiez bien que le bon canal vidéo soit sél ec tionné.
♦ Si vous utilisez un portable, veuillez vous référer à la notice de votre portable pour
y connecter un moniteur externe.
♦ D’après les spécifications d’IBM , certains écrans doivent êt re connectés à
l’allumage de votre ordinateur.
Le LINDY VGA
Converter Plus ne
monte pas en
résolution.
L’affichage de
l’ordinateur ne
s’adapte pas à
l’écran TV .
L’image sur mon
téléviseur est
déformée.
♦ Le taux de raffraichissement ou la résolution de l’ordinateur sont trop élevées.
Essayez tout d’abord d’abaisser le taux de raffrai c hissement, et ensui te de
changer la résolution s’il n’y a pas d’améliorat ion.
♦ Chaque carte graphi que est légèrement différente l’une de l’autre. Modifiez la taille
d’affichage en conséquence.
♦ Avant de réajuster l ’affichage, réinitial isez le LINDY VG A Converter.
♦ Chaque carte graphi que est légèrement différente l’une de l’autre. Modifiez la taille
d’affichage en conséquence.
♦ Utilisez les réglages de contraste pour éviter toute distorsion.
© LINDY FRANCE Installation & Utilisation Manuel en Françai s Page 29
Page 30 Installation & Utilisation Manuel en Françai s © LINDY FRANCE
Page 34

Page 35

Manuale d’uso
LINDY VGA Converter Plus - Installazione e Utilizzo
Prima Edizione (Ottobre 2000)
LINDY VGA Converter Plus – LINDY Cod. Art. 32 561
© 2000 LINDY Italia Srl
Tutti i diri tti sono riservati. Ogni precauzione è stata presa durante la stesura di questo manuale,
LINDY Italia Srl non si assume responsabilità per errori o omissioni. Neanche per danni causati
dall’utilizzo delle informazioni contenute. Ci riserviamo il diritto di cambiare le specifiche, le
funzionalità e lo schema del circuito del prodotto senza alcun preavviso. Tutti i marchi sono
registrati.
Precauzioni
• Pregasi osservare che la radiazione laser è nociva agli occhi. Non guardare direttamente nel
raggio del laser. Non puntare il raggio laser contro qualcuno.
• Utilizzare in ambienti secchi, privi di sostanze oleose.
• Attenzione – non modificare le parti interne dell’alimentatore.
• Nessuno è autorizzato alla modifica delle parti dell’alimentatore – non aprire.
• Inserire l’alimentatore nella presa del LINDY VGA Converter Plus.
• Non utilizzare l’alimentatore se risulta danneggiato, visibilmente rovinato o se sospettate che
non funzioni perfettamente.
Garanzia
LINDY Italia Srl garantisce il suddetto prodotto per la durata di dodi ci mesi dalla data di acquisto.
Se il prodotto non dovesse funzionare correttamente durante il periodo coperto dalla garanzia,
LINDY provvederà alla sostituzione o alla sua riparazione. Nessuna responsabilità può essere
accettata per danni dovuti all’errato utilizzo o circostanze al di fuori del controllo della LINDY.
Inoltre LINDY non sarà responsabile per qualsiasi perdita e danno provocato direttamente o
indirettamente dall’utilizzo di questa apparecchiatura. La totale responsabilità di LIN DY è lim it at a al
periodo di garanzia e limitata in tutte le circostanze al solo rimborso del costo del prodotto.
Se sorgono delle difficoltà nell’installazione del prodotto, contattare il fornitore.
LINDY ITALIA Srl Manuale d’uso Pagina 31
Page 36

Interferenze su Frequenze Radio
Cavi schermati devono essere utilizzati con questa apparecchiatura per mantenere la conformità
con la frequenza radio emessa e assicurare un soddisfacente alto li vel lo di protezione dai disturbi
elettromagnetici.
Direttiva Eu ropea EMC 89/336/EEC
Questa apparecchiatura è stata testata e trovata
completamente conforme nei limiti della classe B in
accordo con le specifiche Europee dello standard
EN55022. Questi l i m i ti sono def ini t i per provv edere ad
una ragionev ole protezione delle interferenze nocive.
Questa apparecchiatura utilizza e può trasmettere
frequenze radio e se non installata e utilizzata
correttamente come da istruzioni, può causare
interferenze noiose a radio o televisori. Comunque,
non c’è garanzia che i n particolar i installazi oni queste
interferenze a radio o televisori, che possono essere
determinate dalla sua accensione o dal suo
spegnimento, l’utilizzatore può correggere le
interf erenze seguendo una o più di queste m isure: (a)
riposizionare o riorientare l’antenna. (b) incrementare
la distanza tra l’apparecchiatura e il ricevitore. (c)
collegare l ’apparecchiat ura ad una dif ferente presa da
quella a cui p collegato i l ricev itore. ( d) consultare un
tecnico o il f or nitore radio / TV.
Conformità Dichiarazione FCC (USA)
Questa apparecchiatura genera radio frequenze di
disturbo nel c aso in cui non sia c orrettam ente i nstall ata
secondo le specifiche del produttore. Essa è stata
testata e trovata completamente conforme nei limiti
della classe A in accordo con le specifiche del
paragrafo J dell’appendice 15 del regolamento FCC,
che sono designate ad assicurare una ragionevole
protezione se utilizzata in ambienti commerciali.
L’utilizzo di questo strumento in un’area residenziale
può causare interferenze, in questo caso l’utilizzatore
dovrà prendere le necessarie precauzioni per
correggere le interferenze. Cambiamenti o modifiche
non espressamente approvate dal produttore
potrebbero inv ali dare l’autori tà dell ’operatore all ’utilizzo
dell’apparecchiatura.
Conformità Dipartimento Canadese delle
Comunicazioni RFI
Questa apparecchiatura non eccede ai limiti previsti
dalla c lasse A per nocive emissioni radio prov enienti da
apparecchiature digital i, regolarizzate dal Dipartimento
Canadese delle Comunicazioni.
Le présent appareil numérique n’émet pas de
bruits radioélectriques dépassant les limites
applicab les aux ap pareil s numériq ues de l a classe
A prescrites dans le règlement sur le brouillage
radioélectriques publié par le ministère des
Communications du Canada.
Pagina 32 Interferenze su Frequenze Radio LINDY ITALIA Srl
Page 37

Introduzione
La nuova versione del LINDY VGA Converter Plus è un convertitore professionale che permette di
convertire la grafica presente del computer su una TV. Potrete così creare incredibili e
sensazionali presentazi oni di al ta qualità. Per esempio, è possibile personalizzare le informazioni
in modo da ottenere una visualizzazione TV in true colour. L’Enhanced LINDY VGA Converter
Plus è in grado di funzi onare su diverse piattaforme. E’ possibile collegarlo a qual siasi personal
computer - IBM PC o MAC … ecc.
E’ possibil e control l are con la massima efficienza la real izzazi one e i l ri tocco del le presentazi oni ,
utilizzando sia il telecomando che l’apposito tasto posto sulla parte frontale. E’ possibile mettere in
evidenza tutti i dettagl i sul Vostro monitor e ridurre o allargare lo schermo in modo che possano
essere visualizzati al meglio sullo schermo del dispositivo utilizzato per la presentazione.
L’Enhanced LINDY VGA Converter Plus offre immagini di qualità eccellente. La risoluzione
massima è pari a 1280 X 1024 true colour. Mediante la tecnol ogia “ Flicker Resistor”, i l pubblico
può godersi le immagini grafiche in TV con elevata nitidezza e confort.
Caratteristiche
• Telecomando con funzioni laser pointer & page up/down integrate
(La funzione Page Up/Down non è compatibile con Mac)
• “Plug & Play” – non necessita di software d’installazi one
• L’immagine è presente simultaneamente sia sullo schermo TV che sul monitor del PC
• Tecnologia anti-fliccheraggio
• Adattamento Verticale e Orizzontal e dello schermo TV
• Funzione Zoom e Pan
• Controllo del fermo immagine
• Possibilità di evidenziare una zona specifica dello schermo
• On Screen Display
• Eccellente supporto per DVD e CDi
• Supporta risoluzioni multiple fino a 1280 x 1024
• Frequenza fino a 150Hz
• Video Composito, uscita video S-VHS e RGS SCART
• Supporta formato PAL
LINDY ITALIA Srl Installazione & Utili zzo – Manuale in Italiano Pagina 33
Page 38

Requisiti del sistema
• Qualsiasi computer 286 o modelli superiori IBM PC/AT compatibili dotato di scheda grafica
VGA.
• Qualsiasi computer Apple Macintosh con uscita video. Gli adattatori opzionali dovranno essere
richiesti.
• TV con sistema PAL Composite, S-VHS o RGB SCART connettore video.
Contenuto della confezione
! Unità LINDY VGA Converter Plus
! Telecomando
! Manuale d’uso (multilingue)
! Alimentatore AC-DC
! Cavo prolunga VGA a “Y”
! Cavo video Composito
! Cavo tastiera con connettore di passaggio
! Cavo video S-VHS
! Cavo video/audio RGB SCART con connettore ingresso audio (dalla scheda Sound)
Accessori opzionali:
! Adattatore computer Mac ad uscita video PC
! Adattatore video PC video a monitor Mac
Pagina 34 Installazione & Utiliz z o – Manual e i n Itali ano LINDY ITALIA Srl
Page 39

Installazione
Il sistema di configurazione del LINDY VGA Converter Plus è illustrata qui di seguito:
Visione del retro del LINDY VGA Converter Plus
CONNETTORE DESCRIZIONE
DC 9V
Porta jack per l’alimentatore del LINDY VGA Converter Plus
Input: DC 9V
Uscita video per collegamento alla TV. Il cavo SCART inoltre è dotato di un
SCART
connettore di ingresso Audio per il collegamento della Scheda Sound del PC
al connettore SCART.
S-VHS Uscita video S-VHS per collegamento alla TV o Videoregistratore
VIDEO
COMPOSITO
Uscita video Composito per collegamento al Video o alla TV o Camcorder
VGA I/O Collegare il cavo a “Y” a questo connettore
Collegamento del LINDY VGA Converter Plus ad un’uscita video grafica
♦ Spegnere il computer e le periferiche collegate.
♦ Posizionare il LINDY VGA Converter Plus accanto al computer.
♦ Collegare la parte del cavo a “Y” identificata con “VGA CARD” all’uscita video del Vostro PC.
♦ Collegare la parte del cavo a “Y” identificata con “ENDCODER” al VGA Converter Plus
Per Macintosh:
Un adattatore opzionale da Mac a PC potrebbe essere necessario su alcuni modelli di
computer Macintosh.
Nota importante per utilizzatori di Laptop
Alcuni notebook o laptop con monitor LCD non supportano
simultaneamente un monitor ed uno esterno. Quando
collegate ad un computer un monitor esterno, dovrete
comm utare il monitor sulla porta esterna. Pregasi controllare
la documentazione del Vostro computer su come abilitare la
porta per un monitor esterno.
LINDY ITALIA Srl Installazione & Utili zzo – Manuale in Italiano Pagina 35
Page 40

Collegamento del LINDY VGA Converter Plus al monitor di un computer
♦ Video Composito a TV
Collegare un’estremità del cavo video composito al connettore video composito del LINDY
VGA Converter Plus Composite e l’altra sull’ingresso video della TV.
♦ S-VHS a TV
Collegare un’estremità del cavo S-VHS al connettore S-VHS del LINDY VGA Converter Plus e
l’altra all’ingresso della porta S-VHS sulla TV.
♦ RGB SCART Video a TV
Se volete utilizzare un’apparecchiatura speciale che richiede un’uscita video RGB SCART,
collegare il cavo RGB SCART all’uscita vi deo del connettore RGB SCART.
♦ Per VCR
Se volete utili zzare un VCR con una TV, collegare un’estremità del cavo video composito al
connettore video composito del LINDY VGA Converter Plus e l’altra estrem ità all’ingresso video
del VCR. Potete utilizzare il connettore S-VHS per migliorare la qualità se il Vostro VCR
supporta S-VHS. Inoltre potrete collegare l’uscita video del VCR alla TV per avere un
monitoraggio.
Collegamento dell’alimentatore
♦ Collegare un’estremità dell’uscita Jack dell’alimentatore al LINDY VGA Converter Plus e l’altra
ad una presa elettrica.
Collegamento del cavo tastiera (solo per PC)
♦ Collegare il cavo tastiera con il connettore passante all’uscita del Vostro PC e la parte opposta
al VGA Converter.
Pagina 36 Installazione & Utiliz z o – Manual e i n Itali ano LINDY ITALIA Srl
Page 41

Utilizzo del LINDY VGA Converter Plus
Funzioni dei tasti del telecomando del LINDY VGA Converter Plus
Figura
Tasto Descrizione della funzione
Mode Tasto per regolare la Luminosità, il Colore, lo Sfarfallio su llo s c he rmo .
Visuali zza i dati cat turat i dal c om puter sull o scherm o TV . Pot rebbero
Pan
Direction
Area
Zoom
esserci alcune pi c c ole dif ferenze tra quello presente sulla TV e quello
sul monitor del PC; questo tasto permette di eseguire dei piccoli
aggiustament i sullo schermo.
Questa è una funzi one di zoom vel oce. E’ div isi bile ino 6 quadranti .
Quando ogni tasto corrispondente viene prem uto, la relativa porzione
verrà ingrandita ed occuperà l’intero schermo della TV. Questa
porzione verrà sovrapposta alle altre.
Zoom Off
Beam
Page Up
Page
Down
Spot
Zoom &
Horizontal
Reveal
Spot Size
& Reveal
Colour
Una volta che è attiva la funzione di zoom, dovrete premere i l tasto
di cancellazione del l’area zoom per r ipristi nar e il video alla norm alità.
Produce un raggio laser (di colore rosso) che Vi aiuterà nella
visualizzazione di alcuni dettagli durante le present az ioni.
Quando si util izzano per le presentazioni certi software come p.es.
Microsof t Powerpoint potrete ut ili zzare questo t asto per rit ornare al la
pagina precedente.
Quando si utilizzano per le presentazioni c erti software come p.es.
Microsoft Powerpoint potr ete utilizzare questo tasto per andar e alla
pagina successiva.
Evidenziare una zona sullo schermo e poi utilizzare i tasti per
spostare quest’area dove desi der ate. La funzione “Horizontal Reveal”
è utilizzata per evidenziare dall’alto verso il basso dello schermo,
ideale per pr esentaz ioni.
Utilizzare questo tasto per aumentare o diminuire la dimensione della
zona da evidenziare e cambiare i l colore del lo sfondo.
LINDY ITALIA Srl Installazione & Utili zzo – Manuale in Italiano Pagina 37
Page 42

Funzioni dei tasti sul LINDY VGA Converter Plus
Figura
Tasto Descrizione della funzione
F ‘Tasto Funzione’
ZOOM
SIZE
SHARP
V-SEL
Direzione tasti
Passa attraverso le possibili opzioni da selezionare. Ogni volta che si preme il tasto ‘F’ il
LED mostrerà le opzioni sotto elencate:
Premere
‘+’
Premere
‘-‘
Premere
‘+’
Premere
‘-‘
Premere
‘+’
Premere
‘-‘
Premere
‘+’
Premere
‘-‘
→
←
↑
Aumenta lo zoom sullo schermo TV
Riduce lo zoom e torna al la visualizzazione normale sullo schermo TV
Aumenta la dimensi one visual izzata
Diminuisce la di mensione visualizz ata
Abilita la riduzione dello sfarfallio
Disabilita la riduzione dello sfarfallio
Abilita l’uscita video composito e S-VHS & disabilita quella RGB SCART
Abilita l’uscita RGB SCART & disabilita quella video composito e S-VHS
Muove il video verso destra
Muove il video verso sinistra
Muove il video verso l’alt o
↓
Premere
&
rilasciare
Freeze
Pagina 38 Installazione & Utiliz z o – Manual e i n Itali ano LINDY ITALIA Srl
Premere
& tenere
premuto
Muove il video verso il basso
Ferma l’immagine sullo schermo TV ed illumina il relativo LED. Una volta che il
LED è acceso premere anc or a il tasto se si desidera tornare alla visi one
normale.
Quando il LED è spento, premendo il tasto e tenendolo premuto per qual che
secondo resetterà il VGA Converter Plus. Quando questa operazione è stata
eseguita tutti i LED si accenderanno sull’unità (eccetto quello SCART) e
rilasciando il tasto il LINDY VGA Conver ter Plus è resettato.
Page 43

Domande e Risposte
Guida alla soluzione …
Ques t o c ap it o lo fo r n is c e a lc u n i ut ili s uggerim enti per diagnosticare eventuali problemi con il LINDY
VGA Converter Plus. Molti di questi problemi possono essere risolti con facilità.
Problema
Non appaiono le
immagini sul
televisore quando si
utilizza il LINDY VGA
Converter Plus
Soluzione
♦ Controll are tutti i collegamenti come descritto in questo manuale.
♦ Controll ar e se il LINDY VGA Converter Plus è acceso.
♦ Verificare che il canale AV si a stato selezionato. Alcuni televisori m oder ni hanno
più di un canale AV.
♦ Se state utilizzando un not ebook , verifi c ar e la document az ione e controllare come
impostar e la modalità di monitor esterno.
♦ Come specificato dall’IBM, alcuni sistemi potr ebber o r ichiedere che il monitor sia
già collegato al momento del l’accensione.
Il LINDY VGA
Converter Plus non
può operare con alt e
risoluzioni
La grafi c a del
computer non si
adatta allo schermo
TV
L’immagine sul
televisore è distorta.
♦ La fr equenza o la r isoluzi one dei comput er è stata sett ata troppo al ta. Pr ov ate ad
abbassare come prima cosa la frequenza. Se anche con questo tentativo non
funzi ona allora abbassate anche la r isoluzione.
♦ L’uscita video di ci ascuna scheda graf i ca è l eggerm ent e di v er sa da tutt e le al t re .
Utilizzate i tasti Direction o Size sul l’unità principale o sul telecomando.
♦ Prim a di eseguire qualsiasi regol azione, ripr istinare le i mpostazioni pr edefinit e di
tutti gli attributi dell’immagine premendo e tenendo premuto il tasto Freeze per
qualche secondo.
♦ Ogni uscita video sulla scheda grafica è leggermente diversa dalle altre. Utilizzare i
tasti Dir ection o Si z e sul l’unità principale o sul telecom ando.
♦ Utilizzare i controlli per la luminosità del LINDY VGA Converter Plus o del
televisore per ridurre la distor sione.
LINDY ITALIA Srl Installazione & Utili zzo – Manuale in Italiano Pagina 39
 Loading...