

Page 1
KVM Extender SMART
User Manual English
Benutzerhandbuch Deutsch
Manuel Utilisateur Français
Manuale d’uso Italiano
LINDY No. 32397
www.lindy.com
© LINDY ELECTRONICS LIMITED & LINDY-ELEKTRONIK GMBH - FIRST EDITION (March 2005)
Page 2

User Manual 1
Benutzerhandbuch 7
Manuel Utilisateur 13
Manuale d’uso 19
Page 3
English User Manual
p
Introduction
Thank you for purchasing the LINDY KVM Extender SMART. The KVM Extender SMART allows
you to control your PC, server or KVM switch from a keyboard, mouse and monitor at distances
of up to approximately 150 metres (500 feet) away using low cost CAT5 or higher cable.
The KVM Extender SMART consists of a Transmitter (Local) unit and a Receiver (Remote) unit.
The Transmitter connects to a computer or KVM switch. The Receiver unit is located at a
remote location and connects to a keyboard, monitor and mouse console. The KVM Extender
SMART converts the PS/2 and VGA signals into a signal that can be transmitted over
inexpensive CAT5 Ethernet cable.
The KVM Extender SMART is ideal for network managers and system administrators – a
workstation can be connected to the Receiver unit allowing the operator to work on his
computer or remotely on the KVM switch. Additionally, a local console can be connected to the
Transmitter unit for direct access to the KVM switch. Both local and remote consoles can
access the servers connected to the KVM switch simultaneously, governed by a short timeout.
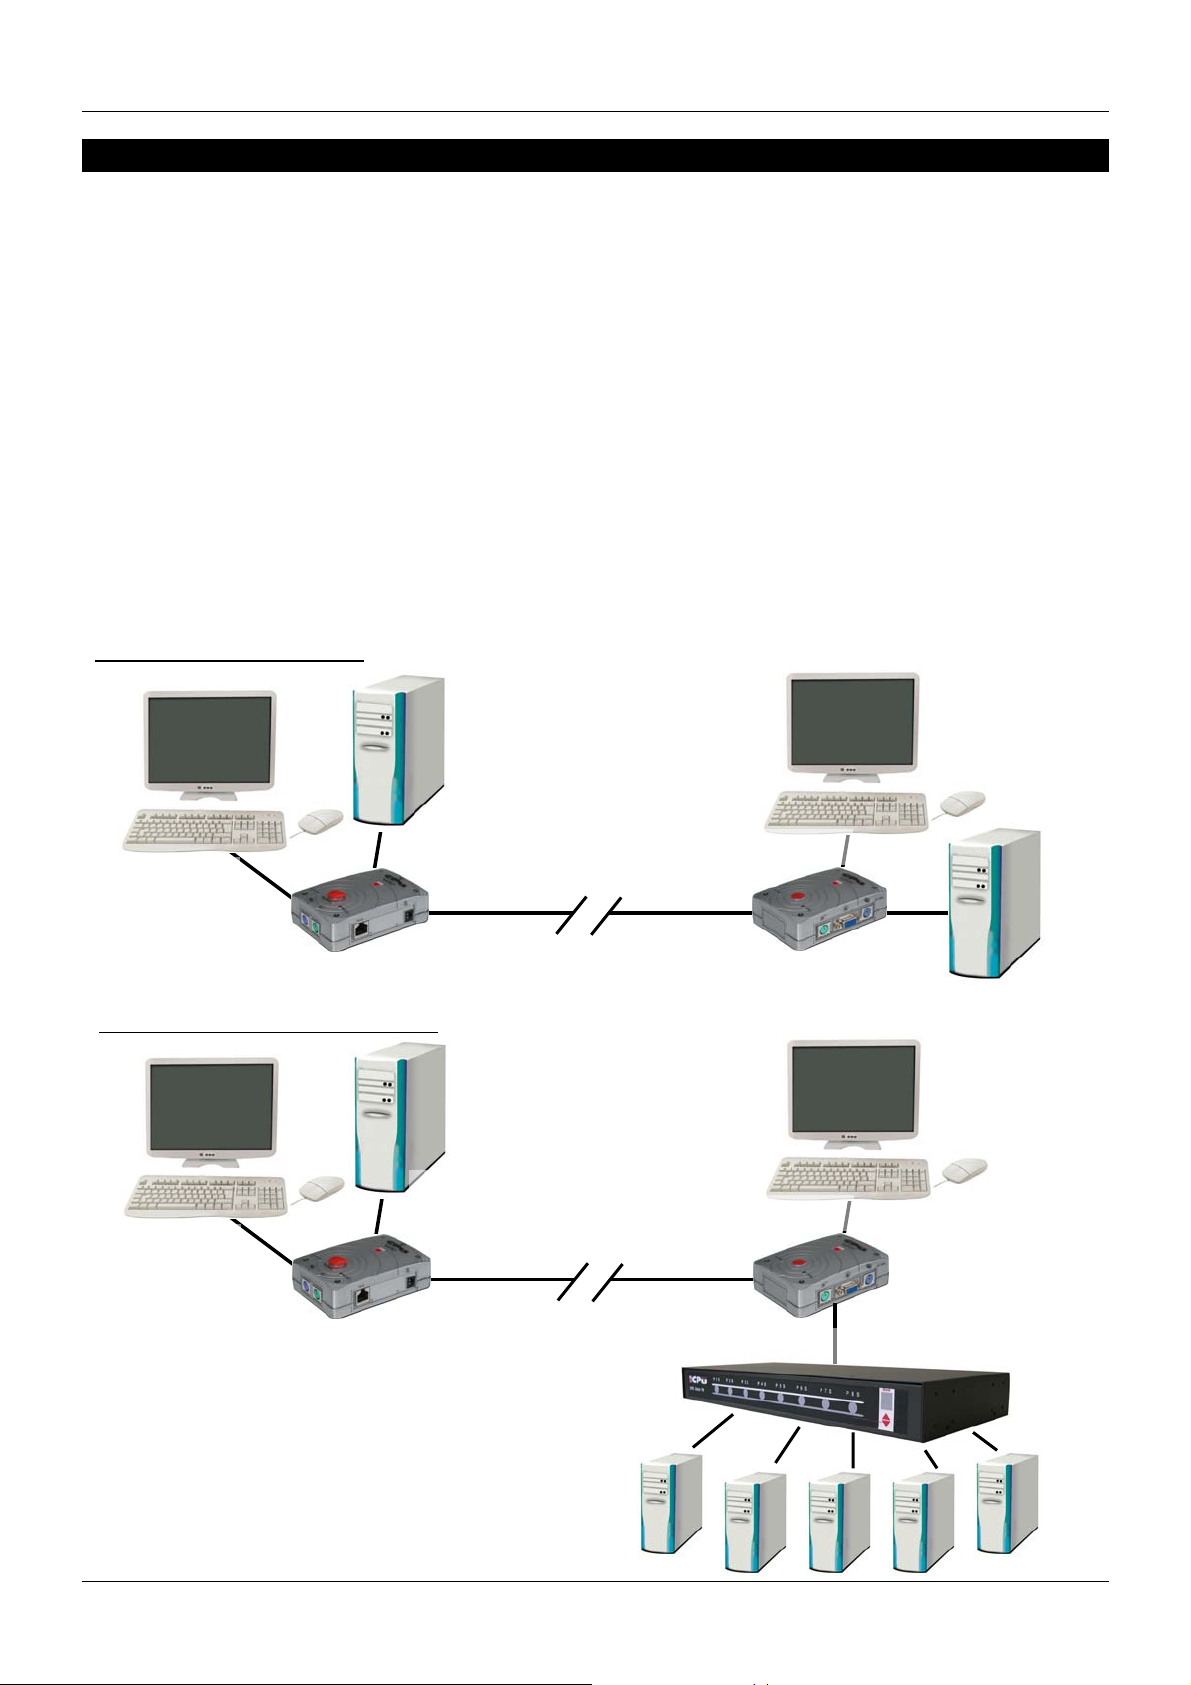
Using the KVM Extender SMART to remotely access a computer:
Remote
Operators PC
Remote C
Using the KVM Extender SMART to remotely access a KVM Switch:
onsole
Remote Receiver
Up to 150m
Remote
erators PC
O
Remote Console
Remote Receiver
Up to 150m
Local Computer
Local Console
Local Transmitter
Local Console
Local
Transmitter
KVM Switch
1
Page 4
User Manual English
Features
Provides a convenient and secure method of remotely locating workstations or
servers without compromising convenience and control
Distances of up to 150m supported between local and remote units
Dual console operation – control your computer / KVM Switch from both local and
remote locations
Remote Receiver unit features a built-in KVM Switch – allowing control of a local PC
High-resolution video support: 1280 x 1024 @ 100m
800 x 600 @ 150m
Adjustable VGA Tuning control to improve video quality
Easy, user-friendly installation – no software required
Supports PS/2 keyboard/mouse and VGA monitor signals
Compatible with all major operating systems
Package Contents
Local Transmitter unit
Remote Receiver unit
9V DC, 500mA Power Adapter (for the Remote Receiver unit)
1 x 3-in-1 KVM cable
This manual
System Requirements
VGA, SVGA or Multisync monitor for each console. The monitor should be capable
of supporting the highest resolution you will be using on any computer in the
installation
PS/2 keyboard and mouse for each console
Note: If you experience problems with mouse functionality, try using the same brand and
model of mouse on both local and remote units.
Additional Cable Requirements
If you want to connect a workstation to the remote receiver you require a 3-in-1 KVM cable (not
included). For optimum signal integrity and to simplify the layout, we strongly recommend that
you use high quality LINDY 3-in-1 KVM cables. The following lengths are available:
1m No. 33711
2m No. 33712
3m No. 33713
5m No. 33714
For connecting the local and remote units, Category 5 UTP, STP, FTP or PIMF cable is the
minimum requirement. Using lower quality cable will result in a degraded video signal.
See
www.lindy.com for our extensive range of CAT5 and higher cable.
2
Page 5
User Manual English
Product Information
Local Transmitter unit
Computer/KVM Switch
Connection Ports
Remote Receiver unit
VGA Tuning
Control
Console Keyboard &
Mouse Ports
RJ-45
Connection
RJ-45
Connection
DIP Switches
Console
Connection Ports
Power Adapter
Connection
Console
Video Port
Computer
Connection Ports
3
Page 6

User Manual English
Installation
Important: Make sure all of your computers and peripherals are switched OFF before
proceeding with the installation.
Transmitter Unit
If the distance between the Local Transmitter and the Remote Receiver is greater than 90
metres (300 feet) you must set DIP switches 1 & 2 on the side of the Transmitter unit to ON.
1. Connect your keyboard, mouse and monitor to the Local Console ports on the
Transmitter unit.
2. Using a 3-in-1 KVM cable, connect the ports labelled PC / KVM on the Transmitter unit to
the keyboard, mouse and video ports on your computer or the keyboard, video and
mouse control console ports on your KVM switch.
3. Connect the CAT5 (or higher) network cable to the RJ-45 port
Remote Receiver Unit
1. Connect your keyboard, mouse and monitor to the ports on the Remote unit.
2. Using the supplied 3-in-1 KVM cable, connect the keyboard, video and mouse ports
labelled LOCAL PC to the keyboard, video and mouse ports on your local PC.
3. Connect the CAT5 (or higher) network cable to the RJ-45 port
4. Connect the power supply jack to the port on the Remote unit. Plug the power supply into
the mains
Powering up and checking the installation
1. Power on the PC connected to the Remote Receiver unit and then power on the PC /
KVM Switch installation connected to the Local Transmitter unit.
2. Check the display quality at the Remote Receiver console. Rotate the VGA Tuning
control to adjust the picture quality. If this does not provide a good enough picture quality
try changing the dip switches to all possible settings and try VGA tuning again until you
get the best result.
4
Page 7
User Manual English
LED Status Indicators
Remote Receiver Unit
LED STATUS MEANING
LOCAL RED The console is switched to the workstation
LOCAL
REMOTE RED
REMOTE SOLID
FLASHING
RED
LED STATUS MEANING
POWER OFF No computer(s) connected to the Local Transmitter.
POWER RED Computer(s) connected to the Local Transmitter.
STATUS
REMOTE OFF
FLASHING
RED
Keyboard hotkey commands (Remote Receiver only)
Both consoles of the extender can have simultaneous access to the connected server or KVM
switch. Active keyboard and mouse access is governed by a short timeout period.
When you access from the local console at the Transmitter unit you can use operate your KVM
switch using its regular keyboard hotkeys. When you use the remote console you have two
additional hotkeys that allow you to switch between your workstation and remote KVM access:
You can switch console control at the Remote Receiver unit from PC port (connected
workstation) to RJ-45 port (the PC / KVM switch connected to the Local Transmitter) using this
simple hotkey command:
The console is switched to the workstation, but the
PC is turned off or not connected.
The console is switched to the remote computer /
KVM Switch
The console is switched to the remote computer /
KVM Switch but the computer(s) are not connected or
are switched off.
Local Transmitter Unit
Flashes when there is local console keyboard/mouse
activity.
When there is no console keyboard/mouse activity
this LED remains off.
Scroll
Lock
+ +
Scroll
Lock
C
= select ‘PC Port’ or ‘RJ-45 Port (Remote KVM access)
When switching, the appropriate LOCAL and REMOTE LED will light on the Remote unit. You
will also hear an audible confirmation. You can enable and disable this audible beeper using
this hotkey command:
Scroll
Lock
Scroll
Lock
+ +
Q
= Beeper ON/OFF
5
Page 8

User Manual English
Troubleshooting
There are no LED’s illuminated on the Remote Receiver unit
Ensure that the AC Adapter is plugged into the mains and the jack is plugged into
the socket on the Remote Receiver.
Verify that the connected PC is switched on. Otherwise it may result in display
problems.
There is no video signal displayed on the monitor
Check that the VGA cables and CAT5 cable are properly connected to the
respective ports on the Receiver and Transmitter units.
Ensure the VGA cables are correctly connected to the computers
Make sure the power adapter is connected to the Receiver
If you still can’t see a picture, try connecting with a short CAT5 patch cable to make
sure there is not a fault with the CAT5 cable.
The display is ‘foggy’ or unclear.
Check that the VGA cables are properly connected.
Try adjusting the VGA Tuning control as described in section Installation
Ensure that the VGA resolution is not set too high for the length of Ethernet cable
that is used.
Try a higher specification or shorter length CAT5, 5e or 6 cable
Try reducing the display resolution.
6
Page 9
Benutzerhandbuch Deutsch
p
Einführung
Dieser KVM-Extender erlaubt Ihnen Monitor-, Maus- und Tastatursignale zu Ihrem PC oder
KVM-Switch über günstiges Cat.5 Netzwerkkabel über eine Entfernung bis zu 150m zu senden.
Der KVM Extender SMART besteht aus einem Transmitter (Local Unit) und einem Receiver
(Remote) Unit. Der Local Unit (Transmitter) wird am fernzubedienenden PC oder KVM Switch
angeschlossen, der Receiver (Remote Unit) befindet sich (wie eine Fernbedienung: Remote
Control) beim User. Die beiden Units werden mit preiswertem Netzwerkkabel Cat.5 oder höher
verbunden.
Der KVM Extender SMART ist der ideale KVM-Extender für Netwerkadministratoren: An der
lokalen Seiten am KVM Switch erklaubt er zusätzlich den Anschluss einer Arbeitskonsole mit
Monitor, Maus und Tastatur. Dies ist für Wartungsarbeiten eine quasi unverzichtbare Option.
Beide Konsolen können simultan arbeiten, der aktive Zugriff wird über einen kurzen Time-out
geteilt. Und der Extender erlaubt am Büroarbeitsplatz (Remote) zusätzlich den Anschluss eines
Arbeitsplatzrechners, so dass der User / Admin bei Bedarf vom Arbeitsplatzrechner jeder Zeit
auf den KVM-Switch im Serverraum umschalten kann.
Beispielkonfiguration mit einem PC
Remote C
Beispielkonfiguration mit einem KVM Switch
onsole
Remote Receiver
Remote Console
Remote Receiver
Remote
Operators PC
Remote
O
erators PC
Bis 150m
Kabellänge
Bis 150m
Kabellänge
Local Console
Local Transmitter
Local Console
Local Computer
Local
Transmitter
KVM Switch
7
Page 10

Benutzerhandbuch Deutsch
Eigenschaften
Erlaubt den bequemen komfortablen Remote Zugriff auf PCs, Server und KVM-
Switches aus Distanzen bis 150m
Dual Console Betrieb: Je eine Arbeitskonsole an jeder Lokation
Option Arbeitsplatzrechner: Der Remote Unit am Arbeitsplatz enthält einen KVM-
Switch zum Umschalten zwischen Arbeitsplatzrechner und Remote KVM-Zugriff
Unterstütz hohe VGA Auflösungen, z.B.: 1280 x 1024 bis 100m
800 x 600 bis 150m
Einstellbare VGA Verstärkung und RGB-Laufzeitkalibrierung
Einfach zu bedienen und zu installieren – keinerlei Softwareinstallation
Unterstützt PS/2-Tastaturen und -Mäuse sowie VGA-Monitorsignale
Betriebssystem unabhängig, kompatibel zu allen weit verbreiteten Betriebssystemen
Lieferumfang, Packungsinhalt
Local Transmitter Unit (am fern zu bedienenden PC / KVM-Switch)
Remote Receiver Unit (am Arbeitsplatz)
9V DC, 500mA Netzteil (für den Remote Receiver Unit)
1 x 3-in-1 KVM Kabel, 2m, wahlweise zum Anschluss des lokalen
Arbeitsplatzrechners oder des fern bedienten KVM-Switch bzw. PC
Dieses Handbuch
Systemanforderungen
VGA, SVGA oder Multisync Monitor für beide Konsolen. Beide Monitore müssen die
höchsten geplanten Auflösungen unterstützen.
PS/2 Tastatur und Maus an beiden Konsolen, ggf. gleiche Modelle erforderlich
WICHTIG: Falls Sie Probleme mit den Maus- und Tastatursignalen haben setzen Sie bitte
identische Mäuse und Tastaturen local und remote ein!
Kabel und Zubehör
Sowohl zum Anschluss eines Arbeitsplatzrechners wie auch zum Anschluss des fernzusteuernden KVM-Switch / PC benötigen Sie je ein Monitor-, Maus- und Tastaturkabel. Ein 2m Kabel ist
bereits im Lieferumfang enthalten. Für das andere Kabel können Sie auf ein LINDY 3-in-1 KVMKombikabel in der passenden Länge aus der folgenden Tabelle zurückgreifen:
1m No. 33711
2m No. 33712
3m No. 33713
5m No. 33714
Zur Verbindung von Local und Remote Unit wird ein günstiges Netzwerkkabel Cat.5 oder höher
in passender Länge eingesetzt. Es können sowohl UTP wie auch FTP, STP oder S/FTP/PIMF
Kabel eingesetzt werden. Ein minderwertigeres Kabel kann zu schlechter Bildqualität führen.
Geeignete Kabel finden Sie unter
www.lindy.com in der Rubrik Netzwerk – LAN / Patchkabel.
8
Page 11

Benutzerhandbuch Deutsch
Produktinformation
Local Transmitter Unit
Computer/KVM Switch
Ports
Remote Receiver Unit
VGA Tuning
Konsolenports
Tastatur & Maus
RJ-45
Anschluss
RJ-45
Anschluss
DIP Switches
Konsolenports
Netzteilanschluss
Konsolen-
Monitoranschluss
Computer
Anschlüsse
9
Page 12

Benutzerhandbuch Deutsch
Installation
WICHTIG: Schalten Sie alle angeschlossenen Rechner und Peripheriegeräte aus bevor Sie mit
der Installation beginnen.
Transmitter Local Unit
Ist die Kabellänge zwischen Transmitter und Receiver größer als 90m so setzen Sie die beiden
DIP Switches bitte auf ON.
1. Schließen Sie ihre Maus, Tastatur und Monitor an die entsprechend gelabelten Ports am
Local Unit an.
2. Schließen Sie den fernzusteuernden KVM-Switch oder PC mit einem 3-in-1 Kombi-KVMKabel an die Ports PC / KVM an.
3. Schließen Sie das Netzwerk-Verbindungskabel an den RJ-45-Port an.
Remote Receiver Unit
1. Schließen Sie ihre Maus, Tastatur und Monitor an die entsprechend gelabelten Ports am
Remote Unit an.
2. Schließen Sie den Arbeitsplatzrechner mit einem 3-in-1 Kombi-KVM-Kabel an die Ports
LOCAL PC an.
3. Schließen Sie das Netzwerk-Verbindungskabel an den RJ-45-Port an.
4. Schließen Sie das Netzteil an.
Inbetriebnahme
1. Schalten Sie die Monitore ein und dann den Arbeitsplatzrechner
2. Schalten Sie dann den fernzusteuernden PC bzw. den KVM Switch und ggf. die
angeschlossenen Rechner ein
3. Prüfen Sie die Bildqualität am Arbeitsplatzrechner wenn dieser remote zugreift. Durch
Justierung der Farbkalibrierung können Sie Laufzeitunterschiede der Einzelfarben RGB
justieren und so die Bildschärfe und Farbverschiebungen korrigieren. Sollte dies keine
zufrieden stellenden Ergebnisse liefern so versuchen Sie im Anschluss noch die DIPSwitches anders einzustellen und erneut den VGA Tuning Drehknopf zu justieren.
4. Sollte dies alles nicht die gewünschten Ergebnisse erbringen, versuchen Sie eventuell
noch ein anderes Netzwerkverbindungskabel oder kontaktieren Sie den Techniksupport
von LINDY. Starke Farbsäume auf dem Monitor deuten darauf hin, dass im RJ-45
Verbindungskabel die einzelnen Paare unterschiedlich lang sind und daher
Laufzeitunterschiede für die Einzelfarben Rot, Grün und Blau bewirken, da jedes dieser
Signale über ein Adernpaar im RJ-45-Kabel übertragen wird. Abhilfe kann hier ein
anderes RJ-45-Kabel bringen, der LINDY Laufzeitkompensator (Skew Compensator) Art.
Nr. 39389 und ein höherwertiger KVM-Extender besonders bei Kabellängen oberhalb
von 50m.
10
Page 13

Benutzerhandbuch Deutsch
Bedeutung der LED Anzeigen
Remote Receiver Unit
LED STATUS BEDEUTUNG
LOCAL ROT Diese Konsole greift gerade auf den Arbeitsplatz PC zu
LOCAL
REMOTE ROT
REMOTE AUS
ROT
BLINKEND
LED STATUS BEDEUTUNG
POWER AUS
POWER ROT PC oder KVM Switch angeschlossen und eingeschaltet
STATUS
REMOTE AUS Remote Konsole nicht aktiv bzw. ausgeschaltet
ROT
BLINKEND
Tastatur Hotkey Kommandos ( nur Remote Receiver )
Beide Konsolen können gemeinsamen Zugriff auf den ferngesteuerten KVM-Switch / Server /
PC haben und sehen das Monitorbild gleichzeitig. Aktiver Maus- und Tastaturzugriff ist nur von
einer Seite möglich, wird aber über kurzen Timeout für die jeweils andere Konsole freigegeben,
so dass auch gemeinsame Wartungsarbeiten durchgeführt werden können.
Von der lokalen Konsole am fernzusteuernden KVM-Switch können Sie alle KVM-Hotkeys Ihres
KVM-Switches ganz normal verwenden. Von der Remote Konsole aus haben Sie zwei
zusätzliche Hotkeys, die zwischen dem Zugriff auf den Arbeitsplatzrechner und den Remote
Rechner / KVM-Switch umschalten. Der Umschalt-Hotkey ist:
Diese Konsole greift gerade auf den Arbeitsplatz PC zu
aber der Arbeitsplatz PC ist ausgeschaltet
Diese Konsole greift gerade auf den Remote PC / KVM
Switch zu
Remote PC / KVM Switch nicht aktiv, möglicherweise
Remote Rechner ausgeschaltet
Local Transmitter Unit
Kein eingeschalteter PC oder KVM Switch
angeschlossen (keine Stromversorgung von diesem)
Aktiver Zugriff erfolgt von der lokalen Konsole am
Local Unit
Rollen Rollen
+ +
C
= Umschalten zwischen Arbeitsplatzrechner und
Remote Zugriff am Remote Unit
Die beiden LEDs am Remote Receiver Unit zeigen Ihnen visuell an ob Ihr KVM-Zugriff LOCAL
oder REMOTE erfolgt.
Beim Umschaltvorgang ertönt ein kurzer Quittierungston. Sie können diesen bei Bedarf einoder ausschalten:
Rollen
Rollen
+ +
Q
= Beeper ON/OFF
11
Page 14

Benutzerhandbuch Deutsch
Problemlösung
Am Remote Receiver Unit leuchten keine LEDs
Prüfen Sie ob das Netzteil Strom liefert und korrekt eingesteckt ist.
Es sollte immer ein Arbeitsplatzrechner angeschlossen sein und dieser sollte
eingeschaltet (mindestens Ruhezustand) sein. Wenn dies nicht der Fall ist, kann
dies in einigen Fällen zu Problemen führen.
Auf dem Monitor wird kein Bildsignal angezeigt
Dies könnte ein Zeichen dafür sein, dass sich der Rechner, auf den zugegriffen
werden soll, im Standby Modus oder Ruhezustand befindet oder ausgeschaltet ist.
Versuchen Sie den Rechner auf die übliche Weise aus dem Standby/Ruhezustand
zu wecken (Mausbewegung, Drücken der Leer- oder Großschreibtaste,
Einschalten).
Überprüfen Sie lokal und remote ob die PS/2- und VGA-Kabel korrekt befestigt sind.
Prüfen Sie ob das das RJ-45-Kabel korrekt befestigt ist.
Prüfen Sie ob das Netzteil Strom liefert und korrekt eingesteckt ist.
Falls Sie immer noch kein Bild erhalten, versuchen Sie es mit einem anderen oder
kürzeren RJ-45 Kabel. Beachten Sie bitte die maximal möglichen Distanzen und
Auflösungen.
Das Bild ist unscharf, die Farben sind verwaschen
Prüfen Sie die VGA-Kabel auf korrekten Sitz.
Versuchen Sie mit dem Drehregler VGA Tuning die Bildqualität zu verbessern.
Beachten Sie dabei die Hinweise im Kapitel Installation.
Sollten einzelne Farben stark gegeneinander verschoben sein so ist dies ein
deutlicher Hinweis auf eine ungenügende Kabelqualität des RJ-45-Kabels. Dies
Problem können Sie nur durch ein hochwertigeres RJ-45 Kabel oder einen
Laufzeitkompensator (LINDY Skew Compensator, Art.Nr. 39389) beheben.
Versuchen Sie ob das Bildsignal bei einer geringeren Auflösung besser übertragen
wird.
Sollten alle Maßnahmen nicht das gewünschte Resultat erbringen so kontaktieren
Sie bitte den LINDY-Support. Ziehen Sie eventuell den Erwerb eines höherwertigen
(und teureren) Cat.5 KVM Extender in Betracht.
12
Page 15

Manuel Utilisateur Français
Introduction
Merci pour l’achat du commutateur LINDY KVM Extender SMART. Le KVM Extender SMART
vous permet de contrôler vos PCs, serveurs ou KVM à partir d’un seul clavier, souris et
moniteur sur des distances allant jusqu’à 150 mètres (500 pieds) avec connexion par câble
réseau CAT5 ou supérieur.
Le KVM Extender SMART est constitué d’un transmetteur (Local) et d’un récepteur (Distant). Le
transmetteur se connecte à un ordinateur ou un commutateur KVM. Le récepteur est placé à
l’emplacement distant, (comme un contrôle distant à portée de l’utilisateur) et se connecte à un
clavier, souris et moniteur. Le KVM Extender SMART convertit les signaux PS/2 et VGA dans
un signal pouvant être véhiculé par du câble CAT5 Ethernet.
Le KVM Extender SMART est idéal pour les administrateurs de réseaux et systèmes – un
station de travail peut être connectée au Récepteur permettant l’utilisateur de travailler sur son
ordinateur à distance ou se connecter sur un commutateur KVM. Une console locale
supplémentaire peut être rajoutée au Transmetteur pour accéder directement au commutateur
KVM. Les consoles locales et distantes peuvent accéder aux serveurs et au commutateur KVM
simultanément, avec un délai de commutation très court.
Utilisation du KVM Extender SMART pour accéder à un ordinateur à distance:
PC distant
console d
Utilisation du KVM Extender SMART pour accéder à un commutateur KVM:
istante
Récepteur (distant)
Jusqu’à 150m
PC distant
console distante
Récepteur (distant)
Jusqu’à 150m
Console locale
Transmetteur (local)
Console locale
PC local
Transm.
(local)
Comm. KVM
13
Page 16

Manuel Utilisateur Français
Caractéristiques
Fournit une méthode sécurisée et fiable pour contrôler vos serveurs à distance
depuis un poste de travail local
Distances jusqu’à 150m entre le boîtier local et distant
Utilisation des deux consoles en simultané – contrôlez votre ordinateur / KVM depuis
l’une ou l’autre console
Le récepteur intègre un petit commutateur KVM – permettant le contrôle PC local
Support Haute Résolution vidéo: 1280 x 1024 @ 100m
800 x 600 @ 150m
Contrôle et ajustement de la qualité vidéo VGA
Installation facile et conviviale – pas de logiciel nécessaire
Supporte les signaux PS/2 clavier/souris et moniteur VGA
Compatible avec la plupart des systèmes d’exploitation
Contenu de l’emballage
Transmetteur (local)
Récepteur (distant)
Alimentation 9V DC, 500mA (pour unite distante)
1 câble KVM 3-en-1
Ce manuel
Système Nécessaire
Un moniteur VGA, SVGA ou Multisync pour chaque console. Le moniteur doit être
capable de supporter des hautes résolutions lors de l’utilisation avec des ordinateurs
récents et de cartes graphiques récentes
Un clavier et souris PS/2 pour chaque console
Remarque: Si vous rencontrez des problèmes avec la function de la souris, essayez
d’utiliser la même marque de souris sur les deux unités locales et distantes.
Câbles Additionnels
Si vous souhaitez connecter une station de travail supplémentaire sur le module distant, vous
aurez besoin d’un câble 3-en-1 KVM supplémentaire (non inclus). Pour une qualité de signal
optimale et pour simplifier la mise en place, nous vous conseillons d’utiliser les câbles combinés
LINDY 3-en-1. Les longueurs suivantes sont disponibles:
1m No. 33711
2m No. 33712
3m No. 33713
5m No. 33714
Pour la connexion des boîtiers local et distant, du câble Cat. 5 UTP, STP, FTP ou PIMF est le
besoin minimum. Si vous utilisez du câble de qualité plus faible, le signal sera dégradé.
Consultez notre site
www.lindy.fr pour orienter le choix de votre câble.
14
Page 17

Manuel Utilisateur Français
Information Produit
Transmetteur (local)
PC/Commutateur KVM
Ports de connexion
Connection
RJ-45
Récepteur (distant)
Réglage VGA
Port console clavier
& souris
Connexion
RJ-45
DIP Switches
Ports de connexion
Console
Connexion
Alimentation
Port vidéo de
la console
Ports de connexion de
l’ordinateur
15
Page 18

Manuel Utilisateur Français
Installation
Important: Assurez-vous d’avoir éteint tous les ordinateurs et périphériques pendant
l’installation du matériel.
Transmetteur
Si la distance entre le transmetteur local et le récepteur distant est supérieure à 90 mètres (300
pieds) vous devez régler les DIP switches 1 & 2 du coté transmetteur sur ON.
1. Connectez votre clavier, souris et moniteur aux ports Local Console sur le transmetteur.
2. En utilisant un câble KVM 3-en-1, connectez les ports PC / KVM du Transmetteur aux
ports clavier, souris et moniteur de l’ordinateur.
3. Connectez le câble CAT5 (ou plus) au port RJ-45
Récepteur
1. Connectez votre clavier, souris et moniteur aux ports du récepteur.
2. Avec l’aide du câble KVM 3-en-1 fourni, connectez les ports clavier, souris et vidéo
indiqués LOCAL PC vers les ports clavier, souris et vidéo de votre ordinateur local.
3. Connectez le câble CAT5 (ou plus) au port RJ-45
4. Connectez l’alimentation au port du boîtier Récepteur. Connectez l’adaptateur
d’alimentation au secteur.
Alimentation et vérification de l’installation
1. Allumez d’abord le PC connecté au Récepteur et ensuite le PC ou le KVM connecté au
Transmetteur.
2. Vérifiez la qualité de l’affichage de la console coté Récepteur. Tournez la molette de
réglage de qualité VGA (orange) pour ajuster la qualité de l’image. Si cela n’améliore pas
la qualité de l’image, essayez de changer de commutateur et de réessayer cette
manipulation.
16
Page 19

Manuel Utilisateur Français
Statut des afficheurs LED
Récepteur (distant)
LED STATUT DESCRIPTION
LOCAL ROUGE La console est connectée à la station de travail
LOCAL ROUGE CL.
REMOTE ROUGE
REMOTE FIXE
LED STATUT DESCRIPTION
POWER ETEINT Aucun ordinateur connecté au transmetteur local.
POWER ROUGE Ordinateur connecté au transmetteur local.
STATUS ROUGE CL.
REMOTE ETEINT
Commandes de raccourci clavier (Récepteur distant uniquement)
Les deux consoles de l’extender peuvent accéder simultanément aux serveurs ou aux
commutateurs KVM connectés. L’accès aux clavier et souris sont contrôlés par un timeout de
courte durée.
Lorsque vous accédez depuis la console locale du transmetteur, vous pouvez utiliser votre
commutateur KVM de façon normale en utilisant ses touches de raccourci clavier
correspondantes. Lorsque vous accédez à la console distante, vous devez entrer deux touches
de raccourci supplémentaires vous permettant de commuter entre votre station de travail et
votre KVM distant:
Vous pouvez commuter entre la console de contrôle sur le récepteur (station de travail
connectée) ou sur le port RJ-45 (le PC / KVM connecté au transmetteur local) en utilisant cette
simple commande de raccourci clavier :
La console est connectée à la station de travail, mais
le PC n’est pas allumé ou actif
La console est connectée à l’ordinateur distant ou le
commutateur KVM
La console est connectée à l’ordinateur distant ou le
commutateur KVM mais les ordinateurs ne sont pas
connectés ou éteints.
Transmetteur (local)
Clignote lors d’une activité clavier/souris de la
console locale.
Lorsqu’il n’y a aucune activité clavier/souris, cette
LED reste éteinte.
Arrêt
Défil
+ +
Arrêt
Défil
C
= sélectionne le port ‘PC’ ou ‘RJ-45 (accès distant)
Lors de la commutation, la LED LOCAL et REMOTE vont s’allumer sur le boîtier distant. Vous
allez également entendre un bip sonore pour confirmation. Vous pouvez activer ou désactiver le
beeper en utilisant la commande suivante:
Arrêt
Défil
Arrêt
Défil
+ +
Q
= Beeper ON/OFF
17
Page 20

Manuel Utilisateur Français
Problèmes Rencontrés
Aucune LED n’est allumée sur le Récepteur (distant)
Assurez-vous d’avoir l’adaptateur secteur sous tension et le jack connecté au port
du Récepteur.
Vérifiez que le PC connecté est allumé. Dans le cas contraire, vous rencontrerez
des problèmes d’affichage.
Il n’y a pas de signal vidéo affiché sur le moniteur
Vérifiez que les câbles VGA et Cat.5 soient bien connectés aux ports respectifs du
Récepteur et du Transmetteur.
Assurez-vous d’avoir connecté correctement les câbles VGA aux ordinateurs
Assurez vous que l’adaptateur d’alimentation est bien connecté au Récepteur
Si vous ne pouvez toujours pas voir d’image, essayez de connecter un câble CAT5
plus court pour voir si le câble n’est pas défectueux.
L’affichage est ‘brumeux’ ou n’est pas net.
Vérifiez que les câbles VGA soient correctement connectés.
Essayez d’ajuster l’affichage VGA en utilisant la fonction d’ajustement VGA
Assurez-vous que la résolution VGA n’est pas trop élevée par rapport à la longueur
de câble Ethernet utilisé.
Essayez de connecter un câble Ethernet de plus grande qualité CAT5, 5e ou 6
Essayez de diminuer la résolution d’affichage.
18
Page 21

Manuale d’uso Italiano
Introduzione
Grazie per aver acquistato il KVM Extender Smart LINDY. Questo KVM Extender vi permetterà
di controllare un PC, un Server o un KVM switch da una console (Tastiera, Mouse e monitor) ad
una distanza massima di 150 m utilizzando un normale ed economico cavo CAT5.
Il KVM Extender SMART è composto da un’unità trasmittente (Locale) e una ricevente
(Remota). L’unità trasmittente va connessa ad un computer o ad un KVM switch. L’unità
ricevente va collegata ad una consolle formata da un mouse, una tastiera e un monitor
posizionata nel luogo da cui volete controllare il vostro PC o un KVM switch. Il KVM Extender
SMART converte i segnali PS/2 e VGA in un formato trasmettibile tramite economici cavi
Ethernet Cat.5.
Il KVM Extender SMART è la soluzione ideale per gli amministratori di rete e dei server – una
workstation può essere collegata all’unità ricevente (remota) permettendo all’operatore di
lavorare localmente sul proprio PC e, all’occorrenza, passare all’utilizzo del computer o KVM
switch remoto. In aggiunta, una consolle locale può essere collegata all’unità trasmittente per
consentire l’accesso alle macchine locali. Sia la consolle locale che quella remota sono
accessibili contemporaneamente e il controllo viene assegnato tramite un sistema a Time out.
Utilizo del KVM Extender SMART per accedere ad un computer remoto:
PC Remoto
Consolle Remota
Utilizzo del KVM Extender SMART per accedere ad un KVM Switch remoto :
Unità Remota (Ricevente)
Fino a 150m di
cavo cat.5
Consolle Remota
PC Remoto
Unità Remota (Ricevente)
Fino a 150m di
cavo cat.5
19
Consolle Locale
Unità Locale
(Transmettitore)
Consolle Locale
Unità Locale
(Trasmettitore)
KVM Switch
Computer Locale
Page 22

Manuale d’uso Italiano
Caratteristiche
Permette di posizionare i propri server e workstation in un luoghi sicuri senza
comprometterne il controllo.
Possibilità di posizionare l’unità remota fino a 150m di distanza da quella locale.
Dual consolle – controllate il vostro computer / KVM Switch sia dalla consolle locale
che da quella remota
L’unità remota include un KVM Switch integrato permettendovi di controllare un PC
locale.
Supporto per alte risoluzioni video: 1280 x 1024 @ 100m
800 x 600 @ 150m
Sintonia VGA Regolabile per migliorare la qualità video
Semplice da installare e utilizzare – non necessita di alcun software
Supporta mouse e tastiere PS/2 e segnali video VGA
Compatibile con i principali sistemi operativi
Contenuto della confezione
Unità Locale (Trasmittente)
Unità Remota (Ricevente)
Alimentatore 9V DC, 500mA (per l’unità Remota – Ricevente)
Cavo 3-in-1 KVM (2 x PS/2 + VGA)
Questo manuale
Requisiti di Sistema
Un monitor VGA, SVGA o Multisync per ogni consolle. Il monitor deve essere in
grado di visualizzare la risoluzione più elevata utilizzata su ciascun PC incluso
nell’installazione
Una tastiera e un mouse PS/2 per ogni consolle
Nota: se rilevate problemi nell’utilizzo di mouse e tastiera provate ad utilizzare prodotti
della stessa marca sia per la consolle remota che per quella locale
Cavi Addizionali Richiesti
Se volete connettere una workstation all’unità remota (ricevente) dovrete acquistare un cavo
KVM 3-in-1 (venduto separatamente). Per migliorare la qualità dei segnali e semplificare
l’installazione raccomandiamo l’utilizzo dei cavi ad alta qualità LINDY 3-in-1 KVM . Sono
disponibili le seguenti lunghezze:
Per connettere l’unità locale e quella remota è necessario un cavo, Categoria 5 UTP, STP, FTP
o PIMF. Utilizzare cavi di qualità inferiore causa un forte degrado del segnale video.
Controllate il sito
ampissima gamma a catalogo.
www.lindy.com per selezionare il cavo CAT5 o superiore dalla nostra
1m No. 33711
2m No. 33712
3m No. 33713
5m No. 33714
20
Page 23

Manuale d’uso Italiano
Informazioni sul Prodotto
Unità Locale (Trasmittente)
Porte di connessione
Computer/ KVM Switch
Unità Remota (Ricevente)
Controllo
VGA Tuning
Porta RJ-45
DIP Switches
Porte di connessione
per la Console
Porte Tastiera &
Mouse della consolle
Porta
RJ-45
Porta Video
Consolle
21
Connettore
Alimentatore
Porte di connessione del
Computer
Page 24

Manuale d’uso Italiano
Installazione
Importante: Controllate che tutti i computer e le periferiche siano spente prima di procedere
all’installazione.
Unità trasmittente
Se la distanza fra l’unità ricevente e quella trasmittente è superiore a 90 metri dovrete spostare i
DIP switches 1 & 2 posizionati sul lato dell’unità trasmittente su ON.
1. Collegate la vostra tastiera, mouse e monitor della Consolle Locale alle rispettive porte
sull’unità locale.
2. Collegate le porte mouse, tastiera e monitor del vostro PC/KVM alle porte indicate
sull’unità locale come PC / KVM utilizzando il cavo KVM 3-in-1 fornito.
3. Connettete il cavo CAT5 (superiore) alla porta RJ-45.
Unità Remota (Ricevente)
1. Collegate la vostra tastiera, mouse e monitor alle rispettive porte sull’unità Remota.
2. Se presente, collegate le porte mouse, tastiere e video della vostra workstation alle porte
dell’unità remota indicate come LOCAL PC utilizzando un cavo KVM 3-in-1 (non fornito).
3. Collegate il cavo CAT5 (o superiore) alla porta RJ-45.
4. Collegate l’alimentatore alla porta apposita sull’unità remota e infine inseritelo in una
presa di alimentazione.
Accensione e controllo dell’installazione
1. Accendete il PC eventualmente connesso all’unità Remota (ricevente) e poi il PC/KVM
connesso all’unità locale (trasmittente).
2. Controllate la qualità del segnale video sulla consolle remota. Ruotate il regolatore di
sintonia del segnale VGA per migliorare la qualità dell’immagine visualizzata. Se non
riuscite ad ottenere una qualità soddisfacente ripetete l’installazione modificando
l’ipostazione dei Dip Switch presenti sul lato dell’unità locale (trasmittente) e ripetete la
regolazione fino ad ottenere la migliore qualità possibile.
22
Page 25

Manuale d’uso Italiano
LED Indicatori di stato
Unità Remota (Ricevente)
LED STATO DESCRIZIONE
LOCAL ROSSO La consolle controlla la workstation locale.
LOCAL
REMOTE ROSSO La consolle controlla il PC/KVM Switch remoto.
REMOTE SOLID
ROSSO
INTERMITTENTE
Unità Locale (Trasmittente)
LED STATO DESCRIZIONE
POWER SPENTO Nessun computer connesso all’unità locale.
POWER RED Esistono computer connessi all’unità locale.
STATUS
REMOTE SPENTO
ROSSO
INTERMITTENTE
Comandi da Tastiera – Hotkey (Solo per unità Remota)
Entrambe le consolle dell’extender possono accedere ai computer. La consolle attiva è
governata da un sistema basata da un breve timeout dopo il quale lascia il controllo all’altra
qualora rilevasse traffico.
Quando accedete al KVM switch eventualmente connesso all’unità locale dell’extender potete
continuare a controllarlo tramite le combinazioni hotkey previste dall’apparecchio. Quando
utilizzate la consolle remota avrete altre due sequenze di Hotkeys per commutare fra l’utilizzo
del PC locale e quello/i remoto/i.
Potrete commutare la vostra consolle dal PC connesso all’unità remota a quello connesso
all’unità locale utilizzando la seguente combinazione di tasti:
La consolle controlla la workstation locale ma essa è
spenta o disconnessa.
La consolle controlla il PC/KVM Switch remoto ma il/i
computer sono spenti o disconnessi.
Lampeggia quando c’è attività sulla consolle locale.
Rimane spento quando non c’è attività sulla
consolle.
Blocc
Scorr
+ +
Blocc
Scorr
C
= seleziona ‘PC Port’ o ‘RJ-45 Port (Accesso al PC/KVM
remoto)
Mentre commutate, i LED LOCAL e REMOTE si accenderanno sull’unità Remota e sentirete un
segnale acustico di conferma. Potete disabilitare l’emissione di questo segnale acqustico con
la seguente combinazione di tasti (hotkeys):
Blocc
Scorr
Blocc
Scorr
+ +
Q
= Beeper ON/OFF
23
Page 26

Manuale d’uso Italiano
Risoluzione dei problemi
Non ci sono LED accesi sull’Unita Remota
Assicuratevi che l’alimentatore sia correttamente collegato all’unità remota e inserito
nella presa di corrente.
Verificate che il PC connesso sia accesso. In caso contrario potrebbero sorgere
problemi di visualizzazione.
Sullo schermo non viene visualizzato alcun segnale
Controllate che i cavi VGA e il cavo CAT. 5 siano connessi correttamente alle
rispettive porte sia sull’unità locale che su quella remota.
Assicuratevi che i cavi VGA siano correttamente connessi ai computer.
Assicuratevi che l’alimentatore sia connesso all’unità remota.
Se non ancora non appare nulla a video provate a connettere le unità con un cavo
Patch Cat.5 corto per assicurarvi che non ci siano danni al cavo CAT.5 principale.
L’immagine è “offuscata” o poco visibile.
Assicuratevi che i cavi VGA siano correttamente connessi..
Provate a sintonizzare il segnale VGA come descritto nella sezione “installazione”
Assicuratevi che la risoluzione VGA non sia impostata su un valore troppo elevato in
proporzione alla lunghezza del cavo Cat. 5 utilizzato
Provate ad utilizzare un cavo Ethernet di categoria superiore (cat. 5e o 6) oppure di
lunghezza inferiore.
Provate a ridurre la risoluzione video impostata.
24
Page 27

Radio Frequency Energy, Certifications
CE Statement
This device complies with the European Regulations for Electromagnetic Compatibility (EMC) of
the European Union and it is equipped with the CE mark. This unit has to be used with high
quality shielded connection cables. Only if these high quality shielded cables are used it can be
sure that the EMC compatibility is not adversely influenced.
FCC Statement
Shielded cables must be used with this equipment to maintain compliance with radio frequency
energy emission regulations and ensure a suitably high level of immunity to electromagnetic
disturbances.
FCC Warning
This equipment has been tested and found to comply with the limits for a Class B Digital device,
pursuant to part 15 of the FCC Rules. These limits are designed to provide reasonable
protection against harmful interference in a residential installation. This equipment generates,
uses, and can radiate radio frequency energy and, if not installed and used in accordance with
the instructions, may cause harmful interference to radio communications. However, there is no
guarantee that interference will not occur in a particular installation. If this equipment does
cause harmful interference to radio or television reception, which can be determined by turning
the equipment off and on, the user is encouraged to try to correct the interference by one or
more of the following measures:
y Reorient or relocate the receiving antenna
y Increase the separation between the equipment and receiver
y Connect the equipment into an outlet on a circuit different from that to which the receiver is
connected
y Consult the dealer or an experienced technician for help
You are cautioned that changes or modifications not expressly approved by the party
responsible for compliance could void your authority to operate the equipment.
LINDY No. 32397
st
1
Edition March 2005
www.lindy.com
25
Page 28

 Loading...