

Page 1

Tested to Comply with
FCC Standards
For Home and Office Use!
Thunderbolt 3 to Dual HDMI Adapter
User Manual English
Benutzerhandbuch Deutsch
Manuel Utilisateur Français
Manuale Italiano
No. 43900
lindy.com
© LINDY Group - FIRST EDITION (September 2017)
Page 2

Page 3

User Manual English
Introduction
Thank you for purchasing the Thunderbolt 3 to Dual HDMI Adapter. This product has been designed to
provide trouble free, reliable operation. It benefits from both a LINDY 2 year warranty and free lifetime
technical support. To ensure correct use, please read this manual carefully and retain it for future
reference.
The Thunderbolt 3 to Dual HDMI 2.0 Adapter uses a single Type C port to attach two Ultra HD 4K HDMI
monitors, giving you a simple way to experience an Ultra HD resolution desktop environment.
Please Note: A computer system which supports Thunderbolt 3 is required. Early Thunderbolt 3 PCs
(2015 and early 2016) might require firmware and software updates before all adapters will work.
Package Contents
Thunderbolt 3 to Dual HDMI Adapter
This Manual
Features
Compatible with all Thunderbolt 3 USB Type C equipped computers
Input: Thunderbolt 3 USB Type C connector - male
Outputs: 2x HDMI A female
HDMI standard 2.0
Max. resolution: 4K 3840 x 2160@60Hz
Chipsets: Intel Alpine Ridge 4C, Parade PS176 (HDMI), TI TPS65983A (PD)
HDCP support
Bus powered
Installation & Operation
When first connecting a Thunderbolt 3 device, it must be authenticated through Intel’s Thunderbolt 3
software. Use the following instructions as a guide:
After connecting a Thunderbolt 3 device the first thing that you should see (assuming that the system
NVM, BIOS, drivers, etc are up to date and compatible) is an automatic notification above the system tray
notifying you that a new device has been attached. Please click OK:
Page 4

User Manual English
After clicking OK, you may get a Windows User Account Control (UAC) popup asking if you “want to
allow this app to make changes to your PC?”. Click Yes.
After clicking Yes a window will open, here you can approve the Thunderbolt 3 device that was just
attached. Click on the drop down menu where it says “Do Not Connect” and select “Always Connect”.
Then click OK.
Identifying the NVM:
To find out what version of NVM firmware your system has, the first step is to ensure you have the latest
Thunderbolt software version which varies depending on the system manufacturer. You should be able to
download it from your system manufacturer’s website. Once installed you can open the software by
searching the start menu for Thunderbolt:
Once open you can find the program sitting in the system tray. You may need to click the caret (up arrow
icon) to show all of the running programs then right click on the Thunderbolt icon it and select Settings:
Page 5

User Manual English
Now you should see the settings window. Click on Details to find out all of the Thunderbolt software and
controller information. Unfortunately if a Thunderbolt device has not yet been connected to the system,
the information about the NVM firmware may not be available within the utility.
Dual Display Installation
1. Power on your computer and connect the Thunderbolt Type C connector of the Adapter to a
Thunderbolt 3 equipped port.
2. Connect a standard HDMI A Male/Male cable (not included) to the HDMI outputs of the Adapter and to
the input ports of your displays. If you are using 4K 60Hz graphics it is recommended to keep the cable
distance to 2m maximum)
3. Power on the displays and your computer will detect them as two separate displays which can be
configured in Display Settings as usual.
Page 6

Benutzerhandbuch Deutsch
Einführung
Wir freuen uns, dass Ihre Wahl auf ein LINDY-Produkt gefallen ist und danken Ihnen für Ihr Vertrauen.
Sie können sich jederzeit auf unsere Produkte und einen guten Service verlassen. Dieser Thunderbolt 3
an Dual HDMI Adapter unterliegt einer 2-Jahres LINDY Herstellergarantie und lebenslangem, kostenlosen technischen Support. Bitte lesen Sie diese Anleitung sorgfältig und bewahren Sie sie auf.
Dieser Thunderbolt 3 an Dual HDMI Adapter ermöglicht es Ihnen zwei Monitore mit 4K60Hz über einen
Thunderbolt 3 USB Typ C-Port anzuschliessen.
Voraussetzung ist ein Computer, der Thunderbolt 3 unterstützt. Möglicherweise sind Firmware- oder
Softwareupdates erforderlich, damit der Adapter ordnungsgemäß funktioniert.
Lieferumfang
Thunderbolt 3 an Dual HDMI Adapter
Dieses Handbuch
Eigenschaften
Kompatibel mit allen Computern mit Thunderbolt 3-Unterstützung
Eingang: Thunderbolt 3 USB Typ C-Stecker
Ausgänge: 2x HDMI A Buchse
HDMI Standard 2.0
Maximale Auflösung: 4K 3840 x 2160@60Hz
Chipsätze: Intel Alpine Ridge 4C, Parade PS176 (HDMI), TI TPS65983A (PD)
Unterstützt HDCP
Bus powered
Installation & Betrieb
Wenn Sie zum ersten Mal ein Thunderbolt 3-Gerät anschließen, muss es von Intels Thunderbolt 3Software authentifiziert werden.
Nach Anschluss eines Thunderbolt 3-Geräts erhalten Sie zunächst eine automatische Benachrichtigung
(vorausgesetzt dass die System-Firmware, BIOS, Treiber etc. aktuell und kompatibel sind) über der
Taskleiste, dass ein neues Gerät angeschlossen wurde. Bestätigen Sie mit “Ok”.
Möglicherweise verlangt dann die Windows Benutzerkontensteuerung eine Bestätigung, dass Eingriffe
auf dem PC erlaubt werden. Bestätigen Sie das bitte.
Page 7
Benutzerhandbuch Deutsch
Anschließend wird sich ein Fenster öffnen, in dem Sie das Thunderbolt 3-Gerät genehmigen können.
Klicken Sie dann auf den Pfeil in der Dropdown-Liste und wählen Sie “Always Connect / Immer Verbinden”.
Bestätigen Sie mit „Ok”.
Identifizieren der Firmware
Um die Firmwareversion Ihres Systems herauszufinden, müssen Sie sich zunächst vergewissern, dass
Sie die neueste Thunderboltsoftware haben. Diese können Sie in der Regel von der Herstellerwebsite
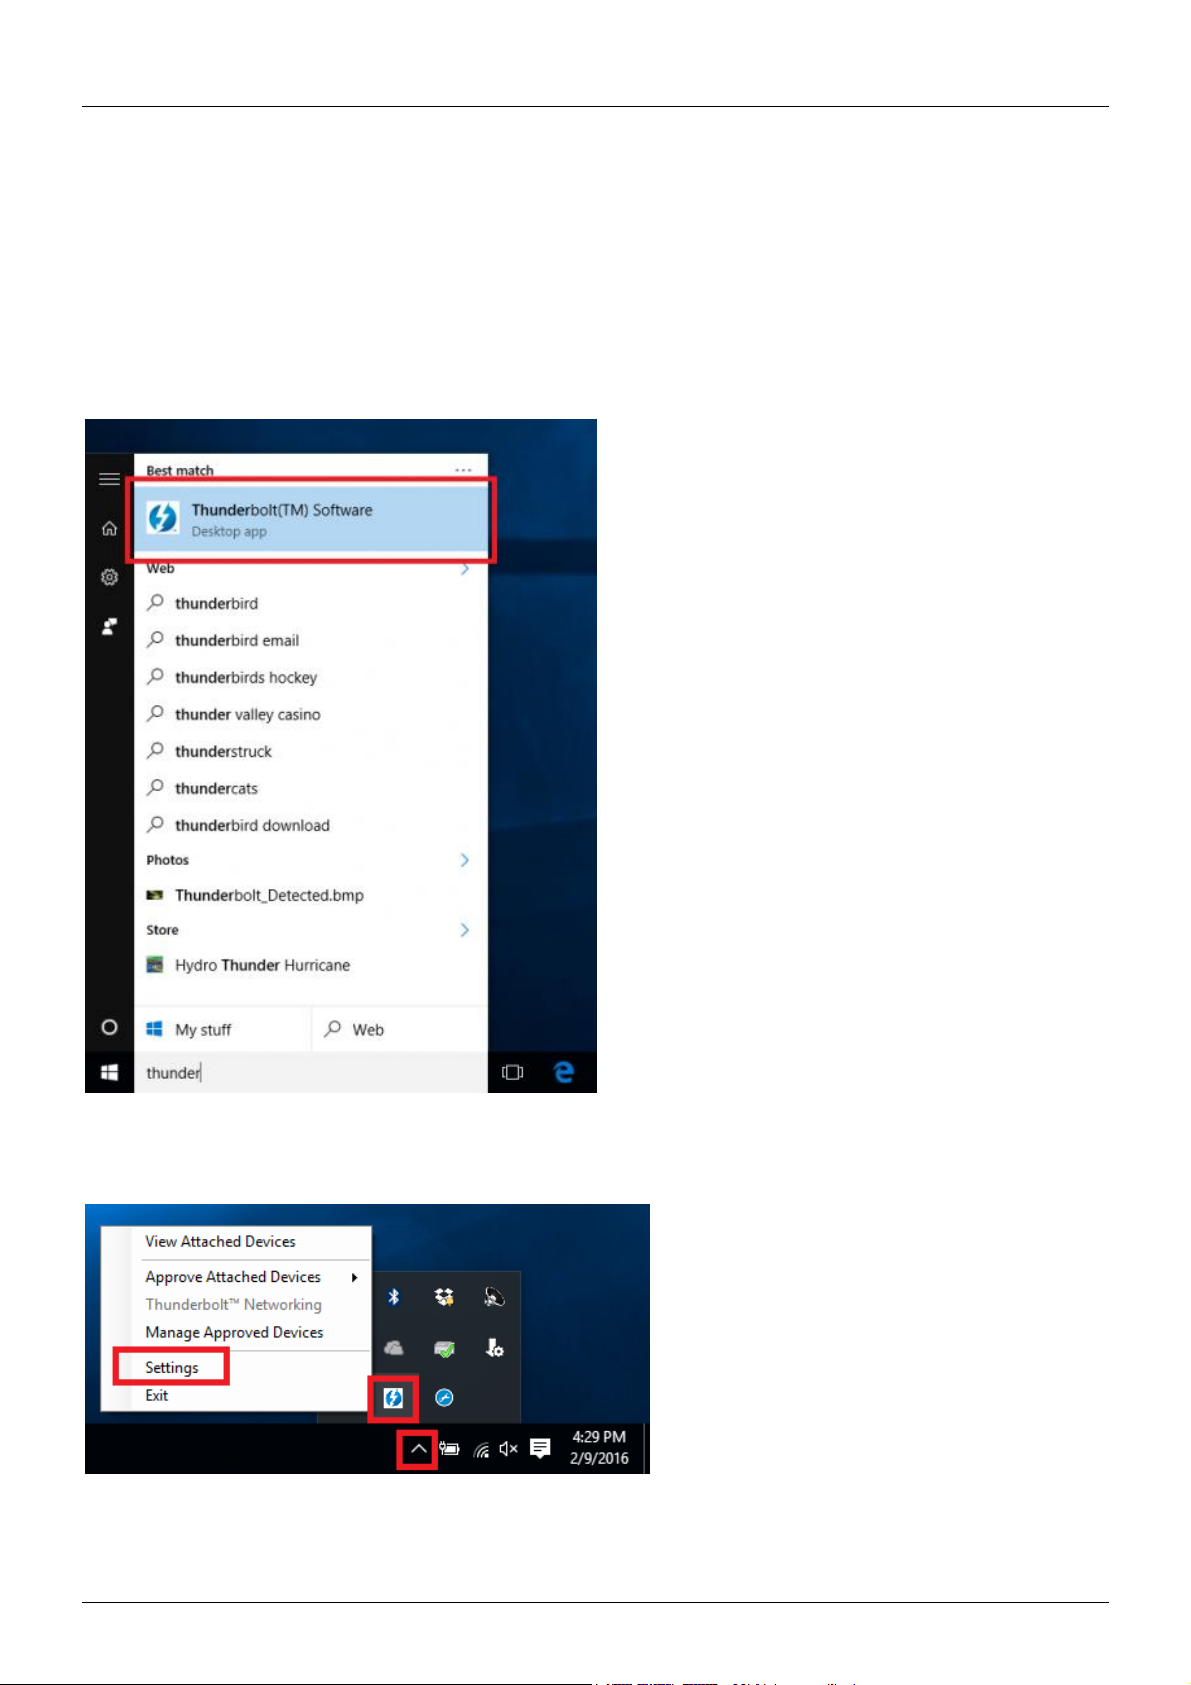
herunterladen. Nach der Installation öffnen Sie die Software indem Sie im Startmenü nach “Thunderbolt“
suchen:
Nach dem Öffnen finden Sie das Programm in der Taskleiste. Klicken Sie auf den Pfeil in der Taskleiste,
dann klicken Sie mit der rechten Maustaste auf das Thunderbolt-Icon und wählen „Settings /
Einstellungen“:
Hier können Sie nun Details über die Thunderboltsoftware und Informationen über den Controller finden.
Leider stehen diese Firmewareinformationen nicht zur Verfügung, wenn das Thunderboltgerät nicht
angeschlossen wurde.
Page 8

Benutzerhandbuch Deutsch
Dual Display-Installation
1. Schalten Sie Ihren Computer ein und stecken Sie den Thunderbolt Typ C-Stecker des Adapters in
den entsprechenden Thunderbolt 3-Port Ihres Computers.
2. Schließen Sie je ein Standard HDMI-Kabel (nicht enthalten) an die HDMI Ports des Adapters und
an den der Monitore an (das Kabel sollte maximal 2m lang sein um eine Auflösung von 4K bei
60Hz zu erreichen).
3. Schalten Sie die Monitore ein. Ihr Computer wird diese als 2 separate Monitore erkennen, die
individuell eingestellt werden können.
Page 9

Manuel Utilisateur Français
Introduction
Nous sommes heureux que votre choix se soit porté sur un produit LINDY et vous remercions de votre
confiance. Vous pouvez compter à tout moment sur la qualité de nos produits et de notre service. Cet
Adaptateur Thunderbolt 3 vers Dual HDMI est soumis à une durée de garantie LINDY de 2 ans et d’une
assistance technique gratuite à vie. Merci de lire attentivement ces instructions et de les conserver pour
future référence.
L’adaptateur Thunderbolt 3 vers Dual HDMI 2.0 utilise un seul port USB Type C pour raccorder deux
moniteurs Ultra HD 4K HDMI, vous offrant une solution simple pour bénéficier d’un environnement de
bureau Ultra HD.
Merci de noter: un ordinateur prenant en charge la norme Thunderbolt 3 est requis. Les PC Thunderbolt
3 de première génération (2015 et début 2016) peuvent nécessiter une mise à jour firmware et logicielle
avant de pouvoir utiliser ce type d’adaptateur.
Contenu de l’emballage
Adaptateur Thunderbolt 3 vers Dual HDMI
Ce manuel
Caractéristiques
Compatible avec tout ordinateur équipé en Thunderbolt 3 USB Type C
Entrée: connecteur Thunderbolt 3 USB Type C mâle
Sorties: 2x HDMI A femelle
Norme HDMI 2.0
Résolution maximale: 4K 3840 x 2160@60Hz
Chipsets: Intel Alpine Ridge 4C, Parade PS176 (HDMI), TI TPS65983A (PD)
Prise en charge HDCP
Alimenté par le bus
Installation & Utilisation
Lors de la première connexion d’un périphérique Thunderbolt 3, celui doit être authentifié par le logiciel
Intel Thunderbolt 3. Utilisez les instructions suivantes:
Après connexion d’un périphérique Thunderbolt 3, la première chose que vous devriez voir (en assumant
que NVM, BIOS, drivers, etc sont à jours et compatibles) est une notification automatique au-dessus de
la barre des tâches notifiant qu’un nouveau matériel a été connecté. Merci de cliquer sur OK:
Page 10
Manuel Utilisateur Français
Après avoir cliqué sur OK, un pop-up de contrôle d’utilisateur (Windows User Account Control - UAC)
vous demandera confirmation des changements sur le PC. Cliquez sur Oui.
Après avoir cliqué sur Oui, une fenêtre va s’ouvrir, ici vous pouvez approuver le périphérique Thunderbolt
3 qui vient d’être raccordé. Cliquez sur le menu déroulant “ne pas connecter” et sélectionnez “Toujours
connecter”. Cliquez sur OK.
Identification de NVM:
Pour trouver la version de firmware NVM installée sur votre système, assurez-vous de posséder la
dernière version logicielle Thunderbolt en fonction du fabricant de votre système. Celle-ci devrait être
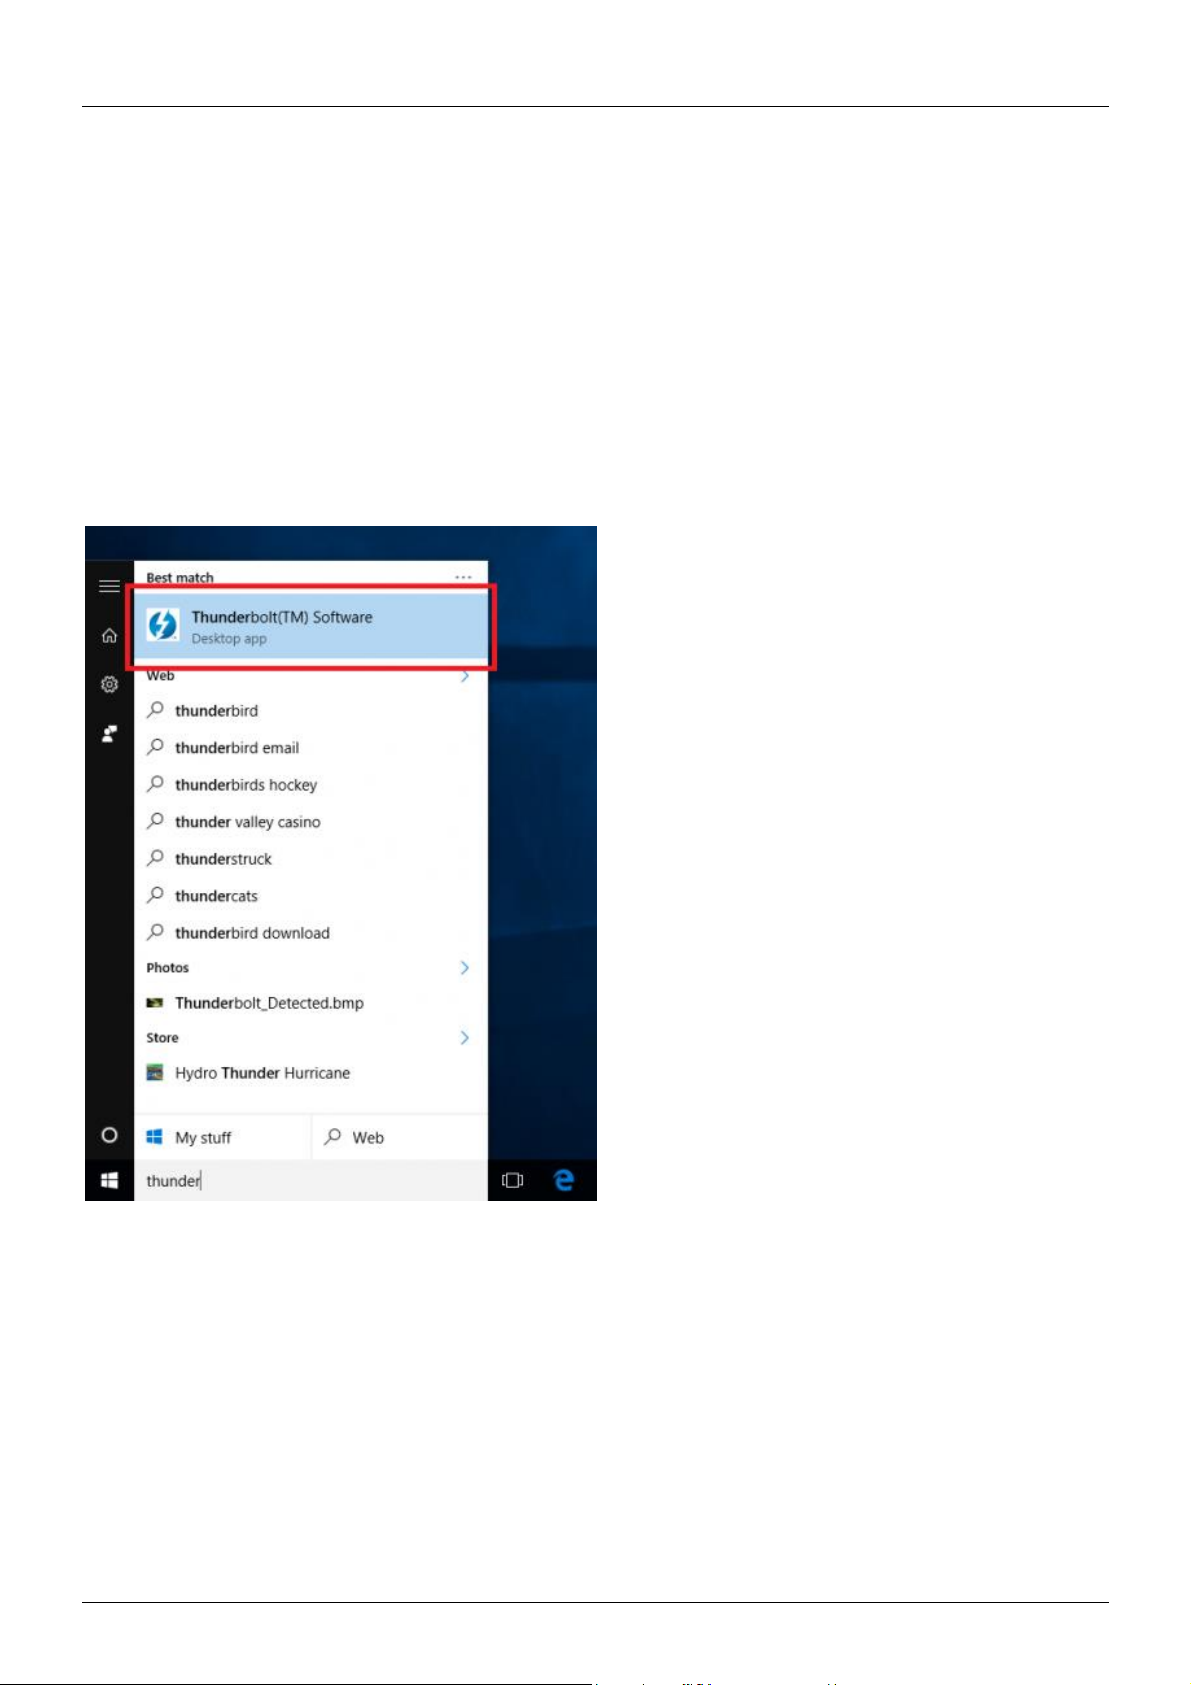
disponible sur le site du fabricant. Une fois installé, vous pouvez ouvrir le logiciel à partir du menu
Démarrer, en cherchant Thunderbolt:
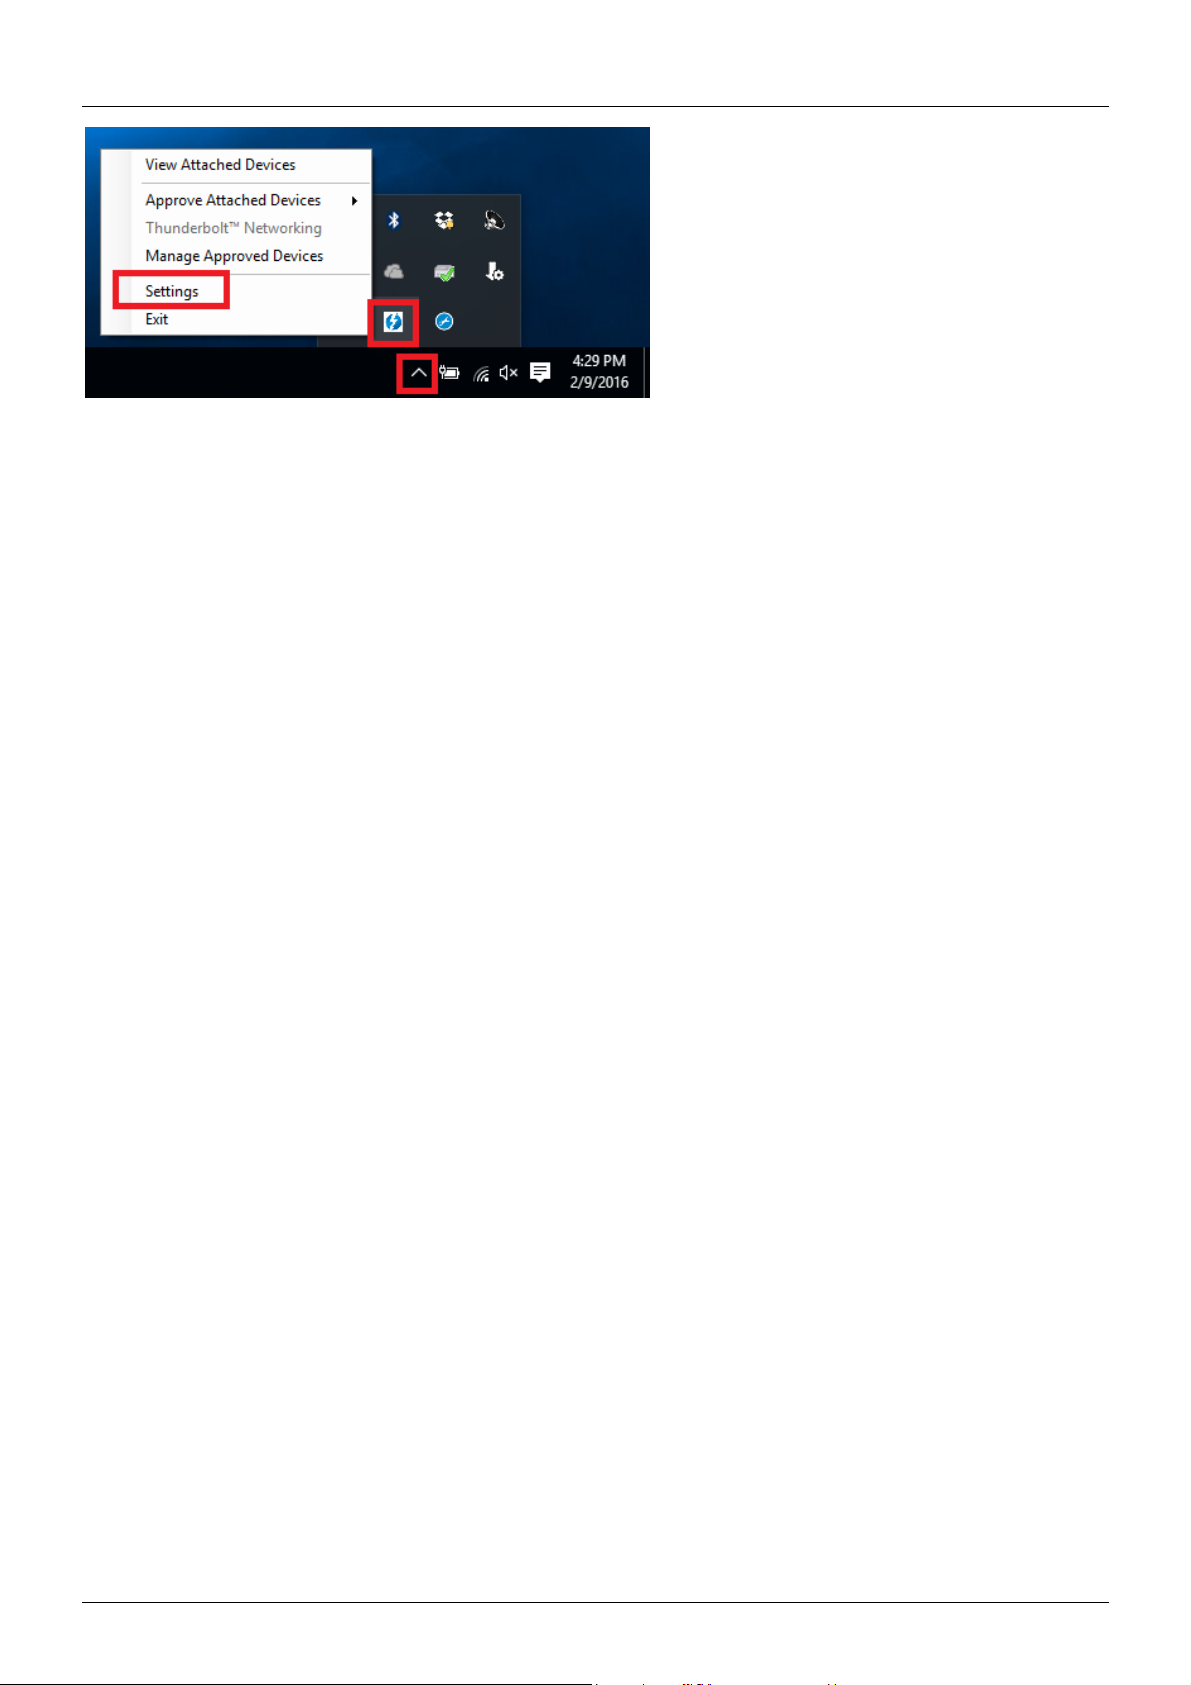
Une fois ouvert vous trouverez le programme dans la barre des tâches système. Cliquez si nécessaire
sur l’icône sous forme de flèche pour afficher tous les programmes situés dans la barre des tâches,
cliquez ensuite à droite sur l’icône Thunderbolt et sélectionnez Paramètres:
Page 11
Manuel Utilisateur Français
La fenêtre des paramètres doit s’afficher. Cliquez sur détails pour voir toutes les informations sur le
logiciel et le contrôleur Thunderbolt. Tant qu’un périphérique Thunderbolt n’a pas été connecté au
système, les informations sur le firmware NVM ne seront pas disponibles sur l’utilitaire.
Installation Dual Moniteurs
1. Démarrez votre ordinateur et branchez le connecteur Thunderbolt Type C de l’adaptateur à un port
Thunderbolt 3.
2. Connectez un câble HDMI A mâle/mâle standard (non inclus) à chacune des sorties HDMI de
l’adaptateur et aux ports d’entrée de vos affichages. Si vous utilisez des résolutions 4K 60Hz, il est
recommandé d’utiliser des câbles de 2m maximum.
3. Démarrez les affichages, votre ordinateur va les détecter comme deux écrans indépendant qui peuvent
configures dans les paramètres d’affichages comme habituellement.
Page 12

Manuale Italiano
Introduzione
Vi ringraziamo per aver acquistato l’adattatore Thunderbolt 3 Dual HDMI. Questo prodotto è stato
progettato per garantirvi la massima affidabilità e semplicità di utilizzo ed è coperto da 2 anni di garanzia
LINDY oltre che da un servizio di supporto tecnico a vita. Per assicurarvi di farne un uso corretto vi
invitiamo a leggere attentamente questo manuale e a conservarlo per future consultazioni.
The Thunderbolt 3 to Dual HDMI 2.0 Adapter uses a single Type C port to attach two Ultra HD 4K HDMI
monitors, giving you a simple way to experience an Ultra HD resolution desktop environment.
Please Note: A computer system which supports Thunderbolt 3 is required. Early Thunderbolt 3 PCs
(2015 and early 2016) might require firmware and software updates before all adapters will work.
Contenuto della confezione
Adattatore Thunderbolt 3 Dual HDMI
Questo manuale
Caratteristiche
Compatibile con computer con porta Thunderbolt 3 USB Tipo C
Ingresso: Thunderbolt 3 USB Tipo C - maschio
Uscite: 2x HDMI A femmina
HDMI standard 2.0
Risoluzione massima: 4K 3840 x 2160@60Hz
Chipset: Intel Alpine Ridge 4C, Parade PS176 (HDMI), TI TPS65983A (PD)
Supporto HDCP
Bus powered
Installazione & Utilizzo
Quando si collega per la prima volta un dispositivo Thunderbolt 3, viene autenticato dal software Intel
Thunderbolt 3. Seguite le seguenti istruzioni:
Dopo aver connesso un dispositivo Thunderbolt 3, dovrebbe comparire per prima cosa (ammesso che il
sistema NVM, BIOS, driver, ecc sono aggiornati e compatibili) una notifica automatica del sistema che
avvisa che è stata connessa un nuovo dispositivo. Cliccate OK:
Page 13
Manuale Italiano
Una volta cliccato su OK, dovrebbe comparire un popup Windows User Account Control (UAC) che
chiede se “vuoi consentire a questa app di apportare modifiche al tuo PC?”. Cliccate Sì.
Si aprirà quindi una finestra nella quale potrete confermare il dispositivo Thunderbolt 3 appena collegato.
Cliccate sul menu a tendina dove dice “Non connettere” e selezionate “Connettere sempre”. Poi cliccate
OK.
Identificazione NVM:
Per trovare quale versione di firmware NVM avete nel vostro sistema, assicuratevi prima di avere l’ultima
versione di software Thunderbolt che può variare a seconda del vostro sistema. Una volta installato
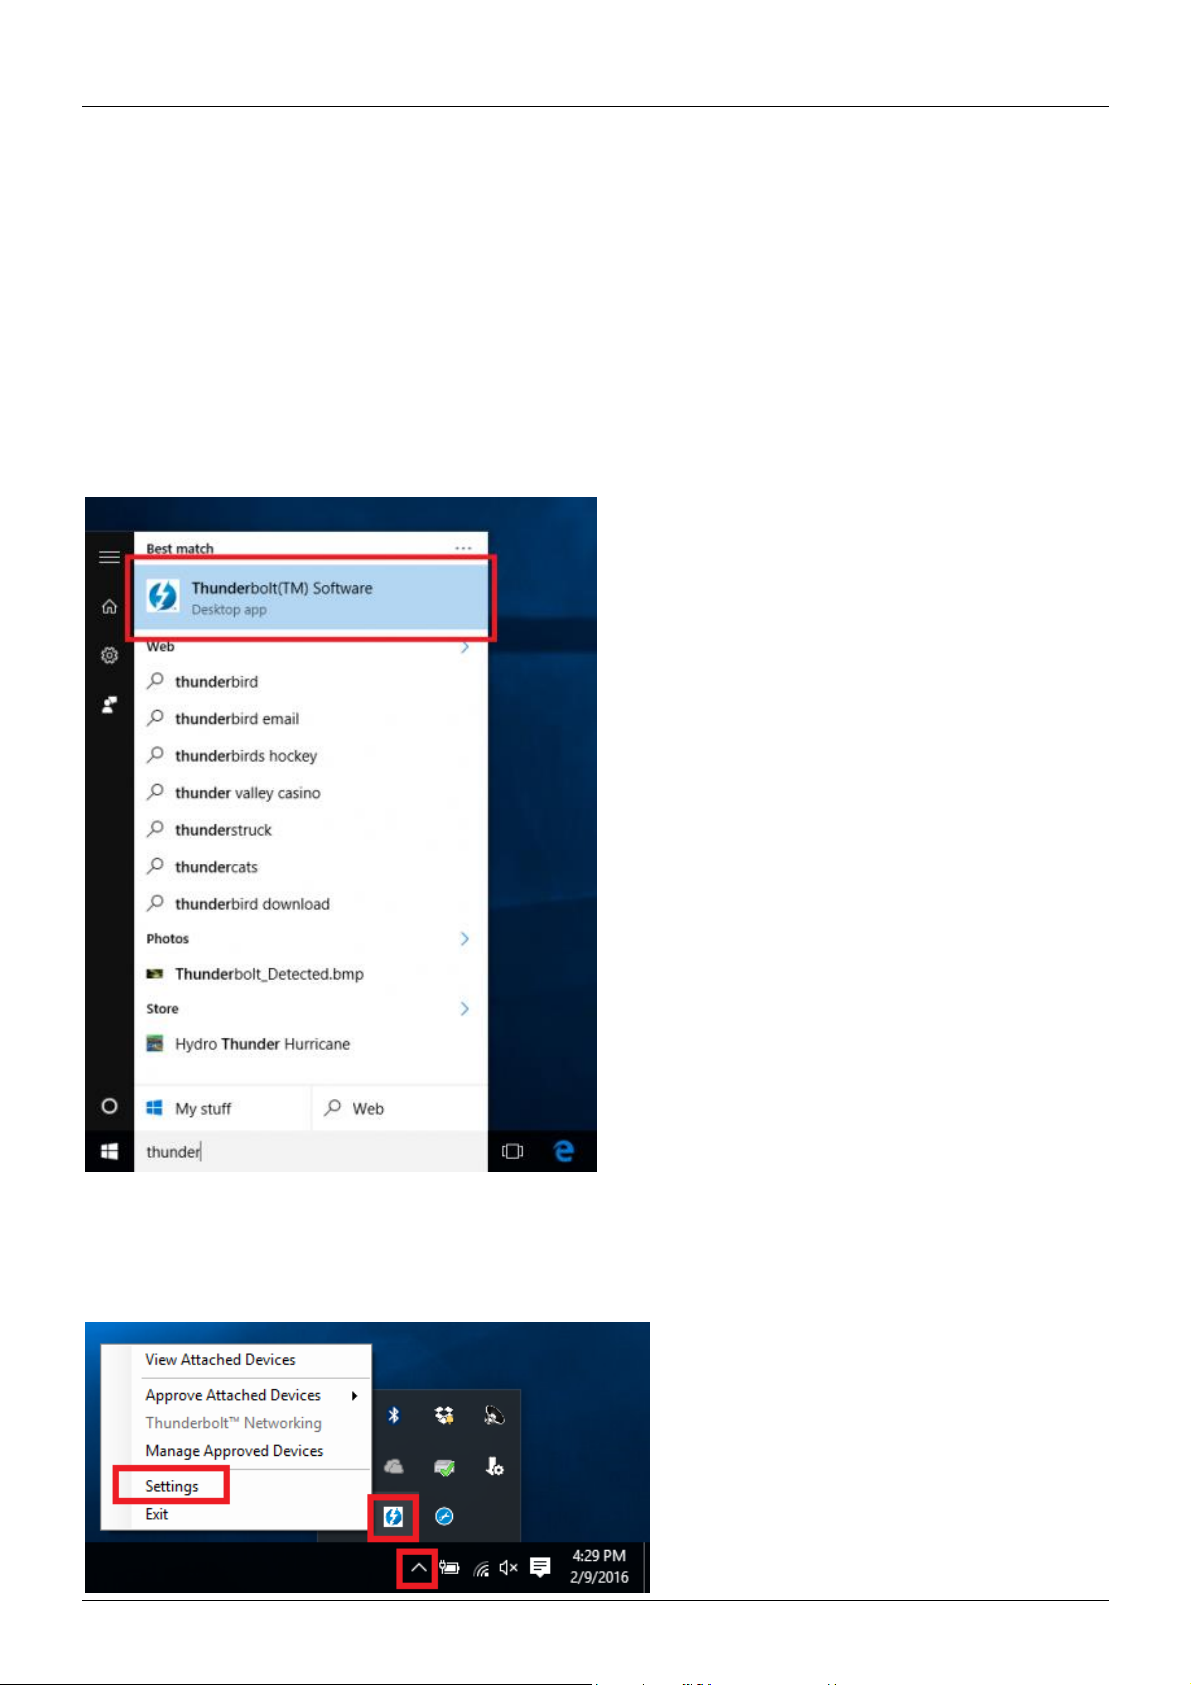
l’aggiornamento potete aprire il software dal menu start, Thunderbolt:
Una volta aperto potete trovare il programma nella barra delle applicazioni. Può essere necessario
cliccare sulla freccia per mostrare le icone nascoste, cliccare col tasto destro sull’icona Thunderbolt e
selezionare Impostazioni:
Page 14

Manuale Italiano
Una volta aperte le impostazioni cliccate su Dettagli per trovare le informazioni relative al software
Thunderbolt e al controller. Tenete presente che se non c’è collegato alcun dispositivo Thunderbolt, non
potrete visualizzare le informazioni relative al firmware NVM.
Installazione Dual Display
1. Accendete il computer e collegate l’adattatore Thunderbolt Tipo C ad una porta Thunderbolt 3.
2. Collegate un cavo HDMI A Maschio/Maschio (non incluso) ad ogni uscita HDMI dell’adattatore e agli
ingressi dei monitor. Se state lavorando alla risoluzione di 4K 60Hz è consigliato l’utilizzo di un cavo
della lunghezza non superiore a 2m
3. Accendete i monitor e il computer li riconoscerà come due monitor distinti che andranno poi configurati
dalle opzioni grafiche.
Page 15

CE/FCC Statement
CE Certification
This equipment complies with the requirements relating to Electromagnetic Compatibility Standards.
It has been manufactured under the scope of RoHS compliance.
CE Konformitätserklärung
Dieses Produkt entspricht den einschlägigen EMV Richtlinien der EU für IT-Equipment und darf nur
zusammen mit abgeschirmten Kabeln verwendet werden.
Diese Geräte wurden unter Berücksichtigung der RoHS Vorgaben hergestellt.
Die formelle Konformitätserklärung können wir Ihnen auf Anforderung zur Verfügung stellen
FCC Certification
This equipment has been tested and found to comply with the limits for a Class B digital device, pursuant
to part 15 of the FCC Rules. These limits are designed to provide reasonable protection against harmful
interference in a residential installation.
You are cautioned that changes or modification not expressly approved by the party responsible for
compliance could void your authority to operate the equipment.
This device complies with part 15 of the FCC Rules.
Operation is subject to the following two conditions:
1. This device may not cause harmful interference, and
2. This device must accept any interference received, including interference that may cause undesired
operation.
LINDY Herstellergarantie – Hinweis für Kunden in Deutschland
LINDY gewährt für dieses Produkt über die gesetzliche Regelung in Deutschland hinaus eine zweijährige Herstellergarantie ab Kaufdatum. Die detaillierten Bedingungen dieser Garantie finden Sie auf der LINDY Website aufgelistet
bei den AGBs.
Hersteller / Manufacturer (EU):.
LINDY-Elektronik GmbH LINDY Electronics Ltd
Markircher Str. 20 Sadler Forster Way
68229 Mannheim Stockton-on-Tees, TS17 9JY
GERMANY United Kingdom
Email: [email protected] , T: +49 (0)621 470050 [email protected] , T: +44 (0)1642 754000
Page 16

Recycling Information
Tested to Comply with
FCC Standards
For Home and Office Use!
WEEE (Waste of Electrical and Electronic Equipment),
Recycling of Electronic Products
Europe, United Kingdom
In 2006 the European Union introduced regulations (WEEE) for the collection and recycling of all waste electrical
and electronic equipment. It is no longer allowable to simply throw away electrical and electronic equipment. Instead,
these products must enter the recycling process.
Each individual EU member state has implemented the WEEE regulations into national law in slightly different ways.
Please follow your national law when you want to dispose of any electrical or electronic products. More details can
be obtained from your national WEEE recycling agency.
Germany / Deutschland Rücknahme Elektroschrott und Batterie-Entsorgung
Die Europäische Union hat mit der WEEE Direktive Regelungen für die Verschrottung und das Recycling von Elektround Elektronikprodukten geschaffen. Diese wurden im Elektro- und Elektronikgerätegesetz – ElektroG in deutsches
Recht umgesetzt. Das Entsorgen von Elektro- und Elektronikgeräten über die Hausmülltonne ist verboten! Diese
Geräte müssen den Sammel- und Rückgabesystemen zugeführt werden! Dort werden sie kostenlos entgegen
genommen. Die Kosten für den weiteren Recyclingprozess übernehmen die Gerätehersteller.
LINDY bietet deutschen Endverbrauchern ein kostenloses Rücknahmesystem an, beachten Sie bitte, dass Batterien
und Akkus den Produkten vor der Rückgabe an das Rücknahmesystem entnommen werden müssen und über die
Sammel- und Rückgabesysteme für Batterien separat entsorgt werden müssen. Ausführliche Informationen zu
diesen Themen finden Sie stets aktuell auf der LINDY Webseite im Fußbereich.
France
En 2006, l'union Européenne a introduit la nouvelle réglementation (DEEE) pour le recyclage de tout équipement
électrique et électronique.
Chaque Etat membre de l’ Union Européenne a mis en application la nouvelle réglementation DEEE de manières
légèrement différentes. Veuillez suivre le décret d’application correspondant à l’élimination des déchets électriques
ou électroniques de votre pays.
Italy
Nel 2006 l’unione europea ha introdotto regolamentazioni (WEEE) per la raccolta e il riciclo di apparecchi elettrici ed
elettronici. Non è più consentito semplicemente gettare queste apparecchiature, devono essere riciclate. Ogni stato
membro dell’ EU ha tramutato le direttive WEEE in leggi statali in varie misure. Fare riferimento alle leggi del proprio
Stato quando si dispone di un apparecchio elettrico o elettronico.
Per ulteriori dettagli fare riferimento alla direttiva WEEE sul riciclaggio del proprio Stato.
LINDY No 43900
1st Edition, September 2017
www.lindy.com
 Loading...