

Page 1

© LINDY Group - FOURTH EDITION (September 2019)
USB 3.1 Docking & Clone Station
User Manual English
Benutzerhandbuch Deutsch
Manuel Utilisateur Français
Manuale Italiano
No. 43231
lindy.com
Tested to comply with
FCC Standards
For Home and Office Use!
Page 2
Page 3

User Manual English
Introduction
Thank you for purchasing the USB 3.1 Docking & Clone Station. This product has been designed to provide
trouble free, reliable operation. It benefits from both a LINDY 2 year warranty and free lifetime technical
support. To ensure correct use, please read this manual carefully and retain it for future reference.
Package Contents
• USB 3.1 Gen 2 Docking & Clone Station
• USB 3.1 Gen 2 Type C to A connection cable ~90cm
• USB 3.1 Gen 2 Type C to C connection cable ~90cm
• External Level VI power supply 12V 4A with ~1m DC cable with 5.5/2.5mm round connector
• 4 power cables (Euro/UK/US/AUS)
• Foam pad (50x50x6mm) for 7mm HDDs
• LINDY manual
Features
• Connects two SATA HDD/SSDs to a computer using a single connector
• Accepts 1.8/2.5/3.5” HDD/SSDs with 22 pin SATA combo interface. For Micro SATA please use LINDY
adapter No. 33502.
• Offline clone function (OS independent) with button for cloning from slot A (source) to slot B (target)
• USB 3.1 Gen 2 SuperSpeed+ Interface up to 10Gbps
• SATA 6.0Gbps standard
• Interfaces: USB Type C socket, DC 12V power socket
• On/Off power switch
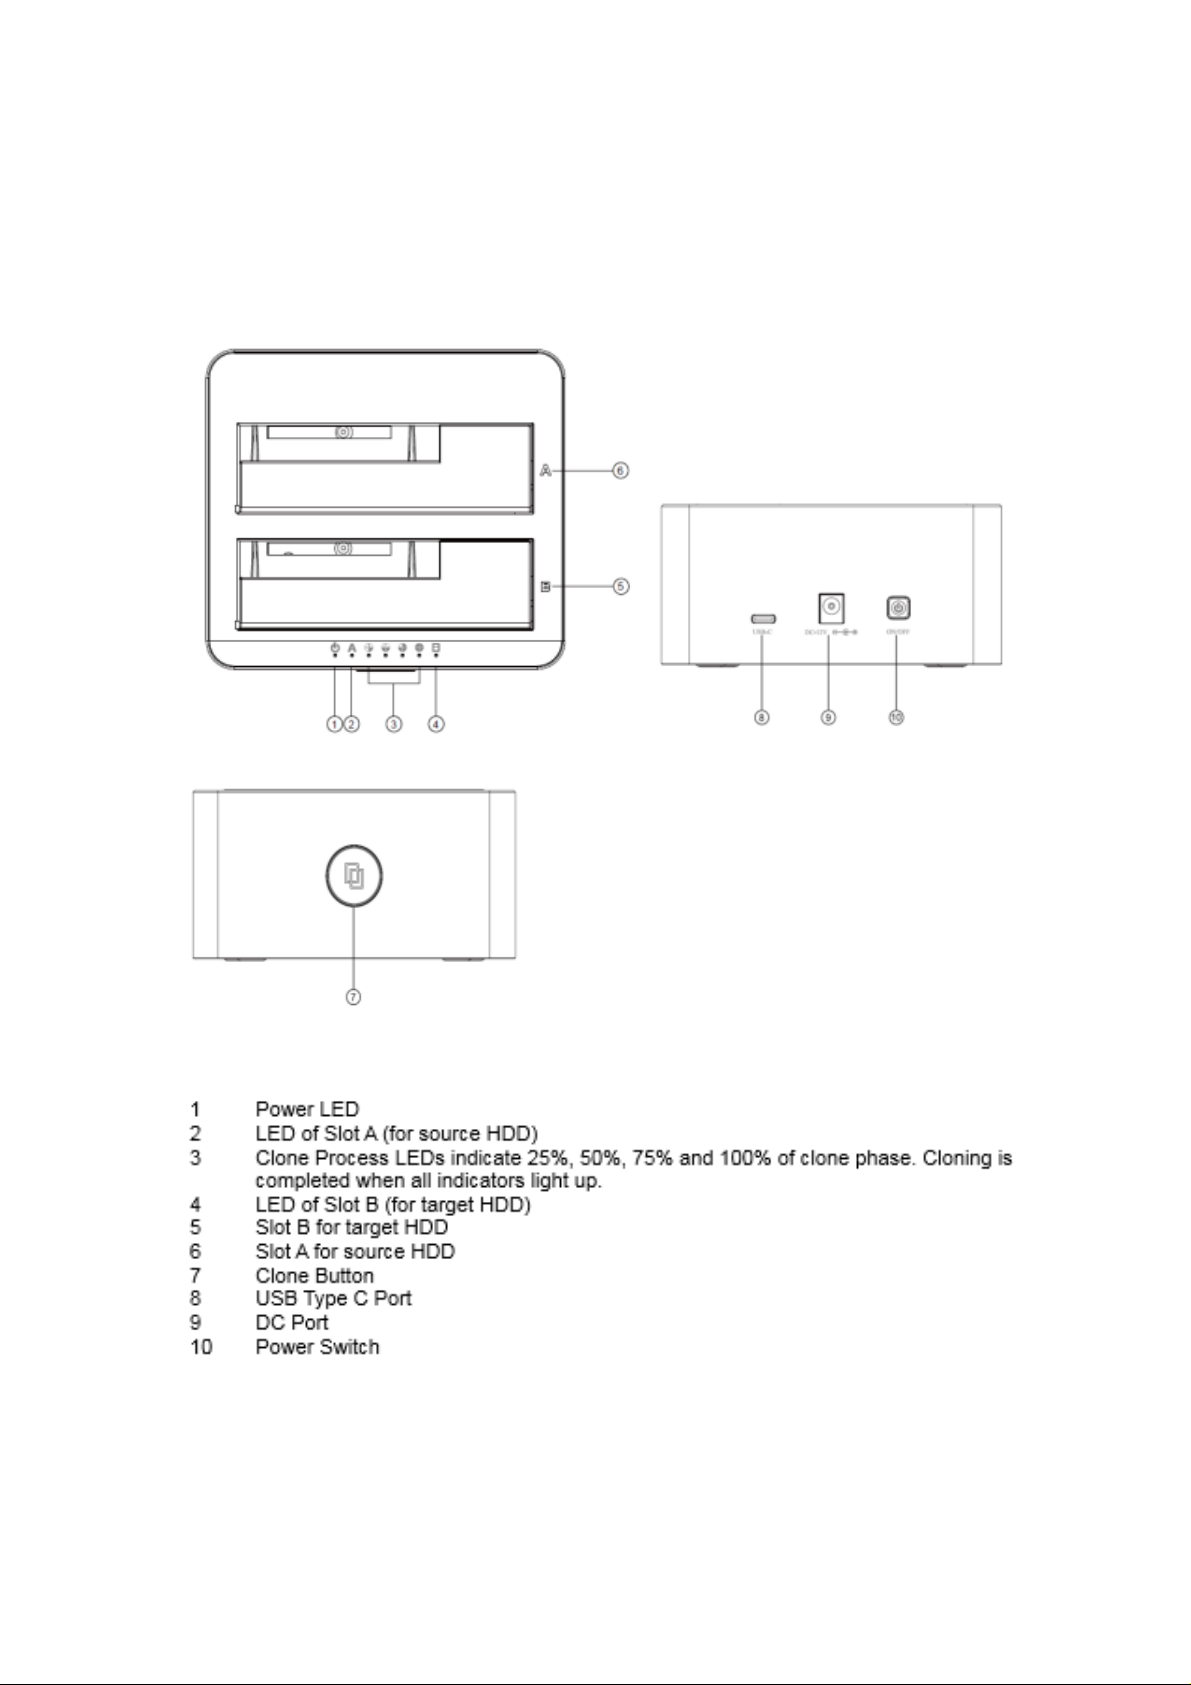
• LEDs for power, slot A, slot B, clone process
• Compatible with USB equipped computers
Installation & Use
• Connect the power supply
• If you want to clone HDDs, do not connect the Docking Station to your computer
• For normal docking station operation connect the Docking Station to your computer via USB cable
• Insert the HDDs in to the docking station and press the power switch to turn on
• Wait until the drivers are loaded by the operating system – you should then see the drives in the file
manager program
• HDDs may need to be partitioned / formatted using your operating system disk management utility
before you can access them.
• Before unplugging HDDs make sure data transfer processes are completed
Using the Clone Function
• Install the source and target HDDs into the appropriately labelled slot A (source) and B (target)
• The target HDD must be of equal or larger capacity than the source HDD
• Make sure that the target HDD is empty and not partitioned
• When both drives are connected, press and hold the clone button for 3 seconds until the LED for
100% cloning is lit up. Then the button must be pressed again to start the clone process. All 4 LEDs
(3) light up once the clone process has ended (percent status changes as clone progresses).
Do not switch off or unplug the HDDs during the cloning process!
Page 4

Benutzerhandbuch Deutsch
Einführung
Wir freuen uns, dass Ihre Wahl auf ein LINDY-Produkt gefallen ist und danken Ihnen für Ihr Vertrauen.
Sie können sich jederzeit auf unsere Produkte und einen guten Service verlassen. Diese USB 3.1
Docking & Clone Station unterliegt einer 2-Jahres LINDY Herstellergarantie und lebenslangem
kostenlosen, technischen Support. Bitte lesen Sie diese Anleitung sorgfältig und bewahren Sie sie auf.
Lieferumfang
• USB 3.1 Gen 2 Docking & Clone Station
• USB 3.1 Gen 2 Typ C auf A Kabel ~90cm
• USB 3.1 Gen 2 Typ C auf C Kabel ~90cm
• Externes Level VI Netzteil 12V 4A mit ca. 1m langem DC-Kabel mit 5.5/2.5mm Hohlstecker
• 4 länderspezifische Stromkabel (Euro/UK/US/AUS)
• Schaumstoffpad (50x50x6mm) zum Stabilisieren für 7mm Festplatten
• LINDY Handbuch
Eigenschaften
• Anschluss von zwei SATA HDD/SSDs über nur ein Kabel
• Für 1.8/2.5/3.5” HDD/SSDs mit 22poligem SATA Kombianschluss (für Micro SATA verwenden Sie bitte
LINDY Adapter No. 33502)
• Offline Clonefunktion (betriebssystemunabhängig) – klont per Knopfdruck von Slot A (Quelle) zu Slot
B (Zielfestplatte)
• USB 3.1 Gen 2 SuperSpeed+ Schnittstelle (bis 10Gbit/s)
• Unterstützt SATA 6.0Gbit/s
• Schnittstellen: USB Typ C-Buchse, DC 12V Buchse
• Ein-/Ausschalter; LEDs für Power, Slot A, Slot B und Klonprozess
• Kompatibel mit modernen USB Betriebssystemen
Installation & Betrieb
• Schließen Sie das Netzteil an
• Wenn Sie Festplatten klonen wollen, sollte die Docking Station nicht an einen Rechner angeschlossen
sein, siehe nächster Abschnitt
• Zum normalen Betrieb schließen Sie die Docking Station über das USB-Kabel an
• Stecken Sie die Festplatten in die Docking Station ein und schalten Sie die Docking Station mit dem
Power Switch ein
• Warten Sie bis das Betriebssystem die Treiber vollständig geladen und die Laufwerke angemeldet hat
– danach sollten Sie auf die Laufwerke aus Ihrem Dateimanager zugreifen können
• HDDs müssen partitioniert bzw. formatiert sein, verwenden Sie hierzu ggf. die Management Utilities
Ihres Betriebssystems
• Bevor Sie Festplatten entfernen stellen Sie sicher, dass alle Dateitransfers komplett abgeschlossen
sind.
Clone-Funktion
• Stecken Sie die Quell-Festplatte in Steckplatz A, die Zielfestplatte in Steckplatz B.
• Die Ziel-Festplatte muss leer und nicht partitioniert sein, außerdem mindestens genauso groß oder
größer als die Quelle.
• Wenn beide Festplatten angeschlossen sind, drücken Sie den Clone-Schalter für ca. 3 Sekunden, bis
die LED für 100% Cloning leuchtet. Drücken Sie nun den Clone-Schalter noch einmal, um den
Cloneprozess zu beginnen. Wenn alle 4 LEDs (3) leuchten, ist der Cloneprozess beendet. Entfernen
Sie die Festplatten zwischenzeitlich nicht!
Page 5

Manuel Utilisateur Français
Introduction
Nous sommes heureux que votre choix se soit porté sur un produit LINDY et vous remercions de votre
confiance. Vous pouvez compter à tout moment sur la qualité de nos produits et de notre service. Ce
USB 3.1 Docking & Clone Station est soumis à une durée de garantie LINDY de 2 années et d’une
assistance technique gratuite à vie. Merci de lire attentivement ces instructions et de les conserver pour
future référence.
Contenu
▪ Station d’accueil et de clonage ‘’USB 3.1 Gen 2 Docking & Clone Station’’
▪ Câble de connexion USB 3.1 Gen 2 Type C vers A ~90cm
▪ Câble de connexion USB 3.1 Gen 2 Type C vers C ~90cm
▪ Alimentation Level VI 12V 4A avec câble DC de 1m avec connecteur 5,5/2,5mm
▪ 4 câbles secteur (Euro/UK/US/AUS)
▪ Cale (mousse synthétique 50x50x6m) pour HDD de 7mm
▪ Manuel LINDY
Caractéristiques
▪ Connecte deux HDD/SSD SATA à un ordinateur via un seul connecteur
▪ Accepte les HDD/SSD 1.8/2.5/3.5” avec une interface 22 pins SATA combo. Pour le Micro SATA
veuillez utiliser l’adaptateur LINDY N°Art.33502.
▪ Fonction de clonage Offline (indépendant de l’OS) avec bouton pour le clonage du slot A (source)
vers le slot B (target)
▪ Interface USB 3.1 Gen 2 SuperSpeed+ jusqu’à 10Gbit/s
▪ Norme SATA 6.0Gbit/s
▪ Interfaces: USB Type C, DC 12V
▪ Bouton marche arrêt (On/Off)
▪ LED pour l’alimentation, slot A, slot B, processus de clonage
▪ Compatible avec les ordinateurs équipés en USB
Installation et utilisation
• Connectez l’alimentation
• Pour la fonction de clonage de HDD, ne pas connecter la Docking Station à votre ordinateur
• Pour la fonction station d’accueil, connectez la Docking Station à votre ordinateur le câble USB
• Insérez les HDD dans la station d’accueil et appuyez sur le bouton de mise sous tension
• Patientez pendant l’installation des pilotes par le système d’exploitation– les disques durs s’affichent
ensuite dans le gestionnaire de fichiers
• Les HDD nécessiteront peut-être un partitionnement/formatage en utilisant le gestionnaire de disques
de votre système avant de pouvoir y accéder.
• Avant de déconnecter un HDD, assurez-vous que les transferts sont terminés !
Utilisation de la fonction de clonage
• Installez les HDD source et target (destination) dans les slots correspondant: slot A (source) et B
(target)
• Le HDD target doit avoir une capacité égale ou supérieure que le HDD source
• Assurez-vous que le disque de destination soit vide et non partitionné
• Lorsque les deux lecteurs sont connectés, appuyez sur le bouton cloner et maintenez-le enfoncé
pendant 3 secondes jusqu'à ce que la LED clonage à 100% s'allume. Il faut ensuite appuyer à
nouveau sur le bouton pour lancer le processus de clonage. Toutes les 4 LED (3) s’éclairent une fois
le processus de clonage finalisé (le pourcentage change pendant la progression du clonage).
Ne pas mettre hors tension ou déconnecter les HDD pendant le clonage !
Page 6

Manuale Italiano
Introduzione
Vi ringraziamo per aver acquistato la Docking & Clone Station USB 3.1. Questo prodotto è stato
progettato per garantirvi la massima affidabilità e semplicità di utilizzo ed è coperto da da 2 anni di
garanzia LINDY oltre che da un servizio di supporto tecnico a vita. Per assicurarvi di farne un uso
corretto vi invitiamo a leggere attentamente questo manuale e a conservarlo per future consultazioni.
Contenuto della confezione
• Docking & Clone Station USB 3.1 Gen 2
• Cavo USB 3.1 Gen 2 Tipo C a Tipo A ~90cm
• Cavo USB 3.1 Gen 2 Tipo C a Tipo C ~90cm
• Alimentatore Level VI da 12V 4A con cavo da ~1m, diametro connettore 5.5/2.5mm
• 4 cavi di alimentazione (Euro/UK/US/AUS)
• Spessore antivibrazioni (50x50x6mm) per HDD alto 7mm
• Manuale
Caratteristiche
• Connessione di due HDD/SSD SATA ad un computer
• Supporta HDD/SSD 1.8/2.5/3.5” con interfaccia 22pin SATA combo. Per connettori Micro SATA
occorre l’adattatore LINDY Art. 33502.
• Funzione Clone offline (indipendente dal sistema operativo) premendo il tasto per clonare il disco
collegato allo slot A (source) sul disco collegato allo slot B (target)
• Interfaccia USB 3.1 Gen 2 SuperSpeed+, fino a 10Gbps
• SATA 6.0Gbps standard
• Porte: USB Tipo C, DC 12V per alimentatore
• Tasto On/Off
• LED per alimentazione, slot A, slot B, clone
• Compatibile con computer con interfaccia USB
Installazione e Utilizzo
• Collegate l’alimentatore
• Se volete clonare HDD, non collegate la Docking Station al computer
• Per utilizzarla come normale docking station, collegatela al computer tramite cavo USB
• Inserite gli HDD nella docking station e premete il tasto on
• Aspettate che i driver siano caricati dal sistema operativo
• Potrebbe essere necessario partizionare/formattare gli HDD dall’utility del Vostro sistema operativo
prima di potervi accedere
• Prima di scollegare gli HDD assicuratevi che il processo di trasferimento dati sia completato
Funzione Clone
• Installate gli HDD negli appositi slot, A (source) e B (target)
• L’HDD target deve essere di capacità uguale o superiore all’HDD source
• Assicuratevi che l’HDD target sia vuoto e non partizionato
• Quando vengono connessi entrambi i dischi, tenere premuto il tasto clone per 3 secondi fino a quando
si illumina il LED 100% cloning. Quindi premere nuovamente il tasto per avviare il processo di
clonazione. Una volta che il processo è terminato dovrebbero accendersi tutti e 4 i LED (3) (potete
visualizzare anche l’avanzamento del processo).
Non spegnete o scollegate gli HDD durante il processo di clonazione!
Page 7

CE/FCC Statement
CE Certification
This equipment complies with the requirements relating to Electromagnetic Compatibility Standards.
It has been manufactured under the scope of RoHS compliance.
CE Konformitätserklärung
Dieses Produkt entspricht den einschlägigen EMV Richtlinien der EU für IT-Equipment und darf nur
zusammen mit abgeschirmten Kabeln verwendet werden.
Diese Geräte wurden unter Berücksichtigung der RoHS Vorgaben hergestellt.
Die formelle Konformitätserklärung können wir Ihnen auf Anforderung zur Verfügung stellen
FCC Certification
This equipment has been tested and found to comply with the limits for a Class B digital device, pursuant
to part 15 of the FCC Rules. These limits are designed to provide reasonable protection against harmful
interference in a residential installation.
You are cautioned that changes or modification not expressly approved by the party responsible for
compliance could void your authority to operate the equipment.
This device complies with part 15 of the FCC Rules.
Operation is subject to the following two conditions:
1. This device may not cause harmful interference, and
2. This device must accept any interference received, including interference that may cause undesired
operation.
LINDY Herstellergarantie – Hinweis für Kunden in Deutschland
LINDY gewährt für dieses Produkt über die gesetzliche Regelung in Deutschland hinaus eine zweijährige Herstellergarantie ab Kaufdatum. Die detaillierten Bedingungen dieser Garantie finden Sie auf der LINDY Website aufgelistet
bei den AGBs.
Hersteller / Manufacturer (EU):.
LINDY-Elektronik GmbH LINDY Electronics Ltd
Markircher Str. 20 Sadler Forster Way
68229 Mannheim Stockton-on-Tees, TS17 9JY
Germany England
Email: info@lindy.com , T: +49 (0)621 470050 postmaster@lindy.co.uk , T: +44 (0)1642 754000
Page 8

Recycling Information
WEEE (Waste of Electrical and Electronic Equipment),
Recycling of Electronic Products
Europe, United Kingdom
In 2006 the European Union introduced regulations (WEEE) for the collection and recycling of all waste electrical
and electronic equipment. It is no longer allowable to simply throw away electrical and electronic equipment. Instead,
these products must enter the recycling process.
Each individual EU member state has implemented the WEEE regulations into national law in slightly different ways.
Please follow your national law when you want to dispose of any electrical or electronic products. More details can
be obtained from your national WEEE recycling agency.
Germany / Deutschland Rücknahme Elektroschrott und Batterie-Entsorgung
Die Europäische Union hat mit der WEEE Direktive Regelungen für die Verschrottung und das Recycling von Elektround Elektronikprodukten geschaffen. Diese wurden im Elektro- und Elektronikgerätegesetz – ElektroG in deutsches
Recht umgesetzt. Das Entsorgen von Elektro- und Elektronikgeräten über die Hausmülltonne ist verboten! Diese
Geräte müssen den Sammel- und Rückgabesystemen zugeführt werden! Dort werden sie kostenlos entgegen
genommen. Die Kosten für den weiteren Recyclingprozess übernehmen die Gerätehersteller.
LINDY bietet deutschen Endverbrauchern ein kostenloses Rücknahmesystem an, beachten Sie bitte, dass Batterien
und Akkus den Produkten vor der Rückgabe an das Rücknahmesystem entnommen werden müssen und über die
Sammel- und Rückgabesysteme für Batterien separat entsorgt werden müssen. Ausführliche Informationen zu
diesen Themen finden Sie stets aktuell auf der LINDY Webseite im Fußbereich.
France
En 2006, l'union Européenne a introduit la nouvelle réglementation (DEEE) pour le recyclage de tout équipement
électrique et électronique.
Chaque Etat membre de l’ Union Européenne a mis en application la nouvelle réglementation DEEE de manières
légèrement différentes. Veuillez suivre le décret d’application correspondant à l’élimination des déchets électriques
ou électroniques de votre pays.
Italy
Nel 2006 l’unione europea ha introdotto regolamentazioni (WEEE) per la raccolta e il riciclo di apparecchi elettrici ed
elettronici. Non è più consentito semplicemente gettare queste apparecchiature, devono essere riciclate. Ogni stato
membro dell’ EU ha tramutato le direttive WEEE in leggi statali in varie misure. Fare riferimento alle leggi del proprio
Stato quando si dispone di un apparecchio elettrico o elettronico.
Per ulteriori dettagli fare riferimento alla direttiva WEEE sul riciclaggio del proprio Stato.
No.43231
4th Edition, September 2019
lindy.com
Tested to comply with
FCC Standards
For Home and Office Use!
 Loading...