

Page 1

h
USB 3.0 Dual Gigabit Ethernet
Adapter
User Manual English
Benutzerhandbuch Deutsch
Manuel Utilisateur Français
Manuale d’uso Italiano
LINDY No. 43123
www.lindy.com
© LINDY ELECTRONICS LIMITED & LINDY-ELEKTRONIK GMBH - SECOND EDITION (June 2015)
Page 2

User Manual
Introduction
Thank you for purchasing the LINDY USB 3.0 Dual Gigabit Ethernet Adapter, which offers a
10/100/1000Mbps network connection via USB 3.0 connection. The dual RJ45 design provides
a switch function, which allows sharing the networking access with a second computer.
Features
• USB specification 3.0 up to 5Gbps, USB 2.0/1.1 compliant
• Network standards: IEEE 802.3/802.3u/802.3ab (10Base-T/100Base-T/1000Base-T),
IEEE802.3az (Energy Efficient Ethernet)
• Data Transfer Rates: Ethernet 10Mbps, Fast Ethernet 100Mbps and Gigabit Ethernet
1000Mbps (Half/Full Duplex)
• USB Chipset AX88179
• Internal Gigabit switch chip allows network connection of multiple computers
• Allows independant network switching (without USB connection) – powered via Micro-B
USB port
• Supports IPv4/IPv6 pack Checksum Offload Engine (COE) to reduce CPU load
• Wake On LAN function
• Interfaces: 1x USB 3.0 A male, 2x RJ45 female, 1x USB Micro-B for optional power
• LEDs: yellow for internet connection (blinking when data are transmitted) ; green for
activcation of the Gigabit network
• Compatible with Win 8.1/8/7/Vista, Mac OS 10.x and above, Linux Kernel 3.x/2.6x
Package Contents
• USB 3.0 Dual Gigabit Ethernet Adapter
• Driver CD
• This Manual
Driver Installation
Caution!
DO NOT connect the Ethernet Adapter to your computer before you install the provided
driver.
Windows:
• Insert the attached CD into the disc drive, run the CD menu or browse the file directory to
choose the rigth driver programm according to your PC version. Click setup.exe and
complete the installation process.
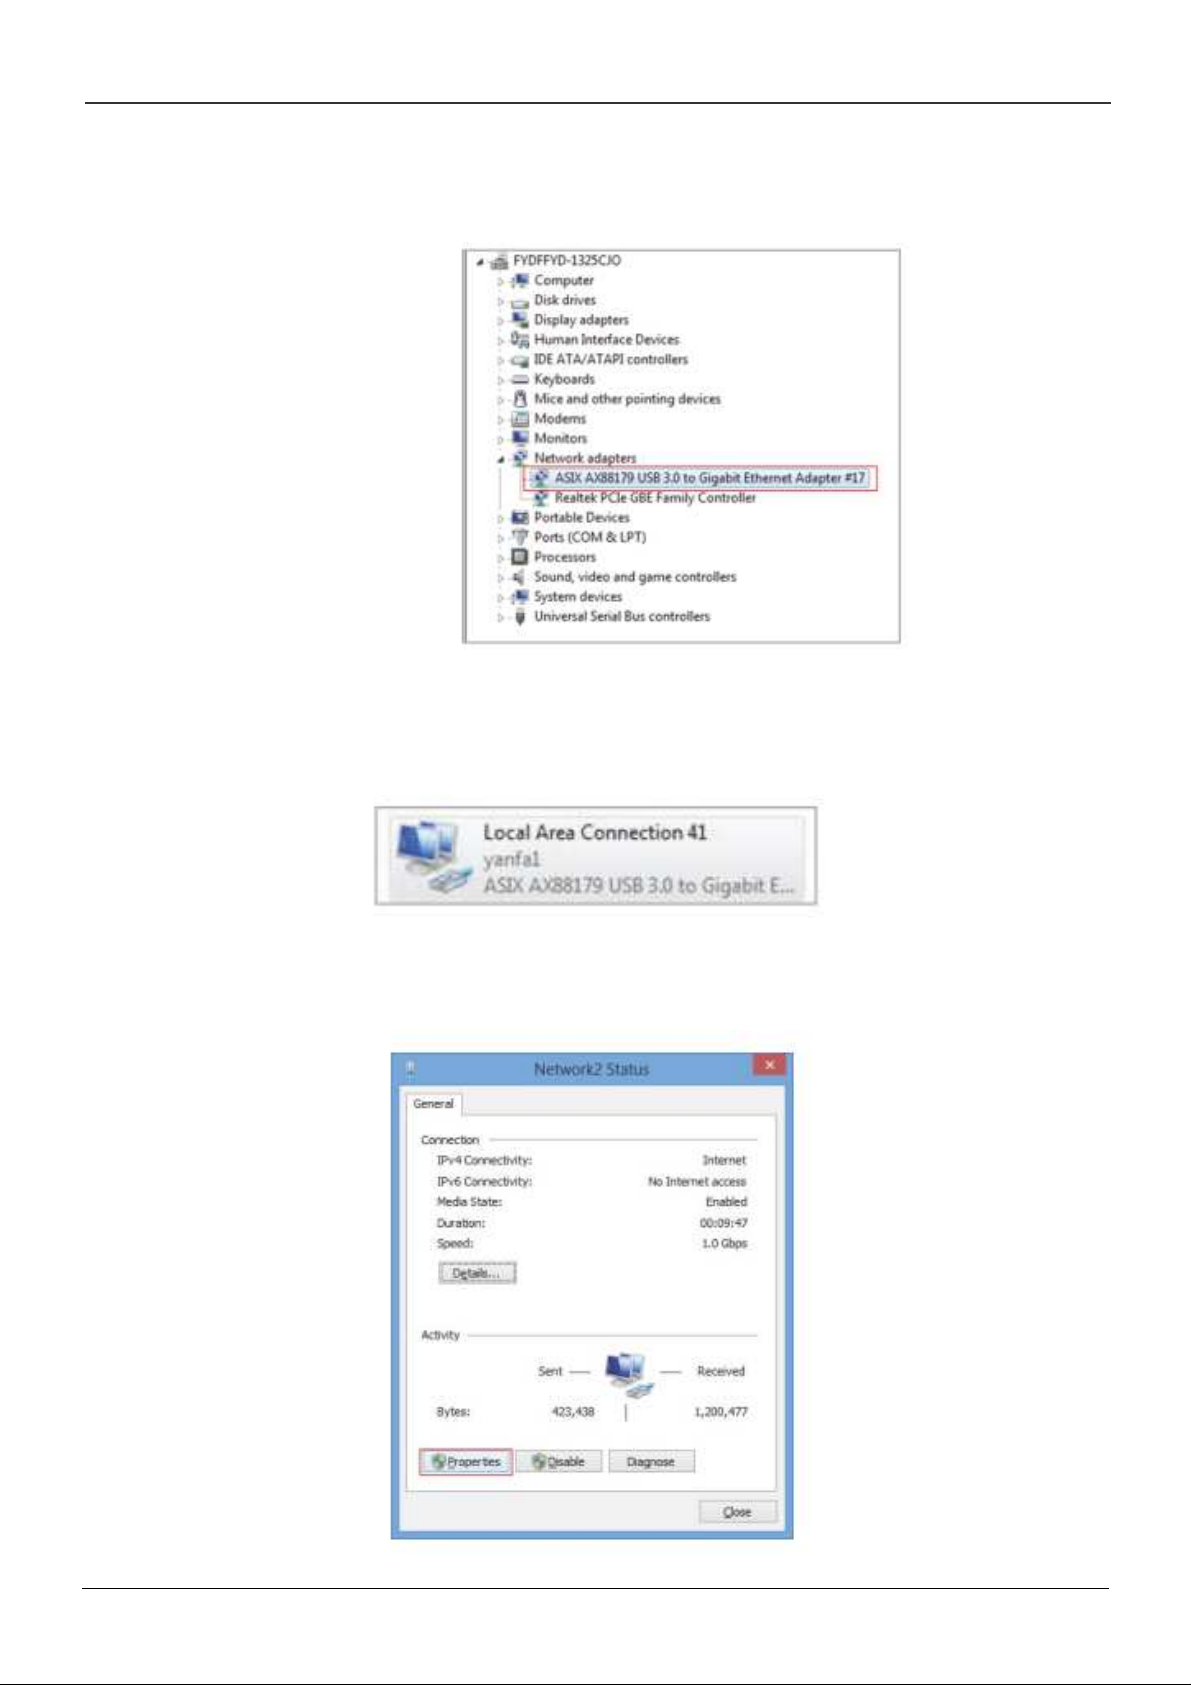
• Connect the USB 3.0 Dual Gigabit Ethernet Adapter to the computer after the installation
process is completed. The USB 3.0 Dual Gigabit Ethernet Adapter will then appear in the
device manager:
Page 3
User Manual
• After successful installation you can see the new network connection in “Control Panel –
Network and Internet”. The network will automatically assign the IP feature for you and
now you will be able to connect to the internet.
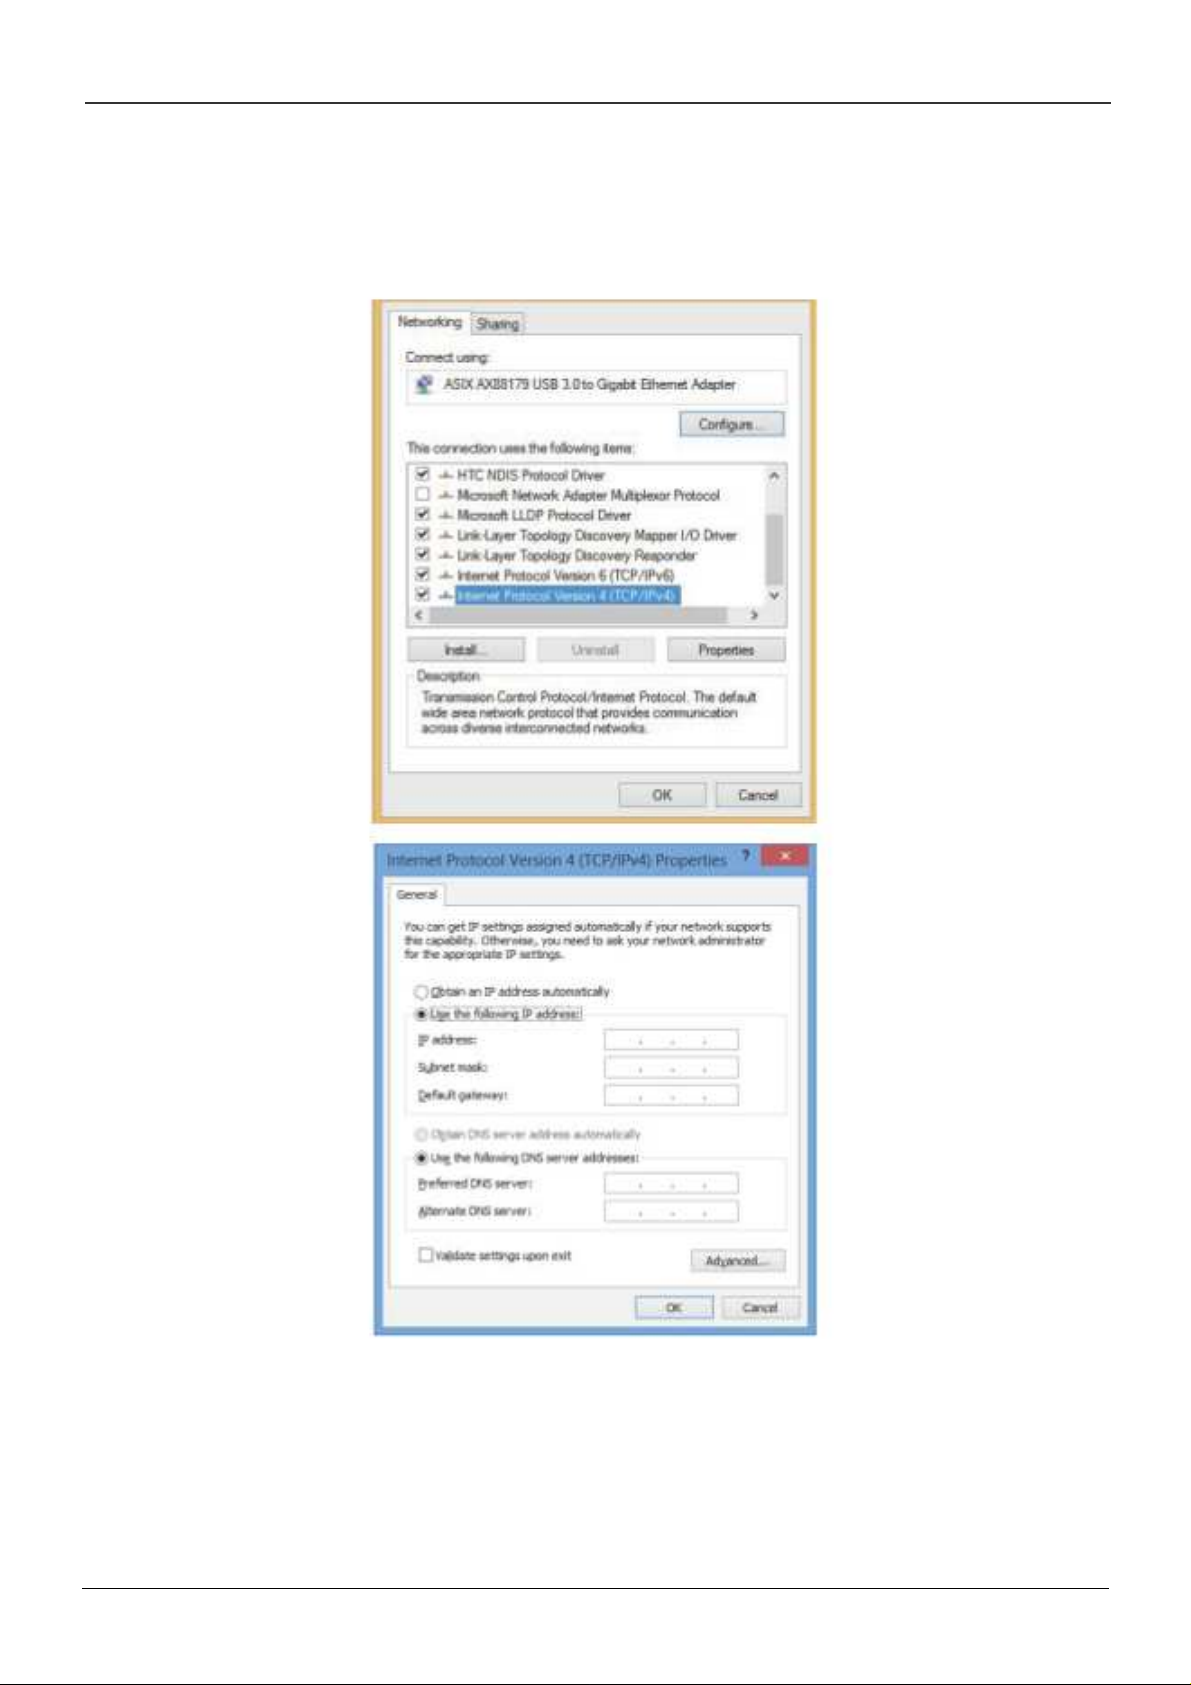
• For some internet connections you will need to set the IP address manually. Please click
on “Change Adapter setting” and then double click on the ASIX AX88179 adapter and
refer to the pictures:
Page 4
User Manual
If you still cannot access the internet after the manual setup, please recheck all settings and
options or contact your network administrator.
Page 5
User Manual
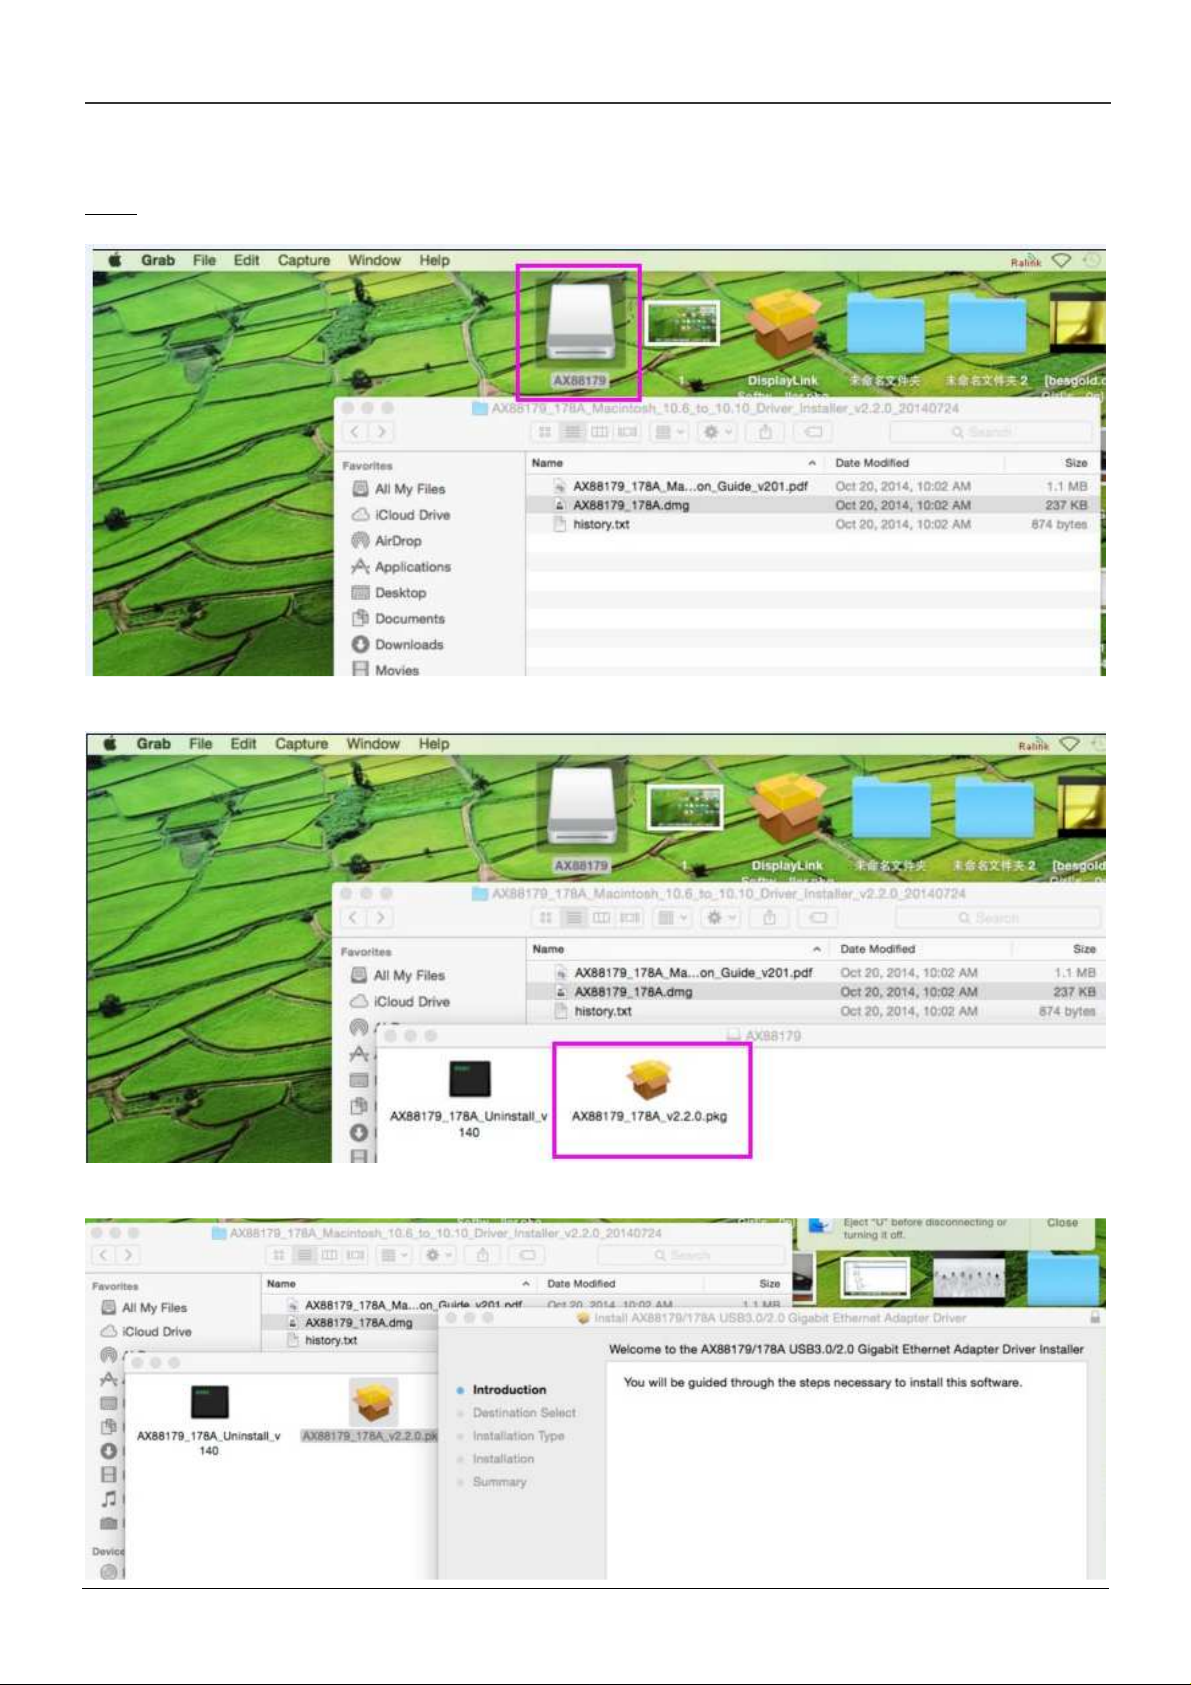
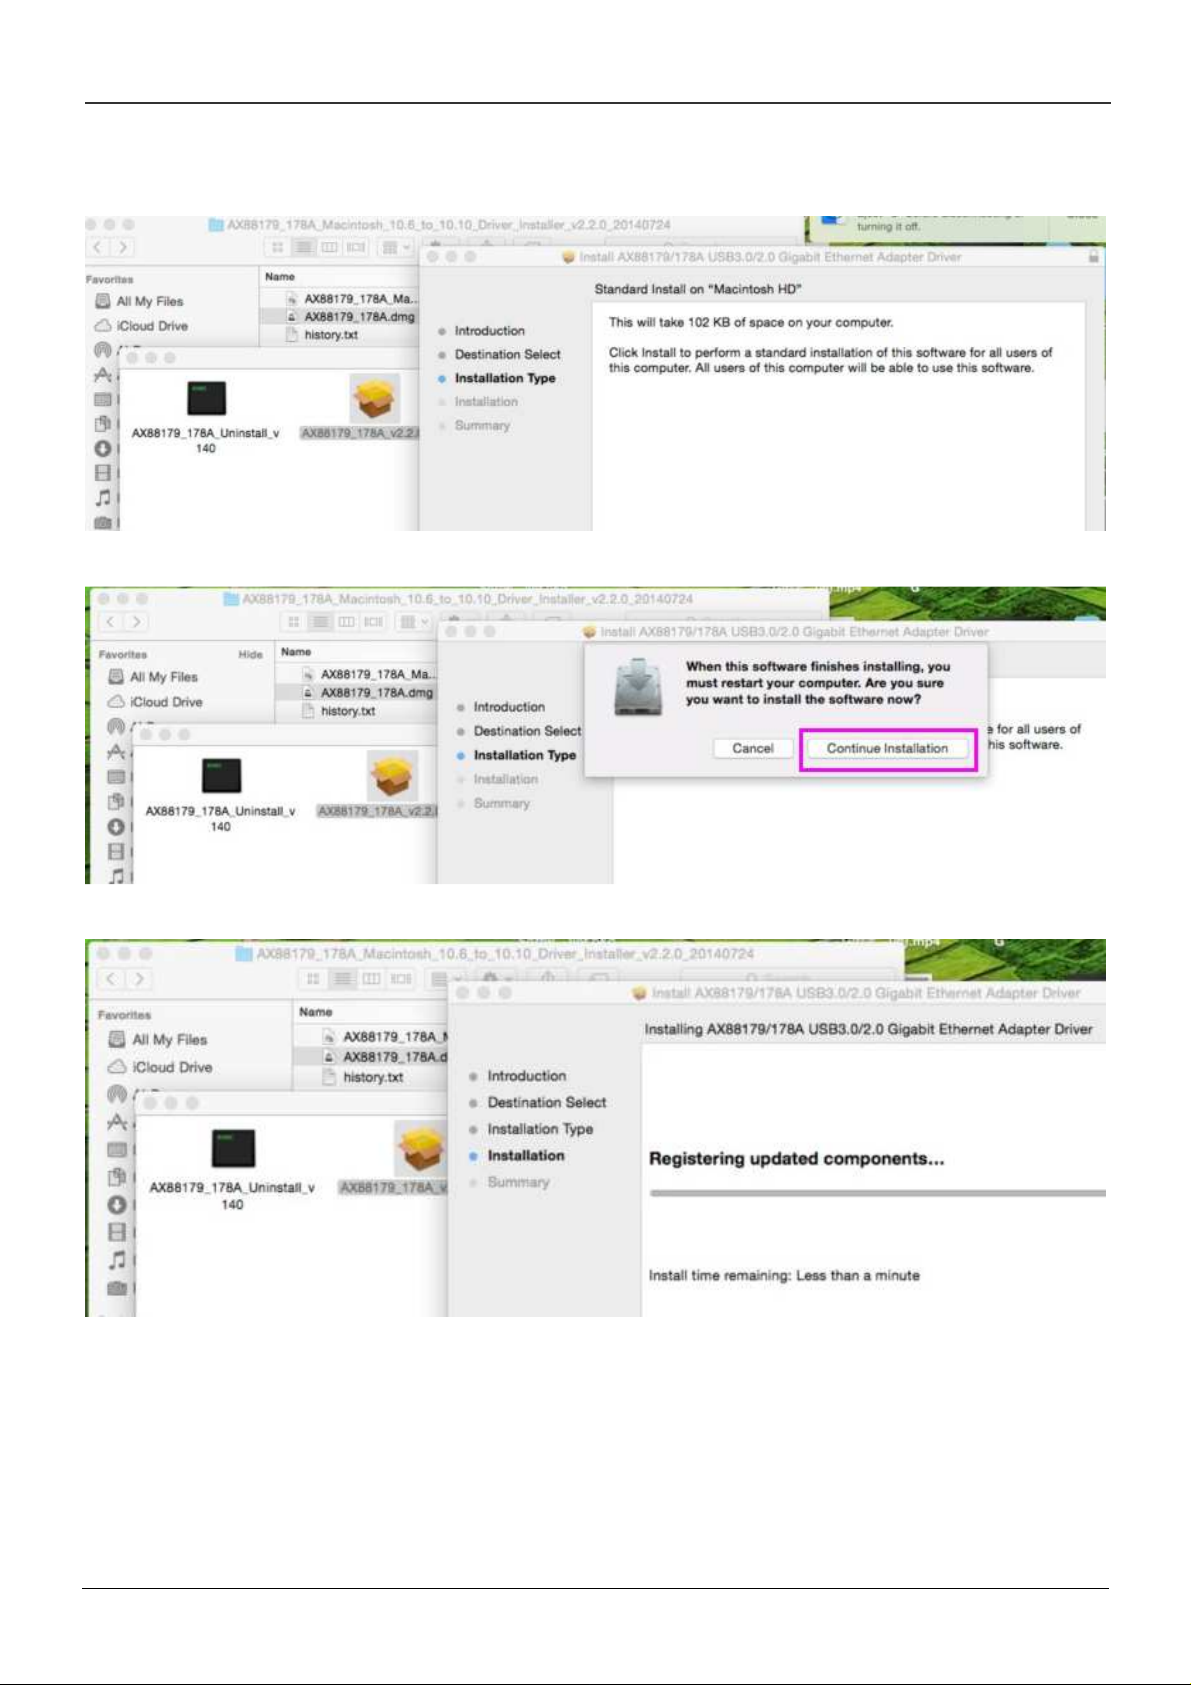
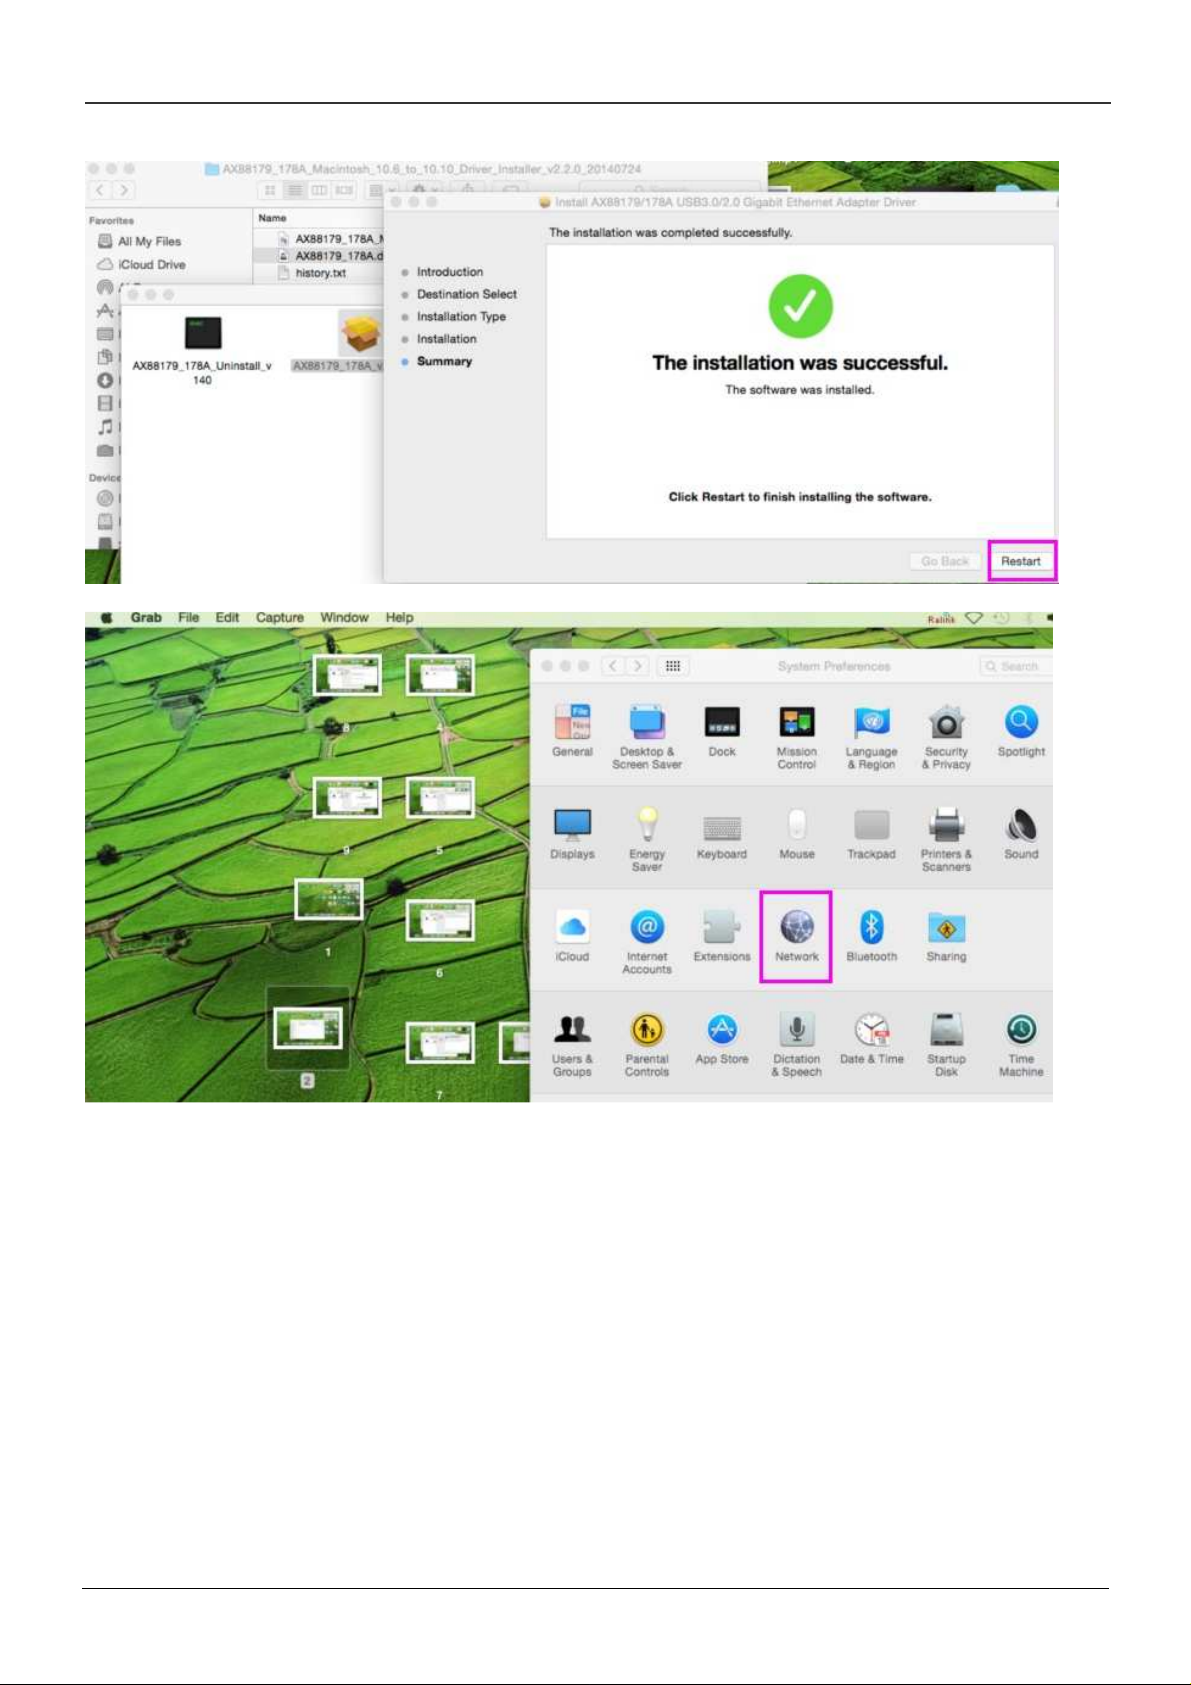
Mac: Please follow the steps below:
Page 6
User Manual
Page 7
User Manual
Page 8
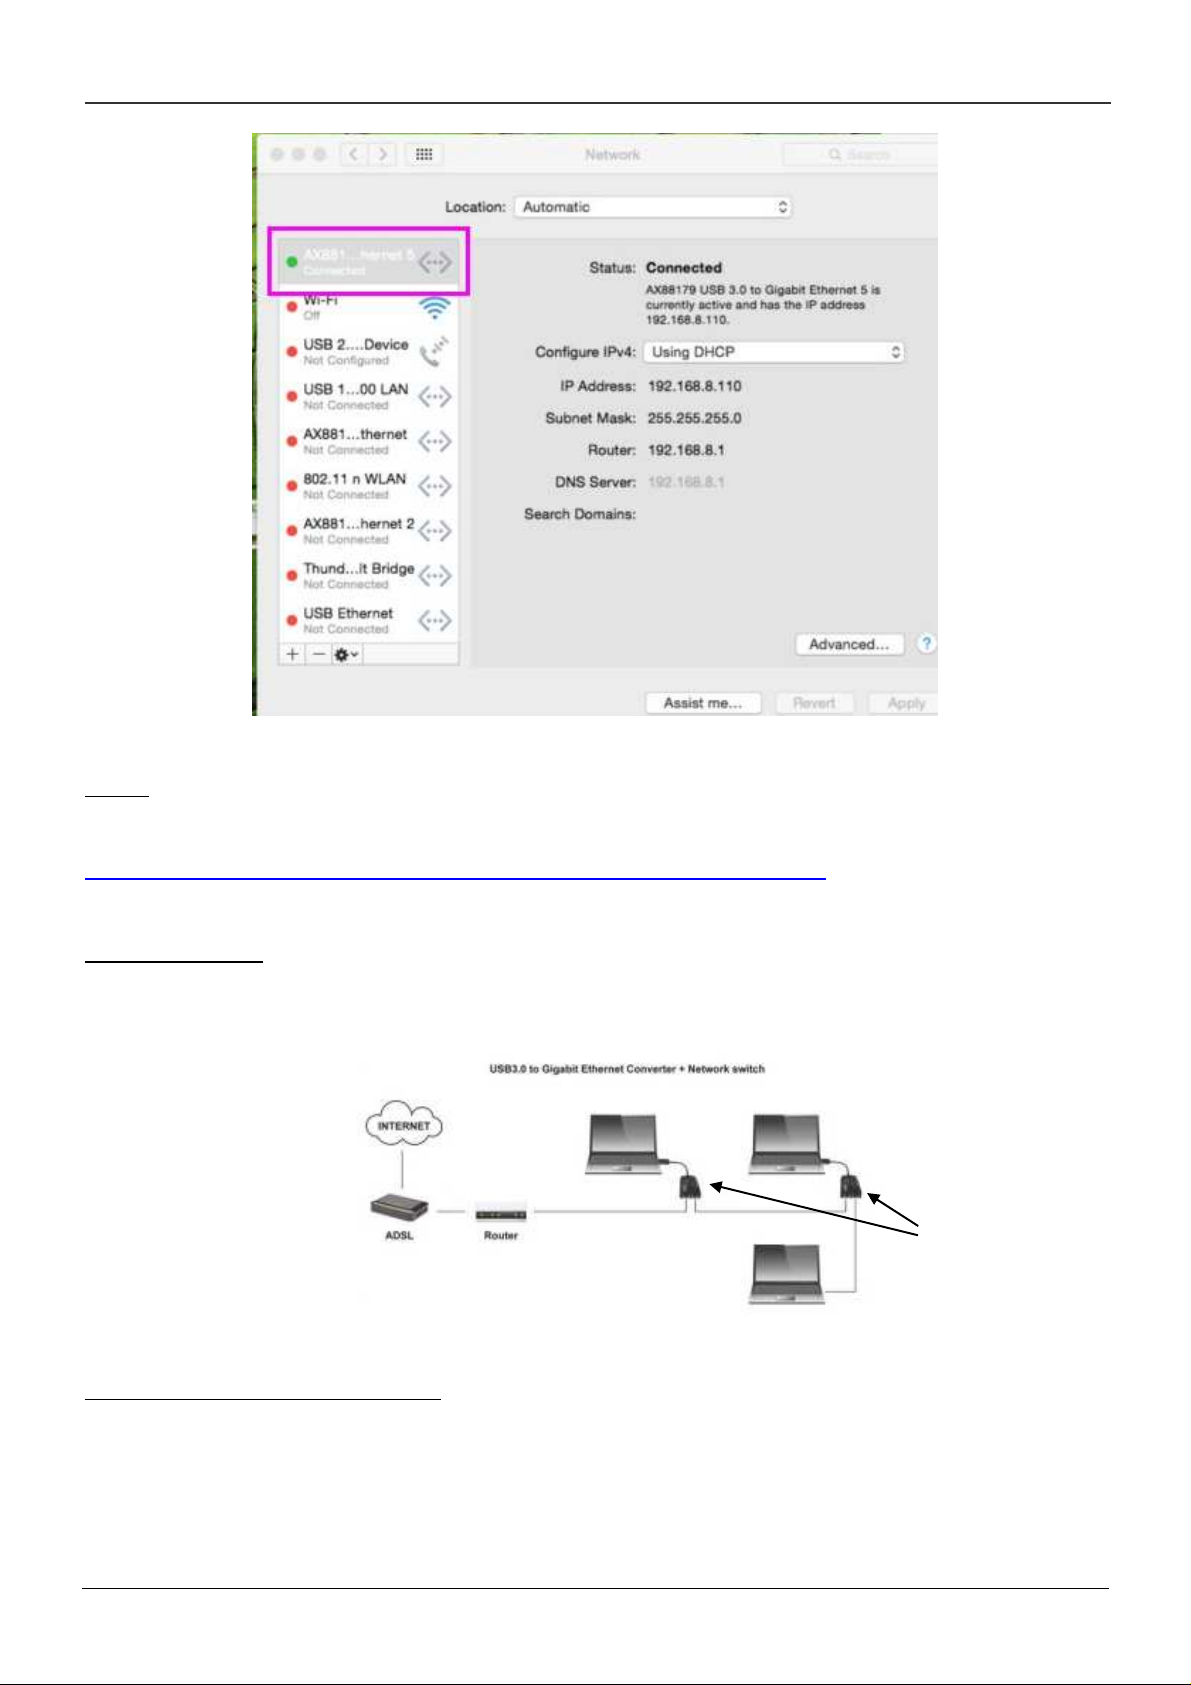
User Manual
Linux:
Please download the drivers from the following link:
http://www.asix.com.tw/download.php?sub=driverdetail&PItemID=131
Internet Sharing:
If the hardware of a computer does not support internet sharing, it can be connected to a
second computer with internet access by use of the USB 3.0 Dual Ethernet Adapter
43123
Power through USB Micro-B port:
The USB 3.0 Dual Ethernet Adapter does not require a power supply when connected to the
computer via the USB 3.0 interface, however, when the computer is turned off you can get
power though the USB Micro-B port to maintain the network connection.
Page 9

Benutzerhandbuch
Einführung
Vielen Dank für den Kauf des LINDY USB 3.0 Dual Gigabit Ethernet Adapters. Dieser stellt über
die USB 3.0 Schnittstelle eine 10/100/1000Mbit/s Netzwerkverbindung zur Verfügung. Der
Adapter verfügt über zwei RJ45-Netzwerkanschlüsse und eine interne Switchfunktion, die es
ermöglicht, einen zweiten Computer ans Netzwerk anzubinden.
Eigenschaften
• USB 3.0 Spezifikation mit bis zu 5Gbit/S., abwärts kompatibel mit USB 2.0/1.1
• Kompatibel mit IEEE802.3/802.3u/802.3ab (10BASE-T, 100BASE-TX, 1000BASE-T),
IEEE802.3az (energieeffizientes Ethernet)
• USB Chipsatz : AX88179
• Interner Gigabit Switch Chip ermöglicht die Netzwerkanbindung mehrerer Computer
• Netzwerkzugang der kaskadierten Rechner auch ohne USB 3.0 Anbindung – die
Stromversorgung erfolgt in diesem Fall über den USB Micro-B Anschluss
• Unterstützt IPv4/IPv6 Checksum Offload Engine (COE) zur Entlastung des Prozessors
• Wake On LAN-Funktion
• Interfaces: 1x USB 3.0 A male, 2x RJ45 female, 1x USB Micro-B for optional power
• LED-Anzeige: gelb zeigt Internetverbindung an (blinkend bei Datentransfer); grün zeigt
die Aktivierung des Gigabit Netzwerks
• Systemvoraussetzungen: Windows 8.1/8/7/Vista/XP, Mac OS ab 10.x, Linux Kernel
3.x/2.6x
Lieferumfang
• USB 3.0 Dual Gigabit Ethernet Adapter
• Treiber-CD
• Dieses Handbuch
Installation
Achtung!
Installieren Sie zuerst den Treiber von beiliegender CD bevor Sie den Ethernet Adapter am
Computer anschließen!
Windows:
• Legen Sie die Treiber-CD in das CD-Laufwerk,die CD startet automatisch und das CD
Menü erscheint. Oder suchen Sie im Dateiverzeichnis den richtigen Treiber. Starten Sie
die Treiberinstallation mit einem Doppelklick auf die Datei <Setup.exe>.
• Nach erfolgter Treiberinstallation können Sie den USB 3.0 Dual Gigabit Ethernet Adapter
an den Computer anschließen, dieser erscheint dann im Gerätemanager:
Page 10

Benutzerhandbuch
• Nach der erfolgreichen Installation sehen Sie die neue Netzwerkverbindung in der
Systemsteuerung (Netzwerk und Internetverbindungen). Das Netzwerk wird automatisch
eine IP Adresse zuordnen. Nun können Sie eine Internetverbindung herstellen.
• Bei einigen Internetverbindungen müssen Sie die IP Adresse manuell festlegen. Klicken
Sie dazu auf « Adaptereinstellungen ändern » und dann zweimal auf den ASIX AX88179
Adapter. Die folgenden Screenshots zeigen Ihnen wie Sie weiter vorgehen :
Page 11

Benutzerhandbuch
Wenn Sie nun trotzdem keinen Zugang zum Internet haben, überprüfen Sie Ihre Einstellungen
noch einmal oder wenden Sie sich an Ihren Netzwerkadministrator.
Mac:
Folgen Sie den Anweisungen der Screenshots im englischen Teil dieses Handbuchs (S. 5)
Linux :
Laden Sie bitte die Treiber von diesem Link herunter:
http://www.asix.com.tw/download.php?sub=driverdetail&PItemID=131
Page 12

Benutzerhandbuch
Internetzugang:
Wenn die Hardware Ihres Computer keinen Internet- bzw. Netzwerkzugang unterstützt, können
Sie ihn an einen anderen Computer mit Internetzugang anschließen und durch den Einsatz des
USB 3.0 Dual Gigabit Ethernet Adapters dennoch auf das Internet zugreifen (siehe Grafik):
43123
Stromversorgung durch den USB Micro-B Port:
Der USB 3.0 Dual Ethernet Adapter bezieht seinen Strom über die USB 3.0-Schnittstelle des
Computers. Wenn allerdings der Computer, an dem der Adapter angeschlossen ist,
ausgeschaltet ist, können Sie den zweiten Computer über den USB Micro-B Port mit Strom
versorgen um die Netzwerkverbindung (auch bei ausgeschaltetem ersten Computer) aufrecht
zu erhalten.
Page 13

Manuel utilisateur
Introduction
Merci d’avoir choisi l’adaptateur USB 3.0 Dual Gigabit Ethernet LINDY. Il vous permet de
disposer, via un port USB 3.0, d’une connexion au réseau 10/100/1000Mbit/s. L’adaptateur
dispose de deux ports Ethernet RJ45 et d’une fonction switch interne, qui vous permet de
connecter un deuxième ordinateur au réseau Ethernet.
Caractéristiques
• Spécifications USB 3.0 avec jusqu’à 5Gbit/S., rétrocompatible USB 2.0/1.1
• Compatible IEEE802.3/802.3u/802.3ab (10BASE-T, 100BASE-TX, 1000BASE-T),
IEEE802.3az (Energy Efficient Ethernet)
• Chipset USB: AX88179
• Chipset Switch Gigabit interne permettant la connexion de plusieurs ordinateurs au
réseau Ethernet
• Accès réseau pour l’ordinateur en cascade sans liaison au port USB 3.0 – l’alimentation
se fait dans ce cas via le connecteur USB Micro-B
• Prise en charge IPv4/IPv6 Checksum Offload Engine (COE) pour soulager le processeur
• Fonction Wake On LAN prise en charge
• Interfaces: 1x USB 3.0 A mâle, 2x RJ45 femelle, 1x USB Micro-B pour alimentation
optionnelle
• Indicateurs LED: jaune pour connexion au réseau (clignote lors de transferts de
données); vert pour indiquer l’activation du réseau Gigabit
• Configuration requise: Windows 8.1/8/7/Vista/XP, Mac OS ab 10.x, Linux Kernel 3.x/2.6x
Contenu de la livraison
• Adaptateur USB 3.0 Dual Gigabit Ethernet
• CD avec pilotes
• Ce manuel
Installation
Attention !
Installez en premier les pilotes présents sur le CD avant de connecter l’adaptateur à votre
ordinateur !
Windows:
• Installez le pilote dans votre lecteur de CD-Rom, le CD démarre automatiquement et le
menu du CD apparait. Vous avez aussi la possibilité de chercher le pilote manuellement.
Démarrez l’installation des pilotes avec un double clic sur <Setup.exe>.
• Après la finalisation de l’installation des pilotes vous pouvez connecter l’adaptateur USB
3.0 Dual Gigabit Ethernet à votre ordinateur, il s’affiche ensuite dans le gestionnaire de
périphériques:
Page 14

• Une nouvelle connexion réseau apparait dans le panneau de configuration après une
installation réussie (sous Réseau et Internet). Le réseau attribuera automatiquement une
adresse IP dans la plupart des cas. Vous pouvez maintenant vous connecter à internet.
• Pour certaines connexion réseau vous devrez entrer l’adresse IP manuellement. Cliquez
sur ‘‘Modifier les paramètres de la carte‘‘, puis deux fois sur l’adaptateur ASIX AX88179.
Les copies d’écrans suivantes vous indiquent les étapes suivantes:
Manuel utilisateur
Page 15

Manuel utilisateur
Si vous n’obtenez toujours pas de connexion réseau, veuillez vérifier encore une fois vos
paramètres ou adressez-vous à votre administrateur réseau.
Mac:
Merci de suivre les indications présentées sur les copies d’écrans en page 5 de ce manuel.
Linux :
Merci de télécharger les pilotes à partir du lien ci-dessous:
http://www.asix.com.tw/download.php?sub=driverdetail&PItemID=131
Page 16

Manuel utilisateur
Accès internet:
Lorsque votre ordinateur ne possède pas l’interface matérielle nécessaire à la prise en charge
d‘une connexion au réseau ou à internet, vous pouvez connecter un autre ordinateur avec
accès réseau et accèder à internet via l‘utilisation de l’adaptateur USB 3.0 Dual Gigabit
Ethernet (voir schéma):
43123
Alimentation via le port USB Micro-B:
L’adaptateur USB 3.0 Dual Ethernet obtient son alimentation via l’interface USB 3.0 de
l’ordinateur. Toutefois, si l’ordinateur auquel l’adaptateur est connecté est éteint, vous pouvez
alimenter l’adaptateur du deuxième ordinateur via le port USB Micro-B pour maintenir la
connexion au réseau Ethernet (également lorsque le premier ordinateur est éteint).
Page 17

Manuale
Introduzione
Vi ringraziamo di aver acquistato l’adattatore LINDY USB 3.0 Dual Gigabit Ethernet che
consente la connessione a reti 10/100/1000Mbps utilizzando una porta USB 3.0. La
configurazione con due porte RJ45 aggiunge una funzione di Switch integrata che consente di
condividere la connessione con un secondo computer.
Caratteristiche
• Conforme alle specifiche USB 3.0 fino a 5Gbps, retrocompatibile USB 2.0/1.1
• Standard di rete supportati: IEEE 802.3/802.3u/802.3ab (10Base-T/100Base-
T/1000Base-T), IEEE802.3az (Energy Efficient Ethernet)
• Velocità di Trasferimento: Ethernet 10Mbps, Fast Ethernet 100Mbps e Gigabit Ethernet
1000Mbps (Half/Full Duplex)
• Chipset USB AX88179
• Chip per funzione Switch Gigabit integrato che consente la connessione di più computer
• Funziona come un normale switch di rete (senza connessione USB) se alimentato
tramite la porta USB Micro-B
• Supporta Checksum Offload Engine (COE) su pacchetti IPv4/IPv6 per ridurre il carico
sulla CPU
• Funzione Wake On LAN
• Interfacce: 1x USB 3.0 A maschio, 2x RJ45 femmina, 1x USB Micro-B per alimentazione
opzionale
• LED: giallo per connessione alla rete (lampeggia quando vengono trasmessi o ricevuti
dati); verde quando è attiva una connessione Gigabit
• Compatibile con Win 8.1/8/7/Vista, Mac OS 10.x e superiori, Linux Kernel 3.x/2.6x
Contenuto della confezione
• Adattatore USB 3.0 Dual Gigabit Ethernet
• CD Driver
• Questo manuale
Installazione dei Driver
ATTENZIONE!
NON collegate l’adattatore al computer prima di aver installato i driver forniti a corredo!!
Windows:
• Inserito il CD incluso nella confezione ed attendete che venga visualizzato il menù di
installazione oppure avviate direttamente l’installazione dei driver selezionado nel cd il
file setup.exe dalla cartella relativa al vostro sistema operativo.
• Collegate l’adattatore USB 3.0 Dual Gigabit Ethernet al computer non appena il processo
di installazione sarà completato. A questo punto l’adattatore comparirà nella finestra di
gestione dei dispositivi
Page 18

• Se l’installazione avrà aavuto successo potrete vedere una nuova connessione di rete
nella finestra “Rete ed Internet” raggiungibile dal pannello di controllo. La rete assegnerà
automenticamente un indirizzo IP all’adattatore (se è presente un server HDCP) e
potrete immediatamente connettervi ad essa tramite l’adattatore.
Manuale
• Nel caso non sia presente un server HDCP o per configurazioni di rete particolari sarà
necessario inserire manualmente un indirizzo IP. Vi preghiamo di fare click sulla
connessione creata sulla scheda ASIX AX88179 e selezionare “Cambia impostazioni
connessione” e poi fate riferimento alla seguente sequenza di azioni:
Page 19

Manuale
Inserite null’ultima finestra i dati della vostra connessione (indirizzo IP, ecc..)
Se non riuscite ancora a stabilire una connessione di preghiamo di contattare il vostro
amministratore di rete.
Page 20

Mac: Vi preghiamo di seguire i passi descritti nelle seguenti immagini:
Manuale
Page 21

Manuale
Page 22

Manuale
Page 23

Manuale
Linux:
Vi preghiamo di scaricare i driver dal seguente link:
http://www.asix.com.tw/download.php?sub=driverdetail&PItemID=131
Condivisione connessione di rete:
Se un computer non supporta la condivisione della connessione ad Internet, può essere
connesso ad un computer con accesso ad Internet tramite l’adattatore USB 3.0 Dual Ethernet
43123
Alimentazione tramite la porta USB Micro-B:
L’adattatore USB 3.0 Dual Ethernet non necessita di un’alimentazione esterna quando è
connesso ad un computer tramite l’interfaccia USB 3.0; tuttavia a computer spento è possibile
alimentarlo tramite la porta USB Micro-B per mantenere attiva la connessione di rete.
Page 24

CE / FCC Statement
CE Certification
This equipment complies with the requirements relating to electromagnetic compatibility, EN 55024 and
EN55022 for ITE (Information Technolology Eqipment), EN61000-3-2/-3. It must be used with shielded
cables only.
It has been manufactured under the scope of RoHS compliance.
CE Konformitätserklärung
Dieses Produkt entspricht den einschlägigen EMV Richtlinien der EU für IT-Equipment und darf nur
zusammen mit abgeschirmten Kabeln verwendet werden.
Diese Geräte wurden unter Berücksichtigung der RoHS Vorgaben hergestellt.
Die formelle Konformitätserklärung können wir Ihnen auf Anforderung zur Verfügung stellen
FCC Certification
This equipment has been tested and found to comply with the limits for a Class B digital device, pursuant
to part 15 of the FCC Rules. These limits are designed to provide reasonable protection against harmful
interference in a residential installation.
You are cautioned that changes or modification not expressly approved by the party responsible for
compliance could void your authority to operate the equipment.
This device complies with part 15 of the FCC Rules.
Operation is subject to the following two conditions:
1. This device may not cause harmful interference, and
2. This device must accept any interference received, including interference that may cause undesired
___________________________________________________________________________________
LINDY Herstellergarantie – Hinweis für Kunden in Deutschland
LINDY gewährt für dieses Produkt über die gesetzliche Regelung in Deutschland hinaus eine
zweijährige Herstellergarantie ab Kaufdatum. Die detaillierten Bedingungen dieser Garantie finden Sie
auf der LINDY Website aufgelistet bei den AGBs.
Hersteller / Manufacturers (EU):
LINDY-Elektronik GmbH Sadler Forster Way
Markircher Str. 20 Teesside Industrial Estate, Thornaby
68229 Mannheim Stockton-on-Tees, TS17 9JY
Germany United Kingdom
Email: info@lindy.com postmaster@lindy.co.uk
T: +49 (0)621 470050 T: +44 (0) 1642 754000
LINDY Electronics Ltd.
Page 25

Recycling Information
WEEE (Waste of Electrical and Electronic Equipment),
Recycling of Electronic Products
Europe, United Kingdom
In 2006 the European Union introduced regulations (WEEE) for the collection and recycling of all waste
electrical and electronic equipment. It is no longer allowable to simply throw away electrical and
electronic equipment. Instead, these products must enter the recycling process.
Each individual EU member state has implemented the WEEE regulations into national law in slightly
different ways. Please follow your national law when you want to dispose of any electrical or electronic
products. More details can be obtained from your national WEEE recycling agency.
Germany / Deutschland
Die Europäische Union hat mit der WEEE Direktive Regelungen für die Verschrottung und das Recycling
von Elektro- und Elektronikprodukten geschaffen. Diese wurden im Elektro- und Elektronikgerätegesetz
– ElektroG in deutsches Recht umgesetzt. Dieses Gesetz verbietet das Entsorgen von entsprechenden,
auch alten, Elektro- und Elektronikgeräten über die Hausmülltonne! Diese Geräte müssen den lokalen
Sammelsystemen bzw. örtlichen Sammelstellen zugeführt werden! Dort werden sie kostenlos entgegen
genommen. Die Kosten für den weiteren Recyclingprozess übernimmt die Gesamtheit der
Gerätehersteller.
France
En 2006, l'union Européenne a introduit la nouvelle réglementation (DEEE) pour le recyclage de tout
équipement électrique et électronique.
Chaque Etat membre de l’ Union Européenne a mis en application la nouvelle réglementation DEEE de
manières légèrement différentes. Veuillez suivre le décret d’application correspondant à l’élimination des
déchets électriques ou électroniques de votre pays.
Italy
Nel 2006 l’unione europea ha introdotto regolamentazioni (WEEE) per la raccolta e il riciclo di
apparecchi elettrici ed elettronici. Non è più consentito semplicemente gettare queste apparecchiature,
devono essere riciclate. Ogni stato membro dell’ EU ha tramutato le direttive WEEE in leggi statali in
varie misure. Fare riferimento alle leggi del proprio Stato quando si dispone di un apparecchio elettrico o
elettronico. Per ulteriori dettagli fare riferimento alla direttiva WEEE sul riciclaggio del proprio Stato
.
LINDY No. 43123
2nd Edition June 2015
www.lindy.com
 Loading...