

Page 1
USB MiniCam
LINDY No’s 42803 & 42804
www.lindy.com
Page 2

Introduction
Thank you for purchasing the LINDY USB MiniCam. This MiniCam is a high-resolution camera with a builtin microphone. A single USB cable connects the camera to your computer for audio and video, so there’s
no need for a separate untidy microphone cable.
Features
USB Webcam with high quality 350k Pixel CMOS sensor for smooth, clear images
Built-in USB microphone
Allows you to capture still pictures, video and audio
Ideal for use with NetMeeting or other similar video conferencing software
Adjustable focus glass lens: 3cm to infinity
Resolution: up to 640 x 480
Captures video at up to 30fps
Snapshot function
Flexible neck for easy positioning
IR and white illumination LEDs for use in low light conditions
Interface: USB 1.1 Full Speed, USB 2.0 compatible
Software compatibility: Windows 98SE/ME/2000/XP & Mac OS X
Package Contents
USB MiniCam
Driver and Manual CD
Page 3
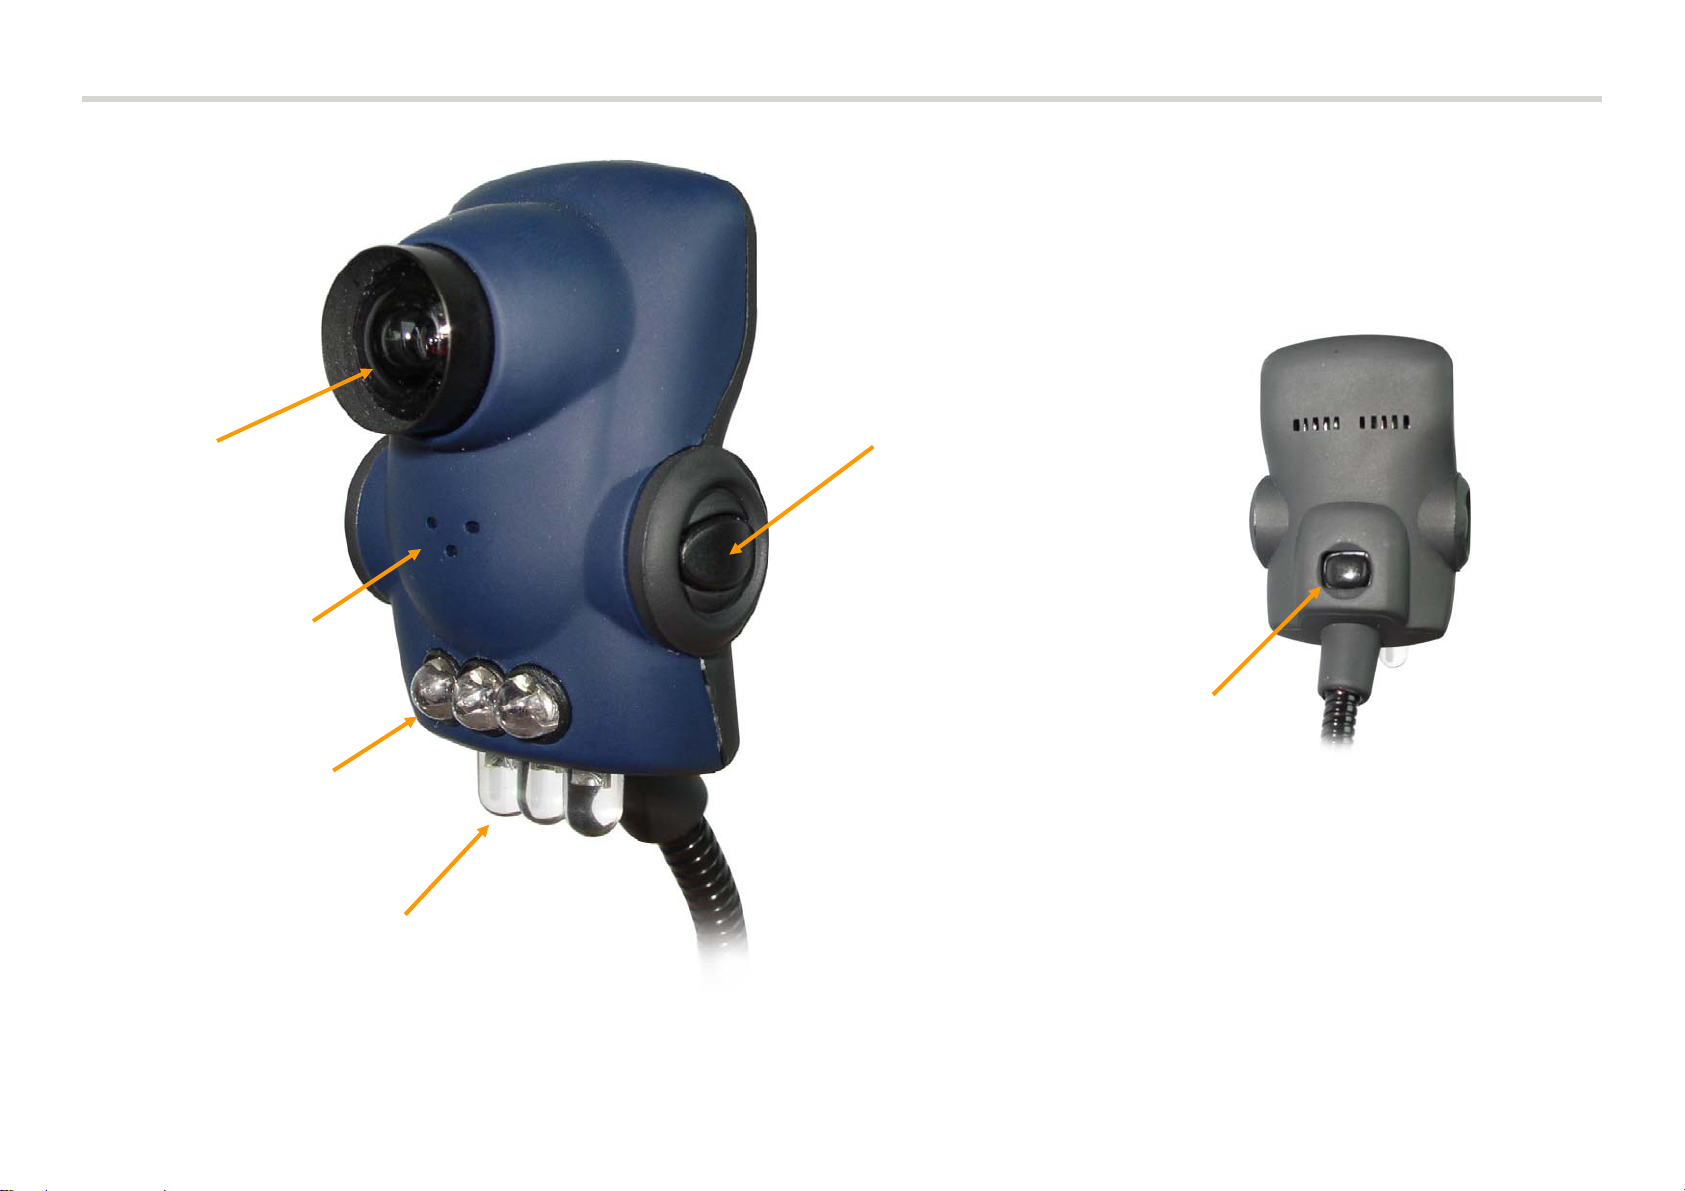
Product Information
Lens
Microphone
Snapshot button
Infra red LEDs
White LEDs
White LED on/off
button
Page 4

Installation
1.
Insert the driver CD, the installation application will automatically launch.
2.
Click Install and follow the on-screen instructions to install the MiniCam driver software.
3.
When the installation software has installed, connect the MiniCam to a USB port on your PC.
4.
Windows will automatically detect the MiniCam and display a Found New Hardware Wizard window.
Select the Install the software automatically (Recommended) option and click, Next.
5.
If you see a ‘Windows Logo testing’ box, click Continue Anyway.
Important! You must install the drivers BEFORE connecting the camera to your PC.
6.
When the wizard has finished installing the software, click Finish. The MiniCam is now ready to be
used!
Page 5
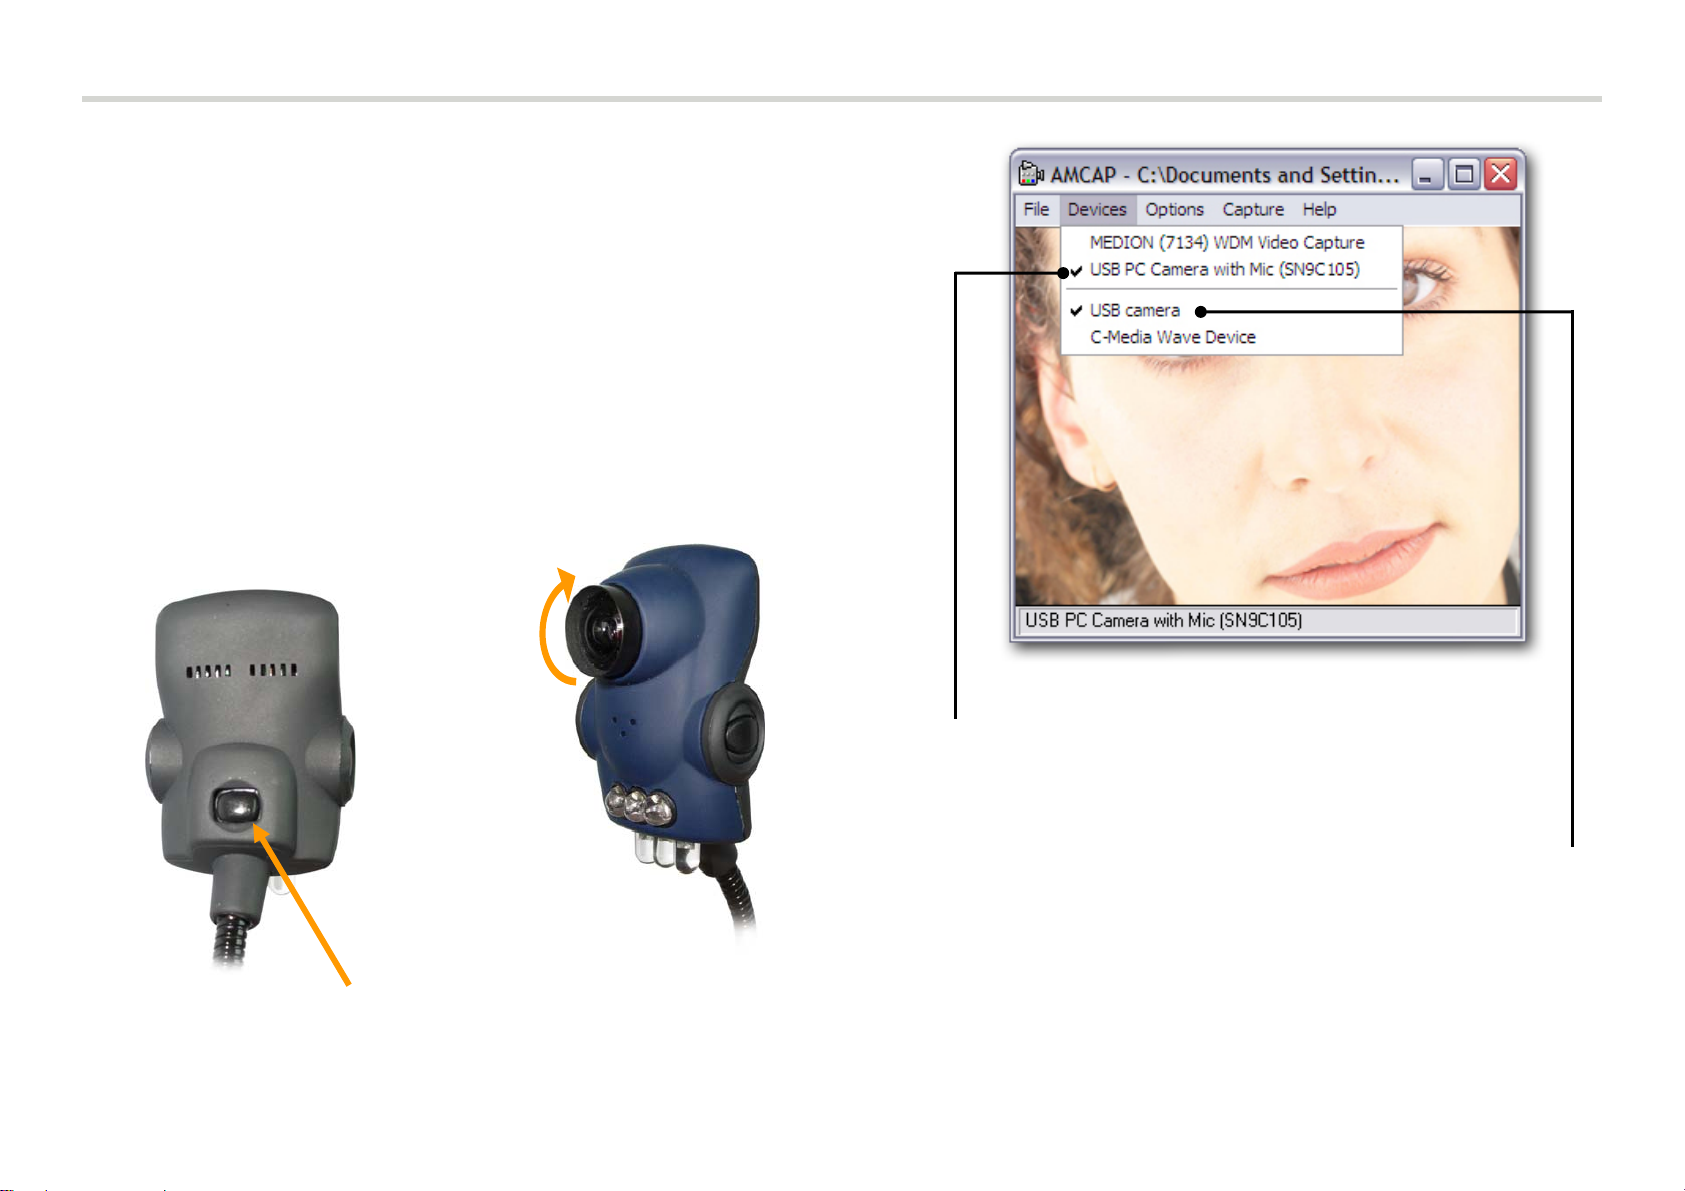
Initial Operation
To use the MiniCam, you must launch the
AMCap application. Select:
Start > All Programs > USB PC Camera Plus >
AMCap
The AMCap window will open and display
the output from the MiniCam.
Rotate the
lens to focus.
Configuration
If you don’t see anything in the AMCap window, ensure
that ‘USB PC Camera with Mic’ is selected in the Devices
drop down menu.
The lower part of the drop-down menu allows
you to select the audio input device. Ensure
that ‘USB Camera’ is ticked.
Press this button to switch the
white LEDs on; press again to
switch off.
Page 6
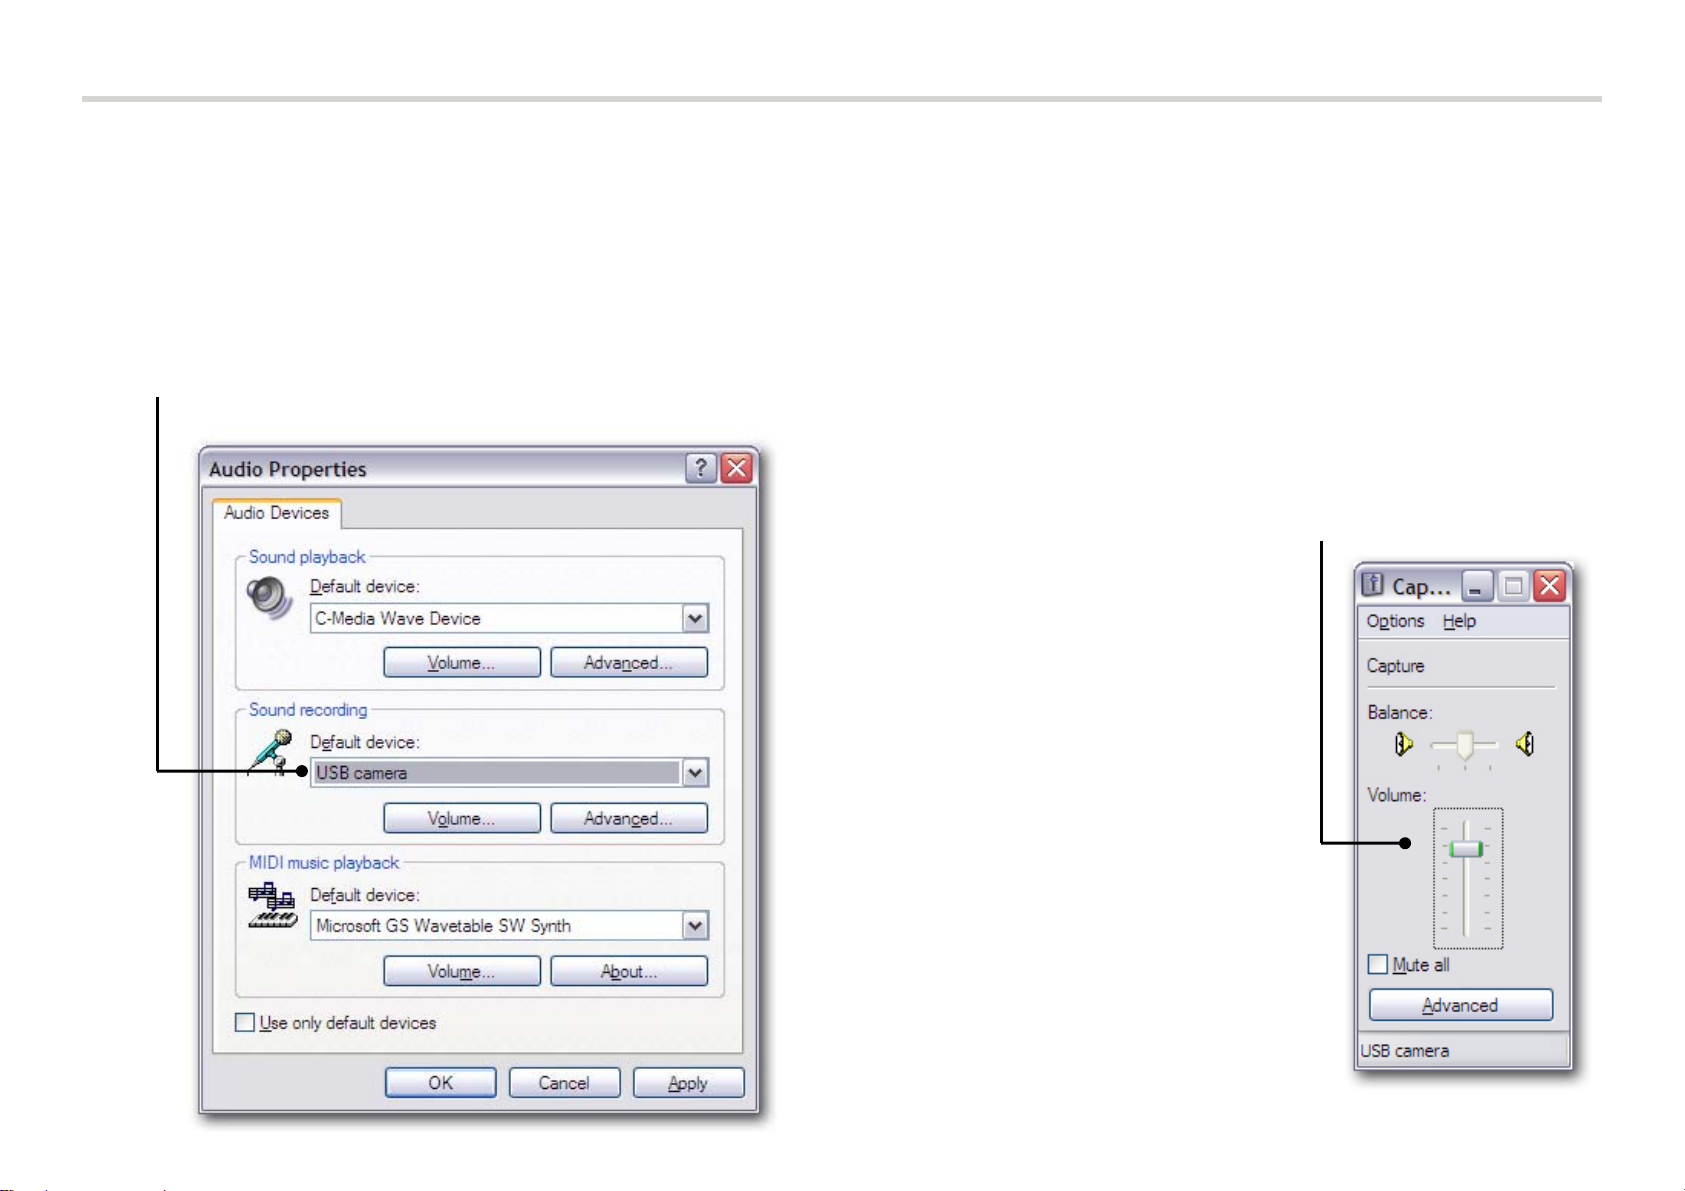
Configuration
Setting up the microphone
For correct microphone operation you must follow the procedure below.
Open the windows Sound Recorder application: Start > Control Panel > Sounds and Audio Devices
1.
Click on the Audio tab; make sure that USB Camera is set as the default sound recording device.
2.
Click the Volume button. In the window that
appears, you can raise the volume control for the
MiniCam’s built-in microphone. For most purposes a
setting of about ¾ of the way
up will suffice.
3.
Close the volume control
window by clicking the ‘X’ in
the top right hand corner,
then, in the Audio Properties
window, click Apply and then
OK, to save the settings.
Page 7

4.
In the AMCap program’s Capture menu, ensure that Capture Audio is ticked.
5.
Open the Options > Audio Capture Filter… menu.
In the Properties window, check that Microphone is
selected from the Pin Line drop-down list, and then
click OK.
Configuration
Page 8

Configuration
Video Capture Pin
To change video compression, output size and frame rate settings, select Video Capture Pin… from the
Options menu.
Here you can increase or decrease
the video capture frame rate (the
higher the frame rate, the
smoother the captured video)
Select the Color Space / Compression setting
here, you can choose from ‘RGB 24’ or ‘I420’. The
RGB 24 setting allows a higher display output to
be selected, but at a lower maximum frame rate.
Choose the display output size
from this drop-down menu
Page 9

Configuration
Video Capture Filter
The Video Capture Filter menus allow you to change various settings and apply special effects. To open,
select Video Capture Filter... from the Options menu and click the Settings tab.
The Image Control section
allows you to make various
changes to the image settings;
please experiment with the
controls to see the effect they
make.
Click the ‘Reset’ button to
return to the standard settings
In the Auto Mode Control
section you can make changes
to the USB bandwidth use,
exposure and white balance
settings.
Selecting ‘Reset’ changes back
to the default settings; click
‘Save’ to store your current
settings; clicking ‘Restore’
reverts to the previously saved
settings.
Here you can change the
settings for indoor / outdoor
operation, refresh rates (flick
and backlight compensa
You can also choose to outpu
the video in black & white.
tion.
er)
t
The Aux LED Mode section
allows you to switch the
MiniCam’s infra red LEDs on or
off. Selecting ‘Auto’ switches
the infra red LEDs on
automatically depending on the
ambient lighting conditions.
Note: illumination from the
infra red LEDs is not visible to
the naked eye!
Page 10

Click the Effects tab to view and change the special effects settings.
Select different
video effects here.
You can use your own
customised frame. It must be
a VGA size 24 Bit bitmap.
Configuration
You can choose a
frame to apply to
your captured
video.
Select ‘Auto Change’
to automatically cycle
through the various
Effects and Frames.
Page 11

Click the Zoom tab to use the digital zoom and pan controls.
Use the arrows to pan
up, down, left and
right
Configuration
Move the slider up to
zoom in and down to
zoom out
Tick the check box to
enable the zoom controls
Page 12

Recording & Capture
Creating a Capture File
Before capturing video and audio, you should create a capture file.
1.
Select File > Set Capture File...
Choose a name and location for the capture file. Be sure to add the .avi extension to the file name. As
an example you could name the file: Capture.avi
2.
Choose File > Allocate File Space... to set aside the amount of disk space for the capture file.
3.
Alternatively, instead of using the pre-allocated capture file
created in step 1, you can copy the captured data to another
file using: File > Set Capture File... Be sure to add the
.avi extension to the file name.
Page 13

Recording & Capture
Capturing Video & Audio
1.
If you want to capture audio as well as video, ensure that Capture Audio is ticked under the Capture
menu.
2.
Select Capture > Start Capture and click OK or press the Enter key.
3.
To stop capture, press the Esc key or click Capture > Stop Capture.
4.
The captured file can be accessed from the location you have previously selected. Double-click the file
to launch Windows Media Player to view the captured video.
Page 14

Recording & Capture
Snapshot Function
1.
Press the button on the side of the MiniCam to take a photo snapshot.
2.
A new window will appear showing the photo. Click
on the Rotate menus to rotate the image in various
Press this button to
take a snapshot
ways; select File > Save As... to save the image.
Page 15

Recording & Capture
Using the MiniCam with NetMeeting
Note: For more information about installing and using NetMeeting on your PC, please use Windows Help.
Click to place a call to the
computer identified in the
IP address field.
Type the IP address of the
computer you want to
contact in this box.
From the NetMeeting menu
bar, select Tools > Options
and then click the Video tab.
Ensure that the MiniCam is
selected here.
Page 16

WEEE (Waste of Electrical and Electronic Equipment),
Recycling of Electronic Products
United Kingdom
In 2006 the European Union introduced regulations (WEEE) for the collection and recycling of all waste electrical and electronic equipment. It is no longer allowable to
simply throw away electrical and electronic equipment. Instead, these products must enter the recycling p rocess.
Each individual EU member state has implemented the WEEE regulations into national law in slightly different ways. Please follow your national law when you want to
dispose of any electrical or electronic products.
More details can be obtained from your national WEEE recycling agency.
Germany / Deutschland
Die Europäische Union hat mit der WEEE Direktive umfassende Regelungen für die Verschrottung und das Recycling von Elektro- und Elektronikprodukten geschaffen.
Diese wurden von der Bundesregierung im Elektro- und Elektronikgerätegesetz – ElektroG in deutsches Re cht umgesetzt.
Dieses Gesetz verbietet vom 24.März 2006 an das Entsorgen von entsprechenden, auch alten, Elektro- und Elektronikgeräten über die Hausmülltonne! Diese Geräte
müssen den lokalen Sammelsystemen bzw. örtlichen Sammelstellen zugeführt werden! Dort werden sie kostenlos entgegen genommen. Die Kosten für den weiteren
Recyclingprozess übernimmt die Gesamtheit der Gerätehersteller.
France
En 2006, l'union Européenne a introduit la nouvelle réglementation (WEEE) pour le recyclage de tout équipement électrique et électronique.
Chaque Etat membre de l’ Union Européenne a mis en application la nouvelle réglementation WEEE de manières légèrement différentes. Veuillez suivre le décret
d’application correspondant à l’élimination des déchets électriques ou électroniques de votre pays.
Italy
Nel 2006 l’unione europea ha introdotto regolamentazioni (WEEE) per la raccolta e il riciclo di apparecchi elettrici ed elettronici. Non è più consentito semplicemente
gettare queste apparecchiature, devono essere riciclate.
Ogni stato membro dell’ EU ha tramutato le direttive WEEE in leggi statali in varie misure. Fare riferimento alle leggi del proprio Stato quando si dispone di un apparecchio
elettrico o elettronico.
Per ulteriori dettagli fare riferimento alla direttiva WEEE sul riciclaggio del proprio Stato.
Page 17

CE Statement
This device complies with the European Regulations for Electromagnetic Compatibility (EMC) of the European Union and it is equipped with the CE mark. This unit has to be used with high quality shielded
connection cables. Only if these high quality shielded cables are used can it be sure that the EMC compatibility is not adversely influenced.
FCC Statement
Shielded cables must be used with this equipment to maintain compliance with radio frequency energy emission regulations and ensure a suitably high level of immunity to electromagnetic disturbances.
FCC Warning
This equipment has been tested and found to comply with the limits for a Class B Digital device, pursuant to part 15 of the FCC Rules. These limits are designed to provide reasonable protection against
harmful interference in a residential installation. This equipment generates, uses, and can radiate radio frequency energy and, if not installed and used in accordance with the instructions, may cause harmful
interference to radio communications. However, there is no guarantee that interference will not occur in a particular installation. If this equipment does cause harmful interference to radio or television reception,
which can be determined by turning the equipment off and on, the user is encouraged to try to correct the interference by one or more of the following measures:
y Reorient or relocate the receiving antenna
y Increase the separation between the equipment and receiver
y Connect the equipment into an outlet on a circuit different from that to which the receiver is connected
y Consult the dealer or an experienced technician for help
You are cautioned that changes or modifications not expressly approved by the party responsible for compliance could void your authority to operate the equipment.
LINDY No’s 42803, 42804
st
1
Edition July 2006
www.lindy.com
 Loading...