

Page 1
USB to VGA Adapter
User Manual
English
LINDY No. 42799
www.lindy.com
© LINDY ELECTRONICS LIMITED & LINDY-ELEKTRONIK GMBH – SECOND EDITION (June 2009)
Page 2

User Manual English
2
Page 3

User Manual English
Introduction
Thank you for purchasing the USB VGA Adapter. The USB VGA Adapter enables you to
connect an additional display device (CRT/LCD monitor, projector) to your desktop or
notebook PC. The connected display can act as mirrored or extended desktop (it can
also be used as the primary display) of the main display on your PC. The flexibility of
USB 2.0 technology saves the need to open the computer and install a VGA graphics
card.
System Requirements
•
Available USB 2.0 port
•
Minimum Requirement to use one (1) USB Display Adapter: Intel/AMD Single
Core 1.5GHz or higher processor, RAM: 512MB memory or higher
•
2~3 Displays - (additional USB display adapters): Intel/AMD Single Core
2.4GHz or higher processor, RAM: 1GB memory or higher
•
4~6 Displays (additional USB display adapters): Intel/AMD Dual Core 2.0GHz or
higher processor, RAM: 2GB memory or higher
•
Windows 2000 SP4 / Windows XP SP2 / Windows Vista
Package Contents
•
USB 2.0 to VGA Adapter
•
Driver CD
•
LINDY Manual
Features
•
USB 2.0 compliant
•
supports display resolution up to VGA : 1600 x 1200
•
Plug-and-Play USB connectivity
•
Display Modes: Primary, Extended, Mirror
•
Display Rotation: 0°, 90°, 180°, 270°
•
Identify Monitors
•
Multi-Display Control Panel
•
Short-cut to access Windows Display Setting
3
Page 4

User Manual English
Resolution
800 * 600 16bit, 32bit
1024 *768 16bit, 32bit
1152 * 864 16bit, 32bit
1280 * 720 16bit, 32bit
1280 * 768 16bit, 32bit
1280 * 800 16bit, 32bit
1280* 960 16bit, 32bit
1280 * 1024 16bit, 32bit
1360 * 768 16bit, 32bit
USB-VGA
Refresh Rate
Frequency
60Hz,75Hz
60Hz,75Hz
60Hz
60Hz
60Hz
60Hz
60Hz
60Hz
60Hz
1400 * 1050 16bit, 32bit
1440 * 900 16bit, 32bit
1680 * 1050 16bit, 32bit
1600 * 1200 16bit, 32bit
60Hz
60Hz
60Hz
60Hz
Installation
Windows 2000/XP:
Installing the device driver enables your computer’s operating system to recognize the
USB VGA Adapter once it’s connected. Please check your operating system and refer
to the appropriate installation procedure to begin installing the device driver. Please
make sure the USB VGA Adapter is
executing the setup program. This section illustrates the simple device driver
installation procedure for computer running Windows 2000 / XP operating system.
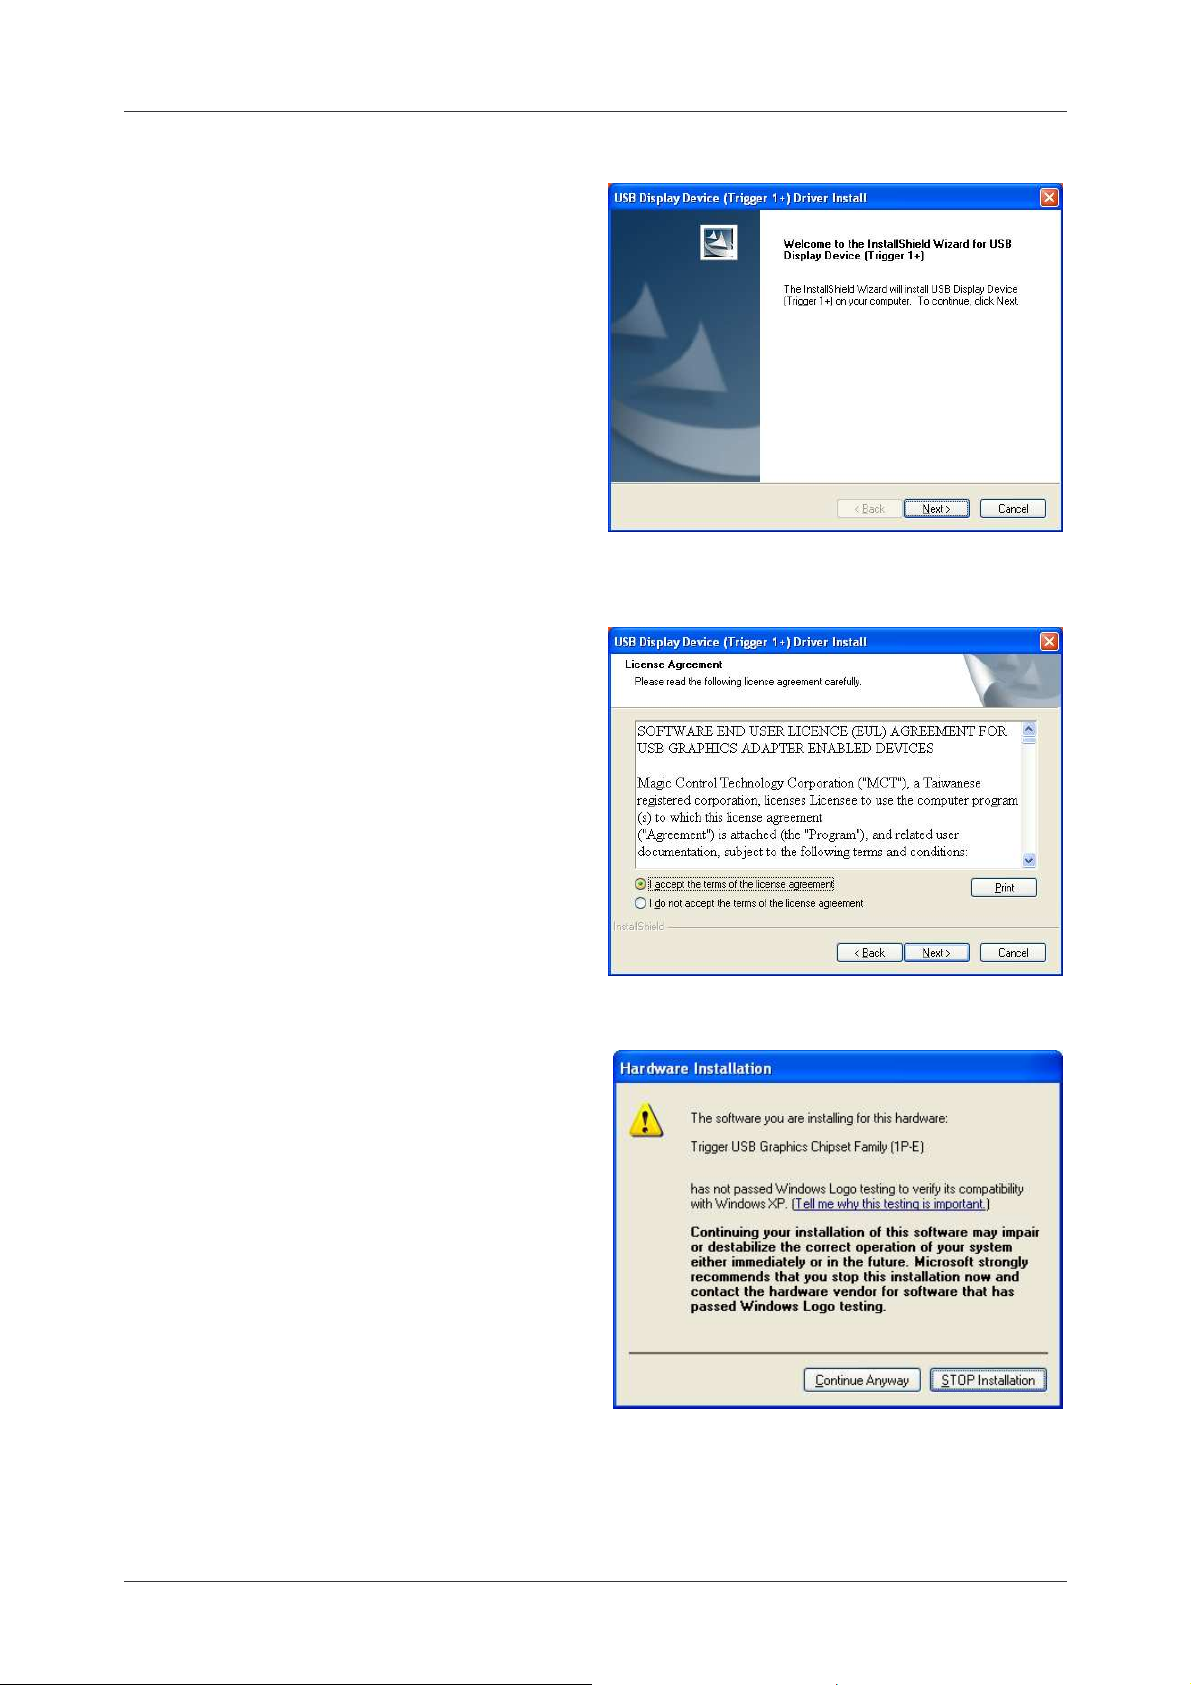
Step 1
Insert the Driver CD into the CD-ROM drive; the setup program should be launched
automatically. If setup program does not begin automatically, click Start, Run and
double click “
D:\Setup.exe
” (where D: is the path of your CD-ROM drive).
unplugged
from your PC or Notebook before
4
Page 5
User Manual English
Step 2
Driver Installation Wizard, click “
continue.
Step 3
License Agreement; please read it and
select
license agreement
“I accept the terms of the
.” Click “
accept the License Agreement.
Step 4
The Microsoft Software Installation
Certificate warning dialogue box, please
select “
Continue Anyway
” to continue with
the device driver installation. This will not
affect the device driver installation and the
device usage.
Next
Next
” to
” to
5
Page 6

User Manual English
Step 5
Please select “
computer now”.
complete the software installation.
Step 6 (After System Reboot)
Please connect the external display device (monitor/projector) to the VGA connector
of USB VGA Adapter and switch it on.
Then plug the USB VGA Adapter into an available USB 2.0 port of your PC or
Notebook.
Yes, I want to restart my
Then, click “
Finish
” to
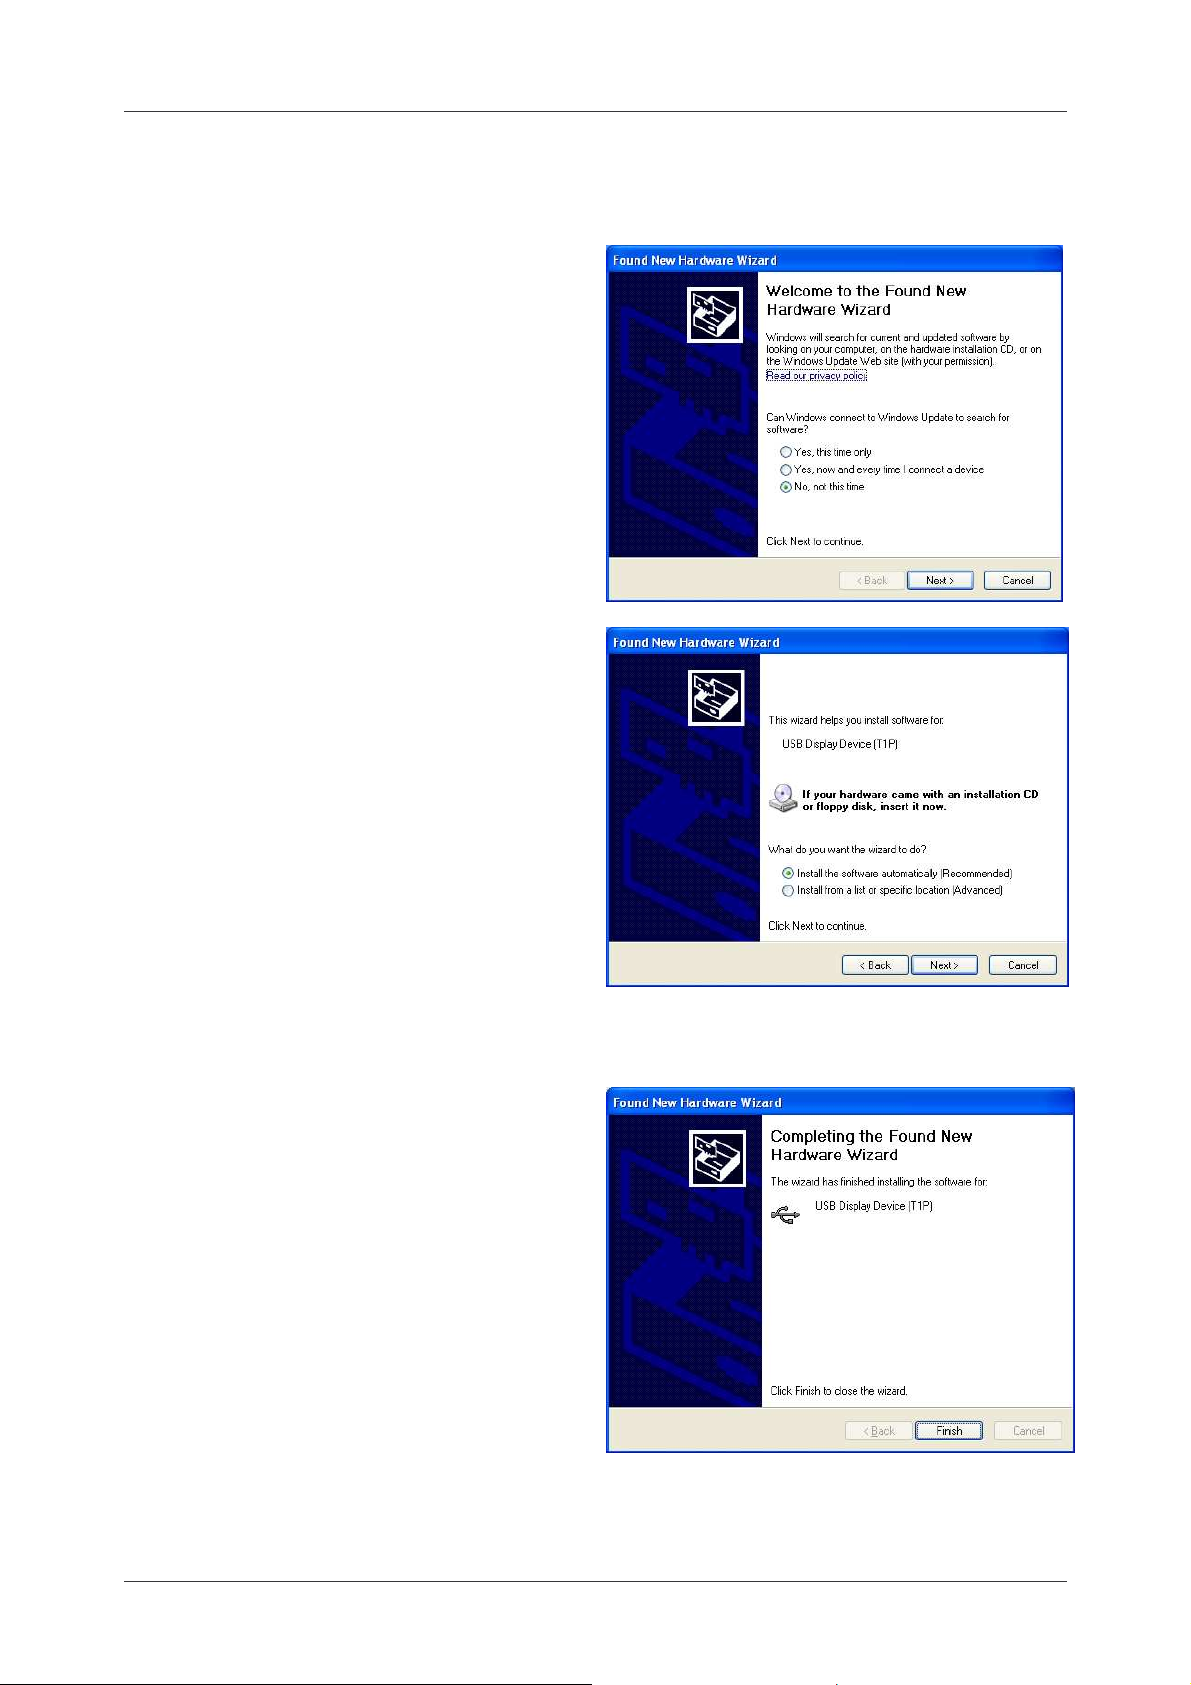
Step 7
A Hardware Installation Wizard dialog will
show up, please select “
time
” and click “
Next
No, not this
” to continue.
6
Page 7

User Manual English
Step 8
Please select
automatically (Recommended)”.
And click
Step 9
The Microsoft Software Installation
Certificate warning dialogue box, please
select “
with the hardware installation.
This will not affect the device driver
installation and the device usage.
The extended display will be shown
on 2nd display device.
Step 10
Click
Wizard.
Continue Anyway
“Finish
“Install the software
”Next”
to continue.
” to continue
” to complete the Hardware
7
Page 8
User Manual English
Step 11
Please plug the additional USB VGA Adapter into an available USB 2.0 port of your
PC or Notebook.
a. A Hardware Installation Wizard dialog
will show up, please select “
time
Installation of multiple
” and click “
Next
” to continue.
USB VGA Adapters
No, not this
b. Please select “
automatically (Recommended)
And click ”
Install the software
Next
” to continue.
”.
c. Please select “
The extended display will be shown on additional display device.
d. Click
Hardware Wizard.
“Finish
Continue Anyway
” to complete the
” to complete the device driver installation.
e. If you wish to install additional USB VGA Adapter, please follow the procedure
again.
8
a~ d
Page 9

User Manual English
To make sure the USB VGA Adapter works
correctly, please reboot the computer after
the installation.
After rebooting the computer, the USB
extended display will be shown on the
display device.
Verifying the device driver installation
The following procedure allows you to verify the device driver installation.
Please right click “
Manager
Plug-in the USB VGA Adapter, then double click “
Serial Bus controllers
Single USB VGA Adapter installation on the computer
”.
My Computer
”. It will show the new directions as below,
” “
Properties
Display adapters
” “
Hardware
” and “
” “
Universal
Device
9
Page 10

User Manual English
Multiple USB VGA Adapters installation on the computer
10
Page 11

User Manual English
Device Driver Un-Installation
Step 1.
Start menu:
Click
“Start
“
Control Panel
“
Add or Remove Programs
”
“
”
”
Select “
Click “
USB Display Device (Trigger 1+) 9.xx.xxxx.0159”
Remove
” button.
Step 2.
Unplug the USB VGA
A
DAPTER
and click “OK”
to continue.
Step 3.
Select “
computer now
Yes, I want to restart my
” and click “
Finish
” to
reboot.
After reboot, you will complete the driver
un-installation.
(driver ver.).
11
Page 12

User Manual English
Windows Vista
Installing the device driver enables your computer’s operating system to recognize the
adapter once it’s connected. Please check your operating system and refer to the
appropriate installation procedure to begin installing the device driver.
Please make sure the USB VGA Adapter is
unplugged
from your PC or Notebook
before executing the setup program. This section illustrates the simple device driver
installation procedure for computer running Windows Vista operating system.
Step 1
Insert the Driver CD into the CD-ROM drive; the setup program should be launched
automatically. If setup program does not begin automatically, click Start, Run and
double click “
D:\Setup.exe
” (where D: is the path of your CD-ROM drive).
Step 2
Driver Installation Wizard, click “
Next
”
to continue.
Step 3
License Agreement; please review it
and check “
license agreement.
I accept the terms of the
” Click “
Next
” to
accept the License Agreement.
Step 4
Windows Security warning dialogue box
under Windows Vista, it will not affect
the device driver installation and usage
the device. Please select “
Always trust
software from “Magic Control
Technology Corp.
”, then click “
Install
”
to continue.
12
Page 13

User Manual English
Step 5
Setup is searching for installed features.
Step 6
Please select “
my computer now”.
“
Finish
installation.
Step 7 (After System Reboot)
Please connect the external display device (monitor/projector) to the VGA connector
of the USB VGA Adapter and switch it on.
Step 8 Hardware Driver Setup Process
Plug the USB VGA Adapter into an available USB 2.0 port of your PC or Notebook.
The hardware driver setup will begin
automatically.
After the driver is configured, you may
begin to use the USB VGA Adapter
with your display device.
Yes, I want to restart
Then, click
” to complete the software
13
Page 14

User Manual English
Step 9 Installation of multiple USB VGA Adapters
Please plug the additional USB VGA Adapters into another available USB 2.0 port of
your PC or Notebook.
The setup process will begin automatically. You may see below notification balloons
for each additional adapter.
Verifying Device Driver Installation
The following procedure allows you to verify the device driver installation.
Please right click “
Computer
Plug-in the USB VGA Adapter, then double click “
Serial Bus controllers
” “
Properties
” “
Device Manager
Display adapters
”. It will show the new directions as below,
”.
”, and “
Universal
14
Page 15

User Manual English
Single USB VGA Adapter installation on the computer
15
Page 16

User Manual English
Multiple USB VGA Adapters installation on the computer
16
Page 17

User Manual English
Device Driver Un-Installation
Step 1 Access Program Uninstall
Click “
Under “
Start
” “
Programs
Control Panel”
”, click “
:
Uninstall a program
”
Look for “
“
Uninstall
Step 2
Unplug the USB VGA Adapter and click
“OK
” to continue.
Step 3
Select “
computer now
reboot.
After reboot, you will complete the
driver un-installation.
USB Display Device (Trigger 1+) 9.xx.xxxx.0159”
” button.
Yes, I want to restart my
” and click “
Finish
” to
(driver ver.) Click
17
Page 18

User Manual English
Function Description
This section describes several friendly functions provided by the USB VGA Adapter
display device described in this section means devices such as CRT, LCD monitor, TV
display, projector.
Access USB VGA Adapter Utility
Make sure the USB VGA Adapter is attached to the PC.
Look for this on your Windows Start bar.
Right-click this icon to access the variety of functions associated to the adapter.
The first view of the utility, you will notice below sections on the top menu.
D
ISPLAY ID –
Smart Display Device ID Detection
The USB VGA Adapter supports VESA
defined DDC/EDID. The utility can show the
display device ID
whenever it is attached to
the USB VGA Adapter.
If there is no display device attached to the
USB VGA Adapter, an “
Unknown Monitor
”
ID will be shown. In some cases, the
attached display device does not support
EDID, in this case the ID will also defined as “
Unknown Monitor
”.
. A
D
ISPLAY RESOLUTION –
Fast Access to Display Resolution Setting
The default setting resolution is:
1024 * 768 * 32bit.
18
Page 19

User Manual English
D
ISPLAY ROTATION
4 options available: “0°, 90°, 180°, 270°
under the Extended or Primary display
modes. It is a useful function for some
rotatable display device.
D
ISPLAY MODES
“E
XTENDED” DISPLAY MODE (DEFAULT
The default display mode; this feature allows
the attached USB display device to work as
an “Extended” display of the on-board
screen. The extended working space
improves work efficiency.
You may change the relative position of the
extended USB display device under the
Display Settings.
)
“M
IRROR” DISPLAY MODE
This feature allows the contents of the
primary screen to be displayed (mirroring)
on the USB display device.
The screen resolution setting on the USB
display device will follow the primary
screen’s resolution. For example, if the
primary screen’s resolution is
1024x768x32bit, and the USB Display
enabled device will be set at the same
resolution.
19
Page 20

User Manual English
“P
RIMARY” DISPLAY MODE
A feature to allow the USB display device to
act as the main working display. The USB
VGA Adapter will work as the main graphics
adapter of the computer. The
screen connected to the on-board graphics
card will then work as the extended display.
Please be advised that some display utilities
and drivers that ship with certain AGP and
built-in display adapters may prevent this
option from working on some systems. You
may disable the other utility program usually
found in the same toolbar located on the
bottom right hand corner) to make this
function work properly.
“OFF”
DISPLAY MODE
This option disables the video output from
USB VGA Adapter.
I
DENTIFY MONITORS
Easy display identification via a serial number will be showed on the upper right
corner
of all attached display devices.
20
Page 21

User Manual English
M
ULTI-DISPLAY CONTROL PANEL
A feature to allow a much quicker and
simpler working experience in a multidisplay environment. A series of hotkeys
to quickly change active window or
cursor to the desired display device
(either on-board graphics or each USB
Display enabled devices).
The default setting of hotkeys can be
found on the Hotkey List of “Multi-Display
Control Panel”.
For example: Ctrl + 2 means: change to the window to the Display 2.
D
ISPLAY SETTINGS
Fast access to the system “Display
Settings”.
21
Page 22

User Manual English
Frequently Asked Questions (FAQ)
Q:
Why can’t I make the USB D
A:
Some video cards ship their product with a utility that prevent other video cards
from being set as the primary card. Check the bottom right hand corner taskbar for the
utility. Disable the utility before switching our adapter to be the primary display.
Q:
Why won’t my DVD player work when I move it over to the extended display?
A:
Some DVD playback software packages do not support playing on a second
display adapter of any kind. You may try to open the program in the secondary display
first before playing the DVD.
Q:
How come my video will not play on Media Player if I move it over to the extended
desktop?
A:
Check that you have moved the Media Player window completely over to the
second screen.
ISPLAY ADAPTER
the primary display?
Q:
Why does my mouse not move pass the right side of the screen as it should on
extended desktop?
A:
Check the display settings and make sure that your display number ‘2’ is on the
right side of display number ‘1’. You can rearrange how Windows treats each display
in relation to each other in the Display Properties Settings.
Q:
There are lines running horizontally up and down my screen.
A:
This is due to a low refresh rate setting. You can change this in the Display
Properties / Settings / Advanced / Monitor. Make sure you select the USB D
A
DAPTER
This may damage your monitor. You can also try to reset/refresh/resynchronize your
monitor.
Q:
Direct3D does not work?
A:
This is a current limitation of the adapter. Please check for driver updates in the
future to add support for this. If your application requires this, please use the main
display adapter.
first and not set the refresh rate higher than what your monitor can support.
ISPLAY
Troubleshooting Tips
Known Issues
-
Windows Vista Aero mode support will be available at MP version driver update
(WDDM).
WDDM driver update is also aimed to resolve most of video playback
compatibility issue under Windows Vista.
22
Page 23

User Manual English
-
Direct 3D is not supported under XP. It would be supported under Vista Aero
mode.
General Recommendation
-
Check to make sure that the device is plugged in correctly to the host system.
-
Make sure that the USB port that you are using is USB 2.0.
-
Unplug the USB cable of USB graphics device and re-insert it.
-
Check to see that the monitor is connected correctly and is powered ON.
-
Make sure to restart your computer after the driver installation.
-
Try a different USB 2.0 port and/or computer.
-
Unplug all other USB devices from the system.
-
Try connecting the USB cable of USB graphics device directly to the computer
instead of through a hub.
-
Reset/refresh/resynchronize your monitor.
Media Playback
-
During video playback on all platforms, please do not change the display mode,
position or arrangement of video player window (such as dragging the video player
window between main display and attached display). This usually causes the video
player to have strange behavior and the video may stop playing. We suggest
stopping the video playback, moving the window to the USB graphics device
attached display and then selecting the video clip to start playing.
-
You may experience poor video performance on USB graphics device attached
display under some low-spec PC system.
-
Video rendering using hardware overlays is supported.
-
Some DVD playback software packages do not support playing on a second
display adapter of any kind. You may try to open the media player in the secondary
display first before start playing the DVD.
-
Your PC may be lack of certain video codec to support playback of certain video
format. Please use the link below to install license free media codec.
K- Lite:
-
Video/Media players have different decoding capability under different display
http://www.free-codecs.com/download/K_Lite_Codec_Pack.htm
modes. For better performance on watching DVD or certain video format on the
USB graphics device attached display, it is recommended to use the following
23
Page 24

User Manual English
license free software.
VLC Media Player
Media Player Classic
Others
-
Some graphics card, i.e. Intel, prevents other secondary graphics chipset from
: http://www.videolan.org/vlc/
: http://sourceforge.net/projects/guliverkli/
being set as the primary card. As the result of this,
primary mode
might not work or
the display maybe disabled.
-
If you have problems during the boot up process, start your computer in Safe Mode
and uninstall the driver. Hold the CTRL key until the Windows startup menu
appears and select Safe Mode.
-
To verify the driver version that you installed, please click “Control Panel” “Add
or Remove Programs” to check the program: USB Display Device (Trigger 1+)
9.xx.xxxx.0159 (the number means the driver version).
-
Please contact your dealer to obtain the latest driver or for additional assistance if
needed.
-
Some limitation exists in different media player on file format support. We enclose
our compliance test result in the tables according to different operating system,
main system graphics card/chipset, media players, and the supported media
format. It will be updated periodically with new version of media players or our
latest driver.
24
Page 25

CE/FCC & Recycling Information
CE Certification
This equipment complies with the requirements relating to electromagnetic compatibility, EN55022/EN55024 class B for
IEC/EN61000-4-2/3 the essential protection requirement of Council Directive 89/336/EEC on the approximation of the laws of
the Member States relating to electromagnetic compatibility.
FCC Certification
This equipment has been tested and found to comply with the limits for a Class B digital device, pursuant to part 15 of the FCC
Rules. These limits are designed to provide reasonable protection against harmful interference in a residential installation.
This equipment generates, uses, and can radiate radio frequency energy and, if not installed and used in accordance with the
instructions, may cause harmful interference to radio communications. However, there is no guarantee that interference will not
occur in a particular installation. If this equipment does cause harmful interference to radio or television reception, which can be
determined by turning the equipment off and on, the user is encouraged to try to correct the interference by one or more of the
following measures:
• Reorient or relocate the receiving antenna
• Increase the separation between the equipment and receiver
• Connect the equipment into an outlet on a circuit different from that to which the receiver is connected
• Consult the dealer or an experienced technician for help
You are cautioned that changes or modification not expressly approved by the party responsible for compliance could void your
authority to operate the equipment.
This device complies with part 15 of the FCC Rules.
Operation is subject to the following two conditions:
1. This device may not cause harmful interference, and
2. This device must accept any interference received, including interference that may cause undesired operation.
WEEE (Waste of Electrical and Electronic Equipment),
Recycling of Electronic Products
United Kingdom
In 2006 the European Union introduced regulations (WEEE) for the collection and recycling of all waste electrical and electronic
equipment. It is no longer allowable to simply throw away electrical and electronic equipment. Instead, these products must
enter the recycling process.
Each individual EU member state has implemented the WEEE regulations into national law in slightly different ways. Please
follow your national law when you want to dispose of any electrical or electronic products. More details can be obtained from
your national WEEE recycling agency.
Germany
Die Europäische Union hat mit der WEEE Direktive umfassende Regelungen für die Verschrottung und das Recycling von
Elektro- und Elektronikprodukten geschaffen. Diese wurden von der Bundesregierung im Elektro- und Elektronikgerätegesetz –
ElektroG in deutsches Recht umgesetzt. Dieses Gesetz verbietet vom 24.März 2006 an das Entsorgen von entsprechenden,
auch alten, Elektro- und Elektronikgeräten über die Hausmülltonne! Diese Geräte müssen den lokalen Sammelsystemen bzw.
örtlichen Sammelstellen zugeführt werden! Dort werden sie kostenlos entgegen genommen. Die Kosten für den weiteren
Recyclingprozess übernimmt die Gesamtheit der Gerätehersteller.
France
En 2006, l'union Européenne a introduit la nouvelle réglementation (DEEE) pour le recyclage de tout équipement électrique et
électronique.
Chaque Etat membre de l’ Union Européenne a mis en application la nouvelle réglementation DEEE de manières légèrement
différentes. Veuillez suivre le décret d’application correspondant à l’élimination des déchets électriques ou électroniques de
votre pays.
Italy
Nel 2006 l’unione europea ha introdotto regolamentazioni (WEEE) per la raccolta e il riciclo di apparecchi elettrici ed elettronici.
Non è più consentito semplicemente gettare queste apparecchiature, devono essere riciclate. Ogni stato membro dell’ EU ha
tramutato le direttive WEEE in leggi statali in varie misure. Fare riferimento alle leggi del proprio Stato quando si dispone di un
apparecchio elettrico o elettronico.
Per ulteriori dettagli fare riferimento alla direttiva WEEE sul riciclaggio del proprio Stato.
LINDY No. 42799
2nd Edition June 2009
www.lindy.com
© LINDY ELECTRONICS LIMITED & LINDY-ELEKTRONIK GMBH – SECOND EDITION (June 2009)
 Loading...