

LINDY 42340, 42341, 42342, 42343 User Manual [ml]
No.
4234
0 –
HDMI
KVM Switch Compact USB 2.0 Audio
Installation Guide English
Installationsanleitung Deutsch
Manuel Utilisateur Français
Manuale d’uso Italiano
No. 42341 – DVI-D
No. 42342 – VGA
No. 42343 – DisplayPort
www.LINDY.com
For Home and Office Use
Tested to Comply with
FCC Standards
© LINDY – 2nd EDITION (September 2013)
Specification E n g l i s h
• USB 2.0 compliant, supports USB 2.0 hubs and device sharing
• Port switching via button, software and keyboard hotkey switching
• 2 System Cables connected to the switch
No. 42340 – Interfaces: HDMI, USB 2.0, Audio out & Microphone
HDMI up to 1920x1080, HDCP & 3D compliant, with HDMI Audio
No. 42341 – Interfaces: DVI, USB 2.0, Audio out & Microphone
DVI-D Single Link: up to 1920x1200, HDCP compliant – not for connection to HDMI ports of graphic cards or PC/notebook, HDMI and Deep
Colour are not supported!
No. 42342 – Interfaces: VGA, USB 2.0, Audio out & Microphone
No. 42343 – Interfaces: DisplayPort, USB 2.0, Audio out & Microphone
Installation E n g l i s h
1. Install the software (CD) on a PC “Software Installation for Windows”.
To install on Mac OS, copy the file (*.pkg format) to the local hard
disk and install it from there.
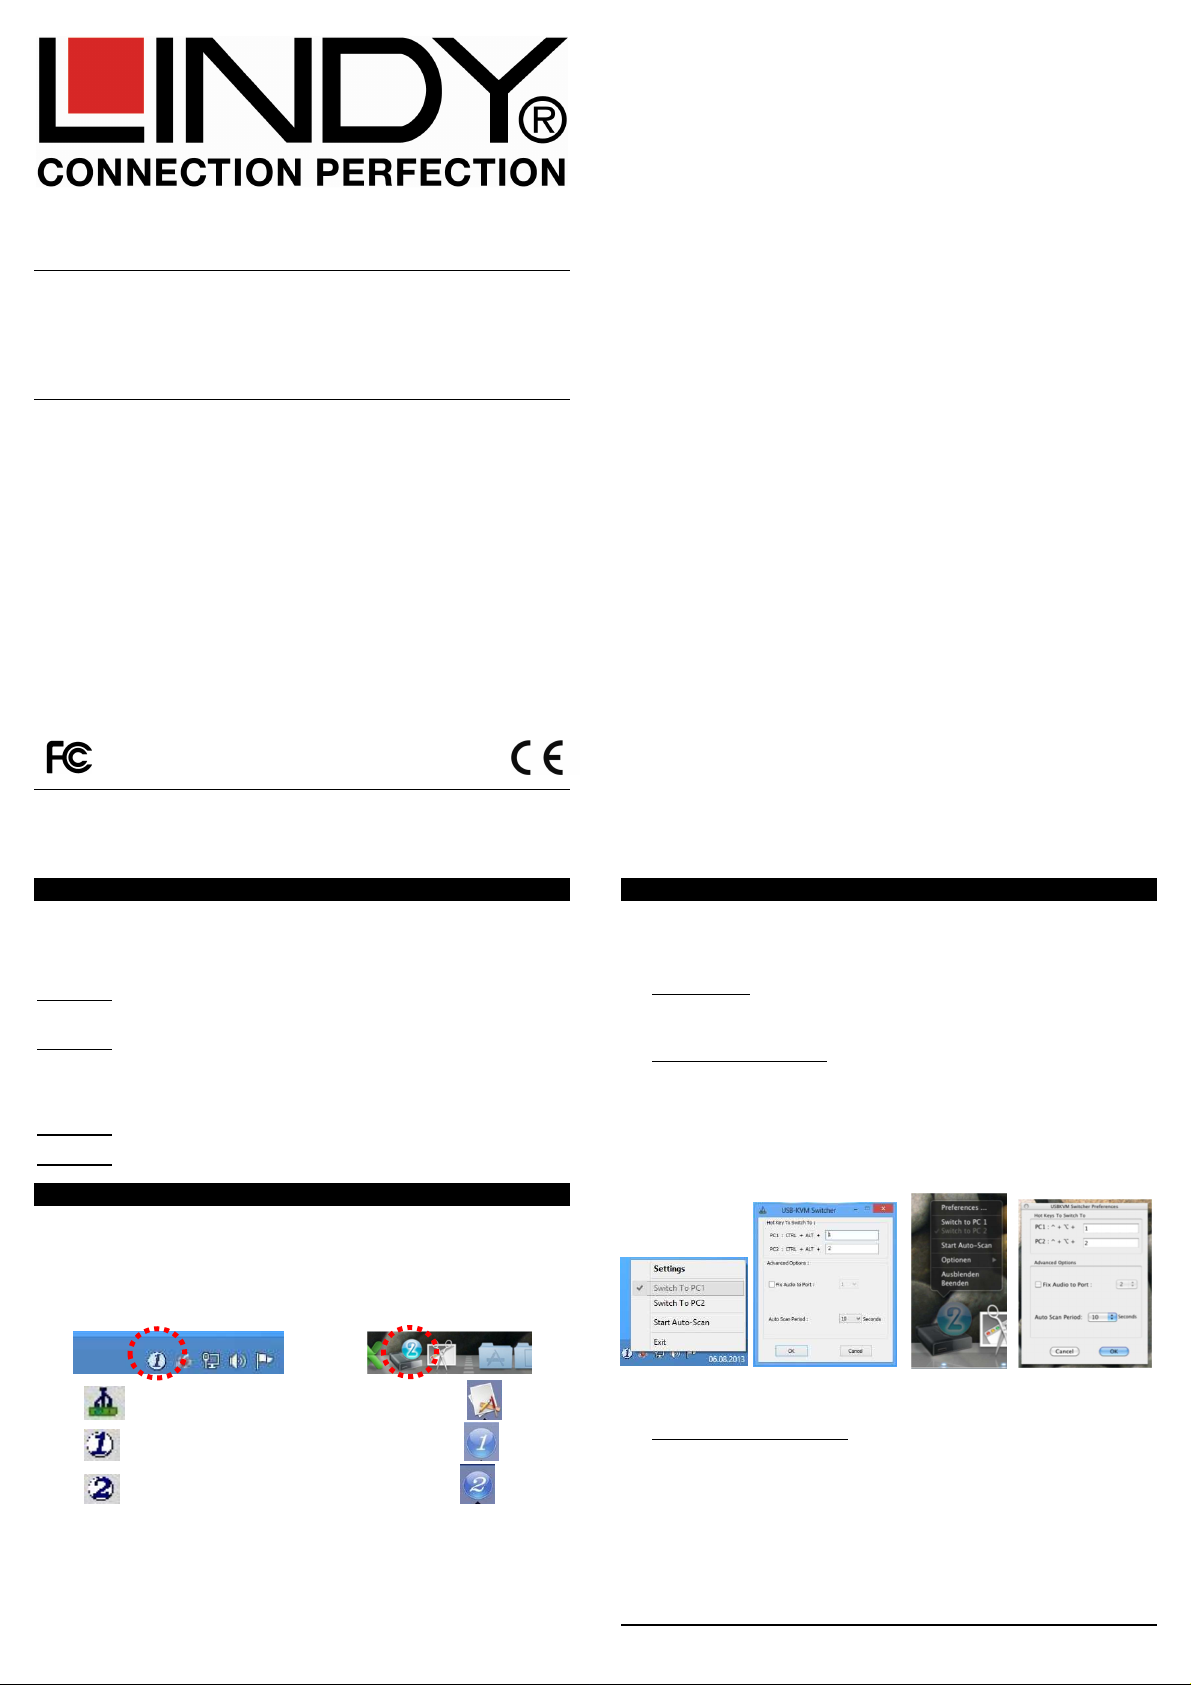
2. This will install the software on your computer and create some new
icons in the Windows taskbar or in the Mac Dock. They will look like
one of the icons shown below.
3.
No live connection or KVM switch detected
Port 1computer is displayed and selected
Port 2 computer is displayed and selected
4. Connect your keyboard, mouse, monitor and audio devices to the
KVM switch.
5. If required, you may use a USB hub to connect more than 2 USB
devices, to do this please use a self powered USB hub.
6. Connect the system cables directly to your computers. Extension or
adapter cables may NOT be supported at high video resolutions.
Operation & Port Switching English
There are three methods to toggle between the computers. After switching
please allow the computer a few seconds to load all USB drivers before
you can use the system.
1. Switch Button
The Switch Button is a wired remote control. Press the button to toggle
between the two computers.
2. KVM Switching Software (Windows & Mac OS)
For KVM Switching Software please refer to installation section.
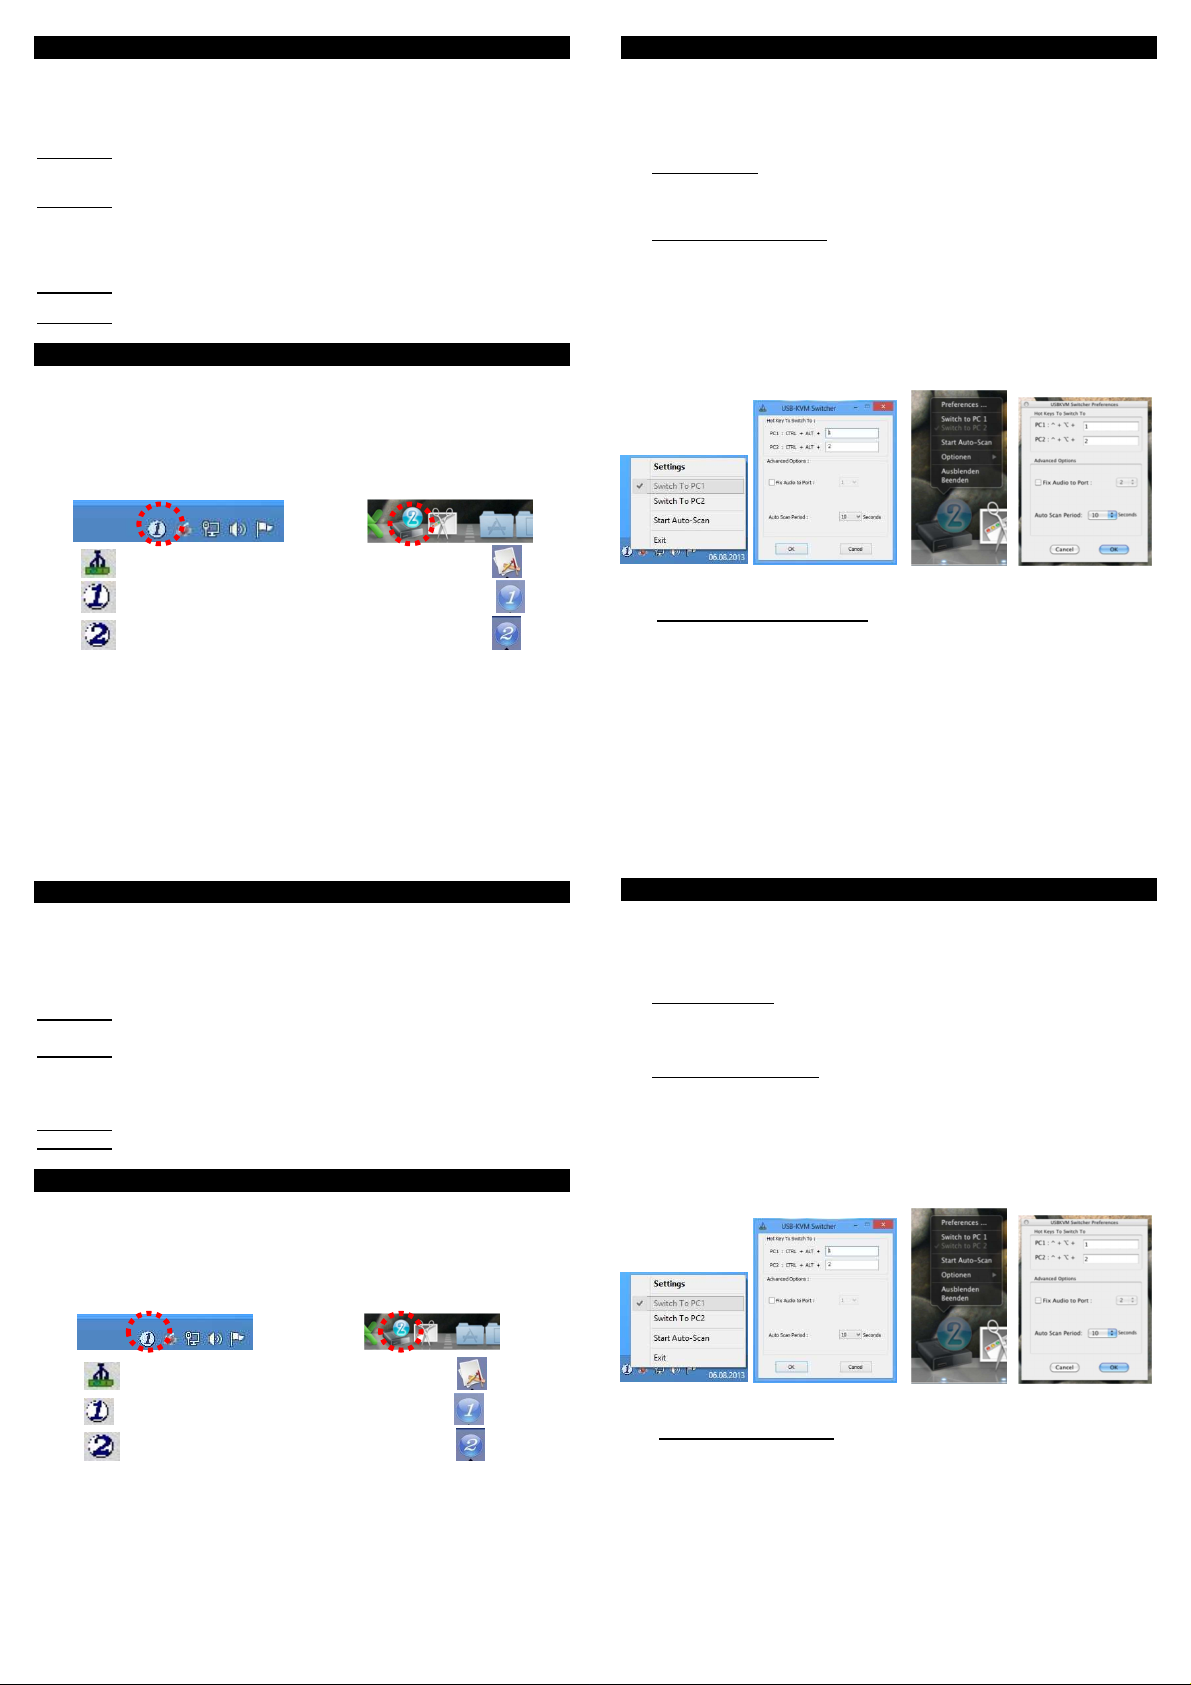
Right clicking the icon opens the port switching menu.
Double clicking the icon opens the configuration menu. Using this
menu you may bind the audio ports to one computer and you may enable the beeper.
Windows OS Mac OS
Switching Menu Configuration Menu Switching Menu Configuration Menu
3. Keyboard Hotkey Switching (Windows & Mac OS)
Each keystroke hotkey sequence must be pressed within two seconds.
It is not possible to switch to a port with no active computer attached.
For Windows, the following key sequence for switching is preset:
“Scroll Lock + Scroll Lock”. Additional hotkeys like "CTRL ALT + *" can
be configured via the Configuration menu as described above.
For Mac, please define the hotkeys via the Configuration menu as described above.
Spezifikationen Deu t s c h
• USB 2.0 kompatibel, unterstützt USB 2.0 Hubs und Device Sharing
• Port Umschalten via Taste, Software und Tastatur-Hotkey
• 2 Systemkabel fest am Switch
No. 42340 – Interfaces: HDMI Full HD 1080p, USB 2.0, Audio, Mikrofon
HDMI bis 1920x1080, HDCP und 3D kompatibel, mit HDMI Audio
No. 42341 – Interfaces: DVI, USB 2.0(2x), Audio, Mikrofon.
DVI-D Single Link, unterstützt Auflösungen bis 1920x1200 und HDCP –
NICHT zum Anschluss an HDMI Ports von Grafikkarten und
PC/Notebooks, unterstützt HDMI und Deep Colour NICHT.
No. 42342 – Interfaces: VGA, USB 2.0, Audio, Mikrofon
No. 42343 – Interfaces: DisplayPort, USB 2.0, Audio, Mikrofon
Installation Deu t s c h
1. Starten Sie auf einem Windows PC von der mitgelieferten CD das
Programm “Software Installation for Windows”.
2. Um die Mac Version zu installieren, kopieren Sie die Datei im *.pkg
Format auf die Festplatte und installieren Sie sie von dort.
3. Dies Installiert die Umschaltsoftware auf Ihrem Rechner und erzeugt
ein neues Icon in der Taskleiste bzw. im Mac Dock.
Keine Verbindung zum KVM Switch erkannt
Computer an Port 1 wird angezeigt und ist aktiv
Computer an Port 2 wird angezeigt und ist aktiv
4. Verbinden Sie Tastatur, Maus, Monitor und Audiogeräte mit dem KVM
Switch.
5. Verwenden Sie einen USB Hub um weitere Devices anzuschließen.
Der USB Hub sollte über ein eigenes Netzteil verfügen!
6. Verbinden Sie die KVM-Kabel direkt mit dem Computer. Verwenden
Sie bei hohen Auflösungen keine Verlängerungen oder Adapterkabel!
Bedienung und Port-Umschaltung D eutsch
Es gibt drei Methoden um zwischen den Computern umzuschalten. Nach
dem Umschalten müssen auf dem Rechner zuerst die USB Treiber aktiviert werden. Bitte warten Sie einige Sekunden auf den Abschluss der
Installation bevor Sie das System verwenden.
1. Umschaltknopf
Der Umschaltknopf ist eine kabelgebundene Fernbedienung. Mit einem einfachen Betätigen des Knopfes, schaltet der Switch um.
2. KVM Umschalt-Software (Windows & Mac Betriebssysteme)
Die KVM Umschalt-Software muss wie oben beschrieben installiert
werden.
Rechtsklick auf das Umschalticon öffnet das Umschaltmenü.
Doppelklick auf das Icon öffnet das Konfigurationsmenü. Hier können
Sie weitere Tastaturhotkeys definieren, die Audioports fest an einen
Rechner binden, und den Beeper ein- und ausschalten.
Windows OS Mac OS
Umschaltmenü Konfigurationsmenü Umschaltmenü Konfigurationsmenü
3. Tastatur Hotkey Umschaltung (Windows & Mac OS)
Jede Tastenkombination muss in weniger als 2 Sekunden abge-
schlossen werden. Es ist nicht möglich auf einen Port ohne angeschlossenen aktiven Rechner zu schalten.
Für Windows verwenden Sie die Tastenkombination “Rollen + Rollen”.
Weitere Hotkeys, z.B. „CTRL ALT + *“ können über das Konfigurationsmenü umdefiniert werden.
Mac User definieren ihre Hotkeys über das Konfigurationsmenü, s.o.
Spécifications Français
• USB 2.0, supporte des hubs USB 2.0 et le partage d’appareils USB
• Commutation par bouton sur le switch, par logiciel et par séquence
clavier hotkey
•
2 câbles combo fixés au KVM
No. 42340 – Interfaces: HDMI Full HD 1080p, USB 2.0, audio, micro.
HDMI jusqu‘au 1920x1080, compatible HDCP et 3D, audio sur HDMI.
No. 42341 – Interfaces: DVI, USB 2.0, audio, micro.
DVI-D Single Link: résolutions jusqu’au 1920x1200, compatible HDCP –
NE PAS connecté aux ports HDMI de carte graphique sur PC/Notebook,
HDMI et Deep Colour NON pris en charge !
No. 42342 – Interfaces: VGA, USB 2.0, audio, micro
No. 42343 – Interfaces: DisplayPort, USB 2.0, audio, micro
Installation Français
1. Installez le logiciel PC “Software Installation for Windows”.
Pour l’installer sous Mac OS, copiez le fichier (format *.pkg) vers le
disque dur local et installez-le depuis ce disque.
2. Cela installera le logiciel sur votre ordinateur et créera des nouveaux
icônes dans la barre des tâches Windows ou dans la barre Mac Dock.
Ils ressembleront à cela:
Aucune connexion détectée au switch KVM
Le port 1 est affiché et sélectionné
3. Connectez le clavier, la souris, l’écran et les appareils audio au switch
4. Si nécessaire, vous pouvez utiliser un hub USB pour connecter plus
5. Connectez les câbles combo directement à vos ordinateurs.
Le port 1 est affiché et sélectionné
KVM.
que 2 périphériques USB. Vérifiez que le hub utilisé possède une
alimentation externe
N’employez pas d’adaptateurs ou rallonges si vous utilisez de hautes
résolutions !
Utilisation & commutation Français
Il y a 3 méthodes de commutations. Après la commutation, laissez
quelques secondes à tous les pilotes USB de se charger avant d’utiliser le
système.
1. Bouton du switch
Ce bouton est une télécommande filaire. Pressez le bouton pour
commuter entre les 2 ordinateurs.
2. Logiciel KVM Switching (Windows & Mac OS)
Merci de lire le paragraphe précédent.
Clic droit sur l’icône ouvre le menu de commutation.
Double clic sur l’icône ouvre le menu de configuration. En utilisant ce
menu, vous pouvez lier les ports audio à un port et vous pouvez activer le bip sonore.
Windows OS Mac OS
Menu du switch Menu de configuration Menu du switch Menu de configuration
3. Séquence hotkey clavier (Windows & Mac OS)
Chaque séquence hotkey doit être pressée en moins de 2 secondes.
Il n’est pas possible de commuter sur un port non actif (pas
d’ordinateur allumé ou connecté).
Pour Windows, la séquence clé de commutation est: “Scroll Lock +
Scroll Lock”. Ces séquence clés peuvent être changées en: "CTRL
ALT + *" via le menu de configuration décrit ci-dessus.
Pour Mac, merci de définir les hotkeys via le menu de configuration
décrit ci-dessus.
 Loading...