

Page 1
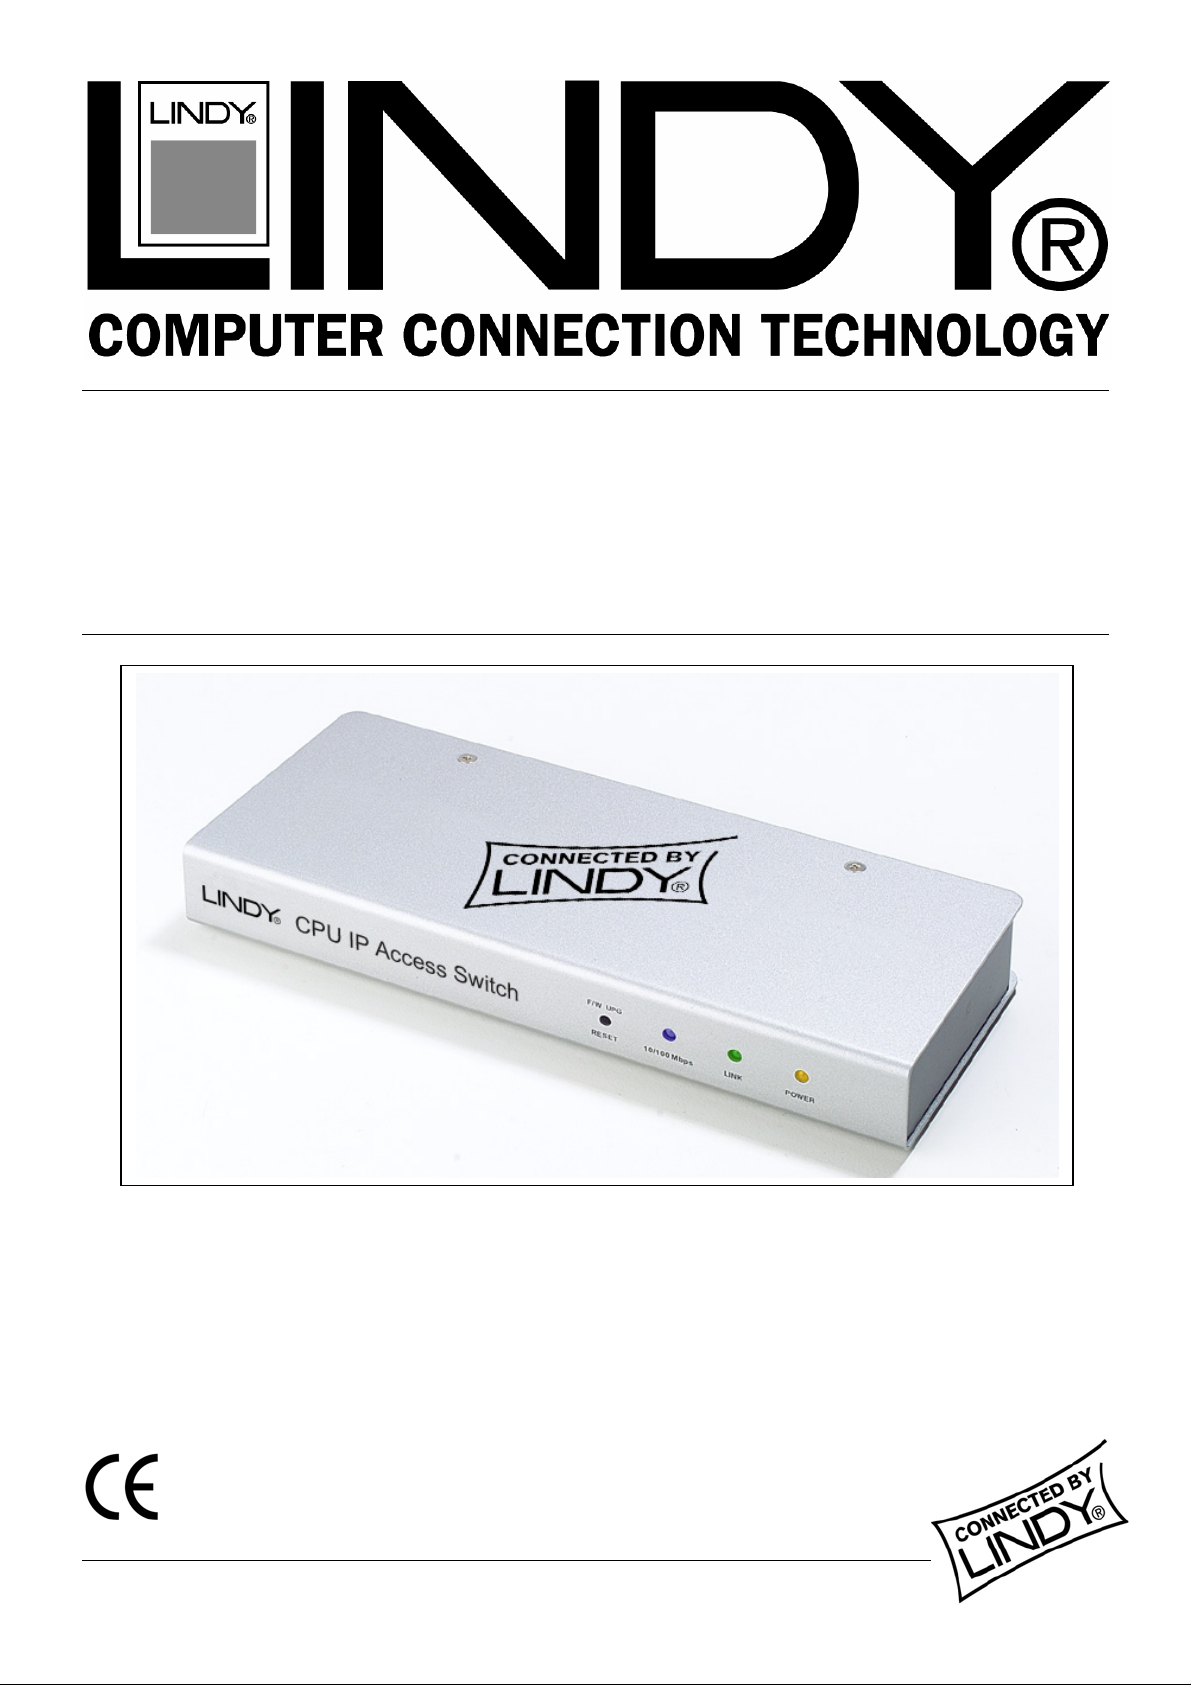
CPU IP Access Switch
User Manual
LINDY No. 39401
www.LINDY.com
© LINDY ELECTRONICS LIMITED & LINDY-ELEKTRONIK GMBH - SECOND EDITION (OCT 2004)
Page 2

Page 3

LINDY CPU IP Access Switch User Manual
Contents
PACKING LIST............................................................................................................................1
ABOUT THIS MANUAL...............................................................................................................2
CONVENTIONS...........................................................................................................................3
1. INTRODUCTION .....................................................................................................................4
1.1 Overview.................................................................................................................................................................4
1.2 Features..................................................................................................................................................................5
1.3 System Requirements ............................................................................................................................................5
2. HARDWARE SETUP...............................................................................................................6
2.1 Front View...............................................................................................................................................................6
2.2 Rear View ...............................................................................................................................................................7
2.3 Installation...............................................................................................................................................................8
2.4 Quick Setup Guide................................................................................................................................................ 9
3. THE ADMINISTRATION UTILITY .........................................................................................10
3.1 Installation.............................................................................................................................................................10
3.2 Starting Up............................................................................................................................................................11
3.3 Logging In.............................................................................................................................................................12
3.4 The Settings Notebook.........................................................................................................................................13
3.5 Upgrading the Firmware.......................................................................................................................................23
3.6 Java Authentification Page...................................................................................................................................25
Page 4

LINDY CPU IP Access Switch User Manual
4. THE WINDOWS CLIENT.......................................................................................................26
4.1 Installation.............................................................................................................................................................26
4.2 Starting Up............................................................................................................................................................27
4.3 The File Menu.......................................................................................................................................................29
4.4 The Tools Menu....................................................................................................................................................29
4.5 Connecting............................................................................................................................................................33
4.6 Operation..............................................................................................................................................................34
5. THE JAVA CLIENT ...............................................................................................................39
5.1 Starting Up............................................................................................................................................................39
5.2 Operation..............................................................................................................................................................41
6. THE LOG SERVER ...............................................................................................................44
6.1 Installation.............................................................................................................................................................44
6.2 Starting Up............................................................................................................................................................45
6.3 The Menu Bar.......................................................................................................................................................46
6.4 The CPU IP ACCESS SWITCH List Panel...........................................................................................................50
6.5 The Event List Window.........................................................................................................................................52
7. APPENDIX.............................................................................................................................53
7.1 Specifications........................................................................................................................................................53
7.2 Rack Mounting......................................................................................................................................................54
7.3 Troubleshooting....................................................................................................................................................55
Page 5

LINDY CPU IP Access Switch User Manual
Packing List
The complete CPU IP ACCESS SWITCH package consists of:
• 1 CPU IP ACCESS SWITCH KVM Control Unit
• 1 CS Custom KVM Cable Set
• 1 Power Adapter
• 1 Rack Mount Kit
• 1 Software CD
• 1 User Manual
• 1 Quick Start Guide
Check to make sure that all the components are present and that nothing was damaged in shipping. If you
encounter a problem, contact your dealer.
Read this manual thoroughly and follow the installation and operation procedures carefully to prevent any damage
to the unit, and/or any of the devices connected to it.
1
Page 6

LINDY CPU IP Access Switch User Manual
About This Manual
This User Manual is provided to help you get the most from your CPU IP ACCESS SWITCH system. It covers all
aspects of installation, configuration and operation. An overview of the information found in the manual is provided
below.
Overview
Chapter 1, Introduction, introduces you to the CPU IP ACCESS SWITCH. Its purpose, features and benefits are
described.
Chapter 2, Hardware Setup, presents the front and back panel components, and explains how to connect the
CPU IP ACCESS SWITCH to your server or KVM switch and the Internet.
Chapter 3, The Administrator Utility, explains how to connect to the CPU IP ACCESS SWITCH as an
administrator; and how to configure the CPU IP ACCESS SWITCH for operation.
Chapter 4, The Windows Client, explains how to run the Windows Client Software; how to connect to the CPU IP
ACCESS SWITCH and how to remotely control the connected server (or servers via a KVM switch).
Chapter 5, The Java Client, explains how to run the Java Client Software; how to connect to the CPU IP ACCESS
SWITCH and how to remotely control the connected server (or servers via a KVM switch).
Chapter 6, The Log Server, is a Windows-based administrative utility that records all the events that take place on
selected CPU IP ACCESS SWITCH units and stores them in a searchable database.
An Appendix at the end of the manual provides specifications and other technical information regarding the CPU
IP ACCESS SWITCH.
2
Page 7

LINDY CPU IP Access Switch User Manual
Conventions
This manual uses the following conventions:
Courier Indicates text that you should key in.
[ ] Indicates keys you should press. For example, [Enter] means to press the Enter key. If keys need
to be chorded, they appear together in the same bracket with a plus sign between them: [Ctrl+Alt].
1. Numbered lists represent procedures with sequential steps.
• Bullet lists provide information, but do not involve sequential steps.
> Indicates selecting an option on a menu. For example, Start > Run means to open the Start menu,
and then select Run.
Indicates critical information.
3
Page 8
LINDY CPU IP Access Switch User Manual
1. Introduction
1.1 Overview
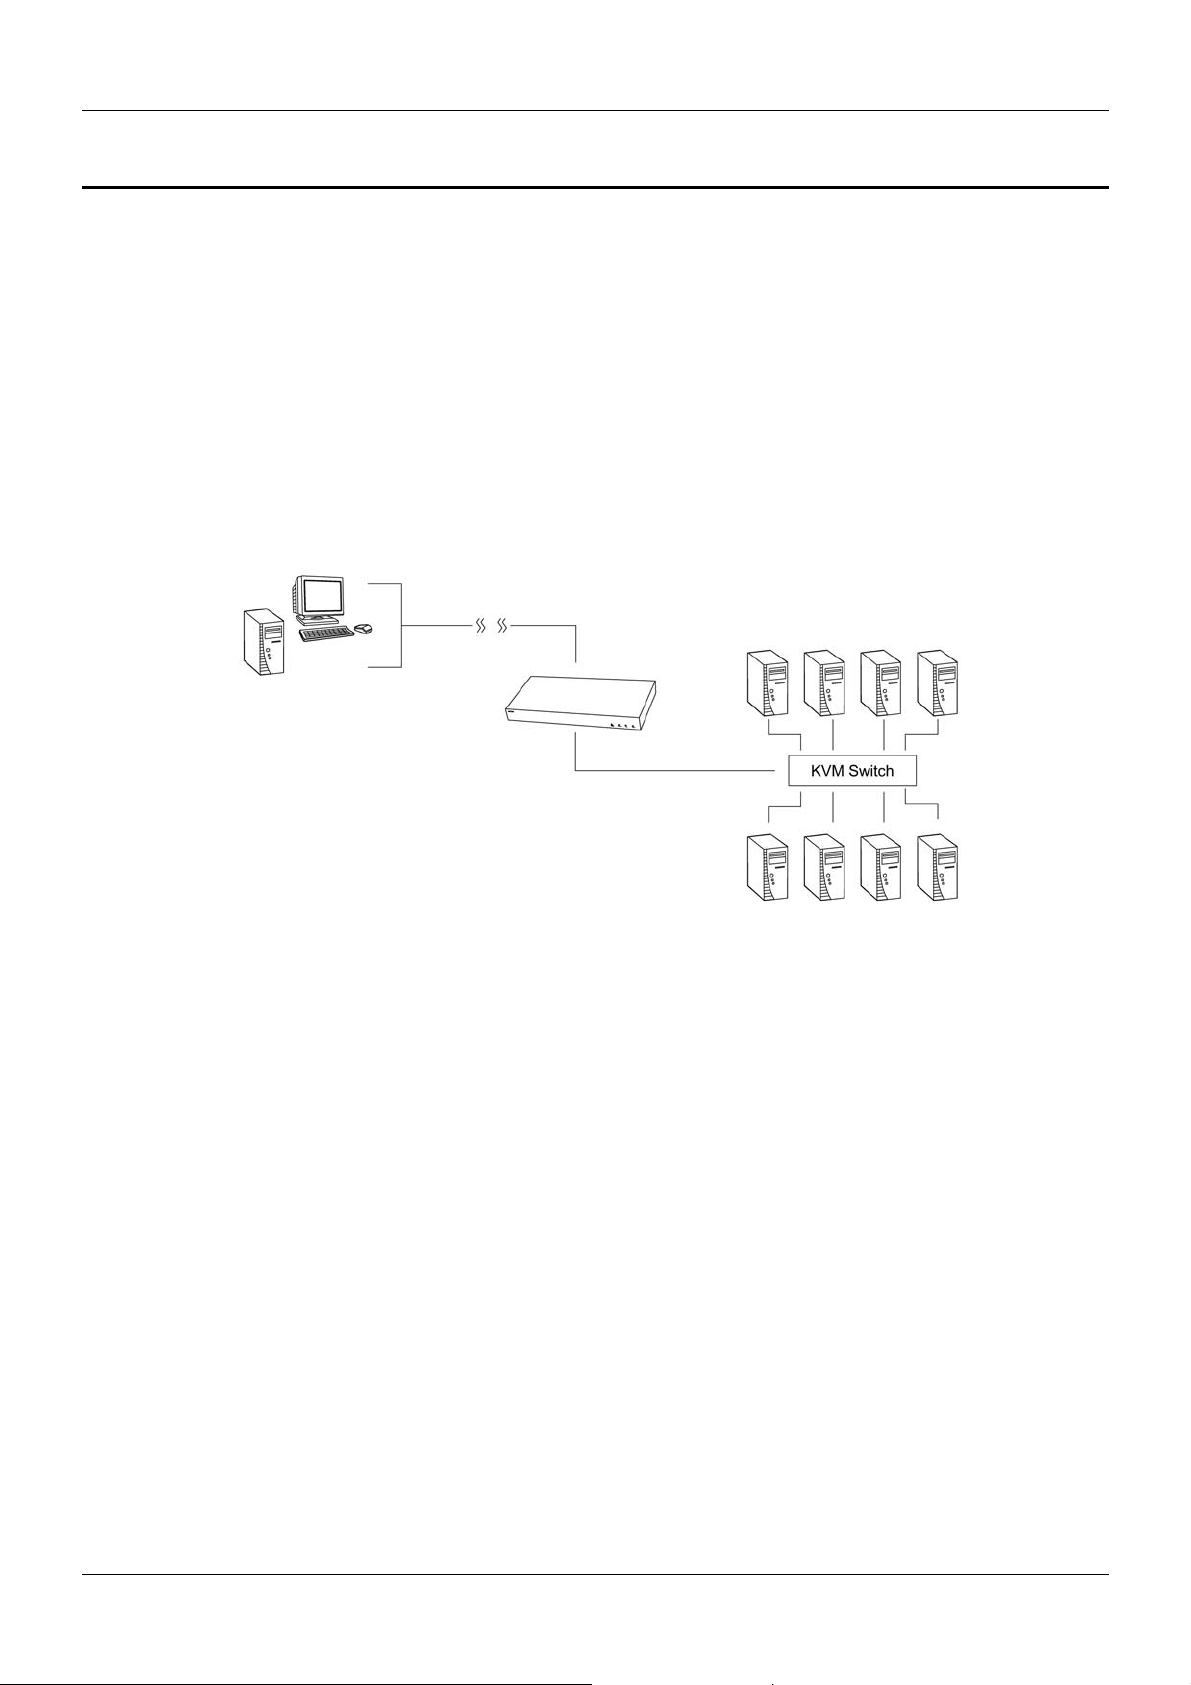
The CPU IP ACCESS SWITCH is a control unit that allows operators to monitor and access their computers from
remote locations. The CPU IP ACCESS SWITCH connects to the Internet, an Intranet, LAN, or WAN using industry
standard Category 5 cable, then uses a KVM cable to connect to a local KVM switch or server.
Since the CPU IP ACCESS SWITCH uses TCP/IP for its communications protocol, the server or KVM switch it is
connected to can be accessed from any computer on the Net - whether that computer is located down the hall,
down the street, or half-way around the world.
Operators at remote locations connect to the CPU IP ACCESS SWITCH via its IP address. Once a connection has
been established and authorization granted, operators of the remote computer can exchange keyboard, video and
mouse signals with the server (or servers on a KVM switch installation), just as if they were present locally and
working on the equipment directly.
With its advanced security features, the CPU IP ACCESS SWITCH is the fastest, most reliable, most cost effective
way to remotely access and manage widely distributed multiple computer installations.
The Administrator and Client software utilities provided with the CPU IP ACCESS SWITCH make it easy to install,
maintain, and operate. System administrators can handle a multitude of tasks with ease - from installing and
running GUI applications, to BIOS level troubleshooting, routine monitoring, concurrent maintenance, system
administration, rebooting and even pre-booting functions.
The Administrator Utility is used to: configure the system; limit access from remote computers; manage u sers; and
maintain the system with firmware and software module updates.
Both a Windows GUI Client and a Java Client are provided for IP connection and login from anywhere on the net.
Inclusion of a Java-based client ensures that the CPU IP ACCESS SWITCH is platform independent, and is able to
work with all operating systems.
The CPU IP ACCESS SWITCH’s client software allows access to, and control of, the connected servers. Once an
operator successfully connects a nd logs in, his screen displays what is running on the remote unit attached to the
CPU IP ACCESS SWITCH (a KVM OSD display, a server’s desktop, or a running program, for example) and he
can control it from his console just as if he were there.
The Log Server records all the events that take place on selected CPU IP ACCESS SWITCH units for the
administrator to analyze.
Your CPU IP ACCESS SWITCH investment is protected by a Firmware Upgrade Utility. You can stay current with
the latest functionality improvements by downloading firmware update files from our website as they become
available, and then using the utility to quickly and conveniently perform the upgrade.
4
Page 9
LINDY CPU IP Access Switch User Manual
1.2 Features
• Remote access of KVM switches or servers via LAN, WAN, or the Internet; control your installation from
down the hall, down the street, or half-way around the world
• Supports 10Base-T, 100Base-T, TCP/IP, HTTP
• Advanced security features include password protection and advanced encryption tech nologies
• High video resolution: up to 1280 x 1024 @ 75Hz; 1600 x 1200 @ 60Hz
• Windows GUI and Java-based client software; Java client works with all operating system s
• Upgradeable firmware via RJ45 Ethernet connection (with default F/W)
• Supports up to 64 user accounts
1.3 System Requirements
• For best results we recommend that the computers used to access the CPU IP ACCESS SWITCH control
unit have at least a PIII 1 GHz processor, and that the screen resolution is set to 1024 x 768.
• For best results we recommend that the internet connection speed be at least 128 kbp s.
• For the Windows Client, you must have DirectX 7.0 or higher installed.
• For the Java Client, you must have Sun’s Java 2 (1.4 or higher).
• For the Log Server, you must have the Microsoft Jet OLEDB 4.0 or higher driver installed.
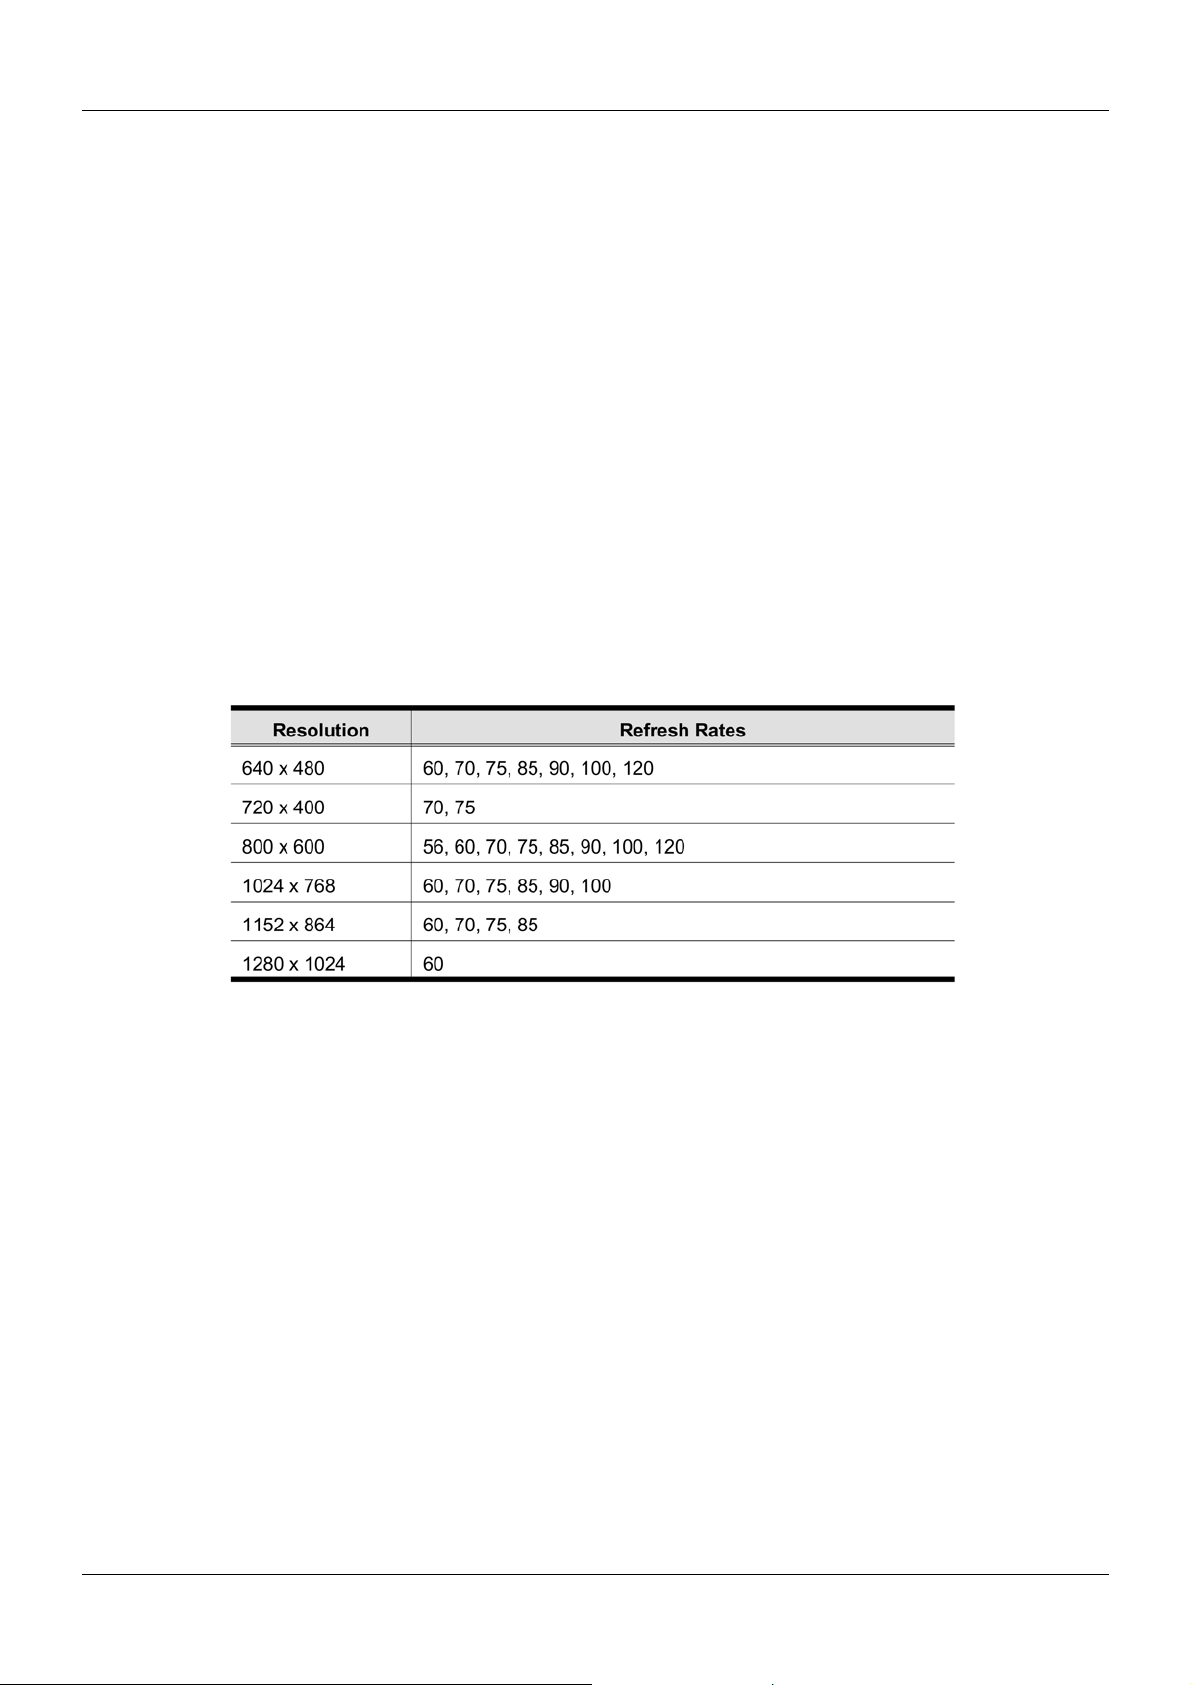
• Only non-interlaced video signals at the following resolutions and refresh rates are supported:
5
Page 10
LINDY CPU IP Access Switch User Manual
2. Hardware Setup
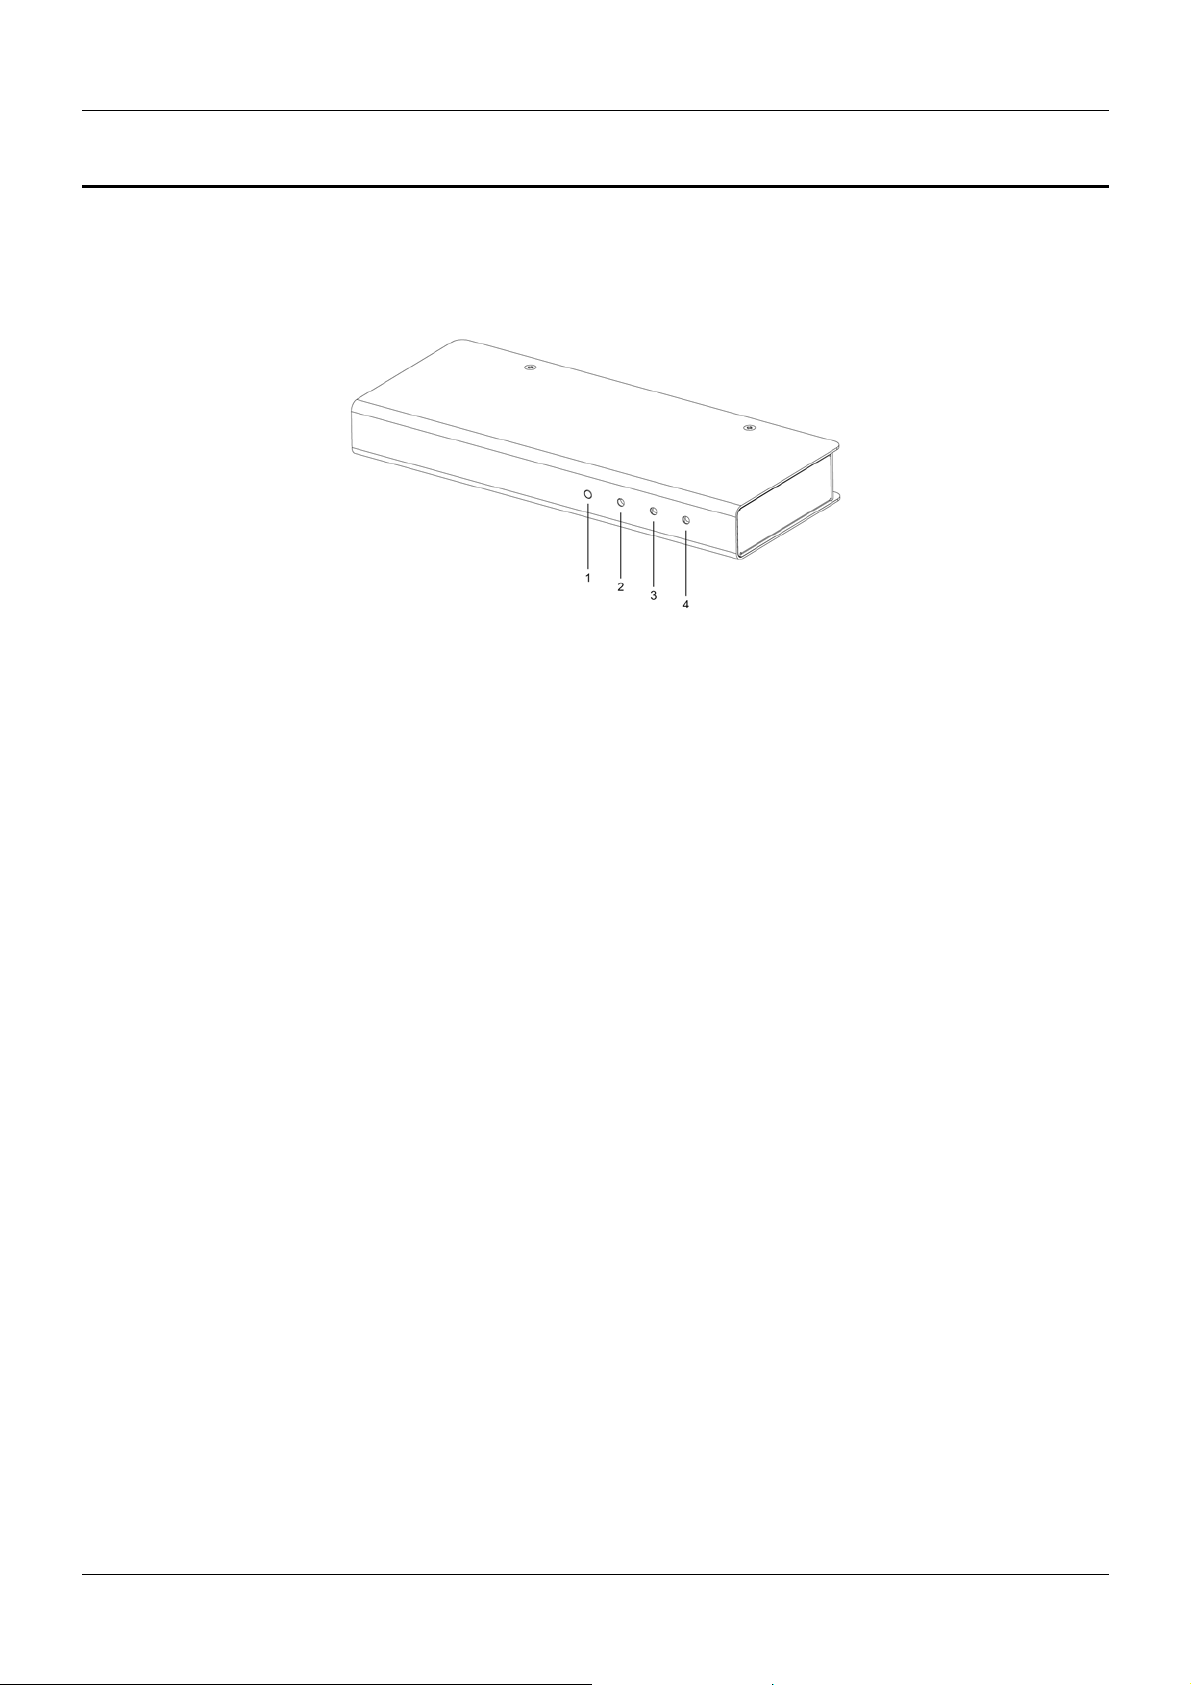
2.1 Front View
1. Reset / Firmware Upgrade Switch
• Pressing and holding this switch in while powering ON the CPU IP ACCESS SWITCH resets it to the
factory default firmware level
• After the CPU IP ACCESS SWITCH has been powered ON, pressing and holding this switch in for more
that two seconds performs a system reset
Note: This switch is recessed and must be pushed with a thin object – such as the end of a paperclip, or a
ballpoint pen.
2. 10/100 Mbps Data LED
• The LED lights GREEN to indicate 10 Mbps data transmission speed
• The LED lights ORANGE to indicate 100 Mbps data transmission speed
3. Link LED
Flashes GREEN to indicate that a Client program is accessing the device.
4. Power LED
Lights when the CPU IP ACCESS SWITCH is powered up and ready to operate.
6
Page 11

LINDY CPU IP Access Switch User Manual
2.2 Rear View
1. KVM Port
The KVM cable (supplied with this package) that links the CPU IP ACCESS SWITCH to your KVM switch or server
plugs in here.
2. Local Console Section
The CPU IP ACCESS SWITCH can be accessed via a local console as well as over the Net. The cables for the
local console (keyboard, monitor, and mouse) plug in here. Each port is colour coded and marked with an
appropriate icon to indicate itself.
3. RJ-45 Port
The cable that connects the CPU IP ACCESS SWITCH to the Internet server plugs in here.
4. RS-232 Port
Reserved
5. Power Jack
The power adapter cable plugs in here.
7
Page 12
LINDY CPU IP Access Switch User Manual
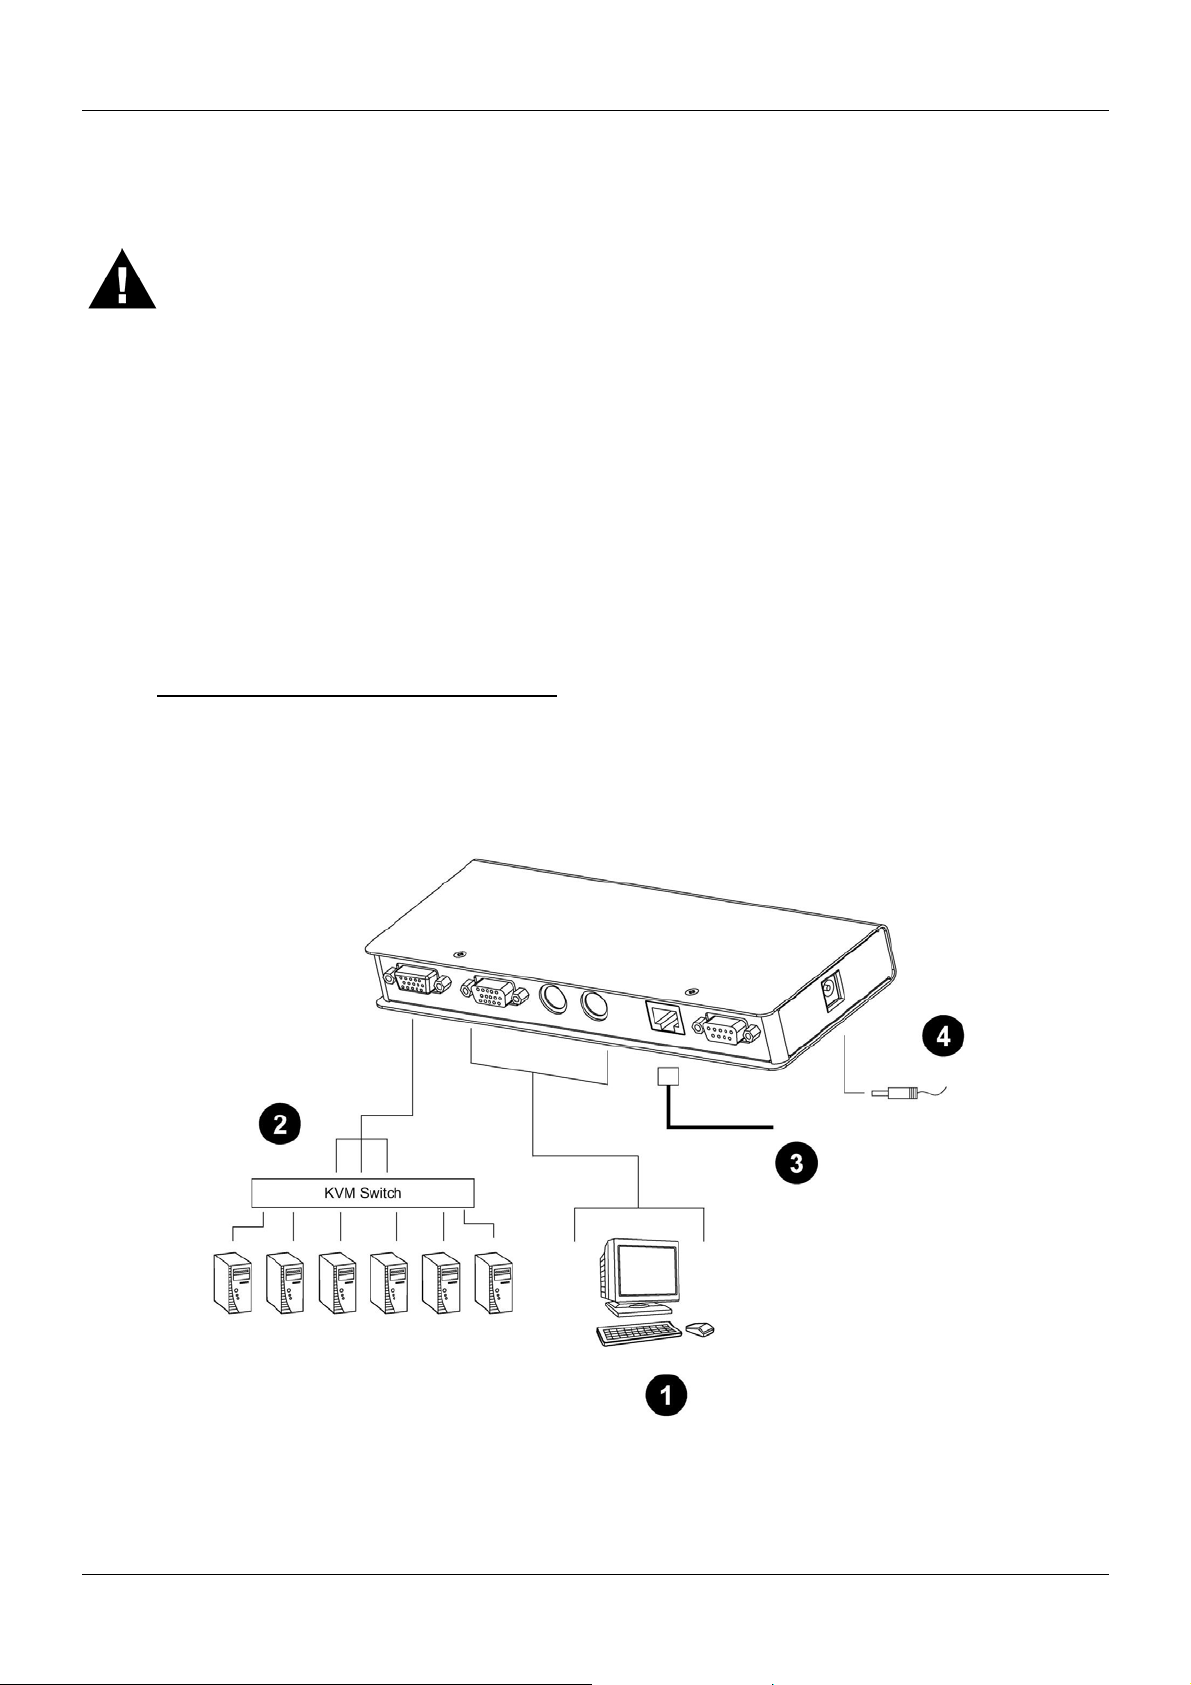
2.3 Installation
1. Before you begin, make sure that power to all the devices you will be connecting up has been
turned off. You must unplug the power cords of any computers that have the Keyboard Power
On function.
2. To prevent damage to your installation, make sure that all devices on the installation are properly
grounded.
Note: For a Quick Setup Guide please skip to Section 2.4 on page 9
To install the CPU IP ACCESS SWITCH, refer to the diagram below (the diagram numbers correspond to the
numbered steps), and do the following:
1. Plug the local administrator’s keyboard, mouse, and monitor into the unit’s Console Ports.
2. Use the KVM cable provided with this package to connect the CPU IP ACCESS SWITCH’s KVM Port, to
the Keyboard, Video and Mouse ports of the server or KVM switch that you are installing.
3. Plug the LAN or WAN cable into the CPU IP ACCESS SWITCH’s RJ-45 socket.
4. Power up your server or KVM installation first
ACCESS SWITCH’s power jack. Plug the power adapter into an AC power source.
and then plug the power adapter cable into the CPU IP
8
Page 13

LINDY CPU IP Access Switch User Manual
2.4 Quick Setup Guide
This Quick Setup Guide provides an overview for quickly installing the CPU IP ACCESS SWITCH using a Setup
Admin PC. Follow the procedures outlined below and refer to the relevant sections as indicated.
Firstly disconnect the KVM installation from the CPU IP Access Switch or make sure all computers connected to
the KVM Switch are turned OFF!
1. Connect one end of a CAT5 cross-over cable to the RJ-45 port on the CPU IP ACCESS SWITCH and the other
end to the RJ-45 port on a network configured PC (Setup Admin PC).
Note: The Setup Admin PC does not have to be the remote PC, but simply a PC used to configure the IP
ACCESS SWITCH when setting up security or network settings for the first time.
2. Power up the Setup Admin PC only! Change the IP address of the PC’s Ethernet card to suit your IP range e.g
192.168.0.99
3. Now, power up the CPU IP ACCESS SWITCH.
4. Go to Chapter 3 – The Administration Utility (page 10), and complete sections 3.1, 3.2 and 3.3, then return
to this Quick Setup Guide
5. Once you have logged in you can customise your settings as detailed in section 3.4. (page 13). It is
recommended that you change the default password and username.
6. If you wish to use the CPU IP ACCESS SWITCH to control your servers over a LAN only, then you need to
either specify a static IP address which is within the range of your LAN/WAN or select ‘Obtain an IP address
automatically’ using DHCP (See pages 15 – 16).
7. One you have assigned an IP address to the switch (within the same range as your LAN/WAN), po wer off the
switch and the Admin Setup PC and connect the switch to your LAN/WAN, local console and KVM installation
(See page 8 for connection instructions).
8. If you wish you can install the Windows Client Tool (see page 26).
9. You can also access the CPU IP ACCESS SWITCH using a web browser from any PC on your network.
Simply type in the IP Address of the switch in the Address bar of the browser.
Note: A program is installed from the browser which requires Admin login to connect to the switch. You must log
in using the previously assigned username and password.
10. From the browser click the ‘WinClient’ icon. The WinClient will then appear on your desktop.
11. After launching WinClient select ‘Switch’ to access the KVM installation.
12. The Quick Setup Guide is now complete. Go to Section 4.6. Operation, (page 34) to learn about hotkey setup,
video adjustment and mouse synchronisation.
9
Page 14
LINDY CPU IP Access Switch User Manual
3. The Administration Utility
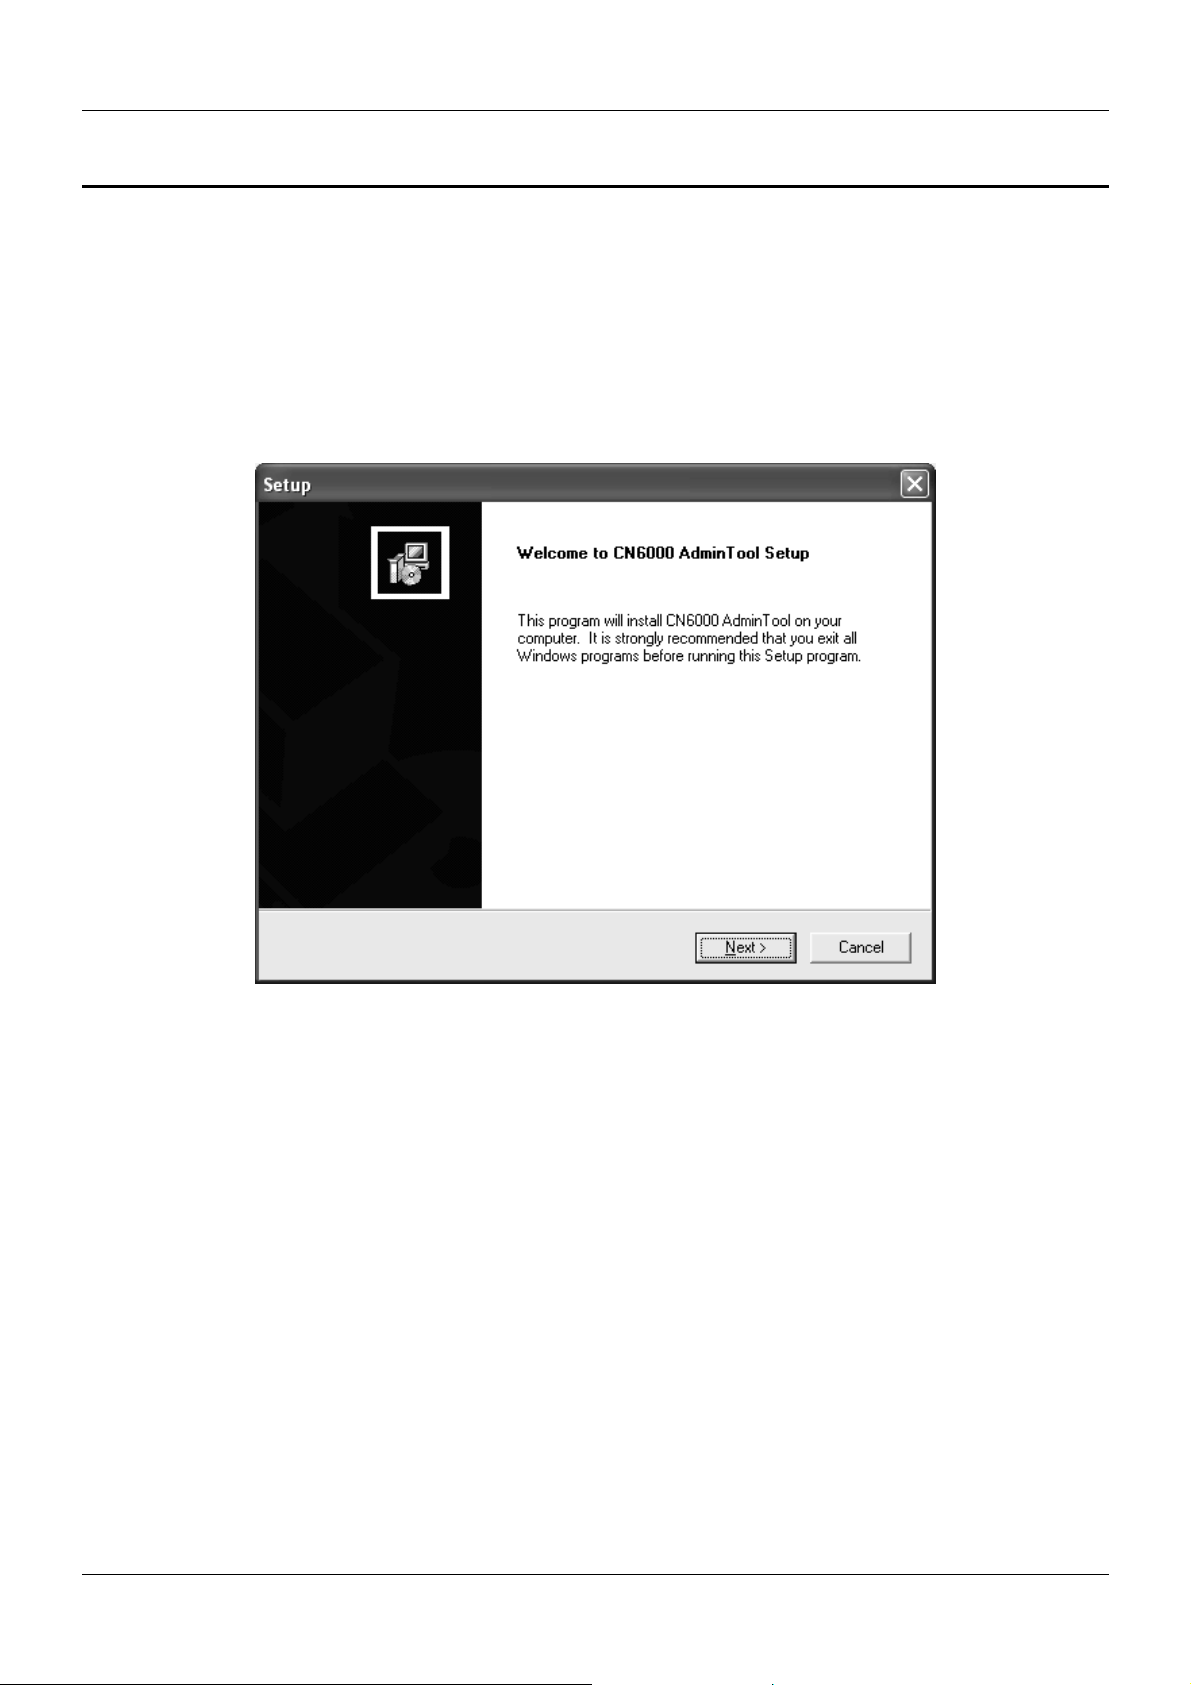
3.1 Installation
1. Insert the software CD into your CD-ROM drive.
2. Open the drive and folder where the Administrator Setup icon (CN6kAdminTool_x_x_xxxLindy.exe ) is
located and double click the icon.
The Administration Utility installation screen appears:
3. Click Next, and follow the on-screen instructions to complete the installation and have the program icon
placed on the desktop.
10
Page 15
LINDY CPU IP Access Switch User Manual
3.2 Starting Up
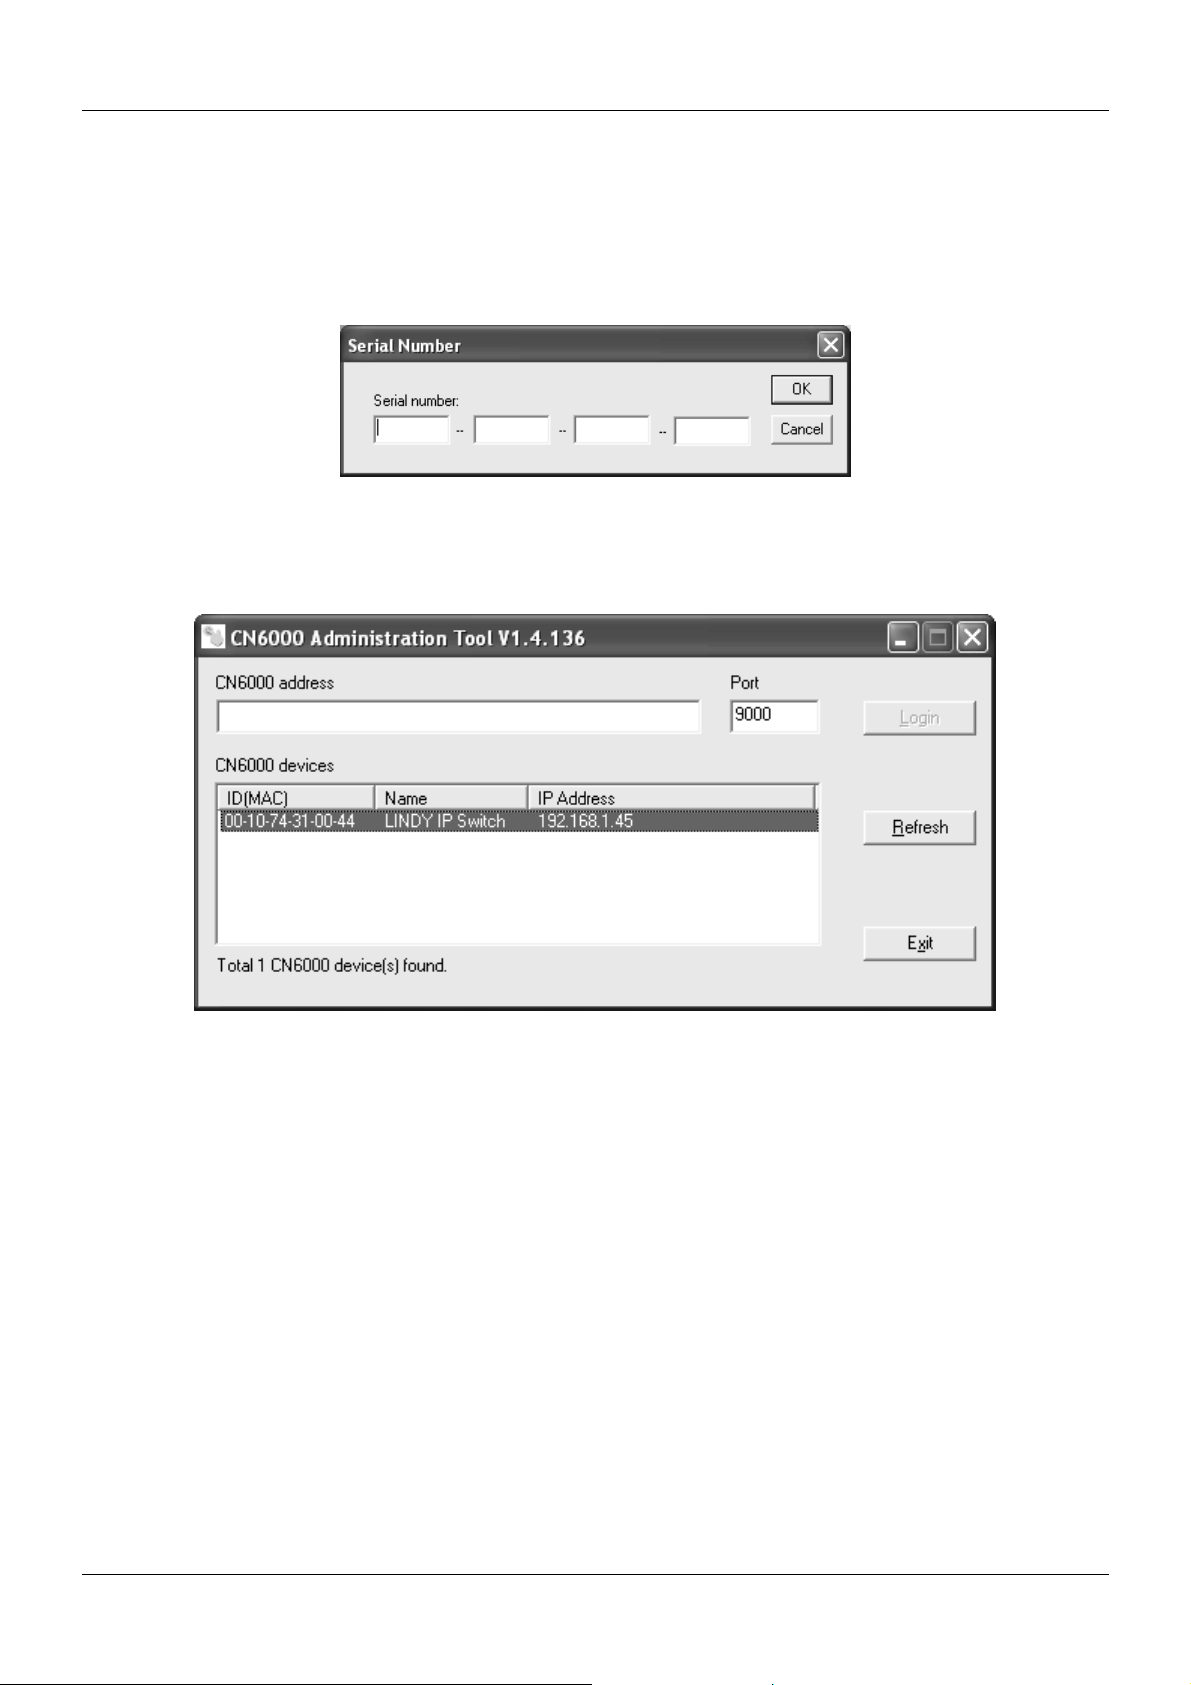
Run the program either by double clicking its icon, or by typing the path to CN6kAdminTool_x_x_xxxLindy.exe
on the command line. If this is the first time that you are running the utility a dialog box appears requesting you to
input your serial number. The serial number can be found printed on the CD-ROM. Key in the serial number - 5
characters per box - then Click OK.
The Administrator Utility attempts to find all the CPU IP ACCESS SWITCH devices installed on the local LAN
segment. When it has finished searching, it displays a device selection window similar to the one below:
CPU IP ACCESS SWITCH devices on the local LAN segment found by the Administrator Utility are displayed in the
large central listbox.
• If the unit you wish to configure appears in the listbox, double click it.
• If the unit you want doesn’t appear in the listbox, key in its IP address in the CPU IP ACCESS SWITCH
address field, and its Port number in the Port box, then Click Login.
Note:
1. The Port number that corresponds to a unit’s IP address is set by the Administrator on the Network
configuration page (see p. 15 for details).
2. Clicking the Refresh button causes the utility to rescan the local LAN segment for CPU IP
ACCESS SWITCH devices.
3. If the utility fails to connect to a unit that you specified, it assigns another free IP address (if one
exists), to that device and attempts to connect again.
4. When the Administrator Utility searches for CPU IP ACCESS SWITCH devices, if it finds them in
different network segments (one at 10.0.0.xxx, and another at 216.0.0.xxx, for example), it will
attempt to substitute a dynamic IP address (10.0.0.111, for example).
11
Page 16
LINDY CPU IP Access Switch User Manual
3.3 Logging In
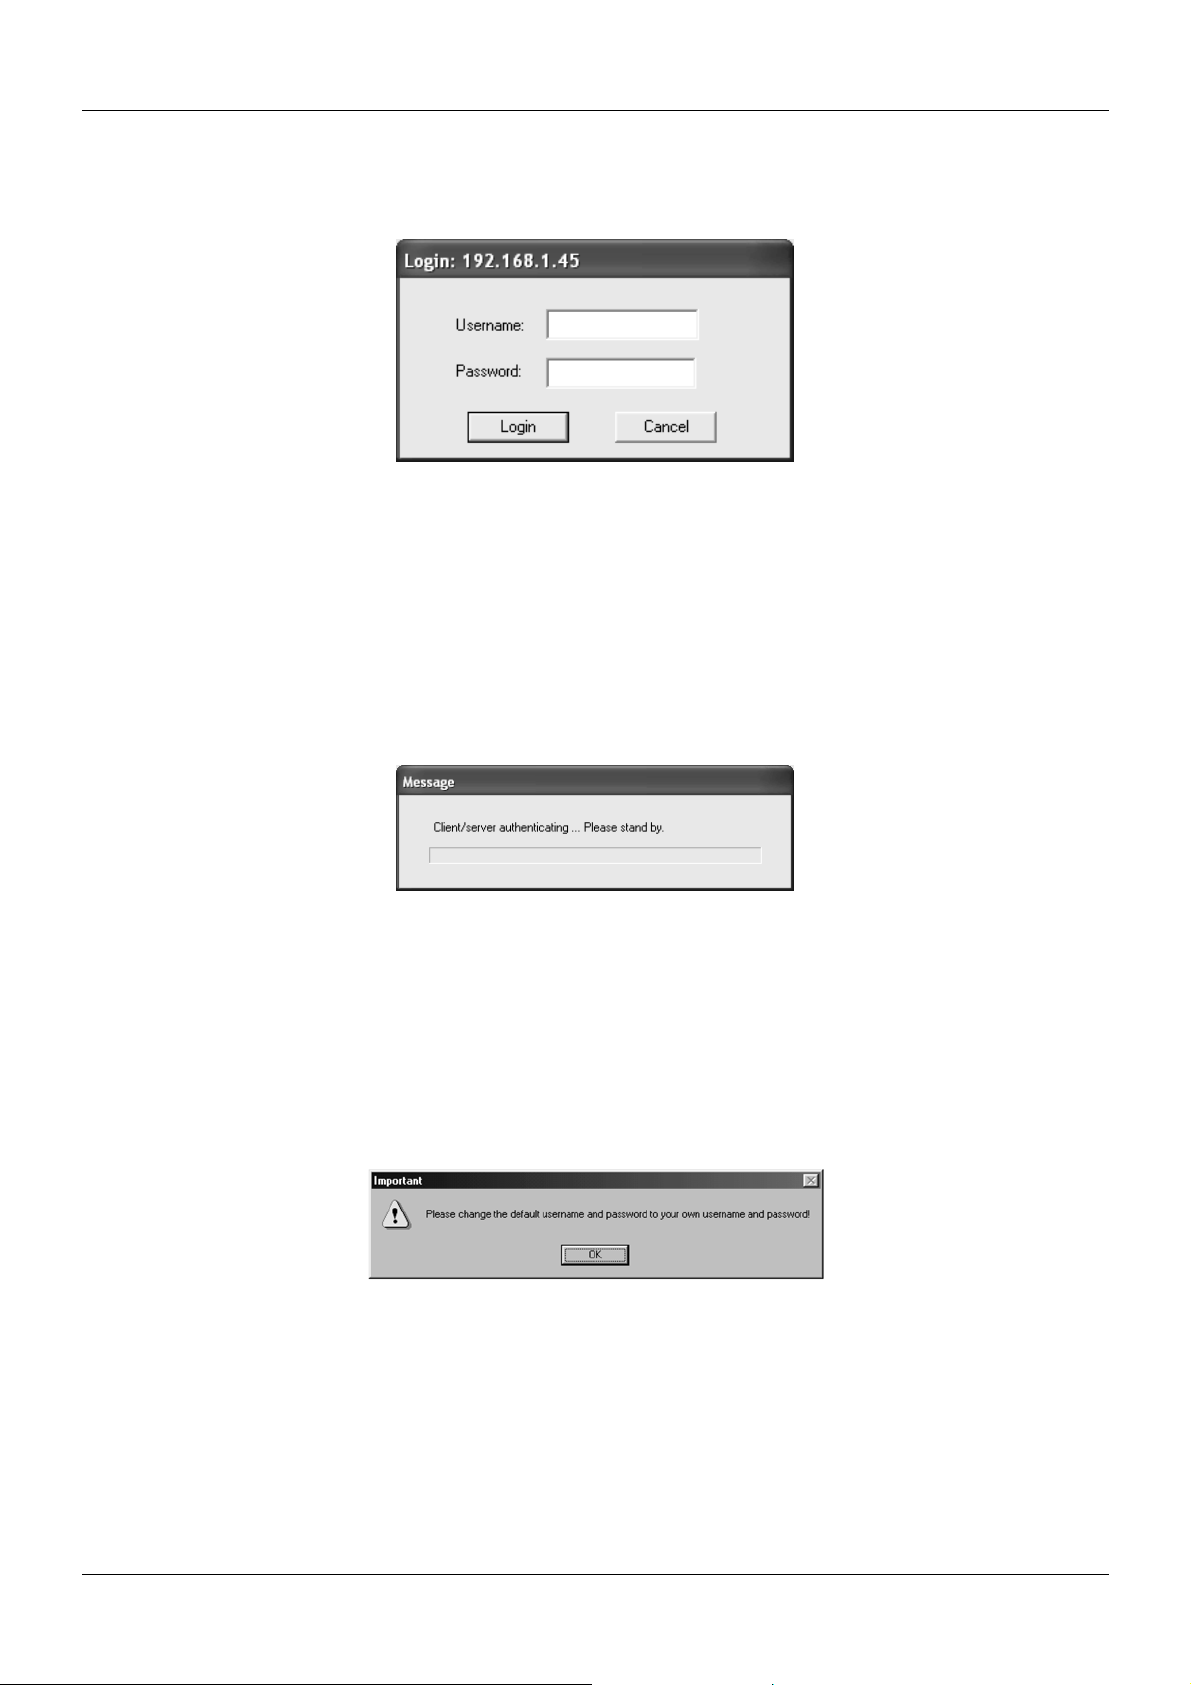
Once the Administrator Utility connects to the unit you specified, a login window appears:
Only those who have Configuration privileges (see User Management; Permissi ons, p. 21) are allowed to log in.
Provide a valid Username and Password, then Click Login to continue.
Note: The default Username is administrator; the default Password is password. You can change these to
whatever you prefer (see User Management, p. 20) after you have logged in.
While the Utility processes the login request, the following message appears:
Note: If you supplied an invalid login, the authentication routine will return a message informing you that the
“server is busy.” This is done as a security measure to confuse and discourage hackers from trying to
discover a valid Username and Password. If you see this message, try logging in again being careful with
the Username and Password.
If you successfully log in to the CPU IP ACCESS SWITCH with the default username and password, the following
message appears:
For security purposes, be sure to change the default Username and Password to something unique (se e User
Management, p. 20).
12
Page 17
LINDY CPU IP Access Switch User Manual
3.4 The Settings Notebook
Overview
After successfully logging in, the Settings notebook appears:
There are five tabs, each representing a different administrative activity. A description of each of the five activities
and how to configure their settings is provided in the sections that follow.
Uploading Changes
When settings have been configured to your satisfaction and you are ready to upload the changes to the CPU IP
ACCESS SWITCH:
1. Click OK to start the updating procedure. When updating has finished, the following message displays:
2. Click OK and you return to the Administration Utility device selection window (see p. 11).
Note: If you decide you want to abandon the changes you made and return the settings to the values they had
before you ran the Utility, Click Cancel instead of OK in step 1.
13
Page 18
LINDY CPU IP Access Switch User Manual
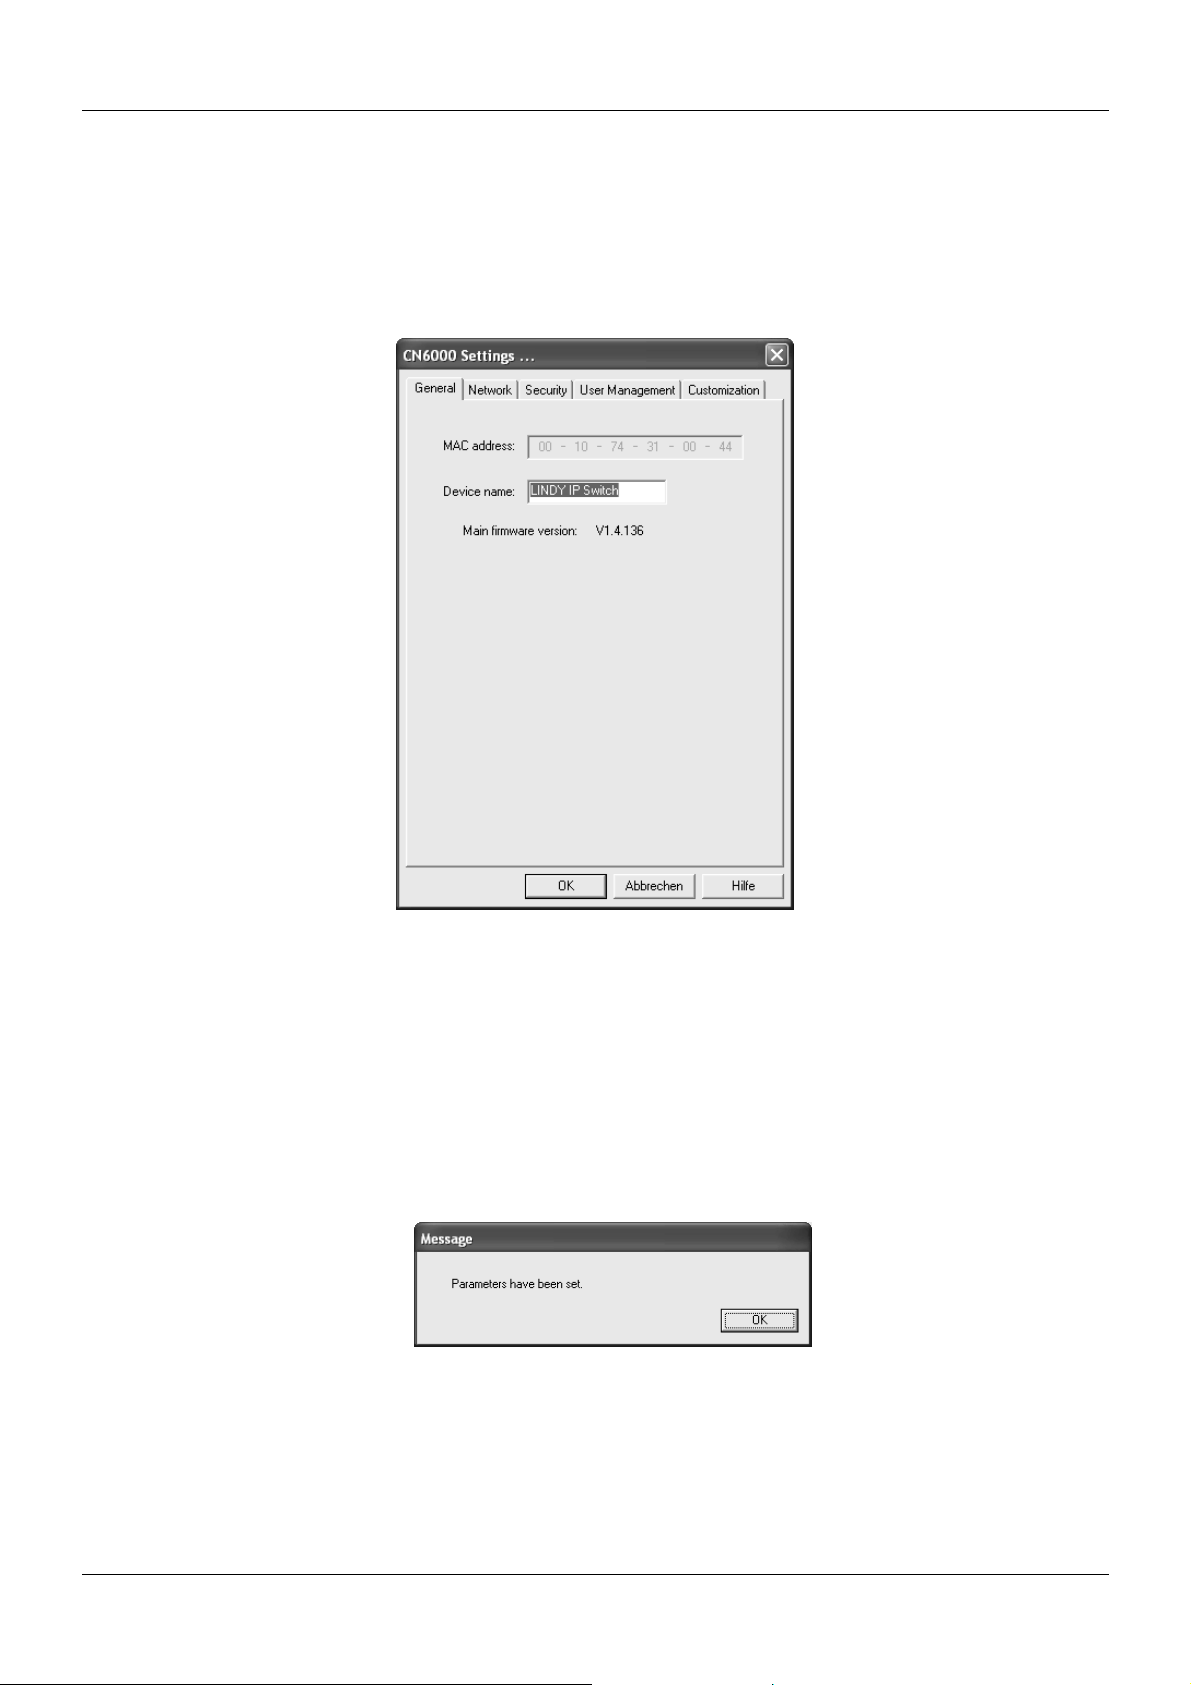
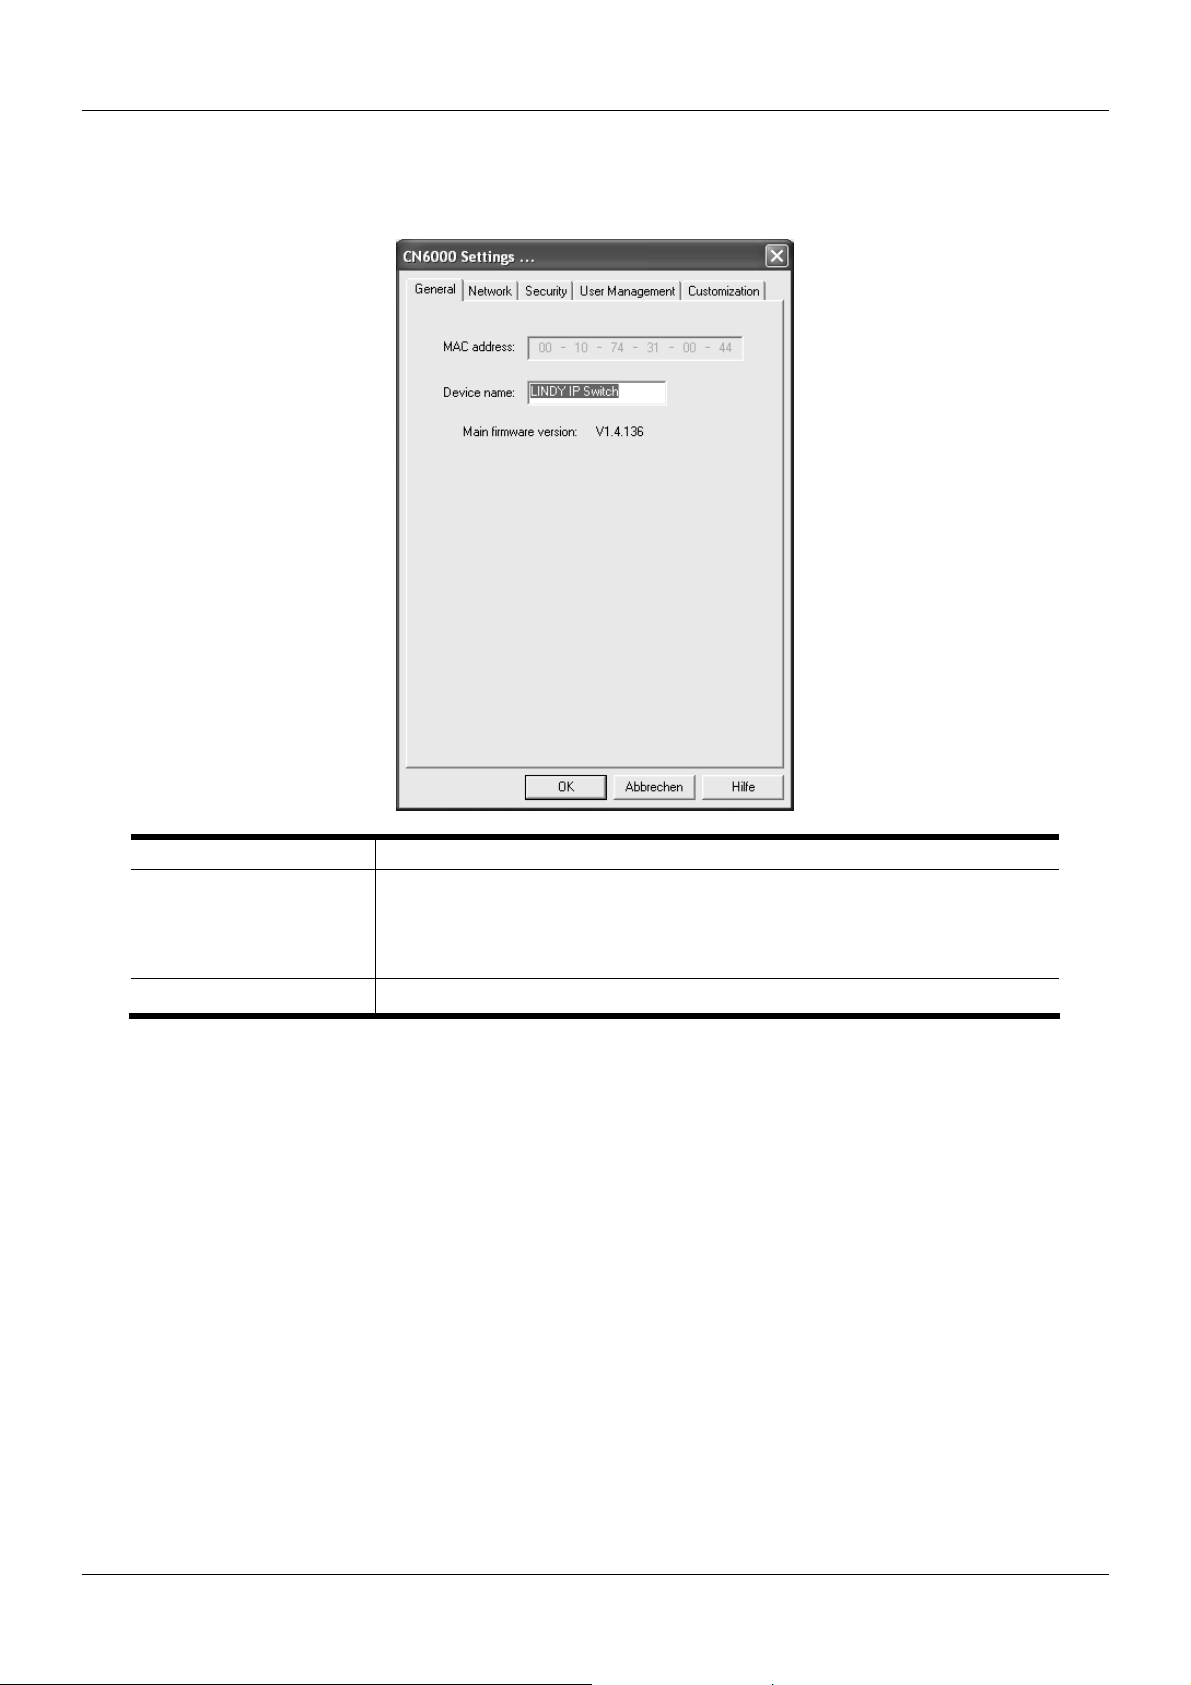
General
The General page provides information about the CPU IP ACCESS SWITCH’s status:
MAC address The CPU IP ACCESS SWITCH’s MAC address displays here
To make it easier to manage installations with more than one CPU IP
Device Name
Main Firmware Version Indicates the CPU IP ACCESS SWITCH’s current firmware version level
New versions of the CPU IP ACCESS SWITCH’s firmware can be downloaded from our web site (www.lindy.com)
as they become available (see p. 23 for installation details).
ACCESS SWITCH, each one can be given a name. To assign a name for
this CPU IP ACCESS SWITCH, erase the current name and key in one of
your choosing (15 characters max)
14
Page 19
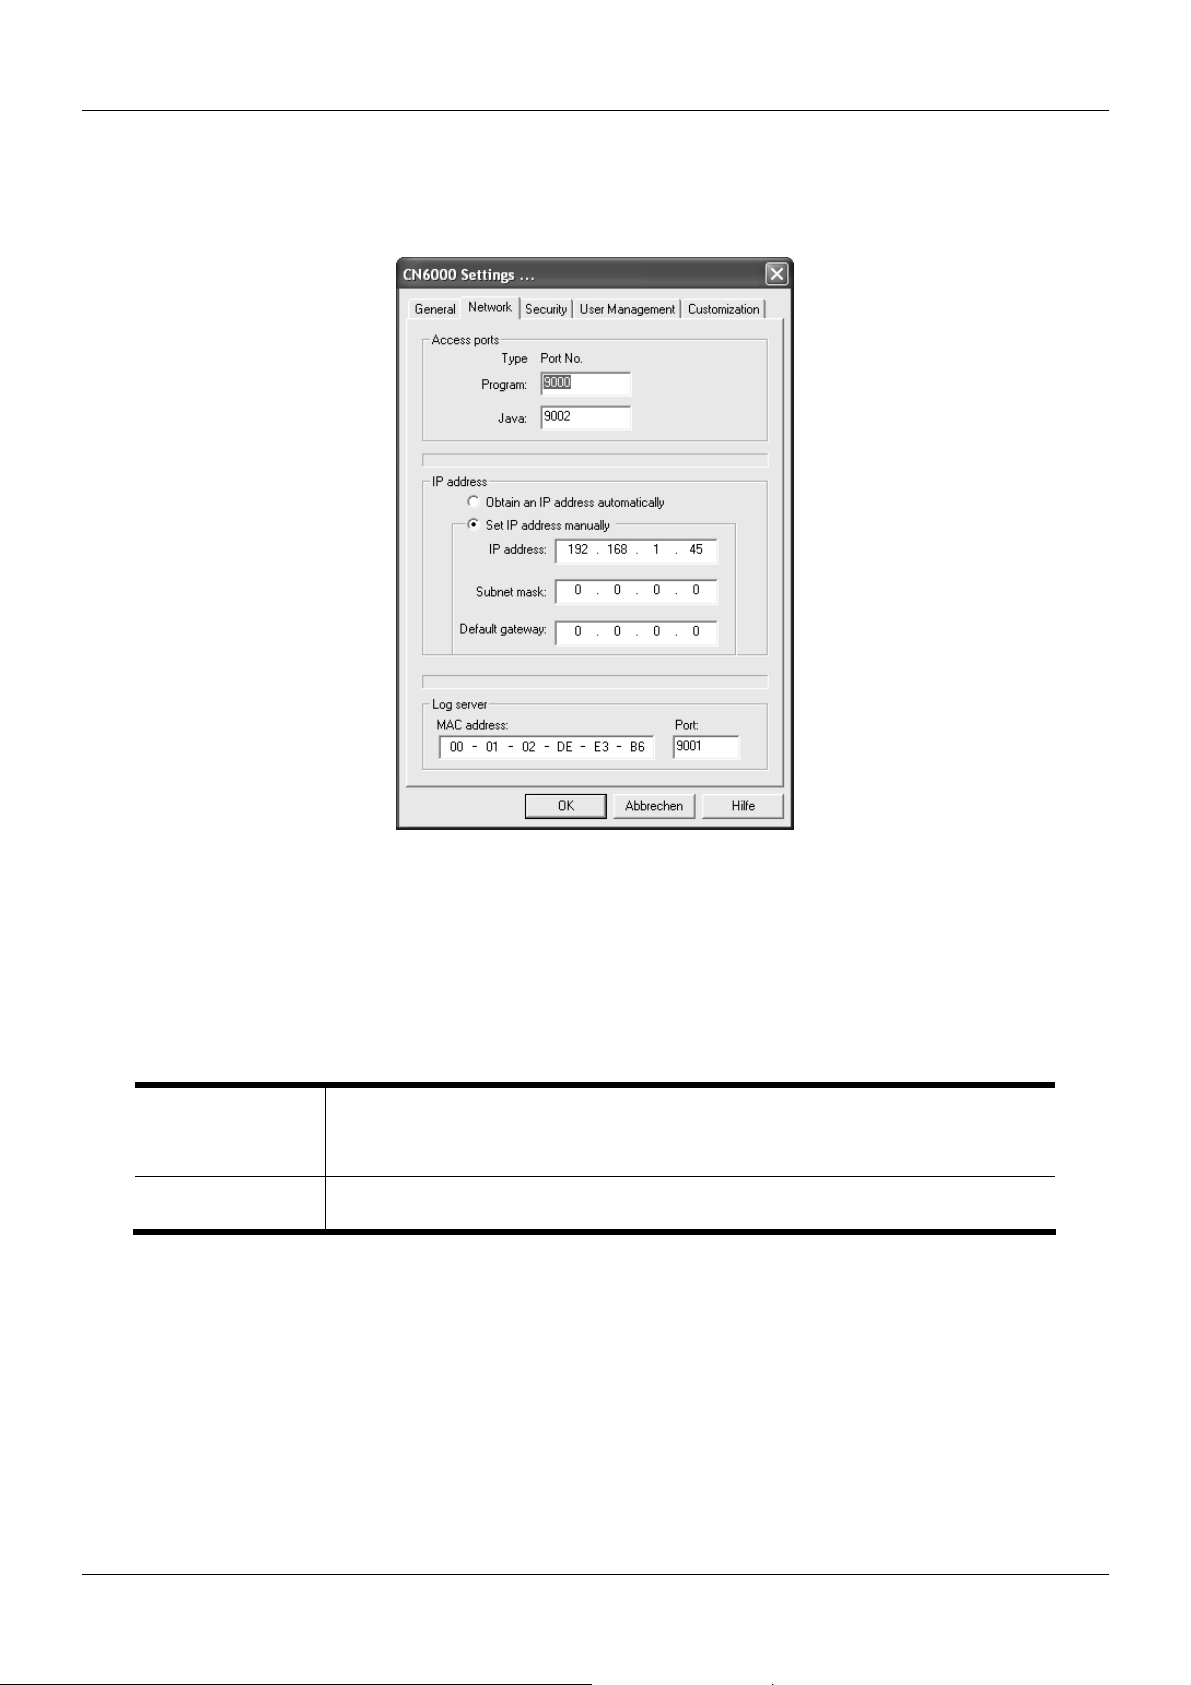
LINDY CPU IP Access Switch User Manual
Network
This page is used to specify the CPU IP ACCESS SWITCH’s network environment.
The Network page is divided into three main sections: Access Ports, IP Address, and Log Server. Each section is
discussed below.
Access Ports:
As a security measure, the Administrator can set the Port numbers that the user must specify when he attempts to
connect to a CPU IP ACCESS SWITCH’s IP address. Unless the correct Port number is given, the CPU IP
ACCESS SWITCH device will not be found. An explanation of the fields is given in the table below:
This is the port number that must be specified when connecting from the
Program:
Java:
Note: The port number must be different from the Program port number.
Administrator and Windows Client software programs. Valid entries are from
1024 - 60,000
This is the port number used for Java Client connections. Valid entries are from
0 - 65535
15
Page 20

LINDY CPU IP Access Switch User Manual
IP Address:
The unit can either have its IP address assigned dynamically at bootup (DHCP), or it can be given a fixed IP
address.
• For dynamic IP address assignment, select the Obtain an IP address automatically, radio button.
• To specify a fixed IP address, select the Set IP address manually, radio button and fill in the information
required.
Note: A fixed IP address can also be assigned with the ARP command as follows:
For example,
assigns an IP address of 10.0.0.10 to a CPU IP ACCESS SWITCH with a MAC address of 00-48-
54-65-00-01
arp -s <ip address> <CPU IP ACCESS SWITCH’s MAC address>
arp -s 10.0.0.10 00-48-54-65-00-01
Log Server:
Important transactions that occur on the CPU IP ACCESS SWITCH, such as logins, internal status messages, etc.,
are kept in an automatically generated log file. Specify the MAC address and a Port number for the server you want
the log file to reside on in the Log Server section.
Note: The Log Server port number must be different from the port numbers that were specified for Program and
Java in the Access Ports section.
The Log Server is discussed in detail in Chapter 6.
16
Page 21

LINDY CPU IP Access Switch User Manual
Security
The Security page is used to control access to the CPU IP ACCESS SWITCH.
• User station filters permit or deny access to the CPU IP ACCESS SWITCH for specific IP and MAC
addresses attempting to access the system with CPU IP ACCESS SWITCH Client software.
• The Java Access Page lets the Administrator specify the page that the user connects to when he uses the
Java Client to access the CPU IP ACCESS SWITCH. Users must include the name of this page in the IP
address that they specify, or they will not be granted access. If no name is specified here, no one will be
able to access the CPU IP ACCESS SWITCH with the Java Client.
For security purposes, we recommend that you change the name of this page from time to time.
See p. 25 for information regarding the implementation of a Java Access Page; see chapter 5 for Java
Client details.
• Admin station filters specify which MAC addresses are allowed to access the system with the CPU IP
ACCESS SWITCH Administrator program. If nothing is specified here, there are no restrictions.
17
Page 22

LINDY CPU IP Access Switch User Manual
Filtering:
• There are a maximum of 100 filters allowed for each category (User IPs, User MACs, and Administrator
MACs).
• To enable filtering for User Stations, Click to put a check mark in the IP and/or MAC Filter enable
checkbox.
• To add a filter, Click Add. A dialog box similar to the ones below appears (the top example is for IP
address filters; the bottom is for MAC address filters):
• Specify the filter address in the dialog box, then Click OK.
• Each filter can consist of a single IP or MAC address, or a range of IP addresses. For a single IP address
filter, the address is the same for both the From and To fields.
• To delete a filter, select it and Click Remove. To modify a filter, select it and Click Edit. The Edit dialog box
is similar to the Add dialog box. When it comes up, simply delete the old address and replace it with the
new one.
• User Station filtered items can be specified as included or excluded by highlighting the item and clicking the
include or exclude radio button.
• If the include button is checked, all the addresses within the filter range are allowed access to the CPU IP
ACCESS SWITCH; all other addresses are denied access.
• If the exclude button is checked, all the addresses within the filter range are denied access to the CPU IP
ACCESS SWITCH; all other addresses are allowed access.
• The Administrator station filter dialog boxes are similar to the MAC filter dialog boxes for user stations.
18
Page 23

LINDY CPU IP Access Switch User Manual
An example of the Security page with filters configured is shown below:
19
Page 24

LINDY CPU IP Access Switch User Manual
User Management
This page is used to set up and manage user profiles. It defines the access rights of each user. Up to 64 user
profiles can be established.
Note: Only one user can connect to the CPU IP ACCESS SWITCH at a time
• To add a user profile, Click Add and fill in the information asked for in the User Management dialog box
that appears. (See p. 21)
• To delete a user profile, select it and Click Remove.
• To modify a user profile, select it; Click Edit; and change the information shown in the User Management
dialog box that appears.
20
Page 25

LINDY CPU IP Access Switch User Manual
When you click Add or Edit, a dialog box with fields to configure the user profile appears:
An explanation of the profile items is given in the table below:
Username A minimum of 6 and a maximum of 15 characters is allowed.
Password A minimum of 8 and a maximum of 15 characters is allowed.
Confirm Password
Description Additional information about the user that you may wish to include.
Permissions
To be sure there is no mistake in the password you are asked to enter it
again. The two entries must match.
1. Checking Configure defines an Administrator who is allowed to
configure the system, but does not have permission to access the
CPU IP ACCESS SWITCH via the Java Client software.
2. Checking Java access defines a User who is allowed to access the
CPU IP ACCESS SWITCH via the Java Client software, but does
not have permission to configure the system.
3. Checking both defines an Administrator who has permission to
configure the system and access the CPU IP ACCESS SWITCH
via the Java Client software.
21
Page 26

LINDY CPU IP Access Switch User Manual
Customization
An explanation of the customization settings is given in the table, below:
After obtaining new versions of the firmware, specify the directories that you
Uploads
Time out Control
Login failure
Working Modes
Reset on exit
have put them in here to start the firmware upgrade procedure (see p. 23 for
details).
If the CPU IP ACCESS SWITCH doesn’t receive any input from the computer
that currently has access to it for the amount of time specified here, it ends
the connection so it can be available for other users.
Login failures allowed, sets the number of consecutive failed login attempts
that are permitted from a remote computer. Login failure timeout, sets the
amount of time a remote computer must wait before attempting to login again
after it has exceeded the number of allowed failures
If Stealth Mode is enabled, the CPU IP ACCESS SWITCH cannot be pinged.
If Echo Mode is disabled, the CPU IP ACCESS SWITCH will not show up in
the list of local CPU IP ACCESS SWITCH units (see p. 11 and p. 27)
Placing a check here causes the CPU IP ACCESS SWITCH to reset itself and
implement all the new changes when you Click OK and close the Settings
Notebook. Otherwise settings changes will not take effect until the CPU IP
ACCESS SWITCH is manually reset.
22
Page 27

LINDY CPU IP Access Switch User Manual
3.5 Upgrading the Firmware
New versions of the firmware files can be downloaded from our website at
http://www.lindy.com
After downloading the file, to upgrade the firmware do the following:
1. Go to the Customization page of the Administration configuration notebook (see p. 22). In the Uploads
panel, click the Browse button. A File Open dialog box appears.
2. Navigate to the directory that the downloaded firmware upgrade file is in; select the file, and Click Open.
23
Page 28

LINDY CPU IP Access Switch User Manual
You return to the Customization page with the path to file, and the Upload version number displayed.
3. Check Reset on exit, then Click OK to exit the Administrator Utility and complete the firmware upgrade
24
Page 29

LINDY CPU IP Access Switch User Manual
3.6 Java Authentification Page
As an important security feature, users who connect to the CPU IP ACCESS SWITCH via the Java Client must first
log in before being allowed access. A Java Authentication Page that implements a Login (Username and
Password) feature is provided on the distribution disk for this purpose.
Updated Java Authentication Page versions will be made available for download from our website as they become
available. See Upgrading the Firmware, p. 23, for details on upgrading.
Be sure to specify the name and full path location of the page you will be using in the Java Access Page text box
on the Security page of the Settings Notebook (see p. 17).
25
Page 30

LINDY CPU IP Access Switch User Manual
4. The Windows Client
4.1 Installation
1. Insert the CPU IP ACCESS SWITCH software CD into your CD-ROM drive
2. Open the drive and folder where the Windows Client Setup icon (CN6kClient_x_x_xxxLindy.exe) is
located and double click the icon.
The Windows Client installation screen appears:
3. Click Next, and follow the on-screen instructions to complete the installation and have the program icon
placed on the desktop.
26
Page 31

LINDY CPU IP Access Switch User Manual
4.2 Starting Up
To bring up the Windows Client Main Screen, run the CPU IP ACCESS SWITCH Client either by double clicking its
icon, or by keying in the full path to CN6kClient_x_x_xxxLindy.exe on the command line.
If this is the first time that you are running the program, a dialog box appears requesting you to input your serial
number.
If you don’t know what it is, contact the CPU IP ACCESS SWITCH administrator. Key in the serial number - 5
characters per box - then Click OK.
Note: You must have DirectX 7.0 or higher installed on your computer. If not, the Client program will not load.
The Connection Screen
When the Windows Client starts, a Connection Screen, similar to the one below, appears:
27
Page 32

LINDY CPU IP Access Switch User Manual
A description of the Connection Screen is given in the following table:
The Menu Bar contains three items: File, Tools, and Help
1. The File Menu allows the operator to Create, Save, and Open
Menu Bar
CPU IP ACCESS SWITCH List
CPU IP ACCESS SWITCH IP
user created Work files (see p. 29 for details)
2. The Tools Menu contains two entries: Keyboard and Config,
(see p. 30 for details).
Each time CN6KClient.exe is run, it searches the User’s local
LAN segment for CPU IP ACCESS SWITCH units, and lists
whichever ones it finds in this box. If you want to connect to one
of these units, Click it.
This area is used when you want to connect to a CPU IP
ACCESS SWITCH at a remote location. You can drop down the
list box and select an IP address or key in an IP address if the
one you want isn’t listed, then key in the Port number in the Port
field. If you don’t know the Port number, contact the
Administrator.
When the IP address and Port number for the CPU IP ACCESS
SWITCH unit you wish to connect to has been specified, Click
Connect to start the connection. When you have finished with
your session, Click Disconnect to break the connection.
Message List
Switch to Remote View
Change Password
Lists status messages regarding the connection to the CPU IP
ACCESS SWITCH.
Once contact with a CPU IP ACCESS SWITCH has been
established, this button becomes active. Click it to switch and
take over console control of the unit that is attached to the CPU
IP ACCESS SWITCH.
The screen output of the unit appears on your monitor. Your
keystrokes and mouse movements are captured and sent to the
CPU IP ACCESS SWITCH to be executed on the attached unit.
If the CPU IP ACCESS SWITCH is connected to a KVM switch,
you can control the switch and the computers connected to it just
as if you were connected locally.
This button becomes active after a connection to a CPU IP
ACCESS SWITCH unit has been established. It allows the User
to change the password he logs onto the CPU IP ACCESS
SWITCH with.
28
Page 33

LINDY CPU IP Access Switch User Manual
4.3 The File Menu
The File Menu allows the operator to Create, Save, and Open user created Work files. A Work File consists of all
the information specified in a Client session. This includes the CPU IP ACCESS SWITCH and CPU IP ACCESS
SWITCH IP list items, as well as the Hotkey settings.
Whenever a user runs the Client program, it opens with the values contained in the current wo rk file. The cu rrent
work file consists of the values that were in effect the last time the program was closed.
Users can use the Client program’s File menu to Create, Save, and Open Work files:
New
Open
Save Allows the user to save the values presently in effect as the current work file.
Allows the user to create a named work file so its values will not be lost, and it
will be available for future recall.
Allows the user to open a previously saved work file and use the values
contained in it.
4.4 The Tools Menu
Tools menu operations are performed after you connect, but before you switch to remote view. There are two
entries on the Tools Menu: Keyboard and Config.
They are explained in the sections that follow.
Keyboard
Various configuration actions related to the keyboard, video, and mouse can be performed via hotkey
combinations. The Hotkey Setup utility is accessed by opening the Tools menu and selecting Keyboard. The
Hotkey Setup Screen appears:
The actions performed by the Hotkeys are listed in the left column; the currently defined keys that invoke them are
shown in the right column.
29
Page 34

LINDY CPU IP Access Switch User Manual
Configuring the Hotkeys:
If you find the default Hotkey combinations inconvenient, you can configure them to whatever suits your taste, as
follows:
1. With the Hotkey Setup screen open, highlight the Action, then Click Start
2. Key in the Function keys (one at a time). The key names appear in the Key field as you press them
3. When you have finished keying in your sequence, Click Stop
4. Click Set
5. Repeat for any other actions you wish to set up
Note: 1. Only the F1 - F12 function keys can be used for these hotkeys
2. You can use the same function keys for more than one action, as long as the first key is not
the same. For example, you can use F1 F2 F3 for one action; F2 F1 F3 for another; F3 F2 F1 for a
third, etc.
30
Page 35

LINDY CPU IP Access Switch User Manual
An explanation of the actions is given in the table below:
Action Explanation
Exit remote location
Adjust video Brings up the video adjustment utility.
Toggle OSD
Toggle mouse mode
Adjust mouse
Break the connection to the CPU IP ACCESS SWITCH and return to
local operation.
Toggles the OSD display Off and On (see Screen Information, p. 34
for details).
Under some circumstances, especially if the remote computer uses a
non-Windows OS, there may be some areas that the mouse pointer
can’t reach due to differences in mouse movement implementation.
If this occurs, you can toggle the mouse to base movement mode.
Although the mouse movement isn’t as smooth as it is under
Windows movement mode, it allows the pointer to move anywhere
regardless of the OS.
This utility synchronizes the local and remote mouse movements
following a video resolution change. After invoking this utility, simply
click the local mouse pointer on top of the remote mouse pointer.
[Alt + Tab] and [Ctrl + Alt + Del] work on the local computer, even
though all other keyboard input is captured and sent to the CPU IP
ACCESS SWITCH.
Substitute Alt key
Note: To invoke an action, you must press and release the keys one key at a time - do not chord the
keys.
In order to implement their effects on the remote system, a function
key can be substituted for the Alt key. If you substitute the F12 key,
for example, you would use [F12 + Tab] and [Ctrl + F12 + Del].
31
Page 36

LINDY CPU IP Access Switch User Manual
Config
When you select Config, a screen similar to the one below appears:
If Keep screen size is not enabled (there is no checkmark in the box), the remote screen is resized to fit the
resolution of your local monitor.
If Keep screen size is enabled (there is a checkmark in the box), the remote screen is not resized.
• If the remote resolution is smaller, its display appears like a window centred on your screen.
• If the remote resolution is larger, its display is centred on your screen. To access the areas that are off
screen, move the mouse to the corner of the screen that is closest to the area you want to view.
32
Page 37

LINDY CPU IP Access Switch User Manual
4.5 Connecting
To connect to a CPU IP ACCESS SWITCH unit:
1. If it is in the CPU IP ACCESS SWITCH List, Click it; if you are using the CPU IP ACCESS SWITCH IP
input box, specify the IP address and Port number, then Click Open. A Login dialog box appears:
2. After you key in a valid Username and Password, Click OK.
The program attempts to contact your selected CPU IP ACCESS SWITCH unit.
3. Check the Message List window for status messages regarding the operation’s progress.
4. Once contact with the CPU IP ACCESS SWITCH has been established, the Switch to Remove View button
becomes active. Click it to connect to the CPU IP ACCESS SWITCH and take over console control of the
unit that is connected to it.
33
Page 38

LINDY CPU IP Access Switch User Manual
4.6 Operation
Screen Information
Once the connection to the CPU IP ACCESS SWITCH has been accomplished, a window opens on the Client’s
monitor that exactly replicates the remote system’s video output display captured by the CPU IP ACCESS
SWITCH. Local keystroke and mouse input is captured and sent to the remote system.
A small OSD control panel opens at the lower right hand corner of the screen:
The panel consists of an icon bar at the top, with two text bars below it. Initially, the text bars display the video
resolution and IP address of the device at the remote location. As the mouse pointer moves over the icons, the
information in the text bars changes to describe the icon’s function.
Icon Function
Hand
Keyboard Click to bring up the Hotkey Setup dialog box (see p. 29 for details).
Hammer Click to bring up the Video Adjustment dialog box (see p. 37 for details).
Arrow Click to exit the Windows Client control of the remote unit.
Space
Lock LEDs
Drag the OSD display to another position on the screen by clicking and
holding on the hand while you move the mouse.
Hover over the space to see the video resolution and IP address of the
device at the remote location.
These LEDs show the Num Lock, Caps Lock, and Scroll Lock status of the
remote computer. Click on the icon to toggle the status.
Note: When you first connect, the LED display may not be accurate.
To be sure, click on the LEDs to set them.
34
Page 39

LINDY CPU IP Access Switch User Manual
Keystrokes
Keyboard input has no effect on the local (operators) computer except for [Alt + Tab] and [Ctrl + Alt + Del]. These
key functions are retained on the local system to switch among applications and to recover from disaster.
In order to provide the [Alt + Tab] and [Ctrl + Alt + Del] functions on the remote system, one of the Function Keys is
used as a Substitute for the [Alt] key.
For example, the F12 key could substitute for the Alt key, in which case [F12 + Tab] substitutes for [Alt + Tab]; and
[Ctrl + F12 + Del] substitutes for [Ctrl + Alt + Del]. See Configuring the Hotkeys on p. 30 for details on setting up a
substitute key.
Note: While any Function Key can be used for the Substitute key, you must not use one that is being used for
another action.
Mouse Synchronization
Until you close the CPU IP ACCESS SWITCH connection, mouse movements have no effect on your local system,
but are captured and sent to the remote system, instead.
From time to time, especially if you change video resolution, the local mouse movement may no longer be
synchronized with the remote system’s mouse pointer. There are three methods that can be used to bring t he two
pointers back into sync:
1. Moving the mouse pointer over the arrow in the OSD panel and right clicking
2. Moving the mouse pointer into the OSD panel and then moving it back out again
3. Performing an Auto Sync with the Video Adjustment function (see Video Adjustment, p. 37 for details).
If performing an Auto Sync doesn’t resolve the problem, do the following:
1. Invoke the Adjust Mouse action with the Adjust Mouse hotkeys (see p. 31 for details)
2. Move the local mouse pointer exactly on top of the remote mouse pointer and Click.
If these procedures still do not help, set the mouse speed and acceleration for the computer (or computers via KVM
switch) connected to the CPU IP ACCESS SWITCH as follows:
35
Page 40

LINDY CPU IP Access Switch User Manual
Windows 2000:
Set the mouse speed to the middle position; set the mouse acceleration to None (Control Panel > Mouse > Mouse
Properties > Motion):
Windows XP/Server 2003:
Set the mouse speed to the middle position; disable Enhance Pointer Precision (Control Panel > Printers and Other
Hardware > Mouse > Pointer Options):
36
Page 41

LINDY CPU IP Access Switch User Manual
Windows ME/95:
Set the mouse speed to the middle position; disable mouse acceleration (click Advanced to get the dialog box for
this).
Windows NT/98:
Set the mouse speed to the slowest position.
Video Adjustment
You can adjust the placement and the picture quality of the remote screen (as displayed on your local mon itor) with
the Video Options function. To do so, either click on the Hammer icon on the O S D Control Panel, or use the Adjust
Video hotkeys (see p. 30). The following screen appears:
37
Page 42

LINDY CPU IP Access Switch User Manual
The meanings of the adjustment options are given in the table below:
Option Usage
Screen Position
Auto-Sync
RGB
Video Quality
Adjust the horizontal and vertical position of the remote computer window by
Clicking the Arrow buttons.
Click Auto-Sync to have the function detect the vertical and horizontal offset
values of the remote screen and automatically synchronize it with the local
screen.
If the local and remote mouse pointers are out of sync, in most cases,
performing this function will bring them back into sync.
Note: This function works best with a bright screen.
If you are not satisfied with the results, use the Screen Position arrows to
position the remote display manually.
Drag the slider bars to adjust the RGB (Red, Green, Blue) values. When an
RGB value is increased, the RGB component of the image is correspondingly
increased.
Drag the slider bar to adjust the overall Video Quality. Values can be from 20
to 100. The larger the value, the clearer the picture and the more video data
goes through the network. Depending on the network bandwidth, a high value
may adversely effect response time.
This setting adjusts the ratio between picture quality and network spe ed. For
Bandwidth Control
slow data connections, drag the slider bar to a lower setting to decrease the
amount of video data transferred. This ensures screen refresh at workable
speeds
38
Page 43

LINDY CPU IP Access Switch User Manual
5. The Java Client
The Java Client is provided to make the CPU IP ACCESS SWITCH accessible to all platforms. Systems that have
Java installed can connect. If you don’t already have Java, it is available for free download from Sun’s Java web
site (http://java.sun.com).
5.1 Starting Up
1. Insert the CPU IP ACCESS SWITCH software CD into your CD-ROM drive
2. Open the drive and folder where the Java Client jar file (CN6000main.jar) is located and copy the file to
your hard disk
3. To bring up the Java Client Main Screen, run the Java Client jar file (CN6000main.jar) either by double
clicking its icon, or by keying in the full path to it on the command line.
Note: The Java Client requires Java version 1.4 or higher. It will not work with earlier versions of Java.
If this is the first time that you are running the program, a dialog box appears requesting you to input your serial
number.
4. Key in the serial number - 5 characters per box - then Click OK. (If you don’t know what it is, contact the
CPU IP ACCESS SWITCH administrator.)
An Address Input dialog box appears:
5. Key in the IP address for the unit you want to connect to - including a forward slash followed by the name
of the CPU IP ACCESS SWITCH’s Java Client web page.
For example:
168.10.95.1/cn6k.html
Note: For security purposes, the name of the page that you connect to must be specified correctly as part of the
IP address. The system administrator may change the name of this page from time to time to thwart
unauthorized access attempts. Be sure you have the correct name for this page when you attempt to
connect.
39
Page 44

LINDY CPU IP Access Switch User Manual
After you key in the IP address and Click OK, a Connection Progress window appears:
After you establish a connection, a Login dialog box appears:
6. Provide a valid Username and Password and Click OK. After a second or two, an Authentication progress
window appears:
Once the authentication procedure completes successfully, the remote system displays in a window on your
monitor:
40
Page 45

LINDY CPU IP Access Switch User Manual
5.2 Operation
The remote system displays in a window on the upper portion of your monitor. You can work on the remote system
via this screen just as if it were your local system.
The Java Client’s toolbar is hidden in the blank area at the bottom centre of the screen. When you move the mouse
pointer over this area, the toolbar appears:
Note:
1. You can switch between your local and remote programs with [Alt + Tab].
2. Due to net lag, there might be a slight delay before your keystrokes show up. You may also have to
wait a bit for the remote mouse to catch up to your local mouse before you click.
3. Due to net lag, or insufficient computing power on the local machine, some images, especially
motion images, may display poorly
4. If the local and remote mouse pointers get out of sync, you can use the Mouse Synchronization
Button to bring them back into synch (see p. 43 for details).
41
Page 46

LINDY CPU IP Access Switch User Manual
The Toolbar
The Toolbar at the bottom of the screen is a Java applet that gives you control over the KVM operations. Going
from left to right on the toolbar, its functions are as follows:
Video:
Clicking the first button brings up the Video Settings dialog box:
This is similar to the Adjust Video feature of the Windows Client. See p. 37 for details about its use.
Note: We recommend that you perform an Autosync right after you connect for improved mouse
synchronization.
Keypad:
Clicking the second button brings up the Keypad. Since some locally input keyboard
combinations can not be captured and sent to the CPU IP ACCESS SWITCH, the
Keypad provides a one-click implementation of their actions on the remote system.
42
Page 47

LINDY CPU IP Access Switch User Manual
Mouse:
At times the local mouse movement may lose sync with the remote mouse movement. If performing an Autosync
doesn’t resolve the problem the Mouse Synchronization function gets them back into sync. This is similar to the
Mouse Synchronization feature of the Windows Client (see p. 35 for details).
1. Click the Mouse Synchronization button. The remote mouse pointer moves to the upper left area of the
screen.
2. Move your local mouse pointer directly over the remote mouse pointer and Click.
Lock LEDs:
These LEDs show the Num Lock, Caps Lock, and Scroll Lock status of the remote computer. Click on the icon to
toggle the status.
Note: When you first connect, the LED display may not be accurate. To be sure, click on the LEDs to set them.
The
i Button:
Clicking this button provides information about the Java Client.
The
? Button:
Clicking this button brings up the Java Client Help pages.
Exit:
Click this button to exit the Java Client program and return to local operation.
43
Page 48

LINDY CPU IP Access Switch User Manual
6. The Log Server
The Windows-based Log Server is an administrative utility that records all the events that take place on selected
CPU IP ACCESS SWITCH units.
6.1 Installation
1. Insert the CPU IP ACCESS SWITCH software CD into your CD-ROM drive
2. Open the drive and folder where the Log Server Setup icon (CN6kLogServer_x_x_xxxLindy.exe) is
located and double click the icon.
The Log Server installation screen appears:
3. Click Next, and follow the on-screen instructions to complete the installation and have the program icon
placed on the desktop.
44
Page 49

LINDY CPU IP Access Switch User Manual
6.2 Starting Up
To bring up the Log Server, run the Log Server either by double clicking its icon, or by keying in the full path to
CN6kLogServer_x_x_xxxLindy.exe on the command line. A screen similar to the one b elow appears:
Note: The MAC address and port number of the computer that will contain the Log Server Events database must
be specified on the Network page of the Administrator Utility (see p. 15).
The screen is divided into three components:
• A Menu Bar at the top
• A panel to display a list of CPU IP ACCESS SWITCH units below it (see p. 50 for details)
• A panel to display an Events List at the bottom
Each of the components is explained in the sections that follow.
45
Page 50

LINDY CPU IP Access Switch User Manual
6.3 The Menu Bar
The Menu bar consists of four items:
• Configure
• Events
• Options
• Help
These are discussed in the sections that follow.
Note: If the Menu Bar appears to be disabled, click in the CPU IP ACCESS SWITCH List panel below it to enable
the bar.
Configure
The Configure menu contains three items: Add; Edit; and Delete. They are used to add new CPU IP ACCESS
SWITCH units to the CPU IP ACCESS SWITCH List; edit the information for units already on the list; or delete CPU
IP ACCESS SWITCHES from the list.
To edit or delete a listed CPU IP ACCESS SWITCH, first select the one you want in the CPU IP ACCESS SWITCH
List window, then open this menu and click Edit or Delete.
To add a CPU IP ACCESS SWITCH to the CPU IP ACCESS SWITCH List, click Add. When you choose Add or
Edit, a dialog box, similar to the one below, appears:
46
Page 51

LINDY CPU IP Access Switch User Manual
A description of the fields is given in the table, below:
Field Explanation
Address
Port
Description
Limit
Fill in or modify the fields, then click OK to finish.
This can either be the IP address of the CPU IP ACCESS SWITCH or its
DNS name (if the network administrator has assigned it a DNS name).
The Log Server port number assigned to the CPU IP ACCESS SWITCH
(see p. 15).
This field is provided so that you can put in a descriptive reference for
the unit to help identify it.
This specifies the number of days that an event should be kept in the
Log Server’s database before it expires and should be cleared.
Events
The Events Menu has two items: Search and Maintenance.
Search:
Search allows you to search for events containing specific words or strings. When you access this function, a
screen, similar to the one below, appears:
47
Page 52

LINDY CPU IP Access Switch User Manual
A description of the items is given in the table, below:
Item Explanation
This is one of three radio buttons that define the scope of the
New search
search. If it is selected, the search is performed on all the
events in the database for the selected CPU IP ACCESS
SWITCH.
Search last results
Search excluding last results
CPU IP ACCESS SWITCH List
Priority
From
To Select the date and time that you want the search to end at.
This is a secondary search performed on the events that
resulted from the last search.
This is a secondary search performed on all the events in the
database for the selected CPU IP ACCESS SWITCH excluding
the events that resulted from the last search.
CPU IP ACCESS SWITCH units are listed according to their IP
address. Select the unit that you want to perform the search on
from this list. You can select more than one unit for the search.
If no units are selected, the search is performed on all of them.
The search results are divided into three categories depending
on their importance: Most, are events concerning System
Settings and User login information, and are displayed in red.
Less, are events concerning Network IP Settings, and are
displayed in blue. Least, are events concerning Video Settings,
and are displayed in black.
Select the date and time that you want the search to start from.
The format follows the MM/DD/YYYY HH:MM:SS convention,
and is numeric, as follows:
05/11/2002 13:45:08
Key in the pattern that you are searching for here. The multiple
Pattern
Search Click this button to start the search.
Print Click this button to print the search results
Results Lists the events that contained matches for the search.
Maintenance:
This function allows the administrator to perform manual maintenance of the database. He can use it to erase
specified records before the expiration time that was set with the Limit setting of the Edit function (see p. 47).
character wildcard (%) is supported. E.g., h%ds would match
hands and hoods.
48
Page 53

LINDY CPU IP Access Switch User Manual
Options
This menu has a single item: Retry.
Retry allows you to set the number of seconds that the Log Server should wait before attempting to connect if its
previous attempt to connect failed. When you click this item, a dialog box, similar to the one below, appears:
Key in the number of seconds, then click OK to finish.
49
Page 54

LINDY CPU IP Access Switch User Manual
6.4 The CPU IP ACCESS SWITCH List Panel
The CPU IP ACCESS SWITCH List panel displays a list of all the CPU IP ACCESS SWITCH units that have been
selected for the Log Server to track (see Configure, p. 46).
Tick information for the currently selected CPU IP ACCESS SWITCH displays in the Events List panel below it. To
select a CPU IP ACCESS SWITCH unit in the list, simply click on it.
50
Page 55

LINDY CPU IP Access Switch User Manual
The CPU IP ACCESS SWITCH List window contains six fields:
Field Explanation
Determines whether the Log Server records the ticks for this CPU IP
ACCESS SWITCH, or not. If the Recording checkbox is checked, the field
displays Recording, and the ticks are recorded. If the Recording checkbox is
Recording
not checked, the field displays Paused, and the ticks are not recorded.
Note: Even though a CPU IP ACCESS SWITCH is not the currently
selected one, if its Recording checkbox is checked, the Log Server
will still record its ticks.
Address
Port
Connection
Limit
Description
This is the IP Address or DNS name that was given to the CPU IP ACCESS
SWITCH when it was added to the Log Server (see Configure, p. 46).
This is the Port number assigned to the CPU IP ACCESS SWITCH (see
Configure, p. 46).
If the Log Server is connected to the CPU IP ACCESS SWITCH, this field
displays Connected.
If it is not connected, this field displays Waiting. This means that the Log
Server’s MAC address has not been set properly. It needs to be set on the
Network page of the Administrator Utility (see p. 15).
This field displays the number of days that the CPU IP ACCESS SWITCH’s
events are to be kept in the Log Server’s database before expiration (see
Edit, p. 46).
This field displays the descriptive information given for the CPU IP ACCESS
SWITCH when it was added to the Log Server (see Configure, p. 46).
51
Page 56

LINDY CPU IP Access Switch User Manual
6.5 The Event List Window
This window displays tick information for the currently selected CPU IP ACCESS SWITCH. Note that even though
any other CPU IP ACCESS SWITCHES aren’t currently selected, if their Recording checkbox is checked, the Log
Server records their tick information and keeps it in its database.
52
Page 57

LINDY CPU IP Access Switch User Manual
7. Appendix
7.1 Specifications
Function Specification
1 x 6 pin mini-DIN F - Keyboard
Connectors
Console Ports
KVM Port 1 x SPHD-15 F
LAN 1 x RJ-45 Receptacle
Power 1 x DC Jack
Power 1 (Orange)
1 x 6 pin mini-DIN F - Mouse
1 x HDB-15 F - Video
LEDs
Video Up to 1600 x 1200 @ 60 Hz
Protocols
Environment
Housing Metal
Weight 0.51kg
Dimensions (L x W x H) 43.24 x 25.42 x 4.42 cm
Link 1 (Green)
10/100 Mbps 1 (Green/Orange)
10BaseT Ethernet; 100BaseT Fast Ethernet;
TCP/IP; HTTP
Operating Temperature: 0 - 50°C
Storage Temperature: -20 - 60°C
Humidity: 0 - 80% RH
53
Page 58

LINDY CPU IP Access Switch User Manual
7.2 Rack Mounting
For convenience and flexibility, the CPU IP ACCESS SWITCH can be mounted on a system rack.
To rack mount the unit do the following:
1. Screw the mounting bracket into the top or bottom of the unit as shown in the example diagram below.
2. Screw the bracket into any convenient location on the rack.
54
Page 59

LINDY CPU IP Access Switch User Manual
7.3 Troubleshooting
General Operation
Problem Solution
If the CPU IP ACCESS SWITCH is connected to a KVM
Erratic Operation
Sun Systems
Problem Solution
Video display problems with
HDB15 interface systems
(e.g., Sun Blade 1000 servers)
switch, make sure to power on the switch before powering
on the CPU IP ACCESS SWITCH.
The display resolution should be set to 1024 x 768:
Under Text Mode:
1. Go to OK mode and issue the following commands:
setenv output-device screen:r1024x768x60
reset-all
Under XWindow:
1. Open a console and issue the following command:
m64config -res 1024x768x60
2. Log out
3. Log in
The display resolution should be set to 1024 x 768:
Under Text Mode:
1.Go to OK mode and issue the following commands:
Video display problems with
13W3 interface systems (e.g.,
Sun Ultra servers).
setenv output-device screen:r1024x768x60
reset-all
Under XWindow:
1. Open a console and issue the following command:
ffbconfig -res 1024x768x60
2. Log out
3. Log in
55
Page 60

LINDY CPU IP Access Switch User Manual
The Administrator Utility
Problem Solution
The default CPU IP ACCESS
SWITCH IP address is determined
by DHCP. My network uses fixed
IP addresses. How can I access
the CPU IP ACCESS SWITCH to
give it a fixed IP address?
Forgot/Corrupt Password
The Windows Client
Problem Solution
Remote mouse pointer is out of
step.
1. When the CPU IP ACCESS SWITCH starts, if it doesn’t find
a DHCP environment after 30 seconds, it automatically sets its
IP address to 192.168.0.60. Connect to it at that address, and
change its Network settings to a fixed IP address.
2. You can use the ARP function to assign a fixed IP address to
the CPU IP ACCESS SWITCH. See p. 15 for details.
Turn off the power; short jumper labelled Password Default on
the CPU IP ACCESS SWITCH’s mainboard; turn on the power
and wait for all the LEDs to blink; turn off the power and open
the Password Default jumper; start the CPU IP ACCESS
SWITCH up.
1. Use the AutoSync feature (see Video Adjustment, p. 37), to
synch the local and remote monitors.
2. If that doesn’t resolve the problem, use the Adjust Mouse
feature (see Mouse Movement, p. 35) to bring them back in step.
Part of remote window
is off my monitor.
The remote screen
display is rotated 90°
I can’t run Net Meeting
when the Windows
Client is running.
If Keep Screen Size (see p. 32) is not enabled, use the
AutoSync feature (see Video Adjustment, p. 37), to synch the
local and remote monitors. If it is enabled, see the discussion
under Config on p. 32.
Enable Keep Screen Size. See the discussion under Config on p.
32 for details
Enable Keep Screen Size. See the discussion under Config on p.
32 for details.
56
Page 61

LINDY CPU IP Access Switch User Manual
The Java Client
For mouse synchronization problems, refer to the discussion on page 35. For connection and ope ration problems,
see the table below:
Symptom Action
1. Make sure to include the correct name of the web page
Java Client won’t connect to the
CPU IP ACCESS SWITCH
Java Client performance deteriorates. Exit the program and start again.
when you specify the CPU IP ACCESS SWITCH’s IP
address.
2. Close the Java Client, reopen it, and try again.
The Log Server
Problem Resolution
The Log Server requires the Microsoft Jet OLEDB 4.0 driver in
order to access the database.
This driver is automatically installed with Windows
ME, 2000 and XP.
For Windows 98 or NT, you will have to go to the
The Log Server program does
not run.
Microsoft download site:
http://www.microsoft.com/data/download.htm
to retrieve the driver file:
MDAC 2.7 RTM Refresh (2.70.9001.0)
Since this driver is used in Windows Office Suite, an
alternate method of obtaining it is to install Windows
Office Suite. Once the driver file or Suite has been
installed, the Log Server will run.
57
Page 62

Radio Frequency Energy, Certifications
Shielded cables must be used with this equipment to maintain compliance
with radio frequency energy emission regulations and ensure a suitably
high level of immunity to electromagnetic disturbances.
FCC Warning
This is a class A product. In a domestic environment this product may cause radio interference in which
case the user may be required to take adequate measures.
This equipment has been tested and found to comply with the limits for a Class A digital device, pursuant
to Part 15 of the FCC Rules. These limits are designed to provide reasonable protection against harmful
interference when the equipment is operated in a commercial environment. This equipment generates,
uses and can radiate radio frequency energy and, if not installed and used in accordance with the
instruction manual, may cause harmful interference to radio communications.
Operation of this equipment in a residential area is likely to cause harmful interference in which case the
user will be required to correct the interference at his own expense.
The user is encouraged to try to correct the interference by one or more of the following measures:
Reorient or relocate the receiving antenna
Increase the separation between the equipment and receiver
Connect the equipment into an outlet on a circuit different from that to which the receiver is connected
Consult the dealer or an experienced technician for help
This device complies with part 15 of the FCC Rules.
Operation is subject to the following two conditions:
1. This device may not cause harmful interference, and
2. This device must accept any interference received, including interference that may cause undesired
operation
© LINDY ELECTRONICS LIMITED & LINDY-ELEKTRONIK GMBH - SECOND EDITION (OCT 2004)
 Loading...