

LINDY 39378 User Manual [ml]
Cat.5 KVM Extender Combo 300
User Manual English
Benutzerhandbuch Deutsch
Manuale d’uso Italiano
Manuel d’utilisateur Français
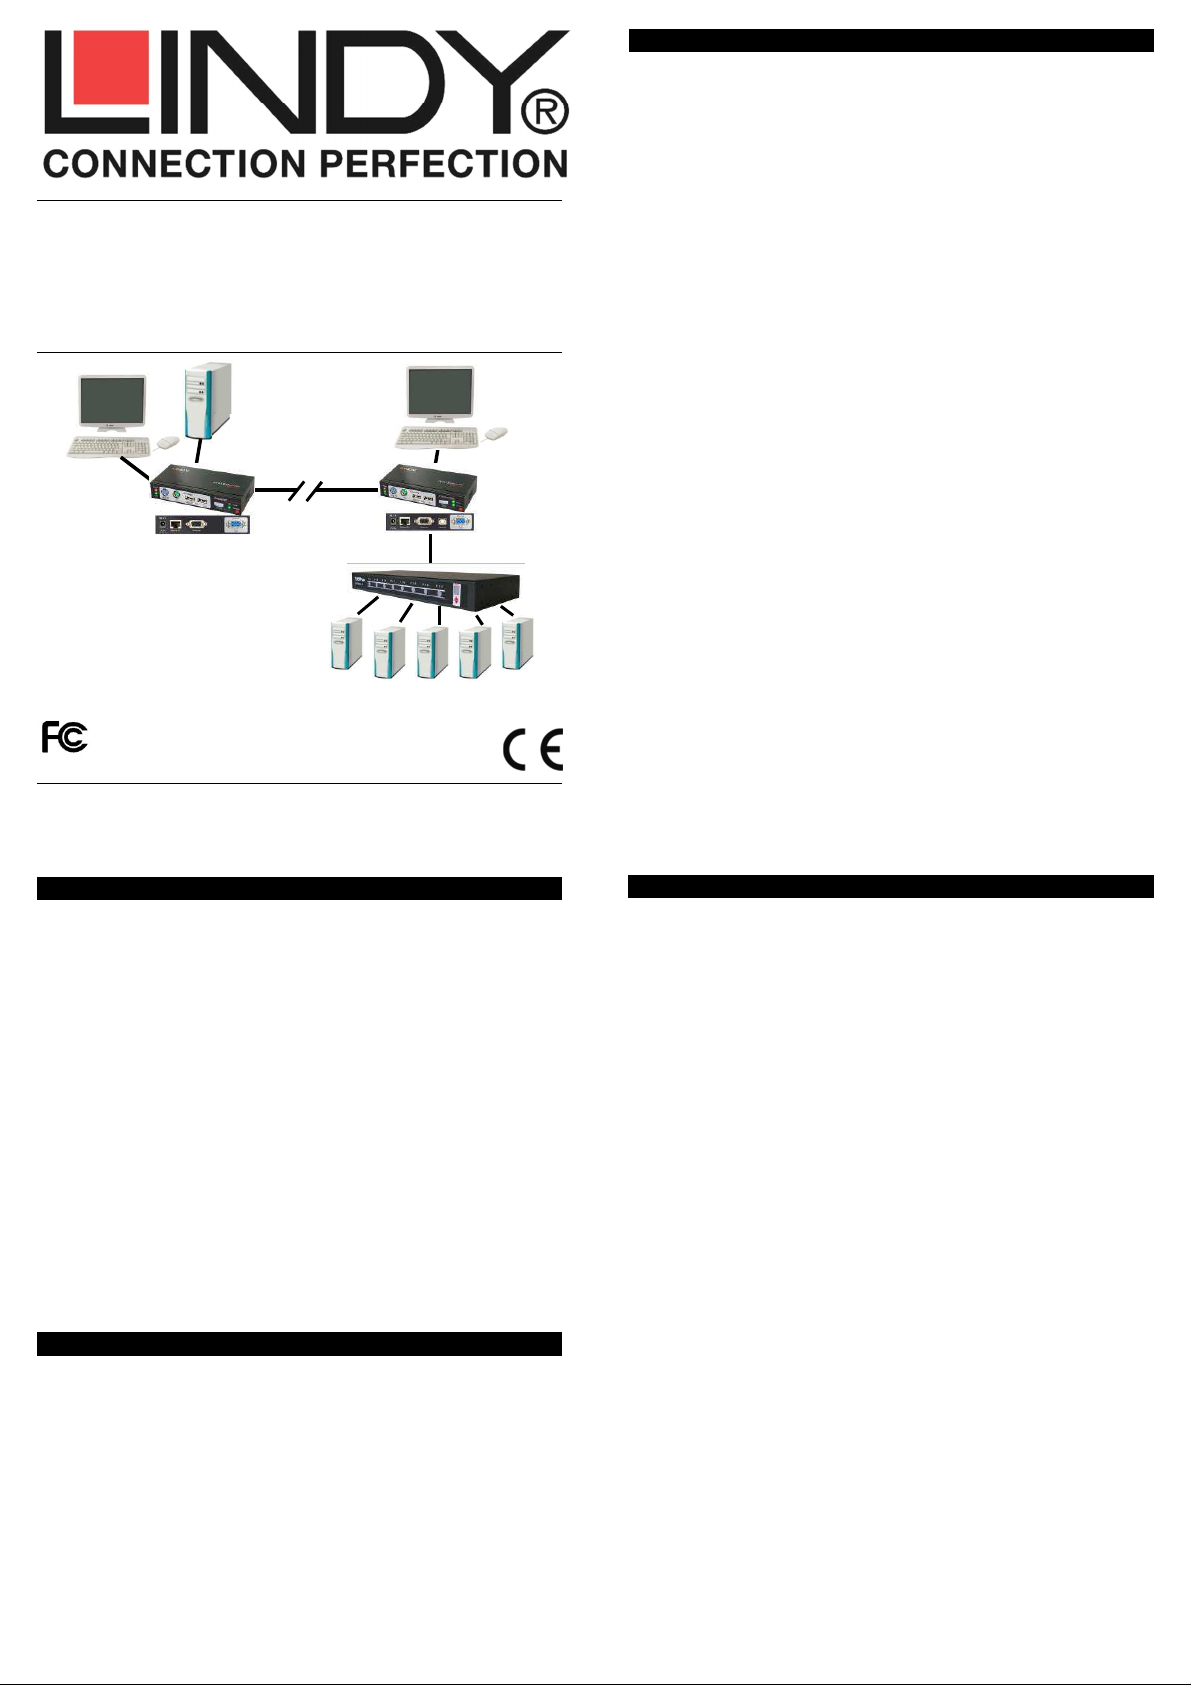
Remote
Operator’s PC
Up to 300m
Receiver
LINDY No. 39378
Tested to Comply with FCC Standards
For Home and Office Use!
© LINDY ELECTRONICS LIMITED & LINDY-ELEKTRONIK GMBH - FIRST EDITION (June 2013)
www.lindy.com
Local
Console
Transmitter
KVM Switch / or PC
Overview English
Thank you for purchasing the LINDY KVM Extender Combo 300. The
KVM Extender Combo 300 allows you to control your PC, server or KVM
switch from a keyboard, mouse and monitor at a resolution of 1920 x
1200 at distances of up to approximately 300 metres (900 feet) away
using low cost UTP CAT5 or higher cable.
The KVM Extender Combo 300 consists of a Transmitter (Local) unit and
a Receiver (Remote) unit. The Transmitter connects to a computer or
KVM switch. The Receiver unit is located at a remote location and
connects to a keyboard, monitor and mouse console offering a KVM
switch to switch between a local connected computer and the remote
system.
The KVM Extender Combo 300 converts the VGA, USB and PS/2 signals
into a signal that can be transmitted over inexpensive CAT5 Ethernet
cable. The extender accepts USB as well as PS/2 keyboard and mouse
signals in any combination and can also output it in any combination.
However, please note that for USB only HID devices like mice and
keyboards are supported. The extender only supports standard signals
for mice with up to 5 buttons as well as standard keyboard functions.
The VGA signal is separated into the RGB components and sent over
individual twisted pairs of the RJ45 cable. The extender features an OSD
adjustable electronic skew compensation and amplification circuit to
adjust the video quality to the connection cable to provide optimum video
quality.
The KVM Extender Combo 300 is ideal for network managers and
system administrators - a workstation can be connected to the Receiver
unit allowing the operator to work on his computer or remotely on the
KVM switch. Additionally, a local console can be connected to the
Transmitter unit for direct access to the KVM switch. Both local and
remote consoles can access the servers connected to the KVM switch
simultaneously, governed by a short timeout.
Features English
• Provides a real-time, convenient and password secure method of
remotely locating PCs or servers without compromising convenience
and control
• Distances of up to 300m supported between local and remote units
• Local Transmitter unit features a built-in KVM Switch - allowing local as
well as remote console access
• Remote Receiver unit features a built-in KVM Switch – allowing local
and remote access
• Supports USB as well as PS/2 standard keyboard and mouse signals
in any combination – for devices and for output to the systems
• High-resolution video support: typically 1920 x 1200 for up to 300m –
Use monitors with the same aspect ratio on local and remote console
• Adjustable OSD controlled VGA amplification and sharpness tuning
control as well as electronic RGB skew compensation to improve video
quality
• Easy, user-friendly installation - no software required
Packaging Contents English
• Local Transmitter unit
• Remote Receiver unit
• 5V DC Power Adapter (x2 – for both units, with multi country adapters
for EUR, UK, US and AUS/China)
• 2 x KVM combo cables 3-in-1 with additional USB to PS/2 adapter to
connect the local computer and the remote system to the
transmitter/receiver units
• 1x FW Upgrade cable USB A/B
• This manual
Installation and Use English
For connecting the local and remote units Category 5e/6 UTP cable
provides the best results. Using higher quality shielded STP/FTP cable
may result in a degraded video signal and shorter transmission
distances.
For distances up to 100m ready-made high quality LINDY Cat.6A or
Cat.6 S/FTP patch cables may be used.
See www.lindy.com for our range of appropriate cables.
Make sure all of your computers and peripherals are switched OFF
before proceeding with the installation.
Your monitor at the remote Receiver should at least support the
resolution as provided by the remote system.
Do NOT use a LAN/Ethernet connection. You must always use a
dedicated direct cable! Adding any additional connections inbetween like wall outlets etc. will result in reduced video quality!
1. Transmitter Unit
Connect the CAT5/5e/6 RJ45 cable to the RJ45 port. Connect the
Transmitter’s power supply. Then use the 3-in-1 KVM cable to connect to
the keyboard, video and mouse ports on the KVM switch or on the
PC/Server – Do NOT connect USB AND PS/2 at the same time! If you
want to connect via USB use the VGA and USB connector only! If you
want to connect via PS/2 use the supplied USB to PS/2 adapter for the
USB cable end on the 3-in-1 cable. Then connect your console
keyboard, mouse and monitor to the ports on the Transmitter unit
labelled Console. Switch everything on and check that the Transmitter
Unit is working correctly (before you install the Receiver Unit).
2. Receiver Unit
Connect the CAT5/5e/6 RJ45 cable to the RJ45 port. Connect the
Receiver’s power supply. Then connect your keyboard, mouse and
monitor to the Console ports. You may either use USB or PS/2 mouse
and keyboard. Use the supplied 3-in-1 KVM cable to connect to your
local computer – Pay close attention to the USB-PS/2 connectivity
remarks mentioned above! Connect your monitor and check that the
Receiver works correctly. Now switch the Receiver to use the remote
Cat.5 connection either by pressing the switch button or by typing in the
hotkey command SCROLL LOCK twice + left or right cursor key. Your
video image may be blurred in the beginning. It must now be tuned via
the OSD (On Screen Display) adjustment.
Video Image Adjustments
To adjust the display please use a test image with a white and black
background and sharp edged red, green and blue lines above each
other. Please download this test image (Skew_adjust.bmp) from the
LINDY 39378 website.
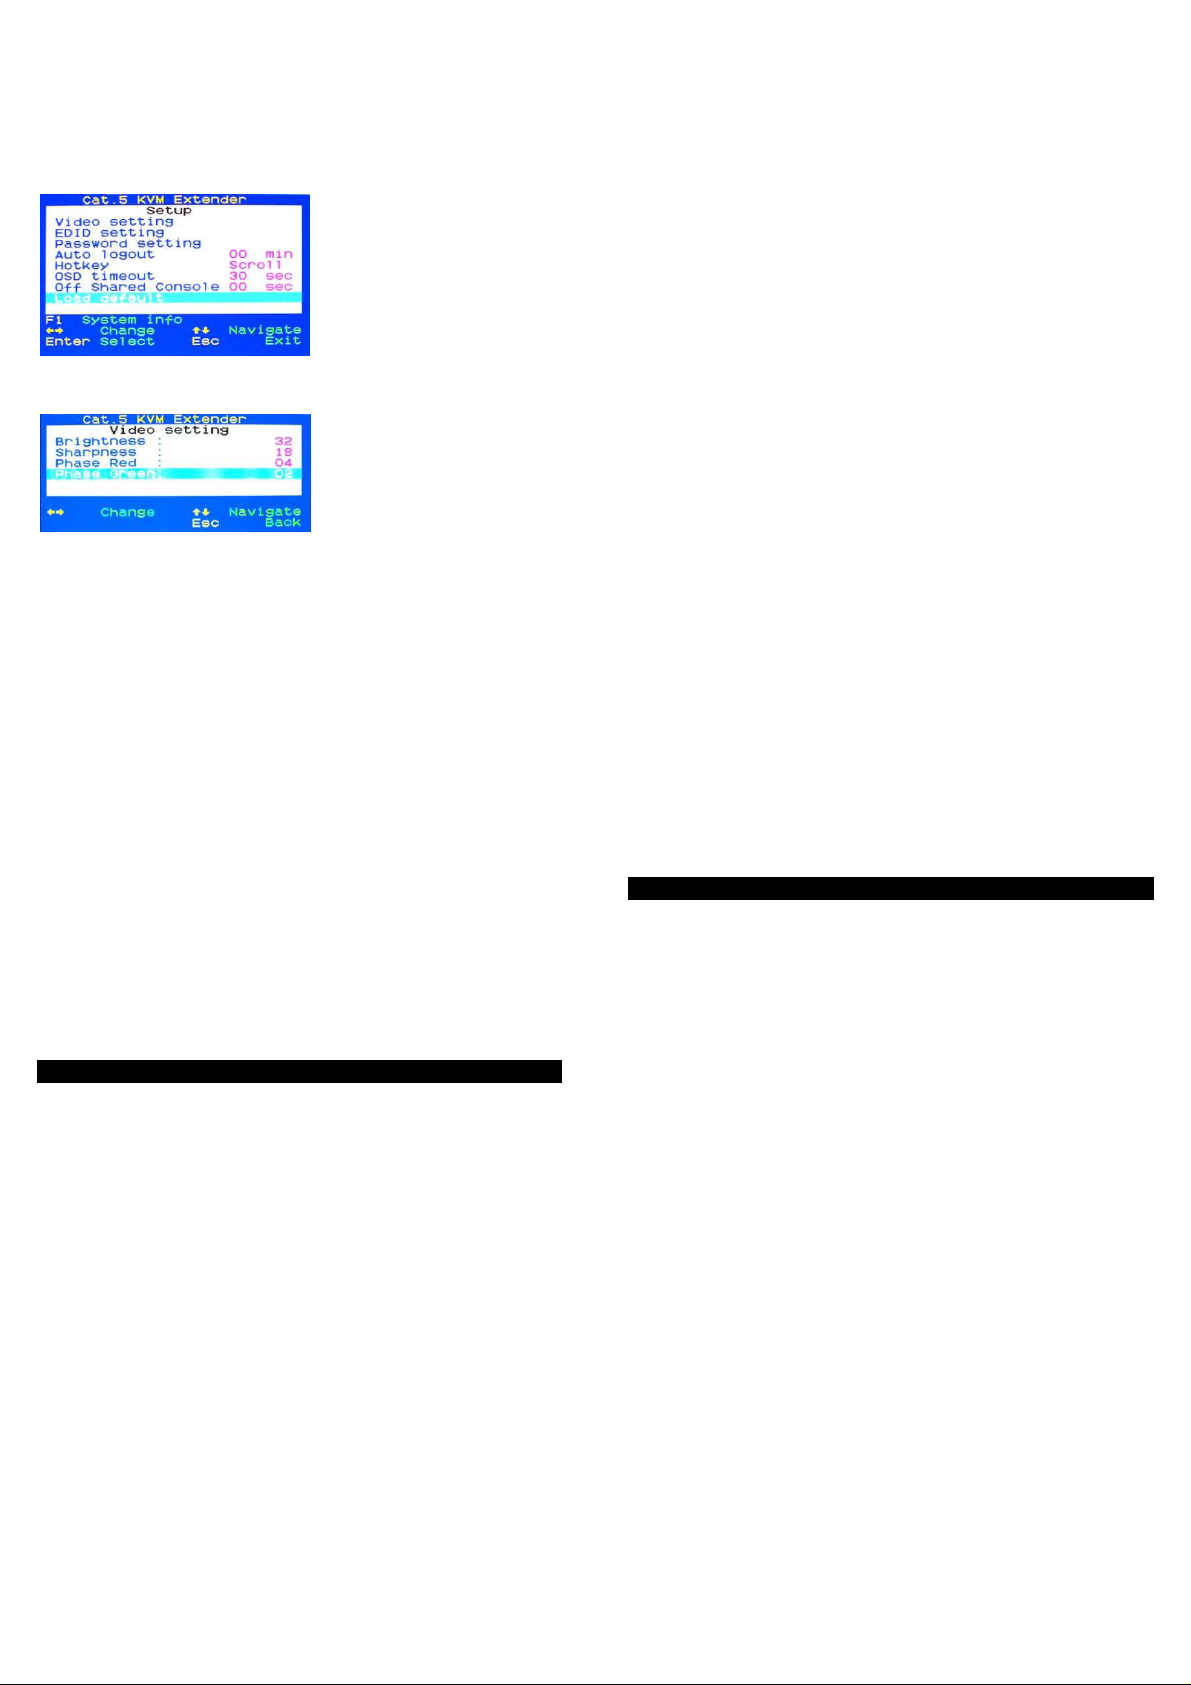
To enter the video adjustment OSD open the OSD by typing in the
hotkey command SCROLL + SCROLL + SPACE in sequence followed
after each other within less than 2 seconds.
Use the up/down cursor keys to
navigate.
Select the EDID setting
submenu and select the
command Read monitor if your
monitors are not yet identified.
They should be listed with their
correct names. You can use the
Load Default DDC command to
copy the factory default monitor DDC data to both the Transmitter and
Receiver Units.
Select the Video Setting
submenu and press ENTER.
The Video setting submenu
allows adjustment for
brightness, sharpness and skew
compensation (Phase red and
green). First adjust Phase red
and green so that you don’t have any coloured edges on the right or left
of any white and black fields or vertical lines or so that red and green
vertical lines are exactly in the same line with blue vertical lines on
the test picture. Then adjust brightness and sharpness using the
Windows desktop icon texts and also open text windows with text until
you are satisfied. You may have to go through the complete procedure
several times. Changes have to be stored when leaving the OSD!
If your extender does not show the remote screen at all but the LINK LED
on the RX is lit, go through the following process step by step: adjust the
sharpness to 60, then Phase red to 30, then green to 30, then green to 30, and then red to -30. When still no picture is shown the skew
adjustment probably cannot correct the cable and you need to use a
different and higher quality RJ45 cable!
Whenever you change the RJ45 cable you will need to repeat this
adjustment process.
Operation
When you access from the local console at the Transmitter Unit you
can operate your KVM switch using its regular keyboard hotkeys. You
now have one additional Extender hotkey to restrict access from the
extender’s remote console:
Remote Console ON/OFF Settings
SCROLL + SCROLL + [***] with *** = 1, 2, 3:
1: Full Access, no restrictions; 2: No remote access (receiver
completely blocked); 3: Video only, mouse and keyboard without
function.
When you use the remote console at the Receiver Unit you also have
additional hotkeys. To switch between your workstation and remote KVM
access use the switch button at the receiver or press:
HOTKEY + HOTKEY + left or right cursor key
The proceeding HOTKEY of the KVM Extender can be changed if it is in
conflict with any other hotkeys. The available hotkeys are: CAPS, NUM,
SCROLL, F12, R_CTRL and L_CTRL. To change the hotkey either
change it within the OSD menu or use the hotkey command HOTKEY +
HOTKEY + H + [new HOTKEY] - new one as above.
Password:
Disable/Enable the password protection feature. After you logout or the
Auto logout timeout has passed, the console gets locked and you will be
prompted for your password before you can access the console again.
If you set a password, please make sure to note it in a safe place where
you can find it in case you forget it.
Auto logout: [0 ~ 60]
Disable / Enable the logout timeout (0~60min, 0 = Disable).
The Auto logout time can be configured from 0 (Disable), with an
increment of 5, right up to 60 Min. If the password protection is not
enabled, the Auto logout will not be put into operation.
OSD Timeout: [0~60]
Configure the OSD timeout value (0~60 seconds, 0 = Disable). When this
time has passed the OSD will automatically be closed again.
EDID setting
Display and Read the DDC data of the attached monitors.
Load Default Setting: Load factory default settings.
Off Shared Console
Configure the Console Control timeout value (0~60 seconds). Both
extender consoles (local and remote) can have access to the connected
computer or KVM switch. Access from the other console is blocked for
this timeout value when one console is actively accessed.
Troubleshooting English
My monitor stays dark when I access the remote system/ KVM switch.
Make sure the remote system is switched on and not in energy save
mode. Make sure your monitors have approximately the same aspect
ratio, frame rate and resolution. The monitor at the user’s desk should at
least support the resolution as the local monitor on the KVM switch /
remote system. Please again carry out all adjustments as mentioned in
section Video Image Adjustments. Any further inquiry, please contact
your dealer or LINDY technical support team.
My monitor picture is blurred or low quality.
Please follow video quality adjustment steps as described in section
Video Image Adjustments. The video quality has to be re-adjusted
whenever anything is changed for the Cat.5 connection cable.
My KVM switch and the extender use the same hotkeys. How can I
change hotkeys?
Please refer to section OSD Operation to find the available hotkeys and
how to change them.
My mouse (or keyboard) doesn’t work
Please connect either PS/2 or USB connectors from the 3in1 system
cable to your local workstation as well as remote system/KVM Switch. Do
NOT connect both USB and PS/2! (See installation section above).
Receiver console: Check the remote access settings: Open OSD > F1
System Information > Access Mode > FULL. Adjust this as described in
section Operation.
Should you have any further problems please contact the LINDY Support
team – worldwide contact information at www.lindy.com
Einführung Deutsch
Dieser KVM-Extender erlaubt Ihnen Monitor-, Maus- und Tastatursignale
zu Ihrem entfernten KVM-Switch oder Rechner über günstiges Cat.5
Netzwerkkabel über eine Entfernung bis zu 300m zu senden. Erhöhte
VGA Auflösungen bis 1920x1200 unterstützt er bis etwa 300m bei relativ
hoher Bildqualität.
Der KVM Extender Combo 300 besteht aus einem Transmitter und
einem Receiver. Der Transmitter wird am fernzubedienenden Rechner
oder KVM Switch angeschlossen und stellt dort sowohl Anschlüsse für
eine lokale Konsole für Wartungsarbeiten wie auch für den remote
Anschluss (RJ45) zur Verfügung. Der Receiver befindet sich beim User
und bietet zusätzlich eine Anschluss- und Umschaltmöglichkeit für einen
Arbeitsplatzrechner.
Die beiden Extendereinheiten werden mit preiswertem Netzwerkkabel
Cat.5 UTP oder höher verbunden. Bis 100m können auch hochwertige
LINDY Cat.6 Patchkabel verwendet werden. Beide Konsolen können
simultan arbeiten, der aktive Zugriff ist über einen kurzen Time-out
geteilt.
Der KVM Extender Combo 300 wandelt VGA-, USB- und PS/2-Signale
und sendet sie über günstiges Netzwerkkabel. Er unterstützt sowohl
USB- wie auch PS/2-Maus- und -Tastatursignale sowohl für die
angeschlossenen Geräte wie auch für den Anschluss an die Rechner
bzw. den KVM-Switch, in jeder Kombination. Es ist lediglich zu beachten,
dass der Rechneranschluss entweder über USB ODER PS/2 erfolgt! Es
werden ausschließlich Standardfunktionen von Mäusen mit bis zu 5
Tasten und Standardtastaturen unterstützt und bei Bedarf in das jeweils
andere USB- oder PS/2-Protokoll gewandelt.
Die USB Anschlüsse unterstützen lediglich Maus und Tastatur (HID)!
Das VGA-Signal wird in den Komponenten RGB über jeweils eins der
verdrillten Adernpaare im Cat.5/6 Kabel gesendet. Da diese meist
unterschiedlich lang sind kommen die RGB-Komponenten zu
unterschiedlichen Zeiten an. Zur Kompensation dieses Effektes und zur
Optimierung der Bildqualität verfügt der Extender über einen elektronisch
regelbaren Skew-Kompensator und eine Signalverstärkung.
Eigenschaften Deutsch
• Erlaubt den bequemen komfortablen Real Time Remote Zugriff auf
PCs, Server und KVM-Switches aus Distanzen bis 300m
• Unterstützt am KVM-Switch bzw. am abgesetzten Rechner eine
lokale Konsole für (Wartungs-)Arbeiten
• Unterstützt am Büroarbeitsplatz das Umschalten zwischen einem
Arbeitsplatzrechner und dem Remote KVM-Fernzugriff
• Unterstützt sowohl USB- wie auch PS/2-Tastaturen und -Mäuse in
jeder Kombination und wandelt auch zwischen den Protokollen
• Dual Console Betrieb: Zugriff sowohl lokal als auch remote mit
kurzem Timeout
• Passwortschutz ein-/ausschaltbar
• Unterstützt hohe VGA Auflösungen, z.B.: 1920x1200 bis 300m –
Verwenden Sie bitte Monitore mit etwa gleichem Seitenverhältnis
• Einstellbare VGA Bildqualität durch Laufzeitkompensation der RGB
Komponenten sowie Verstärkung und Fokussierung
• Einfach zu bedienen und zu installieren - keine Softwareinstallation
• LINDY gewährt für dieses Produkt über die gesetzliche Regelung
hinaus eine zweijährige Herstellergarantie ab Kaufdatum. Die
detaillierten Bedingungen dieser Garantie finden Sie auf der LINDY
Website aufgelistet bei den AGBs.
Lieferumfang Deutsch
• Local Transmitter Unit
• Remote Receiver Unit
• 2x Netzteil 5V DC, ~1A, 100…240VAC mit Wechselsteckern für
EURO,US, UK, AUS/China
• 2x KVM 3-in1 Kabel und 2x USB-PS/2-Adapter zum Anschluss der
Rechner / des KVM Switch
• 1x FW Upgrade Kabel USB A/B
• Diese Anleitung
Installation und Betrieb Deutsch
Verwenden Sie ab 100m zur Verbindung von Transmitter und Receiver
UTP Installationskabel der Kategorie 5e/6 mit starren Adern (Solid Core)
um größte Distanzen und beste Bildqualität zu erreichen. Die
Verwendung abgeschirmter STP/FTP Kabel führt in der Regel zu
Nachteilen. Bis 100m können Sie auch hochwertige LINDY Patchkabel
Cat.6 verwenden.
Der Monitor an Ihrem Arbeitsplatz sollte zumindest die Auflösung des
lokalen Monitors am ferngesteuerten System haben, die gleiche
Bildwiederholrate unterstützen und das gleiche Seitenverhältnis haben.
Verwenden Sie KEINE LAN/Netzwerkverbindung sondern eine
direkte Kabelverbindung ohne zwischengeschaltete LAN Switches!
1. Transmitter Unit – Installation am KVM-Switch
Schließen Sie zuerst das Cat.5e/6 Verbindungskabel an die RJ45
Buchse an und das Netzteil an die Stromversorgung.
Verwenden Sie dann zum Anschluss Ihres ferngesteuerten Rechner oder
KVM-Switch das beiliegende 3in1 Kombikabel. Schließen Sie
ENTWEDER den USB- oder den PS/2-Anschluss am Rechner an!
Wenn Sie sich für die PS/2-Anschlüsse entscheiden verwenden Sie
den mitgelieferten USB auf PS/2-Adapter am USB-Kabelende des
3in1-Kabels! Schließen Sie danach die lokale Konsole (Tastatur, Maus
und Monitor) an die CONSOLE gelabelten Ports am Transmitter an und
stellen Sie sicher, dass alles funktioniert.
2. Receiver Unit – Installation am Büroarbeitsplatz
Schließen Sie das Cat.5e/6 Verbindungskabel an die RJ45 Buchse an.
Schließen Sie das Netzteil am Extender an. Schließen Sie dann Tastatur,
Maus und Monitor ihres Arbeitsplatzes direkt an die CONSOLE
gelabelten Ports am Receiver an. Sie können sowohl PS/2- als auch
USB-Maus & -Tastatur verwenden, auch gemischt. Schließen Sie mit
dem beiliegenden 3in1 KVM-Kabel Ihren Arbeitsplatzrechner an (Hinweis
s.o.). Prüfen Sie bitte ob Ihre Konsole wie gewollt am Arbeitsplatzrechner
funktioniert. Mit dem Tastatur-Hotkey-Kommando ROLLEN + ROLLEN +
Cursor/Pfeiltaste rechts oder links oder mit der Taste am Receiver
schalten zwischen Arbeitsplatzrechner und fernbedientem System um.
Einstellung des Monitorbildes am Receiver
Über das On-Screen-Display des Receivers muss nun die Bildqualität an
die Kabelverbindung angepasst und optimiert werden. Verwenden Sie
dazu bitte das Testbild Skew_Adjust.bmp (Download von der LINDY
39378 Webseite).
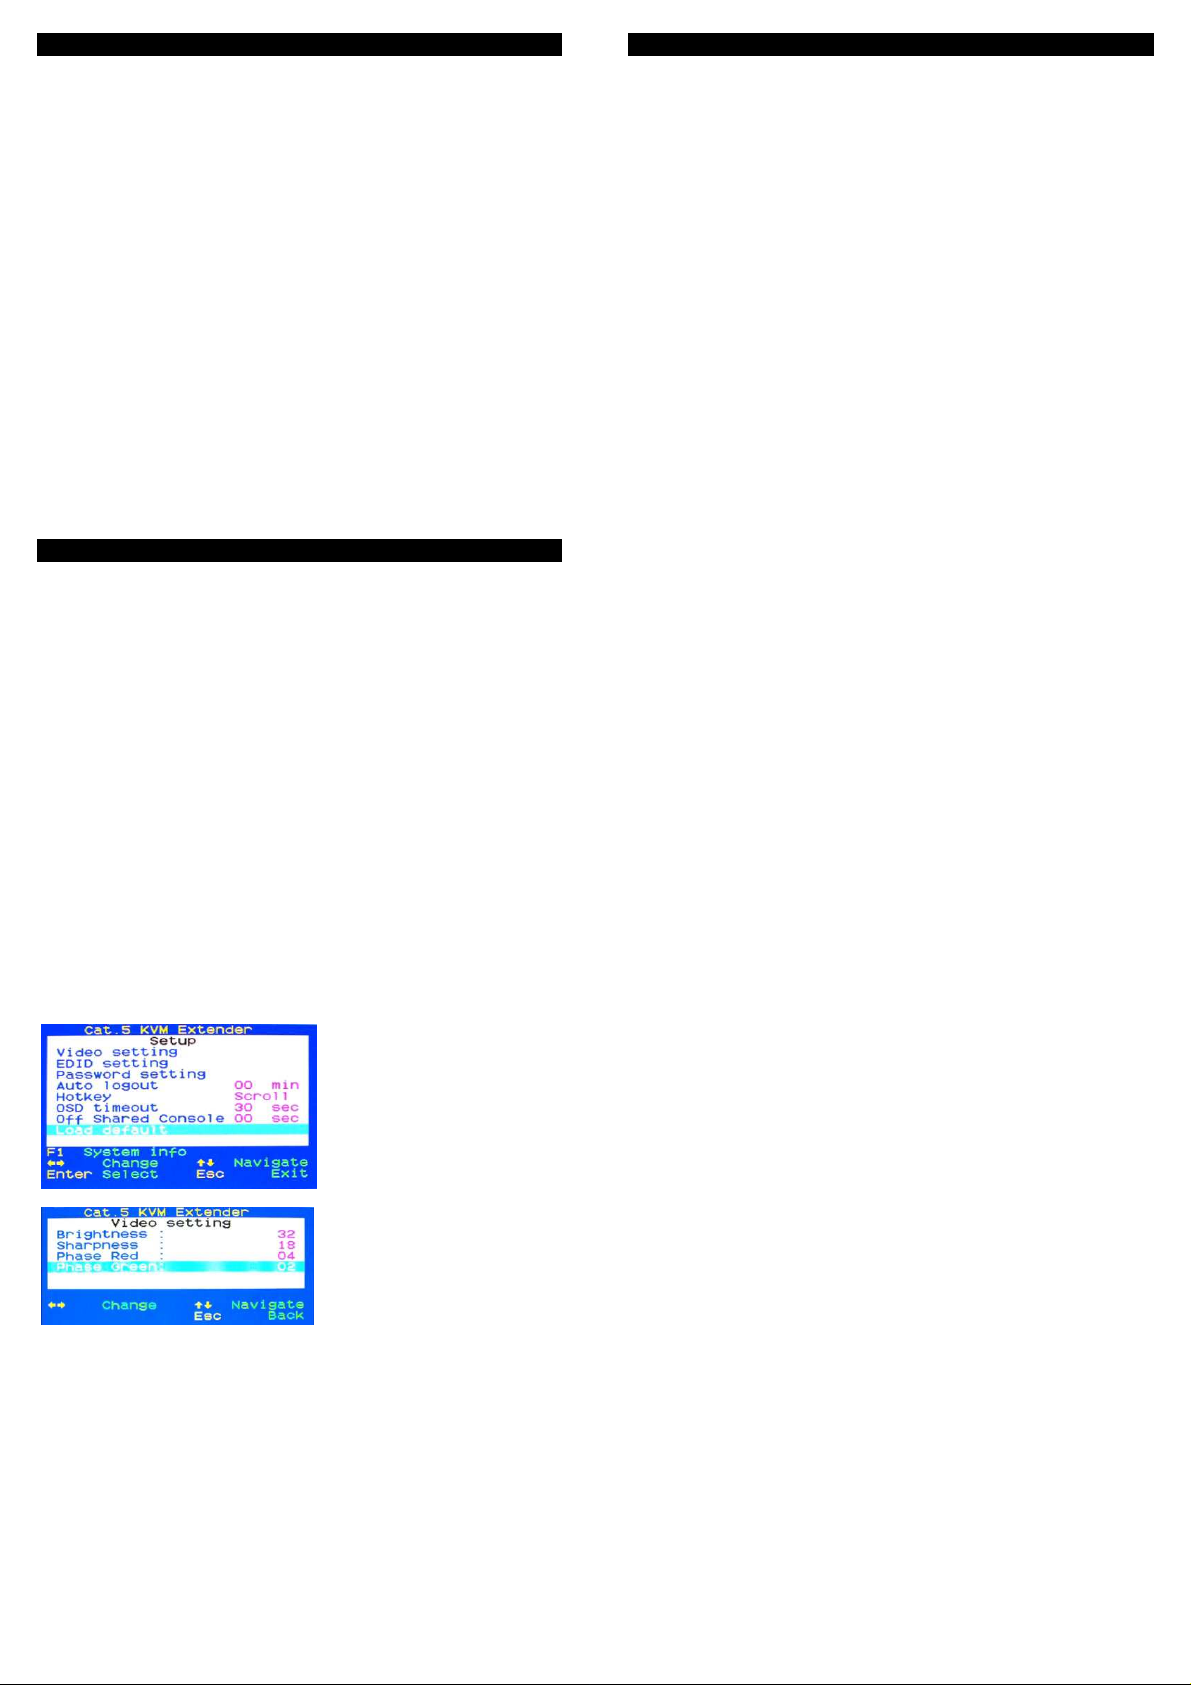
Öffnen Sie das OSD des Receivers durch Eingabe des Tastaturhotkeys
ROLLEN + ROLLEN + Leertaste (Eingaben kurz nacheinander).
Verwenden Sie die CursorTasten um im OSD zu
navigieren. Wählen Sie EDID
settings und dort Read
monitor. Danach sollten Ihre
korrekten Monitormodelle
sowohl am Receiver wie auch
am Transmitter angezeigt
werden.
Wählen Sie nun Video
Settings. Dieses Untermenü
erlaubt die Einstellung von
Helligkeit (Brightness), Schärfe
(Sharpness) und Laufzeitkompensation (Phase red / green).
Stellen Sie Phase red / green
so ein, dass im Testbild die
roten bzw. grünen Striche exakt in einer vertikalen Linie mit den blauen
Strichen übereinander stehen.
Öffnen Sie zusätzlich ein Text- und Ordnerfenster und stellen Sie
Brightness und Sharpness so ein, dass Text und Grafikelemente optimal
zu erkennen sind. Eventuell müssen Sie den gesamte Vorgang mehrfach
wiederholen um die beste Einstellung zu finden.
Sollte kein Remote-Bild angezeigt werden aber die LINK LED am
Receiver leuchten, nehmen Sie bitte Schritt für Schritt die folgenden
Einstellungen vor: Regeln Sie Sharpness auf 60, dann Phase Red auf
30, dann Phase green auf 30, dann green auf -30 und schließlich red auf
-30. Wenn bei keiner dieser Einstellungen ein Bild erscheint so benötigen
Sie vermutlich ein anderes höherwertiges Verbindungskabel.
Änderungen müssen beim Verlassen des OSD gespeichert werden!
Die Bildoptimierung muss jedes Mal wiederholt werden wenn
irgendetwas am Verbindungskabel geändert wird!
Betrieb, OSD Einstellungen und Optionen
Von der Konsole am Transmitter können Sie genau wie auch vor der
Installation des Extenders auf den Rechner oder KVM Switch zugreifen.
Ihnen steht ein zusätzlicher Hotkey zur Zugriffssteuerung zur Verfügung:
Remote Console ON/OFF Settings
Vom Transmitter aus kann der Remote-Zugriff ganz oder teilweise
mit folgendem Hotkey blockiert werden.
ROLLEN + ROLLEN + [***] wobei [***] = 1, 2, 3 sein darf:
1: Full Access, keine Einschränkungen; 2: Kein Remote Zugriff
(komplett blockiert); 3: Nur Bild – Maus & Tastatur ohne Funktion.
Vom entfernten Arbeitsplatz aus – am Receiver - verfügen Sie ebenfalls
über zusätzliche Hotkeys. Zum Umschalten auf den Arbeitsplatzrechner
drücken Sie die Taste am Receiver oder den Hotkey:
HOTKEY + HOTKEY + Cursor/Pfeiltaste rechts oder links.
Der einführende HOTKEY ist konfigurierbar und kann bei Bedarf
geändert werden, z.B. wenn er mit anderen Hotkeys des KVM Switches
kollidiert. Verfügbare Hotkeys sind: ROLLEN (SCROLL), CAPS
(Großschreib-Feststelltaste), NUM, F12, R_CTRL (rechte Strg) und
L_CTRL (linke Strg). Um den Hotkey zu ändern gehen Sie entweder über
das OSD Menü oder geben Sie HOTKEY + HOTKEY + H + [neuer
HOTKEY] ein, wobei HOTKEY der alte und [neuer Hotkey] der neue
Hotkey sind.
Password
Ein- oder Ausschalten des Passwortschutzes. Wenn eingeschaltet
fordert der Extender nach Ausloggen bei der nächsten Eingabe zur
Eingabe des Passwortes auf. Notieren Sie ihr Passwort an einem
sicheren Ort wo Sie es ggf. wiederfinden.
Autologout: [0~60]
Ausschalten oder setzen der Zeitspanne des automatischen
zeitgesteuerten Logout 5…60 Minuten, in 5 Minutenschritten, 0 schaltet
den zeitgesteuerten Logout ganz aus.
OSD Timeout: [0~60]
Zeitspanne des zeitgesteuerten Ausblenden des OSD Fensters, 5…60
Sekunden, in 5 Sekundenschritten, 0 schaltet das Ausblenden aus.
EDID setting
Lesen und Anzeigen der EDID-/DDC-Daten der Monitore.
 Loading...