

Page 1

Tested to Comply with
FCC Standards
For Home and Office Use!
100m C6 HDMI 2.0 18G HDBaseT Extender
User Manual English
Benutzerhandbuch Deutsch
Manuel Utilisateur Français
Manuale Italiano
No. 38219
lindy.com
© LINDY GROUP – FIRST EDITION (OCTOBER 2017)
Page 2

!!! IMPORTANT !!!
Only use a direct Cat.5e/6/7 cable connection between the
HDBaseT ports. Do not connect these ports to Network or
Ethernet equipment or any active components
!!!! WICHTIG !!!!
Verwenden Sie AUSSCHLIEßLICH eine direkte
Kabelverbindung zwischen den HDBaseT Anschlüssen
aber NIEMALS eine Netzwerkverbindung oder Ethernet
oder irgendwelche aktiven Komponenten
!!! ATTENTION !!!
N'utilisez qu'une connexion par câble Ethernet directe
entre les ports, sans passer par le réseau Ethernet, un
commutateur ou un quelconque périphérique connecté à
votre réseau !
!!! IMPORTANTE !!!
UTILIZZATE UN CAVO DEDICATO PER LA CONNESSIONE
TRA LE DUE UNITA', NON COLLEGATELO AD UNA RETE
ETHERNET O AD ALTRI COMPONENTI ATTIVI
Page 3

User Manual English
Introduction
Thank you for purchasing the Lindy C6 HDMI 2.0 18G HDBaseT Extender. This product has been
designed to provide trouble free, reliable operation. It benefits from both a LINDY 2 year warranty and
free lifetime technical support. To ensure correct use, please read this manual carefully and retain it for
future reference.
The C6 Lindy HDMI 2.0 18G HDBaseT Extender is a cost effective, high performance solution for
sending HDMI 2.0 signals over long distances, helping break the distance barrier for HDMI 2.0. Using a
single low cost Cat.6 cable to make the long distance connection, the HDMI Extender provides full
support for Ultra HD 4K 60Hz resolutions, including support for HDR10 (High Dynamic Range) and
HDCP 2.2, ensuring it meets the demands of contemporary AV installations. Support for the full range of
HDMI 2.0 defined resolutions, which need up to 18Gbps of bandwidth, requires the Extender to use a
visually lossless compression, latency free technology, to enable the extension of signals via HDBaseT
Technology.
For added convenience and to enable discreet installation of the Receiver unit the Extender supports
PoC (Power over Cat.6) allowing a single power supply to be used with either the Transmitter or
Receiver to power both units.
Please Note: The quoted lengths and resolutions are possible with a direct connection between
Transmitter and Receiver using good quality Cat.6 solid core cable. Using a different cable type, or
introducing wall plates, couplers or patch panels will result in a reduction of possible distances.
Package Contents
HDMI 2.0 18G Transmitter
HDMI 2.0 18G Receiver
2 x IR Emitter Cables
2 x IR Receiver Cables
Specification
2 x Phoenix Block for RS232
Mounting Kit
24VDC 1A Power Adapter (EU, UK, US, AUS)
This manual
HDMI 2.0b 18Gbps compliant
Extends HDMI 2.0b, 10/100 Ethernet, RS232 & Bi-directional IR
Using solid core Cat.6 U/UTP or F/UTP cable supports resolutions up to:
100m 1080p60 (4:4:4 12bit) / 3D 1080p30 (4:4:4 12bit)
70m 4K 2160p60 (4:4:4 8bpc) / 1080p120 (4:4:4 8bit) / 1080p60 (4:4:4 16bit)
Compatible with HDR10
Support for HDCP 2.2/1.4, CEC and Lip Sync pass-through
PoC (Power over Cat.6) requires only a single 24V 1A PSU to be attached
Screw Type 5.5/2.1mm (Outer/inner) DC Socket
Audio Pass-through of all HDMI audio formats including Dolby Atmos and DTS:X
Bi-directional control of IR (30-60kHz) equipment via the extender
Maximum HDMI Cable length: Up to 4K 30Hz: 5m in/out, 4K 60Hz: 2m in/out
ESD Protection: ± 8kV (air-gap discharge)
Human Body Model: ± 4kV (contact discharge)
Operating Temperature: 0°C - 40°C (32°F - 104°F)
Storage Temperature: -20°C - 60°C (-4°F - 140°F)
Relative Humidity: 20 - 90% RH (Non-condensing)
Metal Housing with mounting kit
Dimensions (WxDxH): 157x90x20mm (6.18x3.54x0.79in) each unit
Weight: 0.333kg (0.73lb) each unit
HDBaseT™ and the HDBaseT Alliance logo are trademarks of the HDBaseT Alliance.
Page 4
User Manual English
Overview
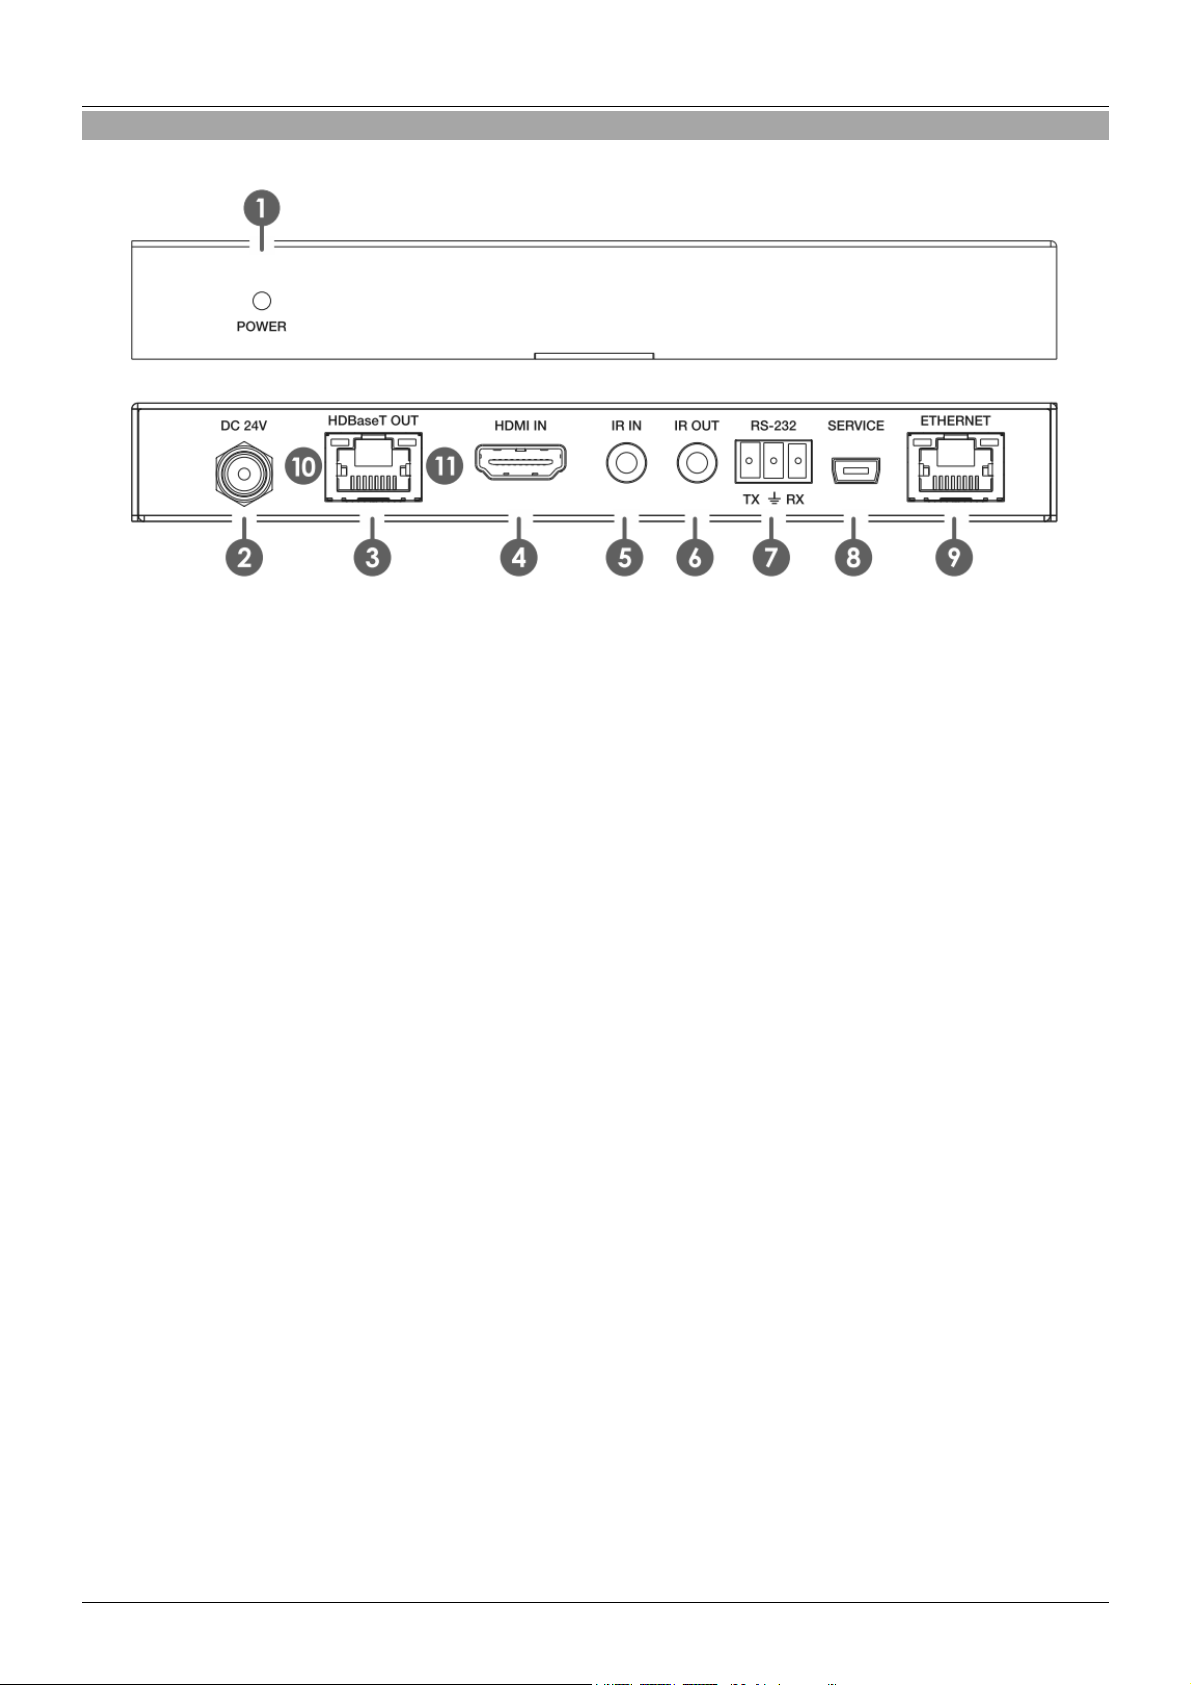
Transmitter – Front & Back Panels
1. POWER: Illuminates when the unit is powered
2. DC 24V: Plug the supplied 24V DC power supply into the unit
3. HDBaseT OUT: Connect to the HDBaseT IN port on the Receiver unit with a single Cat.6/7 cable for
transmission of all data signals – never connect to a network port
4. HDMI IN: Connect to an HDMI source device using an HDMI cable
5. IR IN: Connect the supplied IR Extender cable for IR signal reception. Ensure that remote being
used is within the direct line-of-sight of the IR Extender
6. IR OUT: Connect the supplied IR Blaster Cable for IR signal transmission. Place the IR Blaster in
direct line-of-sight of the equipment to be controlled
7. RS-232: Connect to a PC, Serial Controller or Serial device via phoenix block 3 way connection for
the transmission of RS-232 commands
8. SERVICE: Reserved for future use
9. ETHERNET: Connect to an internet or network connection – never connect to an HDBaseT port
Page 5

User Manual English
Receiver – Front & Back Panels
1. POWER: Illuminates when the unit is powered
2. DC 24V: Plug the supplied 24V DC power supply into the unit (if not connected to the Transmitter)
3. HDBaseT IN: Connect to the HDBaseT OUT port on the Transmitter unit with a single Cat.6/7 cable
for transmission of all data signals – never connect to a network port
4. HDMI OUT: Connect to an HDMI display using an HDMI cable
5. IR IN: Connect the supplied IR Extender cable for IR signal reception. Ensure that remote being
used is within the direct line-of-sight of the IR Extender
6. IR OUT: Connect the supplied IR Blaster Cable for IR signal transmission. Place the IR Blaster in
direct line-of-sight of the equipment to be controlled
7. RS-232: Connect to a PC, Serial Controller or Serial device via phoenix block 3 way connection for
the transmission of RS-232 commands
8. SERVICE: Reserved for future use
9. ETHERNET: Connect to an internet or network connection – never connect to an HDBaseT port
IR Receiver IR Emitter
Page 6

User Manual English
Installation
Important! Before starting the installation, please ensure that all devices are powered off.
Please Note: The maximum HDMI cable length which can be used in/out is 5m with resolutions up to 4K
30Hz, or 2m with 4K resolutions with 60Hz refresh rate.
1. Connect your HDMI equipped source device to the Transmitter unit using a good quality HDMI cable.
2. Connect one end of the Cat.6/7 cable (max. length 100m @ 1920x1080p or 70m @ 3840x2160p) to
the HDBaseT OUT port on the Transmitter and the other end to the HDBaseT IN port of the
Receiver. U/UTP or F/UTP solid core installation cable is recommended.
3. Use another HDMI cable to connect your HDMI display device to the HDMI output port on the
Receiver unit.
4. Plug the DC power supply into the Transmitter or Receiver and switch on.
5. Power on your source device and display to complete the installation.
In addition to the basic installation steps outlined above the HDMI 2.0 18G Extender can also provide the
following additional/optional functionality:
10/100 Ethernet
The Transmitter and Receiver units both feature a single RJ45 port for the connection of network
equipment such as a Router, Network Switch, IP Camera, Wireless Access Point or Smart TV.
RS-232 Serial
The Transmitter and Receiver both feature a phoenix block Serial connection for the extension of control
signals.
Infrared Control
The Transmitter and Receiver units both feature an IR In and Out port, with two pairs of IR extension
cables provided. The extension cables allow an IR remote control to be used from the Transmitter to the
Receiver or vice versa.
Troubleshooting
There is no display on the screen.
It has been found that there are significant differences in the cable lengths/types and even input
ports which can be used on different brands of HDTV using HDMI 2.0 4K 60Hz. If you experience
problems, please use the following steps:
Try a different input port on your HDTV.
Reduce the cable length on the Input and Output to 1m.
Try a different type of 1m HDMI Cable.
Check that the DC plug and jack used by the external power supply is firmly connected and that the
power LED is illuminated on both the Transmitter and Receiver.
Check that the Cat.6/7 cable is plugged in correctly and that the Green Link Status LED on the left
side of both the HDBaseT In and Out ports are lit.
Check that the Yellow Sync Status LED on the right side of the HDBaseT In and Out ports are
flashing, if not please power cycle the source and display.
For several HDMI devices it may be helpful to unplug and replug their HDMI connection to re-initiate
the HDMI handshake and recognition.
Power off all the devices, then power on in this order: first, the extender, then the display and finally
the source.
Reduce the length of Cat.6/7 or HDMI cable used, or use a higher quality cable.
Page 7

Benutzerhandbuch Deutsch
Einführung
Wir freuen uns, dass Ihre Wahl auf ein Lindy-Produkt gefallen ist und danken Ihnen für Ihr Vertrauen. Sie
können sich jederzeit auf unsere Produkte und einen guten Service verlassen. Dieser Lindy C6 HDMI
2.0 18G HDBaseT Extender unterliegt einer 2-Jahres Lindy Herstellergarantie und lebenslangem
kostenlosen technischen Support. Bitte lesen Sie diese Anleitung sorgfältig und bewahren Sie sie auf.
Der Lindy C6 HDMI 2.0 18G HDBaseT Extender ist eine kosteneffiziente Lösung um HDMI 2.0 Signale
über große Distanzen zu übertragen. Um dem Anspruch von professionellen AV Installationen gerecht
zu werden, unterstützt der Extender Auflösungen bis zu 4K 60Hz, inklusive HDR10 (High Dynamic
Range) und HDCP 2.2. Sie benötigen hierfür ein Cat.6 Kabel. Um die von HDMI 2.0 vorgegebenen
Auflösungen bei einer Bandbreite von 18Gbit/s zu erreichen, nutzt der Extender verlust- sowie
latenzfreie Komprimierungstechnologien.
Für zusätzlichen Komfort und um eine dezente Installation des Receivers zu realisieren sorgt PoC
(Power over Cat.6). PoC ermöglicht Ihnen den Betrieb beider Geräte (Transmitter und Receiver) mit dem
Anschluss des Netzteils an nur einem der beiden Geräte. Die Stromversorgung erfolgt hierbei über das
Cat.6 Kabel.
Bitte beachten Sie: Die angegebenen Längen und Auflösungen basieren auf einer direkten Verbindung
zwischen Transmitter und Receiver unter der Verwendung eines hochwertigen Cat.6 Kabels (starre
Adern). Falls Sie andere Kabeltypen, Wanddosen, Kupplungen oder Patch Panel hinzuziehen, kann dies
zur Verringerung dieser Werte führen.
Lieferumfang
HDMI 2.0 18G Transmitter
HDMI 2.0 18G Receiver
2 x IR Empfängerkabel
2 x IR Senderkabel
Eigenschaften
2 x Phoenix Block (RS232)
Montage Kit
24VDC 1A Netzteil (EU, UK, US, AUS)
Dieses Handbuch
Kompatibel zu HDMI 2.0b 18Gbit/s
Überträgt HDMI 2.0b, 10/100 Ethernet, RS232 & bidirektionale IR-Signale
Unterstützt folgende Auflösungen unter Verwendung von Cat.6 U/UTP oder F/UTP Kabeln:
100m 1080p60 (4:4:4 12bit) / 3D 1080p30 (4:4:4 12bit)
70m 4K 2160p60 (4:4:4 8bpc) / 1080p120 (4:4:4 8bit) / 1080p60 (4:4:4 16bit)
Kompatibel zu HDR10
Unterstützt HDCP 2.2/1.4, CEC und “Lip Sync pass-through”
Unterstützt PoC (Power over Cat.6) – es wird nur ein 24V 1A Netzteil benötigt um beide Geräte mit
Strom zu versorgen
5.5/2.1mm DC Buchse
Audio Pass-through für alle HDMI Audioformate - inklusive Dolby Atmos und DTS:X
Bidirektionale Kontrolle von IR (30-60kHz) Zubehör
Maximale HDMI Kabellänge: 4K 30Hz: 5m Eingang/Ausgang, 4K 60Hz: 2m Eingang/Ausgang
ESD Schutz: ± 8kV (air-gap discharge)
Human Body Model: ± 4kV (contact discharge)
Betriebstemperatur: 0°C - 40°C (32°F - 104°F)
Lagertemperatur: -20°C - 60°C (-4°F - 140°F)
Feuchtigkeit: 20 - 90% RH (nicht-kondensierend)
Metallgehäuse inklusive Montagezubehör
Abmessungen (WxDxH): 157x90x20mm (6.18x3.54x0.79in) je Einheit
Gewicht: 0,333kg (0.73lb) je Eineit
HDBaseT™ and the HDBaseT Alliance logo are trademarks of the HDBaseT Alliance.
Page 8

Benutzerhandbuch Deutsch
Übersicht
Transmitter – Vorder- und Rückseite
1. POWER: Leuchtet, wenn das Gerät eingeschaltet ist
2. DC 24V: Buchse um das mitgelieferte Netzteil mit dem Gerät zu verbinden
3. HDBaseT OUT: Dieser Port dient zur Verbindung mit dem Receiver (Cat.6/7 Kabel)
4. HDMI IN: Dient zur Verbindung von HDMI Quellgeräten (HDMI Kabel)
5. IR IN: Dient zur Verbindung des mitgelieferten IR Empfängerkabels für den Empfang von IR
Signalen. Bitte stellen Sie sicher, dass freie Sicht zum angeschlossenen Sensor besteht.
6. IR OUT: Dient zur Verbindung des mitgelieferten IR Senderkabels für die Übertragung von IR
Signalen. Platzieren Sie den Sensor so, dass auch hier freie Sicht zum entsprechenden, zu
kontrollierenden Zubehör besteht.
7. RS-232: Dient zur Verbindung eines PCs, seriellen Kontrollers oder eines anderen seriellen Gerätes.
8. SERVICE: Reserviert für die zukünftige Nutzung
9. ETHERNET: Dient zur Verbindung mit dem Internet oder eines Netzwerks – bitte vermeiden Sie es,
diesen Port mit einem HDBaseT Port zu verbinden.
HDBaseT™ and the HDBaseT Alliance logo are trademarks of the HDBaseT Alliance.
Page 9

Benutzerhandbuch Deutsch
Receiver – Vorder- und Rückseite
1. POWER: Leuchtet, wenn das Gerät eingeschaltet ist
2. DC 24V: Buchse um das mitgelieferte Netzteil mit dem Gerät zu verbinden (falls das Netzteil nicht
bereits mit dem Transmitter verbunden ist).
3. HDBaseT IN: Dient zur Verbindung des Cat.6/7 Kabels, welches mit dem HDBaseT Out des
Transmitters verbunden ist - bitte vermeiden Sie es, diesen Port mit einem HDBaseT Port zu
verbinden.
4. HDMI OUT: Dient zur Verbindung eines HDMI Displays (HDMI Kabel)
5. IR IN: Dient zur Verbindung des mitgelieferten IR Empfängerkabels für den Empfang von IR
Signalen. Bitte stellen Sie sicher, dass freie Sicht zum angeschlossenen Sensor besteht.
6. IR OUT: Dient zur Verbindung des mitgelieferten IR Senderkabels für die Übertragung von IR
Signalen. Platzieren Sie den Sensor so, dass auch hier freie Sicht zum entsprechenden, zu
kontrollierenden Zubehör besteht.
7. RS-232: Dient zur Verbindung eines PCs, seriellen Kontrollers oder eines anderen seriellen Gerätes.
8. SERVICE: Reserviert für die zukünftige Nutzung
9. ETHERNET: Dient zur Verbindung mit dem Internet oder eines Netzwerks – bitte vermeiden Sie es,
diesen Port mit einem HDBaseT Port zu verbinden.
IR Empfängerkabel IR Senderkabel
HDBaseT™ and the HDBaseT Alliance logo are trademarks of the HDBaseT Alliance.
Page 10

Benutzerhandbuch Deutsch
Installation
Wichtig: Bevor Sie mit der Installation beginnen, stellen Sie bitte sicher, dass alle Geräte ausgeschaltet
sind.
Bitte beachten Sie: Die maximalen Kabellängen betragen 5m am Ein- und Ausgang bei einer Auflösung
bis zu 4K 30Hz oder 2m bei einer Auflösung von 4K 60Hz.
1. Verbinden Sie ihre HDMI Quelle mit dem Transmitter unter Verwendung eines HDMI Kabels.
2. Verbinden Sie das eine Ende des Cat.6/7 Kabels (max. Länge: 100m @ 1920x1080p oder 70m @
3840x2160p) mit dem HDBaseT OUT Port des Transmitters und das andere Ende mit dem
HDBaseT IN Port des Receivers. Wir empfehlen U/UTP oder F/UTP Kabel mit starren Adern.
3. Nutzen Sie ein weiteres HDMI Kabel um das HDMI Display mit dem HDMI OUT Port des Receivers
zu verbinden.
4. Verbinden Sie nun das mitgelieferte Netzteil mit dem Transmitter oder Receiver und schalten Sie
diese ein.
5. Schalten Sie im Anschluss bitte sowohl das Quell- als auch das Zielgerät ein um die Installation zu
beenden.
Zusätzlich zur Basisinstallation können weitere Funktionen genutzt werden:
10/100 Ethernet
Sowohl der Transmitter als auch der Receiver besitzen einen RJ45 Port für die Verbindung von
Netzwerkzubehör wie Router, eines Netzwerkswitches, einer IP-Kamera, Wireless Access Points oder
Smart TVs.
RS-232 Seriell
Sowohl Transmitter als auch Receiver verfügen über einen seriellen Anschluss um entsprechende
Signale zu übertragen.
Infrarot-Kontrolle
Sowohl Transmitter als auch Receiver verfügen über einen IR IN und IR OUT Port (Kabel befinden sich
im Lieferumfang). Dies ermöglicht die bidirektionale Nutzung und Übertragung von IR Signalen.
Fehlersuche
Kein Bild:
Falls Sie Probleme bei der Übertragung von Signalen haben, führen Sie bitte folgende Schritte
durch:
Versuchen Sie einen anderen Eingangsport Ihres HDTVs
Reduzieren Sie die Kabellänge am Eingang und Ausgang auf 1m
Versuchen Sie einen anderen Kabeltyp (1m Länge)
Überprüfen Sie die Verbindung des Netzteils. Achten Sie darauf, dass die LED des Transmitters und
des Receivers leuchtet.
Überprüfen Sie die Verbindung des Cat.6/7 Kabels. Achten Sie darauf, dass die grüne LED sowohl
am HDBaseT OUT als auch am HDBaseT IN Port leuchtet.
Überprüfen Sie ebenfalls die gelbe Status LED beider Ports. Falls diese nicht blinkt, schalten Sie
bitte beide Geräte aus und wieder ein.
Bei einigen Geräten ist es hilfreich die HDMI-Verbindungen erneut herzustellen um einen erneuten
“Hand-Shake” herbeizuführen.
Schalten Sie alle Geräte aus und in folgender Reihenfolge wieder ein: Extender, Display, Quelle.
Reduzieren Sie die Kabellänge des Cat.6/7 oder HDMI Kabels oder versuchen Sie es erneut mit
hochwertigeren Kabeln.
HDBaseT™ and the HDBaseT Alliance logo are trademarks of the HDBaseT Alliance.
Page 11

Manuel Utilisateur Français
Introduction
Nous sommes heureux que votre choix se soit porté sur un produit Lindy et vous remercions de votre
confiance. Vous pouvez compter à tout moment sur la qualité de nos produits et de notre service. Cet
C6 Extender HDBaseT HDMI 2.0 18G Lindy est soumis à une durée de garantie LINDY de 2 ans et
d’une assistance technique gratuite à vie. Merci de lire attentivement ces instructions et de les conserver
pour future référence.
L’Extender HDBaseT HDMI 2.0 18G Lindy est une solution bénéficiant d’un excellent rapport qualité/prix
et de hautes performances, pour transmettre des signaux HDMI 2.0 sur des grandes distances, pour
briser les limitations de distance HDMI 2.0. Utilisant un simple câble Cat.6 pour réaliser les connexions
longues distances, l’Extender HDMI fournit une pleine prise en charge des résolutions Ultra HD 4K
60Hz, incluant les signaux HDR10 (High Dynamic Range) et HDCP 2.2, pour vous assurer qu’il réponde
aux exigences des installations audio/vidéo actuelles. La pleine prise en charge des résolutions définies
en HDMI 2.0, qui demandent une bande passante de jusqu’à 18Gbit/s, requièrent que l’Extender utilise
une compression (visually lossless compression), technologie sans latence, pour permettre l’extension
des signaux via la technologie HDBaseT. Pour plus de commodités et pour permettre une installation
discrète du récepteur (Receiver) l’Extender prend en charge la fonction PoC (Power over Cat.6), lui
permettant l’utilisation d’une unique alimentation pour les besoins de l’émetteur et du récepteur.
Merci de noter: les longueurs et résolutions citées sont possibles au travers d’une connexion directe
entre émetteur et récepteur en utilisant un câble Cat.6 monobrin de bonne qualité. L’utilisation de câble
de qualité différente, ou l’introduction de connexions intermédiaires, coupleurs ou panneaux de
brassages, peut amener à une diminution des distances possibles.
Contenu de l’emballage
Transmitter HDMI 2.0 18G (émetteur)
Receiver HDMI 2.0 18G (récepteur)
2 x câbles émetteurs IR
2 x câbles récepteurs IR
Spécifications
2 x blocs de connexion Phoenix RS232
Kit de montage
Alimentation 24VDC 1A (EU, UK, US, AUS)
Ce manuel
Conforme HDMI 2.0b 18Gbit/s
Etend les signaux HDMI 2.0b, 10/100 Ethernet, RS232 & IR (bidirectionnel)
L’utilisation de câbles monobrins Cat.6 U/UTP ou F/UTP permet la prise en charge des résolutions:
100m 1080p60 (4:4:4 12bit) / 3D 1080p30 (4:4:4 12bit)
70m 4K 2160p60 (4:4:4 8bpc) / 1080p120 (4:4:4 8bit) / 1080p60 (4:4:4 16bit)
Compatible HDR10
Prise en charge HDCP 2.2/1.4, CEC et bypass Lip Sync
PoC (Power over Cat.6) pour l’utilisation d’une unique alimentation 24V 1A
Prise d’alimentation DC à visser 5,5/2,1mm (ext./int.)
Bypass audio de tous les formats audio HDMI, Dolby Atmos et DTS:X inclus
Contrôle bidirectionnel des équipements IR (30-60kHz) via l’extender
Longueur maximale de câbles HDMI: jusqu’à 4K 30Hz: 5m in/out, 4K 60Hz: 2m in/out
Protection ESD: ± 8kV (décharge dans l’air)
Modèle corps humain: ± 4kV (contact par décharge)
Température de fonctionnement: 0°C à 40°C (32°F à 104°F)
Température de stockage: -20°C à 60°C (-4°F à 140°F)
Humidité relative: 20 à 90% RH (non condensée)
Boitier métal avec kit de montage
Dimensions (LxlxH): 157x90x20mm (6.18x3.54x0.79in) pour chacun des boitiers
Poids: 0,333kg (0.73lb) pour chacun des boitiers
HDBaseT™ et le logo HDBaseT Alliance sont des marques déposées par HDBaseT Alliance
Page 12

Manuel Utilisateur Français
Vue d’ensemble
Transmitter – Vues avant et arrière
1. POWER: s’allume lorsque l’unité est alimentée
2. DC 24V: connecte l’alimentation 24V DC fournie à l’unité
3. HDBaseT OUT: se connecte au port HDBaseT IN du récepteur (Receiver) en utilisant un câble
Cat.6/7 pour la transmission de tous les signaux de données – ne pas connecter à un port réseau
4. HDMI IN: Connecte une source HDMI en utilisant un câble HDMI
5. IR IN: Connecte le câble d’extension IR fourni pour la réception des signaux IR. Assurez-vous que la
télécommande puisse atteindre le capteur
6. IR OUT: Connecte le câble émetteur IR pour la transmission des signaux IR. Placez l’émetteur IR en
face de l’équipement à contrôler
7. RS-232: Connecte un PC, contrôleur série ou périphérique série via bloc de connexion phoenix 3
voies pour la transmission des commandes RS-232
8. SERVICE: Réservé à un futur usage
9. ETHERNET: Connecte un réseau Ethernet ou internet – ne pas connecter au port HDBaseT
Page 13

Manuel Utilisateur Français
Receiver – Vues avant et arrière
1. POWER: s’allume lorsque l’unité est alimentée
2. DC 24V: connecte l’alimentation 24V DC fournie à l’unité (si non connectée au Transmitter)
10. HDBaseT IN: se connecte au port HDBaseT OUT de l’émetteur (Transmitter) en utilisant un câble
Cat.6/7 pour la transmission de tous les signaux de données – ne pas connecter à un port réseau
3. HDMI OUT: Connecte un affichage HDMI en utilisant un câble HDMI
11. IR IN: Connecte le câble d’extension IR fourni pour la réception des signaux IR. Assurez-vous que la
télécommande puisse atteindre le capteur
12. IR OUT: Connecte le câble émetteur IR pour la transmission des signaux IR. Placez l’émetteur IR en
face de l’équipement à contrôler
13. RS-232: Connecte un PC, contrôleur série ou périphérique série via bloc de connexion phoenix 3
voies pour la transmission des commandes RS-232
14. SERVICE: Réservé à un futur usage
15. ETHERNET: Connecte un réseau Ethernet ou internet – ne pas connecter au port HDBaseT
Récepteur IR (capteur) Emetteur IR
Page 14

Manuel Utilisateur Français
Installation
Important! Avant de débuter l’installation, assurez-vous que tous les appareils soient hors tension.
Merci de noter: la longueur maximale de câble HDMI utilisable en entrée/sortie est de 5m avec les
résolutions jusqu’à 4K 30Hz, ou 2m avec les résolutions 4K et une fréquence 60Hz.
1. Connectez votre source HDMI source à l’émetteur en utilisant un câble HDMI de bonne qualité.
2. Connectez une extrémité du câble Cat.6/7 (longueur max. 100m @ 1920x1080p ou 70m @
3840x2160p) au port HDBaseT OUT de l’émetteur et l’autre extrémité au port HDBaseT IN du
récepteur. L’utilisation de câble U/UTP ou F/UTP monobrin d’installation est recommandé.
3. Utilisez un autre câble HDMI pour connecter votre affichage HDMI au port de sortie HDMI sur le
récepteur (Receiver).
4. Branchez l’alimentation DC à l’émetteur ou au récepteur et mettez sous tension.
5. Démarrez votre source et votre affichage pour compléter l’installation.
En plus des étapes d’installation de base ci-dessus, l’Extender HDMI 2.0 18G fourni également les
fonctionnalités additionnelles/optionnelles suivantes:
Ethernet 10/100
Emetteur et récepteur disposent tous deux d’un port RJ45 pour la connexion d’équipements réseau
comme un routeur, switch réseau, caméra IP, point d’accès sans fil ou Smart TV.
RS-232 série
Emetteur et récepteur disposent tous deux d’un bloc de connexion phoenix série pour l’extension des
signaux de contrôle RS-232.
Contrôle Infrarouge
Emetteur et récepteur disposent tous deux d’un port IR In et Out, avec deux paires de câbles
d’extension IR fournis. Les câbles d’extensions permettent à une télécommande IR d’être utilisée à partir
de l’émetteur ou du récepteur (prise en charge bidirectionnelle).
Dépannage
Aucune image à l’écran.
Il a été constaté qu’il existe des différences significatives dans les longueurs/types de câbles et
même les ports d’entrée qui peuvent être utilisés sur différentes marques de TV HD en utilisant l’
HDMI 2.0 4K 60Hz. Si vous rencontrez des problèmes, veuillez suivre les étapes suivantes:
Essayez un port d’entrée différent sur votre HDTV.
Réduisez la longueur de câble à 1m en entrée et en sortie.
Essayez un autre type de câble HDMI de 1m.
Vérifiez que la prise DC de l’alimentation externe est bien connectée et que les LED power sont bien
allumées sur l’émetteur et le récepteur.
Vérifiez la bonne connexion du câble Cat.6/7 et que la LED verte (Link Status) à gauche des ports
HDBaseT In et Out sont allumées.
Vérifiez que les LED jaunes (Sync Status) à droite des ports HDBaseT In et Out clignotent, si ce
n’est pas le cas redémarrez source et affichage.
Pour certains appareils HDMI il peut être nécessaire de refaire la connexion HDMI pour réinitialiser
le handshake HDMI.
Mettez tous les appareils hors tension et redémarrez les dans cet ordre: extender, puis affichage et
la source pour finir.
Réduisez la longueur des câbles Cat.6/7 ou HDMI, ou utilisez une qualité de câble supérieure.
Page 15

Manuale Italiano
Introduzione
Vi ringraziamo per aver acquistato C6 Extender HDMI 2.0 18G HDBaseT. Questo prodotto è stato
progettato per garantirvi la massima affidabilità e semplicità di utilizzo ed è coperto da 2 anni di garanzia
LINDY oltre che da un servizio di supporto tecnico a vita. Per assicurarvi di farne un uso corretto vi
invitiamo a leggere attentamente questo manuale e a conservarlo per future consultazioni.
Questo C6 Extender HDBaseT HDMI 2.0 18G rappresenta la soluzione ad alte prestazioni per inviare
segnali HDMI 2.0 su lunghe distanze con un singolo cavo di rete Cat.6. L’Extender ha il pieno supporto
delle risoluzioni Ultra HD 4K 60Hz, compreso segnali HDR10 (High Dynamic Range) e HDCP 2.2, per
venire incontro a tutte le caratteristiche delle più moderne installazioni AV. Supporta a pieno tutte le
risoluzioni dello standard HDMI 2.0, al massimo della banda richiesta di 18Gbps, grazie ad una
compressione del segnale che non genera alcuna perdita, latenza praticamente nulla, il tutto garantito
dalla tecnologia di estensione di segnali via HDBaseT.
Entrambe le unità dell’Extender supportano la funzione PoC (Power over Cat.6) permettendo quindi di
scegliere se alimentare trasmettitore o ricevitore.
Nota Bene: le distanze e le risoluzioni massime indicate si riferiscono solo a connessioni dirette tra
trasmettitore e ricevitore, utilizzando cavi di buona qualità Cat.6 solid core. L’utilizzo di cavi di diversa
tipologia, l’introduzione di prese a muro, accoppiatori o patch panel potrebbe provocare una riduzione
della distanza massima supportata.
Contenuto della confezione
Trasmettitore HDMI 2.0 18G
Ricevitore HDMI 2.0 18G
2 x Emettitori IR
2 x Ricevitori IR
Specifiche
HDMI 2.0b 18Gbps compatibile
2 x Phoenix Block per RS232
Kit di montaggio
Alimentatore 24VDC 1A (EU, UK, US, AUS)
Questo manuale
Supporta segnali HDMI 2.0b, 10/100 Ethernet, RS232 & IR Bi-direzionale
Supporto cavi solid core Cat.6 U/UTP o F/UTP alle seguenti distanze e risoluzioni:
100m 1080p60 (4:4:4 12bit) / 3D 1080p30 (4:4:4 12bit)
70m 4K 2160p60 (4:4:4 8bpc) / 1080p120 (4:4:4 8bit) / 1080p60 (4:4:4 16bit)
HDR10 compatibile
Supporto HDCP 2.2/1.4, CEC e Lip Sync passante
PoC (Power over Cat.6), necessita di un solo alimentatore 24V 1A PSU
Connettore alimentatore da 5.5/2.1mm
Audio passante di tuti i formati HDMI audio incluso Dolby Atmos e DTS:X
Gestione bidirezionale segnale IR (30-60kHz)
Lunghezza massima cavi HDMI: fino a 4K 30Hz: 5m in/out, 4K 60Hz: 2m in/out
Protezione ESD: ± 8kV (air-gap discharge)
Human Body Model: ± 4kV (contact discharge)
Temperatura operativa: 0°C - 40°C (32°F - 104°F)
Temperatura di stoccaggio: -20°C - 60°C (-4°F - 140°F)
Umidità relativa: 20 - 90% RH (senza condensa)
Case in metallo con kit di montaggio
Dimensioni per unità: 157x90x20mm (6.18x3.54x0.79in
Peso per unità: 0.333kg (0.73lb)
HDBaseT™ e il logo HDBaseT Alliance sono marchi registrati dell’Alliance HDBaseT.
Page 16

Manuale Italiano
Installazione
Trasmettitore – fronte & retro
1. POWER: Si illumina quando l’unità è alimentata
2. DC 24V: Connettore per l’alimentatore 24V DC
3. HDBaseT OUT: Collegare con la porta HDBaseT IN del ricevitore con un cavo Cat.6/7 dedicato per la
trasmissione di tutti i segnali – non collegare questa porta ad una rete
4. HDMI IN: Collegare ad una sorgente HDMI tramite un cavo HDMI
5. IR IN: Collegare il cavo IR incluso per la ricezione del segnale IR. Assicuratevi che rimanga in vista in
modo da poter essere raggiunto direttamente dal segnale IR
6. IR OUT: Collegare il cavo IR incluso per la trasmissione del segnale IR. Assicuratevi che rimanga in
vista in modo da poter essere raggiunto direttamente dal segnale IR del dispositivo
7. RS-232: Collegare ad un PC, Controller o altro dispositivo seriale tramite il terminale a 3 vie per la
trasmissione di comandi RS-232
8. SERVICE: Riservata per eventuali usi futuri
9. ETHERNET: Collegare ad una rete o connessione internet – non collegare mai alla porta HDBaseT
Page 17

Manuale Italiano
Ricevitore – fronte & retro
1. POWER: Si illumina quando l’unità è alimentata
2. DC 24V: Connettore per l’alimentatore 24V DC (se non è già connesso al trasmettitore)
3. HDBaseT IN: Collegare con la porta HDBaseT UOT del trasmettitore con un cavo Cat.6/7 dedicato
per la trasmissione di tutti i segnali – non collegare questa porta ad una rete
4. HDMI OUT: Collegare ad un monitor HDMI tramite un cavo HDMI
5. IR IN: Collegare il cavo IR incluso per la ricezione del segnale IR. Assicuratevi che rimanga in vista in
modo da poter essere raggiunto direttamente dal segnale IR
6. IR OUT: Collegare il cavo IR incluso per la trasmissione del segnale IR. Assicuratevi che rimanga in
vista in modo da poter essere raggiunto direttamente dal segnale IR del dispositivo
7. RS-232: Collegare ad un PC, Controller o altro dispositivo seriale tramite il terminale a 3 vie per la
trasmissione di comandi RS-232
8. SERVICE: Riservata per eventuali usi futuri
9. ETHERNET: Collegare ad una rete o connessione internet – non collegare mai alla porta HDBaseT
Ricevitore IR Emettitore IR
Page 18

Manuale Italiano
Utilizzo
Importante! Prima di iniziare l’installazione, assicuratevi che tutti i dispositivi siano spenti.
Nota Bene: la lunghezza massima dei cavi HDMI è di 5m in ingresso e in uscita a risoluzioni fino a 4K
30Hz, o 2m a 4K 60Hz.
1. Collegate la sorgente HDMI al trasmettitore tramite un cavo HDMI di buona qualità.
2. Collegate il cavo di rete Cat.6/7 (lungo fino a 100m @ 1920x1080p o 70m @ 3840x2160p) alla porta
HDBaseT OUT del Trasmettitore e alla porta HDBaseT IN del ricevitore. Consigliamo l’utilizzo di un
cavo U/UTP o F/UTP solid core.
3. Utilizzate un altro cavo HDMI per collegare il monitor HDMI all’uscita HDMI del ricevitore.
4. Collegate l’alimentatore al trasmettitore o al ricevitore per accenderlo.
5. Alimentate sorgente e monitor per completare l’installazione.
In aggiunta ai passaggi di base elencati qui sopra, l’Extender HDMI 2.0 18G può anche fornire le seguenti
funzioni aggiuntive:
Ethernet 10/100
Trasmettitore e ricevitore hanno una singola porta RJ45 per la connessione ad una rete o Router, Switch,
IP Camera, Access Point Wireless o Smart TV.
Seriale RS-232
Trasmettitore e ricevitore hanno un terminale seriale per l’estensione di segnali di controllo.
Infrarossi
Trasmettitore e ricevitore hanno porte IR In e Out, con due coppie di cavi IR. Questi cavi permettono di
usare il telecomando di un dispositivo dal trasmettitore al ricevitore o vice versa.
Risoluzione dei problemi
Non c’è segnale video.
Possono esserci differenze rilevanti in baste alla lunghezza/tipologia dei cavi utilizzati e anche ai
differenti ingressi dei vari HDTV HDMI 2.0 4K 60Hz. Se riscontraste problemi, seguite i seguenti
passaggi:
Provate un ingresso diverso sulla vostra HDTV.
Riducete la lunghezza dei cavi HDMI in ingresso e in uscita (massimo 1m).
Provate con un cavo HDMI 1m differente.
Controllate che il connettore dell’alimentatore sia inserito correttamente e che i LED power siano
illuminati sia sul trasmettitore che sul ricevitore.
Controllate che il cavo Cat.6/7 sia inserito correttamente e che i LED verdi sulla parte sinistra delle
porte HDBaseT siano illuminati.
Controllate che i LED gialli (Sync) sulla parte destra delle porte HDBaseT lampeggino, in caso
contrario spegnete e riaccendete sorgente e monitor.
Per alcuni dispositivi HDMI può essere utile scollegare e ricollegare il cavo HDMI per inizializzare di
nuovo il riconoscimento e l’handshake HDMI.
Spegnere tutti i dispositivi e riaccenderli nel seguente ordine: extender, monitor e sorgente.
Ridurre la lunghezza del cavo Cat.6/7 e dei cavi HDMI usati, o usare cavi di qualità superiore.
Page 19

CE/FCC Statement
CE Certification
This equipment complies with the requirements relating to Electromagnetic Compatibility Standards.
It has been manufactured under the scope of RoHS compliance.
CE Konformitätserklärung
Dieses Produkt entspricht den einschlägigen EMV Richtlinien der EU für IT-Equipment und darf nur
zusammen mit abgeschirmten Kabeln verwendet werden.
Diese Geräte wurden unter Berücksichtigung der RoHS Vorgaben hergestellt.
Die formelle Konformitätserklärung können wir Ihnen auf Anforderung zur Verfügung stellen
FCC Certification
This equipment has been tested and found to comply with the limits for a Class B digital device, pursuant
to part 15 of the FCC Rules. These limits are designed to provide reasonable protection against harmful
interference in a residential installation.
You are cautioned that changes or modification not expressly approved by the party responsible for
compliance could void your authority to operate the equipment.
This device complies with part 15 of the FCC Rules.
Operation is subject to the following two conditions:
1. This device may not cause harmful interference, and
2. This device must accept any interference received, including interference that may cause undesired
operation.
LINDY Herstellergarantie – Hinweis für Kunden in Deutschland
LINDY gewährt für dieses Produkt über die gesetzliche Regelung in Deutschland hinaus eine zweijährige
Herstellergarantie ab Kaufdatum. Die detaillierten Bedingungen dieser Garantie finden Sie auf der LINDY Website
aufgelistet bei den AGBs.
Hersteller / Manufacturer (EU):.
Lindy-Elektronik GmbH Lindy Electronics Ltd
Markircher Str. 20 Sadler Forster Way
68229 Mannheim Stockton-on-Tees, TS17 9JY
GERMANY United Kingdom
Email: info@Lindy.com , T: +49 (0)621 470050 postmaster@Lindy.co.uk , T: +44 (0)1642 754000
Page 20

Recycling Information
Tested to Comply with
FCC Standards
For Home and Office Use!
WEEE (Waste of Electrical and Electronic Equipment),
Recycling of Electronic Products
Europe, United Kingdom
In 2006 the European Union introduced regulations (WEEE) for the collection and recycling of all waste electrical
and electronic equipment. It is no longer allowable to simply throw away electrical and electronic equipment.
Instead, these products must enter the recycling process.
Each individual EU member state has implemented the WEEE regulations into national law in slightly different
ways. Please follow your national law when you want to dispose of any electrical or electronic products. More
details can be obtained from your national WEEE recycling agency.
Germany / Deutschland Rücknahme Elektroschrott und Batterie-Entsorgung
Die Europäische Union hat mit der WEEE Direktive Regelungen für die Verschrottung und das Recycling von
Elektro- und Elektronikprodukten geschaffen. Diese wurden im Elektro- und Elektronikgerätegesetz – ElektroG in
deutsches Recht umgesetzt. Das Entsorgen von Elektro- und Elektronikgeräten über die Hausmülltonne ist
verboten! Diese Geräte müssen den Sammel- und Rückgabesystemen zugeführt werden! Dort werden sie
kostenlos entgegen genommen. Die Kosten für den weiteren Recyclingprozess übernehmen die Gerätehersteller.
LINDY bietet deutschen Endverbrauchern ein kostenloses Rücknahmesystem an, beachten Sie bitte, dass
Batterien und Akkus den Produkten vor der Rückgabe an das Rücknahmesystem entnommen werden müssen und
über die Sammel- und Rückgabesysteme für Batterien separat entsorgt werden müssen. Ausführliche
Informationen zu diesen Themen finden Sie stets aktuell auf der LINDY Webseite im Fußbereich.
France
En 2006, l'union Européenne a introduit la nouvelle réglementation (DEEE) pour le recyclage de tout équipement
électrique et électronique.
Chaque Etat membre de l’ Union Européenne a mis en application la nouvelle réglementation DEEE de manières
légèrement différentes. Veuillez suivre le décret d’application correspondant à l’élimination des déchets électriques
ou électroniques de votre pays.
Italy
Nel 2006 l’unione europea ha introdotto regolamentazioni (WEEE) per la raccolta e il riciclo di apparecchi elettrici
ed elettronici. Non è più consentito semplicemente gettare queste apparecchiature, devono essere riciclate. Ogni
stato membro dell’ EU ha tramutato le direttive WEEE in leggi statali in varie misure. Fare riferimento alle leggi del
proprio Stato quando si dispone di un apparecchio elettrico o elettronico.
Per ulteriori dettagli fare riferimento alla direttiva WEEE sul riciclaggio del proprio Stato.
No. 38219
1st Edition, October 2017
lindy.com
 Loading...