

Page 1
Tested to Comply with
FCC Standards
For Home and Office Use!
8x8 HDMI 2.0 18G Matrix Switch
User Manual English
No. 38160
lindy.com
© LINDY Group
Page 2

Page 3

User Manual English
Introduction
Thank you for purchasing the LINDY 8x8 HDMI 2.0 18G Matrix Switch. This product has been designed
to provide trouble free, reliable operation. It benefits from both a LINDY 2 year warranty and free lifetime
technical support. To ensure correct use, please read this manual carefully and retain it for future
reference.
Package Contents
8x8 HDMI 2.0 18G Matrix Switch
12V DC PSU
IEC mains cable
IR Extension cable
Rack mounting brackets
IR Remote control including CR2025 3V battery
Quick Install Guide
Features
HDMI 2.0, HDCP 2.2, DVI 1.0 complaint
Resolutions up to 4096x2160@60Hz 4:4:4 8bit
Full 18G bandwidth
Supports 7.1 channel of LPCM, Dolby TrueHD and DTS-HD Master Audio digital audio signals
RS232, IR remote control & IP control for switching
Support for switching via cloud app
Specification
Input Ports: 8 x HDMI (Female), RJ45 (Female), RS232 (Female), 3.5mm IR (Female), USB Type A
(Female)
Output Ports: 8 x HDMI (Female)
Power Supply: DC 12V
Dimensions: 440x220x44mm (17.32x0.87x1.73in)
Operating Temperature: 0°C - 40°C (32°F - 104°F)
Storage Temperature: -20°C - 60°C (-4°F - 140°F)
Relative Humidity: 20 ~ 90% RH (Non-condensing)
Power Consumption: 60W max
Installation
Make sure all devices are switched off before making any connections!
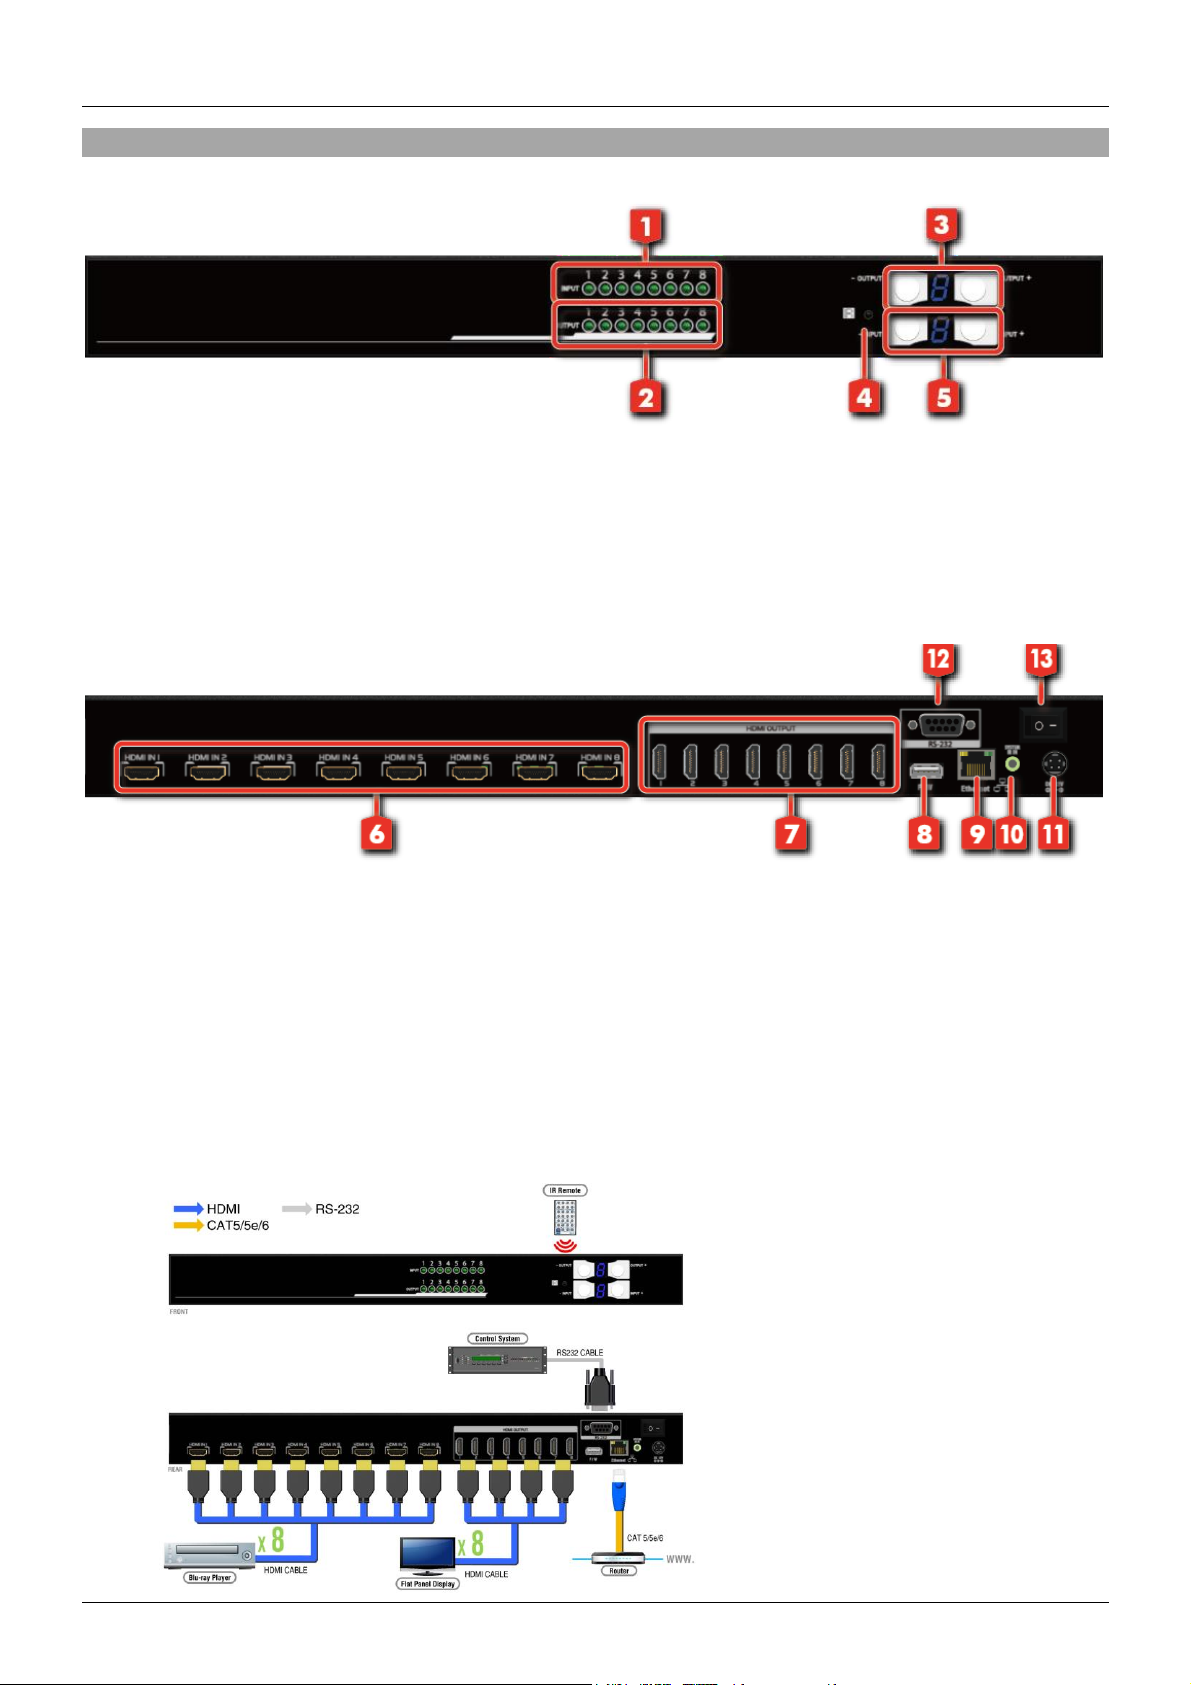
Connect the source devices such as a PC, Blu-ray player or games console to the HDMI matrix input
ports. Then connect the high definition displays to the HDMI matrix output ports. When all the
connections are made, connect the power supply and switch on.
Once all the connections have been made, switch on the devices in this order: displays, HDMI Matrix,
source devices. Please allow a few minutes for the devices to handshake and for the signals to appear.
Page 4
User Manual English
Operation
Front Panel
1. Input status LED’s
2. Output status LED’s
3. Output push buttons & 7 segment display
4. IR sensor port
5. Input push buttons and 7 segment display
Rear Panel
6. HDMI input ports 1-8
7. HDMI output ports 1-8
8. USB port (for firmware update only)
9. RJ45 port
10. IR extension port
11. DC power port
12. RS232 port
13. Power switch
Connection Diagram
Page 5
User Manual English
Operation
Procedure
7-Segment LED
IN/OUT Switch
Output Number (1~8) + Input Number (1~8)
Example: Input 2
To Output 3
1. Press output number “3” to select Output 3
3
-
2. Press input number “2” to select Input 2
3
2
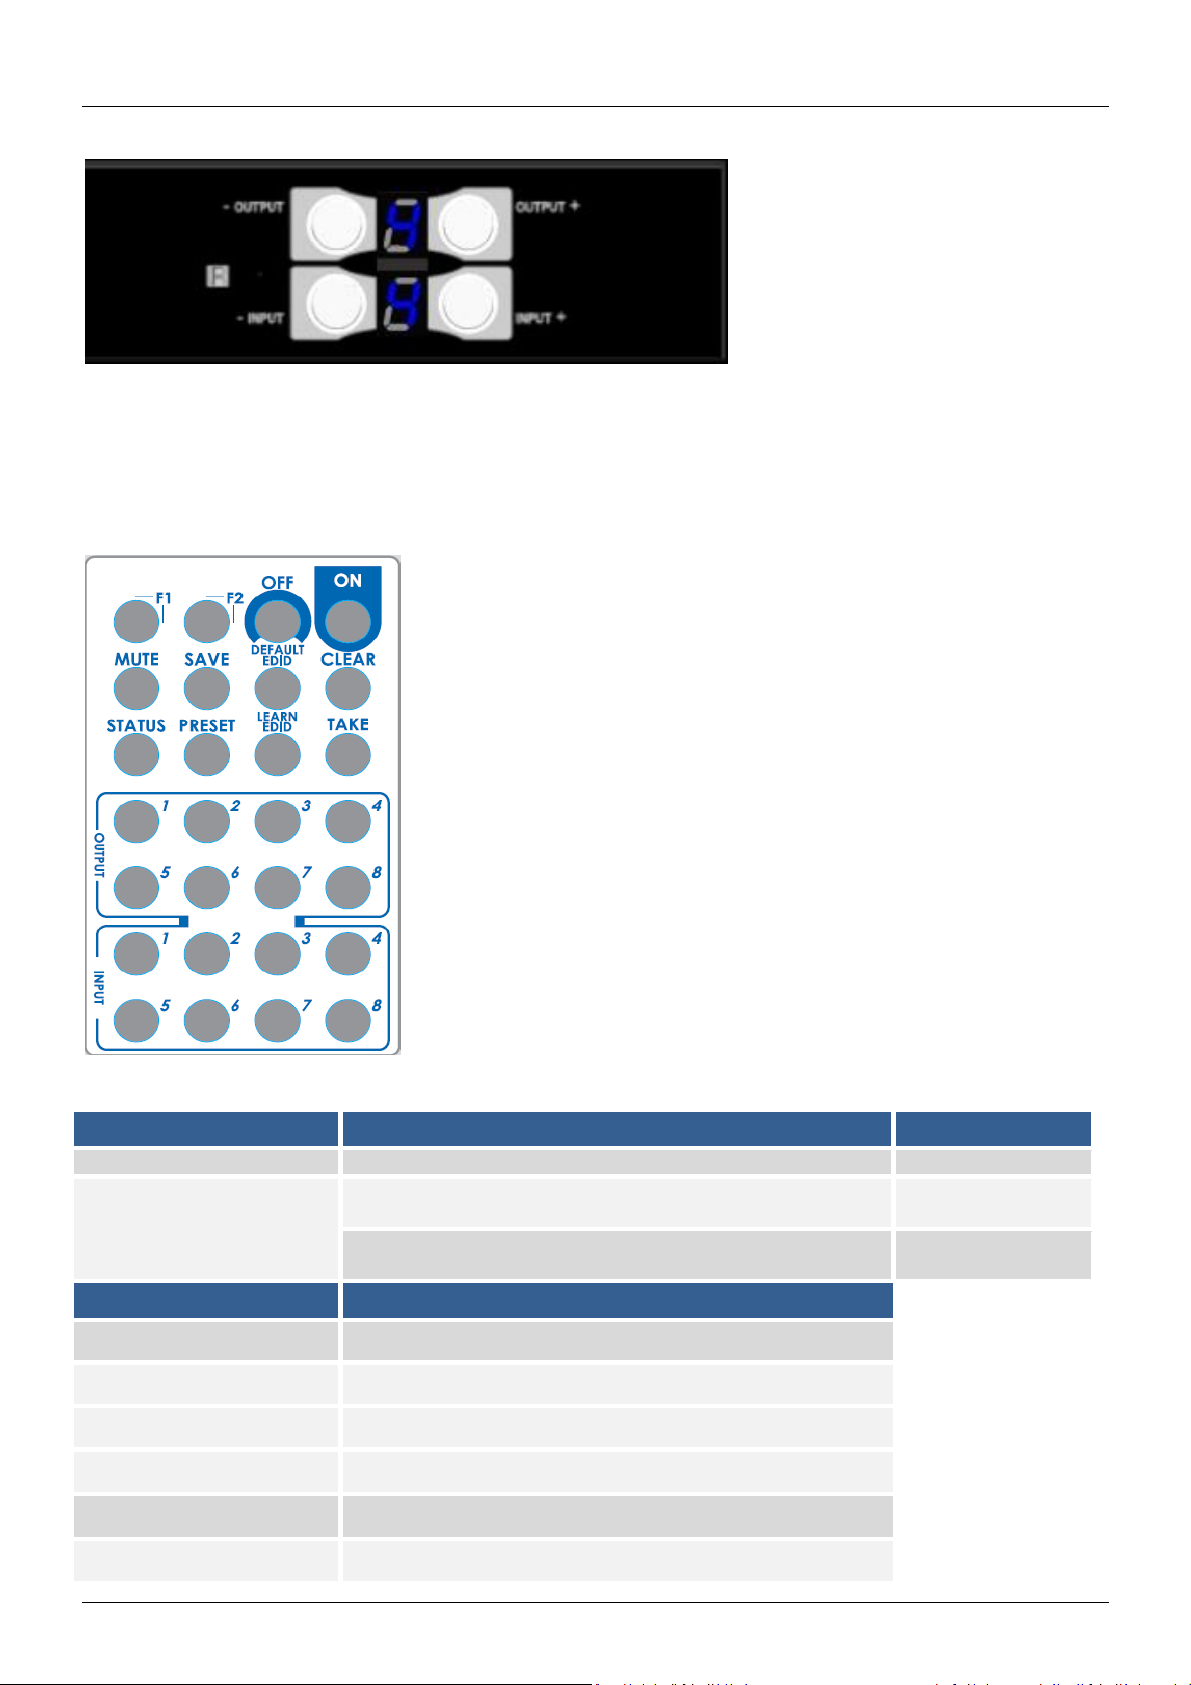
Button
Function
OFF
Standby mode
ON
Power on the matrix switch
MUTE
Turn off output’s video and audio
STATUS
Preset output status
SAVE
Save current mapping mode
PRESET
Preset mapping mode
Front Button Switching
Use the output + or – to select the desired display
Use the input + or – to select the desired input source
Once the desired ports are selected the display will blink twice to confirm the setting
Remote Control Switching
Page 6

User Manual English
DEFAULT EDID
Begin default EDID selection
LEARN EDID
Begin EDID learning from one output
CLEAR
Clear the previous IR operation procedure
TAKE
Trigger the previous setting
F1
Reserved
F2
Reserved
Operation
Procedure
7-Segment LED
Output Status
Status + Output Number (1~8) + Take
Example: Output 4
(Input 2)
1.Press “STATUS” button
-
-
2.Press output number key “4” to select Output 4
4
-
3.Press “TAKE” button
4
2
Save Current Mapping
Save + Output Number (1-8 storage site) + Take
Example: Save current
mapping to 5
1.Press “SAVE” button
d
-
2.Press output number key “5” to select the storage site 5
d
5
3.Press “TAKE” button
Preset Mapping
Preset + Output Number (1-8 storage site) + Take
Example: Preset saved
mapping from 5
1.Press “PRESET” button
P
-
2.Press output number key “5” to select the storage site 5
P
5
3.Press “TAKE” button
Learn default EDID
Default EDID + Output Number (1-8 default EDID) + Input
Number (input 1~8) + Take
*The resolution for 1~8 default EDID (1080P) is same as the
software.
Example: Default EDID 2
Input 3
1.Press “DEFAULT EDID” button
E
d
2.Press output number key “2” to select default EDID 2
2
d
3.Press input number key “3” to select Input 3
2
3
4.Press “TAKE” button
0 (success) F (fail)
Learn Output EDID
Learn + Output Number (Output 1~8) +Input Number
(input 1~8) + Take
Example: Learn Output 4
Input 3
1.Press “LEARN” button
E
L
2.Press output number key “4” to select Output 4
4
L
3. Press input number key “3” to select Input 3
4
Page 7

User Manual English
3
4.Press “TAKE” button
0 (success) F(fail)
Mute Output
Mute + Output Number (1~8) + Take
Example: Mute Output 3
1. Press “MUTE” button
- 0 2. Press output number key “3” to select Output 3
3 0 3.Press “TAKE” button
3
0
1
Power ON/ Standby mode
2
Control SW via RS-232
3
COM Port Selection
4
I/O Routing Button
5
EDID Button
6
Rename I/O Button
7
Network Setting & Default Reset Button
8
Firmware Update Button
1 2 4 5 6 7 8
3
RS-232 Software Switching
System Requirements:
MS WinXP/7 OS
Supported Baud Rate: 9600
Supported Software Size: 1MB
Minimum RAM: 256MB
Page 8

User Manual English
Using the I/O Routing Button: Mapping
I/O Mapping
Change the input for each of the listed outputs
Recall Mapping
In the drop down box, select the stored Mapping from 1-16. To recall previously saved Mapping, click
the ‘Recall’ button
Save Mapping
In the drop down box, select the Mapping from 1-16. To save the current mapping, click the ‘Save’
button
EDID
Learn EDID from Default to Input
In the ‘From Default’ drop down box, select the Default EDID from 1-17 EDID
Page 9

User Manual English
In the ‘Input’ drop down box, select the desired Input
To learn from the default EDID, click the ‘Apply’ button
Learn EDID from Display to Input
In the ‘From Display’ drop down box, select the desired output
In the ‘Input’ drop down box, select the desired input
To learn from the display EDID, click the ‘Apply’ button
Loading the EDID File to Input
To select the EDID file, click the ‘Load File’ button
In the ‘Input’ drop down box, select the desired input
To load the EDID file, click the ‘Apply’ button
Auto EDID
The best EDID from the connected outputs is generated by Automatic EDID learning from the matrix
Read Button
Read the auto EDID status from the device
View EDID
In the drop down box, select the Input or HDMI Output
To read and analyse the EDID, click the ‘View’ button
Rename
Rename I/O
Rename the Inputs
Rename the Outputs
Rename Mapping
Rename the mappings
Page 10

User Manual English
System
Network DHCP Mode
Click HDCP and then click ‘Read’ to see the IP address information
Network Static Mode
Click Static and then type in the IP, Mask and Gateway information. Once the IP address is set, to
save the IP address information, click the ‘Save’ button
Save Button
Saves the manually typed IP address
Read Button
Reads the IP address of the device (Default IP address is set by the DHCP server)
System: Factory reset
Factory default resets the device
System: Firmware Version
Shows the F/W version information
Cloud Setting: Association Code
Enters an ‘association code’ that can be used to pair the device with a cloud server
Cloud Setting: Reset Cloud
Resets the cloud server after pairing with the device
Page 11

User Manual English
Firmware Update
Update from USB
Ensure new firmware files are in the root directory of the USB Flash Drive that will be attached. The
file suffix should be .bin
Plug the USB Flash Drive into the USB port of the matrix interface
To start the firmware update, click ‘Start’
Update from NET
In the matrix’s ‘IP’ address, type the IP of the user which wants to run the firmware update
In ‘Port’ type 5888
To select the new firmware click ‘Load File’
To start the firmware update, click ‘Start’
Ethernet Cloud Control Switching (Eagleyes)
Creating an Eagleyes Account
For new Eagleyes users, please create a new account
In a search engine address bar, type (http://www.eagleyes.io), and then ‘Create New Account’
This will open the Registration page where an email and password information is required to create a
private account
Page 12

User Manual English
Adding a Device to the Eagleyes Cloud
As a first step, ensure the device is connect to the router via an Ethernet cable. Then under the System
tab, click ‘Read’ to obtain the ‘association code’. (The status of the software is connected)
In a search engine address bar, type (http://www.eagleyes.io), or alternatively download the Eagleyes
mobile app, then log in to the Eagleyes account in the top right corner of the page. To add the device for
which the association code has been obtained, click ‘Add Device’
Page 13

User Manual English
In ‘Installer Email’, enter an email for future online support from Eagleyes. In ‘Association Code’, enter
the association code previously obtained to pair the Eagleyes cloud with the device
Once the device is paired, a list of paired devices will show in the top right corner under ‘Matrix’. This
button can be clicked to switch control between devices
EDID Learning
If a HDMI output display is not playing audio and video correctly, the EDID learning function is required.
As HDMI source devices and displays can have different levels of capability when playing audio or video,
the general principle is that the source device will output in the lowest resolutions of audio and video to
be accepted amongst all HDMI displays. If this situation occurs, an output of 720p with stereo audio
HDMI signal would most likely be the safest choice, however if required, the user can tell the matrix to
learn the EDID of the HDMI display with the lowest possible resolution output to ensure that all displays
play the HDMI signal successfully.
To use EDID Learning, please follow one of these methods:
IR Remote Control: Please follow the same method as discussed in Operation-Remote Control
Switching
Software Control: Please follow the same method as discussed in Operation-RS-232 Software
Switching
There are 17 embedded default EDID, which can be found below:
1080p@60 24bit 2ch
1080p@60 24bit 7.1ch
1080p@60 24bit 2ch
1080p@60 24bit 7.1ch
1080i@60/720p@60 24bit 2ch
1080i@60/720p@60 24bit 7.1ch
1080p@60 36bit 2ch
Page 14

User Manual English
1080p@60 36bit 5.1/7.1ch
1080p@60 24bit 2ch
4k2k@30 36bit 2ch
4k2k@30 36bit 7.1ch
4k2k@30 36bit 3D 2ch
4k2k@30 36bit 3D 7.1ch
4k2k@60 420 36bit 3D 2ch
4k2k@60 420 36bit 3D 7.1ch
4k2k@60 36bit 3D 2ch
4k2k@60 36bit 3D 7.1ch
Page 15

CE/FCC Statement
CE Certification
This equipment complies with the requirements relating to Electromagnetic Compatibility Standards.
It has been manufactured under the scope of RoHS compliance.
CE Konformitätserklärung
Dieses Produkt entspricht den einschlägigen EMV Richtlinien der EU für IT-Equipment und darf nur
zusammen mit abgeschirmten Kabeln verwendet werden.
Diese Geräte wurden unter Berücksichtigung der RoHS Vorgaben hergestellt.
Die formelle Konformitätserklärung können wir Ihnen auf Anforderung zur Verfügung stellen
FCC Certification
This equipment has been tested and found to comply with the limits for a Class B digital device, pursuant
to part 15 of the FCC Rules. These limits are designed to provide reasonable protection against harmful
interference in a residential installation.
You are cautioned that changes or modification not expressly approved by the party responsible for
compliance could void your authority to operate the equipment.
This device complies with part 15 of the FCC Rules.
Operation is subject to the following two conditions:
1. This device may not cause harmful interference, and
2. This device must accept any interference received, including interference that may cause undesired
operation.
LINDY Herstellergarantie – Hinweis für Kunden in Deutschland
LINDY gewährt für dieses Produkt über die gesetzliche Regelung in Deutschland hinaus eine zweijährige
Herstellergarantie ab Kaufdatum. Die detaillierten Bedingungen dieser Garantie finden Sie auf der LINDY Website
aufgelistet bei den AGBs.
Hersteller / Manufacturer (EU):.
LINDY-Elektronik GmbH LINDY Electronics Ltd
Markircher Str. 20 Sadler Forster Way
68229 Mannheim Stockton-on-Tees, TS17 9JY
GERMANY United Kingdom
Email: info@lindy.com , T: +49 (0)621 470050 postmaster@lindy.co.uk , T: +44 (0)1642 754000
Page 16

Recycling Information
WEEE (Waste of Electrical and Electronic Equipment),
Recycling of Electronic Products
Europe, United Kingdom
In 2006 the European Union introduced regulations (WEEE) for the collection and recycling of all waste electrical
and electronic equipment. It is no longer allowable to simply throw away electrical and electronic equipment.
Instead, these products must enter the recycling process.
Each individual EU member state has implemented the WEEE regulations into national law in slightly different
ways. Please follow your national law when you want to dispose of any electrical or electronic products. More
details can be obtained from your national WEEE recycling agency.
Battery Remark:
Do not put empty batteries in your domestic waste bin as they will not be recycled. Empty batteries can be returned
for recycling at our trade counter or at your local household recycling centre.
The raw materials enclosed in batteries such as Zinc, Iron and Nickel can be reused to a very large proportion. The
recycling of batteries and disused/obsolete electronic equipment is one of the most efficient environment protection
actions you can easily take.
Germany / Deutschland Rücknahme Elektroschrott und Batterie-Entsorgung
Die Europäische Union hat mit der WEEE Direktive Regelungen für die Verschrottung und das Recycling von
Elektro- und Elektronikprodukten geschaffen. Diese wurden im Elektro- und Elektronikgerätegesetz – ElektroG in
deutsches Recht umgesetzt. Das Entsorgen von Elektro- und Elektronikgeräten über die Hausmülltonne ist
verboten! Diese Geräte müssen den Sammel- und Rückgabesystemen zugeführt werden! Dort werden sie
kostenlos entgegen genommen. Die Kosten für den weiteren Recyclingprozess übernehmen die Gerätehersteller.
LINDY bietet deutschen Endverbrauchern ein kostenloses Rücknahmesystem an, beachten Sie bitte, dass
Batterien und Akkus den Produkten vor der Rückgabe an das Rücknahmesystem entnommen werden müssen und
über die Sammel- und Rückgabesysteme für Batterien separat entsorgt werden müssen. Ausführliche
Informationen zu diesen Themen finden Sie stets aktuell auf der LINDY Webseite im Fußbereich.
France
En 2006, l'union Européenne a introduit la nouvelle réglementation (DEEE) pour le recyclage de tout équipement
électrique et électronique.
Chaque Etat membre de l’ Union Européenne a mis en application la nouvelle réglementation DEEE de manières
légèrement différentes. Veuillez suivre le décret d’application correspondant à l’élimination des déchets électriques
ou électroniques de votre pays.
Remarque sur les piles et batteries
En tant que consommateur final, vous êtes tenus de restituer toutes les piles et batteries usagées. Il est clairement
interdit de les jeter avec les ordures ménagères ! Les piles et batteries contenant des substances nocives sont
marquées par le symbole ci-dessus. Vous pouvez déposer gratuitement vos piles ou batteries usagées dans les
centres de collecte de votre commune, dans nos succursales ou dans tous les points de vente de piles ou
batteries. Vous respecterez ainsi la loi et contribuerez à la protection de l'environnement !
Italy
Nel 2006 l’unione europea ha introdotto regolamentazioni (WEEE) per la raccolta e il riciclo di apparecchi elettrici
ed elettronici. Non è più consentito semplicemente gettare queste apparecchiature, devono essere riciclate. Ogni
stato membro dell’ EU ha tramutato le direttive W EEE in leggi statali in varie misure. Fare riferimento alle leggi del
proprio Stato quando si dispone di un apparecchio elettrico o elettronico.
Per ulteriori dettagli fare riferimento alla direttiva WEEE sul riciclaggio del proprio Stato.
LINDY No 38160
lindy.com
 Loading...