

Page 1

HDMI Daisy Chain Cat.5e/6 Extender
Tested to Comply with
FCC Standards
For Home and Office Use!
Manual English
Benutzerhandbuch Deutsch
Manuel Français
Manuale Italiano
© LINDY ELECTRONICS LIMITED & LINDY-ELEKTRONIK GMBH - FIRST EDITION (November 2015)
LINDY No. 38140 – Transmitter
LINDY No. 38141 – Receiver / Repeater
www.lindy.com
Page 2

Page 3
Manual English
No. 38140:
HDMI Daisy Chain Cat.5e/6 Extender –
Transmitter unit
5V DC 2A Multi Country Power Supply
User manual
No. 38141:
HDMI Daisy Chain Cat.5e/6 Extender –
Receiver / Repeater unit
5V DC 2A Multi Country Power Supply
User manual
Introduction
Thank you for purchasing the LINDY HDMI Daisy Chain Cat.5e/6 Extender. This extender allows you to
transmit an HDMI video signal to a series of remote displays/projectors up to a distance of up to 150m
between each Transmitter and Receiver/Repeater using high quality Cat.5e/6 solid core cables.
Each HDMI Receiver/Repeater unit features a HDMI output port for local connection of a
display/projector and two RJ45 output ports allowing further Receiver/Repeaters to be cascaded. This
allows a single Transmitter to be used with up to 100 displays/projectors by cascading through multiple
layers.
Please Note: Network components are not required and not allowed in this daisy chain system!
Package Contents
Features
Supports display resolutions up to 1920x1080
HDMI 1.3 Compliant, HDCP compatible, 3D signals are not supported
Transmission range up to 150m for each segment over Cat.5e cable
Integrated HDMI Splitter on the Receiver/Repeater Unit to connect 1 HDMI Display and 2
cascaded Receivers/Repeaters.
Up to 31 levels (max 100 displays connected) of Receiver/Repeater can be used
Plug & Play Installation: no configuration required
No EDID data pass though function (please refer to the table in the section “EDID Presets” at the
end of the manual to see the supported video modes)
Supported Audio formats: LPCM 2-channel, 16/20/24 bit depths at 32/44/48 kHz
Overview
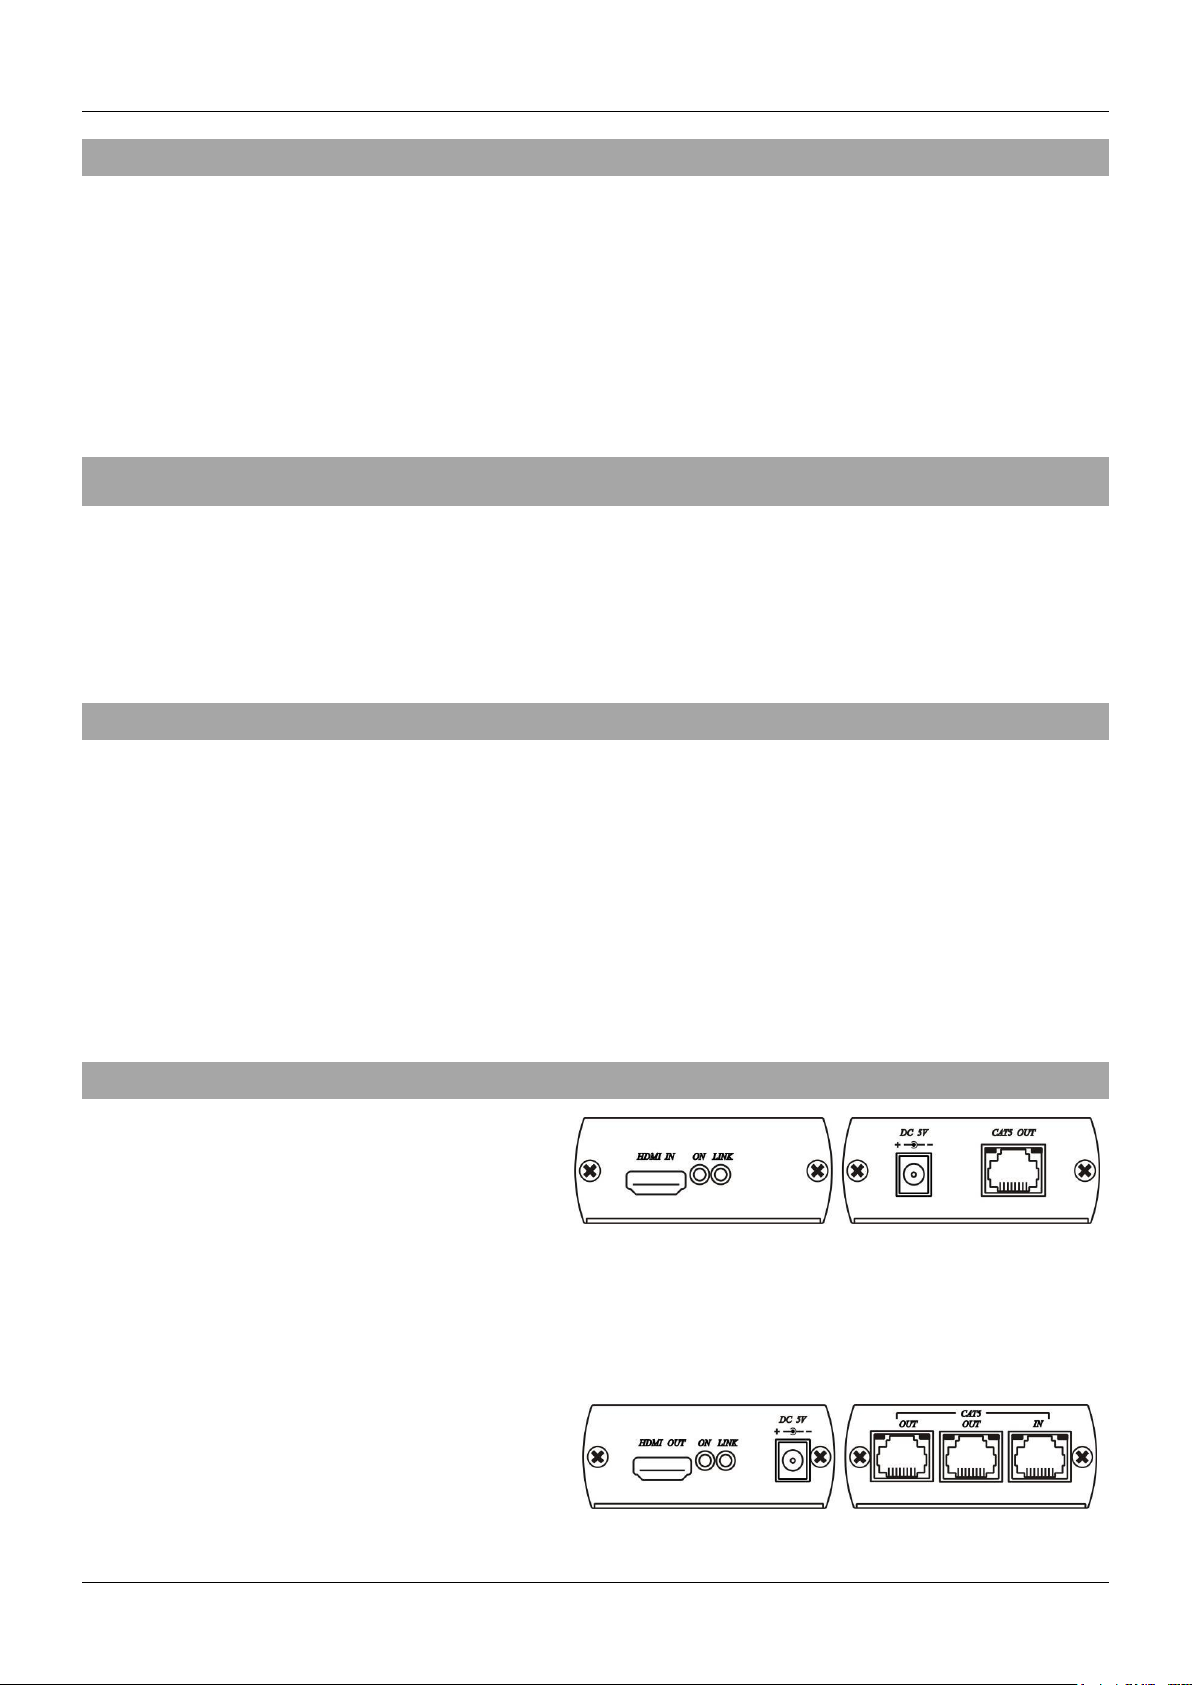
No. 38140 – TRANSMITTER UNIT
HDMI IN: to be connected to the HDMI source
(Blu-ray Player, Computer, Set Top Box, Game Console, etc.)
ON LED: Lit when powered via the mains power supply
LINK LED: Lit when a connection to a receiver/repeater unit No.38141 is established
DC 5V: Connect the supplied power supply to this port
Cat.5 Out: Attach to the Cat.5e/6 cable used to connect to the receiver/repeater unit No.38141
No. 38141 – RECEIVER / REPEATER UNIT
HDMI OUT: to be connected to the HDMI
Monitor / Display / Projector
ON LED: Lit when powered via the mains power
supply
1
Page 4

Manual English
LINK LED: Flashing while the unit establishes a connection to a transmitter unit No. 38140 or to another
receiver/repeater unit No.38141.
DC 5V: Connect the supplied power supply to this port
Cat.5 In : Attach to the Cat.5e/6 cable used to connect to the Cat.5e/6 cable coming from a transmitter
unit No.38140 or another receiver/repeater unit No.38141.
Cat.5 Out (2 ports): each to be connected to the Cat.5e/6 cable to the next receiver/repeater(s) unit
No.38141 in the daisy chain.
NOTE: The RJ45 ports have two integrated LEDs: the Green LED is lit when a connection is
established on that port, and the orange LED will flash when data is passing through that port
Installation and Operation
ATTENTION! Do not connect these units to an active Ethernet Network! These are NOT Ethernet
devices: they only use Ethernet standard cables for the connections and they can’t work through
Ethernet active devices like switch, router, etc.
This device doesn’t support any EDID forwarding or cloning. Please be sure that the the displays and
sources can work in a video mode included in the table you can find in the section “EDID Presets” at the
end of this manual.
Please use short HDMI cables (i.e. 0.5m: No.41110, 1m: No.41111) to connect the extender units to the
monitors. This will ensure the best results.
Please switch off all the devices involved in the installation before starting to make any
connection.
For the installation, please use the following steps:
1) Connect the remote displays / projectors to the receiver / repeater units with a HDMI cable.
2) Connect an RJ45 connector of the Cat.5e/6 cable(s) to all the receiver / repeater units to be
installed (Cat.5 In)
3) Connect the other RJ45 connector of the Cat.5e cable(s) to the transmitter unit (Cat.5 Out.). If
using multiple Receiver/Repeaters connect them together in the required configuration using
Cat.5e/6 cable(s) too.
4) Connect the HDMI video source to the related Input port on the transmitter unit using a HDMI
cable.
5) Connect the Power Supply Units to the DC power ports on the transmitter and receiver units and
then to the mains power socket.
6) Switch on all the source and display devices.
Troubleshooting
There is no display on a screen.
Make sure you have NOT used any active networking devices in the extender network
Check that the DC plug and jack used by external power supply are firmly connected.
Check that the CAT5e/6 cable is plugged in correctly and that the Power LED is light
Check that the HDMI source and display are both powered on and active.
Reduce the length of CAT5e/6 or HDMI cable used, or use a higher quality cable.
Check if the video mode you are using is included in the table “EDID Presets” at the end of this
manual.
If the problem persist please contact LINDY technical support teams for help.
2
Page 5

Benutzerhandbuch Deutsch
Nr. 38140:
Daisy Chain HDMI Cat.5e/6 Extender –
Transmitter
5V DC ~2A Multi Country Netzteil
Benutzerhandbuch
Nr. 38141:
Daisy Chain HDMI Cat.5e/6 Extender –
Receiver/Repeater
5V DC ~2A Multi Country Netzteil
Benutzerhandbuch
EINFÜHRUNG
Vielen Dank für den Kauf des LINDY HDMI Daisy Chain Cat.5e/6 Extender. Dieser Exender ermöglicht
es ein HDMI-Signal zu einer ganzen Reihe von Monitoren zu senden mit Entfernungen von bis zu 150m
zwischen den Monitoren jeweils mit hochwertigen Cat.5e/6 Installations-Kabeln. Die Installation erfolgt
in einer Daisy-Chain-Konfiguration, beginnend mit dem Transmitter. Dank der 2 Output-Ports können an
jedem Receiver/Repeater jeweils zwei weitere Receiver/Repeater angeschlossen werden, was auch
Verzweigungen im Daisy Chain Bus erlaubt. Aktive LAN-/Netzwerkkomponenten sind in diesem DaisyChain-System VERBOTEN!
LIEFERUMFANG
EIGENSCHAFTEN
Unterstützt Auflösungen bis 1920x1080
HDMI 1.3 kompatibel, HDCP kompatibel, 3D Signale werden nicht unterstützt
Maximallänge der einzelnen Segmente bis zu 150m mit Cat.5e/6 Kabel
Integrierte HDMI Splitter an den Receiver/Repeatern um gleichzeitig 1 HDMI Display und 2 Daisy
Chain Receiver/Repeaters anschließen zu können.
Daisy Chain Bus bis maximal 31 Ebenen (maximal 100 Displays)
Plug & Play Installation: keine Konfiguration erforderlich
EDID Daten werden nicht übertragen! Bitte beachten Sie die “EDID Presets” Daten und die
unterstützten Auflösungen und Timings am Ende dieses Handbuches
Unterstützt folgende HDMI Audio Formate: LPCM 2-Kanal, 16/20/24 Bit und 32/44/48 kHz
Übersicht
Nr. 38140 – TRASMITTER
HDMI IN: Anschluss an HDMI Quelle (BluRay
Player, Computer, Set Top Box, Game Console, etc.)
ON Led: Leuchtet bei Versorgung mit Strom
LINK Led: Leuchtet wenn eine Verbindung zu einem Receiver/Repeater Nr.38141 aktiv ist
DC 5V: Anschluss für das mitgelieferte Netzteil
Cat.5 Out: Anschluss für das Cat.5e/6 Kabel zum nächsten Receiver/Repeater Nr.38141
Nr. 38141 – RECEIVER/REPEATER
HDMI OUT: Anschluss für den HDMI Monitor
POWER Led: Leuchtet bei Versorgung mit Strom
LINK Led: Blinkt während der Herstellung der Verbindung zum vorhergehenden Receiver/Repeater
Nr.38141 oder Transmitter Nr.38140
3
Page 6

Benutzerhandbuch Deutsch
DC 5V: Anschluss für das mitgelieferte Netzteil
Cat.5 In: Anschluss für das Cat.5e/6 Kabel vom Transmitter Nr.38140 oder vom vorhergehenden
Receiver/Repeater Nr.38141.
Cat.5 Out (2 Ports): 2x Anschluss für das Cat.5e/6 Kabel zum nächsten Receiver/Repeater Nr.38141
Hinweis: Die RJ45-Ports verfügen über zwei integrierte LEDs: die grüne LED leuchtet wenn auf diesem
Port eine Verbindung hergestellt ist, und die orange LED blinkt, wenn Daten über diesen Port übertragen
werden.
INSTALLATION UND BETRIEB
ACHTUNG! Schließen Sie diese Extender nicht an einem aktiven Ethernet-Netzwerk an! Dies sind
keine Ethernet-Geräte: Verwenden sie Standard-Ethernet-Kabel für die Verbindungen. Sie können
nicht durch aktive Ethernet-Geräte wie Switch, Router, etc. arbeiten!
Hinweis: EDID Daten werden nicht übertragen! Bitte beachten Sie die “EDID Presets” Daten und
die unterstützten Auflösungen und Timings am Ende dieses Handbuches.
Bitte verwenden Sie kurze HDMI-Kabel (d.h. 0,5m: Nr.41110, 1m: No.41111) zum Anschluss der
Monitore. Dies gewährleistet optimale Ergebnisse.
Bitte schalten Sie alle Geräte vor der Installation aus. Für die Installation gehen Sie bitte
folgendermaßen vor:
1. Schließen Sie die entfernten Displays / Projektoren und Lautsprecher an die Receiver/RepeaterEinheiten mit einem HDMI Kabel an.
2. Cat.5e/6 Kabel an die RJ45-Anschlüsse des Transmitter und der Receiver/Repeater anschließen.
3. Schließen Sie die HDMI Videoquelle mit einem HDMI-Kabel am Transmitter an.
4. Schließen Sie die Netzteile an und schalten Sie alle Geräte ein.
Fehlersuche
Ein Bildschirm zeigt kein Signal an.
Untersuchen Sie das System ausgehend vom Transmitter und beachten Sie die Status-LEDs.
Stellen Sie sicher, dass Sie keine aktiven Netzwerkgeräte im Extender Netzwerk eingebunden
sind.
Achten Sie darauf dass alle Netzteile korrekt angeschlossen sind und dass die Power-LED
leuchtet.
Verringern Sie die Länge der Cat.5e/6-Kabel vor dem Segment welches Probleme verursacht,
oder verwenden Sie eine höhere Kabel-Qualität.
Überprüfen Sie, ob die HDMI-Auflösung und die -Timings in der Tabelle EDID Presets am Ende
dieses Handbuchs enthalten sind.
Wenn das Problem weiterhin auftritt kontaktieren Sie bitte LINDYs Technik-Support-Teams.
4
Page 7

Manuel Français
No. 38140:
Extender HDMI Cat.5e/6 cascadable -
unité émettrice (Transmitter)
Alimentation multi-pays 5V DC ~2A
Manuel utilisateur
No. 38141:
Extender HDMI Cat.5e/6 cascadable –
unité récepteur/répéteur (Receiver /
Repeater)
Alimentation multi-pays 5V DC ~2A
Manuel utilisateur
Introduction
Merci d’avoir choisi l’extender HDMI Daisy Chain Cat.5e/6 LINDY. Cet extender permet de transmettre
un signal vidéo HDMI à une série d’écrans/projecteurs déportés à une distance de jusqu’à 150m en
utilisant du câble Cat.5e/6 monobrin de haute qualité. L’installation peut être réalisée en configuration
cascadée en démarrant avec un émetteur. Grâce aux 2 ports de sorties intégrés sur chaque
récepteur/répéteur HDMI on pourra connecter deux récepteurs/répéteurs additionnels. Des composants
réseau Ethernet ne sont pas nécessaires et leurs connexions ne sont pas autorisées dans ce système
de connexions en cascade !
Contenu de l’emballage
Caractéristiques
Prend en charge les résolutions d’affichage jusqu’à 1920x1080
Conforme HDMI 1.3, compatible HDCP, les signaux 3D ne sont pas pris en charge
Portée de transmission jusqu’à 150m pour chaque segment via câble Cat.5e
Splitter HDMI intégré sur l’unité Receiver / Repeater pour connecter 1 affichage HDMI et 2
Receivers / Repeaters cascadés.
Cascadable sur jusqu’à 31 niveaux (100 affichages connectés au maximum)
Installation Plug & Play: aucune configuration requise
Pas de fonction de by-pass EDID (merci de vous reporter au tableau de la section “EDID
Presets” à la fin du manuel pour voir les modes vidéo pris en charge)
Formats audio CE pris en charge: LPCM 2 canaux, 16/20/24 bit à 32/44/48 kHz
Vue d’ensemble
No. 38140 – Emetteur (TRANSMITTER UNIT)
HDMI IN: à connecter à la source HDMI (lecteur
Blu-ray, ordinateur, Set Top Box, console de jeux, etc.)
LED ON: s’allume lorsque l’alimentation est active
LED LINK: s’allume lorsque une connexion à un récepteur/répéteur N°Art.38141 est établie
DC 5V: à connecter à l’alimentation fournie
Cat.5 Out : à connecter au câble Cat.5e/6 de l’unité récepteur/répéteur N°Art.38141
No. 38141 – Récepteur/répéteur (RECEIVER /
REPEATER UNIT
HDMI OUT: à connecter à l’affichage HDMI
LED POWER: s’allume lorsque l’alimentation est active
5
Page 8

Manuel Français
LED LINK: clignote lorsque les unités établissent une connexion à un émetteur N°Art.38140 ou à une
autre unité récepteur/répéteur N°Art.38141 via le port RJ45 Cat.5 IN
DC 5V: à connecter à l’alimentation fournie
Cat.5 In : à connecter au câble Cat.5e/6 provenant d’un émetteur N°Art.38140 ou d’un
récepteur/répéteur N°Art.38141.
Cat.5 Out (2 ports): chacun doit être connecté au câble Cat.5e/6 du récepteur/répéteur N°Art.38141
dans la cascade.
NOTE: les ports RJ45 possèdent deux LED intégrées: la LED verte s’allume lorsqu’une connexion est
établie sur ce port, et la LED orange clignote lorsque des données transitent sur ce port
Installation et utilisation
ATTENTION! Ne pas connecter ces unités sur un réseau Ethernet actif ! Ce ne sont PAS des
appareils pour un réseau Ethernet: ils ne font qu’utiliser des câbles réseau standards pour les
connexions et ils ne peuvent fonctionner sur des équipements réseau Ethernet comme des
switchs, routeurs, etc.
NOTE: cet appareil ne prend pas en charge le transfert ou le clonage EDID. Merci de vous assurer que
vos affichages et sources fonctionnent dans un mode vidéo inclus dans le tableau se trouvant dans la
section “EDID Presets ” à la fin de ce manuel.
NOTE: Merci d’utiliser des câbles HDMI courts (par ex.0.5m: N°Art.41110, 1m: N°Art.41111) pour
connecter les extenders aux écrans. Ceci pour assurer les meilleurs résultats.
Merci de mettre hors tension tous les appareils entrant dans cette installation avant de réaliser
toute connexion.
Pour l’installation, veuillez suivre les étapes suivantes:
1) Connectez les affichages/projecteurs et haut-parleurs distants aux récepteurs/répéteurs à l’aide
d’un câble HDMI.
2) Connectez les connecteurs RJ45 des câbles Cat.5e/6 à tous les récepteurs/répéteurs qui doivent
être installés
3) Connectez le connecteur RJ45 du câble Cat.5e à l’émetteur.
4) Connectez la source vidéo HDMI au port INPUT de l’émetteur en utilisant un câble HDMI.
5) Connectez les alimentations aux ports d’alimentation DC sur les unités émetteurs et récepteurs
et aux prises secteur.
6) Mettez sous tension tous les autres appareils.
Dépannage
Il n’y a pas d’affichage sur un écran.
Assurez-vous de ne PAS avoir utilisé un appareil réseau Ethernet actif
Vérifiez la bonne connexion des alimentations DC.
Vérifiez que le câble CAT5e/6 est bien branché et que la LED Power est bien allumée
Vérifiez que la source HDMI et l’affichage sont sous tension et actifs.
Réduisez la longueur des câbles CAT5e/6 ou HDMI utilisés, ou utilisez des câbles de meilleur
qualités.
Vérifiez que le mode vidéo utilisé est inclus dans le tableau “EDID Presets” à la fin du manuel.
Merci de contacter le support technique LINDDY si le problème persiste.
6
Page 9

Manuale Italiano
Art. 38140:
Extender HDMI Cat.5e/6 Concatenabile –
Unità trasmittente
Alimentatore 5V DC ~2A Multi Country
Manuale utente
Art. 38141:
Extender HDMI Cat.5e/6 Concatenabile –
Unità Ricevente / Ripetitore
Alimentatore 5V DC ~2A Multi Country
Manuale utente
Introduzione
Vi ringraziamo per aver acquistato l’extender HDMI Cat.5e/6 concatenabile. Questo prodotto vi
consentirà di distribuire un segnale video HDMI ad una serie di schermi/proiettori remoti ad una distanza
massima di 150m fra ogni trasmettitore e ricevitore utilizzando cavo Cat.5e/6 solid core di elevata
qualità. Ogni Ricevitore/Ripetitore integra in uscita un porta HDMI per il collegamento di un monitor
locale e due porte RJ45 che consentono il collegamento di ulteriori due ricevitori/ripetitori. Questa
caratteristica consente di connettere ad un singolo trasmettitore un massimo di 100 schermi in cascata
su livelli multipli.
N.B.: Non sono richiesti componenti di rete per il funzionamento di questo sistema a catena! In
generale gli apparati non vanno collegati a switch o hub Ethernet per evitare danni ai
componenti!
Contenuto della confezione
Caratteristiche
Supporta risoluzioni fino a 1920x1080
Conforme HDMI 1.3, Compatibile HDCP compatibile, I segnali 3D NON sono supportati
Trasmissione fino a 150m di distanza per ogni segmento su cavo Cat.5e
Splitter HDMI integrato sull’unità Ricevente/Ripetitore per connettere 1 schermo HDMI e 2
Ricevitori/Ripetitori in cascata.
E’ possibile raggiungere un massimo di 31 livelli di cascata (massimo 100 schermi connessi)
Installazione Plug & Play: nessuna configurazione richiesta
Non è presente nessuna funzione di replica dei segnali EDID (fate riferimento alla tabella nella
sezione “EDID Presets” alla fine del manuale per controllare le modalità video supportate)
Formati Audio Supportati: LPCM 2 canali a 16/20/24bit 32/44/48 kHz
Panoramica
Art. 38140 – UNITA’ TRASMITTENTE
HDMI IN: da connettere alla sorgente HDMI (Blu-
ray Player, Computer, Set Top Box, Game
Console, etc.)
ON LED: Acceso quando l’unità è alimentata
LINK LED: Acceso quando una connessione con una unità ricevente/ripetitore (Art.38141) è stabilita
DC 5V: Porta di connessione dell’alimentatore MultiCountry 5V fornito a corredo
Cat.5 Out: Porta per il collegamento del cavo Cat.5e/6 connesso all’unità ricevente/ripetitore Art.38141
Art. 38141 – UNITA’ RICEVENTE/RIPETITORE
HDMI OUT: da connettere al Monitor / Proiettore
POWER Led: accesso quando l’unità è alimentata
7
Page 10

Manuale Italiano
LINK Led: Lampeggia quando viene stabilita una connessione con un’unità trasmittente Art.38140 o ad
un altro ricevitore / ripetitore art.38141.
DC 5V: Porta di connessione dell’alimentatore MultiCountry 5V fornito a corredo
Cat.5 In : da connettere al cavo Cat.5e/6 in uscita da un’unità trasmittente Art.38140 o ad un altro
ricevitore / ripetitore art.38141.
Cat.5 Out (2 porte): ciascuna porta può essere connessa ad un cavo Cat.5e/6 utilizzato per collegare
l’unità ricevente / ripetitore art. 38141 seguente.
N.B.: Le porte RJ45 hanno due LED integrati: il LED Verde si accende quando una connessione è
attiva su quella porta mentre quello arancione lampeggerà quando vengono trasmessi dati tramite la
medesima porta.
Installazione ed utilizzo
ATTENZIONE! Non connettere queste unità ad una rete Ethernet attiva! Questi NON sono
dispositivi Ethernet: vanno solo utilizzati cavi Ethernet standard per l’interconnessione ma non
possono funzionare attraverso apparati attivi come switch, router, ecc..
NOTA: Questo dispositivo non supporta nessun sistema di inoltro o copia dei segnali EDID. Assicuratevi
che i vostri schermi e sorgenti possano lavorare in una delle modalità video elencate nella tabella
riportata alla fine del manuale nella sezione “EDID Presets”.
NOTA: Vi preghiamo di utilizzare cavi HDMI corti (es. 0.5m: Art.41110, 1m: Art.41111) per collegare le
unità dell’extender ai monitor per garantire la massima qualità di visualizzazione possibile.
Vi preghiamo di spegnere tutti i dispositivi coinvolti nell’installazione prima di effettuare
qualsiasi connessione.
Per l’installazione effettuate i seguenti passi:
1) Collegate i monitor / proiettori remoti alle unità riceventi art. 38141 con un cavo HDMI.
2) Collegate i connettori RJ45 dei cavi Cat.5e/6 a tutti i ricevitori/ripetitori art.38141 da installare
3) Collegate il connettore RJ45 del cavo Cat.5e/6 all’unità trasmittente art.38140.
4) Collegate la sorgente HDMI alla porta HDMI INPUT sull’unità trasmittente art.38140 utilizzando
un cavo HDMI.
5) Collegate gli alimentatori forniti a corredo alle porte DC di trasmettitore e ricevitori e poi alle prese
di corrente.
6) Accendete tutti gli altri apparati.
Risoluzione dei problemi
Non viene visualizzata alcuna immagine su uno o più schermi.
Assicuratevi che NON stiate utilizzando cavi cat.5 connessi ad una rete Ethernet attiva
Controllate che il connettore DC e quelli utilizzati sull’alimentatore siano perfettamente inseriti.
Controllate che i connettori RJ45 dei cavi CAT5e/6 siano inseriti fermamente il LED Power sia
acceso
Controllate che la sorgente e lo schermo HDMI siano entrambi alimentati e attivi.
Riducete la lunghezza del cavo CAT5e/6 o HDMI utilizzate o utilizzate cavi di qualità superiore.
Controllate che la modalità video che stato utilizzando sia inclusa nella tabella riportata nella sezione
“EDID Presets” alla fine di questo manuale.
Se il problema persiste contattate il supporto tecnico LINDY
8
Page 11

Technical Specifications
720 x 400p at 70Hz - IBM VGA
1024 x 768p at 75Hz - VESA
640 x 480p at 60Hz - IBM VGA
1280 x 1024p at 75Hz - VESA
640 x 480p at 67Hz - Apple Mac II
1152 x 870p at 75Hz - Apple Mac II
640 x 480p at 72Hz - VESA
1920 x 1080p at 60Hz - VESA STD
640 x 480p at 75Hz - VESA
1680 x 1050p at 60Hz - VESA STD
800 x 600p at 56Hz - VESA
1600 x 1200p at 60Hz - VESA STD
800 x 600p at 60Hz - VESA
1440 x 900p at 60Hz - VESA STD
800 x 600p at 72Hz - VESA
1400 x 1050p at 60Hz - VESA STD
800 x 600p at 75Hz - VESA
1280 x 1024p at 60Hz - VESA STD
832 x 624p at 75Hz - Apple Mac II
1280 x 960p at 60Hz - VESA STD
1024 x 768p at 60Hz - VESA
1152 x 864p at 75Hz - VESA STD
1024 x 768p at 70Hz - VESA
Revision number: 3
IT underscan: Supported
Basic audio:Supported
YCbCr 4:4:4: Supported
YCbCr 4:2:2: Supported
Native formats: 1
Detailed timing #1: 1920x1080p at 60Hz (16:9)
Modeline: "1920x1080" 148.500 1920 2008 2052 2200 1080 1084 1089 1125 +hsync +vsync
Detailed timing #2: 1920x1080i at 60Hz (16:9)
Modeline: "1920x1080" 74.250 1920 2008 2052 2200 1080 1084 1094 1124 interlace +hsync +vsync
Detailed timing #3: 1280x720p at 60Hz (16:9)
Modeline: "1280x720" 74.250 1280 1390 1430 1650 720 725 730 750 +hsync +vsync
Detailed timing #4: 1920x1080p at 50Hz (16:9)
Modeline: "1920x1080" 148.500 1920 2448 2492 2640 1080 1084 1089 1125 +hsync +vsync
Detailed timing #5:720x480p at 60Hz (16:9)
Modeline: "720x480" 27.000 720 736 798 858 480 489 495 525 -hsync -vsync
1920 x 1080p at 60Hz - HDTV (16:9, 1:1) [Native]
1920 x 1080p at 50Hz - HDTV (16:9, 1:1)
1920 x 1080i at 60Hz - HDTV (16:9, 1:1)
1920 x 1080i at 50Hz - HDTV (16:9, 1:1)
1280 x 720p at 60Hz - HDTV (16:9, 1:1)
1440 x 576p at 50Hz - DVD (16:9, 32:45)
720 x 480p at 60Hz - EDTV (16:9, 32:27)
1440 x 576p at 50Hz - DVD (4:3, 8:15)
720 x 480p at 60Hz - EDTV (4:3, 8:9)
1280 x 720p at 50Hz - HDTV (16:9, 1:1)
720 x 480i at 60Hz - Doublescan (16:9, 32:27)
720 x 576p at 50Hz - EDTV (16:9, 64:45)
720 x 480i at 60Hz - Doublescan (4:3, 8:9)
720 x 576p at 50Hz - EDTV (4:3, 16:15)
1440 x 480p at 60Hz - DVD (16:9, 16:27)
720 x 576i at 50Hz - Doublescan (16:9, 64:45)
1440 x 480p at 60Hz - DVD (4:3, 4:9)
640 x 480p at 60Hz - Default (4:3, 1:1)
NB: NTSC refresh rate = (Hz*1000)/1001
EDID Presets
Standard timings supported
EIA/CEA-861 Information
CE video identifiers (VICs) - timing/formats supported
9
Page 12

Legal Statements
LINDY-Elektronik GmbH
Markircher Str. 20
DE-68229 Mannheim
GERMANY
T:. +49 (0)621 47005 0
info@lindy.de
LINDY Electronics Ltd.
Sadler Forster Way
Teesside Industrial Estate, Thornaby
Stockton-on-Tees, TS17 9JY
United Kingdom
T: +44 (0) 1642 754000
postmaster@lindy.co.uk
CE Certification This equipment complies with the requirements relating to Electromagnetic Compatibility Standards
EN55022/EN55024 and the further standards cited therein. It has been manufactured under the scope of RoHS compliance.
CE Konformitätserklärung Dieses Produkt entspricht den einschlägigen EMV Richtlinien der EU für IT-Equipment.
Diese Geräte wurden unter Berücksichtigung der RoHS Vorgaben hergestellt.
Die formelle Konformitätserklärung können wir Ihnen auf Anforderung zur Verfügung stellen
LINDY Herstellergarantie – Hinweis für Kunden in Deutschland LINDY gewährt für dieses Produkt über die gesetzliche
Regelung in Deutschland hinaus eine zweijährige Herstellergarantie ab Kaufdatum. Die detaillierten Bedingungen dieser
Garantie finden Sie auf der LINDY Website aufgelistet bei den AGBs.
FCC Certification - This equipment has been tested and found to comply with the limits for a Class B digital device,
pursuant to part 15 of the FCC Rules. These limits are designed to provide reasonable protection against harmful interference in
a residential installation.
Operation is subject to the following two conditions:
1. This device may not cause harmful interference, and
2. This device must accept any interference received, including interference that may cause undesired operation.
WEEE (Waste of Electrical and Electronic Equipment),
Recycling of Electronic Products
Europe, United Kingdom
In 2006 the European Union introduced regulations (WEEE) for the collection and recycling of all waste electrical and electronic
equipment. It is no longer allowable to simply throw away electrical and electronic equipment. Instead, these products must
enter the recycling process. Each individual EU member state has implemented the WEEE regulations into national law in
slightly different ways. Please follow your national law when you want to dispose of any electrical or electronic products. More
details can be obtained from your national WEEE recycling agency.
Germany / Deutschland
Die Europäische Union hat mit der WEEE Direktive Regelungen für die Verschrottung und das Recycling von Elektro- und
Elektronikprodukten geschaffen. Diese wurden im Elektro- und Elektronikgerätegesetz – ElektroG in deutsches Recht
umgesetzt. Dieses Gesetz verbietet das Entsorgen von entsprechenden, auch alten, Elektro- und Elektronikgeräten über die
Hausmülltonne! Diese Geräte müssen den lokalen Sammelsystemen bzw. örtlichen Sammelstellen zugeführt werden! Dort
werden sie kostenlos entgegen genommen. Die Kosten für den weiteren Recyclingprozess übernimmt die Gesamtheit der
Gerätehersteller.
France
En 2006, l'union Européenne a introduit la nouvelle réglementation (DEEE) pour le recyclage de tout équipement électrique et
électronique. Chaque Etat membre de l’ Union Européenne a mis en application la nouvelle réglementation DEEE de manières
légèrement différentes. Veuillez suivre le décret d’application correspondant à l’élimination des déchets électriques ou
électroniques de votre pays.
Italy
Nel 2006 l’unione europea ha introdotto regolamentazioni (WEEE) per la raccolta e il riciclo di apparecchi elettrici ed elettronici.
Non è più consentito semplicemente gettare queste apparecchiature, devono essere riciclate. Ogni stato membro dell’ EU ha
tramutato le direttive WEEE in leggi statali in varie misure. Fare riferimento alle leggi del proprio Stato quando si dispone di un
apparecchio elettrico o elettronico. Per ulteriori dettagli fare riferimento alla direttiva WEEE sul riciclaggio del proprio Stato.
LINDY No 38140, 38141
Hersteller EU: Manufacturer EU:
1st Edition, November 2015
www.lindy.com
 Loading...