

Page 1
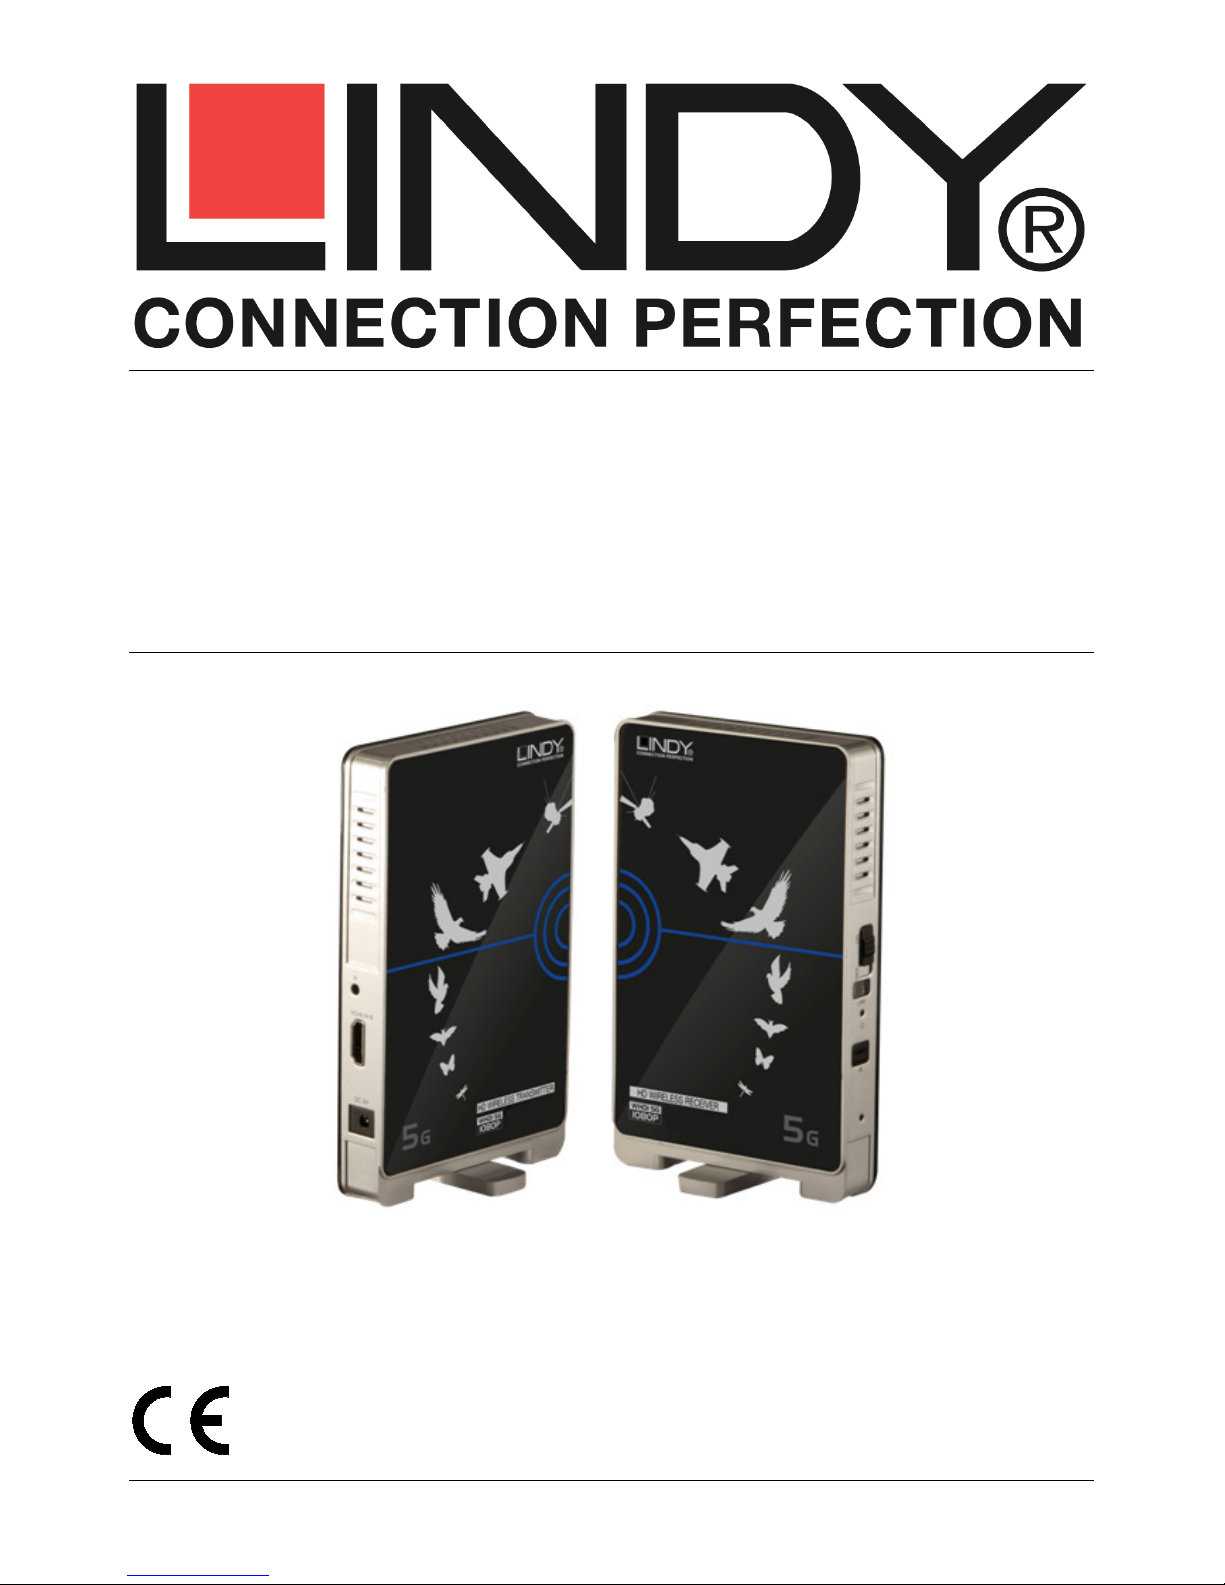
Wireless Extender for HDMI
User Manual English
Benutzerhandbuch Deutsch
Manuel Utilisateur Français
Manuale d’uso Italiano
LINDY No. 38121
www.lindy.com
© LINDY ELECTRONICS LIMITED & LINDY-ELEKTRONIK GMBH - FIRST EDITION (March 2011)
Page 2

Page 3

User Manual English
Introduction
Thank you for purchasing the LINDY Wireless Extender for HDMI. The Wireless Extender for
HDMI allows you to extend Full HD 1080p HDMI signals up to 30m using WHDI Technology,
without compression or latency.
Package Contents
LINDY Wireless HDMI Extender x 2 (1 x Transmitter, 1 x Receiver)
Power Adapter (5V DC) x 2
HDMI Cable, 1.2m
IR Extender Cable, 1.4m
This User Manual
Features
Extends HDMI or DVI signals up to 30m (open space) or 20m (indoor)*
Supports Full HD 1080p signals including 3D
Suitable for use with Home Cinema and Computer equipment
Extends IR and CEC Signals for remote control of AV Equipment
* Actual distances will depend entirely on the construction of the building and any walls or floors that are situated
between the Transmitter and Receiver units.
Specification
Compatible with HDMI 1.3 specification
Supported HDTV resolutions: 1080p24/30/50/60, 1080i, 720p, 576p, 480p
Supported PC resolutions: From 640x480 (VGA) to 1920x1080
Deep Colour capable: supports 30/36/48 bit colour depth
Audio Formats: PCM, DTS, Dolby Digital
Supports CEC
Supports HDCP 1.2 video encryption
RF Communication: 5 Channel MIMO
Operating Frequency: 5.1GHz to 5.9GHz
Maximum HDMI cable length up to 5m in and out
Dimensions: 95 x 22 x 155mm (WxDxH)
1
Page 4
User Manual English
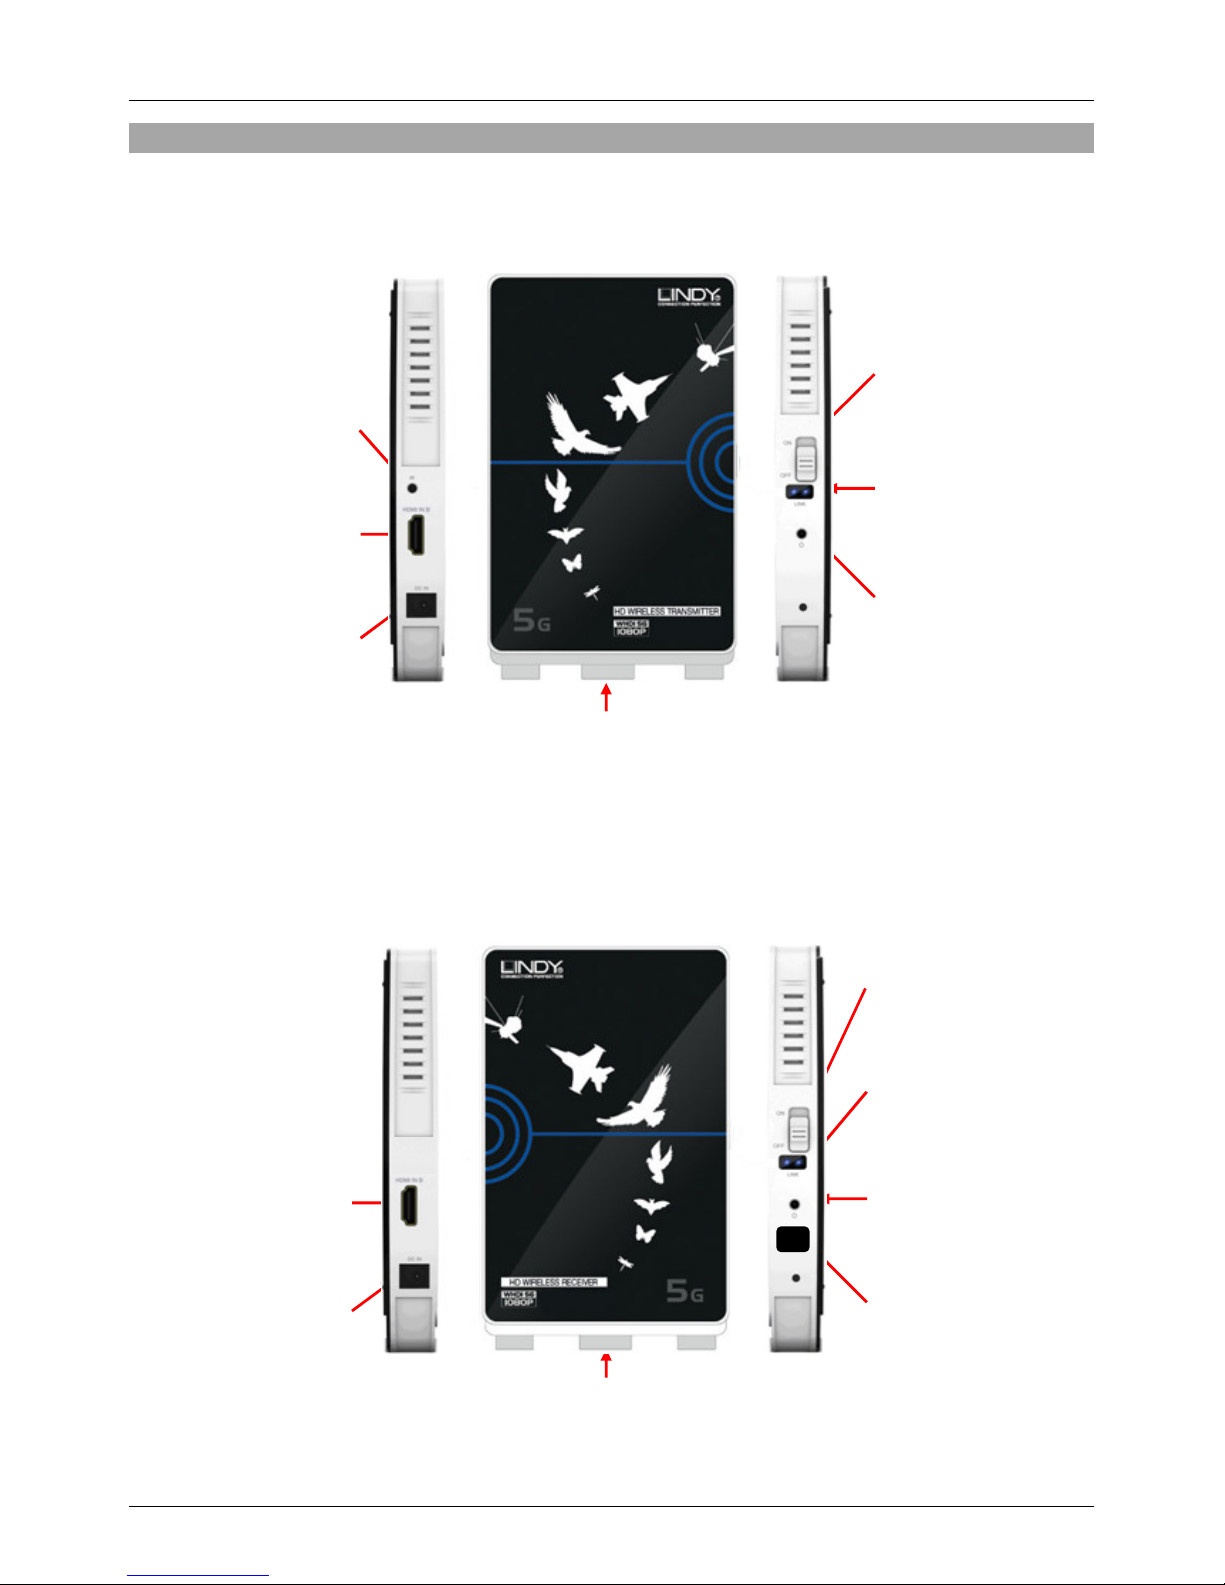
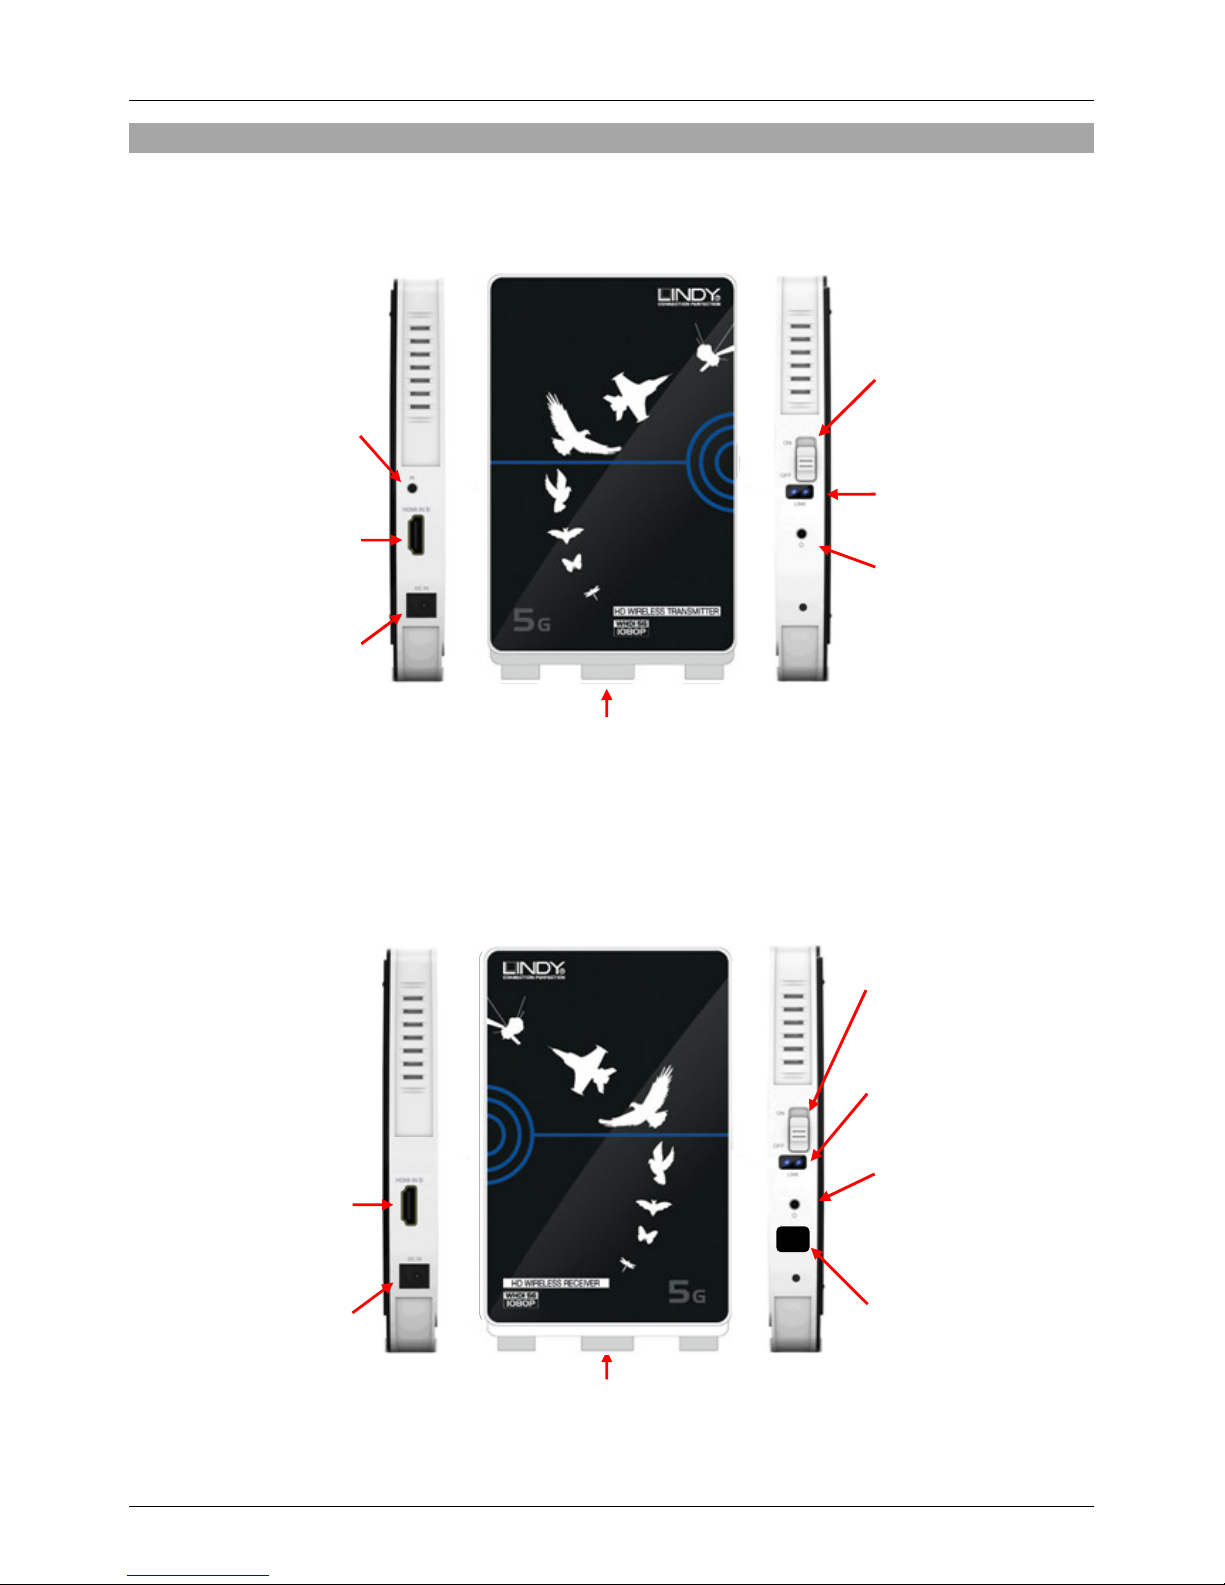
Connect the supplied IR
Connect your HDMI
Connect the supplied
Power the Wireless
Shows the power status
Connect your HDMI
Connect the supplied
Power the Wireless
Shows the power status
Overview
Wireless Transmitter
4. On/Off Switch
1. IR Input
Extender Cable here
2. HDMI Input
HDMI Transmitter on/off
5. Link LEDs
Wireless Link Indicator
Video Link Indicator
source device here
3. DC In
6. Power Indicator
of the unit
mains power supply here
7. Rotatable Foot
For use in vertical mode
Wireless Receiver
3. On/Off Switch
HDMI Receiver on/off
4. Link LEDs
Wireless Link Indicator
Video Link Indicator
1. HDMI Output
5. Power Indicator
display device here
2. DC In
mains power supply here
of the unit
6. IR Eye
Receives IR signals
7. Rotatable Foot
For use in vertical mode
2
Page 5

User Manual English
Installation
The Wireless Extender can be used in horizontal or vertical mode, depending on your
requirement, however for optimum performance it is recommened to operate in vertical mode.
To use the Extender in vertical mode simply slide the foot, on the bottom edge of each unit, until
it creates a 900 angle with the body of the unit.
The Wireless Extender is capable of sending a video signal up to 30m in an open environment
or up to 20m indoors though walls and floors. Actual distances will depend entirely on the
construction of the building and any walls or floors that are situated between the Transmitter
and Receiver units.
Important! Before starting the installation, please ensure that all devices are powered off.
The following steps are for an installation using HDMI equipment, if you are using DVI
equipment you should substitute the HDMI cables for DVI to HDMI cables where required.
1. Place the Transmitter unit near your HDMI media device
2. Connect the IR Extension Cable to the IR port (1) on the Transmitter unit
3. Place the other end of the IR Extension Cable near the IR port of your HDMI media device
4. Connect your HDMI media device to the HDMI In port (2) of the Transmitter unit, using a
standard HDMI cable (included)
5. Place the Receiver unit near you HDMI display/projector
6. Connect your HDMI display/projector to the HDMI Output port (1) of the Receiver unit
7. Connect the supplied power supply units to the DC IN ports of the Transmitter unit (3) and
Receiver unit (2)
Once these steps have been completed the Extender is ready to use, simply power on all
devices to begin operation.
Operation
Once all equipment is turned on the Extender will initiate a Wireless link, successful connection
of the link will be shown by the blue Wireless Link LED on both the Transmitter and Receiver
units. This may take a short while depending on the distance between the units and other
environmental factors.
When the initial Wireless Link has been established the Extender will then establish a Video
Link between the Transmitter and Receiver units, once this has been completed a second blue
3
Page 6

User Manual English
Link LED will be lit on both units. Whilst the Extender is creating the video link it is normal for
your HDMI display to flicker on and off. With both the Wireless and Video Link LEDs illuminated
the Extender is ready to transmit video. If your HDMI source and display devices support CEC
then your source device can simply be controlled using the displays remote control.
IR Extender Function
If your source and display devices do not support CEC then you may control your source device
remotely using the IR Extender function.
1. Ensure that the IR Eye on the Receiver unit is positioned to receive IR commands
2. Connect the supplied IR Extender Cable to the IR Input on the Transmitter unit
3. Position the IR Flasher near the IR Port of your source device
You can now control your source device from the display side of your installation, using the
source remote control.
Troubleshooting
The Wireless or Video Link LED is not lit
1. If the Transmitter and/or Receiver are positioned horizontally move them to the vertical
position. Switch both Extender units off and back on.
2. Reduce the distance between the Transmitter and Receiver units and then switch both
Extender units off and back on.
The screen is blank
1. Check that all connections are correctly made and that all units are powered on.
2. Check that the Wireless and Video Link LEDs are lit
The IR Extender does not work
1. Check that the IR Extender cable is correctly connected to the Transmitter unit.
2. Check that the IR Eye is visible and able to directly see your remote control.
3. Reposition the IR Flasher to another location near the IR port of your source device
4
Page 7

Benutzerhandbuch Deutsch
Einführung
Wir danken Ihnen für das entgegengebrachte Vertrauen durch den Kauf des LINDY Wireless
HDMI Extender. Der HDMI Extender verwendet die WHDI-Technologie um HDMI-Signale
kabellos über Distanzen bis 30m zu senden, ohne Kompression und fast verzögerungsfrei.
Lieferumfang
LINDY Wireless HDMI Extender (1x Transmitter, 1x Receiver)
Universalnetzteil (100…240VAC / 5VDC ~2,6A) x2
HDMI Kabel, ca. 1,2m
IR Senderkabel, ca. 1,4m
Dies Handbuch
Eigenschaften
Überträgt HDMI- oder DVI-Signale bis zu 30m (Freifeld) oder 20m (Konferenzraum)*
Unterstützt Full HD 1080p Signale einschließlich diverser 3D Formate und HDCP
Ideal geeignet für den Einsatz im Home Theater sowie mit Computer-Peripherie
Überträgt auch IR und CEC Signale von AV- und HDMI-Fernbedienungen
* Die tatsächlich erreichbare Distanz hängt sehr von den räumlichen und baulichen Gegebenheiten ab, Decken
und Wände behindern die Übertragungsleistung und verringern die Reichweite sehr.
Spezifikationen
Kompatibel zur HDMI 1.3 Spezifikation
Unterstützte HDTV Auflösungen: 1080p24/30/50/60, 1080i, 720p, 576p, 480p
Unterstützte PC Auflösungen: von 640x480 (VGA) bis 1920x1080
Unterstützt Deep Colour Modi: 30/36/48 Bit Farbtiefe
Audio-Formate: PCM, DTS, Dolby Digital
Unterstützt CEC (Weiterleitung von HDMI CEC Fernbedienungssignalen)
Unterstützt HDCP 1.2 Verschlüsselung
RF Übertragung: 5 Kanal MIMO (4 Sendekanäle + 1 Rückkanal)
Frequenzbereich: 5,1GHz bis 5,9GHz
Unterstützt maximale HDMI Kabellänge bis jeweils 5m am Ein- und Ausgang
Abmessungen: ca. 95 x 22 x 155mm (BxTxH)
1
Page 8
Benutzerhandbuch Deutsch
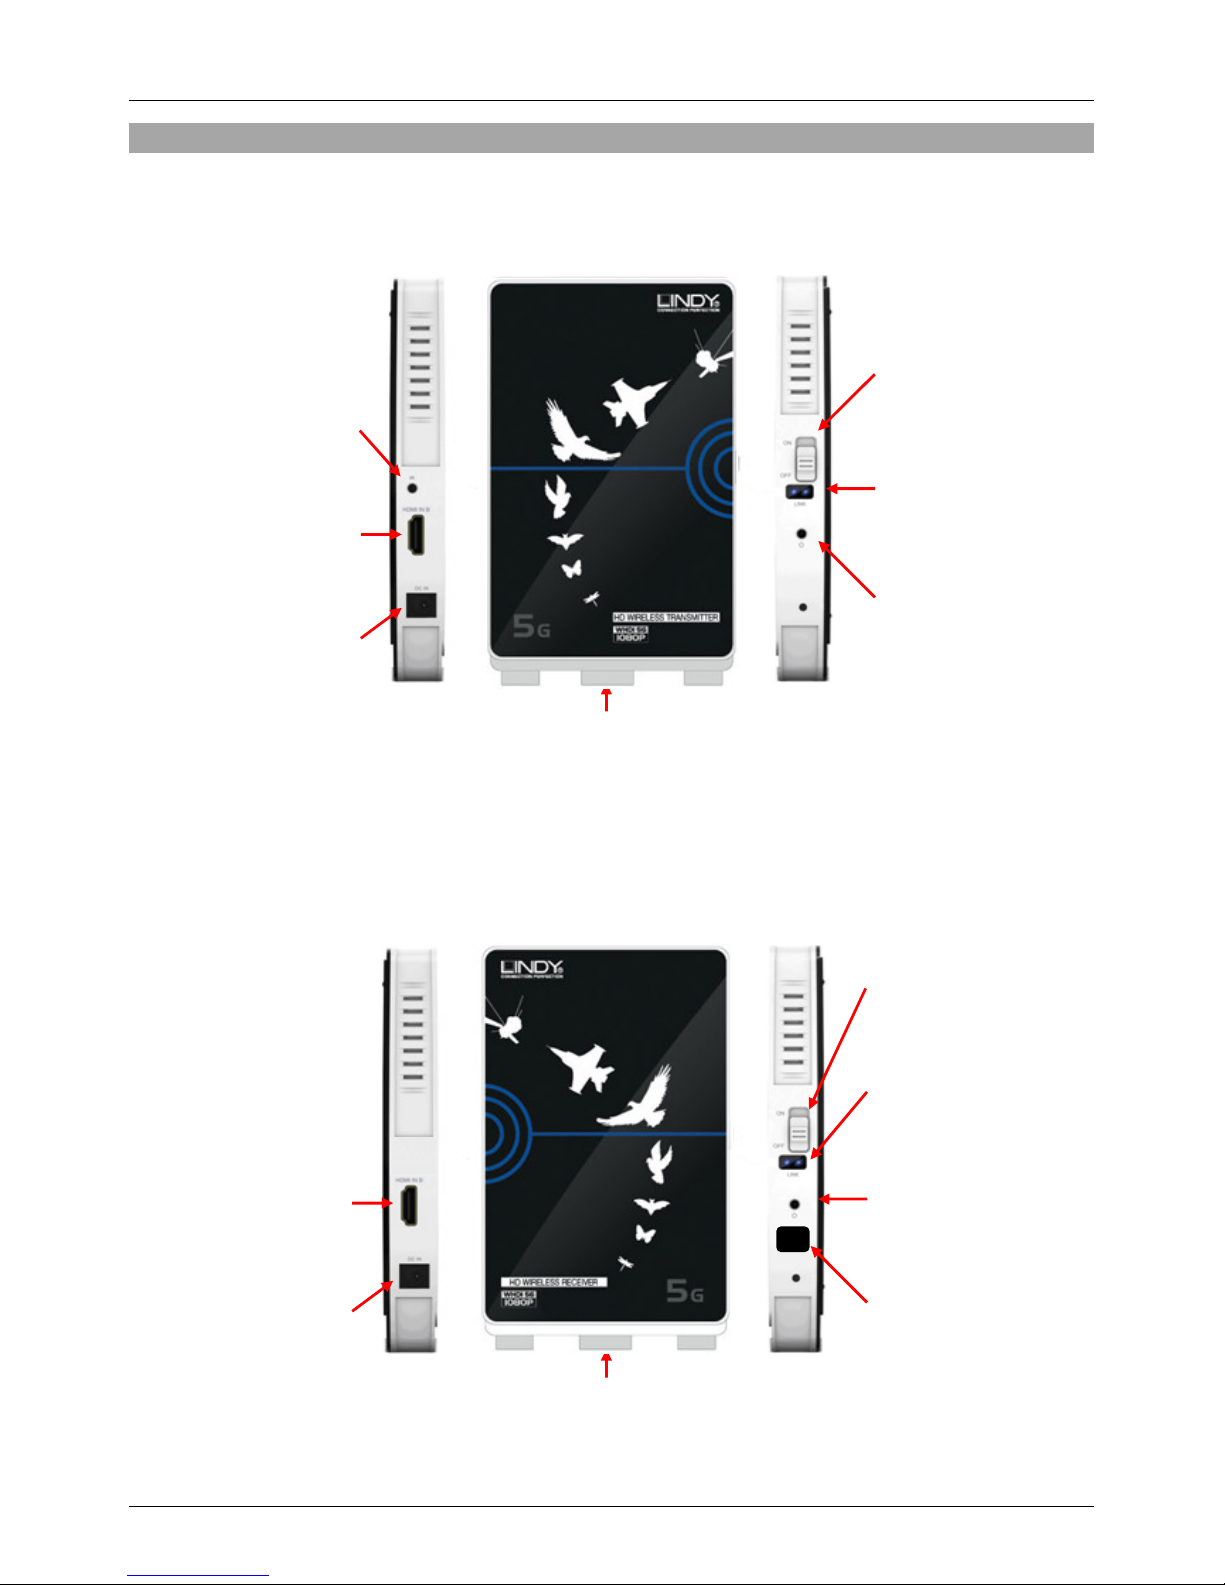
Übersicht
Wireless HDMI Transmitter
1. IR Ausgang
Hier das IR Transmitter
Kabel anschließen
2. HDMI Eingang
Hier die HDMI Signal-
quelle anschließen
3. DC In
Hier das eine der beiden
Netzteile anschließen
4. On/Off Schalter
HDMI Transmitter EIN
und AUS schalten
5. Zwei Link LEDs
Wireless Link LED
Video Link LED
6. Power LED
Status-LED für Ein-
/Ausgeschaltet
7. Drehbarer Fuß
Drehen Sie den Fuß und stellen
Sie das Gerät aufrecht!
Wireless HDMI Receiver
3. On/Off Schalter
HDMI Receiver EIN und
AUS schalten
4. Zwei Link LEDs
Wireless Link LED
Video Link LED
1. HDMI Ausgang
Hier das HDMI Ausgabe-
gerät anschließen
2. DC In
Hier das eine der beiden
Netzteile anschließen
5. Power LED
Status-LED für Ein-
/Ausgeschaltet
6. IR Eye
Sensor für IR
Fernbedienung
7. Drehbarer Fuß
Drehen Sie den Fuß und
stellen Sie das Gerät aufrecht!
2
Page 9

Benutzerhandbuch Deutsch
Installation
Der HDMI Wireless Extender sollte um die besten Übertragungsverhältnisse zu erreichen
aufrecht stehend verwendet werden! Drehen Sie dazu einfach den Drehfuß an der Unterseite
heraus und stellen Sie die Geräte aufrecht hin.
Der HDMI Wireless Extender kann Signale kabellos über Distanzen bis 30m im Freifeld
übertragen. In Gebäuden sind geringere Distanzen bis 20m (Konferenzraum) möglich. Wände
und Geschossdecken behindern die Übertragung zwischen Receiver und Transmitter.
WICHTIG! Bevor Sie mit der Installation beginnen schalten Sie bitte alle Geräte aus.
Die folgenden Schritte beschreiben die Installation mit HDMI Geräten. Bei Verwendung von DVI
Geräten ersetzen Sie bitte die HDMI-Kabel durch HDMI-DVI-Kabel.
1. Stellen Sie den Transmitter neben Ihrer HDMI Signalquelle auf
2. Schließen Sie das IR Transmitterkabel an und platzieren Sie den IR Transmitter vor dem IR
Sensor ihrer HDMI Signalquelle
3. Verbinden Sie mit dem HDMI-Kabel Ihre HDMI Signalquelle mit dem Transmitter
4. Stellen Sie den Receiver neben Ihrem HDMI Anzeigegerät auf
5. Verbinden Sie mit einem HDMI-Kabel Ihre HDMI Anzeigegerät mit dem Receiver
6. Schließen Sie die beiden Netzteile an Transmitter und Receiver an und schalten Sie alle
Geräte ein
Betrieb
Nachdem die Geräte eingeschaltet sind wird der Transmitter die kabellose Verbindung zum
Receiver in zwei Schritten aufbauen. Zuerst wird die Funkverbindung aufgebaut und die Link
LED sollte sowohl am Transmitter wie auch am Receiver leuchten. Danach sollte dann der
Videolink aufgebaut werden und die zweite blaue LED sollte auch leuchten. Dieser Vorgang
kann durchaus eine kurze Zeit (eine Minute) in Anspruch nehmen, je nach Distanz und Qualität
der Verbindung, auch abhängig von anderen störenden 5GHz WLAN Netzwerken und anderen
Störquellen in der Umgebung.
Während diesem Verbindungsaufbau kann Ihr HDMI Anzeigegeräte wiederholt flackern, Bilder
anzeigen und wieder ausgehen. Wenn an beiden Geräten beide blauen Anzeige-LEDs
kontinuierlich leuchten steht die Verbindung.
Wenn sowohl Ihre HDMI Quelle wie auch ihr Anzeigegerät die CEC Funktion unterstützen,
können Sie mit eine Fernbedienung beide Geräte auch ohne das IR Transmitterkabel am
Transmitter steuern.
3
Page 10

Benutzerhandbuch Deutsch
Funktion des IR Transmitterkabel
Wenn Ihre HDMI Signalquelle oder Ihr Anzeigegerät HDMI CEC nicht unterstützen, kann der
Receiver die Fernbedienungssignale der IR Fernbedienung der HDMI Signalquelle an den
Transmitter übertragen, welcher sie dann über das IR Transmitterkabel an Ihre HDMI
Signalquelle ausgibt. Dazu muss der IR Sensor des Receivers die Fernbedienungssignale
optisch aufnehmen können und das Transmitterkabel muss optisch vor dem IR Sensor der HDMI
Signalquelle platziert werden.
Fehlersuche
Bitte stellen Sie sicher, dass die POWER LEDs an Transmitter und Receiver leuchten
Andernfalls könnte ein Netzteil defekt sein, tauschen Sie in diesem Fall die Netzteile
untereinander aus um festzustellen, ob das Netzteil oder eines der Geräte defekt ist.
Die Wireless oder Video Link LED leuchtet nicht
1. Möglicherweise ist die Verbindung zu schwach, die Distanz zu groß, andere Funksignale
stören erheblich, sind zu viele Wände zwischen Transmitter und Receiver?
2. Stellen Sie Transmitter und Receiver in aufrechte Position und mit den flachen Seiten
zueinander zeigend auf. Schalten Sie beide Geräte einmal aus und wieder ein.
3. Vermindern Sie die Distanz zwischen Transmitter und Receiver und schalten Sie beide
Geräte einmal aus und wieder ein um dem Problem auf den Grund zu gehen. Stellen Sie die
Geräte notfalls im Abstand weniger Meter ohne störende Wände auf, nur um die generelle
Funktion zu verifizieren.
Der Bildschirm bleibt dunkel
1. Prüfen Sie alle Kabel auf korrekten Sitz und LEDs auf korrekte Statusanzeige
2. Möglicherweise liegt eine Inkompatibilität zwischen den Geräten vor. Wenn sie alle oben
genannten Maßnahmen durchgeführt haben, kontaktieren Sie bitte den LINDY Support und
berichten Sie genau den Status der LEDs und Ihrer Gerätekonfiguration
Das IR Transmitterkabel überträgt die Fernbedienungssignale nicht
1. Überprüfen Sie ob der IT Transmitter optisch vor dem Sensor der Signalquelle positioniert ist
2. Die Fernbedienung muss auf den IR Sensor am Receiver gerichtet werden
4
Page 11

Manuel Utilisateur Français
Introduction
Merci d’avoir choisi l’extender HDMI LINDY wifi. Il vous permet d’envoyer des signaux HDMI
Full HD 1080p jusqu’à 30m en utilisant la technologie WHDI, sans compression ni latence.
Contenu
Extender LINDY HDMI wifi x 2 (1 x émetteur, 1 x récepteur)
Alimentation (5V DC) x 2
Câble HDMI, 1.2m
Câble infrarouge, 1.4m
Ce manuel d’utilisateur
Caractéristiques
Envoie des signaux HDMI ou DVI jusqu’à 30m (champs libre) ou 20m (en intérieur)*
Supporte les signaux Full HD 1080p, y compris la 3D
Idéal pour les équipements home cinéma et ordinateurs
Envoie aussi les signaux infrarouges et CEC des télécommandes
* Les distances dépendront du type de murs entre l’émetteur et le récepteur.
Spécification
Compatible aux spécifications HDMI 1.3
Résolutions HDTV supportées: 1080p24/30/50/60, 1080i, 720p, 576p, 480p
Résolutions PC supportées: de 640x480 (VGA) à 1920x1080
Profondeur de couleurs: jusqu’à 30/36/48 bits
Formats audio: PCM, DTS, Dolby Digital
Supporte CEC
Supporte le codage vidéo HDCP 1.2
Communication RF (radiofréquence): 5 canaux MIMO
Fréquence de fonctionnement: 5.1GHz à 5.9GHz
Longueur maximale de câble HDMI: jusqu’à 5m en entrée comme en sortie
Dimensions: 95 x 22 x 155mm (LxPxH)
1
Page 12
Manuel Utilisateur Français
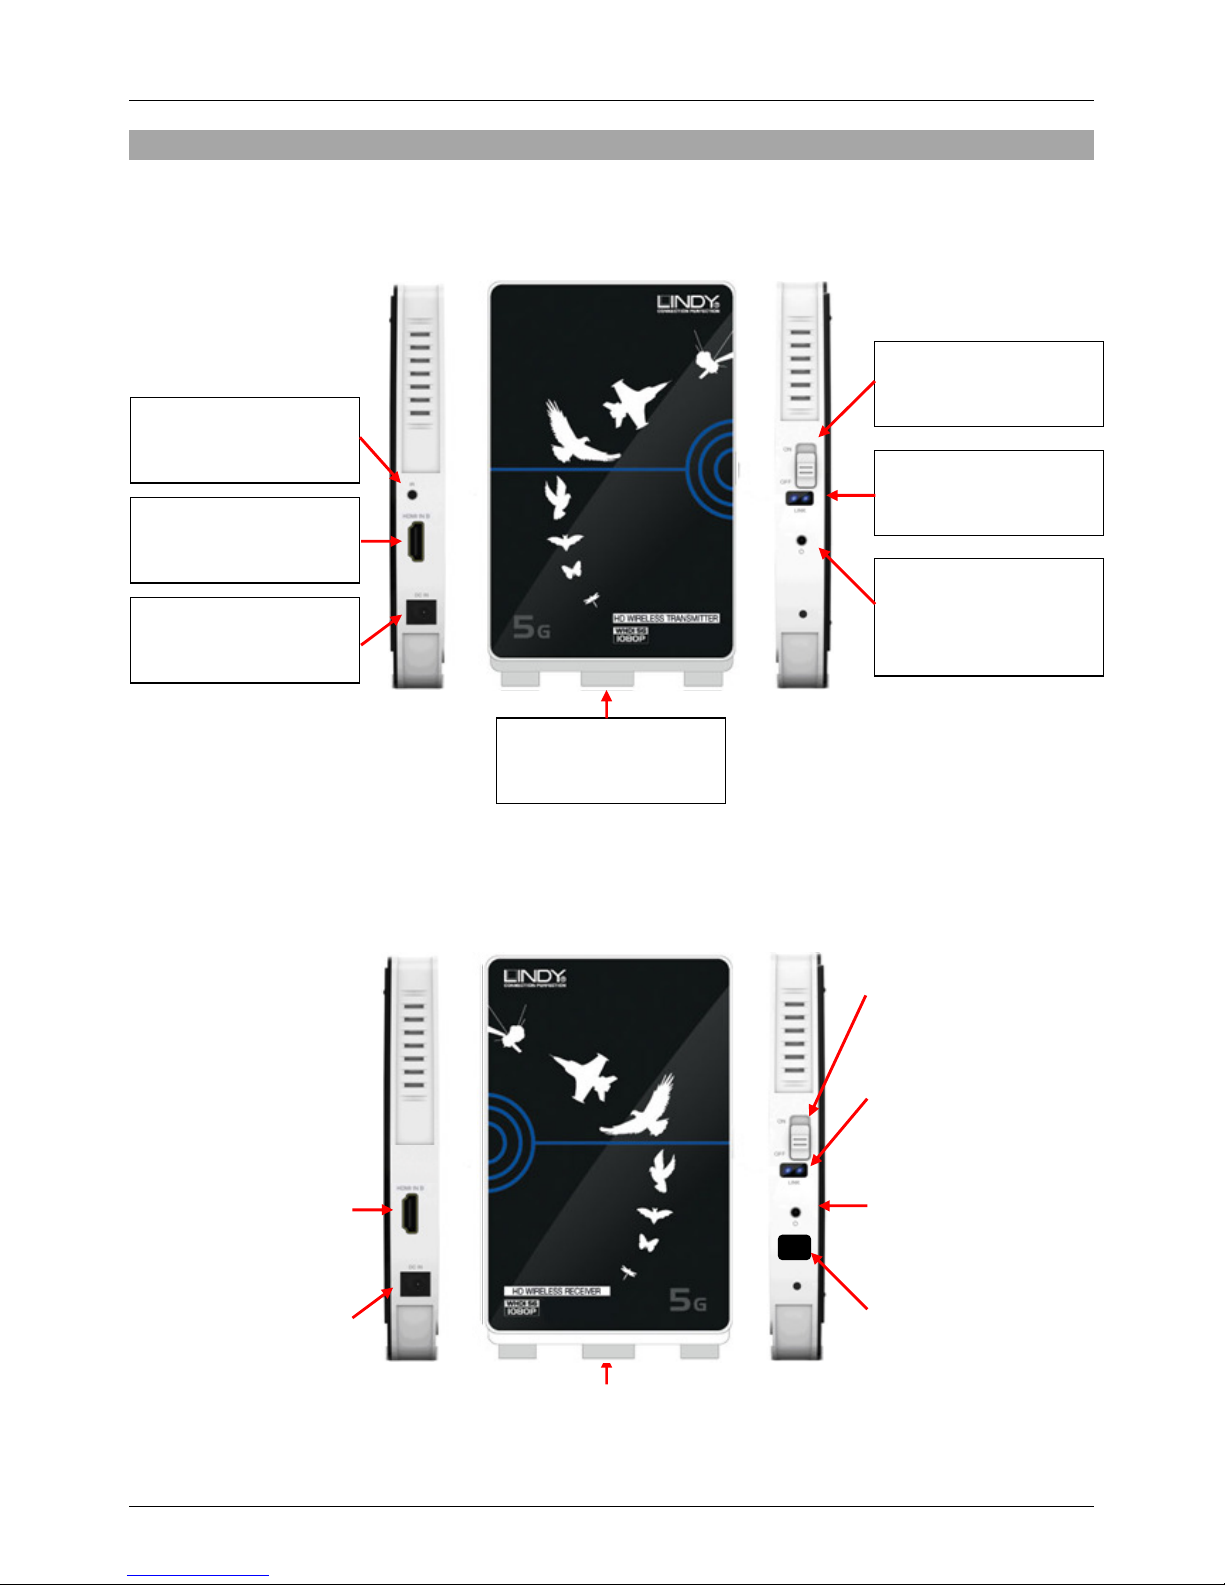
Connectez le câble
Connectez votre source
tation
Alimentez l’émetteur
Affiche l’état de
A utiliser en mode
A utiliser en mode
Connectez le câble
Connectez votre source
Alimentez l’émetteur
Visualisation
Emetteur HDMI wifi
4. Interrupteur on/off
1. Entrée infrarouge
extender IR ici
2. Entrée HDMI
HDMI wifi
5. LEDs du lien (“Link”)
Indicateur du lien wifi
et du lien vidéo
HDMI ici
3. Entrée DC
Connectez l’alimen
ici
6. Indicateur
d’alimentation
l’alimentation
7. Pied pivotable
vertical
Récepteur HDMI wifi
3. Interrupteur on/off
HDMI wifi
4. LEDs du lien (“Link”)
Indicateur du lien wifi
et du lien vidéo
1. Entrée infrarouge
extender IR ici
2. Entrée HDMI
HDMI ici
5. LEDs du lien (“Link”)
Indicateur du lien wifi
et du lien vidéo
6. Capteur IR
Reçoit les signaux IR
7. Pied pivotable
vertical
2
Page 13

Manuel Utilisateur Français
Installation
L’extender sans fil peut être positionnée horizontalement ou verticalement, pour une
performance optimale, il est recommandé de le laisser en position verticale via le pied fourni.
L’extender sans fil est capable d’envoyer des signaux jusqu’à 30m en champ libre ou jusqu’à
20m en intérieur. Les distances dépendent complètement du type de murs entre l’unité emttrice
et réceptrice.
Important! Avanr de démarrer l’installation, assurez-vous que tous les appareils soient éteints.
Les étapes suivantes sont pour l’installation d’appareils HDMI, si vous utilisez des appareils
DVI, vous utiliser des câbles ou adaptateurs HDMI vers DVI.
1. Placez l’émetteur à côté de votre source HDMI
2. Connectez le câble d’extension infrarouge au port IR (1) sur l’émetteur (transmitter)
3. Placez l’autre extrémité du câble infrarouge en face de votre source HDMI
4. Connectez votre source HDMI au port HDMI In (2) de l’émetteur, en utilisant le câble HDMI
standard fourni
5. Placez le récepteur (receiver) à côté de votre écran/projecteur HDMI
6. Connectez les 2 alimentations aux ports DC IN des unités émettrice (transmitter) et
réceptrice (receiver)
Une fois cet étapes effectuées, l’extender est prêt à être utilisé, allumez ensuite les autres
appareils (source et écran HDMI).
Utilisation
Dès que tous les appareils sont allumés, l’extender va initier un lien sans fil, si ce lien est activé:
la LED bleue du lien wifi sera allumée sur l’émetteur et le récepteur. Cela prend quelques
instants, dépendant de la distance et de l’environnement entre les deux unités.
Si le lien wifi est établi, l’extender va ensuite établir un lien vidéo entre l’émetteur et le
récepteur, si celui-ci s’active bien: une seconde LED bleue s’allumera sur les 2 unités. Pendant
que l’extender crée le lien vidéo, il est normal que l’image sautille sur l’écran HDMI.
Lorsque les 2 LED Wifi (wireless) et Video sont allumées en bleu, l’extender est alors prêt pour
transmettre de la vidéo. Si votre source HDMI et votre écran supportent les signaux CEC, alors
votre source peut être contrôlée simplement depuis la télécommande de l’écran.
3
Page 14

Manuel Utilisateur Français
Fonction infrarouge (IR) de l’extender
Si votre source et écran ne supportent pas les signaux CEC, vous devrez alors contrôler votre
source à distance en utilisant la fonction infrarouge de l’extender
1. Assurez-vous que l’oeil infrarouge de l’unité réceptrice (receiver) soit bien positionnée pour
recevoir les commandes IR de votre télécommande
2. Connectez le câble extender IR fourni à l’entrée IR de l’unité émettrice (transmitter)
3. Positionnez l’émetteur IR en face du capteur IR de votre source
Vous pouvez à présent contrôler votre source vidéo depuis votre écran, en utilisant la
télécommande de votre source vidéo.
Foire aux questions
La LED Wireless (Wifi) ou Video n’est pas fixe
1. Si l’émetteur et/ou le récepteur sont positionnées horizontalement, mettez-les en position
verticale. Eteignez puis allumez les 2 unités extenders.
2. Réduisez la distance entre l’émetteur et le récepteur, puis éteignez et rallumez les 2 unités
de l’extender.
L’écran est noir (pas d’image)
1. Vérifiez que les connexions soient bonnes et que les 2 unités soient allumées.
2. Vérifiez que les LEDs Wireless (Wifi) et Video soient fixes, en bleu
L’extender infrarouge (IR) ne fonctionne pas
1. Vérifiez que le câble extender IR soit correctement connectée à l’unité émettrice.
2. Vérifiez que l’oeil IR soit visible et capable de “voir” votre télécommande.
3. Repositionnez l’émetteur IR à un autre endroit proche de votre source vidéo
4
Page 15

Manuale d’uso Italiano
Introduzione
Grazie per aver scelto l’Extender Wireless HDMI LINDY. Questo Extender consente di inviare
segnali HDMI Full HD 1080p fino a 30m grazie alla tecnologia WHDI, senza compressioni o
latenza.
Contenuto della confezione
LINDY Wireless HDMI Extender x 2 (1 x trasmettitore, 1 x ricevitore)
Alimentatori (5V DC) x 2
Cavo HDMI da 1.2m
Cavo IR Extender da 1.4m
Questo manuale
Caratteristiche
Invia segnali HDMI o DVI fino a 30m (in spazi aperti) o 20m (ambienti interni)*
Supporta segnali Full HD 1080p e 3D
Ideale per applicazioni Home Cinema e con Computer
Invia segnali IR e CEC per poter controllare il dispositivo con il relativo telecomando
* Le distanze massime supportate dipendono dagli ambienti in cui si utilizza l’Extender, se ci sono pareti o piani tra
trasmettitore e ricevitore.
Specifiche
Compatibile con le specifiche HDMI 1.3
Supporta risoluzioni HDTV 1080p24/30/50/60, 1080i, 720p, 576p, 480p
Supporta risoluzioni per PC da 640x480 (VGA) a 1920x1080
Deep Colour, 30/36/48 bit
Formati Audio: PCM, DTS, Dolby Digital
Supporta CEC
Supporta codifica video HDCP 1.2
RF: 5 canali MIMO
Frequenza: da 5.1GHz a 5.9GHz
Supporta cavi HDMI lunghi fino a 5m in ingresso e in uscita
Dimensioni: 95 x 22 x 155mm
1
Page 16
Manuale d’uso Italiano
Collegare qui il cavo IR
Indicatori connessione
Panoramica
Trasmettitore
1. Ingresso IR
Extender
2. Ingresso HDMI
Connessione della
sorgente HDMI
4. Tasto On/Off
Accensione e
spegnimento unità
5. LED
Wireless e video
6. Indicatore alimentazione
3. Ingresso DC
Connessione
dell’alimentatore
7. Piedini regolabili
Per posizionarlo
verticalmente
Ricevitore
3. Tasto On/Off
Accensione e
spegnimento unità
4. LED
Indicatori connessione
Wireless e video
1. Uscita HDMI
Connessione di un
Monitor HDMI
2. Ingresso DC
Connessione
dell’alimentatore
5. Indicatore alimentazione
6. IR Eye
Riceve i segnali IR
7. Piedini regolabili
Per posizionarlo
verticalmente
2
Page 17

Manuale d’uso Italiano
Installazione
L’Extender Wireless può essere posizionato orizzontalmente o verticalmente. Per usarlo in
posizione verticale basta spostare i piedini sul bordo posteriore dell’unità fino a creare un
angolo di 900 con l’unità stessa.
L’Extender è in grado di inviare un segnale fino a 30m di distanza in uno spazio aperto o fino a
20m in installazioni in stanze o piani diversi. La distanza massima supportata può variare in
base alla conformazione dell’edificio e delle pareti in cui sono situati trasmettitore e ricevitore.
Importante! Prima di iniziare l’installazione, assicurarsi che tutti i dispositivi siano spenti.
I seguenti passaggi sono riferiti ad installazioni HDMI, con dispositivi DVI basta sostituire i cavi
HDMI con cavi DVI / HDMI.
1. Posizionare il trasmettitore dietro la sorgente HDMI
2. Collegare il cavo IR alla porta IR (1) sul trasmettitore
3. Posizionare l’altro capo del cavo IR vicino alla porta IR della sorgente HDMI
4. Collegate la sorgente HDMI all’ingresso HDMI (2) del trasmettitore con un cavo HDMI
(incluso)
5. Posizionare il ricevitore vicino alla porta HDMI del monitor/proiettore
6. Collegare il monitor/proiettore HDMI all’uscita HDMI (1) del ricevitore
7. Collegare gli alimentatori agli ingressi DC del trasmettitore (3) e ricevitore (2)
Una volta completata questa procedura l’Extender è pronto all’uso, basta accendere i dispositivi
collegati.
Utilizzo
Una volta che gli apparati sono accesi, l’Extender avvia una connessione Wireless che è
possibile riconoscere grazie ai LED blu su entrambe le unità. Questo processo potrebbe
avvenire in un breve periodo di tempo variabile a seconda della distanza tra le unità.
Una volta che avviene la connessione Wireless, l’Extender avvia una connessione Video tra le
unità, quando viene completata si accende il secondo LED blu su entrambe le unità. Durante
questo processo il monitor potrebbe accendersi e spegnersi. Quando entrambi i LED per le
connessioni Wireless e Video sono illuminati, l’Extender è pronto per trasmettere il segnale. Se
la sorgente e il monitor HDMI hanno il supporto CEC, la sorgente può essere controllata tramite
il telecomando del monitor.
3
Page 18

Manuale d’uso Italiano
Funzione IR Extender
Se la sorgente e il monitor non hanno il supporto CEC è possibile controllare la sorgente grazie
alla funzione IR Extender.
1. Assicurarsi che il sensore IR sul ricevitore sia posizionato in correttamente
2. Connettere il cavo IR Extender all’ingresso IR sul trasmettitore
3. Posizionare il sensore IR vicino alla porta IR della sorgente
In questo modo è possibile controllare la sorgente da dove è posizionato il monitor tramite il
telecomando della sorgente.
Soluzione dei problemi
I LED Wireless o Video non si accendono
1. Se il trasmettitore e/o il ricevitore sono posizionati orizzontalmente, spostarli in posizione
verticale. Spegnere e riaccendere entrambe le unità.
2. Ridurre la distanza tra le due unità, quindi spegnerle e riaccenderle.
Nessun segnale sul monitor
1. Controllare che tutte le connessioni siano effettuate correttamente e che tutti i dispositivi
siano accesi e funzionanti.
2. Controllare che i LED Wireless e Video siano accesi
L’IR Extender non funziona
1. Controllare che il cavo IR Extender sia collegato correttamente al trasmettitore.
Controllare che il sensore IR sia visibile e che non ci siano ostacoli tra il sensore e il
telecomando. Riposizionare il sensore IR vicino alla porta IR della sorgente.
4
Page 19

Radio Frequency Energy, Certifications
Shielded cables must be used with this equipment to maintain compliance with radio frequency
energy emission regulations and ensure a suitably high level of immunity to electromagnetic
disturbances.
CE Certification
This equipment complies with the requirements relating to electromagnetic compatibility (EMC)
and radio spectrum matters (R&TTE), ETSI EN 301489-1 V1.8, ETSI EN 301489-17 V2.1.1,
ETSI EN 301893 V1.5.1, ETSI EN 300328 V1.7.1, EN 62311, EN 55013+A1+A2, EN 55020,
EN 55022 A1, EN 55024 /A2, EN 61000-3 /A2 and EN 61000-3 according to the Council
Directives 2004/108/EEC (EMC) and 1999/5/EEC (R&TTE) on the approximation of the laws of
the Member States.
Page 20

Recycling Information
WEEE (Waste of Electrical and Electronic Equipment),
Recycling of Electronic Products
Europe, United Kingdom
In 2006 the European Union introduced regulations (WEEE) for the collection and recycling of
all waste electrical and electronic equipment. It is no longer allowable to simply throw away
electrical and electronic equipment. Instead, these products must enter the recycling process.
Each individual EU member state has implemented the WEEE regulations into national law in
slightly different ways. Please follow your national law when you want to dispose of any
electrical or electronic products. More details can be obtained from your national WEEE
recycling agency.
Germany / Deutschland
Die Europäische Union hat mit der WEEE Direktive Regelungen für die Verschrottung und das
Recycling von Elektro- und Elektronikprodukten geschaffen. Diese wurden im Elektro- und
Elektronikgerätegesetz – ElektroG in deutsches Recht umgesetzt. Dieses Gesetz verbietet das
Entsorgen von entsprechenden, auch alten, Elektro- und Elektronikgeräten über die
Hausmülltonne! Diese Geräte müssen den lokalen Sammelsystemen bzw. örtlichen
Sammelstellen zugeführt werden! Dort werden sie kostenlos entgegen genommen. Die Kosten
für den weiteren Recyclingprozess übernimmt die Gesamtheit der Gerätehersteller.
France
En 2006, l'union Européenne a introduit la nouvelle réglementation (DEEE) pour le recyclage
de tout équipement électrique et électronique.
Chaque Etat membre de l’ Union Européenne a mis en application la nouvelle réglementation
DEEE de manières légèrement différentes. Veuillez suivre le décret d’application
correspondant à l’élimination des déchets électriques ou électroniques de votre pays.
Italy
Nel 2006 l’unione europea ha introdotto regolamentazioni (WEEE) per la raccolta e il riciclo di
apparecchi elettrici ed elettronici. Non è più consentito semplicemente gettare queste
apparecchiature, devono essere riciclate. Ogni stato membro dell’ EU ha tramutato le direttive
WEEE in leggi statali in varie misure. Fare riferimento alle leggi del proprio Stato quando si
dispone di un apparecchio elettrico o elettronico.
Per ulteriori dettagli fare riferimento alla direttiva WEEE sul riciclaggio del proprio Stato.
LINDY No 38121
1st Edition, March 2011
www.lindy.com
 Loading...