

Page 1
User Manual English
Introduction
Thank you for purchasing the LINDY KVM Switch Pro Audio. This product is covered by a
limited 2 Year warranty.
Please read this manual carefully to fully understand all the functions and features of this
advanced KVM Switch.
This KVM Switch allows several computers to be connected and controlled from a single
keyboard, monitor and mouse thereby reducing hardware costs and maximising desk space.
KVM Switch Pro Audio
User Manual English
Benutzerhandbuch Deutsch
Manuel Utilisateur Français
Manuale d’uso Italiano
LINDY No. 32920 – 2 Port VGA
LINDY No. 32921 – 4 Port VGA
© LINDY ELECTRONICS LIMITED
For Home and Office Use
Tested to Comply with
FCC Standards
www.LINDY.com
& LINDY-ELEKTRONIK GMBH - FIRST EDITION (SEP 2008)
Product Features
The LINDY KVM Switch Pro Audio supports advanced features that allow computers to share
and switch one PS/2 keyboard, mouse as well as one VGA monitor and stereo speakers and
microphone.
•
Computer port selection by any of the following:
o Front panel push buttons on the switch
o Keyboard Hotkey – configurable by the user
•
Hot plug support for Windows with mouse & keyboard reset function
•
Audio support for microphone and speakers. Includes selectable switching function which
can be configured to exclude audio switching for uninterrupted listening to the same source
•
PS/2, VGA and audio versions available with 2 or 4 ports and supplied with KVM cables for
connecting to the computers
•
Powered from the computers PS/2 ports – no power supply required. An optional regulated
DC 9V power supply may be connected if required
•
DVI-I versions are also available with support for USB keyboards and mice
•
DVI-I versions use advanced DVI-I technology for digital video as well as analogue video
signals via the DVI-I connector. Supports all digital DVI-D Single Link resolutions up to 1920
x 1200, and analogue VGA resolutions up to 2048 x 1536. Supports Dual Head video card
operation when used with two monitors per computer
Package contents
LINDY KVM Switch Pro Audio ( 2 or 4 port)
2 or 4 sets of KVM cables (depending on model) to connect the computers
This manual
- 2 -
Page 2
User Manual English
Installation
You can now install your LINDY KVM Switch Pro Audio by following the procedure as
described below:
Step 1. Connect your keyboard, monitor and mouse to the PS/2 and VGA ports on the KVM
switch labelled CONSOLE. Connect your speakers and microphone if required.
Step 2. Connect your computers using the cables provided. Should you wish to extend the
operating distance then you may purchase suitable cables up to 5m from LINDY. Or you
may use high quality extension cables with standard connectors. As soon as you connect
any PS/2 cables the KVM Switch will be powered on if the computer is not disconnected
from the mains. This is because modern computers also supply power over the PS/2 ports
even when they are soft switched off.
Step 3. Turn on the power to all devices and switch on the computers if not already powered.
Remark: The KVM Switch supports the hot plug and keyboard & mouse reset function. That
means you don’t have to switch off the computers when plugging and unplugging cables if
you are using modern Windows operating systems.
If your Windows operating system locks the mouse you can use the mouse reset hotkey
(see section hotkey switching commands) or press port 1 button for 2…3 seconds.
If you are using Linux computers the operating system may not fully support the hot plug
function and lock or freeze the mouse when plugging or unplugging.
KVM switching options
Computer port selection may be made by any of the following:
o Front panel push buttons on the switch
o Keyboard Hotkey – configurable by the user
Front panel push buttons with white LED indicator
Press the front push button to select the appropriate port/computer. During the switching
process a white LED behind the push button will flash. The LED will remain on when switching
is completed and the connections are established. Depending on the configuration only the
KVM ports (PS/2 keyboard, mouse and monitor) or KVM and audio ports are switched. You may
wish to bind or unbind audio switching if required. The white port LEDs refer to the KVM port
status and reports an active connection to the computer at this port. If the LED is flashing the
computer connected to this port may be turned off or in standby mode. To learn more about
these switching options, please refer to the table on the next page.
Keyboard Hotkey Switching
The KVM switch may also be conveniently switched and configured using keyboard hotkeys.
This process is invoked by pressing a universal hotkey on the keyboard twice within 2 seconds.
The factory default setting for this universal hotkey is the SCROLL LOCK button. The KVM
switch can be reconfigured to use a different hotkey from the following list: NUM LOCK, or
CAPS LOCK, or F12 or Escape (ESC) key.
Press the universal hotkey twice to invoke the switching function – the KVM switch will confirm
this with a short beep signal. Depending on the next key you press (within 2 seconds) you can
select any of the available switching or configuration functions of the KVM switch. Please refer
to the following table for the available options.
User Manual English
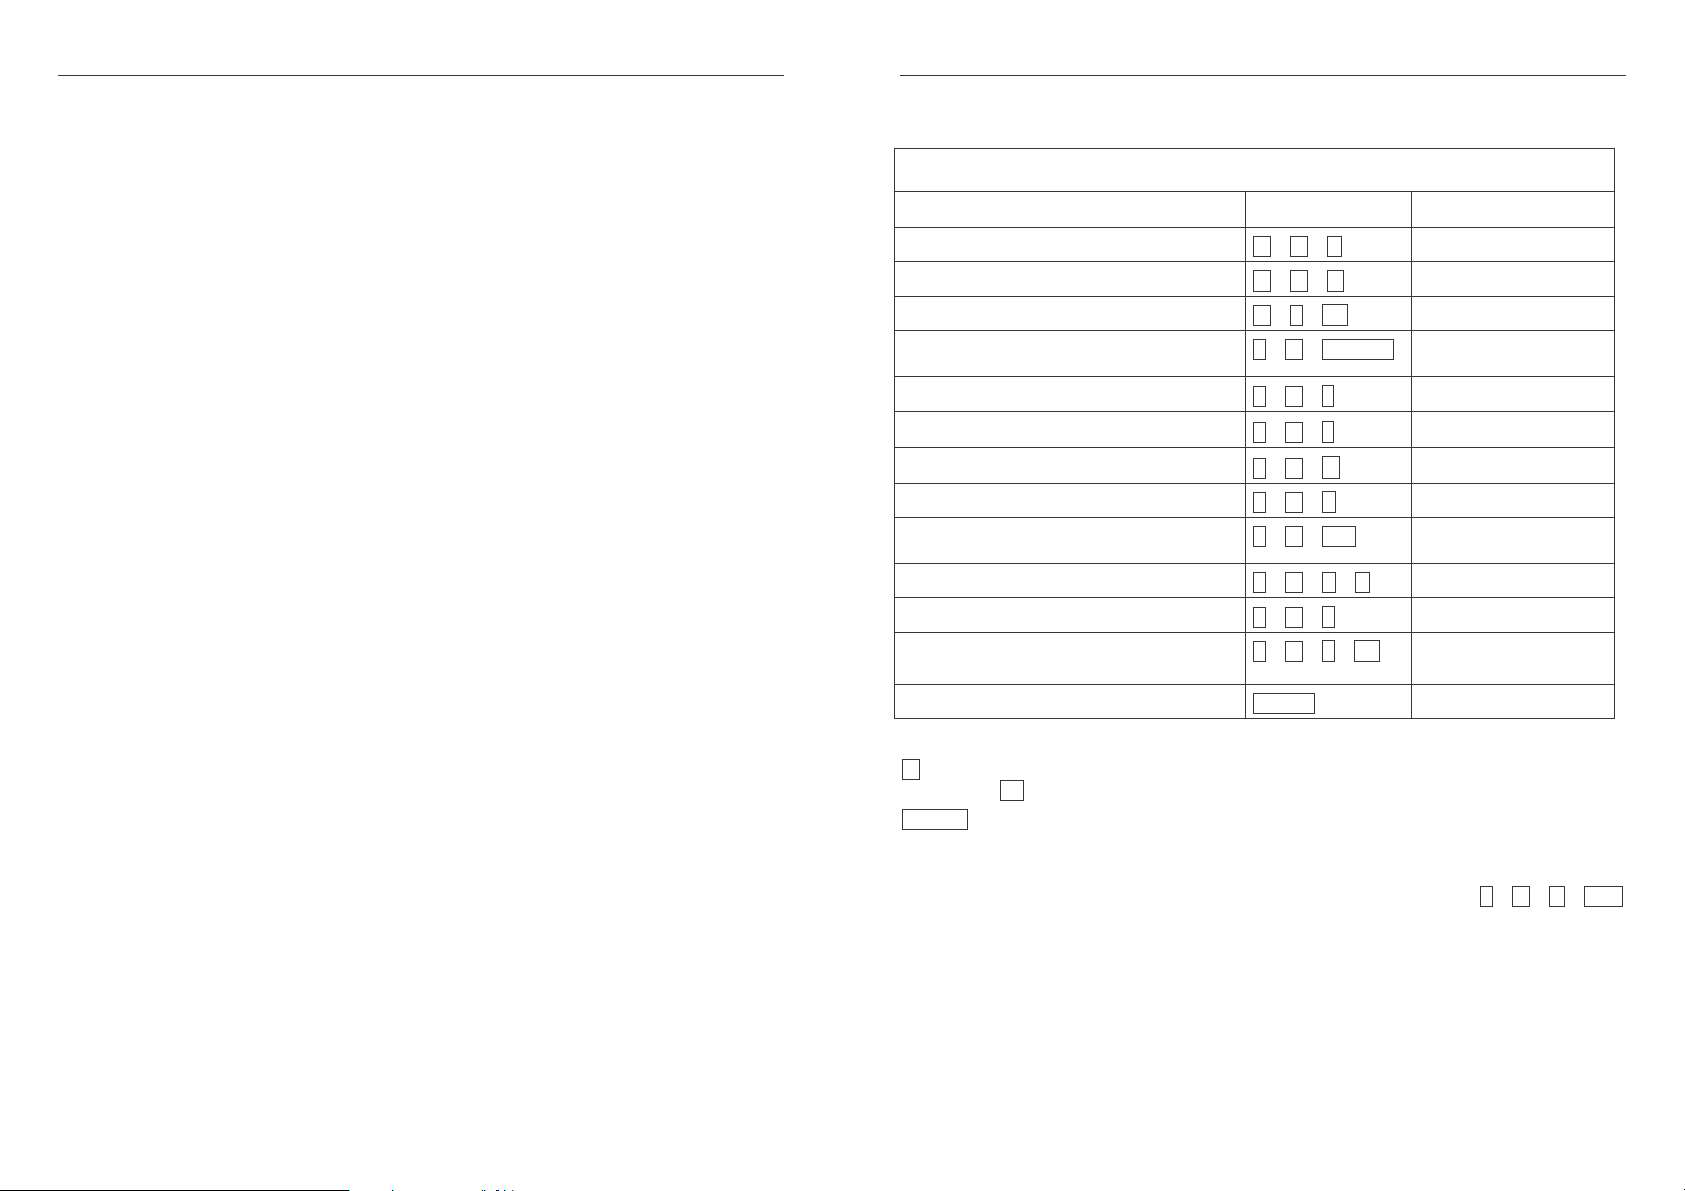
Hotkey Switching and Configuration Commands
KVM Switch Pro Audio
Command Hotkey Input Front / Remark
Binds KVM & Audio switching (Default)
Unbinds KVM & Audio switching
Switches directly to port 1, 2, 3 or 4
Switches Audio devices to port 1, 2, 3 or 4
Switches one port up
Switches one port down
Switches to the previous port
Switches the Beep confirmation ON / OFF
Mouse & keyboard reset (console)
Switches the universal Hotkey to **
Switches to Autoscan
Switches to Autoscan with port time 10s (1)
* + * + Q
* + * + W
* + * + 1-4
* + * + Fn1-Fn4
* + * + ↓↓↓↓
* + * + ↑↑↑↑
* + * + ←←←←
* + * + B
* + * + End
* + * + H + **
* + * + S
* + * + S + 0-9
When binding is active PC
ports will be switched too
Yes, press port 1 button for 3
seconds. Also see remark 1
Yes (see remark 2)
to 100s (0)
Stops Autoscan
Any key
* stands for the universal hotkey (factory default is SCROLL LOCK, configurable to new
hotkey ** NUM, CAPS, F12, or ESC key)
Fn1-Fn4 stands for the function keys F1, F2, F3, and F4
Remark 1: In case a non PnP operating system such as Windows NT or Linux locks the mouse
you may try to reset the mouse using one of the following hotkeys: * + * + M + 1/2/3
for a 2 or 3 or 5 button (wheel) mouse
Remark 2: To change the universal hotkey from the front push buttons please press the highest
port button until you hear two short confirmation beeps. Then press the chosen new
hotkey SCROLL, NUM, CAPS, F12, or ESC on your keyboard. The KVM switch will
confirm this by a short beep and the hotkey is permanently changed.
Yes
Yes, any button
- 3 -
- 4 -
Page 3

Benutzerhandbuch Deutsch
Benutzerhandbuch Deutsch
Einführung
Herzlichen Glückwunsch zum Erwerb des KVM Pro Audio. Wir wünschen Ihnen viel Freude mit
diesem neuen KVM Switch. Sollten Sie jemals Probleme mit dem Gerät haben, so kontaktieren
Sie bitte unsere Servicehotline. Die Kontaktinformationen für die verschiedenen Länder finden
Sie auf unserer Internetseite.
Bitte lesen Sie dieses Handbuch sorgfältig um die diversen Umschaltmöglichkeiten kennen zu
lernen, die Ihnen dieser technisch herausragende KVM-Switch bietet.
Durch den Einsatz dieses LINDY KVM Switches können Sie Kosten für zusätzliche Monitore,
Tastaturen und Mäuse einsparen. Ferner sparen Sie erheblich an Platz und Sie beseitigen die
Problematik, hin und wieder Mäuse und Tastaturen der einzelnen Rechner zu verwechseln.
Eigenschaften
KVM Switch Pro Audio ist ein KVM-Umschalter mit einigen herausragenden technischen
Features zum Einsatz mit mehreren PCs die über PS/2, VGA und Audio Stereo angeschlossen
werden:
•
Er unterstützt 2 Wege des Umschaltens zwischen den Rechnern:
o Umschalttaste am Switch
o Tastatur-Hotkey – Umschaltoptionen durch Anwender konfigurierbar
•
Hot Plug Unterstützung für Windows Rechner mit Maus- und Tastatur-Reset-Funktion
•
Der KVM-Switch schaltet bei Bedarf auch die Audio-Lautsprecher und ein Mikrofon mit um.
Er kann auch so konfiguriert werden, dass diese vom Umschalten ausgenommen werden
und immer an einen Port / Rechner gebunden bleiben
•
Anschlusskabel für die beiden Rechner enthalten
•
Stromversorgung über die PS/2 Ports der angeschlossenen Computer, keine Netzteil
erforderlich. (Zusätzlicher Anschluss für optionales Netzteil DC 9V geregelt.)
•
Verfügbar mit 2 und 4 Ports als VGA & PS/2 Versionen.
•
Verfügbar auch als & DVI-I Versionen mit Dual Head Unterstützung (2 Monitore pro
Rechner:
Lieferumfang
LINDY KVM Switch Pro Audio
2 bzw. 4 Kabelsätze (je nach Modell) zum Anschluss der Rechner
Dieses Handbuch
- 5 -
Installation
Nehmen Sie den KVM Switch und die Kabel aus der Verpackung und folgen Sie bitte den
Installationsschritten wie folgt:
Schritt 1: Schließen Sie Ihre Tastatur, Maus und Monitor an den Switch direkt an die mit
Console, Tastatur und Maus gelabelten Konsolenports an. Schließen Sie bei Bedarf
ebenfalls Ihre Lautsprecher und das Mikrofon an.
Schritt 2: Schließen Sie die Rechner unter Verwendung der beiliegenden KVM Kabel an. Falls
Sie längere Kabel benötigen, können Siue diese bis zu einer Länge von 5m direkt bei
LINDY bestellen. Sie können aber auch mit hochwertigen Verlängerungskabeln mit
Standardanschlüssen verlängern – aus Gründen der Bildqualität ist allerdings die
Verwendung von Verlängerungskabeln nicht optimal.
Sobald Sie die PS/2 Ports angeschlossen haben und einer der Rechner nicht vom
Stromnetz getrennt oder komplett abgeschaltet ist, wird der KVM Switch mit Strom versorgt
Schritt 4. Schalten Sie dann alle Geräte und die Rechner ein.
Hinweis Der KVM Switch unterstützt die Hot Plug Funktionalität für Maus und Tastatur. Sie
müssen also die Rechner nicht ausschalten, wenn Sie die Kabel abziehen und wieder
anschließen, sofern Ihr Betriebssystem, wie moderne Windows Systeme, dies korrekt
unterstützt. Falls Ihr Windows dennoch die Maus blockiert bzw, den Mauszeiger einfriert,
können Sie den Maus-Reset-Hotkey durchführen oder die Port 1 Umschalttaste für 3
Sekunden gedrückt halten. Linux Systeme unterstützen dies Funktion nur begrenzt,
eventuell müssen Sie hier den Rechner neu starten.
KVM Umschaltoptionen
KVM Switch Pro Audio unterstützt 2 Arten des Umschaltens:
o Umschalttaste am Switch
o Tastatur-Hotkey – durch Anwender konfigurierbar
Umschalttaste am Switch mit LED Anzeige
Drücken Sie die entsprechende Port-Taste um umzuschalten. Während des Umschaltvorganges blinkt die weiße Tasten-LED. Sie leuchtet für den aktiv ausgewählten Port dauerhaft
weiß nachdem der Umschaltvorgang abgeschlossen ist. Eine blinkende LED zeigt eine nich
abgeschlossen Umschaltvorgang an, oder, dass der am ausgewählten Port angeschlossene
Rechner nicht eingeschaltet ist.
Je nach Konfiguration werden ausschließlich die KVM- oder die KVM- zusammen mit den
Audio-Ports umgeschaltet. Beachten Sie hierzu bitte die weiter unten stehende Aufstellung der
Umschalthotkeys.
Tastatur Hotkey Umschaltung
Der KVM Switch kann komfortabel über Tastatur-Hotkeys umgeschaltet und konfiguriert
werden. Ein Hotkey-Kommando wird eingeleitet durch zweimaliges Drücken einer universellen
Hotkey-Taste. Die Werkseinstellung hierfür ist die Rollen-Taste (SCROLL LOCK). Dieser
universelle Hotkey kann bei Bedarf auf die ESCAPE-, Num-, Feststell-(Großschreibung), oder
F12-Taste umgestellt werden. (Siehe auch Folgeseite.)
Drücken Sie die universelle Hotkey-Taste 2x kurz hintereinander um die Umschaltfunktion zu
aktivieren. Der KVM Switch gibt zur Bestätigung einen Piepton aus. Je nach weiterem
eingegebenen Tastenkommando (innerhalb von max. 2 Sekunden) können Sie dann weitere
Tasten drücken und der KVM Switch gibt erneut einen Piepton aus. Folgende Optionen stehen
zur Verfügung:
- 6 -
Page 4

Benutzerhandbuch Deutsch
Hotkey Umschalt- & Konfigurations-Kommandos
KVM Switch Pro Audio
Kommando Hotkey-Eingabe
Bindet KVM- & Audio-Umschaltung (Default)
Entkoppelt KVM- & Audio-Umschaltung
Schaltet direkt zu Port 1, 2, 3 oder 4
Schaltet Audiogeräte zu Port 1, 2, 3 oder 4
Schaltet einen Port hoch
Schaltet einen Port hinunter
Schaltet zum vorherigen Port
Schaltet den Piepton An / Aus
Maus und Tastatur Reset Funktion
Schaltet den universellen Hotkey um auf **
Schaltet auf Autoscan
Schaltet auf Autoscan mit Kanalzeit 10s (1)
bis 100s (0)
Stoppt den Autoscan
* + * + Q
* + * + W
* + * + 1-4
* + * + Fn1-Fn4
* + * + ↓↓↓↓
* + * + ↑↑↑↑
* + * + ←←←←
* + * + B
* + * + Ende
* + * + H + **
* + * + S
* + * + S + 0-9
Jede Taste
Fronttaste /
Hinweis
Ja
Bei aktiver KVM-Audio-Kopp-
lung wird beides geschaltet
Ja, drücken Sie Port 1 Taste
für 3 Sekunden. Siehe auch
Anmerkung 1
Ja (siehe Anmerkung 2)
Ja, jede Taste
Manuel d’utilisateur Français
Introduction
Félicitations d’avoir choisi le switch KVM Pro audio.
Merci de soigneusement lire ce manuel pour apprendre à connaître les
possibilités qu’offrent ce switch KVM.
En utilisant ce switch KVM LINDY, vous pouvez économiser le coût de
claviers/écrans/souris supplémentaires. De plus, vous gagnez de la place et
évitez de confondre les claviers et souris de chaque ordinateur.
Caractéristiques
Ce switch KVM Pro audio est un commutateur permettant de connecter plusieurs ordinateurs
avec prises PS/2, VGA et audio stéréo:
•
Il supporte 2 méthodes de commutation entre les ordinateurs:
o Commutation par bouton sur le switch
o Séquence clavier Hotkey – Options de commutation configurable par l’utilisateur
•
Support ’‚Hot Plug’ pour les ordinateurs sous Windows avec fonction de reset pour la souris
et le clavier
•
Le switch KVM commute les haut-parleurs et le micro. La commutation du son peut être
dépendante de celles des ports PS/2 et VGA, ou indépendante (toujours sur le même
ordinateur)
•
Câble combo pour les ordinateurs, fournis
•
Alimentation via les ports PS/2 des ordinateurs connectés, aucune alimentation n’est
nécessaire. (prise pour alimentation optionnelle DC 9V régulée)
•
Disponible en version 2 et 4 ports en VGA & PS/2.
•
Egalement disponible en version DVI-I avec support Dual Head (2 écrans par ordinateurs)
* steht in der obigen Tabelle für die universelle Hotkey-Taste (Werkseinstellung Rollen-
Taste, durch Anwender änderbar auf ** Num-, Feststell-, F12-, oder Escape-Taste)
Fn1-Fn4 steht für die Funktionstasten F1, F2, F3, F4
Anmerkung 1 Falls Sie ein nicht-PnP Betriebssystem wie Win NT oder Linux einsetzen und
die Maus resettet werden soll drücken Sie bitte die folgenden Hotkeys: * + * + M +
1 oder 2 oder 3 je nachdem ob Sie eine 2 oder 3 oder 5 Tasten Maus mit Scrollrad
verwenden. Sollte dies nicht zum Erfolg führen müssen Sie den Rechner neu booten.
Anmerkung 2 Halten Sie zum Ändern des universellen Hotkeys über die Fronttasten die
höchste Porttaste gedrückt bis zwei Piepstöne erklingen, lassen sie los und drücken als
nächstes auf Ihrer Tastatur den neuen gewünschten Hotkey (Rollen-, Feststell-, Num-,
F12- oder ESC-Taste).
- 7 -
Livraison
Switch KVM LINDY Pro Audio
2 à 4 câbles à connecter sur 2 à 4 ordinateurs
Ce manuel
- 8 -
Page 5

Manuel d’utilisateur Français
Manuel d’utilisateur Français
Installation
Déballez le switch KVM et les câbles, puis suivez les étapes d’installations:
Etape 1: connectez votre clavier, souris et écran sur port console du switch. Si besoin,
connectez également vos haut-parleurs et votre micro.
Etape 2: connectez les ordinateurs via le câble combo fourni. Si vous avez besoin de câbles
plus long, vous pouvez en commander jusqu’à 5m, auprès de LINDY. Vous pouvez aussi
rallonger les câbles via des câbles rallonge – cela dit, la qualité d’image ne sera pas
optimale.
Dès que vous avez connecté les ports PS/2 et qu’un PC est connecté au secteur ou
allumé : le switch KVM sera alimenté en courant
Etape 3 Allumez ensuite tous les boîtiers et PC.
Note Le switch KVM supporte la fonctionnalité ’Hot Plug’ pour la souris et le clavier. Vous ne
devez alors pas éteindre l’ordinateur quand vous connectez/déconnectez les câbles, à
condition aussi que votre système d’exploitation supporte cela (comme les systèmes sous
Windows). Dans le cas où la souris se bloque (que le pointeur de souris se bloque), vous
pouvez lancer un reset pour la souris, ou bien appuyer le bouton du port 1 pendant 3
secondes. Les systèmes Linux supportent la fonction de façon limitée, vous devrez
éventuellement redémarrer l’ordinateur.
Options de commutation KVM
Switch KVM Pro audio supporte 2 manières de commutation:
o Touche de commutation sur le switch
o Séquence clavier Hotkey – configurable par l’utilisateur
Touche de commutation sur le switch avec LED de statut
Appuyez la touche du port en question, pour pouvoir s’y commuter. Pendant le processus de
commutation, la LED clignote en blanc. Elle s’allume en blanc pour signaler que la commutation
est active sur le port sélectionné. Une LED clignotante signale un processus de commutation en
cours, ou qu’aucun ordinateur n’est connecté sur le port sélectionné.
Suivant la configuration, les ports audio (micro et haut-parleurs) sont dépendants de la
commutation KVM, ou indépendants (restent connectés à un port donné). Veuillez lire les
détails des séquences clavier hotkey.
Séquence Hotkey clavier
Le switch KVM peut être commuté via des séquences clavier Hotkeys, qui peuvent être
configurées. Une commande/séquence Hotkey est introduite via deux pressions sur la touche
universelle Arrêt défil (SCROLL LOCK). Cette touche Hotkey peut être modifiée en touche
ECHAP, Num lock, Maj, ou F12. (voir tableau à la page suivante.)
Appuyez rapidement 2 fois sur la touche Hotkey pour activer la fonction de commutation. Le
switch KVM émet alors un bip sonore de confirmation. A chaque commande clavier saisie (en
moins de 2 secondes), vous pouvez presser d’autres touches et le switch KVM émettra un bip
sonore. Les options suivantes sont à la page suivante:
Séquence clavier de commutation & de configuration
Switch KVM Pro Audio
Commande Séquence
Hotkey
Lie la commutation KVM & audio (par défaut)
Sépare la commutation KVM & audio
Commute directement sur le port 1, 2, 3 ou 4
Commute les appareils audio sur le port 1, 2,
3 ou 4
Commute sur le port supérieur
Commute sur le port inférieur
Commute sur le port précédent
Active/désactive le bip sonore
Fonction de reset pour le clavier et la souris
Change la touche de commutation Hotkey
vers **
Démarre un autoscan
Règle l’autoscan avec durée de 10s (1)
jusqu’à 100s (0)
Stoppe l’autoscan
* correspond à la touche Hotkey universelle (touche ’‚Arrêt Défil’, modifiable par l’utilisateur
en ** : Num lock, Maj, F12, ou Echap)
Fn1-Fn4 correspond aux touches de fonction F1, F2, F3, F4
Remarque 1 dans le cas utilisez un système d’exploitation non Plug-and-Play (comme Win NT
ou Linux) et que vous devez faire un reset de la souris, lancez cette séquence Hotkeys:
* + * + M + 1 ou 2 ou 3 à chaque fois que vous utilisez une souris 2 ou 3 ou 5 boutons
avec molette. Si cela ne fonctionne pas, vous devrez redémarrer l’ordinateur.
Remarque 2 pour changer le bouton Hotkey depuis la façade du switch, pressez le
bouton correspondant au plus haut port, jusqu’à ce que vous entendez deux courts bip
sonore de confirmation. Puis pressez le nouveau bouton Hotkey désiré: ARRET DEFIL,
NUM LOCK, CAPS LOCK, F12, ou ECHAP sur votre clavier. Le switch KVM confirmera
cela par un court bip sonore et la touche hotkey sera changée de façon permanente.
* + * + Q
* + * + W
* + * + 1-4
* + * + Fn1-Fn4
* + * + ↓↓↓↓
* + * + ↑↑↑↑
* + * + ←←←←
* + * + B
* + * + Ende
* + * + H + **
* + * + S
* + * + S + 0-9
N’importe quelle touche
Vue en façade /
Note
Ja
Si la liaison KVM + audio est
active, le PC sera également
commuté avec l’audio
Oui, presser la touche du port
1 pendant 3 secondes. Voir la
remarque 1
Oui (voir remarque 2)
Oui, n’importe quelle touche
- 9 -
- 10 -
Page 6

Manuale d’uso Italiano
Manuale d’uso Italiano
Introduzione
Vi ringraziamo per aver scelto il LINDY KVM Switch Pro Audio. Questo prodotto è coperto da 2
anni di garanzia.
Leggete attentamente questo manuale per apprendere tutte le funzioni e le caratteristiche di
questo KVM Switch .
Questo KVM Switch consente di controllare più computer da un monitor, mouse e tastiera.
Caratteristiche
Questo Switch Pro Audio consente di gestire più computer da una stazione di lavoro con mouse
e tastiera PS/2 e Monitor VGA.
•
La commutazione può avvenire:
o Tasti sul pannello frontale dello switch
o Hotkey tastiera – configurabile dall’utente
•
Supporto Hot Plug su Windows per la funzione reset di mouse e tastiera
•
Supporto audio per microfono e casse, escludibile dalla commutazione dei computer
•
Versione con porte VGA e PS/2 da 2 o 4 porte con cavi di collegamento inclusi
•
Alimentato dalle porte PS/2 dei computer collegati, è possibile comunque collegare un
alimentatore opzionale da 9V DC
•
Disponibili le verisoni DVI-I e USB
•
Le versioni DVI-I supportano segnali video sia digitali che analogici grazie al connettore DVII. Supportano tutte le risoluzioni digitali DVI-D Single Link fino a 1920 x 1200, ed analogiche
VGA fino a 2048 x 1536. Supportano schede video Dual Head per collegare 2 Monitor per
computer.
Contenuto della Confezione
LINDY KVM Switch Pro Audio (2 o 4 porte)
2 o 4 cavi KVM (a seconda del modello) per il collegamento ai computer
Questo manuale
Installazione
Per installare il Vostro LINDY KVM Switch Pro Audio basta seguire questi semplici
passaggi:
Step 1. Collegare mouse, tastiera e monitor alle porte PS/2 e DVI sul KVM Switch (porte
CONSOLE). Collegare casse e microfono se necessarie.
Step 2. Collegare i computer tramite i cavi inclusi nella fornitura. All’occorrenza è possibile
sostituire i cavi a corredo con altri cavi LINDY di dimensioni differenti, considerando che la
distanza massima supportata è di 5m.
Step 3. Accendere i dispositivi e i computer collegati.
Nota Bene: Il KVM Switch supporta connessioni hot plug e funzione reset di mouse e tastiera.
Ciò significa che non dovete spegnere i computer ogni volta che collegate o scollegate i cavi
dallo Switch (Windows).
Se il vostro sistema operativo blocca il mouse potete utilizzare la funzione reset attivabile
tramite hotkey (vedi sezione Commutazione tramite hotkey) oppure tenere premuto il tasto
Porta 1 per 2….3 secondi. Se utilizzate Linux potrebbero non essere supportate le funzioni
hot plug e reset.
Opzioni di Commutazione
La selezione dei Computer collegati può avvenire nei seguenti modi:
o Tasti sul pannello frontale dello switch
o Hotkey tastiera – configurabili dall’utente
Tasti sul pannello frontale con indicatore LED bianco
Premere i tasti sul pannello frontale a seconda della porta che si desidera attivare. Durante la
commutazione il LED bianco dietro il tasto sullo switch lampeggerà, rimarrà invece fisso a
commutazione completata.
In base alla configurazione impostata verranno commutate solo le porte KVM (mouse, tastiera e
monitor) oppure sia le porte KVM che le porte Audio.
I LED bianchi sono riferiti allo stato della selezione delle porte KVM, se un LED lampeggia
significa che il computer corrispondente è spento o in standby.
Per approfondire il funzionamento di queste opzioni, consultare la tabella nella pagina
successiva.
Commutazione tramite Hotkey
La commutazione può essere effettuata anche tramite delle combinazioni di tasti (hotkey)
configurabili. Questo avviene quando l’hotkey principale viene premuta due volte di seguito
entro 2 secondi. L’hotkey di default principale è il tasto BLOC SCORR. Il KVM switch può
essere riconfigurato impostando una tra le seguenti hotkey: BLOC NUM, CAPS LOCK, F12 o
Escape (ESC).
Premendo due volte di seguito l’hotkey principale viene attivata la commutazione – il KVM
switch emetterà un breve segnale acustico per confermare il comando ricevuto. A questo punto
basta premere il tasto riferito alla porta che si intende selezionare (entro 2 secondi) oppure è
possibile accedere alle funzioni di configurazione del KVM switch. Consultare la tabella nella
pagina successiva per conoscere tutte le opzioni selezionabili.
- 11 -
- 12 -
Page 7

Manuale d’uso Italiano
Comandi Hotkey e Opzioni di Configurazione
KVM Switch Pro Audio
Comando Hotkey Pannello frontale
Commutazione congiunta KVM & Audio
* + * + Q
(Default)
Commutazione separata KVM & Audio
Commutazione diretta alla porta 1, 2, 3 o 4
Commutazione Audio alla porta 1, 2, 3 o 4
Commutazione alla porta precedente
Commutazione alla porta successiva
Commutazione alla porta precedente
Beep di conferma ON / OFF
Reset Mouse & Tastiera (console)
Sostituisci la hotkey universale con **
Autoscan
Commutazione di Autoscan tra 10 (1) a 100
* + * + W
* + * + 1-4
* + * + Fn1-Fn4
* + * + ↓↓↓↓
* + * + ↑↑↑↑
* + * + ←←←←
* + * + B
* + * + End
* + * + H + **
* + * + S
* + * + S + 0-9
A commutazione congiunta
abilitata, sarà attiva anche la
Si, premendo il tasto della porta
1 per 3 secondi. (#)
secondi (0)
Stop Autoscan
Tasto qualsiasi
* Rappresenta l’hotkey principale (di default è BLOC SCORR, configurabile con le hotkey
** NUM, CAPS, F12, o ESC)
Fn1-Fn4 sono i tasti funzione F1, F2, F3 e F4
(#) : In caso di blocco del mouse sotto un sistema operativo “non PnP” come Windows NT o
Linux potrebbe essere necessario utilizzare una tra le seguenti hotkey per sbloccarlo:
* + * + M + 1/2/3 per un mouse a 2, 3 o 5 tasti
(##) : per modificare la hotkey universale utilizzando i tasti sul pannello frontale dello switch,
tenere premuto il tasto corrispondente al numero di porta più alto fino a quando si sentono
una serie di beep di conferma. Quindi premere la nuova hotkey scegliendo tra BLOC
SCORR, NUM, CAPS, F12, o ESC. Dopo un altro breve beep di conferma la nuova hotkey
sarà attiva.
Si
porta PC
Si (##)
Si, qualsiasi tasto
Certifications and Statements
FCC Warning
This device complies with part 15 of the FCC Rules.
Operation is subject to the following two conditions:
1. This device may not cause harmful interference, and
2. This device must accept any interference received, including interference that may cause undesired
operation.
CE Statement, EMC Compatibility
This device complies with EN Standards EN55022 and EN55024 according to the relevant EC EMC
Directive. It must be used with shielded cables only to maintain EMC compatibility.
Dieses Produkt entspricht den einschlägigen EMV Richtlinien der EU und darf nur zusammen mit
abgeschirmten Kabeln verwendet werden.
LINDY Herstellergarantie
LINDY gewährt für dieses Produkt über die gesetzliche Regelung hinaus eine zweijährige
Herstellergarantie ab Kaufdatum. Die detaillierten Bedingungen dieser Garantie finden Sie auf der
LINDY Website aufgelistet bei den AGBs.
WEEE (Waste of Electrical and Electronic Equipment),
Recycling of Electronic Products
In 2006 the European Union introduced regulations (WEEE) for the collection and recycling of all waste
electrical and electronic equipment. The wheelie bin symbol shown indicates that this product must not
be disposed of with household waste. Instead the product must be recycled in a manner that is
environmentally friendly. For more information on how to dispose of this product, please contact your
local recycling centre or your household waste disposal service. Each individual EU member state has
implemented the WEEE regulations into national law in slightly different ways. Please follow your
national law when you want to dispose of any electrical or electronic products.
More details can be obtained from your national WEEE recycling agency.
Germany / Deutschland
Die Europäische Union hat mit der WEEE Direktive umfassende Regelungen für die Verschrottung und
das Recycling von Elektro- und Elektronikprodukten geschaffen. Diese wurden von der Bundesregierung
im Elektro- und Elektronikgerätegesetz – ElektroG in deutsches Recht umgesetzt. Dieses Gesetz
verbietet vom 24.März 2006 an das Entsorgen von Elektro- und Elektronikgeräten über die
Hausmülltonne! Diese Geräte müssen den lokalen Sammelsystemen bzw. örtlichen Sammelstellen
zugeführt werden! Dort werden sie kostenlos entgegen genommen. Die Kosten für den weiteren
Recyclingprozess übernimmt die Gesamtheit der Gerätehersteller.
LINDY No 32920, 32921
1st Edition, September 2008
www.lindy.com
- 13 -
- 14 -
 Loading...