

Page 1
USB 2.0 TV Tuner
& Video Capture Box
User Manual English
Benutzerhandbuch Deutsch
Manuel Francaise
LINDY No. 32898
www.lindy.com
© LINDY ELECTRONICS LIMITED & LINDY-ELEKTRONIK GMBH - FIRST EDITION (July 2004)
Page 2

English Manual
Deutsches Benutzerhandbuch
Kapitel 1 Einleitung
Kapitel 2 Hardware-Konfiguration
Kapitel 3 Installation von Treiber und Anwendung
Kapitel 4 WinDVR 3 Software
Kapitel 5 Kanalvorschau
Kapitel 6 Problembeseitigung
Manuel de l’utilisateur francaise
Veuillez trouver la version française de ce manuel en
téléchargement sur notre site Internet www.lindy.fr
Page 3

Table of Contents
Introduction........................................................................................................... 1
Features................................................................................................................. 1
Technical Specifications...................................................................................... 2
System Requirements.......................................................................................... 2
Package Checklist ................................................................................................ 3
Installation and Connections............................................................................... 4
Remote Control Handset...................................................................................... 6
Driver and Application Installation .....................................................................7
Windows 2000......................................................................................................................... 7
Windows XP..........................................................................................................................12
WinDVR 3 Software ............................................................................................ 17
Features ................................................................................................................................17
Control Panel ........................................................................................................................18
Display Screen......................................................................................................................18
Sub-Control Panels ..............................................................................................................19
TV Panel........................................................................................................................................... 19
General Panel...................................................................................................................................19
Right-Click Menu ................................................................................................ 20
Channel Preview................................................................................................. 21
Troubleshooting ................................................................................................. 22
Page 4

Instruction Manual
Introduction
The LINDY USB 2.0 TV Tuner & Video Capture Box is a compact, external TV Box, which features a built-in TV
Tuner and video decoder. It turns your computer into an all-in-one TV reception and video capture device, allowing
you to watch and record TV, and capture still and full motion video.
In addition to the advanced hardware features, the powerful, included software supports TV and digital video
recording, pre-scheduled TV recording, time-shifting playback, DVD video file recording, video cut and merge, and
many other advanced functions. The hardware and software work in partnership to implement the recording, editing,
and DVD/VCD making process.
Features
Full-Screen Video Resolution Input: Supports full-screen video resolution up to 720
x 480 30 fps for NTSC and 720 x 576 25fps for PAL
Full TV Channels: The built-in TV tuner, allows you to watch full screen TV on your
desktop or laptop computer
USB 2.0 Support: Allows you to hot-swap the device and provides DVD quality video
resolution
Multi-Input Connections: An S-Video input, Composite Video input, stereo audio
line-in and TV RF input means you can do more than just watch TV; you can record
full motion video and still frame images from your DV Camcorder, VCR or DVD player
etc
IR Remote Handset: Almost all the functions can be operated by remote control
Instant TV Replay: Pause, and rewind live television, watch in slow motion, and view
instant replays
Multi-Channel Preview: View a selection of the currently broadcast programmes
simultaneously. Once you’ve decided which programme you want, just click the image
and you’ll be able to watch and record in full screen mode
Play list Video Playback: Allows separate video files to be played back seamlessly -
enjoy a long movie without the hassle of opening and closing several video files
TV and Digital Video Recording Capabilities: The super fast software encoder can
record digital video in real-time
Pre-Scheduled TV Recording: You can easily set the time, date, and channel of the
TV programme you want to record
Time Shifting Playback: Record a programme, leave for a period of time, then come
back and watch what you’ve missed. You can even fast forward over commercials to
catch up with the live broadcast. All this can be done without interrupting the recording!
DVD Video File Recording: Video can be recorded directly in, or converted to,
MPEG-2 (DVD format). You can use a DVD Authoring Tool to create your own DVD
titles
1
Page 5

Instruction Manual
Technical Specifications
Supports RF input for the following TV systems:
o PAL B&G
o PAL D&K
o PAL I
o SECAM L
o SECAM D&K
Connections:
o Video Line In: 4 Pin Mini-DIN S-Video and RCA Composite Video
o Audio Line In: RCA Stereo Audio
o Audio Line Out: Phone jack connector
Interface: USB 2.0 High Speed, Type B
Status LEDs: Power and Link
Power Connector: +5V DC
System Requirements
PC with 2 available USB ports as detailed below –
o USB 2.0 port for connecting the Capture Box
o USB 2.0 port for connecting the USB to DC Power Cable
Minimum recommended CPU – P4 1.5GHz or equivalent
128MB RAM (256MB recommended)
AGP Video Adapter supporting a minimum resolution of 800 x 600
8x speed or above CD-ROM drive for driver and application installation
Sound Card or onboard sound controller
Windows 2000/XP
2
Page 6
Instruction Manual
A
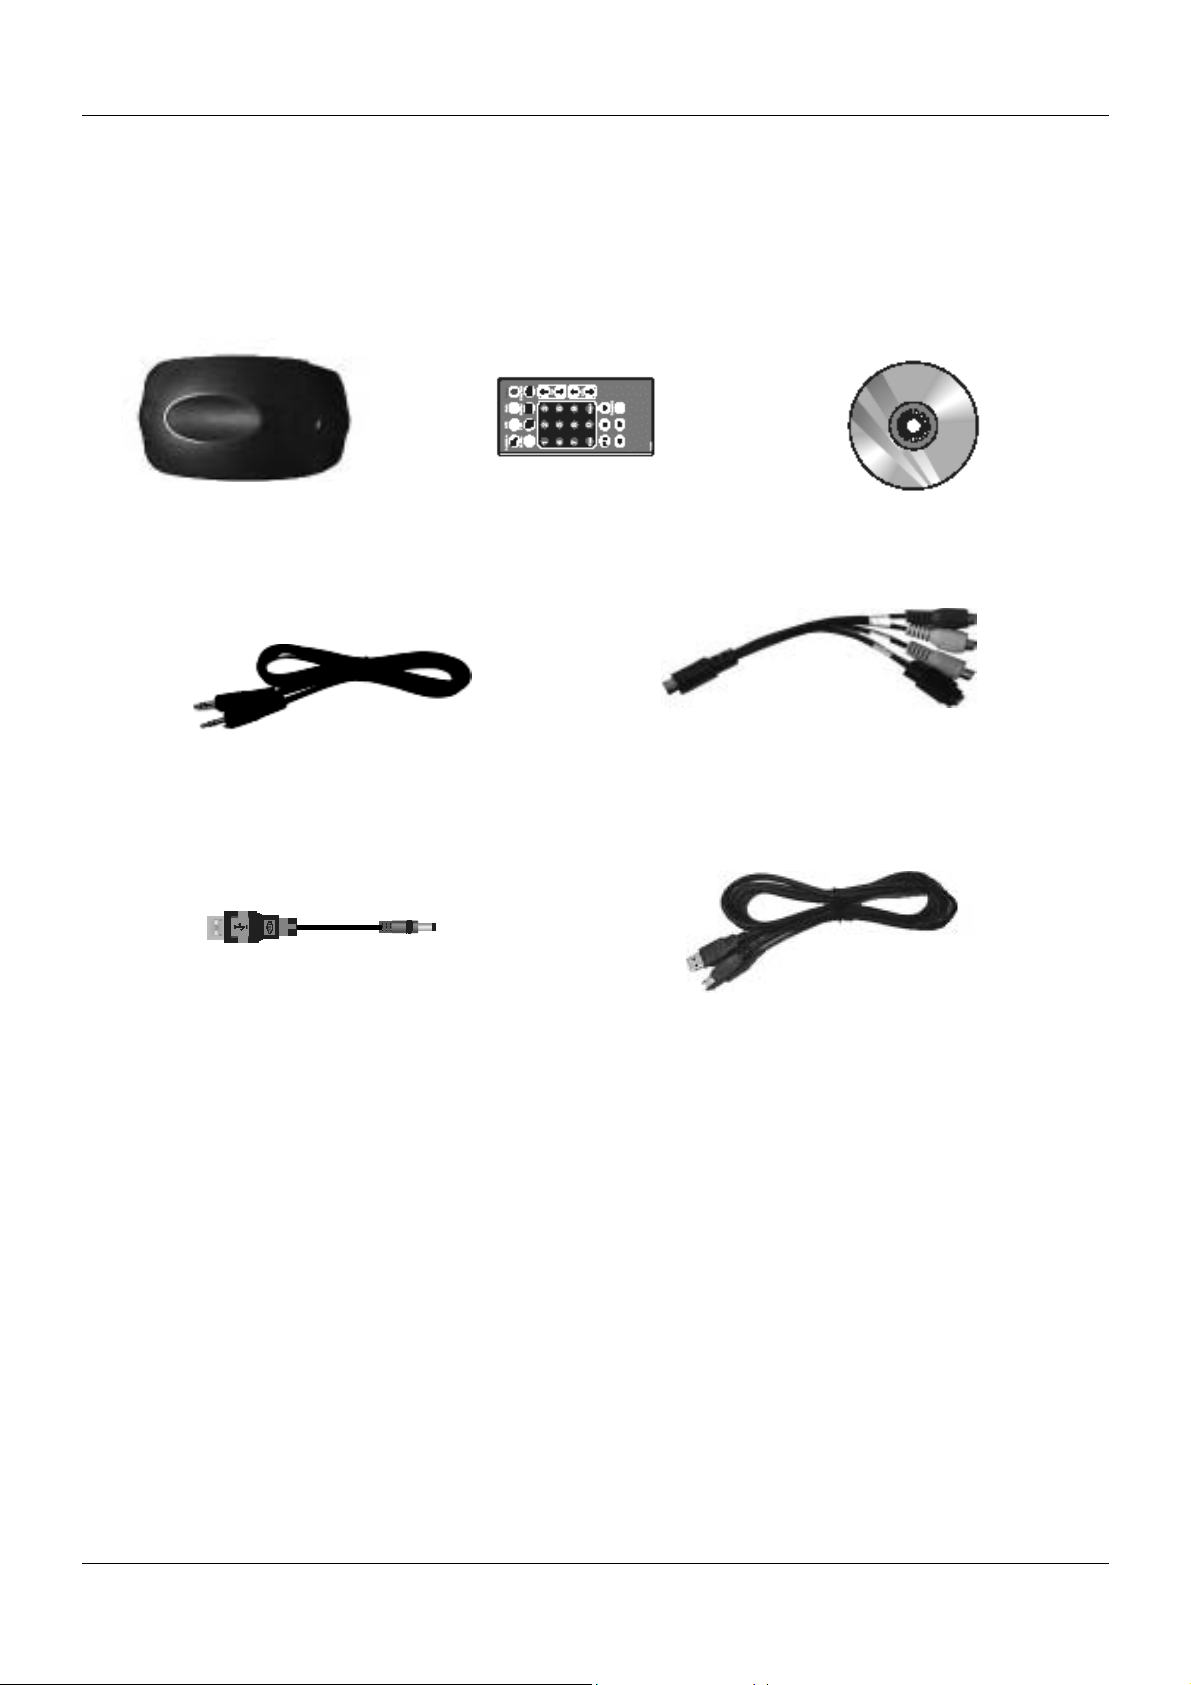
Package Checklist
Check and identify the supplied contents match the items below before operating the hub. If any of the items are
missing please contact your dealer as soon as possible.
LINDY USB 2.0
TV Tuner & Video
Capture Box
Audio Cable
(Stereo to Stereo)
Power Cable
IR Remote
Controller
Software CD
V Connection
Cable
USB 2.0 Cable USB to DC
3
Page 7
Instruction Manual
Installation and Connections
IMPORTANT:
Please install the driver and application from the CD before connecting the Capture Box!
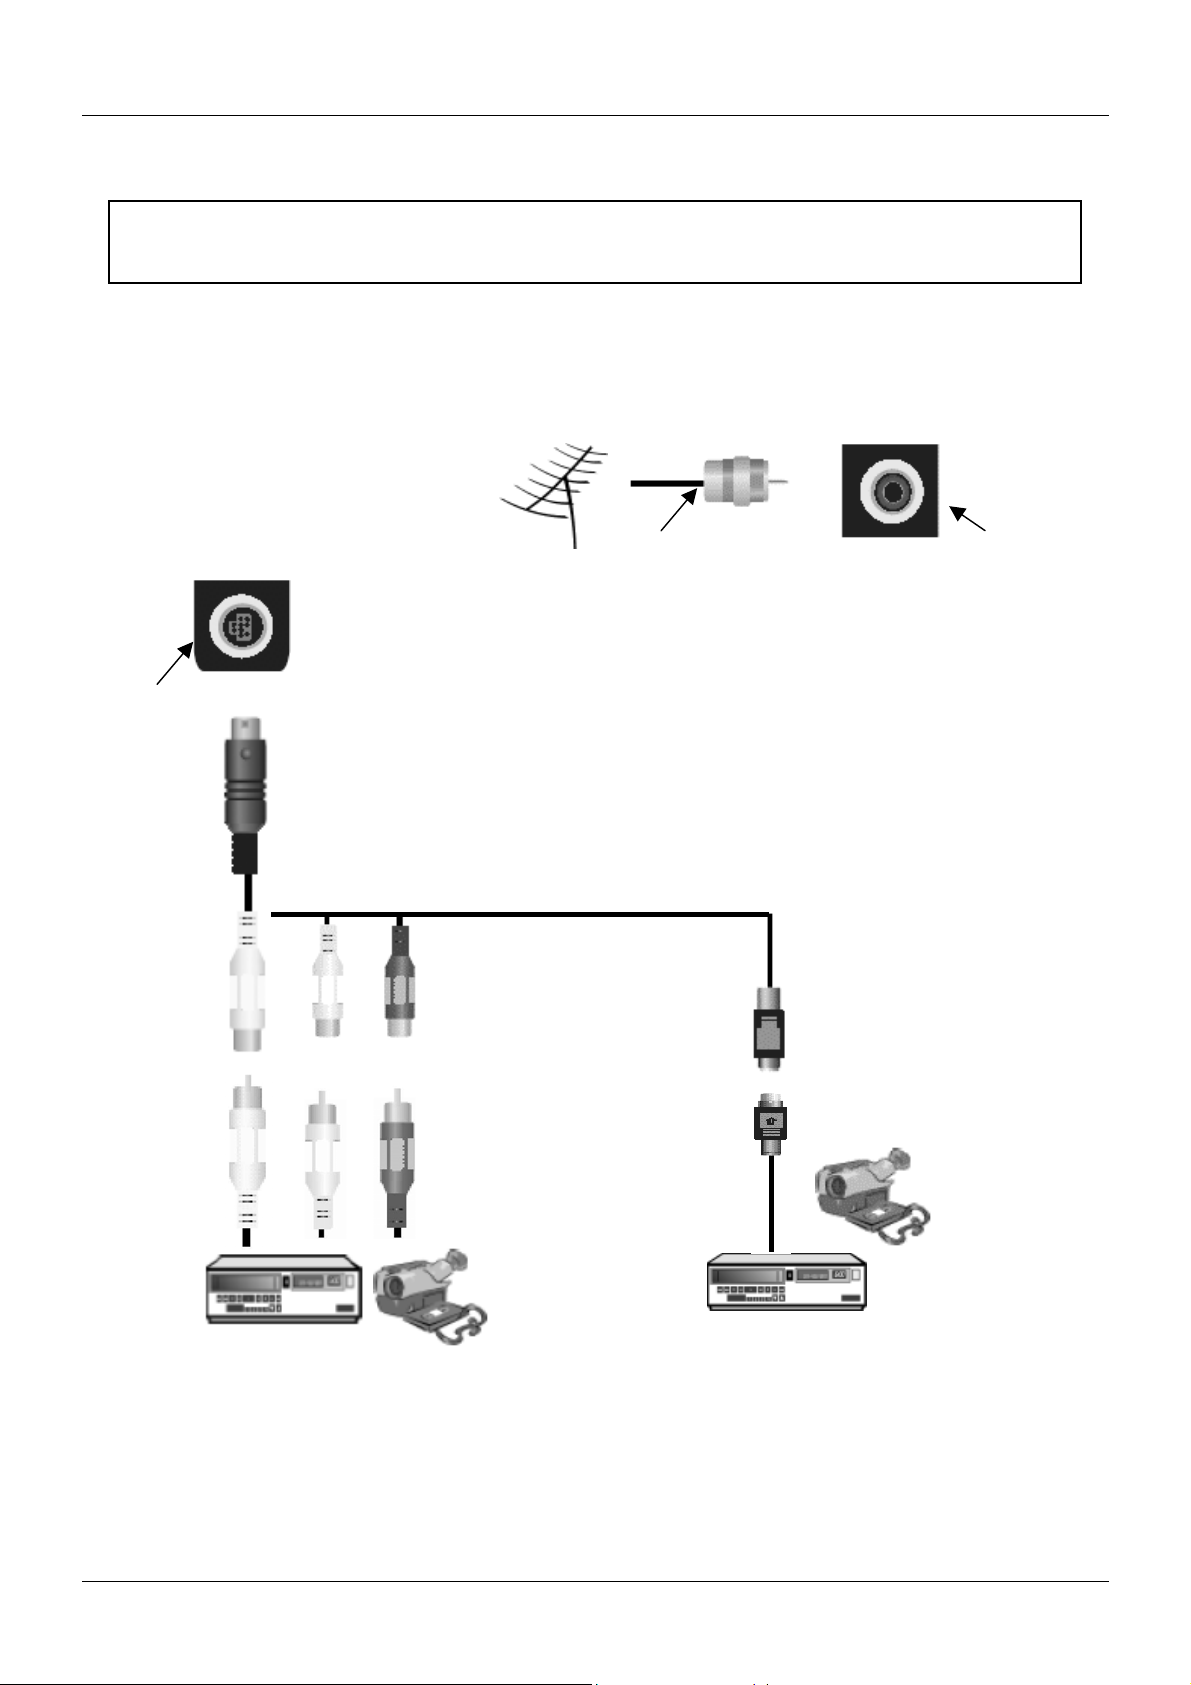
Please follow the step-by-step process below to complete the connection of all peripherals -
1. Connect the TV RF Cable
to the TV Tuner Port on the
rear of the Capture Box
TV RF Cable
2. Connect the AV Combined jack to
the AV In Port on the rear of the
Capture Box
TV Tuner
Port
AV In Port
3. Connect the Composite Video (Yellow), Audio
L (White) and Audio R (Red) connectors to the
corresponding connectors from your video device
4. Alternatively, if your
video device is suitably
equipped, you can use the
S-Video connection
4
Page 8
Instruction Manual
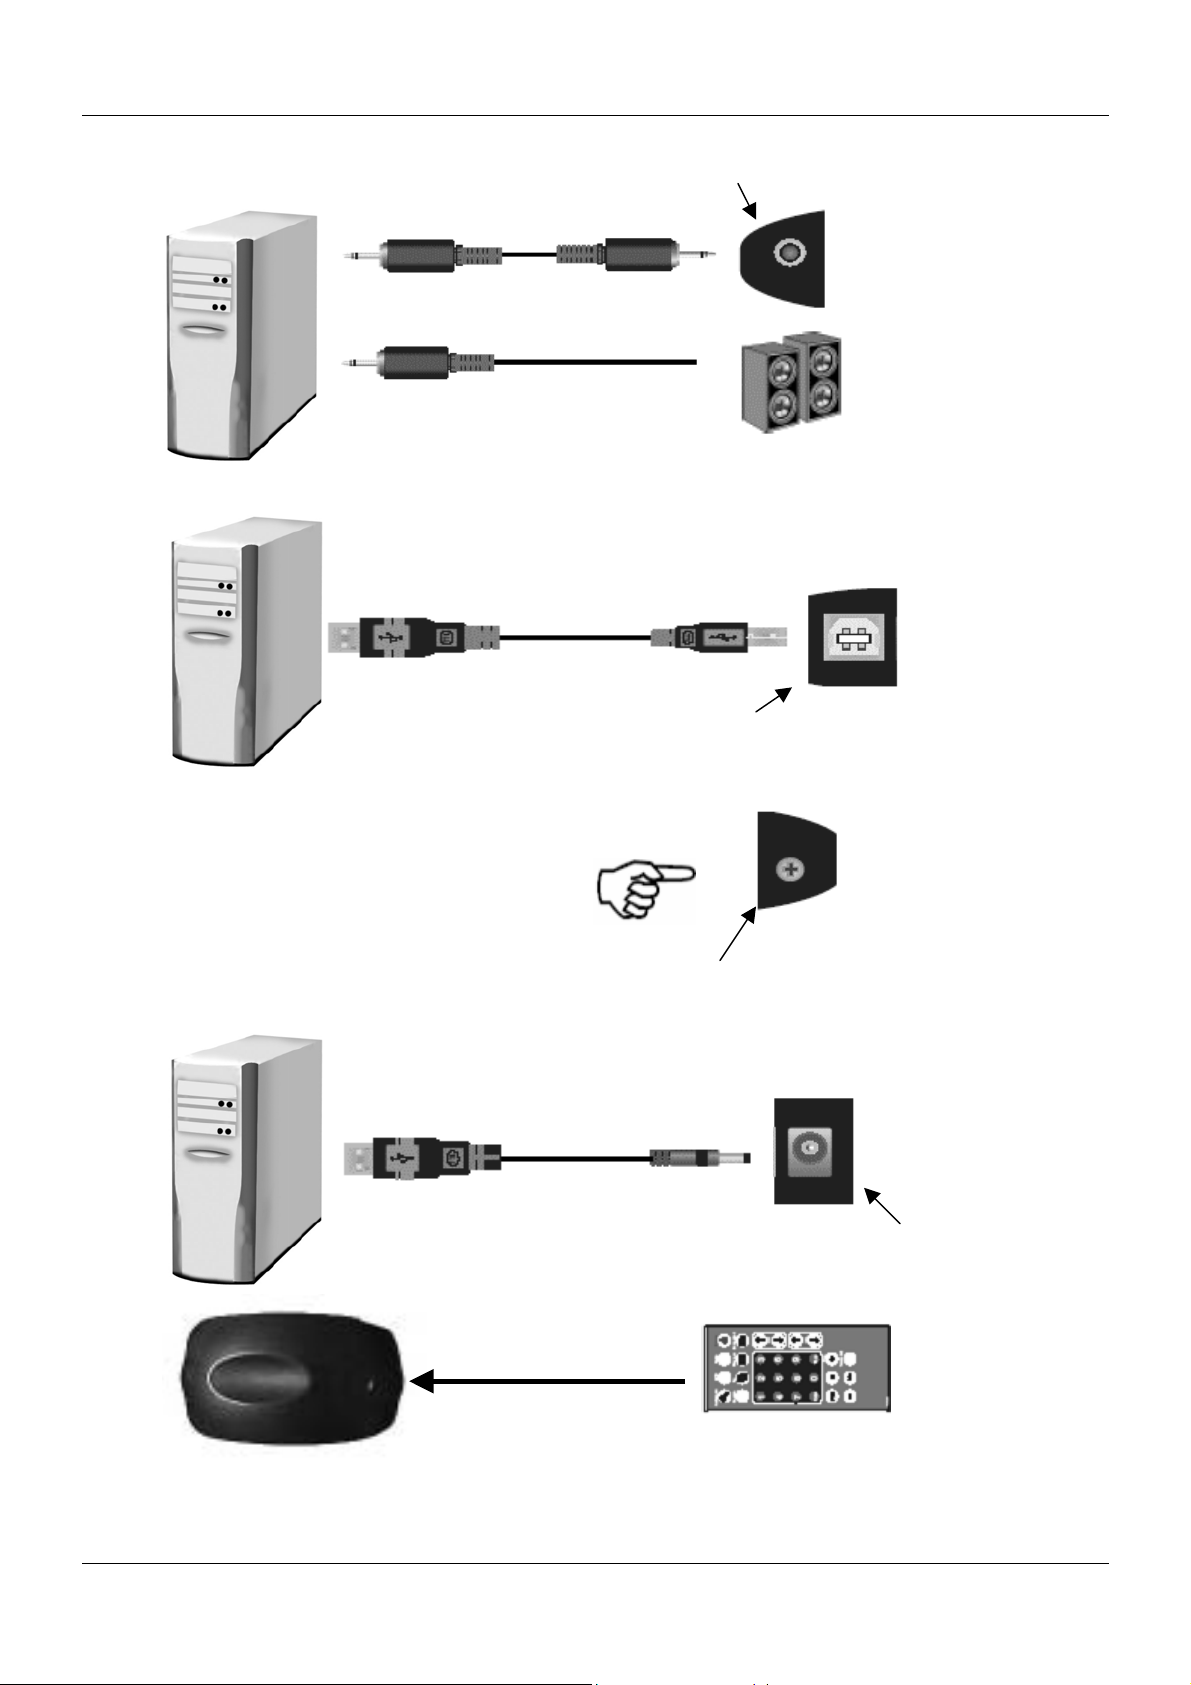
9. Use the SNAP button to
take a snapshot picture
To PC’s Line In Port
Speaker Output
7. Connect the USB 2.0 cable to the USB
Out Port on the Capture Box and to an
available USB 2.0 Port on your PC
8. Connect the USB to DC Power Cable to
the DC-In Port on the Capture Box and to a
USB port on the PC
Audio Line
Out Port
USB Out Port
SNAP button
5. Connect one end
of the Audio Cable to
the Audio Line Out
Port on the side of
the Capture Box.
Connect the other
end to the Line In
Port on your PC
6. Make sure your
PC has speakers
connected!
DC In Port
10. Make sure the IR Remote Controller is aimed
directly at the LED detection window when using
it to control the Capture Box
5
Page 9
Instruction Manual
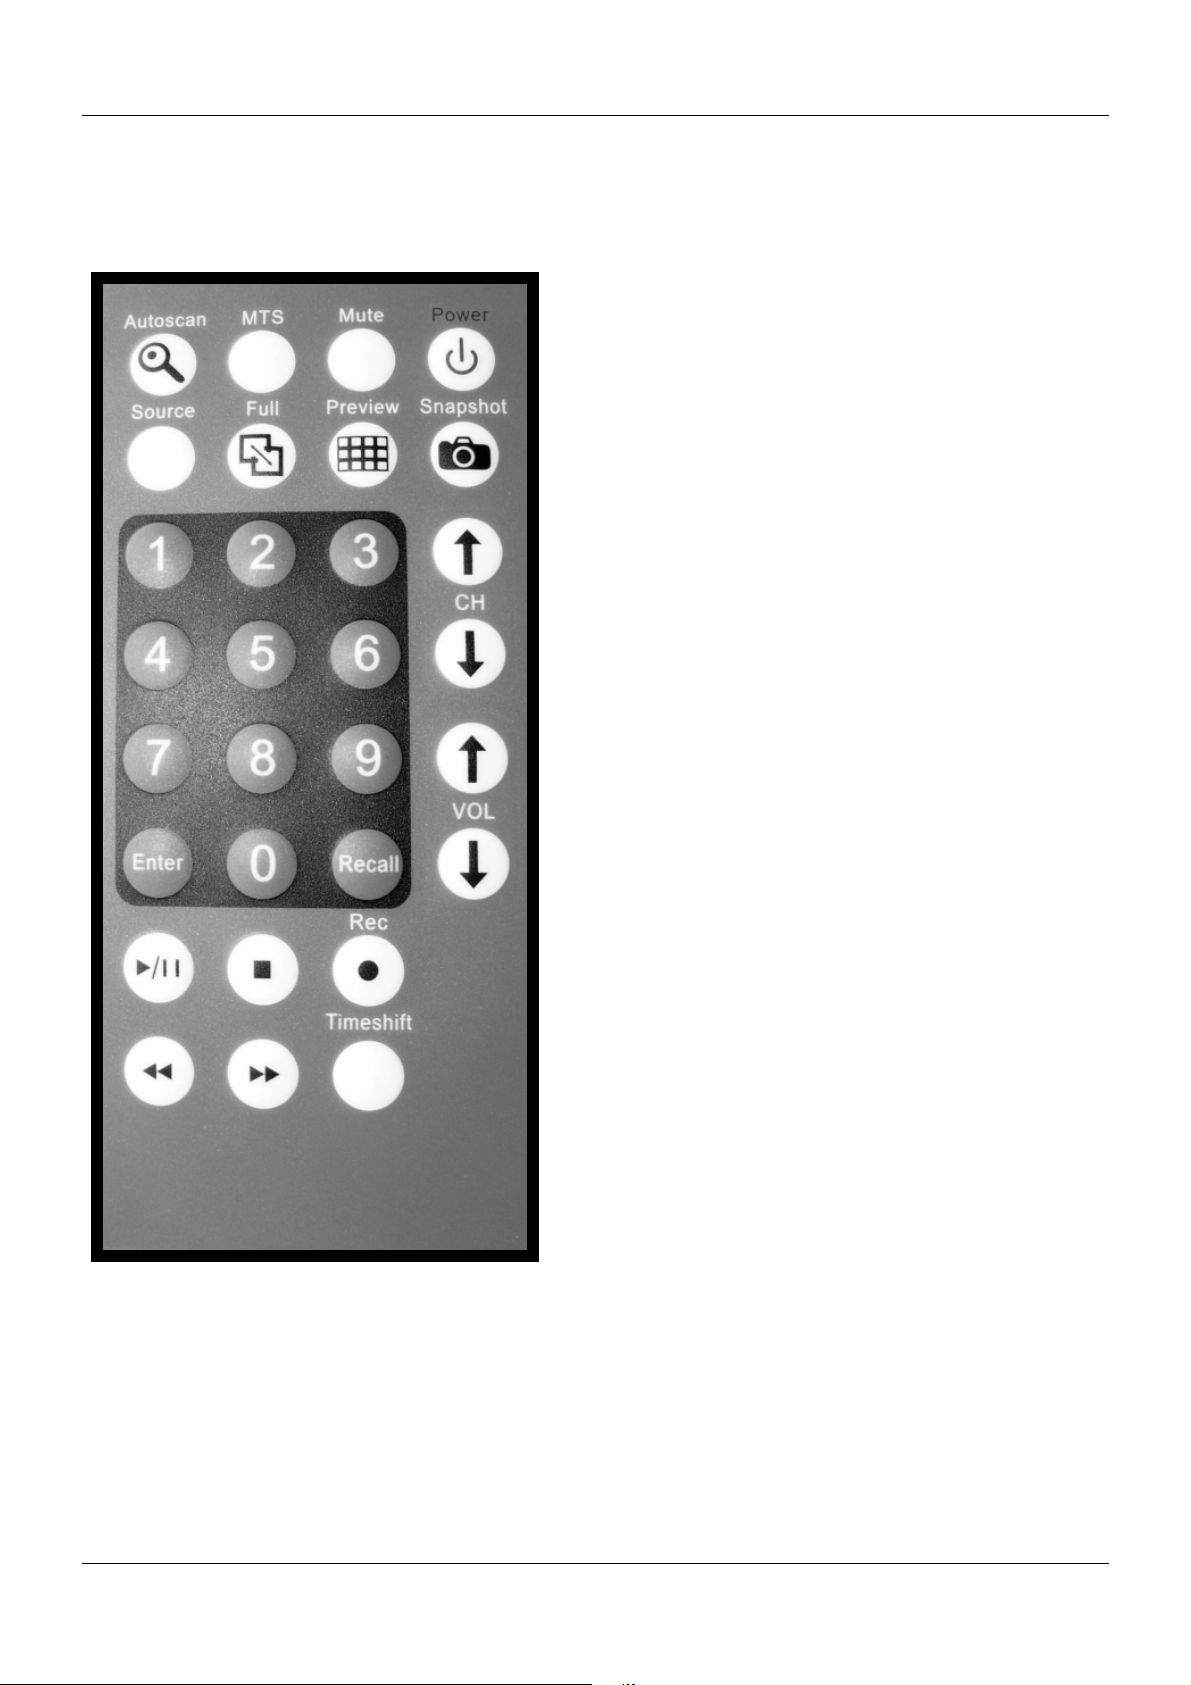
Remote Control Handset
Note: Before using the remote controller for the first time, remove the plastic tab from the battery compartment.
Power: Turn On/Off Capture Box
Mute: Turn Off/Resume Audio
MTS: Toggles between languages (if the TV channel
offers this feature)
Autoscan: Autoscan TV channels
Snapshot: Capture TV/Video image
Preview: Press to preview multiple channels at the
same time, and then double click the channel you want
to view
Full: Press to display full screen
Source: Switch between TV and external sources
Numeric Pad: Selects channel 0 – 9
CH: Channel up/down buttons
VOL: Volume up/down buttons
Recall: Jump to the previous channel
Enter: Press enter to confirm selection
Rec: Records the selected view
Timeshift: Play and record video at the same time,
press to review the recorded video; press to
restore current playback
: Stops video playback
/: Press for video playback, press again to pause
: Seek forward
: Seek backward
6
Page 10
Instruction Manual
Driver and Application Installation
Please install the driver and application from the CD before connecting the Capture Box!
Before installation ensure the following –
Windows 2000: Service Pack 4 or above is installed
Windows XP: Service Pack 1 or above is installed
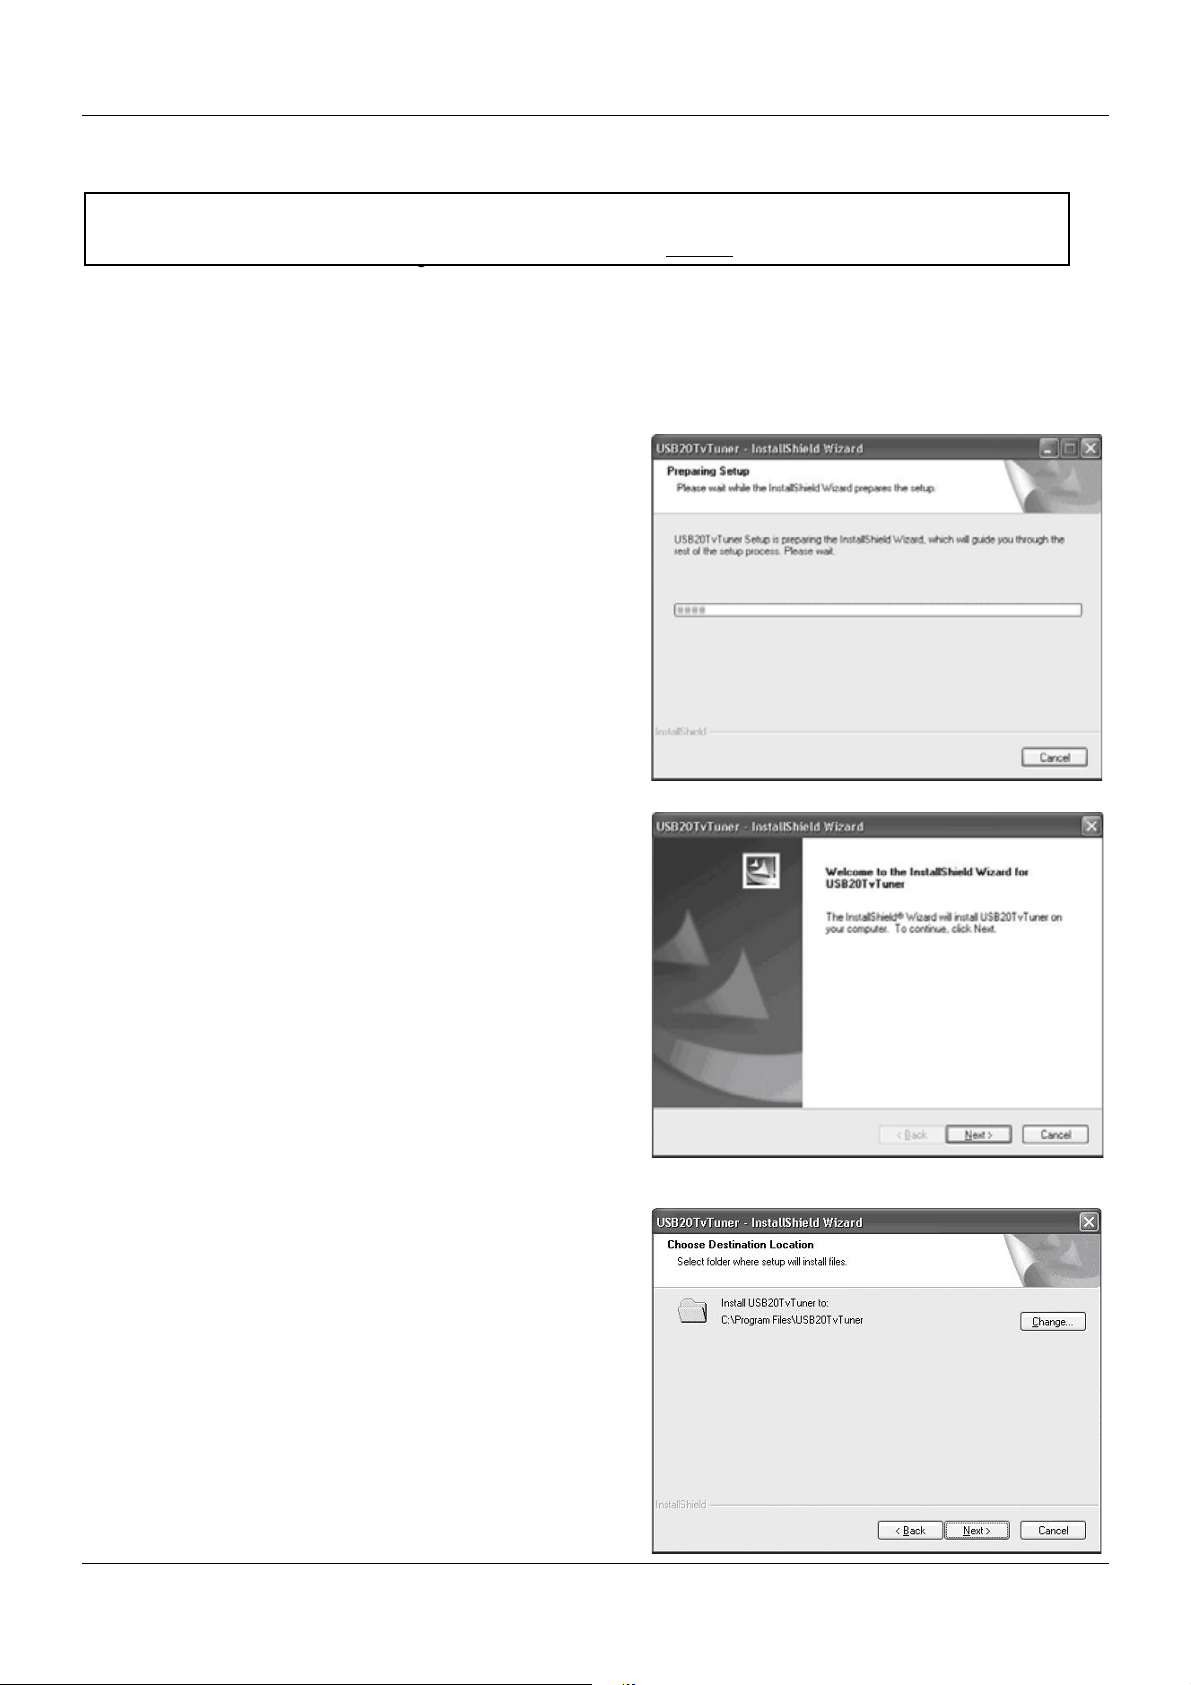
Windows 2000
1. Insert the CD into the drive, installation will start
automatically
2. Click ‘Next’ to continue
3. Click ‘Next’ to continue
IMPORTANT:
7
Page 11

Instruction Manual
4. Once the driver installation is complete, WinDVR
software installation will begin, click ‘Next’ to continue
5. Click ‘Yes’ to agree to the Licence Agreement
6. Enter your details, the product serial number can be
found on the CD envelope, click ‘Next’ to continue
8
Page 12
Instruction Manual
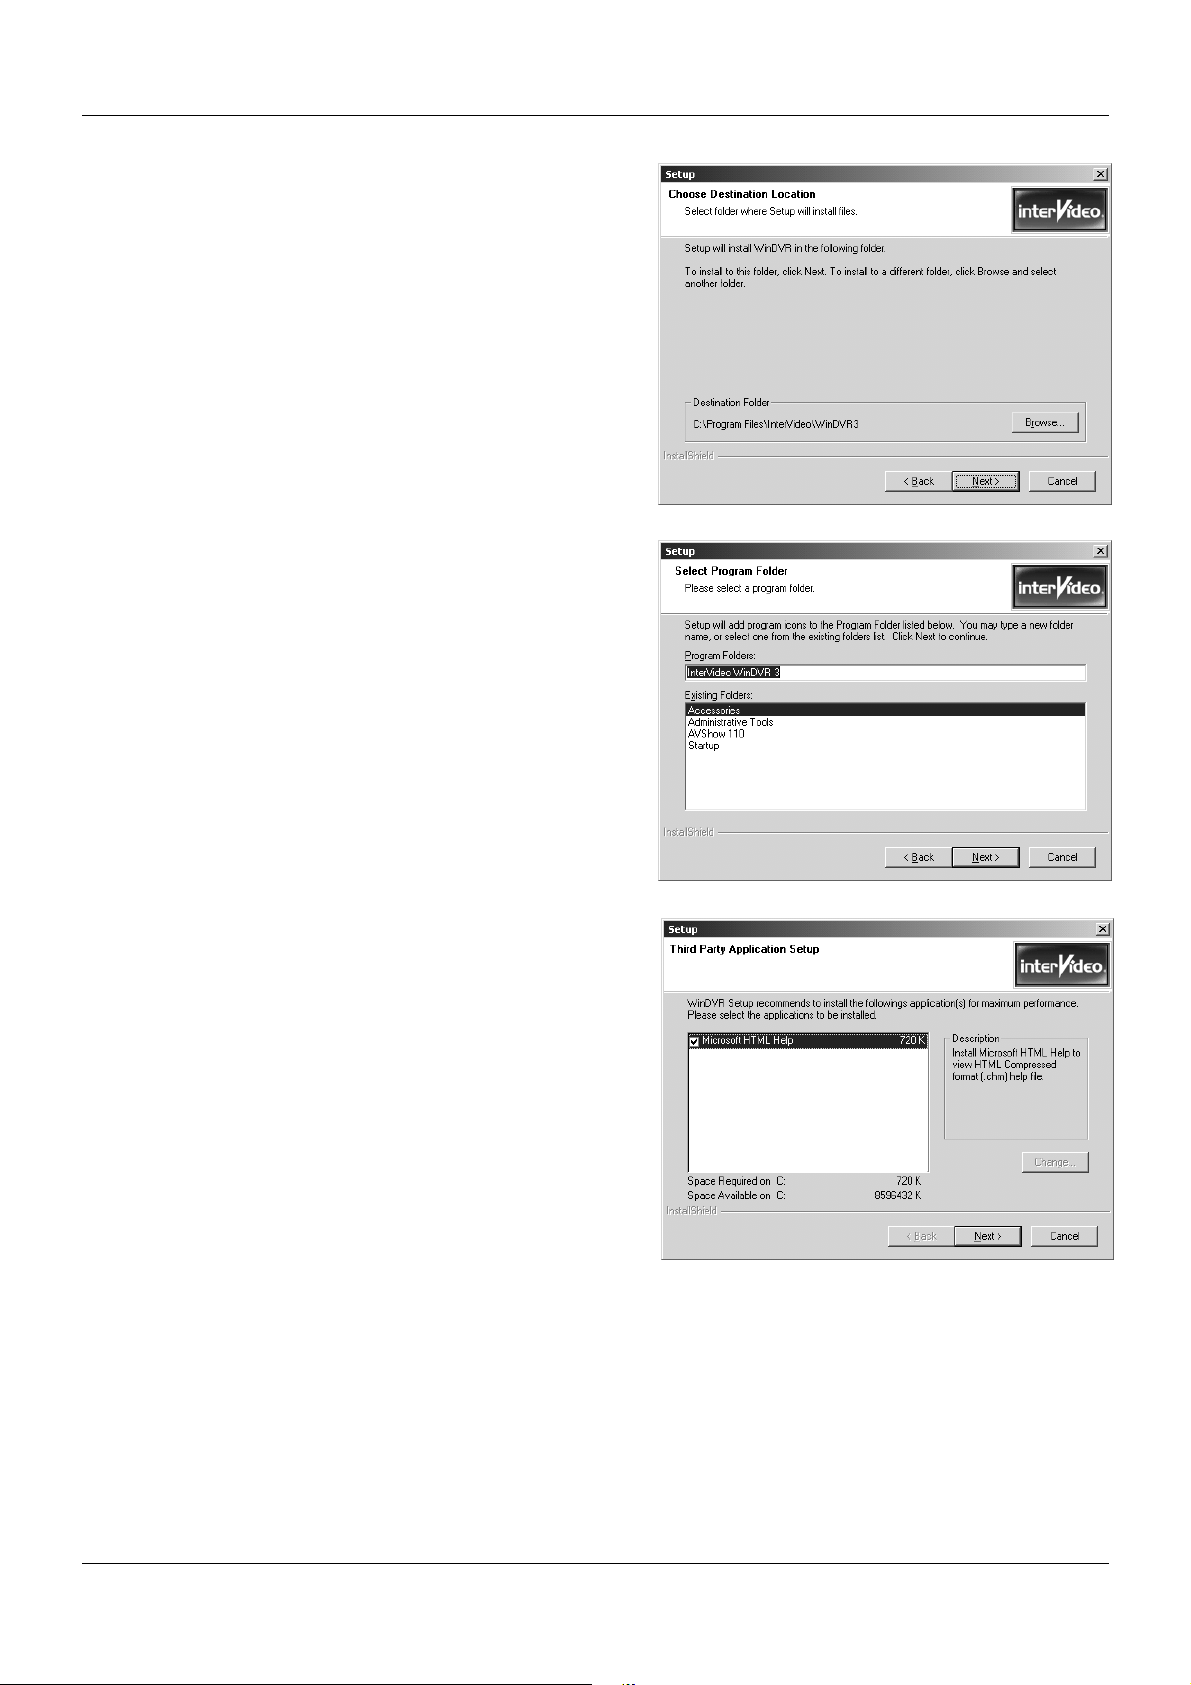
7. Click ‘Next’ to continue setup
8. Click ‘Next’ again to continue
9. We recommend you install the Help file, click ‘Next’
9
Page 13
Instruction Manual
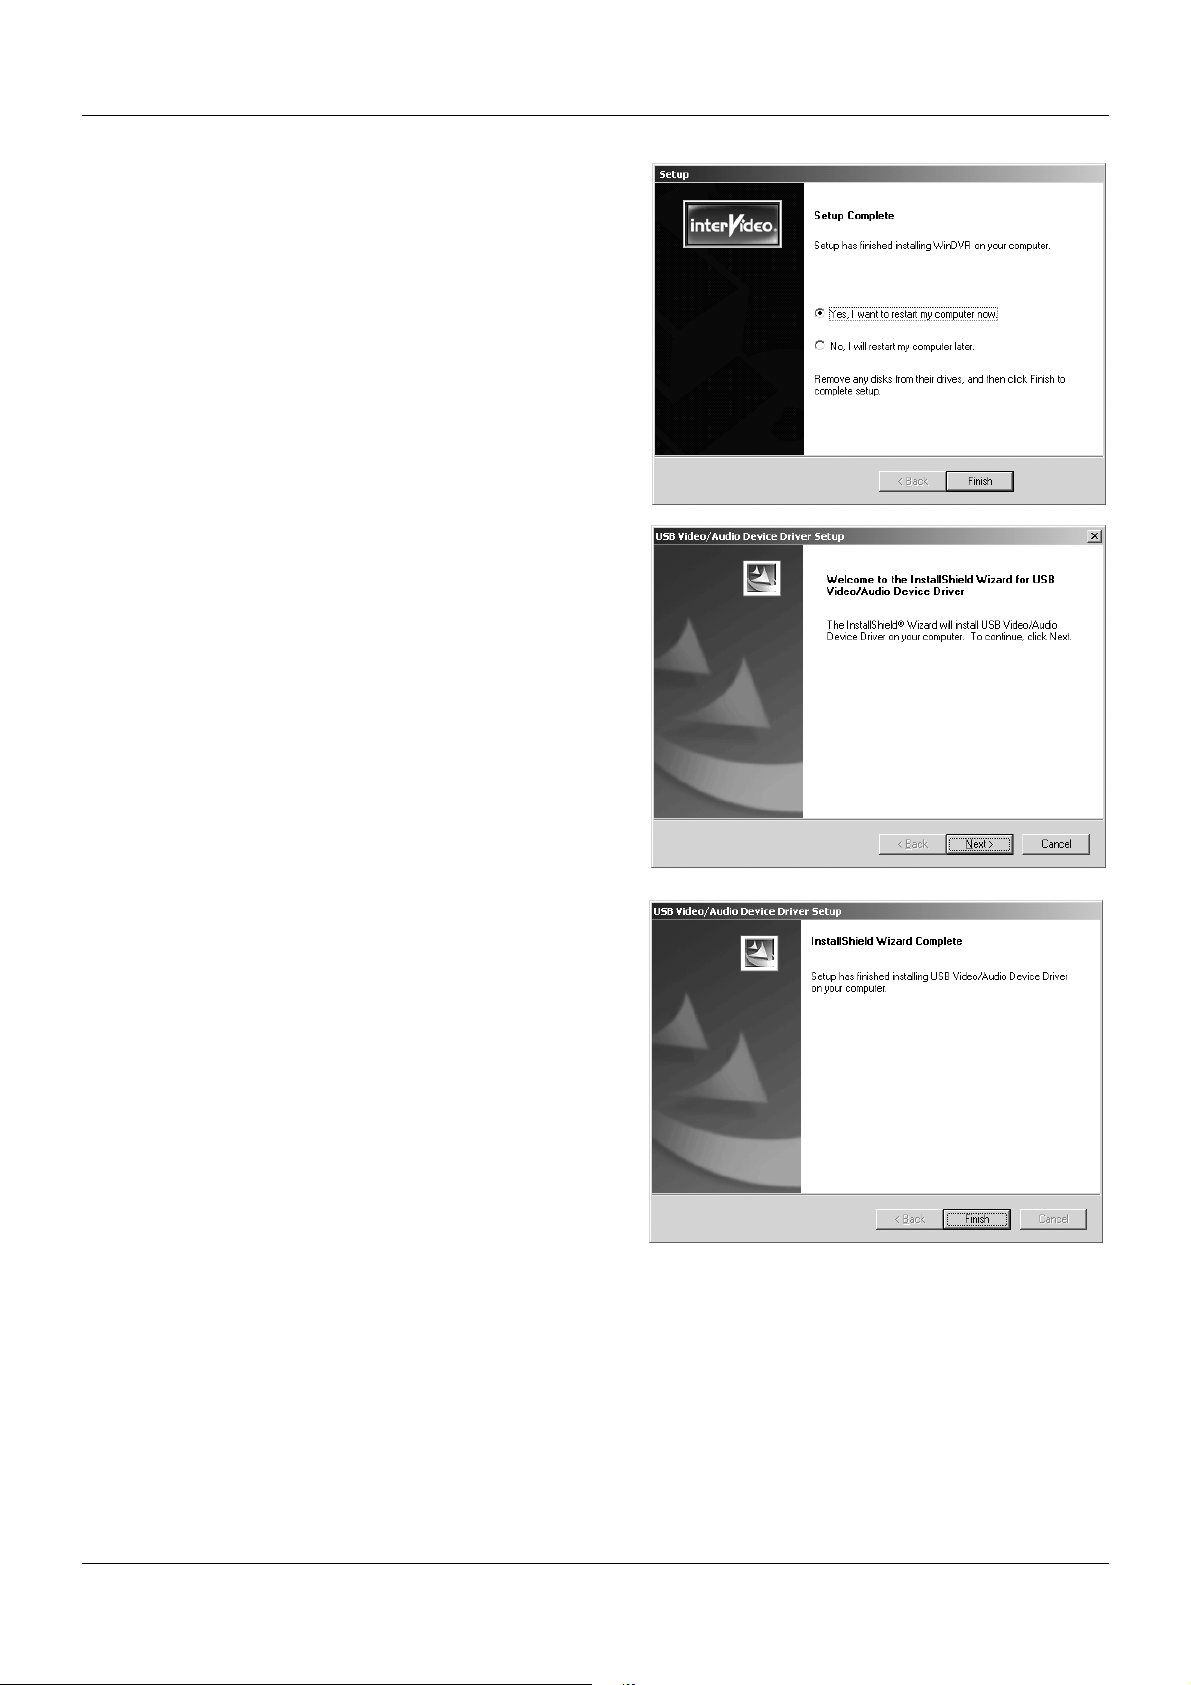
10. Select ‘Yes, I want to restart my computer now’
and click ‘Finish’
11. The USB Audio/Video Device Driver will
automatically continue, click ‘Next’
12. When installation has completed, click ‘Finish’
10
Page 14
Instruction Manual
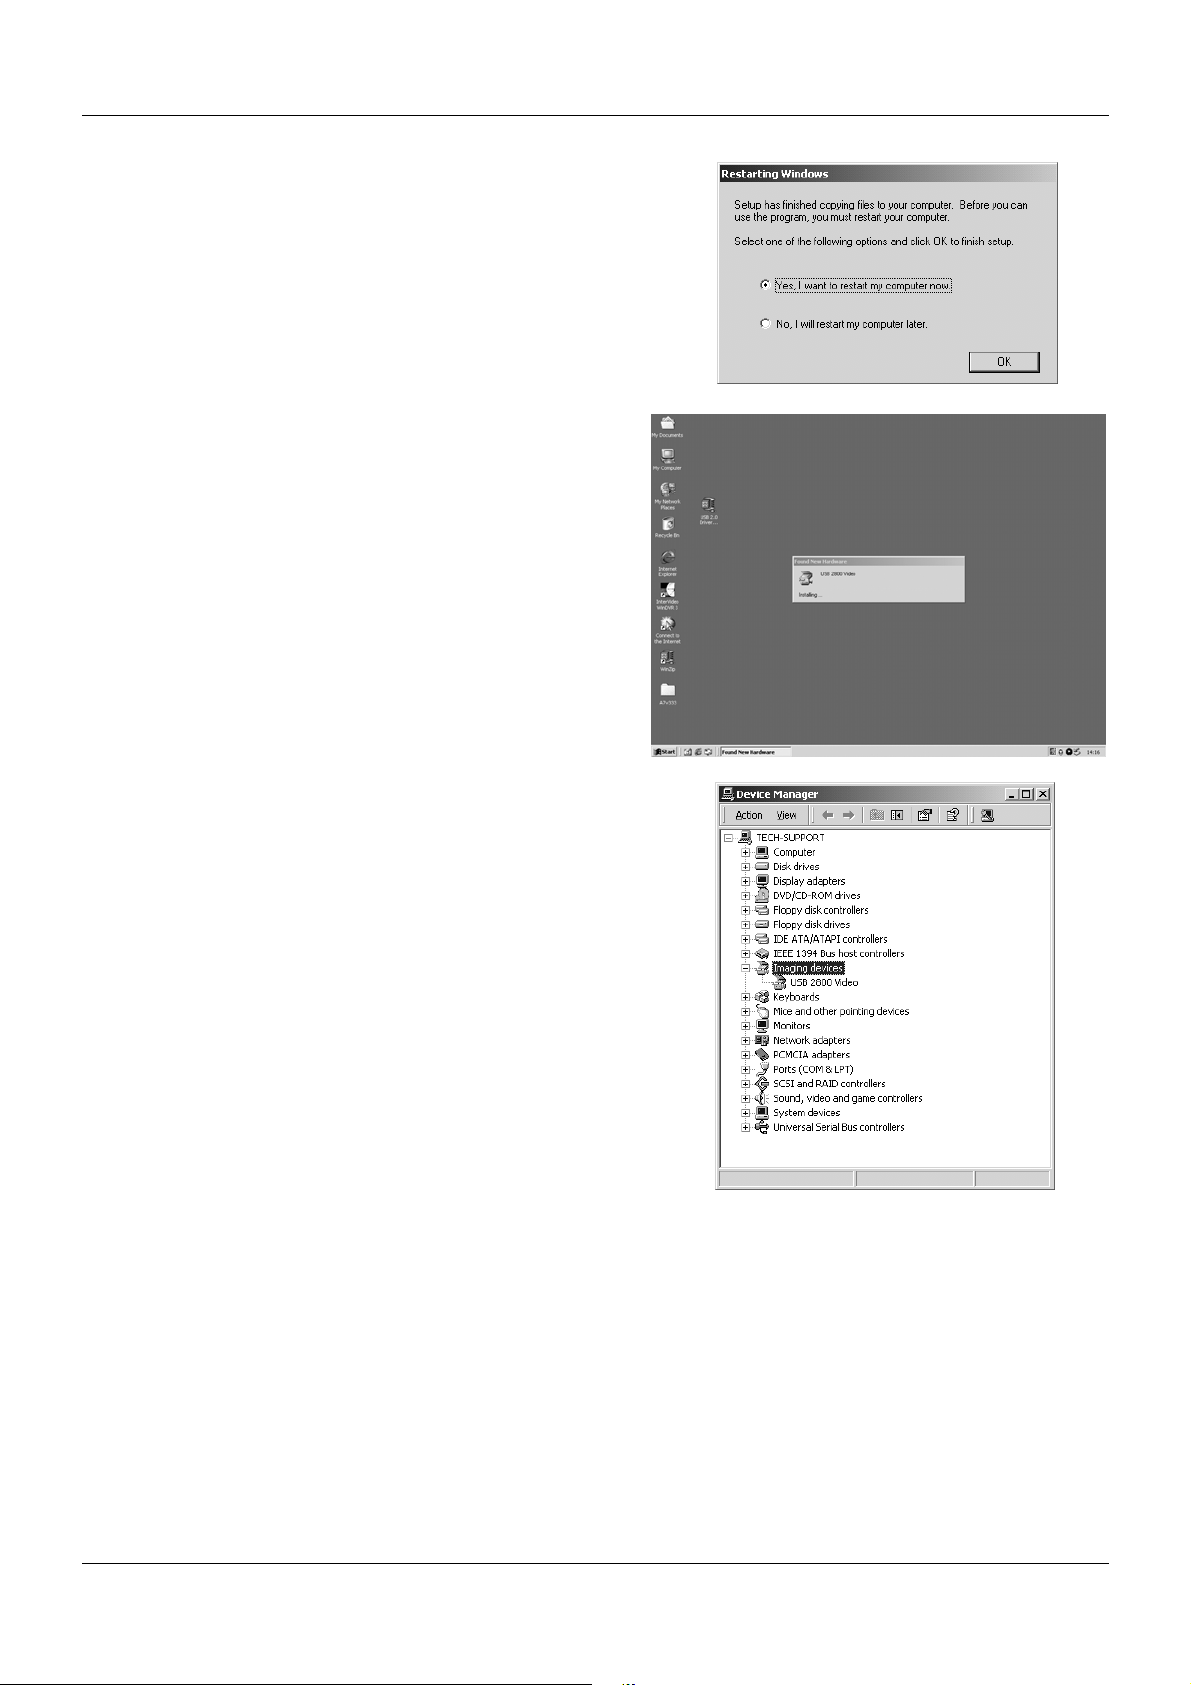
13. Select ‘Yes, I want to restart the computer now’ and click
‘OK’
14. Once the computer has restarted you can connect
the Capture Box - the hardware will be detected
15. You can confirm correct installation by checking the entry in
Device Manager
11
Page 15

Instruction Manual
Windows XP
1. Insert the CD into the drive, installation will start
automatically click ‘Next’ to continue
2. Click ‘Next’ to continue
3. Click ‘Next’ to start WinDVR setup
12
Page 16

Instruction Manual
4. Click ‘Yes’ to the Licence Agreement
5. Enter your details, the product serial number can be
found on the CD envelope, click ‘Next’ to continue
6. Click ‘Next’ to continue
13
Page 17

Instruction Manual
7. Click ‘Next’ to install the application
8. We recommend you install the Help file, click ‘Next’
9. Click ‘Next’ to continue the installation
14
Page 18

Instruction Manual
10. Click ‘Finish’ to complete the driver installation
11. Click ‘Finish’ at the next screen
12. Select ‘Yes, I want to restart my computer now’ and
click ‘OK’
15
Page 19

Instruction Manual
13. When the computer has restarted you can install the
Capture Box. Windows will detect new hardware and
display the ‘Found New Hardware Wizard’. Click ‘Next’
14. Windows will search for the drivers, you may see this
screen. Select the latest version and click ‘Next’
15. Installation is now complete, click ‘Finish’
16
Page 20

Instruction Manual
WinDVR 3 Software
To launch WinDVR 3, double-click the InterVideo WinDVR3 icon on your desktop –
Features
TV Viewing Functions
o EPG (Electronic Programming Guide)
o TV Control
o Initialisation Wizard
o Viewing Aspect Ratio
o VPS and Channel List
o Video Colour control
o Mute Unlocked Channels
o TV Standards
o Channel Surfing
o Non-Overlay Support On VGA
Recording Functions
o MPEG 1 & 2 Support
o MPEG 1 & 2 at different resolutions
o Recording level control
o VCD and DVD compatible file output
o Advanced de-interlacing and noise reduction
Advanced Functions
o Parental Control
o Screen Capture
o Video desktop
o Time-shifting
o Pan and Zoom
o Sleep timer
o Task Manager
o Personalised Channel Maps
17
Page 21

Instruction Manual
p
p
p
p
V
A
–
Control Panel
The WinDVR 3 Control Panel provides easy access to all of the most commonly used functions of the program. For
ease of use, the Control Panel is designed to look like the controls of a VCR. Please be aware that not all Control
Panel options are available at all times, and some may be greyed out, or inaccessible, depending on the hardware
setup and TV services available.
Main Control Panel Buttons
Stop button
Play button
Pause button
Record button
Note! For more detailed
information refer to help “?”
on the Control Panel
Channel U
Channel Down
olume
Mute button
Last Channel -
Returns to last
selected channel
Pan & Zoom -
llows you to
zoom in & pan
around the screen
Rewind &
Fast Forward
Still Capture -
Captures still images
of current programme
Panel Button
opens Sub-Control
Panel
Program –opens
the full program list
box
Previous & Next
Chapter –
are playing a DVD
you can use these
buttons to navigate
through each
chapter
If you
Display Screen
Displays the current
rocess
Shows the selected
Ca
ture/Tuner device
The display area of the Control Panel
shows the status of the ongoing process,
and the selected configuration. The
appearance will vary according to the
current task.
Displays the video
in
ut source
Shows the current
TV channel
Time display
18
Page 22

Instruction Manual
V
A
g
–
y
p
–
V
Sub-Control Panels
The secondary panels of the main Control Panel provide additional options specific to the device and/or mode you
are currently working in. You can click the panel button to open the panel menu from which you can select one of
two panels – TV or General.
TV Panel
General Panel
ideo Source – Cycles
through the available video
sources
Audio mode
through the available
audio modes
Cycles
Closed Caption –
Displays overlayed text
ca
On Screen Display
(OSD) – Activates the on
screen display of the
command functions
tions, when available
Selects the default video
window: Normal, Always
On and Video Desktop
Electronic Programme
Guide – Opens the online
channel listin
Schedule –Opens
window for scheduling
recordings, or
programme reminders
ideo Window –
spect Ratio – Selects
the default aspect ratio
for the video window
19
s
Selects TeleText
service
Surfing –Lets you
browse thumbnail
images of available
channels
Setup – Opens
WinDVR setup
Europe onl
Page 23

Instruction Manual
Right-Click Menu
At any time whilst running DVR 3, you can place the cursor on the display window and right-click your mouse to
display a pop-up text menu. The commands on this menu are the same as those on the WinDVR 3 Control Panel,
along with some extra options.
Record: Start recording TV and encoding it into MPEG-2
format
Play: Begin playback of recorded programme
Pause: Suspend current action
Stop - Stop current action
Time shifting: Pause live TV
Go to Live: Returns to current time in programme
Instant Replay: Replay a preset amount of time
Skip Commercial: Skip ahead a preset amount of time
Still Capture: Capture still images of current programme
Channel: Opens the Channel submenu:
- Channel Up: Cycle up to the next channel
- Channel Down: Cycle down to the next channel
- Last channel: Return to last selected channel
- Surfing: Browse thumbnails of available channels
EPG: Opens online channel listings
Schedule: Opens a window for scheduling recordings or
reminder for programme times
Video Source: Opens the Video Source submenu:
- Composite: An external source such as a DVD player
or VCR
- TV: A television tuner
- S-Video: An external source such as a DVD player or a
VCR
TV Audio: Opens the TV Audio submenu:
- Mono: Single audio channel piped through all speakers
- Stereo: Dual audio channels sent to the corresponding
left and right speakers
- SAP: Second Audio Program, often used for bilingual
programmes
Panel: Display or Hide the WinDVR control panel
Aspect Ratio: Opens the Aspect submenu:
- Free: Stretch the screen to any size dimension
- 4 x 3: Size the video display to 320 x 420 pixels
- 16 x 9: Size the video display to standard film
dimensions. Also known as “wide screen”
Screen Size: Opens the Screen Size submenu -
- 320 x 240: Size the display window to 320 x 240
- 640 x 480: Size the display window to 640 x 480
Zoom and Pan: Zoom in on the video and then pan
around it
OSD: Activate and deactivate the On-Screen Display
Video Desktop:
Desktop feature
Volume: Opens the Volume submenu:
- Volume Up: Increase the programmes volume
- Volume Down: Decrease the programmes volume
Mute: Mute or restore sound
Set-up: Opens the WinDVR properties window
About: Show version and copyright information
Exit: Exit WinDVR
Activate and deactivate the Video
20
Page 24

Instruction Manual
Channel Preview
The multi-channel preview function can display 16 TV channels at the same time.
1. Press Preview on the remote control. The screen will display multi channels (the default is 16)
2. Press Preview again to restore the screen –
3. To select a channel in multi-channel preview mode, just ‘left-click’ with your mouse on the chosen channel.
4. ‘Left-click’ again to zoom in and view the channel in normal size.
5. You can use the Full button on the remote control to switch between full and normal size display.
Press Preview
button
Press Preview
button again
21
Page 25

Instruction Manual
Troubleshooting
Poor quality TV/Video pictures
i. Try adjusting the TV antenna for better reception. Make sure all cables are connected correctly.
Intermittent or no remote control function
i. Ensure there is a clear path between the remote control handset and the remote sensor on the Capture
Box.
ii. Aim the remote control directly at the Capture Box Sensor/Receiver
iii. Make sure the battery in the remote control handset is installed correctly or try a replacement
There is no video picture
i. Connect and disconnect the cables, then try again
ii. Make sure all cables are connected correctly
Using Windows XP, the message appears – “High Speed device plugged into Full Speed USB Port....”
i. Make sure your system features USB 2.0 support. Ensure the Capture Box is plugged into a USB 2.0 port.
ii. Make sure your system has the Microsoft USB 2.0 host driver installed
Why do I only see video resolutions of 320 x 240 when connected to a USB 2.0 port?
i. Make sure your system has the Microsoft USB 2.0 host driver installed
ii. Check your display adapter is configured correctly
iii. Try installing a newer version of the video adapter driver
WinDVR3 is running very slow
i. Go to Control Panel> Device Manager>Add/Remove Programs and un-install WinDVR3, this will also un-
install the association to the device
ii. Restart the PC
iii. Navigate the CD-ROM and locate the 'Driver' folder, within this folder open the 'Update Driver' folder and
run the ‘set-up’ file
iv. Follow the on screen instructions as per page 12; you must restart the PC once the Wizard has finished
v. Once Windows has restarted, connect the Device and follow the instructions as per page 16
22
Page 26

Benutzerhandbuch DEUTSCH
Kapitel 1 Einleitung
LINDY USB 2.0 TV Tuner & Video Capture Box ist ein Gerät zum externen Anschluss an einen PC, eine
Antenne bzw. einen TV-Kabelanschluss sowie andere Videoquellen mit SVHS oder Composite Video (CV
Ausgang. Es verfügt über eine USB 2.0 Schnittstelle zum Anschluss an den PC. Es kann während des Betriebs
des Rechner angeschlossen werden (hot swap). Mit dem eingebauten Fernsehempfänger und Videorekorder ist
es ein kompaktes, tragbares und komplett integriertes Fernsehempfangsgerät zum digitalen Mitschneiden von
Videos und Sendungen. Sie können fernsehen, bewegte Videobilder oder Fotos betrachten und
Videokonferenzen an ihrem Desktop oder Laptop-Computer durchführen.
Sie werden mit Freude feststellen, dass Sie sehr hohe Videoauflösungen im Vollbildmodus bis hin zu DVDQualität erzielen und über einen USB 2.0 Anschluss in den Rechner einlesen können. Bei voller PAL-Auflösung
benötigen Sie zur MPEG-2 Komprimierung einen leistungsfähigen PC mit 2,4GHz und mehr! Zusätzlich zu den
hervorragenden Hardware-Eigenschaften entfaltet die mitgelieferte Software die Möglichkeiten des CODEC. Bei
Fernseh- und Videoaufzeichnung werden folgende Features unterstützt: programmierte Aufnahmen, Zeit
versetzte Wiedergabe, Videoaufzeichnung in DVD-Qualität, Videoschnitt und Montage sowie anderen
Funktionen. Die Hardware und Software unterstützen neben dem bloßen Fernsehen am Computer und
Aufnahme von Videos das Editieren und auch die Erstellung von DVD und VCD. Sie werden verblüfft feststellen,
dass Sie Ihrem Computer um einen DVR (Digitalen Videorekorder) hoher Qualität erweitert haben.
1.1 Eigenschaften
Hardware
■ USB Anschluss für Videoauflösung im Vollbildmodus:
Mit USB 2.0 erreichen Sie eine Videoauflösung von 720 * 576 * 25 Bildern pro Sekunde bei PAL.
■ Alle Fernsehkanäle:
Mit dem eingebauten Fernsehempfänger/-tuner können Sie nicht nur auf Ihrem Desktop oder Notebook
Fernsehbilder betrachten, sondern auch alle möglichen Fernsehkanäle (Antenne & Kabel) empfangen.
■ Unterstützung für USB 2.0 (nicht für USB 1.1!):
Über die USB 2.0 Schnittstelle können Sie das Gerät während des Betriebs anschließen. Mit Bitraten von bis zu
480 Mbps ermöglicht USB 2.0 Videoauflösungen bis zu DVD-Qualität.
■ Vielfältige Anschlussmöglichkeiten:
Sie finden Anschlüsse für S-Video, Composite Video, Stereoaudioeingang und für das Fernsehsignal vor. Sie
können nicht nur Fernsehen sondern auch Videos oder Standbilder von verschiedenen Geräten wie Fernseher,
Camcordern, Videorekordern und DVD-Spielern aufzeichnen.
■ Infrarot Fernbedienung:
Mit de Infrarot-Fernbedienung kontrollieren sie beinahe alle Funktionen bequem und aus der Distanz.
■ Stereo- und Zweikanalton (NICAM) - optional:
Sie haben NICAM Unterstützung für PAL. Mit NICAM genießen Sie den Klang in Stereo (oder Mono) oder
Zweikanalton.
Software
■ Unmittelbare Fernsehwiedergabe:
Sie können die Live-Sendung anhalten und zurücklaufen lassen oder aber auch in Zeitlupe wiedergeben, bzw.
sofort noch einmal abspielen lassen.
■ Mehrkanalvorschau:
Sie können sich eine Vorschau aller gerade ausgestrahlter Programme auf den verfügbaren Kanälen anzeigen
lassen. Wenn Sie sich dann für ein bestimmtes Programm entschieden haben, dann können Sie es mit einem
Doppelklick auswählen und als Vollbild betrachten und aufnehmen.
■ Spielliste für Videowiedergabe:
Die integrierte Videospielliste erlaubt es ein Video, auch wenn es aus separaten Dateien besteht, wie eine
einzige Datei wiederzugeben. So können Benutzer einen langen Spielfilm genießen, ohne ständige mehrere
Dateien öffnen und schließen zu müssen und trotzdem Speicherplatz sparen.
■ Die Möglichkeiten zur Aufzeichnung von TV und digitalem Video:
Als einer der schnellsten Software Decoder kann Video in Echtzeit in einer Auflösung von 320 x 240 auf einem
Pentium II 350 und in einer Auflösung von 720 x 420 auf einem Pentium III 650 aufzeichnen.
■ Vorprogrammierte TV Mitschnitte:
Sie können Zeit, Datum und Kanal eines Fernsehprogramms, das Sie aufzeichnen möchten, ganz einfach
einstellen. Sie können Wiederholungen einstellen, so dass die Folgen einer Serie aufgezeichnet werden.
1
Page 27

Benutzerhandbuch DEUTSCH
■ Zeitversetzte Wiedergabe:
Sie können zur gleichen Zeit aufnehmen und wiedergeben. Sie haben so die Möglichkeit ein Programm
aufzuzeichnen, die Wiedergabe anzuhalten und aus dem Raum gehen, und wenn Sie wieder zurückkommen,
den Teil betrachten, den Sie verpasst haben, während der Rest des Programms weiter aufgenommen wird. Sie
können die Reklameeinblendungen schnell überspringen, so dass Sie mit der Live-Übertragung wieder
gleichziehen. All dies kann vorgenommen werden ohne die Aufzeichnung zu unterbrechen.
■ Aufzeichnung von DVD Videodateien:
Die Aufzeichnung des Videos kann direkt in MPEG-2 (DVD-Format) erfolgen oder dahin konvertiert werden.
Danach können Sie mit Hilfe des DVD Autorenprogramms Ihre eigenen DVDs erstellen.
1.2 Spezifikationen
1. Anschluss für Antennensignal: Unterstützung für PAL und SECAM Europa (nicht für NTSC).
2. Kabeladapter:
- Videoeingang: 4 poliger Mini-DIN S-Video-(SVHS)-Eingang und RCA Composite Videoanschluss.
- Audioeingang: RCA Stereo Audioanschluss
3. Audioausgang: Kopfhörerbuchse
4. USB 2.0-Anschluss zur Verbindung mit dem PC
5. Infrarotsensor für die Fernbedienung
6. Statusanzeigen für Strom und Verbindung
7. Stromanschluss (+5V DC
) (Optional)
1.3 Mindestanforderungen an das System für Videovorschau und Videomitschnitt.
USB: PC mit USB 2.0 Anschluss.
CPU:
• Vollbild D1 MPEG 2 P4 2.4 GHz oder mehr
• DVD: 640 × 480 MPEG P4 2.0 GHz oder mehr
• VCD: 352 × 288 MPE PIII 1.5 GHz oder mehr
Arbeitsspeicher: min. 128 MB (besser 256 MB oder mehr)
Festplatte : je mehr Speicher und je schneller um so besser
Soundkarte
VGA-Karte: AGP Schnittstelle 800 x 600 oder mehr.
CD- (oder DVD-)Laufwerk: für Treiber- und Programminstallation.
Betriebssystem: Windows 2000 / XP
1.4 Verpackungsliste
Überprüfen und identifizieren Sie die gelieferten Gegenstände, bevor Sie das Gerät in Betrieb nehmen. Sollte
etwas fehlen oder beschädigt sein, dann kontaktieren Sie bitte Ihren Händler so bald wie möglich.
LINDY USB 2.0 TV Audio-Kabel Audio- und Video- IR Fernbedienung
Tuner & Video Capture Box (Stereo zu Stereo) Verbindungskabel
USB 2.0 Kabel USB zu Stromversorgungs-Kabel Software CD
2
Page 28

Benutzerhandbuch DEUTSCH
Kapitel 2 Hardware-Konfiguration
Bitte folgen Sie den folgenden Anweisungen, um alles für die Installation vorzubereiten. Diese Schritte helfen
Ihnen, alles vorzubereiten und um Ihre LINDY USB 2.0 TV Tuner & Video Capture Box genießen zu können.
2.1 Produktbeschreibung
S-Video
SVHS
DVD / VCD / V8 /
VCR / CCD
Antenne
oder TV
Kabel
Rückseite LINDY USB 2.0 TV Tuner &
Video Capture Box
Seitenansicht
C-VIDEO (Gelb)
AUDIO_L (Weis)
Audioeingang am PC
Audio Kabel
Schnappschuss- /
Aufnahmebutton
AUDIO_R (Rot)
USB Anschluss am PC
USB Stromversorgungskabel
oder Netzteil
2.2 Geräteverbindungen herstellen
Bitte befolgen Sie die folgende schrittweise Anleitung, um die Verbindungen zwischen dem und den
Peripheriegeräten herzustellen.
Rückseite
(1) Schließen Sie das Antennenkabel am Antenneneingang der LINDY USB 2.0 TV Tuner & Video Capture
Box an.
Antennenanschluss der LINDY USB 2.0 TV
Tuner & Video Capture Box
Antenne oder TV Kabel
3
Page 29

Benutzerhandbuch DEUTSCH
(2) Schließen Sie das Audio- und Videokabel mit dem schwarzen Kombinationsstecker am Audio- und
Videoeingang der LINDY USB 2.0 TV Tuner & Video Capture Box an. Die andere Seite des Audio- and
Videokabels verbinden Sie mit den Audio- und Videoausgängen des Composite Video Zuspielers.
DVD / VCD / V8 /
VCR / CCD
(3) S-Video / SVHS Anschlüsse: Verbinden Sie das S-Video-Kabel Ihres DVD oder VCD Spielers mit dem
Audio- und Video-Verbindungskabel.
DVD oder VCD mit S-Video Anschluss
(4) Schließen Sie das Audiokabel (Stereo zu Stereo) am Audioausgang der LINDY USB 2.0 TV Tuner & Video
Capture Box und am Audioeingang des PC an. Um den Ton hören zu können, müssen Sie Lautsprecher
am Audioausgang des PC angeschlossen haben.
C-VIDEO (Gelb)
AUDIO_L (Weis)
AUDIO_R (Rot)
Audio- und Videoanschlusskabel
S-VIDEO Kabel S-VIDEO Stecker
Video und Audio
Eingang
Audioeingang des PC
Audioausgang
Audiokabel
Lautsprecher
Audioausgang des PC
(5) Verbinden Sie das USB 2.0 Kabel mit der LINDY USB 2.0 TV Tuner & Video Capture Box und dem USB-
Anschluss des PC.
USB-Eingang des PC
(6) Schließen Sie das USB Stromversorgungskabel am Gleichstromanschluss der LINDY USB 2.0 TV Tuner
& Video Capture Box und an einem freien USB Anschluss des Rechners an.
USB Stromversorgungs-Kabel
USB 2.0 Kabel
USB-Ausgang
Gleichstromanschluss
4
Page 30

Benutzerhandbuch DEUTSCH
(7) Wenn Sie das aktuell wiedergegebene Videosignal unmittelbar aufzeichnen wollen, brauchen Sie nur auf den
Schnappschussbutton an der Seite der LINDY USB 2.0 TV Tuner & Video Capture Box zu drücken.
Achten Sie darauf, dass die Infrarot Fernbedienung auf die Sensoren gerichtet ist, bevor Sie die LINDY USB
(8)
2.0 TV Tuner & Video Capture Box mit der Fernbedienung steuern.
IR Fernbedienung
2.3 Fernbedienung
Bitte folgen Sie den folgenden Schritten, um die Fernbedienung für die Nutzung vorzubereiten.
a. An der Unterseite der Fernbedienung klebt eine Plastikfolie.
b. Ziehen Sie diese Folie ab um die Batterien zu aktivieren.
c. Achten Sie darauf, dass die IR Fernbedienung auf die LED Sensoren gerichtet ist, bevor Sie die
Fernbedienung einsetzen.
1 Standby: Ein- / Ausschalter
2 Stummschaltung: Ton ein oder ausschalten
3 MTS: Wenn der Kanal mehrsprachige Programme unterstützt,
dann können Sie mit diesem Schalter zwischen den Sprachen
umschalten.
4 Autoscan: Autoscan über die TV Kanäle
5 Schnappschuss: TV / Videobild mitschneiden.
6 Vorschau: Drücken Sie hier um mehrere Kanäle auf dem
Bildschirm anzuzeigen und klicken Sie dann mit der Maus auf
den Kanal, den Sie wünschen. (Sehen Sie auch Kapitel 5
Kanalvorschau)
7 Vollbild: Wiedergabe im Vollbildmodus.
8 Quelle: Hiermit schalten Sie den Eingang zwischen Fernsehen
und externer Videoquelle um.
9 Kanalnummer: Nummern 0~9 zur Auswahl der Kanäle.
10 CH
11 VOL
12 Recall: Springt zum Vorherigen Kanal
13 Eingabe: Drücken Sie die Eingabetaste um Ihre Eingabe zu
14 REC: Aufnahnmebutton
15 TIMESHIFT / Zeitversetzt: Gleichzeitige Aufzeichnung und
16 : Beendet die Videowiedergabe.
17 /: Spielt das Video ab, nochmaliges Drücken hält es an.
18 : Suchlauf vorwärts.
19 : Suchlauf rückwärts.
↑
: einen Kanal höher, CH↓: einen Kanal niedriger.
↑
: lauter, VOL↓: leiser.
bestätigen.
Wiedergabe des Videos. Drücken Sie auf um zurückzufahren
und drücken Sie um zur gegenwärtigen Wiedergabe
zurückzukehren.
Aufnahme- / Schnappschussbutton
LED Sensoren
5
Page 31

Benutzerhandbuch DEUTSCH
Kapitel 3 Installation von Treiber und Anwendung
Für Windows 2000: Verbessern Sie das System auf Service Pack 4 oder höher. Für Windows XP: Verbessern Sie
auf Service Pack 1 oder höher. Diese CD enthält Treiber und Anwendung. Für Win XP, Win 2000: Installieren Sie
zuerst den Treiber und die Anwendung und schließen Sie erst dann die LINDY USB 2.0 TV Tuner & Video
Capture Box am Computer an.
3.1 Installation unter Windows 2000
Bitte legen Sie die Treiber CD in das CD-ROM Laufwerk ein. Die Installation startet automatisch.
(1)
Der Bildschirm des InstallShield Assistenten der
LINDY USB 2.0 TV Tuner & Video Capture Box zur
automatischen Erkennung erscheint automatisch.
Klicken Sie auf Weiter.
(2) Wählen Sie den Ordner aus, in dem Setup die Dateien
installieren soll. Klicken Sie dann auf Weiter.
(3) Klicken Sie auf Ja.
(4) Klicken Sie auf Weiter.
6
Page 32

Benutzerhandbuch DEUTSCH
(5) Klicken Sie auf Ja.
(6) Geben Sie „Namen“, „Firma“ und
„Seriennummer“ ein. (Die Seriennummer
befindet sich auf der Hülle der CD.)
(7) Klicken Sie auf Durchsuchen und wählen Sie den Ordner,
in dem Setup die Dateien installieren soll. Klicken Sie dann
auf Weiter.
(8) Klicken Sie auf Weiter.
(9) Klicken Sie auf Weiter.
(10) Wählen Sie Ja und drücken Sie auf Beenden. Dies
wird jedoch Ihren Computer jetzt noch nicht neu starten,
die Treiberinstallation wird fortgesetzt.
7
Page 33

Benutzerhandbuch DEUTSCH
(11) Klicken Sie auf Weiter.
(12) Klicken Sie auf Fertig stellen.
(13) Wählen Sie Ja und drücken Sie auf OK. Ihr Computer
startet dann automatisch neu.
(14) Klicken Sie auf Ja um diesen Bildschirm zu
verlassen und die Installation abzuschließen.
8
Page 34

Benutzerhandbuch DEUTSCH
3.2 Installation unter Windows XP
Bitte legen Sie die Treiber CD der LINDY USB 2.0 TV Tuner & Video Capture Box in das CD-ROM
Laufwerk ein. Die Installation startet automatisch.
(1) Klicken Sie auf Weiter.
(2) Wählen Sie den Ordner aus, in dem Setup die
Dateien installieren soll. Klicken Sie dann auf Weiter.
(3) Klicken Sie auf Weiter.
(4) Klicken Sie auf Ja.
9
Page 35

Benutzerhandbuch DEUTSCH
(5) Geben Sie „Namen“, „Firma“ und
„Seriennummer“ ein.
(Die Seriennummer befindet sich auf der
Hülle der CD.)
(6) Klicken Sie auf Durchsuchen und wählen Sie
den Ordner, in dem Setup die Dateien installieren
soll. Klicken Sie dann auf Weiter.
(7) Klicken Sie auf Weiter.
(8) Klicken Sie auf Weiter.
(9) Klicken Sie auf Weiter.
(10) Klicken Sie auf Weiter.
10
Page 36

Benutzerhandbuch DEUTSCH
(11) Wählen Sie „Ich stimme zu“ und klicken Sie dann auf
Weiter.
(12) Klicken Sie auf Fertig stellen.
(13) Klicken Sie auf Fertig stellen.
(14) Wählen Sie Ja und klicken Sie dann auf OK. Ihr Computer
startet dann automatisch neu.
(15) Schließen Sie nach dem Neustart die LINDY USB 2.0 TV
Tuner & Video Capture Box an und das USB Gerät wird
automatisch gefunden.
11
Page 37

Benutzerhandbuch DEUTSCH
(16) Legen Sie die CD der LINDY USB 2.0 TV Tuner & Video
Capture Box ins CD-ROM Laufwerk ein und drücken Sie dann
auf Weiter. Die Installation beginnt automatisch.
(17) Drücken Sie auf „Installation fortsetzen“.
(
19) Die Installation der der LINDY USB 2.0 TV Tuner &
Video Capture Box Hardware ist abgeschlossen. Sie
können sie jetzt verwenden.
(18) Klicken Sie auf Fertig stellen.
12
Page 38

Benutzerhandbuch DEUTSCH
Kapitel 4 WinDVR 3 Software
Mit WinDVR 3 können Sie mit Ihrem Computer automatisch all Ihre Lieblingssendungen aufzeichnen, so dass
Sie sie sehen können wann immer Sie möchten. Sie können Ihren Computer auch als digitalen Videorekorder
DVR / persönlichen Videorekorder PVR einsetzten, um gleichzeitig fernzusehen und aufzuzeichnen! Sie
müssen Ihren Computer dabei nicht im Auge behalten. WinDVR 3 weckt Ihren Computer bei entsprechender
Unterstützung durch Ihre Rechnerhardware auf sobald die Zeit für die Aufzeichnung einer Sendung
gekommen ist und schaltet ihn dann wieder ab, wenn sie beendet ist – alles ganz automatisch.
Bei der Installation des Treibers wird WinDVR 3 automatisch mitinstalliert. Um das WinDVR 3 Programm zu
starten doppelklicken Sie auf das InterVideo WinDVR 3
wählen Sie Start / Programme / InterVideo Win DVR 3 / InterVideo WinDVR 3 über die Windows Startleiste
um das WinDVR 3 Programm zu starten.
4.1 Eigenschaften
■ Wiedergabefunktionen
- EPG (Elektronischer Programmführer)
- TV Kontrolle
- Installationsassistent
- Seitenverhältnis des Bildes
- VPS und Kanalliste
- Videofarbabstimmung
- Nicht blockierte Kanäle stumm schalten
- TV Standards
- Kanal Surfen
- Unterstützung von Non-Overlay bei VGA
■ Aufnahmefunktionen
- MPEG 1 & 2 Unterstützung
- MPEG 1 & 2 mit unterschiedlichen Auflösungen.
- Kontrolle des Aufnahmeniveaus
- VCD und DVD kompatible Dateiausgabe
- Erweitertes De-Interlacing und Störungsverminderung
4.2 Programmfenster
" Ausführliche Informationen finden Sie in der Hilfefunktion „?“ des Programmfensters.
Dieses Kapitel bietet nur eine knappe Übersicht über WinDVR 3.
Das Programmfenster von WinDVR 3 bietet einen einfachen Zugang zu den am meisten verwendeten
Funktionen des Programms. Das Programmfenster ist so entworfen, dass es der Steuerung eines
Videorekorders ähnelt. Denken Sie bitte daran, dass nicht alle Funktionen immer zur Verfügung stehen. Je
nach Hardware Ihres Rechners und den verfügbaren Fernsehprogrammen können sie entweder deaktiviert
(grau gekennzeichnet) oder nicht zugänglich sein.
Icon auf der Arbeitsoberfläche Ihres PCs. Oder
■ Erweiterte Funktionen
- Elterliche Kontrolle / Kinderschutzsicherung
- Mitschnitt
- Videoarbeitsfläche
- Zeitversetzter Betrieb
- Verschieben und Zoomen
- Schlaftimer
- Aufgabenmanager
- Persönliche Kanalliste
13
Page 39

Benutzerhandbuch DEUTSCH
Hauptbereich des Programmfensters:
Kanal hoch – geht zum nächst höheren verfügbaren Kanal.
Kanal runter – geht zum nächst niedrigeren verfügbaren Kanal.
Aufnahme – startet den Fernsehmitschnitt und kodiert ihn im MPEG-2 Format.
Vorheriger Kanal – kehrt zum zuletzt ausgewählten Kanal zurück.
Wiedergabe – startet die Wiedergabe eines aufgezeichneten Programms.
Stopp – Beendet die aktuelle Aktion (z.B. Aufnahme, Wiedergabe, Zeitversetzung, etc.)
Pause – Unterbricht die aktuelle Aktion (z.B. Aufnahme, Wiedergabe, Zeitversetzung, etc.)
Einzelbildaufnahme – Nimmt ein Einzelbild des gerade laufenden Programms auf.
Stummschaltung – Schaltet den Ton aus oder ein.
WinDVR - Link zur WinDVR Webseite.
Zoomen und Verschieben - ermöglicht die Ausschnittvergrößerung eines
Bildes und das Verschieben des Ausschnitts.
Lautstärkeregelung – erhöht oder verringert die Lautstärke.
Schneller Vor- und Rücklauf – im aktuellen Programm vorwärts und
rückwärts bewegen. Deaktiviert im TV Modus.
Vorheriges und nächstes Kapitel – Wenn Sie eine DVD mit
Kaptiteleinteilung abspielen, dann können Sie mit diesen Schaltern
zwischen den Kapitel navigieren. Deaktiviert im TV Modus.
Programm – Die größeren Schalter öffnen das Dialogfenster der vollständigen
Programmliste, die alle Videodateien enthält, die Sie mit WinDVR angelegt
haben, während die kleineren Schalter, die sich zwischen dem Rücklauf und
dem Vorlaufschalter befinden, die Liste der kürzlich benützten Dateien öffnet,
die die Dateinamen der 10 zuletzt verwendeten Dateien enthält.
Steuerfensterschalter – Der erste (nach rechts weisende) Pfeil öffnet das
Steuerfenstermenü, in dem Sie je nach Bedarf entweder die DV Steuerung, TV
Steuerung oder die Allgemeine Steuerung auswählen können. Der zweite (nach
links weisende) Pfeil entfernt die sekundäre Steuerung.
14
Page 40

Benutzerhandbuch DEUTSCH
A
Bildschirmausgabebereich:
Der Ausgabebereich des Programmfensters zeigt den Status der laufenden Prozesse und der ausgewählten
Konfiguration an. Je nach Aufgabenbereich, z.B. TV- / Videosignal oder Programmwiedergabe, kann das
Erscheinungsbild anders sein.
TV- / Videosignal
Reihenfolge: Hilfe, Minimieren, Maximieren und WinDVR verlassen.
Wiedergabe des aktuellen Prozesses, z.B. entweder TV- / Videosignal oder
Aufnahmemodus.
Anzeige der ausgewählten Videoquelle.
Anzeige der ausgewählten Videoschnitt- / TV Empfangskarte.
Anzeige des ausgewählten Fernsehkanals
Zeitanzeige
Wiedergabe / Aufnahme
Zeigt den aktuellen Prozess an, z.B. Programm (Wiedergabe) oder
ufnahme.
Zeigt die verstriche Zeit an.
Zeigt Kanalinformationen an.
Bereich des sekundären Programmfensters:
Das sekundäre Programmfenster des Hauptsteuerfensters bietet
zusätzliche Optionen, die vom Gerät bzw. dem Modus, in dem es sich
gerade befindet, abhängen. Sie können auf den
Programmfensterschalter klicken, um das Programmmenü zu öffnen,
aus dem Sie eine von drei Steuerungen auswählen können: TV und
Allgemein.
EPG (Elektronischer Programmführer) – Öffnet die Online Kanallisten.
Teletext – nur für Europa.
Surfing – Damit durchsuchen Sie die Vorschaubilder der verfügbaren Kanäle.
Schedule / Zeitplan – Öffnet ein Fenster zum Programmieren von Mitschnitten oder
zur Erinnerung von Programmzeiten.
Titel – Gibt eingeblendete Texttitel an, falls vorhanden.
Setup – Öffnet das Setup-Fenster von WinDVR
TV Panel
Videoquelle – Wählt nacheinander die verfügbaren Videoquellen aus, z.B. TV, SVideo und Composite.
Audiomodus – Wählt nacheinander die verfügbaren Audiomodi aus, z.B. Stereo,
Mono, SAP.
15
Page 41

Benutzerhandbuch DEUTSCH
,
Allgemeines Panel
Videofenster- Hiermit stellen Sie das Standardvideofenster ein:
Normal
Seitenverhältnis – Hiermit stellen Sie das Standardseitenverhältnis des Videofensters ein.
On Screen Display (OSD) – Aktiviert das Kommandofunktionsmenü auf dem Bildschirm.
Setup – Öffnet das Setup-Fenster von WinDVR
Immer An und Arbeitsplatzvideo
4.3 Kontextmenü
Sie können zu jeder Zeit während des Betriebs von WinDVR 3 den Zeiger auf das Wiedergabefenster setzen
und mit einem Klick der rechten Maustaste ein Kontextmenü wie unten abgebildet aufrufen. Dieses Menü
erscheint auch, wenn Sie die Taste „B“ auf Ihrer Tastatur drücken. Die Kommandos diese Kontextmenüs sind
die gleichen wie die des WinDVR 3 Programmfensters, wobei einige zusätzliche Optionen hinzugefügt sind.
Das Kontextmenü wird im Folgenden beschrieben.
verbirgt es.
Seitenverhältnis-Öffnet das Seitenverhältnisuntermenü:
Frei–Hiermit können Sie den Bildschirm auf beliebige Abmessungen ziehen.
4 x 3–Setzt die Größe der Videowiedergabe auf 320 x 420 Pixel.
16 x 9–Setzt die Größe der Videowiedergabe auf Standardfilmabmessung. Auch als ‚Breitbild’
bezeichnet.
Aufnahme-Startet den TV Mitschnitt und kodiert ihn im MPEG-2 Format.
Wiedergabe-Startet die Wiedergabe eines aufgezeichneten Programms.
Pause-Unterbricht die aktuelle Aktion (z.B. Wiedergabe, Live TV,
Aufnahme, etc.)
Stopp-Beendet die aktuelle Aktion (z.B. Aufnahme, Wiedergabe,
Zeitversetzung, etc.)
Zeitversetzung-Unterbricht das Live TV.
Zurück zu Live-Kehrt zur aktuellen Zeit im Programm zurück, wenn die
Funktion zur Zeitversetzung aktiviert wurde.
Unmittelbare Wiederholung-Wiederholt eine voreingestellte Zeitspanne.
Werbung überspringe-Überspringt eine voreingestellte Zeitspanne
Einzelbildaufnahme-Macht ein Foto vom aktuellen Programm
Kana-Öffnet die Kanaluntermenüs:
Kanal hoch-Geht zum nächst höheren verfügbaren Kanal
Kanal runter-Geht zum nächst niedrigeren verfügbaren Kanal.
Vorheriger Kanal-Kehrt zum zuletzt ausgewählten Kanal zurück.
Surfen-Hiermit können Sie die Vorschaubilder der verfügbaren
Kanäle durchsuchen.
EPG-Öffnet die online Kanallisten
Zeitplan-Öffnet ein Fenster zum Programmieren von Mitschnitten oder
zur Erinnerung von Programmzeiten.
Videoquelle-Öffnet das Untermenü der Videoquelle:
Composite-Eine externe Quelle wie etwa ein DVD-Spieler oder
ein Videorekorder.
TV-Ein Fernsehempfänger.
S-Video-Eine externe Quelle wie etwa ein DVD-Spieler oder ein
Videorekorder.
TV Audio-Öffnet das Untermenü des Fernsehtons:
Mono-Ein einzelner Audiokanal der in alle Lautsprecher gespeist
wird
Stereo-Duale Audikanäle die in die entsprechenden linken und
rechten Lautsprecher gespeist werden.
SAP-Zweites Audioprogramm, häufig für zweisprachige
Programme verwendet.
Programmfenster-Zeigt das WinDVR Programmfenster an oder
16
Page 42

Benutzerhandbuch DEUTSCH
Bildschirmgröße-Öffnet das Untermenü für die Bildschirmgröße:
320 x 240-Stellt das Wiedergabefenster auf diese Pixelgröße ein.
640 x 480-Stellt das Wiedergabefenster auf diese Pixelgröße ein.
Zoomen und Verschieben-Vergrößern und Verschieben eines Ausschnitts.
OSD-Aktiviert und deaktiviert das On-Screen Display.
Videoarbeitsfläche-Aktiviert und deaktiviert die Videoarbeitsfläche
Lautstärke-Öffnet das Lautstärkeuntermenü:
Lauter-Erhöht die Lautstärke des Programms
Leiser-Verringert die Lautstärke des Programms.
Stummschaltung-Ton ein oder ausschalten
Setup-Öffnet das Eigenschaftenfenster von WinDVR.
Info-Zeigt Versions- und Copyright-Informationen an.
Schließen-Beendet WinDVR.
Kapitel 5 Kanalvorschau
Die Kanalvorschaufunktion der LINDY USB 2.0 TV Tuner &
Video Capture Box kann 16 Fernsehkanäle gleichzeitig am
Bildschirm darstellen. Sie können deutlich erkennen, welche
Fernsehprogramme gerade auf diesen Kanälen laufen.
Vorschau:
a) Bitte Drücken Sie auf den Vorschau/Preview-Knopf auf
Ihrer Fernbedienung.
b) Dann erscheint die Mehrkanalanzeige auf dem Bildschirm
(16 Fernsehkanäle ist Standard).
c) Um zum vorherigen Bildschirm zurückzukehren drücken Sie den Vorschau-Knopf erneut.
Vorschau-Knopf
drücken
Vorschau-Knopf noch
einmal drücken
Den 15. Kanal wiedergeben
Ausschnitt vergrößern:
a) Drücken Sie auf den Vorschau-Knopf auf Ihrer Fernbedienung, um die 16 TV Kanäle anzuzeigen.
b) Mit einem Klick der linken Maustaste wählen Sie den Kanal, den Sie möchten, aus.
c) Daraufhin beginnt die Wiedergabe des ausgewählten Kanals.
d) Klicken Sie noch einmal mit der linken Maustaste um zu Vergrößern. Nochmaliges Klicken kehrt zur
normalen Größe und Wiedergabe zurück.
e) Sie können auch den Full / Vollbild-Schalter auf Ihrer Fernbedienung drücken, um zum Vollbild und
normalen Wiedergabegröße zurückzukehren.
" Während die Vorschau der 16 TV Kanäle aktiv ist, können Sie den Kanal, den Sie möchten, nicht mit
einem Doppelklick auswählen, da diese Funktion nicht verfügbar ist.
16 TV Kanäle als
Übersicht anzeigen
Fortfahren mit der Wiedergabe
des 15. Kanals
17
Page 43

Benutzerhandbuch DEUTSCH
Kapitel 6 Problembeseitigung
Problem 1: TV oder Videobild sind gestört.
Lösung: Überprüfen Sie, ob alle Kabel richtig angeschlossen sind oder justieren Sie die Fernsehantenne
neu.
Problem 2: Fernbedienung funktioniert nur manchmal oder überhaupt nicht.
Lösung:
a) Vergewissern Sie sich, dass die Sichtlinie zwischen der Fernbedienung und dem Sensor / Empfänger der
Fernbedienungssignale der LINDY USB 2.0 TV Tuner & Video Capture Box nicht blockiert wird.
b) Richten Sie die Fernbedienung direkt auf den Sensor / Empfänger.
c) Überprüfen Sie, ob die Batterien in der Fernbedienung verbraucht sind.
Problem 3: Kein Videobild
Lösung:
a) Überprüfen Sie, ob alle Kabel richtig angeschlossen sind. Stecken Sie die Kabel aus und wieder ein.
b) Bitte installieren Sie den USB Video- / Audiotreiber erneut.
Problem 4: Warum gibt WinXP die Meldung „Hochgeschwindigkeits-USB-Gerät an Nicht-
Hochgeschwindigkeits-USB …“ aus?
Lösung:
a) Vergewissern Sie sich, dass Ihr System über einen USB 2.0 Anschluss verfügt.
b) Vergewissern Sie sich, dass in Ihrem System ein Microsoft USB 2.0 Host Treiber installiert ist.
Problem 5: Warum erhalte ich am USB 2.0 Anschluss nur eine Auflösung von 320 x 240 Pixel?
Lösung:
a) Vergewissern Sie sich, dass in Ihrem System der USB 2.0 Host Treiber installiert ist.
b) Überprüfen Sie, ob die Einstellungen der Videoauflösung in Ihrer Anwendung stimmen.
c) Stecken Sie die Kabel aus und wieder ein.
d) Versuchen Sie, den USB Video- / Audiotreiber neu zu installieren.
Problem 6: WINDVR3 läuft nur sehr langsam
Lösung:
a) Öffnen Sie die über Systemsteuerung > Software > WinDVR3 und deinstallieren Sie WinDVR3. Dies wird
b) Booten Sie Ihren Rechner neu.
c) Legen Sie die WINDVR3 CD ein. Rufen Sie aus dem Ordner DRIVER / UPDATE DRIVER das Setup
d) Folgen Sie den Anweisungen auf dem Bildschirm und auf Seite 6 des Handbuches, nach Beendigung der
e) Nachdem Windows neu gestartet wurde schließen Sie bitte das Device wieder an und folgen Sie den
auch die Verknüpfung mit dem Device deinstallieren.
Programm auf.
Installation starten Sie bitte den Rechner neu.
Anweisung im Handbuch ab Seite 12.
18
Page 44

Radio Frequency Energy, Certifications
Shielded cables must be used with this equipment to maintain compliance with radio frequency energy
emission regulations and ensure a suitably high level of immunity to electromagnetic disturbances.
FCC Warning
This equipment has been tested and found to comply with the limits for a Class B Digital device,
pursuant to part 15 of the FCC Rules. These limits are designed to provide reasonable protection
against harmful interference in a residential installation. This equipment generates, uses, and
can radiate radio frequency energy and, if not installed and used in accordance with the
instructions, may cause harmful interference to radio communications. However, there is no
guarantee that interference will not occur in a particular installation. If this equipment does
cause harmful interference to radio or television reception, which can be determined by turning
the equipment off and on, the user is encouraged to try to correct the interference by one or
more of the following measures:
Reorient or relocate the receiving antenna
Increase the separation between the equipment and receiver
Connect the equipment into an outlet on a circuit different from that to which the receiver is
connected
Consult the dealer or an experienced radio/TV technician for help
You are cautioned that changes or modifications not expressly approved by the party
responsible for compliance could void your authority to operate the equipment.
This device complies with part 15 of the FCC Rules.
Operation is subject to the following two conditions:
1. This device may not cause harmful interference
2. This device must accept any interference received, including interference that may cause
undesired operation
For Home and Office
Use, tested to comply
with FCC Standards
LINDY No. 32898
© LINDY ELECTRONICS LIMITED & LINDY-ELEKTRONIK GMBH - FIRST EDITION (July 2004)
 Loading...