

Page 1

KVM Switch Compact USB Audio
User Manual English
Benutzerhandbuch Deutsch
Manuel Utilisateur Français
Manuale d’uso Italiano
LINDY No. 32797 – 2 Port
LINDY No. 32827 – 4 Port
© LINDY ELECTRONICS LIMITED & LINDY-ELEKTRONIK GMBH - SECOND EDITION (MAY 2009)
For Home and Office Use
Tested to Comply with
FCC Standards
www.LINDY.com
User Manual English
Introduction
Thank you for purchasing the LINDY KVM Switch Compact Audio. Please
read this short manual carefully to fully understand all the functions and
advanced features of this KVM Switch.
This manual refers to the 2 Port Model 32797 with KVM cables fixed to the
KVM switch and to the 4 port model 32827 with individually connected KVM
combo cables. These cables can be extended up to a maximum length of 5m
using individual standard extension cables.
Both KVM Switches allows several computers to be connected and controlled
from a single keyboard, monitor and mouse thereby reducing hardware costs
and maximising desk space. Both are compatible with PC as well as with Mac
computers. Computer port selection may be made by any of the following: Top
panel push buttons on the switch, Keyboard Hotkey – configurable by the user
from Windows and Mac systems, Mac Dock icon or Windows software or the
task bar icon.
In addition to USB keyboard and mouse support both KVM Switches allow
you to share USB devices. Please refer to the additional information below.
Package contents
LINDY KVM Switch Compact USB Audio ( 2 or 4 port)
CD containing the Windows and Mac software
This manual
Model 32827 (4 Port): 4 sets of KVM cables to connect the computers:
USB/VGA combo KVM cable and 2x3.5mm Speaker and microphone
cables
Installation
Sharing of further additional USB devices:
If you connect a USB 1.1/2.0 hub to the USB port of the KVM Switch you can
switch and share additional USB 1.1/2.0 devices between your computers.
Depending on the power requirements of the USB devices you want to share
you should use a USB hub with an external power supply if the connected
devices require more than 500mA in total.
Note: The KVM Switches operate with USB 1.1 speed and support USB 2.0
Full Speed data transfer rates up to 12MBit/sec. The hub (USB 1.1 or 2.0) can
be connected to either the mouse or keyboard port. If you want to share USB
2.0 peripherals with High Speed up to 480MBit/sec. please refer to the LINDY
KVM Switch Pro USB 2.0 series.
- 2 -
Page 2
User Manual English
Initial Installation
• Connect your keyboard, monitor and mouse to the USB and VGA ports on
the KVM switch labelled CONSOLE and connect the USB hub if required.
Connect your speakers and microphone if required.
• Model 32827 (4 Port): Connect the single HD-15 connector cable end of
the combined VGA/USB KVM cable to the KVM Switch and also connect
the 2x3.5mm speaker & microphone cables to the KVM switch – we
suggest to use as many of the KVM ports 1 to 4 as required in the
numbered order
• Connect the other ends of the KVM cables to your computers
• Switch on the first computer and allow it to boot up completely, do not
switch away from this port unless the port LED on the KVM Switch has
stopped blinking. The port LED will stop blinking as soon as all USB
devices are recognised and installed completely by the operating system.
Note: The USB KVM Switch is recognised by USB operating systems as
“KVM Switcher“ Device (Mac) or USB Composite Devices (Windows) and also
as a USB Hub. For correct recognition and installation your operating system
should be up to date. If you are faced with any problems with device
recognition and driver installation then please install the most recent updates
for your operating system.
• Now proceed to install the Windows or Mac KVM Switcher software from
the CD included to allow you to use all the advanced KVM switching
functions such as hotkey configuration, Audio binding and Auto Scan.
• Whenever you connect a USB device to the KVM switch it will operate in
the same way with your computers as if it was simply connected to a USB
hub.
KVM operation
You can choose from 3 different methods of switching between computers:
Via “Port”-button on top of the Switch
Via keyboard hotkey (2x Scroll Lock button- not available on a Mac!)
Via KVM software (only Windows and Mac, requires installation oft he
KVM software):
o Hotkey CTRL + ALT + [*], as default [*] are the keys 1, 2, 3, 4, and can
be reconfigured under Windows and Mac
o Switching icon in the system tray (Windows) respectively in the Dock
(Mac)
o Desktop Icon or program (Windows)
User Manual English
Please note that the green port LED will continue blinking during the
USB device enumeration process. Please wait for this process to
complete and for the LED to remain illuminated before switching
computer ports.
KVM switching software
Hotkey switching – Universal hotkey: on IBM compatible PCs you can
switch ports by simply pressing the Scroll Lock hotkey twice within 1
second.
Windows ME/2000/XP/Vista and Mac users should install the software
from the included CD to use the advanced switching options as mentioned
earlier. In addition to the hotkey switching the Auto Scan function and
binding of audio ports to one computer are available.
The switching software has to be installed on all connected computers to
allow the advanced switching options to be available. Insert the CD into
your CD drive. Locate and start the “setup.exe” file if the program does not
start automatically. Mac users: please follow the info file and extract a
folder to a local drive and start installation from there. When installation is
complete an additional icon will appear in the Windows system tray and on
the desktop. Mac users may have to place an
alias in the Dock.
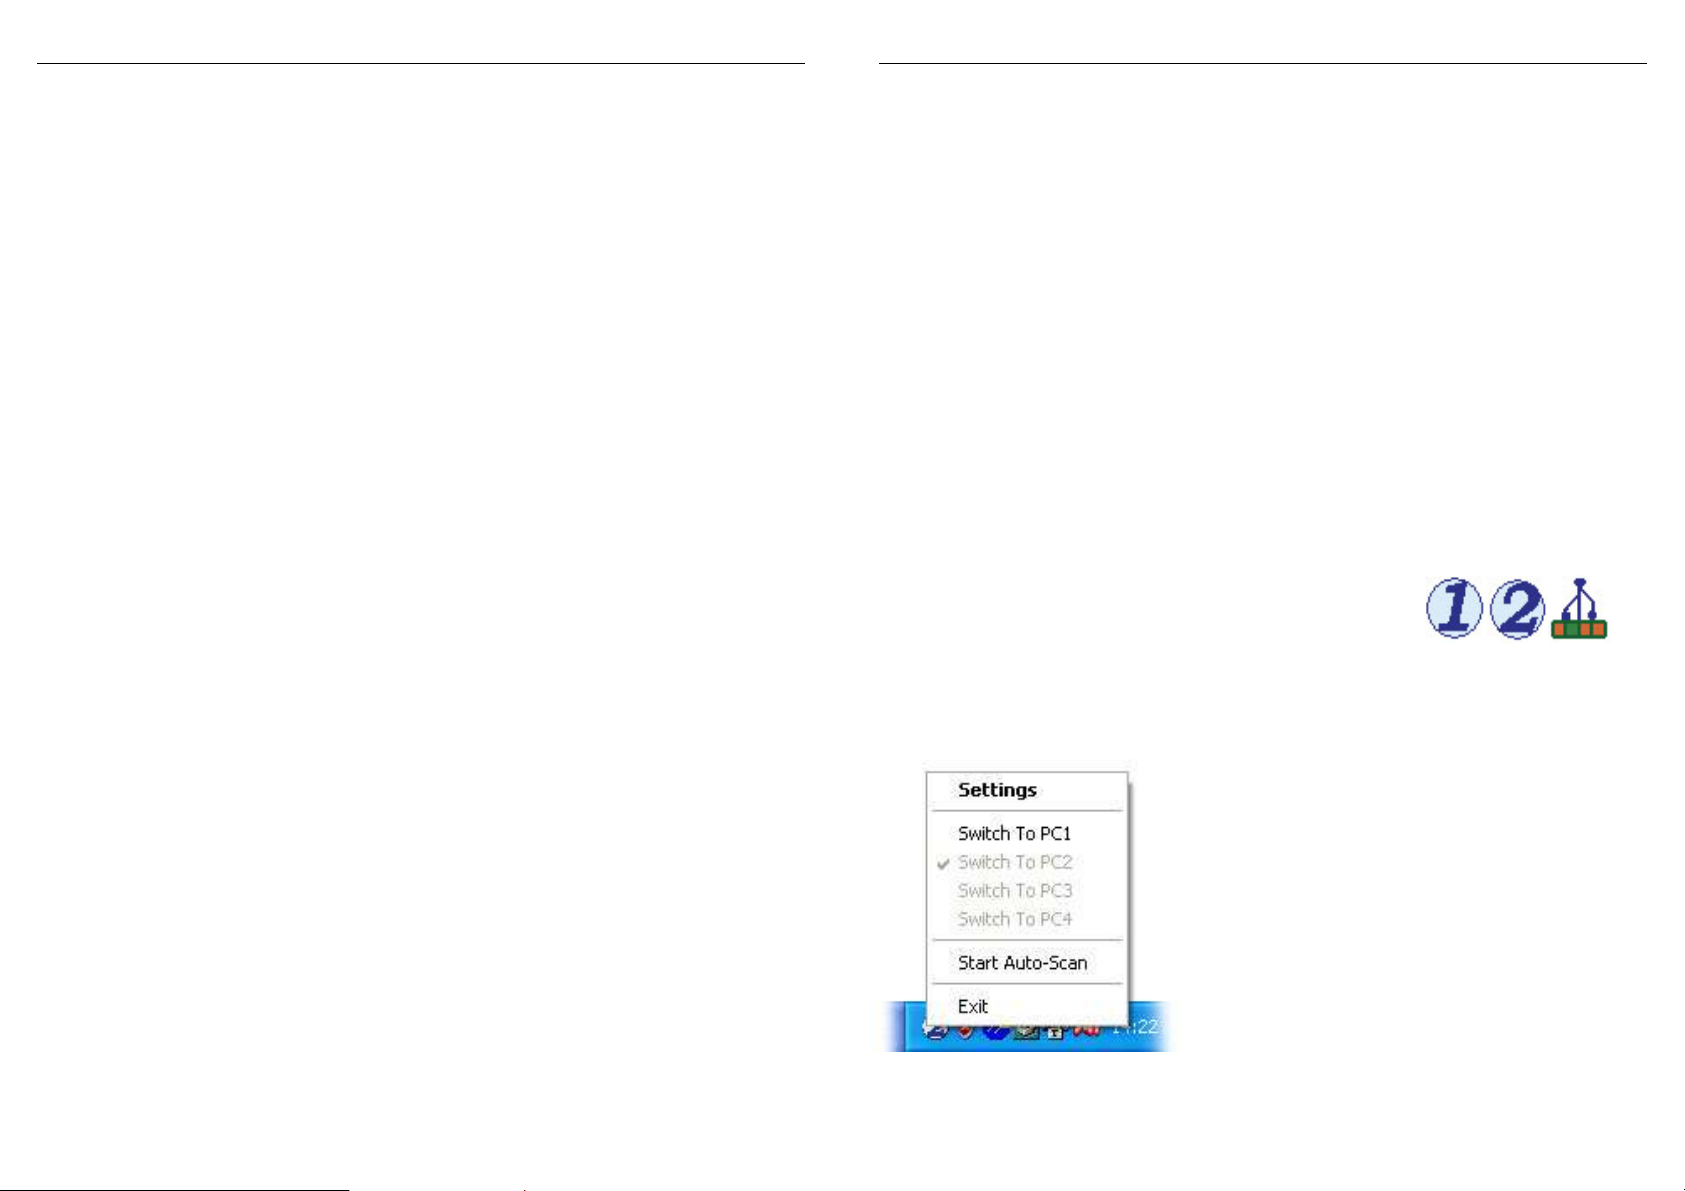
When no KVM switch is connected the symbol on
the right may be shown, otherwise you will see an icon 1, 2, 3 or 4 for the
recently connected computer port number. (The design of the icon may
appear slightly different depending on your operating system!)
When switching computers simply click
the icon with the right mouse button or
double click the icon on the desktop. A
switching windows as shown will appear.
Click Switch to PC1 order 2, 3, 4 to
select the desired computer.
Only switching to active ports will be
available! The only way to switch to a non
active port is to use the buttons on top of
the KVM switch.
Select Start Autoscan to automatically
switch through the active computers.
- 3 -
- 4 -
Page 3
User Manual English
Benutzerhandbuch Deutsch
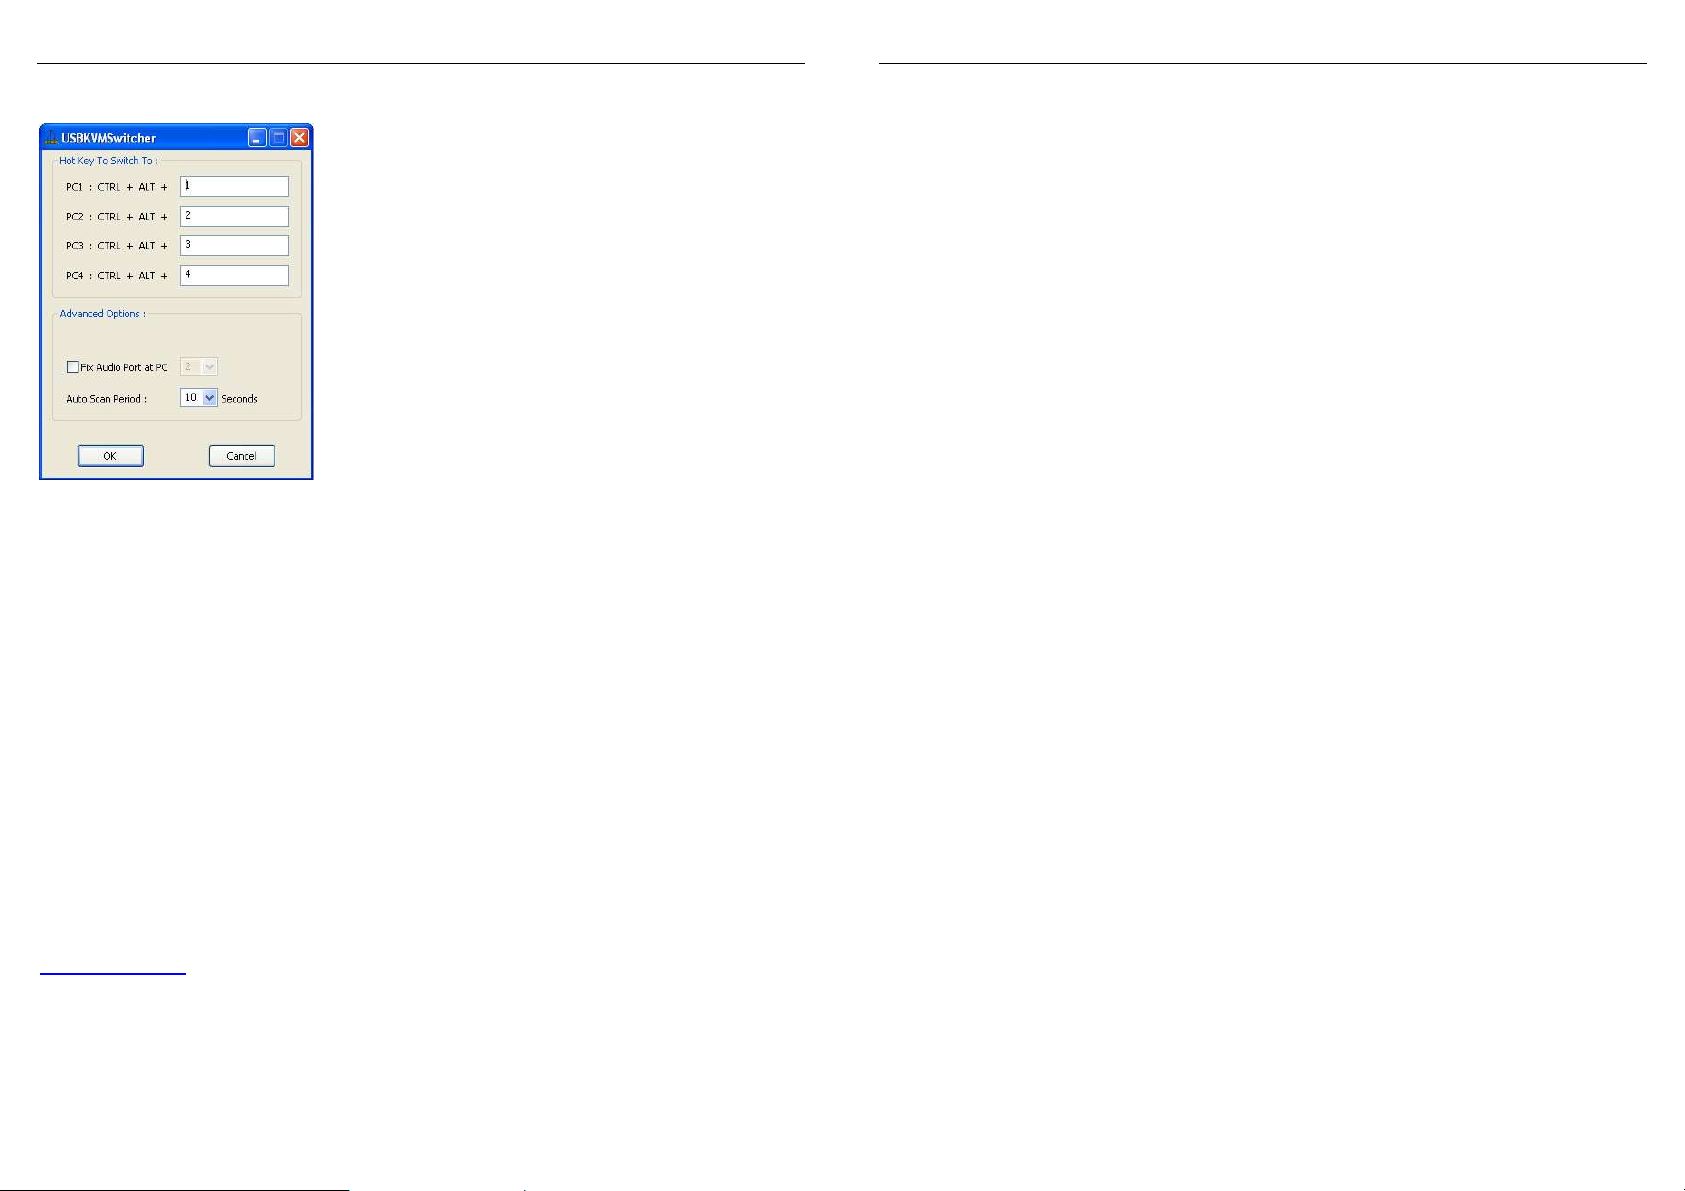
Select Settings to invoke the configuration utility.
KVM Software Configuration utility
Changing the additional hotkeys
Besides the universal Scroll Lock hotkey you
can switch ports by selecting the target port
directly using CTRL + ALT + [*].
As default [*] are the keys 1, 2, 3, 4. You can
reconfigure these keys to almost any other key
except Alt, Ctrl, any of the Shift, Caps Lock,
Tab, as well as function- and edit keys.
Audio binding to individual computers
This option disables audio switching and binds the audio signals to a
particular port / computer. This option will allow uninterrupted audio to be
selected from an individual computer whilst still being able to switch between
the connected computers.
Auto Scan Period
The Auto Scan time interval can be defined in the range from 10 sec. to 60
sec. per channel.
Technical support:
Should you encounter any problems with your KVM switch then please
contact LINDY for technical support. You may also wish to visit our website
www.lindy.com for further information on our range of KVM switches with
advanced features, including support for DVI, HDMI, USB 2.0 and Multi
Monitor versions.
- 5 -
EINFÜHRUNG
Wir gratulieren Ihnen zum Erwerb dieses LINDY KVM Switches und
wünschen Ihnen angenehmes Arbeiten mit diesem Umschalter. Bitte lesen
Sie dieses kurze Handbuch bis zum Ende um alle Möglichkeiten der
Umschaltfunktionen kennen zu lernen.
Dieses Handbuch bezieht sich auf das 2 Port Modell 32797 mit fest am KVM
Switch angeschlossenen Kabeln sowie auf das 4 Port Modell 32827 mit
einzeln anschließbaren Kabelsätzen. Die Kabel können bei Verwendung von
Standardverlängerungskabeln bis auf maximal 5m Länge verlängert werden.
Der KVM Switch Compact USB Audio erlaubt zwei bzw. bis zu vier Rechner
von nur einer Tastatur/Maus/Monitor-Kombination aus komplett zu steuern. Er
kann mit PCs und MACs kombiniert werden. Das Umschalten kann auf
mehrere verschiedene Arten erfolgen: Taste am Switch, Tastatur-Hotkey oder
durch eine KVM-Software. Unter LINUX Betriebssystemen ist der KVM Switch
nur mit dem universellen Hotkey: 2x Rollen-Taste und am Switch direkt
umschaltbar.
Der USB-Teil des KVM-Switch Compact unterstützt neben USB-Mäusen
und -Tastaturen annähernd alle USB-Geräte. Er arbeitet mit USB 1.1
Geschwindigkeit. Bei Verwendung eines USB-Hubs können hier weitere
USB 1.1/2.0-Geräte angeschlossen werden!
LIEFERUMFANG
LINDY KVM Switch Compact USB Audio & VGA
Software & Handbuch CD
Gedruckte englische, französische, deutsche & italienische Anleitungen
Modell 32827 (4 Port): separate Kabelsätze bestehend aus 4x USB/VGA
Kombikabel und 4x Lautsprecher- & Mikrofonkabel
INBETRIEBNAHME
Verwendung des KVM Switches mit einem zusätzlichen USB-Hub
Sie können zusätzlich einen USB-Hub an eine USB-Buchse des KVM Switch
anschließen und die an diesen USB-Hub angeschlossenen USB-Geräte mit
umschalten und so an den Rechnern abwechselnd nutzen. Je nach
Strombedarf der angeschlossenen USB-Geräte sollten Sie einen USB-Hub
mit eigenem Netzteil verwenden!
Hinweis: Dieses Feature unterstützt USB 1.1 und USB 2.0 Full Speed
Datentransferraten bis 12MBit/sec. Der Hub (USB 1.1 oder 2.0) kann
entweder an den Tastatur- oder Mausport angeschlossen werden. Zur
- 6 -
Page 4

Benutzerhandbuch Deutsch
Unterstützung von USB 2.0 High Speed verwenden Sie bitte die LINDY KVM
Switches der Pro-Serie!
Erstinstallation
• Schließen Sie Maus und Tastatur (bzw. den USB-Hub) an den USBBuchsen am KVM Switch (bzw. am Hub) an.
• Schließen Sie Ihren Monitor am KVM Switch sowie gegebenenfalls
Lautsprecher und Mikrofon an.
• Modell 32827 (4 Port): Schließen Sie bei den mitgelieferten KVM-Kabeln
das Ende mit dem Einzelstecker sowie gegebenenfalls die mitgelieferten
Lautsprecher-/Mikrofonkabel am KVM Switch an. Es empfiehlt sich nach
der Reihenfolge der Portnummerierung vorzugehen.
• Schließen Sie die anderen Enden dieser KVM-Kabel an Ihre Rechner an.
• Fahren Sie bei der ersten Installation des KVM Switches die Rechner der
Reihe nach hoch und warten Sie unbedingt bis alle Geräte vom jeweiligen
Rechner korrekt erkannt wurden. Die Port-LED am KVM Switch hört auf zu
blinken wenn alle USB-Geräte korrekt erkannt wurden!
Anmerkung: Der USB KVM Switch wird von Windows und Mac USB
Betriebssystemen erkannt und als „KVM Switcher“ Device (Mac) oder USB
Verbundgerät (Windows) und als USB Hub installiert. Dazu sollte Ihr Betriebssystem möglichst aktuelle Treiber verwenden, die in den aktuellen Betriebssystemversionen z.B. ab Windows ME aufwärts enthalten sind. Sollte es
hierbei zu Problemen kommen so aktualisieren Sie bitte Ihr Betriebssystem
und die Treiberausstattung auf den Updateseiten des Betriebssystemherstellers (z.B. Microsoft oder Windows Update).
• Installieren Sie auf den Windows- und Mac-Rechnern die KVM Switcher
Software von der beiliegenden CD um alle Features dieses KVM Switches
und das Umschalten per Hotkey und Software sowie die Audio-Bindung an
einen bestimmten Rechner nutzen zu können.
• Installieren Sie neu angeschlossene USB Devices im Betriebssystem
genauso wie Sie es bisher auch ohne diesen KVM Switch getan haben, es
besteht kein Unterschied.
VERWENDUNG
Sie können zwischen 3 Arten des Umschaltens wählen:
Per “Port”-Taste am Switch
Per Tastatur-Hotkey (2x Rollen-Taste drücken. Nicht am Mac verfügbar!)
Per KVM-Umschaltsoftware (nur Windows und Mac, erfordert Installation
der KVM-Software):
Benutzerhandbuch Deutsch
o Hotkey STRG + ALT + [*], wobei [*] per Voreinstellung die Tasten 1, 2,
3, 4 sind, können unter Windows und am Mac umkonfiguriert werden
o Umschalt-Icon in der Taskleiste (Windows) bzw. im Dock (Mac)
o Desktop Icon oder Programm für die Umschaltsoftware (Windows)
Bitte beachten Sie, dass beim Umschalten die grüne Port-LED an Switch
blinkt. Dies zeigt an, dass der Umschaltvorgang noch nicht abgeschlossen ist und noch nicht alle USB Geräte am Zielsystem korrekt
eingebunden sind. Schalten Sie erst weiter wenn die LED aufgehört hat
zu blinken.
KVM Umschalt-Software
Hotkey Umschaltung – Bei Verwendung von IBM-kompatiblen PCs können
Sie durch zweimaliges kurzes Drücken der „Rollen“-Taste (universeller
Hotkey) zwischen den Rechnern weiterschalten.
Windows ME/2000/XP/Vista und Mac Anwender sollten die auf CD
beiliegende KVM Umschaltsoftware installieren und können dann
verschiedene Zusatzfunktionen nutzen:
•
Umschalten via Icon in der Taskleiste bzw. im Dock
•
Umschalten auch per „STRG + ALT + [*] “ Tastenkombination, freie
Konfiguration des Hotkeys [*] (s.u.)
•
AutoScan Funktion mit Einstellung der Kanalzeit
•
Fixierung der Audiokanäle an einen der vier Rechner, so dass Audio nicht
mehr umgeschaltet wird
Die Software muss auf allen Rechnern installiert werden auf denen per
Icon/Software umgeschaltet werden soll. Legen Sie dazu die CD ein und
starten Sie ggf. Setup.exe. Am Mac muss ein File auf die lokale Festplatte
kopiert, entpackt und installiert werden, siehe Infofile für Mac-User auf CD.
Nach Abschluss der Installation erscheint unter
Windows ein zusätzliches Icon rechts unten in der
Taskleiste und auf dem Desktop, am Mac muss ggf.
ein Alias im Dock platziert werden. Wenn kein KVM
Switch angeschlossen ist, wird in der Taskleiste das
rechte der oben abgebildeten Icons angezeigt.
Andernfalls sehen Sie entweder das Icon „1“ oder „2“.
(Das Aussehen der Icons kann leicht variieren.)
Zum Umschalten klicken Sie mit der rechten Maustaste
auf das Icon in der Taskleiste bzw. im Dock oder
doppelklicken Sie das Icon auf dem Desktop. Ein
Fenster wie nebenstehend wird geöffnet.
- 7 -
- 8 -
Page 5

Benutzerhandbuch Deutsch
Wählen Sie Switch to PC1 oder 2, 3, 4 zum Umschalten.
Es ist ausschließlich das Schalten auf aktive Ports möglich! Die anderen Ports
sind ausgegraut. Wollen Sie auf einen nicht aktiven Port schalten so ist dies
nur über die Tasten am Switch möglich!
Wählen Sie Start Autoscan um automatisch kontinuierlich zwischen den
Rechnern hin und her zu schalten.
Wählen Sie Settings um das Konfigurationsutility aufzurufen
KVM Software Konfigurationsutility
Änderung der zusätzlichen Umschalt-Hotkeys
Neben dem zweimaligen Drücken des „Rollen“Tastaurhotkeys können Sie nach Installation der
Software auch „STRG+ALT+1“ oder
„STRG+ALT+2“ etc. zum Umschalten verwenden.
Mit dem Konfigurationsutility können Sie statt der
Tasten 1, 2, 3 ,4 hier andere Tasten eintragen. Die
folgenden Tasten können jedoch nicht verwendet
werden: Alt, Ctrl, Strg, beide Großschreibtasten
(Shift, Caps Lock), Tab (Tabulator), sowie die
Funktions- und Editierungs-Tasten rechts neben
der Return / Zeilenschaltungs-Taste.
Fixieren des Audio Ports an einen PC
Diese Option schließt das Umschalten von Mikrofon- und Lautsprecheranschlüssen aus und bindet die Audio-Ports fest an einen der Rechner.
AutoScan Kanalzeit
Sie können hier das Zeitintervall definieren (10 – 60 Sekunden), das im
AutoScan Modus zwischen den Schaltvorgängen liegen soll.
Wir wünschen Ihnen allzeit viel Freude mit Ihrem LINDY KVM Umschalter.
Bei Problemen wenden Sie sich bitte vertrauensvoll an unseren Support. Sie
finden alle Kontaktdaten weltweit auf unserer Website.
KVM-Umschalter für weitergehende höhere technologische Anforderungen
(DVI, HDMI, USB 2.0, mehrere Monitore, …) finden Sie ebenfalls auf unserer
Website.
Manuel Utilisateur Français
Introduction
Merci d’avoir choisi le switch KVM LINDY Compact Audio. Merci de lire ce
manuel pour bien comprendre toutes les fonctions offertes par ce switch.
Ce manuel décrit le modèle 2 ports N° Art. 32797 avec câbles combo soudés,
et le modèle 4 ports N° Art. 32827 avec câbles combo individuels. Ces câbles
peuvent être étendus jusqu’à 5m en utilisant des rallonges.
Ce switch KVM permet à plusieurs ordinateurs d’être connectés et contrôlés
depuis un seul clavier, écran et souris. Il est compatible PC et Mac. La
sélection de port peut se faire par bouton sur le switch, séquence clavier
hotkey (configurable par l’utilisateur sous Windows et Mac), et icône sur la
barre des tâches sous Windows et sous Mac.
En plus du clavier et souris USB, ce switch KVM supporte peut partage des
périphériques USB. Merci de lire les informations ci-dessous.
Contenu du package
Switch KVM LINDY compact USB audio ( 2 ou 4 ports)
CD contenant le logiciel Windows et Mac
Ce manuel
Modèle N° Art. 32827 (4 ports): 4 câbles combo pour connecter les
ordinateurs: câble combo USB/VGA + 2x3.5mm Jack (haut-parleurs et
micro)
Installation
Partager un périphérique USB additionnel:
Si vous connectez un hub USB 1.1/2.0 à un port USB du swtich KVM, vous
pouvez alors partager des périphériques USB 1.1/2.0 sur vos ordinateurs. Si
la consommation de vos appareils USB dépasse, vous devrez alors utiliser
une alimentation externe.
Remarque: le switch KVM fonctionne en USB 1.1 speed et supporte USB 2.0
Full Speed jusqu’à 12MBit/sec. Le hub (USB 1.1 ou 2.0) peut être connecté
sur le port de la souris ou du clavier. Si vous voulez partager des
périphériques USB 2.0 en High Speed 480MBit/sec merci d’utiliser les switchs
KVM de la série Pro.
Vielen Dank! Ihr LINDY-Team
- 9 -
- 10 -
Page 6

Manuel Utilisateur Français
Manuel Utilisateur Français
Installation initiale
• Connectez votre clavier, écran et souris aux ports ‘CONSOLE’ USB et
VGA du switch et connectez le hub USB si nécessaire. Connectez vos
haut-parleurs et microphone si nécessaire.
• Modèle 32827 (4 ports): connectez le câble combo HD-15 aux ports
VGA/USB du switch KVM + les 2 prises Jack 3.5mm haut-parleurs &
microphone au switch KVM – nous proposons d’utiliser les ports KVM 1 à 4
dans l’ordre correct
• Connectez les autres extrémités des câbles combo à vos ordinateurs
• Sf vous connectez un ordinateur pour la 1ère fois, merci d’attendre qu’il
soit complètement démarré et ne commutez pas tant que ce port la LED du
port cesse de clignoter (le temps que tous les périphériques USB soient
reconnus et installés).
Remarque: le switch KVM USB est reconnu par les systèmes d’exploitation
USB comme périphérique “KVM Switcher“ sous Mac ou périphérique USB/
hub USB sous Windows. Pour une parfaite compatibilité, votre système
d’exploitation doit être mis à jour. Si vous rencontrez des problèmes, merci de
télécharger les dernières mises à jour de votre système d’exploitation.
• A présent installez le logiciel KVM pour Windows ou Mac depuis le CD
fourni pour pouvoir utiliser les fonctions avancées KVM comme la
configuration des séquences hotkey, audio et autoscan.
• Si vous connectez des périphériques USB sur le switch KVM, il
fonctionnera comme s’il était connecté à votre ordinateur via un hub USB.
Commandes KVM
Vous pouvez sélectionner 3 différentes manières de commutation entre les
ordinateurs:
Logiciel de commutation KVM
Commutation Hotkey – hotkey universel: sur les PC compatibles IBM, vous
pouvez commuter les ports en pressant deux fois le bouton “Arrêt Défil“ en
une seconde.
Les utilisateurs Windows ME/2000/XP/Vista et Mac devront installer le logiciel
fourni sur le CD pour utiliser les options précédentes. En plus de la
commutation, les fonctions Autoscan et audio existent.
Le logiciel doit être installé sur chaque ordinateur utilisé, pour pouvoir
bénéficier des fonctions avancées. Insérez le CD dans le lecteur CD et
démarrez setup.exe. Les utilisateurs Mac suivront le fichier info et extrairont le
répertoire sur le Mac, puis démarreront l’installation. Une fois l’installation
complète, un icône additionnel sera vu dans la barre des tâches Windows et
sur le bureau. Les utilisateurs Mac devront créer un alias sur la barre des
tâches (Dock).
Si le switch KVM n’est pas connecté, le symbole de
droite apparaîtra, sinon vous verrez l’icône 1, 2, 3 ou
4 correspondant au port KVM utilisé. (la forme de l’icône peut être légèrement
différente!)
Pour commuter, faites un clic droit sur l’icône.
L’image ci-contre apparaît alors. Cliquez
Switch to PC1 ou 2, 3, 4 pour sélectionner
l’ordinateur désiré.
Il n’y a que les ports actifs qui seront
disponibles! La seule façon de commuter sur
un port non actif est le bouton sur le switch
KVM.
Via le bouton “Port” sur le switch
Via une séquence clavier hotkey (2x ”Arrêt Défil” non disponible sur un
Mac!)
Via logiciel KVM (uniquement pour Windows et Mac
o Hotkey CTRL + ALT + [*], par défaut [*] sont les n° de ports 1, 2, 3, 4 La
commande peut être reconfigurée sous Windows et Mac
o L’icône de commutation dans la barre des tâches (Windows et Mac)
Merci de toujours attendre que LED verte soit fixe avant de pouvoir
commuter sur un autre PC (LED verte clignotante = périphériques pas
encore reconnus dans le système d’exploitation)
- 11 -
Sélectionnez Start Autoscan pour commuter
automatiquement sur les ordinateurs actifs.
Sélectionnez Settings pour démarrer
l’utilitaire de cofiguration.
- 12 -
Page 7

Manuel Utilisateur Français
Manuale d'uso Italiano
Logiciel de configuration KVM
Changez les séquences hotkeys
additionnelles
Avec les séquences hotkey Arrêt Défil, vous
pouvez commuter les ports en tapant
directement: CTRL + ALT + [*].
Par défaut [*] sont les ports 1, 2, 3, 4. Vous
pouvez reconfigurer la séquence en n’importe
quoi sauf Alt, Ctrl, sinon Shift, Caps Lock,
Tab, ou function- et les touches d’édition sur la
droite à droite de la touche entrée.
Commutation audio fixe, sur un seul ordinateur
Cette option désactive la commutation audio et la fixe sur un port audio. En
faisant ainsi, vous pouvez écouter en continu tout en commutant sur les
autres ports du switch KVM.
Période Autoscan
Le temps/intervalle Autoscan peut être défini de 10 sec. à 60 sec. par canal.
En cas de problème, vous pouvez contacter notre support technique.
Vous trouverez d’autres switchs KVM (DVI, HDMI, USB 2.0, plusieurs écrans,
…) sur notre site web.
Votre équipe LINDY
Introduzione
Grazie per aver scelto il LINDY KVM Switch Compact Audio. In questo
manuale troverete le caratteristiche e le funzioni di questo KVM Switch.
Questo manuale si riferisce al modello 2 porte Art 32797 con i cavi KVM
integrati nello switch, e 4 porte Art 32827 con i cavi KVM collegati
singolarmente. Questi cavi possono essere prolungati fino a una lunghezza
massima di 5m utilizzando dei cavi prolunga standard.
Questo KVM Switch consente di controllare più computer da un unica tastiera,
mouse e monitor. E’ compatibile con PC e Mac, la commutazione tra i
computer può avvenire in diverse modalità: tasti sul pannello frontale dello
switch, hotkey tastiera – configurabili dall’utente da Windows e Mac, icona
Mac Dock, software Windows o icona nella task bar.
Oltre a mouse e tastiera USB, questo KVM Switch supporta alter periferiche
USB (vedi sotto per ulteriori dettagli).
Contenuto della confezione
LINDY KVM Switch Compact USB Audio (2 o 4 porte)
CD con software per Windows e Mac
Questo manuale
Modello 32827 (4 Porte): 4 cavi KVM per il collegamento ai computer: cavi
KVM USB/VGA e 2x3.5mm per casse e microfono
Installazione
Condivisione di dispositivi USB addizionali:
Se collegate un Hub USB 1.1/2.0 alla porta USB del KVM Switch potrete
condividere ulteriori periferiche USB 1.1/2.0 tra i computer.
A seconda dell’alimentazione richiesta dai dispositivi USB collegati, dovrete
utilizzare un Hub USB alimentato (se l’alimentazione complessiva supera i
500mA).
N.B.: il KVM Switch lavora in modalità USB 1.1 e supporta le specifiche USB
2.0 Full Speed con una velocità di trasferimento dati fino a 12MBit/sec. L’hub
(USB 1.1 o 2.0) può essere collegato sia alla porta del mouse che a quella
della tastiera. Se desiderate condividere periferiche USB 2.0 ad una velocità
massima di 480MBit/sec, fate riferimento ai LINDY KVM Switch della serie
Pro.
- 13 -
- 14 -
Page 8

Manuale d'uso Italiano
Installazione iniziale
• Collegate tastiera, monitor e mouse alle porte USB e VGA sul KVM switch
contrassegnate come CONSOLE. Collegate un Hub USB, casse e
microfono se necessario.
• Modello 32827 (4 Porte): collegate al KVM Switch il cavo KVM con il
connettore HD-15 singolo da una parte, collegate anche i cavi jack da
3.5mm per casse e microfono – è consigliabile effettuare i collegamenti
seguendo l’ordine delle porte KVM, quindi dalla 1 alla 4.
• Collegate i computer tramite i cavi KVM
• Se collegate i computer per la prima volta assicuratevi che siano
completamente spenti e non effettuare commutazioni prima che il LED sul
KVM Switch abbia smesso di lampeggiare. Smetterà di lampeggiare
appena tutti i dispositivi USB collegati saranno riconosciuti ed installati
correttamente.
N.B.: il KVM Switch viene riconosciuto dal sistema operativo come “KVM
Switcher“ Device (Mac) o USB Composite Device (Windows) e anche come
Hub USB. Per un corretto riconoscimento ed installazione, il sistema operativo
deve essere aggiornato. Se incontrate problemi durante la fase di
riconoscimento e installazione dei dispositivi USB, aggiornate il sistema
operativo, per esempio da Windows update.
• Installate il software KVM Switcher per Windows o Mac dal CD incluso
nella fornitura per poter usufruire di tutte le funzioni avanzate come la
configurazione delle hotkey, Auto Scan, opzioni di commutazione Audio,
ecc...
• Ogni volta che collegate dispositivi USB al KVM switch, questo opererà
esattamente come quando collegate periferiche USB ad un Hub del
computer.
Funzioni KVM
Potrete effettuare la commutazione tra i computer in 3 modi differenti:
Via tasto “Port” sul pannello frontale dello Switch
Via hotkey tastiera (2x Bloc Scorr - non disponibile per Mac!)
Via KVM software (solo per Windows e Mac):
o Hotkey CTRL + ALT + [*], di default [*] sono i tasti 1, 2, 3, 4 che
possono essere riconfigurati (Windows e Mac)
o Icona Switching nella barra in basso a destra (Windows) o nel Dock
(Mac)
o Icona Desktop o programma (Windows)
Manuale d'uso Italiano
Considerate che il LED di colore verde continuerà a lampeggiare fino a
quando il processo di commutazione non è completato e i dispositivi
USB non sono completamente attivi sul sistema operativo. Aspettare
che il LED smetta di lampeggiare prima di commutare su altre porte.
Software KVM switching
Hotkey switching – Universal hotkey: su PC IBM compatibili potete
commutare premendo il tasto Bloc Scorr due volte entro un secondo.
Su sistemi operativi Windows ME/2000/XP/Vista e Mac potrete installare il
software dal CD incluso per poter usufruire di ulteriori funzioni come indicato
qui sopra. Potrete quindi utilizzare le funzioni hotkey switching, Auto Scan,
porte audio escludibili dalla commutazione.
Il software deve essere installato su ogni computer; inserite il CD nel drive ed
avviate il file setup.exe se non dovesse partire l’avvio automatico. Per Mac
seguite il file info ed estraete una cartella in un drive locale, avviate quindi
l’installazione. Quando l’installazione è terminate apparirà un’icona nella barra
di Windows in basso a destra e sul desktop. Utenti Mac dovranno inserire un
alias nel Dock.
Se il KVM switch non è collegato il simbolo in basso a
destra potrebbe apparire, altrimenti potrete
visualizzare un icona 1, 2, 3 o 4 a seconda dell’ultimo
computer connesso corrispondente al numero della porta (il design delle icone
potrebbe essere differente).
Per commutare tra i computer cliccate
sull’icon con il tasto destro del mouse o con
doppio click sull’icona sul desktop. Apparirà
una finestra come pop up; cliccate su Switch
to PC1 o 2, 3, 4 per selezionare il computer
desiderato.
Potrete commutare solo tra porte attive!
L’unico modo per commutare su una porta
non attiva è utilizzando i tasti sullo Switch.
Selezionate Start Autoscan per commutare
automaticamente tra le porte attive.
Selezionate Settings per accedere al menu
di configurazione.
- 15 -
- 16 -
Page 9

Manuale d'uso Italiano
Configurazione via Software KVM
Modifica hotkey aggiuntiva
Oltre alla hotkey universale Bloc Scorr, potete
commutare premendo la combinazione di tasti
CTRL + ALT + [*].
Di default [*] sono impostati sui tasti 1, 2, 3, 4.
Potete riconfigurare questi tasti inserendo
qualsiasi altro tasto tranne Alt, Ctrl, Shift, Caps
Lock, Tab, i tasti funzione F- e i tasti edit a
destra del tasto Invio.
Opzione commutazione Audio
Questa funzione permette di disabilitare la commutazione del segnale audio,
lasciandola quindi assegnata sempre ad un computer. In questo modo potete
per esempio ascoltare file musicali da un computer e commutare
contemporaneamente su altri computer.
Periodo Auto Scan
L’intervallo di tempo di Auto Scan può essere impostato da 10 a 60 secondi
per canale.
Per qualsiasi chiarimento o problema riscontrato con questo KVM Switch
contattate il nostro supporto tecnico.
Potete trovare molte altre versioni di KVM Switch con funzioni avanzate, porte
DVI, HDMI, USB 2.0, supporto multi monitor, ecc… sul sito LINDY
www.lindy.com
Certifications and Statements
FCC Warning
This device complies with part 15 of the FCC Rules.
Operation is subject to the following two conditions:
1. This device may not cause harmful interference, and
2. This device must accept any interference received, including interference that may cause undesired
operation.
CE Statement, EMC Compatibility
This device complies with EN Standards EN55022 and EN55024 according to the relevant EC EMC
Directive. It must be used with shielded cables only to maintain EMC compatibility.
Dieses Produkt entspricht den einschlägigen EMV Richtlinien der EU und darf nur zusammen mit
abgeschirmten Kabeln verwendet werden.
LINDY Herstellergarantie
LINDY gewährt für dieses Produkt über die gesetzliche Regelung hinaus eine zweijährige
Herstellergarantie ab Kaufdatum. Die detaillierten Bedingungen dieser Garantie finden Sie auf der LINDY
Website aufgelistet bei den AGBs.
WEEE (Waste of Electrical and Electronic Equipment),
Recycling of Electronic Products
In 2006 the European Union introduced regulations (WEEE) for the collection and recycling of all waste
electrical and electronic equipment. The wheelie bin symbol shown indicates that this product must not be
disposed of with household waste. Instead the product must be recycled in a manner that is
environmentally friendly. For more information on how to dispose of this product, please contact your local
recycling centre or your household waste disposal service. Each individual EU member state has
implemented the WEEE regulations into national law in slightly different ways. Please follow your national
law when you want to dispose of any electrical or electronic products.
More details can be obtained from your national WEEE recycling agency.
Germany / Deutschland
Die Europäische Union hat mit der WEEE Direktive umfassende Regelungen für die Verschrottung und das
Recycling von Elektro- und Elektronikprodukten geschaffen. Diese wurden im Elektro- und
Elektronikgerätegesetz – ElektroG in deutsches Recht umgesetzt. Dieses Gesetz verbietet das Entsorgen
von Elektro- und Elektronikgeräten über die Hausmülltonne! Diese Geräte müssen den lokalen
Sammelsystemen bzw. örtlichen Sammelstellen zugeführt werden! Dort werden sie kostenlos entgegen
genommen. Die Kosten für den weiteren Recyclingprozess übernimmt die Gesamtheit der Gerätehersteller.
LINDY No 32797, 32827
2nd Edition, May 2009
www.lindy.com
- 17 -
- 18 -
 Loading...