

Page 1
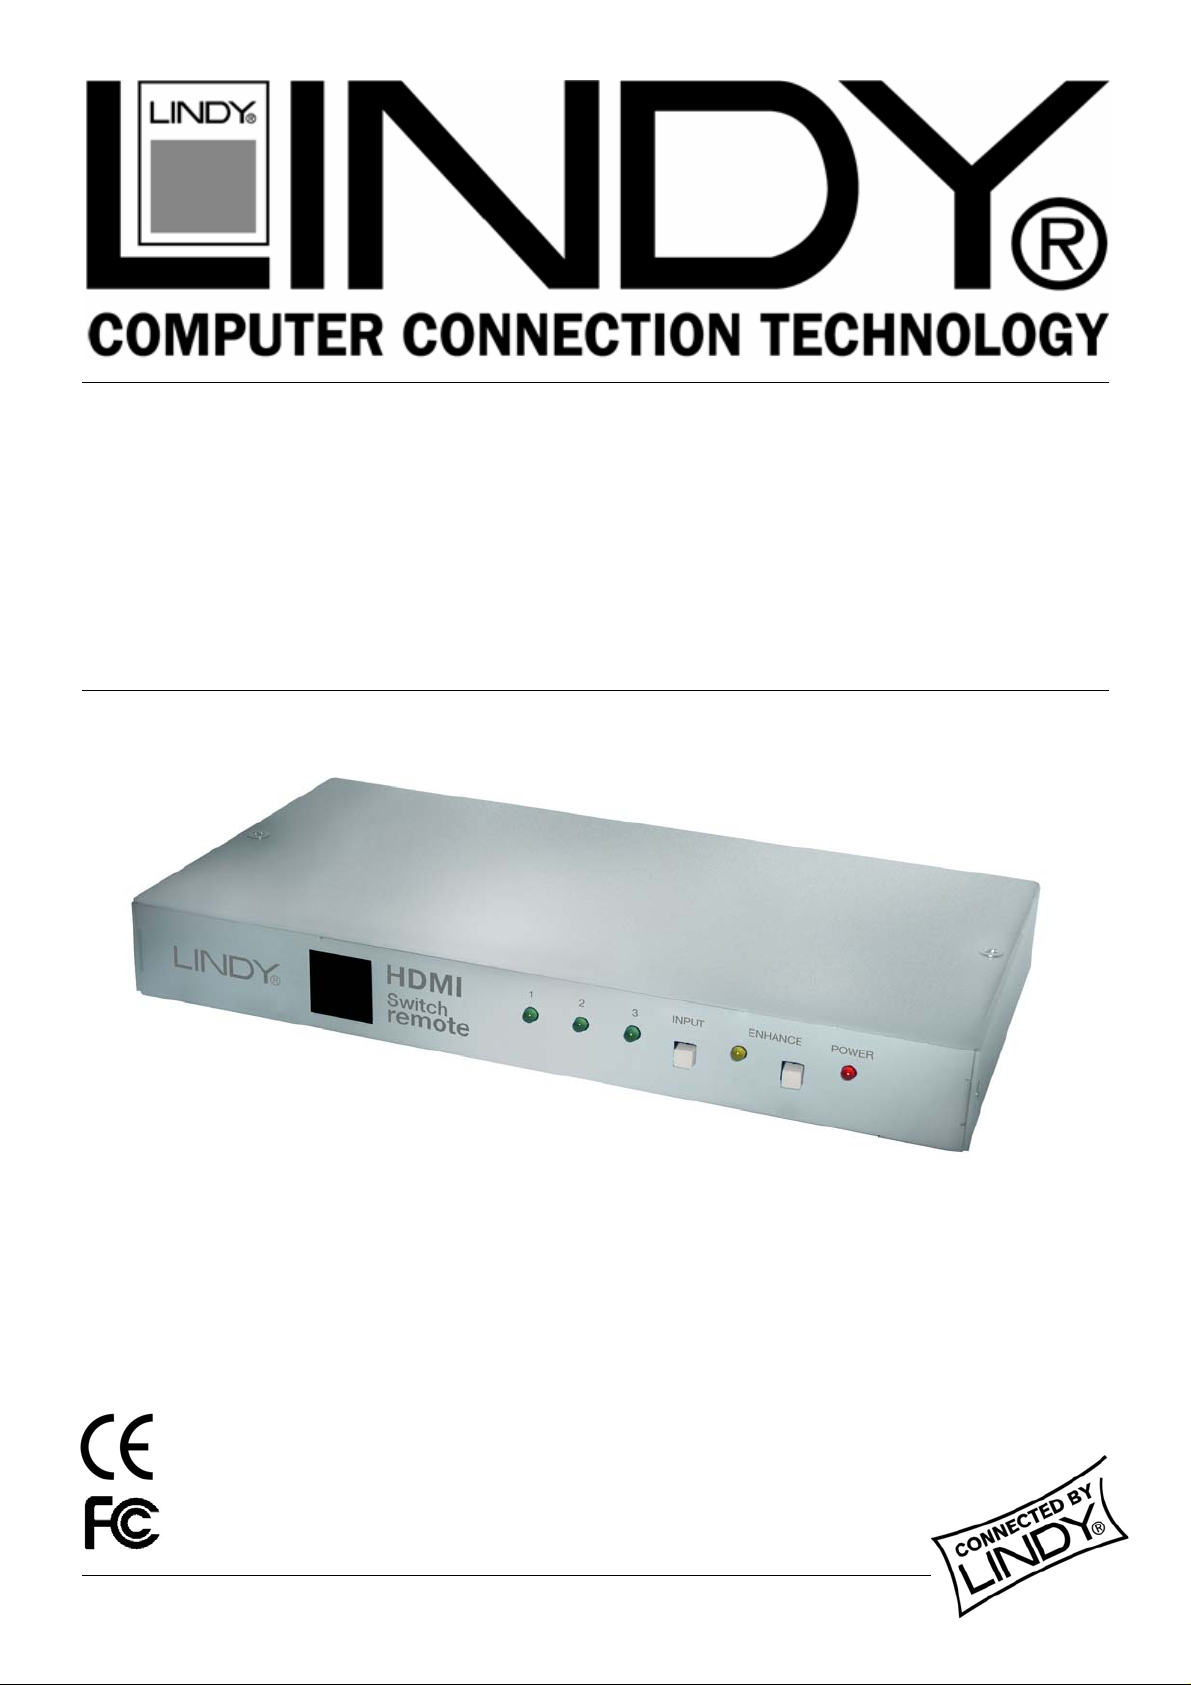
HDMI Switch Remote
User Manual English
Benutzerhandbuch Deutsch
Manuel Utilisateur Français
Manuale d’uso Italiano
LINDY No. 32592
www.lindy.com
© LINDY ELECTRONICS LIMITED & LINDY-ELEKTRONIK GMBH - FIRST EDITION (APRIL 2006)
Page 2

User Manual................Page 2
Benutzerhandbuch.....Page 5
Manuel Utilisateur.......Page 8
Manuale d’uso.............Page 11
Page 3
User Manual
play
p
English
Introduction
Thank you for purchasing the LINDY HDMI Switch Remote. This high performance switch
allows you to connect up to 3 DVI/HDMI devices to a single DVI/HDMI equipped TV or projector.
Designed for Home Theatre/Cinema installations, the HDMI Switch Remote is fully HDCP
compliant and supports multi-channel audio and HDTV resolutions of up to 1080p. Switching
between devices is achieved using the push button on the switch or the supplied infra-red
remote control. A signal enhancement feature allows signal quality to be improved over longer
transmission distances.
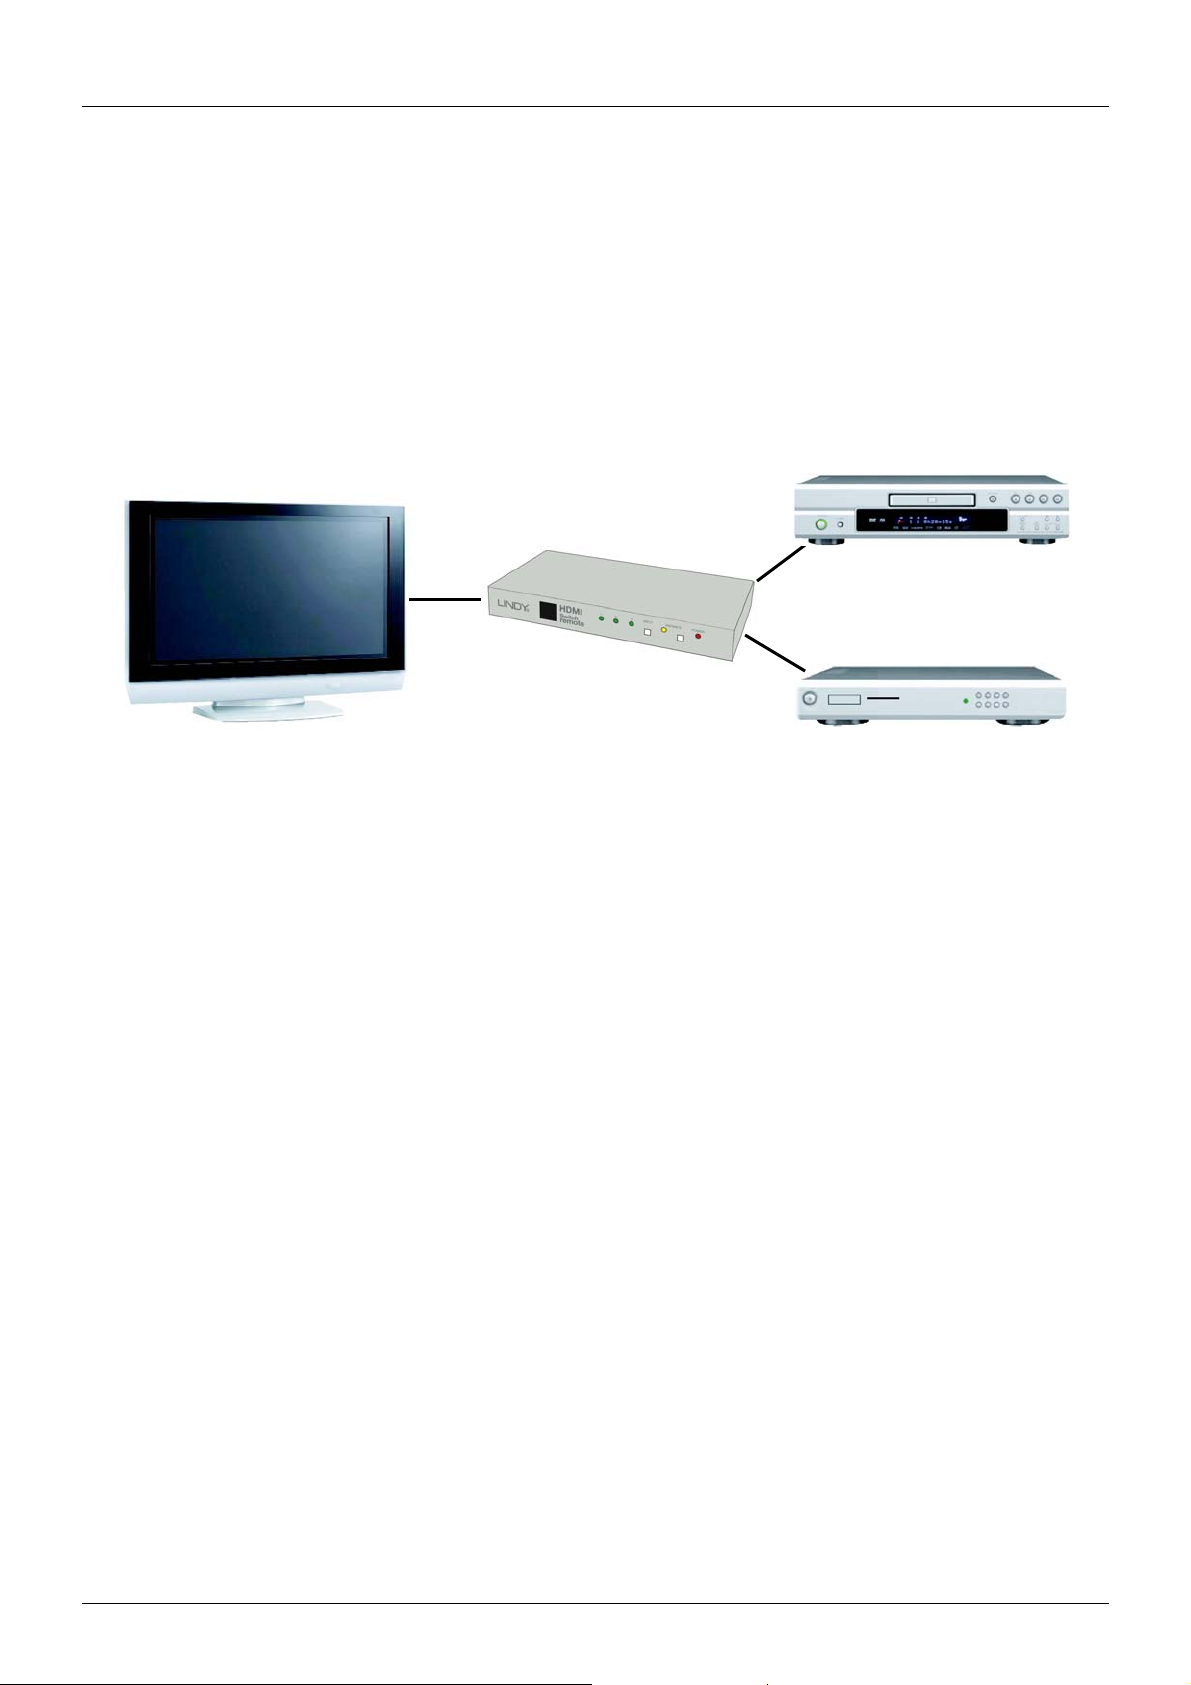
HDMI Switch
DVD Player
Remote
Dis
Set To
Typical HDMI Switch Remote application
Package Contents
LINDY HDMI Switch Remote
Infra-red remote control with battery (CR2025)
5V DC, 2.6A power supply
This manual
Features
HDMI 1.1, HDCP 1.1 and DVI 1.0 compliant
Supports HDTV resolutions: 480i, 576i, 480p, 576p, 720p, 1080i and 1080p
When used with computers, supports DVI-D resolutions of up to 1600 x 1200
Supports multi-channel audio
Input Ports: 3 x HDMI Female
Output Port: 1x HDMI Female
Device Selection by push button or infra-red remote control
LEDs to indicate channel selection, power and signal enhance
Box
- 2 -
Page 4
User Manual
English
Connection & Operation
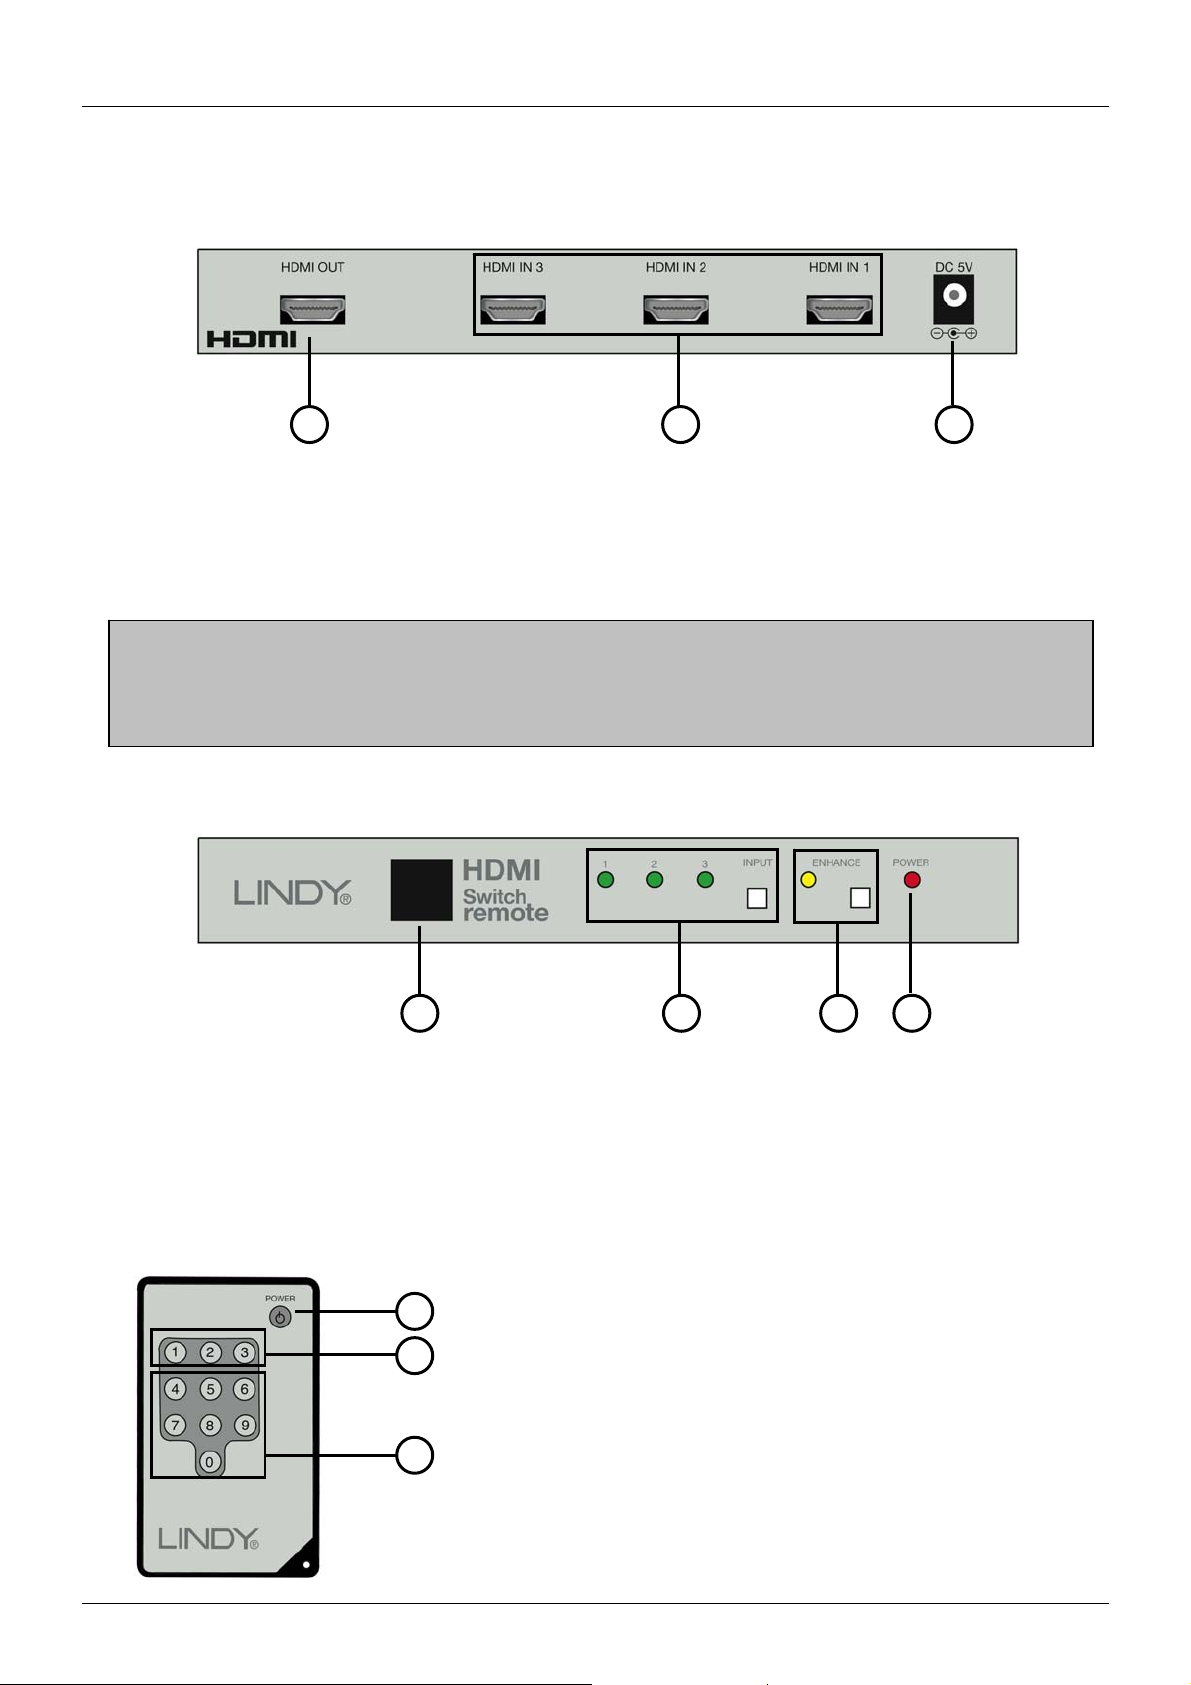
Rear Panel Connections
1
2
3
1. HDMI output: Using an HDMI cable, connect the HDMI OUT to the HDMI input on your
display
2. HDMI inputs: Use HDMI cables to connect the HDMI outputs of your source devices to the
three HDMI IN inputs.
3. Power input: Connect the supplied 5V DC power supply
Notes on using DVI equipped devices: To connect devices equipped with DVI
connections, you can use either modular DVI/HDMI adapters or DVI/HDMI adapter
cables. Be aware that DVI is a ‘video only’ interface – no audio signals will be switched by
the HDMI Switch Remote when using DVI devices!
Front Panel Operation and Indicators
4
5
6
7
4. Remote control sensor
5. Input select: Press the INPUT button to cycle through the different input channels. The
appropriate LED will illuminate to indicate the selected channel.
6. Signal enhance: Press the ENHANCE button to improve signal quality over longer
transmission distances. The LED will illuminate when signal enhance is selected.
7. Power LED: Illuminates when the power is connected
Remote Control Operation:
8
9
10
8. Power button: Press to turn the unit on/off
9. Input select: Press 1,2 or 3 to select the source
10. Void buttons: These buttons are not used
- 3 -
Page 5

User Manual
English
Troubleshooting
There is no picture on the display.
Check the HDMI Switch Remote and all connected devices are correctly powered up and
switched on.
Make sure all cables and connectors are correctly installed.
If a computer is connected, hit a key or move the mouse to wake it from power saving mode.
The HDMI Switch Remote does not respond to any commands from the remote control.
If present, remove the plastic tab labelled ‘Remove this tab’ that ships with the remote
control.
Make sure you are in line of sight of the HDMI Switch Remote. Make sure that there are no
obstructions which may be blocking the infra-red signal from the remote control.
Try switching channels using the push button to verify correct operation of the switch.
Ensure the battery is correctly installed in the remote control. Try a new battery (Type
CR2025)
- 4 -
Page 6

Benutzerhandbuch Deutsch
Einführung
Wir gratulieren Ihnen zum Erwerb des LINDY HDMI Switch Remote. Sie haben mit diesem
Gerät eine gute Wahl getroffen. Sollten Sie nicht zufrieden sein oder Probleme haben, so
wenden Sie sich bitte an den Techniksupport bei LINDY.
Dieser High End Umschalter erlaubt Ihnen zwischen 3 HDMI bzw. DVI-Signalquellen
umzuschalten und das Bild auf Ihrem TV oder Projektor mit HDMI bzw. DVI Schnittstelle
auszugeben. Er wurde entwickelt für den Einsatz in digitalen Home Theater Umgebungen, er ist
voll HDMI 1.1 / HDCP kompatibel, unterstützt Multi-Channel Audio sowie HDTV Auflösungen bis
1080p. Das Umschalten zwischen den Signalquellen erfolgt entweder über die beiliegende
Fernbedienung oder auch über die Taste am Umschalter. Integrierte Signalverstärker
unterstützen auch größere Kabeldistanzen.
DVD Player
HDMI Switch
Remote
TV
Set Top Box
Typische HDMI Switch Remote Anwendung
Lieferumfang
LINDY HDMI Switch Remote
Infrarot Fernbedienung mit Batterie (CR2025)
5V DC, 2.6A Netzteil
Dies Handbuch
Eigenschaften
HDMI 1.1, HDCP 1.1 and DVI 1.0 (digital) kompatibel
Unterstützt HDTV Auflösungen: 480i, 576i, 480p, 576p, 720p, 1080i und 1080p
Unterstützt Computer-DVI-D Auflösungen bis zu 1600 x 1200
Unterstützt Multi-Kanal Audio
Eingänge: 3 x HDMI Buchse
Ausgang: 1x HDMI Buchse
Kanalumschaltung via Taste oder Fernbedienung
LED-Anzeigen für gewählten Kanal, EIN und Signalverstärkung
- 5 -
Page 7

Benutzerhandbuch Deutsch
Anschluss & Betrieb
Rückseitige Anschlüsse
1
2
3
1. HDMI Ausgang: Schließen Sie hier Ihren TV oder Projektor an. Verwenden Sie ein
HDMI/HDMI oder HDMI/DVI-D Kabel
2. HDMI Eingänge: Schließen Sie hier bis zu 3 Signalquellen an. Verwenden Sie
HDMI/HDMI oder HDMI/DVI-D Kabel.
3. DC / Versorgungsspannung: Schließen Sie hier das beiliegende 5V DC Netzteil an.
HINWEIS zum Betrieb mit Geräten mit DVI Anschluss: Um ein Gerät mit DVI
Anschluss zu integrieren können Sie entweder Adapterkabel HDMI auf DVI-D oder kurze
HDMI/DVI-D Steckadapter verwenden. Beachten Sie aber unbedingt:
1. Steckadapter üben eine enorme Hebelkraft auf die HDMI Buchse aus und führen durch
wackeligen Sitz möglicherweise zu Bildproblemen! Verwenden Sie besser Adapterkabel!
2. DVI-Anschlüsse unterstützen kein Audio-Signal!
Vorderseite
4
5
6
4. IR Sensor Fernbedienung
5. Kanalumschalter: Drücken den INPUT Schalter so oft, bis die grüne LED des
gewünschten Kanals aufleuchtet
6. Signalverstärkung: Drücken Sie den ENHANCE Schalter um die Signalverstärkung zu
aktivieren, z.B. bei großen Kabellängen. Die zugehörige LED leuchtet bei eingeschalteter
Verstärkung.
7. Power LED: Sollte im eingeschalteten Zustand leuchten
8
9
Tasten der Fernbedienung:
8. Power Taste: Schalten Sie den Umschalter EIN/AUS
9. Kanalwahl: Drücken Sie 1,2 oder 3 zur Kanalwahl
10. Tasten 4….0: Nicht verwendet
10
7
- 6 -
Page 8

Benutzerhandbuch Deutsch
Fehlersuche
Kein Bild auf dem TV/Projektor
Prüfen Sie ob alle Geräte korrekt eingeschaltet sind
Prüfen Sie ob alle Kabelanschlüsse korrekt sitzen, auch vom Netzteil
Falls ein Computer angeschlossen ist, prüfen Sie ob er sich im Sleep-Modus befindet und
wecken Sie ihn gegebenenfalls auf.
Prüfen Sie, ob bei direktem Anschluss der Signalquelle an den TV / Projektor ein Bild korrekt
angezeigt wird.
Ein HDMI Umschalter kann nur digitale Bildsignale verarbeiten, er ist nicht zu Komponenten-
oder VGA-Signalen kompatibel
Der HDMI Switch Remote reagiert nicht auf Kommandos der Fernbedienung
Entfernen Sie bei Inbetriebnahme der Fernbedienung die Kunststofffolie mit dem Aufdruck
‘Remove this tab’ aus der Fernbedienung durch herausziehen.
Sie benötigen zwischen Fernbedienung und dem IR Sensor am Switch (4) eine direkte nicht
blockierte Sichtverbindung.
Wechseln Sie die Kanäle mit der Wahltaste direkt am Switch um sicher zu stellen, dass der
Switch korrekt arbeitet.
Nehmen Sie ggf. die Batterie für 10 Sekunden aus der Fernbedienung. Sollte dies das
Problem kurzzeitig beseitigen bis der Fehler erneut auftritt, so benötigen Sie vermutlich eine
neue Batterie für die Fernbedienung. Diese erhalten Sie im einschlägigen Fachhandel.
- 7 -
Page 9

Manuel Utilisateur Français
Introduction
Merci d’avoir acheté le LINDY HDMI Switch Remote. Ce commutateur haute performance vous
permet de connecter jusqu’à 3 périphériques DVI/HDMI à un seul récepteur DVI/HDMI comme
une télé ou un projecteur.
Conçu pour les installations Home Cinema, le HDMI Switch Remote est compatible Full HDCP
et supporte de l’audio multi canal et résolutions HDTV jusqu’à 1080p. La commutation entre les
périphériques se fait en appuyant sur le bouton du commutateur ou par une télécommande
infrarouge. Une fonction d’amélioration de la qualité du signal permet de connecter l’installation
même sur de grandes distances.
Lecteur DVD
HDMI Switch
Remote
Affichage
Amplificateur
Installation typique du HDMI Switch Remote
Contenu de l’emballage
LINDY HDMI Switch Remote
Contrôle infrarouge avec batterie (CR2025)
Alimentation 5V DC, 2.6A
Le manuel
Caractéristiques
Compatible HDMI 1.1, HDCP 1.1 et DVI 1.0
Support des résolutions HDTV: 480i, 576i, 480p, 576p, 720p, 1080i et 1080p
Lorsque utilisé avec un ordinateur, résolution DVI-D jusqu’à 1600 x 1200
Supporte l’audio multi canal
Entrée: 3 x HDMI Femelle
Sortie: 1x HDMI Femelle
Sélection du périphérique par bouton en façade ou contrôle infrarouge
LEDs pour l’indication de la sélection de canal, alimentation et signal d’entrée
- 8 -
Page 10

Manuel Utilisateur Français
Connexion & Utilisation
Connexions Face Arrière
1
2
3
1. Sortie HDMI: En utilisant un câble HDMI, connectez HDMI OUT à l’entrée HDMI sur votre
affichage
2. Entrées HDMI: Utilisez un câble HDMI pour connecter les sorties HDMI de vos
périphériques source aux trois entrées HDMI IN.
3. Alimentation: Connectez l’alimentation 5V fournie
Remarques pour l’utilisation de périphériques équipés DVI: Pour connecter des
périphériques équipés de connecteurs DVI, vous pouvez utiliser des adaptateurs
DVI/HDMI ou câbles DVI/HDMI. Assurez vous que ce soit une interface DVI uniquement
vidéo – aucun signal audio ne sera commuté !
Panneau frontal et indicateurs
4
5
6
7
4. Capteur de contrôle distant
5. Sélection de l’entrée: Appuyez sur le bouton INPUT pour passer d’un canal à l’autre.
La LED appropriée va s’allumer et indiquer le canal sélectionné.
6. Amplification de signal: Appuyez sur le bouton ENHANCE pour augmenter la qualité du
signal sur de grandes distances de transmission. La LED s’allume lorsqu’un signal amplifié
est détecté.
7. LED Alimentation: S’allume lorsque l’alimentation est connectée
Utilisation du contrôle distant:
8
9
10
8. Power: Appuyez pour éteindre/allumer le produit
9. Sélection d’entrée: Appuyez 1,2 ou 3 pour la source
10. Autres: ces boutons ne sont pas utilisés
- 9 -
Page 11

Manuel Utilisateur Français
Problèmes rencontrés
Il n’y a pas d’affichage.
Vérifiez les connexions sur le HDMI Switch Remote et vérifiez que tous les périphériques
connectés soient alimentés
Assurez-vous d’avoir connecté tout les câbles.
Si un ordinateur est connecté, appuyez sur une touche pour sortir de l’économie d’énergie.
Le HDMI Switch Remote né répond à aucune commande de la télécommande .
Si présent, retirez la partie plastique indiquant ‘Remove this tab’.
Assurez vous d’être à portée du HDMI Switch Remote. Vérifiez qu’aucun objet ne soit placé
dans la ligne de portée du signal infrarouge.
Essayez de commuter les canaux avec le bouton en façade pour vérifier le bon
fonctionnement du commutateur.
Assurez vous que la batterie est correctement installée dans la télécommande. Essayez de
remplacer la batterie par une nouvelle (Type CR2025)
- 10 -
Page 12

Manuale d’uso Italiano
Introduzione
Grazie pre aver scelto LINDY HDMI Switch Remoto. Questo switch ad alte prestazioni consente
di collegare fino a 3 dispositivi DVI/HDMI a un televisore o proiettore DVI/HDMI.
Progettato per installazioni Home Theatre/Cinema, lo Switch Remoto HDMI supporta gli
standard HDCP, multi-channel audio e risoluzioni HDTV fino a 1080p. La commutazione
avviene per mezzo del tasto sullo switch o con il telecomando a infrarossi. La qualità del
segnale viene amplificata su lunghe distanze.
HDMI Switch
Lettore DVD
Remoto
Monitor
RIcevitore
Applicazione tipica dello Switch Remoto HDMI
La fornitura comprende:
Switch Remoto HDMI
Telecomando a infrarossi con batterie (CR2025)
Alimentatore 5V DC, 2.6A
Questo manuale
Caratteristiche
Compatibile con gli standard HDMI 1.1, HDCP 1.1 e DVI 1.0
Risoluzioni HDTV supportate: 480i, 576i, 480p, 576p, 720p, 1080i e 1080p
Se si usa con computer, supporta risoluzioni DVI-D fino a 1600 x 1200
Supporta applicazioni multi-channel audio
Ingressi: 3 x HDMI femmina
Uscite: 1x HDMI femmina
Commutazione tramite tasto sullo switch o con telecomando a infrarossi
Indicatori LED per la selezione del canale, accensione e miglioramento del segnale
- 11 -
Page 13

Manuale d’uso Italiano
Modalità d’uso
Connettori sul retro
1
2
3
1. Uscita HDMI: utilizzare un cavo HDMI per collegare alla porta HDMI OUT il monitor HDMI
2. Ingressi HDMI: utilizzare cavi HDMI per collegare i dispositivi HDMI alle tre porte HDMI IN
sullo switch.
3. Ingresso alimentatore: collegare l’alimentatore da 5V DC in dotazione.
Per dispositivi DVI: per collegare dispositivi con connettori DVI, è possibile utilizzare
adattatori modulari DVI/HDMI o cavi/adattatori DVI/HDMI. Assicurarsi che il dispositivo
DVI abbia solo un interfaccia video – nessun segnale audio può essere commutato dallo
Switch Remoto HDMI se si collegano dispositivi DVI!
Indicatori sul pannello frontale
4
5
6
7
4. Sensore del telecomando
5. Segnali in Input: schiacciare il tasto INPUT per selezionare i diversi canali. Il relativo LED si
illuminerà a seconda del canale selezionato.
6. Amplificazione del segnale: schiacciare il tasto ENHANCE per migliorare la qualità del
segnale su lunghe distanze. Il LED si illuminerà una volta che il segnale viene amplificato.
7. Power LED: si illumina quando lo switch è acceso.
Funzioni del telecomando:
8
9
10
8. Tasto Power: consente di accendere o spegnere lo
switch
9. Tasti selezione input: consente di selezionare il
dispositivo 1,2 o 3.
10. Tasti numerici: tasti non utilizzabili.
- 12 -
Page 14

Manuale d’uso Italiano
Soluzione dei problemi
Non si vede nessuna immagine sul display.
Verificare che lo Switch HDMI e tutti i dispositivi collegati siano accesi.
Assicurarsi che tutti i cavi e conne ttori siano installati correttamente.
Se c’è un computer collegato, muovere il mouse o schiacciare un tasto per disattivare la
modalità standby.
Il telecomando non riesce a comunicare con lo Switch.
Se presente, rimuovere la linguetta con scritto ‘Remove this tab’ sul telecomando.
Assicurarsi che il telecomando sia direzionato verso il ricevitore dello switch e che non ci
siano ostacoli che potrebbero bloccare il segnale a infrarossi del telecomando.
Provare a commutare tramite il tasto sullo switch per verificarne il corretto funzionamento.
Assicurarsi che le pile siano installate correttamente. Provare con pile nuove (CR2025)
- 13 -
Page 15

Radio Frequency Energy, Certifications
Shielded cables must be used with this equipment to maintain compliance with radio frequency
energy emission regulations and ensure a suitably high level of immunity to electromagnetic
disturbances.
FCC Warning
This equipment has been tested and found to comply with the limits for a Class B digital device,
pursuant to part 15 of the FCC Rules. These limits are designed to provide reasonable
protection against harmful interference in a residential installation.
This equipment generates, uses, and can radiate radio frequency energy and, if not installed
and used in accordance with the instructions, may cause harmful interference to radio
communications. However, there is no guarantee that interference will not occur in a particular
installation. If this equipment does cause harmful interference to radio or television reception,
which can be determined by turning the equipment off and on, the user is encouraged to try to
correct the interference by one or more of the following measures:
Reorient or relocate the receiving antenna
Increase the separation betw een the equipment and receiver
Connect the equipment into an outlet on a circuit different from that to which the receiver is
connected
Consult the dealer or an experienced technician for help
You are cautioned that changes or modification not expressly approved by the party responsible
for compliance could void your authority to operate the equipment.
This device complies with part 15 of the FCC Rules.
Operation is subject to the following two conditions:
1. This device may not cause harmful interference, and
2. This device must accept any interference received, including interference that may cause
undesired operation.
Page 16

Recycling Information
WEEE (Waste of Electrical and Electronic Equipment),
Recycling of Electronic Products
United Kingdom
In 2006 the European Union introduced regulations (WEEE) for the collection and recycling of all waste electrical
and electronic equipment. It is no longer allowable to simply throw away electrical and electronic equipment.
Instead, these products must enter the recycling process.
Each individual EU member state has implemented the WEEE regulations into national law in slightly different
ways. Please follow your national law when you want to dispose of any electrical or electronic products.
More details can be obtained from your national WEEE recycling agency.
Germany / Deutschland
Die Europäische Union hat mit der WEEE Direktive umfassende Regelungen für die Verschrottung und das
Recycling von Elektro- und Elektronikprodukten geschaffen. Diese wurden von der Bundesregierung im Elektround Elektronikgerätegesetz – ElektroG in deutsches Recht umgesetzt.
Dieses Gesetz verbietet vom 24.März 2006 an das Entsorgen von entsprechenden, auch alten, Elektro- und
Elektronikgeräten über die Hausmülltonne! Diese Geräte müssen den lokalen Sammelsystemen bzw. örtlichen
Sammelstellen zugeführt werden! Dort werden sie kostenlos entgegen genommen. Die Kosten für den weiteren
Recyclingprozess übernimmt die Gesamtheit der Gerätehersteller.
France
En 2006, l'union Européenne a introduit la nouvelle réglementation (WEEE) pour le recyclage de tout équipement
électrique et électronique.
Chaque Etat membre de l’ Union Européenne a mis en application la nouvelle réglementation WEEE de manières
légèrement différentes. Veuillez suivre le décret d’application correspondant à l’élimination des déchets électriques
ou électroniques de votre pays.
Italy
Nel 2006 l’unione europea ha introdotto regolamentazioni (WEEE) per la raccolta e il riciclo di apparecchi elettrici
ed elettronici. Non è più consentito semplicemente gettare queste apparecchiature, devono essere riciclate.
Ogni stato membro dell’ EU ha tramutato le direttive WEEE in leggi statali in varie misure. Fare riferimento alle
leggi del proprio Stato quando si dispone di un apparecchio elettrico o elettronico.
Per ulteriori dettagli fare riferimento alla direttiva WEEE sul riciclaggio del proprio Stato.
LINDY No 32592
1st Edition, April 2006
www.lindy.com
 Loading...