

Page 1

Manual English
VGA & Audio Cat.5e Extender 300m
Manual
Benutzerhandbuch
Manuel
Manuale
LINDY No. 32540
English
Deutsch
Français
Italiano
www.lindy.com
© LINDY ELECTRONICS LIMITED & LINDY-ELEKTRONIK GMBH - FIRST EDITION (February 2015)
2
Page 2
Manual English
VGA & Audio Cat.5e
VGA & Audio Cat.5e Extender
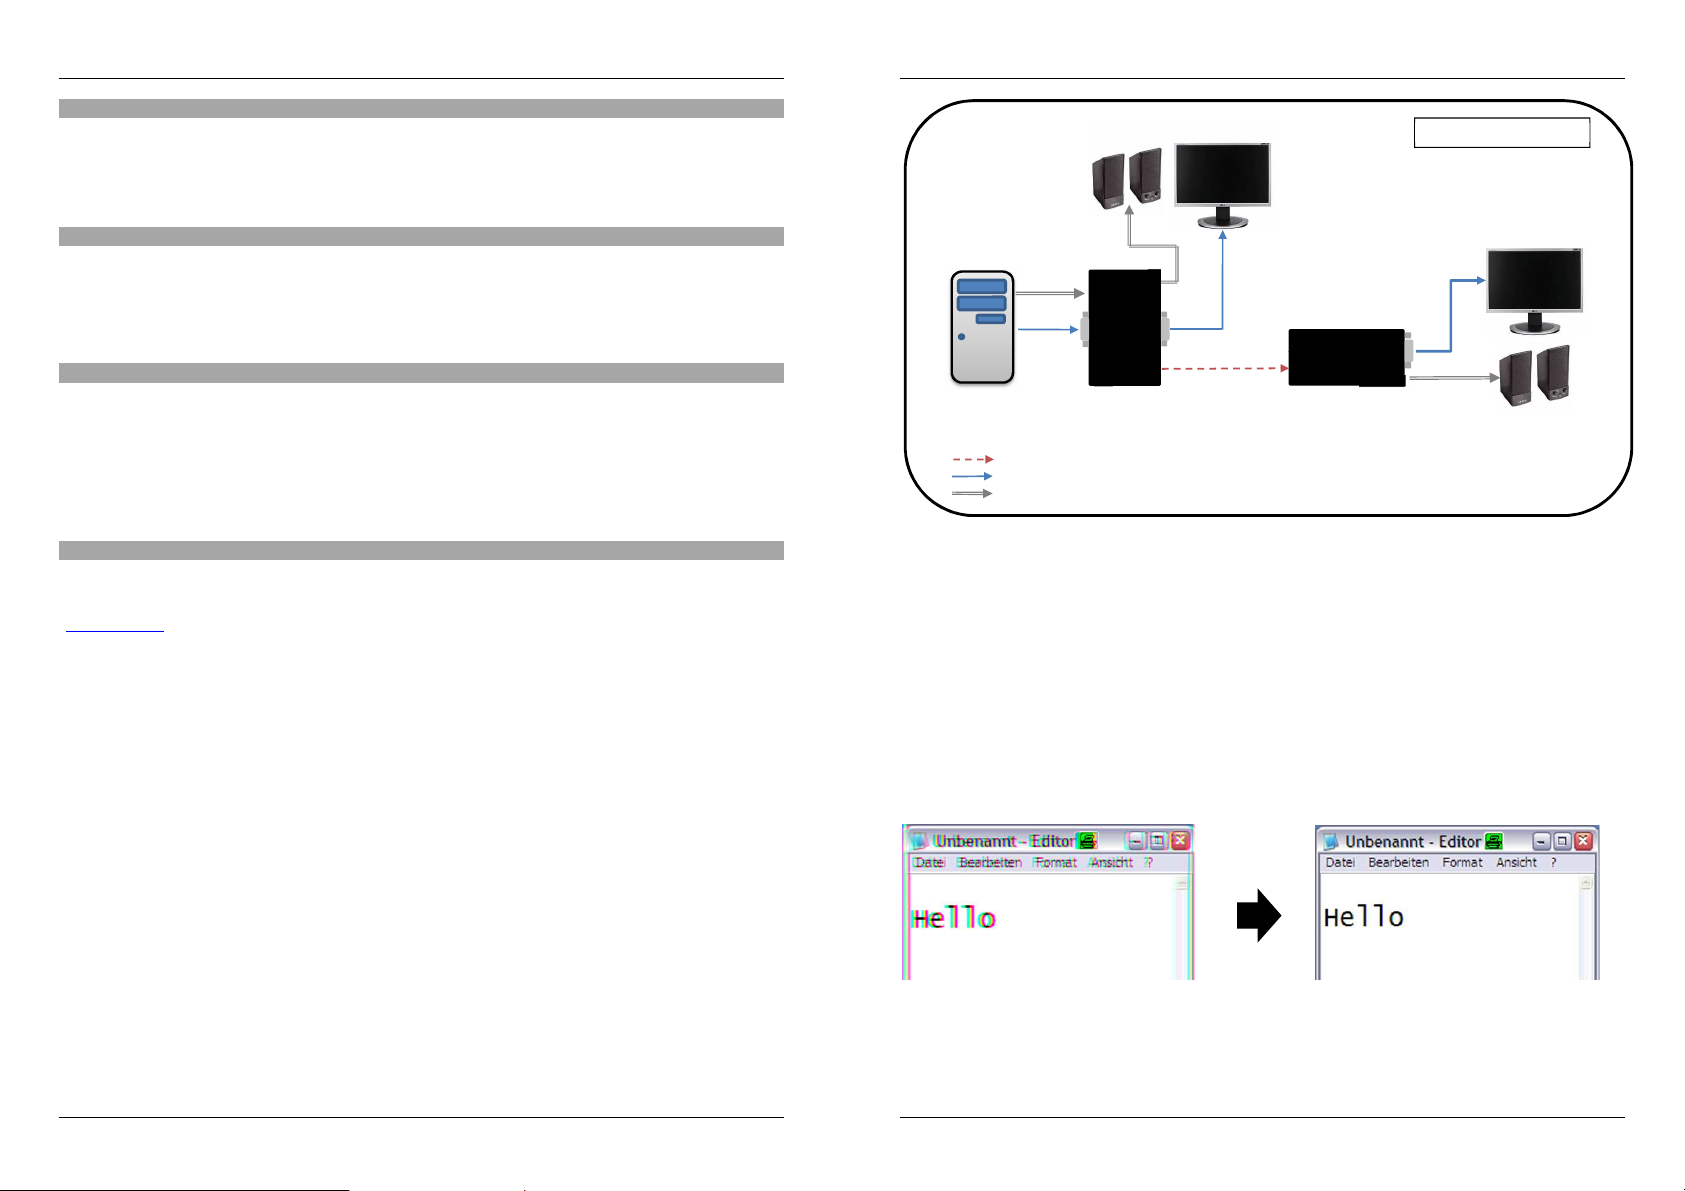
Transmitter
Signals Source
Installation Example
Introduction
Thank you for purchasing the LINDY VGA & Audio Cat.5e Extender. This device allows a VGA video signal and
Audio (mono) to be transmitted up to a distance of 300m using high quality Cat.5e solid core cable. An optional skew
compensation unit (like LINDY No. 32766) can be used to correct colour shadows on the display caused by different
lengths of RGB signal transmission over the twisted pairs in the Cat.5e cable.
Package Contents
VGA & Audio Cat. 5e Extender – Transmitter unit
VGA & Audio Cat. 5e Extender – Receiver unit
2 x 5V ~2A DC Multi Country PSU
This manual
Features
Supports display resolutions up to 1920x1200@60Hz or 1600x1200@60hz or
Supports Mono audio signals (left and right channels are combined)
Allows video & audio signals to be extended up to a maximum distance of 300m via high quality solid core Cat.5e
cables. A skew compensation unit like LINDY no. 32766 may be required to get the best image quality.
Gain and Peak adjustment option on the receiver unit.
Supports local monitor and speakers out ports on the transmitter unit
Installation and Operation
Please switch off all the devices involved in the installation before starting to make any connection.
NOTE: All cables listed in the following procedure can be found and bought directly on the LINDY Website
(www.lindy.com)
NOTE: Please use short VGA and audio cables (i.e. 1m) to ensure the best results
For the installation please use the following steps:
1) Connect the remote display / projector and speakers to the receiver unit with a standard VGA (male /
male) cable and (if needed) a standard audio cable with 3.5mm Stereo jack connectors.
2) Connect the RJ45 connector of the Cat.5e cable to the receiver unit.
3) Connect the other RJ45 connector of the Cat.5e cable to the transmitter unit.
4) Connect the local display / projector and speakers to the OUTPUT ports on transmitter unit using a
standard VGA (male / male) cable and a standard audio cable with 3.5mm Stereo Jack connectors.
5) Connect the VGA video source and audio source to the related INPUT ports on the transmitter unit
using a standard VGA (male / male) cable and (if needed) a standard audio cable with 3.5mm Stereo
jack connectors.
6) Connect the Power Supply Units to the DC power ports on both the transmitter and receiver unit and
then to the mains power socket.
7) Switch on all the other devices.
2048x1536@60Hz
Manual English
Local Monitor and Speakers
Remote Monitor and Speakers
Extender
Receiver
(ex. PC)
Cat.5e RJ45 Cable (up to 300m)
VGA Cable
Audio Cable
Adjusting the Remote Monitor Picture Quality
Use the two dials on the remote unit labelled “Gain” and “Peak” to adjust the remote picture quality.
Gain adjusts the brightness. Peak adjusts the sharpness to fit the user requirement.
If you find coloured horizontal shadows as shown in the example below you can remove them with a skew
compensation unit like LINDY no. 32766. It compensates for different lengths of the RGB related twisted pairs
in the Cat.5e cable and allows for a sharp video as shown below on the right side. Please find further details
in the product description of the skew compensation unit.
If this cannot compensate your video problem please use a higher quality Cat.6 cable.
Whenever required you may contact LINDY technical support teams for help.
1
2
Page 3

Benutzerhandbuch
VGA & Audio Cat.5e
VGA & Audio Cat.5e Extender
Transmitter
Signal
quelle
Remote / entfernter Monitor
Installationsbeispiel
Deutsch
EINFÜHRUNG
Dieser VGA und Audio (Mono) Extender überträgt Signale über preiswertes Cat.5/6 Installationskabel (mit
starren Adern) über Distanzen bis zu 300m. Bei großen Distanzen kann der LINDY Skew Compensator /
Laufzeitkompensator (Nr. 32766) eventuell durch das lange Kabel hervorgerufene Farbsäume bzw.
Farbschatten effizient kompensieren, siehe dazu das Beispiel am Ende der Installationsanleitung. Sofern
keine Audiofunktion benötigt wird können diese Anschlüsse unbenutzt bleiben.
Benutzerhandbuch Deutsch
INSTALLATION UND BETRIEB (Fortsetzung)
Lokaler Monitor und Lautspecher
LIEFERUMFANG
VGA & Audio Cat.5e Extender – Transmitter Einheit
VGA & Audio Cat.5e Extender – Receiver Einheit
2 x 5V ~2A DC Multi Country Netzteil mit Steckeradaptern für Euro, UK, USA und Australien
Dieses Handbuch
EIGENSCHAFTEN
Unterstützt Auflösungen bis 1920x1080@60Hz oder 1600x1200@60Hz oder 2048x1536@60Hz
Unterstützt Mono Audio Übertragung – rechter und linker Kanal werden zusammen gefasst
Überträgt auch bei hoher Auflösung über Distanzen bis zu 300m über hochwertige Cat.5/6
Installationskabel (mit starren Adernpaaren). Beim Auftreten von Farbsäumen (siehe Ende dieser
Anleitung) können diese durch einen Skew Compensator kompensiert werden.
Einstellregler für Verstärkung (Gain) und Schärfe (Peak)
Unterstützt Anschluss eines lokalen Kontrollmonitors und Lautsprecherausgang am Transmitter
INSTALLATION UND BETRIEB
Schalten Sie bitte vor Beginn der Installation alle Geräte aus
Hinweis: Verwenden Sie bitte möglichst kurze VGA und Audio-Anschlusskabel, die besten Resultate
erzielen Sie z.B. mit 1m langen Kabeln. Falls Sie feststellen, dass Sie zusätzliche Kabel benötigen können
Sie diese direkt über die LINDY Webseite bestellen.
Gehen Sie bitte wie folgt vor
1. Schließen Sie den entfernten (remote) Monitor und die Lautsprecher an den Receiver an
2. Schließen Sie das RJ45 Verbindungskabel sowohl an Transmitter wie an Receiver an
3. Falls benötigt schließen Sie bitte den lokalen Monitor und die lokalen Lautsprecher an die mit OUTPUT
gekennzeichneten Buchsen am Transmitter an.
4. Schließen sie die VGA und die Audio Signalquelle an die mit INPUT gekennzeichneten Buchsen am
Transmitter an.
5. Schließen Sie die Netzteile an Transmitter und Receiver an
6. Schalten Sie alle Geräte ein.
5
und Lautspecher
Extender
Receiver
(z.B. PC)
Cat.5/5 RJ45 Kabel (bis 300m)
VGA Kabel
Audio Kabel
Transmitter Receiver
Einstellung der Bildqualität am entfernten (Remote) Monitor
Justieren Sie die beiden Einstellregler GAIN und PEAK um die bestmögliche Bildqualität zu erhalten.
GAIN justiert die Helligkeit, PEAK die Schärfe, beide beeinflussen sich gegenseitig leicht und müssen auf die
Eigenschaften des Verbindungskabels und der Hardware abgestimmt werden.
Falls Sie mit der Bildqualität nicht zufrieden sind und horizontale farbige Schatten bzw. Säume wie im unteren
linken Bild sehen, so muss der durch das Verbindungskabel hervorgerufene Laufzeitunterschied zwischen
den RGB-Signalen kompensiert werden! Hierfür benötigen Sie einen zusätzlichen Skew Compensator (oder
alternative ein Verbindungskabel, welches keine unterschiedlich langen Adernpaaren hat). Der LINDY Skew
Compensator Nr. 32766 kompensiert die unterschiedliche Länge der Adernpaare so dass die RGB-Signale
wieder zur gleichen Zeit am Monitor ankommen und ein Bild ohne Farbsäume wiedergegeben wird, wie unten
rechts angezeigt.
Falls Sie auch damit das Problem nicht lösen können hilft Ihnen unser Techniksupport gerne weiter. Die
Kontaktadressen finden Sie auf der LINDY Webseite www.lindy.com
4
Page 4

Manuel
VGA & Audio Cat.5e
Source du signal
Moniteur et haut
-
parleurs
Exemple d‘installation
VGA & Audio Cat.5e
Transmitter
Français
Introduction
Cet extender VGA et Audio (Mono) transmet les signaux via du câble d’installation Cat.5/6 (monobrin ou âme
rigide) jusqu’à 300m. Pour les grandes distances, le compensateur/synchronisateur LINDY (N°Art. 32766)
pourra compenser efficacement les éventuels défauts dans les couleurs (franges ou ombres) dues à la
longueur du câble, voir l’exemple donné à la fin de ce manuel. Les connexions audio peuvent rester
déconnectées si cette fonction n’est pas utilisée.
Manuel Français
Installation et utilisation (suite)
Moniteur et haut-parleurs locaux
Contenu de l’emballage
Extender VGA & Audio Cat.5e Extender – Transmitter (unité émettrice)
Extender VGA & Audio Cat.5e– Receiver (unité réceptrice)
2 x 5V ~2A DC alimentation multi-pays avec adaptateurs secteur Euro, UK, USA et Australie
Ce manuel
Caractéristiques
Prend en charge les résolutions jusqu’à 1920x1080@60Hz ou 1600x1200@60Hz ou 2048x1536@60Hz
Prend en charge le transfert audio en mono – les canaux droit et gauche sont combinés
Transmet aussi en haute résolution jusqu’à 300m via câble Cat.5/6 d’installation de haute qualité
(monobrin). Si des défauts de couleurs apparaissent, elles pourront être compensées (voir à la fin de ce
manuel) par l’utilisation d’un synchronisateur VGA.
Potentiomètres de réglages d’amplification (Gain) et de netteté (Peak)
Prend en charge le raccordement d’un moniteur de contrôle local et possède une sortie haut-parleur sur le
Transmitter (émetteur)
Installation et utilisation
Merci de mettre tous les appareils hors-tension avant de débuter l’installation
Note: merci d’utiliser des câbles de connexions VGA et Audio le plus possible si possible, les meilleurs
résultats sont obtenus avec des câbles de 1 mètre. Si nécessaire, vous pourrez commander directement
d’autres câbles sur le site internet LINDY.
Merci de suivre les étapes suivantes
1. Connectez le moniteur distant (remote) et les haut-parleurs au Receiver (récepteur)
2. Raccordez le câble de liaison RJ45 au Transmitter (émetteur) et au Receiver (récepteur)
3. Si nécessaire, merci de raccordez le moniteur local et les haut-parleurs locaux aux connecteurs
femelles marqués OUTPUT sur le Transmitter.
4. Connectez les sources VGA et Audio aux connecteurs femelles marqués INPUT sur le Transmitter.
5. Raccordez les alimentations aux Transmitter et Receiver
6. Mettez tous les appareils sous tension.
5
distant / Remote
Extender
(PC par exemple)
Câble RJ45 Cat.5/5 (jusqu’à 300m)
Câble VGA
Câble Audio
Extender
Transmitter
Receiver
Receiver
Réglages de la qualité de l’image sur le moniteur distant (Remote)
Ajustez les deux potentiomètres GAIN et PEAK pour obtenir la meilleure qualité d’image.
GAIN ajuste la luminosité, PEAK la netteté, les deux s’influencent mutuellement de façon légère et doivent
être adaptés aux caractéristiques du câble de liaison et du matériel.
Si vous n‘êtes pas satisfait de la qualité de l’image et constatez des ombres colorées ou des coulures comme
dans l’exemple ci-dessous à gauche, la désynchronisation entre les signaux RGB, liée à la longueur du
câble, devra être compensée ! Il faudra que vous utilisiez, pour ce faire, un synchronisateur VGA ou Skew
Compensator (ou un câble de liaison ayant des longueurs de paires identiques). Le synchronisateur VGA
LINDY N°Art. 32766 compense les différences de longueurs de paires pour que les signaux RGB arrivent de
façon synchronisée au moniteur et permettent d’afficher une image non dégradée, comme indiqué ci-dessous
à droite.
Si vous ne parvenez pas à résoudre le problème, notre support technique se tient à votre disposition.
L’adresse de contact se trouve sur le site Web LINDY sous www.lindy.com
4
Page 5

Manuale Italiano
VGA & Audio Cat.5e
VGA & Audio Cat.5e Extender
Transmitter
Sorgente Segnale
Esempio Installazione
Introduzione
Grazie per aver acquistato l’Extender
segnale video VGA e uno Audio (mono) fino ad una distanza di 300m utilizzando cavi Cat.5e solid core. E’ inoltre
possibile utilizzare una unità di compensazione diffrazione (skew) opzionale come l’art. 32766 per correggere le
ombreggiature generate dalle diverse lunghezze dei conduttori all’interno dei cavi cat.5e.
Contenuto della confezione
Extender VGA & Audio Cat. 5e– Unità Trasmittente (Transmitter)
Extender VGA & Audio Cat. 5e– Unità Ricevente (Receiver)
2 x Alimentatori 5V ~2A DC Multi Country
Questo Manuale
Caratteristiche
Supporta risoluzioni fino a 1920x1200@60Hz o 1600x1200@60hz o
Supporta Segnali Audio Mono (I canali destro e sinistro vengono combinati)
Consente di estendere una segnale video & audio fino ad un Massimo di 300m tramite un cavo solid core Cat.5e
di alta qualità. Una unità di compensazione skew come l’art. 32766 può essere necessario per ottenere la
migliore qualità di visualizzazione sulle distanze più elevate.
Sono presenti le regolazioni di guadagno (Gain) e Sincronia (Peak) sull’unità ricevente.
Supporta la connessione di un monitor e speaker locali su porte dedicate sull’unità trasmittente
Funzionamento
Vi preghiamo di spegnere tutti i dispositivi coinvolti nell’installazione prima di effettuare qualsiasi
connessione
NOTE: Tutti i cavi elencati in questa procedura possono essere reperiti e comprati direttamente sul sito Web
LINDY (www.lindy.com)
NOTE: Vi preghiamo di utilizzare cavi VGA e audio più corti possibili (es. 1m) per ottenere la migliore qualità
finale del segnale video.
Per l’installazione seguite i seguenti passi:
1) Collegate il monitor / proiettore e diffusori audio all’unità ricevente (Receiver) con un cavo VGA standard
(maschio / maschio) e (se richiesto) un cavo audio standard con un connettore jack stereo da 3.5mm.
2) Collegate il connettore RJ45 del cavo Cat.5e all’unità ricevente (Receiver)
3) Collegate il connettore RJ45 all’altro capo del cavo Cat.5e all’unità trasmittente (Transmitter)
4) Collegate il monitor / proiettore e i diffusori audio locali alle porte indicate come OUTPUT sull’unità
trasmittente (Transmitter) con un cavo VGA standard (maschio / maschio) e (se richiesto) un cavo audio
standard con un connettore jack stereo da 3.5mm
5) Collegate la sorgente VGA e audio ai relativi connettori indicati come INPUT sull’unità trasmittente
(Transmitter) con un cavo VGA standard (maschio / maschio) e (se richiesto) un cavo audio standard
con un connettore jack stereo da 3.5mm
6) Collegate gli alimentatori alle porte DC di entrambe le unità e di seguito a due prese di corrente.
7) Accendete tutti gli altri dispositivi
LINDY VGA & Audio Cat.5e. Questo dispositivo consente di trasmettere un
2048x1536@60Hz
Manuale Italiano
Monitor e diffusori locali
Monitor e diffusori remoti
Extender
Receiver
(es. PC)
Cavo Cat.5e RJ45 (fino a 300m)
Cavo VGA
Cavo Audio
Regolazione immagine su monitor o proiettore remoto
Utilizzate i due regolatori indicati come “Gain” e “Peak” sull’unità remota per regolare l’immagine remota
riprodotta dall’extender.
Il regolatore “Gain” agisce sulla luminosità mentre “Peak” regola la nitidezza dell’immagine per adattarsi alle
necessità dell’utente.
Se vedete delle ombre colorate orizzontali come quelle presenti nell’esempio riportato di seguito è possibile
utilizzare un unità di “skew compensation” come l’art.32766 LINDY per rimuoverle. Questo prodotto venduto
separatamente permette di compensare le differenti lunghezze dei conduttori interni al cavo cat.5e utilizzati
per la trasmissione dei segnali RGB come indicati nella seconda immagine riportata sotto. Potrete trovare
ulteriori informazioni nella documentazione dell’unità di “skew compensation”.
Nel caso non riusciate a compensare i difetti di visualizzazione vi preghiamo di utilizzare un cavo di qualità
superiore come, per esempio, un Cat.6
Per ulteriore assistenza potete contattare il supporto tecnico LINDY ai recapiti riportati sul nostro sito Web.
5
4
Page 6

Technical Specifications
CE Certification
EN55022/EN55024 and the further standards cited therein. It must be used with shielded cables only. It has been manufactured
under the scope of RoHS compliance.
CE Konformitätserklärung
darf nur zusammen mit abgeschirmten Kabeln verwendet werden.
Diese Geräte wurden unter Berücksichtigung der RoHS Vorgaben hergestellt.
Die formelle Konformitätserklärung können wir Ihnen auf Anforderung zur Verfügung stellen
LINDY Herstellergarantie –
Regelung in Deutschland hinaus eine zweijährige Herstellergarantie ab Kaufdatum. Die detaillierten Bedingungen dieser Garantie
finden Sie auf der LINDY Website aufgelistet bei den AGBs.
FCC Certification
to part 15 of the FCC Rules. These limits are designed to provide reasonable protection against harmful interference in a
residential installation.
You are cautioned that changes or modification not expressly approved by the party responsible for compliance could void your
authority to operate the equipment.
This device complies with part 15 of the FCC Rules.
Operation is subject to the following two conditions:
1. This device may not cause harmful interference, and
2. This device must accept any interference received, including interference that may cause undesired operation.
WEEE (Waste of Electrical and Electronic Equipment),
Recycling of Electronic Products
Europe, United Kingdom
In 2006 the European Union introduced regulations (WEEE) for the collection and recycling of all waste electrical and electronic
equipment. It is no longer allowable to simply throw away electrical and electronic equipment. Instead, these products must enter
the recycling process. Each individual EU member state has implemented the WEEE regulations into national law in slightly
different ways. Please follow your national law when you want to dispose of any electrical or electronic products. More details can
be obtained from your national WEEE recycling agency.
Germany / Deutschland
Die Europäische Union hat mit der WEEE Direktive Regelungen für die Verschrottung und das Recycling von Elektro- und
Elektronikprodukten geschaffen. Diese wurden im Elektro- und Elektronikgerätegesetz – ElektroG in deutsches Recht umgesetzt.
Dieses Gesetz verbietet das Entsorgen von entsprechenden, auch alten, Elektro- und Elektronikgeräten über die Hausmülltonne!
Diese Geräte müssen den lokalen Sammelsystemen bzw. örtlichen Sammelstellen zugeführt werden! Dort werden sie kostenlos
entgegen genommen. Die Kosten für den weiteren Recyclingprozess übernimmt die Gesamtheit der Gerätehersteller.
France
En 2006, l'union Européenne a introduit la nouvelle réglementation (DEEE) pour le recyclage de tout équipement électrique et
électronique. Chaque Etat membre de l’ Union Européenne a mis en application la nouvelle réglementation DEEE de manières
légèrement différentes. Veuillez suivre le décret d’application correspondant à l’élimination des déchets électriques ou
électroniques de votre pays.
Italy
Nel 2006 l’unione europea ha introdotto regolamentazioni (WEEE) per la raccolta e il riciclo di apparecchi elettrici ed elettronici.
Non è più consentito semplicemente gettare queste apparecchiature, devono essere riciclate. Ogni stato membro dell’ EU ha
tramutato le direttive WEEE in leggi statali in varie misure. Fare riferimento alle leggi del proprio Stato quando si dispone di un
apparecchio elettrico o elettronico. Per ulteriori dettagli fare riferimento alla direttiva WEEE sul riciclaggio del proprio Stato.
1st Edition, February 2015
LINDY-Elektronik GmbH
Markircher Str. 20
DE-68229 Mannheim
GERMANY
T:. +49 (0)621 47005 0
info@lindy.de
This equipment complies with the requirements relating to Electromagnetic Compatibility Standards
Dieses Produkt entspricht den einschlägigen EMV Richtlinien der EU für IT-Equipment und
Hinweis für Kunden in Deutschland LINDY gewährt für dieses Produkt über die gesetzliche
This equipment has been tested and found to comply with the limits for a Class B digital device, pursuant
LINDY No 32540
LINDY Electronics Ltd.
Sadler Forster Way
Teesside Industrial Estate, Thornaby
Stockton-on-Tees, TS17 9JY
GREAT BRITAIN
T: +44 (0) 1642 754000
postmaster@lindy.co.uk
www.lindy.com
 Loading...