

Page 1
802.11g – 54Mbps Wireless
Projector Server
User Manual English
LINDY No. 32500
www.lindy.com
© LINDY ELECTRONICS LIMITED & LINDY-ELEKTRONIK GMBH - FIRST EDITION (February 2005)
Page 2

Wireless Projector Server User Manual
Contents
INTRODUCTION................................................................................................2
OVERVIEW........................................................................................................4
USING THE WIRELESS PROJECTOR SERVER.............................................5
CONNECTING THE PROJECTOR SERVER....................................................7
INSTALLING THE PLAYER UTILITY ...............................................................8
USING THE PLAYER UTILITY........................................................................10
PROJECTOR SERVER CONSOLE OPERATION ..........................................13
KEYBOARD/MOUSE OPERATION ................................................................15
THE SLIDE SHOW MENU...............................................................................16
THE ADMINISTRATOR UTILITY.....................................................................19
TROUBLESHOOTING.....................................................................................22
1
Page 3
Wireless Projector Server User Manual
Introduction
Thank you for purchasing the LINDY Wireless Projector Server. This innovative product allows
you to connect to your projector for presentations via a Wireless LAN, Ethernet network or
directly, using a built-in image viewer.
The LINDY Wireless Projector Server features both an IEEE 802.11g 54Mbps WLAN and a
10/100Mb Ethernet LAN connection for maximum versatility. Additionally, the Projector Server
features 32MB of internal memory for uploading PowerPoint presentations. A dedicated USB
port means you can connect your USB keyboard or mouse, allowing you to conduct
presentations without the need for a PC!
Features
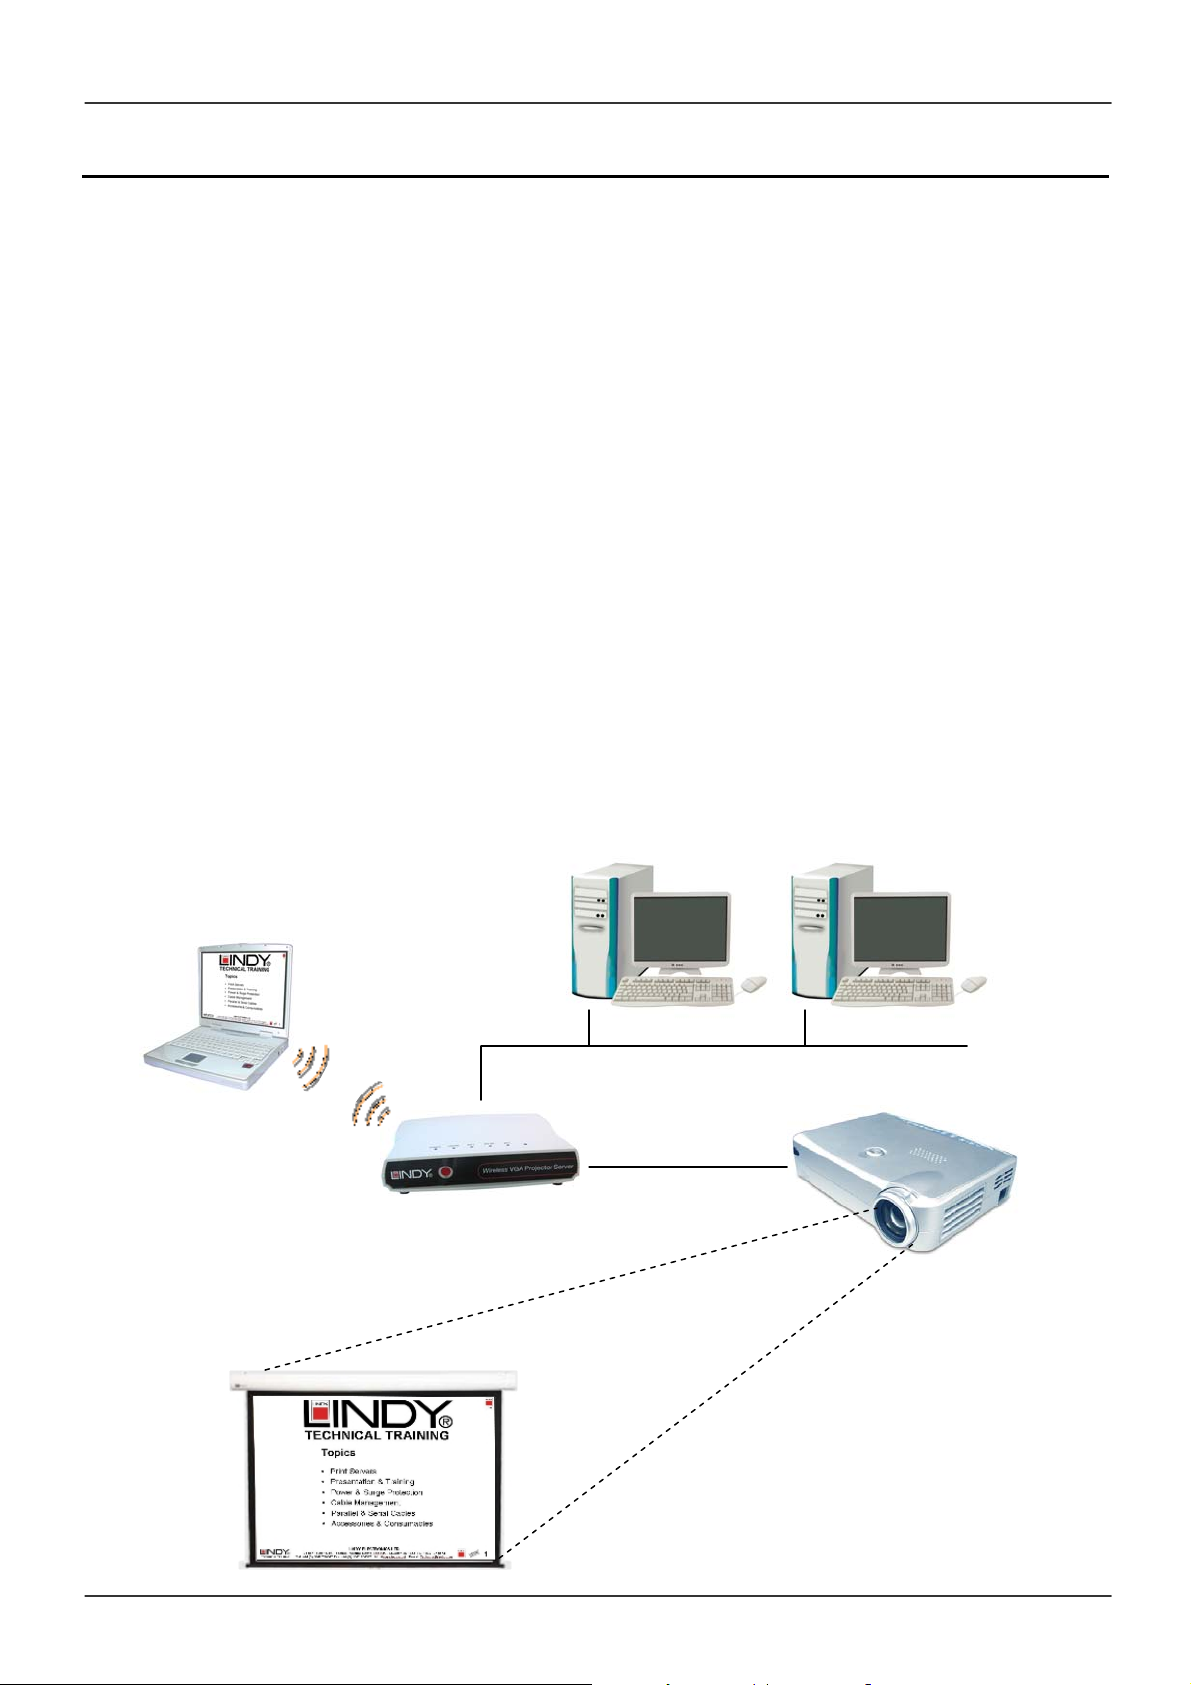
Allows connection to a projector or monitor via wired or wireless LAN
Built-in image viewer for ‘computer-less’ presentations
Internal 32MB memory for image storage
IEEE802.11g (DSSS) 2.4GHz wireless connection
Up to 128-Bit WEP encryption
Wireless access point function
10/100Base-TX interface
Supports XGA display resolutions of up to 1024 x 768 and 24-bit colour
USB 1.1 port for connecting a keyboard or mouse
Simple installation and operation
WLAN
Wireless Projector Server
LAN
Projector
2
Page 4

Wireless Projector Server User Manual
Specifications
Network
Standards: IEEE 802.11g (DSSS) 2.4GHz WLAN; IEEE 802.3u (100Base-TX), 802.3
(10Base-T) LAN
Supports AP/Client/Ad-Hoc modes
Security: 64/128-Bit WEP Encryption
Channels: 11 (US, Canada), 13 (Europe), 14 (Japan)
Range: Up to 25 metres (82 feet)
Antenna: Built-in
Interfaces
VGA: 15 Way HD Female
LAN: 100/100Mbps, RJ-45
USB 1.1: Type A Female
General
Internal Storage: 32MB
Power: 5V, 2.5A
Dimensions (WxDxH): 208 x 144 x 33mm
Weight: 0.4kg
Operating temperature: 0°C ~ 40°C; 32°F ~ 104°F
Operating humidity: 10% ~ 85%, non-condensing
System Requirements (PC)
Pentium III 500MHz or faster processor
128MB RAM recommended
LAN or WLAN adapter
Windows 2000/XP
Web browser (IE 5.0, Netscape 4.0 or above)
Adobe Acrobat Reader (to access on-line help)
Package Contents
Wireless Projector Server
Power Adapter
Installation CD
This manual
3
Page 5
Wireless Projector Server User Manual
Overview
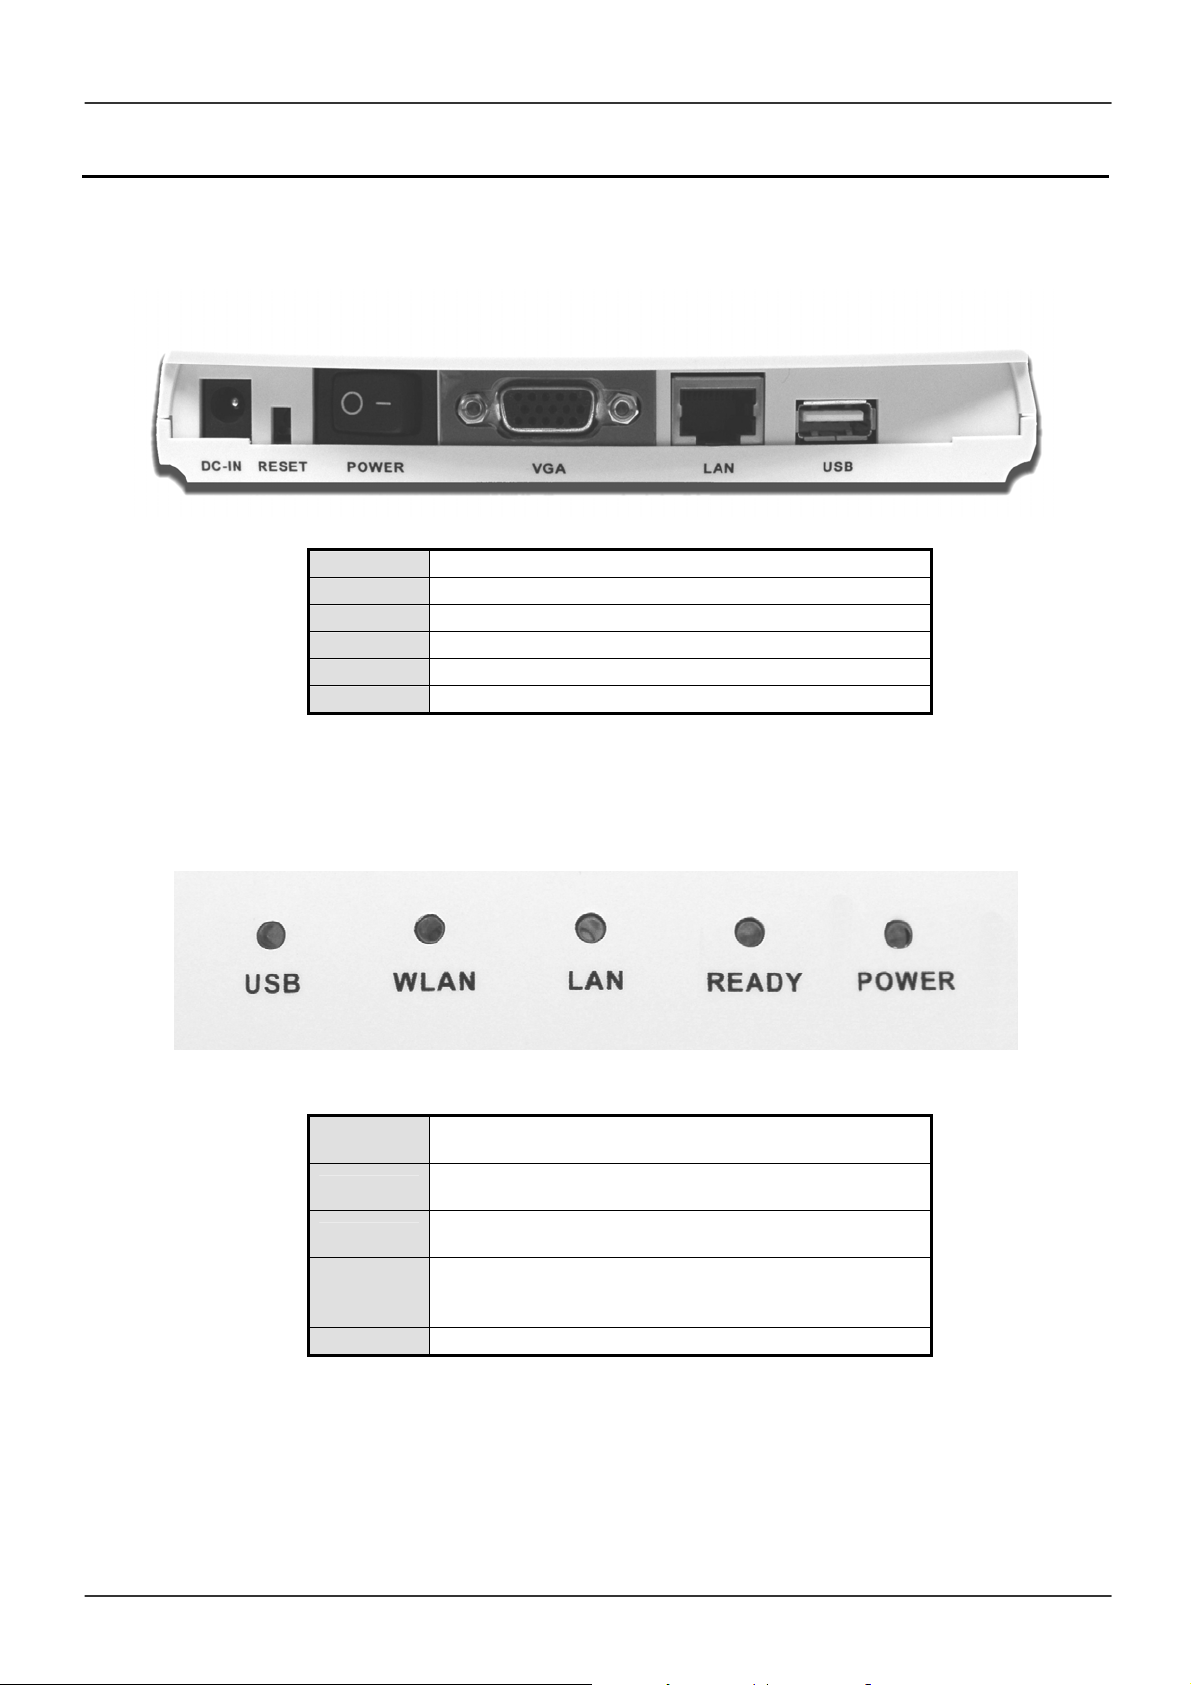
Rear Panel
DC-IN Connect the power adapter here
RESET Resets the Projector Server to factory defaults
POWER Power ON/OFF switch
VGA Connect the projector’s video cable here
LAN Ethernet connection
USB
LED Indicators
For connecting a USB keyboard or mouse
USB
WLAN
LAN
READY
POWER
Illuminates when a mouse or keyboard is
connected
Illuminates when the WLAN is active; blinks when
there is traffic
Lights up when the LAN port is connected; blinks
when there is LAN traffic
Blinks while the system is powering up. It will
illuminate steadily when the Projector Server is
ready
Lights up when the projector server is powered on
4
Page 6
Wireless Projector Server User Manual
Using the Wireless Projector Server
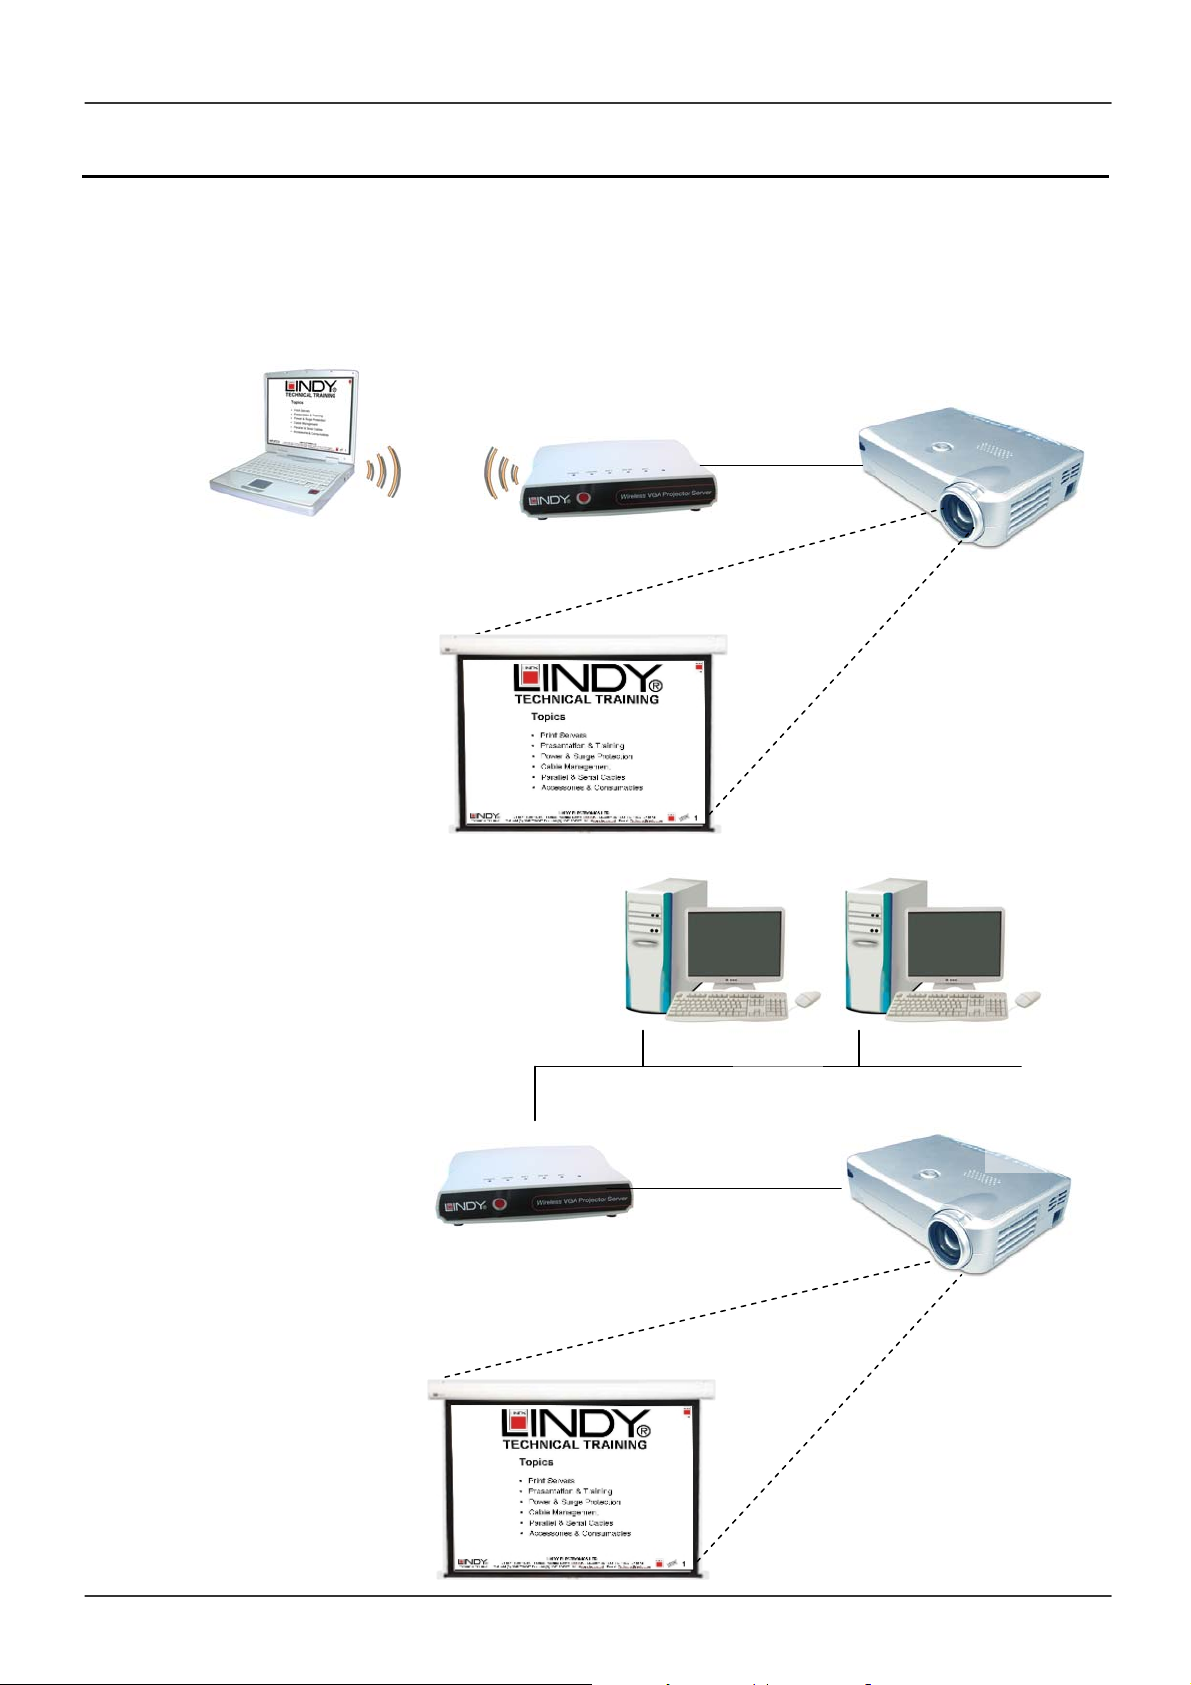
There are three ways of using the Wireless Projector Server:
Via a WLAN
Via an Ethernet network
Via the built-in image viewer
Via a WLAN
Via an Ethernet
network
WLAN
Wireless Projector Server
Wireless Projector Server
Projector
LAN
Projector
5
Page 7
Wireless Projector Server User Manual
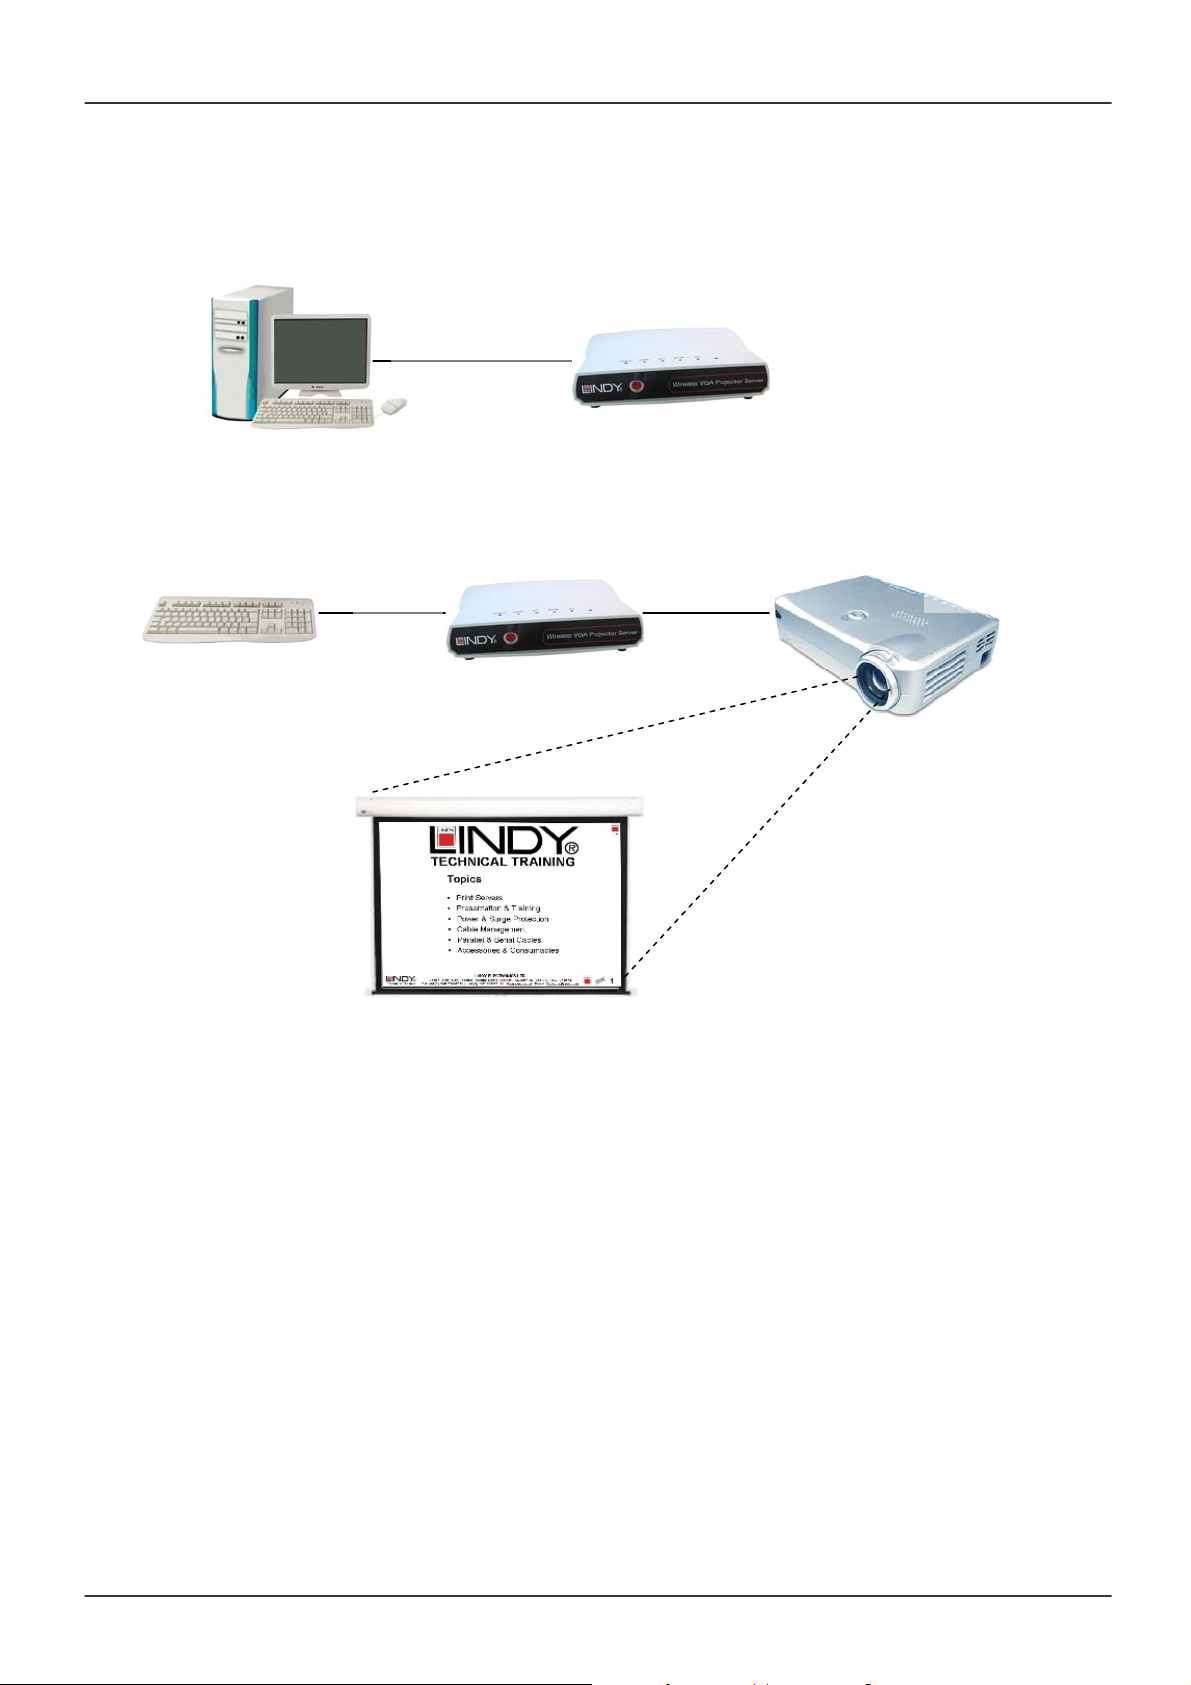
Via the built in image viewer
Step 1 – Upload the Presentation to the Projector Server’s internal memory
Step 2 – Connect a USB keyboard or mouse. Conduct a presentation without a PC!
LAN / WLAN
Wireless Projector Server
Projector
USB
6
Page 8
Wireless Projector Server User Manual
Connecting the Projector Server
Connecting to an Ethernet network:
1. Connect one end of a standard CAT5 or higher UTP Ethernet cable to the Projector
Server’s LAN port.
2. Connect the other end of the Ethernet cable into a network hub or switch. (The maximum
distance between the Projector Server and hub/switch is 100m)
Connecting the power:
1. Plug the power adapter jack into the DC-IN socket on the Projector Server
2. Connect the power adapter into a mains outlet
3. Switch on the power at the rear of the Projector Server. The Power and LAN LED’s will
illuminate and READY LED will flash while the Projector Server initializes. If the LAN LED
is not lit, please check your Ethernet cable connection.
Connecting a Projector (or monitor):
1. Connect the VGA cable from your Projector/monitor to the Projector Server’s VGA port.
2. Power on the projector/monitor to complete installation.
Configuring the Projector Servers network address:
The default IP address setting of the Projector Server is set to ‘Dynamic IP enabled’. When
connected to a LAN with a DHCP (Dynamic Host Configuration Protocol) service the Projector
Server’s IP address will be automatically set. For fixed IP network settings Dynamic IP should
be disabled (See Pages 19 – 21)
Connecting to a Wireless
Network:
Set up a wireless LAN connection to the
Projector Server in the same way that you
would a Wireless Access Point:
1. Power up and connect the
Projector Server to your projector
or monitor. Ensure the WLAN
Adapter in your PC is properly
configured and functioning
correctly
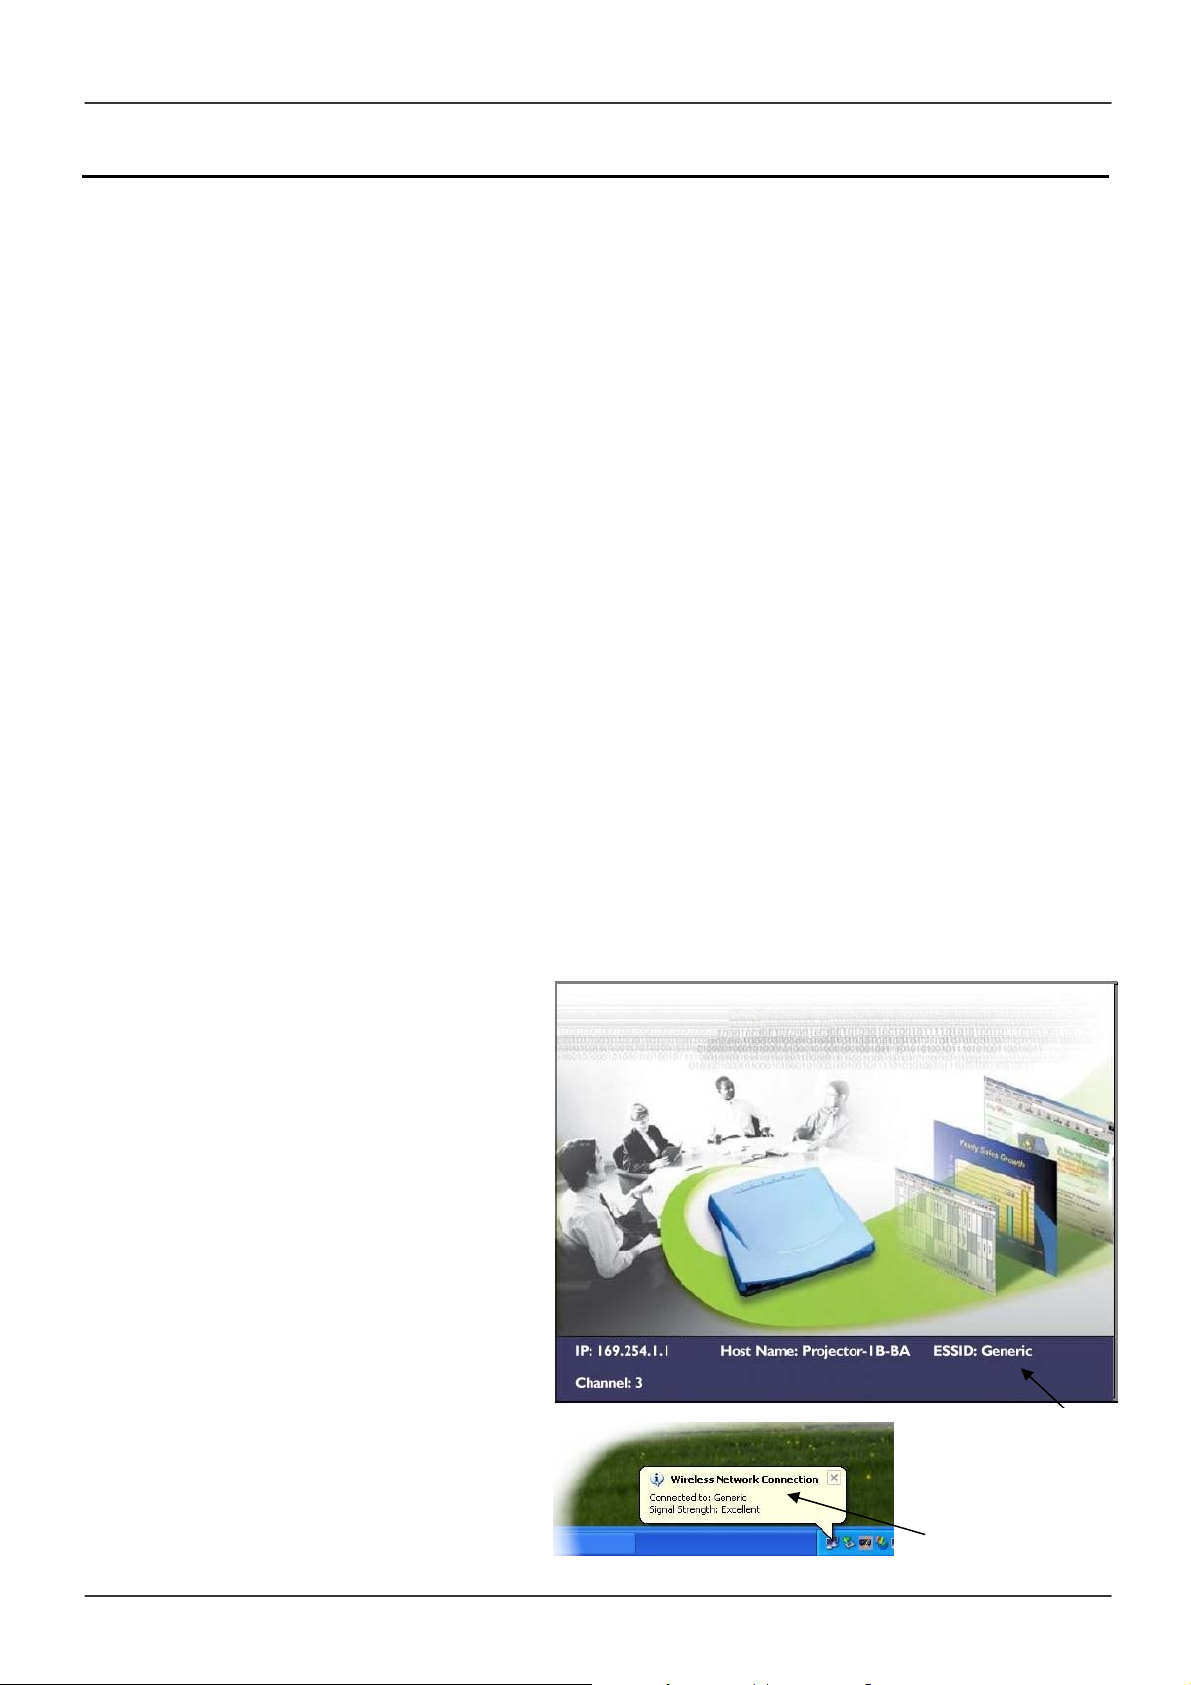
2. Move the mouse pointer over the
network tray icon on the right hand
side of the Windows task bar.
Make sure the Projector Server,
identified by its ESSID as shown in
the Main Console Menu (see Page
13), is linked to the adapter:
Wireless network connection
on Windows taskbar showing
link to the Projector Server.
Main Console Menu
showing Projector
Server’s ESSID
7
Page 9

Wireless Projector Server User Manual
Installing the Player Utility (Meeting Gateway)
Each PC which needs to access the Projector Server (either wirelessly or over a wired LAN)
needs to have the Projector Server’s utility, called Meeting Gateway, installed. Please follow the
instructions below to install the software. Repeat for each required PC.
1. Insert the supplied utility CD into your CD-ROM drive
2. The setup utility should run automatically. If it does not, then select Start from the
Windows taskbar, and then choose Run. In the command box type:
x:\player_setup.exe (where x is the letter of your CD-ROM drive)
3. The following welcome screen will appear. Click Next to continue:
4. The setup utility will choose a default folder in which to install the utility files. Click Next to
accept the default folder:
8
Page 10

Wireless Projector Server User Manual
5. Select the component from the list and click Next:
6. Once the installation has completed click Finish:
7. The Meeting Gateway program icon will be created on your desktop:
9
Page 11

Wireless Projector Server User Manual
Using the Player Utility
Launch the Meeting Gateway Player Utility by double clicking the icon on the desktop.
Note: Some personal firewall software may block connection of the Player Utility to the
Projector Server. Disable the personal firewall software when using the Player Utility,
or configure the firewall to allow connections on ports 4000, 4001 and 5900.
The Player Utility will search for connected Projector Server’s and a menu will appear:
Help: Access the on-line help. (Requires Acrobat Reader)
Search: Searches for all available Projector Servers on the network. The results are displayed
in the central drop down list
Connect: Clicking this button connects to the selected Projector Server (displayed in the drop
down list). Once connected to the Projector Server your computer’s display will be output on the
projector connected to the Projector Server.
Options: Provides the following connection options: Low Speed / High Quality
High Speed / Low Quality (Less Colour)
Upload: Click here to upload your presentations to the Projector Server’s internal memory (see
Page 12)
Disconnect: Click this button to end your session and make the Projector Server available to
other users
10
Page 12

Wireless Projector Server User Manual
Searching and Connecting to a Projector Server
1. Click Search to begin searching for
available Projector Servers. (You can
also type the Projector Servers IP
address in the drop down box). If no
Projector Servers are initially found,
continue clicking Search until the
dialog box below appears:
2. When a Projector Server has been found it
will appear in the drop down list:
3. Click Connect to connect to the Projector
server:
4. Once connected to the Projector Server your computer’s display will be output by the
projector connected to the Projector Server
5. The Player Utility needs to remain running while you
are connected to the Projector Server, so minimize the
window by clicking the button on the Windows taskbar:
Disconnecting from a Projector Server
1. Maximize the Player Utility by clicking the Program button on the Windows taskbar
2. Click Disconnect to end a current session and make the Projector Server available to
other users:
11
Page 13

Wireless Projector Server User Manual
Uploading a presentation to the Projector Server
The Projector Server provides the option of console based ‘PC-less’ presentations. The Player
Utility’s UPLOAD function converts your PowerPoint presentations into a series of jpeg files
which are then transferred to the Projector Server’s built-in memory.
You will need either a USB mouse (with scroll wheel) or USB keyboard to conduct the Slide
Show.
Note: You must have Microsoft PowerPoint installed on your PC to use the Player
Utilities UPLOAD function!
1. Launch the Player Utility and click the
UPLOAD button:
2. Click BROWSE to search for the required
PowerPoint file
3. Click NEXT. PowerPoint will be launched
and a box will appear stating that the
PowerPoint file is being converted.
4. Once the PowerPoint presentation has been
converted the files will be uploaded to the
Projector Server.
5. After the file upload has completed, click OK.
6. Click DISCONNECT to complete the upload procedure
12
Page 14

Wireless Projector Server User Manual
Projector Server Console Operation
Note: For Console operation you must use a mouse (with scroll wheel) or keyboard
attached to the USB port at the rear of the Projector Server. Make sure you connect
the mouse/keyboard before powering on the Projector Server!
The Main Console Screen
After you have connected the Project Server and powered up you will see the Main Console
Screen:
IP: The IP Address of the Projector Server
Host Name: The name of the Projector Server
ESSID: The network name for other wireless devices to identify and connect to the Projector
Server
Channel: Shows the currently selected wireless channel.
ESSID: The network name for other wireless devices to identify and connect to the Projector
Server
From the main console screen you can access the slide show sub-menus by pressing the
ENTER key on your keyboard or the left button on your mouse
13
Page 15

Wireless Projector Server User Manual
y
Using the Projector Server Console
There are three menus within the Projector Server Console: Console Screen, Slide Show
Menu, and Slide Show Listing. All of these menus are made up of the following operating
components:
Bulletin Board: Used to display items
for menu operations.
“More” Indicator: Eight items can be
displayed in the bulletin board area at
one time. If there are more than eight
items a “More” indicator will appear to
remind you of the additional nondisplayed items.
System Info: System information such
as available memory is displayed in
this area.
Command buttons: The various
command buttons are displayed here.
Command buttons
System Info & Command buttons area
Bulletin Board
“More” Indicator
Play
ExitDelete Auto-Pla
14
Page 16

Wireless Projector Server User Manual
Ð
Ð
Keyboard/Mouse Operation
Keyboard/Mouse operation within the Slide Show Menu and Show Listing
Mouse Action Keyboard Action Function
Switch between Bulletin
Board and Command
Button Areas
Move between items
Select
Exit
TAB
Ï
ENTER
or
and
or
ESC
Î
Í
Right-click
Scroll-wheel
Forward/backward
Left-click
Press the
Scroll-wheel
Keyboard/Mouse operation during Slide Show playback
Mouse Action Keyboard Action Function
Next/Previous Slide
Next Slide
Return to Slide Show
Listing
Ï
ENTER
and
ESC
Scroll-wheel
Forward/backward
Left-click
Press the
Scroll-wheel
15
Page 17

Wireless Projector Server User Manual
A
y
The Slide Show Menu
The Slide Show Menu allows for simple ‘PC-less’ presentations using just a USB keyboard or
mouse.
When a PowerPoint file is uploaded to the Projector Server, each slide is converted into a jpeg
image and stored in the Projector Server’s internal memory.
Note: Because the PowerPoint presentation needs to be converted into jpegs,
animation effects are not available during ‘PC-less’ slideshow presentations!
Play
uto-Pla
Uploaded Files: The uploaded files are numbered and displayed in the bulletin board area.
Each file is represented by a thumbnail view of its first slide.
Play: Plays the selected file.
Auto-Play: Select this button to automatically advance to the next
REP:
Ok No
9 8
slide at preset time intervals. Upon activating Auto-Play a box will
appear which provides the option to repeat the slide show (REP) and
allows you to select the duration (in seconds) each slide displays
before the next one appears.
3 5 10 30
45 60 120 180
Delete: Deletes the selected file. A message box will appear
prompting you to confirm the deletion:
Ok No
9 8
Exit: Returns to the Main Console Menu
16
ExitDelete
Page 18

Wireless Projector Server User Manual
Slide Show Listing
The Slide Show Listing screen serves as the control panel during slide show playback.
The Bulletin Board displays all of the slides in the selected file. Each slide is numbered and is
represented by its thumbnail view.
You can move to a selected slide and start slide playback from that point by pressing the
ENTER key or clicking the LEFT BUTTON on the mouse.
17
Page 19

Wireless Projector Server User Manual
Conducting a Slide Show
There are three Slide Show modes: Slide Show Menu, Slide Show Listing and Slide Show
Play.
Their relationship is illustrated below:
Select a file and
activate Play
Press ESCAPE
Note: See Page 15 for keyboard and mouse controls
1. From the Slide Show Menu select the desired file.
2. Activate the Play button in the command bar to display slide by slide images.
3. During Slide Show playback you can press the ESCAPE key on your keyboard or the
SCROLL WHEEL on your mouse to enter the Slide Show Listing.
4. When you reach the last slide in the presentation use the next slide command (press the
ENTER key on your keyboard or left-click your mouse) to move to the first slide in the
presentation.
5. To end the slide show press ESCAPE or the mouse SCROLL WHEEL to return to the
Slide Show Listing.
6. From the Slide Show Listing press ESCAPE or the mouse SCROLL WHEEL to return to
the slide show menu.
Press ESCAPE
Select a slide and
activate Play
18
Page 20

Wireless Projector Server User Manual
The Administrator Utility
The Projector Server’s Administrator Utility is a browser based utility which allows you to modify
or change the password, network and encryption settings. To configure the network and
encryption settings, some basic knowledge of Ethernet and TCP/IP protocols is essential.
Accessing the Administrator Utility
Note: It is recommended that you disable the proxy server in your browser. The proxy
server may block your access to the Projector Server!
1. Set up the Projector Server (See Page 7). The Main Console Screen will appear. Ensure
the Projector Server is connected to your LAN or WLAN.
2. Make a note of the IP address shown in the lower part of
the Main Console Screen.
3. Open a web browser (MS Explorer or Netscape) on your PC and enter the IP address as
noted in Step 1:
4. Enter the password (default: 654321) and click LOGIN.
19
Page 21

Wireless Projector Server User Manual
Using the Administrator Utility
The Administrator Utility consists of four sections that allow you to configure different settings.
After making changes you need to click on the Save button within each section and then click
Re-boot to reboot the Projector Server and make the changes effective. The exception is in the
password section; clicking Apply here changes the password immediately without the need to
reboot!
Log Out: Exits the Administrator Utility and returns to your previous web page
Re-boot: Closes the Administrator Utility and reboots the Projector Server to update changes
Change Password: Sets a new password to access the Administrator Utility. Click Apply to
save changes.
New Password - Enter your new password here (case sensitive)
Confirmation – Re-enter the password
System: Here you can change the Host Name (Network identification) and default language.
Click Save and Re-boot to save changes.
Host Name – Enter a new host name here
20
Page 22

Wireless Projector Server User Manual
Networking: You can modify various network settings here. Click Save and Re-boot to save
changes.
IP - The Projector Server’s IP address can be set here
Mask – The Subnet Mask can be set here
Gateway – The Gateway address can be input here
Network Name (ESSID) – The network name (ESSID) allows other wireless devices
to identify and connect to the Projector Server. If there are multiple Projector Servers
nearby, a unique name for each is necessary. Use a different network name and
channel from a nearby Access point to avoid wireless interference problems.
Channel – Here you can select a wireless channel from the drop down list.
Dynamic IP – Click the Dynamic IP button to enable or disable automatic network
address setting. You must have the DHCP (Dynamic Host Configuration Protocol)
service on your network in order to use the Dynamic IP function. For fixed IP network
settings, Dynamic IP should be disabled and the user should enter the parameters
manually.
Encryption: The Encryption section allows the user to set the encryption keys for the WEP
(Wired Equivalent Privacy), a data privacy mechanism based on a shared encryption key
algorithm as defined in the IEEE 802.11 standard. If you enable the WEP setting on the
Projector Server, all other wireless devices to be connected to it should use WEP with the same
encryption keys. Click Save and Re-boot to save changes.
WEP Encryption – Three settings: Disable, 64 Bits or 128 Bits can be chosen from
the drop down list. Note – some wireless devices may not support 128 Bit
encryption.
WEP Key Entry – Here you can manually enter a set of four keys. For 64 Bit
encryption, each key must consist of exactly 10 hexadecimal characters. For 128 Bit
encryption, each key must consist of exactly 26 hexadecimal characters.
Note: The hexadec imal characters are: 0, 1, 2, 3, 4, 5, 6, 7, 8, 9, a, b, c, d, e
and f. Make sure you enter the hexadecimal characters when setting up WEP
keys on your PC as well!
Default TX Key – Select which key to use when transmitting data. Make sure the
PC’s WEP encryption key exactly matches the Projector Server’s.
It is highly recommended that you always enter all four sets of WEP keys to ensure smooth
communications with other WLAN devices. When WEP encryption is enabled, the selected
WEP key of the sending device must match exactly with that of the receiving device.
For example, if you select Key 2 as the Projector Server’s default TX key, then the receiver’s
(the PC’s WLAN adapter) Key 2 must contain exactly the same encryption codes. Then, if you
select Key 3 as your PC’s default TX key, then the receiver’s (Projector Server) Key 3 must
contain exactly the same encryption codes. Therefore, under these two circumstances, your
PC’s Key 2 and Key 3 encryption settings must match those of the Projector Server.
Note: The Projector Server’s four WEP keys are labelled 1 through 4
respectively. Some WLAN devices WEP keys are labelled 0, 1, 2 and 3. In
such instances the Projector Server’s Key 1 must match with the devices Key
0, Key 2 with Key 1 and so on.
21
Page 23

Wireless Projector Server User Manual
Troubleshooting
Common Problems and Solutions
Some personal firewall software may block connection of the Player Utility to the
Projector Server. Disable the personal firewall software when using the Player Utility,
or configure the firewall to allow connections on ports 4000, 4001 and 5900.
If the WLAN utility on your PC indicates that your WLAN card is already linked to the
Projector Server, but the Player Utility can not connect, please check that the WEP
setting and the WEP keys on your computer are the same as those on the Projector
Server.
Frequently Asked Questions
Can I connect to the Projector Server to a computer through the internet?
No. Although the Projector Server uses standard internet protocols, most companies will have a
firewall to restrict traffic.
Can I play a game or watch movies through the Projector Server?
No. The Projector Server is designed for business graphics and presentations only.
22
Page 24

Wireless Projector Server Radio Frequency Energy, Certifications
FCC Warning
This equipment has been tested and found to comply with the limits for a Class B Digital device,
pursuant to part 15 of the FCC Rules. These limits are designed to provide reasonable protection
against harmful interference in a residential installation. This equipment generates, uses, and
can radiate radio frequency energy and, if not installed and used in accordance with the
instructions, may cause harmful interference to radio communications. However, there is no
guarantee that interference will not occur in a particular installation. If this equipment does
cause harmful interference to radio or television reception, which can be determined by turning
the equipment off and on, the user is encouraged to try to correct the interference by one or
more of the following measures:
y Reorientate or relocate the receiving antenna
y Increase the separation between the equipment and receiver
y Connect the equipment into an outlet on a circuit different from that to which the receiver is
connected
y Consult the dealer or an experienced radio/TV technician for help
You are cautioned that changes or modifications not expressly approved by the party
responsible for compliance could void your authority to operate the equipment.
For Home and Office Use
Tested to comply
with FCC Standards
LINDY No. 32500
© LINDY ELECTRONICS LIMITED & LINDY-ELEKTRONIK GMBH - FIRST EDITION (February 2005)
 Loading...