

Page 1
IP Protocol Support
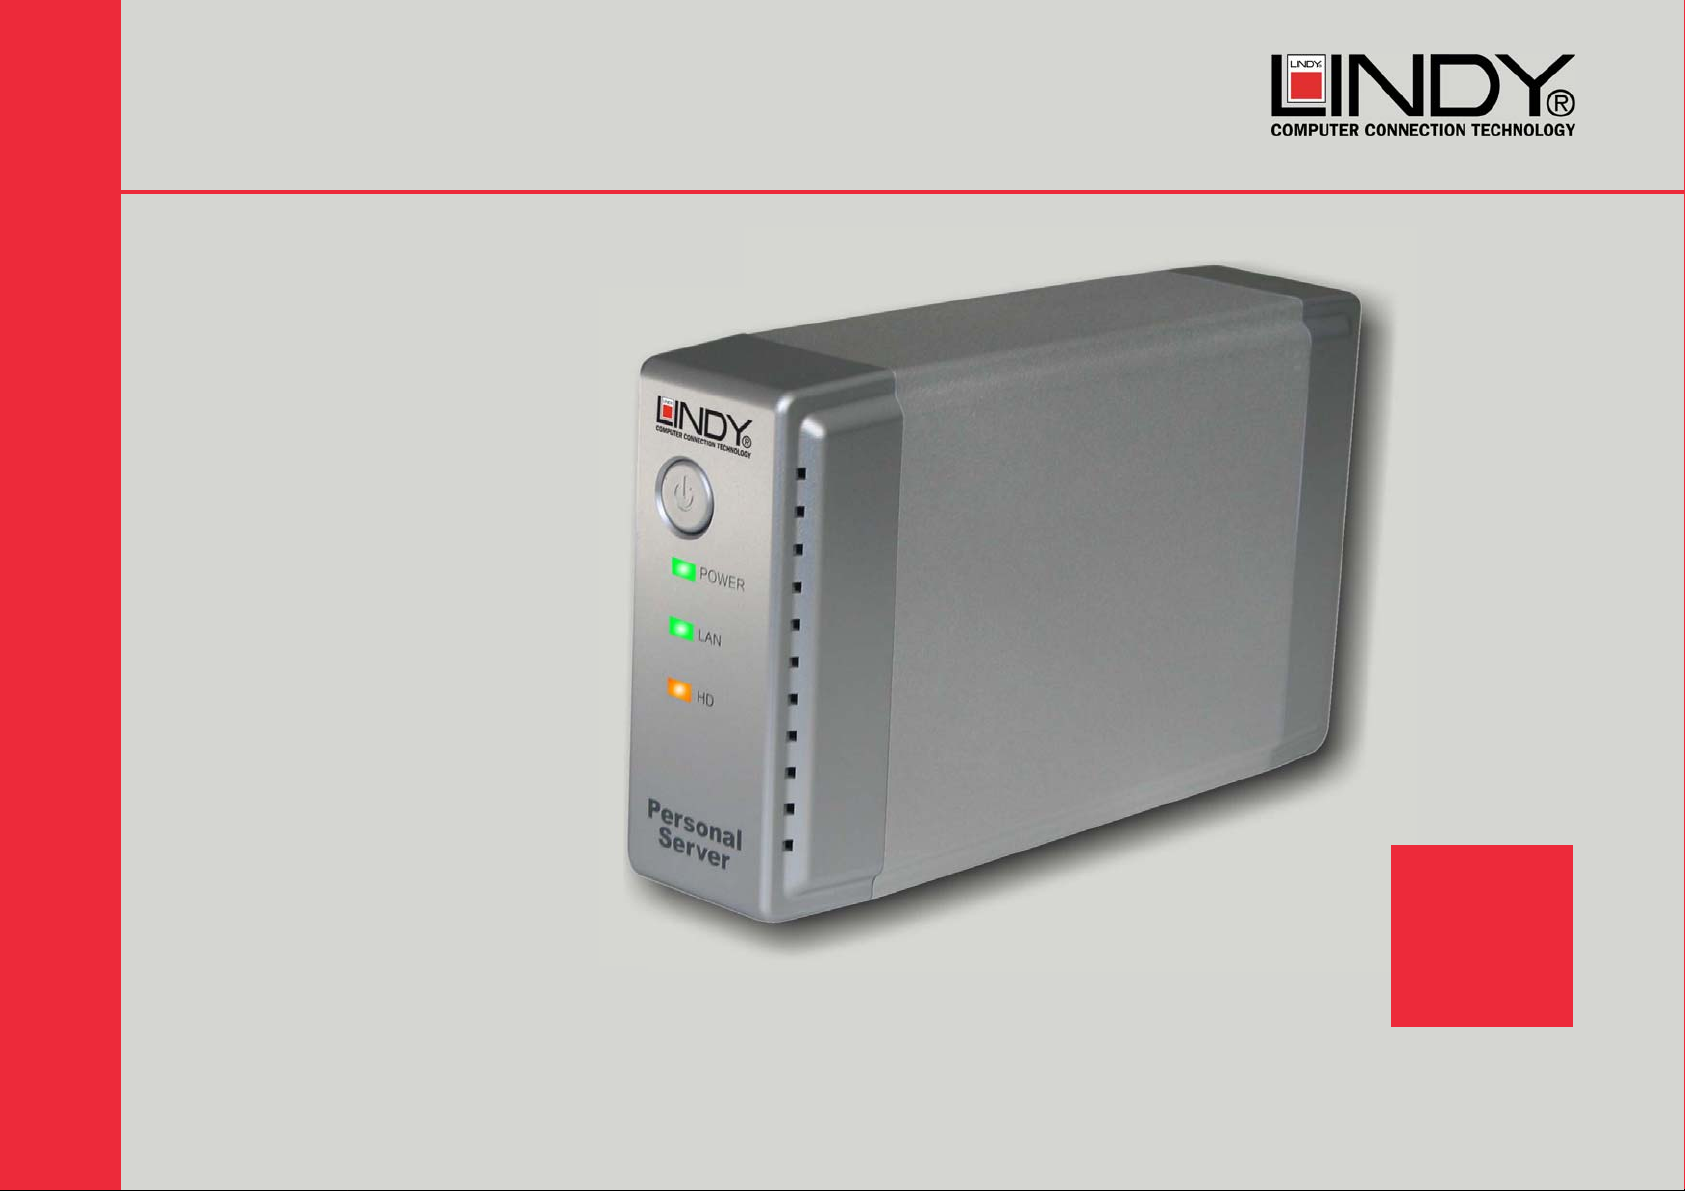
Personal Server
Instruction Manual
www.lindy.com
No. 32454
Page 1
Page 2

Contents
What’s in the box?................................................................................................ 3
Product Information..............................................................................................
4
IP Protocol Setup..................................................................................................
Configuring TCP/IP settings (Windows 98/Me)......................................... 6
Configuring TCP/IP settings (Windows 2000)...........................................
Configuring TCP/IP settings (Windows XP)..............................................
Hard Disk Installation...........................................................................................
Quick Setup Wizard..............................................................................................
Management Guide..............................................................................................
Applications..........................................................................................................
5
8
10
12
14
16
34
Troubleshooting...................................................................................................
Specifications.......................................................................................................
Certifications........................................................................................................
37
38
39
Page 2
Page 3
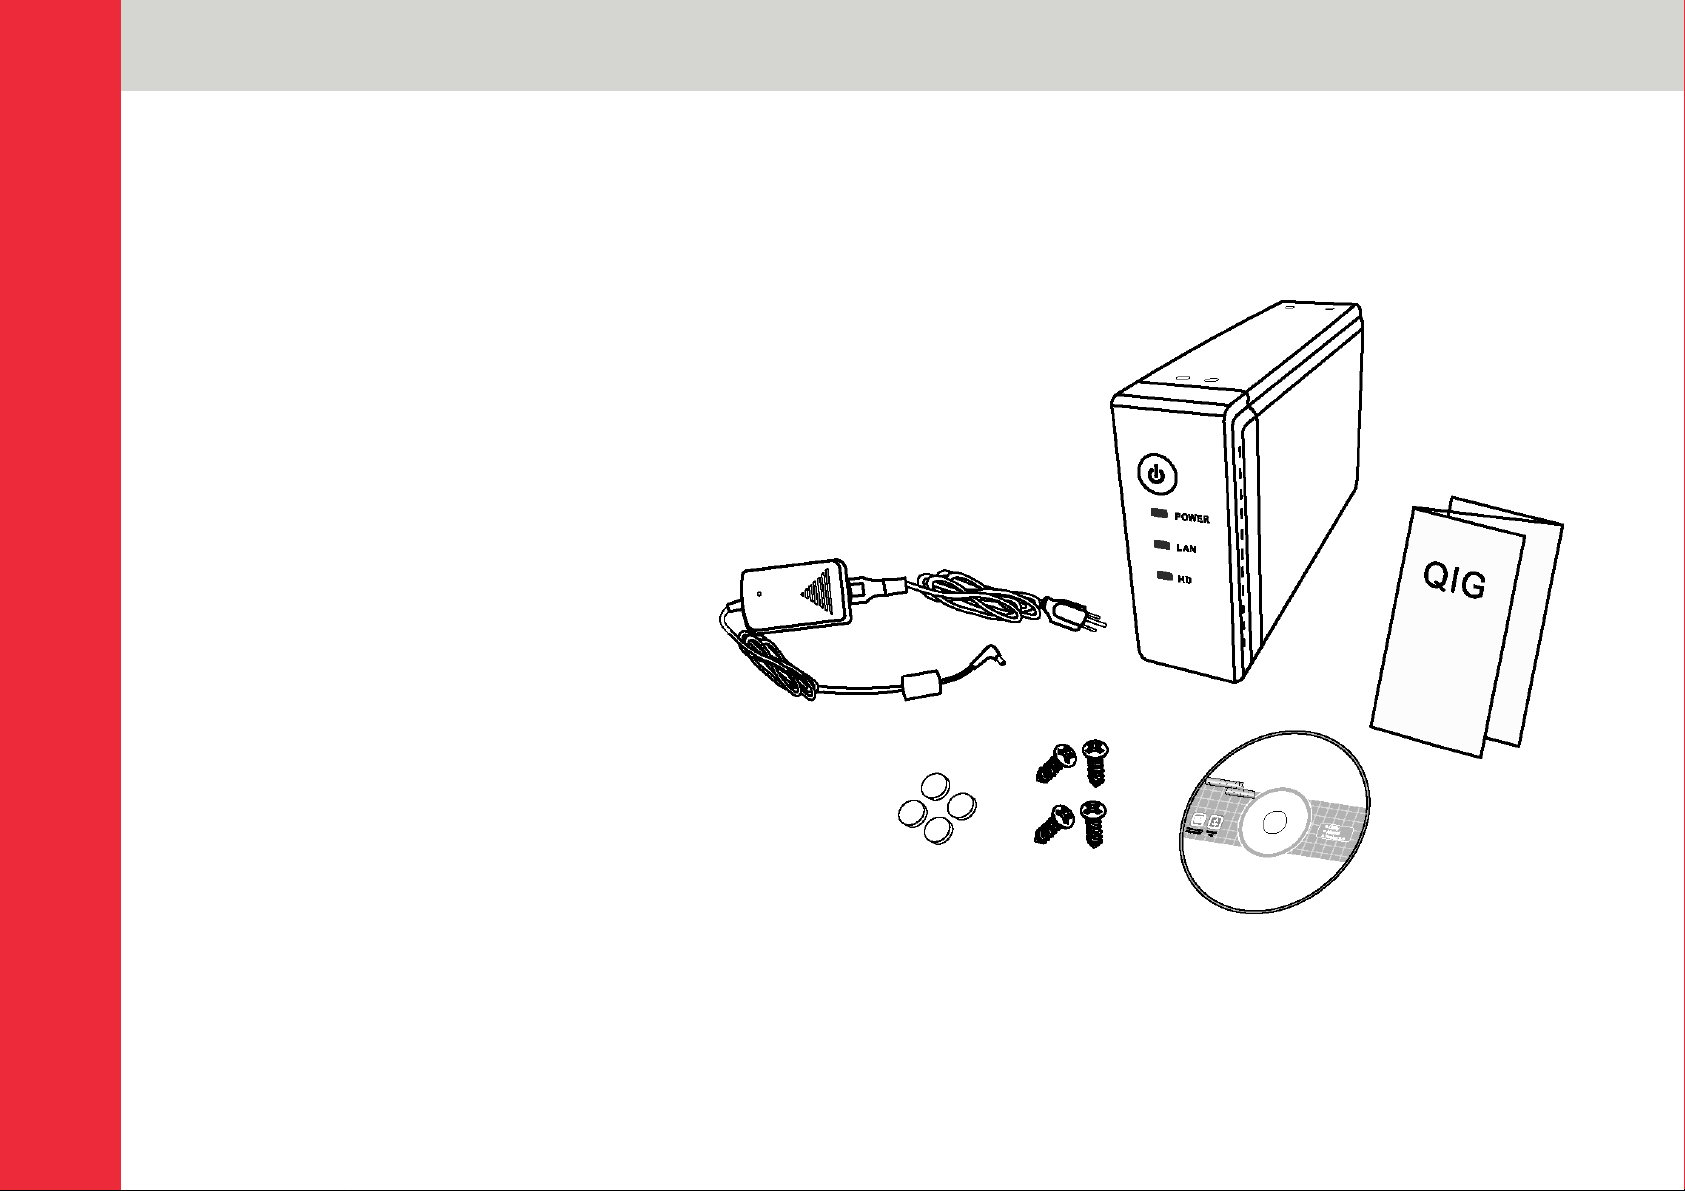
What’s in the box?
Thank you for purchasing the LINDY Personal Server. Before
you move on, please verify your package contains the
following items:
1. One Personal Server (Hard Disk not included)
2. One Power adapter
3. One Quick Install Guide
4. One Utility/Manual CD-ROM
5. Rubber foot x 4
6. Screws for HD installation x 4
Page 3
Page 4

Product Information
Front Panel
LED Indicators
Power Button
After connecting the Personal
Server to a mains power outlet,
press this button to switch on
To power off, press and hold
the button for two seconds until
the power LED flashes
Rear Panel
Reset Button
Press this button to reset the
Personal Server to its default
settings
LAN Port
Connect the network cable here
Power Connection
Connection for the external
power adapter
LED Status
ON /OFF Green/Off Power
Boot/Shutdown Blinking
LAN
HD
Ethernet Connected Green
Ethernet Not Connected Off
Ethernet Data transferring Blinking
Data Transfer Amber/Blinking
Page 4
Page 5

IP Protocol Setup
Configuring network protocols
To allow users to launch the device easily we have provided a
convenient Quick Setup Wizard which automatically detects
the Personal Server on your LAN.
To run the Wizard correctly, please ensure that your PC does
not obtain an IP address automatically; otherwise it will not be
able to initialize the setup procedure according to your
network settings. To get around this problem you can either
configure your PC with a static IP address or connect it to a
router with an embedded DHCP server.
The following section indicates how to configure your PC with
an IP address. Users of PCs that are already configured with
a static IP address can skip to the next chapter – Hard Disk
Installation.
How to configure your PCs TCP/IP settings
Before proceeding you must obtain an IP address in advance.
If you don’t have an IP address or you are not going to access
the Personal Server via the Quick Setup Wizard, please
choose an address (highlighted in blue) within the following
range:
192.168.1.2 to 255
Please do not choose 192.168.1.1 as this has been set as the
default for the network device.
In the following TCP/IP configuration guide, 192.168.1.2 is
assumed to be your IP address.
Page 5
Page 6

IP Protocol Setup
Configuring TCP/IP settings (Windows 98/Me)
1. Click Start >Settings >Control Panel >Network
2. Select TCP/IP >(Your Ethernet Adapter), then click
on the Properties button.
Page 6
Page 7

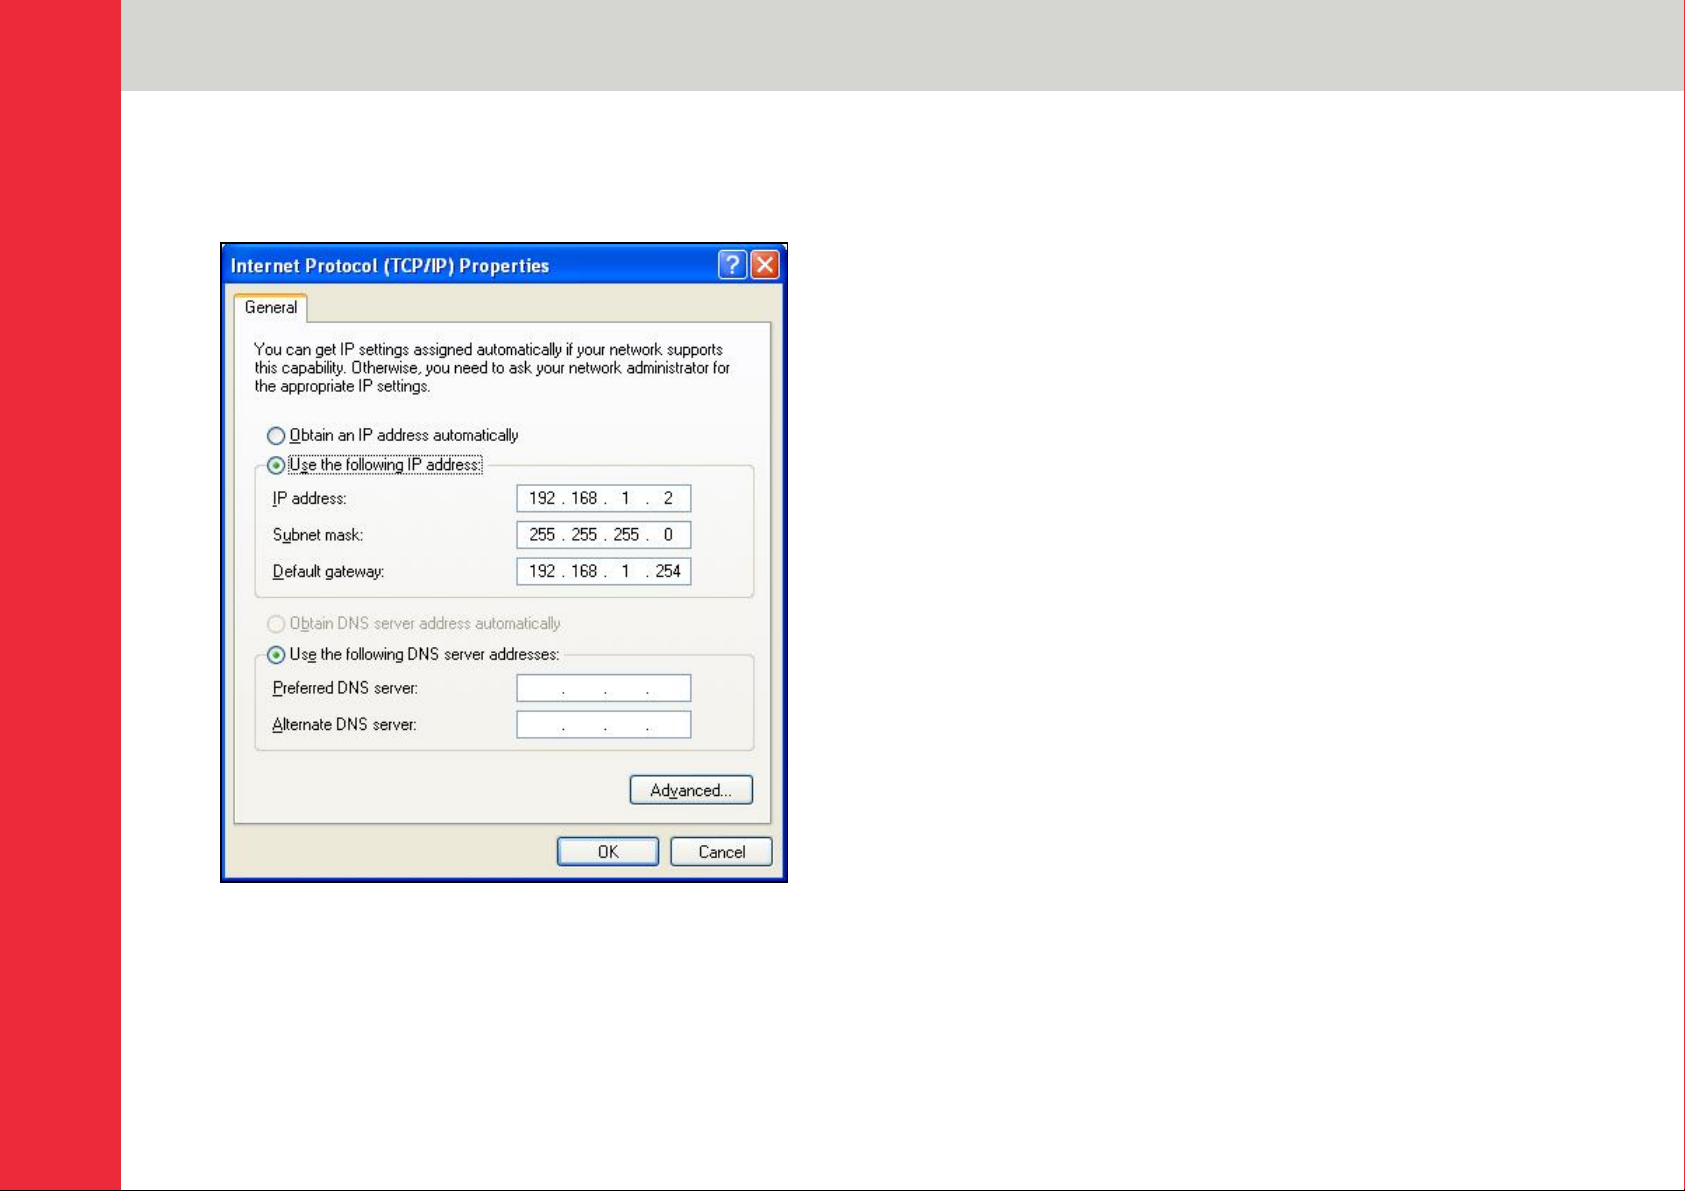
IP Protocol Setup
3. Click IP Address and then select Specify an IP
address
4. Type in the IP address. The subnet mask is
255.255.255.0
5. Click OK, then OK again. The system may ask for your
Windows CD. Follow the on-screen instructions then
restart your PC.
Page 7
Page 8
IP Protocol Setup
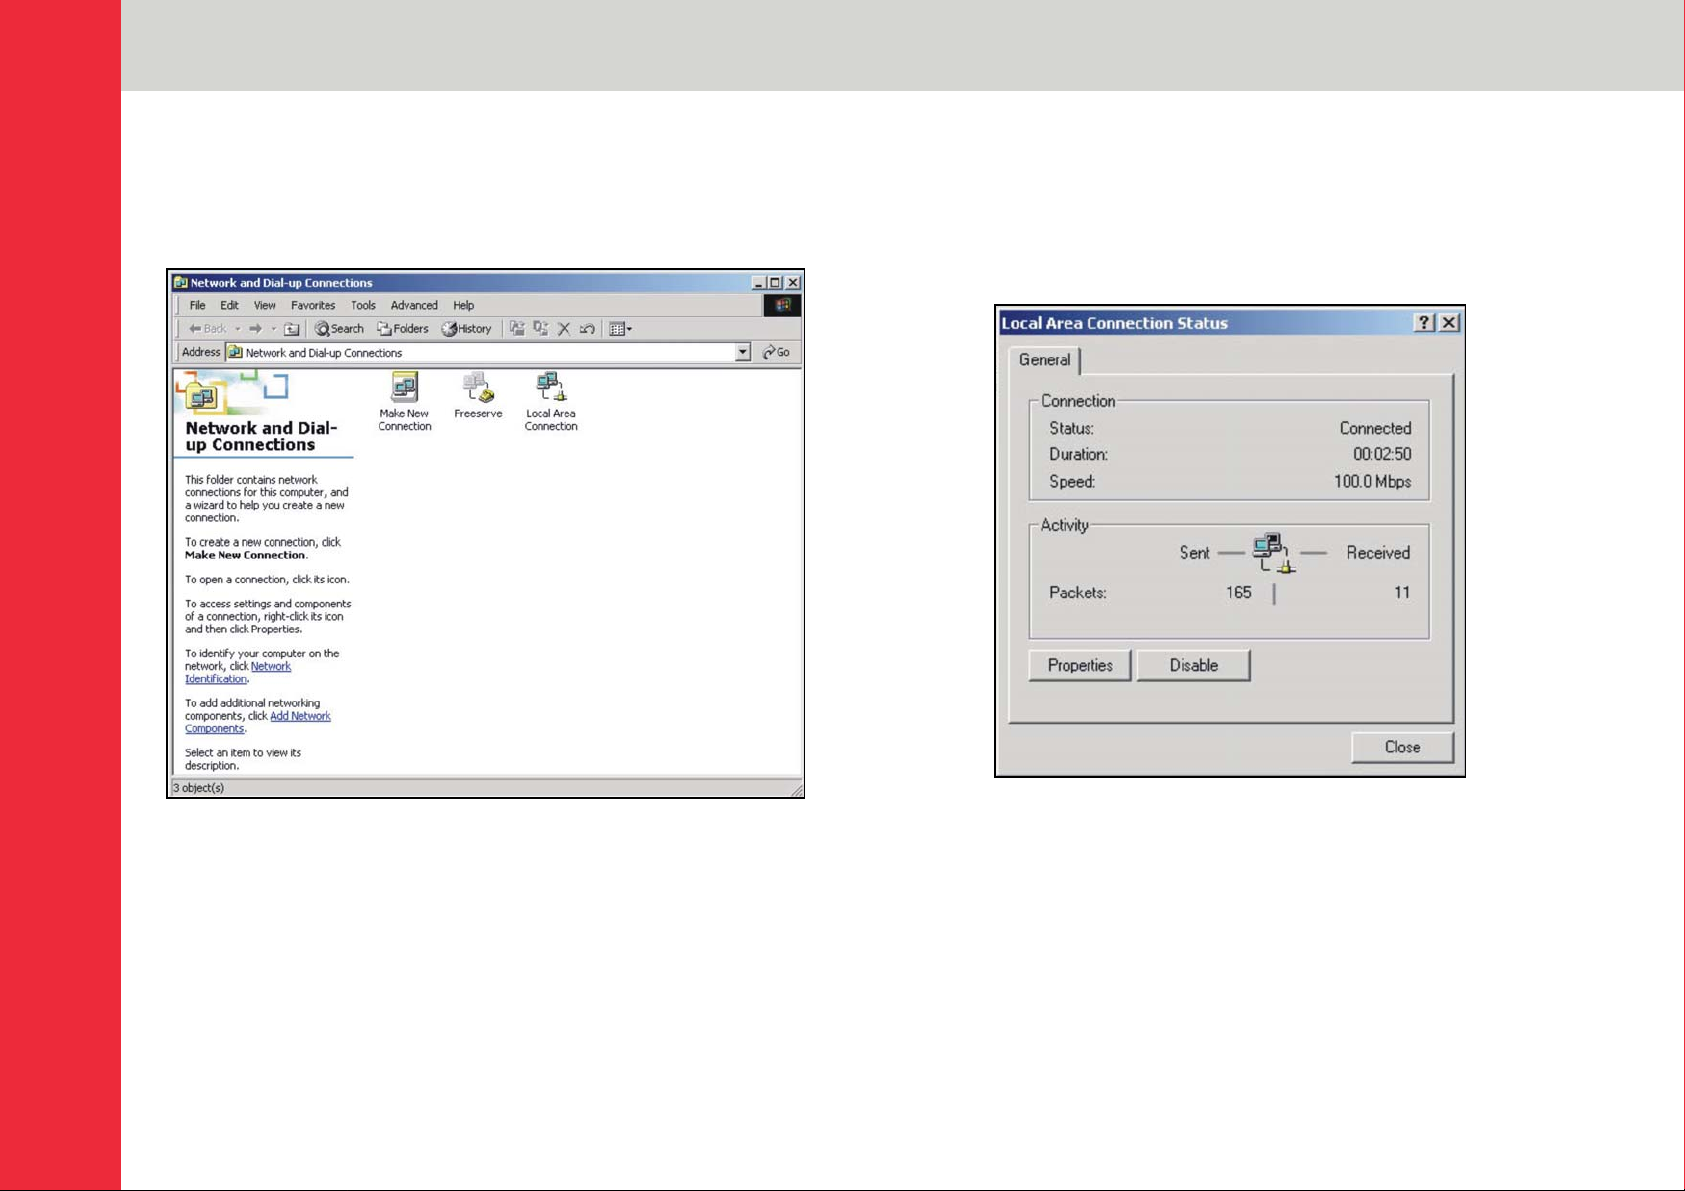
Configuring TCP/IP settings (Windows 2000)
1. Click Start >Settings >Network and Dial-up
connections
2. Double-click on Local Area Connection and then click
on the Properties button
Page 8
Page 9
IP Protocol Setup
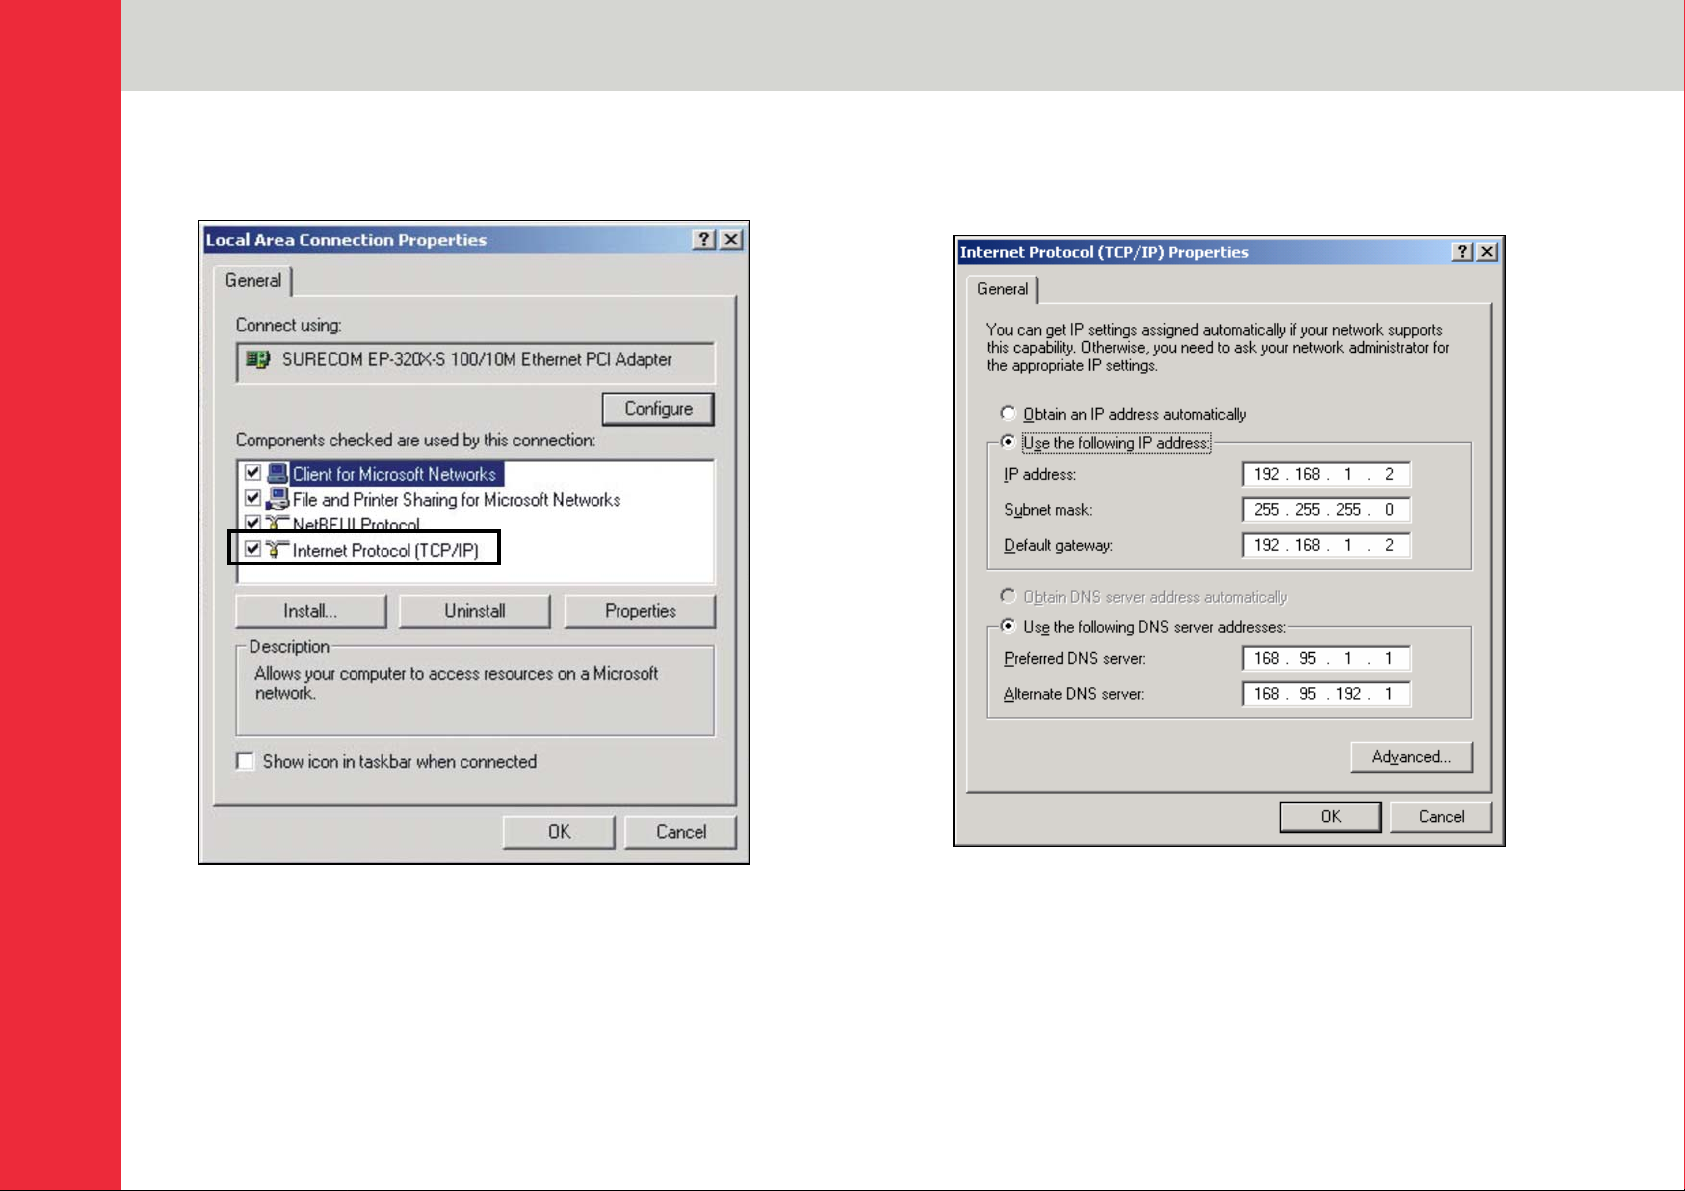
3. Highlight Internet Protocol (TCP/IP), and then click
Properties
4. Select Use the following IP address. Enter the IP
address. The subnet mask is 255.255.255.0. Click OK
and restart your computer.
Page 9
Page 10

IP Protocol Setup
Configuring TCP/IP settings (Windows XP)
1. If you are in Classic Start menu view, click:
Start >Settings >Control Panel >Network Connections
If you’re in Start menu view, click:
Start >Control Panel >Network Connections
2. Double-click Local Area Connection
3. Highlight Internet Protocol (TCP/IP) and then click
Properties
Page 10
Page 11
IP Protocol Setup
4. Enter the IP address you chose earlier. The subnet
mask is entered automatically in Windows XP. Click
OK.
The IP configuration of your PC is now complete. Please refer
to the instructions that follow to complete the Hard Disk
Installation and Quick Setup Wizard.
Page 11
Page 12
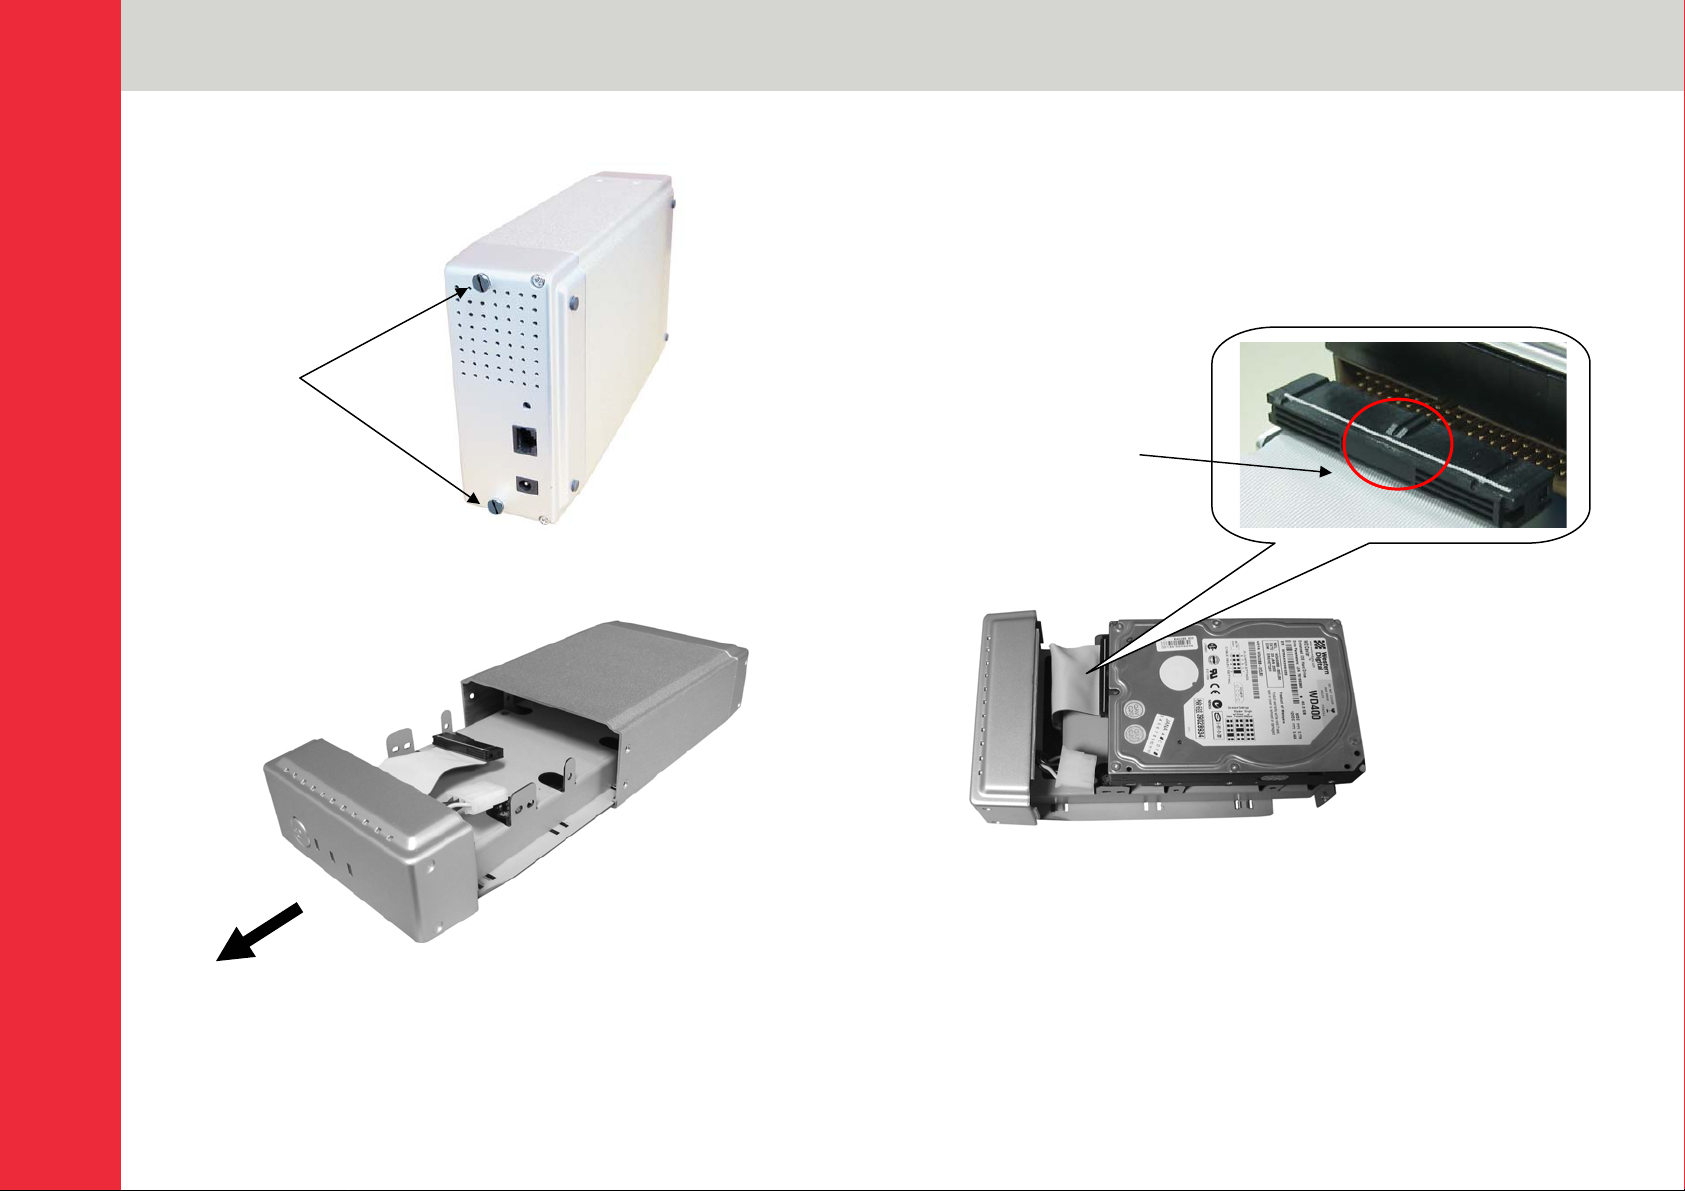
Hard Disk Installation
1. Use a screwdriver to loosen the two screws on the rear
panel.
2. Grab the front panel and pull the chassis out of the
case.
3. Please ensure that the jumper on your hard drive is set
to the Master position.
Note: refer to your Hard Disk manual for the location of
the jumper!
4. Insert the IDE connector into the IDE socket on the
Hard Disk. Make sure that pin 1 on the cable connects
to pin1 on the hard disk. The location of pin 1 can be
identified by the red strip on the edge of the cable. The
IDE cable is ‘keyed’ to fit correctly into most hard
drives.
IDE Connector
Page 12
Page 13

Hard Disk Installation
5. Push the power connector into the power socket on the
hard drive. The power connector is designed to be
inserted into the socket one way only. Please check the
shape for the correct installation.
Power Connector
6. Secure the hard disk using the supplied screws.
7. Push the hard disk and chassis back into the case and
tighten the two case screws.
Page 13
Page 14

Quick Setup Wizard
The Quick Setup Wizard provides an installation guide from
cable attachment to initialization. Please follow the steps
below to proceed.
Please note: If you’ve run the wizard previously and there
are existing shortcuts for accessing and managing the
device on your desktop, please delete them before running
the wizard again.
Starting the Quick Setup Wizard
Insert the supplied utility CD into your CD-ROM drive. The
main menu will pop up automatically.
Note: If the auto-run program does not launch automatically,
please click on My Computer >(CD drive) and then click the
AUTORUN icon to start the main menu.
Activate the utility software
Click Quick Setup Wizard to activate the setup utility and
follow the on-screen instructions.
Page 14
Page 15

Quick Setup Wizard
After the Personal Server has been automatically installed by
the Quick Setup Wizard, there will be two shortcuts on your
desktop:
Setup My Personal Server allows you to
setup the Personal Server using a web
browser.
To setup the Personal Server, please see
the section called Management Guide.
Access my Personal Server is a link to
access the shared folder on the Personal
Server’s hard drive.
Note: If there is no hard disk installed or
it is not formatted, then you will not be
able to access the personal server by
clicking this shortcut. But, you will still be able to use the
Setup My Personal Server shortcut to manage the device.
To access the hard drive
Double-click the Access my Personal Server icon to access
the hard disk. An authentication window will pop up. Please fill
in the user name and password to access the folders.
The Personal Server provides three default accounts, for
users to access folders, with different authority levels.
All = Read/Write (The account is allowed to read/write all
the folders on the Personal Server)
Power = Read/Write (The account is allowed to
Read/Write the ‘share’ folder only)
Guest = Read Only (The account is allowed to read the
‘share’ folder only)
Note:
1. By default, the ‘Share’ folder is created automatically and can
be accessed by any user.
2. Users that would like to use another user name / password
after having already accessed any folder need to log off and
on again.
3. Windows 95/98/98SE users, please note that you should add
a new user with the user name of your operating system. To
configure each account including adding new users,
changing user names & passwords, please refer to the
‘Share’ chapter.
Page 15
Page 16

Management Guide
Setup the Personal Server
To configure the Personal Server via your computer with a
web browser installed, please follow the steps below:
Double-click the Setup My Personal Server icon on your
desktop.
The User name and Password window appears.
Enter admin in the User Name location (default value)
Enter admin in the Password location (default value)
Click the OK button
Note: If you didn’t run the Quick Setup Wizard, you should
configure your IP address in the range from 192.168.1.2 to
192.168.1.255. Start your web browser and, in the address
field, type http://192.168.1.1
Home Page
The Personal Server is managed via a web-based graphical
user interface (GUI) that can be accessed with a standard
HTML (HTTP v1.0) compliant browser.
Page 16
Page 17

Management Guide
Status
Host name: the Personal Server’s identification
IP Address: the IP address of the Personal Server
Version: the Firmware version
Configuration
Click each item to access each management page
Status Detail
To see more information about the Personal Server, such as
HD used (%), up-time, samba users and FTP users, select:
Click here for more information...
IP Address: the IP address of the Personal Server
HD used (%): the total amount of HD used
Up-time: the estimated time that the Personal Server has
been powered on
Samba Users: the number of members who are currently
using the Personal Server
FTP User: the number of members who are currently
using the Personal Server via the FTP client
Check if the Unicode has been loaded in the Personal
Server
Note:
1. The Personal Server provides a maximum of five online
Samba users and five online FTP users.
2. For instructions regarding Unicode installation, please
refer to Character Set under the Administration
category.
Page 17
Page 18

Management Guide
The Networking management function allows users to modify
the Host name, IP address, Superuser/Password and the
IP/MAC Filter settings.
Host Name Setting
Host Name: the Personal Server’s identification
Work Group: the workgroup in which the Personal Server
is located
Description: a brief description of the Personal Server
(e.g. IP address, location etc...)
IP Address Setting
DHCP Enable: click Yes to enable the Personal Server as
a DHCP client
IP Address: the IP address of the Personal Server
Subnet Mask: the subnet mask must be compatible with
the other devices on your network
Gateway: enter the Router or Gateway IP of your network,
or leave it blank
DNS Server: specify the server IP address provided by
your ISP
Page 18
Page 19

Management Guide
Superuser/Password Setting
You can setup the administration user account and password
on this page. The user name/password is used to access the
web based GUI to setup the Personal Server.
Superuser name: the user name the Personal Server
administrator uses to access the web-based GUI
Old Password: enter your old password here
New Password: enter the new password here
Confirm Password: enter the new password again to
confirm
IP Filter
The IP Filter function provides access management by IP
address filtering. There are three configuration modes:
1. Disable: disables the IP Filter function. All IP addresses
are allowed to access the Personal Server
2. Allowed: allows you to setup the IP addresses that are
allowed to access the Personal Server. Only the
configured IP addresses have the right to access the
Personal Server
3. Denied: allows you to setup the IP addresses that are not
allowed to access the Personal Server. The configure IP
addresses are not allowed to access the Personal Server
Page 19
Page 20

Management Guide
MAC Filter
The MAC Filter function provides access management by
MAC address filtering. There are three configuration modes:
1. Disable: disables the MAC Filter function. All MAC
addresses are allowed to access the Personal Server
2. Allowed: lets you setup the MAC addresses that are
allowed to access the Personal Server.
3. Denied: lets you setup the MAC addresses that are not
allowed to access the Personal Server.
From this page you can manage the Personal Server. The
Administration section provides the tools to:
Restart the system
Format the hard disk
Restore the default settings
Update the firmware
Adjust the system time
Support the correct code pages in SAMBA for the
character set
System Restart
To restart the Personal Server, click Yes. Do not power off the
device until the system restart has completed.
Page 20
Page 21

Management Guide
HD Format
If you see the message – HD Unable to use, in the HD used
(%) field it means that your hard disk is unformatted or is not
formatted using the EXT3 format.
You must format the hard drive or replace it with a drive with
the EXT3 format.
To format the hard drive, click Yes.
Please wait while the drive is formatting. Do not power off the
system or close the browser. After the formatting process has
completed, the system will restart automatically.
Factory Default Reset
Caution: All partitions on your drive will be formatted and all
your data will be erased.
To restore the Personal Server to its default configuration,
click Yes. Do not power off the device during the reset.
Page 21
Page 22

Management Guide
Firmware Upgrade
To upgrade the firmware:
1. Click Browse...
2. Select the firmware update file
3. Click Apply
Caution: To avoid possible damage, DO NOT POWER OFF
the Personal Server during the firmware upgrade process.
System Time
1. If your system is not connected to the internet, click Time
Sync to synchronize the current time with the PC.
2. If your system is connected to the internet, use Time
Server and select Time Zone to perform time
synchronisation. Please remember to click Save. The
correct time will be applied after the next boot-up.
Page 22
Page 23

Management Guide
Character Set
Unicode allows the Personal Server to recognize most
character sets from around the world in order to prevent errors
from font differences.
To install Unicode, insert the supplied utility CD into your CD
drive and click the Browse icon. Click on your CD-ROM drive
and open the folder named Unicode. Select the file –
ntx_chset.h, click open to browse the file and then Save to
enable.
Page 23
Page 24

Management Guide
At the Share page, you can manage the Users and Folders on
the Personal Server.
User Configuration
This page allows you to add/remove users and configure user
properties
To add a user...
1. Click the Add button
2. Enter User Name, New password, Confirm password, and
User description
Note:
If you want to add an account for Windows 98/98/98SE users,
you must use their OS user names as the user names for the
Personal Server.
3. Decide the FTP Access and Access Level. When FTP
Access is enabled, those users are allowed to access FTP
using their user name and password.
4. Choose the default folder for the user.
5. Click Apply to save.
Page 24
Page 25

Management Guide
To change the user configuration...
1. Click the User Name link, for example, All.
2. Enter New Password; Confirm Password and
Description to change the settings.
To delete a user...
1. Fill in the check boxes to select the users you want to
remove.
2. Click Delete to remove.
Folder Configuration
On this page, you can add folders, delete folders and setup
the authentication of users.
To add a folder...
1. Click Add to add a new folder.
2. Enter the folder name and description.
3. Click Apply to save.
Page 25
Page 26

Management Guide
To delete a folder...
1. Select the folder you want to remove by clicking the check
box.
2. Click Delete to remove.
To change the user authentication of a folder...
From this page you can configure the privilege levels for each
user, e.g. reading and writing files. Three privilege modes are
provided for each user:
Non-access: the user is not allowed to access the folder
Read-only: the user is only allowed to read files in this
folder
Read & Write: the user is allowed to read and write files to
or from this folder
You can also perform overall authority configuration for all
users toward the folder. 4 authority levels are provided:
Authentication free access
No access for all users
Only Read access for all users
Read/Write access for all users
Page 26
Page 27

Management Guide
The Personal Server provides FTP functionality to allow users
to access and upload/download files using FTP software.
FTP Configuration
Click FTP Configuration to setup configuration options such
as user limitation, Service port number, Length for timeout
and anonymous user restriction.
Maximum Unit Number: Fill in a number from 1 to 5.
Port Number: Enter the FTP port number. A default port
number, 21 is configured if no specified number has been
selected.
Timeout: Enter the length you want. A default 15 min is
configured if no specific time has been selected.
Allow Anonymity: Choose Yes to enable or No to disable
Note: To add a new F TP account, please add a user in User
Configuration and enable the privilege to access FTP.
Page 27
Page 28

Management Guide
The Personal Server provides P2P downloading with an
embedded BitTorrent client. To process downloading, refer to
the following procedure:
1. Obtain a Torrent File: the BitTorrent download is triggered
by Torrent files (formatted as xxx.torrent)
2. Locate the Torrent files in a folder within the Personal
Server (e.g. create a folder named P2P, place the Torrent
files in the P2P folder)
3. Create a folder within the Personal Server in which to
place the data you are going to download. Please note that
this folder should be a sub-folder of the folder that contains
the Torrent files (e.g. create a folder named BT in the P2P
folder.)
4. Start downloading. For more details see the instructions
that follow.
Important Note:
All users of the Personal Server are warned against the illegal downloading of copyrighted materials. The P2P embedded functionality
is provided for downloading authorized files only. Downloading or distribution of unauthorized material may result in severe civil and
criminal penalties. Users of this device are subject to the restrictions of the copyright laws and should accept all the consequences.
Page 28
Page 29

Management Guide
BitTorrent Configuration
BitTorrent configuration settings can be made here. Fill in the
settings in each blank and the press Apply to activate.
1. Enable BitTorrent: choose Yes to enable the BitTorrent
download
2. Download Folder: choose the folder where you have
placed the Torrent files.
Note: To download successfully, please make sure that
the Torrent files and the sub-folder for restoring
downloaded data are in the same folder.(e.g. if you place
the Torrent files in the Share folder, the sub-folder called
Multimedia for placing downloaded data should also be in
the Share folder.)
3. BitTorrent Configuration File: You can specify any name
for the file. The file is for recording the download
information, which helps should the download be
interrupted. Note: Please do not delete the file after
downloading.
4. Max Active Torrent Number: Sets the number of Torrent
files to be active at the same time. (Max. 10.)
5. Scheduler: Click Yes to enable the scheduler. The
scheduler is provided for users to set up the start/end time
of BitTorrent functionality.
6. Start: Set the time to start BitTorrent download/upload.
7. End: Set the time to end BitTorrent download/upload (e.g.
you can configure the scheduler to start ‘Everyday, Hour:
23, Minute:0’ and end ‘Everyday, Hour: 6, Minute:0’ to
process a BitTorrent download/upload from 11:00pm to
6:00am)
Page 29
Page 30

Management Guide
Download Configuration
This page is provided for users to activate a download task. It
also shows downloading information. The explanation for
each item is shown below:
1. Sel: checkbox to select the desired download task.
2. Torrent File: names and status hyperlink for each Torrent
file.
3. D/L (%): downloaded percentage.
4. Size (MB): The size of the data.
5. Start time: the time that the download starts.
6. Rate (Down/Up): the download/upload speed.
7. Max Rate (Down/Up): The maximum download speed.
To add new downloading tasks...
1. To add a new download task, place the Torrent files in the
folder you specified as the download folder. Select the files
awaiting download and click Add.
2. Select the files for download, and then click Next.
Page 30
Page 31

Management Guide
3. Specify the sub-folder for placing downloaded data and
then click Next. Please make sure this sub-folder is within
the folder in which you placed the Torrent files.
4. Check the download environments and then click Apply to
finish the procedure.
The meaning for each item is listed as follows:
Listen Port: the port number of the P2P program.
Time to Leave: the allowed time to process a download
task. The task will be terminated when the time passes.
Max Peers Count: sets up the maximum allowed peers
when uploading/downloading
Min Peers Count: sets up the minimum peers when
uploading/downloading
Max Download Bandwidth: the maximum allowed
download bandwidth
Max Upload Bandwidth: the maximum allowed upload
bandwidth
Note: A peer is a connection processing uploads or
downloads between nodes.
Page 31
Page 32

Management Guide
5. The current task and the relative information will be shown
in the downloading column. Select a file in the checkbox
and then click Inactive if you want to terminate a
download task. You can also click on the hyperlink of the
Torrent file name to check the properties of the task.
Page 32
Page 33

Management Guide
Administrator WEB Server: the administration port is the
port for accessing the web-based management interface.
The default is port 80.
WEB Server: the WEB server allows users to construct a
website using the HTML format. To activate the WEB
server, click YES to enable. Specify a port number from 1
– 65535. WEB Folder is the location where you place your
HTML files.
Note:
1. By default, port 80 is not allowed to be setup as it has
been configured as the port for accessing the web-based
management interface.
2. A website template is provided on the supplied CD. To use
the template, copy the data in the folder on the CD named
WEB Template. Paste this data into the folder you have
configures as the WEB Folder.
To access the WEB Server...
The address for linking the WEB Server is the IP address of
the Personal Server with a colon and then the port number,
e.g. use – 192.168.1.1:8080 when the IP address of the
Personal Server is 192.168.1.1 and the port number of the
WEB server is configured as 8080)
Note:
For WAN users to gain access to the FTP or WEB server,
you should link the Personal Server to a router with the
appropriate configuration. Please ensure:
1. The NAT functionality in your router is enabled.
2. In the port-mapping settings, the Internal Host IP
should be configured as the IP address of this Personal
Server and the value of the Port should cor respond to
the port number of the WEB server or FTP server you
configured.
(e.g. If the IP address of your Personal Server is
10.10.7.251, the port number of your FTP is configured as
21 and the port for the WEB server is 8888, then you
should add or modify a port mapping record: set the
internal host IP address to 10.10.7.251, the port as 21, and
then add or modify another port mapping record. Set the
internal host IP address as 10.10.7.251 and the port as
8888).
3. Before allowing the device to communicate with the
internet, we strongly recommend the use of a Firewall to
secure the network.
Page 33
Page 34

Applications
There are several applications for which you can use the
Personal Server:
For one user or a single PC, you can backup important files.
For multiple users, the Personal Server provides a convenient
way of file sharing and backup by using ‘My Neighbourhood’.
All you have to do is connect the Personal Server to a network
switch.
Data Backup
File Sharing &
Remote Backup
Backup
For Windows 2000/XP users, the OS provides an accessory
system tool called Backup. Please follow the steps below to
complete data backup.
1. Activate the program, select:
Start >Programs >Accessories >System Tools >Backup
2. Click the Schedule Jobs tab and select the date that you
want to activate the backup job and click Add Job.
3. When the Wizard appears, select Create a new job and
click OK.
Page 34
Page 35

Applications
4. Select Backup everything on this computer to backup
the whole system or Backup selected files, drives, or
network data to backup selected files only.
5. Decide upon the destination of the backup file.
6. Type a name for this backup job and click Start.
7. Wait for the program to finish the backup process.
Remote Backup
The Personal Server’s FTP function allows remote backup
support:
For example, if you have an IP camera with an FTP function
and want to transfer video data from the camera to the
Personal Server for remote monitoring.
To use the FTP, please choose an FTP supported browser,
e.g. IE 6.0. In the address box, type:
ftp:// [domain name or IP address ]
and press Enter. The authentication window will appear for
you to input your user name and password.
You can find the username/password configuration in the
User Management section. Please make sure that the
privilege to access FTP is enabled.
To use the Personal Server as an FTP server without a fixed
IP or domain name, please set up your router’s DDNS and
port mapping (Virtual Server) first. As for the setting, please
refer to your router’s manual.
Page 35
Page 36

Applications
Download
The Personal Server provides more convenience for P2P
downloading. The Scheduler function allows users to set up
the time for downloading, enabling users to avoid
downloading files in bandwidth ‘rush hours’. Also, after giving
a download command, users can download files without
keeping the PC powered on.
Web Server
For users who wish to share files via their website, the
embedded WEB server provides an easy solution. Users don’t
need to worry about the limited size provided by their ISP.
Page 36
Page 37

Troubleshooting
1. How to shut down the Personal Server properly
Press and hold the power button on the front panel until
the power LED blinks then goes off.
2. The Quick Setup Wizard can’t configure my network
settings
Make sure that the RJ-45 network cable is properly
connected to the Personal Server and the PC/Switch.
Check the LAN LED of the Personal Server and make sure
it’s green.
Check the power connection to the Personal Server; make
sure it’s switched on!
Check your PC’s IP address; make sure that it has a static
IP address or connects to a router with a DHCP client. As
for the setting, please refer to the IP Protocol Setup
section.
The Personal Server is down. Reboot, using the web
based GUI of press the Default button on the rear panel to
restore to factory default and reboot.
3. The Personal Server can’t find the hard disk and the
home page of the web-based GUI displays – ‘HD
unable to use’
There are several possibilities...
The hard disk is faulty, please try another hard disk.
The hard disk jumper is not set to Master; please refer to
your hard disk manual for the correct setting of the jumper.
The hard drive is unformatted; please format it using the
HD format tool in the Administration section.
The partition format of the drive is not EXT3, e.g. NTFS.
Please format it with the HD format tool.
4. I use the Personal Server as a Web/FTP server, but
users outside the LAN can’t access it
To use the Personal Server as an FTP server without a
fixed IP or domain name, please set up your router’s
DDNS and port mapping (Virtual Server) first.
5. I can’t access the Personal Server
Check the LAN LED; make sure it’s green.
The Personal Server is down. Reboot, using the web
based GUI or press the Default button on the rear panel to
restore to factory default, and reboot.
When there are over 5 concurrently connected users the
system will block any further users who try to access it.
Please check the Samba users/FTP users by clicking
Click here for more information from the web based
GUI.
6. I can access the hard disk, but can’t access folders.
Verify that you have the correct username and password.
For Windows 95/98/98SE users, please note that you
should add new user using the user name of your OS.
If you have accessed any folder on the hard disk and
would like to use another username/password for different
authority, you must log off your OS and then log back on
again.
7. There are unrecognizable characters in the file name
If you are using the Samba mechanism to access the hard
disk, please use FTP to view the file. Characters that can
be recognized from FTP may not be recognised via
Samba and vice versa.
Page 37
Page 38

Specifications
Standards
IEEE 802.3, IEEE 802.3u
Support Protocol
TCP/IP, HTTP, SMB, FTP
Support for concurrently connected Users
Samba: Five Users / FTP: Five Users
Interface
One 10/100Mbps RJ-45 Ethernet port
One Default Button
Connection speed
10/100Mbps
Hard Disk Support
One removable 3.5” external HD (ATA)
Diagnostic LEDs
Power: On/Boot or Shutdown (Green/Blinking)
LAN: Ethernet Act/Link (Green)
HD: Hard Disk data transfer (Amber/Blinking)
Dimensions
63 x 225 x 135mm (WxDxH)
Operating Temperature
Operating -- 0~40°C; Storage -- -10~65°C
Power Supply
DC 12V 3A External power adapter
Certification
FCC (CISPR_22), CE (EN55022), VCCI Class B
Page 38
Page 39

Certifications
FCC Certifications
This Equipment has been tested and found to comply
with the limits for a Class B digital device, pursuant to
part 15 of the FCC Rules. These limits are designed
to provide reasonable protection against harmful
interference when the equipment is operated in a
commercial environment. This equipment generates,
uses, and can radiate radio frequency energy and, if
not installed and used in accordance with the
instruction manual, may cause harmful interference
to radio communications.
Operation of this equipment in a residential area is
likely to cause harmful interference in which case the
user will be required to correct the interference at his
own expense.
This device complies with Part 15 of the FCC Rules.
Operation is subject to the following two conditions:
(1) this device may not cause harmful interference,
and (2) this device must accept any interference
received; including interference that may cause
undesired operation.
CE Mark Warning
This equipment complies with the requirements
relating to electromagnetic compatibility, EN 55022
class B for ITE, the essential protection requirement
of Council Directive 89/336/EEC on the
approximation of the laws of the Member States
relating to electromagnetic compatibility.
Company has an on-going policy of upgrading its
products and it may be possible that information in
this document is not up-to-date. Please check with
your local distributors for the latest information. No
part of this document can be copied or reproduced in
any form without written consent from the company.
Trademarks:
All trade names and trademarks are the properties of
their respective companies.
LINDY No. 32454
st
1
Edition November 2005
www.lindy.com
Page 39
 Loading...