

Page 1
Introduction
nd on the front of the camera: The
lens, the microphone and the status LED. On the back panel you can
If you wish to connect any external components (e.g. sensors/
Please record the serial number from the label on the unit. This serial
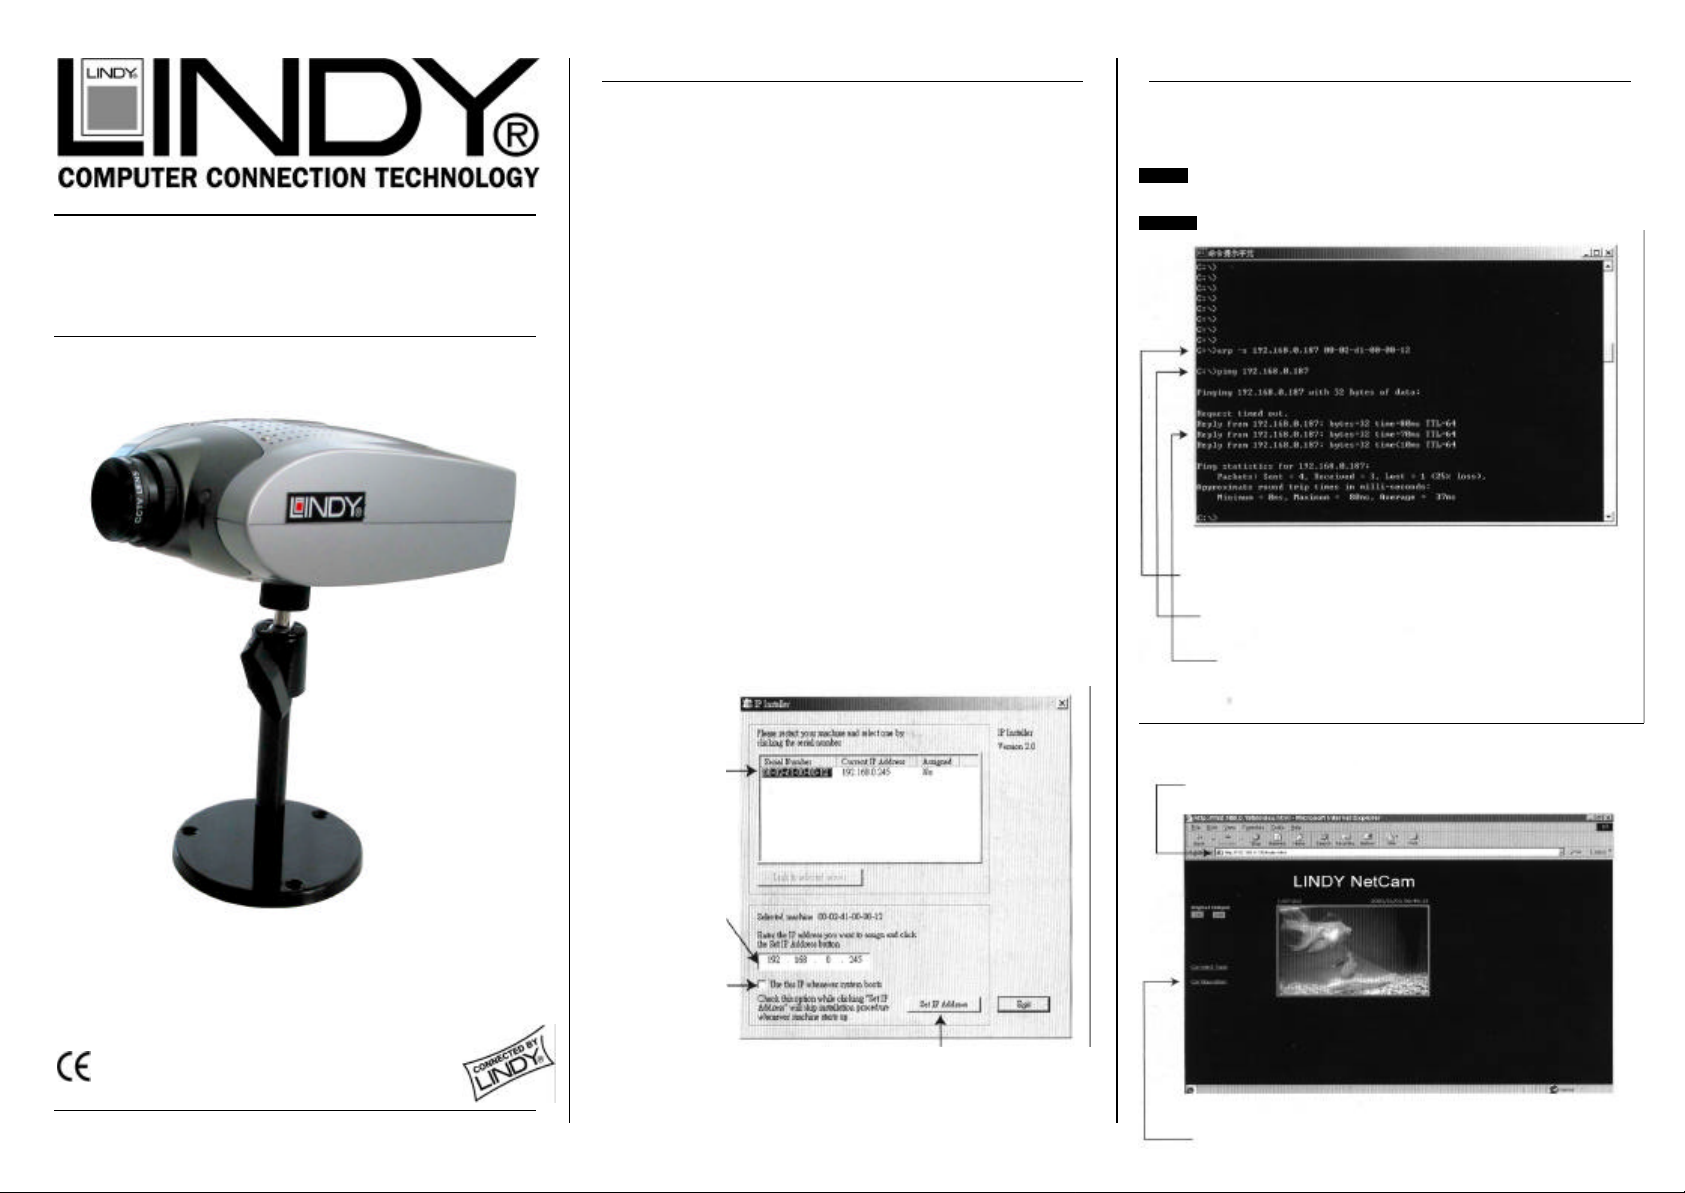
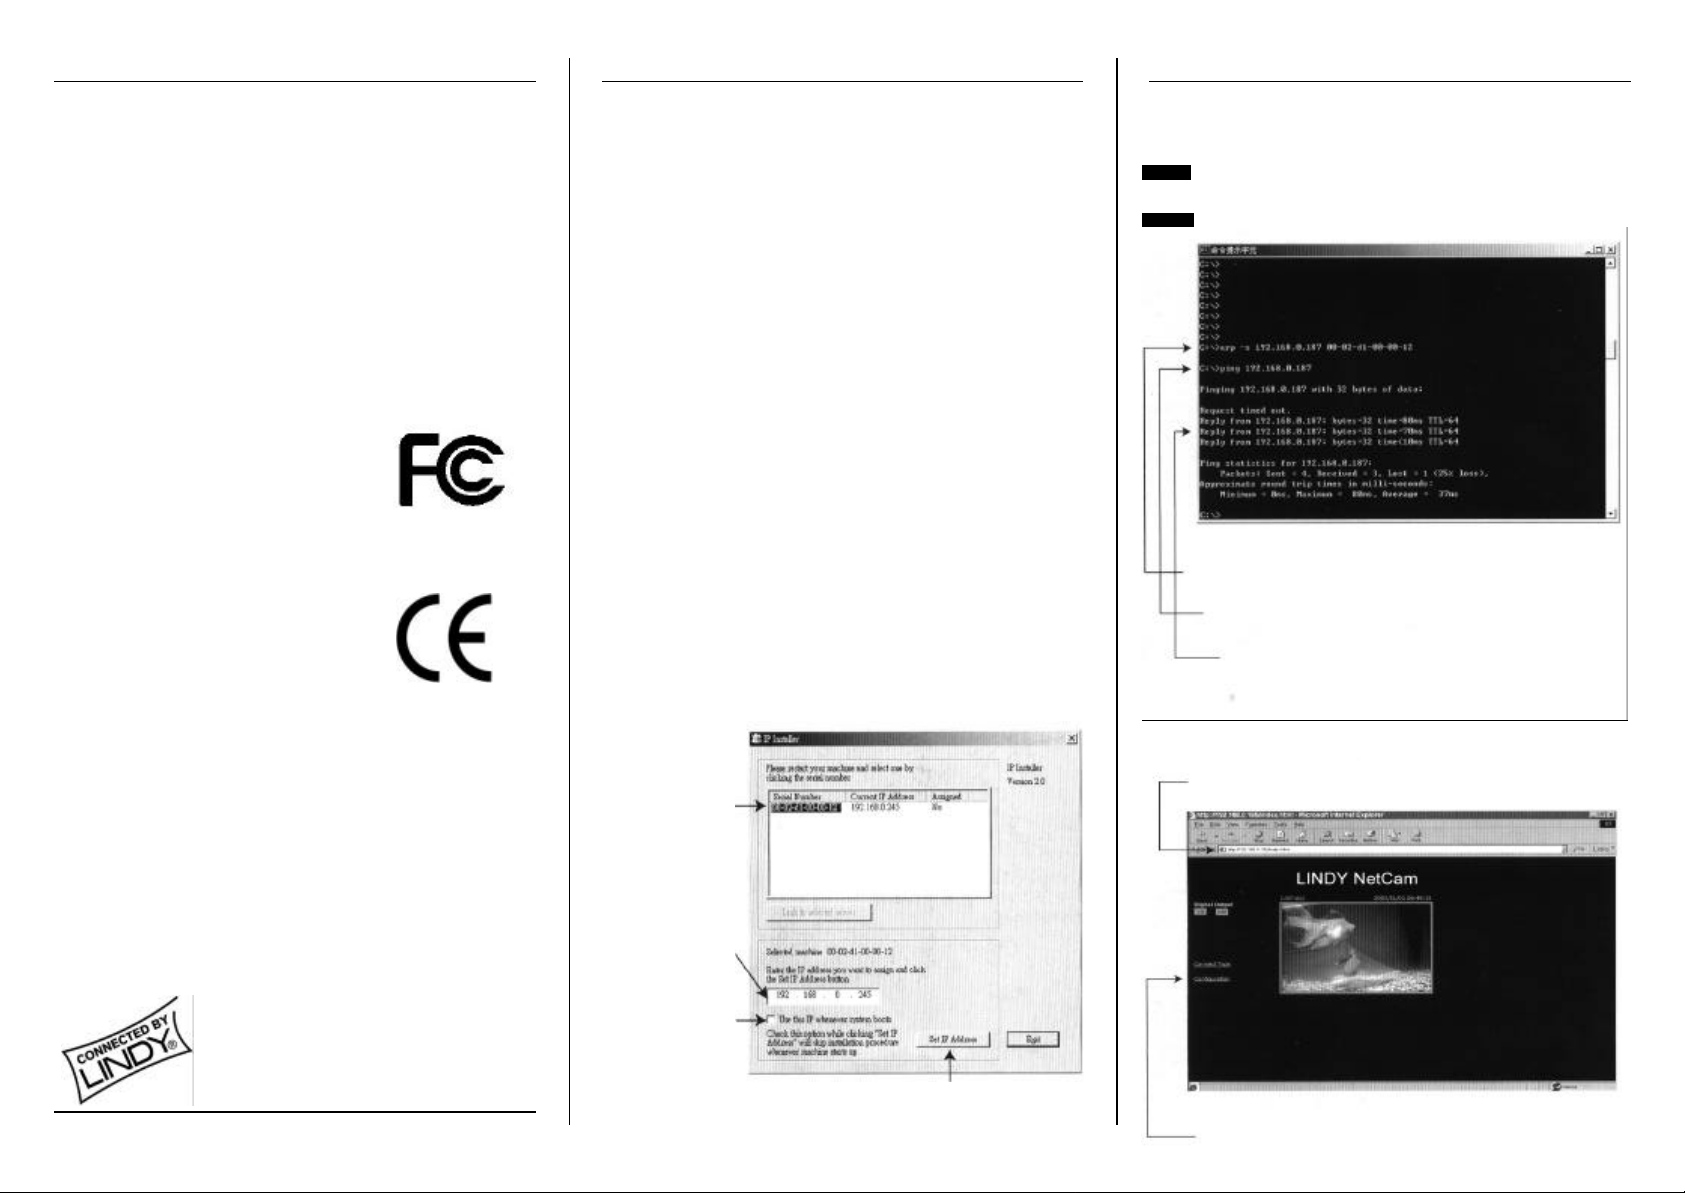
52. There are two ways to assign
2.
By using the DOS command line under Windows
Click on the serial
corresponds to your
If you want to fix the
it,
check the option ‘Use
this IP whenever the
If you see the reply message, the unit has been install
ed
successfully
Type the IP address that you’ve assigned. The required password is the
LINDY NetCam
User Manual English
Benutzerhandbuch Deutsch
English Manual
Please check the package contents before proceeding, you should
find the following items included.
1. The LINDY NetCam
2. Power supply unit
3. Mounting bracket
4. I/O Terminal block connector
5. This user manual
6. CD-ROM containing driver, software and user manual
English Manual
Start a DOS Window and type the following commands:
Syntax: arp –s <IP address> <MAC address>
ping <IP address>
Example:
Description and Installation
The following elements can be fou
find: the power connector, the I/O terminal block, the Ethernet jack
and the label containing the serial number. To connect the camera
via a hub to an existing network, please use a standard 1:1 patch
cable, to connect it directly to a PC, please use a crossover patch
cable.
alarms) then please refer to user manual on the CD-ROM. You can
now proceed to the installation and applying power to the LINDY
NetCam.
Setting the IP Address for the Camera
LINDY No. 32444
www.LINDY.com
© LINDY ELECTRONICS LIMITED & LINDY-ELEKTRONIK GMBH - FIRST EDITION (Feb-2003)
number is the MAC address for the camera, for example
0002D11000520 = 00-02-D1-10-00an IP address to this MAC address.
1. By using the ‘Installer.exe’ software on the CD-ROM
Run the ‘Installer.exe’ first, then power on the unit.
number that
camera
Assign a free IP address
Viewing the Camera via a Web browser
Type the arp command and press ‘enter’
Type the ping command and press ‘enter’
serial number (mind upper and lower cases), the login name is ‘root’
IP address of the un
system boots’
Click ‘Set IP Address’ to start the installation process
Click on the ’Configuration’ button for further adjustments
Page 2
Radio Frequency Energy, Certifications
Einführung
Sie finden an der Voderseite der Kamera die folgenden Elemente:
Anschluss und das Etikett mit der Seriennummer.
Um die Kamera über einen Hub mit einem vorhandenen Netzwerk zu
Patchkabel, um sie direkt
Patchkabel. Wenn
Sie externe Komponenten (Sensoren / Alarmgeber) verwenden,
schliessen Sie diese an die Kamera an wie im ausführlichen
n Sie zuletzt das
Zuleitung mit der
Bitte notieren Sie sich die Seriennummer vom rückseitig
Adresse
52. Um dieser
Adresse zuzuweisen, haben Sie zwei
2. ü
ber die Kommandozeile
Fenster auf und tippen Sie die folgenden Kommandos ein:
Ansprechen des Video
Klicken Sie auf die
Tragen Sie eine freie
Wenn Sie die IP
-
Wenn Sie eine ‚reply’
-
Nachricht empfangen, war die
Tippen Sie die IP
-
Adresse ein, die Sie vergeben haben. Das nun
Klicken Sie auf den ‚Configuration’
-
Button, um weitere
Shielded cables must be used with this equipment to maintain
compliance with radio frequency energy emission regulations and
ensure a suitably high level of immunity to electromagnetic
disturbances.
FCC Compliance Statement (United States)
This equipment has been tested and found to comply with part 15 of
FCC rules.
Operation is subject to the following two conditions:
(1) This device may not cause harmful interference.
(2) This device must accept any interference received.
Including interference that may cause undesired
operation.
Canadian Department of Communications RFI statement
This equipment does not exceed the class B limits for radio noise
emissions from digital apparatus set out in the radio interference
regulations of the Canadian Department of Communications.
Le présent appareil numérique n’émet pas
de bruits radioélectriques dépassant les
limites applicables aux appareils numériques
de la classe A prescrites dans le règlement
sur le brouillage radioélectriques publié par
le ministère des Communications du Canada
European EMC directive 89/336/EE CE statement
This equipment complies with the requirement for CE mentioned in the European
Directive and Standards EN55022 and
EN55024.
This equipment has been tested and found
to comply with the limits (for a class B
computing device) in accordance with the specifications in the
European Standard EN55022. These limits are designed to provide
reasonable protection against harmful interference. This equipment
generates, uses and can radiate radio frequency energy and if not
installed and used in accordance with the instructions may cause
harmful interference to radio or television reception. However, there
is no guarantee that harmful interference will not occur in a
particular installation. If this equipment does cause interference to
radio or television reception, which can be determined by turning the
equipment on and off, the user is encouraged to correct the
interference with one or more of the following measures: (a)
Reorient or relocate the receiving antenna. (b) Increase the
separation between the equipment and the receiver. (c) Connect the
equipment to an outlet on a circuit different from that to which the
receiver is connected. (d) Consult the supplier or an experienced
radio / TV technician for help.
© LINDY ELECTRONICS LIMITED & LINDY-ELEKTRONIK GMBH - FIRST EDITION (Feb-2003)
LINDY No. 32444
Deutsches Benutzerhandbuch
Bitte überprüfen Sie vor Inbetriebnahme der Kamera den Inhalt der
Lieferung auf Vollständigkeit. Es müssen vorhanden sein:
1. Die Kamera
2. Das Netzteil
3. Der Kamerafuß in 2 Teilen
4. Ein Schraub/Steckverbinder
5. Dieses Manual und
6. Die Software-CD
Beschreibung und Installation
Objektiv, Status-LED. Mikrofonöffnung.
Auf der Rückseite finden sich: der Netzteilanschluss, der I/O TerminalBlock, der Ethernet-
verbinden, verwenden Sie ein standard 1:1an einen Rechner anzuschliessen, ein Crossover-
Handbuch (auf der CD) beschrieben. Verbinde
externe Netzteil mit einer Steckdose und die 12VKamera.
Setzen der IP-Adresse
aufgebrachten Etikett; diese Nummer ist gleichzeitig die MACder Kamera, z.B. 0002D1100052 = 00-02-D1-10-00MAC-Adresse eine IPMöglichkeiten:
1. über die ‚Installer’-Software auf der CD:
Starten Sie das Programm und verbinden Sie dann die Kamera mit den Netzteil
Seriennummer
(dieselbe, die Sie
notiert haben)
IP-Adresse ein
Adresse fest
vergeben wollen,
dann markieren Sie
dies Option
Klicken Sie auf ‚Set IP Adress’ um den Zuweisungsvorgang zu starten
Deutsches Benutzerhandbuch
Rufen Sie ein DOS-
Syntax: arp –s <IP-Address> <MAC -Adresse>
ping <IP-Address>
Beispiel:
Tippen Sie das ‚arp’-Kommando und bestätigen Sie mit ‚Enter’
Tippen Sie das ‚ping’-Kommando und bestätigen Sie mit ‚Enter’
Adresszuweisung erfolgreich.
abgefragte Passwort ist identisch mit der Seriennummer (Groß - und
Kleinschreibung beachten), der Login-Name ist ‚root’!
Einstellungen vornehmen zu können
-Servers über den Browser
 Loading...