

Page 1
CPU Switch Smart Audio
User Manual English
Benutzerhandbuch Deutsch
Manuel Utilisateur Français
Manuale d’uso Italiano
LINDY No. 32400 4 Port Version VGA & PS/2
LINDY No. 32402 2 Port Version VGA & PS/2
LINDY No. 32343 4 Port Version DVI & PS/2
LINDY No. 32345 2 Port Version DVI & PS/2
www.lindy.com
© LINDY ELECTRONICS LIMITED & LINDY-ELEKTRONIK GMBH - FIRST EDITION (Dec 2004)
Page 2

User Manual................Page 2
Benutzerhandbuch.....Page 10
Manuel Utilisateur.......Page 18
Manuale d’uso.............Page 26
Page 3

User Manual English
Quick Installation
1. Make sure all the devices you are connecting to the CPU Switch Smart
Audio are turned off
2. Connect the computers, keyboard, monitor, mouse, speakers and
microphone to the CPU Switch
3. Switch the monitor on first, then the computers
4. Do
5. For operation you can switch computer ports by using keyboard
6. Detailed information can be found in the relevant sections of the
not switch channels during the boot up process
hotkeys (SCROLL LOCK key twice and then either the UP or DOWN
cursor or port number key, within 2 seconds)
manual
2
Page 4

User Manual English
Introduction
Thank you for purchasing the LINDY CPU Switch Smart Audio. This KVM Switch allows you to
access several computers using a single keyboard, mouse and monitor console.
This switch supports PS/2 keyboard/mouse connections. It also offers audio support for
switching a microphone and stereo speakers between the connected computers. The switch is
compatible with a wide variety of mice including 4D/5D mice with one or two scroll wheels and
up to 5 or more buttons. It also supports most RF mice.
The VGA versions of the switch support all VGA monitors up to a maximum resolution of
2048x1536. The DVI versions support DVI monitors with digital DVI-D single link signals. They
do not support analogue DVI RGB signals as used in DVI-I or DVI-A cables. If you want to use
analogue RGB signals, we recommend you use DVI to VGA adapters with the VGA version of
the CPU Switch Smart Audio!
The CPU Switch Smart Audio supports switching between the connected computers via
keyboard hotkeys (SCROLL LOCK twice and either cursor up/down, or port number key 1 to
2/4). The CPU Switch permanently emulates the keyboard and mouse connections of all
connected computers. This prevents error messages when switching between computers.
The CPU Switch Smart is a pure hardware solution and will therefore work with all operating
systems. It does not require any software installation - simply connect the cables between the
switch and your computers, and then turn on the computers.
Additionally, the CPU Switch Smart Audio features an intelligent Flash ROM design which
allows the firmware to be upgraded for future improvements.
Features
2/4 Port KVM Switch with audio support
VGA versions support display resolutions of up to 2048x1536, bandwidth 400MHz
DVI version supports DVI-D Single Link display resolutions
Permanent keyboard and mouse emulation
Hot-plug support - add or remove PCs without powering down the switch
Supports most popular PS/2 mice including dual scroll wheel, wireless and 5 or more
button types
Two methods of switching between computers: front panel push button or keyboard
hotkeys
Unique KVM cables feature integrated speaker and microphone connections
“Plug & Play” installation - no special software required
Flash upgradeable
Compatible with all major operating systems in any combination
Powered from the attached computers - no external power supply required
3
Page 5
User Manual English
Package Contents
CPU Switch Smart Audio (2 or 4 port depending on model)
2m KVM+Audio cables (2 or 4 depending on model). Please note these cables are
specially designed KVM+Audio cables that carry the speaker and microphone
signals via the PS/2 connectors.
This manual
Product Information
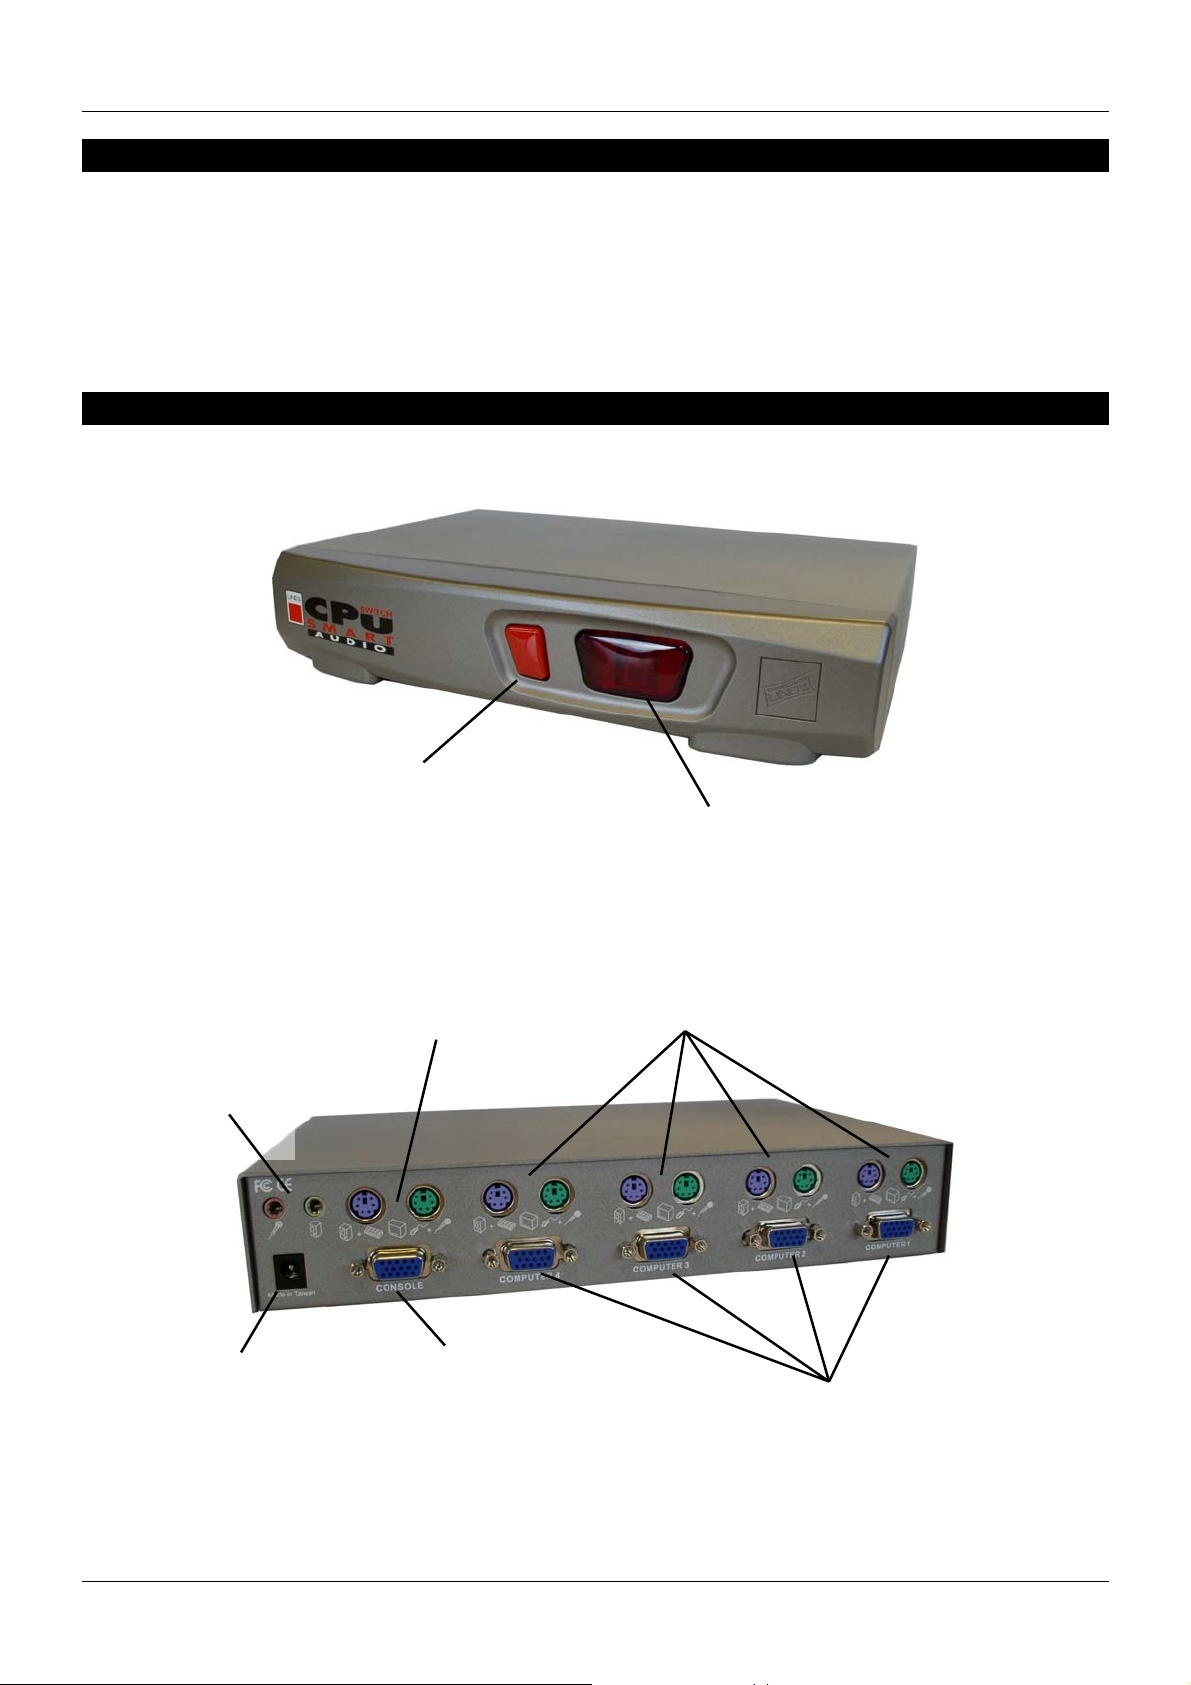
Front view:
Front panel
push button
Rear view (4 Port VGA model):
Speaker &
microphone
sockets
Console mouse &
keyboard ports
Power socket
for optional
power adapter
Console video
connection
LED port
indicator
Computer mouse
& keyboard ports
Computer
video ports
4
Page 6
User Manual English
Installation
Note: Make sure all of your computers are switched OFF before connecting them to the switch!
1. Connect the KVM+Audio cables to the keyboard, video, mouse, speaker out and
microphone in ports on each computer.
2. Connect the KVM+Audio cables to the computer connection ports on the switch.
3. Plug your keyboard, mouse, monitor, speakers and microphone into the console ports on
the switch.
4. Power on the monitor, computers and speakers.
Important: Please do not try to switch computers while they are booting up!
Using the CPU Switch Smart Audio
There are two methods of selecting computers: by using keyboard hotkeys or the button on the
front panel of the switch.
Front Panel Push button Selection:
The front panel button is used to select which connected computer is currently controlled by the
KVM Console. Pressing the button during normal operation will cause the next computer to be
selected. The status display will show the currently selected port.
Keyboard Hotkey Selection:
You can also select computers by switching ports using simple hot key sequences. To send
commands to the switch you must enter hotkey mode by pressing the Scroll Lock key twice
within 2 seconds. You will hear a beep to confirm that the keyboard is in hotkey mode. If you
do not press any further command key within 2 seconds the keyboard will revert to standard
O/S control.
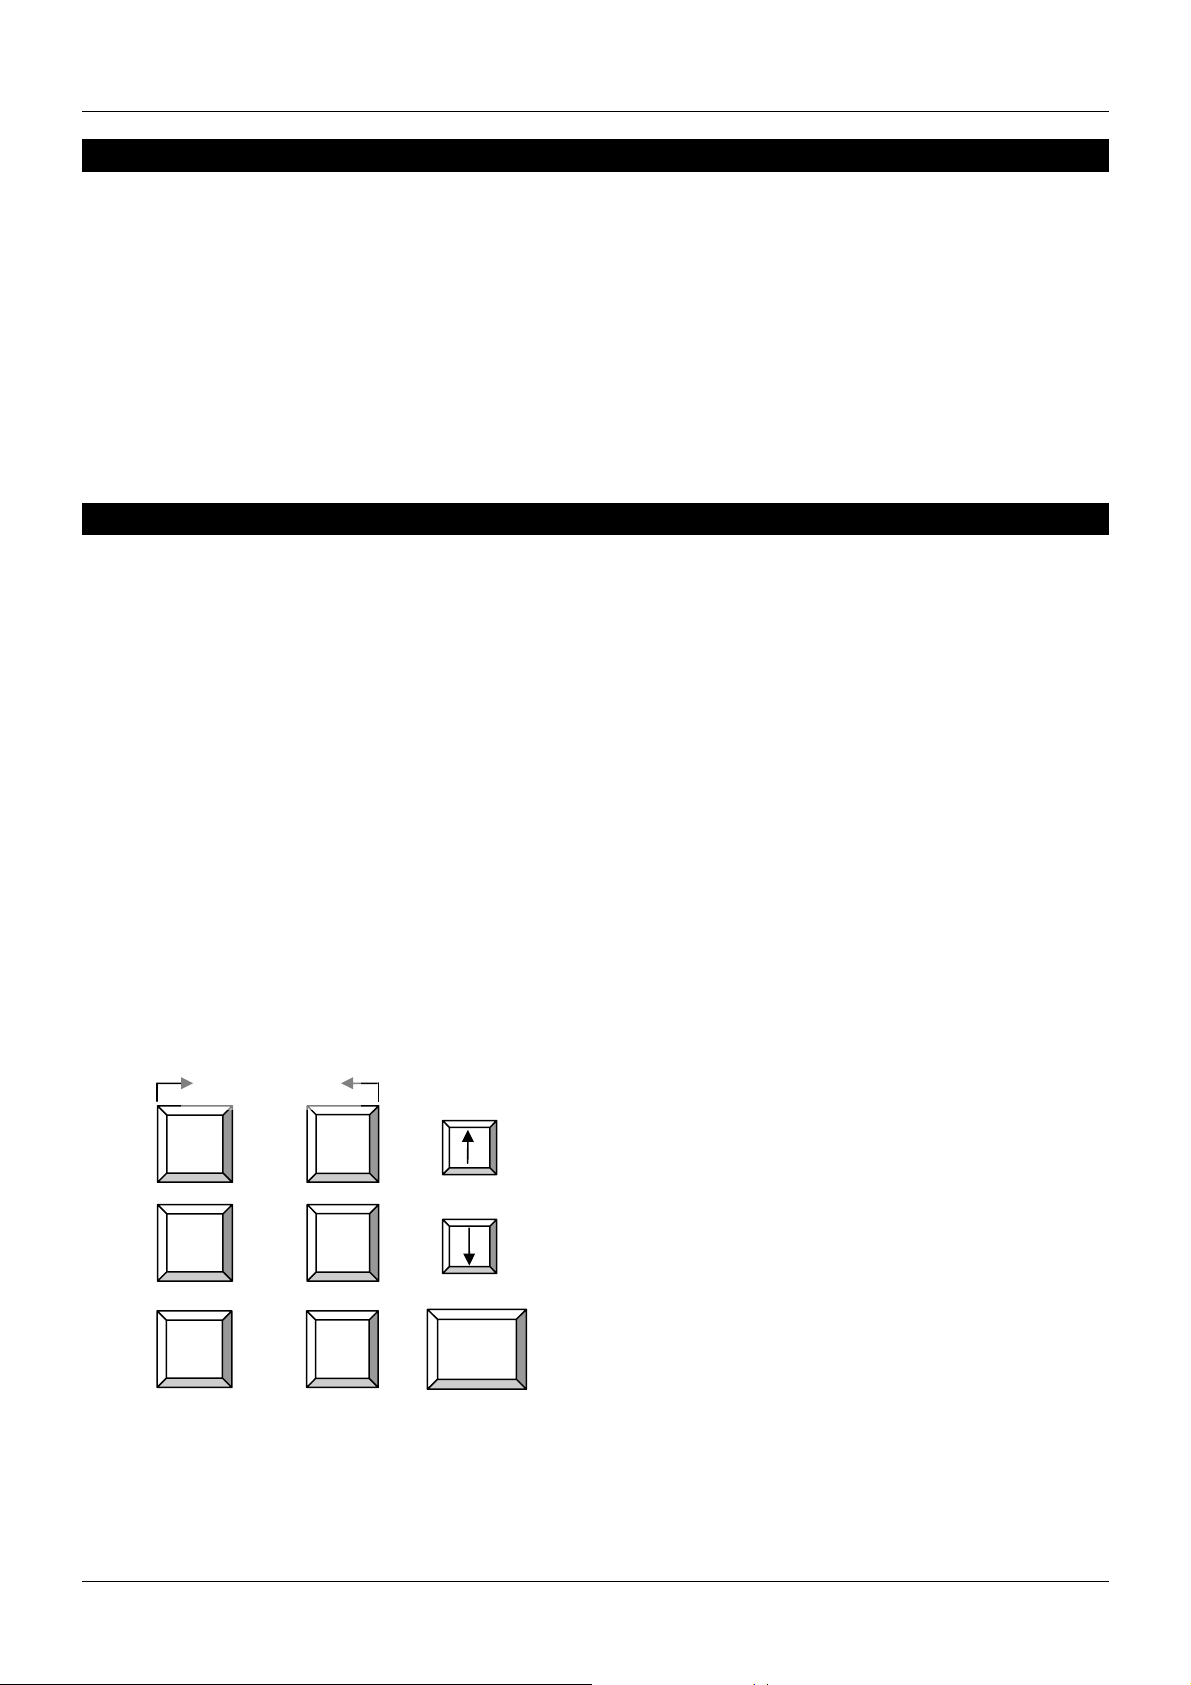
Hotkey Commands
within 2 seconds
Scroll
Lock
Scroll
Lock
Scroll
Lock
+
+
+
Scroll
Lock
Scroll
Lock
Scroll
Lock
+
+
+
1 - 2/4
= previous computer
= next computer
= direct selection of computer 1 to 2/4
5
Page 7

User Manual English
S
B
Autoscan Mode
Scroll
Lock
Autoscan mode automatically cycles through each connected computer. The scan interval is 8
seconds.
Beep Function
Scroll
Lock
This command switches the beep on or off during Autoscan or when the front panel button is
pressed. The factory default value is ON.
Note: When you enter hotkey mode the beeper remains on for command confirmation, but key
presses within hot key mode do not beep!
Upgrading the Firmware
The CPU Switch Smart Audio’s firmware can be upgraded for future improvements and to
support future new functions of mice, keyboards, motherboards etc. There’s no need for any
extra cables or connection - the firmware is copied to the switch over the PS/2 connections.
1. The upgrade program must be run from a Windows PC connected to Port 1 on the CPU
Switch Smart Audio
2. Please contact LINDY Technical Support to obtain the upgrade program. The upgrade
software consists of the files illustrated below –
Scroll
+
Lock
SPACE BAR
Scroll
+
Lock
+
+
= select Autoscan
= exit Autoscan
= Beep on/off (Autoscan/front button & hotkey mode)
3. Once you have obtained the software you need to run the Setup program –
4. The following window will appear. Click OK, then restart your computer
6
Page 8
User Manual English
5. When the computer has restarted, click START > PROGRAMS > KVMDLOAD to launch
the upgrade application.
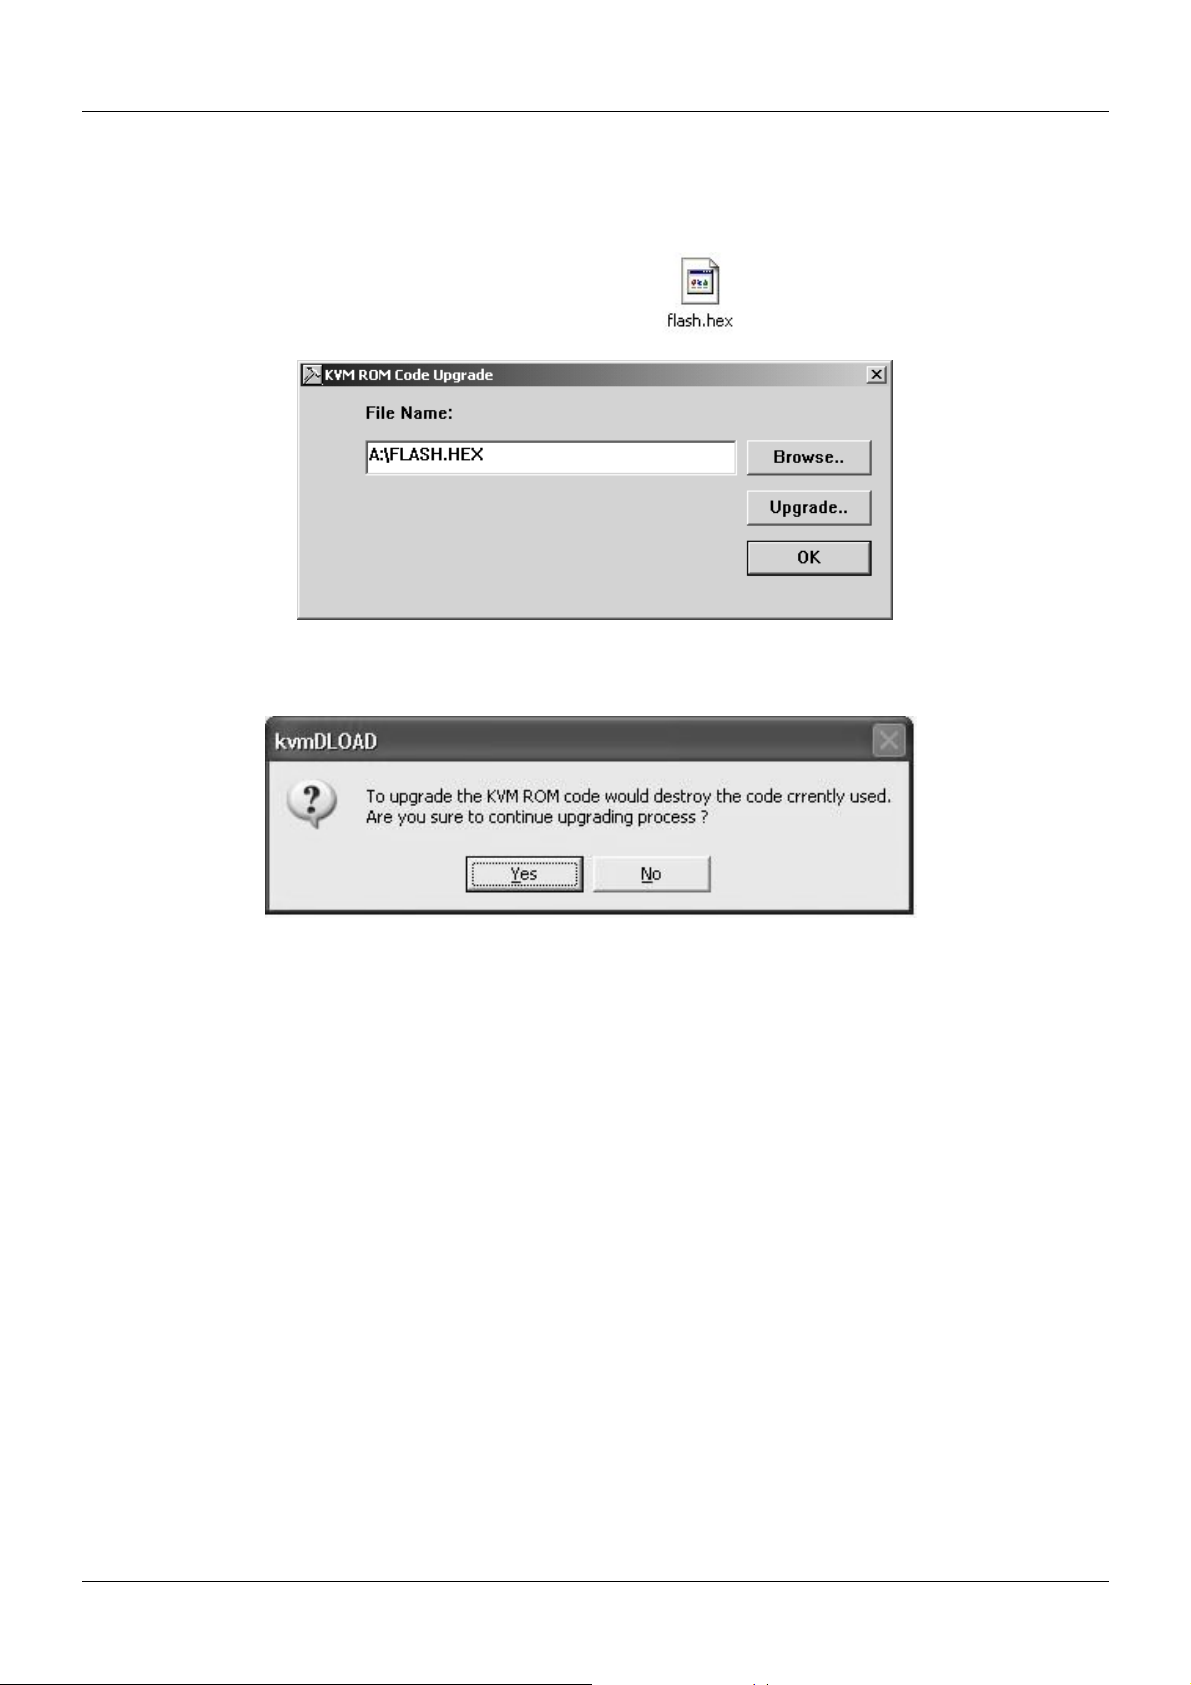
6. A window will appear. Click Browse and select the location of the software.
The upgrade file will end in the extension .hex.
7. Click the Upgrade button to continue. The following dialog box will appear:
Click YES to upgrade the CPU Switch Smart Audio firmware.
8. The upgrade file will now be transferred to the KVM switch and the process is complete.
7
Page 9

User Manual English
Troubleshooting
Please ensure that all cables are inserted correctly into the relevant ports. You may wish to
label each of the cables for easy identification and to avoid confusion later.
Note: When a computer is switched off, or in sleep or standby mode, then the monitor will not
show any display. (This is not the sign of a faulty switch!) Wake up your computer from sleep or
standby mode as you would in the normal way.
Power issues:
This KVM Switch draws its power from the ports of the connected computers. In certain
instance, some computers may not be able to supply enough power to the KVM switch. In this
case use the optional power supply (see optional accessories).
Booting up the computers:
Do NOT press any keys on the keyboard, or move the mouse whilst the connected computers
are booting up, as this may cause an error or prevent the keyboard and mouse from being
detected.
A computer does not boot up correctly (but it did before) or the keyboard or mouse does
not work on one computer (but they did before):
1. Please connect the mouse, keyboard and monitor directly to your computer and check if it
boots up correctly and all the devices work correctly.
2. If any device does not work correctly, check the correct drivers are installed and that
Windows Device Manager reports proper functionality. If you cannot make the device work
try a new device.
3. If all devices work correctly, connect the computer to another port of the CPU Switch, reboot
it and check if the problems are solved. If all is OK you should connect the computer to the
original port, reboot and check for correct operation. If problems persist, disconnect the
optional power supply and all computer KVM cables from the CPU switch. Make sure the
LED display switches off completely. Reconnect your devices and computer KVM cables –
this causes the CPU switch to reboot - and check if the problems are solved. If problems
persist, try the other tips and hotkey commands listed below.
The computers’ boot up correctly but the keyboard doesn’t work:
1. Make sure the keyboard and mouse connections have not been mixed up
2. Test the keyboard works OK when plugged directly into the computer
3. Try a different PS/2 keyboard
The computers’ boot up correctly but the mouse doesn’t work:
1. Check the correct mouse driver is installed on all computers connected to the switch
2. Test the mouse works OK when plugged directly into the computer
3. Make sure the mouse is a true PS/2 mouse. For combo mice always use the original adapter
supplied with your mouse, as there are many different versions
4. Avoid moving the mouse or pressing the buttons when switching ports
5. For non-standard PS/2 mice and mice which are not fully Microsoft compatible, contact
LINDY to obtain an updated version of the firmware which may support these products.
8
Page 10

User Manual English
M
P
If your 3/4/5 button mouse functions as only a 2 button mouse:
Try the following hotkey command to retrieve the full mouse functionality –
+
+
Scroll
Lock
Scroll
Lock
VGA Model
(LINDY No.)
+
+
= retrieve mouse
= hot-plug computer
DVI Model
(LINDY No.)
Scroll
Lock
Hot-plugging PC’s:
If you are connecting a PC that is already powered on, connect the PC mouse cable to the
switch first, followed by the keyboard cable. Use a port that is not currently selected by the CPU
Switch and switch to this port only after all cable connections have been made. If the hotplugged PC is not able to detect the mouse, use the ‘retrieve mouse’ hotkey command as
detailed above. If this is not successful you have to reboot the computer, most probably
because the operating system or computer hardware does not fully support the hot-plug
function.
Notebook computers:
If you are connecting a notebook computer we recommend you connect it to the switch before
powering it on, however if you do hot-plug the notebook and experience problems with
keyboard/mouse detection you can use the following hotkey command to establish connection –
Scroll
Lock
Optional Accessories
UK Power Supply LINDY No. 70238
Euro Power Supply LINDY No. 70237
US Power Supply LINDY No. 70239
KVM+Audio Cables:
Length
1m 33800 2m 33801 33810
3m 33802 33811
5m 33803 33812
* If you don’t need audio support you can use standard KVM cables to connect the
computers
9
Page 11

Benutzerhandbuch Deutsch
KURZANLEITUNG
1. Schalten Sie alle anzuschließenden Rechner und Geräte AUS.
2. Schließen Sie am CPU Switch Monitor, Maus, Tastatur und bei Bedarf
Lautsprecher und Mikrofon an.
3. Schließen Sie die beiliegenden KVM+Audio-Kabel an die entsprechen-
den Ports Ihrer Computer für Monitor, Maus, Tastatur, Lautsprecher
und Mikrofon an.
4. Schalten Sie nun zuerst den Monitor und dann die angeschlossenen
Computer ein.
5. Während des Bootvorganges der Computer sollten Sie die Ports am
CPU Switch NICHT umschalten !
6. Um zwischen den Computern hin und her zu schalten stehen zwei
Methoden zur Verfügung:
durch Drücken des Schalters an der Frontblende des CPU Switch oder
per Tastatur-Hotkey-Umschaltung. Drücken Sie dazu zweimal kurz die
„Rollen“-Taste auf Ihrer Tastatur und danach gleich (innerhalb von 2
Sekunden) die Cursor auf oder ab Taste oder die Tasten 1, 2, 3, oder 4
(nicht die im Ziffernblock) für den auszuwählenden Port.
Bitte beachten Sie darüber hinaus die weiteren Informationen und
vielfältigen Möglichkeiten im folgenden Teil des Handbuches
Einführung
Herzlichen Dank für den Kauf des LINDY CPU Switch Smart Audio. Wir sind überzeugt, dass
Sie eine gute Wahl getroffen haben und mit diesem Gerät zufrieden sein werden. Es gehört am
Markt zu den KVM-Umschaltern mit der umfangreichsten und besten Unterstützung für eine
Vielzahl von Maus- und Tasturtypen mit Ihren vielfältigen Sonderfunktionen.
Dieser CPU Switch Smart Audio erlaubt Ihnen, mehrere Computer von nur einer Konsole mit
Monitor, Maus, Tastatur und, bei Bedarf, Lautsprechern und Mikrofon zu bedienen. Er sorgt
damit für Ordnung und Übersichtlichkeit auf Ihrem Schreibtisch und spart darüber hinaus
Kosten auch für den Energiebedarf zusätzlicher Monitore.
10
Page 12

Benutzerhandbuch Deutsch
Dieser KVM-Umschalter unterstützt PS/2 Maus- und Tasturanschlüsse. Bei LINDY finden Sie
ebenfalls Modelle mit Unterstützung für USB Anschlüsse. Er unterstützt darüber hinaus das
Umschalten auch von Stereo-Lautsprechern sowie von Mikrofonen. Der Umschalter ist
kompatibel mit den meisten am Markt weit verbreiteten Mäusen und Tastaturen, einschließlich
von 3D/4D/5D
Mäusen mit bis zu zwei Scrollrädern und 5 oder mehr Tasten. Er unterstützt ebenfalls die
Sonderfunktionen vieler weit verbreiteter Funkmäuse.
Die VGA-Version dieser CPU Switch Smart Audio unterstützt Monitorauflösungen bis
2048x1536. Die DVI-Version unterstützt alle DVI-Monitore mit digitalem Anschluss (DVI-D
Single Link). Die DVI-Version unterstützt nicht die analogen DVI-RGB-Signale aus dem DVI-A
oder DVI-I Anschluss. Sollten Sie die analogen RGB Signale verwenden wollen so verwenden
Sie bitte DVI auf VGA Adapterkabel und die günstigeren VGA-Modelle dieses Umschalters.
Der CPU Switch Smart Audio unterstützt das Umschalten zwischen den angeschlossenen
Rechnern via Tastatur-Hotkey: Rollen-Taste zweimal kurz drücken und Cursor auf/ab oder
Taste 1/2/3/4 für den auszuwählenden Port. Der CPU Switch Smart Audio emuliert an allen
Ports die Maus- und Tastatursignale permanent. Das sorgt dafür, dass Ihr Computer und die
Betriebssysteme das Signal beim Umschalten nicht verlieren und neu gebootet werden
müssten.
Der CPU Switch Smart ist eine Hardwarelösung. Er benötigt keine Treiber- oder Softwareinstallation und funktioniert daher mit allen verbreiteten Betriebssystemen. Schließen Sie
einfach die Kabel an, booten Sie ihre Computer und wählen Sie den Rechnerport aus.
Der CPU Switch Smart Audio verfügt über ein Flash ROM welches das Update der Firmware
gestattet, z.B. um die Unterstützung für Zusatzfunktionen zukünftiger Mäuse und Tastaturen
nachzurüsten.
Features
2/4 Port KVM-Umschalter mit Audio-Unterstützung
Unterstützt Monitorauflösungen bis 2048x1536, Bandbreite 400MHz (VGA-Modelle)
DVI-Modelle unterstützen alle DVI-D Single Link Auflösungen
Permanente Maus- und Tastaturemulation
Hot-plug Unterstützung – Abziehen und Anschließen von PCs ohne den Switch booten zu
müssen
Unterstützt alle populären PS/2 Mäuse einschließlich Zweirädchen-, Funk- sowie 5- und
Mehr-Tastenmäusen
Zwei Methoden zum Umschalten: Fronttaster oder Tastatur-Hotkey
5-in-1 KVM+Audiokabel für integrierten Audio-Support
“Plug & Play” Installation – benötigt keine Software- oder Treiberinstallation
Flash upgradeable
Kompatibel mit allen populären Betriebssystemen, auch gemischt
Von den angeschlossenen Computern mit Strom versorgt – kein Netzteil notwendig
11
Page 13

Benutzerhandbuch Deutsch
Lieferumfang
CPU Switch Smart Audio (2 oder 4 Port, VGA oder DVI,)
2m KVM+Audiokabel (2 oder 4 Stück, modellabhängig)
Bitte beachten Sie, dass dies speziell designte KVM+Audiokabel sind, die auf der
CPU Switch Seite die Signale für Lautsprecher und Mikrofon durch die PS/2-Stecker
mit durchführen. Sollten Sie keine Audio-Unterstützung benötigen so können Sie
hier auch Standardkabel einsetzen.
Dieses Handbuch
Produktinformationen
Vorderansicht:
Fronttaster
Rückansicht (4 Port VGA-Model):
Anschlüsse für
Lautsprecher &
Mikrofon
Konsolen Maus- &
Tastaturports
Anschluss für
optionales
Netzteil
Monitoranschluss
Konsole
LED Kanalanzeige
Computer Maus& Tastaturports
Monitoranschlüsse
Computer
12
Page 14

Benutzerhandbuch Deutsch
Installation
Hinweis: Schalten Sie alle Rechner aus bevor Sie die Kabel anschließen!
1. Verbinden Sie die beiliegenden KVM+Audiokabel mit den Computeranschlüssen für
Maus, Tastatur sowie Monitor und bei Bedarf für Lautsprecher und Mikrofon an jedem
anzuschließenden Computer.
2. Schließen Sie die KVM+Audiokabel an die Computerports am Switch an.
3. Schließen Sie Maus, Tastatur, Monitor und bei Bedarf Lautsprecher und Mikrofon and
die Konsolenports am Switch an.
4. Schalten Sie zuerst den Monitor und dann die angeschlossenen Rechner ein.
Bitte beachten: Schalten Sie nicht die Ports um während die angeschlossenen Rechner
booten.
Bedienung des CPU Switch Smart Audio
Wählen Sie zwischen zwei Methoden um zwischen den Computern hin und her zu schalten: via
Tastatur-Hotkey oder via Umschaltknopf an der Vorderseite des Switch.
Umschaltknopf an der Vorderseite des Switch:
Drücken Sie den Umschaltknopf um zyklisch zwischen den angeschlossenen Rechnern
umzuschalten. Der ausgewählte Port wird immer im LED Display angezeigt.
Tastatur-Hotkey Umschaltung:
Sie können den Computer / Port ebenso über die Eingabe eines Tastatur-Hotkey anwählen. Um
in den Hotkey-Modus zu kommen drücken Sie 2x kurz hintereinander die Rollen-Taste. Zur
Bestätigung hören Sie einen kurzen Piepton. Drücken Sie im Anschluss innerhalb von 1-2
Sekunden entweder die Cursor auf/ab Taste oder eine der Ziffern 1/2/3/4 für die direkte
Portanwahl. Wenn Sie innerhalb von 2 Sekunden keine weitere Tasten drücken wird der
Hotkey-Modus wieder verlassen.
Tastatur-Hotkey Kommandos
innerhalb 2 Sek.
Rollen
Rollen
Rollen
+
+
+
Rollen
Rollen
Rollen
+
+
+
1 - 2/4
= vorher ausgewählter PC
= nächster Port
= direkte Portanwahl 1, 2, 3 oder 4
13
Page 15

Benutzerhandbuch Deutsch
S
B
Autoscan Modus
Rollen
Autoscan schaltet automatisch durch die angeschlossenen Ports, jeder Kanal wird für 8
Sekunden angezeigt.
Beeper Funktion
Rollen
Dies Kommando schaltet den Piepton im Autoscan-Modus sowie bei Drücken des
Frontumschalters Ein oder Aus. (Lieferzustand ist EIN.)
Hinweis: Beim Hotkey-Umschalten bleibt der Beeper aktiv und gibt nach zweimaligem Drücken
der Rollen-Taste weiterhin einen Piepton ab.
Firmware Updade
Die Firmware des CPU Switch Smart Audio kann upgedated werden. Zum Beispiel, um
zusätzliche neue Mausfunktionen zukünftiger Mausgenerationen zu unterstützen. Die Daten
werden dabei über die verwendeten PS/2-Kabel übertragen.
1. Das Updateprogramm muss von einem Windows PC an Port 1 gestartet werden.
2. Bitte kontaktieren Sie den Techniksupport von LINDY via Email (
eine neuere Firmware zu erhalten. Erwägen Sie dies nur wenn Sie Probleme mit dem
Switch haben und der LINDY Techniksupport Ihnen zum Update der Firmware rät.
Gehen Sie zuvor bitte alle unter dem unten stehenden Punkt Hilfe bei Problemen
genannten Möglichkeiten durch!
Die Update Software enthält die folgenden Files:
Rollen
+
Leertaste
Rollen
+
+
+
= aktiviere Auto Scan
= verlasse Autoscan
= Beeper Ein/Aus (wirkt nur für Autoscan-Modus
sowie bei Schalten durch Fronttaster
info@lindy.com) um ggf.
3. Nach Erhalt der Software können Sie das Updateprogramm starten:
14
Page 16

Benutzerhandbuch Deutsch
4. Das folgende Fenster wird geöffnet. Klicken Sie OK und booten Sie den Rechner neu
5. Wenn Ihr Rechner wieder hochgefahren ist, klicken Sie START > PROGRAMME >
KVMDLOAD um das Upgrade-Programm zu starten.
6. Ein Fenster öffnet sich und fragt nach dm Speicherort der neuen Firmware. Klicken Sie
auf Browse/Durchsuchen und wählen Sie das Verzeichnis des Firmware Files. Es hat
die Endung .hex.
7. Klicken Sie auf den Upgrade Button um fortzufahren. Die folgende Dialogbox erscheint:
Das Update löscht die auf dem Switch installierte Firmwareversion unwiderruflich!
Wenn Sie sicher sind klickern Sie YES/Ja um das Update auf den CPU Switch Smart
Audio zu laden.
8. Das Update File wird nun auf den CPU Switch übertragen und der Prozess wird beendet.
Dieser Vorgang kann bis zu 2 Minuten dauern.
15
Page 17

Benutzerhandbuch Deutsch
Hilfe bei Problemen
Stellen Sie bitte sicher, dass alle Kabel an den richtigen Ports befestigt sind und korrekt sitzen.
Eventuell kann es hilfreich sein die Kabel entsprechend der angeschlossenen Rechner zu
kennzeichnen.
Hinweis: Wenn sich ein Rechner im Standby- oder Ruhezustand befindet oder den Bildschirmausgang auf Standby geschaltet hat zeigt der Monitor, wenn Sie diesen Rechner anwählen,
kein Bild. (Dies ist nicht ein Zeichen für einen Defekt am CPU Switch!) Wecken Sie den
Rechner aus dem Standby oder Ruhezustand auf wie Sie es tun würden wenn Maus und
Tastatur direkt am Rechner angeschlossen wären!
Stromversorgung:
Dieser KVM-Umschalter bezieht seine Versorgungsspannung von den angeschlossenen
Rechnern und benötigt daher kein eigenes Netzteil. In einigen wenigen Fällen mag es vorkommen, dass ein Rechner nicht genug Strom liefern kann. In diesem Falle müssen Sie das
optionale Netzteil anschließen (siehe optionales Zubehör).
Booten der angeschlossenen Computer:
Schalten Sie nicht die Ports um während die angeschlossenen Rechner booten. Bewegen Sie
nach Möglichkeit auch nicht die Maus und machen Sie keine Tastatureingaben. Es könnte zu
Problemen bei der Erkennung von Maus und Tastatur kommen (siehe folgender Punkt).
Ein Computer bootet nicht korrekt (aber er tat es zuvor) oder Tastatur oder Maus arbeiten
nicht mehr korrekt (aber sie taten es zuvor):
1. Bitte schließen Sie Maus, Tastatur und Monitor kurz direkt am Computer an und prüfen Sie
ob er korrekt bootet und alles korrekt funktioniert.
2. Falls eines der Geräte weiter nicht korrekt funktioniert, prüfen Sie im Windows Gerätemanager ob die Treiber korrekt geladen sind und ob Windows das Gerät als funktionierend
meldet. Falls Sie das Gerät nicht aktivieren können ist es vermutlich defekt und Sie sollten
es ersetzen.
3. Wenn alle Geräte korrekt funktionieren, schließen Sie den Rechner an einen anderen Port
des CPU Switch an, booten Sie ihn neu und prüfen Sie ob die Probleme beseitigt sind. Falls
alles OK ist sollten Sie den Rechner wieder an den ursprünglichen Port des CPU Switch
anschließen und neu booten. Falls die Probleme an diesem Port weiterhin bestehen, lösen
Sie alle Kabel (sowie ein optionales Netzteil), so dass die LED-Anzeige des CPU Switch
erlischt. Schließen Sie alle Kabel wieder an - dabei bootet der CPU Switch neu – und prüfen
Sie ob die Probleme nun beseitigt sind. Sollte dies nicht der Fall sein so tauschen Sie auch
noch die CPU Switch-Kabel untereinander aus um einen Kabeldefekt auszuschließen.
4. Falls die Probleme weiterhin bestehen versuchen Sie es bitte auch noch mit einem der
unten stehenden Tipps und Tastatur-Hotkeys.
5. Lässt sich das Problem auch dadurch nicht lösen so kontaktieren Sie bitte Ihren Händler
oder den LINDY-Support.
Die Computer booten korrekt aber die Tastatur funktioniert nicht:
1. Stellen Sie sicher, dass nicht die PS/2 Stecker von Maus und Tastatur untereinander am
Rechner und am CPU Switch vertauscht sind!
2. Prüfen Sie ob die Tastatur bei direktem Anschluss an den Rechner korrekt arbeitet.
3. Versuchen Sie es gegebenenfalls mit einem anderen Tastaturmodell.
Die Computer booten korrekt aber die Maus funktioniert nicht:
1. Prüfen Sie die PS/2 Anschlüsse wie in vorstehendem Punkt genannt.
16
Page 18

Benutzerhandbuch Deutsch
M
P
2. Prüfen Sie ob die Maus korrekt arbeitet bei direktem Anschluss an den Rechner.
3. Stellen Sie sicher, dass die Mau seine echte PS/2 Maus ist. Bei Multiprotokoll-Mäusen (PS/2
& USB oder PS/2 & RS-232) verwenden Sie bitte immer den mit der Maus gelieferten
Adapter, es gibt viele verschiedene Adaptermodelle am Markt!
4. Wegen der Unterstützung für nicht standardkonforme PS/2 Mäuse sowie nicht voll Microsoft
kompatible Mäuse kontaktieren Sie bitte LINDY ob eine Firmware Update zur Unterstützung
dieser Funktionen vorliegt.
Falls Ihre 3/4/5 Tasten-Maus nur wie eine 2 Tasten-Maus funktioniert:
Versuchen die vollen Mausfunktionen über folgenden Tastaturhotkey zu aktivieren:
Rollen
Hot-plugging von Rechnern:
Falls Sie einen bereits eingeschalteten Rechner anschließen wollen, verbinden Sie zuerst das
Mauskabel und danach Tastatur- und Monitorkabel. Der Port des CPU Switch sollte NICHT
aktiv ausgewählt sein. Schalten Sie auf den angeschlossenen Port erst nach Anschluss aller
Kabel. Sollte der Rechner Maus und Tastatur dann nicht finden so versuchen Sie den obigen
Hotkey “Rollen Rollen M” und/oder “Rollen Rollen P”. Falls dies nicht zum Erfolg führt müssen
Sie den Rechner neu booten. Wahrscheinlich unterstützen Rechnerhardware und
Betriebssystem das Hot-Plugging nicht.
Notebooks:
Sofern Sie ein Notebook anschließen wollen sollten Sie dies tun bevor Sie es einschalten. Sie
können es auch im eingeschalteten Zustand versuchen und bei auftretenden Problemen diese
mit dem Hotkey “Rollen Rollen P” versuchen zu beseitigen.
Rollen
Optionales Zubehör
Euro Steckernetzteil 230V LINDY Art.Nr. 70237
US Steckernetzteil 110V LINDY No. 70239
UK Steckernetzteil 230V LINDY No. 70238
KVM+Audio Kombikabel* sind in folgenden Längen bei LINDY erhältlich :
Länge
1m 33800 2m 33801 33810
3m 33802 33811
5m 33803 33812
* Falls Sie die Audiounterstützung nicht benötigen können Sie auch Standardanschlusskabel (VGA oder DVI-D sowie PS/2) verwenden um die Rechner anzuschließen
+
+
Rollen
+
Rollen
+
Für VGA Model
(LINDY Art. Nr.)
= Aktivieren der Maus
= Hot-plug computer
Für DVI Model
(LINDY Art.Nr.)
17
Page 19

Manuel Utilisateur Français
Installation Rapide
1. Assurez-vous que tous les périphériques que vous connectez au KVM
Switch Smart Audio sont éteints
2. Connectez les ordinateurs, claviers, moniteurs, souris, enceintes et
microphones au KVM Switch
3. Allumez d’abord le moniteur, puis les ordinateurs
4. Ne commutez pas les ports pendant le démarrage
5. Pour la commutation des ordinateurs vous pouvez utiliser une
combinaison de touches (ARRET DEFIL deux fois de suite puis la
touche UP ou DOWN du curseur, en moins de 2 secondes)
6. Vous trouverez des informations détaillées dans les différentes
sections de ce manuel
18
Page 20

Manuel Utilisateur Français
Introduction
Merci pour votre achat du commutateur LINDY KVM Switch Smart Audio. Ce commutateur
KVM vous permet d’accéder à plusieurs ordinateurs à partir d’un seul clavier, souris et écran.
Ce commutateur supporte les connexions PS/2 clavier/souris. Il offre également un support
audio pour le microphone et des enceintes stéréo des ordinateurs. Le commutateur est
compatible avec une large variété de souris incluant les souris 4/5 boutons ou deux molettes.
Les souris sans fil sont également supportées.
Les versions VGA du commutateur supportent tous les moniteurs VGA avec une résolution
maximale de 2048x1536. Les versions DVI supportent les moniteurs DVI avec un signal DVI-D
single link. Le signal analogique DVI RVB n’est pas supporté et la connexion se fait par des
câbles DVI-I ou DVI-A. Si vous souhaitez utiliser un signal analogique RVB, nous vous
recommandons d’utiliser des adaptateurs DVI à VGA avec la version VGA du commutateur
KVM Switch Smart Audio!
Le KVM Switch Smart Audio supporte la commutation entre les ordinateurs connectés par des
touches de raccourci clavier (ARRET DEFIL deux fois + la touche up/down du curseur, ou bien
encore le numéro de port 1 à 2/4). Le KVM Switch émule en permanence les connexions souris
et clavier des ordinateurs connectés. Cela évite des messages d’erreurs lors de la commutation
entre les ordinateurs.
Le KVM Switch Smart est une solution entièrement matérielle et fonctionne avec la plupart des
systèmes d’exploitation. Aucune installation logicielle est nécessaire – connectez simplement
les câbles entre le commutateur et vos ordinateurs, et allumez les ordinateurs.
Le KVM Switch Smart Audio bénéficie d’un système de mise à jour intelligent par BIOS Flash,
ce qui permet une réactualisation du produit régulière.
Caractéristiques
Commutateur KVM 2/4 Ports avec support Audio
Versions VGA supportant un affichage jusqu’à 2048x1536, 400MHz
Versions DVI supportant les résolutions DVI-D Single Link
Emulation permanente du clavier et de la souris
Suppport Hot-plug – ajoutez ou enlevez des PCs sans éteindre le commutateur
Supporte la plupart des souris PS/2 incluant les souris à deux molettes, sans fil et à
5 boutons ou plus
Deux méthodes de commutation entre les ordinateurs: bouton en façade ou bien
touches de raccourcis clavier
Câble spécial KVM pour la fonction audio pour connexion d’enceintes et micro
Installation “Plug & Play” – pas de logiciel nécessaire
Mise à jour du BIOS Flash possible
Compatible avec la plupart des systèmes d’exploitation
Alimentation par les ordinateurs connectés – pas d’alimentation externe nécessaire
19
Page 21

Manuel Utilisateur Français
Contenu de l’emballage
KVM Switch Smart Audio (2 ou 4 ports dépendant du modèle)
Câbles KVM+Audio 2m (2 ou 4 ports dépendant du modèle) Veuillez remarquer que
ces câbles sont spécialement conçus pour transporter le signal Audio du
microphone et des enceintes.
Ce manuel
Information Produit
Vue Frontale:
Bolton en
façade
Vue Arrière (modèle 4 Ports VGA):
Connexions
enceintes &
microphone
Connexions
souris & clavier
Connexion
pour
alimentation
optionnelle
Connexions
Moniteur
Afficheur
LED
Connexions
ordinateurs
Connexions
Vidéo
ordinateur
20
Page 22

Manuel Utilisateur Français
Installation
Remarque: Assurez-vous que tous les ordinateurs soient éteints avant de les connecter au
commutateur!
1. Connectez les câbles KVM+Audio aux ports clavier, vidéo, souris, enceintes et
microphone de chaque ordinateur.
2. Connectez les câbles KVM+Audio aux ports ordinateurs du commutateur.
3. Connectez votre écran, souris, clavier, enceintes et microphone sur le port console du
commutateur.
4. Allumez le moniteur, les ordinateurs et les enceintes.
Important: Ne commutez pas les ordinateurs pendant le démarrage!
Utilisation du KVM Switch Smart Audio
Il y a deux méthodes pour sélectionner les ordinateurs: en utilisant les touches de raccourci
clavier ou bien le bouton en façade sur le commutateur.
Bouton de sélection en façade:
Le bouton en façade est utilisé pour sélectionner l’ordinateur souhaité. Si vous appuyez sur le
bouton, l’ordinateur suivant sera sélectionné. L’affichage par LED montrera l’ordinateur
sélectionné actuellement.
Sélection par touches de raccourci clavier:
Vous pouvez également sélectionner les ordinateurs par des touches de raccourci clavier. Pour
envoyer les commandes au commutateur vous devez entrer en mode raccourci clavier en
appuyant deux fois sur la touche Arrêt Défil en moins de 2 secondes. Vous entendrez un bip
de confirmation si l’opération se déroule avec succès. Si vous n’appuyez pas sur d’autres
touches en moins de deux secondes, le clavier repassera en mode normal.
Commandes de raccourci
En moins de 2s
Arrêt
Défil
Arrêt
Défil
Arrêt
Défil
+
+
+
Arrêt
Défil
Arrêt
Défil
Arrêt
Défil
+
+
+
1 - 2/4
= ordinateur précédent
= ordinateur suivant
= sélection directe d’ordinateur 1 à 2/4
21
Page 23

Manuel Utilisateur Français
S
B
Mode Auto Scan
Arrêt
Défil
+
Le mode Auto Scan passe automatiquement d’un ordinateur à l’autre. Délai de 8 secondes.
BARRE ESPACE
Fonction Bip
Arrêt
Défil
+
Cette commande permet de désactiver le bip pendant le mode Auto scan ou lors de la pression
du bouton en façade. La valeur usine par défaut est ON.
Remarque: Lorsque vous êtes dans le mode raccourci clavier, vous n’entendrez pas de bip
lorsque vous appuyez sur chaque touche du raccourci!
Mise à jour du BIOS Flash
Le BIOS du KVM Switch Smart Audio peut être mis à jour pour de futures améliorations
éventuelles concernant le support des nouvelles souris, claviers, cartes mères, etc…. Il n’est
pas nécessaire d’utiliser un câble spécifique pour la connexion – le nouveau BIOS est copié par
l’intermédiaire des connexions PS/2.
1. Le programme de mise à jour doit être lancé depuis un PC Windows connecté au Port 1
du KVM Switch Smart Audio
2. Veuillez contacter le service technique LINDY pour obtenir une éventuelle mise à jour et
le programme de mise à jour. Le programme de mise à jour se présente comme suit :
Arrêt
Défil
Arrêt
Défil
+
+
= Mode Auto Scan
=Sortie Autoscan
= Bip on/off (modes Auto-scan/façade & raccourci)
3. Lorsque vous avez obtenu le logiciel, lancez le programme Setup :
4. La fenêtre suivante va apparaître. Cliquez sur OK, et redémarrez l’ordinateur.
22
Page 24

Manuel Utilisateur Français
5. Lorsque l’ordinateur a redémarré, cliquez sur DEMARRER > PROGRAMMES >
KVMDLOAD pour lancer le programme de mise à jour.
6. Une fenêtre va apparaître. Cliquez sur Browse et sélectionnez l’emplacement du logiciel.
Le fichier de mise à jour se termine par l’extension hex.
7. Cliquez sur le bouton Upgrade pour continuer. La boîte de dialogue suivante apparaît:
Cliquez sur YES pour mettre à jour le BIOS du KVM Switch Smart Audio.
8. La mise à jour sera ensuite transférée au KVM switch et la procédure sera terminée.
23
Page 25

Manuel Utilisateur Français
Problèmes Rencontrés
Assurez-vous que tous les câbles soient insérés correctement dans les ports correspondants.
L’idéal serait d’étiqueter chaque câble pour une identification facile.
Remarque: Lorsqu’un ordinateur est éteint, ou en mode veille, le moniteur n’affichera rien (cela
ne signifie pas que le commutateur est défectueux!) Sortez du mode veille comme vous le faites
d’habitude en fonctionnement normal.
Alimentation:
Ce commutateur KVM tire son alimentation des ports des ordinateurs. Dans certains cas,
lorsque l’ordinateur ne peut fournir assez de puissance au commutateur KVM, vous pouvez
utiliser l’option d’alimentation (accessoires optionnels).
Démarrage des ordinateurs:
N’appuyez pas sur les touches du clavier, ou ne déplacez pas la souris lorsque les ordinateurs
démarrent, cela pourrait provoquer un disfonctionnement du clavier et de la souris.
Un ordinateur ne démarre pas correctement (mais il a démarré correctement avant) ou le
clavier ou la souris ne fonctionnent pas sur un ordinateur (mais fonctionnaient avant):
1. Veuillez connecter la souris, le clavier et le moniteur directement à l’ordinateur et vérifiez si
l’ensemble démarre correctement.
2. Si l’un des périphériques ne fonctionne pas correctement, vérifiez si les pilotes adéquats
sont installés et que le système les gère correctement. Si le périphérique ne fonctionne pas,
essayez d’installer un nouveau périphérique.
3. Si tous les périphériques fonctionnent correctement, connectez l’ordinateur à un autre port
du commutateur KVM, redémarrez et vérifiez si le problème est résolu. Si tout est OK,
reconnectez l’ordinateur au port original et redémarrez l’ensemble. Si le problème persiste,
déconnectez l’alimentation optionnelle et tous les câbles raccordés aux ordinateurs du
commutateur KVM. Assurez-vous que la LED d’affichage soit totalement éteinte.
Reconnectez vos périphériques et les câbles KVM et redémarrez le KVM. Si le problème
persiste, essayez les autres points énoncés ci-dessous.
Les ordinateurs démarrent correctement mais le clavier ne fonctionne pas:
1. Assurez-vous de ne pas avoir inversé les connexions claviers et souris
2. Testez le clavier directement connecté à l’ordinateur
3. Essayez un clavier PS/2 différent
Les ordinateurs démarrent correctement mais la souris ne fonctionne pas:
1. Vérifiez si le pilote installé de la souris est le pilote adéquat
2. Testez si la souris fonctionne correctement lorsque directement connectée à l’ordinateur
3. Assurez-vous que la souris est une vraie souris PS/2. Pour les souris combo, utilisez
toujours l’adaptateur original fourni avec votre souris, car il existe différentes versions.
4. Evitez de déplacer la souris lors de la commutation des ports
5. Pour des souris non standards PS/2 n’étant pas totalement compatible Microsoft, contactez
LINDY pour obtenir une mise à jour du BIOS du KVM pour le support de ces produits.
24
Page 26

Manuel Utilisateur Français
M
P
Si votre souris 3/4/5 boutons fonctionne seulement en tant que souris 2 boutons:
Essayez la combinaison de touches de raccourci clavier suivante –
+
+
Arrêt
Défil
Arrêt
Défil
Modèle VGA
(LINDY No.)
+
+
=redétection souris
=hot-plug ordinateur
Modèle DVI
(LINDY No.)
Arrêt
Défil
Hot-plug des PCs:
Si vous souhaitez connecter un PC étant déjà allumé, connectez le câble de la souris du PC au
commutateur en premier, suivi du câble clavier. Utilisez un port qui n’est pas actuellement
sélectionné par le KVM Switch et connectez-vous à ce port seulement après avoir connecté
tous les câbles. Si le PC reconnecté n’est pas capable de détecter la souris, utilisez la fonction
de redétection de la souris détaillée ci-dessus. Si cela ne fonctionne pas, vous devez
redémarrer l’ordinateur, probablement car le système n’a pas reconnu le PC ou qu’il ne
supporte pas la fonction hot-plug.
Ordinateurs portables:
Si vous connectez un ordinateur portable, nous vous recommandons de le connecter au
commutateur avant de l’allumer. Si vous rencontrez des problèmes, essayez la combinaison de
touches suivantes –
Arrêt
Défil
Accessoires Optionnels
Alimentation UK LINDY No. 70238
Alimentation Euro LINDY No. 70237
Alimentation US LINDY No. 70239
Câbles KVM+Audio:
Longueur
1m 33800 2m 33801 33810
3m 33802 33811
5m 33803 33812
* Si vous n’avez pas besoin de support Audio vous pouvez utiliser des câbles KVM
standards pour connecter les ordinateurs.
25
Page 27

Manuale d’uso Italiano
Installazione rapida
1. Assicuratevi che tutti I dispositivi a cui dovete collegare il CPU Switch
siano spenti.
2. Connettete mouse, tastiera, monitor, microfono e casse/cuffie al CPU
Switch. Procedete poi al collegamento di tutti i PC.
3. Accendete il monitor e poi tutti i PC.
4.
NON commutare fra i PC durante la fase di boot.
5. E’ possibile commutare dalla tastiera tramite una combinazione di tasti
(hotkeys) (Premere due volte BLOC SCORR e poi le frecce SU e GIU’
entro 2 secondi per scorrere fra i PC collegati)
6. Informazioni più dettagliate possono essere trovate all’interno di
questo manuale nelle varie sezioni dedicate all’utilizzo di questo
prodotto.
26
Page 28

Manuale d’uso Italiano
Introduzione
Grazie per aver acquistato il LINDY CPU Switch Smart Audio. Questo KVM Switch vi
permetterà di controllare più computer da una singola postazione di lavoro composta da un
monitor, un mouse, una tastiera, una coppia di casse o cuffie e un microfono.
Questo switch supporta mouse e tastiere con connettori PS/2 ed è compatibile con un ampia
varietà di mouse inclusi i modelli 4D/5D con una o due rotelle, con un massimo di 5 pulsanti e
permette anche l’utilizzo della maggior parte dei mouse radio pilotati.
Lo switch consente inoltre di commutare anche la sezione audio (casse e microfono) di ciascun
computer sulla consolle principale.
La versione VGA dello switch supporta tutti i monitor VGA fino ad una risoluzione massima di
2048x1536. La versione DVI supporta monitor digitali DVI con interfaccia DVI-D Single Link.
NON supportano interfacce e cavi con segnali analogici RGB integrati (cavi DVI-I o DVI-A). Se
volete usare utilizzare una connessione RGB analogica vi raccomandiamo di utilizzare
adattatori DVI to VGA e la versione VGA del CPU Switch Smart Audio!
Il CPU Switch Smart Audio supporta la commutazione fra i PC collegati tramite tastiera con una
sequenza di tasti (hotkeys: premere due volte BLOC SCORR seguito dalle frecce cursore
SU/GIU’ o dal numero corrispondente alla porta desiderata: da 1 a 2/4). Il CPU Switch emula
permanentemente la presenza di tastiera e mouse su tutti i computer connessi. Ciò impedisce il
verificarsi di errori commutando fra i vari PC.
Il CPU Switch Smart è una soluzione puramente hardware e funziona quindi con qualsiasi
sistema operativo e non richiede l’installazione di alcun software sui computer controllati. E’
sufficiente collegare tutti i cavi e accendere monitor e computer per cominciare a lavorare.
In aggiunta il CPU Switch Smart Audio possiede una Flash ROM riscrivibile per consentire
eventuali aggiornamenti del firmware.
Caratteristiche
KVM Switch a 2/4 Porte con supporto audio.
La versione VGA supporta risoluzioni fino a 2048x1536, larghezza di banda
400MHz
La versione DVI supporta tutte le risoluzioni DVI-D Single Link
Emulazione permanente di mouse e tastiera su tutte le porte.
Supporto Hot-plug – aggiungete e rimuovete i PC senza spegnere lo switch.
Supporto dei più diffusi mouse PS/2 inclusi i dual scroll wheel, mouse wireless e a 5
tasti.
Due metodi di commutazione: dal pannello frontale con il tasto integrato o da
tastiera tramite le combinazioni hotkeys.
Cavi KVM specifici con connettori audio per speaker e microfono.
Installazione “Plug & Play” - nessun software specifico richiesto
Memoria Flash aggiornabile
Compatibile con la maggior parte dei sistemi operativi in qualsiasi combinazione.
Alimentato dai PC collegati – non necessità di un alimentatore esterno.
27
Page 29

Manuale d’uso Italiano
Contenuto della confezione
CPU Switch Smart Audio (2 o 4 porte a seconda del modello)
Cavi KVM+Audio da 2m (2 o 4 a seconda del modello). Notate che questi cavi sono
specifici per questo modello in quanto veicola i segnali audio attraverso i connettori
PS/2.
Questo manuale
Informazioni sul prodotto
Vista frontale:
Pulsante di
commutazione
frontale
Vista posteriore (Modello VGA 4 porte):
Porte mouse &
tastiera della
console
Connettori per
casse e
microfono
Presa di
alimentazione
per
l’alimentatore
opzionale
Connettore video
della Console
28
Indicatore
Porta LED
Porte mouse &
tastiera dei
Computer
Connettori
video dei
computer
Page 30

Manuale d’uso Italiano
Installazione
Nota: Assicuratevi che tutti i computer siano spenti prima di connetterli allo switch!
1. Collegate i cavi KVM+Audio alle porte tastiera, video, audio out e microfono di ogni PC.
2. Collegate i cavi KVM+Audio alle porte per i pc sullo switch.
3. Collegate la tastiera, il mouse, il monitor, le casse e il microfono alle porte consolle sullo
switch.
4. Accendete in sequenza il monitor, i computer e le casse.
Importante: Per favore non commutate da un PC all’altro durante la fase di boot dei PC.
Utilizzo del CPU Switch Smart Audio
Esistono due metodi per commutare fra i vari computer connessi allo switch:.
Selezione tramite il Pulsante sul pannello frontale:
Il pulsante sul pannello frontale permette di selezionare il PC da controllare con la consolle del
KVM switch. Premendo il pulsante si passa al controllo del computer successivo a quello
correntemente selezionato. Il display mostra il numero della porta selezionata.
Selezione tramite tastiera (Combinazione Hotkey):
E’ possibile selezionare il PC da controllare con una semplice sequenza di tasti: premete due
volte il tasto Bloc Scorr entro 2 secondi. Sentirete un beep di conferma dell’ingresso in
modalità Hotkey. Se non premerete altri pulsanti entro 2 secondi la tastiera ritornerà sotto il
controllo del Sistema Operativo del PC
Comandi Hotkey
entro 2 secondi
Bloc
Scorr
Bloc
Scorr
Bloc
Scorr
+
+
+
Bloc
Scorr
Bloc
Scorr
Bloc
Scorr
+
+
+
1 - 2/4
= Computer Precedente
= Computer Successivo
= Selezione diretta del computer da controllare ( 1 a 2/4)
29
Page 31

Manuale d’uso Italiano
S
B
Modalità Auto Scan
+
Bloc
Scorr
Bloc
Scorr
+
+
= Modalità Auto Scan
=Uscita modalità Auto Scan
= Beep on/off (Auto-scan/Pulsante Frontale & modalità hotkey)
Bloc
Scorr
Nella modalità Auto Scan lo switch scorre automaticamente fra i vari PC permettendone il
monitoraggio. L’intervallo di scansione è di 8 secondi.
BARRA SPAZIATRICE
Funzione Beep
Bloc
Scorr
+
Questo comando abilita o disabilita l’emissione del segnale acustico (beep) durante la modalità
autoscan e quando il pulsante frontale viene premuto. L’impostazione di fabbrica prevede che la
funzione sia ATTIVATA (ON).
Nota: Quando entrate nella modalità hotkey il beep viene comunque emesso ma non verrà più
emesso alla selezione del PC.
Aggiornamento del Firmware
Il firmware del CPU Switch Smart Audio può essere aggiornato per aggiungere il supporto a
futuri modelli di mouse, tastiere o inserire nuove funzioni. Non è necessario utilizzare alcun
cavo aggiuntivo: l’aggiornamento viene effettuato tramite i cavi PS/2.
1. Il programma di aggiornamento deve essere avviato da un computer con Sistema
Operativo Windows collegato alla porta 1 del CPU Switch Smart Audio
2. Contattate il supporto tecnico LINDY per ottenere la versione aggiornata del firmware. Il
software di upgrade è composto dai seguenti file: –
3. Una volta che avete ottenuto il software di upgrade dovrete avviare il Setup:
4. Apparirà la seguente finestra. Fate Click su OK, e poi riavviate il computer.
30
Page 32

Manuale d’uso Italiano
5. Quando il computer si sarà riavviato fate click su START > PROGRAMS > KVMDLOAD
per avviare l’applicazione.
6. Apparirà una finestra. Fate Click su Browse e selezionate la cartella dove avete
posizionato il software.
Il file di upgrade ha estensione .hex.
7. Fate Click sul pulsante Upgrade per continuare. Apparirà la seguente finestra:
Fate Click su YES per procedere all’upgrade del firmware del CPU Switch Smart Audio.
Il programma trasferirà ora il file al KVM switch e la procedura sarà completa.
31
Page 33

Manuale d’uso Italiano
Risoluzione dei problemi
Per favore assicuratevi che tutti i cavi siano collegati correttamente alle corrispondenti porte.
Potete eventualmente etichettare ogni cavo per facilitarne il riconoscimento.
Nota: Quando un computer è spento o in modalità sleep o stand-by lo Switch non invierà alcun
segnale al monitor (questo non è un sintomo di un difetto dello switch!). Quando il computer
verrà avviato o ripristinato dalle varie modalità di sospensione la visualizzazione sul monitor
tornerà normale.
Problemi di alimentazione:
Questo KVM Switch attinge energia elettrica dalle porte dei computer a cui è connesso. In casi
particolari alcuni PC non forniscono un alimentazione sufficiente al funzionamento dello switch.
In questo caso è necessario utilizzare un alimentatore esterno opzionale. (vedere sezione
Accessori Opzionali).
Accessione dei computer:
NON premere alcun tasto e NON utilizzate il mouse durante il caricamento dei PC. I segnali
provenienti da mouse e tastiera potrebbero interferire con il normale avvio della macchina
generando errori o il mancato riconoscimento di mouse e tastiera.
Un computer non si avvia correttamente (ma ha funzionato correttamente in passato) o
un computer non riconosce correttamente mouse e tastiera (ma lo ha fatto in passato):
1. Collegate direttamente al PC mouse e tastiera per verificare che non generino errori.
2. Se uno dei dispositivi non funziona correttamente controllate che i driver siano installati
correttamente e che nella lista dell’hardware connesso al pc non siano presenti errori. Se il
problema persiste provate ad utilizzare un nuovo dispositivo di input.
3. Se tutti i dispositivi di input funzionano correttamente provate a collegare il PC ad un'altra
porta dello Switch e riavviatelo. Se tutto funziona correttamente spegnete il PC e
ricollegatelo alla porta originale. Se i problemi persistono disconnettete l’alimentare
opzionale (se presente) e tutti i PC. Controllate che il display sia spento e poi ricollegate
tutto e controllate se il problema si è risolto. Se il problema persiste ancora provate a
controllare gli altri suggerimenti presenti in questa sezione e le combinazioni di tasti hotkey
riportate di seguito
Il computer si avvia correttamente ma la tastiera non funziona:
1. Controllate che i connettori di mouse e tastiera non siano invertiti.
2. Controllate che la tastiera funzioni correttamente quando viene connessa direttamente al
PC.
3. Provate ad utilizzare una tastiera PS/2 differente.
32
Page 34

Manuale d’uso Italiano
M
P
Il computer si avvia correttamente ma il mouse non funziona:
1. Controllate che il driver corretto del mouse sia installato su tutti i PC connessi allo switch
2. Controllate che il mouse funzioni correttamente quando è collegato direttamente al PC.
3. Verificate che il mouse sia un vero mouse PS/2. Per combo mouse utilizzate sempre
l’adattatore originale fornito dal produttore del mouse.
4. Evitate di muovere il mouse e premere i pulsanti mentre commutate fra i vari PC.
5. Per mouse PS/2 non standard PS/2 non completamente compatibili con lo standard
Microsoft, contattate il supporto LINDY per ottenere la versione aggiornata del firmware che
potrebbe supportare il vostro modello.
Se il vostro mouse a 3/4/5 pulsanti funziona solo come un mouse a 2 pulsanti:
Provate ad utilizzare la seguente combinazione di hotkey per ripristinare la completa
funzionalità del mouse:
+
+
Bloc
Scorr
Bloc
Scorr
+
+
Per modello VGA
(LINDY No.)
= ripristina mouse
= hot-plug computer
Per modello DVI
(LINDY No.)
Bloc
Scorr
Collegamento a caldo dei PC (Hot-Plug):
Se state collegando un PC già accesso allo switch connettete prima di tutto il mouse e poi la
tastiera. Utilizzate una porta dello switch non attualmente selezionata e commutate su questa
porta solo dopo che i cavi sono tutti collegati. Se il computer appena collegato non riconosce il
mouse utilizzate la funzione di ripristino del mouse appena illustrata sopra. Se anche dopo
questo tentativo dovesse fallire sarà necessario riavviare il PC perché probabilmente il PC non
supporta la funzione di Hot-Plug.
Notebook:
Se state connettendo un computer portatile allo switch vi raccomandiamo di farlo PRIMA di
accendere il pc stesso. Nel caso vogliate lo stesso effettuare un operazione di Hot-Plug molto
probabilmente avrete difficoltà a far funzionare mouse e tastiera. Provate a ripristinare la
funzionalità della consolle con la seguente sequenza hotkey: –
Bloc
Scorr
Accessori Opzionali
Alimentatore UK LINDY No. 70238
Alimentatore Euro LINDY No. 70237
Alimentatore US LINDY No. 70239
Cavi KVM+Audio:
Lunghezza
1m 33800 2m 33801 33810
3m 33802 33811
5m 33803 33812
* Se non necessitate del supporto audio potete utilizzare cavi KVM standard.
33
Page 35

Radio Frequency Energy and Certifications
CE Statement
This device complies with the European Regulations for Electromagnetic Compatibility (EMC) of the European Union and it is equipped with the
CE mark. This unit has to be used with high quality shielded connection cables. Only if these high quality shielded cables are used it can be
sure that the EMC compatibility is not adversely influenced.
FCC Statement
Shielded cables must be used with this equipment to maintain compliance with radio frequency energy emission regulations and ensure a
suitably high level of immunity to electromagnetic disturbances.
FCC Warning
This equipment has been tested and found to comply with the limits for a Class B Digital device, pursuant to part 15 of the FCC Rules. These
limits are designed to provide reasonable protection against harmful interference in a residential installation. This equipment generates, uses,
and can radiate radio frequency energy and, if not installed and used in accordance with the instructions, may cause harmful interference to
radio communications. However, there is no guarantee that interference will not occur in a particular installation. If this equipment does cause
harmful interference to radio or television reception, which can be determined by turning the equipment off and on, the user is encouraged to try
to correct the interference by one or more of the following measures:
y Reorient or relocate the receiving antenna
y Increase the separation between the equipment and receiver
y Connect the equipment into an outlet on a circuit different from that to which the receiver is connected
y Consult the dealer or an experienced technician for help
You are cautioned that changes or modifications not expressly approved by the party responsible for compliance could void your authority to
operate the equipment.
LINDY No. 32400, 32402, 32343, 32345
For Home and Office Use
Tested to comply with FCC Standards
© LINDY ELECTRONICS LIMITED & LINDY-ELEKTRONIK GMBH - FIRST EDITION (Dec 2004)
 Loading...