

Page 1

Tested to Comply with
FCC Standards
For Home and Office Use!
EDID Programmer & EDID Emulators
User Manual English
Benutzerhandbuch Deutsch
Manuel Utilisateur Français
Manuale Italiano
No.32100 EDID Emulator Programmer
32101 VGA EDID Emulator
32102 DVI EDID Emulator
32104 HDMI 2.0 EDID Emulator
lindy.com
© LINDY Group – SIXTH EDITION
Page 2

Page 3
User Manual English
Introduction
Thank you for purchasing this product from the LINDY EDID/DDC Emulator range. This product has been
designed to provide trouble free, reliable operation. It benefits from both a LINDY 2 year warranty and free
lifetime technical support. To ensure correct use, please read this manual carefully and retain it for future
reference.
The Lindy HDMI 2.0 EDID Emulator Adapter is designed for systems that require EDID signals to be
continuously provided without interruption and helps overcome EDID related problems which can occur
when using AV/KVM Extenders, Switches and Splitters.
Package Contents
32101/32102/32104
EDID/DDC Emulator Adapter
This manual
32100
EDID/DDC Emulator Programmer
USB DC Cable, 1m (3.28ft)
VGA / DVI Adapter
4K HDMI Adapter
VGA / HDMI Adapter
This manual
Features
VGA (32101), DVI (32102) & HDMI (32104) Emulator Adapter
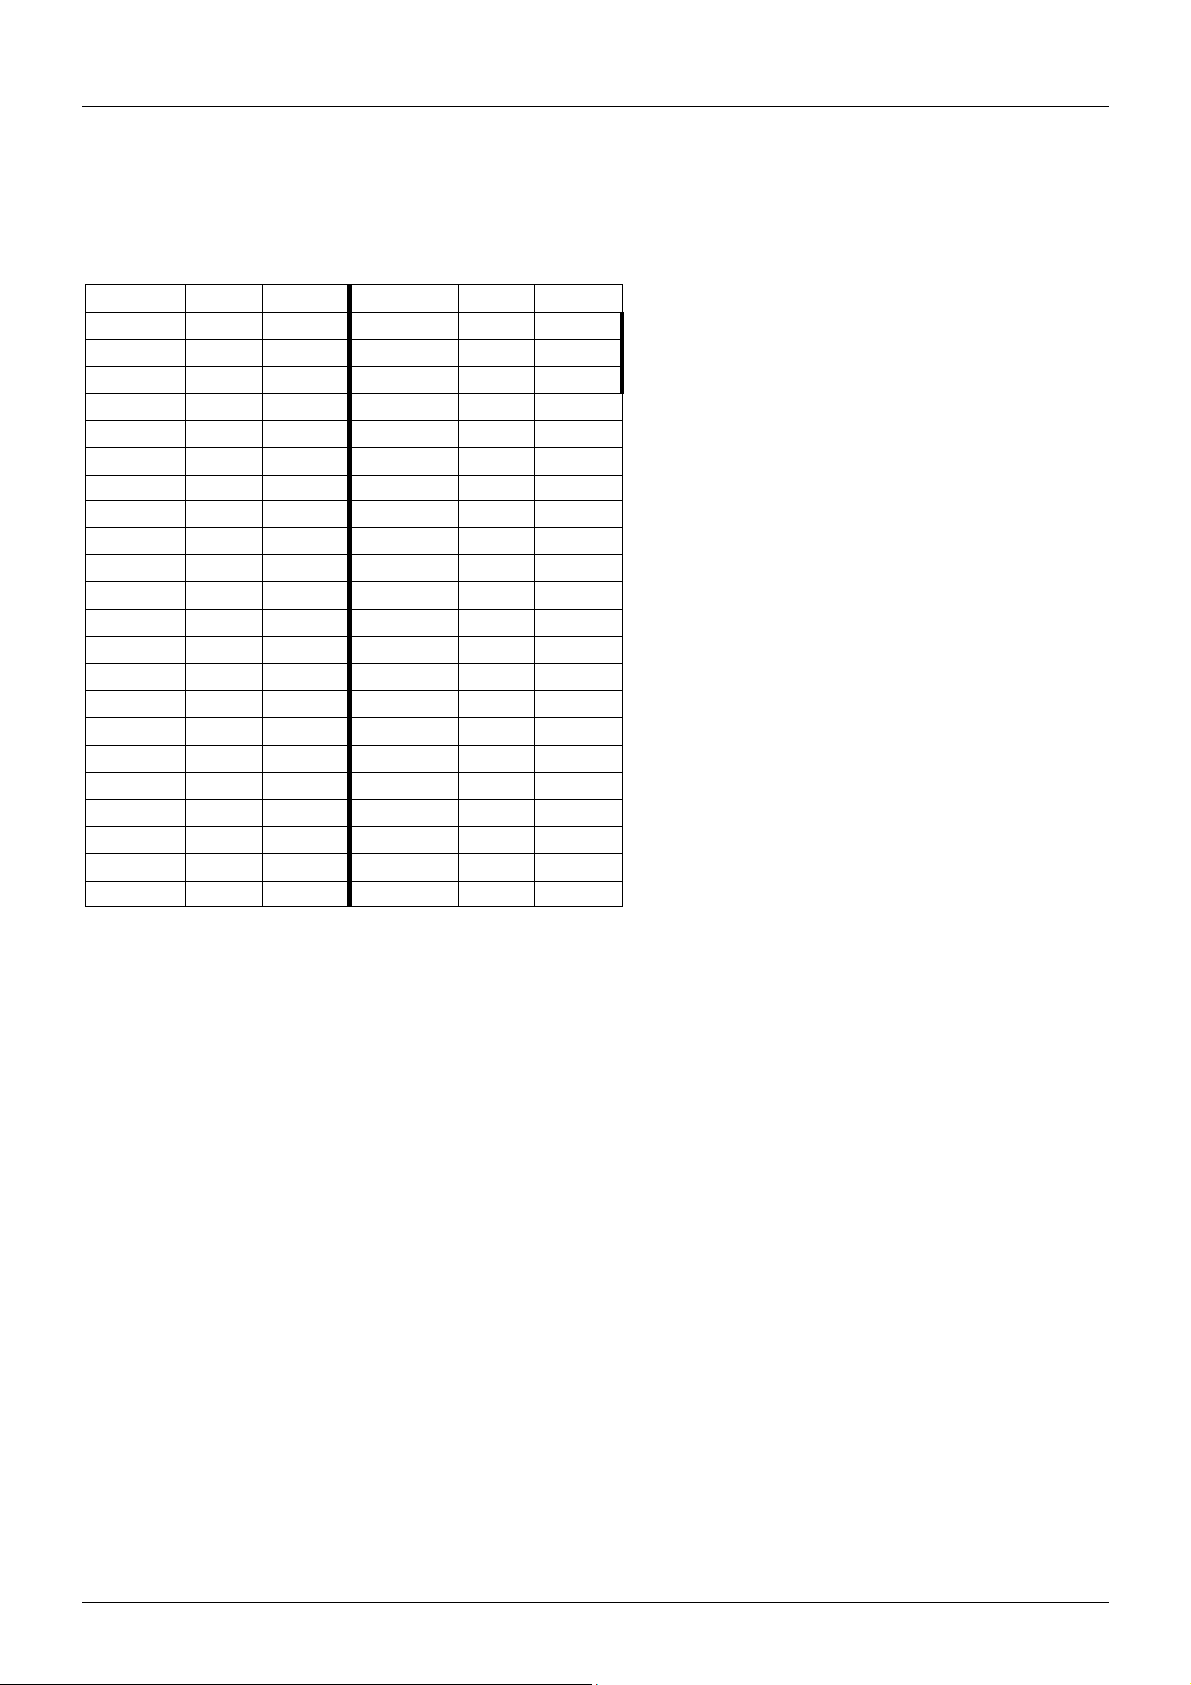
Contains preset EDID/DDC Data for commonly used resolutions and refresh rates (see following page
for details)
Integrated flash memory allows cloned EDID/DDC Data to be written and stored
Powered via VGA/DVI/HDMI interface
EDID/DDC Emulator Programmer (32100)
Clones EDID/DDC Data from VGA, DVI & HDMI (using supplied adapter) displays
Writes EDID/DDC Data to LINDY EDID/DDC Emulator Adapters
Powered via USB connection
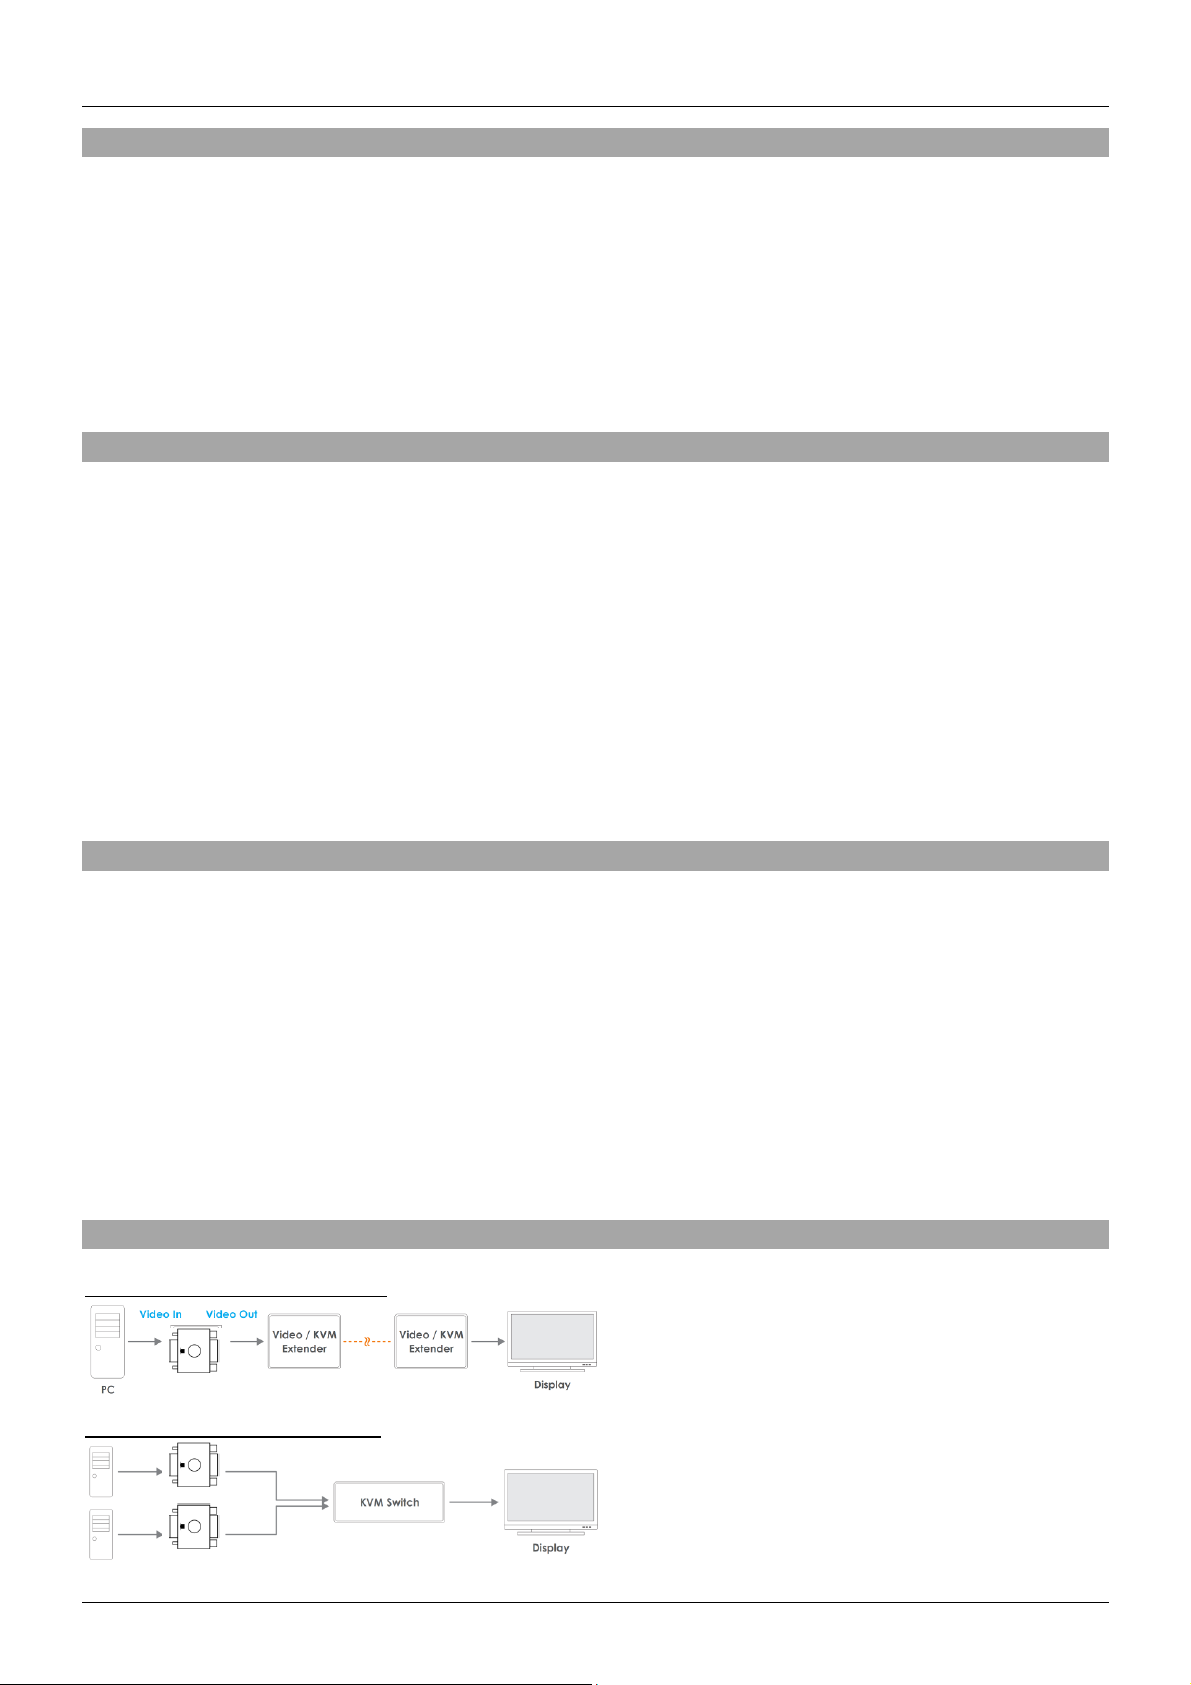
Installation
Example for use with extender:
Example for use with a switch:
Page 4
User Manual English
Resolution
Refresh
Available
Resolution
Refresh
Available
640x480p
75Hz
V/D/H
1280x800p
75Hz
D
640x480p
72Hz
V/D/H
1280x960p
60Hz
V/D/H
640x480p
67Hz
V/D
1280x960p
75Hz
V/D
640x480p
60Hz
V/D/H
1280x1024p
60Hz
V/D/H
720x400p
60Hz
V/D/H
1280x1024p
75Hz
V/D/H
720x400p
70Hz
H
1360x768p
60Hz
D
800x600p
75Hz
V/D/H
1360x768p
75Hz
D
800x600p
72Hz
V/D/H
1366x768p
60Hz
D
800x600p
60Hz
V/D/H
1366x768p
75Hz
D
800x600p
56Hz
V/D/H
1440x900p
75Hz
D
832x624p
75Hz
V/H
1440x900p
60Hz
V/D/H
1024x768p
75Hz
V/D/H
1600x900p
60Hz
D
1024x768p
70Hz
V/H
1600x1024p
60Hz
D
1024x768p
60Hz
V/D/H
1600x1200p
60Hz
V/H
1152x864p
60Hz
D
1680x1050p
60Hz
V/D/H
1152x864p
75Hz
V/D/H
1920x1080i/p
50Hz
H
1152x870p
75Hz
V/H
1920x1080i/p
60Hz
V/D/H
1280x720p
50Hz
V/D/H
1920x1200p
60Hz
D/H
1280x720p
60Hz
V/D/H
2560x1440p
60Hz
H
1280x768p
60Hz
D
3840x2160p
24Hz
H
1280x768p
75Hz
D
3840x2160p
30Hz
H
1280x800p
60Hz
D
3840x2160p
60Hz
H
EDID/DDC Emulator Adapters
If you are using the EDID/DDC Emulator Adapters in isolation they may simply be installed as shown in
the diagrams above, by connecting the Male interface of the Emulator Adapter to the graphics card. The
preset values (see table) will then be available via your computers graphics/resolution settings.
EDID/DDC Emulator Programmer & EDID/DDC Emulator Adapter
Please Note: Writing cloned EDID/DDC data to the Adapters will overwrite the preset EDID/DDC data
which cannot be recovered.
Before beginning the cloning procedure, please turn your monitor off.
1. To clone the EDID/DDC data of a monitor you will need to attach the Programmer to your monitor:
a. If you’re using a VGA monitor this can be done directly using a VGA cable.
b. If you’re using a DVI monitor you will need the supplied VGA/DVI adapter along with a standard DVI
cable.
c. If you’re using a HDMI monitor you will need the supplied VGA/HDMI adapter cable along with a
standard HDMI cable.
d. If you’re using a 4K HDMI monitor you will need the supplied VGA/HDMI adapter cable, then the
blue 4K HDMI Adapter and finally a standard HDMI cable.
2. Once you have made the connection turn the monitor on and select the corresponding input, and then
connect the USB DC cable to the Programmer.
3. The LED on the top of the Emulator Programmer will immediately illuminate blue and then blink once.
Once the LED has blinked the EDID/DDC data has been cloned and the Programmer can be detached
from your monitor. If using the 4K HDMI adapter remove this now.
4. Now disconnect the USB DC cable and connect an EDID/DDC Emulator Adapter to the VGA, DVI
(using VGA/DVI Adapter) or HDMI (using the VGA/HDMI adapter) port of the Emulator Programmer.
Page 5

User Manual English
5. Connect the USB DC cable. The LED on the top of the EDID/DDC Emulator Programmer will
immediately illuminate red and then blink once. Once the LED has blinked the EDID/DDC data has
been written to the Emulator Adapter.
6. Now connect the male interface of the EDID/DDC Emulator Adapter to your graphics card. The cloned
values (including monitor name) will then be available via your PCs operating system.
Troubleshooting
Windows shows a “Generic Non-PnP Monitor” is connected
Make sure that the EDID/DDC Emulator Adapter is directly connected to the graphics card or with the male
connector (with the arrow above it) pointing towards the graphics card if connected to a cable.
After cloning a display the preset values are still present/shown in the operating system
1. Repeat the cloning process, ensuring that the display is powered on and set to the VGA/DVI input that
you are cloning
2. Make sure that the LED on the EDID Emulator Programmer blinks blue to confirm cloning and then
red to confirm writing to the Emulator Adapter
Reboot the PC and reconnect the Emulator Adapter
Page 6

Benutzerhandbuch Deutsch
Einführung
Wir freuen uns, dass Ihre Wahl auf ein LINDY-Produkt gefallen ist und danken Ihnen für Ihr Vertrauen.
Sie können sich jederzeit auf unsere Produkte und einen guten Service verlassen. Diese LINDY
EDID/DDC Emulator Produktreihe unterliegt einer 2-Jahres LINDY Herstellergarantie und lebenslangem
kostenlosen, technischen Support. Bitte lesen Sie diese Anleitung sorgfältig und bewahren Sie sie auf.
Der Lindy HDMI 2.0 EDID Emulator wurde speziell für Anwendungen konzipiert, bei welchen dauerhaft
eine zuverlässige Verfügbarkeit der EDID gewährleistet werden muss. Er speichert und emuliert die
EDID eines Displays, damit Signalquellen auch bei einer Störung das Signal nicht abschalten oder
verändern - ideal für Anwendungen in Verbindung mit AV/KVM Extendern, Switches oder auch Splittern.
Lieferumfang
32101/32102/32104
EDID/DDC Emulator
Dieses Handbuch
32100
EDID/DDC Emulator Programmer
USB DC Kabel, 1m (3.28ft)
VGA / DVI Adapter
4K HDMI Adapter
VGA / HDMI Adapter
Dieses Handbuch
Eigenschaften
VGA (32101), DVI (32102) & HDMI (32104) Emulator
Enthält bereits gespeicherte EDID/DDC Daten für die am häufigsten genutzten Auflösungen und
Bildwiederholfrequenzen (siehe folgende Seite für Details)
Integrierter Speicher erlaubt das Speichern von geklonten EDID/DDC Daten
Die Stromversorgung erfolgt über die VGA/DVI/HDMI Schnittstelle
EDID/DDC Emulator Programmer (32100)
Klont EDID/DDC Daten von VGA, DVI und HDMI Displays (mittels der beiliegenden Adapter)
Schreibt EDID/DDC Daten auf Lindy EDID/DDC Emulatoren
Die Stromversorgung erfolgt via USB
Page 7

Benutzerhandbuch Deutsch
Resolution
Refresh
Available
Resolution
Refresh
Available
640x480p
75Hz
V/D/H
1280x800p
75Hz
D
640x480p
72Hz
V/D/H
1280x960p
60Hz
V/D/H
640x480p
67Hz
V/D
1280x960p
75Hz
V/D
640x480p
60Hz
V/D/H
1280x1024p
60Hz
V/D/H
720x400p
60Hz
V/D/H
1280x1024p
75Hz
V/D/H
720x400p
70Hz
H
1360x768p
60Hz
D
800x600p
75Hz
V/D/H
1360x768p
75Hz
D
800x600p
72Hz
V/D/H
1366x768p
60Hz
D
800x600p
60Hz
V/D/H
1366x768p
75Hz
D
800x600p
56Hz
V/D/H
1440x900p
75Hz
D
832x624p
75Hz
V/H
1440x900p
60Hz
V/D/H
1024x768p
75Hz
V/D/H
1600x900p
60Hz
D
1024x768p
70Hz
V/H
1600x1024p
60Hz
D
1024x768p
60Hz
V/D/H
1600x1200p
60Hz
V/H
1152x864p
60Hz
D
1680x1050p
60Hz
V/D/H
1152x864p
75Hz
V/D/H
1920x1080i/p
50Hz
H
1152x870p
75Hz
V/H
1920x1080i/p
60Hz
V/D/H
1280x720p
50Hz
V/D/H
1920x1200p
60Hz
D/H
1280x720p
60Hz
V/D/H
2560x1440p
60Hz
H
1280x768p
60Hz
D
3840x2160p
24Hz
H
1280x768p
75Hz
D
3840x2160p
30Hz
H
1280x800p
60Hz
D
3840x2160p
60Hz
H
Installation
Beispiel für die Nutzung in Verbindung mit Extendern:
Beispiel für die Nutzung mit einem Switch:
EDID/DDC Emulatoren
Wenn sie die EDID/DDC Emulatoren separat nutzen, können sie wie oben beschrieben installiert werden.
Hierfür müssen sie den HDMI Stecker mit der jeweiligen Grafikkarte verbinden. Die bereits gespeicherten
Werte (siehe Tabelle) sind dann über die Einstellungen der Grafikkarte verfügbar.
Page 8

Benutzerhandbuch Deutsch
EDID/DDC Emulator Programmer & EDID/DDC Emulator
Bitte beachten: Beim Schreiben von geklonten EDID/DDC Daten werden die bisher gespeicherten
Presets gelöscht und können nicht wiederhergestellt werden.
Schalten sie bitte die Monitore aus bevor sie mit dem Klonen beginnen.
1. Um die EDID/DDC Daten ihres Monitors zu klonen, muss zuerst der Programmer mit ihrem Monitor
verbunden werden.
a. Bei der Nutzung eines VGA Monitors, kann dies durch ein VGA Kabel erfolgen.
b. Falls ein DVI Monitor genutzt wird, muss der mitgelieferte VGA/DVI Adapter in Verbindung mit
einem Standard DVI Kabel genutzt werden.
c. Falls ein HDMI Monitor genutzt wird, muss der mitgelieferte VGA/HDMI Adapter in Verbindung
mit einem Standard HDMI Kabel genutzt werden.
d. Falls ein 4K HDMI Monitor genutzt wird, muss der mitgelieferte VGA/HDMI Adapter sowie
zusätzlich der blaue 4K HDMI Adapter in Verbindung mit einem Standard HDMI Kabel genutzt
werden.
2. Wenn die Verbindungen hergestellt sind, schalten sie den Monitor ein. Im Anschluss muss der
passende Eingang gewählt werden. Verbinden sie dann noch das mitgelieferte USB DC Kabel mit dem
Programmer.
3. Die LED auf der Oberseite des Emulator Programmers wird sofort blau aufleuchten und einmal blinken.
Nach Beenden des Blinkens wurden die EDID/DDC Daten geklont und der Programmer kann wieder
vom Monitor entfernt werden. Bei Einsatz des 4K HDMI Adapters entfernen sie diesen nun ebenfalls.
4. Trennen sie nun ebenfalls das USB DC Kabel und verbinden sie dann den EDID/DDC Emulator mit
dem entsprechenden (VGA, DVI (mittels Adapter), HDMI (mittels Adapter)) Port des Programmers.
5. Verbinden Sie das USB DC Kabel. Die LED auf der Oberseite des Emulator Programmers wird sofort
rot aufleuchten und einmal blinken. Wenn die LED nicht mehr blinkt, sind die EDID/DDC Daten auf den
Emulator geschrieben worden.
6. Verbinden sie nun den Stecker des EDID/DDC Emulators mit der Grafikkarte. Die geklonten Werte
(inklusive Name des Monitors) sollten nun in den Einstellungen zu finden sein.
Fehlersuche
Windows zeigt die Verbindung eines „Generischen Nicht Plug & Play fähigen Monitor“ an
Stellen sie sicher, dass der EDID/DDC Emulator direkt mit der Grafikkarte verbunden ist. Hierzu muss der
Stecker, auf dem sich ein Pfeil befindet, in Richtung Grafikkarte angeschlossen sein.
Nach dem Klonen eines Displays sind weiterhin die Preset-Werte in den Einstellungen des
Betriebssystems zu finden
1. Wiederholen sie den Klonprozess. Stellen sie dabei sicher, dass das Display eingeschaltet und mit
dem richtigen Port verbunden ist.
2. Stellen sie zudem sicher, dass die LED blau blinkt um somit den Klonvorgang zu bestätigen. Zudem
muss die LED rot blinken, wenn die Daten auf den Emulator geschrieben wurden. Starten Sie
gegebenenfalls den Computer neu und verbinden sie im Anschluss den Emulator neu.
Page 9

Manuel Utilisateur Français
Introduction
Nous sommes heureux que votre choix se soit porté sur ce produit issu de la gamme d’Emulateurs
EDID/DDC LINDY et vous remercions de votre confiance. Vous pouvez compter à tout moment sur la
qualité de nos produits et de notre service. Celui-ci est soumis à une durée de garantie LINDY de 2 ans
et d’une assistance technique gratuite à vie. Merci de lire attentivement ces instructions et de les
conserver pour future référence.
L’adaptateur Emulateur EDID HDMI 2.0 LINDY est conçu pour des systèmes qui requièrent que les
signaux EDID soient fournis sans interruption et permet de surmonter les problèmes liés à l‘EDID qui
peuvent survenir avec l’utilisation d’extenders AV/KVM, switchs et splitters.
Contenu de l’emballage
32101/32102/32104
Adaptateur émulateur EDID/DDC
Ce manuel
32100
Programmeur émulateur EDID/DDC
Câble USB DC, 1m (3.28ft)
Adaptateur VGA / DVI
Adaptateur HDMI 4K
Adaptateur VGA / HDMI
Ce manuel
Caractéristiques
Adaptateur émulateur VGA (32101), DVI (32102) & HDMI (32104)
Contient une présélection de données EDID/DDC pour les résolutions et fréquences usuelles (voir page
suivante pour plus de détails)
Mémoires flash intégrée pour le stockage des données EDID/DDC clonées
Alimenté par l’interface VGA/DVI/HDMI
Programmeur émulateur EDID/DDC (32100)
Clone les données EDID/DDC des affichages VGA, DVI & HDMI (en utilisant les adaptateurs fournis)
Ecrit les données EDID/DDC dans les adaptateurs émulateurs EDID/DDC LINDY
Alimenté via une connexion USB
Installation
Exemple d’utilisation avec un extender:
Exemple d’utilisation avec un switch:
Adaptateurs émulateurs EDID/DDC
Page 10

Manuel Utilisateur Français
Résolution
Fréqu.
Dispo.
Résolution
Fréqu.
Dispo.
640x480p
75Hz
V/D/H
1280x800p
75Hz
D
640x480p
72Hz
V/D/H
1280x960p
60Hz
V/D/H
640x480p
67Hz
V/D
1280x960p
75Hz
V/D
640x480p
60Hz
V/D/H
1280x1024p
60Hz
V/D/H
720x400p
60Hz
V/D/H
1280x1024p
75Hz
V/D/H
720x400p
70Hz
H
1360x768p
60Hz
D
800x600p
75Hz
V/D/H
1360x768p
75Hz
D
800x600p
72Hz
V/D/H
1366x768p
60Hz
D
800x600p
60Hz
V/D/H
1366x768p
75Hz
D
800x600p
56Hz
V/D/H
1440x900p
75Hz
D
832x624p
75Hz
V/H
1440x900p
60Hz
V/D/H
1024x768p
75Hz
V/D/H
1600x900p
60Hz
D
1024x768p
70Hz
V/H
1600x1024p
60Hz
D
1024x768p
60Hz
V/D/H
1600x1200p
60Hz
V/H
1152x864p
60Hz
D
1680x1050p
60Hz
V/D/H
1152x864p
75Hz
V/D/H
1920x1080i/p
50Hz
H
1152x870p
75Hz
V/H
1920x1080i/p
60Hz
V/D/H
1280x720p
50Hz
V/D/H
1920x1200p
60Hz
D/H
1280x720p
60Hz
V/D/H
2560x1440p
60Hz
H
1280x768p
60Hz
D
3840x2160p
24Hz
H
1280x768p
75Hz
D
3840x2160p
30Hz
H
1280x800p
60Hz
D
3840x2160p
60Hz
H
Si vous utilisez les adaptateurs émulateurs EDID/DDC isolément ils pourront être simplement installés
comme indiqué dans les schémas ci-dessous, en connectant l’interface mâle de l’adaptateur émulateur à
la carte graphique. Les valeurs de présélection (voir tableau) seront alors disponibles via les paramètres
de résolution de votre ordinateur.
Programmeur émulateur EDID/DDC & Adaptateur émulateur EDID/DDC
Merci de noter: l’écriture des données EDID/DDC clonées dans les adaptateurs va écraser les
présélections de données EDID/DDC qui ne pourront pas être récupérées.
Avant de débuter la procédure de clonage, mettez votre moniteur hors tension.
1. Pour cloner les données EDID/DDC d’un moniteur vous devrez connecter le programmeur à celui-ci:
a. Si vous utilisez un moniteur VGA cela peut être fait en connectant directement un câble VGA.
b. Si vous utilisez un moniteur DVI vous avez besoin de l’adaptateur VGA/DVI fourni, avec un câble
DVI standard.
c. Si vous utilisez un moniteur HDMI vous avez besoin de l’adaptateur VGA/HDMI fourni, avec un câble
HDMI standard.
d. Si vous utilisez un moniteur HDMI 4K vous avez besoin de l’adaptateur VGA/HDMI fourni, puis de
l’adaptateur HDMI 4K de couleur bleue et finalement d’un câble HDMI standard.
2. Une fois les connexions réalisées mettez le moniteur sous tension et sélectionnez l’entrée requise, pour
finir alimentez le programmeur à l’aide du câble USB DC fourni.
3. La LED sur le dessus du programmeur émulateur va immédiatement s’allumer en bleu et clignoter une
fois. Une fois ce clignotement fait, les données EDID/DDC sont clonées et le programmeur peut être
déconnecté du moniteur. Si vous utilisez l’adaptateur HDMI 4K, retirez-le à présent.
Déconnectez le câble USB DC et l’adaptateur émulateur EDID/DDC au port VGA, DVI (en utilisant
l’adaptateur VGA/DVI) ou HDMI (en utilisant l’adaptateur VGA/HDMI) du programmeur émulateur.
Page 11

Manuel Utilisateur Français
4. Connectez le câble USB DC. La LED sur le dessus du programmeur émulateur EDID/DDC va
immédiatement s’allumer en rouge et clignoter une fois. Une fois ce clignotement fait, les données
EDID/DDC sont écrites dans l’adaptateur émulateur.
5. Connectez maintenant l’interface mâle de l’adaptateur émulateur EDID/DDC à votre carte graphique.
Les valeurs clonées (nom du moniteur inclus) sont disponibles via votre système d’exploitation.
Dépannage
Windows indique qu’un “Moniteur Généric Non-PnP” est connecté
Assurez-vous que l’adaptateur émulateur EDID/DDC est directement connecté à la carte graphique ou
avec le connecteur mâle (avec la flèche au-dessus) qui pointe vers la carte graphique s’il est connecté à
un câble.
Après clonage d’un affichage les données présélectionnées sont toujours actives/visibles dans le
système d’exploitation
1. Répétez la procédure de clonage, en vous assurant que l’affichage est sous tension et paramétré sur
la bonne entrée VGA/DVI que vous cherchez à cloner
2. Assurez-vous que la LED du programmeur émulateur EDID clignote en bleu pour confirmer le clonage
et ensuite en rouge pour confirmer l’écriture des données dans l’adaptateur émulateur
Rebootez le PC et reconnectez l’adaptateur émulateur
Page 12

Manuale Italiano
Introduzione
Vi ringraziamo per aver acquistato questo Emulatore EDID/DDC Lindy . Questo prodotto è stato
progettato per garantirvi la massima affidabilità e semplicità di utilizzo ed è coperto da 2 anni di garanzia
LINDY oltre che da un servizio di supporto tecnico a vita. Per assicurarvi di farne un uso corretto vi
invitiamo a leggere attentamente questo manuale e a conservarlo per future consultazioni.
L’emulatore EDID HDMI 2.0 Lindy è stato concepito per sistemi che richiedono una costante presenza
dei segnali EDID per funzionare e permette di risolvere i problemi ad essi connessi che possono
comparire usando Extender, Switch e Splitter A/V e KVM
Contenuto della confezione
32101/32102/32104
Emulatore EDID/DDC
Questo manuale
32100
Programmatore per emulatore EDID/DDC
Cavo USB DC, 1m
Adattatore VGA / DVI
Adattatore HDMI 4K
Adattatore VGA / HDMI
Questo manuale
Caratteristiche
Emulatore EDID/DCC VGA (32101), DVI (32102) & HDMI (32104)
Contiene preimpostazioni EDID/DDC per le risoluzioni e le frequenze più comuni (vedete la pagina
seguente per I dettagli)
Integra una memora flash per scrivere e conservare i dati EDID/DDC clonati
Alimentato direttamente dalle interfacce VGA/DVI/HDMI
Programmatore per Emulatori EDID/DDC (32100)
Clona i dati EDID/DDC da schermi VGA, DVI & HDMI (utilizzando l’adattatore fornito a corredo)
Scrive i dati EDID/DDC sugli emulatori EDID/DDC Lindy.
Alimentato tramite una comune porta USB
Installazione
Esempio d’uso con un extender:
Esempio d’uso con uno switch:
Page 13

Manuale Italiano
Risoluzione
Frequenza
Disponibile
Risoluzione
Frequenza
Disponibile
640x480p
75Hz
V/D/H
1280x800p
75Hz
D
640x480p
72Hz
V/D/H
1280x960p
60Hz
V/D/H
640x480p
67Hz
V/D
1280x960p
75Hz
V/D
640x480p
60Hz
V/D/H
1280x1024p
60Hz
V/D/H
720x400p
60Hz
V/D/H
1280x1024p
75Hz
V/D/H
720x400p
70Hz
H
1360x768p
60Hz
D
800x600p
75Hz
V/D/H
1360x768p
75Hz
D
800x600p
72Hz
V/D/H
1366x768p
60Hz
D
800x600p
60Hz
V/D/H
1366x768p
75Hz
D
800x600p
56Hz
V/D/H
1440x900p
75Hz
D
832x624p
75Hz
V/H
1440x900p
60Hz
V/D/H
1024x768p
75Hz
V/D/H
1600x900p
60Hz
D
1024x768p
70Hz
V/H
1600x1024p
60Hz
D
1024x768p
60Hz
V/D/H
1600x1200p
60Hz
V/H
1152x864p
60Hz
D
1680x1050p
60Hz
V/D/H
1152x864p
75Hz
V/D/H
1920x1080i/p
50Hz
H
1152x870p
75Hz
V/H
1920x1080i/p
60Hz
V/D/H
1280x720p
50Hz
V/D/H
1920x1200p
60Hz
D/H
1280x720p
60Hz
V/D/H
2560x1440p
60Hz
H
1280x768p
60Hz
D
3840x2160p
24Hz
H
1280x768p
75Hz
D
3840x2160p
30Hz
H
1280x800p
60Hz
D
3840x2160p
60Hz
H
Emulatore EDID/DDC
Se state utilizzando l’emulatore EDID/DDC da solo è possibile installarlo come mostrato nei diagrammi
riportati sopra collegando il connettore maschio dell’emulatore direttamente alla scheda grafica. I valori
precaricati nell’emulatore (vedi tabella) saranno subito disponibili nella sezione di impostazione della
risoluzione sul vostro computer.
Programmatore per Emulatori EDID/DDC
Attenzione: Dopo aver clonato i dati EDID/DDC su un emulatore i dati preimpostati (vedi tabella sopra)
verranno cancellati e non sarà più possibile recuperarli.
Prima di iniziare la procedura di clonazione vi preghiamo di spegnere lo schermo.
7. Per clonare i dati EDID/DDC di uno schermo dovrete collegare il programmatore all’interfaccia del
presento sullo schermo stesso:
a. Se state utilizzando uno schermo VGA potrete utilizzare direttamente un cava VGA.
b. Se state utilizzando uno schermo DVI dovrete utilizzare l’adattatore VGA/DVI fornito ed un cavo
standard DVI.
c. Se state utilizzando uno schermo HDMI dovrete utilizzare l’adattatore VGA/HDMI fornito ed un cavo
standard HDMI.
d. Se state utilizzando uno schermo HDMI 4K dovrete utilizzare l’adattatore VGA//HDMI con collegato
l’adattatore HDMI 4k di colore blu (entrambi forniti a corredo) e, da ultimo, un cavo HDMI standard.
8. Una volta terminate lo connessioni accendete il monitor e selezionate la porta di Input corretta. Infine
collegate il cavo USB DC al programmatore e ad una porta/alimentatore USB.
9. Il LED sul lato superiore dell’alimentatore si accenderà in blu e poi lampeggerà una volta ad indicare il
completamento della copia dei dati EDID/DCC. A questo punto potrete rimuovere il programmatore dal
monitor e se state utilizzando l’adattatore HDMI 4K rimuovete anche quello.
10. Ora disconnettete il cavo USB DC e collegate un emulatore EDID/DDC alla porta VGA, DVI
(utilizzando l’adattatore VGA/DVI) o HDMI (utilizzando l’adattatore VGA/HDMI) del programmatore.
Page 14

Manuale Italiano
11. Collegate nuovamente il cavo USB DC. Il LED posto sul lato superiore del Programmatore
EDID/DDC si illuminerà in rosso e poi lampeggerà una volta per indicate il completamento della scrittura
dei dati EDID/DDC sull’Emulatore.
12. Ora collegate l’interfaccia maschio dell’emulatore alla scheda grafica e potrete vedere tutti i valori
clonati (incluso il nome del monitor) all’interno della pagina di gestione della risoluzione del vostro
sistema operativo.
Risoluzione dei problemi
Windows riporta che un Monitor Generico Non-PnP (Generic Non-PnP Monitor) è connesso.
Assicuratevi che l’emulatore EDID/DDC sia connesso direttamente alla scheda grafica con il connettore
maschio (con la freccia stampata sopra che punta verso la scheda grafica anche nel caso sia stia
utilizzando un cavo).
Dopo aver clonato i dati di uno schermo le preimpostazioni sono ancora presenti sull’emulatore
ed elencate dal sistema operativo.
1. Ripetete il processo di clonazione assicurandovi che lo schermo sia alimentato e abbia selezionato
come input la porta VGA/DVI/HDMI da cui volete copiare i dati.
2. Assicuratevi che il LED sul programmatore lampeggi in blu per confermare l’avvenuta copia dei
dati EDID dallo schermo e poi che lampeggi anche in rosso per confermare che la scrittura dei valori EDID
sull’emulatore. Riavviate il PC e ricollegate l’Emulatore
Page 15

CE/FCC Statement
CE Certification
This equipment complies with the requirements relating to Electromagnetic Compatibility Standards.
It has been manufactured under the scope of RoHS compliance.
CE Konformitätserklärung
Dieses Produkt entspricht den einschlägigen EMV Richtlinien der EU für IT-Equipment und darf nur
zusammen mit abgeschirmten Kabeln verwendet werden.
Diese Geräte wurden unter Berücksichtigung der RoHS Vorgaben hergestellt.
Die formelle Konformitätserklärung können wir Ihnen auf Anforderung zur Verfügung stellen
FCC Certification
This equipment has been tested and found to comply with the limits for a Class B digital device, pursuant
to part 15 of the FCC Rules. These limits are designed to provide reasonable protection against harmful
interference in a residential installation.
You are cautioned that changes or modification not expressly approved by the party responsible for
compliance could void your authority to operate the equipment.
This device complies with part 15 of the FCC Rules.
Operation is subject to the following two conditions:
1. This device may not cause harmful interference, and
2. This device must accept any interference received, including interference that may cause undesired
operation.
LINDY Herstellergarantie – Hinweis für Kunden in Deutschland
LINDY gewährt für dieses Produkt über die gesetzliche Regelung in Deutschland hinaus eine zweijährige Herstellergarantie ab Kaufdatum. Die detaillierten Bedingungen dieser Garantie finden Sie auf der LINDY Website aufgelistet
bei den AGBs.
Hersteller / Manufacturer (EU):.
LINDY-Elektronik GmbH LINDY Electronics Ltd
Markircher Str. 20 Sadler Forster Way
68229 Mannheim Stockton-on-Tees, TS17 9JY
GERMANY United Kingdom
Email: info@lindy.com , T: +49 (0)621 470050 postmaster@lindy.co.uk , T: +44 (0)1642 754000
Page 16

Recycling Information
Tested to Comply with
FCC Standards
For Home and Office Use!
WEEE (Waste of Electrical and Electronic Equipment),
Recycling of Electronic Products
Europe, United Kingdom
In 2006 the European Union introduced regulations (WEEE) for the collection and recycling of all waste electrical
and electronic equipment. It is no longer allowable to simply throw away electrical and electronic equipment. Instead,
these products must enter the recycling process.
Each individual EU member state has implemented the WEEE regulations into national law in slightly different ways.
Please follow your national law when you want to dispose of any electrical or electronic products. More details can
be obtained from your national WEEE recycling agency.
Germany / Deutschland Rücknahme Elektroschrott und Batterie-Entsorgung
Die Europäische Union hat mit der WEEE Direktive Regelungen für die Verschrottung und das Recycling von Elektround Elektronikprodukten geschaffen. Diese wurden im Elektro- und Elektronikgerätegesetz – ElektroG in deutsches
Recht umgesetzt. Das Entsorgen von Elektro- und Elektronikgeräten über die Hausmülltonne ist verboten! Diese
Geräte müssen den Sammel- und Rückgabesystemen zugeführt werden! Dort werden sie kostenlos entgegen
genommen. Die Kosten für den weiteren Recyclingprozess übernehmen die Gerätehersteller.
LINDY bietet deutschen Endverbrauchern ein kostenloses Rücknahmesystem an, beachten Sie bitte, dass Batterien
und Akkus den Produkten vor der Rückgabe an das Rücknahmesystem entnommen werden müssen und über die
Sammel- und Rückgabesysteme für Batterien separat entsorgt werden müssen. Ausführliche Informationen zu
diesen Themen finden Sie stets aktuell auf der LINDY Webseite im Fußbereich.
France
En 2006, l'union Européenne a introduit la nouvelle réglementation (DEEE) pour le recyclage de tout équipement
électrique et électronique.
Chaque Etat membre de l’ Union Européenne a mis en application la nouvelle réglementation DEEE de manières
légèrement différentes. Veuillez suivre le décret d’application correspondant à l’élimination des déchets électriques
ou électroniques de votre pays.
Italy
Nel 2006 l’unione europea ha introdotto regolamentazioni (WEEE) per la raccolta e il riciclo di apparecchi elettrici ed
elettronici. Non è più consentito semplicemente gettare queste apparecchiature, devono essere riciclate. Ogni stato
membro dell’ EU ha tramutato le direttive WEEE in leggi statali in varie misure. Fare riferimento alle leggi del proprio
Stato quando si dispone di un apparecchio elettrico o elettronico.
Per ulteriori dettagli fare riferimento alla direttiva WEEE sul riciclaggio del proprio Stato.
LINDY No 32100-4
6th Edition, May 2018
lindy.com
 Loading...