

Page 1
HomePlug
Ethernet Bridge
User Manual English
LINDY No. 25120
www.LINDY.com
© LINDY ELECTRONICS LIMITED & LINDY-ELEKTRONIK GMBH - SECOND EDITION (Feb 2004)
Page 2

Manual
Introduction
Thank you for purchasing a LINDY HomePlug product. HomePlug technology makes setting up
a home or small office network quick and easy!
HomePlug allows you to create a network using electrical power lines. Simply plug a LINDY
HomePlug Ethernet Bridge into your computers Ethernet port and then into a mains socket. The
computer data is converted into a signal that can be carried over the mains wiring without
interfering with the ordinary current travelling through the wire!
About LINDY HomePlug devices
There are two LINDY HomePlug devices available – The HomePlug USB Adaptor and the
HomePlug Ethernet Bridge. Each device allows you to connect your computer to a network, but
there is an essential difference between them -
The HomePlug Ethernet Bridge connects to an Ethernet port. It does not function as a network
adaptor, but provides a ‘bridge’ between the Ethernet and HomePlug networks.
The HomePlug USB Adaptor connects to a USB port on your computer and functions as a
network adaptor. It can only be connected to a PC running Windows 98SE, ME, 2000 or XP. It
cannot be connected to a USB printer or other USB device!
The HomePlug Ethernet Bridge can be plugged into any device with a 10/100 RJ-45 Ethernet
port, such as PC’s, Mac’s, X-Boxes, hubs, switches etc., without the need to install any special
software. However, the Ethernet port, to which the Bridge is connected, must be configured to
access your network.
Note: to change the network password or use the HomePlug configuration utility, you
need to connect the Ethernet Bridge to a PC and install the supplied software. The
HomePlug software must be installed when using the USB model!
LINDY HomePlug Ethernet Bridge Page 2
IMPORTANT - This manual provides you with details of how to install and
use the HomePlug Ethernet Bridge and its utility software. It is assumed
the user has knowledge and experience of setting up a basic network.
Page 3

Manual
Understanding HomePlug Encryption and Security
HomePlug uses password encryption to prevent unwanted access from within or outside of your
network. The encryption works by using a string of letters and/or numbers to encode your data.
The encryption password is set using the HomePlug Configuration Utility software. By default,
the password protection is enabled (the default password is HomePlug). However, it is
recommended that you change this password. All your Home Plug devices must use the same
password in order for the computers to be networked. Make sure that all devices are loaded
with the same password!
Each LINDY HomePlug device has a Default Encryption Key (DEK) which is printed on the
bottom of the module. The DEK is required when setting up a new password.
Basic requirements for setting up a HomePlug network
At least two HomePlug devices
Available mains sockets at each location
Computer(s) with a 10/100Base-T Ethernet adaptor (Ethernet Bridge model)
PC(s) with a USB 1.1 or 2.0 port (USB Adaptor model)
Standard home power line wiring
CD-ROM drive
Windows 98SE, ME, 2000 or XP, or, for the Ethernet Bridge model, any operating system
- no software installation is required! Note: Password changes require connection to a
PC running the HomePlug Configuration Utility software!
Supplied Items (LINDY Part No. 25120)
1. LINDY HomePlug Ethernet Bridge module
2. Mains power cable
3. RJ-45 network cable
4. Configuration software CD
5. User manual
6. Wall mounting kit
LINDY HomePlug Ethernet Bridge Page 3
Page 4
Manual
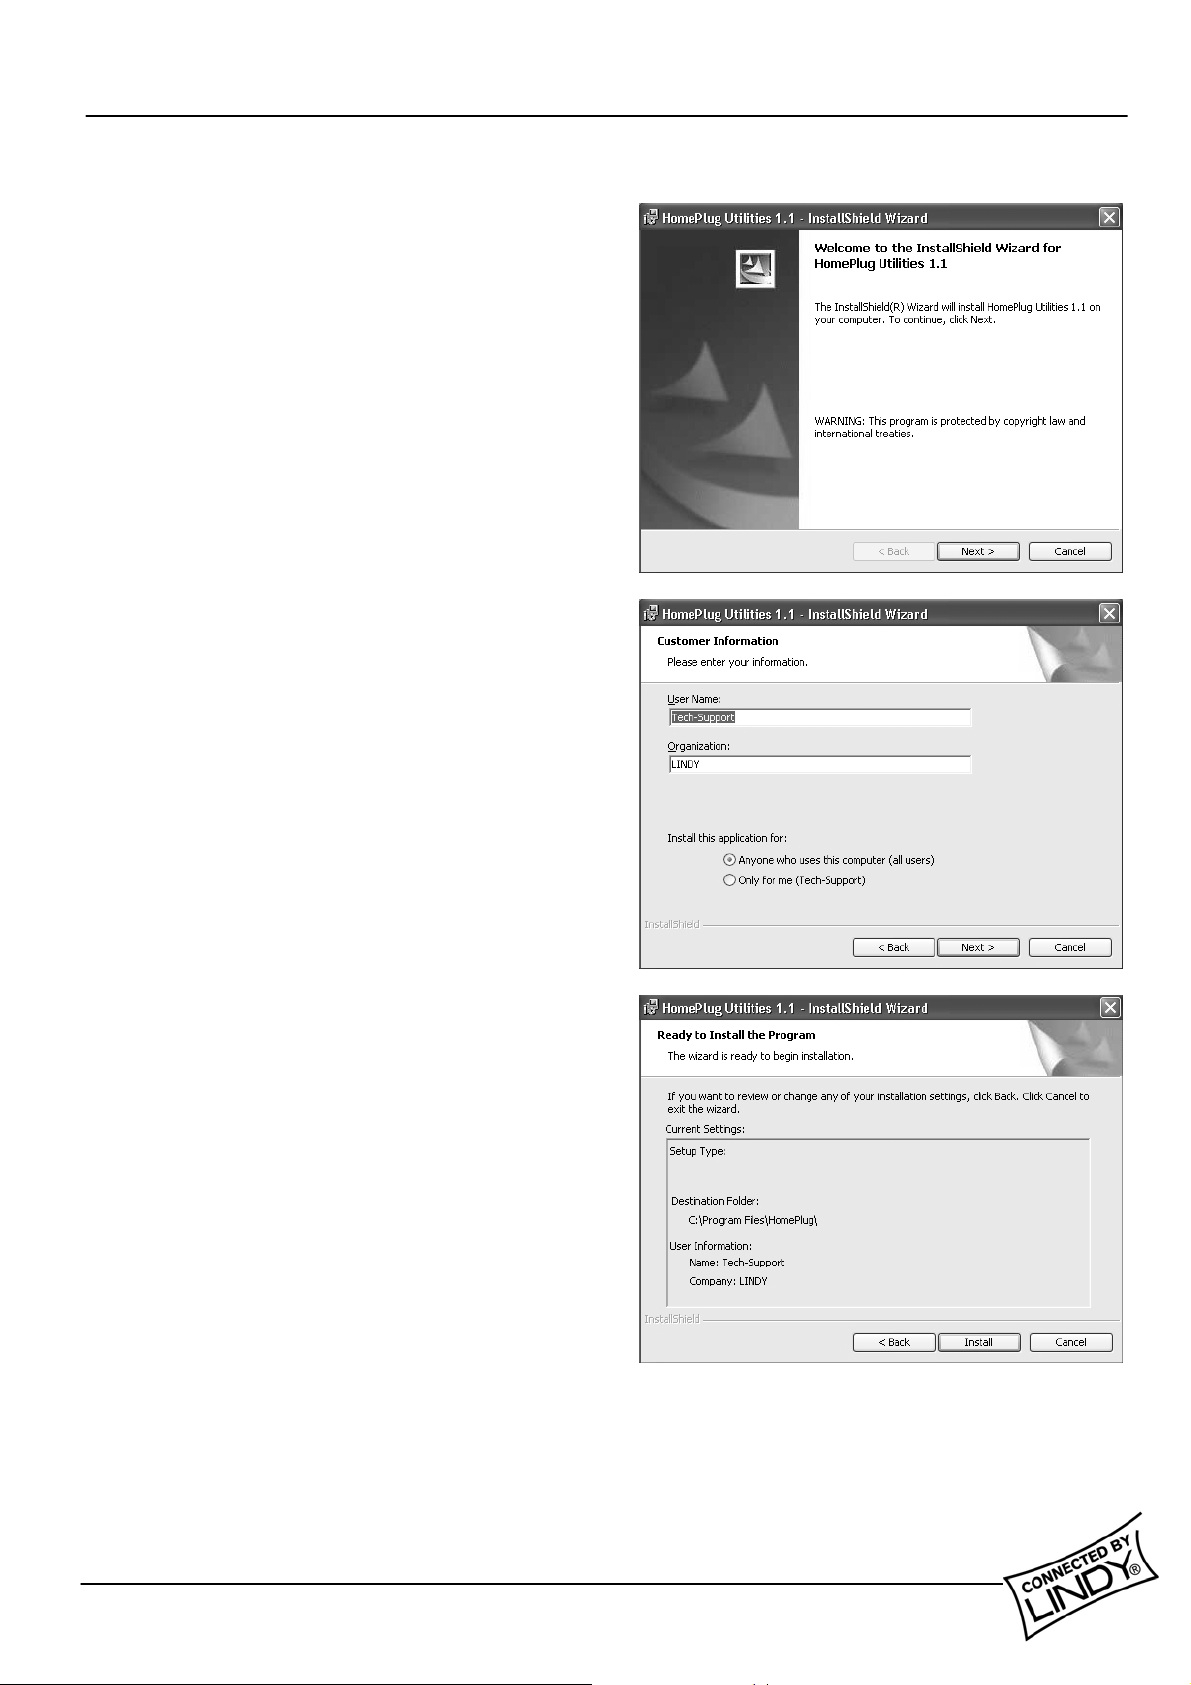
Software Installation (Optional)
Note: Windows may look different on
other platforms!
1. Do not connect the Ethernet Bridge to
your computer yet! Insert the CD into
your CD-ROM drive. If the CD doesn’t
automatically load, run -
<CD Drive Letter>:\eth\setup.exe
Click on ‘Next’ to start the installation
2. Enter a User Name and Organisation, and
select either ‘Anyone who uses this
computer’ or ‘Only for me’, according to
your preference.
Click ‘Next’ to continue.
3. Review or change your installation
settings, then click ‘Install’.
LINDY HomePlug Ethernet Bridge Page 4
Page 5
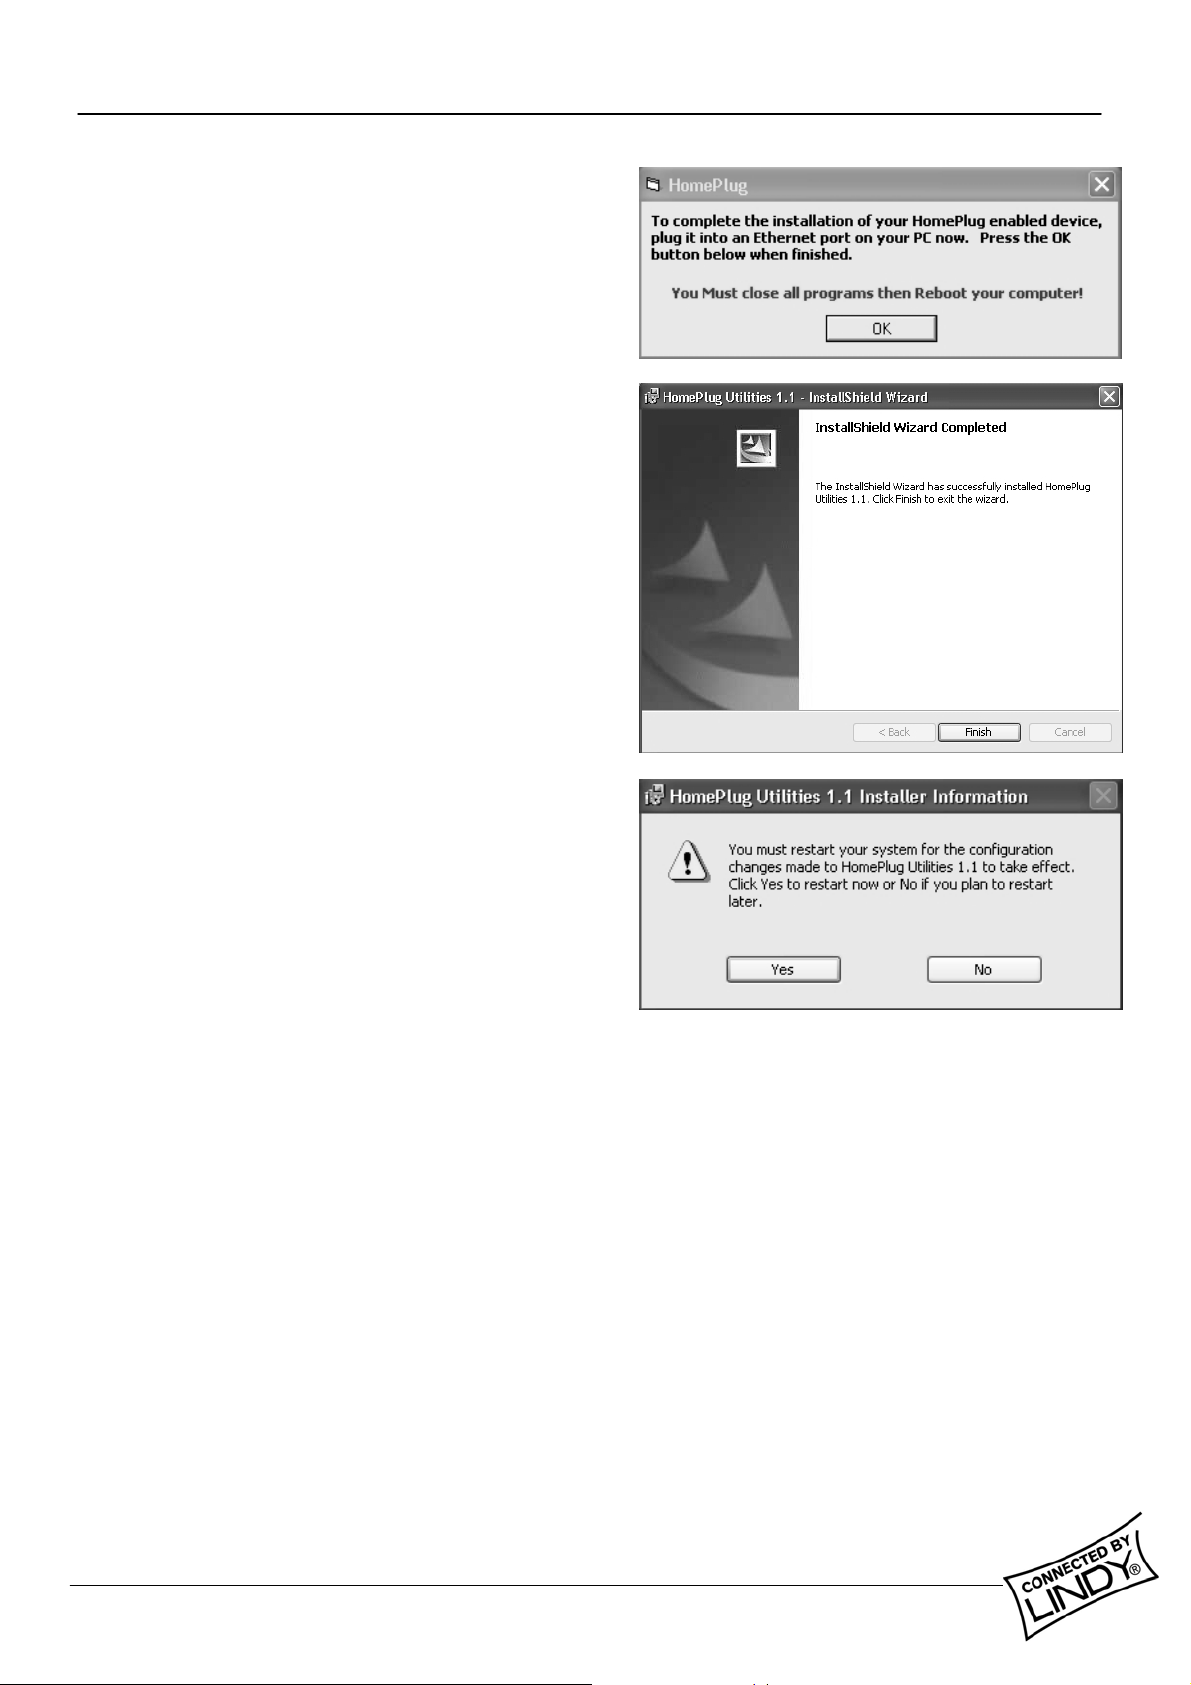
4. Connect the HomePlug Bridge to your
computer now! (See ‘Connecting the
HomePlug Ethernet Bridge’ on page 6).
Click ‘OK’ to continue.
5. Installation is now complete, click ‘Finish’.
6. Restart your computer for the changes to
take effect by clicking ‘Yes’
LINDY HomePlug Ethernet Bridge Page 5
Manual
Page 6

Manual
Connecting the HomePlug Ethernet Bridge
1. Plug the supplied power and network cables into the relevant sockets on the rear of the
HomePlug module.
2. Plug the other end of the network cable into the RJ-45 network socket on your network
device.
3. Plug the mains cable into the socket and switch it on.
Front View
Rear View
LINDY HomePlug Ethernet Bridge Page 6
Page 7

Manual
HomePlug Configuration Utility
With the HomePlug Configuration Utility you will be able to configure and obtain
status on your HomePlug network. Just click the shortcut on your desktop.
Device section
The Device section shows the HomePlug adaptor(s) that are directly connected (local) to your
computer.
State Shows the MAC address of the local HomePlug adaptor.
Refresh Click on this button to refresh the information about the locally
connected HomePlug adaptor.
Connect When you have more than one HomePlug device connected directly
to your computer you can select which one you want to connect to,
by highlighting it in the device window, and clicking ‘Connect’.
Link Quality Shows the signal strength of the linked HomePlug devices on the
network.
Note: When only one HomePlug device is present on the
network the Link Quality will show as poor!
LINDY HomePlug Ethernet Bridge Page 7
Page 8

Manual
Network section
This section shows all of the remote HomePlug devices on the network. The local HomePlug
device will not be shown here.
MAC Address The MAC address of each remotely connected HomePlug device is
shown here.
Data Rate Shows the speed that each remote device is connected at. The data
rate will vary depending on the power line quality.
Scan HomePlug Click here to scan for new HomePlug devices on the
Network network.
LINDY HomePlug Ethernet Bridge Page 8
Page 9

Manual
Security section
The security password for the locally connected device can be set in this section. To ensure
network security, a password must be set for each HomePlug device on the network, and for
correct operation all of the HomePlug devices must share the same password. (See ‘Setting
the network password’ on page 11)
Network Password Enter a new network password here (the default password on all
LINDY HomePlug devices is ‘HomePlug’).
Note: the password is case sensitive and must be the same on
all of the HomePlug devices on the network!
Set Local Click here to set the network password for the local device.
Restore Default Clicking this button restores the default password (‘HomePlug’) to the
local device.
LINDY HomePlug Ethernet Bridge Page 9
Page 10

Manual
Advanced section
This section allows you to remotely set the password for all of the HomePlug devices on the
network.
Remote Passwords The DEK (Default Encryption Key), and status, of each remotely
connected device is listed in this box.
Network Password Shows the current network password
Device Password The DEK (Default Encryption Key) of each remotely connected
device is entered here.
Add Click this button to add the remote device DEK to the ‘Remote
Passwords’ box.
Set All Clicking this button applies the current network password to all the
devices listed in the ‘Remote Passwords’ box.
Remove Remove a device from the ‘Remote Passwords’ box by highlighting it
and clicking this button.
LINDY HomePlug Ethernet Bridge Page 10
Page 11

Setting the network password
1. Open the Advanced section and
enter the DEK number of the
remote HomePlug device
(located on the bottom of the
device) in the Device Password
box and click ‘Add’.
2. The DEK number will appear in
the ‘Remote Passwords’ box.
LINDY HomePlug Ethernet Bridge Page 11
Manual
Page 12

Manual
3. Enter a new network password in
the ‘Network Password’ box and
click ‘Set All’ to change the
network password for the locally
connected device and all the
remote devices listed in the
‘Remote Passwords’ box.
Note: Changing the network
password does not alter the
DEK number in the ‘Remote
Passwords’ box – each device
will always be listed by its DEK
number!
4. Open the Security section and
check the Network Password of
the locally connected device –
it will have changed to the new
password (e.g. LINDY)
LINDY HomePlug Ethernet Bridge Page 12
Page 13

4. Open the Device section and
check the Link Quality of the
remote devices by clicking
‘Refresh’.
Note: When the password
change is successful the link
quality will be ‘Good’ or
‘Excellent’. When a HomePlug
device with an incorrect
password is present on the
network, the link will be poor!
Manual
LINDY HomePlug Ethernet Bridge Page 13
Page 14

Radio Frequency Energy
Shielded cables must be used with this equipment to maintain compliance
with radio frequency energy emission regulations and ensure a suitably
high level of immunity to electromagnetic disturbances.
FCC Warning
This equipment has been tested and found to comply with the limits for a Class B Digital device,
pursuant to part 15 of the FCC Rules. These limits are designed to provide reasonable protection
against harmful interference in a residential installation. This equipment generates, uses, and
can radiate radio frequency energy and, if not installed and used in accordance with the
instructions, may cause harmful interference to radio communications. However, there is no
guarantee that interference will not occur in a particular installation. If this equipment does
cause harmful interference to radio or television reception, which can be determined by turning
the equipment off and on, the user is encouraged to try to correct the interference by one or
more of the following measures:
y Reorient or relocate the receiving antenna
y Increase the separation between the equipment and receiver
y Connect the equipment into an outlet on a circuit different from that to which the receiver is
connected
y Consult the dealer or an experienced radio/TV technician for help
You are cautioned that changes or modifications not expressly approved by the party
responsible for compliance could void your authority to operate the equipment.
This device complies with part 15 of the FCC Rules.
Operation is subject to the following two conditions:
1. This device may not cause harmful interference, and
2. This device must accept any interference received, including interference that may cause undesired
operation
For Home and Office Use
Tested to comply
with FCC Standards
LINDY No. 25120
© LINDY ELECTRONICS LIMITED & LINDY-ELEKTRONIK GMBH - SECOND EDITION (Feb 2004)
 Loading...