

Page 1

Wireless Gesture Mouse
User Manual English
Benutzerhandbuch Deutsch
Manuel Utilisateur Français
Manuale d’uso Italiano
LINDY No. 20900
www.lindy.com
© LINDY ELECTRONICS LIMITED & LINDY-ELEKTRONIK GMBH - FIRST EDITION (FEBRUARY 2013)
Page 2
User Manual English
Introduction
Thank you for purchasing the LINDY Wireless Gesture Mouse. This mouse uses gesture control
to accelerate and improve daily computer operation in web browsers, folders and general
operating system use. Navigation is made easier as commonly and operations can be
completed by a simple gesture.
Package Contents
Wireless Gesture Mouse
Wireless Nano-Receiver
Two AAA batteries
This manual
Specification
Two physical mouse keys (right/left), optical scroll wheel, optical new tab key and optical
Touch Gesture Spot.
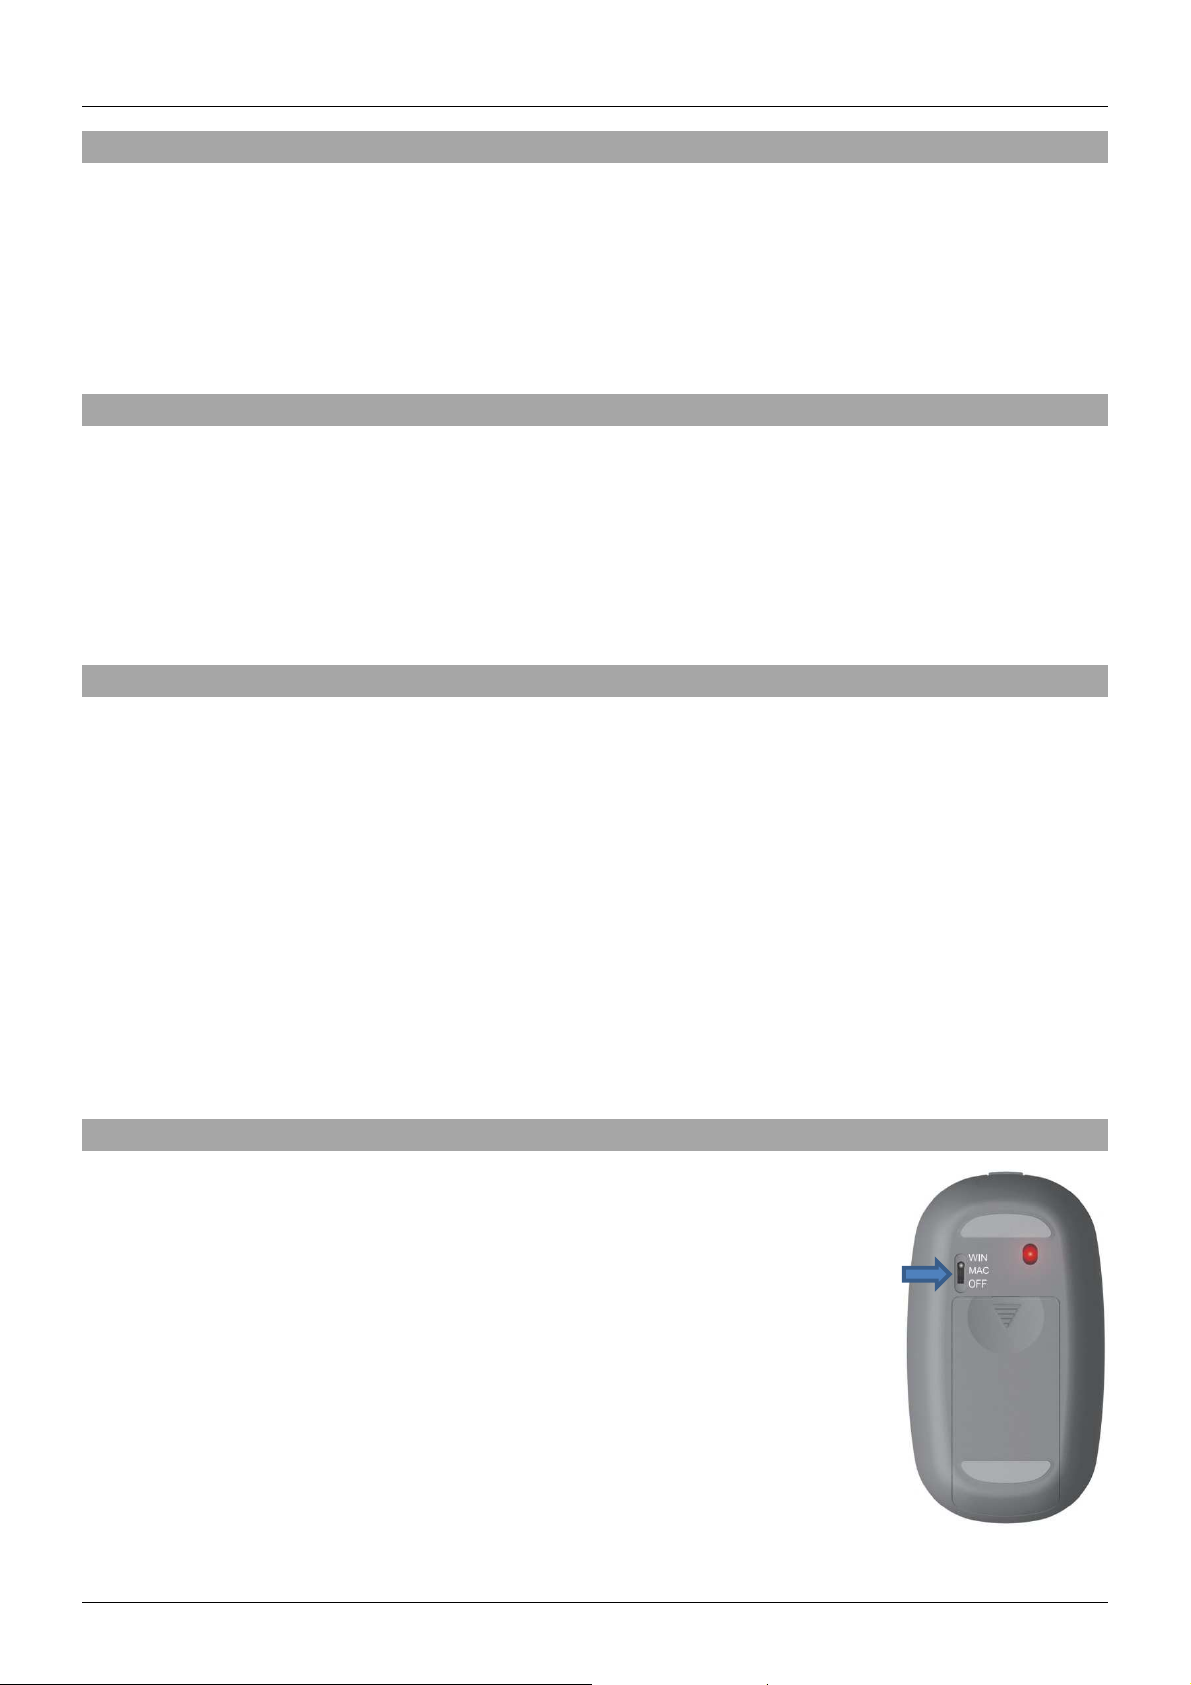
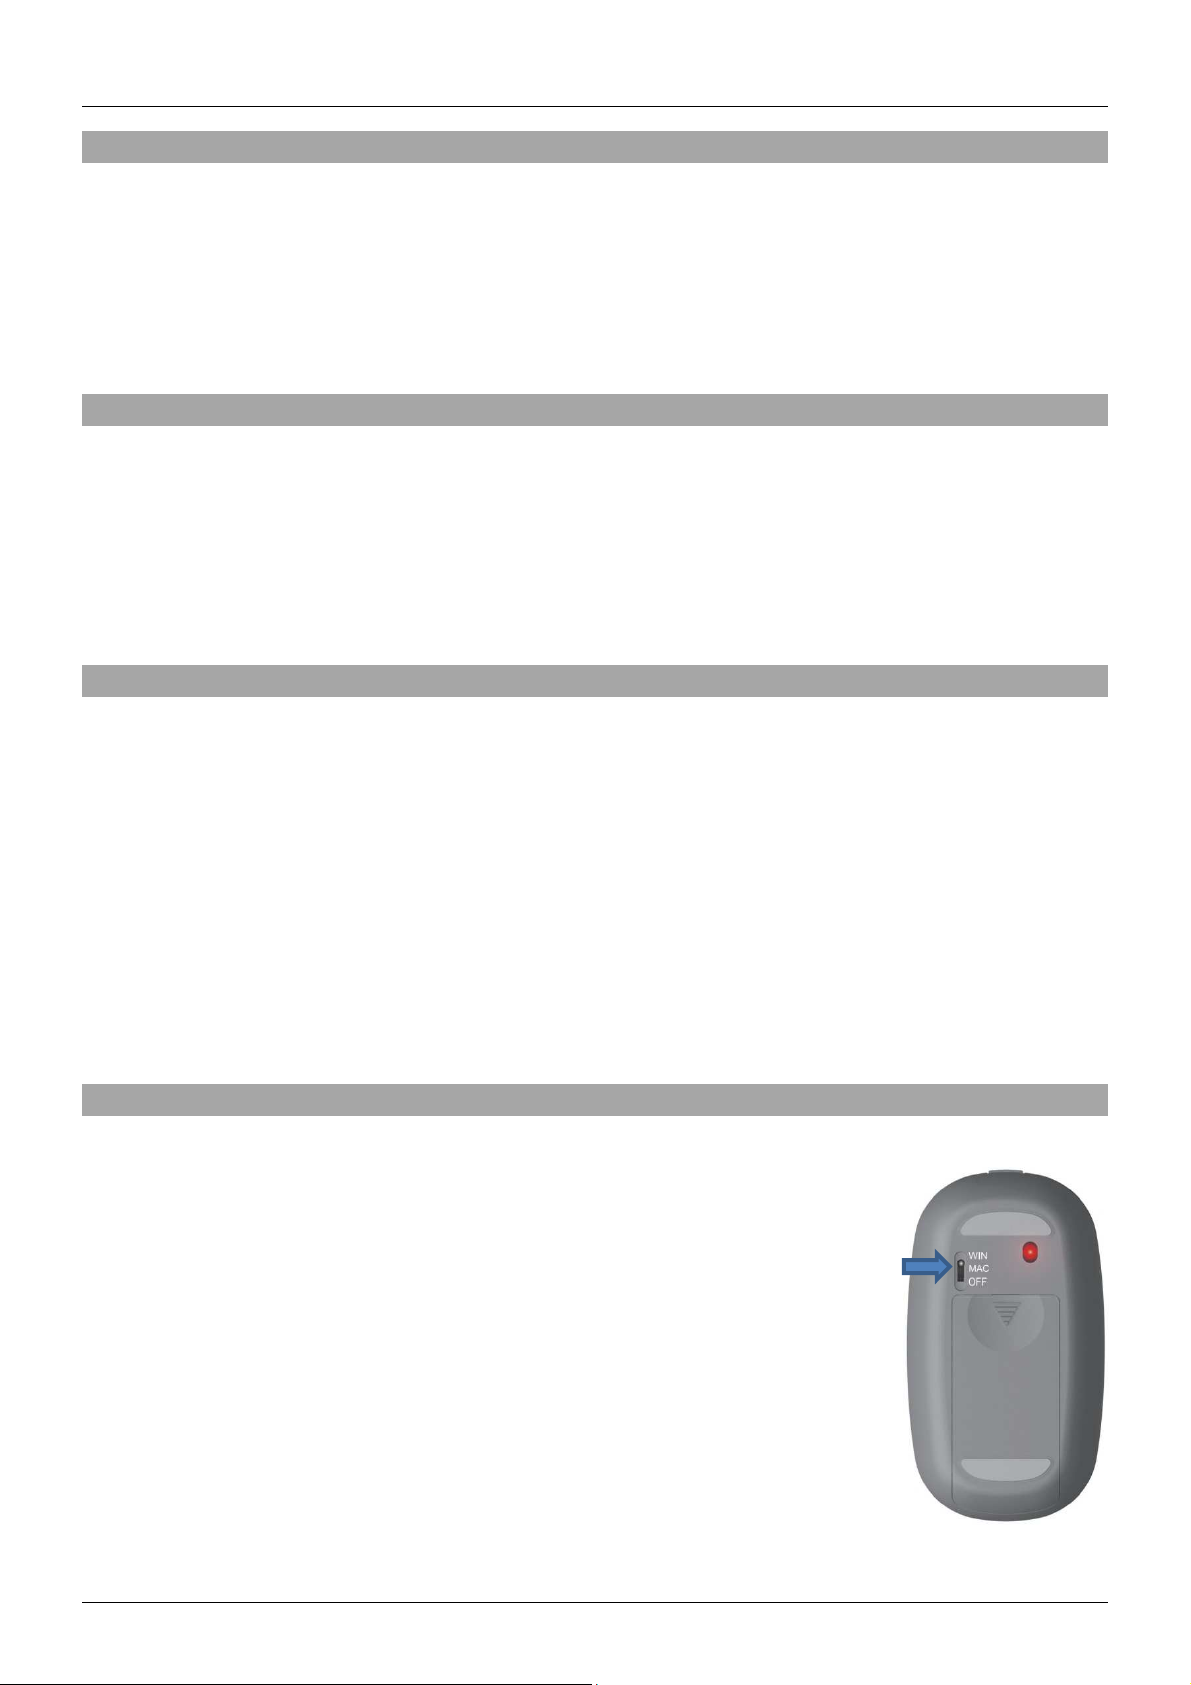
Switch on the bottom: Windows, Mac, Off
Wireless Nano-Receiver storable in the battery compartment
Resolution: 1000 dpi
2.4 GHz band with 10m range
Plug&play
Colour: Black
Power supply: 2 x AAA batteries
Dimensions: 5.5 x 10 x 2.5 cm (W x D x H) ; Weight: 0.1 kg (per unit)
Installation
1. Take the Wireless Nano-Receiver out of the battery compartment
and put in the supplied batteries.
2. Plug the Receiver into an available USB port. It is possible to plug in
at any time because the mouse supports plug&play.
3. Using the switch on its base turn the mouse on choosing between
Windows or Mac.
1
Page 3
User Manual English
Features
The mouse works in Windows mode with a Mac and vice versa, but the features are different for
each operating system. The features of Windows XP / 7 / 8 and Mac OS X are listed below. The
following two optical keys behave the same way in all operating systems:
• Middle mouse button:
Open new tabs in browsers.
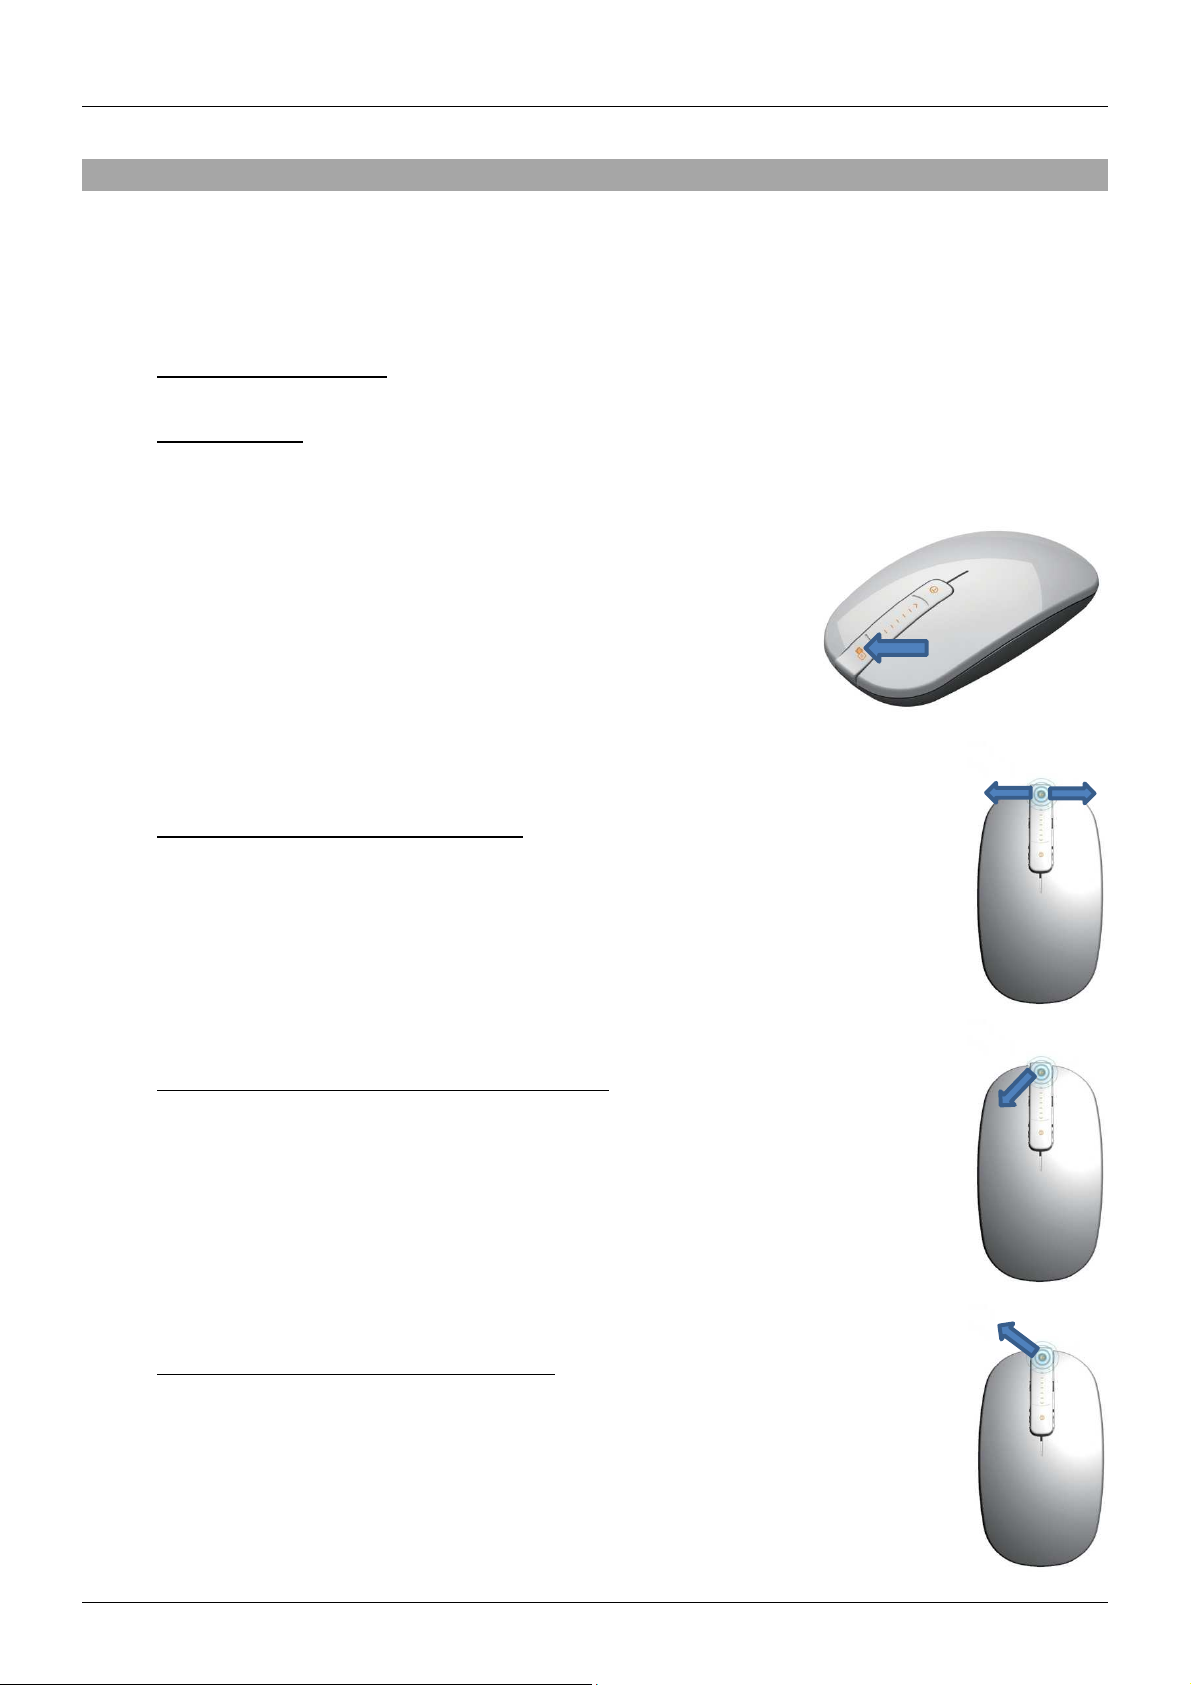
• Touch Wheel:
It acts like a regular scroll wheel. Touch the wheel and move the mouse sideways to
scroll sideways.
The gestures listed below have to be executed in connection with
the Touch Gesture Spot. You have to touch the spot and
maintain contact until you have executed your gesture.
1. Forward/backward (Win XP / 7 / 8)
Move the mouse to the left for the previous page or to the right for next
page. Use these features in folders and browsers.
2. Windows-Key ( Win XP / 7), Bricks (Win 8)
Move the mouse diagonally down/left.
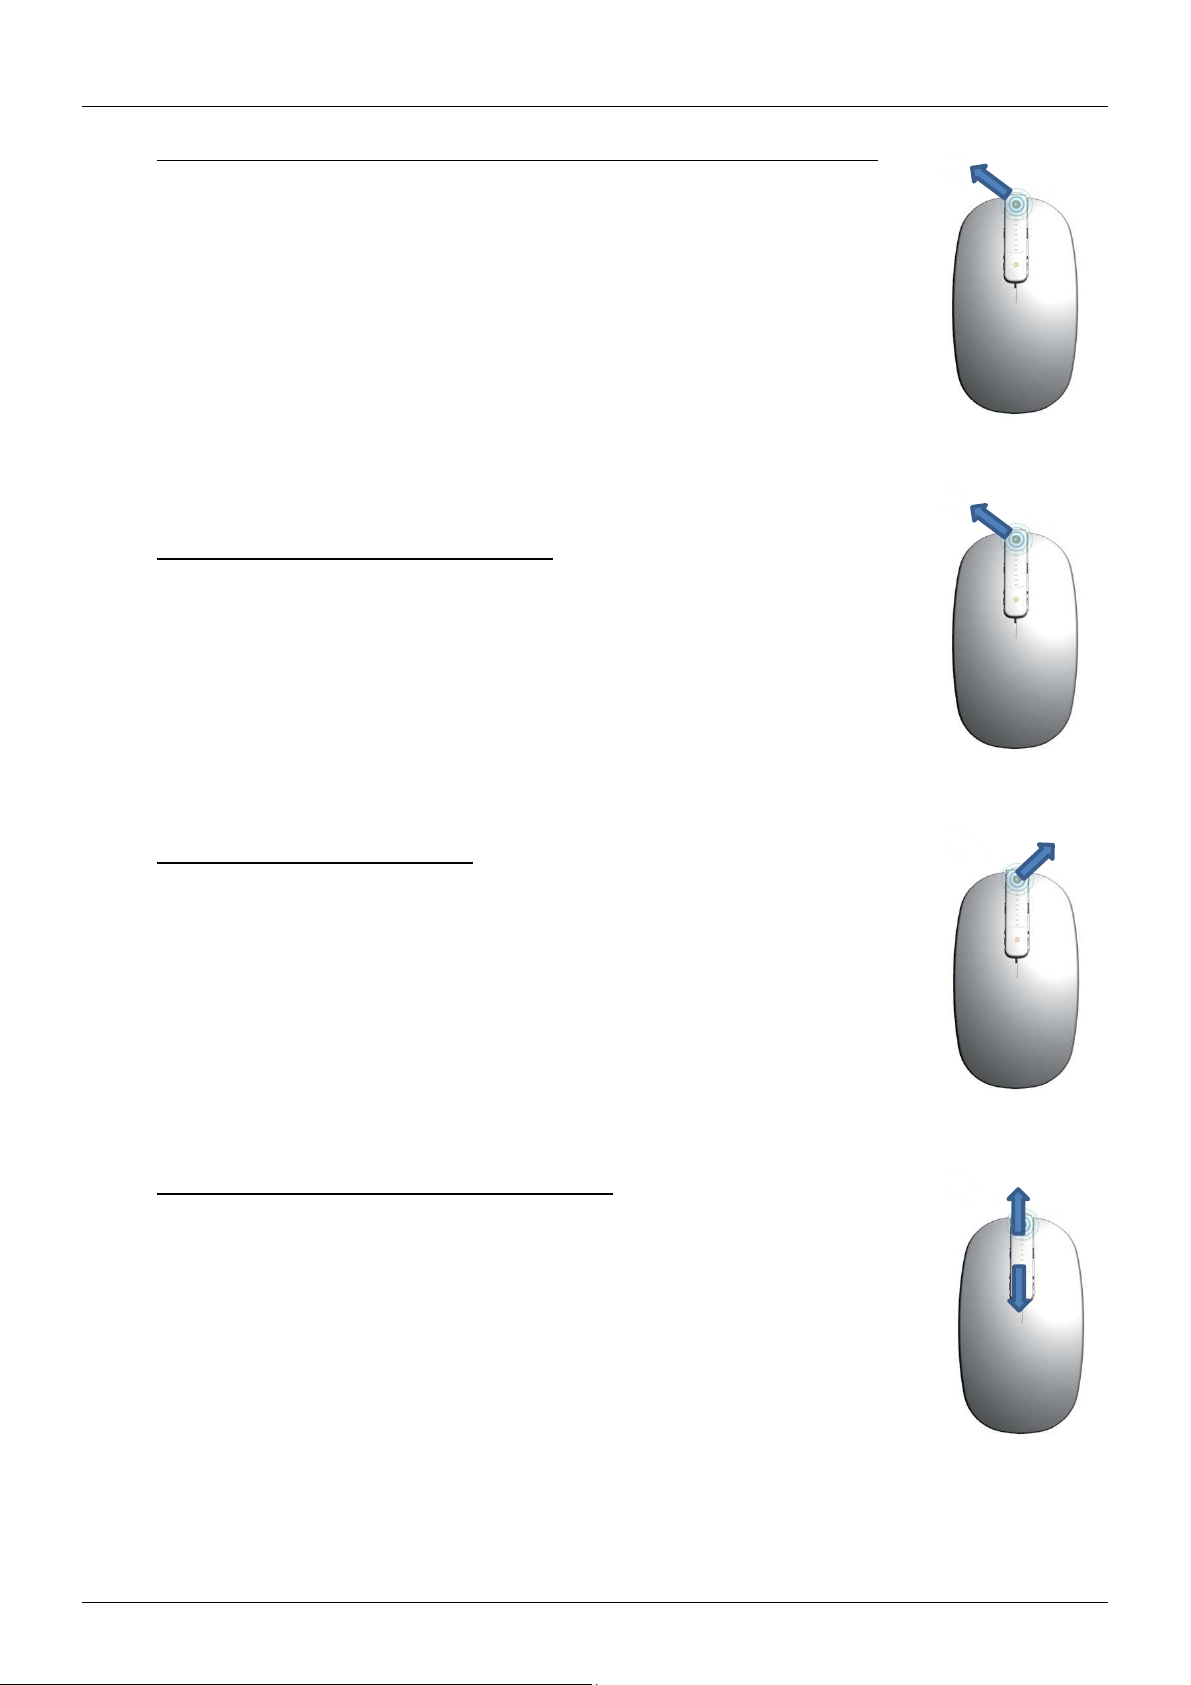
3. Changing tabs in a Browser (Win XP)
Move the mouse diagonally up/left.
2
Page 4
User Manual English
4. Windows Aero-Flip (Win 7), Vertical bar of opened windows (Win 8)
Move the mouse diagonally up/left. There are several ways to switch
between the now shown windows:
a) Same gesture as forward/backwards
b) You can choose the window by mouse click.
c) You can scroll with Touch Wheel.
5. Display opened windows (Mac OS X)
Move the mouse diagonally up/left.
6. Windows Charms Bar (Win 8)
Move the mouse diagonally up/right.
7. Quick scroll (Win XP / 7 / 8 und Mac OS X)
Stay on the touch wheel for a moment. Then move the mouse up or
down.
3
Page 5
User Manual English
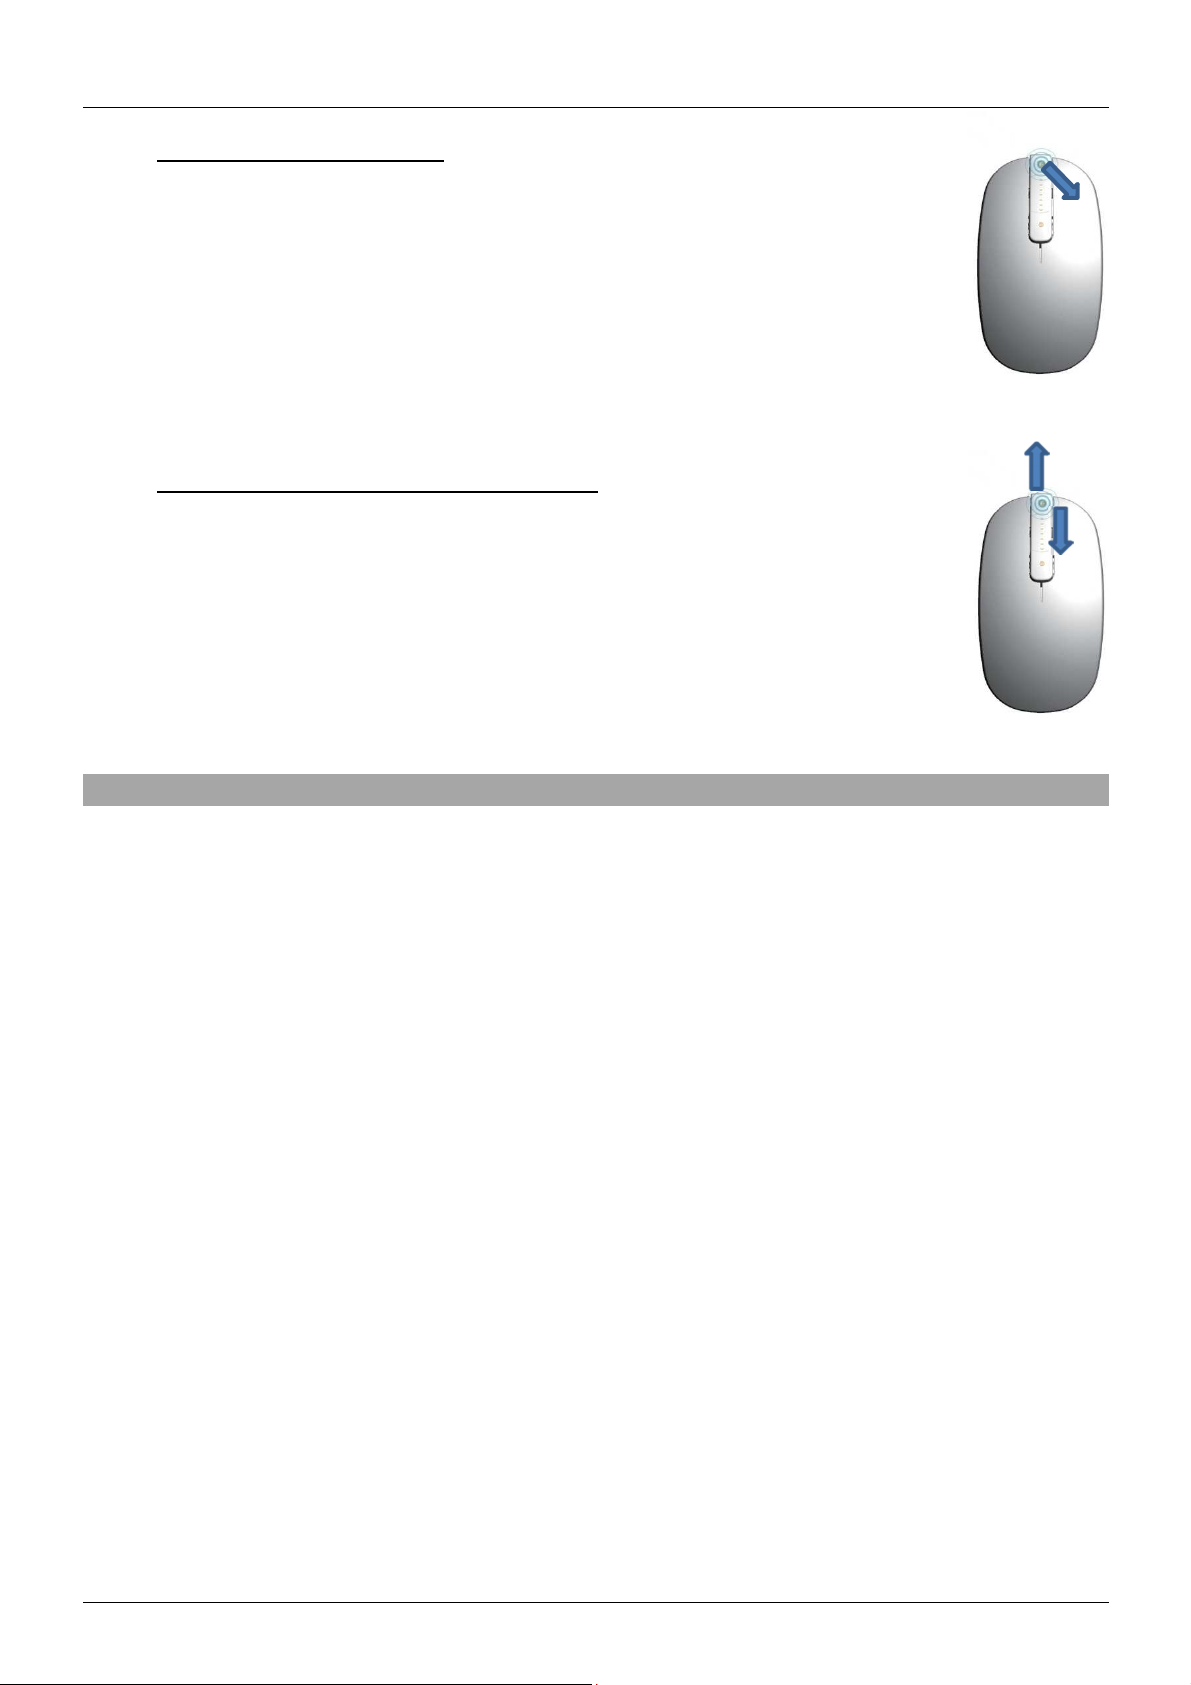
8. Show Desktop (Mac OS X)
Move the mouse diagonally down/right.
9. Zoom-In/Out (Win XP/7/8 and Mac OS X)
Touch and hold the Gesture Spot and move the mouse up or down for
image zoom-in/out.
Troubleshooting
If the cursor doesn´t move on the screen, check the following cases:
1. Is the Nano-Receiver plugged-in correctly?
2. Is the power of the mouse turned on?
3. Does the optical sensor light up when it is turned on? If not, replace the batteries.
4. If the problem persists, disconnect and then re-attach the Nano-Receiver.
4
Page 6
Benutzerhandbuch Deutsch
Einführung
Vielen Dank, dass sie sich für die LINDY Gesture Mouse entschieden haben. Mit der
Gestensteuerung der Wireless Gesture Mouse lassen sich alltägliche Abläufe in Browsern und
Ordnern beschleunigen und verbessern. Die Navigation wird durch schnellere Zugriffe auf
geöffnete Ordner und durch Wechseln zwischen Fenstern vereinfacht.
Lieferumfang
Wireless Gesture Mouse
Wireless Nano-Empfänger
Zwei AAA Batterien
Dieses Handbuch
Spezifikationen
Zwei physische Maustasten (rechts/links), optisches Scrollrad, optische mittlere Maustaste,
optischer Touch Gesture Spot
Umschalter zwischen Off, Windows und Mac an der Unterseite
Wireless Nano-Empfänger im Batteriefach verstaubar
Auflösung: 1000 dpi
2,4 Ghz Band mit einer Funkreichweite bis 10m
Plug&Play
Farbe: schwarz
Stromversorgung mit 2 Batterien Typ AAA
Abmessungen: ca.: 5,5 x 10 x 2,5 cm (B x T x H) ; Gewicht ca.: 0.08 kg (je Einheit)
Installation und Inbetriebnahme
1. Nehmen sie den Wireless Nano-Empfänger aus dem Batteriefach
und legen sie die mitgelieferten Batterien ein.
2. Stecken Sie nun den Empfänger in einen USB Slot. Da die Maus
Plug&Play unterstützt, kann das im laufenden Betrieb geschehen.
3. Schalten sie die Maus an der Unterseite ein. Dies kann
betriebssystemspezifisch geschehen (Windows oder Mac).
1
Page 7

Benutzerhandbuch Deutsch
Benutzung
Die Maus funktioniert im Windows-Zustand auch auf dem Mac und umgekehrt, jedoch sind die
Funktionen bei verschiedenen Betriebssystemen unterschiedlich. Diese werden von den
Betriebssystemen Windows XP / 7 / 8 und Mac OS X im folgenden erklärt. Folgende Tasten
verhalten sich bei allen Betriebssystemen gleich:
• Mittlere Maustaste:
Die mittlere Maustaste wird durch Touch betätigt. Hiermit lassen sich beispielsweise neue
Tabs im Browser öffnen.
• Touch Wheel:
Das Scrollen wird auch per Touch vorgenommen, intuitiv mit dem mittleren Touch Wheel.
Um seitwärts zu scrollen, muss der Finger auf dem Touch Wheel ruhen und die
komplette Maus seitlich bewegt werden.
Die im folgenden beschriebenen Gesten sind alle in Verbindung
mit dem sogenannten Touch Gesture Spot auszuführen. Dabei
ruht der Finger auf dieser optischen Taste und die Maus wird in
verschiedene Richtungen bewegt.
1. Vorwärts/Zurück (Win XP / 7 / 8)
Man bewegt die Maus nach rechts für vorwärts und nach links für
rückwärts. Dies kann in Ordnern oder in verschiedenen Browsern
angewendet werden.
2. Windows-Taste (Win XP / 7), Kachelansicht (Win 8)
Hier muss die Maus nach links unten bewegt werden.
2
Page 8

Benutzerhandbuch Deutsch
3. Wechseln der Tabs im Browser (Win XP)
Hier muss die Maus nach links oben bewegt werden.
4. Windows Aero-Flip (Win 7)
Hier muss die Maus nach links oben bewegt werden. Es gibt mehrere
Möglichkeiten um zwischen den nun angezeigten Fenstern zu
wechseln:
a) Gleiche Geste wie bei "Vorwärts/Rückwärts"
b) Das gewünschte Fenster kann einfach per Linksklick ausgewählt
werden.
c) Man benutzt das Touch Wheel.
5. Vertikale Leiste für geöffnete Fenster (Win 8)
Hier muss die Maus nach links oben bewegt werden.
a) Gleiche Geste wie bei "Vorwärts/Rückwärts"
b) Das gewünschte Fenster kann einfach per Linksklick
ausgewählt werden.
c) Man tippt auf den Gesture Touch Spot und bewegt die Maus
solange nach rechts unten, bis das gewünschte Fenster in
der Leiste ausgewählt ist.
d) Man benutzt das Touch Wheel.
6. Schnelles Scrollen (Win XP / 7 / 8 und Mac OS X)
Verharren sie einen kurzen Moment auf dem Touch Wheel, bevor sie
die Maus nach oben oder unten bewegen.
3
Page 9

Benutzerhandbuch Deutsch
Anzeige der geöffneten Fenster (Mac OS X)
Hier muss die Maus nach links oben bewegt werden.
7. Windows Charms Bar (Win 8)
Hier muss die Maus nach rechts oben bewegt werden.
8. Desktop anzeigen (Mac OS X)
Hier muss die Maus nach rechts unten bewegt werden.
9. Zoom-In/Out (Win XP/7/8 und Mac OS X)
Legen Sie den Finger auf das Touch Wheel und bewegen Sie
die Maus zum Zoomen nach oben oder unten.
Fehlersuche und -behebung
Ist der Cursor auf dem Bildschirm eingefroren, so überprüfen Sie Folgendes:
1. Ist der Nano-Receiver korrekt in den USB-Port eingesteckt?
2. Ist die Maus eingeschaltet?
3. Leuchtet der optische Sensor wenn die Maus eingeschaltet ist? Sollte dies nicht der Fall
sein, setzen Sie bitte neue Batterien ein.
4. Sollte es weiterhin Probleme geben, ziehen Sie den Nano-Receiver aus dem USB-Port
und stecken ihn erneut ein.
4
Page 10

Manuel Utilisateur Français
Introduction
Merci d’avoir choisi la souris Wireless Gesture Mouse LINDY. Cette souris utilise un contrôle
gestuel pour accélérer et améliorer les opérations quotidiennes sur votre ordinateur en
naviguant sur internet ou dans vos répertoires, et l’utilisation générale de votre système
d’exploitation. La navigation est facilitée et les opérations sont complétées d’un simple geste.
Contenu de l’emballage
Souris Wireless Gesture Mouse
Nano récepteur sans-fil
2 piles AAA
Ce manuel
Spécifications
Deux boutons de souris “physique” (droit/gauche), molette optique, bouton du milieu optique
et spot tactile.
Bouton sur le dessous: Windows, Mac, Off
Nano-récepteur sans-fil stockable dans le compartiment des piles
Résolution: 1000 dpi
Fréquence 2.4 GHz avec 10m de portée
Plug&play
Couleur: Noir
Alimentation: 2 piles AAA (LR06)
Dimensions: 5.5 x 10 x 2.5 cm (L x P x H) ; Poids: 0.1 kg
Installation
1. Retirez le nano-récepteur sans-fil du compartiment des piles et insérez
les piles fournies.
2. Branchez le récepteur dans un port USB disponible. Il est possible de
brancher la souris à tout moment, ce produit étant totalement
plug&play.
3. En utilisant le sélecteur sur le dessous, mettez la souris sous tension
et choisissez entre Windows ou Mac.
1
Page 11

Manuel Utilisateur Français
Utilisation
La souris fonctionne en mode Windows avec un Mac et vice versa, mais les fonctionnalités sont
différentes pour chaque système d’exploitation. Les fonctionnalités pour Windows XP / 7 / 8 et
Mac OS X sont listées ci-dessous. Les deux boutons suivant se comportent de la même façon
dans tous les systèmes d’opérations:
• Bouton de souris du milieu:
Ouvre de nouveaux onglets dans les navigateurs.
• Molette tactile:
Fonctionne comme une molette standard. Touchez la molette et bougez sur le côté pour
faire défiler latéralement.
Les gestuelles listées ci-dessous doivent être exécutées dans le
cadre de la gestuelle “Touch Gesture Spot “. Vous devez
toucher le spot et maintenir l’appui jusqu’à ce que vous ayez
exécuté votre geste.
1. En avant/arrière (Win XP / 7 / 8)
Déplacez la souris vers la gauche pour la page précédente ou vers la
droite pour la page suivante. Utilisez ces fonctionnalités dans les
répertoires et navigateurs.
2. Bouton Windows ( Win XP / 7), Briques (Win 8)
Déplacez la souris en diagonale vers le bas à gauche.
3. Changer d’onglet dans un navigateur (Win XP)
Déplacez la souris en diagonale vers le haut à gauche.
2
Page 12

Manuel Utilisateur Français
4. Windows Aero-Flip (Win 7), barre verticale d’une fenêtre ouverte
(Win 8)
Déplacez la souris en diagonale vers le haut à gauche. Il existe
plusieurs façons de passer d’une fenêtre active à une autre:
a) Même gestuelle qu’avant/arrière
b) Vous pouvez choisir la fenêtre par un clic de souris.
c) En faisant défiler avec la molette tactile.
5. Afficher la fenêtre ouverte (Mac OS X)
Déplacez la souris en diagonale vers le haut à gauche.
6. Windows Charms Bar (Win 8)
Déplacez la souris en diagonale vers le haut à droite.
7. Défilement rapide (Win XP / 7 / 8 und Mac OS X)
Maintenez l’appui sur la molette tactile, puis déplacez la souris vers le
haut ou le bas.
3
Page 13

Manuel Utilisateur Français
8. Afficher le bureau (Mac OS X)
Déplacez la souris en diagonale vers le bas à droite.
9. Zoomer/dé-zoomer (Win XP/7/8 und Mac OS X)
Maintenez le doigt sur la molette tactile et déplacez la souris vers le haut
ou le bas pour zoomer/dé-zoomer.
Dépannage
Si le curseur ne se déplace pas sur l’écran, vérifiez les points suivants :
a) Le nano-récepteur est-il bien branché ?
b) La souri est-elle bien mise sous tension ?
c) Le capteur optique est-il allumé une fois la souris sous tension? Si ce n’est pas le cas,
remplacer les piles.
d) Si le problème persiste, débranchez et rebranchez le nano-récepteur.
4
Page 14

Manuale d’uso Italiano
Introduzione
Ti ringraziamo per aver acquistato il LINDY Wireless Gesture Mouse. Questo mouse utilizza
comandi gestuali per accelerare e migliorare il funzionamento del computer nell’utilizzo di
browser web, navigazione cartelle, ecc.. . La navigazione e le operazioni quotidiane sono rese
più semplici con un semplice gesto.
Contenuto della confezione
Mouse Wireless Gesture
Mini Ricevitore Wireless
Due Batterie tipo AAA
Questo manuale
Specifiche
Mouse a due tasti (destra/sinistra), rotella ottica, nuova scheda tasto di scorrimento ottico e
tasto touch gesture.
Interruttore nel retro: Windows, Mac, spento
Mini ricevitore wireless conservabile nel vano batteria
Risoluzione: 1000 dpi
Banda di trasmisisone: 2.4 GHz con raggio di funzionamento di 10m
Plug & Play
Colore: nero
Alimentazione: 2 batterie AAA
Dimensioni: 5.5 x 10 x 2,5 cm (W x D x H); Peso: 0.1 kg
Temperatura operativa: 0-70°C. Solo per uso interno
Installazione
1. Estrarre il mini ricevitore dal vano batteria e inserire le batterie in
dotazione
2. Collegare il ricevitore ad una porta USB disponibile. E’ possibile
inserire il ricevitore in qualsiasi momento, installazione Plug&Play
3. Utilizzando l’interruttore sul retro del mouse e possibile scegliere tra
Windows o Mac
1
Page 15

Manuale d’uso Italiano
Il mouse può funzionare in modalità Windows con Mac e vice versa, ma alcune funzioni sono
specifiche per ogni sistema operativo.
Le due funzionalità seguenti sono comuni per tutti i sistemi operativi:
• Pulsante centrale del mouse:
Apre nuove schede nel browser
• Touch Wheel:
Si comporta come una rotella di scorrimento. Toccare la ruota e spostare il mouse
lateralmente per scorrere lateralmente
Le attività elencate di seguito sono da eseguire in relazione con il
Touch Gesture Spot. Bisogna toccare il punto e mantenere il
contatto finchè non si è eseguito l’azione.
Le seguenti funzioni sono specifiche per i sistemi operativi indicati:
1. Avanti/Indietro (Win XP / 7 / 8)
Muovere il mouse a sinistra per la pagina precedente o a destra per la
pagina successiva. Usare questa azione su cartelle e browser.
2. Tasto Windows ( Win XP / 7), Riquadri del menu start (Win 8)
Spostare il mouse diagonalmente, giù/sinistra.
3. Cambiare le schede nel Browser (Win XP)
Spostare il mouse diagonalmente su/sinistra
2
Page 16

Manuale d’uso Italiano
4. Windows Aero-Flip (Win 7), Barra verticale delle finestre aperte (Win 8)
Spostare il mouse diagonalmente su/sinistra. Ci sono diversi modi per
passare da una finestra all’altra:
d) Stesso gesto come avanti/indietro
e) E’ possibile scegliere la finestra con un click del mouse
f) Si può scorrere con Touch Wheel.
5. Display aperto Windows (Mac OS X)
Spostare il mouse diagonalmente su/sinistra
6. Windows Charms Bar (Win 8)
Spostare il mouse diagonalmente su/destra
7. Scorrimento veloce (Win XP / 7 / 8 e Mac OS X)
Rimanere sulla ruota per un istante, quindi spostare il mouse verso l’alto
o il basso.
3
Page 17

Manuale d’uso Italiano
8. Mostra Desktop (Mac OS X)
Spostare il mouse diagonalmente giù/destra.
9. Zoom-In/Out (WinXP/7/8 e Mac OS X)
Toccare, tenere premuto il tasto e spostare il mouse verso l´alto o verso il
basso per zoom-in/out.
Risoluzione dei problemi
Se il cursore non si muove sullo schermo, verificare I seguenti casi:
1. Il Mini ricevitore è collegato correttamente?
2. E’ acceso il Mouse?
3. E’ accesa la luce del sensore ottico? Se non è così, sostituire le batterie.
4. Se il problema persiste scollegare e ricollegare il Mini ricevitore.
4
Page 18

Radio Frequency Energy, Certifications, Recycling Information
Shielded cables must be used with this equipment to maintain compliance with radio frequency energy emission
regulations and ensure a suitably high level of immunity to electromagnetic disturbances.
FCC Warning
This equipment has been tested and found to comply with the limits for a Class B digital device, pursuant to part 15
of the FCC Rules. These limits are designed to provide reasonable protection against harmful interference in a
residential installation.
This equipment generates, uses, and can radiate radio frequency energy and, if not installed and used in
accordance with the instructions, may cause harmful interference to radio communications. However, there is no
guarantee that interference will not occur in a particular installation. If this equipment does cause harmful
interference to radio or television reception, which can be determined by turning the equipment off and on, the user
is encouraged to try to correct the interference by one or more of the following measures:
Reorient or relocate the receiving antenna
Increase the separation between the equipment and receiver
Connect the equipment into an outlet on a circuit different from that to which the receiver is connected
Consult the dealer or an experienced technician for help
You are cautioned that changes or modification not expressly approved by the party responsible for compliance
could void your authority to operate the equipment.
This device complies with part 15 of the FCC Rules.
Operation is subject to the following two conditions:
1. This device may not cause harmful interference, and
2. This device must accept any interference received, including interference that may cause undesired operation.
Information für deutsche Kunden und Verbraucher in Deutschland nach dem Gesetz zur Neuregelung der
abfallrechtlichen Produktverantwortung für Batterien und Akkumulatoren vom 25. Juni 2009
Dies Produkt enthält zwei Typ AAA (Mikro) Primär Batterien (Al-Mn). Diese können nicht wieder aufgeladen
werden. Das Mülltonnensymbol auf Akkus, Batterien und Geräten bedeutet: Weder leere Batterien und Akkus noch
ausgediente Elektrogeräte dürfen in den Hausmüll, dies ist gesetzlich verboten.
Altbatterien und Altgeräte enthalten möglicherweise Schadstoffe, die Umwelt und Gesundheit schaden können.
Sie können leere Batterien oder Akkus einfach aus dem Batteriefach entnehmen und im Handel oder an den
Recyclinghöfen der Kommunen abgeben. Die Rückgabe ist dort für Sie unentgeltlich und gesetzlich
vorgeschrieben.
Bitte geben Sie auch ausgediente elektrische Altgeräte an den Recyclinghöfen bzw. bei den regionalen
Sammelsystemen der Kommunen ab. Die Rückgabe ist dort für Sie ebenfalls unentgeltlich. Zum Teil nimmt auch
der Handel Altgeräte kostenlos entgegen und führt sie dem Recycling zu.
Alle gesammelten Batterien, Akkus und Altgeräte werden wieder verwertet. So lassen sich wertvolle Rohstoffe wie
Eisen, Zink oder Nickel wieder zurück gewinnen. Batterie- und Geräterecycling ist so einer der leichtesten
Umweltschutzbeiträge an dem Sie aktiv teilnehmen können.
Dies schont die Umwelt und Ihren Geldbeutel.
Vielen Dank fürs Mitmachen!
Page 19

Radio Frequency Energy, Certifications, Recycling Information
WEEE (Waste of Electrical and Electronic Equipment),
Recycling of Electronic Products
United Kingdom
In 2006 the European Union introduced regulations (WEEE) for the collection and recycling of all waste electrical
and electronic equipment. It is no longer allowable to simply throw away electrical and electronic equipment.
Instead, these products must enter the recycling process.
Each individual EU member state has implemented the WEEE regulations into national law in slightly different
ways. Please follow your national law when you want to dispose of any electrical or electronic products. More
details can be obtained from your national WEEE recycling agency.
Germany / Deutschland
Die Europäische Union hat mit der WEEE Direktive umfassende Regelungen für die Verschrottung und das
Recycling von Elektro- und Elektronikprodukten geschaffen. Diese wurden von der Bundesregierung im Elektround Elektronikgerätegesetz – ElektroG in deutsches Recht umgesetzt. Dieses Gesetz verbietet vom 24.März 2006
an das Entsorgen von entsprechenden, auch alten, Elektro- und Elektronikgeräten über die Hausmülltonne! Diese
Geräte müssen den lokalen Sammelsystemen bzw. örtlichen Sammelstellen zugeführt werden! Dort werden sie
kostenlos entgegen genommen. Die Kosten für den weiteren Recyclingprozess übernimmt die Gesamtheit der
Gerätehersteller.
France
En 2006, l'union Européenne a introduit la nouvelle réglementation (DEEE) pour le recyclage de tout équipement
électrique et électronique.
Chaque Etat membre de l’ Union Européenne a mis en application la nouvelle réglementation DEEE de manières
légèrement différentes. Veuillez suivre le décret d’application correspondant à l’élimination des déchets électriques
ou électroniques de votre pays.
Italy
Nel 2006 l’unione europea ha introdotto regolamentazioni (WEEE) per la raccolta e il riciclo di apparecchi elettrici
ed elettronici. Non è più consentito semplicemente gettare queste apparecchiature, devono essere riciclate. Ogni
stato membro dell’ EU ha tramutato le direttive WEEE in leggi statali in varie misure. Fare riferimento alle leggi del
proprio Stato quando si dispone di un apparecchio elettrico o elettronico.
Per ulteriori dettagli fare riferimento alla direttiva WEEE sul riciclaggio del proprio Stato.
LINDY No 20900
1st Edition, February 2013
www.lindy.com
 Loading...