

Page 1
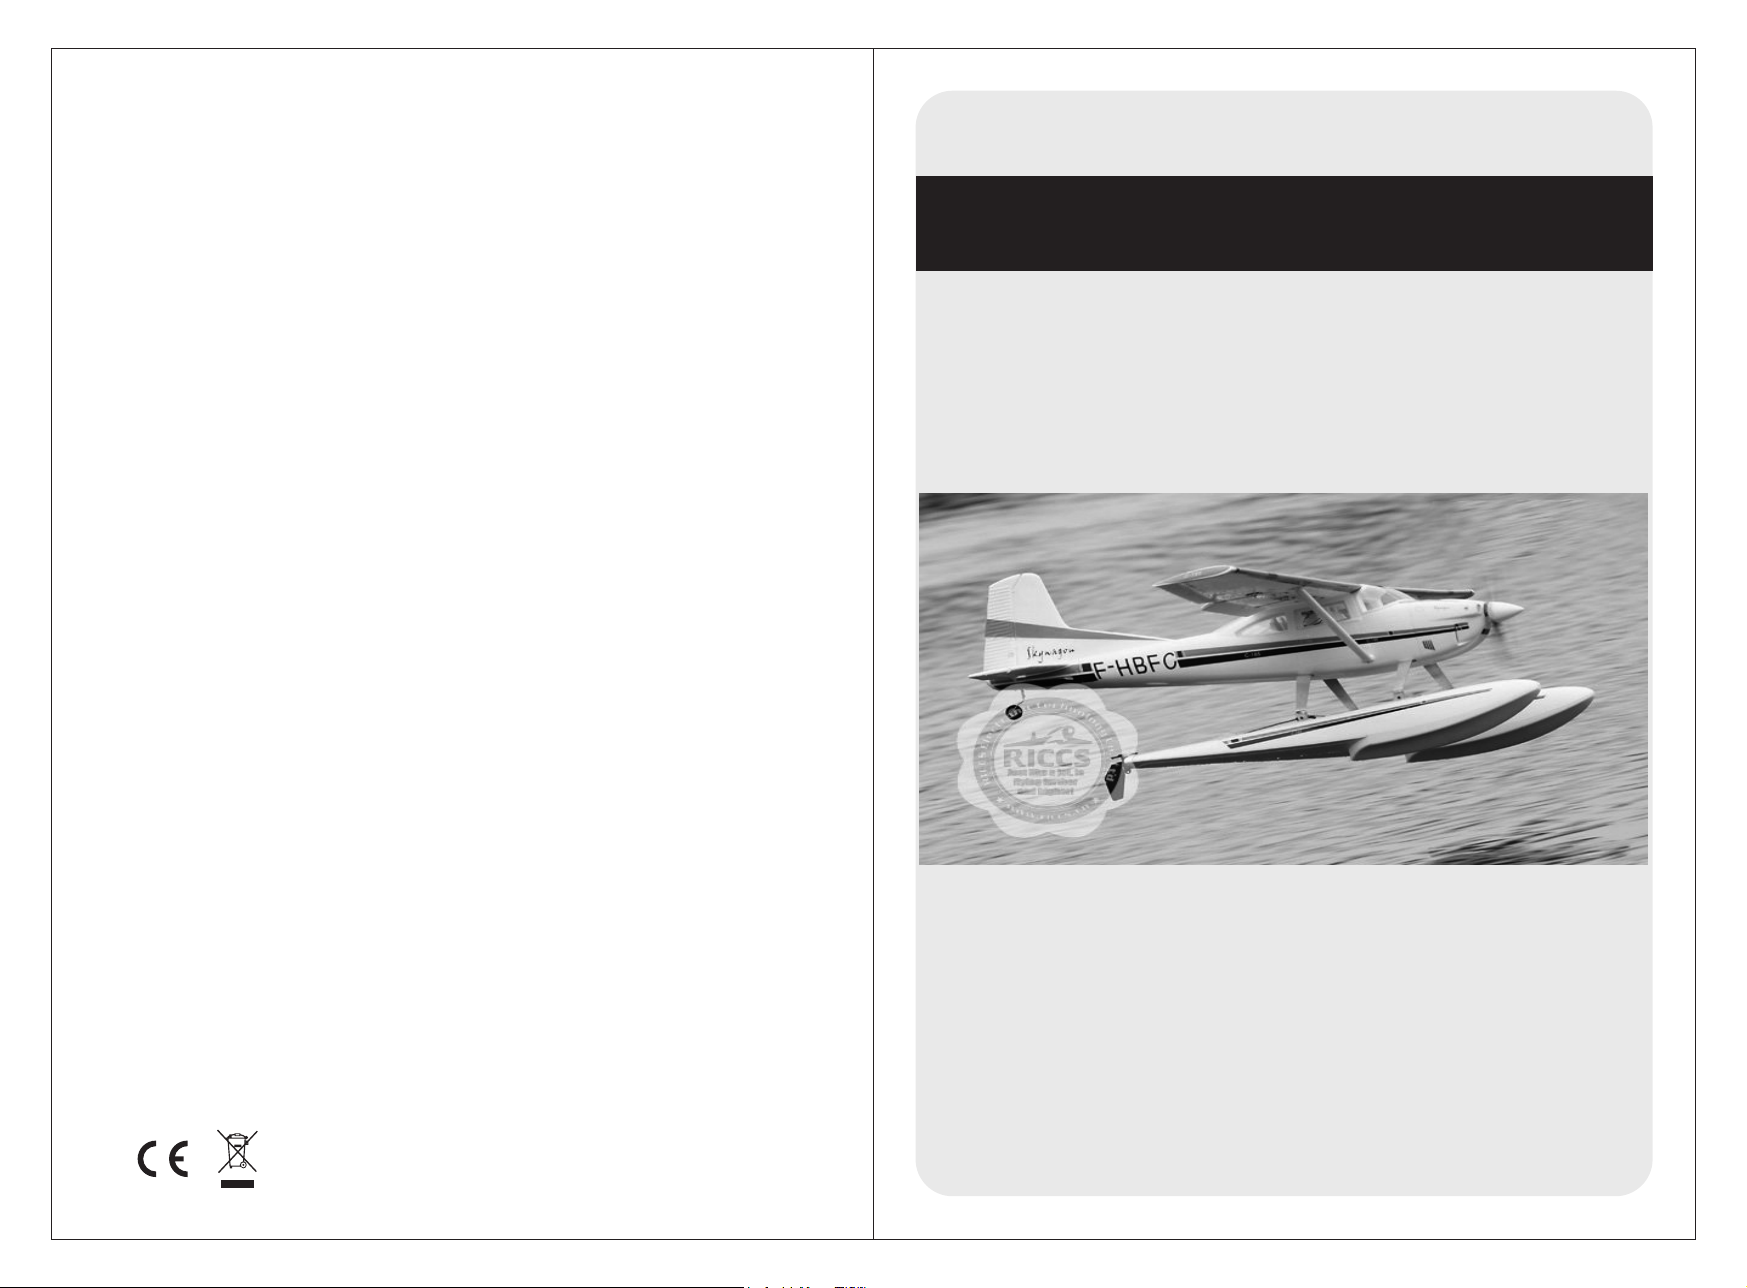
C-185 Manual
Modellbau Lindinger GmbH e-Mail: [email protected] www.lindinger.at
Modellbau Lindinger GmbH e-Mail: [email protected] www.lindinger.at
Page 2
C-185 Manual C-185 Manual
Modellbau Lindinger GmbH e-Mail: [email protected] www.lindinger.at
Modellbau Lindinger GmbH e-Mail: [email protected] www.lindinger.at
Foreword:
The new C185 has a lot of great features...it has an accurate scale
appearance, great lines, simple assembly, stable but aerobatic flight
characteristics, a very powerful brushless motor system, and requires
little or no maintainance.It is suitable for beginning or intermediate
pilots from age 14 on up, who want to either learn how to fly, or learn
some advanced aerobatics.Best of all, it can be converted to a floatplane
very easily.The floats will work off water, wet grass, or snow. It flies just
as well with the floats as without, you will really enjoy it.
You can also upgrade it to add flaps(Optional flaps can be activated with
two extra servos), for even more flying options, and it carry the weight
of an onboard camera, lighting system, or most other options you might
want to try.
Safety Precautions:
1.Please do not repair and modify the airplane with non-factory
parts.The responsibility is yours if you do.
2.Please do not mix new and old batteries, or alkaline and rechargable
batteries.Use only fresh alkaline batteries, and be sure to install them
with the correct polarity.
3.Do not fly the model over roads, railways, near power lines, near
airports, or over people or structures.
4.Do lot fly or launch the model towards people's faces.
5.Do not fly in strong winds or rain or thunderstorms.
6.Keep your hands and face away from the propeller.
Disclaimer:
1.This RC model is not a toy.The owner/pilot is responsible for any
damage to persons or property that results from the use of this product.
2.It is very important to follow ALL instructions for setting up and
debugging the model before attempting flight.
3.The manufacturer and their distributors decline any and all
responsibility for any liability arising from the use of this product.
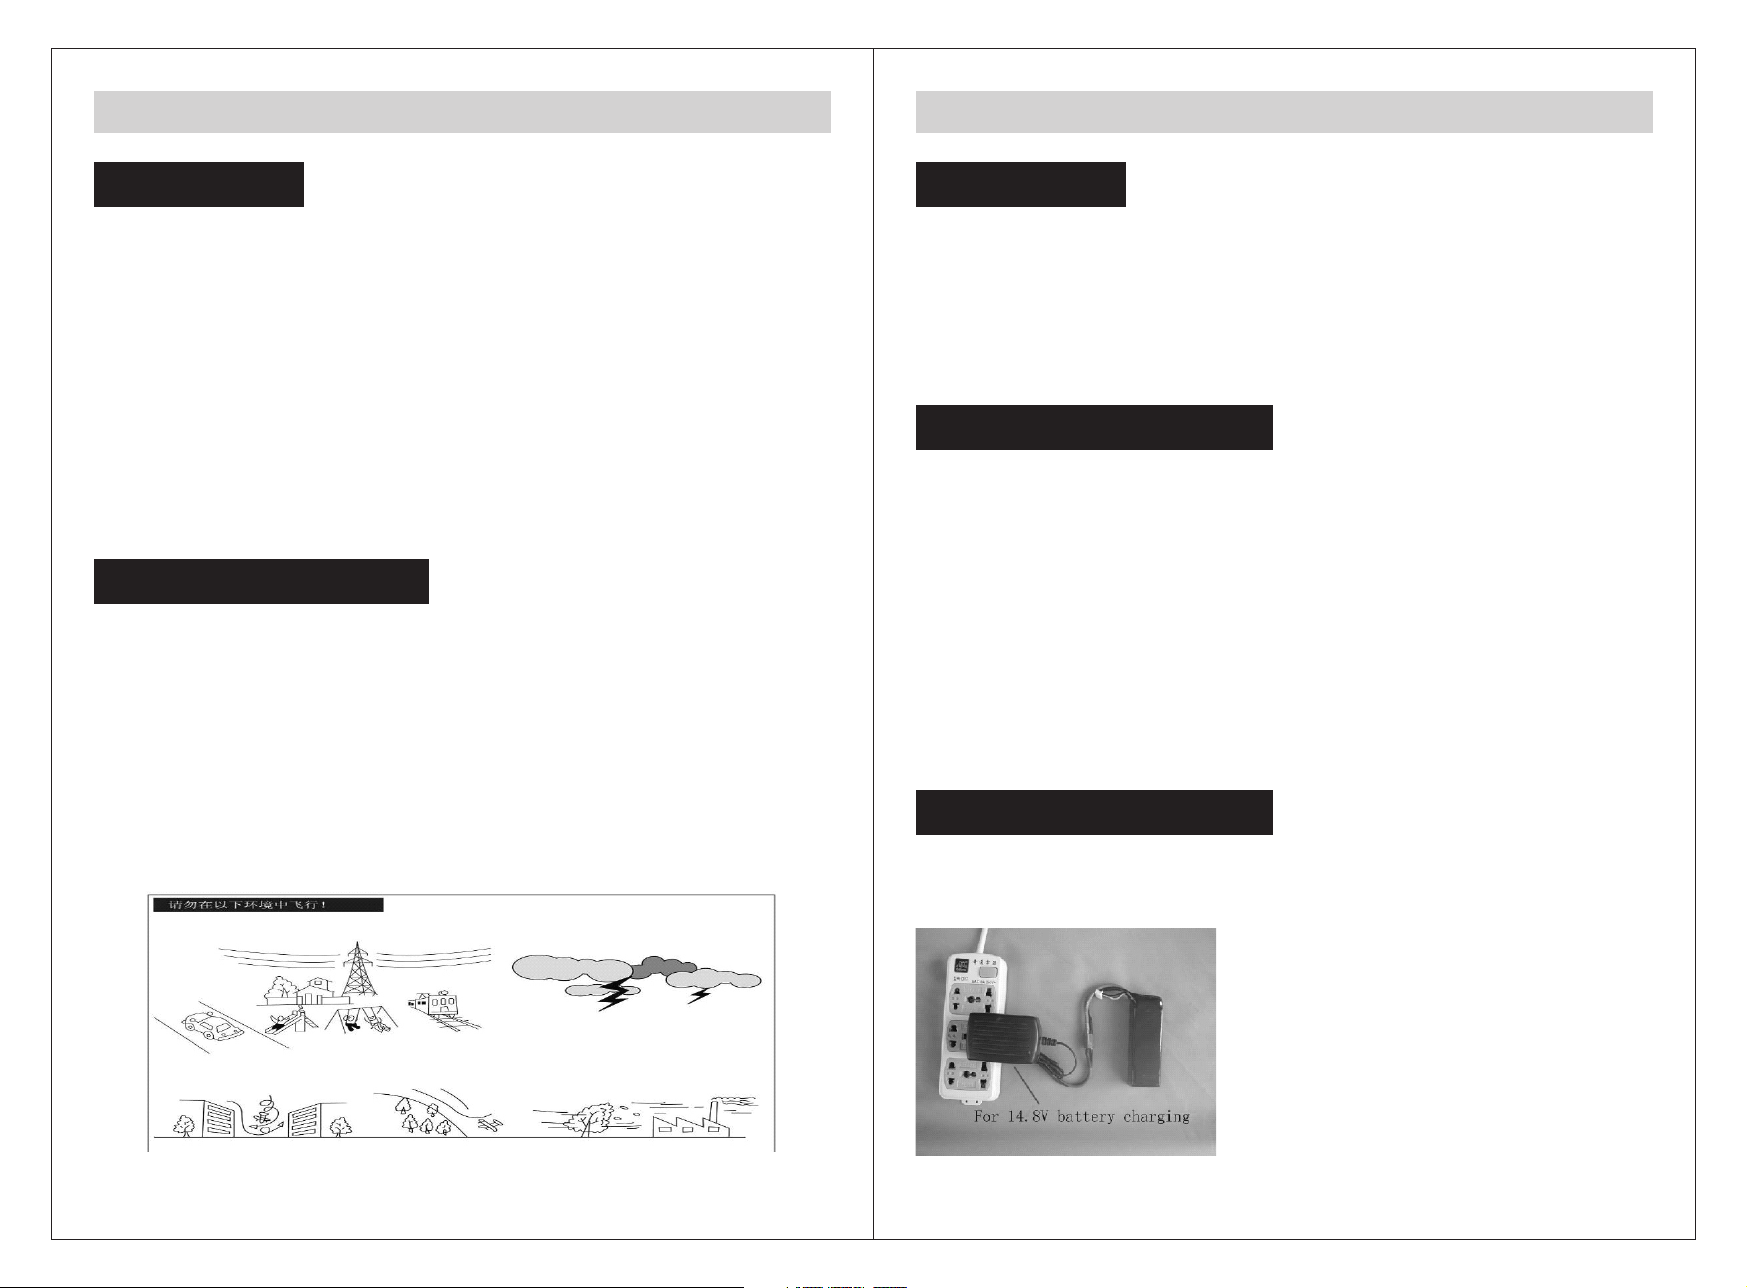
Battery and charging:
1.Do not charge or use the battery near fire or high temperature, or
tinder.
2.Do not leave the battery alone during charging, and remove from
charge as soon as the charge cycle is complete.
3.Keep children away from the battery and charger.
4. Do not disassemble or modify the battery or charger in any way.
5.Do not exhaust the battery cycle,or it will cause the battery
permanent damage 6.Allow the battery to cool before attempting to
recharge it after flying.
7.Do not use any charger except the factory provided one.
8.Read and follow all instructions...misuse of this Lithium Polymer
battery or the charger can result in fire or explosion
Charge as picture show:
1 2
Page 3
C-185 Manual C-185 Manual
Modellbau Lindinger GmbH e-Mail: [email protected] www.lindinger.at
Modellbau Lindinger GmbH e-Mail: [email protected] www.lindinger.at
Technical Data:
Technical Data:
Standard version: Upgrade version
●Wingspan: 1500MM ●Wingspan: 1500MM
●Length: 1138MM ●Length: 1138MM
●Take off weight: 1374g/1622g ●Take off weight: 1622G
●Wing area:35.1 sp.dm ●Wing area:35.1 sp.dm
●Wing laod: 39g sp.dm /46.2g sp.dm ●Wing load: 46.2g sp.dm
●Battery: 2200MAH 14.8V 15C ●Battery: 2200MAH 14.8V 15C
●ESC: 50A ●ESC: 50A
●Motor:3715 big out runner brushless motor Motor:3715 big out runner brushless motor
●Propeller:1060 3blades ●Propeller:1060 3blades
●Max Thrust:1750G ●Max Thrust: 1750G
●Radio: 4 channels ●Radio: 4 channels
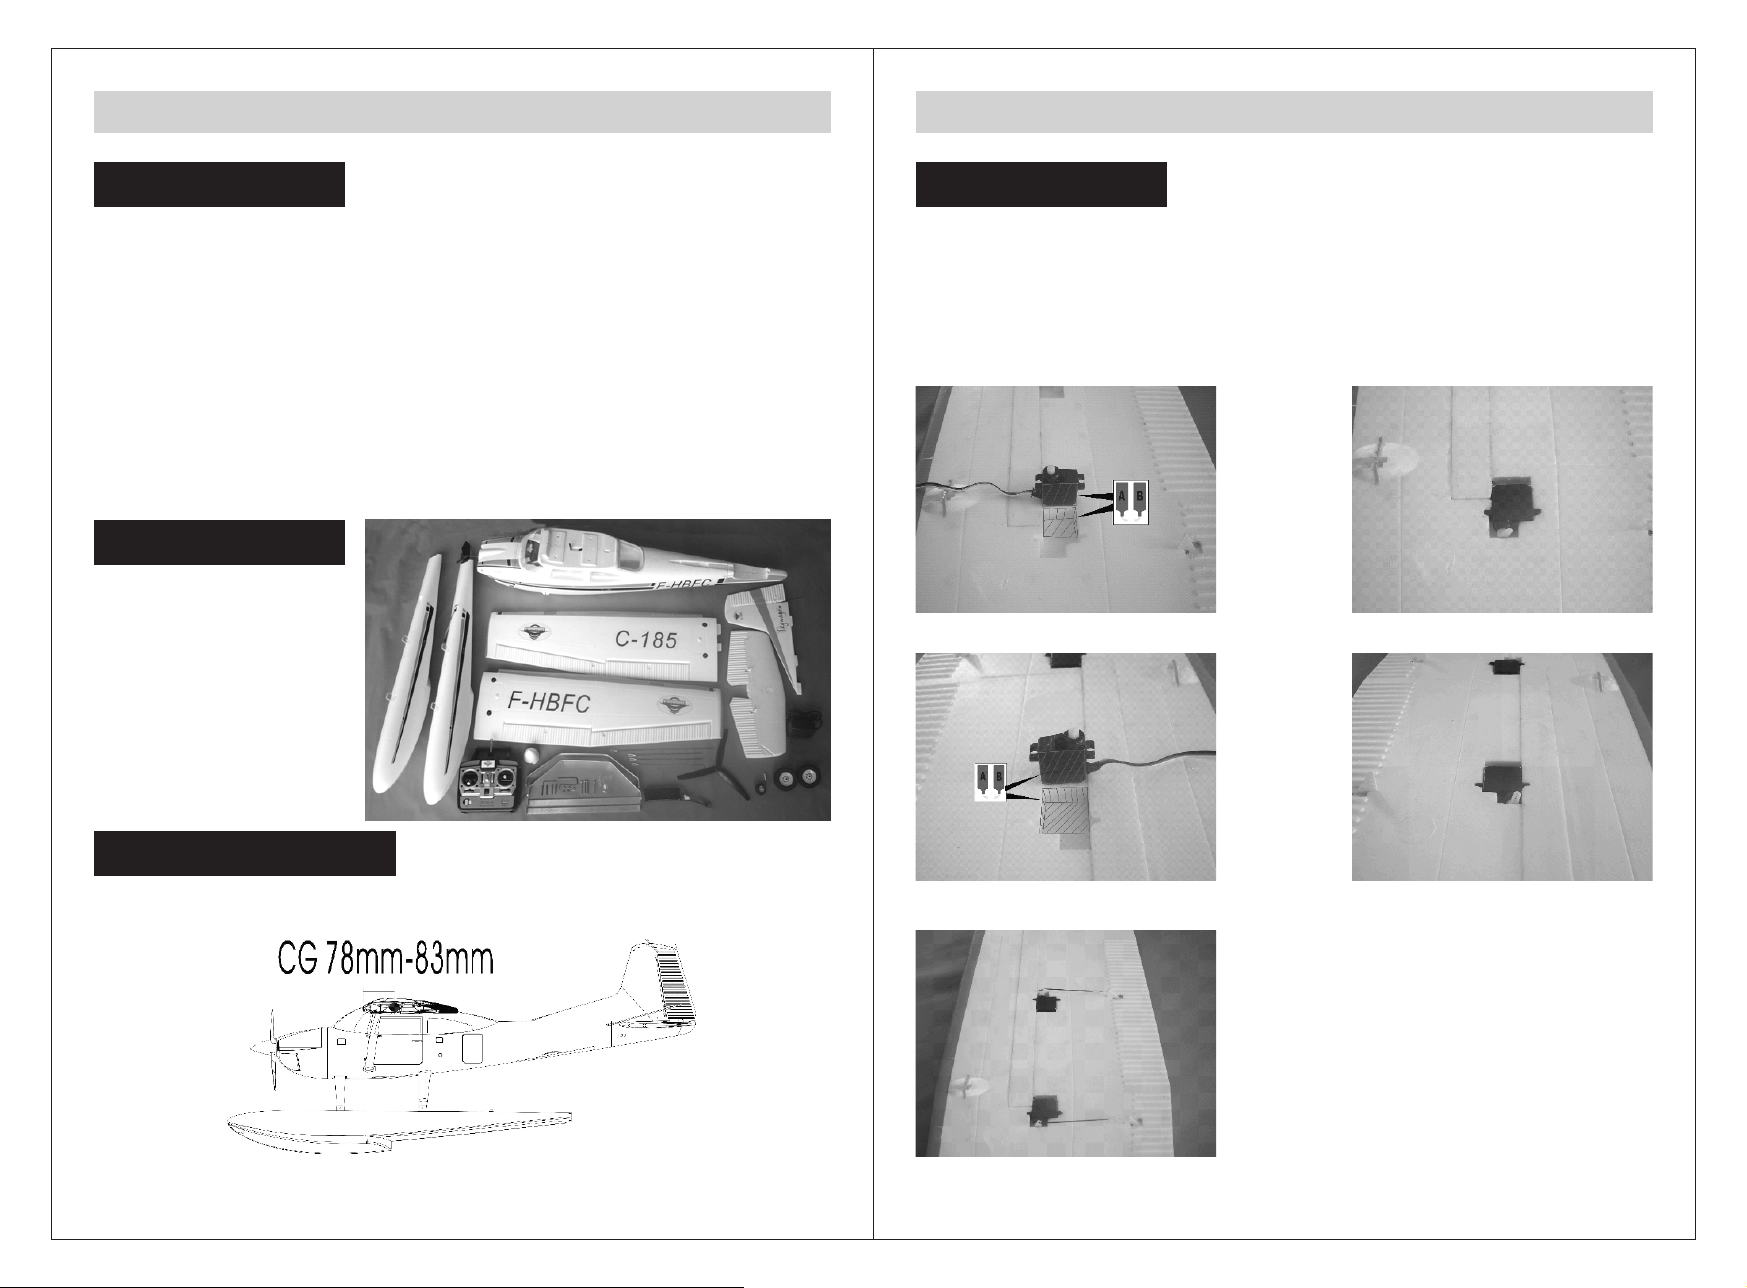
Use of epoxy glue: Put equal amounts of part A and part B of the epoxy
glue onto a clean disposeable surface.Mix WELL and apply to the
parts...hold about five minutes until dry. Use only a THIN LAYER of
epoxy. Just enough to cover the mating surfaces. Any excess epoxy only
adds weight, not strength.
1.Apply epoxy to the aileron servos and glue into place as shown:
Component:
2.(Optional) Epoxy the flap servos into place as shown.
Assembly:
Center Of Gravity:
Center Of Gravity:It is VERY important that the center of gravity be checked
before attempting flight. Move the battery around until the CG is correct.
3 4
3.Install the aileron/flaps control rod.
Page 4
C-185 Manual
Modellbau Lindinger GmbH e-Mail: [email protected] www.lindinger.at
Modellbau Lindinger GmbH e-Mail: [email protected] www.lindinger.at
C-185 Manual
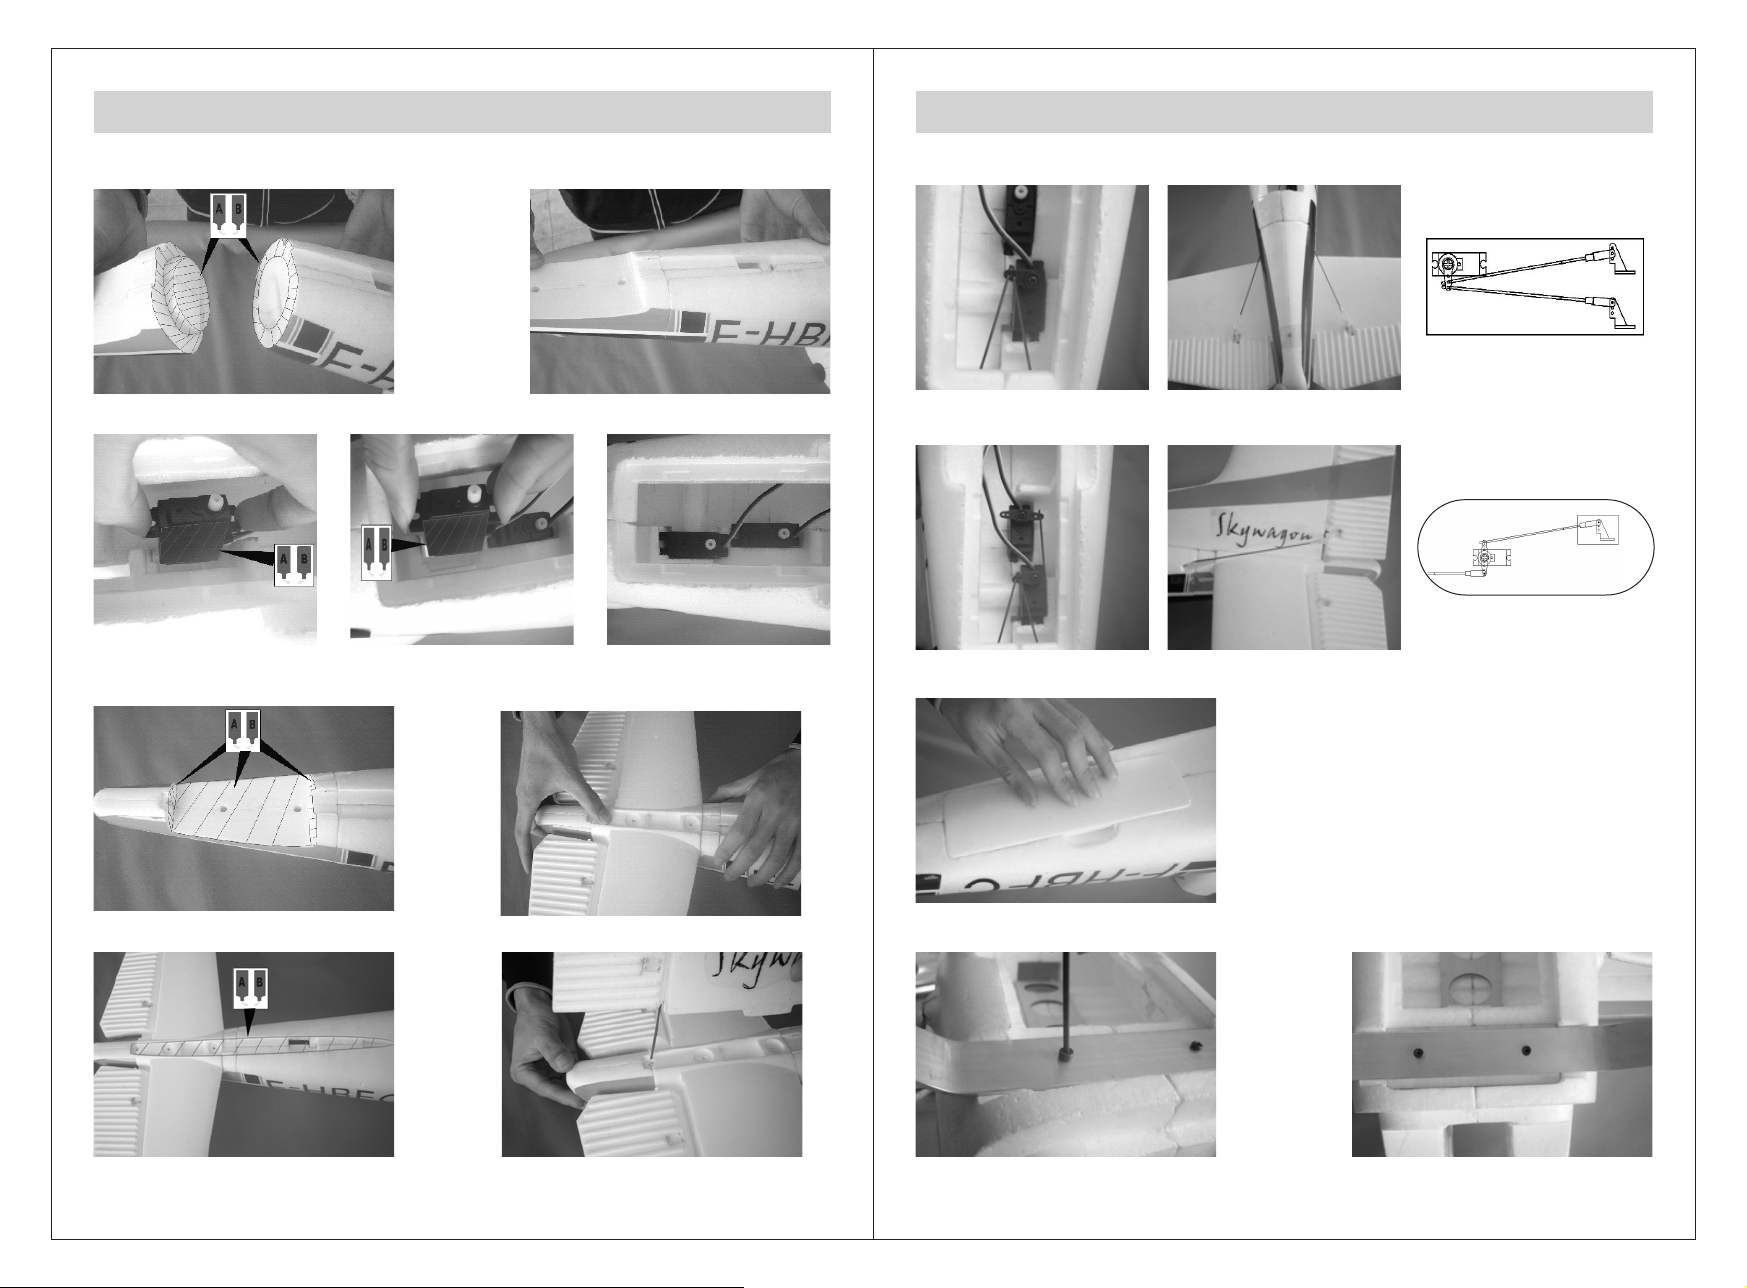
4.Glue the fuselage and tail into place as pictures shown.
5. Glue the rudder and elevator servos into place as pictures shown.
6.Glue the elevator into place the same way, again, carefully checking alignment
while drying. This is important if you want your plane to fly straight.
8.Install the elevator control rod as shown.
9.Install the rudder and steering rods as shown:
10.Put the tail cover into position as shown:
7.Glue the rudder into place as shown. and make sure to keep good alignment while drying.
5
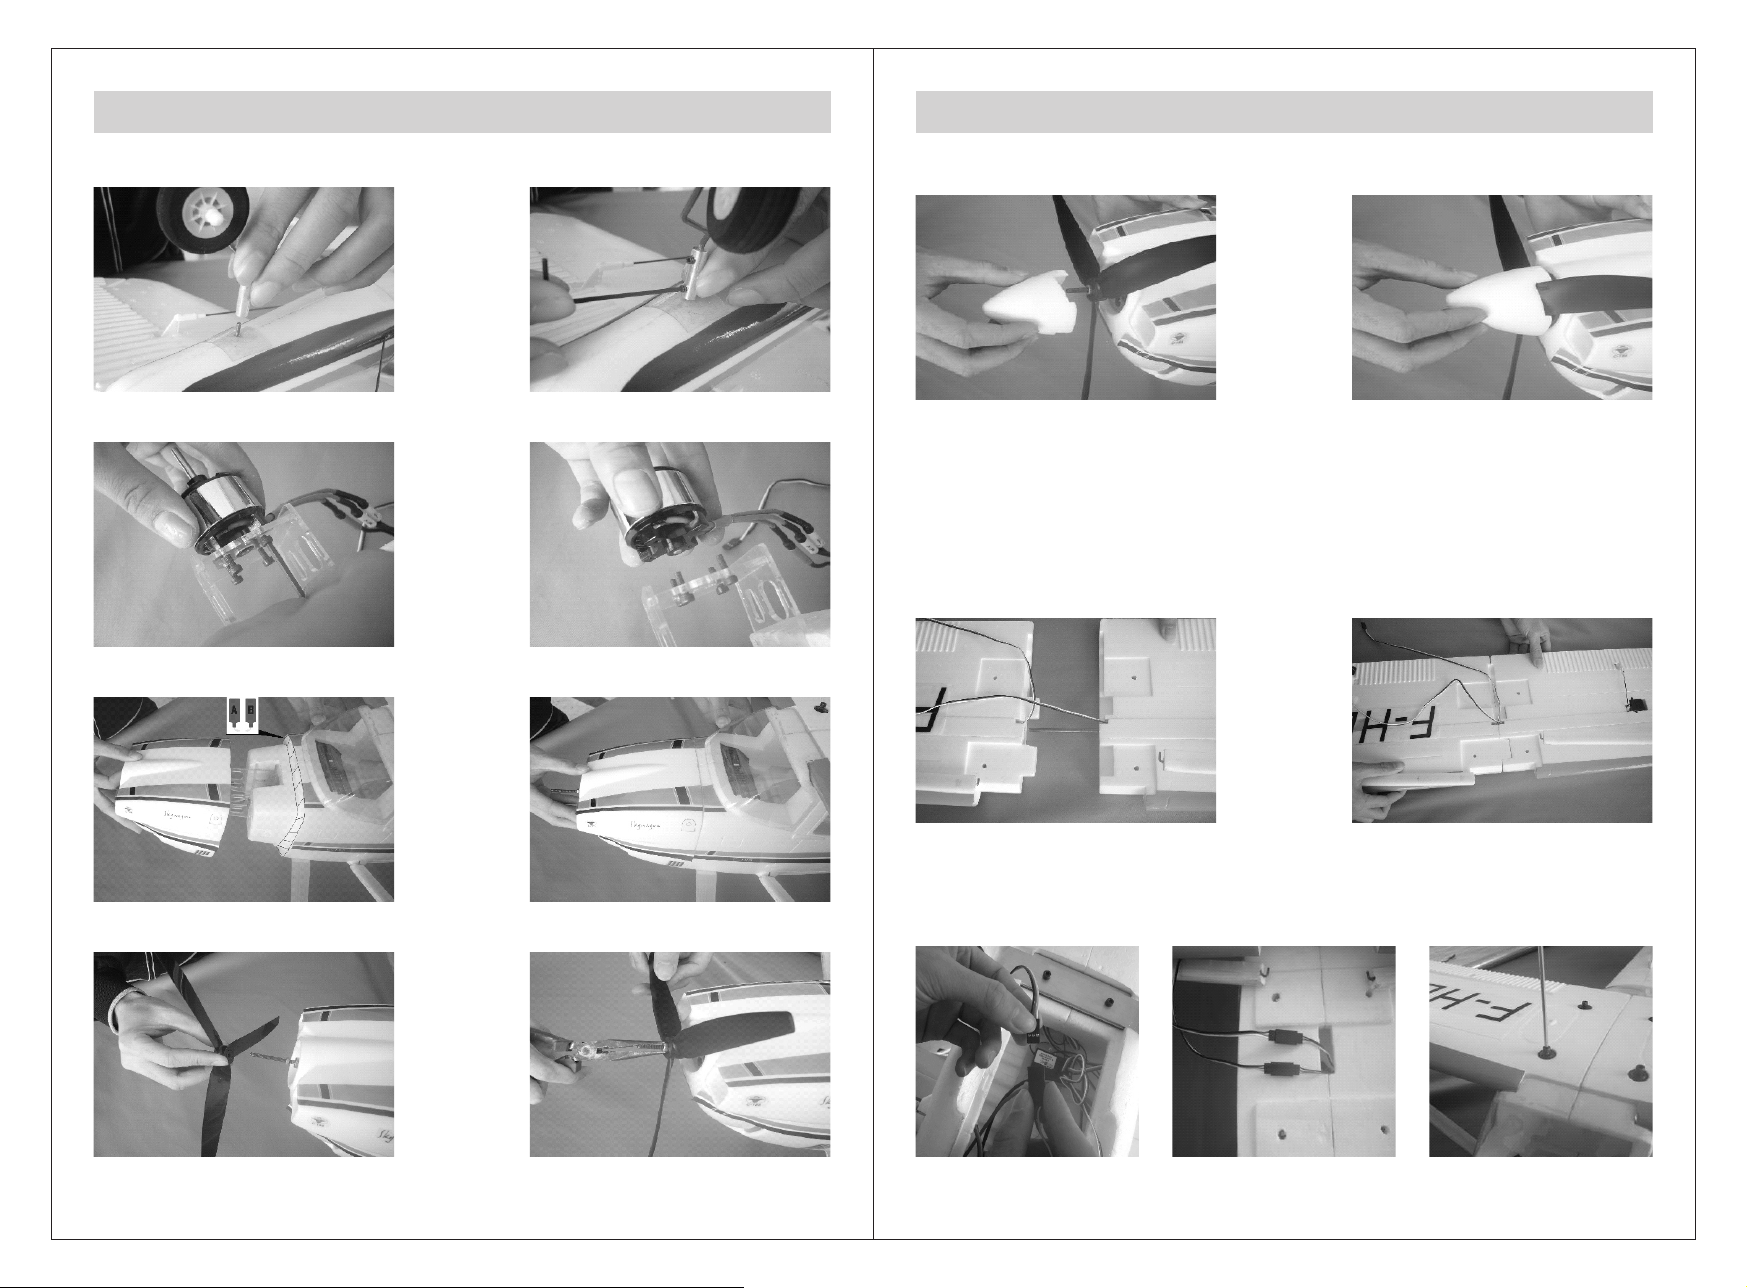
11.Assemble the main landing gear into place using the provided screws as shown
6
Page 5
C-185 Manual
Modellbau Lindinger GmbH e-Mail: [email protected] www.lindinger.at
Modellbau Lindinger GmbH e-Mail: [email protected] www.lindinger.at
C-185 Manual
12.Install the front landing gear and tighten into place using the provided wrench.
13.Install the motor as shown, and fit it by using the provided screw.
14.Glue the head cover into place as shown.
16.Install the nose carefully as shown.
17. Connect the two wings halves together using the provided rod. Pay
attention to the dihedral(upward angle of the wings).Do not glue,
leaving the wing halves unglued allows you to separate them for
transporting the plane to the field or pond. If you want to connect the
two wing halves more tightly and don’t want to disassemble , that you
can also use the glue to fit them.
18.Connect the extended wire of the aileron/flaps. Then install the wing
struts into the wings, then screw them into the fuselage as shown.? Do
15.Install the propeller and carefully tighten the prop screw.
7
not attempt to fly the plane without the wing struts in place.
8
Page 6
C-185 Manual
Modellbau Lindinger GmbH e-Mail: [email protected] www.lindinger.at
Modellbau Lindinger GmbH e-Mail: [email protected] www.lindinger.at
C-185 Manual
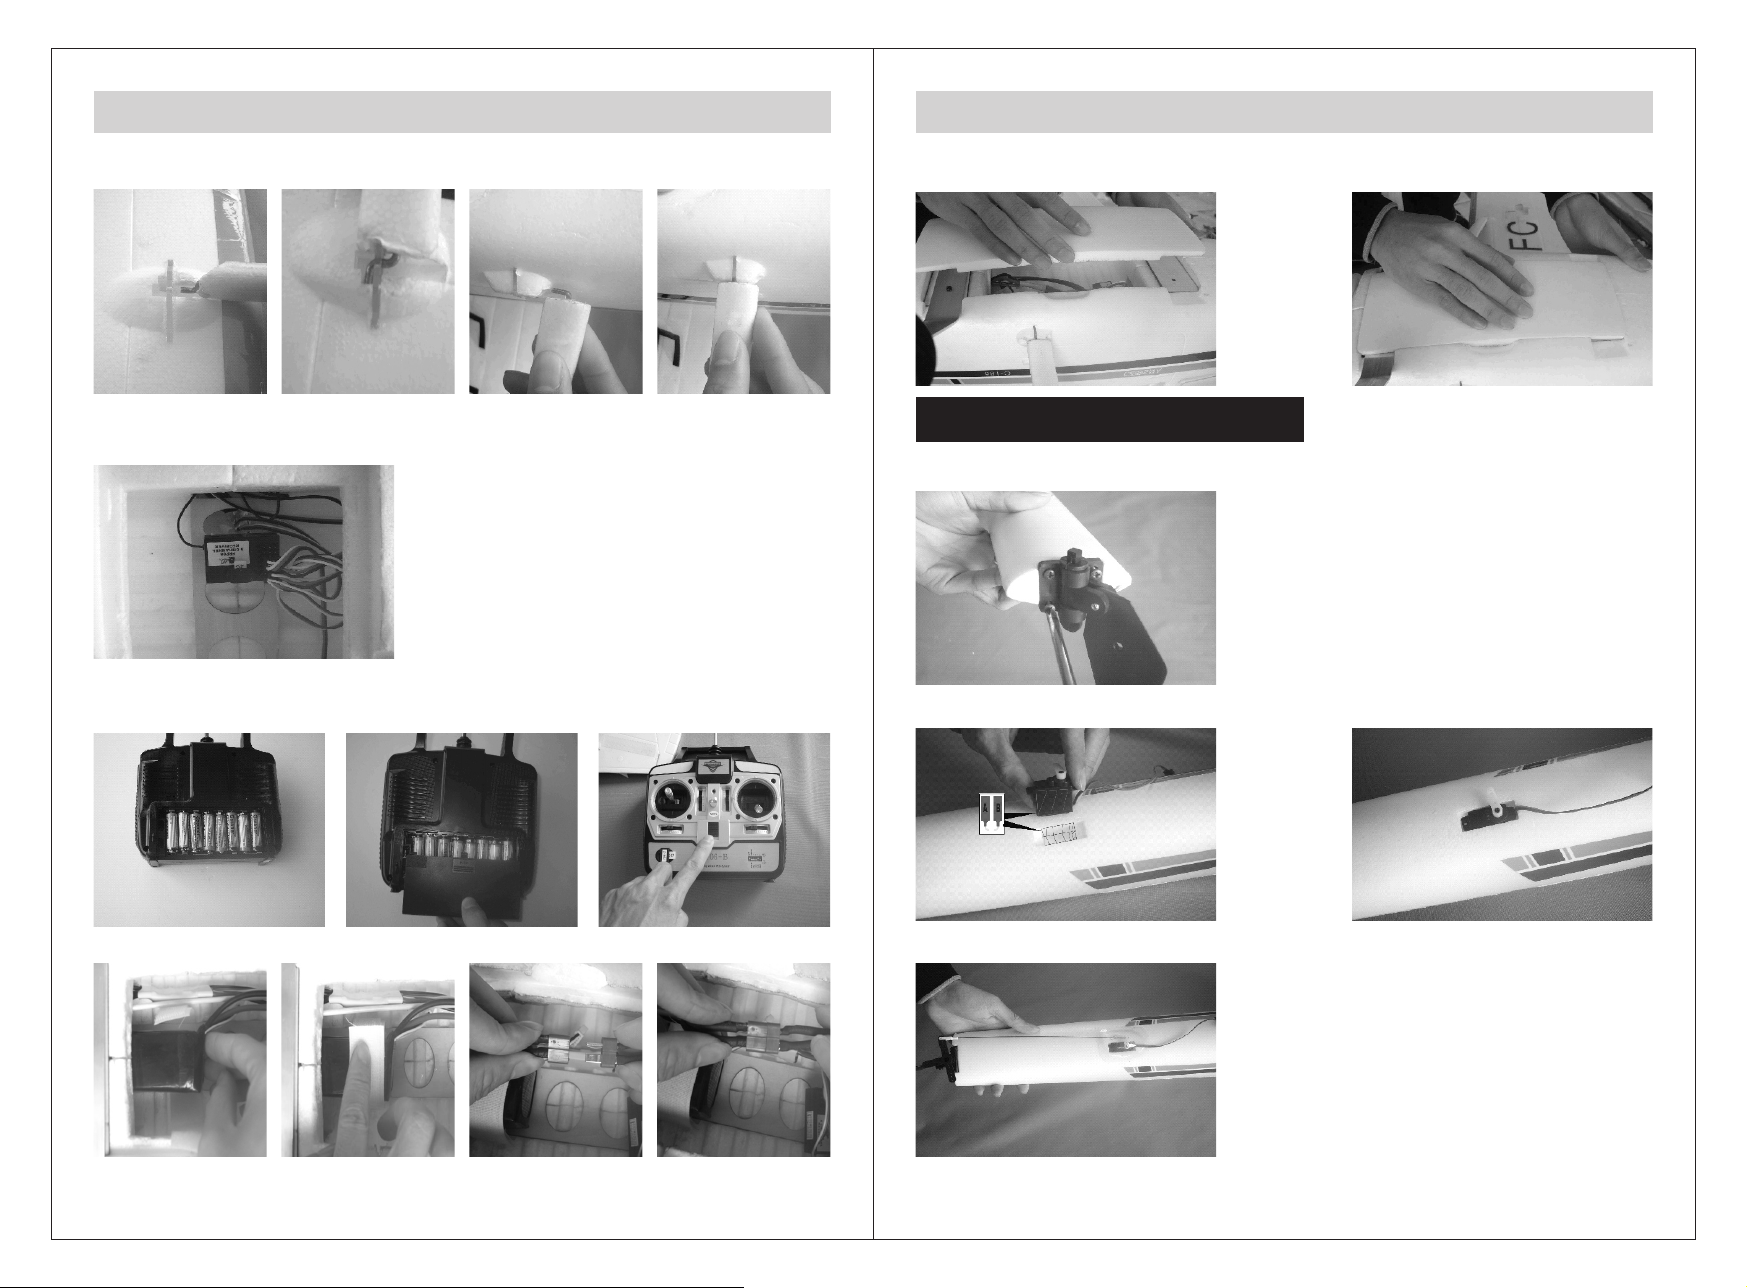
19.Install the wing support as picture shown.
20. Install your receiver and check the action of all controls. Be sure the
throttle is in the off position before plugging in your battery to check controls.
21.Install the transmitter battery, be sure that the throttle is in the off
position. Then turn on the power and check controls.
23.Fit and connect the battery cover as shown.
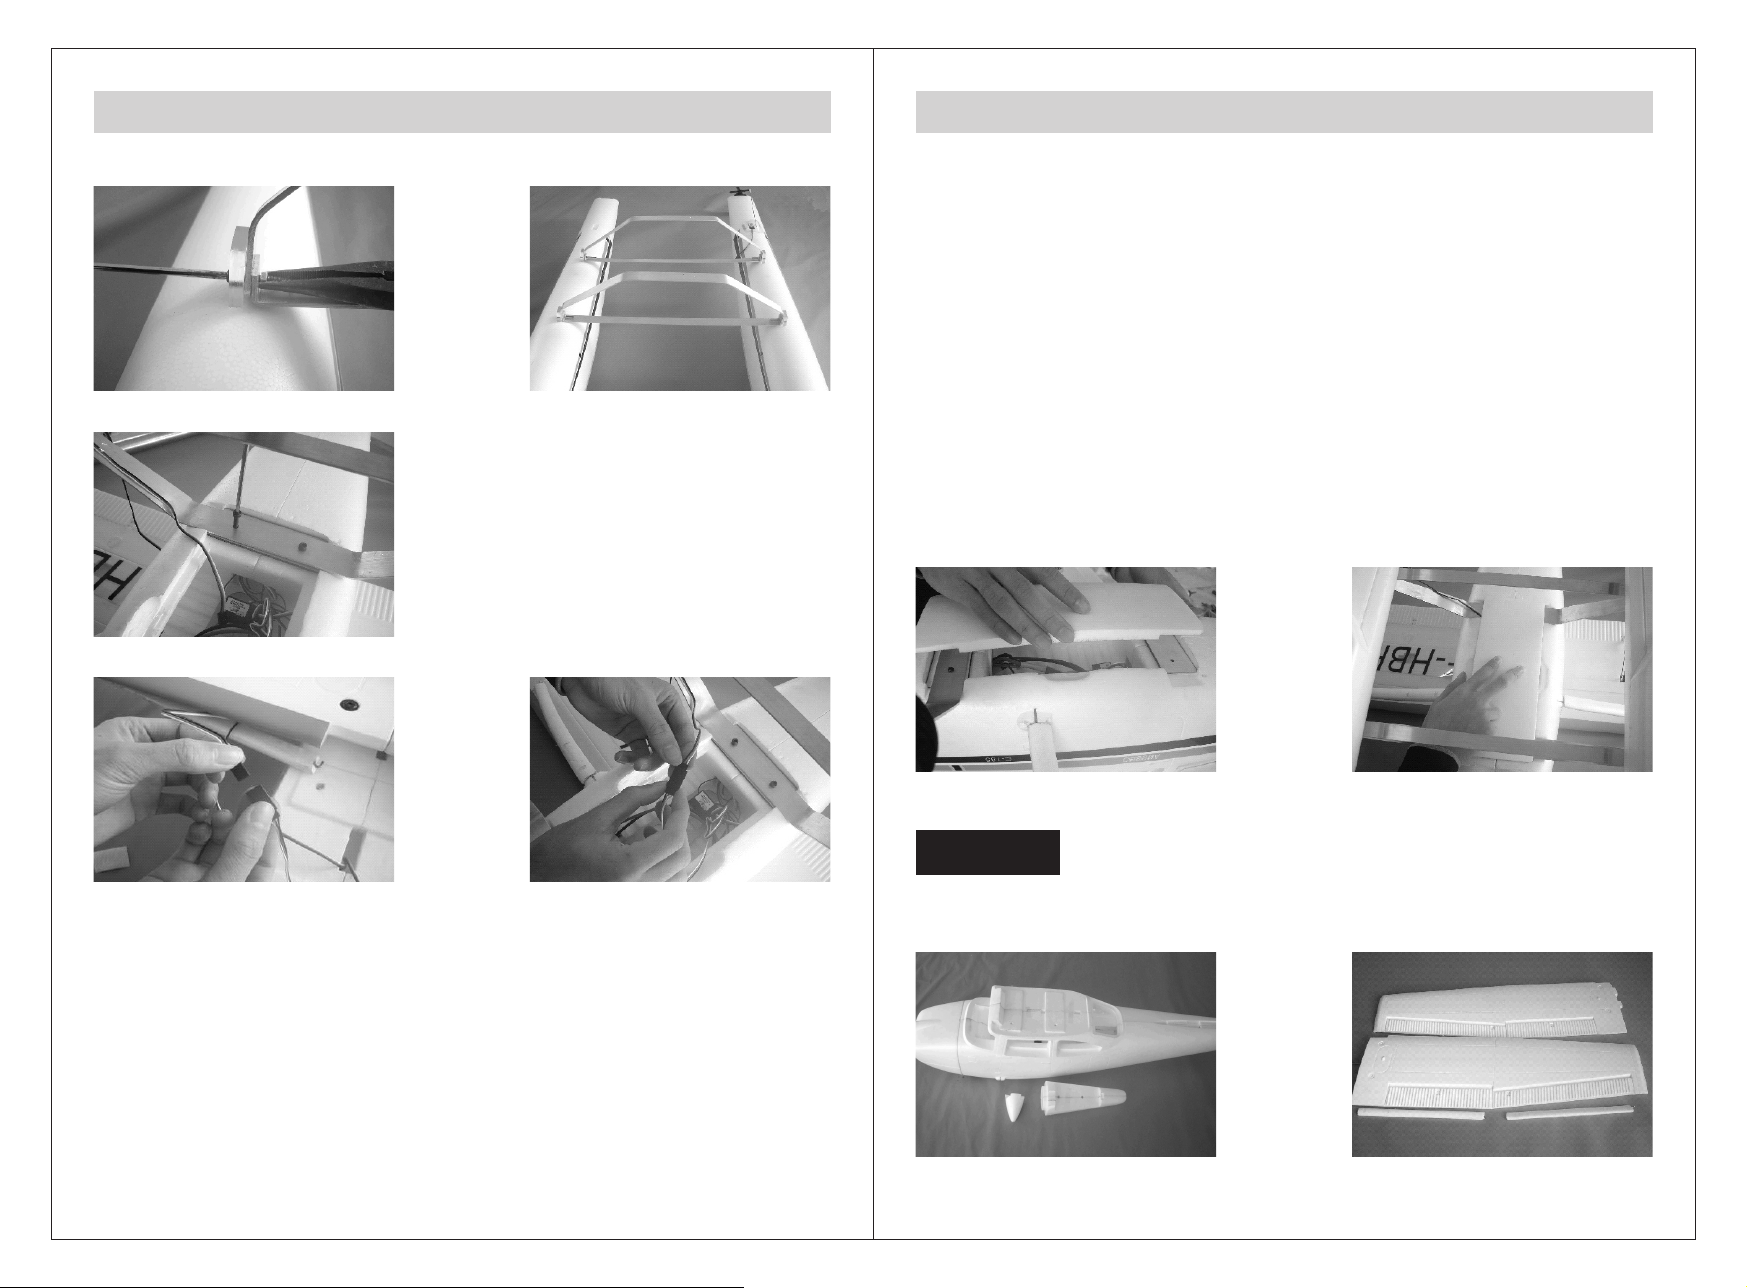
Upgrade Float installation:
1. Screw the water rudders into place on the back of the floats as shown.
2. Glue the servos into place on the floats as shown.
22. Fix and connect the battery into place as shown.
9
3. Install the steering linkages and waterproof cover as shown.
10
Page 7
C-185 Manual
Modellbau Lindinger GmbH e-Mail: [email protected] www.lindinger.at
Modellbau Lindinger GmbH e-Mail: [email protected] www.lindinger.at
C-185 Manual
4. Fit the aluminum float struts as shown.
5. Fit the floats into place on the fuselage instead of the landing gear as shown.
6. Connect the float servos to the rudder channel as shown.
4).If the water is too smooth, the suction of the surface may keep the
plane from taking off.In this case, circle around on the water to create
some waves, then run across the waves to take off.
5). Check that there is no water inside the fuselage before each and
every flight. Water inside the fuselage can wash backwards during
takeoff, change the center of gravity, and cause a crash.
6). After a water flying session, it is VERY important to dry the airplane
and motor thoroughly before putting it away.7). Only fly upwind of
yourself. If you run out of batteries, and the plane is downwind of you,
you have no way of getting it back to shore. If you fly upwind of
yourself, the wind will bring the plane back to shore.
7.Fit the battery cover well as shown, you can change the battery easily
by open the cover, and you can install numeral product like camera,
lighting system ect into it.
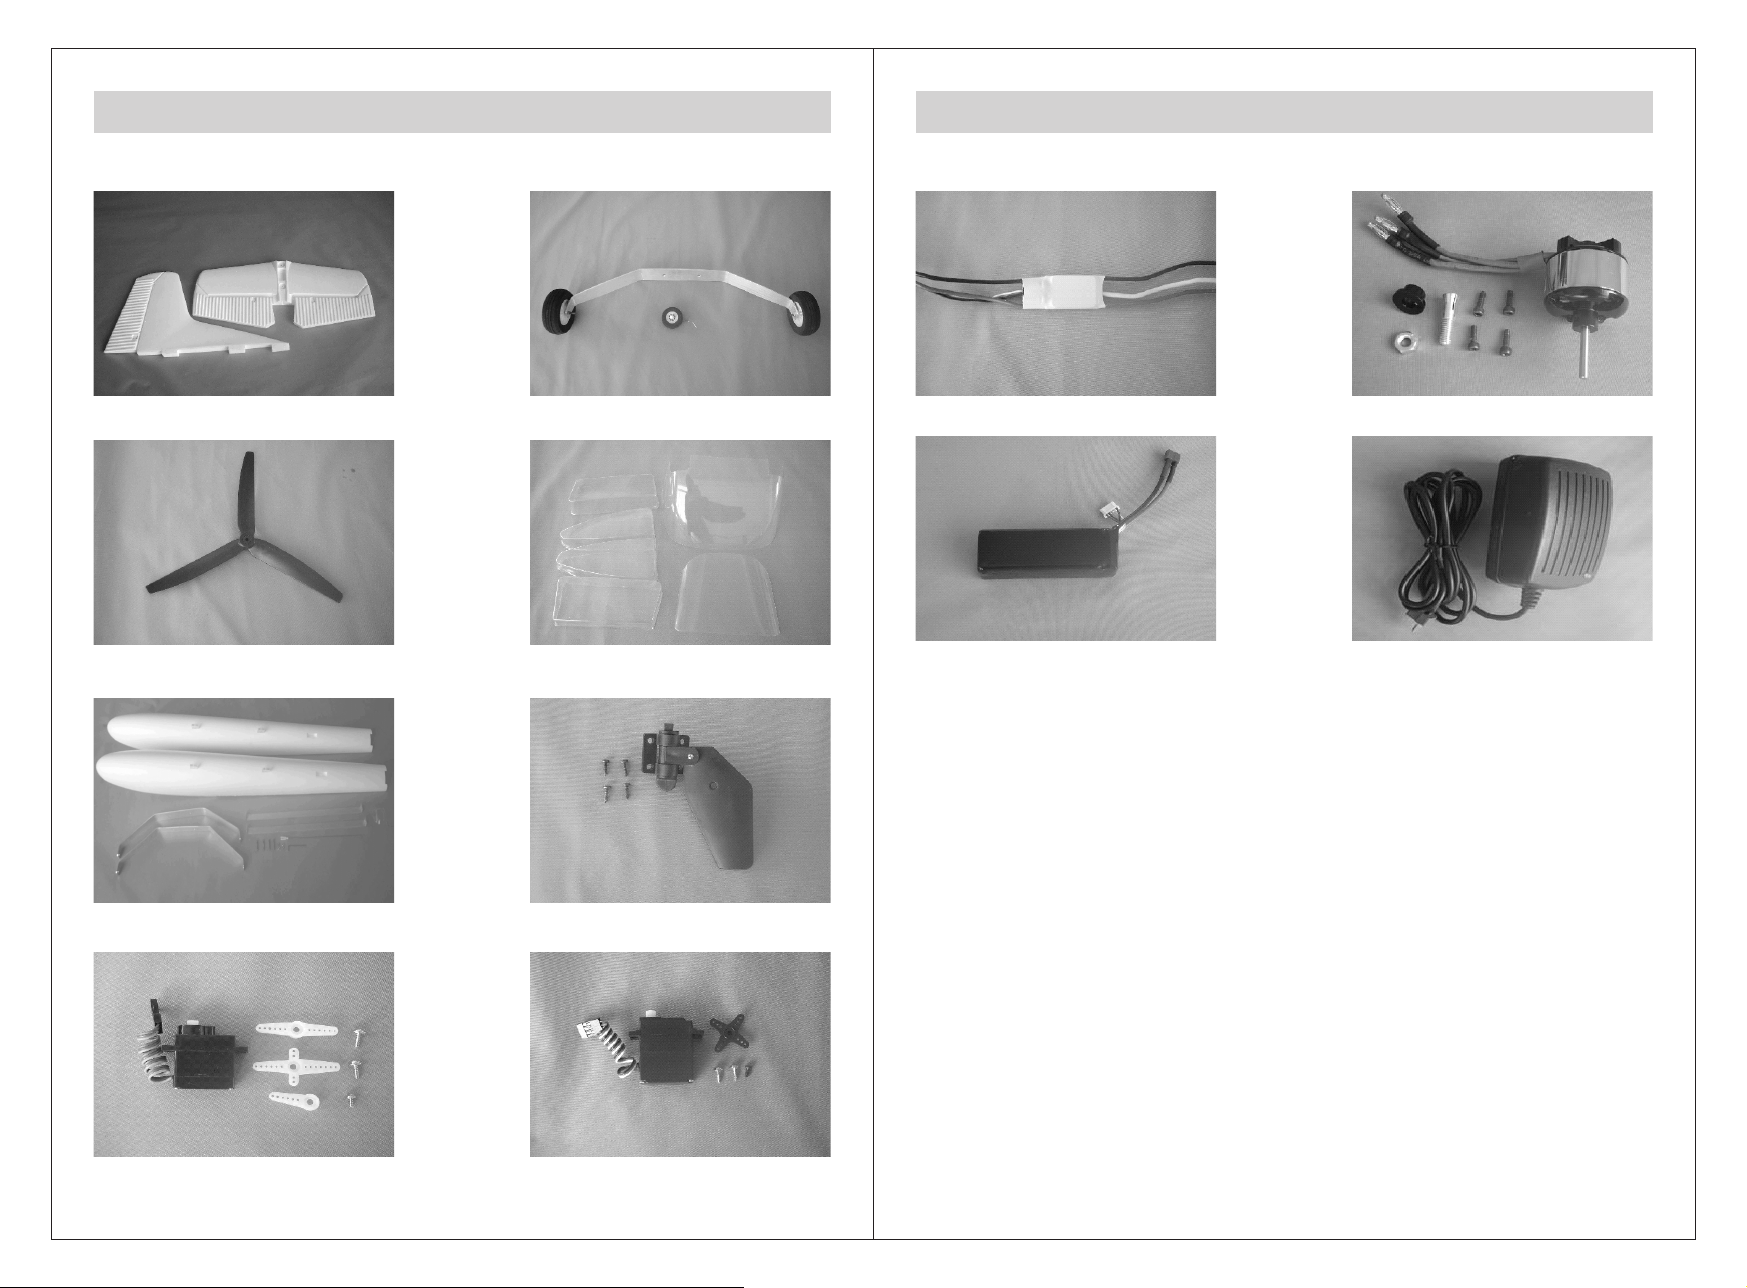
Parts:
Some tips for flying off water as follow:
1).Fit a small plastic bag or balloon over the receiver to waterproof it,
then seal the neck of the bag over the servo wires using a rubber band.
2).Salt water is not recommended, it will destroy the electronics quickly.
If you do end up getting salt water on any of your electronics,
immediately rinse the electronics in fresh water.As soon as possible.
3).If you end up soaking any of your electronic components in fresh
water, you can simply let them sit in the sun to dry off, usually, they will
start working again when they are dry.
11
1.Fuselage 2.Main wings
12
Page 8
C-185 Manual C-185 Manual
Modellbau Lindinger GmbH e-Mail: [email protected] www.lindinger.at
Modellbau Lindinger GmbH e-Mail: [email protected] www.lindinger.at
3.Elevator and Rudder 4.landing gear
5.Propeller 6.plastic parts:
7.Floats 8.Water rudder
11.ESC. 12.Brushless Motor
13. Lipo battery
14. 14.8V lipo charger
9.9g servo 10.17g servo
13 14
 Loading...