

Page 1
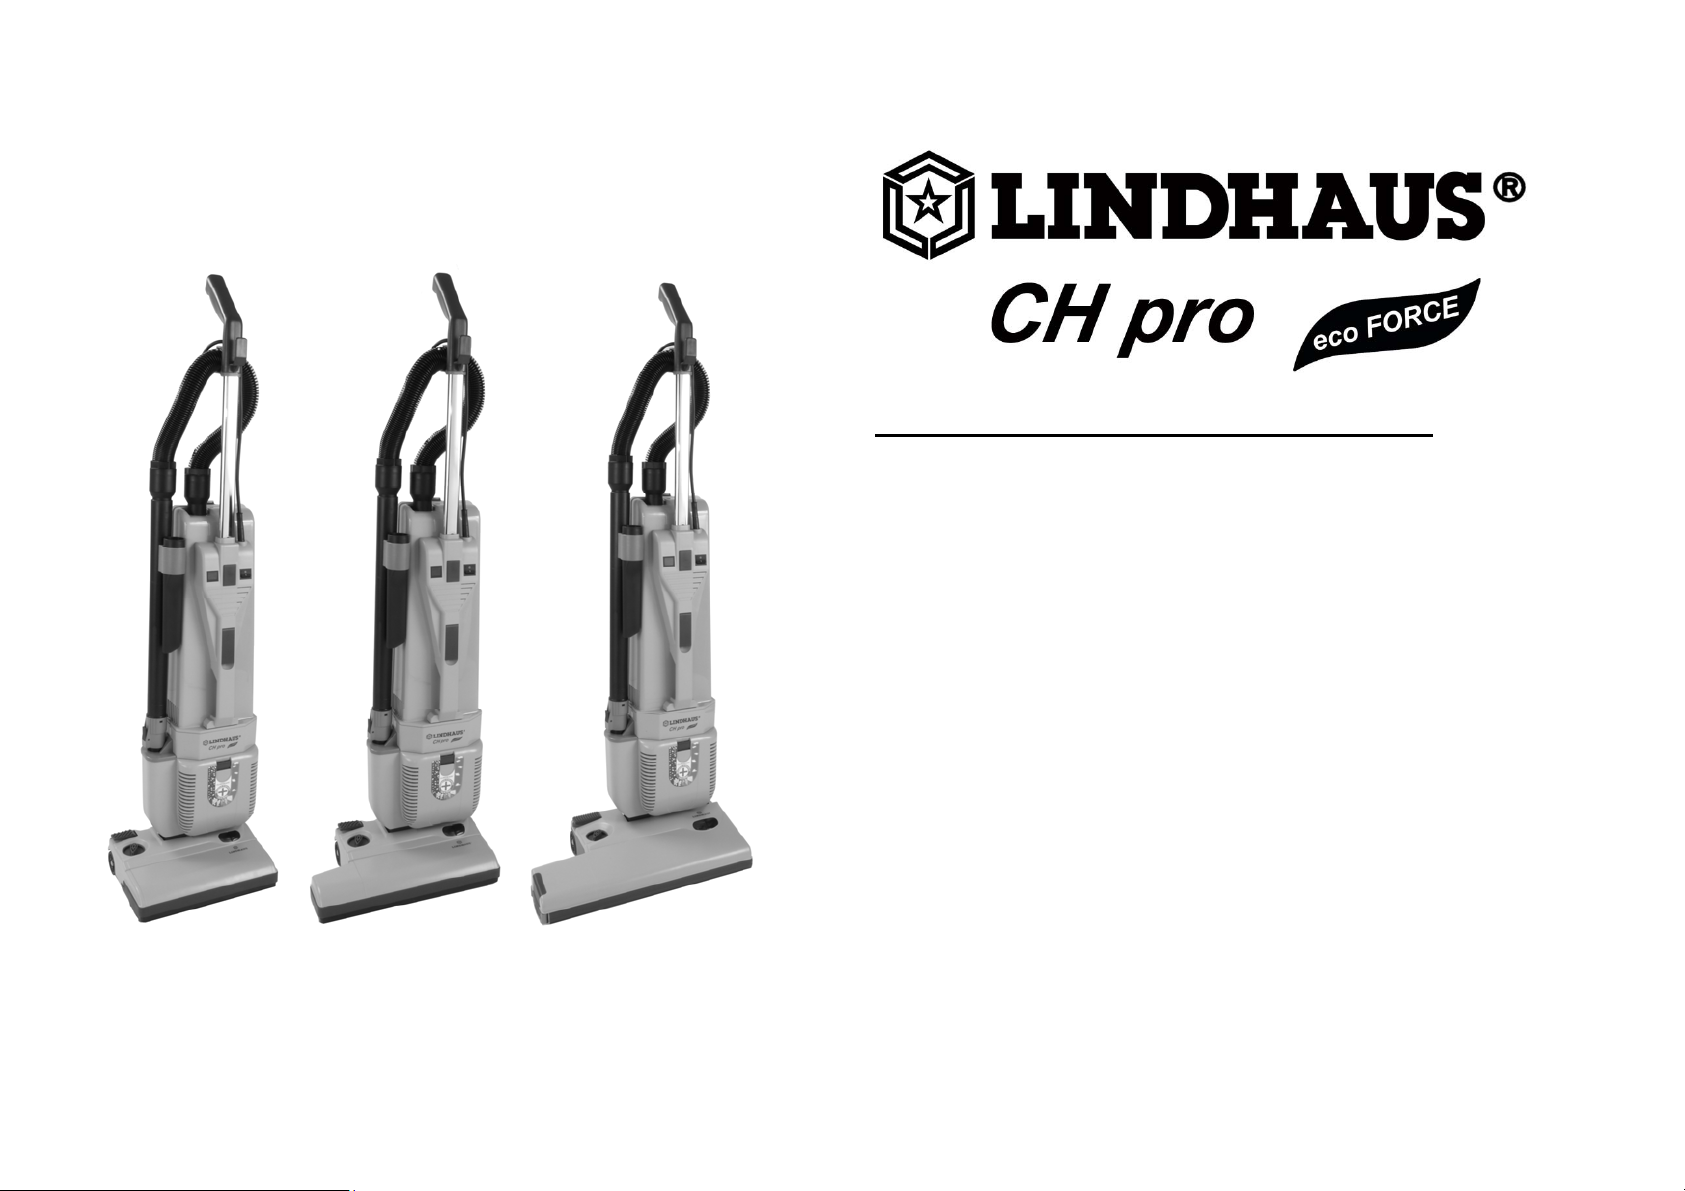
COMMERCIAL UPRIGHT VACUUM CLEANER
03 12 06 V. 100 / 55
03 12 08 V. 120 / 60
CHpro eco FORCE 38 (15”) Mod. 01 15 02 ÷ 05 V. 220-240 / 50-60
01 15 06 V. 100 / 55
01 15 08 V. 120 / 60
CHpro eco FORCE 45 (18”) Mod. 01 18 02 ÷ 05 V. 220-240 / 50-60
01 18 06 V. 100 / 55
01 18 08 V. 120 / 60
ISTRUZIONI PER L’USO E LISTA DELLE PARTI DI RICAMBIO
BEDIENUNGSANWEISUNG UND ERSATZTEILLISTE
MODE D’EMPLOI ET PIÈCES DE RECHANGE
INSTRUCCIONES PARA EL USO Y RECAMBIOS
CHpro eco FORCE 30 (12”) Mod. 03 12 02 ÷ 05 V. 220-240 / 50-60
OWNERS GUIDE AND PARTS MANUAL
09/2014
Page 2
TABLE OF CONTENTS
(USA-GB)
Important safety instructions 3
Grounding instructions 4
Know your machine 5
Assembly instructions 6
Operating instructions 7-8
Brush adjustment 7
Maintenance 9-10-11
Dry Cleaning System 12
Specifications 12
Parts list 13-14
Warranty 15-16
RECORD THE MODEL AND
SERIAL NUMBER OF YOUR
MACHINE AND KEEP FOR
FUTURE REFERENCE.
MODEL NUMBER ______________
SERIAL NUMBER ______________
INDICE (I)
Norme di sicurezza 3
Grounding instructions 4
Conoscere la vostra macchina 5
Messa in funzione 6
Istruzioni per il funzionamento 7-8
Regolazione spazzola 7
Manutenzione 9-10-11
D.C.S. (Lavaggio a secco) 12
Dati tecnici 12
Lista ricambi 13-14
Garanzia 15-16
REGISTRATE IL MODELLO E IL
NUMERO DI SERIE DELLA VS
MACCHINA E CUSTODITE PER
FUTURE REFERENZE.
MODELLO _______________________
NUMERO DI SERIE _______________
INHALTSVERZEICHNIS (D)
Zur besonderen Beachtung 3
Grounding instructions 4
Ihre Maschine kennenlernen 5
Die Maschine in Betrieb setzen 6
Bedienung der Maschine 7-8
Saugbürsten- Höhenverstellung 7
Wartung 9-10-11
D.C.S. (Trockenreinigung) 12
Technische Daten 12
Liste der Ersatzteile 13-14
Garantie 15-16
SCHREIBEN SIE SICH HIER DIE
SERIENNUMMER UND DEN
MODELLTYP AUF.
MODELLTYP ____________________
SERIENNUMMER ________________
INDEX (F)
Consignes de sécurité 3
Grounding instructions 4
Pour connaître votre machine 5
Montage 6
Mise en service de la machine 7-8
Réglage de la brosse 7
Entretien 9-10-11
D.C.S. (nettoyage à sec) 12
Caractéristiques techniques 12
Liste pièces de rechange 13-14
Garantie 15-16
MARQUER LE MODÈLE CI-DES
SOUS ET VOUS Y RÉFÉRER À
L’AVENIR.
MODÈLE _________________________
NUMÉRO DE SÉRIE _______________
INDICE (E)
Instrucciones importantes de seguridad 3
Grounding instructions 4
Conozca su máquina 5
Instrucciones para el montaje 6
Instrucciones de funcionamiento 7-8
Regulación de la altura del cepillo 7
Mantenimiento 9-10-11
D.C.S. (lavado en seco) 12
Características técnicas 12
Lista piezas de recambios 13-14
Garantía 15-16
RECUERDE EL MODELO Y EL N° DE
SERIE DE SU MÁQUINA, GUÁRDELO
COMO REFERENCIA PARA EL
FUTURO.
MODELO ___________________________
NUMERO DE
SERIE______________________________
- MANUFACTURER
- COSTRUTTORE
- ERBAUER
- CONSTRUCTEUR
- CONSTRUCTOR
SRL
Via Belgio,22 - Zona Ind.
35127 PADOVA – ITALY
[email protected]
www.lindhaus.it
The machine is distributed in
U.S.A. by:
U.S.A.
Minneapilis MN – U.S.A.
P.O. Box 159 Savage,
MN 55378.
[email protected]
www.lindhaus.com
- CONGRATULATIONS: We wish to congratulate you on having purchased CHpro, certainly one of the best and technologically most
advanced carpet cleaners. We thank you for your choice and enjoy your new CHpro!
- CONGRATULAZIONI: Ci complimentiamo con voi per aver scelto CHpro, sicuramente uno dei migliori e tecnologicamente più avanzati
battitappeti. RingraziandoVi per la preferenza accordataci, Vi auguriamo un piacevolissimo utilizzo della Vs. nuova CHpro.
- GLÜCKWUNSCH: Wir gratulieren Ihnen für Ihre Wahl, sicher ist Ihre CHpro eine der besten und fortschrittlichsten
Teppichklopfmaschinen. Wir danken Ihnen für Ihre Vorliebe und wünschen Ihnen eine angenehme Ver wendung Ihrer neuen CHpro.
- FÉLICITATIONS: Nos meilleurs compliments pour avoir choisi CHpro, un des meilleurs aspiro-batteurs fabriqué selon les technologies
plus avancées. Nous vous remercions pour la préférence et vous souhaitons une agréable utilisation de la nouvelle CHpro.
- CONGRATULACIONES: Nos felicitamos con Ustedes por haber escogito CHpro, una de las mejores batidoras tecnologicamente màs
avanzada. Les agradecemos por su preferencia y les deseamos un agradable uso de esta nueva CHpro.
Page 3

WHEN USING AN ELECTRICAL
APPLIANCE,
BASIC PRECAUTIONS SHOULD
ALWAYS BE FOLLOWED,
INCLUDING THE FOLLOWING
IMPORTANT SAFETY
INSTRUCTIONS
Read these operating instructions carefully before
using
WARNING
To reduce the risk of fire, electric shock or injury:
1. Always disconnect the plug when
the machine is not in use and before
doing any maintenance or cleaning
of the machine.
2. Do not use outdoors or on wet surfaces.
3. “This appliance is not intended for use by
persons (including children) with reduced physical,
sensory or lack of experience and knowledge
unless they have been given supervision or
instruction concerning use of the appliance by a
person responsible for their safety. Children
should be supervised to ensure that they do not
play with the appliance.”
4. Use the machine only as described on the
present manual. Use only manufacturer’s
recommended attachements.
5. Do not use with damaged cord or plug. If the
machine is not working as it should, has been
dropped, damaged, left outdoors, or dropped into
the water, return it to a authorized dealer for
service.
6. Do not pull or carry by cord, use cord as a
handle, close door on cord, or pull cord around
sharp edgesor corners. Do not run appliance over
cord. Keep cord away from heated surfaces.
7. Do not unplug by pulling on cord. To unplug,
gasp the plug, not the cord.
8. Do not handle plug or appliance with wet
hands.
9. Do not put any object into openings. Do not use
with any opening blocked; keep free of dust, lint,
hair, and anything that may reduce the air flow.
10. keep hair, loose clothing, fingers, and all parts
of body away from openings and moving parts.
11. Turn off all controls before unplugging.
12. Use extra care when using on stairs.
13. Do not use to pic k up fl am mabl e or
combustible liquid, such as gasoline, or use in
areas ahere they may be present.
14. Do not suck up matches, ash or cigarettes
that are still burning.
15. Avoid vacuuming hard or sharp objects or
damage may result.
16. Use and keep this machine in a dry
environment and at a temperatures between+5°C
+35°C (+41°F +95°F).
17. Do not expose to the sun and UV rays
QUANDO SI USANO APPARECCHI
ELETTRICI,
DEVONO ESSERE SEGUITE NORMALI
PRECAUZIONI, INCLUSE LE SEGUENTI
NORME DI SICUREZZA
Leggere attentamente il manuale di
istruzioni prima dell’uso
ATTENZIONE
Per ridurre il rischio di fuoco, scosse elettriche o danni:
1. Staccare sempre la spina dalla presa di
corrente quando l’apparecchio non è in
uso o prima di eseguire regolazioni o
manutenzioni.
2. Non usare la macchina all’esterno o su superfici
bagnate.
3. “Questo apparecchio non è da intendersi adatto all’uso
da parte di persone (incluso bambini) con ridotte capacità
fisiche, sensoriali o mentali, o prive di esperienza e
conoscenza, a meno che siano state supervisionate o
istruite riguardo all’uso dell’apparecchio da una persona
responsabile della loro sicurezza. I bambini dovrebbero
essere supervisionati per assicurarsi che non giochino con
l’apparecchio.”
4. Usare l’apparecchio solo come descritto nel presente
manuale. Usare solo gli accessori raccomandati dal
costruttore.
5. Non usare con cavo o spina danneggiati. Se la
macchina non funziona come dovrebbe, è caduta,
danneggiata, lasciata all’esterno, o caduta nell’acqua,
ritornatela ad un centro assistenza autorizzato.
6. Non tirare mai o trasportare l’apparecchio per il cavo di
alimentazione, o tirare il cavo intorno a spigoli, chiudere
porte sul cavo. Tenere il cavo lontano da fonti di calore.
7. Non staccare mai la spina tirando il cavo. Tirare la
spina non il cavo.
8. Non tenere la spina o l’apparecchio con mani bagnate.
9. Non infilare nessun oggetto nelle aperture.
Non usare con le aperture ostruite; mantenerle
libere da polvere, capelli e qualsiasi cosa che possa
ridurre il passaggio d’aria.
10. Mantenere sempre capelli, indumenti larghi, dita e
tutte le parti del corpo lontani dalle aperture e dalle parti
in movimento.
11. Spegnere tutti i controlli e la macchina stessa prima di
staccare la spina.
12. Prestare particolare attenzione nell’uso su scale.
13. Non usare per aspirare liquidi in genere ed
infiammabili, come benzina o in zone dove questa è
presente.
14. Non aspirare fiammiferi, cenere e mozziconi di
sigarette accesi.
15. Evitare di aspirare oggetti duri o taglienti per non
danneggiare il sacco raccogli polvere e l’apparecchio
stesso.
16. Usare e conservare l'apparecchio all'interno di
ambienti asciutti e ad una temperatura da
+5°C +35°C (+41°F +95°F)
17. Non esporre l’apparecchio ai raggi solari e UV
WENN MAN ELEKTRISCHE GERÄTE
BENÜTZT SOLLTE MAN GEWISSE
VORSICHTSMASSNAHMEN BEACHTEN,
EINSCHLIEßLICH DER FOLGENDEN
ZUR BESONDEREN BEACHTUNG
Lesen Sie die ganze Gebrauchsanweisung vor dem Gebrauch
durch
ACHTUNG
um Feuergefahr, Elektroschocks oder Schäden
einzuschränken:
1. Gerät nie mit angeschlossenem
Netzkabel abstellen. Den Netzstecker bei
längerer Nichtverwendung und vor jeder
Wartungsarbeit aus der Steckdose ziehen.
2. Die Maschine weder draussen noch auf nassen Oberflächen
benützen
3.Dieses Gerät ist kein Spielzeug! Bitte große
Aufmerksamkeit bei der Arbeit in der Nähe von Kindern.
4.Gebrauchsanweisung und Warnungen des
Herstellers beachten. Nur zugelassenes Zubehör
verwenden.
5.Gerät nie bei beschädigtem Netzkabel benutzen.
Gerät zum Service Center bringen wenn es nicht richtig
funktioniert, heruntergefallen ist oder dem Regen
ausgesetzt wurde.
6.Gerät nie am Kabel tragen oder ziehen. Das
Kabel sollte nicht in Türen eigeklemmt oder über
scharfkantige Gegenstände gezogen werden.
Gerät nie über das Kabel rollen. Kabel weit von heissen
Oberflächen fernhalten.
7.Das Kabel stets am Stecker und niemals am Kabel
selbst aus der Steckdose ziehen.
8.Die Maschine und den Stecker nie mit nassen Händen
anfassen.
9. Keine Gegenstände in die Öffnungen einfügen.
Gerät nicht mit verstopften Öffnungen benützen und von
Staub, Haare und al les w as d en L uft zug ei nsc hr än ken
könnte, freihalten.
10.Hände, Haare, Füße und Kleider weit von den
Öffnungen und sich bewegenden Teilen des Gerätes
fernhalten.
11. Vor dem Ausziehen des Kabels alle
Bedienungselemente und die Maschine selbst
ausschalten.
12. Bei der Anwendug auf Treppen besonders vorsichtig
sein.
13.Keine entzündbare Flüssigkeiten wie Benzin
aufsaugen.
14. Zigaretten, Zündhölzer, heisse Asche und andere
rauchenden oder brennenden Gegenstände nicht
aufsaugen.
15.Das Aufsagen von scharfkantigen oder harten
Gegenständen vermeiden, um den Staubbeutel und die
Maschine selbst nicht zu beschädigen
16.Gerät an einem trocknen Platz benutzen und
aufbewahren, Te mp er atu r zwi sc hen +5° C +3 5°C (+41 ° F
+95°F)
17.Gerät nicht Sonnenstrahlen und UV-Strahlen ausset.
aussetzen
QUAND ON UTILISE DES APPAREILS
ELECTRIQUES ON DOIT SUIVRE DES
RÈGLES FONDAMENTALES
Y COMPRISES LES SUIVANTES
CONSIGNES DE SÉCURITÉ
Lire attentivement le mode d’emploi avant
l’utilisation
ATTENTION
: pour réduire tout risque de feu, décharges
électriques ou dégâts.
1. Débrancher toujours la fiche de la
prise de courant quand vous n’utilisez
pas l’appareil ou avant tout réglage ou
entretien.
2. Ne pas utiliser la machine à l’extérieur ou sur les
sols mouillés.
3. Cette machine n’est pas un jouet ! Faire
particulièrement attention en cas d’utilisation à la
présence d’enfants.
4. Utiliser uniquement l’appareil comme il est indiqué
dans le mode d’emploi et utiliser les accessoires
recommandés par le fabricant.
5. Ne pas utiliser l’appareil si la prise ou le cordon
d’alimentation sont endommagés. Si la machine ne
fonctionne pas comme elle devrait, à cause de chute,
laissée à l’extérieur, tombé dans l’eau, la rapporter à
un centre autorisé Lindhaus.
6. Ne pas tirer ni transporter la machine par le câble
d’alimentation ; ne pas coincer le câble entre les
portes et à ne pas le laisser glisser sur des angles
tranchants. Tenir le câble loin de toute surface
chaude.
7. Ne pas débrancher la machine en tirant par le
cordon mais uniquement en tirant par la prise.
8. Ne pas tenir la fiche ou l’appareil avec les mains
Mouillées.
9. Ne pas introduire d’objets dans le ouvertures. Ne
pas utiliser avec les ouvertures bouchées ; les tenir
libérées de la poussière, cheveux ou tout ce qui
pourrait gêner le passage de l’air.
10. Ne pas approcher cheveux , vêtements, doigts
etc. des ouvertures et des parties en mouvement.
11. Eteindre tous les contrôles et la machine aussi
avant de débrancher la fiche.
12. Faire très attention à l’utilisation sur les escaliers.
13. Ne pas utiliser pour aspirer les liquides en
général ou inflammables, comme essence ou endroit
ou celle-ci est présente.
14. Ne pas aspirer d’ allumettes, de cendre ou
mégots allumés.
15. Eviter d’aspirer les objets durs ou tranchants afin
de ne pas abîmer le sac ou l’appareil.
16. Utiliser et conserver l’appareil dans un endroit
sec et à températures entre +5°C +35°C (+41°F
+95°F)
17. Ne pas exposer l’appareil aux rayons solaires et
UV
CUANDO SE USAN APARATOS
ELÉCTRICOS DEBEN TOMARSE
NORMALES PRECAUCIONES
INCLUIDAS LAS SIGUIENTES.
INSTRUCCIONES DE SEGURIDAD
Lea Atentamente el manual de instrucciones
antes del uso
ATENCIÓN
: para reducir el riesgo de fuego, descargas
eléctricas y daños.
1. Desconecte siempre el enchufe
cuando no use la máquina o antes
de cualquier regulación o
mantenimiento.
2. No usar en lugares exteriores o sobre
superficies mojadas.
3. No descuide la máquina y no permita que se
use como un juguete. Tener cuidado cerca de
los niños.
4. Utilizar la máquina como está indicado en el
manual. Utilizar sólo accesorios recomendados
por el fabricante.
5. No utilice con enchufe o cable estropeados,
Si la máquina no funciona porque cayó, la
dejaron al exterior, cayó en el agua, llévela a un
centro de asistencia autorizado.
6. Nunca tire o lleve el aparato por el cable de
alimentación, ni tampoco tire el cable en
rincones o puerta cerradas. Tener lejos de las
fuentes de calor.
7. No desenchufe tirando por el cable. Tire el
enchufe, no el cable.
8. No tener el enchufe o la máquina con las
manos mojadas.
9. No poner ningún objeto cerca de las
aberturas. No utilizar con las aberturas
atascadas depolvo, cabellos o cualquier cosa
que podría reducir el paso del aire.
10. Mantener siempre cabellos, ropas, dedos y
todas las partes del cuerpo lejos de las partes
en movimiento.
11. Apagar todos los controles y la máquina
también antes de desenchufar la máquina.
12. Tener cuidado cuando se usa en las
escaleras.
13. No utilizar para aspirar líquidos en general y
inflamables como la gasolina ni tampoco en
lugar dónde hay estos líquidos.
14. No aspire cerillas, ceniza y cigarrillos que
estén todavía encendidos.
15. No aspire objetos afilados porque podría
dañar la bolsa que recoge el polvo y también la
máquina.
16. Utilizar y poner la máquina en lugares a
temperaturas entre +5°C +35°C (+41°F
+95°F)
17. No exponga el aparato a los rayos
solares y UV.
3
Page 4
FOR U.S.A. and CANADA COMMERCIAL MARKET ONLY
Connect to a properly grounded outlet only. See grounding
instructions.
GROUNDING INSTRUCTIONS
WARNING
This machine must be properly grounded to protect the operator from electrical shock, in a
commercial environment, in accordance with safety regulations. Read the safety instructions
below before operating the machine.
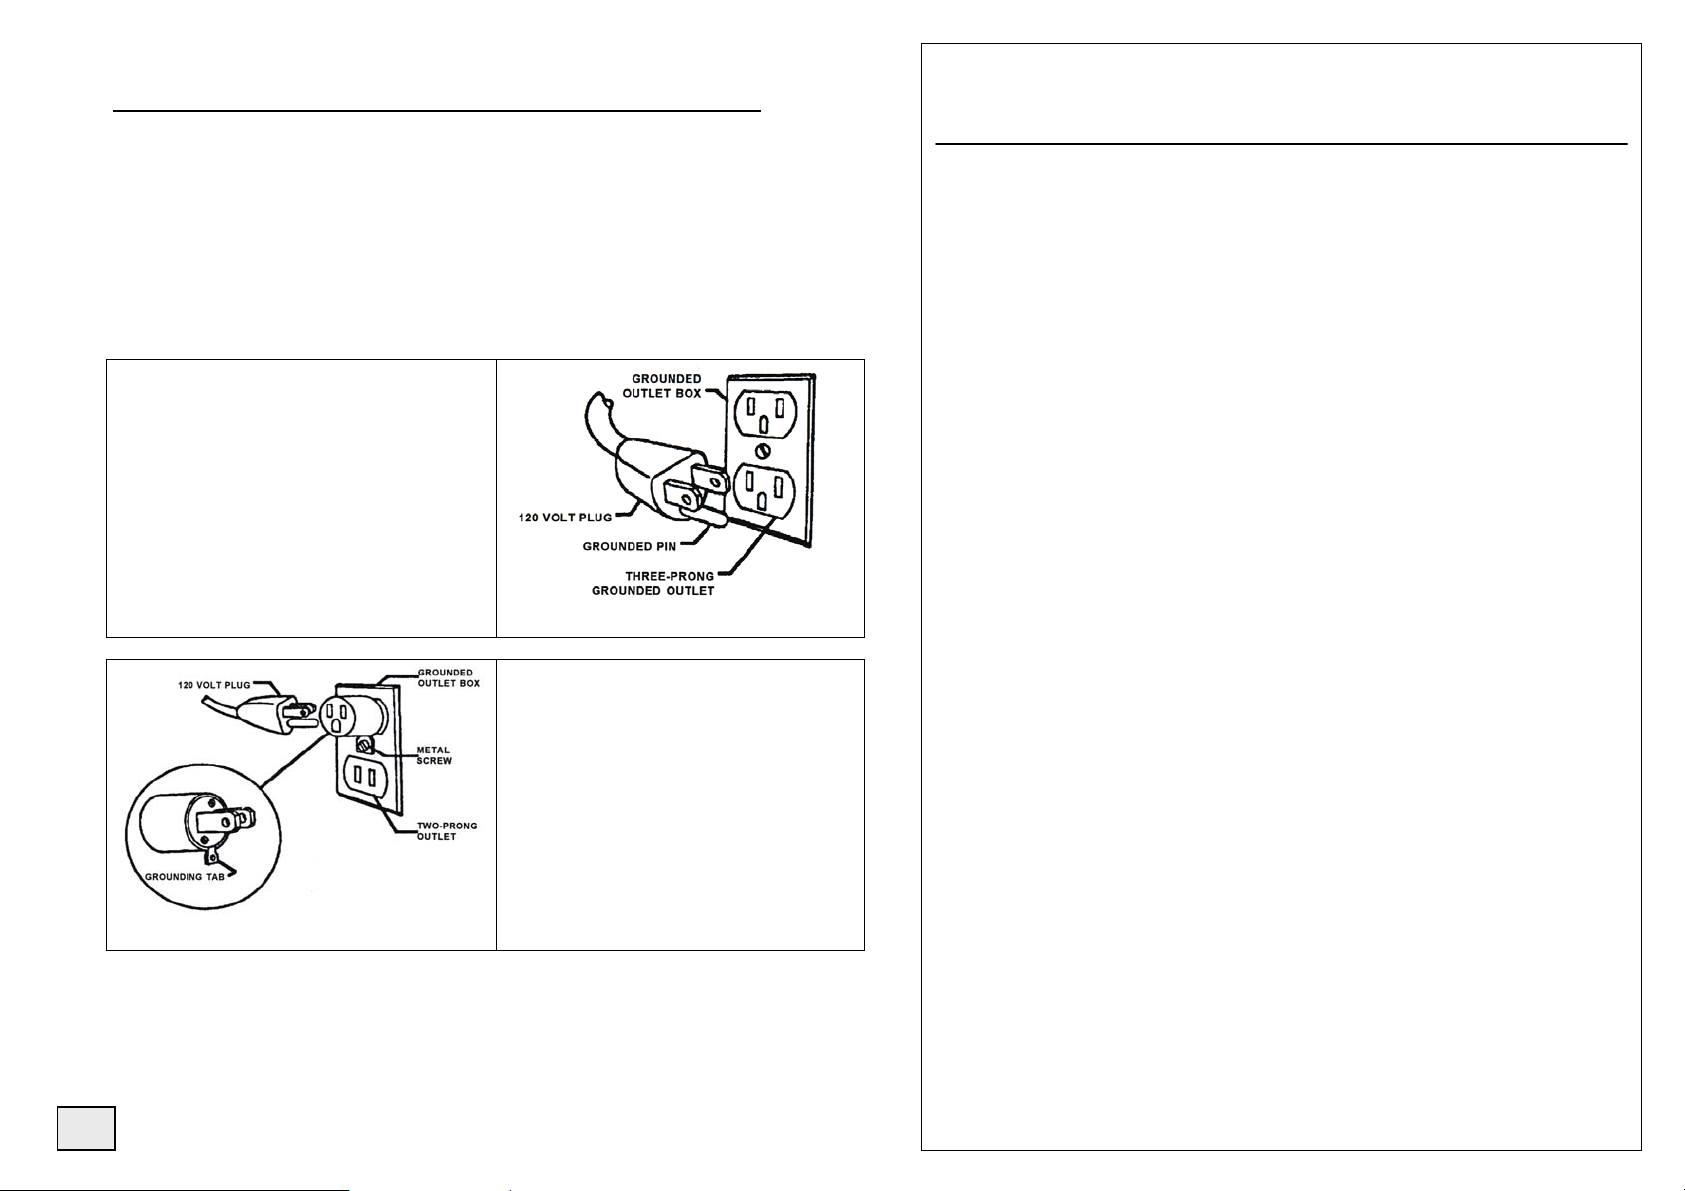
120 V machines have this kind of three-prong plug
at the end of a three-wire electrical cord.
The grounding pin on this plug grounds the
machine when it is plugged into a three-prong
outlet.
A grounding adapter must be installed as
shown here if only two-prong outlets are
available.
The outlet box must be grounded and the
grounding tab (or wire) on the adapter must
be installed under the head of screw in the
centre of the outlet cover.
120 Volt plugs are available at most
hardware stores.
Grounding adapters are not approved for use in
Canada
Replace the plug if the grounding pin is damaged or broken.
The green or (green/yellow) wire in the cord is the grounding wire.
When replacing a plug, this wire must be attached to the grounding pin only.
Extension cords connected to this machine should be 12 gauge, three-wire
cords with three-prong plugs and outlets. Do not use extension cord more than 50 feet
(15 m.) long.
4
IMPORTANT INFORMATION
Your vacuum cleaner international marking to indicate the ON and OFF position of the main power
switch. The 1 indicates ON and the 0 indicates OFF.
3 WAY SWITCH: on request for some Countries, the machine can be supplied with a 3 way power
switch.
Position: 1 both the motors are working
0 off
2 only the vacuum motor is working
INTERRUTTORE A 3 VIE: per alcuni mercati, su richiesta, possono essere fornite macchine
con interruttore di accensione a 3 vie.
Positione: 1 entrambi i motori sono accesi
0 spento
2 solo il motore aspirante è acceso
HAUPTSCHALTER ZU 3 POSITIONEN: auf Anfrage, können für einige Märkte, Maschinen mit 3
Hauptschalter zu 3 Positionen geliefert werden.
Position: 1 Beide Motoren arbeiten
0 Aus
2 Es arbeitet nur der Saugmotor
INTERRUPTEUR À 3 VOIES: Sur demande, pour certains marchés, des appareils avec interrupteur
mise en marche à trois voies peuvent être fournis.
Position: 1 les deux moteurs sont en marche
0 off
2 seul le moteur de l’aspirateur est en marche
INTERRUPTOR DE 3 VIAS: sobre demanda, para algunos mercados, puendense suministrar máquinas
con interruptor de encender de tres vias.
Posición: 1 los dos motores están funcionando
0 off
2 Sólo funciona el motor de la aspiradora.
Technical improvements
Lindhaus reserves the right to make technical improvements and modifications without prior notice. For
this reason, the appliance can deviate in details from the leaflet information.
Migliorie tecniche
Lindhaus si riserva il diritto di apportare delle migliorie tecniche e delle modifiche senza preavviso. In tal
caso alcuni dettagli potranno non risultare conformi alle informazioni riportate sulla documentazione
tecnica.
Technische Verbesserungen
Lindhaus behält sich technische Verbesserungen im Rahmen der Modellpflege vor.
Daher kann das Gerät in Details von Prospektangaben abweichen.
Perfectionnements techniques
Lindhaus se réserve le droit de procéder à des perfectionnements techniques dans le cadre de la gestion de
ses modèles. Certains détails de la machine peuvent ainsi différer des données indiquées dans le prospectus.
Mejoras técnicas
Lindhaus reserva el derecho a hacer cualquier modificatión y arreglo técnico sin previo aviso. Por esta
razón, los detalles acerca de la maquina podrían resultar diferentes de las informaciones indicadas en el
manual de información.
Page 5
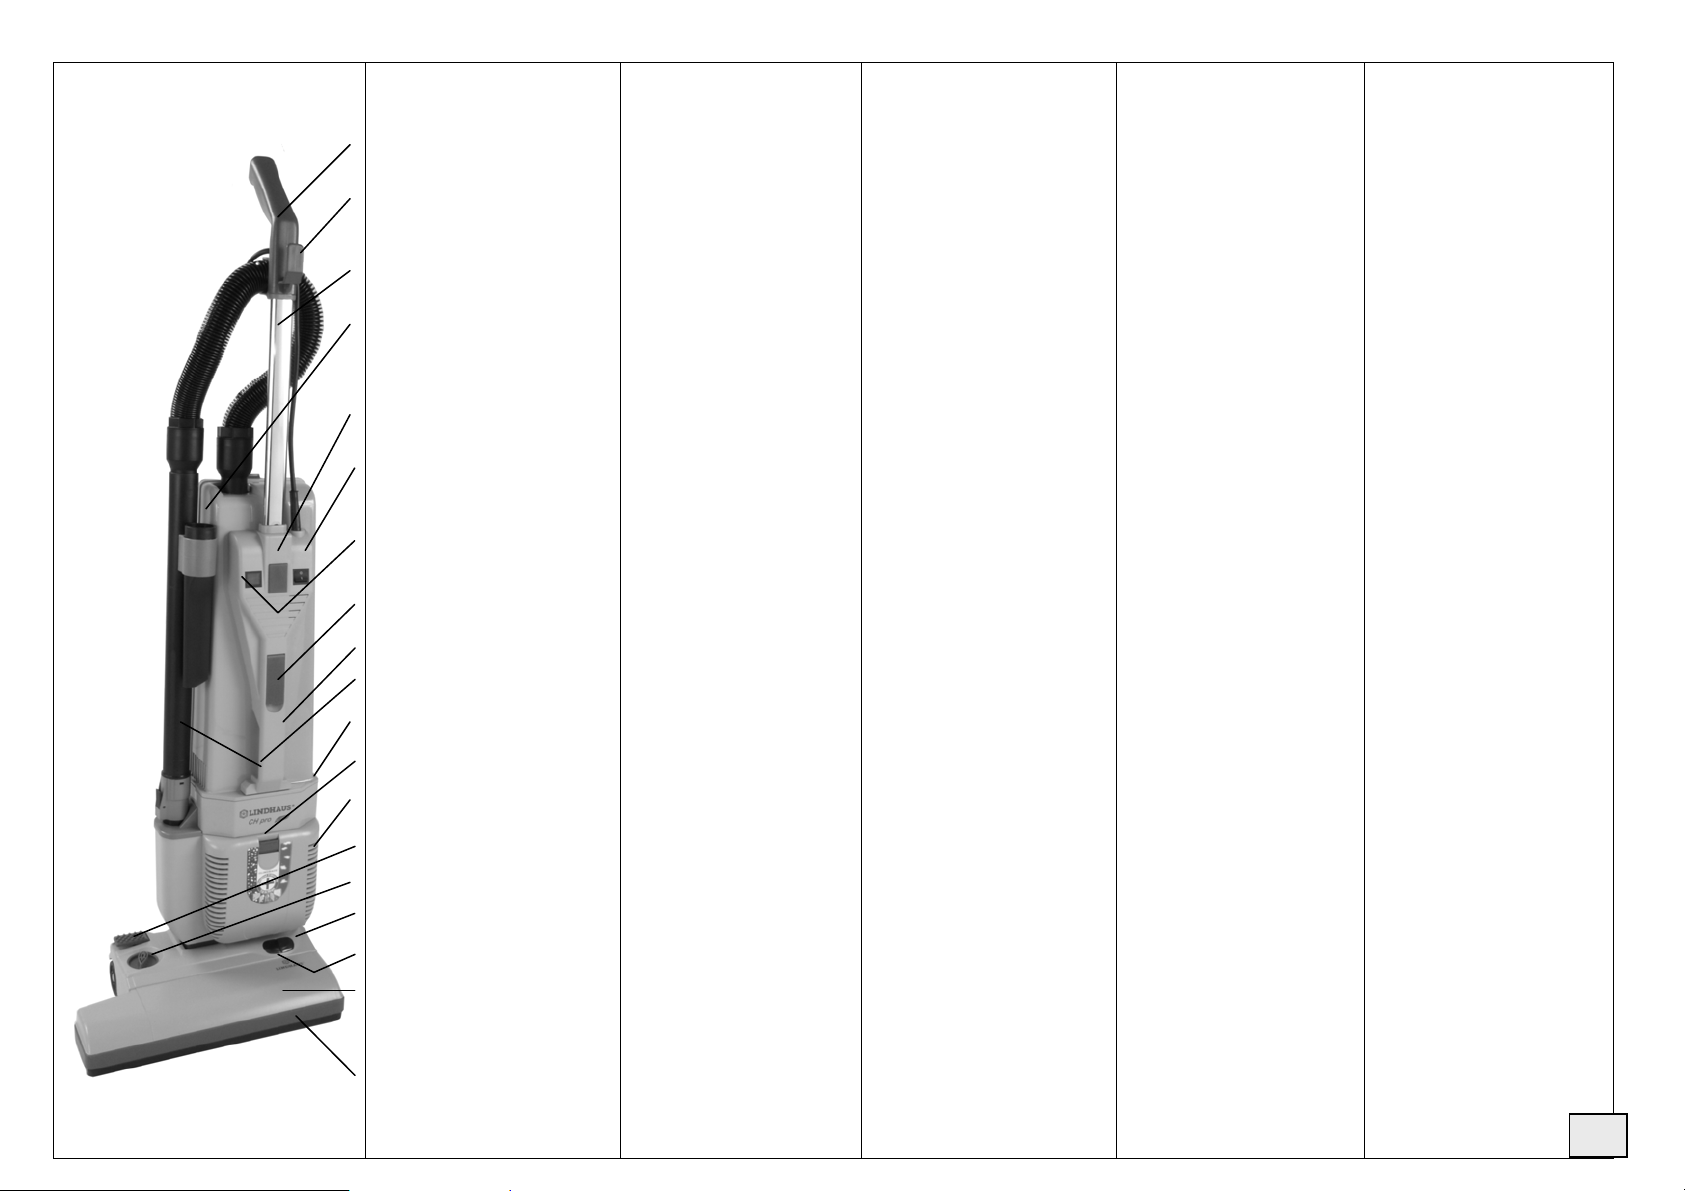
KNOW YOUR MACHINE
Cord strain relief
(Backside of handle)
Upper cord hook
Stretch hose
Handle
Crevice tool
Handle and release double button
Power switch
Full bag light
Lower cord hook
Carrying handle
Wand
Vacuum body
Grill latch
Exhaust filter grill
Pedal
Brush adjustment knob
Red light
Green light
Brush housing
Bumper
CONOSCI LA TUA
MACCHINA
Gancio passacavo (parte
posteriore dell’impugnatura)
Gancio avvolgicavo superiore
Tubo estensibile
Impugnatura
Lancia
Doppio pulsante ferma manico
Interruttore di accensione
Spia sacco pieno
Gancio avvolgicavo inferiore
Impugnatura di trasporto
Tubo prolunga
Corpo aspirante
Pulsante griglia
Griglia con microfiltro
Pedalino
Manopola regolazione altezza
Spia rossa
Spia verde
Elettrospazzola
Paracolpi
LERNEN SIE IHRE
MASCHINE KENNEN
Kabelhaken (hinter dem Griff)
Oberer Kabelhaken
Verlängerungsschlauch
Griff
Flachdüse
Doppelter Griffverriegelungsknopf
Hauptschalter
Staubbeutelfüllanzeige
Unterer Kabelhaken
Traggriff
Rohr
Beutelgehäuse
Gitterknopf
Gitter mit Mikrofilter
Pedal
Bürstenhöhen-Einstellknopf
Rote Lampe
Grüne Lampe
Bürstengehäuse
Schutzprofil
POUR CONNAÎRE VOTRE
Crochet câble
(partie postérieure de la poignée)
Crochet supérieur enroulement du
câble
Tube rallonge
Poignée
Suceur pour fentes
Double verrouillage du manche
Interrupteur principal
Voyant sac plein
Crochet du câble inférieur
Poignée de transport
Tube
Corps aspirant
Bouton grille
Grille avec microfiltre
Pédale
Poignée de réglage de la hauteur
Voyant rouge
Voyant vert
Aspiro-batteur
Profil de protection
MACHINE
d’alimentation
CONOZCA SU MÁQUINA
Gancho pasacable posterior de la
empuñadura
Gancho sujeta cable superior
Tubo extensible
Empuñadura
Lanza
Botón doble para extraer el
mango
Interruptor
Indicador de borsa llena
Gancho sujeta cable inferior
Manija
Tubo
Cuerpo aspirante
Pulsador para extraer la rejilla
Rejilla con microfiltro
Pedal
Regulación de la altura
Luz roja
Luz verde
Batidor
Goma de protección
5
Page 6
1
2
3
4
6
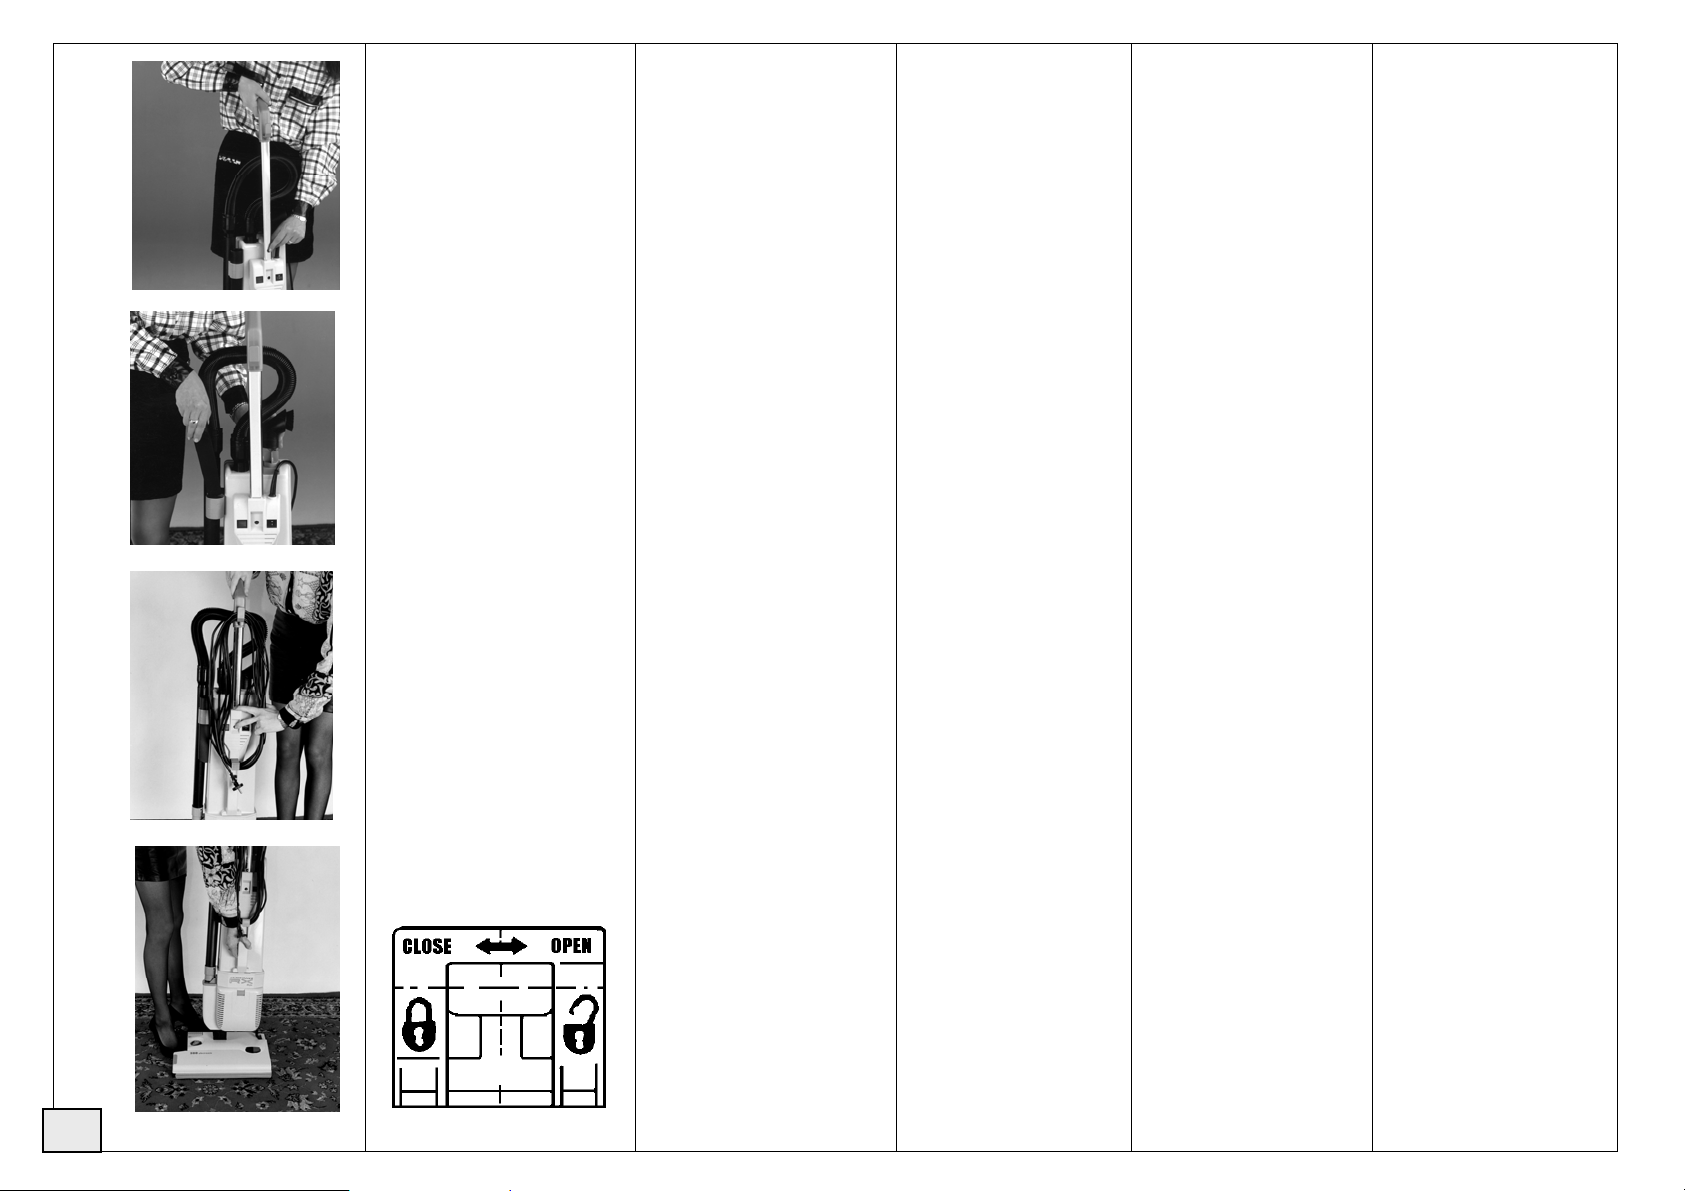
ASSEMBLY INSTRUCTIONS
Insert the chrome handle into the hole
in the top of the switch housing. Push
down until the button snaps into the
proper position.
Insert the one end of the vacuum hose
into the top of the vacuum body and the
other into the extension wand provided.
Insert the wand into the hole and clip
on the right side of the machine. Snap
the hose into the clip below the handle
as shown.
Wind the electrical cord around the
cord hook on the handle and the swing
out cord hook on the front of the
machine. To release the cord, push the
buttons between the switch and bag full
light and push the handle down. Slide
the handle back into the locked position
before using the machine.
Install the bag housing on the brush
housing and slide the lock to the left as
shown and screw the enclosed safety
screw.
ISTRUZIONI PER LA MESSA IN
Inserire il tubo cromato nell’apposita
sede e premere fino a quando il
pulsante scatta nell’apposita sede.
Inserire i tubi e gli accessori nelle
apposite sedi e clip di sostegno.
Avvolgere il cavo tra i ganci
avvolgicavo superiore e inferiore
situati nel retro della macchina. Per
sganciare il cavo dagli appositi
agganci premere i pulsanti e spingere
l’impugnatura verso il basso.
Riportare l’impugnatura in posizione
di blocco prima di usare la macchina.
Inserire il corpo aspirante nello snodo
e leva di supporto e spostate il gancio
di bloccaggio in posizione “close” e
avvitare la vite di sicurezza in
dotazione.
FUNZIONE
MONTAGE
Die verchromte Führungsstange
in die Öffnung des Sauggeräts
einsetzen und hinunterdrücken bis
der Arretierknopf einschnappt.
Saugschlauch in die zwei dafür
vorgesehenen Öffnungen stecken
und in den Halterungen am
Handgriff und an der Seitenwand
befestigen.
Netzkabel vom Kabelhaken
nehmen und an der Steckdose
anschliessen. Das aufgewickelte
Netzkabel kann schnell vom
Haken gelöst werden, indem die
Arretierknöpfe gedrückt werden
und die Führungsstange nach
unten geschoben wird, bis der
Knopf einrastet.
Den Saugkörper auf das
Bürstengehäuse setzen und die
Verriegelung nach links in
Position “close” schieben und die
beigelegte Sicherheitsschraube
anschrauben.
MONTAGE
Introduire le tube chromé dans son
logement le pousser vers le bas
jusqu’à ce que le bouton de
blocage s’encastre.
Introduire les tubes d’aspiration et
les accessoires dans leurs
logements en utilisant les clips de
soutien.
Enrouler le
autour des crochets derrière
l’appareil. Pour décrocher le câble,
il suffit d’appuyer sur le bouton et
pousser la poignée vers le bas.
Remettre la poignée en position de
blocage avant d’utiliser l’appareil.
Introduire le corps aspirant dans le
raccordement et le levier de
support et mettre le crochet
blocage en position «close» et
visser la vis de securité en
dotation.
câble d’alimentation
INSTRUCCIONES PARA EL
Introduzca el tubo
del hueco que está encima del
interruptor. Empuje hacia abajo
hasta que el botón encaje en el
hueco que está entre el interruptor y
el indicador de bolsa llena.
Introduzca una extremidad del tubo
flexible en su lugar encima del
cuerpo aspirante y otra en el tubo
telescópico. Fijar el tubo con los
ganchos adecuados al lado derecho
de la máquina y debajo de la
empuñadura.
Enrolle el cable alrededor del
gancho superior e inferior. Para
soltar el cable, pulse el botón que
está situado entre el interruptor y el
indicador de bolsa llena. Poner la
empuñadura en posición de
bloqueo, antes de usar la máquina.
Conectar la aspiradora al cepillo
eléctrico y mover el gancho de
bloqueo en posición “close” y
atornillar el tornillo de seguridad en
dotatión.
MONTAJE
cromado dentro
Page 7
5
6
STEP 1 STEP 2
7
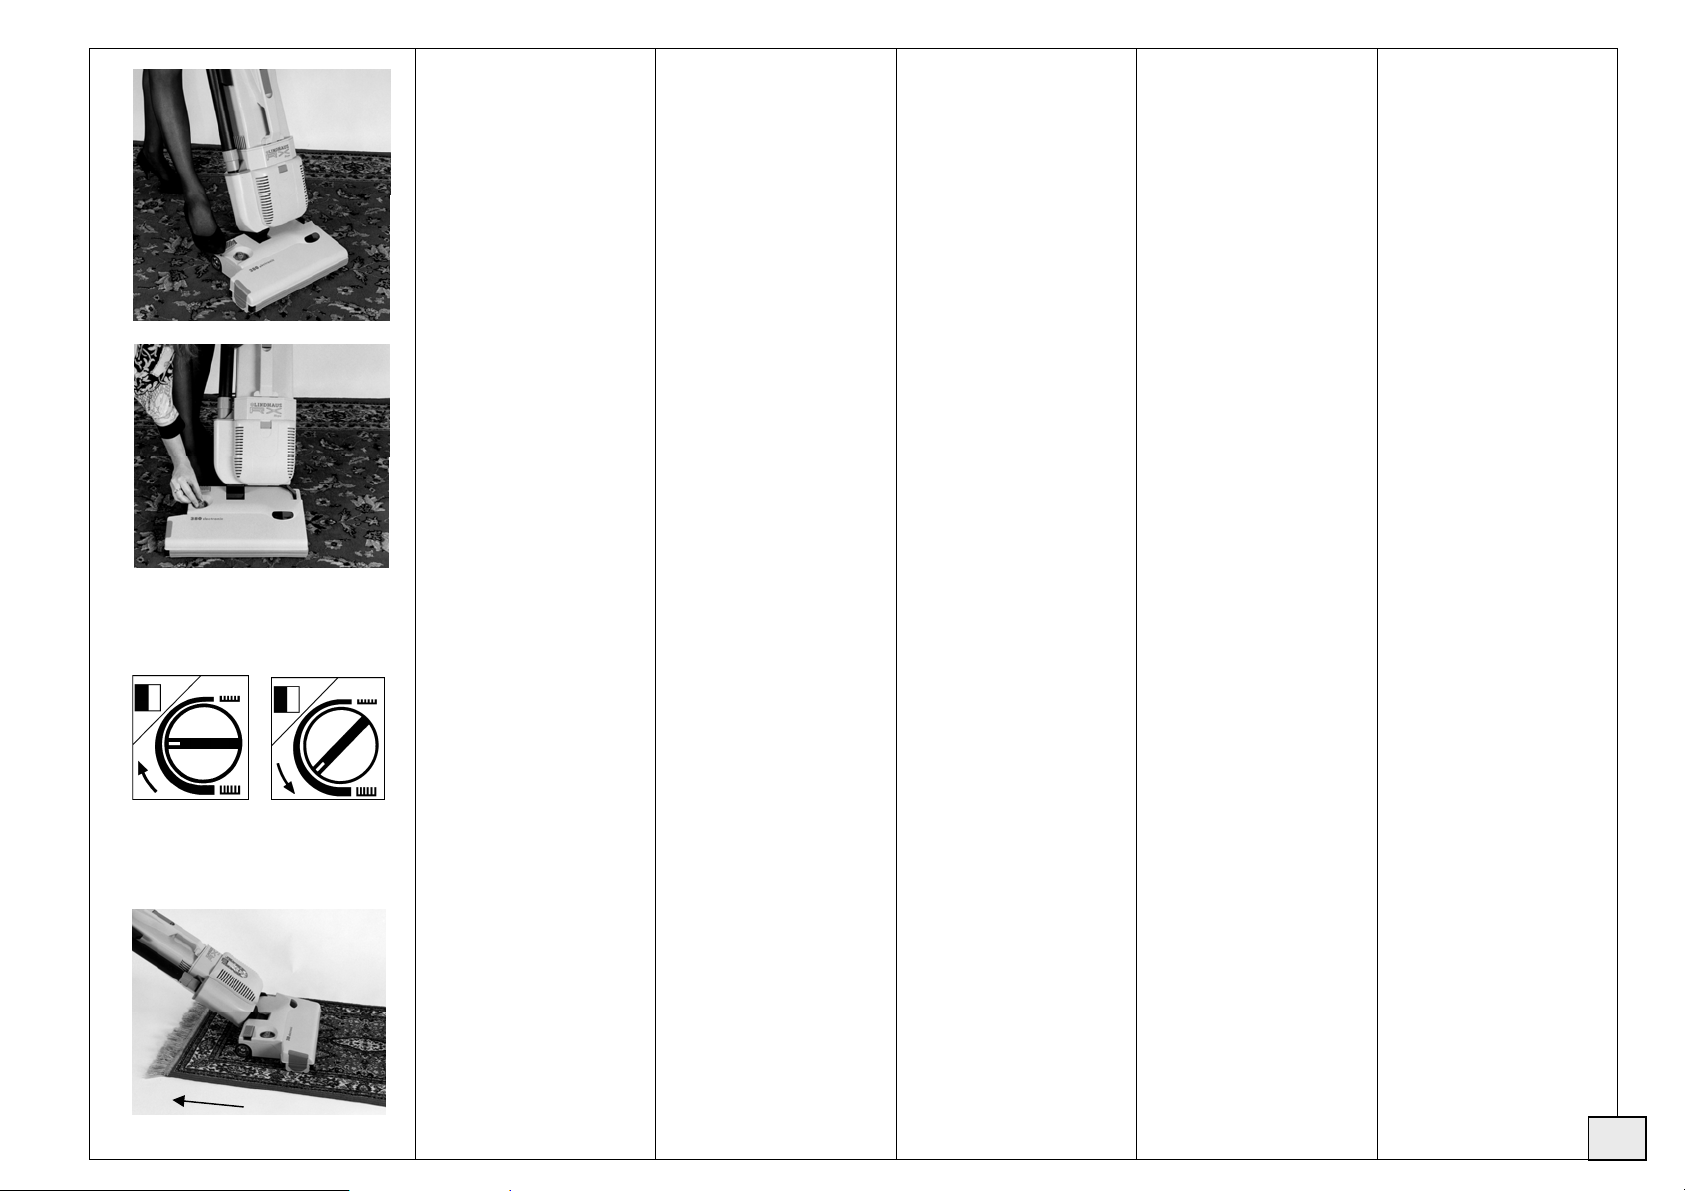
OPERATING INSTRUCTIONS
Switch on the machine (power
switch), depress the foot pedal (by
foot) and move the vacuum body
in working position. The brush
motor will automatically turn on.
BRUSH HEIGHT
ADJUSTEMENT
Your carpet cleaner has several
built in safeguards to protect
components from overload
damage. The electronic circuitry
that operates the red light on the
base indicates that the motor is
overloading because the brush
height is set too low or there are
debris hindering the movement of
the brush roller. If the overload is
excessive the circuitry will shut off
the brush motor and the red light
will stay on until the problem is
corrected. When the problem is
corrected turn the switch off, wait
for a moment and turn it back on.
Make sure you unplug the machine
while inspecting the brush roller
for debris.
STEP 1: With machine on and
handle in normal operating
position, slowly rotate brush
adjustment knob clockwise until
red light turns on.
STEP 2: Turn brush adjustment
knob slowly counterclockwise
until red light turns off.
NOTE: If the red light goes on
and off intermittently while
vacuuming, this is correct. If the
red light stays on all the time, turn
the knob as STEP 2.
In case of fringed carpets the
machine must be used from the
centre to the outside. With one
colour carpet or those whose
weaves have tendency to form
lines, it’s better to follow the
direction of the material to get a
consistent surface appearance.
ISTRUZIONI PER IL
FUNZIONAMENTO
Accendere la macchina, premere il
pedalino di sgancio snodo ed
inclinare la macchina in posizione
di lavoro. Il motore elettrospazzola
si accenderà automaticamente
DISPOSITIVO PER
REGOLARE L’ALTEZZA
Il Vs. battitappeto ha diversi
dispositivi di sicurezza per
proteggere
dovuti a sovraccarico. Il circuito
elettronico che mette in funzione la
spia rossa sulla base indica che il
motore è in sovraccarico perché
l’altezza della spazzola è troppo
bassa o perché ci sono detriti che
bloccano il funzionamento del
rullo. Se il sovraccarico è
eccessivo il circuito spegnerà il
motore elettrospazzola e la spia
rossa rimarrà accesa finché il
problema non viene risolto.
Spegnere l’interruttore, togliere la
spina e quando il problema è
risolto, riaccendere la macchina.
PASSO :1 con la macchina accesa
e con l’impugnatura in posizione
normale di lavoro, ruotate piano in
senso orario il regolatore finché la
spia rossa si accende.
PASSO 2: ruotate il regolatore in
senso antiorario fino a che la spia
rossa si spegne.
NOTA: se la spia rossa si accende
in modo intermittente mentre la
macchina è in lavoro, la
regolazione è corretta. Se invece
rimane sempre accesa, regolare
come passo 2.
In caso di tappeti con frange
bisogna procedere dall’interno
verso l’esterno. Con tappeti a tinta
unita o moquette con trame che
tendono a formare strisce, è
consigliabile seguire la direzione
del pelo per ottenere una superficie
omogenea.
i componenti da danni
BEDIENUNG DER
MASCHINE
Hauptschalter einschalten und die
Führungsstange durch Drücken des
Fusspedals entrasten und in
Arbeitsposition bringen. Der
Bürstenmotor wird erst in Betrieb
gesetzt, wenn die Führungsstange
in Arbeitsposition ist.
SAUGBÜRSTEN
HÖHENVERSTELLUNG
Bürstenverstellung drehen, um die
Bürstenhöhe von 1 mm-10mm
einzustellen. Die Bürstenhöhe
sollte den jeweiligen
Teppichbelägen angepasst werden.
Die Bürstmotor-Kontrolllampe in
grüner Position zeigt die korrekte
Höheneinstellung der Bürste an.
Sobald die Lampe auf rot
wechselt, ist die Bürste zu tief
eingestellet. Nach einigen
Sekunden Betrieb auf Rotlicht
schaltet der Motor automatisch ab.
Hauptschalter ausschalten,
Netzkabel aus der Steckdose
ziehen und, wenn
das Problem behoben ist, schalten
Sie die Maschine nochmals ein.
SCHRITT 1: Bei eingeschalteter
Maschine und mit Griff in
normaler Arbeitsstellung, den
Regler langsam im Uhrzeigersinn
drehen, bis sich die rote
Kontrollampe einschaltet.
SCHRITT 2: Den Regler gegen
den Uhrzeigersinn drehen, bis sich
die rote Kontrollampe ausschaltet.
ANMERKUNG: Wenn die rote
Kontrollampe ab und zu
aufleuchtet während die Maschine
arbeitet, ist die Regulierung
korrekt, wenn sie hingegen immer
anbleibt, regulieren wie Schritt 2.
Teppiche mit Fransen sollten von
innen nach aussen gesaugt werden.
Unifarbige oder tieffloorige
Teppiche solten immer in
Richtung des Floors (im Strich)
gesaugt werden.
INSTRUCTIONS POUR LE
FONCTIONNEMENT
Mettre en marche l’aspirateur;
appuyer sur la pédale de déblocage
et l’incliner en position de travail.
Le moteur de l’aspiro-batteur se
mettra en marcheautomatiquement.
REGLAGE DE L’ HAUTEUR
Votre aspiro-batteur a plusieurs
dispositifs de sécurité pour
protéger ses composants contre les
dangers de surcharge. Le circuit
électronique qui actionne le voyant
rouge, indique que le moteur est en
surcharge, soit à cause de l’hauteur
de la brosse, trop basse, soit à
cause des débrits qui empêche le
fonctionnement du rouleau.
Si la surcharge est exessive, le
circuit arrêtera le moteur de la
brosse et le voyant rouge restera
allumé jusqu’à ce que le problème
sera résolu.
Eteindre l’appareil, débrancher et
le rallumer que lorsque le
problème sera résolu.
PAS 1: Mettre l’appareil en
marche et la poignée en position
normale de travail, tourner
doucement le régulateur en sens
horaire, jusqu’à ce que le voyant
rouge s’allume.
PAS 2: Tourner le régulateur en
sens anti-horaire, jusqu’à ce que le
voyant rouge s’éteigne.
REMARQUE: Si le voyant rouge
clignotte pendant que l’appareil est
en marche le réglage est correct, si
par contre il reste toujours allumé,
il faut régler d’après le pas n°2.
Sur les tapis à franges, passer
l’aspiro-batteur de l’intérieur vers
l’extérieur. Sur les tapis d’une
seule couleur et les moquettes qui
ont la tendance à laisser des
rayures, il est conseillé de suivre le
sens du poil afin d’obtenir une
surface parfaitement homogène.
INSTRUCCIONES
DE FUNCIONAMIENTO
Encienda la máquina, pulse el
pedal con el pie e incline la
máquina en posición de trabajo. El
motor se encenderá
automaticamente
REGULACIÓN DE LA
ALTURA
Su bateador tiene varios
dispositivos de seguridad para
proteger los componentes de daños
debidos a problemas de
sobrecarga. El circuito electrónico
que pone en funcionamiento la luz
roja, indica que el motor está
sobrecargado porque la altura del
cepillo está colocada demasiado
baja o hay deshechos que
dificultan el movimiento del
rodillo. Si la sobrecarga es
excesiva, el circuito desconectará
el motor del cepillo y la luz roja
permanecerá encendida hasta que
el problema sea corregido. Cuando
el problema esté corregido, apague
la luz, espere un momento y
vuélvalo a enchufar. Asegúrese de
tener todo bien revisado antes de
volver a enchufar la máquina.
PASO 1: Con la máquina
encendida y el mango en posición
normal de trabajo, lentamente gire
la ruedecilla en el sentido de las
agujas del reloj hasta que la luz
roja se encienda.
PASO 2: Gire la ruedecilla
lentamente en sentido contrario a
las agujas del reloj, hasta que la
luz roja se apague.
NOTA: Si la luz roja se enciende
y apaga intermitentemente
mientras aspiramos, es correcto. Si
la luz roja permanece todo el
tiempo encendida, gire la
ruedecilla como le indicamos en el
paso 2.
En el caso de alfombras con flecos
la máquina debe ser usada desde el
centro hacia fuera solamente. Con
una alfombra lisa ó cuyos tejidos
tienen una tendencia a formar
líneas, es aconsejable seguir la
dirección del material para
conseguir un aspecto consistente
en la superficie
7
Page 8
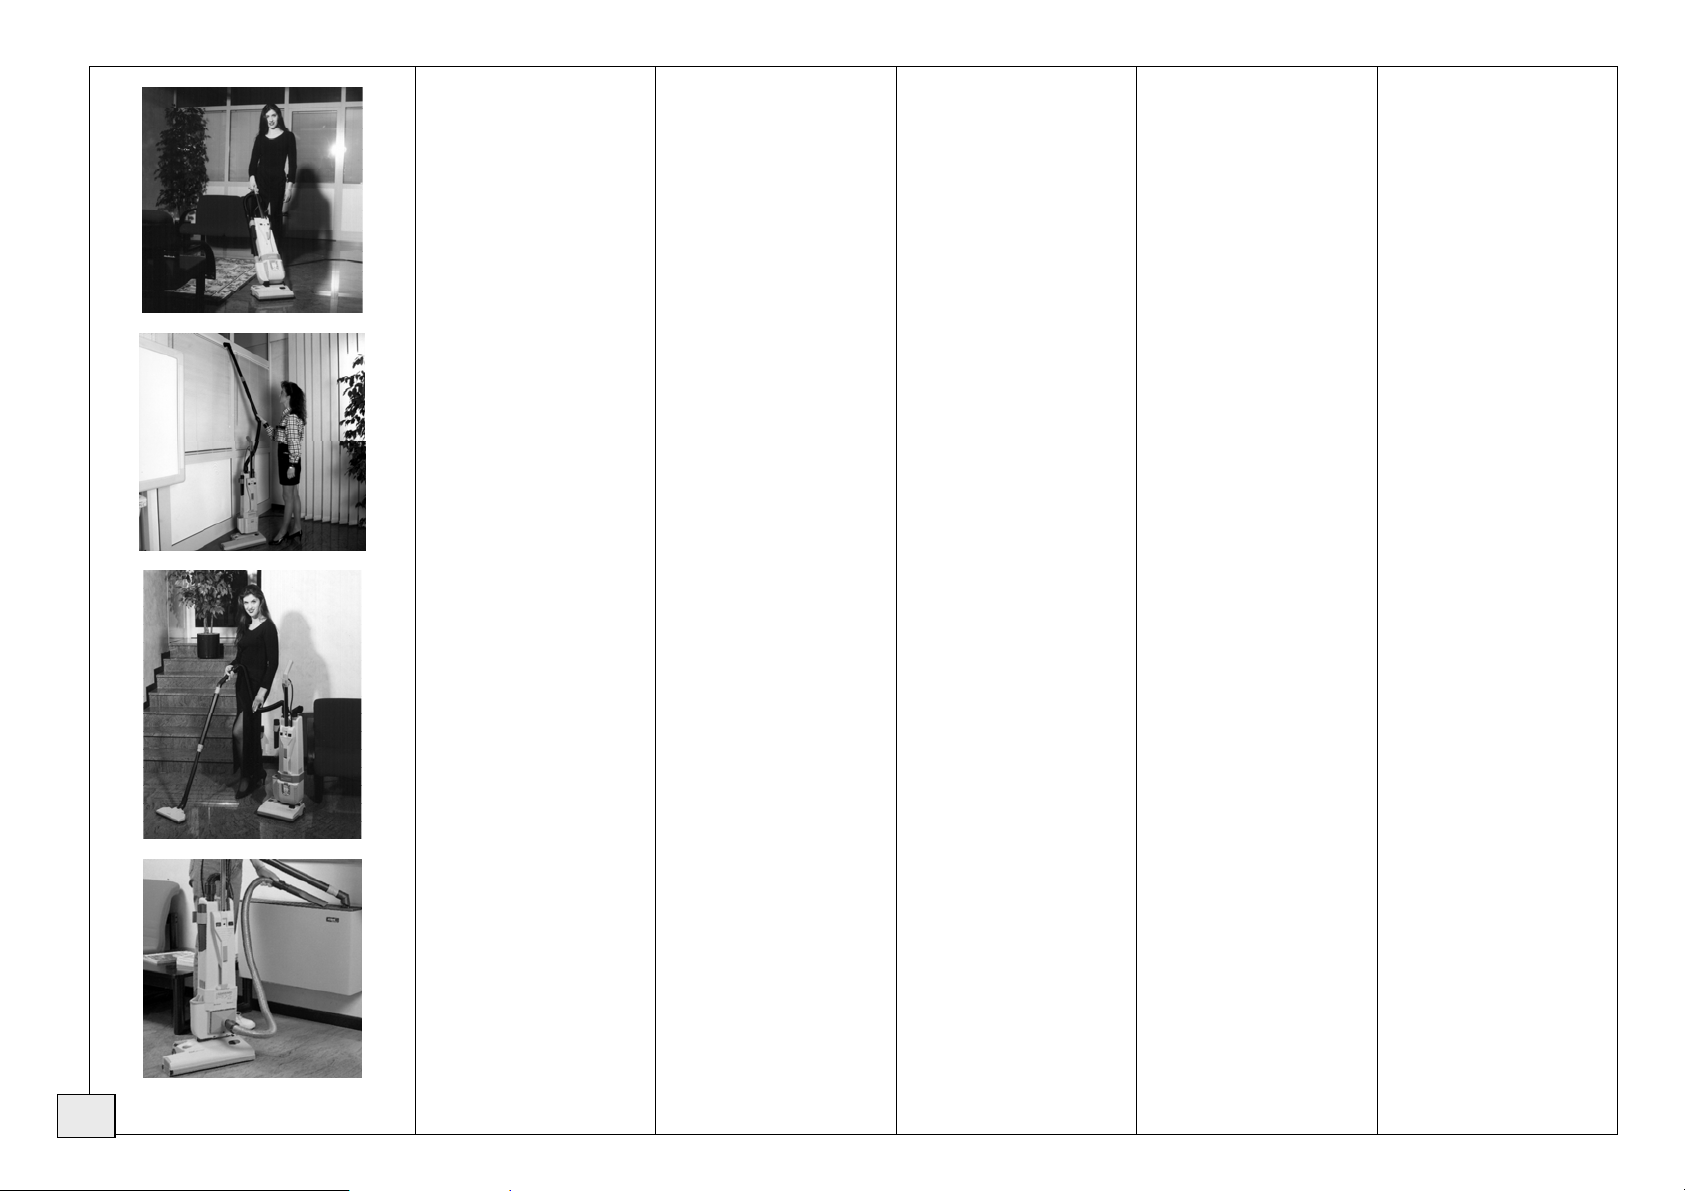
3 WAY SWITCH (option)
Your upright vacuum cleaner can
be equipped with a 3 way switch.
(See instructions on page 4)
On board attachments are provided
for above floor vacuuming
requirements.
Additional optional attachments
including a hard floor tool can be
provided by your dealer.
With the special blower port
accessory (optional) your
vacuum cleaner becomes a
blower.
3 WAY SWITCH (option)
Il vostro battitappeto può essere
provvisto di interruttore a 3 vie
(vedi istruzioni a pag. 4)
Il vostro battitappeto è anche un
aspirapolvere per la pulizia aerea
ed è dotato di utili accessori.
Si può trasformare anche in scopa
elettrica con gli accessori optional
disponibili.
Con lo speciale accessorio
“Soffiatore” (optional) la Vs.
macchina può anche soffiare.
3 WAY SWITCH (option)
Ihr Staubsauger kann mit einen 3Positionen-Schalter ausgestattet
sein.
(siehe Instruktionen Seite 4)
Ihre Teppich Staubsauger
maschine ist auch ein Staubsauger
für die allgemeine Reinigung und
ist mit nützlichem Zubehör
ausgestattet.
Sie kann sich auch in einen
elektrischen Besen verwandeln mit
dem optionalen Zubehör.
Mit dem speziellen “Blaszubehör” (separater Artikel) kann Ihr
Sauger auch blasen.
3 WAY SWITCH (option)
Votre aspiro-batteur peut être doté
d’un interrupteur à trois positions
(voir instructiones page 4)
Votre aspiro-batteur est aussi un
aspirateur pour le nettoyage des
espaces hauts et est équipé de
plusieurs accessoires utiles.
Vous pouvez le transformer aussi
en balai électrique grâce aux
accessoires disponibles en option.
Grâce à l’accessoire spécial
«Souffleur» (en option), votre
aspirateur peut aussi souffler.
3 WAY SWITCH (option)
Vuestra aspiradora batidora puede
ser equipara con un interruptor de
tres vias.
(Consulte instrucciones pag. 4)
Su aspiradora battidora es también
una aspiradora para la parte más
alta de la casa, y dispone de
accesorios utiles.
Se puede convertir también en
escoba eléctrica con los accesorios
opcionales disponibles.
Con el utensilio “Soplador”
(opcional), su aspiradora se
convierte en “sopladora”.
8
Page 9
CAUTION !
ALWAYS DISCONNECT THE POWER
CORD BEFORE PERFORMING ANY
MACHINE MAINTENANCE.
12
13
14
ATTENZIONE!
STACCARE SEMPRE LA SPINA DALLA
PRESA DI CORRENTE PRIMA DI
ESEGUIRE QUALSIASI
MANUTENZIONE.
MAINTENANCE
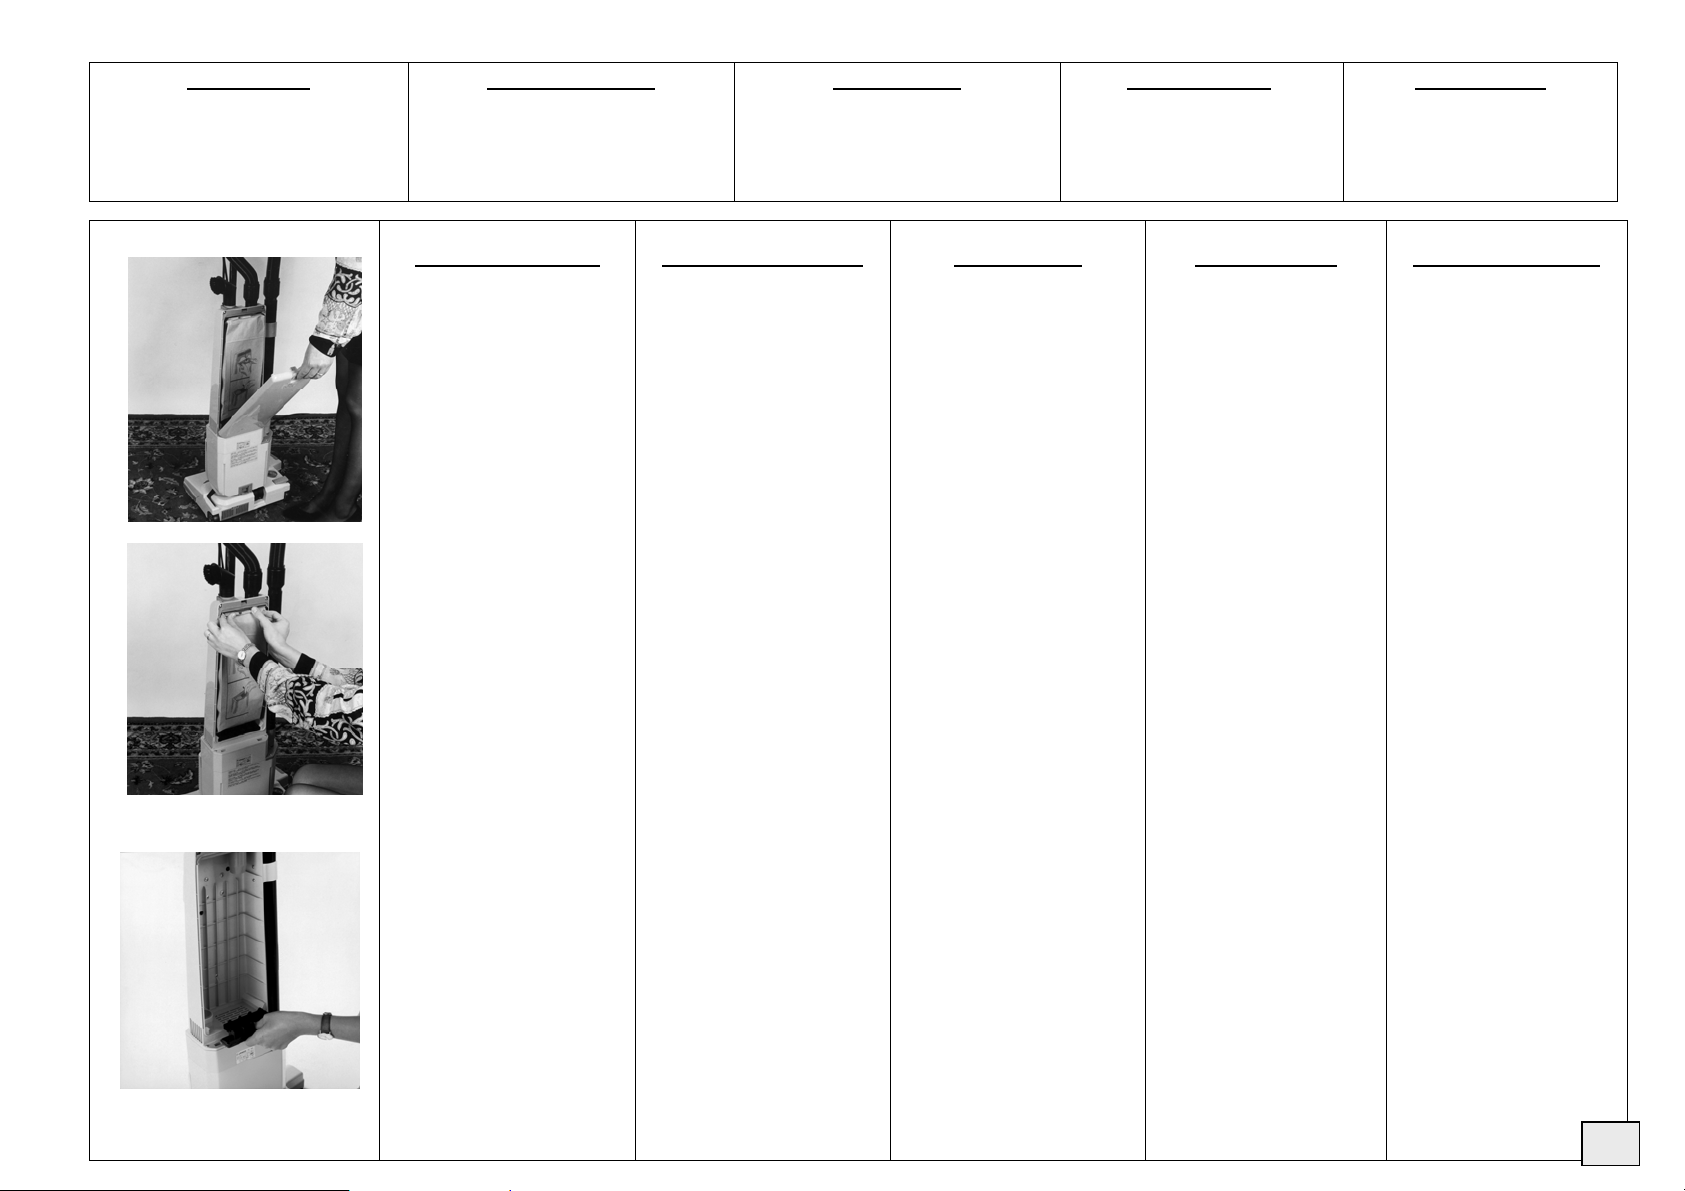
CHANGING THE PAPER
FILTER BAG
Depress the latch on the top of the
bag compartment and remove it.
Remove the full dust bag by holding
the top of the bag and pulling down
and out. Insert new bag by sliding it
in and up (refer to the illustration
printed on the bag).
Before installing a new bag, open
the hole completely with a finger.
Never operate the machine without
an original Lindhaus paper bag.
MOTOR PROTECTION
FILTERFILTER
This filter protects the vacuum motor
from damage due to spilled paper
bags. It provides for the 3
filtration. Clean the filter every
third time that the paper bag is
changed.
Remove filter from grill and wash
out in warm water.
Let the filter dry completely before
putting back into the machine.
Never operate machine without the
inlet filter.
rd
stage of
ACHTUNG!
DEN NETZKABEL IMMER AUS DER
STECKDOSE ZIEHEN, WENN DIE
MASCHINE WEGGERÄUMT ODER
GEWARTET WIRD.
MANUTENZIONE
SOSTITUZIONE DEL SACCO
FILTRO
Aprire lo sportello premendo
l’apposito pulsante.
Sfilare il sacco di carta seguendo
all’inverso le istruzioni di montaggio
stampate sulla confezione dei filtri. Il
sacco si sostituisce ogni qual volta si
accende la spia rossa del corpo
aspirante.
Prima di installare un nuovo sacco
filtro, aprire completamente il foro
con un dito.
Non usare mai l’apparecchio senza
un sacco filtro originale Lindhaus
all’interno.
FILTRO INTERNO
PROTEZIONE MOTORE
Questo filtro protegge il motore da
eventuali danni provocati da
fuoriuscite del sacco e consente il 3°
stadio di filtraggio. Pulire il filtro
ogni 3° cambio del sacco.
Togliere il filtro dalla griglia e
lavarla con acqua tiepida.
Lasciare asciugare completamente
il filtro prima di inserirlo
nuovamente nella macchina.
Non utilizzare la macchina senza
filtro.
DÉBRANCHER TOUJOURS LA
PRISE DE COURANT AVANT
D’EFFECTUER TOUT TRAVAIL
WARTUNG
AUSTAUSCH DES
FILTERBEUTELS
Öffnen und Abheben der Rückklappe
des Saugaggregates durch Drücken
der Taste an der oberen Kante.
Den vollen Staubsack am verstärkten
Ende oben anfassen, nach unten
ziehen und entfernen. Den neuen
Staubsack einsetzen (Bilder auf
Papiersack beachten).
Bevor ein neuer Staubbeutel
eingesetzt wird, das Loch mit dem
Finger ganz öffnen.
Gerät nie ohne einen originalen
Lindhaus Staubbeutel benutzen.
INNERER MOTORSCHUTZ
FILTER
Dieser Filter schützt den Motor vor
eventuellen Staubpartikeln aus dem
Staubsack. Nach jedem dritten
Staubsackwechsel sollte der
Luftfilter gereinigt werden.
Luftfilter mit Halterung
herausziehen, Schaumstoffeinsatz
mit lauwarmem Wasser auswaschen.
Vollkommen trocknen lassen und
wiedereinsetzen.
Die Maschine nie ohne Filter
benutzen.
ATTENTION!
D’ENTRETIEN.
ENTRETIEN
CHANGEMENT DU SAC A
POUSSIERE
Ouvrir le couvercle en appuyant
sur le bouton.
Ôter le sac en papier en suivant à
l’envers les instructions de
montage illustrées sur le paquet
des filtres. Remplacer le sac
chaque fois que le voyant rouge du
corps d’aspiration s’allume.
Avant d’installer un nouveau
sac, il faut bien ouvrir le trou
avec l’aide d’un doigt.
Ne jamais utiliser la machine
sans qu’un sac original
Lindhaus soit en place.
FILTRE INTÉRIEUR
PROTECTION DU MOTEUR
Ce filtre protège le moteur contre
tout dégat provoqué par les fuites
du sac et permet le 3ème stade de
filtrage. Nettoyer le filtre à air
tous les 3 changements de sac.
Ôter le filtre de la grille et le laver
à l’eau tiède.
Laisser bien sécher avant de le
remettre dans l’appareil.
Ne jamais utiliser la machine
sans un filtre.
¡CUIDADO!
DESCONECTE SIEMPRE EL
CABLE ANTES DE LLEVAR A
CABO-CUALQUIER
MANUTENCIÓN
MANUTENCIÓN
SUSTITUCIÓN DE LA BOLSA
DE PAPEL
Pulse el botón de la parte superior
del compartimiento de la bolsa y
sáquelo.
Quite la bolsa llena de polvo
sosteniendo la parte superior de la
bolsa, tire hacia abajo y sáquela.
Inserte una nueva bolsa y deslícela
hacia arriba (como lo indica la
ilustración impresa en la bolsa).
Antes de instalar una nueva
bolsa filtro, abre todo el agujero
con un dedo.
Nunca use la máquina sin la
bolsa original de Lindhaus.
FILTRO INTERIOR
PROTECCIÓN DEL MOTOR
Este filtro protege el motor de los
daños casuales que pudiera
provocar la rotura de la bolsa de
papel, y es la 3ª fase de filtración.
Cada tres cambios de bolsa se
debe limpiar este filtro.
Quitar el filtro de la rejilla y
lavarlo en agua templada.
Secar el filtro completamente
antes de ponerlo de nuevo en la
máquina.
Nunca use la máquina sin este
filtro.
9
Page 10
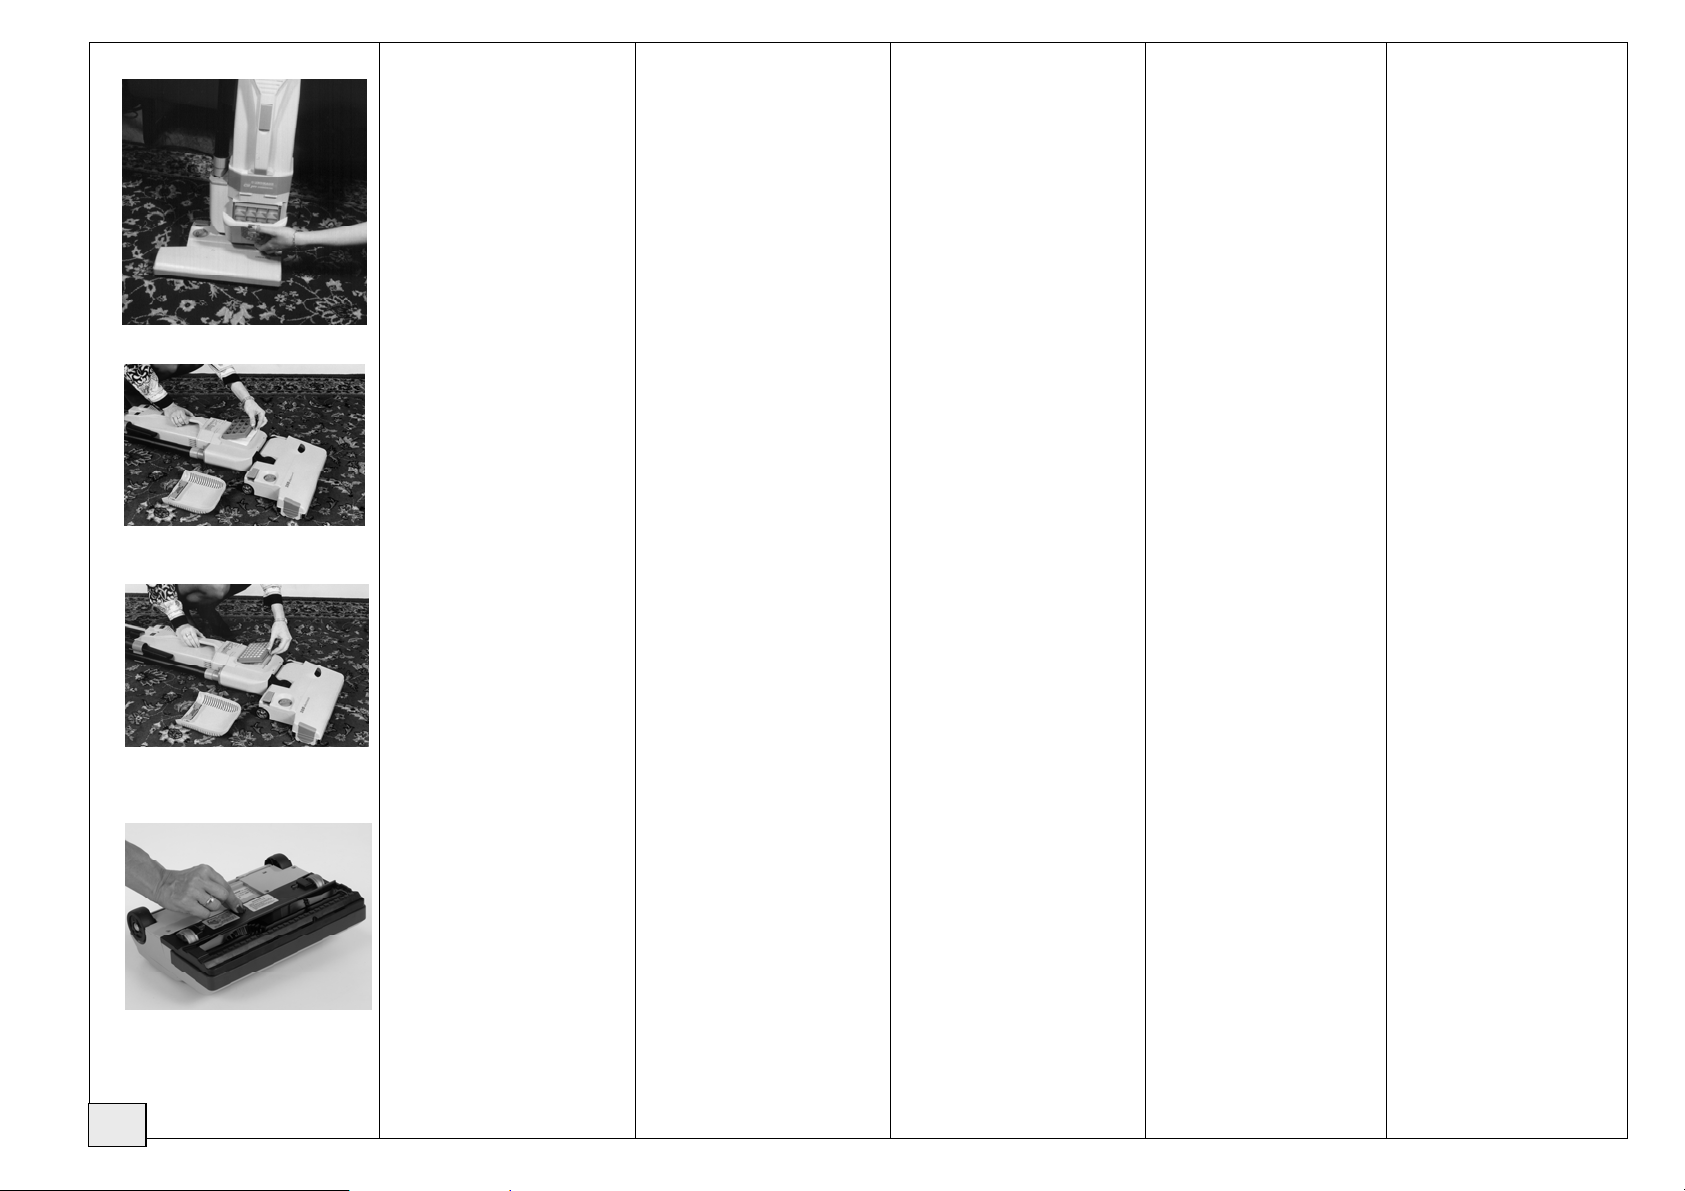
15
16
17
18
10
CHANGING THE
ELECTROSTATIC EXHAUST
The electrostatic exhaust filter
catches any particles that may escape
from the filter bag, vacuum inlet
filter, or lower motor filter. The
electrostatic exhaust filter is located
just below the carrying handle.
Replace the filter every fifth time
you change the bag (more often in
very dusty applications). To replace
the electrostatic filter:
1. Depress the latch on the top of the
filter grill and remove it.
2. Remove the filter from the filter
holder and insert a new original
Lindhaus filter in its space (when
you put the grill into place, with
one hand hold the filter while the
other insert the grill).
3. Snap the filter cover back into
place.
Never operate the machine without
the original Lindhaus Electrostatic
Exhaust Filter in place.
Your carpet cleaner Lindhaus can be
equipped with a special filter for
healthcare environments which
ensures 99.97% filtration efficiency
at 0.3 micron. In case the filter bag
should break, the Hepa filter must
also be replaced. Change the Hepa
filter every 10 bags.
FILTER
HEPA FILTER (optional)
CHANGING THE BRUSH
-Changing the brush is not difficult
but you may want your dealer to
replace it while inspecting other
components for wear.
- Rotate all the red clips until they
are parallel to the roller
- Rotate the bottom cover until it’s
removed from the front hooks
- Rotate the brush roller in parallel
way from the base
SOSTITUZIONE
MICROFILTRO USCITA ARIA
Il filtro elettrostatico blocca le
microparticelle che gli altri filtri non
riescono a trattenere ed evita la
fuoriuscita di micropolvere di
carbone prodotta dal motore. Il
microfiltro è situato nella zona sotto
l’impugnatura di trasporto.
Sostituire il microfiltro ogni 5a
sostituzione del sacco di carta (più
spesso in applicazioni molto
polverose). Per sostituire il filtro:
1. Togliere la griglia premendo
l’apposito pulsante.
2. Rimuovere la contro griglia e
sostituire il microfiltro originale
Lindhaus facendo attenzione ad
applicarlo nella corretta posizione
(quando si rimonta la griglia, con
una mano tenere il filtro e con
l’altra inserire la griglia).
3. Rimontare la griglia.
Non usare mai la macchina senza il
microfiltro elettrostatico originale
Lindhaus.
FILTRO HEPA (optional)
Il vostro battitappeto Lindhaus può
essere dotato di uno speciale filtro
assoluto per ambienti sanitari che
assicura un’efficienza filtrante del
99,97% a 0,3 micron.
In caso di rottura del sacco filtro,
anche il filtro hepa deve essere
sostituito. La durata massima del
filtro Hepa è di 10 sacchi filtro.
SOSTITUZIONE DEL RULLO
-Sostituire il rullo non è difficile ma
forse è preferibile che il Vs.
rivenditore lo sostituisca durante il
controllo di altri componenti soggetti
ad usura.
- ruotare tutte le clip rosse portandole
parallele al rullo
- Ruotate il coperchio rullo fino a
sganciarlo dalle sedi frontali
- Ruotate il rullo sollevandolo dalla
base in modo parallelo.
AUSTAUSCHEN DES
ELEKTROSTATISCHEN
AUSLAßFILTERS
Zweck dieses Filters ist es,Staub der
durch die anderen Filtrierungsstufen
gelangt, aufzufangen. Der Filter
befindet sich direkt unter dem
Traggriff und sollte nach jedem
fünften Wechsel des Staubbeutels
gereinigt werden (häufiger bei sehr
staubigen Reinigungsanwendungen).
1. Filterdeckelklinke drücken und
Auslaßfilterdeckel entfernen.
2. Filter aus der Halterung
herausnehmen und mit einem
neuen originalen Lindhaus Filter
ersetzen (bei Zurückstellung des
Gitters mit einer Hand den Filter
halten und mit der anderen das
Gitter einsetzen).
3. Das Gitter zurückstellen.
Gerät nie ohne den originalen
elektrostatischen Lindhaus Filter
benutzen.
HEPA FILTER (optional)
Der Lindhaus-Sauger kann mit einem
speziellen Filter für Reinräume
ausgestattet werden, der eine
Filtrierleistungsfähigkeit von 99,97
% zu 0,3 Mikron sicherstellt. Sollte
der Papierfilterbeutel reißen, muß
auch der Hepa-Filter gewechselt
werden. Der Hepa-Filter sollte
immer nach 10 Papier-filterbeuteln
erneuert werden.
AUSWECHSELN DER BÜRSTE
Die Rolle auszuwechseln ist nicht
schwierig, es ist jedoch ratsam wenn
Sie dies Ihrem Händler bei der
Auswechslung von anderen
- Verschleißteilen überlassen.
Alle roten Klips drehen bis sie
parallel zur Rolle stehen.
- Den Rollendeckel rotieren bis er
sich vorne von der Basis löst.
- Die Rolle rotieren und parallel zur
Basis aufheben.
REMPLACEMENT DU
FILTRE ÉLECTROSTATIQUE
Ce filtre retientles particules fines
qui s’échappent des autres filtres.
Il est placé juste au-dessous de la
poignée de transport. Changer ce
filtre tous les cinq changements de
sac à poussière ( plus souvent dans
des conditions de travail
particulièrement poussiéreuses).
Pour le changer:
1. Ôter la grille en appuyant sur le
bouton.
2. Enlever le filtre du support et
poser un nouveau filtre original
Lindhaus en faisant attention à
bien le remettre en place (quand
on remonte la grille il faut tenir
d’une main le filtre, de l’autre la
grille).
3. Remonter la grille.
Ne jamais utiliser la machine
sans que le filtre original
Lindhaus soit en place.
HEPA FILTER (en option)
Votre aspirateur peut être équipé
d’un filtre spécial pour tout milieu
sanitaire spécial et assure une
capacité filtrante de 99,97% à 0,3
micron.
En cas de rupture du sac filtre, il
faudra remplacer aussi le filtre
Hepa. Durée maximum
d’utilisation du filtre Hepa : 10
sacs filtre.
CHANGEMENT DU
ROULEAU
- Il n’est pas difficile de remplacer
la brosse, mais peut-être est-il
préférable que votre revendeur le
remplace à l’occasion de contrôles
d’autres pièces soumises à usure.
- Tourner tous les clips rouges en
les portant en parallèle avec la
brosse
- Tourner le couvercle de la brosse
jusqu’à le débloquer des soutiens
frontaux
- Tourner la brosse en la soulevant
de la base de façon parallèle
SUSTITUCIÓN DEL FILTRO
ELECTROSTATICO
El filtro electrostático coge
cualquier partícula que pueda
escapar de otros filtros. El filtro
electrostático está situado debajo
de la manija y debe cambiarse cada
5 bolsas que use (en lugares muy
polvorientos debe cambiarse más a
menudo). Para sustituir el filtro
electrostático:
1. Presione el pulsador de la rejilla
y sáquelo.
2. Saque el filtro de la rejilla y
inserte un nuevo filtro Lindhaus
en su lugar (soportar el
microfiltro con una mano).
3. Monte otra vez la rejilla.
Nunca debe de utilizar el
aparato sin un filtro
electrostático original Lindhaus.
FILTRO HEPA (opcional)
Su Bateador LINDHAUS puede
estar equipado con un filtro
especial para ambientes sanitarios,
el cuál, asegura un filtrado
eficiente del 99,97% a 0,3
micrones.
En caso de rotura de la bolsa, el
filtro Hepa también necesita ser
sostituido. La duración máxima del
filtro Hepa es de 10 bolsas.
SUSTITUCIÓN DEL RODILLO
-No es dificil sustituir el cepillo,
pero sería preferible que lo haría su
revendedor durante el control y
sustitución de otras piezas
sometidas a desgaste
-Girar todos los clips rojos
poniendolos en paralelo con el
cepillo
-Girar la tapa del cepillo hasta el
debloqueo de los ganchos frontales
-girar el cepillo levantadolo de la
base de manera paralela
Page 11
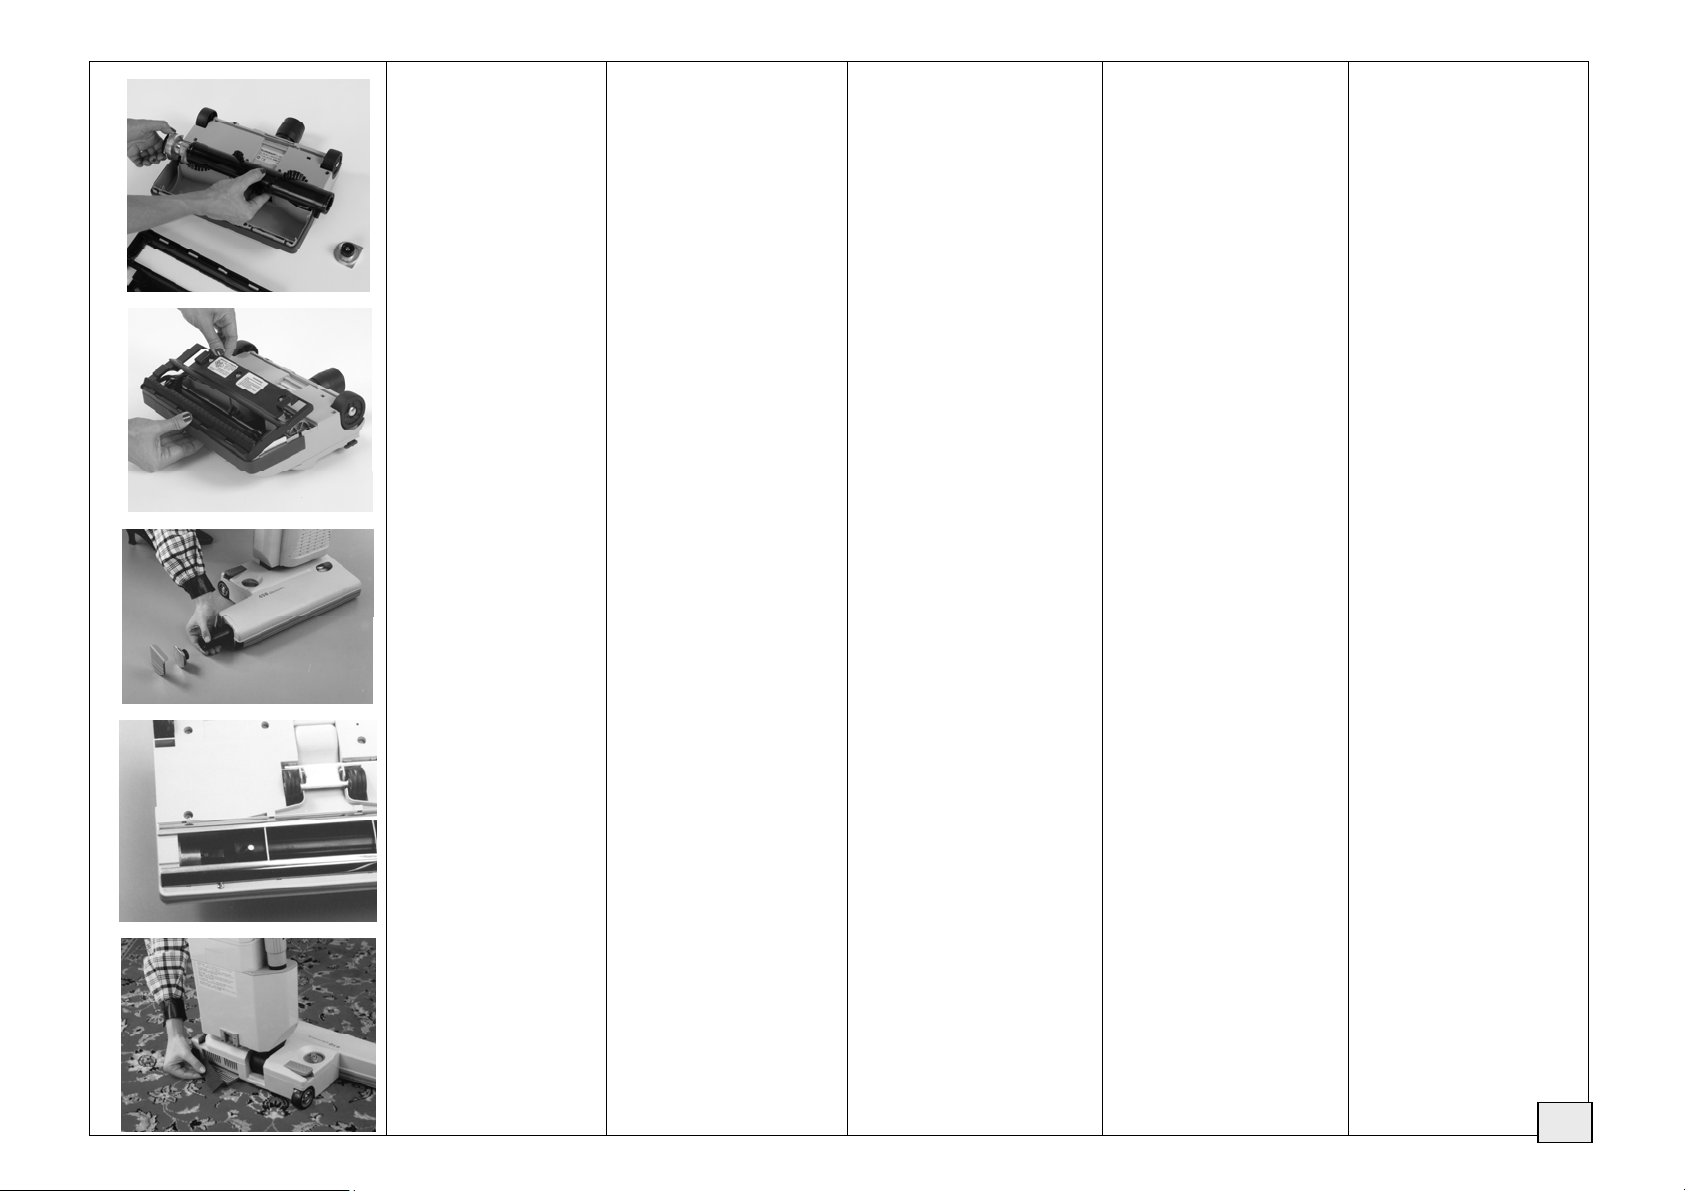
19
20
21
22
23
- Hold the pulley with one hand
and slide out the roller from the
transmission support
- Keep the side brush support
for the new brush roller.
-When necessary replace both
the brush supports with
bearings.
- Assemble the new brush
following in reverse order the
above instructions.
ATTENTION
Hook the brush cover to all
the front hooks, rotate until it’s
perfectly closed with the base,
rotate all the red clips 90° to
lock the cover.
CHANGING THE BRUSH
1. Lay the machine on the left
side.
2 Slide the side cover (item n.
3. Grasp the center of the brush
4. Pull out the brush support
from the brush (part n.40- Pag.
14). This metal support with
ball bearing will be reused with
a new brush roller.
5. Slide brush end transmission
side into the base. Push the
roller to the end and if
necessary rotate a bit until the
teeth are engaged on the
transmission joint.
6. Make sure also that the side
7. Follow steps 1-3 in reverse
CHANGING THE FILTER
Replace or wash the filter for
brush motor protection at least
once a year.
CH pro 45
ROLLER
46/page 14) off the end of the
brush housing.
by the bristles and pull it up
and out the right side of the
housing (reuse this piece
after inserting the new
brush).
bristles are inside the
aluminum roller support
using the side door for help.
order to reassemble.
- Ruotate il coperchio rullo fino a
sganciarlo dalle sedi frontali
- Ruotate il rullo sollevandolo
dalla base in modo parallelo.
-Tenere la puleggia con una mano
e sfilare il rullo dal supporto
trasmissione
- togliere il supporto rullo laterale
e conservarlo per il nuovo rullo
- Quando è necessario, sostituire
entrambi i supporti rullo completi.
- Montare il nuovo rullo,
seguendo all’inverso le operazioni
di smontaggio.
ATTENZIONE
Agganciare bene il coperchio rullo
negli agganci anteriori, ruotarlo
fino alla perfetta chiusura con la
base, ruotare tutte le clip rosse 90°
per bloccare il coperchio.
CH pro 45
SOSTITUZIONE DEL RULLO
1. Stendere l’apparecchio sul lato
sinistro.
2. Sfilare il coperchio laterale
(parte n. 46- pag. 14) dal vano
portaspazzola.
3. Sfilare il rullo afferrandolo per
le setole
4. Estrarre il supporto del rullo
(parte n. 40- pag. 14)
dall’estremità della spazzola
(supporto che verrà riutilizzato
con la nuova spazzola).
5. Inserire l’estremità del rullo lato
giunto di trasmissione nella
base. Spingere il rullo fino in
fondo e se necessario ruotarlo
leggermente fino a far innestare
i denti del giunto di
trasmissione.
6. Assicurarsi che le setole laterali
siano all’interno del supporto in
alluminio aiutandosi con lo
sportello laterale.
7. Seguire le istruzioni riportate
ai punti da 1 a 3 in ordine
inverso per assemblare di nuovo.
SOSTITUZIONE DEL FILTRO
Almeno una volta l’anno sostituire
o lavare il filtro di protezione
motore elettrospazzola.
- Den Rollendeckel rotieren bis er
sich vorne von der Basis löst.
- Die Rolle rotieren und parallel zur
Basis aufheben.
- Die Riemenscheibe mit einer Hand
festhalten und die Rolle von der
Antriebshalterung lösen.
- Die seitliche Rollenhalterung
entfernen und für die neue Rolle
aufbewahren.
- Wenn es notwendig ist, dann beide
Rollenhalterungen komplett ersetzen.
- Bei der Montage der neuen Rolle
die Schritte in umgekehrter
Reihenfolge durchführen.
Den Walzendeckel vorne gut
anklinken und abdrehen bis zur
perfekten Schließung mit der Basis.
Alle roten Klips auf 90° drehen um
den Deckel zu blockieren.
AUSWECHSELN DER BÜRSTE
1. Legen Sie die Maschine so hin,
daß sie auf der linken Seite liegt.
2. Schieben Sie die Seitenabdeckung (Teil n. 46 S. 14) vom
Bürstengehäuse.
3. Lösen Sie die Rollenhalterung
(Teil n. 40- S.14) vorsichtig vom
Ende der Bürste (wird bei der
neuen Bürste wieder verwendet).
4. Fassen Sie die Bürste an den
Borsten und ziehen Sie sie durch die
rechte
heraus.
5. Die Bürstenrolle, auf der Seite mit
dem Antrieb im Bürstengehäuse
einführen. Die Rolle bis auf den
Grund stoßen und falls notwendig
leicht abdrehen bis die Zähne des
Antriebgelenks einschalten
Mit Hilfe der Seitenabdeckung
6.
sicherstellen, dass sich die
Seitenborsten innerhalb der
Aluminiumhalterung befinden.
7. Beim Zusammenbauen führen Sie
die Schritte 1-3 in umgekehrter
Reihenfolge durch.
AUSWECHSELN DES FILTER
Den Schutzfilter des
Elektrobürstenmotors einmal pro
Jahr auswechseln oder waschen.
ACHTUNG
CH pro 45
Seite des Gehäuses nach oben
- Tourner le couvercle de la brosse
jusqu’à le débloquer des soutiens
frontaux
- Tourner la brosse en la soulevant
de la base de façon parallèle
- Tenir la poulie d’une main et
enlever la brosse du support
transmission
- Enlever le support de la brosse
latéral et le garder pour une
nouvelle brosse
- Quand il est nécessaire, remplacer
les deux supports complets.
- Monter la nouvelle brosse, en
suivant au contraire les opérations
de démontage.
ATTENTION
Il faut bien accrocher le couvercle
De la brosse aux crochets
antérieurs, tourner jusqu’à la
fermeture parfaite de la base,
tourner les clips rouges 90° pour
bloquer le couvercle.
CH pro 45
CHANGEMENT DU ROULEAU
1. Poser l’appareil du côté gauche
2. Enlever le couvercle latéral
(partie n. 46 p.14) du logement de
la brosse
3. Ôter la brosse en la prenant par
les poils
4. Extraire le support de la brosse
(partie n.40-p.14) par l’extrémité de
la brosse (support qui sera utilisé
pour la nouvelle brosse).
5. Introduire l’extrémité de la
brosse côté joint de transmission
dans la base. Pousser la brosse
jusqu’au fond et si nécessaire
tourner légèrement jusqu’à
encastrer les dents du joint de
transmission.
6. S’assurer que les poils latéraux
soient à l’intérieur du support en
aluminium en s’aidant avec le
couvercle latéral.
7. Pour le remontage, suivre les
indications en sens inverse de 1 à
3.
CHANGEMENT DU FILTRE
Changer ou laver le filtre de
protection du moteur de la brosse
au moins une fois par an.
-Girar la tapa del cepillo hasta el
debloqueo de los ganchos frontales
-girar el cepillo levantadolo de la
base de manera paralela
-Tener la polea con una mano y
quitar el cepillo desde el soporte
transmisión
-quitar el soporte cepillo lateral y
guardarlo para un cepillo nuevo.
- Cuando es necesario, sustituir
los dos soportes completos.
-Montar el cepillo nuevo,
haciendo al contrario las
operaciones de montaje.
Enganchar bien la tapa del cepillo
con los ganchos anteriores, girar
hasta el cierre perfecto con la
base, girar todos los clips rojos 90°
para bloquear la tapa.
1. Colocar el aparato del lado
izquierdo
2. Quitar la tapa lateral (parte n.46
– pág. 14) del alojamiento del
cepillo.
3. Quitar el cepillo agarrandolo por
las cerdas
4. Sacar el soporte del cepillo
(parte n.40 pág.14) por la
extremidad del cepillo (soporte
que se utilizará para el nuevo
cepillo).
5. Introducir la extremidad del
cepillo lado junta de transmisión
en la base. Empujar el cepillo hasta
el fondo y si necesario girar
suavemente hasta encajar los
dientes de la junta de transmisión.
6. Asegurárse de que las cerdas
laterales sean en el interior del
soporte de alumínio ayudándose
con la tapa lateral.
7. Seguir las instrucciones 1-3 en
SUSTITUCIÓN DEL FILTRO
Sustituir o limpiar el filtro que
protege el motor del cepillo batidor
por lo menos una
vez al año.
ATENCIÓN
CH pro 45
SUSTITUCIÓN DEL
RODILLO
orden inverso para montar otra
vez.
11
Page 12
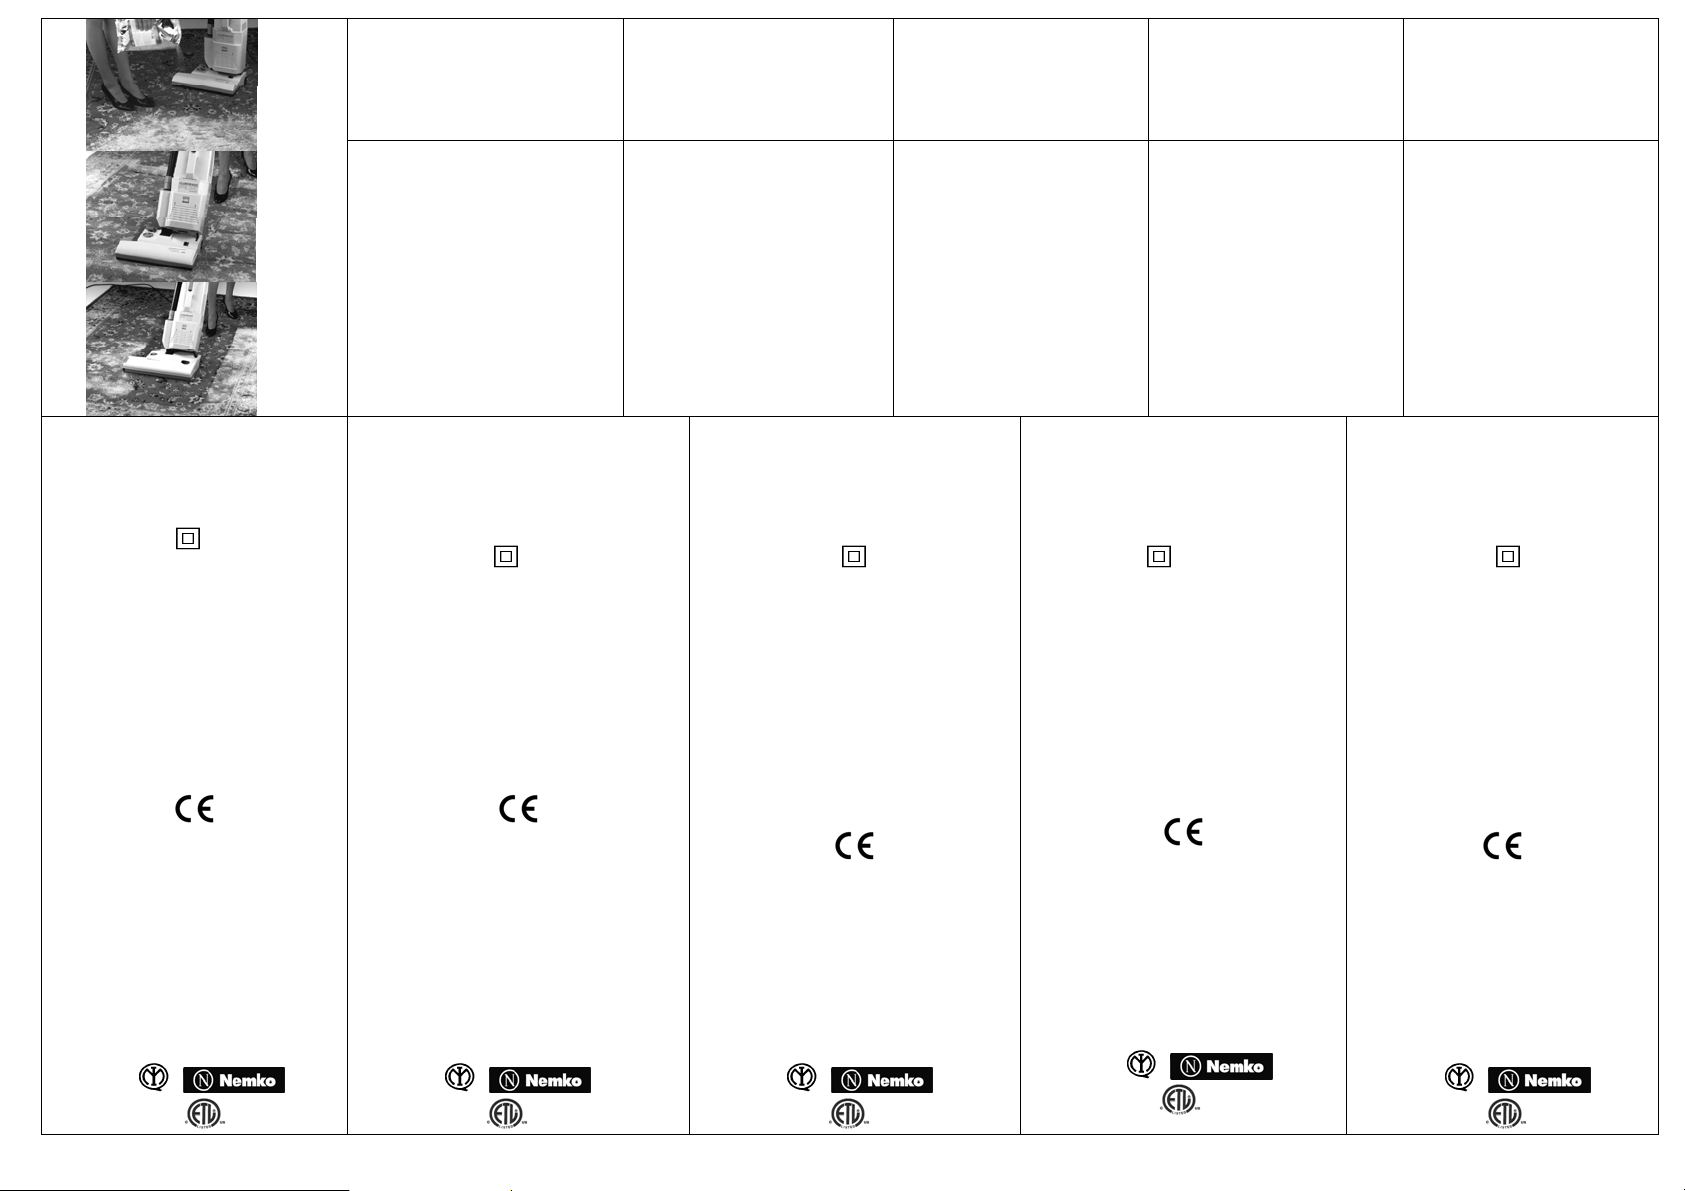
-Voltage (see data place on the machine)
- Input power 700 W
- Notched commutator
- Rotor assembled on two balls bearings
- Double insulation
- Ground wire for USA and Canada
- Suction body made of thermoplastic
material, shockproof, high resistance,
antistatic
- Voltage same as the suction body
- Imput power 180 W. (450=200W.)
- Notched commutator
- Rotor assembled on two balls bearings
- Electronic overload control
- Brush height adjustment 1 10 mm
- Width 12”(300mm) – 15”(380) – 18”(450)
DECLARATION OF CONFORMITY
In conformity with the following standards:
EN 60335-1: 2012; EN 60335-2-69: 2012
EN 62233: 2008; EMC EN 55014—1: 2006
+ A1: 2009 + A2: 2011
EMC EN 55014—1: 2006 + A1: 2009 + A2:
2011; EN 55014-2: 1997 + A1: 2001 + A2:
2008; EN 61000-3-2:2006 + A1: 2009 + A2:
2009; EN 61000-3 – 3: 2008
Directives of reference:
L.V.D. 2006/95 EC; 2002/95 CE (ROHS)
APPROVALS:
Europe IMQ
U.S.A. and Canada
SPECIFICATION
Suction body
POWER HEAD
,
ETL
LINDHAUS
Dry cleaning compound
LINDHAUS SPOTTER
Stain away
LINDHAUS ECO DRY
Microspugne ecologiche per lavare a
secco i tappeti
LINDHAUS SPOTTER
Smacchiatore
ECO SPREADER
Is the perfect solution to sanitize
carpets and rugs with minimum effort
and no risk. You can use it as a power
head by attaching it to any Lindhaus
machine.
1. Sprinkle
2. Brush - in
3. Vacuum
DATI TECNICI
-Tensione di alimentazione (vedi targhetta
caratteristica sulla macchina)
- Potenza assorbita 700 W
- Collettore ad intaglio
- Rotore montato su 2 cuscinetti a sfere
- Doppio isolamento
Per USA e Canada con filo terra
- Corpo macchina in materiale termoplastico,
antiurto, alta resistenza, antistatico
- Tensione stesso del corpo aspirante
- Potenza assorbita 180 W(450=200W)
- Collettore ad intaglio
- Rotore montato su 2 cuscinetti a sfere
- Controllo elettronico del sovraccarico
- Regolazione in altezza 1 10 mm
- Larghezza 12”(300mm) – 15”(380) – 18”(450)
DICHIARAZIONE DI CONFORMITA
Conforme alle segueni norme:
EN 60335-1: 2012; EN 60335-2-69: 2012
EN 62233: 2008; EMC EN 55014—1: 2006 + A1:
2009 + A2: 2011
EMC EN 55014—1: 2006 + A1: 2009 + A2: 2011;
EN 55014-2: 1997 + A1: 2001 + A2: 2008; EN
61000-3-2:2006 + A1: 2009 + A2: 2009; EN
61000-3 – 3: 2008
Direttive di riferimento:
L.V.D. 2006/95 EC; 2002/95 CE (ROHS)
APPROVAZIONI:
Europa IMQ
U.S.A. and Canada
Corpo aspirante
ELETTROSPAZZOLA
,
ETL
ECO SPREADER
E’ la soluzione ideale per igienizzare
senza rischi e fatica tappeti e
moquette.
Si applica come un’elettrospazzola a
qualsiasi apparecchio Lindhaus.
1. Spargere
2. Spazzolare
3. Aspirare
LINDHAUS ECO DRY
Tepppichreinigungsgranulat
LINDHAUS SPOTTER
Teppichfleckenlöser
ECO SPREADER
Die optimale Lösung für die
hygienische Reinigung von
Teppichböden und Teppichen ohne
Risiko und mit geringster
Anstrengung. Der Eco Spreader
kann einfach auf jeden Lindhaus
Staubsauger montiert werden.
1. Aufstreuen
2. Einbürsten
3. Absaugen
TECHNISCHE DATEN
- Versorgungsspannung (siehe Typenschild auf
der Maschine)
- Leistungsaufnahme 700 W
- Kerbkollektor
- Rotor auf zwei Kugellager montiert
- Doppelte Isolierung
- Für den USA - Canada Markt mit Erdleitung
- Maschinenkörper aus thermoplastischem.
stossfestem, antistatischem Material mit hohem
Stosswiderstand.
- Gleiche Spannung wie der Saugkoerper
- Leistungsaufnahme 180 W. (450=200W.)
- Kerbkollektor
- Rotor auf zwei Kugellager montiert
- Elektronische Kontrolle der Überladung
- Höhenregelung 1 10 mm
- Totale Länge: 12”(300mm) – 15”(380) –
18”(450)
KONFORMITÄTSERKLÄRUNG
Diese Erklärung stimmt mit folgenden Normen
EN 60335-1: 2012; EN 60335-2-69: 2012
EN 62233: 2008; EMC EN 55014—1: 2006 +
A1: 2009 + A2: 2011
EMC EN 55014—1: 2006 + A1: 2009 + A2:
2011; EN 55014-2: 1997 + A1: 2001 + A2:
2008; EN 61000-3-2:2006 + A1: 2009 + A2:
2009; EN 61000-3 – 3: 2008
Gemäss den Bestimmungen der Richtlinien:
L.V.D. 2006/95 EC; 2002/95 CE (ROHS)
BILLIGUNG:
Europe IMQ
U.S.A. and Canada
Sauggerät
SAUGBÜRSTE
,
ETL
LINDHAUS ECO DRY
Poudre pour le nettoyage à sec des
tapis et moquettes
LINDHAUS SPOTTER
Détachant pour moquettes
ECO SPREADER
La solution idéale pour une
hygiène parfaite des tapis et
moquettes sans efforts.
À utiliser comme toutes les brosses
électriques sur n’importe quel
appareil Lindhaus.
1. Répandre
2. Brosser
3. Aspirer
CARACTÉRISTIQUES TECHNIQUES
- Tension d’alimentation (voir plaquettes des
caractéristiques)
- Puissance absorbée 700 W
- Collecteur à créneau
- Roteur monté sur 2 roulements à billes
- Double isolation
- Pour les États-Unis et le Canada avec fil à terre
Corps aspirant
- Corps de la machine en matériel
thermoplastique, antichoc, antistatique, à haute
résistance
- Mém tension alimentation corps aspirant
- Moteur d’aspiration 180 W. (450=200W.)
- Collecteur à créneau
- Roteur monté sur 2 roulements à billes
- Contrôle électr. du nombre de la surcharge
- Réglage en hauteur 1 10 mm
- Largeur: 12”(300mm) – 15”(380) – 18”(450)
En conforminté suivant les normes:
EN 60335-1: 2012; EN 60335-2-69: 2012
EN 62233: 2008; EMC EN 55014—1: 2006 +
A1: 2009 + A2: 2011
EMC EN 55014—1: 2006 + A1: 2009 + A2:
2011; EN 55014-2: 1997 + A1: 2001 + A2:
2008; EN 61000-3-2:2006 + A1: 2009 + A2:
2009; EN 61000-3 – 3: 2008
Directives de référence:
L.V.D. 2006/95 EC; 2002/95 CE (ROHS)
APPROBATIONS:
Europe : IMQ
U.S.A. and Canada
BROSSE ÉLECTRIQUE
DECLARATION DE CONFORMITÉ
,
ETL
LINDHAUS ECO DRY
Polvo para el limpiado en seco de
alfombras
LINDHAUS SPOTTER
Quitamanchas
ECO SPREADER
Es la solucion perfecta para
higienizar alfombras y moquetas
con el mínimo esfuerzo y sin
riesgo. El Eco-Speader puede
usarse como un cepillo eléctrico
adjuntándose a cualquier aparato
Lindhaus.
1. Expandir
2. Cepillar
3. Aspirar
CARACTERÍSTICAS TÉCNICAS
- Alimentación (ver la placa sobre la
máquina).
- Energía absorbida 700 W.
- Colector encastrado.
- Rotor montado sobre 2 cojinetes.
- Doble aislamiento
- Para el mercado USA con toma de tierra.
- Cuerpo de la máquina hecho o
- Misma alimentación cuerpo aspirante
- Energía absorbida 180 W (450=200W.)
- Colector encastrado
- Rotor montado sobre 2 cojinetes.
- Control electrónico de sobrecarga
- Regulación de la altura 1 10 mm
- Largo: 12”(300mm) – 15”(380) – 18”(450)
DECLARACIÓN DE CONFORMIDAD
En conformidad con las siguentes normas:
EN 60335-1: 2012; EN 60335-2-69: 2012
EN 62233: 2008; EMC EN 55014—1: 2006 +
A1: 2009 + A2: 2011
EMC EN 55014—1: 2006 + A1: 2009 + A2:
2011; EN 55014-2: 1997 + A1: 2001 + A2:
2008; EN 61000-3-2:2006 + A1: 2009 + A2:
2009; EN 61000-3 – 3: 2008
Normas de referencia :
L.V.D. 2006/95 EC; 2002/95 CE (ROHS)
APROVACIONES:
Europa IMQ
U.S.A. and Canada
Cuerpo de Aspiración
fabricado de material termoplástico a
prueba de golpes, alta resistencia y
antistático.
CEPILLO ELÉCTRICO
,
ETL
Page 13
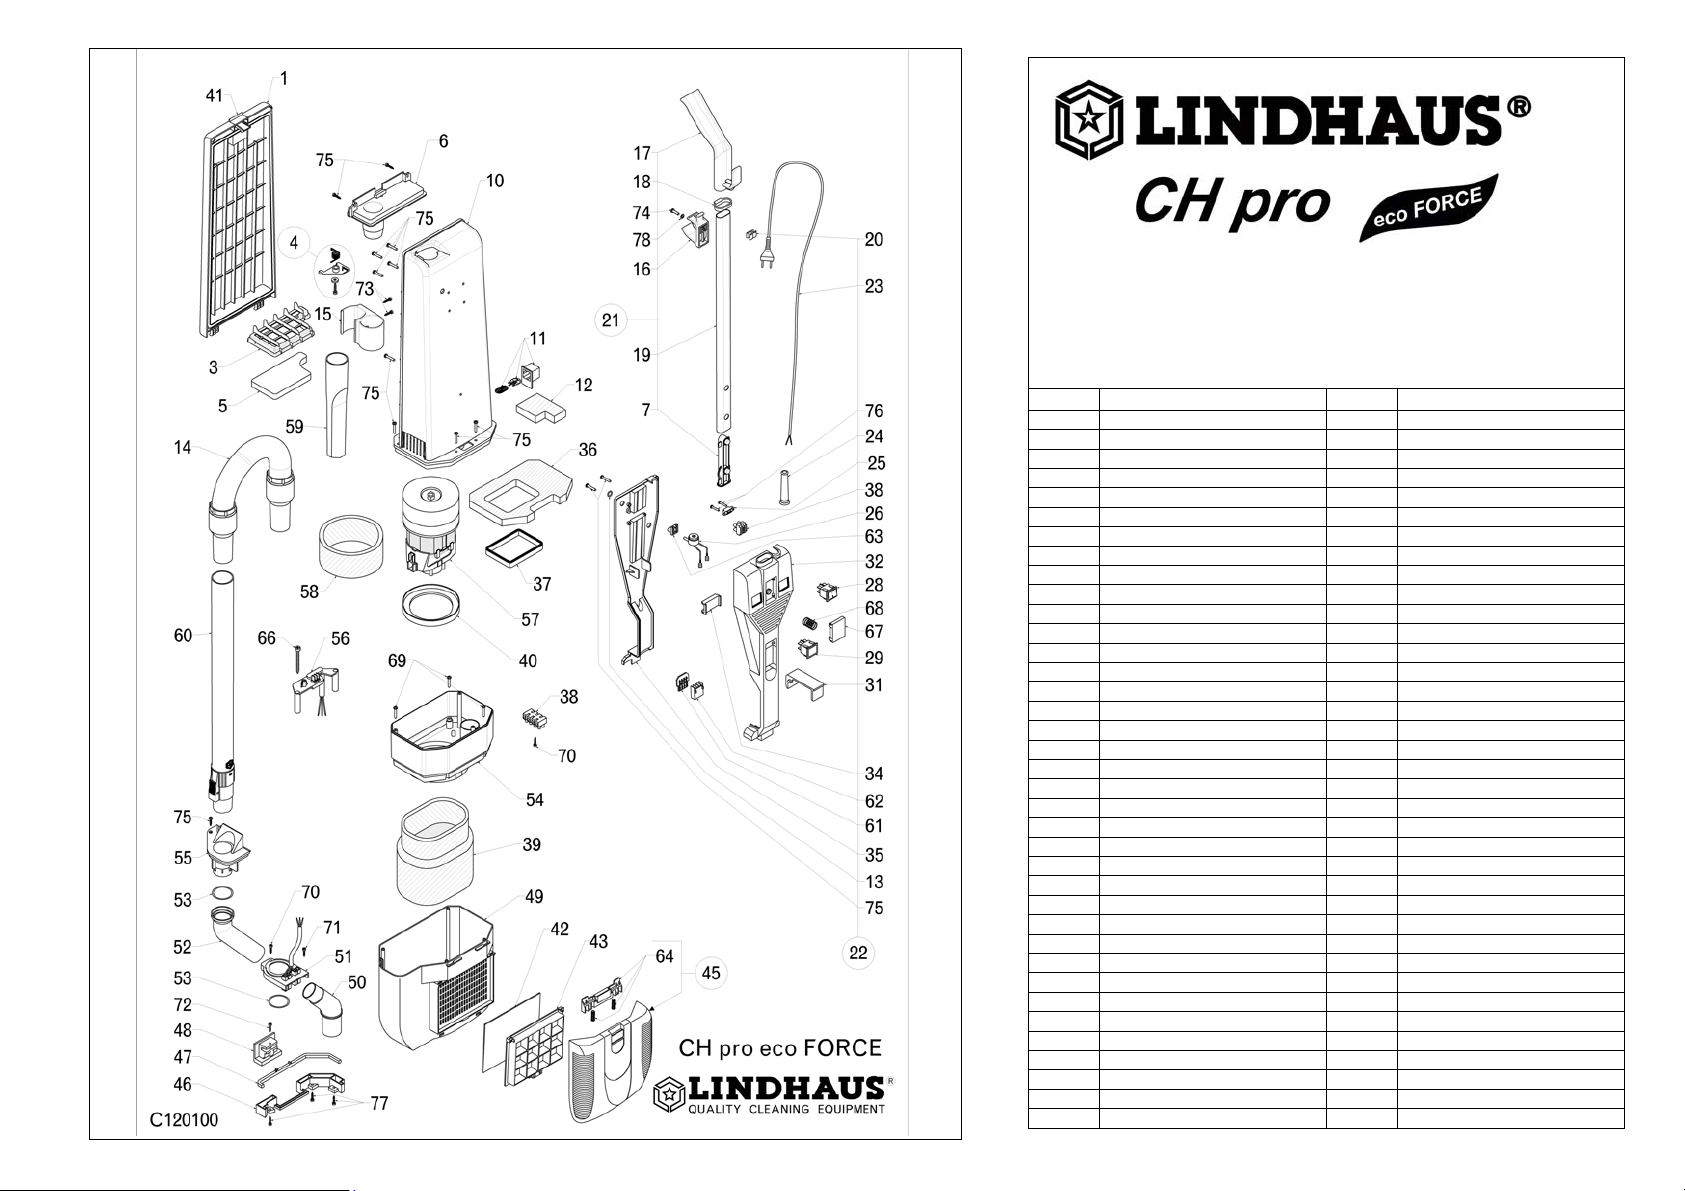
Suction Body Corpo aspirante
Beutelgehäuse Corps aspirant Cuerpo aspirante
SPARE PARTS LIST - LISTA PARTI DI RICAMBIO
LISTE DER ERSATZTEILE - LISTE PIÈCES DE RECHANGE
LISTA PIEZAS DE RECAMBIO
PART. DESCRIPTION PART. DESCRIPTION
RX 1 Bag housing cover RX 41 Bag door latch + spring
RX 3 Grill filter holder RX 42 Exhaust microfilter
RX 4 Safety bag support kit RX 43 Exhaust grill
RX 5 Motor protection filter RX 44 External grill
RX 6 Bag entrance RX 45 Complete grill
RX 7 Buttons+support+spring (kit) RX 46 Blocking joint support
RX 10 Bag housing complete RX 47 Blocking joint pin
RX 11 Valve kit RX 48 Control pin slide
RX 13 O ring RX 49 Vacuum motor housing
RX 14 Extension hose with sleeves RX 50 Lower curve
RX 15 Crevice tool / wand clip RX 51 Curve support V120/60-100/55
RX 16 Upper hook for flexible hose RX 51 Curve support V230/50
RX 17 Handle grip (only) RX 52 Upper curve
RX 18 Retainer RX 53 O ring
RX 19 Chromate tube (only) RX 54 Inner vacuum motor housing
RX 20 Cord clip RX 55 Hose inlet
RX 21 Handle tube assembly RX 56 Cord clampV. 120/60-100/55
RX 22 Ele. System ass. 120/60 RX 56 Cord clamp V. 230/50
RX 22 Ele. System ass. 100/55 RX 57 Vacuum motor V. 120/60
RX 22 Ele. System ass. 230/50 RX 57 Vacuum motor V. 100/55
RX 23 Cord 2x1Schuko - Swiss plug RX 57 Vacuum motor V. 240/50
RX 23 Cord 2x1UK - Australian plug RX 58 Foam filter group
RX 23 Cord 3x18 AWG USA plug RX 59 Crevice tool
RX 24 Strain relief RX 60 Telescopic wand
RX 25 Cable clamp RX 61 Contact cover
RX 26 Vacuum sensor RX 62 Contact housing
RX 28 Main switch 10A-15A RX 63 Adapter
RX 29 Indicator light RX 64 Grill hook kit
RX 32 Cover handle RX 67 Screw 3.5 x 22
RX 34 Comb wire holder RX 68 Screw 3.5 x 16
RX 35 Frame handle RX 69 Screw 3.5 x 25
RX 36 Foam filter intermediate RX 70 Screw 3.5 x 19
RX 37 Gasket RX 71 Screw 3.9 x 13
RX 38 Terminal block 2-3-4 pos. RX 72 Screw 3.9 x 22
RX 39 Foam motor filter RX 73 Screw 2.9 x 16
RX 40 Motor gasket RX 74 Screw 3.9 x 16
Page 14
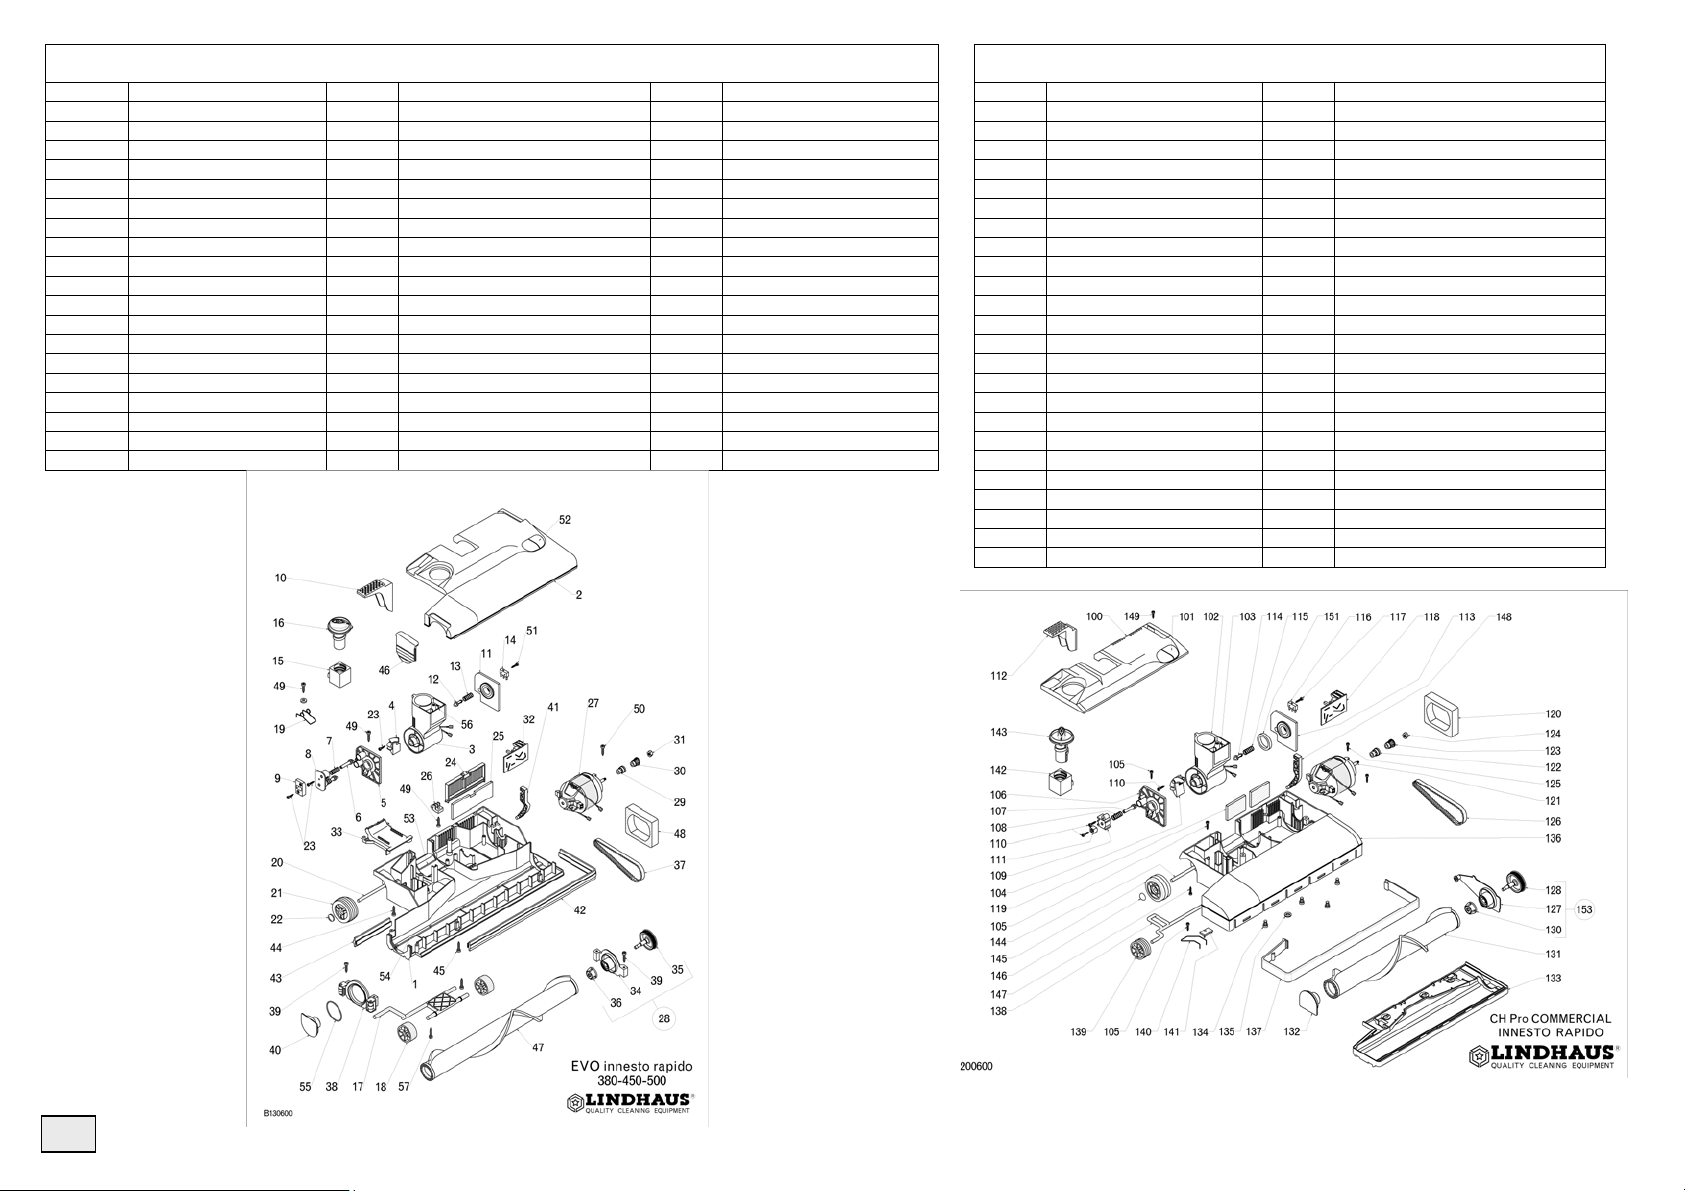
PART. DESCRIPTION PART. DESCRIPTION PART. DESCRIPTION
RX 1 Body brush head 450 RX 20 Shaft for rear wheels RX 39 Screw, 3.9 x 16
RX 2 Brush cover 450 RX 21 Rear rubber wheel RX 40 Roller support
RX 3 Joint complete RX 22 Wheel retainer RX 41 Side lever
RX 4 Joint pin slide RX 23 Screw, 2.9 x 16 RX 42 Front bumper 450
RX 5 Support right joint RX 24 Filter grill RX 43 Back bumper 450
RX 6 Plunger RX 25 Exhaust filter RX 44 Screw, 4.8 x 50
RX 7 Spring release pedal RX 26 Stop grill plate RX 45 Screw, 3.5 x 38
RX 8 Double pin bush RX 27 Brush motor W 200 (450) RX 46 Side cover Brush
RX 9 Double release plate RX 28 Kit, motor gasket RX 47 Brush roller 450
RX 10 Foot pedal RX 29 Pinion spacer RX 48 Motor filter
RX 11 Support left joint RX 30 Pinion RX 49 Screw, 3.9 x 13
RX 12 Switch activator pin RX 31 Nut M4 RX 50 Screw, 3.5 x 25
RX 13 Spring RX 32 Circuit board RX 51 Screw, 2.2 x 16
RX 14 Microswitch RX 33 Channel cover RX 52 Lens set red & green
RX 15 Regulator RX 34 Transmission support with pulley RX 53 Felt seal replacement
RX 16 Adjusting knob RX 35 Pulley RX 54 Base metal guides set 450
RX 17 Front axle RX 36 Nut M6 sx RX 55 O’ ring
RX 18 Front wheel nylon RX 37 Timing belt H.7 RX 56 Male elect. connection. set
RX 19 Spring brush adjust RX 38 Side wheels support RX 57 Screw 3.9 x13 sv
SPARE PARTS LIST - LISTA PARTI DI RICAMBIO -LISTE DER ERSATZTEILE -LISTE DE PIECES –
LISTA DE PIEZAS LINDHAUS CH pro 45 power nozzle
SPARE PARTS LIST - LISTA PARTI DI RICAMBIO -LISTE DER ERSATZTEILE -
LISTE DE PIECES – LISTA DE PIEZAS LINDHAUS CH pro 30-38 Power nozzle
PART. DESCRIPTION PART. DESCRIPTION
CH100 Main brush cover CH124 Pulley nut M4
CH101 Lens set red and green new CH125 Screw 3.9 x 16
CH102 Joint complete CH126 Timing belt 7 mm
CH103 Joint kit CH127 Transmission support w/bearing
CH104 Joint pin slide for new cover CH128 Pulley with shaft
CH105 Screw 3.9 x 13 CH129 Pulley nut M6 six
CH106 Support right joint CH130 Brush insert M30e – M38e
CH107 Plunger handle release CH131 Brush roller M30e – M38e
CH108 Spring dowel release CH132 Brush support w/bearing
CH109 Bushing CH133 Brush shoe plate M30e - M38e
CH110 Screw 2.9 x 16 CH134 Screw M6x9
CH111 Slide CH136 Base housing M30e - M38e
CH112 Foot pedal CH137 Bumper M30e - M38e
CH113 Support left joint CH138 Front axle
CH114 Switch activator pin CH139 Front wheel
CH115 Spring CH140 Spring
CH116 Microswitch CH141 Spring stop plate
CH117 Screw 2.2 x 16 CH142 Brush adjuster
CH118 Circuit board CH143 Adjusting knob
CH119 Filter CH144 Rear axle
CH120 Motor filter CH145 Rear wheel
CH121 Brush motor 30 - 38 (12”-14”) CH146 Wheel retainer
CH122 Pinion spacer CH147 Screw 3.5 x 19
CH123 Pinion
14
Page 15

Lindhaus warrants to the original purchaser only (“Buyer”) that each new vacuum cleaner shall be free from defect in material and workmanship
upon delivery. Lindhaus’ liability is limited to repair or replacement of parts at the discretion of Lindhaus and/or the factory authorized service
centres, transportation prepaid (Buyer expense). The Lindhaus Limited Warranty is absolutely null and void unless the appliance has been
purchased from an Lindhaus Authorized Dealer. A warranty registration card is to be completed and returned immediately at the time of
purchase. Specific limitations and exclusions apply. Lindhaus equipment used in commercial applications has a limited warranty of two years.
ITEMS NOT COVERED BY WARRANTY INCLUDE, BUT ARE NOT LIMITED TO:
Damage resulting from accidents, abuse, misuse or acts of God (lightning flood, etc.)
Damage in transit; Rental units
Failure due to lack of proper maintenance or care
Relatively minor adjustments such as tightening of screws or bolts, etc. not connected with the replacement of parts.
Repairs or alterations by an organization other than the factory or an authorized Lindhaus Service Centres.
Normal wear and tear items: handles, wheels, bristles, nozzles, hoses, paper bags, filters, cords, carbon brushes shall not be consider a
defect in workmanship or materials.
"This warranty covers all defects in workmanship and material for the warranty period. The warranty does not cover any damage
resulting from any misuse, abuse or neglect of the product or any parts needing replacement due to normal wear and usage."
The eventual substitution of the motors under warranty will therefore be affected only in case of production defect (this has to be verified by the
authorized Lindhaus service centres). If, after inspection of the returned machine or any part or parts, Lindhaus determines that the defect is not
covered by the warranty, all expenses incurred by Lindhaus in connection with the replacement or repair if the machine or any parts thereof shall
be at the buyer’s responsibility. Any parts returned to Lindhaus for replacement shall become the property of Lindhaus.
In no event shall Lindhaus be liable for any indirect, special, incidental, consequential or other damages including but not limited to damage or
loss of property or equipment, lost revenues or profits, claims of customers, or harm to goodwill or business reputation directly or indirectly
arising from the sale, handling or use of the vacuum cleaner, or from any other costs relating thereto and Lindhaus’s liability hereunder. shall not
be liable to the buyer for any claims, damages, injures, actions, or causes of action whatsoever based on negligence or strict liability. Lindhaus
makes no warranty that its vacuum cleaner shall be merchantable or that such machine shall be fit for any particular purpose. Moreover
Lindhaus makes no expressed or implied warranties except for the limited warranty set forth herein. In addition no representation or warranty,
expressed or implied, made by any dealer, sales representative, or field agent of Lindhaus which is not specifically set forth herein shall be
binding on Lindhaus. Genuine Lindhaus replacement parts shall be free from defects in material and workmanship for a period of 90 days after
“installation” and shall be subject in all respects to the limitations and exclusions of this limited warranty.
Lindhaus garantiert den Originalkunden (nur den Direktkäufern), daß jeder neue Staubsauger vor der Lieferung frei von Material- und
Fabrikationsfehlern ist. Die Haftung von Lindhaus und der Kundenschutz gegenüber Lindhaus beschränkt sich offensichtlich auf die Reparatur
oder den Austausch der defekten Teile in unserer Fabrik oder in einem autorisierten Kundendienstzentrum, bei vom Kunden vorausbezahltem
Transport. Die beschränkte Lindhaus Garantie ist absolut null und nichtig ausser wenn das Gerät bei einem autorisierten Lindhaus Händler
gekauft worden ist. Die Garantieregistrationskarte sollte gleich beim Kauf ausgefüllt und retourniert werden. Alle Lindhaus Geräte für den
professionellen Gebrauch haben eine Garantiedauer von zwei Jahren.
AUSGENOMMEN VON DER GARANTIELEISTUNG SIND:
Schäden, die durch Unfälle, Mißbrauch, Blitzschlag,
Wasser oder Feuer verursacht werden.
Transportschäden; Mietgeräte; Brüche, die auf eine unsachgemäße Wartung oder Pflege zurückzuführen sind
Geringere Anpassungen wie: gelockerte Schrauben und verschiedene Regulierungen
Reparaturen, die nicht von der Fabrik oder den autorisierten Kundendienstzentren durchgeführt worden sind
Verschleißteile: Griffe, Transporträder, Bürsten, Vorrichtungen für die Kupplung der Bürsten, Rohransätze, Schläuche, Staubbeutel,
Kabel, Filter
Diese Garantie deckt alle Fabrikations- sowie Materialfeher während der ganzen Garantiedauer. Die Garantie deckt keine Schäden, die
auf unkorrekten Gebrauch, Missbrauch und Vernachlässigung im Gebrauch des Produkts zurückzuführen sind sowie alle Teile die
nach normaler Abnützung ersetzt werden müssen. Die eventuelle Auswechslung des Motors in Garantie wird nur dann stattfinden, wenn
sichergestellt wurde, (von den autorisierten Lindhaus Kundendienstzentren) dass es sich um einen Fabrikationsfehler handelt und nicht bei
totaler Abnützung. Wenn Lindhaus bei der Überprüfung eines eingesandten Geräts oder eingesandter Teile feststellt, daß der Fehler nicht von
der Garantie gedeckt wird, gehen alle Reparaturkosten des Geräts oder der Teile zu Lasten des Kunden. Alle zum Austausch an Lindhaus
zurückgesandten Teile gehen in den Besitz von Lindhaus über.
IN KEINEM FALL WIRD LINDHAUS FÜR INDIREKTE, UNVORHERGESEHENE SCHÄDEN HAFTEN, DIE SICH AUS ANDEREN SCHÄDEN
ERGEBEN. Lindhaus haftet gegenüber dem Kunden nicht für Ansprüche, Schäden, Verletzungen, Handlungen oder Gründe für Handlungen
jeglicher Art, die auf Nachlässigkeit oder bestimmte Verantwortung beruhen. Die originalen Lindhaus Ersatzteile müssen nach der Installation
für einen Zeitraum von 90 Tage frei von Materialfehlern sein und unterliegen allen Beschränkungen und Ausschließungen des vorliegenden
beschränkten Garantiescheins. Lindhaus garantiert nicht, daß seine Produkte für jeden Zweck verkäuflich sind oder benutzt werden können.
Außerdem gibt Lindhaus mit Ausnahme der vorliegenden beschränkten Garantie keine weitere Garantie. Keine weitere ausgesprochene oder
miteinbegriffene Darstellung oder Garantie, die von Verkäufern, Vertretern oder Agenten von Lindhaus gemacht wird, die nicht in der
vorliegenden Garantie genau angegeben ist, darf auf Lindhaus zurückfallen.
Lindhaus Limited Warranty
Lindhaus beschränkter Garantieschein
Product name - Nome del prodotto - Name des Produkts - Nom du produit - Nombre del producto
WARRANTY- GARANZIA – GARANTIE - GARANTIA
□ CHpro eco Force 300e □ CHpro eco Force 380e □ CHpro eco Force 450e
Serial N° - N° serie - Seriennummer - N° de série: ___________________
Date - Data – Date- Fecha: _____________________________________________________
Buyer name - Nome dell’acquirente - Name des Käufers - Nom de l’acheteur - Nombre del comprador:
_________________________________________________________________________________________________________
Where is used - Luoghi di utilizzo - Benutzungsorte - Lieu d’utilisation - Lugares de uso:
ٱ Commercial - Professionale - Gewerbe - Professionnel - Profesional
ٱ Home - Casa - Haushalt - Maison - Casa
Address - Indirizzo - Anschrift - Adresse - Dirección:
_____________________________________________________________________________Tel_________________________
City - Città - Stadt -Ville - Ciudad State - Stato - Staat - Pays - País Z.I.P. - C.a.p. - P.L.Z. - C.P - C.P
_______________________________________________ __________________________________________________________
Did you purchase a Lindhaus product for: □ Light weight □ Low sound level □ High quality □ Warranty □ Styling □ Price
Ha deciso di acquistare un prodotto Lindhaus per:
□ Leggerezza □ Bassa rumorosità □ Alta qualità □ Garanzia □ Stile □ Prezzo
Sie haben sich für ein Lindhaus-Produkt entschieden wegen:
□ Filtrierleistungsfähigkeit □ Geräuschentwicklung □ Hohe Qualität □ Garantie □ Stil □ Preis
Vous avez décidé d’acheter un produit Lindhaus pour:
□ Efficacité de filtration □ Faible bruit □ Haute qualité □ Garantie □ Stil □ Prix
Ud. ha decidido comprar un producto Lindhaus por:
□ Eficiencia filtrante □ Bajo nivel de ruido □ Alta cualidad □ Garantía □Estilo □ Precio
Was your instruction manual easy to understand? - Il libretto di istruzioni è stato di facile comprensione?
War die Gebrauchsanweisung leicht verständlich? - Le manuel d’instruction est-il de facile compréhension?
¿El manual de uso ha sido de fácil comprensión? □ Yes-Si-Ja-Oui- Sí □ No-No-Nein-Non-No
Suggestions-Suggerimenti- Ratschläge-suggestions- Sugerensias:_____________________________ ________________________
WARRANTY REGISTRATION AND SURVEY (ONLY U.S.A.)
Machine Model:
□ CHpro eco Force 300e □ CHpro eco Force 380e □ CHpro eco Force 450e
Serial Number:__________________________________
Buyer: Surname____________________________________________________________________
Name_______________________________________________________________________
Address_____________________________________________________________________
Zip Code_______________ Town __________________________Tel.___________________
Did you purchase a Lindhaus product for:
□ Low weight □ Low sound level □ High quality □ Warranty □ Styling □ Price
Where is used:
Was your instruction manual easy to understand?:
□ Home □ School □ Contract cleaning □ Office □ Store □ Other____________
□ Yes □ No
Suggestions:____________________________________________________________________________
______________________________________________________________________________________
PURCHASE DATE
PURCHASE DATE
DEALER STAMP
_________________________________
Page 16

Lindhaus garantit à ses clients (seul aux acheteurs directs) que tout nouvel aspirateur est exempt de matériaux défectueux et de défaut de
A
A
fabrication avant la livraison. La responsabilité de Lindhaus et la tutelle du client à l’égard de Lindhaus, se limite naturellement à la réparation et
au remplacement de pièces défectueuses dans notre usine ou dans des centres d’assistance autorisés, port prépayé par le client. Le certificat
de garantie limitée Lindhaus est à considéré nul ou non valable si l’appareil n’a pas été acheté chez un revendeur autorisé Lindhaus.
La carte d’enregistrement de la garantie doit être remplie et renvoyée immédiatement au moment de l’achat.
Les appareils Lindhaus à usage professionnel sont garantis 2 ans.
NE SONT PAS COUVERTS PAR LA GARANTIE:
tout dommage dus à accidents, mauvaise utilisation, foudre, eau et feu.
tout dommage causé par le transport
Les appareils en location
Les ruptures dues à entretiens ou utilisations non appropriés
Les petits ajustements comme: vis dévissées et réglages divers
Les réparations non effectuées par l’usine ou par les centres autorisés
Les pièces soumises à usure normale: poignées et roues, brosses, dispositif de raccord des brosses, suceurs, tuyaux, sacs à poussière,
filtres, câbles.
Cette garantie couvre tous les défauts de fabrication et de matériaux pendant la période de garantie. La garantie ne couvre pas les
dommages dus à mauvaise utilisation, abus ou négligence durant l’utilisation de l’appareil ou de toute autre pièce qui ait besoin d’être
remplacée à cause d’une normale utilisation.
L’éventuel remplacement du moteur en garantie sera effectué seul en cas de constatation de défaut de fabrication par des centres d’assistance
autorisés Lindhaus. Si après l’inspection de l’appareil ou de pièces renvoyées, Lindhaus établit que le défaut n’est pas couvert par la garantie,
tous les frais que Lindhaus aura couvert pour la réparation de l’appareil ou de certaines parties, seront à la charge du client. Toutes les parties
renvoyées à Lindhaus pour être remplacées deviendront propriété de Lindhaus.
EN AUCUN CAS, LINDHAUS NE SERA RESPONSABLE POUR DES DOMMAGES INDIRECTS, ACCIDENTAUX CONSEQUENTS A
D’AUTRES DOMMAGES. Lindhaus ne sera pas responsable envers les clients pour les revendications, les dommages, les lésions, les actions
ou causes d’actions quelconques se basant sur des négligences ou responsabilités précises. Les pièces de rechange Lindhaus devront être
privés de tout défauts de matériaux pendant une période de 90 jours après l’installation et seront soumises à toutes les limitations et exclusions
du présent certificat de garantie limité.
La Lindhaus ne garantit pas que ses produits puissent être en vente ou que ses appareils puissent être utilisés en tout autre but. En outre la
Lindhaus ne fournit aucune autre garantie que cette garantie limitée. Aucune autre représentation ou garantie, exprimée ou implicite effectuée
par le revendeur, le représentant ou l’agent de la Lindhaus qui ne soient pas précisée dans la présente, ne pourra être rejetée sur Lindhaus.
La Lindhaus garantisce ai Clienti originali solo (diretti acquirenti) che ogni nuovo aspira polvere sarà esente da difetti di materiale
e di fabbricazione prima della consegna. La responsabilità della Lindhaus e la tutela del cliente nei confronti della Lindhaus, è
chiaramente limitata alla riparazione e sostituzione dei pezzi difettosi presso la ns. fabbrica o centro autorizzato di assistenza, con
trasporto prepagato dal cliente.
NON SONO COPERTI DALLA GARANZIA:
Danni causati da incidenti, cattivo uso, fulmini, a cqua e fuoco.
Danni causati dal trasporto.
Apparecchi a noleggio
Rotture dovute a una non appropriata manutenzione o cura.
Minori adattamenti tipo: viti allentate e regolazioni varie.
Riparazioni non effettuate dalla fabbrica o dai centri assistenza autorizzati.
Parti sottoposte ad usura normale: manici, ruote trasportatrici, spazzole, dispositivo di accoppiamento delle spazzole,
bocchette, tubi,
sacchi per polvere, filtri, cavi.
Gli apparecchi Lindhaus utilizzati per uso professionale sono garantiti 2 anni, con eccezione dei motori elettrici a spazzole, che
essendo soggetti ad usura, la loro durata dipende dal n° di ore di utilizzo, e dalla prescritta sostituzione dei filtri, non dal n° di anni
di vita della macchina. Es: nell'uso professionale, lavorando 8 ore al giorno per 20 giorni al mese, in 6 mesi la vita del motore è
finita. L'eventuale sostituzione in garanzia del motore avverrà pertanto soltanto in caso di difetto di fabbrica accertato dai centri
assistenza autorizzati Lindhaus, non in caso di usura totale. Se dopo l’ispezione di una macchina o di pezzi ritornati, la Lindhaus
stabilisce che il difetto non è coperto da garanzia, tutte le spese che la Lindhaus incontrerà nella riparazione della macchina o delle
parti, saranno a carico del cliente. Tutte le parti ritornate alla Lindhaus per sostituzione divente ranno di proprietà della Lindhaus.
IN NESSUN CASO, LA LINDHAUS SARA’ RESPONSABILE PER DANNI INDIRETTI, ACCIDENTALI
CONSEGUENTI DA ALTRI DANNI. La Lindhaus non sarà responsabile nei confronti dei clienti per rivendicazioni, danni,
lesioni, azioni o cause di azioni qualsia si basate su negligenze o precise responsabilità. I ric ambi originali Lindhaus dovranno
essere privi di difetti di materiale per un periodo di 90 giorni dopo l’installazione e saranno so ttoposti a tutte le limitazioni ed
esclusioni del presente certificato di garanzia limitato. La Lindhaus non garantisce che i suoi prodotti siano vendibili o che le sue
macchine possano essere usate per ogni altro fine. Inoltre la Lindhaus non fornisce alcuna ulteriore garanzia eccetto per la presente
garanzia limitata. Nessuna ulterio re rappresentazione o garanzia, espressa o implicita fatta da rivenditori, rappresentanti o agenti
della Lindhaus che non sia specificata nella presente dovrà ricadere sulla Lindhaus.
Lindhaus Lindhaus Certificat de Garantie limitée
Lindhaus Certificato di Garanzi a limitata
FOR U.S.A. ONLY
ffix postage
stamp here
LINDHAUS U.S.A.
P.O. BOX 159
SAVAGE MN
55378-0159
DEALER STAMP / TIMBRO DEL RIVENDITORE
STEMPEL DES VERKÄUFERS / TIMBRE DE
REVENDEUR / SELLO DEL CONSIGNATARIO
Spett.le
LINDHAUS S.r.l.
ffix postage
stamp here
Affrancare come
cartolina
Wie eine Postkarte
frankieren
Affranchir comme
carte postale
Sellar como una
postal
Via Belgio, 22
35127 PADOVA - ITALY
 Loading...