

Page 1

Page
Section
- D7
- 83
Form 404264
DEC - 2011
Models 1860, 1862, 1862E, 1864
PowerLuber Grease Gun (Lithium Ion)
Series “A”
Basic PowerLuber Model 1860
EC Declaration of Confomrity
MACHINERY DIRECTIVE
Lincoln declares that these products described under
“Technical Data” are in compliance with
2006/42/EC and EN 60745-1
Page 2

Page Number - 2
Models 1860, 1862, 1862E, 1864
PowerLuber Grease Gun (Lithium)
Form 404264
GENERAL POWER TOOL SAFETY
WARNINGS
Table of Contents
Page
General Power Tool Safety Warnings.......2
Specic Safety........................................3
Service..........................................4
Tool Use and Care...................................4
Specications........................................4
General Description.................................5
Inspection...........................................6
Operation.........................................6-7
Charger Operation...................................8
Safety Instruction for Charger
and Batteries.................................10-11
Exploded View and Parts List...........12-14
Troubleshooting...........................15
French Version.....................................16
German Version.................................TBD
Spanish Version.................................TBD
Read all safety warnings and
instructions. Failure to follow the warnings
and instructions may result in electric shock,
re and/or serious injury.
Save all warnings and instructions for future
reference.
The term “power tool” in the warnings refers to
your mains-operated (corded) power tool or
battery-operated (cordless) power tool.
1) Work area safety
a) Keep work area clean and well lit.
Cluttered or dark areas invite acci-
dents.
b) Do not operate power tools in ex-
plosive atmospheres, such as in the
presence of ammable liquids, gases
or dust. Power tools create sparks which
may ignite the dust or fumes.
c) Keep children and bystanders away
while operating a power tool. Distractions can cause you to lose control.
2) Electrical safety
a) Power tool plugs must match the
outlet. Never modify the plug in any
way. Do not use any adapter plugs with
earthed (grounded) power tools. Unmodied plugs and matching outlets will
reduce risk of electric shock.
b) Avoid body contact with earthed or
grounded surfaces such as pipes,
radiators, ranges and refrigerators.
There is an increased risk of electric shock if your body is earthed or
grounded.
c) Do not expose power tools to rain
or wet conditions. Water entering a
power tool will increase the risk of electric
shock.
d) Do not abuse the cord. Never use the
cord for carrying, pulling or unplugging
the power tool. Keep cord away from
heat, oil, sharp edges or moving parts.
Damaged or entangled cords increase
the risk of electric shock.
e) When operating a power tool out-
doors, use an extension cord suitable
for outdoor use. Use of a cord suitable
for outdoor use reduces the risk of electric shock.
f) If operating a power tool in a damp
location is unavoidable, use a residual
current device (RCD) protected supply.
Use of an RCD reduces the risk of
electric shock.
NOTE: The term “residual current device
(RCD)” may be replaced by the term
“ground fault circuit interrupter (GFCI)” or
“earth leakage circuit breaker (ELCB)”.
3) Personal safety
a) Stay alert, watch what you are do-
ing and use common sense when
operating a power tool. Do not use
a power tool while you are tired or
under the inuence of drugs, alcohol
or medication. A moment of inattention
while operating power tools may result in
serious personal injury.
b) Use personal protective equipment.
Always wear eye protection. Protective
equipment such as dust mask, non-skid
safety shoes, hard hat, or hearing protection used for appropriate conditions will
reduce personal injuries.
c) Prevent unintentional starting. Ensure
the switch is in the off-position before
connecting to power source and/or
battery pack, picking up or carrying
the tool. Carrying power tools with your
nger on the switch or energizing power
tools that have the switch on invites
accidents.
d) Remove any adjusting key or wrench
before turning the power tool on.
A wrench or a key left attached to a
rotating part of the power tool may result
in personal injury.
ORIGINAL INSTRUCTIONS
Page 3

Page Number - 3
Models 1860, 1862, 1862E, 1864
PowerLuber Grease Gun (Lithium)
Form 404264
e) Do not overreach. Keep proper footing
and balance at all times. This enables
better control of the power tool in
unexpected situations.
f) Dress properly. Do not wear loose
clothing or jewelery. Keep your hair,
clothing and gloves away from moving
parts. Loose clothes, jewelery or long
hair can be caught in moving parts.
g) If devices are provided for the connec-
tion of dust extraction and collection
facilities, ensure these are connected
and properly used. Use of dust collec-
tion can reduce dust-related hazards.
4) Power tool use and care
a) Do not force the power tool. Use the
correct power tool for your application. The correct power tool will do the
job better and safer at the rate for which it
was designed.
b) Do not use the power tool if the
switch does not turn it on and off. Any
power tool that cannot be controlled with
the switch is dangerous and must be
repaired.
c) Disconnect the plug from the power
source and/or the battery pack from
the power tool before making any
adjustments, changing accessories,
or storing power tools. Such preventive
safety measures reduce the risk of starting the power tool accidentally.
d) Store idle power tools out of the reach
of children and do not allow persons
unfamiliar with the power tool or these
instructions to operate the power tool.
Power tools are dangerous in the hands
of untrained users.
e) Maintain power tools. Check for mis-
alignment or binding of moving parts,
breakage of parts and any other condition that may affect the power tool’s
operation. If damaged, have the power
tool repaired before use. Many ac-
cidents are caused by poorly maintained
power tools.
f) Keep cutting tools sharp and clean.
Properly maintained cutting tools with
sharp cutting edges are less likely to
bind and are easier to control.
g) Use the power tool, accessories and
tool bits etc. in accordance with these
instructions, taking into account the
working conditions and the work to
be performed. Use of the power tool for
operations different from those intended
could result in a hazardous situation.
5) Battery Tool Use and Care
a) Recharge only with the battery charger
specied by the manufacturer. A char-
ger that is suitable for one type of battery
pack may create a risk of re when used
with another battery pack.
b) Use power tools only with specically
designated battery packs. Use of any
other battery packs may create risk of
injury and re.
c) When battery pack is not in use, keep
it away from other metal objects, like
paper clips, coins, keys, nails screws
or other small metal objects, that can
make a connection from one terminal
to another. Shorting the battery terminals
together may cause burns or a re.
d) Under abusive conditions, liquid may
be ejected from the battery; avoid
contact. If contact accidentally occurs,
ush with water. If liquid contacts eyes
additionally, seek medical help. Liquid
ejected from battery may cause irritation or
burns.
6) Service
a) Have your power tool serviced by a
qualied repair person using only
identical replacement parts. This will
ensure that the safety of the power tool is
maintained.
Specic Safety
1. Always wear eye protection. The Power-
Luber can generate up to 7,500 psi (517
bar).
2. Use only Lincoln 1218, 1224, 1230 or
1236 outlet whip hoses. Grease injection
injuries are a very serious injury. Hold the
hose only in the area of the spring guard.
3. Avoid accidental starting. Be sure switch
is not depressed when inserting battery
pack.
4. Do not bend the hose so that it becomes
kinked.
5. Replace the hose at the rst sign of wear,
kink or damage to the outside jacket.
Do not overreach. Keep proper footing and
balance at all times. Proper footing and
balance enable better control of the tool in
unexpected situations.
Use safety equipment. Always wear eye
protection.
Dust mask, non-skid safety shoes,
hard hat, or hearing protection must be used
for appropriate conditions.
Page 4
Page Number - 4
Models 1860, 1862, 1862E, 1864
PowerLuber Grease Gun (Lithium)
Form 404264
Any other use not in accordance with instructions will result in loss of claim for warranty or
liability.
SERVICE
Tool service must be performed only by qualied repair personnel. Service or maintenance
performed by unqualied personnel may void
warranty and result in a risk of injury.
When servicing a tool, use only identical
replacement parts.
Extreme pressure may cause nozzle
extension or whip hose to burst. Use only
Lincoln APPROVED hoses and follow whip
hose instructions and warnings.
TOOL USE AND CARE
Do not use tool if switch does not turn it on or
off. A tool that cannot be controlled with the
switch is dangerous and must be repaired.
Do not continue to hold down trigger if grease
gun is stalled. This could damage the motor or
cause re.
Disconnect battery pack from tool before making any adjustments, changing accessories,
or storing the tool. Such preventive safety
measures reduce the risk of starting the tool
accidentally.
Store the tools out of reach of children and
other untrained persons. Tools are dangerous
in the hands of untrained users.
When battery pack is not in use, keep it away
from other metal objects like: paper clips,
coins, keys, nails, screws, or other small metal
objects that can make a connection from
one terminal to another. Shorting the battery
terminals together may cause sparks, burns,
or a re.
Maintain tools with care. Check for misalignment or binding of moving parts, breakage of
parts, and any other condition that may affect
the tool’s operation. If damaged, have the tool
serviced before using. Many accidents are
caused by poorly maintained tools.
Use only accessories that are recommended
by Lincoln.
Only accessories that are capable of handling
7500 psi (517 bar) should be used. Accessories that may be suitable for one tool may create a risk of injury when used on another tool.
Appropriate use
The PowerLuber was exclusively designed to
pump and dispense lubricant using 18 volt battery power. The maximum specication ratings
should not be exceeded.
Grease gun can develop high pressure - up
to 7,500 psi (517 Bar). Use safety glasses
and gloves for protection during operation.
Keep hands clear of the exposed rubber
portion of hose.
Warning! To reduce the risk of
injury, the user must read the
instruction manual.
Separate collection. This product
must not be disposed of with
normal household waste.
The gun uses lubricants, that may be ammable and poisonous if ingested. Do not use
gun near open ame or other re hazards.
Greases are often marketed as high temperature because it must maintain their lubricating
properties in hot areas, but the lubricants may
be ammable if the temperature is too high.
Please read all warnings on lubricants before
using this gun. It is best if the lubricants can
not be ammable.
Page 5

Page Number - 5
Models 1860, 1862, 1862E, 1864
PowerLuber Grease Gun (Lithium)
Form 404264
SPECIFICATIONS
Basic PowerLuber Model 1860
Operating Power, Volt 18
Maximum Operating Pressure, psi (bar)
- Low Output - 7,500 (517)
- High Output - 3,000 (206)
Grease Reservoir Capacity, oz. (g) 14.5 (411)
Operating Temperature Range, °F (°C) 0 to 122
(-18 to +50)
Operating Current, Amp 4.0
Rated Current, Amp 5.0
Lubricant (Grease) Up to NLGI #2
Grease output oz./min. (gram/min)
- Low Output (L) 3.5 (99)
- High Output (H) 8.9 (252)
Weight, Lbs. (Kg) 8.8 (4.0)
Accessories:
Battery Li-Ion Model 1861
Output, VDC 18
Capacity, mAh 3000
Battery Charger Model 1850
Charge time 1 Hour
Input, VAC (3.0 A) 120 V, 50-60 Hz
Battery Charger Model 1850E
Charge time 1 Hour
Input, VAC (3.0 A) 230 V, 50 Hz
Outlet Hose Model 1236
Pressure Rating, psi (Bar) 7,500 (510)
Length of the Hose, In (mm) 36 (914)
Sound pressure (Lp) 70.0 dB(A), uncertainty (K) 3 dB(A)
Acoustic power (Lw) 81 dB(A), uncertainty (K) 3 dB(A)
Vibration emission value (ah) 1.1 m/s2, uncertainty (K)
1.5 m/s2
NOTE 1: Operating current and grease output data at
1,000 Psi (69 bar).
Models
Sales Model Components Included
1860 Grease Gun (W/ Battery)
1862 Grease Gun (W/ Battery)
Charger
Carrying Case
1862E Grease Gun (W/ Battery)
Charger (220v European)
Carrying Case
1864 Grease Gun (W/ Battery)
Extra Battery
Charger
Carrying Case
1850 Charger
1850E Charger (220v European)
1861 Battery Pack
1236 Hose (36”)
1230E Hose (RoHS European- 30”)
5852 Coupler, Midget Hyd.
251-10124-7 Coupler (European)
NOTE 2: The declared vibration total value has been
measured in accordance with a standard test method
and may be used for comparing one tool with another;
that the declared vibration total value may also be used
in a preliminary assessment of exposure.
Note 3: The vibration emission during actual use of
the power tool can differ from the declared total value
depending on the ways in which the tool is used; and
of the need to identify safety measures to protect the
operator that are based on an estimation of exposure in
the actual conditions of use (taking account of all parts
of the operating cycle such as the limes when the tool
is switched off and when it is running idle in addition to
the trigger time).
Page 6
Page Number - 6
Models 1860, 1862, 1862E, 1864
PowerLuber Grease Gun (Lithium)
Form 404264
GENERAL DESCRIPTION
The Lincoln PowerLuber is a Lithium-Ion
battery operated grease gun. The gun was
developed for manual lubrication of grease
points and includes a pressure relief valve,
LED and electronic control center.
The PowerLuber is driven by a small, low
voltage electric motor connected to a threestage planetary gear transmission. The rotary
motion of the motor is converted into a reciprocating motion of the plunger using a yoke
mechanism. The PowerLuber is a positive
displacement single acting pump.
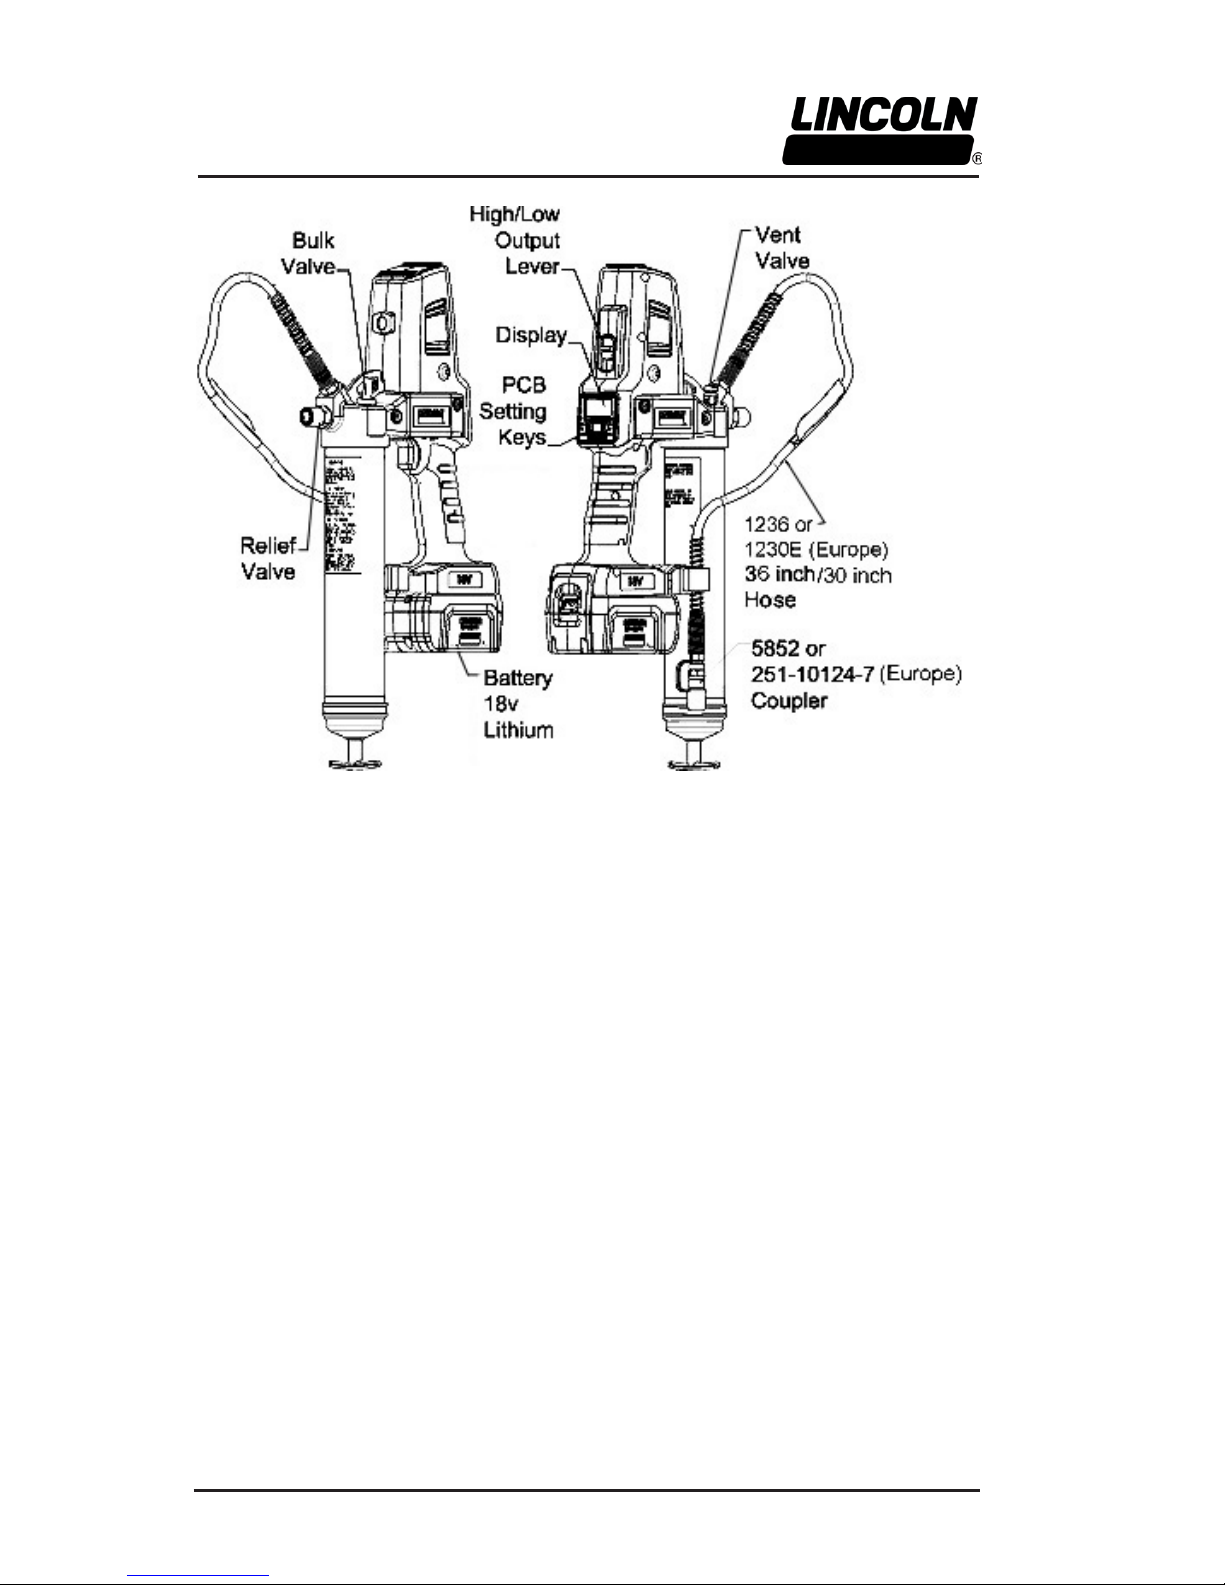
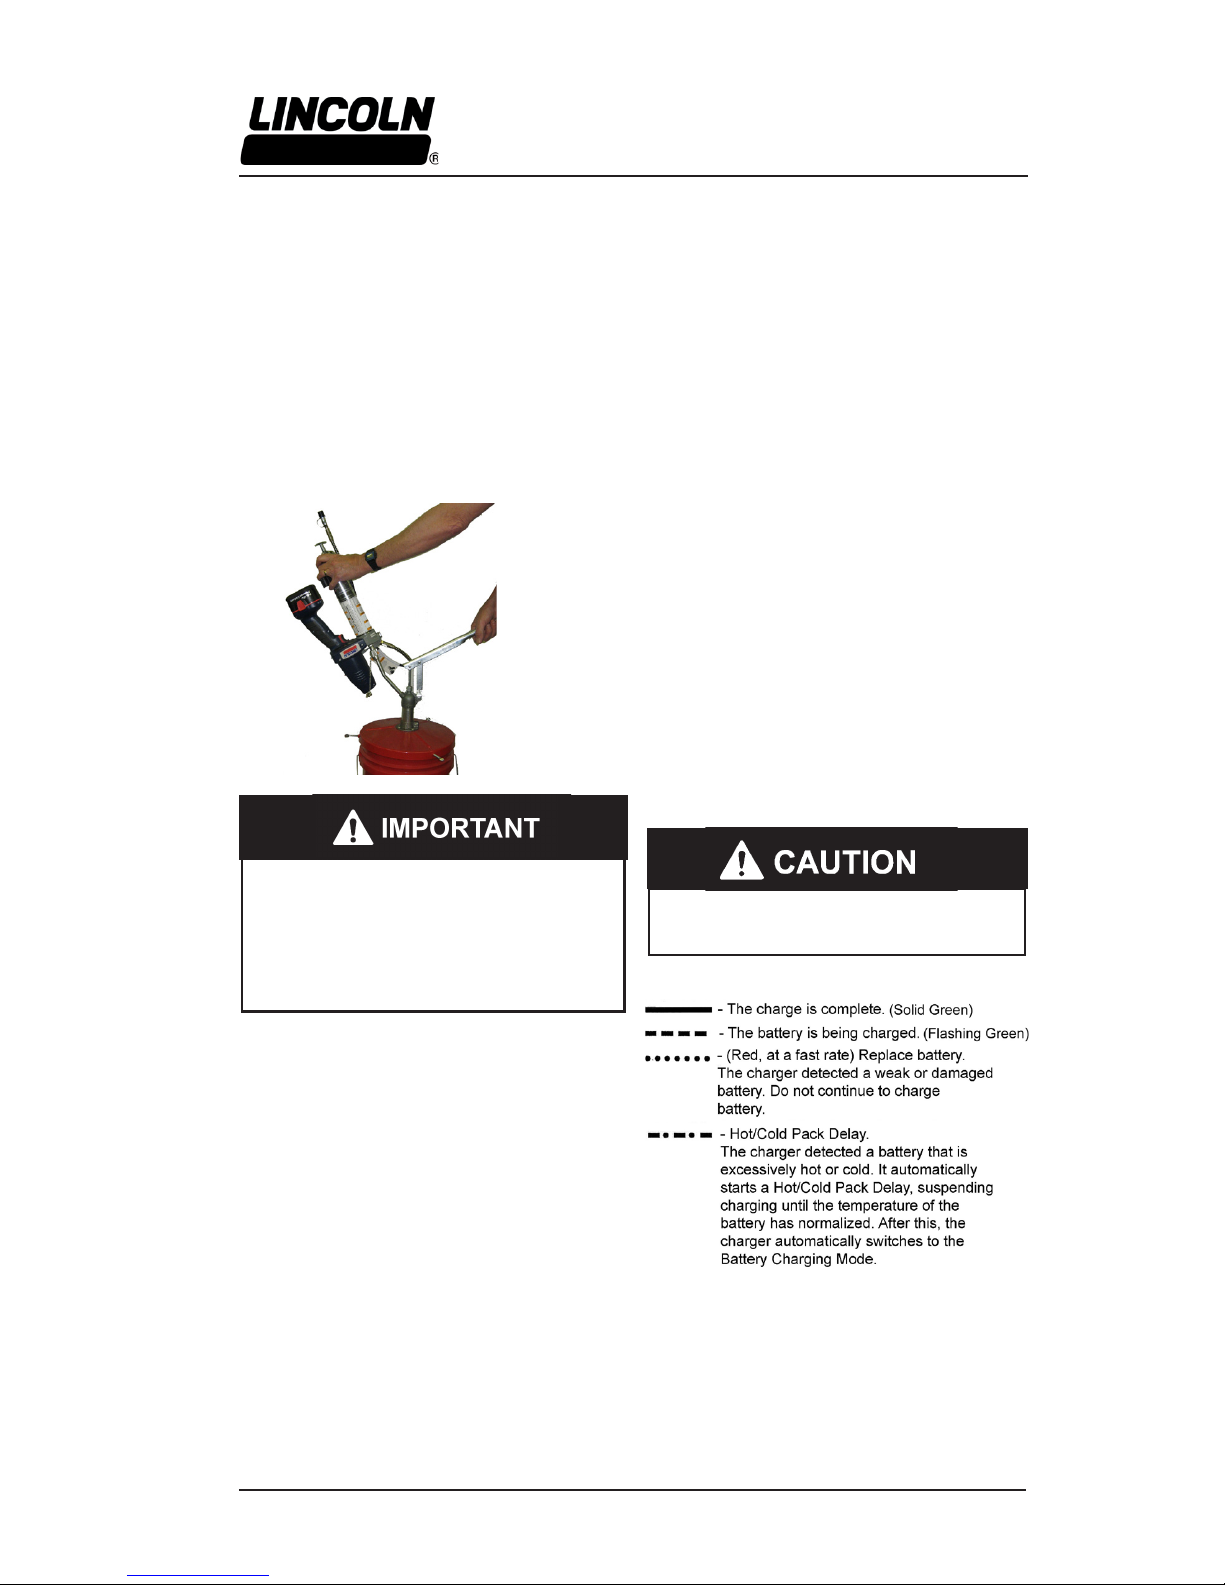
Relief Valve
The safety valve (g. 1) is factory set to
relieve pressure above 7500 psi (517 bar).
The valve also is an indicator of the bearing
and lubrication line conditions. If grease
comes out of the relief valve, it indicates a
clogged or tight bearing or tting or line. Correct this before continuing lubrication with the
PowerLuber.
Figure 1
(1860 Grease Gun)
Control center
The tool is equipped with a control center that
consists of: PC Board with Display, LED light and
Set keys “A” and “B”. Control center provides the
following functions:
• Motor protection. It will stop the motor if the
gun runs continuously at maximum pressure.
The display will ash red until the thermal
protector self resets;
• Displays the current level of battery charge;
• Monitors the level of the grease in tube;
• Calculates and displays the amount of the
grease delivered in, oz. PCB converts stroke
count to grease delivery.
• Allows control of an exact amount of grease
to lubricate critical bearings;
• Illuminates the LED light.
Page 7
Page Number - 7
Models 1860, 1862, 1862E, 1864
PowerLuber Grease Gun (Lithium)
Form 404264
To prevent damage to the gears in the
transmission, the motor must be completely stopped before changing the lever
to the “L” or “H” (low or high) mode of
operation.
INSPECTION
Visually inspect for damaged, loose or missing parts. If equipment is worn or damaged,
remove from service. Contact an authorized
service center for damage assessment or
repair.
OPERATION
Changing “L” or “H” Mode
To change the mode of operation:
“L” (low output/high pressure)
“H” (high output/low pressure)
When motor is not running, push the lever
(Fig. 1) until letter “L” or “H” will be completely
visible in the window.
In case the lever is not completely shifted/
engaged, hold this lever and bump the switch
to engage gears.
High output is recommended if the tool is
used to lubricate large bearings not requiring
high pressure, beyond 3,000 psi (206 bar).
Also, high output is recommended if tool is
used to rell small reservoirs.
Low output is recommended if the tool is
used in construction, mining applications and
general lubrication. Low output will provide
the maximum pressure of up to 7,500 psi
(517 bar) the tool is capable of producing.
It is normal for batteries to lose their power
retention capacity over hundreds of charge
cycles. Replace the battery when this happens.
Turning Display and LED light
“ON”/”OFF”
To turn display and LED light “ON”:
-push either key or
-gently squeeze the trigger/switch;
To turn it “OFF”:
-push key “B” 3 sec. or
-wait 30seconds for self shutoff.
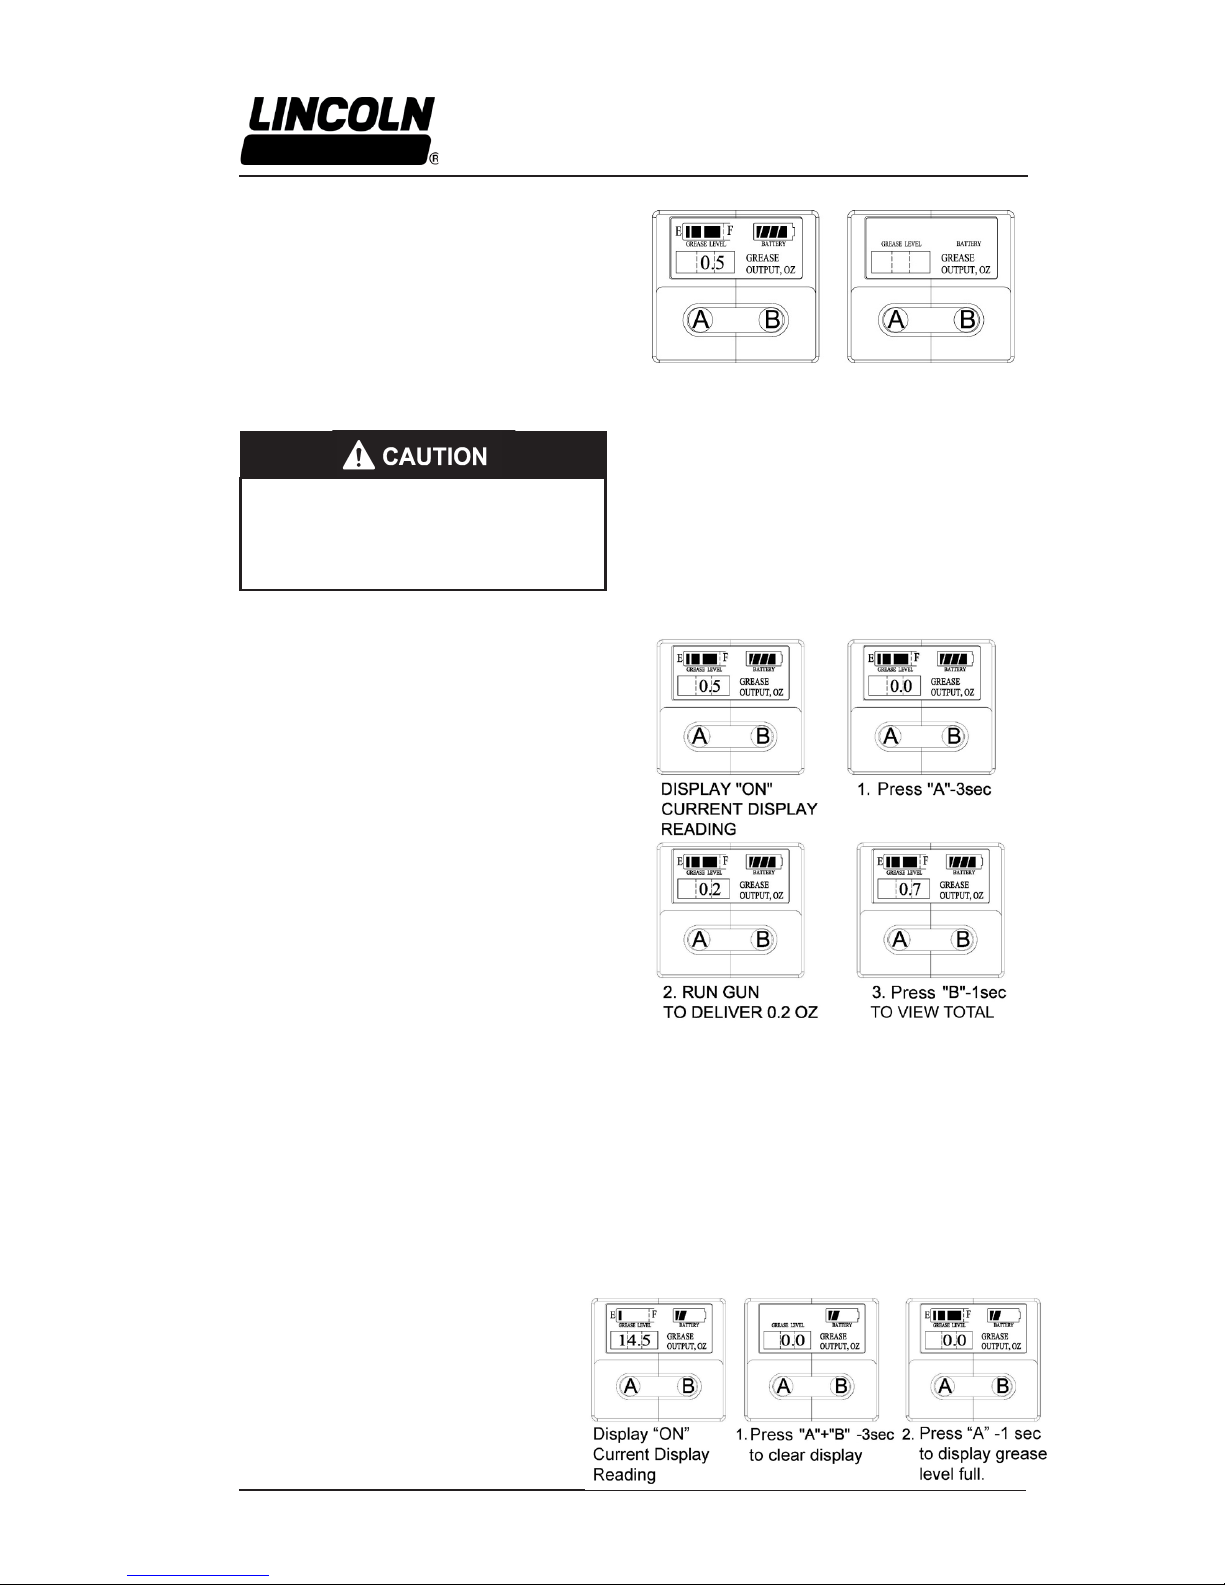
Display “ON” Display “OFF”
Grease ow monitoring.
Some OEM’s recommends the exact amount of
grease to lubricate critical bearings.
To deliver the desired amount of grease:
1. Press set key “A” 3sec. to set display reading
to zero.
2. Run and stop the gun at desired output.
3. Reset with Key A and lubricate next bearing.
4. Press key “B” 1 sec to view total (accumulated) output.
Figure 2
Figure 3
Replacing the grease cartridge or
relling the tube.
1. Prime the Power Luber after each rell or
grease cartridge change. To prime, operate
the gun until grease ows from hose. Use
vent valve (Fig.1) to expel air pockets.
2. Press set key “A” and “B” simultaneously 3
sec to reset all. (output, accumulated output
and grease level indicator.)
3. Press set key “A” 1 sec to display symbol
“grease level full”.
Figure 4
Page 8
Page Number - 8
Models 1860, 1862, 1862E, 1864
PowerLuber Grease Gun (Lithium)
Form 404264
Installing Grease Cartridge
1. Unscrew the grease tube assembly from
the PowerLuber.
2. Visually check the follower seal lip direction before loading a new cartridge. The
follower seal lip must be directed toward
the follower handle or rear side for
cartridge loading. See Fig. 5. (To change
the direction of the follower seal, unscrew
tube cap from grease tube assembly and
pull on the handle to remove follower seal
from tube. Flip follower seal over and
reassemble.)
3. Pull back on the follower handle and latch
the follower rod groove into the slot on the
tube cap.
4. Remove the plastic cap from the grease
cartridge and insert cartridge into the
container tube.
5. Remove the pull tab from grease cartridge
and screw grease tube assembly into
pump assembly.
6. Thread grease tube assembly back onto
the Powerhead.
7. Release follower rod from slot. Purge
air from pump. See air purging instructions.
8. Reset display reading after purging air.
Air pockets in the cartridge lubricant will
cause the gun to lose its prime and will
cause grease output measurements and
cartridge level readings to be inaccurate.
(See page 8).
Removing Empty Grease Cartridge
1. Pull back on the follower handle until the
follower rod is fully extended and latch the
follower rod groove into the slot on the
tube cap.
2. Unscrew the grease tube assembly from
the PowerLuber.
3. Carefully release the follower handle to
eject the empty cartridge from container
tube.
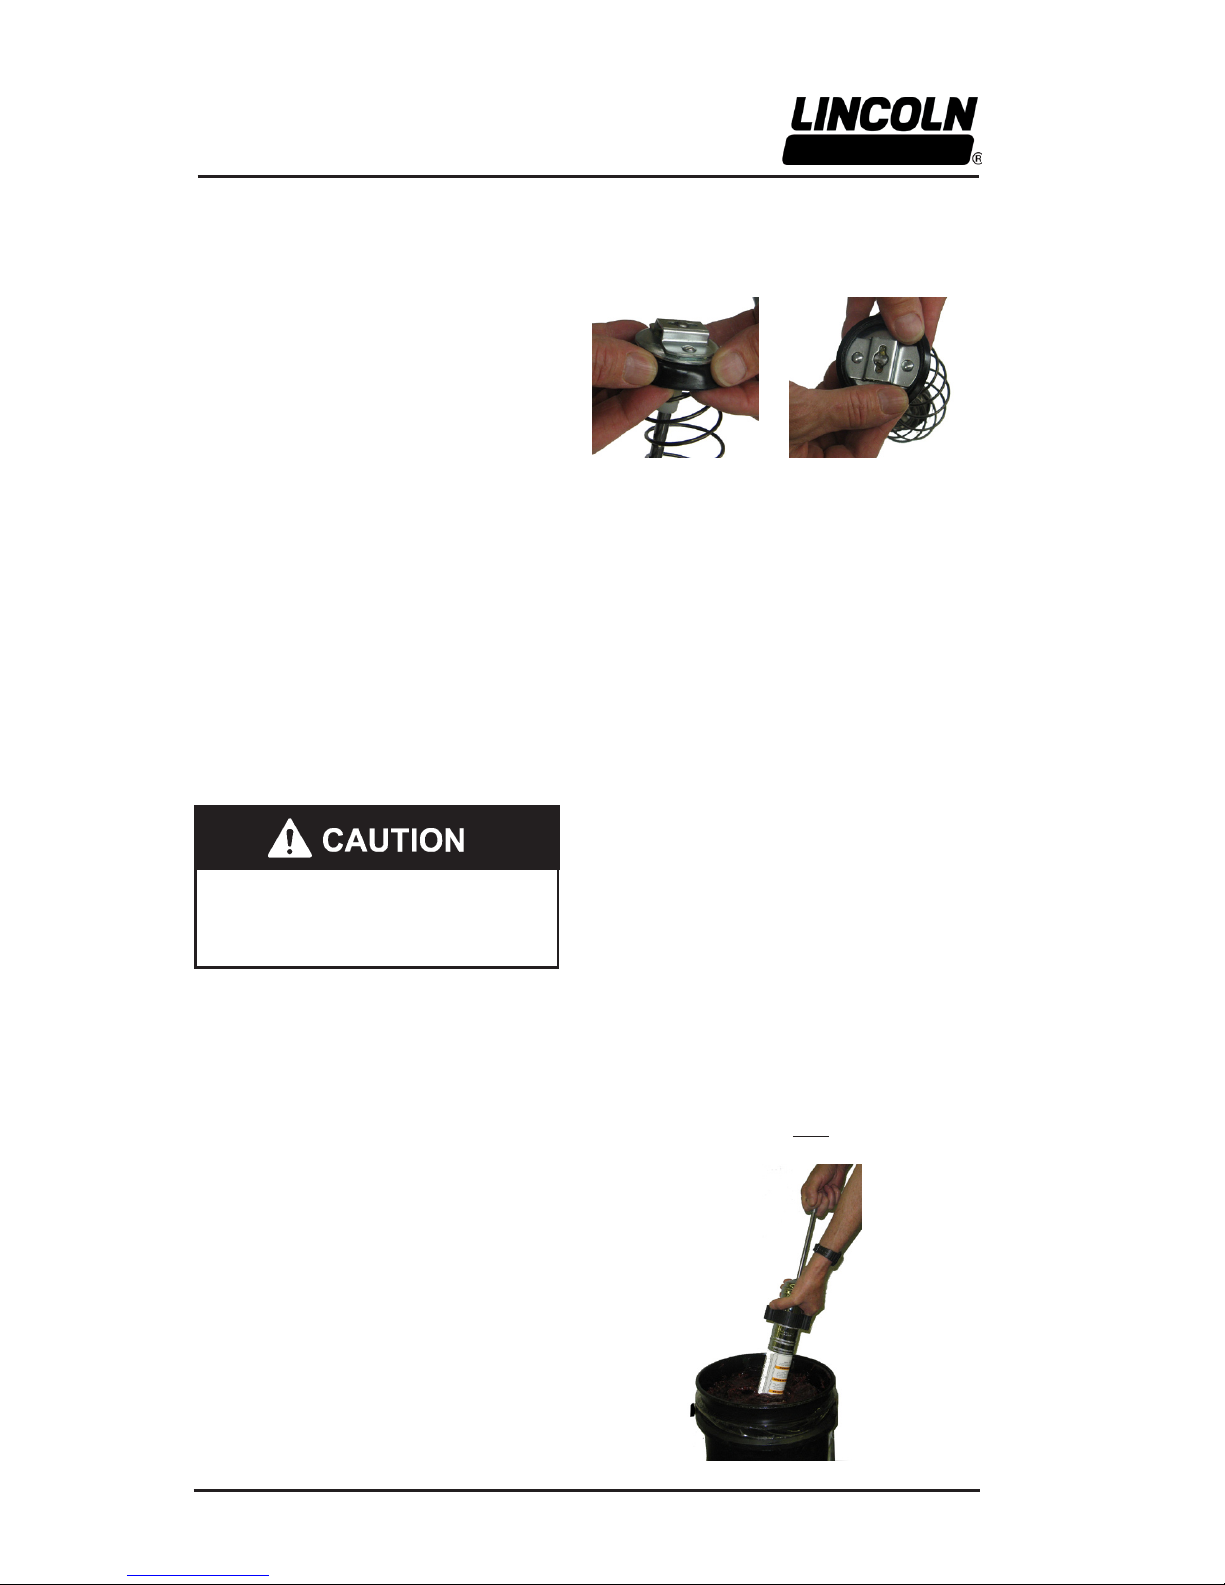
To Convert Gun to Allow Filling From
Bulk Containter or Filler Pump
1. Unscrew the grease tube assembly cap
from the grease tube assembly. Pull on the
follower handle to extract the follower and
spring from the grease tube assembly.
2. Grasp follower between thumb and forenger and ip the follower lip from the rear to
the front side.
NOTE. The follower resembles a cup.
When the gun is assembled for use with
bulk lubricant, the cup opens toward the
pump assembly.
3. Reassemble follower into grease tube and
tighten onto the container tube.
To Fill The Gun from Bulk Container
1. Remove pump assembly from grease tube
assembly.
2. Pack lubricant into cavity of the pump assembly.
3. Insert the open end of the grease tube
assembly into lubricant (see Fig. 6). Slowly
pull the follower handle back while pushing
the grease tube assembly deeper into the
lubricant to prevent air pockets from being
pulled into the grease tube.
4. When the follower rod is fully extended,
pull it sideways to latch the rod groove
into the keyhole slot in the grease tube
assembly cap.
5. Loosely assemble the pump to the grease
tube assembly. Release the follower
rod from the grease tube assembly cap
and disengage the follower rod from the
follower by rotating the follower handle.
Push the follower rod into the grease tube
assembly. Slowly unscrew the grease tube
assembly from the pump until lubricant
oozes from the interface. Tighten grease
tube assembly into the pump assembly.
6. Reset display reading after purging air
Figure 5
Rear Side
Front Side
Figure 6
Page 9
Page Number - 9
Models 1860, 1862, 1862E, 1864
PowerLuber Grease Gun (Lithium)
Form 404264
rod into the grease tube assembly.
CHARGER OPERATION
CHARGING THE BATTERY PACK
Before using your PowerLuber for the rst time,
the battery pack should be fully charged. If the
battery pack is installed in the PowerLuber,
remove it and follow “Charging Procedure”
below.
Lincoln chargers are designed to charge
Lincoln Lithium batteries in 30-60 minutes
depending on the battery’s state of charge and
temperature.
CHARGING PROCEDURE
Make sure power circuit voltage is the same
as that shown on the charger specication
plate.
1. Plug the charger into an appropriate outlet
before inserting battery pack.
2. Insert the battery pack into the charger. The
green (charging) light will blink continuously
indicating that the charging process has
started.
3. The completion of charge will be indicated
by the green light remaining ON continuously. The pack is fully charged and may be
used at this time.
4. Disconnect charger from power source
120/230 volts present at charging terminals. Do
not probe with conductive objects. Danger of
electric shock or electrocution.
when not in use.
(see page 8).
To Fill The Gun with a Filler Pump
1. Engage the follower rod with the follower by
rotating the follower handle.
2. Insert the gun vent/bulk ll valve into the ller
pump socket (see Fig. 7).
3. Operate the ller pump to ll the container.
When the follower rod groove is exposed,
the grease tube assembly is lled. The follower rod will be extended approximately 8
inches (20 cm). Do not overll!
4. Disengage the follower rod from the follower
by rotating the follower handle. Push the
follower rod into the grease tube assembly.
5. Reset display reading after purging air.
To Expel Air Pockets (Air Purging)
1. Withdraw the follower rod from the grease tube
assembly cap and engage it with the follower by
rotating the follower handle.
2. Unscrew the plug of vent valve 3-4 turns. Exert
force on the follower handle until grease ows
through the small hole in the side of the vent
valve.
3. Tighten the vent valve.
4. Pull the trigger in short bursts to operate gun
until trapped air is expelled. Disengage the
follower rod from the follower by rotating the
follower handle. Push the follower rod into the
grease tube assembly.
5. If step 2 fails, unscrew the grease tube assem-
bly 3 turns from the pump assembly.
6. Exert force on the follower handle until lubricant
oozes from the grease tube assembly and
pump assembly interface.
7. Retighten grease tube into the pump assembly.
Disengage the follower rod from the follower by
rotating the follower handle. Push the follower
Remove Air Pocket! Air pocket at grease
inlet will prevent grease from being pumped.
Unscrew the vent valve three to four turns to
remove small air pockets trapped in this area.
If the air pocket is substantial and no grease
ows from coupler after trigger is pulled for 15
seconds, see following steps.
Figure 7
Page 10
Page Number - 10
Models 1860, 1862, 1862E, 1864
PowerLuber Grease Gun (Lithium)
Form 404264
INDICATOR LIGHT OPERATION
NOTE: Battery temperature will increase during
and shortly after use. Batteries may not accept
a full charge if they are charged immediately
after use. Allow the battery pack to cool to
Important Charging Notes
1. Longest life and best performance can be
obtained if the battery is charged when the
air temperature is between 65° F and 75° F
(18° - 24° C). DO NOT charge the battery in
an air temperature below +40° F (4.5° C) or
above 105° F (+40.5° C). This is important
and will prevent serious damage to the battery.
2. The charger and battery may become warm
to the touch while charging. This is a normal
condition, and does not indicate a problem.
3. If the battery does not charge properly:
a. Check current at receptacle by plugging in
a lamp or other appliance.
b. Check to see if the receptacle is con-
nected to a light switch which turns power
off when you turn out the lights.
c. Move charger and battery to a location
where the surrounding air temperature is
approximately 65° F - 75° F (18 - 24° C).
d. If charging problems persist, take the tool,
battery and charger to your local service
center.
room temperature before charging for best
results.
Vent slots in top and bottom of charger must
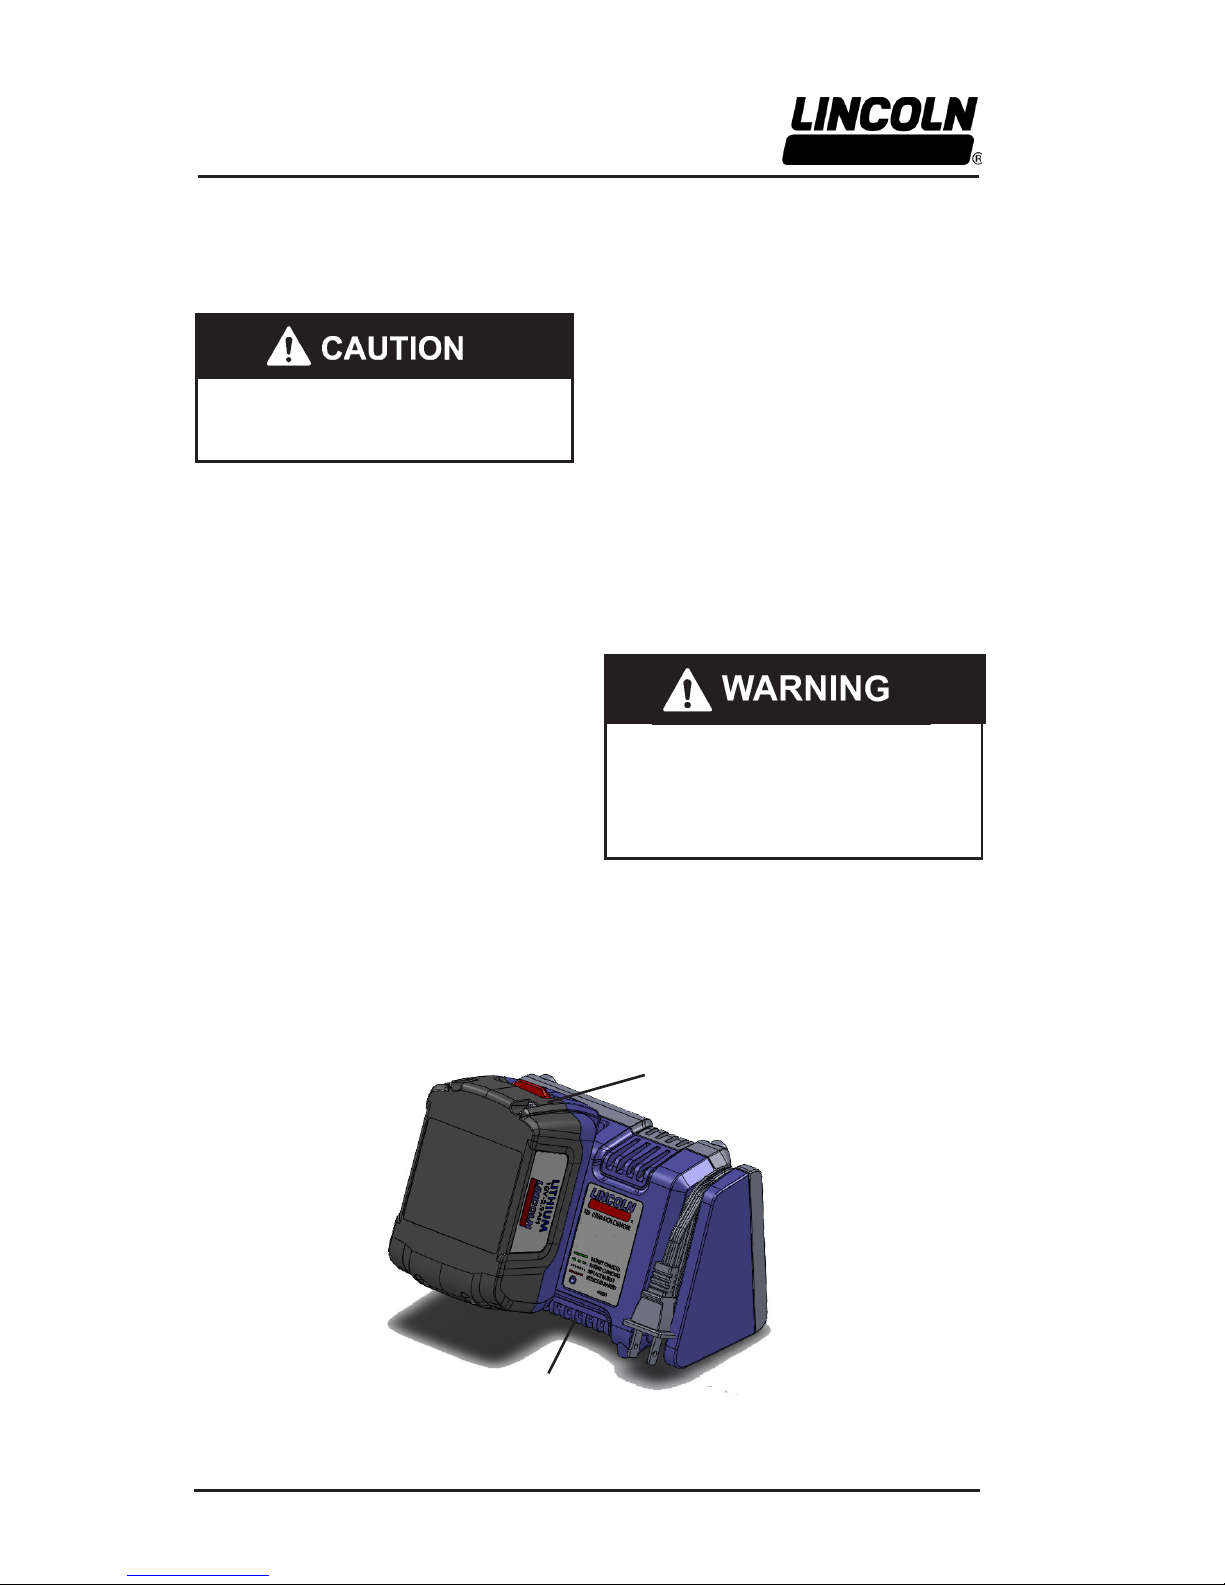
Figure 8
Don’t allow any liquid to get inside charger.
Electric shock may result. To facilitate the
cooling of the battery pack after use, avoid
placing the charger or battery pack in a
warm environment such as a metal shed or
an uninsulated trailer.
1861
Battery
1850 or 1850E
Battery Charger
4. The battery should be recharged when it
fails to produce sufcient power on jobs.
DO NOT CONTINUE to use under these
conditions. Follow the charging procedure.
You may also charge a partially used pack
whenever you desire with no adverse affect
on the battery.
5. Under certain conditions, with the charger
plugged into the power supply, the exposed
charging contacts of the charger can be
shorted by foreign material. Foreign materials of a conductive nature such as, but not
limited to, steel wool, aluminum foil, or any
buildup of metallic particles should be kept
away from charger cavities. Always unplug
the charger from the power supply when
there is no battery in the cavity. Unplug
charger before attempting to clean.
6. Do not freeze or immerse charger in water
or any other liquid.
Page 11
Page Number - 11
Models 1860, 1862, 1862E, 1864
PowerLuber Grease Gun (Lithium)
Form 404264
not be obstructed. Do not charge battery when
temperature is BELOW 40° F (4.5° C) or ABOVE
104° F (40° C).
SAFETY INSTRUCTIONS FOR CHARGER AND BATTERIES
SAVE THESE INSTRUCTIONS
This manual contains important safety and
operating instruction for Lincoln Model 1850 or
1850E Battery Charger.
1. Before using a battery charger, read all
instructions and cautionary markings on
Battery Charger, Battery Pack, and product using battery.
2. CAUTION: To reduce the risk of injury,
Lincoln Model 1850 and 1850E Chargers
should only be used to charge Lincoln
battery pack Model 1861. Other types
of batteries may burst causing personal
injury and damage. Do not charge Lincoln
Model 1861 Battery Packs with any other
charger.
3. Do not expose charger to rain, snow or
frost.
4. Do not abuse cord. Never carry charger by
cord or yank it to disconnect from receptacle. Pull by plug rather than cord when
disconnecting charger. Have damaged
or worn power cord and strain reliever
replaced immediately. DO NOT ATTEMPT
TO REPAIR POWER CORD.
5. Make sure cord is located so that it will not
be stepped on, tripped over, or otherwise
subjected to damage or stress.
6. Do not use an extension cord unless
absolutely necessary. Use of improper
extension cord could result in a risk of re
and electric shock.
7. Do not operate charger with damaged cord
or plug. Have them replaced immediately,
to avoid a hazard DO NOT ATTEMPT TO
REPAIR POWER CORD.
8. Do not operate charger if it has received
a sharp blow, been dropped, or otherwise
damaged in any way, take it to a qualied
service center.
9. Do not disassemble charger or battery pack. Take it to a qualied service
center when service or repair is required.
Incorrect reassembly may result in risk of
electrical shock or re.
10. Unplug charger from outlet before attempting any maintenance or cleaning to reduce
risk of electric shock.
11. Charge the battery pack in a well ventilated place; do not cover the charger and
battery with a cloth, etc., while charging.
12. Do not store the charger or battery packs
in locations where the temperature may
reach or exceed 122° F (50° C) such as
Risk of Electric Shock 120 VAC or 230 VAC
present at charger terminals. Do not probe
with conductive objects. Do not charge damaged battery. Replace immediately.
READ ALL INSTRUCTIONS
• Do not incinerate the battery pack even if it
is severely damaged or is completely worn
out. The battery pack can explode in a re.
Toxic fumes and materials are created when
Ll-ION battery packs are burned.
• Do not charge or use battery in explosive
atmospheres, such as in the presence of
ammable liquids, gases or dust. Inserting
or removing the battery from the charger may
ignite the dust or fumes.
• If battery contents come into contact with
the skin, immediately wash area with mild
soap and water. If battery liquid gets into
the eye, rinse water over the open eye for 15
minutes or until irritation ceases. If medical attention is needed, the battery electrolyte for
LI-ION batteries is composed of a mixture of
liquid organic carbonates and lithium salts.
• Contents of opened battery cells may
cause respiratory irritation. Provide fresh
air. If symptoms persists, seek medical attention.
Burn hazard. Battery liquid may be ammable
if exposed to spark or ame. Charge the
battery packs only in Lincoln Industrial
chargers.
DO NOT splash or immerse in water or
other liquids. This may cause premature cell
failure.
Never attempt to open the battery pack for
any reason. If the plastic housing of the
battery pack breaks or cracks, return to a
service center for recycling.
• Do not store or use the tool and battery in
locations where the temperature may reach
or exceen 105°F (40°C) such as outside
sheds or metal buildings in summer.
Page 12

Page Number - 12
Models 1860, 1862, 1862E, 1864
PowerLuber Grease Gun (Lithium)
Form 404264
a metal tool shed, or a car in the summer
which can lead to deterioration of the storage battery.
13. Do not charge battery pack when the
temperature is BELOW 40° F (4.5° C) or
ABOVE 104° F (40° C). This is very important for proper operation.
14. Do not incinerate battery pack. It can
explode in a re.
15. Do not charge battery in damp or wet locations.
16. Do not attempt to charge any other cordless tool or battery pack with the Lincoln
Model 1850 or 1850E charger.
17. Do not short across the terminals of the
battery pack. EXTREMELY HIGH TEMPERATURES COULD CAUSE PERSONAL INJURY OR FIRE.
18. This appliance is not intended for use by
persons (including children) with reduced
physical, sensory or mental capabilities,
or lack of experience and knowledge, unless they have been given supervision or
instruction concerning use of the appliance
by a person responsible for their safety.
19. Children should be supervised to ensure
that they do not play with the appliance.
20. Dispose of expended batteries properly.
The Lincoln Model 1861 Battery Pack
contains rechargeable, lithium-ion batteries. These batteries must be recycled or
disposed of properly. Drop off expended
battery packs at your local replacement
battery retailer, or your recycling center.
Users in the United States NOTE:
Applicable fees for the collection and recy-
cling of these batteries have been paid to
the RBRCTM. For further information, call
1-800-8BATTERY.
Page 13
Page Number - 13
Models 1860, 1862, 1862E, 1864
PowerLuber Grease Gun (Lithium)
Form 404264
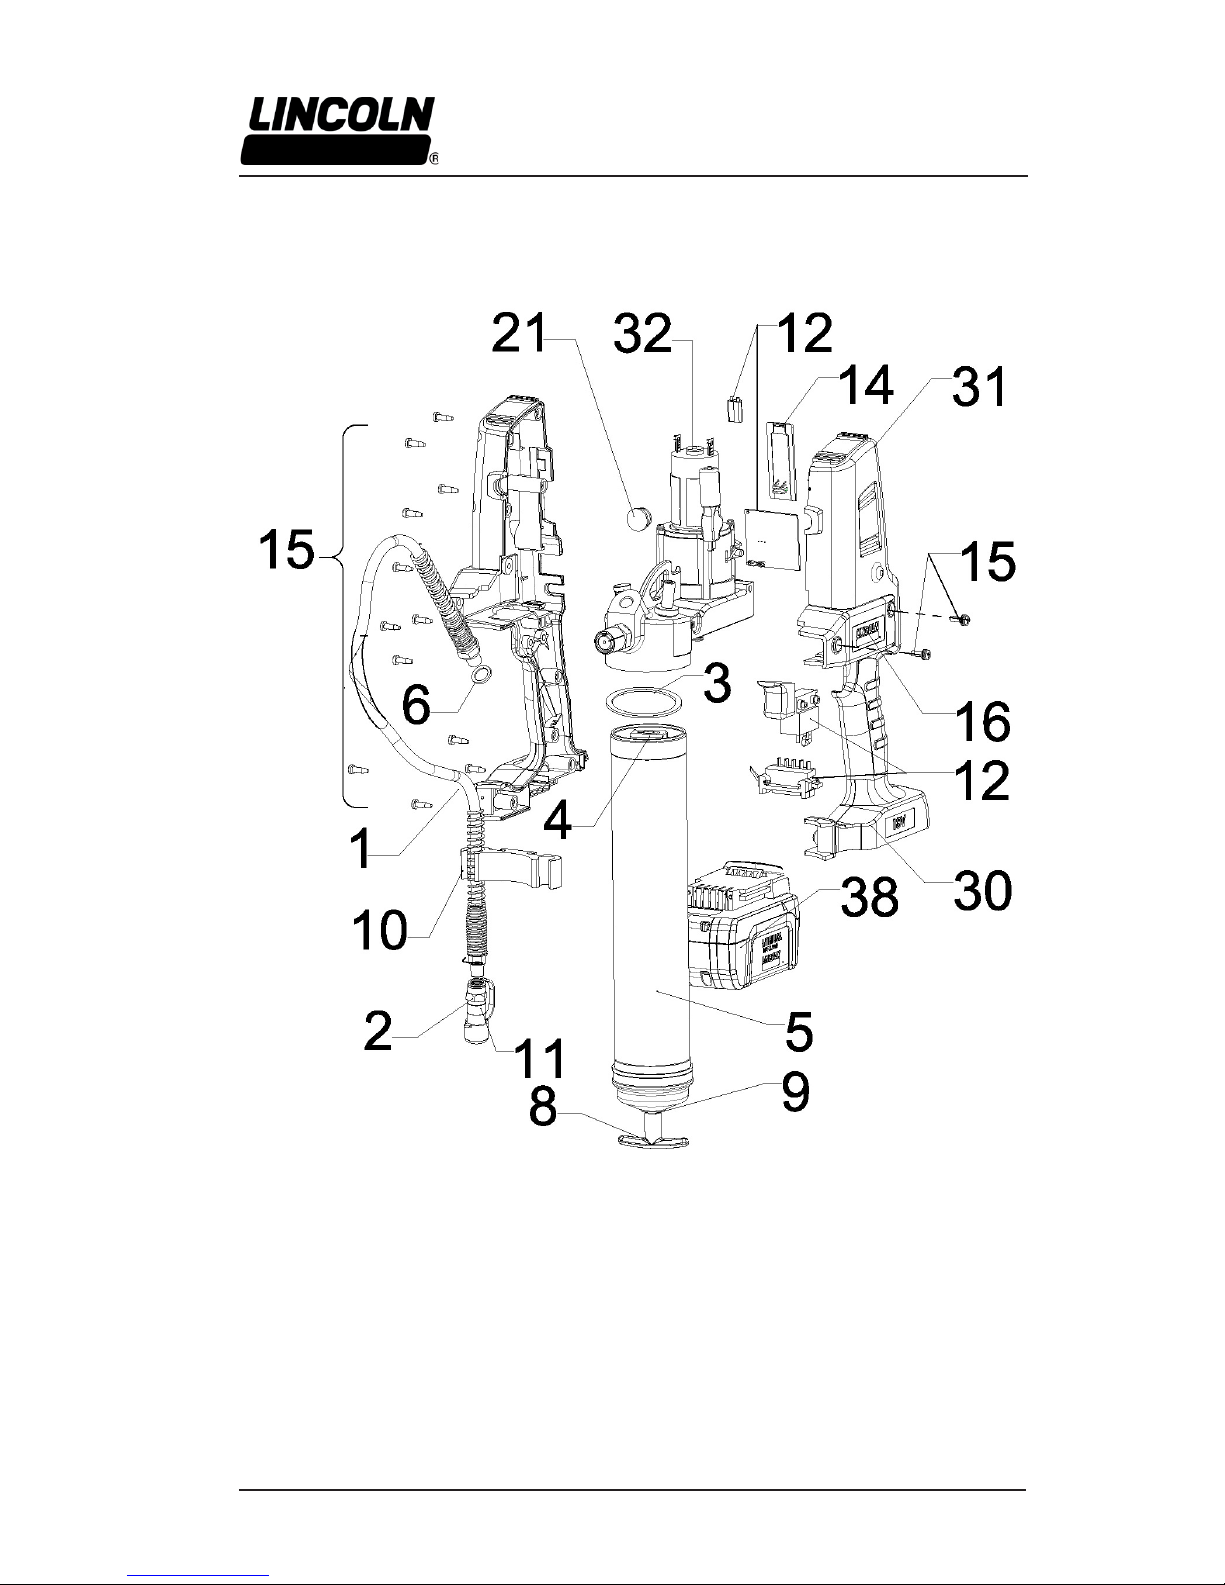
Figure 9
Page 14
Page Number - 14
Models 1860, 1862, 1862E, 1864
PowerLuber Grease Gun (Lithium)
Form 404264
Figure 10
Page 15

Page Number - 15
Models 1860, 1862, 1862E, 1864
PowerLuber Grease Gun (Lithium)
Form 404264
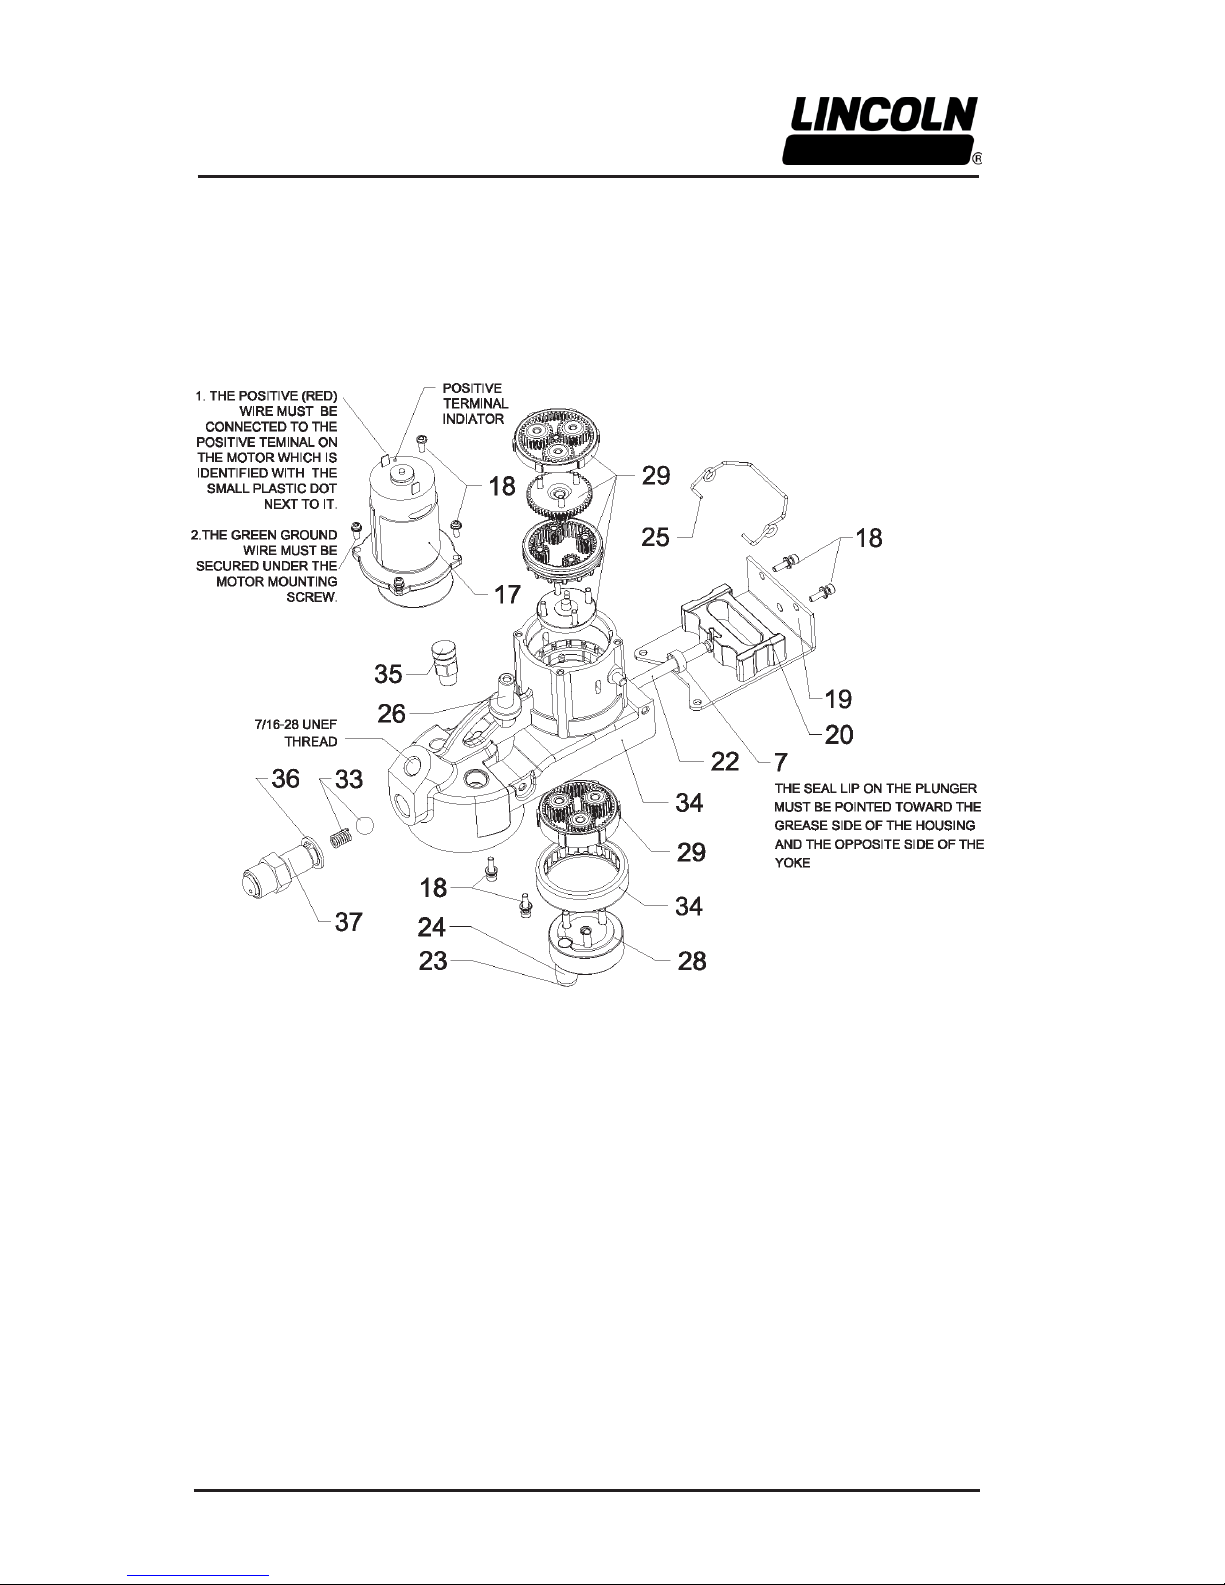
Service Parts List
Item Description Part Number
1 FLEXIBLE HOSE 36” W/GASKET(MODEL 1860) 1236
FLEXIBLE HOSE 30” W/GASKET(MODEL 1860E) 1230E
2 COUPLER (MODEL 1860) 5852
COUPLER (MODEL 1860E) 251-10124-7
3 PACKING 34793
4 FOLLOWER ASSEMBLY KIT 93485
5 GREASE TUBE ASSEMBLY 271882
6 GASKET KIT (HOSE) 271884
7 SEAL 271889
8 HANDLE KIT (GREASE TUBE) 286090
9 ROD, FOLLOWER KIT 286091
10 HOSE CLIP KIT 286367
11 COUPLER CAP KIT 286093
12 ELECTRICAL COMPONENTS KIT 286377
13 RESERVED
14 GEAR SELECTOR KIT 286097
15 HANDLE HARDWARE 286393
16 DECAL KIT 286378
17 MOTOR WITH ADAPTER KIT 286399
18 PUMP HARDWARE KIT 286391
19 COVER PUMP KIT 286379
20 YOKE KIT 286380
21 LED COVER KIT 286381
22 PLUNGER KIT 286109
23 STUD KIT 286110
24 ROLLER 286111
25 SPRING SELECTOR 286113
26 VENT/BULK VALVE KIT 286134
27 RESERVED
28 DRIVER ASSEMBLY 286285
29 GEAR SET KIT 286286
30 HANDLE WITH ELECTRICAL COMPONENT KIT 286382
31 HANDLE WITH SCREW KIT 286383
32 PUMP ASSEMBLY KIT 286384
33 CHECK VALVE KIT 286306
34 HOUSING PUMP WITH BEARING 286394
35 VENT VALVE KIT 286315
36 GASKET KIT (RELIEF VALVE) 286316
37 RELIEF VALVE KIT 286317
38 BATTERY 18V (LITHIUM) 1861
(NOT PICTURED) CHARGER (LITHIUM) 1850
(NOT PICTURED) STRAP 1414
CASE KIT 286392
Page 16

Page Number - 16
Models 1860, 1862, 1862E, 1864
PowerLuber Grease Gun (Lithium)
Form 404264
TROUBLESHOOTING
Condition Possible Cause Corrective Action
Motor fails to run. - Battery needs charging. Recharge battery.
- Faulty wiring to motor. Remove battery, disassemble
handle and check wiring
for loose connection.
PowerLuber fails to - Grease tube assembly is out of grease. Check that grease tube
dispense grease. assembly has grease.
- Loss of prime. Repeat priming operation.
- Ball check item 33 is not functioning. Remove Item 33, clean and
inspect ball seat area.
PowerLuber continues - Air may be trapped in several locations Empty grease tube
to lose prime. in container after bulk lling. assembly, rell and repeat
priming instructions.
- Follower may be binding in grease Replace grease tube assembly
tube assembly. Item 5.
Disassemble grease tube
assembly and clean.
Be sure that follower has properly
entered the grease cartridge.
Or
Verify that the follower is not
caught on the rim of the grease
cartridge.
Battery fails to take - Charger may not have power. Check that receptacle has power.
a charge. - Battery may be bad. Replace battery.
Page 17

Page Numéro - 17
Formulaire 404264
Modèles 1860, 1862, 1862E, 1864
Graisseur PowerLuber (Lithium)
Page
Section
- D7
- 83
DEC – 2011
Modèles 1860, 1862, 1862E, 1864
Graisseur PowerLuber (lithium)
Série « A »
PowerLuber de base modèle 1860
Déclaration de conformité CE
DIRECTIVE « MACHINES »
Lincoln déclare que les produits décrits à
la rubrique « Caractéristiques techniques
» sont conformes à la directive 2006/42/
CE et à la norme EN 60745-1.
Page 18
Page Numéro - 18
Modèles 1860, 1862, 1862E, 1864
Graisseur PowerLuber (Lithium)
Formulaire 404264
Table des Matières
Page
Consignes de sécurité générales
relatives à l’outillage électrique ................18
Consignes spéciques de sécurité.................18
Entretien ........................................................20
Utilisation et soin de l’outil .................................20
Caractéristiques .............................................21
Description générale .....................................22
Contrôle...................................................23
Fonctionnement.........................................23
Fonctionnement du chargeur .........................25
Instructions de sécurité pour chargeur
et batteries ..........................................27
Vue éclatée liste des pièces détachées .........29
Dépannage ....................................................32
Anglise.........................................................2
Allemand ................................. (à déterminer)
Espagnol ................................. (à déterminer)
Prière de lire toutes les instructions et
consignes de sécurité. Le non-respect des
instructions et consignes de sécurité risque
d’entraîner un risque d’électrocution, d’incendie
et (ou) de blessures graves.
AVERTISSEMENTS GÉNÉRAUX
DE SÛRETÉ DE MACHINE-OUTIL
Conserver toutes les instructions et consignes
de sécurité pour référence ultérieure.
Le terme « outil électrique » dans les consignes de sécurité fait référence à votre outil,
qu’il fonctionne sur secteur (avec cordon) ou
sur batterie (sans cordon).
1) Sécurité de la zone de travail
a) Maintenir la zone de travail propre et
bien éclairée.
Les zones encombrées ou mal éclai-
rées sont propices aux accidents.
b) Ne pas faire fonctionner d’outils
électriques en atmosphère explosive,
en présence de liquides ou de gaz
inammables, ou de poussière. Les
outils électrique causent des étincelles
susceptibles d’enammer la poussière ou
les vapeurs.
c) Tenir les enfants et autres personnes
à l’écart d’un outil électrique en fonctionnement. Une distraction risque de
vous faire perdre le contrôle de l’outil.
2) Sécurité électrique
a) La che d’un outil électrique doit
obligatoirement correspondre à la
prise. Il est interdit de modier la che
de quelque manière que ce soit. Il est
interdit d’utiliser un adaptateur de che
avec un outil électrique nécessitant une
mise à la terre. Les ches non modiées
et les prises appropriées réduisent le
risque d’électrocution.
b) Éviter tout contact du corps avec des
surfaces reliées à la terre (tuyaux, radiateurs, cuisinières et réfrigérateurs,
entre autres). Le risque d’électrocution
est plus grand si votre corps est relié à
la terre.
c) Ne pas exposer un outil électrique à
la pluie ou à l’humidité. La pénétration
d’eau dans un outil électrique augmente
le risque d’électrocution.
d) Ne pas malmener le cordon. Il est in-
terdit d’utiliser le cordon pour porter, tirer
ou débrancher l’outil électrique. Tenir le
cordon à l’écart de la chaleur, de l’huile,
des arêtes vives et des pièces mobiles.
Un cordon endommagé ou emmêlé augmente le risque d’électrocution.
e) Lors de l’emploi d’un outil électrique
à l’extérieur, utiliser une rallonge appropriée à une utilisation en extérieur.
L’emploi d’une rallonge appropriée à
un usage en extérieur réduit le risque
d’électrocution.
f) Si l’utilisation d’un outil électrique
dans un endroit humide est inévitable,
alimenter celui-ci à l’aide d’une protection différentielle. Une protection dif-
férentielle réduit le risque d’électrocution.
NOTA : Le terme « protection différentielle » est synonyme de « disjoncteur
différentiel ».
3) Sécurité des personnes
a) Restez vigilant, faites attention à ce
que vous faites et utilisez votre bon
sens en utilisant un outil électrique.
Ne pas utiliser un outil électrique sous
l’effet de la fatigue, ou sous l’inuence
de médicaments, d’alcool ou de
drogue. Un simple moment d’inattention
pendant l’utilisation d’un outil électrique
risque d’entraîner une blessure grave.
b) Utiliser un équipement de protection.
Toujours porter une protection oculaire. Le port d’équipements de sécurité
(masque anti-poussière, chaussures
de sécurité antidérapantes, casque ou
protection auditive, en fonction des conditions) réduit le risque de blessures.
c) Éviter le démarrage intempestif de
l’outil. S’assurer que l’interrupteur est
en position arrêt avant de brancher
l’appareil et (ou) sa batterie, de le soulever ou de le transporter. Le transport
d’un outil électrique avec le doigt sur
Page 19

Page Numéro - 19
Formulaire 404264
Modèles 1860, 1862, 1862E, 1864
Graisseur PowerLuber (Lithium)
l’interrupteur, ou le branchement d’un
outil dont l’interrupteur est en position «
March », ouvre la porte aux accidents.
d) Retirer les éventuelles clefs de réglage
avant la mise en marche de l’outil.
Une clef restée xée à une pièce rotative
d’un outil électrique risque de causer une
blessure.
e) Ne pas se pencher en porte à faux.
Conserver son équilibre en permanence. Ceci permet de mieux contrôler
l’outil en cas de situation imprévue.
f) Porter des vêtements appropriés. Ne
pas porter de vêtements amples ni
de bijoux. Tenir les cheveux, les vêtements et les gants à l’écart des pièces
mobiles. Les vêtements amples, les bi-
joux et les cheveux longs risquent d’être
happés par les pièces en mouvement.
g) Si les outils sont équipés de disposi-
tifs de dépoussiérage, s’assurer que
ceux-ci sont raccordés et correctement utilisés. L’emploi d’un dispositif
de dépoussiérage pourra réduire les
dangers liés aux poussières.
4) Utilisation et soin d’un outil électrique
a) Ne pas forcer un outil électrique.
Utiliser un outil électrique convenant
au travail à effectuer. Un outil électrique
approprié effectuera le travail mieux et
avec davantage de sécurité à la vitesse
pour laquelle il a été étudié.
b) Ne pas utiliser un outil électrique si
son interrupteur ne fonctionne pas.
Un outil qui ne peut pas être contrôlé
au moyen de son interrupteur est
dangereux, et doit obligatoirement être
réparé.
c) Débrancher la che de la prise
d’alimentation et (ou) débrancher la
batterie de l’outil avant d’effectuer un
réglage, un changement d’accessoire,
ou de ranger l’outil. Ces mesures de
sécurité préventives réduisent le risque
de démarrage par inadvertance.
d) Ranger les outils électriques hors de
portée des enfants, et ne pas laisser
des personnes connaissant mal l’outil
ou ces instructions le faire fonctionner. Un outil électrique entre les
mains d’une personne non formée est
dangereux.
e) Entretien des outils électriques. Véri-
er le bon alignement et l’absence de
grippage des pièces en mouvement,
vérier le bon état des pièces ainsi
que toute autre condition susceptible
d’affecter le fonctionnement de l’outil.
Si un outil électrique est endommagé,
le faire réparer avant de l’utiliser. De
nombreux accidents sont causés par des
outils électriques mal entretenus.
f) Maintenir les outils de coupe bien ai-
guisés et propres. Des outils de coupe
entretenus correctement et ayant
des arêtes bien aiguisées sont moins
susceptibles au grippage et sont plus
faciles à contrôler.
g) Utiliser les outils, accessoires, em-
bouts, etc., conformément aux présentes instructions, en tenant compte des
conditions de travail et de la tâche à
effectuer. L’emploi d’un outil électrique
pour un usage différent de celui pour
lequel il est prévu risque de causer une
situation dangereuse.
5) Utilisation et soin d’un outil à batterie
a) Ne recharger la batterie qu’avec le
chargeur spécié par le fabricant.
Un chargeur adapté à un type de
bloc-batterie risque de créer un risque
d’incendie avec un bloc-batterie d’un type
différent.
b) N’utiliser des outils électriques
qu’avec des blocs-batteries prévus
pour ceux-ci. L’emploi d’autres blocs-
batteries pourra créer des risques de
blessures et d’incendie.
c) Hors utilisation, tenir un bloc-batte-
rie à l’écart des objets métalliques
(trombones, pièces de monnaie, clefs,
clous, vis et autres petits objets en
métal) qui risquent de mettre ses
bornes en court-circuit. Un court-circuit
entre les bornes d’une batteries risque
d’entraîner des brûlures ou un incendie.
d) En cas d’utilisation abusive, du liquide
risque d’être éjecté de la batterie ;
éviter le contact. En cas de contact
accidentel, rincer à l’eau. Si le liquide
touche les yeux, consulter un médecin. Le liquide éjecté de la batterie peut
provoquer de l’irritation ou des brûlures.
6) Réparations
a) Faire réparer votre outil par un
technicien qualié, et ne remplacer
des pièces que par des pièces de
rechange identiques. Ceci permettra
de maintenir la sécurité de votre outil
électrique.
Consignes spéciques de sécurité
1. Toujours porter une protection oculaire. Le
Power-Luber peut produire une pression de
517 bars.
2. N’utiliser que des exibles de sortie courts
Lincoln 1218, 1224, 1230 ou 1236. Les
blessures par injection de graisse sont très
graves. Ne tenir le exible que par le ressort
de protection.
Page 20
Page Numéro - 20
Modèles 1860, 1862, 1862E, 1864
Graisseur PowerLuber (Lithium)
Formulaire 404264
Attention danger ! Pour réduire
le risque de blessure, l’utilisateur
doit impérativement lire le manuel
d’instruction.
Rebutage séparé. Ce produit ne doit
pas être rebuté avec les ordures
ménagères.
Le graisseur peut produire une pression très
élevée, pouvant atteindre 517 bars. Porter des
lunettes de sécurité et des gants pendant son
fonctionnement. Tenir les mains à l’écart de la
partie du exible en caoutchouc visible.
Toute autre utilisation non conforme aux instructions risque d’entraîner la perte de la garantie ou
un refus de responsabilité.
ENTRETIEN
La réparation de l’outil ne peut être effectué que
par un technicien compétent. Une réparation ou
un entretien effectué par une personne non compétente pourra annuler la garantie et entraîner un
risque de blessure.
Lors d’une réparation de l’outil, n’utiliser que des
pièces de rechange identiques.
Une pression extrême peut entraîner
l’éclatement d’une rallonge de buse ou d’un
exible court. N’utiliser que des exibles
AGRÉÉS par Lincoln et respecter les instructions et consignes de sécurité du exible court.
UTILISATION ET SOIN DE L’OUTIL
Ne pas utiliser l’outil si son interrupteur ne fonctionne pas. Un outil ne pouvant pas être contrôlé
au moyen de son interrupteur est dangereux, et
doit obligatoirement être réparé.
Ne pas maintenir l’appui sur la gâchette si le
graisseur est bloqué. Ceci risque d’endommager le
moteur ou de provoquer un incendie.
Débrancher la batterie de l’outil avant d’effectuer
un réglage, un changement d’accessoire, ou de
ranger l’outil. Ces mesures de sécurité préventives réduisent le risque d’un démarrage par
inadvertance.
Ranger les outils hors de portée des enfants et des
personnes inexpérimentées. Des outils entre les
mains de personnes non formées sont dangereux.
Tenir les blocs-batteries inutilisés à l’écart d’objets
en métal tels que : trombones, pièces de monnaie,
clefs, clous, vis et autres petits objets en métal
qui risquent de mettre ses bornes en court-circuit.
Un court-circuit entre les bornes d’une batteries
risque de causer des étincelles, des brûlures ou
un incendie.
Entretenir les outils avec soin. Vérier le bon
alignement et l’absence de grippage des pièces
en mouvement, vérier le bon état des pièces ainsi
que toute autre condition susceptible d’affecter le
fonctionnement de l’outil. Si un outil est en mauvais état, le faire réparer avant toute utilisation. De
nombreux accidents sont causés par des outils
mal entretenus.
N’utiliser que les accessoires recommandés par
Lincoln.
Seuls les accessoires prévus pour une pression
de 517 bars peuvent être utilisés. Des accessoires
pouvant convenir à un outil peuvent créer un
risque de blessure sur un autre outil.
Utilisation appropriée
Le PowerLuber a été étudié exclusivement pour
pomper et distribuer des produits de graissage
avec une batterie de 18 V. Le dépassement des
caractéristiques maximales est interdit.
3. Éviter les démarrages accidentels. S’assurer
que l’interrupteur n’est pas enfoncée lors de
l’insertion du bloc-batterie.
4. Ne pas courber le exible au point qu’il soit
plié.
5. Remplacer le exible au premier signe d’usure,
de torsion ou de dommage à sa gaine externe.
Ne pas se pencher en porte à faux. Conserver
son équilibre en permanence. Une position stable
et bien équilibrée permet un meilleur contrôle de
l’outil dans une situation inattendue.
Utiliser des équipements de sécurité. Toujours
porter une protection oculaire.
Un masque anti-poussière, des chaussures de
sécurité antidérapantes, un casque ou une protection auditive doivent impérativement être portés,
en fonction des conditions.
Le graisseur contient des produits lubriants, qui
sont susceptibles d’être inammables et toxiques
en cas d’ingestion. Ne pas utiliser le graisseur à
proximité d’une amme nue ou d’autres dangers
d’incendie.
Bien que de nombreuses graisses mentionnent «
haute température », car elles doivent conserver
leurs propriétés lubriantes à chaud, elles peuvent
malgré tout être inammables si la température
est trop élevée. Bien lire toutes les consignes de
sécurité des produits lubriants avant d’utiliser ce
graisseur. Il est préférable que les produits lubriants ne soient pas inammables.
Page 21

Page Numéro - 21
Formulaire 404264
Modèles 1860, 1862, 1862E, 1864
Graisseur PowerLuber (Lithium)
Modèles et éléments
Modèle de vente PowerLuber de base Batterie Chargeur
1862 1860 1861 1850
1862E 1860 1861 1850E
1864 1860 1861 (2) 1850
CARACTÉRISTIQUES
PowerLuber de base modèle 1860
Tension de fonctionnement (V) - 18
Pression de fonctionnement maximale (bars)
- Bas débit - 517 (7,500)
- Haut débit - 206 (3,000)
Capacité du réservoir de
graisse (g) 411
Température de fonctionnement
° C (°F) -18 to +50
(0 to 122)
Consommation en
fonctionnement (A) 4,0
Intensité nominale (A) 5,0
Lubriant (graisse) Grade NLGI
N° 2 (maxi mum)
Débit de graisse (g/min)
- Bas débit (L) 3.5 (99)
- Haut débit (H) 8.9 (252)
Poids (kg) 4,0
Accessoires :
Batterie li-ion modèle 1861
Tension (V=) 18
Capacité (mAh) 3000
Chargeur modèle 1850
Durée de charge 1 heure
Tension d’alimentation
V (3,0 A) 120 V,
50-60 Hz
Chargeur modèle 1850E
Durée de charge 1 heure
Tension d’alimentation
V (3,0 A) 230 V,
50 Hz
Flexible de distribution modèle 1236
Pression maxi (bars) 510
Longueur du exible (mm) 914
Pression acoustique (Lp) 70,0 dB(A), incertitude (K) 3 dB(A)
Puissance acoustique (Lw) 81 dB(A), incertitude (K) 3 dB(A)
Valeur d’émission vibratoire (ah) 1,1 m/s2,
incertitude (K) 1,5 m/s2
NOTA 1 : Les valeurs de consommation et de
débit de graisse s’entendent à 69 bars.
NOTA 2 : La valeur totale déclarée des vibrations a été mesurée conformément à une
méthode d’essai standard et pourra servir à
comparer un outil à un autre ; la valeur totale
des vibrations déclarée pourra également servir à l’évaluation préliminaire de l’exposition.
NOTA 3 : Les vibrations émises pendant
l’utilisation effective de l’outil électrique
pourront être différentes de la valeur totale
déclarée, en fonction de l’utilisation de l’outil,
et de la nécessité d’identier des mesures de
sécurité, pour protéger l’utilisateur, en fonction
de l’estimation de l’exposition aux conditions
effectives d’utilisation (qui devra tenir compte
de tous les éléments du cycle d’exploitation, y
compris les périodes pendant lesquelles l’outil
est hors tension et celles pendant lesquelles il
fonctionne au ralenti, en plus de sa durée de
fonctionnement effective).
Models
Modèle
commercialisé
Composants inclus
1860 Graisseur (avec batterie)
1862 Graisseur (avec batterie)
Chargeur
Boîtier de transport
1862E Graisseur (avec batterie)
Chargeur (220 V pour l’Europe)
Boîtier de transport
1864 Graisseur (avec batterie)
Batterie supplémentaire
Chargeur
Boîtier de transport
1850 Chargeur
1850E Chargeur (220 V pour l’Europe)
1861 Bloc-batterie
1236 Flexible (0,9 m)
1230E Flexible conforme RoHS (0,75
m)
5852 Raccord modèle « Midget »
251-10124-7 Raccord modèle européen
Page 22

Page Numéro - 22
Modèles 1860, 1862, 1862E, 1864
Graisseur PowerLuber (Lithium)
Formulaire 404264
Figure 1
(1860 Grease Gun)
Clapet de
remplissage
Sélecteur
(bas débit/
haut débit)
Clapet de mise à
l’air libre
Afcheur
Touches de
réglage
– Carte
électronique
Clapet de
surpression
Batterie au
lithium (18 V)
Flexible 1236
(0,9 m) ou 1230E
(0,75 m - Europe)
Raccord 5852 ou 25110124-7 (Europe)
DESCRIPTION GÉNÉRALE
Le PowerLuber de Lincoln est un graisseur
fonctionnant avec une batterie au lithium-ion.
Le graisseur a été étudié pour le graissage
manuel de points de graissage ; il comprend
une clapet de surpression, une diode lumineuse et une centrale de commande électronique.
Le PowerLuber est entraîné par un petit moteur
électrique basse tension relié à un réducteur
épicycloïdal à trois étages. Le mouvement rotatif du moteur actionne un piston alternatif par
l’intermédiaire d’un mécanisme faisant appel
à une chape. Le PowerLuber est une pompe
volumétrique à simple effet.
Clapet de surpression
La clapet de surpression (g. 1) est réglé en
usine pour faire chuter la pression si celle-ci
dépasse 517 bars. Ce clapet sert également
d’indicateur de l’état des paliers et du circuit de
graissage. De la graisse sortant du clapet de
surpression indique l’obstruction ou le serrage
excessif d’un palier, d’un raccord ou d’une canalisation. Ce problème doit être rectié avant
de continuer à utiliser le PowerLuber.
Centrale de commande
L’outil est équipé d’une centrale de commande
composée de : Une carte électronique, un
afcheur, un éclairage à diode lumineuse et
deux touches « A » et « B ». La centrale de
commande dispose des fonctions suivantes :
• Protection du moteur. Le système arrête le
moteur si le graisseur fonctionne en permanence à la pression maximale. L’afcheur
clignote en rouge jusqu’à la réinitialisation
automatique du système de protection
thermique ;
• Afchage du niveau de charge de la batterie ;
• Surveillance du niveau de graisse dans le
tube.
• Calcule et montre la quantité de la graisse
débitée, en onces ; La carte électronique
fait le calcul à partir du nombre de déplacements du piston ;
• Contrôle d’une quantité exacte de graisse
pour lubrier des roulements critiques ;
• Allumage de la diode lumineuse.
Page 23

Page Numéro - 23
Formulaire 404264
Modèles 1860, 1862, 1862E, 1864
Graisseur PowerLuber (Lithium)
Afcheur allumé Afcheur éteint
Figure 2
Figure 3
CONTRÔLE
Effectuer un contrôle visuel pour vérier que
les pièces sont en bon état, bien serrées et
qu’aucune pièce ne manque. Si l’équipement
est usé ou en mauvais état, le retirer du
service. Prendre contact avec un centre
d’entretien agréé pour une estimation des
dommages ou une réparation.
FONCTIONNEMENT
Changement de mode (« L » ou « H »)
Pour changer le mode de fonctionnement
Pour éviter d’endommager les engrenages du
réducteur, il est impératif que le moteur soit
complètement arrêté avant d’actionner le sélecteur de mode de fonctionnement (bas débit «
L » ou haut débit « H »).
« L » (bas débit/haute pression)
« H » (haut débit/basse pression)
Quand le moteur ne fonctionne pas, appuyer
sur le sélecteur (g. 1) jusqu’à ce que la lettre
« L » ou « H » soit complètement visible dans
la fenêtre.
Si le sélecteur n’est pas enclenchée à fond,
appuyer brièvement sur l’interrupteur tout en
maintenant le sélecteur, pour enclencher les
engrenages.
Le haut débit est recommandé pour les gros
roulements ne nécessitant pas une pression
supérieure à 206 bars. De même, le haut
débit est recommandé pour remplir de petits
réservoirs.
Le bas débit est recommandée pour les applications de construction ou minières, ainsi
que pour le graissage général. Le bas débit
donne la pression maximale (517 bar) permise
par le graisseur.
Il est normal pour une batterie de perdre sa
capacité de conservation de l’énergie après
quelques centaines de cycles de charge.
Quand cela se produit, il faut remplacer la
batterie.
Allumage/extinction de l’afcheur et de
l’éclairage par diode lumineuse
Pour allumer l’afcheur et l’éclairage à diode
lumineuse.
- appuyer sur une des touches, ou
- appuyer délicatement sur la gâchette/interrupteur ; Pour éteindre :
- appuyer sur la touche « B » pendant 3
secondes, ou
- attendre 30 secondes (l’extinction est automatique).
Surveillance du débit de graisse.
Certains fabricants recommandent une quantité précise de graisse pour des roulements
critiques.
Pour injecter la quantité de graisse désirée :
1. Appuyer sur la touche « A » pendant 3
secondes pour remettre la valeur afchée
à zéro.
2. Faire fonctionner le graisseur et l’arrêter
quand l’afcheur indique la valeur désirée.
3. Remettre à zéro avec la touche « A » et
graisser le roulement suivant.
4. Un appui d’une seconde sur la touche « B »
afche la quantité de graisse délivrée (total
cumulé)
Afcheur allumé
Afchage normal
1. Appuyer sur « A »
pendant 3 secondes
2. Faire fonctionner le
graisseur pour délivrer
0,2 once
3. Appuyer sur « B »
pendant 1 seconde
pour afcher le total
Remplacement de la cartouche de
graisse ou remplissage du tube.
1. Il faut amorcer le Power Luber après chaque
changement de la cartouche de graisse ou
chaque remplissage. Pour amorcer, faire fonctionner le graisseur jusqu’à ce la graisse sorte
du exible. Utiliser le clapet de mise à l’air libre
(g.1) pour éliminer les poches d’air.
2. Appuyer simultanément sur les touches «
A » et « B » pendant 3 secondes pour tout
réinitialiser (graisse délivrée, graisse délivrée
totalisée et niveau de graisse restant).
3. Appuyer sur la touche « A » pendant 1
seconde pour afcher le symbole « Cartouche
de graisse pleine »
Page 24

Page Numéro - 24
Modèles 1860, 1862, 1862E, 1864
Graisseur PowerLuber (Lithium)
Formulaire 404264
Figure 4
Afcheur allumé
Afchage normal
1. Appuyer sur les
touches « A » & «
B » pendant 3 secondes pour remettre
l’afchage à zéro
2. Appuyer sur la
touche « A » pendant
1 seconde pour
afcher le symbole «
Cartouche de graisse
pleine ».
Mise en place d’une cartouche de
graisse
1. Désolidariser le cylindre de graisse du PowerLuber en le dévissant.
2. Vérier visuellement le sens de la lèvre du
joint avant de mettre en place une cartouche
neuve. La lèvre du joint doit être dirigée
vers la poignée du poussoir (vers l’arrière)
pour le chargement de la cartouche. Voir la
gure 5. (Pour changer le sens du joint du
poussoir, dévisser le bouchon du cylindre
de graisse et tirer la poignée pour extraire le
joint. Retourner le joint puis le remonter.)
3. Tirer la poignée du poussoir et immobiliser la rainure de la tige dans la fente du
bouchon.
4. Enlever le capuchon en plastique de la
cartouche de graisse et enfoncer celle-ci
dans le cylindre.
5. Retirer la languette de la cartouche de
graisse et visser le cylindre à graisse sur la
pompe.
6. Remonter le cylindre de graisse complet
dans le Power Luber .
7. Dégager la tige de la fente. Purger l’air de la
pompe (voir les instructions de purge).
8. Remettre l’afcheur à zéro après la purge.
(voir page 8.)
Des poches d’air dans une cartouche de
graisse désamorcent le graisseur et entraînent des indications inexactes de distribution et de niveau de graisse.
Dépose d’une cartouche de
graisse vide
1. Tirer à fond la poignée du poussoir et immobiliser la rainure de sa tige dans la fente
du bouchon.
2. Désolidariser le cylindre de graisse du
PowerLuber en le dévissant.
3. Libérer avec précaution la poignée du
poussoir pour éjecter la cartouche vide du
cylindre.
Conversion du graisseur pour
permettre son remplissage à
partir d’un récipient de graisse ou
d’une pompe
1. Dévisser le bouchon du cylindre de graisse.
Tirer sur la poignée pour extraire le poussoir
et son ressort du cylindre.
2. Saisir le poussoir entre le pouce et l’index
et inverser le sens de sa lèvre (de l’arrière
à l’avant).
NOTA : Le poussoir ressemble à une
coupelle. Quand le graisseur est conguré
pour de la graisse en vrac, la coupelle
s’ouvre vers la pompe.
3. Remonter le poussoir dans le cylindre à
graisse et le bloquer.
Figure 5
Arrière
Avant
Remplissage du graisseur à partir
d’un récipient de graisse en vrac
1. Séparer la pompe du cylindre à graisse.
2. Remplir de graisse la cavité de la pompe.
3. Enfoncer l’extrémité ouverte du cylindre à
graisse dans le récipient de graisse (voir
g. 6). Tirer lentement sur la poignée du
poussoir tout en poussant le cylindre à
graisse plus profondément dans la graisse
pour éviter la création de poches d’air dans
le cylindre.
4. Une fois la tige du poussoir tirée à fond,
la pousser latéralement pour qu’elle
s’enclenche dans l’encoche du bouchon.
5. Remonter la pompe sur le cylindre à graisse,
sans toutefois les bloquer ensemble. Libérer
la tige du bouchon et la désolidariser du
poussoir en tournant la poignée. Enfoncer la
tige du poussoir dans
le cylindre à graisse.
Desserrer lentement
le cylindre à graisse
de la pompe jusqu’à
ce que de la graisse
apparaisse à leur
jonction. Serrer alors
le cylindre à graisse à
fond sur la pompe.
6. Remettre l’afcheur à
zéro après avoir purgé
l’air (voir page 8).
Figure 6
Page 25

Page Numéro - 25
Formulaire 404264
Modèles 1860, 1862, 1862E, 1864
Graisseur PowerLuber (Lithium)
Remplissage du graisseur avec
une pompe
1. Solidariser la tige avec le poussoir en tournant la poignée.
2. Enfoncer le clapet de mise à l’air libre et de
remplissage dans l’embout de la pompe de
remplissage (voir la g. 7).
3. Faire fonctionner la pompe de remplissage
pour remplir le récipient. Quand la rainure
de la tige du poussoir est visible, le cylindre
à graisse est rempli. La tige du poussoir
dépasse alors d’environ 20 cm. Ne pas
remplir au-dessus du repère !
4. Désolidariser la tige du poussoir en tournant
la poignée. Enfoncer la tige du poussoir
dans le cylindre à graisse.
5. Remettre l’afcheur à zéro après la purge.
Figure 7
Élimination des poches d’air
(purge)
1. Libérer la tige du bouchon du cylindre à
graisse et la désolidariser du poussoir en
tournant la poignée.
2. Desserrer de 3 ou 4 tours le bouchon du
clapet de mise à l’air libre. Appuyer avec
force sur la poignée jusqu’à ce que de la
graisse coule par le petit trou situé sur le
côté du clapet de mise à l’air libre.
3. Resserrer le clapet de mise à l’air libre.
Il faut éliminer les poches d’air. Une poche
d’air à l’orice d’entrée empêcher la graisse
de se remplir. Dévisser le clapet de mise à
l’air libre de trois à quatre tours pour éliminer
les poches d’air qui pourraient se trouver
piégées dans cette zone. Si la poche d’air
est importante et que la graisse ne coule
pas du raccord après une action de 15
secondes sur la gâchette, voir les étapes
suivantes.
4. Appuyer par petits coups sur la gâchette du
graisseur jusqu’à ce que l’air emprisonné
soit expulsé. Désolidariser la tige du poussoir en tournant la poignée. Enfoncer la tige
du poussoir dans le cylindre à graisse.
5. En cas d’échec de l’alinéa 2, desserrer de 3
tours le cylindre à graisse.
6. Appuyer avec force sur la poignée jusqu’à
ce que de la graisse coule à la jonction
entre le cylindre à graisse et la pompe.
7. Resserrer le cylindre à graisse sur la
pompe. Désolidariser la tige du poussoir
en tournant la poignée. Enfoncer la tige du
poussoir dans le cylindre à graisse.
FONCTIONNEMENT DU
CHARGEUR
CHARGE DE LA BATTERIE
Avant d’utiliser votre PowerLuber pour la première fois, sa batterie doit être chargée à fond.
Si la batterie est installée dans le PowerLuber,
la retirer et suivre la « Procédure de charge »
ci-dessous.
Les chargeurs Lincoln sont conçus pour charger les batteries Lincoln au lithium en 30 à 60
minutes, selon l’état de charge et la température de la batterie.
PROCÉDURE DE CHARGE
S’assurer que la tension du secteur est
bien la même que la tension gurant sur la
plaque signalétique du chargeur.
1. Brancher le chargeur dans une prise appropriée avant d’y mettre la batterie.
2. Mettre la batterie dans le chargeur. Le
voyant de charge vert clignote alors sans
interruption pour indiquer que la batterie est
en charge.
3. La charge est terminée quand le voyant
vert reste allumé xe. La batterie est alors
chargée à fond et peut être utilisé à partir de
ce moment.
4. Débrancher le chargeur de la prise lorsqu’il
n’est pas utilisé.
Bornes de chargement sous 120/230 V. Ne
pas enfoncer d’objets conducteurs dans le
chargeur. Danger de décharge électrique ou
d’électrocution.
Page 26

Page Numéro - 26
Modèles 1860, 1862, 1862E, 1864
Graisseur PowerLuber (Lithium)
Formulaire 404264
Figure 8
FONCTIONNEMENT DU VOYANT
NOTA : La température de la batterie augmente
pendant utilisation, et juste après celle-ci. Il se
peut qu’une batterie n’accepte pas une pleine
charge si elle est mise en charge juste après
avoir été utilisée. Pour obtenir les meilleurs
résultats, avant de la charger une batterie, la
laisser refroidir pour se mettre à la température
ambiante.
Ne pas obstruer les fentes d’aération sur le
dessus et le dessous du chargeur. Ne pas
charger la batterie quand la température est
inférieure à 4° C ou supérieure à 40° C.
Remarques importantes à propos
de la charge
1. On obtient la meilleure longévité et la meilleure performance quand la batterie est
chargée à une température ambiante comprise entre 18 et 24° C. NE PAS CHARGER
la batterie quand la température ambiante
est inférieure à 4° C ou supérieure à 40° C.
Ceci est important et empêchera des dommages graves à la batterie.
2. Le chargeur et la batterie peuvent chauffer
pendant la charge. C’est normal, et
n’indique pas un problème.
3. Si la batterie ne se recharge pas correctement :
a. Vérier la présence de tension à la prise
en y branchant une lampe ou un autre
appareil.
b. Vérier que la prise ne soit pas reliée à
un interrupteur qui y couperait le courant.
c. Mettre le chargeur et la batterie à un
endroit où la température ambiante est
comprise entre 18 et 24° C.
d. Si les problèmes de charge persistent,
apporter le graisseur, la batterie et le
chargeur à votre centre d’après-vente.
4. La batterie doit être rechargée quand elle ne
produit pas assez de puissance pour faire
fonctionner le graisseur. NE PAS CONTINUER à utiliser celui-ci dans ces conditions.
Respecter la procédure de charge. On
peut également charger à tout moment un
bloc-batterie partiellement utilisé, sans effet
négatif sur celui-ci.
5. Sous certaines conditions, les contacts de
charge exposés d’un chargeur branché
à une prise secteur peuvent être courtcircuités par des corps étrangers. Les corps
étrangers conducteurs (paille de fer, papier
d’aluminium, accumulation de particules
métalliques, etc.) doivent être tenus à
l’écart des cavités du chargeur. Toujours
débrancher le chargeur quand il ne contient
pas de batterie. Débrancher le chargeur
avant de le nettoyer.
6. Ne pas congeler le chargeur ni l’immerger
dans de l’eau ou un autre liquide.
Ne pas laisser de liquide pénétrer à l’intérieur
du chargeur. Risque d’électrocution. Pour faciliter le refroidissement de la batterie après
utilisation, éviter de placer le chargeur ou la
batterie dans un milieu chaud (hangar métallique ou remorque non isolée, entre autres).
Batterie
1861
Chargeur modèle
1850 ou 1850E
Page 27

Page Numéro - 27
Formulaire 404264
Modèles 1860, 1862, 1862E, 1864
Graisseur PowerLuber (Lithium)
INSTRUCTIONS DE SÉCURITÉ POUR CHARGEUR ET BATTERIES
PRIÈRE DE CONSERVER CES INSTRUCTIONS
Le présent manuel contient des instructions de
sécurité et de fonctionnement importantes pour
le chargeur Lincoln modèle 1850 ou 1850E.
LIRE TOUTES LES INSTRUCTIONS
• Ne pas brûler un bloc-batterie, même s’il
est en très en mauvais état ou complètement usé. Le bloc-batterie risque d’exploser
dans un feu. Des vapeurs et des produits
toxiques sont créés quand un bloc-batterie
LI-ION brûle.
• Ne pas charger ni utiliser une batterie en
atmosphère explosive, ou en présence
de liquides ou de gaz inammables, ou
de poussière. L’insertion de la batterie dans
le chargeur, ou son retrait, risque d’allumer
la poussière ou les vapeurs.
• Si le contenu d’une batterie entre en
contact avec la peau, laver immédiatement la zone touchée à l’eau et au savon.
Si le liquide contenu dans une batterie entre
dans un œil, rincer l’œil ouvert à grande
eau pendant 15 minutes ou jusqu’à ce que
l’irritation cesse. Si un médecin est nécessaire, l’électrolyte d’une batterie au li-ion
se compose d’un mélange de carbonates
organiques liquides et de sels de lithium.
• Le contenu d’une batterie ouverte risque
de causer une irritation respiratoire.
Mettre à l’air frais. Si les symptômes persistent, consulter un médecin.
Risque d’électrocution en raison de la
présence de 120 V ou 230 V aux bornes du
chargeur. Ne pas toucher avec des objets
conducteurs. Ne pas charger une batterie
en mauvais état. La remplacer immédiatement.
• Ne pas ranger ni utiliser un outil et sa batterie dans des locaux où la température est
susceptible d’atteindre ou de dépasser 40°
C (remises extérieures ou bâtiments métalliques, en été, par exemple).
Danger de brûlure. Le liquide d’une batterie peut s’enammer s’il est exposé à
une étincelle ou une amme. Ne charger
les blocs-batteries que dans des chargeurs
Lincoln Industrial.
NE PAS les éclabousser ni les plonger
dans l’eau ou d’autres liquides. Ceci
risquant de causer une défaillance prématurée de la batterie.
Ne jamais essayer d’ouvrir un bloc-batterie
sous quelque raison que ce soit. Si le boîtier
en matière plastique d’un bloc-batterie est
cassé ou ssuré, le renvoyer à un centre
d’après-vente pour qu’il soit recyclé.
1. Avant toute utilisation d’un chargeur de
batterie, lire toutes les instructions et les
mises en garde gurant sur le chargeur, le
bloc-batterie et le produit dans lequel la batterie est utilisée.
2. ATTENTION : Pour réduire le risque de
blessure, les chargeurs Lincoln modèles
1850 1850E ne doivent servir qu’à charger
les batteries Lincoln modèle 1861. D’autres
types de batteries risquent d’exploser et de
causer des blessures et des dégâts matériels. Ne charger les batteries Lincoln modèle
1861 avec aucun autre chargeur.
3. Ne pas exposer le chargeur à la pluie, à la
neige ou au gel.
4. Ne pas malmener le cordon. Ne jamais
transporter un chargeur en le tenant par le
cordon d’alimentation, ou arracher celui-ci
de la prise. Pour débrancher un chargeur,
tirer sur la che et non pas sur le cordon.
Faire remplacer immédiatement un cordon
d’alimentation et un dispositif de soulagement de traction en mauvais état ou usé.
NE PAS ESSAYER DE RÉPARER UN
CORDON D’ALIMENTATION.
5. S’assurer que l’emplacement du cordon lui
évitera de faire trébucher quelqu’un, d’être
piétiné, de l’endommager ou de le soumettre
à un stress.
6. Ne pas utiliser de rallonge sauf en cas de
nécessité absolue. L’emploi d’un rallonge ne
convenant pas risque d’entraîner un risques
d’incendie et d’électrocution.
7. Ne pas faire fonctionner un chargeur
avec un cordon ou une che en mauvais
état. Les faire remplacer immédiatement pour éviter tout danger. NE PAS
ESSAYER DE RÉPARER UN CORDON
D’ALIMENTATION.
Page 28

Page Numéro - 28
Modèles 1860, 1862, 1862E, 1864
Graisseur PowerLuber (Lithium)
Formulaire 404264
8. Ne pas faire fonctionner un chargeur ayant
reçu un coup brutal, étant tombé ou qui
serait en mauvais état de quelque manière
que ce soit, mais le porter à un centre de
réparation compétent.
9. Ne pas démonter un chargeur ou un
bloc-batterie. Les porter à un centre de
réparation compétent si un entretien ou une
réparation s’avère nécessaire. Un mauvais
remontage risque d’entraîner un risques
d’électrocution ou d’incendie.
10. Pour réduire le risque d’électrocution, dé-
brancher un chargeur avant toute tentative
d’entretien ou de nettoyage.
11. Charger le bloc-batterie dans un local
bien aéré ; Ne pas couvrir le chargeur ni
la batterie avec un chiffon, etc., pendant
la charge.
12. Ne pas ranger un chargeur ou des blocs-
batteries dans des endroits où la température risque d’atteindre ou de dépasser 50°
C, par exemple dans une remise en métal
ou une voiture en été, au risque d’entraîner
une détérioration de la batterie.
13. Ne pas charger un bloc-batterie si la
température est INFÉRIEURE à 4° C ou
SUPÉRIEURE à 40° C. Cette restriction
est très importante pour le bon fonctionnement.
14. Ne pas brûler un bloc-batterie. Il risquerait
en effet d’exploser dans un feu.
15. Ne pas charger une batterie dans un
endroit humide ou mouillé.
16. Ne pas essayer de charger d’autres outils
électriques ou d’autres blocs-batteries
avec un chargeur Lincoln modèle 1850 ou
1850E.
17. Ne pas court-circuiter les bornes d’un
bloc-batterie. LES TEMPÉRATURES EXTRÊMEMENT ÉLEVÉES RISQUERAIENT
DE CAUSER DES BLESSURES OU UN
INCENDIE.
18. Cet appareil n’est pas destiné à être utilisé
par des personnes (enfants, en particulier)
ayant des capacités physique, sensorielles ou mentales, ou une expérience et
des connaissances réduites, sauf si les
personnes en question sont sous la supervision d’une personne responsable de
leur sécurité, ou ont reçu des instructions
portant sur l’emploi de l’appareil.
19. Surveiller les enfants pour s’assurer qu’ils
ne jouent pas avec l’appareil.
20. Recycler ou rebuter les batteries selon les
réglementations en vigueur. Le bloc-piles
Lincoln modèle 1861 contient des batteries
rechargeables au lithium-ion. Ces batteries doivent impérativement être recyclées
ou rebutées selon les réglementations en
vigueur. Porter les batteries usées chez
un revendeur local de batteries, ou à une
déchetterie.
NOTA à l’attention des utilisateurs aux ÉtatsUnis :
Les frais de collecte et de recyclage applicables à ces batteries ont été réglés au
RBRCTM. Pour tous renseignements, téléphoner au 1-800-8BATTERY
Page 29

Page Numéro - 29
Formulaire 404264
Modèles 1860, 1862, 1862E, 1864
Graisseur PowerLuber (Lithium)
Figure 9
Page 30

Page Numéro - 30
Modèles 1860, 1862, 1862E, 1864
Graisseur PowerLuber (Lithium)
Formulaire 404264
Figure 10
Page 31

Page Numéro - 31
Formulaire 404264
Modèles 1860, 1862, 1862E, 1864
Graisseur PowerLuber (Lithium)
Liste des pièces détachées
Repère Description Référence
1 FLEXIBLE 0,9 m AVEC JOINT (MODÈLE 1860) 1236
FLEXIBLE 0,75 m AVEC JOINT (MODÈLE 1860E) 1230E
2 Raccord (modèle 1860) 5852
Raccord (modèle 1860E) 251-10124-7
3 Joint d’étanchéité 34793
4 Poussoir complet 93485
5 Cylindre à graisse complet 271882
6 Joint de exible 271884
7 Joint à lèvre 271889
8 Poignée (cylindre à graisse) 286090
9 Tige de poussoir 286091
10 Clip de maintien du exible 286367
11 Kit de capuchon de raccord 286093
12 Jeu de composants électriques 286377
13 Réservé
14 Commutateur de sélection de débit 286097
15 Vis de xation de poignée 286393
16 Kit d’autocollants 286378
17 Ensemble moteur/adaptateur 286399
18 Vis de xation à la pompe 286391
19 Couvercle de pompe équipé 286379
20 Chape équipée 286380
21 Verrine de diode lumineuse 286381
22 Poussoir équipé 286109
23 Axe 286110
24 Galet 286111
25 Sélecteur à ressort 286113
26 Clapet équipé de mise à l’air libre et de remplissage 286134
27 Réservé
28 Dispositif d’entraînement complet 286285
29 Jeu d’engrenages 286286
30 Kit poignée et composants électriques 286382
31 Kit poignée et vis 286383
32 Pompe équipée 286384
33 Jeu de réparation (clapet de mise à l’air libre) 286306
34 Boîtier de pompe avec palier 286394
35 Clapet de mise à l’air libre équipé 286315
36 Joint (clapet de surpression) 286316
37 Clapet de surpression 286317
38 Batterie au lithium (18 V) 1861
(non représenté) Chargeur (lithium) 1850
(non représentée) Sangle 1414
Mallette 286392
Page 32

Page Numéro - 32
Modèles 1860, 1862, 1862E, 1864
Graisseur PowerLuber (Lithium)
Formulaire 404264
DÉPANNAGE
Condition Cause potentielle Mesure corrective
Le moteur ne fonctionne
pas.
- La batterie a besoin d’être rechargée. Mettre la batterie en charge
- Câblage du moteur défectueux. Retirer la batterie, démonter la poignée
et vérier que les connexions sont bien
serrées.
Le PowerLuber ne distribue
pas de graisse.
- Cylindre à graisse vide. Vérier la présence de graisse dans le
cylindre à graisse.
- Désamorçage. Réamorcer.
- Clapet de surpression (repère 33) défectueux. Déposer le clapet 33, nettoyer le siège de
la bille et contrôler son état.
Le PowerLuber
se désamorce
continuellement.
- De l’air a pu être emprisonné à plusieurs
endroits du cylindre après le remplissage.
Vider le cylindre à graisse, le remplir et
réamorcer le graisseur.
- Poussoir bloqué dans le cylindre à graisse. Remplacer le cylindre à graisse (repère 5)
Démonter le cylindre à graisse et le
nettoyer.
S’assurer que le poussoir pénètre
correctement dans la cartouche de graisse.
ou
Vérier que le poussoir n’est pas coincé
sur le rebord de la cartouche de graisse.
La batterie ne se charge
pas.
- Chargeur non alimenté. Vérier que la prise est bien alimentée.
- Batterie en mauvais état. Remplacer la batterie.
Page 33

Seite - 33
Formular 404264
Modelle 1860, 1862, 1862E, 1864
PowerLuber Fettspritze (Lithium)
Seite
Abschnitt
- D7
- 81A
DEC - 2011
Modell 1860, 1862, 1862E, 1864
PowerLuber-Fettpresse (Lithium-Ionen-Akku)
Serie „A“
EG-Konformitätserklärung
MASCHINENRICHTLINIE
PowerLuber-Basismodell 1860
Lincoln erklärt, dass die unter „Technische
Daten“ beschriebenen Produkte den Richtlinien 2006/42/EG und EN 60745-1 entsprechen.
Page 34

Seite - 34
Modelle 1860, 1862, 1862E, 1864
PowerLuber Fettspritze (Lithium)
Formular 404264
Inhaltsverzeichnis
Seite
Allgemeine Sicherheitshinweise
für Elektrowerkzeuge...................................2
Spezische Sicherheitshinweise………..…….3
Wartung/Reparaturen………………………….4
Handhabung und Pege von Elektrowerkzeugen 4
Technische Daten………………………………4
Allgemeine Beschreibung………………………5
Sichtprüfung……………………………………..6
Betrieb………………….....………..……….6-7
Betrieb des Ladegeräts…………………………..8
Sicherheitsanleitung für Ladegerät
und Akkus…………………...……………10-11
Explosionszeichnung und Teileliste………12-14
Fehlerbehebung……………………………….15
Englisch Version...............................................1
Französische Version………………………….17
Spanische Version.......…………................…46
GENERALVOLLMACHTWERKZEUG-SICHERHEITSWARNING
Alle Sicherheitshinweise und Anleitungen
durchlesen. Bei Nichtbeachtung der Warnhinweise und Anleitungen besteht Gefahr
von elektrischen Schlägen, Bränden und/
oder schweren Personenschäden.
Alle Warnhinweise und Anleitungen sind sicher
aufzubewahren.
Der Begriff „Elektrowerkzeug“ in den Warnhinweisen bezieht sich sowohl auf netzbetriebene
Geräte mit Kabel als auch auf batteriebetriebene (schnurlose) Elektrowerkzeuge.
1. Sicherheit im Arbeitsbereich
a) Stellen Sie sicher, dass der Arbeits-
bereich sauber, ordentlich und gut
beleuchtet ist. Unordentliche oder
dunkle Bereiche fordern Unfälle
heraus.
b) Benutzen Sie Elektrowerkzeuge nicht
in explosionsgefährdeten Umgebungen, z.B. in der Nähe von entammbaren Flüssigkeiten, Gasen oder Stäuben.
Elektrowerkzeuge erzeugen Funken, die
Staub oder Dämpfe entzünden können.
c) Halten Sie Kinder und unbefugte
Personen vom Arbeitsbereich fern.
Ablenkungen können zum Verlust der
Kontrolle über das Werkzeug führen.
2. Elektrische Sicherheit
a) Der Stecker des Werkzeugs muss der
Steckdose entsprechen. Der Stecker
darf auf keinen Fall verändert werden.
Benutzen Sie für geerdete Elektrowerkzeuge keine Übergangsstecker.
Unveränderte Stecker und entsprechende Steckdosen mindern die Gefahr
elektrischer Schläge.
b) Vermeiden Sie Körperkontakt mit
geerdeten Oberächen wie Leitungen,
Heizkörpern, Herden und Kühlschränken. Bei einem Erdschluss des menschli-
chen Körpers besteht erhöhte elektrische
Schlaggefahr.
c) Setzen Sie Elektrowerkzeuge niemals
Regen oder Nässe aus. In Elek-
trowerkzeuge eindringendes Wasser
erhöht die elektrische Schlaggefahr.
d) Benutzen Sie das Kabel nicht miss-
bräuchlich. Das Elektrowerkzeug darf
nicht mithilfe des Kabels getragen, gezogen oder ausgestöpselt werden. Halten
Sie das Kabel von Hitzequellen, Öl,
scharfen Kanten oder beweglichen Teilen
fern. Beschädigte bzw. verhedderte Kabel
erhöhen die Schlaggefahr.
e) Muss ein Elektrowerkzeug im Freien
eingesetzt werden, verwenden Sie eine
für den Einsatz im Freien geeignete
Verlängerungsschnur. Ungeeignete
Verlängerungskabel erhöhen die elektrische Schlaggefahr.
f) Lässt sich der Einsatz eines Elek-
trowerkzeugs an einem feuchten Ort
nicht vermeiden, benutzen Sie eine
Fehlerstromschutzeinrichtung. Eine
Fehlerstromschutzeinrichtung mindert die
elektrische Schlaggefahr.
ANMERKUNG: Der Begriff „Fehlerstromschutzeinrichtung“ kann durch den Begriff
„FI-Schutzschalter“ oder „Erdschlussschalter“ ersetzt werden.
3. Persönliche Sicherheit
a) Konzentration, Wachsamkeit und
gesunder Menschenverstand sind
bei der Arbeit mit Elektrowerkzeugen unerlässlich! Benutzen Sie bei
Müdigkeit oder unter dem Einuss von
Drogen, Alkohol oder Medikamenten
keine Elektrowerkzeuge. Bei der Arbeit
mit Elektrowerkzeugen kann selbst eine
winzige Unachtsamkeit zu schweren
Personenschäden führen.
b) Schutzausrüstung und Augenschutz
sind unerlässlich! Eine angemes-
sene Schutzausrüstung wie Staubschutzmaske, rutschfeste Sicherheitsschuhe, Helm und Gehörschutz mindern
die Verletzungsgefahr.
Page 35

Seite - 35
Formular 404264
Modelle 1860, 1862, 1862E, 1864
PowerLuber Fettspritze (Lithium)
c) Das Gerät darf nicht versehentlich
gestartet werden. Achten Sie darauf,
dass der Schalter auf AUS steht, bevor
Sie das Werkzeug an die Stromquelle
bzw. den Akkupack anschließen, es
hochheben oder transportieren. Beim
Transport von Elektrowerkzeugen den
Finger auf dem Schalter zu haben oder
sie bei Schalterstellung EIN unter Strom
zu setzen, fordert Unfälle heraus.
d) Entfernen Sie vor dem Einschalten
des Werkzeugs Stift- oder Schraubenschlüssel. Ein an einem beweglichen
Teil angebrachter Stift- oder Schraubenschlüssel kann zu Personenschäden
führen.
e) Beugen Sie sich nicht zu weit vor.
Sorgen Sie für sicheren Stand und
halten Sie stets das Gleichgewicht.
Dann können Sie das Elektrowerkzeug
in unerwarteten Situationen besser unter
Kontrolle halten.
f) Tragen Sie angemessene Kleidung.
Vermeiden Sie locker sitzende Bekleidung und Schmuck. Halten Sie Haare,
Bekleidung und Handschuhe von
beweglichen Teilen fern. Lose sitzende
Bekleidung, Schmuck oder langes
Haar können sich in beweglichen Teilen
verfangen.
g) Achten Sie darauf, dass Zusatzgeräte
zur Staubabsaugung und –lterung
unbedingt sicher angeschlossen und
vorschriftsgemäß angewendet werden.
Staublter können die von Stäuben ausgehenden Gefahren mindern.
4. Handhabung und Pege von Elektrowerkzeugen
a) Elektrowerkzeuge dürfen niemals mit
Gewalt angewendet werden. Benutzen
Sie stets das für die jeweilige Aufgabe
angemessene Werkzeug. Mit dem richtigen Elektrowerkzeug und bei korrekter
Nennlast erledigen Sie die Arbeit besser
und gefahrloser.
b) Werkzeuge, die sich nicht mit dem
Schalter ein- und ausschalten lassen,
dürfen nicht benutzt werden. Sie stel-
len eine Gefahr dar und müssen repariert
werden.
c) Trennen Sie vor allen Justierungen, je-
dem Austausch von Zubehör oder der
Einlagerung von Elektrowerkzeugen
stets den Stecker von der Netzbuchse
bzw. den Akkupack vom Werkzeug.
Derartige vorbeugende Sicherheitsmaßnahmen minimieren das Risiko eines
versehentlichen Gerätestarts.
d) Bewahren Sie unbenutzte Elek-
trowerkzeuge für Kinder unzugänglich
auf. Lassen Sie Personen, die sich mit
dem Werkzeug oder dieser Anleitung nicht auskennen, nicht mit dem
Werkzeug arbeiten. Elektrowerkzeuge
sind in den Händen von Laien gefährlich.
e) Halten Sie Elektrowerkzeuge stets
instand. Achten Sie auf falsch ausgerichtete oder klemmende bewegliche Teile, beschädigte Teile und
sonstige Probleme, die den Betrieb
beeinträchtigen können. Beschädigte Werkzeuge müssen repariert
werden. Unzureichend gewartete
Elektrowerkzeuge sind eine häuge
Unfallursache.
f) Sorgen Sie dafür, dass Sch-
neidwerkzeuge stets sauber und
scharf sind. Ordnungsgemäß instand
gehaltene Schneidwerkzeuge mit
scharfen Schneiden fressen sich nicht
so leicht fest und lassen sich leichter
kontrollieren.
g) Benutzen Sie Elektrowerkzeuge,
Zubehör, Bohrer und dergleichen stets
anleitungsgemäß und unter Berücksichtigung der Arbeitsbedingungen und
der auszuführenden Arbeit. Entgegen
dem Verwendungszweck eingesetzte
Elektrowerkzeuge können zu gefährlichen Situationen führen.
5) Handhabung und Pege von Akkus
a) Laden Sie den/die Akku(s) aus-
schließlich mit dem vom Hersteller
empfohlenen Ladegerät auf. Ein für
einen bestimmten Akkupacktyp geeignetes Ladegerät kann bei Einsatz mit
einem anderen Akkupack Brandgefahr
darstellen.
b) Benutzen Sie Elektrowerkzeuge stets
nur mit spezisch für das jeweilige
Werkzeug bestimmten Akkupacks. An-
dere Akkupacks können zu Verletzungsund Brandgefahr führen.
c) Halten Sie unbenutzte Akkupacks von
anderen Gegenständen aus Metall wie
Büroklammern, Münzen, Schlüsseln,
Nägeln, Schrauben und sonstigen
kleinen Objekten fern, die die Klemmen kurzschließen können. Kurzge-
schlossene Batterieklemmen können zu
Verbrennungen oder Bränden führen.
d) Vermeiden Sie Kontakt mit bei miss-
bräuchlicher Verwendung eventuell
austretender Batterieüssigkeit.
Sollte es zu versehentlichem Kontakt
kommen, spülen Sie den betroffenen
Bereich gründlich mit Wasser. Bei
Kontakt mit den Augen ist ärztliche
Page 36

Seite - 36
Modelle 1860, 1862, 1862E, 1864
PowerLuber Fettspritze (Lithium)
Formular 404264
Hilfe zu suchen. Aus Batterien austretende
Flüssigkeit kann Reizungen bzw. Verätzungen verursachen.
6) Wartung/Reparaturen
a) Lassen Sie Elektrowerkzeuge nur von
qualiziertem Fachpersonal und nur
mit identischen Ersatzteilen warten/
reparieren. Damit wird die Sicherheit des
Elektrowerkzeugs gewährleistet.
Spezische Sicherheitshinweise
1. Tragen Sie stets einen Augenschutz. Der PowerLuber kann Drücke bis zu 517 bar erzeugen.
2. Benutzen Sie ausschließlich Wippendschläuche der Lincoln-Modelle 1218, 1224,
1230 oder 1236. Bei Spritzarbeiten mit
Fettpressen können schwerste Verletzungen
verursacht werden. Halten Sie den Schlauch
ausschließlich im Bereich der Schutzwendel
fest.
3. Vermeiden Sie versehentliche Gerätestarts.
Achten Sie darauf, dass beim Einlegen des Akkupacks der Schalter nicht betätigt wird.
4. Der Schlauch darf nicht geknickt werden.
5. Bei den ersten Anzeichen von Verschleiß,
Knicken oder Schäden an der Umhüllung muss
der Schlauch ersetzt werden.
Beugen Sie sich nicht zu weit vor. Sorgen Sie für
sicheren Stand und halten Sie stets das Gleichgewicht. Gleichgewicht und ein sicherer Stand
sorgen in unerwarteten Situation für bessere
Kontrolle über das Werkzeug.
Benutzen Sie stets eine angemessene Schutzausrüstung und einen Augenschutz.
Je nach den Bedingungen sind Staubschutzmaske, rutschfeste Sicherheitsschuhe,
Helm und Gehörschutz zu tragen.
Die Fettpresse kann hohe Drücke erzeugen –
bis zu 517 bar. Bei Arbeiten mit einer Fettpresse
sind eine Schutzbrille und Arbeitsschutzhandschuhe zu tragen. Hände vom freiliegenden Teil
des Schlauchs fernhalten.
Achtung! Zur Verminderung der Verletzungsgefahr muss der Benutzer
die Anleitung sorgfältig durchlesen.
Mülltrennung. Dieses Produkt darf
nicht mit dem normalen Haushaltsmüll entsorgt werden.
Bei nicht anleitungsgemäßem Gebrauch gehen
alle Garantie- und Haftungsansprüche verloren.
WARTUNG/REPARATUREN
Das Werkzeug darf nur von qualiziertem Fachpersonal gewartet/repariert werden. Von nicht
entsprechend qualiziertem Personal ausgeführte
Wartungs- und Reparaturarbeiten können die
Garantie nichtig machen und zu Verletzungsgefahr
führen.
Bei allen Wartungs-/Reparaturarbeiten an Elektrowerkzeugen dürfen nur identische Ersatzteile
verwendet werden.
Extreme Drücke können den Düsenansatz
oder den Wippendschlauch platzen lassen.
Es dürfen nur von Lincoln GENEHMIGTE
Schläuche verwendet werden. Alle Anleitungen
und Warnungen im Zusammenhang mit dem
Wippendschlauch sind zu beachten.
HANDHABUNG UND PFLEGE VON
ELEKTROWERKZEUGEN
Werkzeuge, die sich nicht mit dem Schalter einoder ausschalten lassen, dürfen nicht benutzt
werden. Sie stellen eine Gefahr dar und müssen
repariert werden.
Sollte der Motor stocken oder absterben, drücken
Sie auf keinen Fall weiter den Auslöser. Bei
Zuwiderhandlung kann es zu Motorschäden oder
Brandgefahr kommen.
Trennen Sie vor jeder Justierung oder Einlagerung
bzw. vor jedem Austausch von Zubehörteilen den
Akkupack vom Werkzeug. Derartige vorbeugende
Sicherheitsmaßnahmen minimieren das Risiko
eines versehentlichen Gerätestarts.
Bewahren Sie das Werkzeug für Kinder und ungeschulte Personen unzugänglich auf. Werkzeuge
sind in den Händen von Laien gefährlich.
Die Fettpresse verwendet Schmiermittel, die brennbar und bei Verschlucken giftig sein können. Verwenden Sie die Fettpresse nicht in der Nähe von
offenen Flammen oder sonstigen Brandgefahren.
Schmierfette werden häug als Hochtemperaturfette vermarktet, da sie auch in heißen Bereichen
ihre Schmiereigenschaften beibehalten müssen,
aber wenn die Temperatur zu hoch ist, können die
Schmiermittel brennbar sein. Lesen Sie vor der
Verwendung dieser Fettpresse alle Warnhinweise
auf Schmiermitteln. Es ist am besten, wenn
Schmiermittel nicht brennbar sind.
Page 37

Seite - 37
Formular 404264
Modelle 1860, 1862, 1862E, 1864
PowerLuber Fettspritze (Lithium)
Halten Sie unbenutzte Akkupacks von anderen
Gegenständen aus Metall wie Büroklammern,
Münzen, Schlüsseln, Nägeln, Schrauben und
sonstigen kleinen Objekten fern, die die Klemmen kurzschließen können. Kurzgeschlossene
Batterieklemmen können Funken schlagen und
zu Verbrennungen oder Bränden führen.
Lassen Sie bei Pege und Wartung von
Werkzeugen Sorgfalt walten. Achten Sie auf
falsch ausgerichtete oder klemmende bewegliche Teile, beschädigte Teile und sonstige
Probleme, die den Betrieb beeinträchtigen können. Beschädigte Werkzeuge müssen repariert
werden. Unzureichend gewartete Werkzeuge
sind eine häuge Unfallursache.
Benutzen Sie nur von Lincoln empfohlenes
Zubehör.
Alle Zubehörteile müssen 517 bar (7.500 psi)
verkraften können. Zubehör, das für ein bestimmtes Werkzeug durchaus geeignet sein mag,
kann bei Einsatz mit einem anderen Werkzeug
Unfallgefahr bergen.
Zweckmäßige Nutzung
Der PowerLuber ist ausschließlich zum
Pumpen und Dosieren von Schmiermitteln
mithilfe eines 18-Volt-Akkupacks konzipiert. Die
maximale Nennleistung darf nicht überschritten
werden.
TECHNISCHE DATEN
PowerLuber-Basismodell 1860
Betriebsspannung, Volt 18
Maximaler Betriebsdruck, bar
– Niedrige Förderleistung – 517
– Hohe Förderleistung – 206
Kapazität des Fettreservoirs, g 411
Betriebstemperaturbereich, °C -18 bis +50
Betriebsstrom, A 4,0
Nennstrom, A 5,0
Schmiermittel (Fett) Bis zu NLGI Klasse 2
Fettausstoß g/min
– Niedrige Förderleistung (L) – 99
– Hohe Förderleistung (H) – 252
Gewicht, kg 4,0
Zubehör:
Akku-Modell 1861, Li-Ion
Leistung, V DC 18
Kapazität, mAh 3000
Ladegerät Modell 1850
Ladezeit 1 Stunde
Leistungsaufnahme, V AC (3,0 A) 120 V,
50-60 Hz
Ladegerät Modell 1850E
Ladezeit 1 Stunde
Leistungsaufnahme, V AC (3,0 A) 230 V, 50 Hz
Wippendschlauch Modell 1236
Nenndruck, bar 510
Schlauchlänge, mm 914
Schalldruck (LpA) 70,0 dB(A), Unsicherheit (K) 3
dB(A) Schallleistung (LW) 81 dB(A), Unsicherheit (K) 3 dB(A) Schwingungsemissionswert (ah)
1,1 m/s2, Unsicherheit (K) 1,5 m/s2
ANMERKUNG 1: Betriebsstrom- und Fettausstoßdaten bei 69 bar.
ANMERKUNG 2: Der angegebene Schwingungsgesamtwert ist gemäß einer Standard-Testmethode gemessen worden and kann sowohl
zum Vergleich von Werkzeugen als auch für
vorläuge Expositionsschätzungen herangezogen werden.
ANMERKUNG 3: Die bei der tatsächlichen Arbeit
mit dem Elektrowerkzeug auftretenden Schwingungsemissionen können von dem angegeben
Gesamtwert abweichen. Sie hängen von der Art
und Weise ab, wie das Werkzeug benutzt wird.
Auch die zum Schutz des Bedieners identizierten Sicherheitsmaßnahmen auf der Basis einer Expositionsschätzung unter den tatsächlichen
Nutzungsbedingungen können unter Berücksichtigung aller Teile des Arbeitsszyklus* eine
Rolle spielen. *Hierzu zählen zusätzlich zu der
Auslösezeit auch die Zeiten, wenn das Werkzeug
abgeschaltet ist und wenn es im Leerlauf ist.
Modelle
Modell Im Lieferumfang enthalten
1860 Fettpresse (mit Akku)
1862 Fettpresse (mit Akku)
Ladegerät
Tragekoffer
1862E Fettpresse (mit Akku)
Ladegerät (220 Volt für
Europa)
Tragekoffer
1864 Fettpresse (mit Akku)
Zusätzlicher Akku
Ladegerät
Tragekoffer
1850 Ladegerät
1850E Ladegerät (220 Volt für
Europa)
1861 Akkupack
1236 Schlauch (914 mm)
1230E Schlauch (RoHS-konform für
Europa – 762 mm)
5852 Midget-Hydraulikkupplung
251-10124-7 Kupplung (für Europa)
Page 38

Página - 38
Modelos 1860, 1862, 1862E, 1864
Engrasador PowerLuber (Lithium)
Formulario 404264
Mengenventil
Hebel für hohe/
niedrige
Förderleistung
Entlüftungsventil
Display
PCB-Einstelltasten
Überdruckventil
Akku 18 V
Lithium
1236 oder 1230E
(Europa) Schlauch
914/762 mm
5852 oder 251-10124-7
(Europa) Kupplung
Abbildung 1:
(Fettpresse 1860)
ALLGEMEINE BESCHREIBUNG
Bei dem Lincoln PowerLuber handelt es sich
um eine Fettpresse mit Lithium-Ionen-Akku.
Diese mit einem Überdruckventil, einem LEDDisplay und einem elektronischen Steuergerät
ausgestattete Presse ist zur manuellen
Abschmierung von Schmierpunkten entwickelt
worden.
Der PowerLuber wird von einem kleinen,
mit einem dreistugen Planetengetriebe
verbundenen Niederspannungs-Elektromotor
angetrieben. Die Drehbewegung des Motors
wird mithilfe eines Jochmechanismus in eine
Linearbewegung des Kolbens umgesetzt.
Der PowerLuber ist eine einfach wirkende
Kolbenpumpe.
Überdruckventil
Dieses Sicherheitsventil (Abb. 1) ist werksseitig
so eingestellt, dass Drücke über 517 bar
abgelassen werden. Außerdem zeigt dieses
Ventil den Zustand des Lagers und der Schmierleitung an. Wenn aus dem Überdrückventil
Schmierstoff austritt, bedeutet dies, dass das
Lager, das Fitting oder die Leitung verstopft
oder eingeengt ist. Dieser Zustand muss vor
der Weiterarbeit mit dem PowerLuber korrigiert
werden.
Steuergerät
Das Werkzeug hat ein Steuergerät mit folgenden Komponenten: Platine mit LED-Display
und Einstelltasten „A“ und „B“. Das Steuergerät
bietet folgende Funktionen:
• Schutz des Motors. Es stoppt den Motor,
wenn die Presse kontinuierlich bei maximalem Druck läuft. Das Display blinkt rot,
bis sich der Überhitzungsschutz zurücksetzt.
• Zeigt den aktuellen Ladestand des Akkus
an.
• Überwacht den Schmierstoffpegel im Rohr.
• Berechnet in Gramm die ausgestoßene
Fettmenge. Die Platine rechnet die Hubzahl
in den Fettausstoß um.
• Erlaubt eine exakte Fettdosierung und damit
ein präzises Abschmieren von kritischen
Lagern.
• Beleuchtet das LED-Display.
Page 39

Página - 39
Formulario 404264
Modelos 1860, 1862, 1862E, 1864
Engrasador PowerLuber (Lithium)
SICHTPRÜFUNG
Überprüfen Sie das Werkzeug visuell auf
beschädigte, lose oder fehlende Teile. Abgenutzte oder beschädigte Geräte dürfen nicht
betrieben werden. Lassen Sie das Werkzeug
von einer Vertragswerkstatt überprüfen und
ggf. reparieren.
BETRIEB
Wechsel zwischen „L“- und „H“-Modus
Ändern des Betriebsmodus:
Zur Vermeidung von Getriebeschäden
muss der Motor vollständig gestoppt sein,
bevor der Modushebel umgelegt wird (von
„L“ = Low/Niedrig auf „H“ = High/Hoch oder
umgekehrt).
„L“ (niedrige Förderleistung/hoher Druck)
„H“ (hohe Förderleistung/niedriger Druck)
Der Motor darf nicht laufen! Drücken Sie den
Hebel (Abb. 1) so lange, bis entweder „L“ oder
„H“ vollständig auf der Anzeige zu sehen ist.
Sollte der Hebel nicht vollständig umgelegt/
eingerastet sein, halten Sie ihn in der gewün-
schten Stellung und drücken den Schalter, um
das Getriebe in Eingriff zu bringen.
Sollen große Lager bei niedrigem Druck (bis zu
206 bar) und hoher Förderleistung geschmiert
werden, empehlt sich der H-Modus. Auch
zum Befüllen von kleinen Behältern wird eine
hohe Förderleistung empfohlen.
Eine niedrige Förderleistung ist für Bauarbeiten, im Bergbau und für allgemeine Schmierarbeiten angezeigt. Dann kann mit dem
maximalen Druck (517 bar) des Werkzeugs
gearbeitet werden.
Akkus verlieren über Hunderte von Auadungen ihre Erhaltungsleistung. Dies ist normal.
Der Akku muss dann ersetzt werden.
Ein- und Ausschalten des LEDDisplays
Einschalten:
– Drücken Sie eine der beiden Tasten oder
– Drücken Sie vorsichtig den Auslöser/Schalter.
Ausschalten:
– Drücken Sie 3 Sekunden Taste „B“ oder
– warten Sie 30 Sekunden ab, bis sich das
Display von selbst abschaltet.
Überwachung der Schmiermittelförderung
Manche Erstausrüster empfehlen zur
Schmierung von kritischen Lagern eine genaue
Fettmenge.
Ausbringen der gewünschten Fettmenge:
1. Drücken Sie 3 Sekunden lang Taste „A“, um
die Anzeigewerte auf Null zu setzen.
2. Lassen Sie die Presse laufen, bis die
gewünschte Menge erreicht ist, und stoppen
Sie die Presse dann.
3. Setzen Sie die Anzeige mit Taste „A“ wieder
zurück und schmieren Sie das nächste
Lager.
4. Drücken Sie 1 Sekunde lang Taste „B“, um
die Gesamtfördermenge abzurufen.
DISPLAY „EIN“ DISPLAY „AUS“
Abbildung 2:
Abbildung 3:
Ersetzen der Fettkartusche/Nachfüllen des
Rohrs
1. Nach jeder Neubefüllung bzw. jedem
Kartuschenwechsel muss der PowerLuber
vorgefüllt werden. Lassen Sie die Presse
so lange laufen, bis Fett aus dem Schlauch
läuft. Pressen Sie mithilfe des Entlüftungsventils (Abb. 1) alle Luftblasen heraus.
2. Setzen Sie alle Anzeigewerte (Förderleistung, Gesamtförderleistung und Schmierstoffpegel) zurück. Drücken Sie hierzu 3 Sek.
lang gleichzeitig Taste „A“ und „B“.
3. Drücken Sie 1 Sek. lang Taste „A“, um das
Symbol für „FETTSTAND VOLL“ abzurufen.
DISPLAY „EIN“
AKTUELLE ANZEIGEWERTE
1. 3 SEK. „A“ DRÜCKEN
2. PRESSE 5,7 g AUSBRIN-
GEN LASSEN
3. 1 SEK. „B“ DRÜCKEN
= GESAMTMENGE
Page 40

Seite - 40
Modelle 1860, 1862, 1862E, 1864
PowerLuber Fettspritze (Lithium)
Formular 404264
Abbildung 4:
DISPLAY „EIN“
AKTUELLE ANZEIGEWERTE
1. 3 SEK. „A“ + „B“
DRÜCKEN = ANZEIGE
WIRD ZURÜCKGESETZT
2. 1 SEK. „A“
DÜRCKEN =
ANZEIGE „FETTSTAND VOLL“
1. Schrauben Sie das Fettrohr vom PowerLuber ab.
2. Überprüfen Sie vor dem Einsetzen einer
neuen Kartusche visuell die Ausbauchung
der Kolbendichtlippe. Diese Lippe muss
zum Einsetzen der Kartusche in Richtung
des Kolbengriffs bzw. nach hinten weisen
(siehe Abb. 5). (Die Ausbauchrichtung der
Dichtlippe lässt sich ändern. Schrauben Sie
die Kappe vom Fettrohr ab und ziehen Sie
am Griff, bis sich die Dichtlippe vom Rohr
löst. Wenden Sie die Dichtung und montieren Sie alles wieder.)
3. Ziehen Sie den Griff zurück und rasten Sie
den Steg der Kolbenstange im Schlitz der
Rohrkappe ein.
4. Nehmen Sie die Kunststoffkappe von der
Fettkartusche ab und setzen Sie die Kartusche in das Behälterrohr.
5. Ziehen Sie das Aufreißband von der Kartusche ab und schrauben Sie das Fettrohr in
die Pumpe.
6. Schrauben Sie das Fettrohr wieder am
Messkopf fest.
7. Rasten Sie die Kolbenstange aus dem
Schlitz aus. Spülen Sie alle Luft aus der
Pumpe (siehe Anleitung zur Luftspülung).
8. Setzen Sie im Anschluss an die Luftspülung
die Anzeigewerte zurück (siehe Seite 8).
Luftblasen im Kartuschenfett führen dazu,
dass die Presse ihre Vorfüllung verliert und
dass die Messwerte für den Fettausstoß
und den Füllstand der Patrone ungenau
werden.
Ausbau der leeren Fettkartusche
1. Ziehen Sie den Kolbengriff zurück, bis die
Kolbenstange voll ausgefahren ist, und
rasten Sie den Steg der Kolbenstange in
den Schlitz der Rohrkappe ein.
2. Schrauben Sie das Fettrohr vom PowerLuber ab.
3. Stoßen Sie die leere Kartusche durch vorsichtiges Loslassen des Kolbengriffs aus dem
Behälterrohr aus.
Umrüsten auf Befüllung mittels Großbehälter oder Befüllpumpe
1. Schrauben Sie die Kappe vom Fettrohr ab.
Ziehen Sie den Kolben und die Feder am
Kolbengriff aus dem Fettrohr.
2. Fassen Sie den Kolben zwischen Daumen und Zeigenger und wenden Sie die
Dichtlippe um.
ANMERKUNG: Die Dichtlippe ist tassenförmig. Bei Montage der Presse zum Einsatz
mit Schmiermitteln aus Großbehältern ist
die „Tasse“ zur Pumpe hin offen.
3. Montieren Sie den Kolben wieder im
Fettrohr und befestigen Sie ihn am Behälterrohr.
Abbildung 5:
Rückseite
Vorderseite
Befüllen der Presse aus einem Großbehälter
1. Entnehmen Sie die Pumpe aus dem
Fettrohr.
2. Füllen Sie Kavität der Pumpe mit Schmierfett.
3. Stecken Sie das offene Ende des Fettrohrs
in das Schmiermittel (siehe Abb. 6). Ziehen
Sie den Kolbengriff langsam zurück und
drücken Sie das Fettrohr dabei tiefer in das
Schmierfett. Achten Sie darauf, dass keine
Luftblasen in das Fettrohr gesaugt werden.
4. Wenn die Kolbenstange voll ausgefahren ist,
ziehen Sie sie zur Seite, sodass der Steg im
Schlitz der Fettrohrkappe einrastet.
5. Befestigen Sie die Pumpe locker am
Fettrohr. Rasten Sie die Kolbenstange aus
dem Schlitz der Fettrohrkappe aus und
lösen Sie durch Drehen des Kolbengriffs die
Kolbenstange vom Kolben. Schieben Sie die
Kolbenstange in das Fettrohr. Schrauben
Sie das Fettrohr
langsam von der
Pumpe ab, bis
an der Verbindungsstelle Schmiermittel austritt. Ziehen
Sie das Fettrohr in
der Pumpe fest.
6. Setzen Sie im
Anschluss an die
Luftspülung die
Anzeigewerte zurück
(siehe Seite 8).
Abbildung 6
Page 41

Seite - 41
Formular 404264
Modelle 1860, 1862, 1862E, 1864
PowerLuber Fettspritze (Lithium)
Befüllen der Presse mittels Befüllpumpe
1. Bringen Sie durch Drehen des Kolbengriffs
die Kolbenstange mit dem Kolben in Eingriff.
2. Stecken Sie das Entlüftungs-/Mengenventil
der Presse in den Anschluss der Befüllpumpe (Abb. 7).
3. Lassen Sie die Befüllpumpe laufen, bis
der Behälter voll ist. Wenn der Steg der
Kolbenstange frei liegt, ist das Fettrohr
gefüllt. Die Kolbenstange ist dann etwa 20
cm ausgefahren. Nicht zu voll füllen!
4. Lösen Sie durch Drehen des Kolbengriffs
die Kolbenstange vom Kolben. Schieben
Sie die Kolbenstange in das Fettrohr.
5. Setzen Sie im Anschluss an die Luftspülung
die Anzeigewerte zurück.
Abbildung 7
Luftblasen entfernen! Luftblasen am Fetteinlass verhindern, dass das Fett gepumpt
wird. Eventuelle kleine Luftblasen in diesem
Bereich durch Lockern (drei bis vier Umdrehungen) des Entlüftungsventils entfernen.
Sollten große Luftblasen verhindern, dass
Schmierstoff von der Kupplung ießt,
nachdem der Auslöser 15 Sekunden lang
betätigt worden ist, sind folgende Schritte
anzuwenden.
Entfernen von Luftblasen
(Luftspülung)
1. Ziehen Sie die Kolbenstange aus der
Fettrohrkappe und bringen Sie sie durch
Drehen des Kolbengriffs mit dem Kolben in
Eingriff.
2. Lockern Sie den Stopfen des Entlüftungsventils um drei bis vier Umdrehungen.
Forcieren Sie den Kolbengriff, bis Schmiermittel durch das kleine Loch in der Seite des
Entlüftungsventils ießt.
3. Ziehen Sie das Entlüftungsventil fest.
4. Betätigen Sie den Auslöser mehrmals kurz,
bis alle eingeschlossene Luft herausgepresst ist. Lösen Sie durch Drehen des
Kolbengriffs die Kolbenstange vom Kolben.
Schieben Sie die Kolbenstange in das
Fettrohr.
5. Sollte Schritt 2 fehlschlagen, lockern Sie das
Fettrohr um drei Umdrehungen.
6. Forcieren Sie den Kolbengriff, bis an der
Verbindungsstelle zwischen dem Fettrohr
und der Pumpe Schmierstoff austritt.
7. Ziehen Sie das Fettrohr wieder in der
Pumpe fest. Lösen Sie durch Drehen des
Kolbengriffs die Kolbenstange vom Kolben.
Schieben Sie die Kolbenstange in das
Fettrohr.
BETRIEB DES LADEGERÄTS
AUFLADEN DES AKKUPACKS
Vor der Inbetriebnahme des PowerLubers
muss der Akkupack voll aufgeladen werden. Ist
der Akkupack bereits im PowerLuber installiert,
nehmen Sie ihn heraus und laden ihn gemäß
der nachstehenden „Ladeanleitung“ auf.
Die Ladegeräte von Lincoln sind so ausgelegt,
dass sie je nach Ladestand und Temperatur
die Lithium-Akkus von Lincoln in 30-60 Minuten
auaden.
LADEANLEITUNG
Stellen Sie sicher, dass die Spannung des
Hauptstromkreises mit der auf dem Typenschild angegebenen Spannung übereinstimmt.
1. Schließen Sie als Erstes das Ladegerät an
eine geeignete Steckdose an.
2. Setzen Sie erst dann den Akkupack in das
Ladegerät. Die grüne Ladeleuchte blinkt
dann so lange, bis der Ladevorgang abgeschlossen ist.
3. Wenn der Akkupack fertig aufgeladen ist,
leuchtet sie kontinuierlich. Der Akkupack
kann dann benutzt werden.
4. Wenn das Ladegerät nicht benutzt wird,
muss es von der Stromquelle getrennt
werden.
An den Ladeklemmen liegt eine Spannung
von 120/230 Volt an. Nicht mit leitenden
Gegenständen prüfen. Gefahr von elektrischen Schlägen, auch mit Todesfolge.
Page 42

Seite - 42
Modelle 1860, 1862, 1862E, 1864
PowerLuber Fettspritze (Lithium)
Formular 404264
BETRIEB DER ANZEIGELEUCHTE
ANMERKUNG: Die Akkutemperatur steigt
während und kurz nach der Verwendung an.
Werden Akkus direkt nach dem Gebrauch
geladen, können sie u. U. nicht komplett
aufgeladen werden. Um beste Ergebnisse
zu erzielen, lassen Sie den Akkupack vor
dem erneuten Auaden auf Raumtemperatur
abkühlen.
Die Entlüftungsschlitze an der Ober- und
Unterseite des Ladegeräts dürfen nicht
blockiert werden. Der Akku darf nicht aufgeladen werden, wenn die Temperatur UNTER
4,5° C oder ÜBER 40° C liegt.
Wichtige Hinweise zum Ladevorgang
1. Die längste Lebensdauer und beste
Leistung erzielen Sie, wenn der Akku bei
einer Lufttemperatur zwischen 18 ° - 24 °C
aufgeladen wird. Der Akku DARF NICHT bei
einer Lufttemperatur unter 4,5 °C oder über
40,5 °C aufgeladen werden. Die Beachtung
dieses Hinweises ist sehr wichtig und verhindert ernsthafte Schäden am Akku.
2. Das Ladegerät und der Akku können sich
während des Ladevorgangs warm anfühlen.
Dies ist ein normaler Zustand und weist
nicht auf ein Problem hin.
3. Wenn der Akku nicht richtig aufgeladen wird:
a. Prüfen Sie, ob die Netzsteckdose Strom
speist, indem Sie eine Lampe oder ein
anderes Gerät einstecken.
b. Prüfen Sie, ob die Steckdose mit einem
Lichtschalter verbunden ist, der die
Stromzufuhr ausschaltet, sobald Sie das
Licht ausschalten.
c. Bringen Sie das Ladegerät und den Akku
an einen Ort, an dem die Umgebungstemperatur ca. 18 - 24 °C beträgt.
d. Wenn das Ladeproblem weit-
erhin besteht, bringen Sie das Elektrowerkzeug, den Akku und das Ladegerät zu Ihrer örtlichen Vertragswerkstatt.
4. Der Akku sollte wieder aufgeladen werden,
wenn es bei Arbeiten nur eine unzureichende Leistung erbringt. Den Akku unter
diesen Bedingungen NICHT WEITER BENUTZEN. Befolgen Sie die Ladeanleitung.
Es ist auch möglich, einen nur teilweise
entleerten Akkupack aufzuladen, ohne dass
sich dies negativ auf den Akku auswirkt.
5. Wenn das Ladegerät an einer Stromquelle
angeschlossen ist, können unter gewissen
Umständen die freiliegenden Kontakte des
Ladegeräts durch Fremdkörper kurzgeschlossen werden. Leitfähige Fremdkörper,
u. a. Stahlwolle, Alufolie oder sonstige
Ablagerungen von Metallpartikeln, sollten
von den Hohlräumen des Ladegeräts
ferngehalten werden. Ziehen Sie immer
den Stecker des Ladegeräts aus der
Stromquelle heraus, wenn sich im Hohlraum
kein Akku bendet. Ziehen Sie den Stecker
des Ladegeräts heraus, bevor Sie es
reinigen.
6. Das Ladegerät darf keinen Temperaturen
unter dem Gefrierpunkt ausgesetzt und
nicht in Wasser oder sonstige Flüssigkeiten
eingetaucht werden.
Abbildung 8
Akku 1861
Ladegerät 1850
oder 1850E
Lassen Sie keine Flüssigkeit in das Ladegerät geraten. Es besteht Stromschlaggefahr. Um das Abkühlen des Akkupacks nach
der Verwendung zu erleichtern, bringen Sie
das Ladegerät bzw. den Akkupack nicht
in eine warme Umgebung, beispielsweise
einen Geräteschuppen aus Metall oder
einen nicht isolierten Anhänger.
Page 43

Seite - 43
Formular 404264
Modelle 1860, 1862, 1862E, 1864
PowerLuber Fettspritze (Lithium)
SICHERHEITSANLEITUNG FÜR LADEGERÄT UND AKKUS
DIESE ANLEITUNGEN AUFBEWAHREN
Diese Anleitung enthält wichtige Sicherheitsund Betriebsanweisungen für das LincolnModell 1850 oder das Ladegerät 1850E.
Stromschlaggefahr – an den Ladeklemmen
des Ladegeräts liegen 120 V AC oder 230
V AC an. Nicht mit leitenden Gegenständen
prüfen. Einen beschädigten Akku nicht
auaden. Sofort ersetzen.
ALLE ANWEISUNGEN LESEN
• Der Akkupack darf nicht verbrannt
werden, selbst wenn er schwer beschädigt oder komplett abgenutzt ist. Der
Akkupack kann bei einem Brand explodieren. Wenn Ll-ION-Akkupacks verbrannt
werden, können giftige Dämpfe und Stoffe
entstehen.
• Benutzen bzw. laden Sie den Akku nicht
in explosionsgefährdeten Umgebungen,
z. B. in der Nähe von entammbaren
Flüssigkeiten, Gasen oder Stäuben. Beim
Einlegen oder Herausnehmen des Akkus
aus dem Ladegerät kann sich der Staub
bzw. Dampf entzünden.
• Wenn der Akku mit der Haut in Kontakt
kommt, waschen Sie den Bereich sofort
mit milder Seife und Wasser. Wenn
Batterieüssigkeit ins Auge gerät, spülen
Sie das offene Auge 15 Minuten lang oder
bis die Reizung nachlässt mit Wasser aus.
Bei Hinzuziehen eines Arztes muss dieser
darüber informiert werden, dass der Batterieelektrolyt für LI-ION-Akkus aus einer Mischung aus üssigen organischen Carbonaten
und Lithiumsalzen besteht.
• Der Inhalt geöffneter Batteriezellen kann
Atmungsreizungen verursachen. Bringen
Sie den Betroffenen an die frische Luft.
Wenn die Symptome weiterhin bestehen,
ziehen Sie einen Arzt hinzu.
Verbrennungsgefahr. Batterieüssigkeit
kann brennbar sein, wenn sie Funken oder
Flammen ausgesetzt ist. Laden Sie die
Akkupacks nur mit Ladegeräten von Lincoln
Industrial.
NICHT in Wasser oder andere Flüssigkeiten eintauchen oder bespritzen
lassen. Die kann zu einem vorzeitigen
Versagen der Zellen führen.
• Lagern Sie das Elektrowerkzeug bzw. den
Akku nicht an Orten, an denen die Temperatur über 40 °C ansteigen kann, beispielsweise Schuppen oder Metallgebäude im
Sommer.
Versuchen Sie auf keinen Fall, den Akkupack aus irgendeinem Grund zu öffnen.
Wenn das Kunststoffgehäuse des Akkupacks bricht oder rissig wird, bringen Sie es
zwecks Recycling in eine Vertragswerkstatt.
1. Bevor Sie ein Akkuladegerät verwenden,
lesen Sie alle Anweisungen und Vorsichtshinweise auf dem Ladegerät, dem
Akkupack und dem Produkt, das vom Akku
gespeist wird.
2. VORSICHT: Um die Verletzungsgefahr zu
verringern, sollten die Lincoln-Ladegeräte
Modell 1850 und 1850E nur zum Auaden
des Lincoln-Akkupacks Modell 1861 verwendet werden. Andere Batterietypen
können bersten und dabei Verletzungen
und Schäden verursachen. Laden Sie das
Lincoln-Akkupack-Modell 1861 nicht mit
anderen Ladegeräten.
3. Setzen Sie das Ladegerät auf keinen Fall
Regen, Schnee oder Frost aus.
4. Verwenden Sie das Kabel nicht in missbräuchlicher Weise. Tragen Sie das Ladegerät auf keinen Fall am Kabel und reißen
Sie das Kabel nie mit Gewalt aus der Steckdose. Ziehen Sie am Netzstecker, nicht
am Kabel, um das Ladegerät abzutrennen.
Beschädigte oder abgenutzte Netzkabel
und Zugentlastungen müssen sofort ersetzt
werden. VERSUCHEN SIE NICHT, DAS
NETZKABEL ZU REPARIEREN.
5. Stellen Sie sicher, dass das Kabel so liegt,
dass niemand darauf tritt oder über es
stolpert bzw. dass es nicht beschädigt oder
gespannt werden kann.
6. Verwenden Sie ein Verlängerungskabel nur
dann, wenn es unbedingt notwendig ist. Die
unsachgemäße Verwendung eines Verlängerungskabels könnte zu einem Brand- und
Stromschlagrisiko führen.
7. Bedienen Sie das Ladegerät nicht mit
beschädigtem Kabel oder Stecker. Sie müssen sofort ersetzt werden, um Gefahren zu
vermeiden. VERSUCHEN SIE AUF KEINEN
FALL, DAS NETZKABEL ZU REPARIEREN.
8. Benutzen Sie das Ladegerät nicht, wenn
es einem heftigen Schlag ausgesetzt,
fallen gelassen oder auf sonstige Weise
beschädigt wurde. Bringen Sie es zu einer
Page 44

Seite - 44
Modelle 1860, 1862, 1862E, 1864
PowerLuber Fettspritze (Lithium)
Formular 404264
qualizierten Vertragswerkstatt.
9. Nehmen Sie das Ladegerät bzw. den Akkupack nicht auseinander. Bringen Sie es
zu einer qualizierten Vertragswerkstatt,
wenn Wartungs- oder Reparaturarbeiten erforderlich sind. Eine falsche Montage kann
zu einem Stromschlag- oder Brandrisiko
führen.
10. Ziehen Sie den Stecker des Ladegeräts
aus der Steckdose heraus, bevor Sie
Wartungs- oder Reinigungsmaßnahmen
ausführen, um das Risiko eines Stromschlags zu verringern.
11. Laden Sie den Akkupack an einem gut
belüfteten Ort; decken Sie das Ladegerät
und den Akku während des Ladevorgangs
nicht mit einem Tuch usw. ab.
12. Lagern Sie das Ladegerät bzw. die Ak-
kupacks nicht an Orten, an denen die
Temperatur 50 °C überschreiten kann, z.
B. Geräteschuppen aus Metall oder Autos
im Sommer, weil sich dadurch die Akkuleistung verschlechtern kann.
13. Der Akkupack darf nicht aufgeladen
werden, wenn die Temperatur UNTER 4,5°
C oder ÜBER 40° C liegt. Dies ist für einen
ordnungsgemäßen Betrieb sehr wichtig.
14. Verbrennen Sie den Akkupack nicht. Er
kann explodieren.
15. Laden Sie den Akku nicht an feuchten oder
nassen Orten auf.
16. Versuchen Sie nicht, ein anderes schnur-
loses Elektrowerkzeug bzw. einen anderen
Akkupack mit dem Lincoln-Ladegerätmodell 1850 oder 1850E aufzuladen.
17. Schließen Sie die Klemmen des Akkupa-
cks nicht kurz. EXTREM HOHE TEMPERATUREN KÖNNTEN ZU VERLETZUNGEN ODER BRAND FÜHREN.
18. Diese Anwendung ist nicht für die Nutzung
von Personen (auch Kinder) geeignet, die
körperlich oder geistig behindert sind oder
nicht die nötige Erfahrung oder ausreichenden Kenntnisse von dem Produkt
haben, sofern sie nicht beaufsichtigt
werden oder eine gründliche Einweisung
zur Nutzung der Geräte durch eine Person
erhalten haben, die für ihre Sicherheit
verantwortlich ist.
19. Kinder müssen beaufsichtigt werden, um
sicherzustellen, dass sie nicht mit dem
Gerät spielen.
20. Sorgen Sie für eine ordnungsgemäße
Entsorgung der verbrauchten Akkus. Das
Lincoln-Akkupack-Modell 1861 enthält
wieder auadbare Lithium-Ionen-Batterien.
Diese Batterien müssen ordnungsgemäß
recycelt oder entsorgt werden. Bringen
Sie verbrauchte Akkupacks zu Ihrer
örtlichen Batterieverkaufsstelle oder Ihrem
Recycling-Zentrum.
Benutzer in den Vereinigten Staaten
ANMERKUNG: Die anwendbaren Gebühren
für die Sammlung und das Recycling dieser
Batterien wurden an die RBRCTM entrichtet.
Weitere Informationen erhalten Sie unter der
Nummer 1-800-8BATTERY.
Page 45

Seite - 45
Formular 404264
Modelle 1860, 1862, 1862E, 1864
PowerLuber Fettspritze (Lithium)
Abbildung 9
Page 46

Página - 46
Modelos 1860, 1862, 1862E, 1864
Engrasador PowerLuber (Lithium)
Formulario 404264
Abbildung 10
1. DER POSITIVE
(ROTE) DRAHT MUSS
AN DER POSITIVEN
KLEMME AM MOTOR
ANGESCHLOSSEN
WERDEN, DIE DURCH
DEN KLEINEN PLASTIKSTIFT DANEBEN
GEKENNZEICHNET IST.
2. DER GRÜNE ERDUNGSDRAHT MUSS
UNTER DER MOTORMONTAGESCHRAUBE
BEFESTIGT WERDEN.
POSITIVER
KLEMENINDIKATOR
7/16-28
UNEF-GEWINDE
DIE DICHTLIPPE AUF DEM KOLBEN
MUSS AUF DIE SCHMIERFETTSEITE
DES GEHÄUSES UND DIE DEM JOCH
ENTGEGENGESETZTE SEITE WEISEN.
Page 47

Seite - 47
Formular 404264
Modelle 1860, 1862, 1862E, 1864
PowerLuber Fettspritze (Lithium)
Ersatzteilliste
Artikel Beschreibung Teilenummer
1 FLEXIBLER SCHLAUCH MIT DICHTUNG, 914 MM (MODELL 1860) 1236
FLEXIBLER SCHLAUCH MIT DICHTUNG, 762 MM (MODELL 1860E) 1230E
2 KUPPLUNG (MODELL 1860) 5852
KUPPLUNG (MODELL 1860E) 251-10124-7
3 DICHTMATERIAL 34793
4 KOLBENBAUGRUPPE 93485
5 FETTROHRBAUGRUPPE 271882
6 DICHTUNGSSATZ (SCHLAUCH) 271884
7 DICHTUNG 271889
8 GRIFFSATZ (FETTROHR) 286090
9 KOLBENSTANGE,sATZ 286091
10 schlauchklammersatz 286367
11 kupplungskappenSATZ 286093
12 elektrokomponentensatz 286377
13 reserviert
14 getriebewahlhebelsatz 286097
15 befestigungsteile griff 286393
16 aufklebersatz 286378
17 Motor mit adaptersatz 286399
18 Pumpenbefestigungsteile, SATZ 286391
19 ABDECKUNGSSATZ FÜR PUMPE 286379
20 JOCHSATZ 286380
21 LED-ABDECKUNGSSATZ 286381
22 KOLBENSATZ 286109
23 BOLZENSATZ 286110
24 WALZE 286111
25 FEDER-WAHLSCHALTER 286113
26 ENTLÜFTUNGS-/MENGENVENTILSATZ 286134
27 reserviert
28 ANTRIEBSBAUGRUPPE 286285
29 GETRIEBESATZ 286286
30 GRIFF MIT ELEKTROKOMPONENTE, SATZ 286382
31 GRIFF MIT SCHRAUBENSATZ 286383
32 PUMPENBAUGRUPPENSATZ 286384
33 RÜCKSCHLAGVENTILSATZ 286306
34 GEHÄUSEPUMPE MIT LAGER 286394
35 ENTLÜFTUNGSVENTILSATZ 286315
36 DICHTUNGSSATZ (ÜBERDRUCKVENTIL) 286316
37 ÜBERDRUCKVENTILSATZ 286317
38 Akku 18 V (Lithium) 1861
(Nichtt Abegegildet) LADEGERÄT (lithium) 1850
(Nichtt Abegegildet) GURT 1414
KOFFERSATZ 286392
Page 48

Seite - 48
Modelle 1860, 1862, 1862E, 1864
PowerLuber Fettspritze (Lithium)
Formular 404264
FEHLERBEHEBUNG
Zustand Mögliche Ursache Korrekturmaßnahme
Motor läuft nicht. - Akku muss aufgeladen werden. Akku auaden
- Fehlerhafte Verdrahtung zum Motor. Akku herausnehmen, Griff
auseinanderbauen und
Verdrahtung auf lockere
Verbindung prüfen.
PowerLuber gibt kein
Schmierfett ab.
- Fettrohr hat kein Schmierfett mehr. Prüfen, ob das Fettrohr über
Schmierfett verfügt.
- Verlust der Vorfüllung. Vorfüllvorgang wiederholen.
- Kugelrückschlagventil (Artikel 33)
funktioniert nicht.
Artikel 33 ausbauen, reinigen
und Kugelsitzbereich prüfen.
PowerLuber verliert
weiterhin an
Vorfülldruck.
- Nach einer Mengenbefüllung ist
eventuell Luft an mehreren Stellen im
Behälter eingeschlossen.
Fettrohr entleeren, neu füllen
und den Vorfüllvorgang
wiederholen.
Fettrohr, Artikel 5, ersetzen.
- Der Kolben kann eventuell im Fettrohr
festhängen.
Fettrohr auseinanderbauen
und reinigen.
Sicherstellen, dass der
Kolben richtig in die
Fettkartusche eingetreten ist.
Oder
Prüfen, ob der Kolben am
Rand der Fettkartusche
hängengeblieben ist.
Akku hält die Ladung
nicht.
- Das Ladegerät wird eventuell nicht mit
Strom versorgt.
Prüfen, ob die Steckdose mit
Strom gespeist wird.
- Der Akku ist eventuell defekt. Akku ersetzen.
Page 49

Página - 49
Formulario 404264
Modelos 1860, 1862, 1862E, 1864
Engrasador PowerLuber (Lithium)
Página
Sección
- D7
- 83
DIC – 2011
Modelos 1860, 1862, 1862E, 1864
Pistola de engrase PowerLuber (iones de litio)
Serie “A”
PowerLuber básico modelo 1860
Declaración de conformidad de EC
DIRECTIVA DE MAQUINARIA
Page 50

Página - 50
Modelos 1860, 1862, 1862E, 1864
Engrasador PowerLuber (Lithium)
Formulario 404264
Índice
Página
Advertencias de seguridad generales
para herramientas eléctricas .........................2
Seguridad especíca ....................................3
Servicio .........................................4
Uso y cuidado de herramientas ..........................4
Especicaciones ..............................................4
Descripción general ........................................5
Inspección...................................................6
Operación.................................................6-7
Operación del cargador ...................................8
Instrucciones de seguridad del cargador y
de las baterías .......................................10-11
Vista desarrollada y lista de piezas ................12-14
Solución de problemas ...................................15
Versión en ingles .............................................2
Versión en francés .........................................17
Versión en alemán .....................................TBD
Lea todas las advertencias e instrucciones de
seguridad. De no seguir las advertencias e
instrucciones se pueden producir descargas
eléctricas, incendios o lesiones graves.
ADVERTENCIAS GENERALES DE
LA SEGURIDAD DE LA HERRAMIENTA ELÉCTRICA
Guarde todas las advertencias e instrucciones
como referencia para el futuro.
El término “herramienta eléctrica” en las advertencias se reere a su herramienta eléctrica
conectada a la red (con cordón) o herramienta
eléctrica operada por baterías (inalámbrica).
1. Seguridad en el área de trabajo
a) Mantenga el área de trabajo limpia y
bien iluminada. Las áreas con muchos
objetos u oscuras son proclives a
accidentes.
b) No haga funcionar las herramientas
eléctricas en atmósferas explosivas,
como en presencia de líquidos, gases
o polvo inamables. Las herramientas
eléctricas producen chispas que pueden
inamar el polvo o los vapores.
c) Mantenga a los niños y espectadores
alejados mientras se opera una herramienta eléctrica. Las distracciones
pueden causar la pérdida de control.
2. Seguridad eléctrica
a) Los enchufes de las herramientas
deben adaptarse a la toma de corriente. No modique nunca el enchufe
de ninguna manera. No use ningún
enchufe de adaptador con herramientas eléctricas conectadas a tierra. Los
enchufes sin modicar y las tomas de
corriente correspondientes reducirán el
riesgo de descargas eléctricas.
b) Evite el contacto corporal con las
supercies conectadas a tierra
como tuberías, radiadores, cocinas
y refrigeradores. Hay un mayor riesgo
de descarga eléctrica si el cuerpo está
conectado a tierra.
c) No exponga las herramientas eléctri-
cas a la lluvia o a la humedad. El agua
que entra en una herramienta eléctrica aumentará el peligro de descarga
eléctrica.
d) No abuse el cordón. No use nunca el
cordón para transportar, tirar o desenchufar la herramienta eléctrica. Mantenga el
cordón alejado del calor, aceite, bordes
alados o piezas móviles. Los cordones
dañaos o enredados aumentan el riesgo
de descarga eléctrica.
e) Al operar una herramienta eléctrica al
aire libre, use un cordón de alargamiento adecuado para uso al aire libre.
El uso de un cordón adecuado para el
exterior reduce el riesgo de descarga
eléctrica.
f) Si no se puede evitar la operación de
una herramienta eléctrica en un lugar
húmedo, use una fuente protegida
de dispositivo de corriente residual
(RCD). El uso de un RCD reduce el
riesgo de descarga eléctrica.
NOTA: El término “dispositivo de
corriente residual (RCD)” puede ser
reemplazado por el término “interruptor
de pérdidas accidentales a tierra GFCI)”
o “disyuntor de fugas a tierra (ELCB)”.
3. Seguridad personal
a) Esté alerta, observe lo que se está
haciendo y use sentido común al operar una herramienta eléctrica. No use
ninguna herramienta eléctrica cuando
esté cansado o bajo la inuencia de
drogas, alcohol o medicación. Cu-
alquier momento de falta de atención al
operar las herramientas eléctricas puede
producir lesiones personales graves.
b) Use equipos de protección personal.
Lleve siempre protectores de ojos. Los
equipos protectores como máscara para
el polvo, zapatos de seguridad antiresbaladizos, casco o protectores de oídos
usados para condiciones apropiadas
reducirá las lesiones personales.
c) Impida el arranque no intencionado.
Asegúrese de que el interruptor esté en
la posición de apagado antes de conec-
Page 51

Página - 51
Formulario 404264
Modelos 1860, 1862, 1862E, 1864
Engrasador PowerLuber (Lithium)
tarse a una fuente de alimentación o a un
grupo de batería, al recoger o transportar
la herramienta. El transporte de herramientas eléctricas con el dedo en el
interruptor o la activación de herramientas eléctricas que tengan el interruptor en
encendido son proclives a accidentes.
d) Quite cualquier llave de ajuste antes
de encender la herramienta.
Una llave sujeta a una pieza giratoria
puede producir lesiones personales.
e) No extienda demasiado los brazos.
Manténgase en equilibrio en todo momento. Esto permite controlar mejor la
herramienta en situaciones inesperadas.
f) Lleve puesta ropa adecuada. No lleva
ropa ni artículos de joyería holgados.
No acerque el cabello, la ropa y los
guantes a las piezas móviles. La ropa
y los artículos de joyería holgados o el
cabello largo pueden quedar atrapados
por piezas móviles.
g) Si se proporcionan dispositivos
para la conexión de instalaciones
de extracción y recogida de polvo,
asegúrese de que estén bien conectados y se usen bien. La recogida de
polvo puede reducir los peligros relacionados con el polvo.
4. Uso y cuidado de herramientas eléctricas
a) No fuerce la herramienta eléctrica. Use
la herramienta eléctrica correcta para
su aplicación. La herramienta eléctrica
correcta hará el trabajo mejor y de forma
más segura a la velocidad para la que se
ha designado.
b) No use la herramienta eléctrica si
no se puede poner el interruptor
en encendido o apagado. Cualquier
herramienta eléctrica que no pueda
controlarse con el interruptor es peligrosa
y debe repararse.
c) Desconecte el enchufe de la fuente de
alimentación o del grupo de batería de
la herramienta eléctrica antes de hacer
cualquier ajuste, cambiar accesorios
o guardar herramientas eléctricas.
Dichas medidas de seguridad preventivas reducen el riesgo de arrancar la herramienta eléctrica de forma accidental.
d) Guarde las herramientas eléctricas
inactivas fuera del alcance de los
niños y no deje que las personas no
familiarizadas con la herramienta eléctrica o estas instrucciones operen la
herramienta eléctrica. Las herramientas
eléctricas son peligrosas en manos de
usuarios sin capacitar.
e) Efectúe el mantenimiento de las her-
ramientas eléctricas. Compruebe si se
produce la desalineación o el atasco
de piezas móviles, la rotura de piezas
y cualquier otra condición que pueda
afectar la operación de la herramienta
eléctrica. Si se dañan, repare la herramienta eléctrica antes de usarla.
Muchos accidentes se producen debido
al mal mantenimiento de las herramientas eléctricas.
f) Mantenga las herramientas de corte
aladas y limpias. El mantenimiento
apropiado de las herramientas de
corte con cuchillas aladas es menos
probable que se atasque y es más fácil
de controlar.
g) Use la herramienta eléctrica, los ac-
cesorios y las brocas de herramienta,
etc. según estas instrucciones,
teniendo en cuenta las condiciones
de trabajo y el trabajo que se vaya a
realizar. El uso de herramientas eléc-
tricas para operaciones diferentes a las
previstas podría producir una situación
peligrosa.
5. Uso y cuidado de la herramienta con
baterías
a) Recargue solamente con el carga-
dor de baterías especicado por el
fabricante. Un cargador adecuado para
un tipo de grupo de batería puede crear
un riesgo de incendio cuando se usa con
otro grupo de batería.
b) Use las herramientas eléctricas
solamente con los grupos de batería
designados especícamente. El uso de
cualquier grupo de batería puede crear
riesgos de lesiones e incendios.
c) Cuando no se use el grupo de batería,
no lo acerque a otros objetos metales,
como sujetapapeles, monedas, llaves,
clavos, tornillos u otros objetos de
metal pequeños, que puedan hacer
una conexión de un terminal a otro.
El cortocircuito entre terminales de la
batería puede causar quemaduras o un
incendio.
d) En condiciones de abuso, el líquido
puede salir expulsado de la batería;
evite el contacto. Si se produce un
contacto por accidente, lave con agua. Si
el líquido se pone en contacto adicionalmente, acuda a un médico. El líquido
expulsado de la batería puede producir
irritaciones o quemaduras.
6. Servicio
a) Efectúe el servicio de su herramienta
eléctrica usando solamente piezas de
repuesto idénticas. Esto asegurará el
mantenimiento de la seguridad de la herramienta eléctrica.
Page 52

Página - 52
Modelos 1860, 1862, 1862E, 1864
Engrasador PowerLuber (Lithium)
Formulario 404264
Seguridad especíca
1. Lleve siempre protectores de ojos. El PowerLuber puede generar hasta 7500 lb/pulg² (517
bares).
2. Use solamente mangueras exibles Lincoln
1218, 1224, 1230 o 1236. Las lesiones de
inyección de grasa son muy graves. Mantenga
la manguera solamente en el área del protector
de resorte.
3. Evite los arranques por accidente. Asegúrese
de que el interruptor no esté pulsado al insertar
el grupo de batería.
4. No doble la manguera de modo que quede
retorcida.
5. Reemplace la manguera al primer indicio
de desgaste, retorceduras o daños en el
revestimiento exterior.
No introduzca los brazos demasiado lejos. Mantenga el equilibro en todo momento. El equilibrio y
la postura apropiados permiten un mejor control de
la herramienta en situaciones inesperadas.
Use equipos de seguridad. Lleve puestos siempre
protectores de ojos.
Se deben usa máscara para el polvo, zapatos de
seguridad antirresbaladizos, casco o protectores
de oídos para las condiciones apropiadas.
¡Advertencia! Para reducir el riesgo
de lesiones, el usuario debe leer el
manual de instrucciones.
Separe la recogida. Este producto
no debe desecharse con la basura
normal de la casa.
La pistola de engrase puede producir presiones elevadas de hasta 7500 lb/pulg² (517
bares). Use guantes de seguridad y guantes
de protección durante la operación. Mantenga
las manos alejadas de la parte de caucho
expuesta de la manguera.
Cualquier otro uso que no sea según las instrucciones puede producir la pérdida de garantía o
responsabilidad.
SERVICIO
El servicio de la herramienta debe ser realizado
solamente por personal de reparación capacitado. El servicio oel mantenimiento realizado por
personal sin capacitar puede anular la garantía y
producir lesiones.
La presión extrema puede alargar la boquilla o
reventar la manguera exible. Use solamente
mangueras APROBADAS por Lincoln y
siga las instrucciones y advertencias de las
mangueras exibles.
USO Y CUIDADO DE LA HERRAMIENTA
No use la herramienta si no se puede poner el
interruptor en encendido o apagado. Una herramienta que no se pueda controlar con el interruptor
es peligrosa y debe repararse.
No siga apretando el gatillo si se cala la pistola de
engrase. Esto podría dañar el motor o causar un
incendio.
Desconecte el grupo de batería de la herramienta
antes de efectuar cualquier ajuste, cambiar los accesorios o guardar la herramienta. Dichas medidas
de seguridad preventivas reducen el riesgo de
arranque por accidente de la herramienta.
Guarde las herramientas fuera del alcance de los
niños y otras personas sin capacitar. Las herramientas son peligrosas en manos de usuarios sin
capacitar. Cuando no se usa el grupo de batería,
no lo acerque a otros objetos de metal como:
sujetapapeles, monedas, llaves, clavos, tornillos
u otros objetos de metal pequeños que puedan
hacer una conexión de un terminal a otro. Al poner
en cortocircuito los terminales de la batería se pueden producir chispas, quemaduras o un incendio.
Efectúe el mantenimiento de las herramientas con
cuidado. Compruebe si se produce la desalineación o atasco de piezas móviles, la rotura de
piezas y cualquier otra condición que pueda
afectar la operación de la herramienta. Si se daña,
efectúe el servicio de la herramienta antes de usar.
Muchos accidentes se deben a herramientas mal
mantenidas.
Al efectuar el servicio de una herramienta, use
solamente piezas de repuesto idénticas.
La pistola usa lubricantes, que pueden ser
inamables y venenosos si se ingieren. No use
una pistola cerca de llamas u otros peligros de
incendios.
Las grasas a veces se comercializan como
resistentes a las altas temperaturas porque
deben mantener sus propiedades lubricantes en áreas calientes, pero los lubricantes
pueden ser inamables si la temperatura es
demasiado alta. Lea todas las advertencias
sobre lubricantes antes de usar esta pistola.
Es mejor si los lubricantes no son inamables.
Page 53

Página - 53
Formulario 404264
Modelos 1860, 1862, 1862E, 1864
Engrasador PowerLuber (Lithium)
Use solamente accesorios recomendados por
Lincoln.
Se deben solamente accesorios capaces de
resistir 7500 lb/pulg² (517 bares). Los accesorios que pueden ser adecuados para una herramienta pueden crear un riesgo de lesiones
cuando se usan con otra herramienta.
Uso apropiado
El PowerLuber fue diseñado exclusivamente
para bombear y distribuir lubricante usando
una corriente de batería de 18 voltios. No se
deben exceder las especicaciones nominales
máximas.
ESPECIFICACIONES
PowerLuber básico modelo 1860
Corriente de operación, voltios 18
Presión máxima de operación, lb/pulg² (bares)
- Salida baja - 7500 (517)
- Salida alta - 3000 (206)
Capacidad de depósito de grasa,
onzas (g) 14,5 (411)
Gama de temperaturas de operación,
°F (°C) 0 a 122
(-18 a +50)
Corriente de operación, A 4,0
Corriente nominal, A 5,0
Lubricante (grasa) Hasta
NLGI #2
Salida de grasa en onzas/min (g/min)
- Salida baja (L) 3,5 (99)
- Salida alta (A) 8,9 (252)
Peso, lb (Kg) 8,8 (4,0)
Accesorios:
Batería de iones de litio modelo 1861
Salida de VCC 18
Capacidad, mAh 3000
Cargador de baterías modelo 1850
Tiempo de carga 1 hora
Entrada, VCA (3,0 A) 120 V,
50-60 Hz
Cargador de baterías modelo 1850E
Tiempo de carga 1 hora
Entrada, VCA (3,0 A) 230 V,
50 Hz
Manguera de salida modelo 1236
Presión nominal,
lb/pulg² (bares) 7500 (510)
Longitud de la manguera,
pulg (mm) 36 (914)
Presión acústica (Lp) 70,0 dB(A), incertidumbre (K) 3 dB(A)
Potencia acústicas (Lw) 81 dB(A), incertidumbre (K) 3 dB(A)
Valor de emisiones de vibraciones (ah) 1,1 m/
s², incertidumbre (K) 1,5 m/s²
NOTA 1: Corriente de operación y datos de
salida de grasa a 1,000 lb/pulg² (69 bares).
NOTA 2: El valor total declarado de la vibraciones se ha medido según un método de prueba
normal y puede usarse para comparar una herramienta con otra; que el valor total declarado
de las vibraciones también puede usarse en
una evaluación preliminar de la exposición.
NOTA 3: La emisión de vibraciones durante
el uso real de la herramienta eléctrica puede
diferir del valor total declarado dependiendo de
las formas en que se usa la herramienta; y la
necesidad de identicar medidas de seguridad
para proteger al operador que están basadas
en una estimación de la exposición en las
condiciones reales de uso (teniendo en cuenta
todas las partes del ciclo de operación como
los tiempos en que se apaga la herramienta y
cuando esté funcionando en vacío además del
tiempo de activación).
Modelos
Modelo de venta Componentes incluidos
1860 Pistola de engrase (con batería)
1862 Pistola de engrase (con batería)
Cargador
Caja de transporte
1862E Pistola de engrase (con batería)
Cargador (220 V europeo)
Caja de transporte
1864 Pistola de engrase (con batería)
Batería adicional
Cargador
Caja de transporte
1850 Cargador
1850E Cargador (220 V europeo)
1861 Grupo de batería
1236 Manguera (36”)
1230E Manguera (RoHS europea - 30”)
5852 Acoplador Midget hidráulico
251-10124-7 Acoplador (europeo)
Page 54

Página - 54
Modelos 1860, 1862, 1862E, 1864
Engrasador PowerLuber (Lithium)
Formulario 404264
Figura 1:
(pistola de engrase 1860)
Válvula de
granel
Palanca de
salida
alta/baja
Válvula de
ventilación
Pantalla
Teclas
de ajuste
de PCB
Válvula de
alivio
Batería
de litio de
18 V
Manguera 1236 o
1230E (Europa) de
36 pulg/30 pulg
Acoplador 5852 o
251-10124-7 (Europa)
DESCRIPCIÓN GENERAL
El PowerLuber de Lincoln es una pistola de
engrase operada por una batería de iones de
litio. La pistola de desarrolló para a lubricación
manual de puntos de engrase e incluye una
válvula de alivio de presión, LED y centro de
control electrónico.
El PowerLuber es impulsado por un motor
eléctrico pequeño de bajo voltaje conectado a
una transmisión de engranajes planetarios de
tres etapas. El movimiento giratorio del motor
se convierte en un movimiento alternativo del
émbolo usando un mecanismo de horquilla.
El PowerLuber es una bomba single acting de
desplazamiento positivo.
Válvula de alivio
La válvula de alivio (g. 1) se ja en fábrica
para aliviar la presión a más de 7500 lb/pulg²
(517 bares). La válvula también es un indicador
de la condición de las tuberías de los cojinetes
y de lubricación. Si sale grasa de la válvula de
alivio, indica que hay un cojinete o conexión
o tubería atascado o apretado. Cor¬rija esto
antes de seguir lubricando con el PowerLuber.
Centro de control
La herramienta está equipada con un centro
de control que consta de lo siguiente: tablero
PC con pantalla, luz LED y teclas “A” y “B”. El
centro de control proporciona las funciones
siguientes:
• Protección del motor. Detendrá el motor si la
pistola de engrase funciona continuamente
a la presión máxima. La pantalla destellará
de color rojo hasta que se reajuste automáticamente el protector térmico;
• Muestra el nivel de corriente de carga de la
batería;
• Supervisa el nivel de grasa en el tubo;
• Calcula y muestra la cantidad de grasa
suministrada en onzas. El PCB convierte
el contador de carreras para el suministro
de grasa.
• Permite el control de una cantidad exacta de
grasa para lubricar los cojinetes críticos;
• Ilumina la luz LED.
Page 55

Página - 55
Formulario 404264
Modelos 1860, 1862, 1862E, 1864
Engrasador PowerLuber (Lithium)
INSPECCIÓN
Inspeccione visualmente si hay piezas dañadas, sueltas o que falten. Si los equipos están
desgastados o dañados, retírelos del servicio.
Póngase en contacto con un centro de servicio
autorizado para evaluar o reparar los daños.
OPERACIÓN
Cambio de la modalidad “L” (baja) o “H”
(alta)
Para cambiar la modalidad de operación:
Para impedir daños en los engranajes de
la transmisión, el motor debe detenerse
completamente antes de cambiar la
palanca a la modalidad de operación “L” o
“H” (baja o alta).
“L” (salida bajas/presión alta)
“H” (salida alta/presión baja)
Cuando el motor no está en marcha, empuje
la palanca (Fig. 1) hasta que la letra “L” o “H”
sea completamente visible en la ventana.
En caso de que la palanca no esté completamente desplazada/metida, mantenga esta
palanca y pulse el interruptor para engranar los
engranajes.
Se recomienda la salida alta si se usa la
herramienta para lubricar cojinetes grandes
que no requieran alta presión, más de 3000
lb/pulg² (206 bares). También se recomienda
una salida alta si se usa la herramienta para
rellenar depósitos pequeños.
Se recomienda una salida baja si la herramienta se usa en aplicaciones de construcción,
minería y lubricación general. La salida baja
proporcionará la presión máxima de hasta
7500 lb/pulg² (517 bares) que la herramienta
es capaz de producir.
Es normal que las baterías pierdan su
capacidad de retención de corriente después
de cientos de ciclos de carga. Reemplace la
batería cuando ocurra esto.
“ENCENDIDO”/”APAGADO” de la
pantalla y de la luz LED
Para “ENCENDER” la pantalla y la luz LED:
-pulse cualquier tecla o
-apriete suavemente el gatillo/interruptor;
Para “apagar”:
-pulse la tecla “B” durante 3 segundos o
-espera 30 segundos para el apagado automático.
Pantalla “ENCENDIDA”
Pantalla “APAGADA
Figura 2
Supervisión de ujo de grasa.
Algunos fabricantes originales recomiendan
la cantidad exacta de grasa para lubricar
cojinetes críticos.
Para suministrar la cantidad de grasa deseada:
1. Pulse la tecla “A” durante 3 segundos para
jar la lectura de la pantalla a cero.
2. Haga funcionar y pare la pistola para la
salida deseada.
3. Reajuste la tecla A y lubrique el cojinete
siguiente.
4. Pulse la tecla “B” durante 1 segundo para
ver la salida total (acumulada).
Figura 3
Pantalla “ENCENDIDA”
Lectura de la pantalla
actual
1. Pulse “A” – 3 seg
2. Haga funcionar la
pistola ara suministrar
0,2 onzas
3. Pulse “B”- 1 seg
Para ver el total
Page 56

Página - 56
Modelos 1860, 1862, 1862E, 1864
Engrasador PowerLuber (Lithium)
Formulario 404264
Reemplazo del cartucho de engrase o relleno del tubo.
1. Cebe el Power Luber después de cada
relleno o cambio de cartucho de engrase.
Para cebar, haga funcionar la pistola hasta
que salga grasa de la manguera. Use la
válvula de ventilación (Fig.1) para expulsar
bolsas de aire.
2. Pulse la tecla “A” y “B” simultáneamente
durante 3 segundos para reajustar todo.
(salida, salida acumulada e indicador de
nivel de grasa).
3. Pulse la tecla “A” durante 1 seg para
mostrar el símbolo “nivel lleno de grasa”.
Figure 4
Pantalla “ENCENDIDA”
Lectura de
pantalla actual
1. Pulse “A” +
“B” – 3 seg
Para borrar
la pantalla
2. Pulse “A” –
1 seg
Para
mostrar el
nivel de grasa
máximo.
Instalación del cartucho de engrase
1. Desenrosque el conjunto de tubo de en-
grase del PowerLuber.
2. Compruebe visualmente el sentido del
seguidor del labio del sello antes de
cargar un cartucho nuevo. El labio del sello
seguidor debe dirigirse hacia la manija
del seguidor o lado trasero para cargar el
cartucho. Vea la Fig. 5. (Para cambiar el
sentido del sello del seguidor, desenrosque
la tapa del tubo del conjunto de tubo de
engrase y tire de la manija para quitar el
sello del seguidor del tubo. Voltee el sello
del seguidor y rearme).
3. Tire hacia atrás de la manija del seguidor
y enganche la muesca de la varilla del
seguidor en la ranura de la tapa del tubo.
4. Quite la tapa de plástico del cartucho de
engrase e inserte el cartucho en el tubo del
recipiente.
5. Quite la lengüeta de tracción del cartucho de
engrase y enrosque el conjunto de tubo de
engrase en el conjunto de bomba.
6. Vuelva a enroscar el conjunto de tubo de
engrase en el Powerhead.
7. Suelte la varilla del seguidor de la ranura.
Purgue el aire de la bomba. Vea las instrucciones de purga del aire.
8. Reajuste la lectura de la pantalla después
de purgar el aire. (Vea la página 8).
Las bolsas de aire en el lubricante del
cartucho harán que la pistola deje de estar
cebada y producirá mediciones de salida
de grasa y lecturas de nivel del cartucho
inexactas).
Retirada del cartucho de grasa
vacío
1. Tire hacia atrás de la manija del seguidor
hasta que la varilla del seguidor esté
completamente desplegada y enganche
la muesca de la varilla del seguidor en la
ranura de la tapa del tubo.
2. Desenrosque el conjunto de tubo de engrase del PowerLuber.
3. Suelde con cuidado la manija del seguidor
para expulsar el cartucho vacío el tubo del
recipiente
Para convertir la pistola con el
n de llenarlo del recipiente de
granel o bomba de relleno
1. Desenrosque la tapa del conjunto del tubo
de engrase. Tire de la manija del seguidor
para extraer el seguido y el resorte del
conjunto de tubo de engrase.
2. Agarre el seguidor entre los dedos pulgar e
índice y voltee el labio del seguidor del lado
trasero al delantero.
NOTE. El seguidor se asemeja a una taza.
Cuando la pistola se arme para usarla con
lubricante a granel, la taza se abre hacia al
conjunto de bomba.
3. Rearme el seguidor en el tubo de engrase y
arpríerelo en el tubo del recipiente.
Figura 5
Lado trasero
Lado delantero
Page 57

Página - 57
Formulario 404264
Modelos 1860, 1862, 1862E, 1864
Engrasador PowerLuber (Lithium)
Para llenar la pistola del recipiente a granel
1. Quite el conjunto de bomba del conjunto de
tubo de engrase.
2. Ponga lubricante en la cavidad del conjunto
de bomba.
3. Inserte el extremo abierto del conjunto de
tubo de engrase en el lubricante (vea la Fig.
6). Tire lentamente hacia atrás de la manija
del seguidor mientras empuja el conjunto
de tubo de engrase a más profundidad en
el lubricante para impedir que el tubo de
engrase atraiga bolsas de aire.
4. Cuando la varilla del seguidor esté completamente desplegada, tire de la misma hacia
un lado para engancha la muesca de la
varilla en la ranura de ojo de cerradura en la
tapa del conjunto de tubo de engrase.
5. Arme sin apretar la bomba en el conjunto
de tubo de engrase. Suelte la varilla el
seguidor de la tapa del conjunto de tubo
de engrase y desenganche la varilla del
seguidor haciendo girar la manija del
seguidor. Empuje la varilla del seguidor
dentro del conjunto de tubo de engrase.
Desenrosque lentamente el conjunto de
tubo de engrase de la bomba hasta que el
lubricante resume de la interfase. Apriete
el conjunto de tubo de engrase dentro del
conjunto de bomba.
6. Reajuste la lectura de la pantalla después
de purgar el aire (vea la página 8).
Figura 6
Para llenar la pistola con una
bomba de relleno
1. Enganche la varilla del seguidor con el
seguidor haciendo girar la manija del
seguidor.
2. Inserte la válvula de ventilación/llenado
a granel de la pistola en la cavidad de la
bomba de relleno (vea la Fig. 7).
3. Opere la bomba de relleno para llenar el recipiente. Cuando se exponga la muesca de
la varilla del seguidor, se llena el conjunto
del tubo de engrase. La varilla del seguidor
se desplegará unas 8 pulg (20 cm). ¡No lo
llene excesivamente!
4. Desenganche la varilla del seguidor haciendo girar la manija del seguidor. Empuje la
varilla del seguidor en el conjunto de tubo
de engrase.
5. Reajuste la lectura de la pantalla después
de purgar el aire.
Figura 7
¡Elimine la bolsa de aire! La bolsa de aire
en la entrada de grasa impedirá que la
grasa sea bombeada. Desenrosque de tres
a cuatro vueltas la válvula de ventilación
para eliminar las pequeñas bolsas de aire
atrapado en esta área. Si la cavidad de aire
es sustancial y no sale grasa del acoplador
después de apretar el gatillo durante 15
segundos, vea los pasos siguientes.
Page 58

Página - 58
Modelos 1860, 1862, 1862E, 1864
Engrasador PowerLuber (Lithium)
Formulario 404264
Para expulsar las bolsas de aire
(purga de aire)
1. Retire la varilla del seguidor de la tapa del
conjunto de tubo de engrase y engánchela
con el seguidor haciendo girar la manija del
seguidor.
2. Desenrosque el tapón de la válvula de ventilación 3-4 vueltas. Haga fuerza en la manija
del seguidor hasta que salga grasa por el
pequeño agujero del lado de la válvula de
ventilación.
3. Apriete la válvula de ventilación.
4. Apriete el gatillo en ráfagas cortas para
hacer funcionar la pistola hasta que sea
expulsado el aire atrapado. Desenganche la
varilla del seguidor haciendo girar la manija
del seguidor. Empuje la varilla del seguidor
en el conjunto del tubo de engrase.
5. Si falla el paso 2, desenrosque el conjunto
de tubo de engrase 3 vueltas del conjunto
de bomba.
6. Haga fuerza en la manija del seguidor hasta
que rezume lubricante de la interfase entre
el conjunto de tubo de engrase y el conjunto
de bomba.
7. Vuelva a apretar el tubo de engrase en el
conjunto de bomba. Desenganche la varilla
del seguidor haciendo girar la manija del
seguidor. Empuje la varilla del seguidor en
el conjunto de tubo de engrase.
OPERACIÓN DE CARGA
CARGA DEL GRUPO DE BATERÍA
Antes de usar el PowerLuber por primera vez,
el grupo de batería debe cargarse completamente. Si el grupo de batería se instala en el
PowerLuber, quítelo y siga el “Procedimiento
de carga” siguiente.
Los cargadores Lincoln están diseñados para
cargar las batería de litio de Lincoln en 30-60
minutos dependiendo del estado de carga y
dela temperatura de la batería.
PROCEDIMIENTO DE CARGA
Asegúrese de que el voltaje del circuito de
corriente sea igual que el mostrado en la
placa de especicaciones del cargador.
1. Enchufe el cargador en una toma de corriente apropiada antes de insertar el grupo
de batería.
2. Inserte el grupo de batería en el cargador.
La luz verde (carga) destellará continuamente indicando que ha empezado el
proceso de carga.
3. La terminación de la carga vendrá indicada
por la luz verde ENCENDIDA de forma continua. El grupo está completamente cargado
y puede usarse en este momento.
4. Desconecte el cargador de la fuente de
alimentación cuando no se use.
Terminales de carga de 120/230 voltios.
No sondee con objetos conductores. Peligro de descarga eléctrica o electrocución.
OPERACIÓN DE LA LUZ INDICADORA
Page 59

Página - 59
Formulario 404264
Modelos 1860, 1862, 1862E, 1864
Engrasador PowerLuber (Lithium)
NOTA: La temperatura de la batería aumen-
tará durante el uso y poco después. Es posible
que las baterías no acepten una carga máxima
si se cargan inmediatamente después del uso.
Deje que el grupo de batería se enfríe a la
temperatura ambiente antes de cargar para
obtener los mejores resultados.
No se deben obstruir las ranuras de
ventilación de la parte suprior e inferior del
cargador. No cargue la batería cuando la
temperatura sea INFERIOR A 40 °F (4,5
°C) o SUPERIOR a 104 °F (40 °C).
Notas de carga importantes
1. La máxima duración y el mejor rendimiento
pueden obtenerse si la batería se carga cuando la temperatura del aire está comprendidas entre 65 °F y 75 °F (18 °C – 24 °C).
NO cargue la batería a una temperatura
del aire menor que +40 °F (4,5 °C) o mayor
que 105 °F (+40,5 °C). Esto es importante e
impedirá daños importantes en la batería.
2. El cargador y la batería pueden calentarse
al tacto mientras de cargan. Esta es una
condición normal, y no indica un problema.
3. Si la batería no se carga debidamente:
a. Compruebe la corriente en el receptáculo
enchufando una lámpara u otro aparato.
b. Compruebe para ver si el receptáculo
está conectado a un interruptor de luz
que desconecta la corriente cuando se
apagan las luces.
c. Mueva el cargador y la batería a un lugar
donde la temperatura del aire circundante sea de aproximadamente 65 °F – 75
°F (18 °C- 24 °C).
d. Si persisten los problemas de carga,
lleve la herramienta, la batería y el
cargador a su centro de servicio local.
4. La batería debe recargarse cuando no pueda producir suciente electricidad para los
trabajos. NO SIGA usando estas condiciones. Siga el procedimiento de carga. También puede cargar un grupo parcialmente
marcado siempre que no se desee ningún
efecto negativo en la batería.
5. En ciertas condiciones, con el cargador
enchufado a la fuente de alimentación, los
contactos de carga expuestos del cargador
pueden producir un cortocircuito con materiales extraños. Los materiales extraños de
naturaleza conductora como such as, but
not limited to, lana de acero, papel de aluminio o cualquier acumulación de partículas
metálicas deben mantenerse fuera de las
cavidades del cargador. Desenchufe siempre el cargador de la fuente de alimentación
cuando no haya una baterñia en la cavidad.
Desenchufe el cargador antes de tratar de
limpiarlo.
6. No congele ni sumerja el cargador ni en
agua ni en ningún otro líquido.
Batería
1861
Cargador de baterías
1850 o 1850E
No deje que el líquido entre en el cargador, ya
que se pueden producir descargas eléctricas.
Para facilitar el enfriamiento del grupo de batería después de usar, no coloque el cargador
o grupo de batería en un entorno templado
como una estructura de metal o un remolque
sin aislar.
Figura 8
Page 60

Página - 60
Modelos 1860, 1862, 1862E, 1864
Engrasador PowerLuber (Lithium)
Formulario 404264
INSTRUCCIONES DE SEGURIDAD PARA CARGADOR Y BATERÍAS
GUARDE ESTAS INSTRUCCIONES
Este manual contiene instrucciones importantes de seguridad y operación para el cargador de baterías Lincoln modelo 1850 o 1850E.
Riesgo de descarga eléctrica de 120 o 230
VCA presente en los terminales del cargador. No pruebe con objetos conductores.
No cargue la batería dañada. Reemplace
de inmediato.
LEA TODAS LAS
INSTRUCCIONES
• No incinere el grupo de batería incluso
si está muy dañado o completamente
desgastado. El grupo de batería puede es-
tallar en un incendio. Se producen vapores
y materiales tóxicos cuando se queman
grupos de batería de iones de litio.
• No cargue ni use la batería en atmósferas explosivas, como en presencia de
líquidos, gases o polvo inamables. La
inserción o retirada de la batería del cargador puede inamar el polvo o los vapores.
• Si el contenido de la batería se pone
en contacto con la piel, lave inmediatamente el área con agua jabonosa. Si el
líquido de la batería se introduce en el ojo,
lave el ojo abierto con agua durante 15
minutos o hasta que cese la irritación. Si es
necesaria la atención médica, el electrolito
de las baterías de iones de litio se compone
de una mezcla de carbonatos orgánicos
líquidos y sales de litio.
• El contenido de los elementos de las baterías abiertas puede causar irritaciones
respiratorias. Proporcione aire fresco. Si
persisten los síntomas, acuda al médico.
Peligro de quemaduras. El líquido de las
baterías puede ser inamable si expone a
las chispas o a las llamas. Cargue los grupos
de batería solamente en cargadores Lincoln
Industrial.
NO salpique ni sumerja ni en agua ni en
otros líquidos. Esto puede causar fallas
prematuras de los elementos.
• No guarde ni use la herramienta y la batería
en lugares donde la temperatura pueda
alcanzar o superar los 105 °F (40 °C) como
en cobertizos exteriores o estructuras de
metal en verano.
No trate nunca de abrir el grupo de batería
por ningún motivo. Si la caja de plástico
del grupo de batería se rompe o se agrieta,
deposítelo en un centro de servicio para el
reciclado.
1. Antes de usar un cargador de baterías, lea
todas las instrucciones y marcas de precaución en el cargador de baterías, grupo de
batería y productos que usen baterías.
2. PRECAUCIÓN: Para reducir el riesgo de
lesiones, los cargadores Lincoln modelos
1850 y 1850E deben usarse solamente para
cargar el grupo de batería Lincoln modelo
1861. Otros tipos de baterías pueden estallar causando lesiones personales y daños.
No cargue los grupos de batería Lincoln
modelo 1861 con ningún otro cargador.
3. No exponga el cargador a la lluvia, nieve o
escarcha.
4. No use el cordón indebidamente. No transporte nunca el cargador por el cordón ni tire
del mismo fuertemente para desconectar
del receptáculo. Tire del enchufe en vez de
tirar del cordón al desconectar el cargador.
Reemplace inmediatamente el cordón de
alimentación dañado o desgastado y el
aliviador de tensión. NO TRATE DE REPARAR EL CORDÓN DE ALIMENTACIÓN.
5. Asegúrese de que el cordón esté ubicado
de modo que no pueda pisarse ni se puede
tropezar con él, ni esté sometido a daños o
tensiones.
6. No use un cordón de alargamiento a menos
que sea absolutamente necesario. El uso
de un cordón de alargamiento indebido
podría producir riesgos de incendios y
descargas eléctricas.
7. No opere el cargador con un cordón o un
enchufe dañado. Reemplácelos inmediatamente y para evitar un peligro NO TRATE
DE REPARAR EL CORDÓN DE ALIMENTACIÓN.
Page 61

Página - 61
Formulario 404264
Modelos 1860, 1862, 1862E, 1864
Engrasador PowerLuber (Lithium)
8. No opere el cargador si ha recibido un fuerte
impacto, se ha dejado caer o se ha dañado
de alguna forma. Llévelo a un centro de
servicio capacitado.
9. No desarme el cargador o el grupo de
batería. Llévelo a un centro de servicio
capacitado cuando se requiera servicio o
reparaciones. El rearmado incorrecto puede
reducir riesgos de descargas eléctricas o
incendios.
10. Desenchufe el cargador de la toma de cor-
riente antes de tratar de efectuar cualquier
mantenimiento o limpiarlo para reducir el
riesgo de descarga eléctricas.
11. Cargue el grupo de batería en un lugar
bien ventilado; no cubra el cargador ni la
batería con un trapa, etc., durante la carga.
12. No guarde el cargador o grupos de batería
en lugares donde la temperatura pueda
alcanzar o superar los 122 °F (50 °C) como
en caso de un cobertizo de metal, o un automóvil en verano que puede ocasionar el
deterioro de la batería de almacenamiento.
13. No cargue el grupo de batería cuando
la temperatura sea INFERIOR a 40 °F
(4,5 °C) o SUPERIOR a 104 °F (40 °C).
Esto es muy importante para la operación
apropiada.
14. No incinere el grupo de batería. Puede
estallar en un incendio.
15. No cargue la batería en lugares húmedos
o mojados.
16. No trate de cargar ninguna otra herramien-
ta inalámbrica o grupo de batería con el
cargador Lincoln modelo 1850 o 1850E.
17. No ponga en cortocircuito los terminales
del grupo de batería. LAS TEMPERATURAS MUY ALTAS PUEDEN OCASIONAR
LSIONES PERSONALES O INCENDIOS.
18. Este aparato no está diseñado para ser
utilizado por personas (incluidos niños)
con capacidades físicas, sensoriales o
mentales reducidas, o falta de experiencia
y conocimientos, a menos que una persona
responsable de su seguridad les supervise
o les haya dado instrucciones referentes al
uso del aparato.
19. Los niños deben ser supervisados para
asegurarse de que no jueguen con el
aparato.
20. Deseche debidamente las baterías agota-
das. El grupo de batería Lincoln modelo
1861 contiene baterías recargables de iones de litio. Estas baterías deben reciclarse
o desecharse debidamente. Deposite los
grupos de batería agotados en un tienda
minorista de baterías de repuesto, o en su
centro de reciclado.
Usuarios de Estados Unidos
NOTA: Se han abonado las cuotas correspondientes para la recogida y el reciclado de estas
baterías al RBRCTM. Para obtener información
adicional, llame a 1-800-8BATTERY.
Page 62

Página - 62
Modelos 1860, 1862, 1862E, 1864
Engrasador PowerLuber (Lithium)
Formulario 404264
Figura 9
Page 63

Página - 63
Formulario 404264
Modelos 1860, 1862, 1862E, 1864
Engrasador PowerLuber (Lithium)
Figura 10
1. El cable positivo
(ROJO) debe conec-
tarse al terminal positivo
del motor que se iden-
tica con el pequeño
círculo de plástico de
al lado.
2. El cable de tierra
verde debe sujetarse
debajo del tornillo de
montaje del motor.
Indicador
de terminal
positivo
Rosca 7/16-28
UNEF
El labio del sello del émbolo
debe apuntar hacia el lado de
engrase de la caja y el lado
opuesto de la horquilla.
Page 64

Página - 64
Modelos 1860, 1862, 1862E, 1864
Engrasador PowerLuber (Lithium)
Formulario 404264
Lista de piezas de repuesto
Artículo Descripción Número de pieza
1 MANGUERA FLEXIBLE DE 36” CON EMPAQUETADURA (MODELO 1860) 1236
MANGUERA FLEXIBLE DE 30” CON EMPAQUETADURA (MODELO 1860E) 1230E
2 ACOPLADOR (MODELO 1860) 5852
ACOPLADOR (MODELO 1860E) 251-10124-7
3 Guarnición 34793
4 Conjunto de seguidor, juego 93485
5 Conjunto de tubo de engrase 271882
6 Empaquetaduras, juego (MANGUERA) 271884
7 Sello 271889
8 Manija, juego (tubo de engrase) 286090
9 Varillas de seguidor, juego 286091
10 Abrazaderas de manguera, juego 286367
11 Tapas de acoplador, juego 286093
12 Componentes eléctricos, juego 286377
13 Reservado
14 Selectores de engranajes, juego 286097
15 Herrajes de manija 286393
16 Calcomanías, juego 286378
17 Motor con juego de adaptadores 286399
18 Herrajes de bomba, juego 286391
19 Cubierta de bomba, juego 286379
20 Horquillas, juego 286380
21 Cubiertas de LED, juego 286381
22 Émbolos, juego 286109
23 Espárragos, juego 286110
24 Rodillo 286111
25 Selector de resorte 286113
26 Válvula de ventilación/granel, juego 286134
27 Reservado
28 Conjunto de impulsor 286285
29 Conjunto de engranajes, juego 286286
30 Manija con juego de componentes eléctricos 286382
31 Manija con juego de tornillos 286383
32 Conjunto de bomba, juego 286384
33 Válvula de retención, juego 286306
34 Bomba de la caja con cojinete 286394
35 Válvula de ventilación, juego 286315
36 Empaquetaduras, juego (válvula de alivio) 286316
37 Válvula de alivio, juego 286317
38 Batería de 18 V (litio) 1861
(no se indica) Cargador (litio) 1850
(no de indica) Fleje 1414
Caja, juego 286392
Page 65

Página - 65
Formulario 404264
Modelos 1860, 1862, 1862E, 1864
Engrasador PowerLuber (Lithium)
SOLUCIÓN DE PROBLEMAS
Condición Causa posible Acción correctora
El motor no funciona. - Es necesario cargar la batería. Recargue la batería.
- Conexiones defectuosas al motor. Quite la batería, desarme el asa y
compruebe los cables para ver si hay
conexiones sueltas.
El PowerLuber no distribuye grasa. - El conjunto del tubo de engrase no tiene grasa. Compruebe si el conjunto de tubo de
engrase tiene grasa.
- Pérdida de cebado. Repita la operación de cebado.
- El artículo 33, válvula de bola de retención, no
funciona.
Quite el artículo 33, limpie e inspeccione el
área del asiento de la bola.
El PowerLuber sigue perdiendo
cebado.
- Puede haber aire atrapado en varios lugares del
recipiente después de llenar a granel.
Vacíe el conjunto de tubo de engrase,
rellene y repita las instrucciones de cebado.
- El seguidor Puede atascarse en El conjunto de tubo
de engrase.
Reemplace el artículo 5, conjunto de tubo
de engrase.
Desarme el conjunto de tubo de engrase
y límpielo.
Asegúrese de que el seguidor se haya
introducido debidamente en el cartucho de
engrase.
o
Verique que el seguidor no quede atrapado
en el borde del cartucho de engrase.
La batería no se carga. - El cargador tal vez no tenga corriente. Compruebe que legue corriente al
receptáculo.
- La batería puede ser defectuosa. Reemplace la batería.
Page 66

Page Number - 66
Models 1860, 1862, 1862E, 1864
PowerLuber Grease Gun (Lithium)
Form 404264
Lincoln Industrial Standard Warranty
LIMITED WARRANTY
Lincoln warrants the equipment manufactured and supplied by Lincoln to be free from defects in material and workmanship for a period of one (1) year following the date of purchase, excluding therefrom any special, extended, or
limited warranty published by Lincoln. If equipment is determined to be defective during this warranty period, it will
be repaired or replaced, within Lincoln’s sole discretion, without charge.
This warranty is conditioned upon the determination of a Lincoln authorized representative that the equipment is
defective. To obtain repair or replacement, you must ship the equipment, transportation charges prepaid, with proof
of purchase to a Lincoln Authorized Warranty and Service Center within the warranty period.
This warranty is extended to the original retail purchaser only. This warranty does not apply to equipment damaged
from accident, overload, abuse, misuse, negligence, faulty installation or abrasive or corrosive material, equipment
that has been altered, or equipment repaired by anyone not authorized by Lincoln. This warranty applies only to
equipment installed, operated and maintained in strict accordance with the written specications and recommendations provided by Lincoln or its authorized eld personnel.
THIS WARRANTY IS EXCLUSIVE AND IS IN LIEU OF ANY OTHER WARRANTIES, EXPRESS OR IMPLIED,
INCLUDING, BUT NOT LIMITED TO, THE WARRANTY OF MERCHANTIBILITY OR WARRANTY OF FITNESS
FOR A PARTICULAR PURPOSE.
In no event shall Lincoln be liable for incidental or consequential damages. Lincoln’s liability for any claim for loss
or damages arising out of the sale, resale or use of any Lincoln equipment shall in no event exceed the purchase
price. Some jurisdictions do not allow the exclusion or limitation of incidental or consequential damages, therefore
the above limitation or exclusion may not apply to you.
This warranty gives you specic legal rights. You may also have other rights that vary by jurisdiction.
Customers not located in the Western Hemisphere or East Asia: Please contact Lincoln GmbH & Co. KG, Walldorf,
Germany, for your warranty rights.
Lincoln Industrial Special Limited Warranties
SPECIAL LIMITED 2 YEAR WARRANTY-
SL-V Series, Single Injectors-85772, 85782, and Replacement Injectors-85771, 85781
Lincoln warrants the SL-V Injector series to be free from defects in material and workmanship for two (2) years following the date of purchase. If an injector model (single or replacement) is determined to be defective by Lincoln, in
its sole discretion, during this warranty period, it will be repaired or replaced, at Lincoln’s discretion, without charge.
SPECIAL LIMITED 5 YEAR WARRANTY-
Series 20, 25, 40 Bare Pumps, PMV Bare Pumps, Heavy Duty and 94000 Series Bare Reels
Lincoln warrants series 20, 25, 40 bare pumps, PMV bare pumps, Heavy Duty (82206), Mini Bench (81133, 81323),
and 94000 LFR series (94100, 94300, 94500) bare reels to be free from defects in material and workmanship for ve
(5) years following the date of purchase. If equipment is determined by Lincoln, in its sole discretion, to be defective
during the rst year of the warranty period, it will be repaired or replaced at Lincoln’s discretion, without charge. In
years two (2) and three (3), the warranty on this equipment is limited to repair with Lincoln paying parts and labor
only. In years four (4) and ve (5), the warranty on this equipment is limited to repair with Lincoln paying for parts only.
SPECIAL LIMITED 5 YEAR WARRANTY-
LFM Series Oil Meters (Lincoln Fluid Meter), LFV (Lincoln Fluid Valves), AOD (Air-Operated Diaphragm
Pumps)-
Lincoln warrants the LFM meter series (908/912 series), the Lincoln Fluid valve (708/712 series), and our AOD Pump
offering to be free from defects in material and workmanship for ve (5) years following the date of purchase. If either
is determined to be defective by Lincoln, in its sole discretion, during the warranty period, they will be repaired or
replaced, at Lincoln’s discretion, without charge.
Lincoln Industrial Contact Information
To nd Lincoln Industrial’s Nearest Service Center call one of the following numbers, you may
also use our website
Customer Service 314-679-4200
Website lincolnindustrial.com
Page 67

Page Numéro - 67
Formulaire 404264
Modèles 1860, 1862, 1862E, 1864
Graisseur PowerLuber (Lithium)
GARANTIE LIMITEE
Lincoln garantit l’équipement fabriqué et fourni par Lincoln contre tout défaut de matériau et de fabrication pendant
une période d’un (1) an à compter de la date d’achat, à l’exclusion de toute garantie spéciale, étendue ou limitée
publiée par Lincoln. Si, pendant la période de garantie, il est déterminé que l’équipement est défectueux, il sera
réparé ou remplacé, à la seule discrétion de Lincoln, gratuitement.
Cette garantie est sujette à la détermination, par un représentant agréé de Lincoln, que l’équipement est
défectueux. Pour obtenir une réparation ou un remplacement, vous devez expédier l’équipement, port payé, avec
la preuve d’achat, à un centre de réparation et de garantie agréé de Lincoln, pendant la période de garantie.
Cette garantie n’est offerte qu’à l’acheteur au détail initial. Cette garantie n’est pas applicable à de l’équipement
endommagé par un accident, une surcharge, des abus, une mauvaise utilisation, de la négligence, une mauvaise
installation, une exposition à des produits abrasifs ou corrosifs, ni à de l’équipement modié ou réparé par
quiconque pas autorisé par Lincoln. Cette garantie ne s’applique qu’à de l’équipement installé, utilisé et maintenu
en stricte conformité aux normes et recommandations écrites fournies par Lincoln ou son personnel sur place
agréé.
CETTE GARANTIE EST EXCLUSIVE ET REMPLACE TOUTE AUTRE GARANTIE, EXPRIMEE OU SOUSENTENDUE, Y COMPRIS MAIS PAS LIMITEE A LA GARANTIE DE VENDABILITE OU D’APTITUTE A UNE
UTILISATION PARTICULIERE.
En aucun cas, Lincoln ne peut être tenue responsable des dommages indirects ou secondaires. La responsabilité
de Lincoln pour toute réclamation de sinistre ou dommage provenant de la vente, la revente ou l’utilisation de
l’équipement de Lincoln ne peut dépasser le prix d’achat. Certaines juridictions ne permettent pas l’exclusion ni la
limitation des dommages indirects ou secondaires, il est donc possible que la limitation ou exclusion ci-dessus ne
s’applique pas à un cas spécique.
Cette garantie donne des droits spéciques à l’acheteur.
L’acheteur peut également avoir d’autres droits qui varient en fonction de la juridiction.
Clients à l’extérieur de l’hémisphère occidental ou de l’Asie orientale : contacter Lincoln GmbH & Co. KG, Walldorf,
Germany, pour obtenir les droits selon la garantie.
GARANTIE LIMITÉE SPÉCIALE DE 2 ANS
Série de SL-V, Injectors-85772 simple, 85782, et remplacement Injectors-85771, 85781
Lincoln justie la série d’injecteur de SL-V pour être exempt des défauts dans le matériel et l’exécution pendant deux
(2) années suivant la date de l’achat. Si un modèle d’injecteur (choisissez ou remplacement) est déterminé pour être
défectueux par Lincoln, dans sa discrétion unique, au cours de cette période de garantie, il sera réparé ou remplacé,
à la discrétion de Lincoln, sans frais.
GARANTIE LIMITÉE SPÉCIALE DE 5 ANS
Les séries 20, 25, 40 pompes nues, PMV découvrent les bobines nues de pompes, résistantes
et de 94000 séries
Lincoln justie la série 20, 25, 40 pompes nues, PMV découvrent banc résistant (82206) et mini de pompes, (81133,
81323), et 94000 bobines nues de la série de LFR (94100, 94300, 94500) pour être exempt des défauts dans le
matériel et l’exécution pendant cinq (5) années suivant la date de l’achat. Si l’équipement est déterminé par Lincoln,
dans sa discrétion unique, pour être défectueux pendant la première année de la période de garantie, il sera réparé
ou remplacé à la discrétion de Lincoln, sans frais. En (3) des années deux (2) et trois, la garantie sur cet équipement
est limité pour réparer avec Lincoln payant des pièces et pour travailler seulement. En (5) des années quatre (4) et
cinq, la garantie sur cet équipement est limité pour réparer avec Lincoln payant des pièces seulement.
GARANTIE LIMITÉE SPÉCIALE DE 5 ANS
Mètres d’huile de série de LFM (mètre liquide de Lincoln), LFV (valves liquides de Lincoln),
AOD (pompes à diaphragme pneumatiques) -
Lincoln justie la série de mètre de LFM (908/912 série), la valve liquide de Lincoln (708/712 série), et notre pompe
d’AOD offrant d’être exempt des défauts dans le matériel et l’exécution pendant cinq (5) années suivant la date
de l’achat. Si est déterminé à être défectueux par Lincoln, dans sa discrétion unique, au cours de la période de
garantie, elles seront réparées ou remplacées, à la discrétion de Lincoln, sans frais.
Comment contacter Lincoln Industrial
Pour trouver le centre de réparation de Lincoln Industrial le plus proche
Appeler les numéros suivants ou rendre visite à notre site web.
Service après-vente +1 314-679-4200
Site web : lincolnindustrial.com
Page 68

Seite - 68
Modelle 1860, 1862, 1862E, 1864
PowerLuber Fettspritze (Lithium)
Formular 404264
Garantía estándar industrial de Lincoln
GARANTÍA LIMITADA
Lincoln garantiza que los equipos fabricados y suministrados por Lincoln carecen de defectos de materiales
y fabricación durante un (1) año contado a partir de la fecha de compra, excluyéndoles de cualquier garantía
especial, extendida o limitada publicada por Lincoln. Si se demuestra que los equipos son defectuosos durante
este período de garantía, se repararán o remplazarán, a discreción de Lincoln, de forma gratuita.
Esta garantía está condicionada por la determinación de un representante autorizado de Lincoln de que el equipo
es defectuoso. Para obtener su reparación o reemplazo, debe enviar los equipos, gastos de transporte pagados
de antemano, con la prueba de compra a un centro de garantías y servicio autorizado de Lincoln dentro del
período de la garantía.
Esta garantía se extiende solamente al comprador original que haya efectuado la compra a un minorista. Esta
garantía no se aplica a equipos dañados por accidente, sobrecarga, abuso, uso indebido, negligencia, instalación
defectuosa o material abrasivo o corrosivo, o a equipos reparados o alterados por cualquier persona que no esté
autorizada por Lincoln para reparar o alterar los equipos. Esta garantía se aplica solamente a equipos instalados,
operados y mantenidos estrictamente según las especicaciones escritas y recomendadas proporcionadas por
Lincoln o su personal de planta autorizado.
ESTA GARANTÍA ES EXCLUSIVA Y REEMPLAZA CUALQUIER OTRA GARANTÍA, EXPLÍCITA O IMPLÍCITA,
INCLUIDA LA GARANTÍA DE COMERCIALIZACIÓN O GARANTÍA DE IDONEDAD PARA UNA CIERTA
FINALIDAD, PERO SIN LIMITARSE A LAS MISMAS.
En ningún caso Lincoln será responsable de daños emergentes o concomitantes. La responsabilidad de Lincoln
ante cualquier reclamación por pérdida o daños que sean consecuencia de la venta, reventa o uso de equipos
suministrados no debe en ningún caso exceder el precio de compra. Algunas jurisdicciones no permiten la
exclusión o limitación de daños emergentes o concomitantes, por lo que es posible que no se aplique a su caso la
limitación o exclusión anterior.
Esa garantía le da derechos legales especícos. También puede tener otros derechos que varían según la
jurisdicción.
Clientes que no estén ubicados en el Hemisferio Occidental o en el Lejano Oriente: Póngase en contacto con
Lincoln GmbH & Co. KG, Walldorf, Alemania, para obtener información sobre sus derechos de garantía.
GARANTÍA LIMITADA ESPECIAL DE 2 AÑOS
Serie de SL-V, solo Injectors-85772, 85782, y reemplazo Injectors-85771, 85781
Lincoln autoriza la serie del inyector de SL-V para estar libre de defectos en material y la ejecución por dos (2)
años que siguen la fecha de la compra. Si un modelo del inyector (escoja o reemplazo) es determinado para ser
defectuoso por Lincoln, en su única discreción, durante este período de garantía, será reparado o substituido, en la
discreción de Lincoln, sin carga.
GARANTÍA LIMITADA ESPECIAL DE 5 AÑOS
Las series 20, 25, 40 bombas peladas, PMV descubren carretes pelados de las bombas,
resistentes y de 94000 series
Lincoln autoriza la serie 20, 25, 40 bombas peladas, PMV descubre el banco resistente (82206), mini de las bombas,
(81133, 81323), y 94000 carretes pelados de la serie de LFR (94100, 94300, 94500) para estar libre de defectos
en material y la ejecución por cinco (5) años que siguen la fecha de la compra. Si el equipo es determinado por
Lincoln, en su única discreción, para ser defectuoso durante el primer año del período de garantía, será reparado
o substituido en la discreción de Lincoln, sin carga. En (3) de los años dos (2) y tres, la garantía en este equipo se
limita para reparar con Lincoln que paga piezas y para trabajar solamente. En (5) de los años cuatro (4) y cinco, la
garantía en este equipo se limita para reparar con Lincoln que paga piezas solamente.
GARANTÍA LIMITADA ESPECIAL DE 5 AÑOS
Metros del aceite de la serie de LFM (metro úido) de Lincoln, LFV (válvulas úidas) de
Lincoln, AOD (bombas de diafragma neumáticas) -
Lincoln autoriza la serie del metro de LFM (908/912 serie), la válvula úida de Lincoln (708/712 serie), y nuestra
bomba del AOD que ofrece estar libre de defectos en material y la ejecución por cinco (5) años que siguen la
fecha de la compra. Si es determinado ser defectuoso por Lincoln, en su única discreción, durante el período de
garantía, serán reparados o substituidos, en la discreción de Lincoln, sin carga.
Información de contacto de Lincoln Industrial
Para localizar el centro de servicio más próximo de Lincoln Industrial
Llame a uno de los números siguientes, también puede usar nuestro sitio web.
Servicio al cliente 314-679-4200
Sitio web: lincolnindustrial.com
Page 69

Page Number - 69
Models 1860, 1862, 1862E, 1864
PowerLuber Grease Gun (Lithium)
Form 404264
Declaration of conformity according to EMV
directive 89/336/EEG as last amended by
EC Directive 93/68/EEC Electromagnetic
Compatibility.
We declare that the model of the
PowerLuber Grease Gun - Battery Charger
in the version supplied by us, complies with the
provisions of the above mentioned directive.
Applied harmonized standards in particular:
EN61000-3-3 Electromagnetic
Compatibility (EMC) Part 3: Limits - Section 3:
Limitations of Voltage
Fluctuations and Flicker in
Low Voltage Supply
Systems for Equipment with
Rated Current = 16A
- SAME AS IEC 61000-3-3
EN 55014-2 Electromagnetic
Compatibility - Requirements
for Household Appliances,
Electric Tools, & Similar
Apparatus - Part 2: Immunity
- Product Family Standard
EN55014-1 Electromagnetic
Compatibility - Requirements
for Household Appliances,
Electric Tools and Similar
Apparatus - Part 1: Emission
- Product Family Standard
EN 61000-3-2 + Amendment 1, + Amendment 2,
+ Amendment 14
Electromagnetic
Compatibility (EMC) Part 3:
Limits - Section 2: Limits for
Harmonic Current Emissions
(Equipment Input Current
<= 16A per Phase)
St. Louis, MO 12/12/11, Paul Conley, Chief Engineer
Déclaration de la conformité selon la directive 89/336/EEG d’cEmv modié en dernier
lieu par la compatibilité 93/68/EEC électromagnétique directive de EC.
Nous déclarons que le modèle du
PowerLuber A Graisse - Chargeur et de la
Batterie
dans la version fournie par nous, se conforme
aux dispositions de la directive mentionnée
ci-dessus.
Normes harmonisées appliquées en particulier
EN61000-3-3 Electromagnetic
Compatibility (EMC) - Part
3: Limits - Section 3:
Limitations of Voltage
Fluctuations and Flicker in
Low Voltage Supply
Systems for Equipment with
Rated Current = 16A
- SAME AS IEC 61000-3-3
EN 55014-2 Electromagnetic
Compatibility - Requirements
for Household Appliances,
Electric Tools, & Similar
Apparatus - Part 2: Immunity
- Product Family Standard
EN55014-1 Electromagnetic Compatibility
- Requirements for Household
Appliances, Electric Tools and
Similar Apparatus - Part 1:
Emission - Product Family
Standard
EN 61000-3-2 + Amendment 1, + Amendment 2,
+ Amendment 14
Electromagnetic
Compatibility (EMC) Part 3:
Limits - Section 2: Limits for
Harmonic Current Emissions
(Equipment Input Current
<= 16A per Phase)
Page 70

Page Number - 70
Models 1860, 1862, 1862E, 1864
PowerLuber Grease Gun (Lithium)
Form 404264
Konformitätserklärung nach EMV-Richtlinie
89/336/EEG wie zuletzt geändert durch richtungweisende elektromagnetische Kompatibilität 93/68/EEC EC.
Hiermit erklären wir, dass dieses Produkt
PowerLuber Schmierpresse - Batterieladegerat in der von uns gelieferten Ausführung den
Bestimmungen der oben bezeichneten Richtlinie
entspricht.
Angewendete harmonisierte Normen:
EN61000-3-3 Electromagnetic Compatibility
(EMC) - Part 3: Limits Section 3: Limitations of
Voltage Fluctuations and
Flicker in Low Voltage Supply
Systems for Equipment with
Rated Current = 16A - SAME
AS IEC 61000-3-3
EN 55014-2 Electromagnetic Compatibility
- Requirements for
Household Appliances,
Electric Tools, & Similar
Apparatus - Part 2: Immunity
- Product Family Standard
EN55014-1 Electromagnetic Compatibility
‘ - Requirements for
Household Appliances,
Electric Tools and Similar
Apparatus - Part 1: Emission
- Product Family Standard
EN 61000-3-2 + Amendment 1, + Amendment 2,
+ Amendment 14
Electromagnetic Compatibility
(EMC) Part 3: Limits - Section
2: Limits for Harmonic
Current Emissions
(Equipment Input Current
<= 16A per Phase)
Declaración de la conformidad según la
directiva 89/336/EEG de EMV según la
enmienda prevista por último por la compatibilidad electromágnetica directiva 93/68/EEC
de EC.
Declaramos que el modelo de Pistola De Grasa
PowerLuber - El Cargador de Las Baterias la
versión provista por nosotros, se conforma con
las provisiones de la directiva antedicha.
Estándares armonizados aplicados en detalle
EN61000-3-3 Electromagnetic Compatibility
(EMC) - Part 3: Limits Section 3: Limitations of
Voltage Fluctuations and
Flicker in Low Voltage Supply
Systems for Equipment with
Rated Current = 16A - SAME
AS IEC 61000-3-3
EN 55014-2 Electromagnetic Compatibility
- Requirements for Household
Appliances, Electric Tools, &
Similar Apparatus - Part 2:
Immunity - Product Family
Standard
EN55014-1 Electromagnetic Compatibility
- Requirements for Household
Appliances, Electric Tools and
Similar Apparatus - Part 1:
Emission - Product Family
Standard
EN 61000-3-2 + Amendment 1, + Amendment 2,
+ Amendment 14
Electromagnetic Compatibility
(EMC) Part 3: Limits - Section
2: Limits for Harmonic Current
Emissions (Equipment Input
Current <= 16A per Phase)
St. Louis, MO 12/12/11, Paul Conley, Chief Engineer
Europe/Africa:
Heinrich-Hertz-Str 2-8
D-69183 Walldorf
Germany
Phone +49.6227.33.0
Fax +49.6227.33.259
© Copyright 2011
Printed in USA
Web site:
lincolnindustrial.com
Americas:
One Lincoln Way
St. Louis, MO 63120-1578
USA
Phone +1.314.679.4200
Fax +1.800.424.5359
Asia/Pacic:
51 Changi Business Park
Central 2
#09-06 The Signature
Singapore 486066
Phone +65.6588.0188
Fax +65.6588.3438
 Loading...