

Page 1
A
ll information
contained in this
L
incoln Quick
Reference Guide
w
as accurate
a
t the time of
duplication.
W
e reserve the
right to change
f
eatures, operation
and / or functionality
of any vehicle
s
pecification at
any time. Your
Lincoln dealer is
the best source
f
or the most
c
urrent information.
For detailed
operating and
safety information,
please see your
Owner’s Guide.
June 2005
Second Printing
Quick Reference
Guide
Lincoln Mark LT
Litho in U.S.A.
*F
6L3J19G217FA
6L3J-19G217-FA
*
SSENTIAL INFORMATION
E
FUEL: Your vehicle is designed to use “Regular” unleaded gasoline
with a pump (R+M)/2 octane rating of 87. Note: when “Low Fuel
Level” appears in the message center display, you must push the
RESET button to clear this warning
Level”
will reappear at 10 minute
. Until fuel is added,
“Low Fuel
intervals. TIRE PRESSURE: Your
tire pressure is properly set at the dealership to the recommended
specifications found on the Tire Label or Safety Compliance
Certification Label located inside on the edge of the driver’s
pillar. Please check your tire pressure during routine maintenance
seasonal changes.
FUSES: If electrical components in the vehicle
door
and
are
not working, a fuse may have blown. For more information about
changing a
SHUT-OFF SWITCH:
fuse, please see your Owner’s Guide. FUEL PUMP
After a collision, if the engine cranks but does
not start, the fuel pump shut-off switch may have to be reset.
The switch is located in the front passenger’s footwell, behind the
kick panel
details on resetting
access cover, to the left of the fuse box. For complete
the switch, please see your Owner's Guide.
CHANGING THE TIRES: For more information on changing the tires,
please see your Owner’s Guide.
TOOLS:
The spare tire is located under the vehicle, just forward of
LOCATION OF THE SPARE TIRE AND
the rear bumper. The jack, jack handle and wheel nut wrench are
located under the rear seat on the passenger side of the vehicle.
ROADSIDE EMERGENCIES: To fully assist you if you should have a
vehicle concern, Ford offers a complimentary Roadside Assistance
Program. This program is separate from the New Vehicle Limited
Warranty. The service is available 24 hours a day, seven days a week
for the New Vehicle Limited Warranty period (U.S.) or Basic Warranty
period (Canada) of four years or 50,000 miles (80,000 km). Roadside
Assistance will cover: Changing a flat tire, jump-starts, limited fuel
delivery, lock-out assistance, and towing of your vehicle. Roadside
Assistance Centers:
UNITED STATES (800) 521-4140 CANADA
(800) 665-2006. For complete details on any roadside assistance
concern, see the Roadside Emergencies chapter or the Customer
Assistance chapter in your Owner’s Guide.
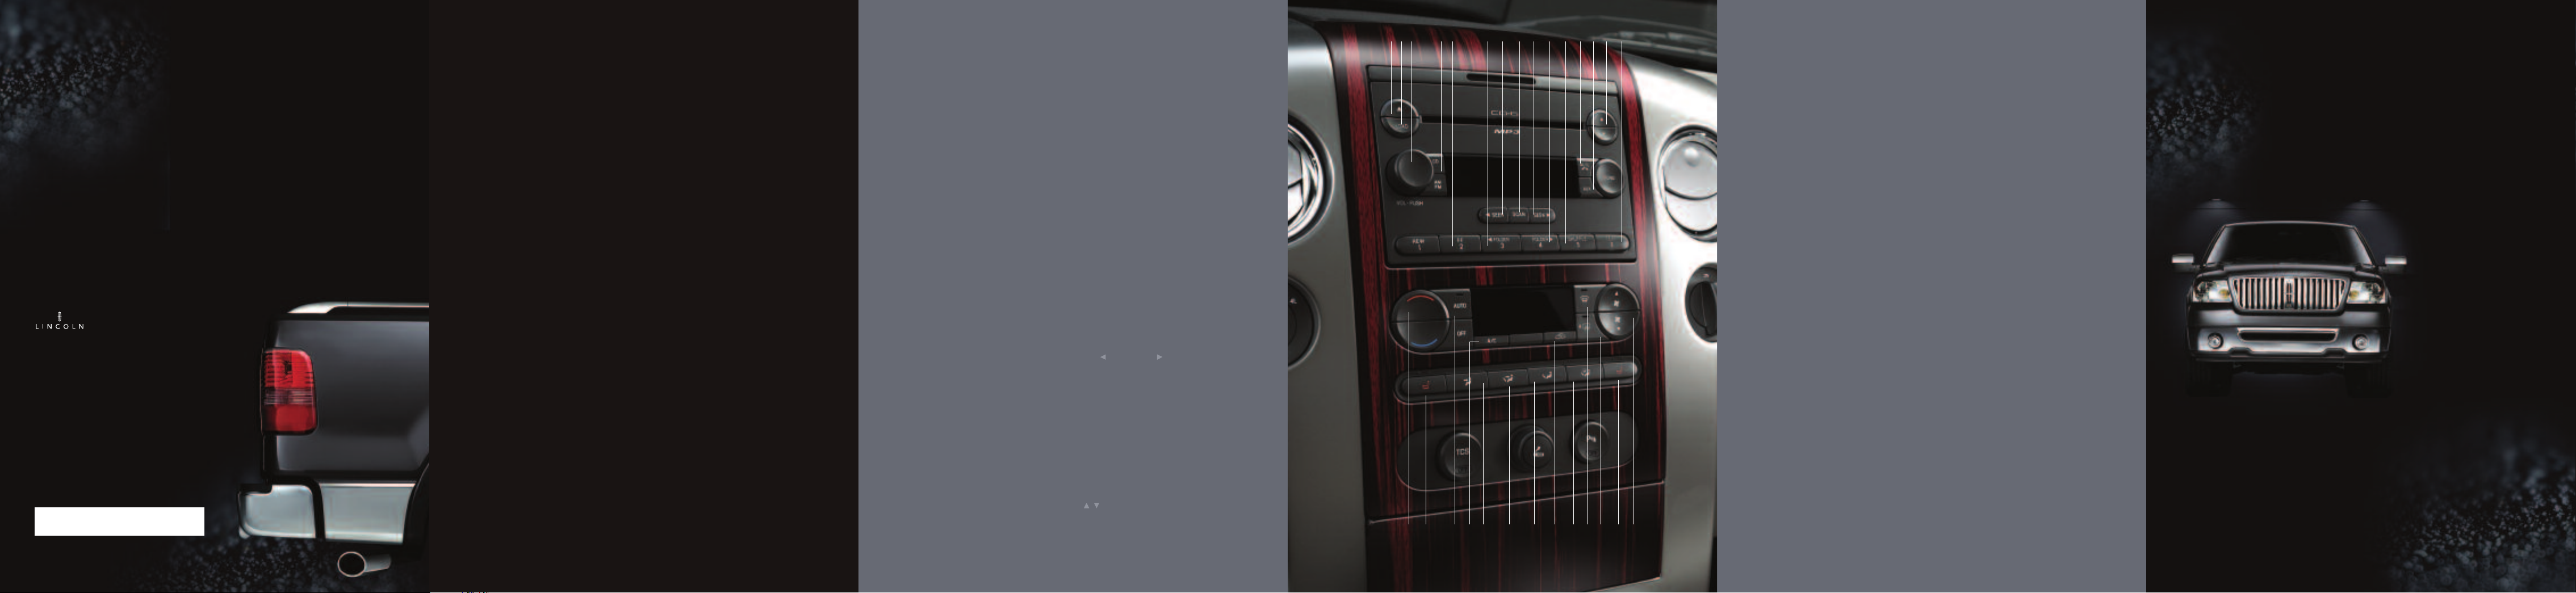
AUDIOPHILE IN-DASH SIX CD / MP3 / SATELLITE COMPATIBLE
.1 EJECTING CDS:
Press this to eject a
CD. For the In-dash
Six CD / MP3 system,
press and hold to
auto-eject all CDs
present in the system.
.2 LOADING CDS:
ess the LOAD button
Pr
and then a preset
number to select a
slot. Pressing and
holding LOAD will
activate the autoload
to load up to 6 CDs.
.3 ON / OFF /
VOLUME CONTROL:
Press to turn ON or
OFF. Turn to increase
or decrease volume.
.4 AM / FM AND CD
SELECT:
mode, press to select
AM or FM frequency
bands. Press CD to
begin CD play. In CD
mode, press AM / FM
to stop play and begin
radio play.
In radio
SOUND SYSTEM
.5 SETTING MEMORY
PRESETS:
station: Select a
frequency band with
the AM / FM button,
then select a station.
Press and hold a
numbered preset
button until the
sound r
.6 FOLDERS: Press to
access previous or next
folder on MP3 discs, if
folders are available.
.7 SEEK FUNCTION:
Press to access the
next listenable station
or CD track.
.8 SCAN FUNCTION:
Press for a brief
sampling of radio
stations or CD tracks.
Press again to stop.
.9 SHUFFLE FUNCTION:
SHUFFLE plays tracks
in random order.
To set a
eturns.
.10 MUTE MODE:
Pressing the MUTE
button will mute the
playing media. Pressing
it again will return to
the playing media.
.11
SATELLITE RADIO
CONTROLS & FEATURES
(IF EQUIPPED):
Satellite Radio
Button (AUX): Pr
enter Satellite Radio
Mode
Channel Switch &
Select Button (SEEK):
Use ( SEEK/SEEK )
to navigate over 120
Sirius Channels.
Category Mode:
Restricts channels to a
selected category only.
See Owner’s Guide for
details.
To exit Category
Mode: press MENU
until the current
category appears on
the display, then press
( / ) to select
“CATEGORY ALL”and
press SEEK to select.
ess to
Memory Presets (1-6):
Sets and selects
preset channels.
.12 TUNE / DISC
Press to go
SELECT:
up or down the radio
frequency or to select a
desired disc. Also, use
in menu mode to select
various settings.
.13 TEXT: In CD
mode, this feature
reads and displays
track, song title, artist
name and album title.
SPEED SENSITIVE
VOLUME
:
This audio
system is equipped
with speed sensitive
volume. The volume
automatically changes
slightly with vehicle
speed to compensate
for road and wind
noise. Press MENU to
access and use SEEK
to adjust.
1
3
2
.
.
.
.14 .17.15 .16 .18 .19 .20 .22.21 .23 .24 .26.25
.4.
5
.6.7.
8
.7.
9
6
13
.12.
.11.10.
AUTOMATIC TEMPERATURE CONTROL (ATC) SYSTEM
.14 TEMPERATURE
CONTROL: Increases /
decreases the
temperature in
the cabin.
.15 DRIVER HEATED
SEAT CONTROL: Press
once to activate high
heat; press a second
time to activate low
heat. Press a third
time to deactivate.
.16 AUTO: The system
will automatically
determine fan speed,
airflow location, A/C on
or off, and outside or
recirculated air, to
heat or cool the
vehicle to reach the
desired temperature.
.17 A/C: Activates /
deactivates the air
conditioning.
AIRFLOW DIRECTION
CONTROLS: These
allow you
controls
to choose the air
distribution mode
you desire.
WITH HEATED SEATS
.18 Distributes air
through the instrument
panel and center
console registers.
.19 Distributes air
through the windshield
defroster ducts, demister
outlets, and the front
and rear seat floor ducts.
.20 Distributes air
through the floor and
rear seat floor vents.
.21
Recirculates air in
the
cabin, thereby
reducing
the amount of
time needed to cool
down the interior of
the vehicle
with A/C.
.22 Distributes air
through the windshield
defroster vents,
demister outlets, and
the front and rear seat
floor vents. The system
will automatically
provide outside
air to reduce
window fogging.
when used
.23 DEFROST: Use to
clear ice or fog from
the windshield by
distributing air through
the windshield
defroster and
demister vents.
.24 REAR DEFROST /
HEATED MIRRORS
EQUIPPED): Use to defrost
your rear windshield of
fog and thin ice. It
operates the heated
mirrors to remove snow
and thin ice from the
side mirrors. If your
vehicle is equipped
with a power sliding
rear window, rear
defrost is not available.
.25 PASSENGER
HEATED SEAT
CONTROL:
to activate high heat;
press a second time to
activate low heat.
Press a third time
to deactivate.
.26 FAN SPEED
CONTROL:
decreases the fan speed.
(IF
also
Press once
Increases /
MAX A/C OVERRIDE
OF AUTO FUNCTION:
Select panel
Then select
recirculated
Set the temperature
setting to 60°F.
Adjust fan speed to
maintain comfort.
mode.
A/C and
air.
2006 LINCOLN MARK LT
QUICK REFERENCE GUIDE
Page 2
006
LINCOLN MARK LT
2
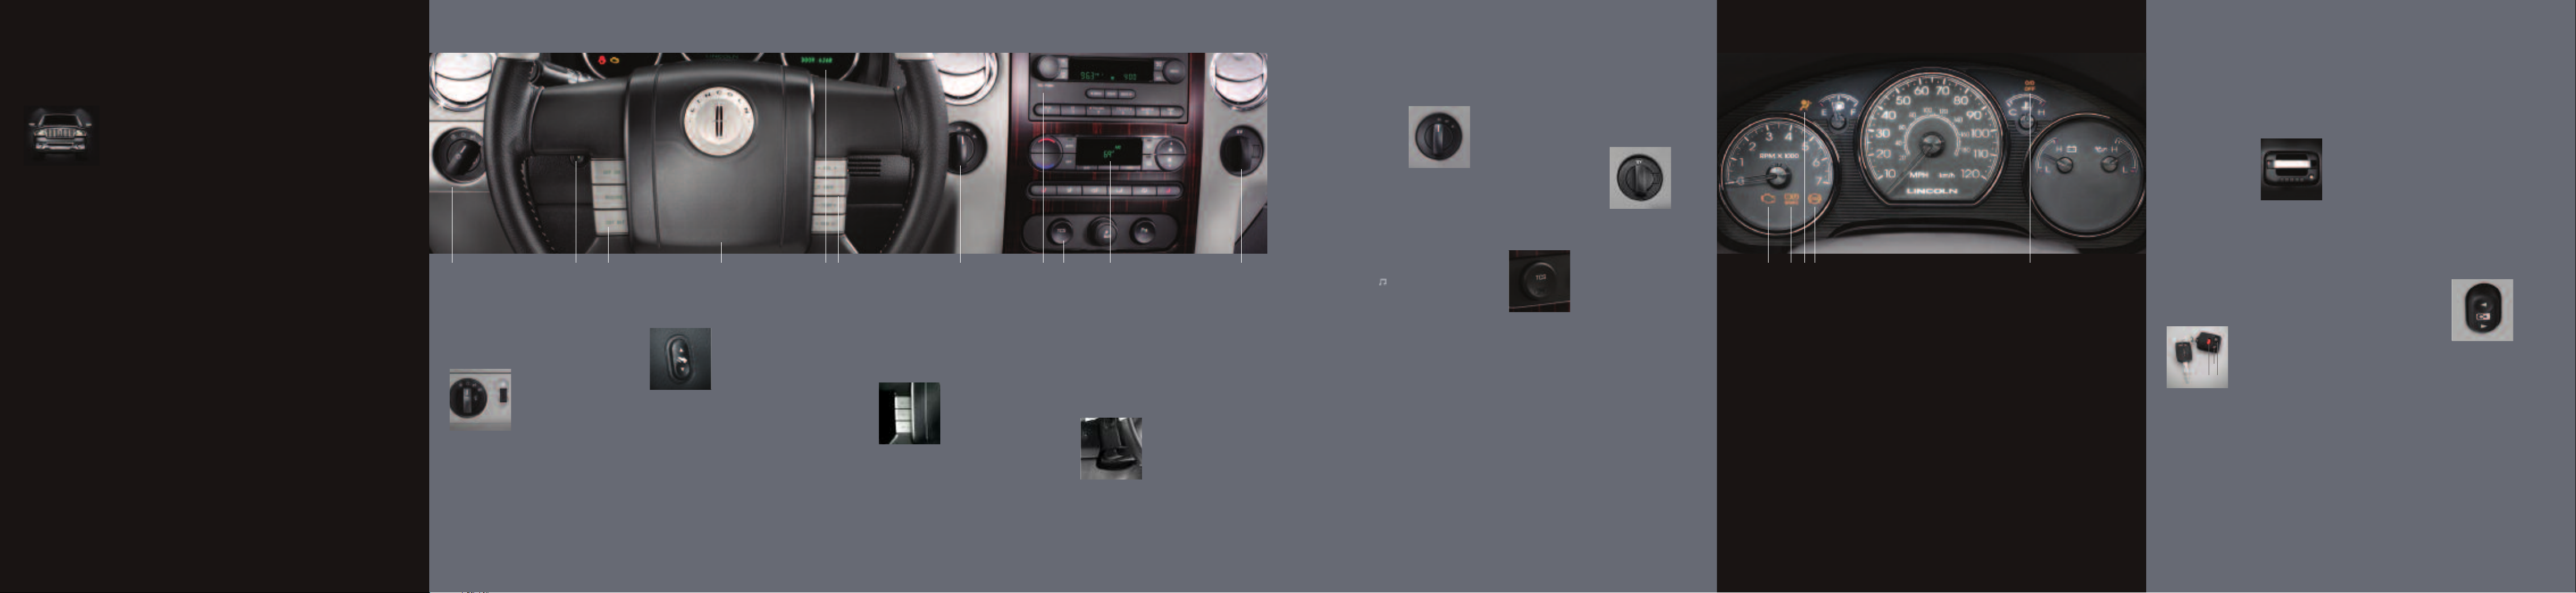
COCKPIT WARNING LIGHTS FEATURES
Welcome to the unparalleled
luxury, extraordinary functionality
and incredible comfort that
is your new Lincoln Mark LT.
This Quick Reference Guide was
designed to help you get to
know
your new Lincoln Mark LT.
Combined with the accompanying
CD-ROM, it will help you quickly
get to know many of your new
Mark LT’s features. For more
detailed information, place the
CD into your computer, or see your
Owner’s Guide. Welcome to the
perfect balance of elegant design
and highly functional engineering.
Let’s get to know your Lincoln
Mark LT better.
.1 . 2
.1 HEADLAMP AND
PANEL DIMMER
CONTROL: Rotate the
control clockwise one
position from off to
turn on the parking
lamps. Rotate two
positions from off
to also turn on the
headlamps. Rotate
counterclockwise from
off to activate the
autolamp,which
provides
automatic
control of the exterior
lights and keeps them
on for a short period of
time after the ignition
is turned off. When
the control is in any
position except high
beams or off, pull the
control toward you to
activate the foglamps
.2 POWER
ADJUSTABLE PEDALS
(IF EQUIPPED): Press
and hold the top end
of rocker control to
.3 .1 .2 .3 .4 .5.7.6.4 .5 .8 .10 .11.9
light-sensitive
on / off
adjust the accelerator
and brake pedal away
from you. Hold the
lower end of the
control to move the
pedals toward you.
Adjust the pedals only
when the vehicle is
stopped and the
gearshift lever is in the
P (Park) position.
With the memory
function, the
adjustable pedals,
along with the driver’s
seat, can be
automatically
positioned in two
programmable
positions using the
control located on the
driver’s seat. Please
see your Owner’s
Guide for instructions
on how to use this
memory feature.
.3 SPEED CONTROL:
To set the speed
control, press the ON
button and release.
Accelerate to the
desired speed and
press the SET button
and release. Once the
system is engaged,
an icon will appear
in the instrument
cluster. To increase
speed, tap the SET
button and the speed
will increase in small
increments each time,
or use the accelerator
pedal to reach desired
speed and then press
SET. To reduce speed,
press and hold CST
until desired speed is
reached. Press and
release the CST button
and speed will
decrease in small
increments. Also, you
can depress the brake
pedal until desired
speed is reached
and press SET. Press
RESUME to return the
vehicle to a previously
set speed if the
vehicle is traveling
more than 30 mph
(48 km/h).
T STEERING
.4 TIL
COLUMN:
the steering wheel,
push the adjustment
lever down to unlock
the steering column.
While the lever is in
the down position, tilt
the steering column to
To adjust
your desired position.
Then, while holding
the steering column in
place, pull the lever
up to its original
position to lock the
steering column.
.5 MESSAGE
CENTER: With the
ignition in the ON
position, the message
center, located on your
instrument cluster,
displays important
vehicle information
through a constant
monitor of vehicle
systems. You may
select display features
on the message center
for a display of status,
preceded by a brief
indicator chime. The
system will also notify
you of potential vehicle
problems with a dis-
play of system warn-
ings, followed by a
long indicator chime.
For more detailed
information, please see
your Owner
.6 STEERING WHEEL
CONTROLS: Press
to select AM, FM1,
FM2 or CD. Press
SEEK to select a
station or track.
Press VOL to adjust
volume. Use the TEMP
button to adjust the
temperature and the
FAN button to adjust
fan speed.
.7 FOUR-WHEEL
DRIVE CONTROL
(IF EQUIPPED): 2H (2WD
HIGH) delivers power
to the rear wheels only
and is the optimal
position for smooth
and fuel economy.
’s Guide.
ness
4H (4WD HIGH)
provides mechanically
locked four-wheel drive
power to all four
wheels. 4L (4WD
LOW) provides
mechanically locked
four-wheel drive when
extra power at reduced
speeds is r
shift from 2H to 4H,
with the electronic
shift 4WD system,
move the control at
any forward speed up
to 55 mph (88 km/h).
To shift to or from 4L,
bring the vehicle to a
stop and keep the
brake pedal depressed.
Next, place the
gearshift in N
(Neutral), and then
move the control to or
from 4L. Some
mechanical noise may
be heard when the
system engages.
This is normal and
no service is required.
equired. To
.8 AUDIOPHILE
IN-DASH SIX CD /
MP3 SOUND SYSTEM:
Please see reverse side
for more details.
.9 TRACTION ASSIST
(IF EQUIPPED):
Your
vehicle may be
equipped
assist. The TCS switch
has an indicator light
that illuminates when
the system is off.
The system will
automatically turn on
ever
is turned off and on.
For more information,
please see your
Owner's Guide.
.10 AUTOMATIC
TEMPERATURE
CONTROL SYSTEM
WITH HEATED SEATS:
Please see reverse side
for more details.
with traction
y time the ignition
.11 AUXILIARY
POWERPOINT (12V):
An auxiliary power
point is located on the
instrument panel.
An additional auxiliary
power point is located
on the lower rear side
of the center console
that is accessible fr
the rear seats. Do NOT
plug optional electrical
accessories into the
cigarette lighter.
om
.1 SERVICE ENGINE
SOON LAMP:
Illuminates briefly when
the ignition is turned to
the ON position.
light comes on after
the engine is started,
please see your
Owner’s Guide.
.2 BRAKE SYSTEM
WARNING: To confirm
the brake system
warning light is
functional, it will
momentarily illuminate
when the ignition is
turned to the ON
position when the
engine is not running,
If the
or in a position between
the ON and START
positions, or by applying
the parking brake
when the ignition has
ned to the ON
been tur
position. If the brake
system warning light
does not illuminate
at this time, seek
vice immediately
ser
from your
Illumination
releasing the parking
brake indicates low
brake fluid and
the brake system
should be inspected
immediately by your
servicing dealership.
dealership.
after
.3 AIR BAG
READINESS: If this
light fails to illuminate
when the ignition is
turned ON, continues
to flash, or r
on, have the system
serviced immediately.
A chime will also
sound when a
malfunction in
the supplemental
restraint system has
been detected.
.4 ABS WARNING
LAMP:
briefly when the
ignition is turned
to the ON
emains
Illuminates
position. If the light
comes on after the
engine is started,
please see your
Owner’s Guide.
.5 OVERDRIVE OFF:
Illuminates when
the overdrive function
of the transmission
has been tur
refer to the Driving
chapter of your Owner’s
Guide for additional
information. If the
light flashes steadily or
does not illuminate,
have the transmission
serviced soon, or
damage may occur.
ned of
f;
AUTO-DIMMING
REAR VIEW MIRROR:
The auto-dimming
rear view mirror is
equipped with a
feature that will
reduce glare in the
rear view mirror
when bright lights
are detected. It
automatically returns
to normal / clear when
the vehicle is placed
in R (Reverse). For
more information,
please see your
Owner’s Guide.
REMOTE ENTRY
SYSTEM:
A once to lock all
doors. The parklamps
will flash. Pressing
the control a second
time will chirp the
horn and the
parklamps will flash
once more to confirm
that all doors are
closed and locked.
Press control B once
to unlock the driver's
door and twice to
unlock all doors.
Press control C to
sound the panic
alarm. To silence,
press the control
again, or turn the
ignition on. The
remote entry system
can also control the
memory feature.
Please see your
Owner's Guide for
Press control
B
AC
instructions on
how to activate.
KEYLESS ENTRY
SYSTEM:
With this control you
can lock or unlock all
doors without using
a key.
Unlock all doors
Enter the five-digit
program code and
then press 3 • 4
Lock all doors
Press 7 • 8 and
9 • 0 at the
same time.
®
R
TMINDE
BEL
BeltMinder
is a supplemental
warning to the safety
belt warning function.
This feature provides
additional reminders
by intermittently
sounding a chime
and illuminating the
safety belt war
lamp in the instrument
cluster when the
driver's and front
passenger's safety
belt is unbuckled.
Both the driver's and
front passenger's
safety belt usages are
monitored and either
may activate the
BeltMinder
SECURILOCK
PASSIVE ANTITHEFT SYSTEM:
®
feature
®
feature.
™
: The
ning
Securilock™ passive
anti-theft system
is an engine
immobilization system.
This system is
designed to help
prevent the engine
from being started
unless a coded key
programmed to your
vehicle is used. Your
Securilock™ system
is armed immediately
after switching the
ignition to the OFF /
LOCK position. The
theft indicator will
flash every two seconds when the vehicle is armed.
Switching the
ignition to the ON
position with a coded
key disarms the
system. The theft
indicator will
illuminate for three
seconds and then go
out. Your vehicle
comes with two
coded keys. Additional
coded keys can be
purchased from your
dealer. For more
detailed infor
on your Securilock™
passive anti-theft
system, please see
your Owner
REVERSE SENSING
SYSTEM (RSS)
EQUIPPED): This sonar
system sounds a tone
to warn the driver of
obstacles near the
rear bumper when
the reverse gear is
selected. Obstacles
can be detected
within approximately
6 feet (2 m) behind
mation
’s Guide.
(IF
the rear bumper
while the vehicle
moves in reverse at
speeds less than 3
mph (5 km/h). The
reverse sensing
system defaults to
on, but can be
disabled by turning
the ignition on,
placing the gearshift
in (R) Reverse and
pressing the RSS
control. An indicator
light on the control,
located next to the
cigarette lighter, will
illuminate when the
system is turned off.
POWER SLIDING
BACK WINDOW:
your vehicle is
equipped with a
power sliding back
window, press and
hold the bottom part
ocker switch
of the r
to open the window
all the way. Press
and hold the top part
of the switch to
close the window.
The ignition must
be in the Run or
Accessory position.
If
 Loading...