

Lincoln A Series, 1880, 1882E, 1882, 1884 Installation And Maintenance Manual

Installation and maintenance guide
PowerLuber grease gun
(lithium ion)
1880, 1882, 1882E, 1884 series “A”
Date of issue January 2014
Form number 423077A
Section D7
Page 86A
DANGER
Read manual prior to installation or use
of this product. Keep manual nearby for
future reference. Failure to follow
instructions and safety precautions may
result in death or serious injury.
To order call 1-800-548-1191 or visit www.partdeal.com - info@partdeal.com

Contents
General power tool safety warnings . 2
Specific safety ................... 3
Inspection ...................... 5
Operation ...................... 5
Charger operation ................ 8
Safety instruction for charger and
batteries ....................... 11
Exploded view and parts list ....... 13
Troubleshooting ................. 15
General power tool
safety warnings
WARNING
Read all safety warnings and instructions. Failure to follow the warnings and
instructions may result in electric shock,
fire and/or serious injury.
Save all warnings and instructions for future
reference.
The term “power tool” in the warnings refers to your mains-operated (corded) power
tool or battery-operated (cordless) power
tool.
Work area safety
Keep work area clean and well lit.
Cluttered or dark areas invite accidents.
Do not operate power tools in explosive
atmospheres, such as in the presence of
flammable liquids, gases or dust. Power
tools create sparks which may ignite the
dust or fumes.
Keep children and bystanders away while
operating a power tool.
Distractions can cause you to lose control.
Electrical safety
Power tool plugs must match the outlet.
Never modify the plug in any way. Do not
use any adapter plugs with earthed
(grounded) power tools. Unmodified plugs
and matching outlets will reduce risk of
electric shock.
Avoid body contact with earthed or
grounded surfaces such as pipes, radiators,
ranges and refrigerators. There is an increased risk of electric shock if your body is
earthed or grounded.
Do not expose power tools to rain or wet
conditions. Water entering a power tool will
increase the risk of electric shock.
Do not abuse the cord. Never use the cord
for carrying, pulling or unplugging the power
tool. Keep cord away from heat, oil, sharp
edges or moving parts. Damaged or entangled cords increase the risk of electric shock.
When operating a power tool outdoors,
use an extension cord suitable for outdoor
use. Use of a cord suitable for outdoor use
reduces the risk of electric shock.
If operating a power tool in a damp
location is unavoidable, use a Residual
Current Device (RCD) protected supply.
Notice
!
The term “residual current device
(RCD)” may be replaced by the term
“ground fault circuit interrupter (GFCI)”
or “earth leakage circuit breaker (ELCB)”.
Personal safety
Use personal protective equipment.
Always wear eye protection. Protective
equipment such as dust mask, non-skid
safety shoes, hard hat, or hearing protection
used for appropriate conditions will reduce
personal injuries.
Remove any adjusting key or wrench be-
fore turning the power tool on.
Power tool use and care
Do not force the power tool. Use the correct
power tool for your application. The correct
power tool will do the job better and safer at
the rate for which it was designed.
Do not use the power tool if the switch
does not turn it on and off. Any power tool
that cannot be controlled with the switch is
dangerous and must be repaired.
Disconnect the plug from the power
source and/or the battery pack from the
power tool before making any adjustments,
changing accessories, or storing power
tools.
Store idle power tools out of the reach of
children and do not allow persons unfamiliar
with the power tool or these instructions to
operate the power tool.
Maintain power tools. Check for misalignment or binding of moving parts, breakage
of parts and any other condition that may
affect the power tool’s operation.
Use the power tool, accessories and tool
bits in accordance with instructions.
2
To order call 1-800-548-1191 or visit www.partdeal.com - info@partdeal.com
Battery tool use and care
Recharge only with the battery charger
specified by the manufacturer.
Use power tools only with specifically
designated battery packs. Use of any
other battery packs may create risk of
injury and fire.
When battery pack is not in use, keep
it away from other metal objects, like
paper clips, coins, keys, nails, screws or
other small metal objects, that can make a
connection from one terminal to another.
Shorting the battery terminals together
may cause burns or a fire.
Under abusive conditions, liquid may be
ejected from the battery; avoid contact.
Liquid ejected from battery may cause
irritation or burns. If contact accidentally
occurs, flush with water. If liquid contacts
eyes, seek medical help.
Specific safety
• Always wear eye protection. The PowerLuber can generate up to 10,000 psi
(689 bar).
• Use only Lincoln 1218, 1224, 1230 or
1236 outlet whip hoses. Grease injection
injuries are a very serious injury. Hold the
hose only in the area of the spring guard.
Avoid accidental starting. Be sure switch
is not depressed when inserting battery
pack.
• Replace the hose at the first sign of wear,
kink or damage to the outside jacket.
• Do not bend the hose so that it becomes
kinked.
• Do not overreach. Keep proper footing
and balance at all times. Proper footing
and balance enable better control of the
tool in unexpected situations.
• Use safety equipment. Always wear eye
protection.
• Dust mask, non-skid safety shoes, hard
hat or hearing protection must be used
for appropriate conditions.
WARNING
To reduce the risk of injury, the
user must read the instruction
manual.
Separate collection. This product must not be disposed of
with normal household waste.
WARNING
Grease gun can develop high pressure
up to 10,000 psi (689 bar). Use safety
glasses and gloves for protection during
operation. Keep hands clear of exposed
rubber portion of hose.
Service
WARNING
Do not use any hose that has not been
approved by Lincoln. Extreme pressure
may cause nozzle extension or whip
hose to burst.
Replace hose at first sign of wear, kinks,
or damage to outside jacket.
Follow whip hose instructions and
warnings. Failure to comply may result
in serious injury or death.
Tool service must be performed only by
qualified repair personnel. Service or maintenance performed by unqualified personnel
may void warranty and result in a risk of
injury.
When servicing a tool, use only identical
replacement parts.
3
To order call 1-800-548-1191 or visit www.partdeal.com - info@partdeal.com

The gun uses lubricants, that may be flammable and poisonous if ingested. Do not use
gun near open flame or other fire hazards.
Greases are often marketed as high temperature because it must maintain their lubricating properties in hot areas, but the lubricants may be flammable if the
temperature is too high. Please read all
warnings on lubricants before using this
gun. Do not use flammable greases with this
grease gun.
Tool use and care
Do not use tool if switch does not turn it on
or off. A tool that cannot be controlled with
the switch is dangerous and must be
repaired.
Do not continue to hold down trigger if
grease gun is stalled. This could damage the
motor or cause fire.
Disconnect battery pack from tool before
making any adjustments, changing accessories, or storing the tool. Such preventive
safety measures reduce the risk of starting
the tool accidentally.
Store the tools out of reach of children
and other untrained persons. Tools are dangerous in the hands of untrained users.
When battery pack is not in use, keep it
away from other metal objects like: paper
clips, coins, keys, nails, screws, or other
small metal objects that can make a connection from one terminal to another.
Shorting the battery terminals together may
cause sparks, burns, or a fire.
Maintain tools with care. Check for misalignment or binding of moving parts,
breakage of parts, and any other condition
that may affect the tool’s operation. If damaged, have the tool serviced before using.
Many accidents are caused by poorly maintained tools.
Use only accessories that are recommended by Lincoln.
Only accessories that are capable of handling 10,000 psi (689 bar) should be used.
Accessories that may be suitable for one tool
may create a risk of injury when used on
another tool.
Appropriate use
The PowerLuber was exclusively designed to
pump and dispense lubricant using 18 volt
battery power. Do not exceed the maximum
specification ratings.
Specifications
Basic PowerLuber model 1880
Operating power 14.5 to 20.5 V DC
Maximum operating
pressure
Low output 6,000 psi (413 bar)
High output 6,000 psi (413 bar)
Grease reservoir
capacity
Maximum peak
pressure
Operating temperature
range
Operating current 4 A at 20 to 130 °F
Rated current 5 A at 20 to 130 °F
Lubricant (grease) up to NLGI #2
Grease output
Low output (L) 3.5 oz./min.
High output (H) 5.5 oz./min.
Weight 6.5 lbs. (2,0 kg)
Accessories
Battery li-ion Model 1871
Output 20 V DC maximum
Capacity 1,500 mAh
Battery charger Model 1870
Charge time 1.5 hours
Input, vac (0.6 A) 120 v, 60 hz
Outlet hose Model 1236
Pressure rating 10,000 psi (689 bar)
Length of the hose 36 in. (914 mm)
Note 1: Operating current and grease output data at
1,000 psi (69 bar).
Note 2: The declared vibration total value has been measured in accordance with a standard test method and may be
used for comparing one tool with another and the declared
vibration total value may also be used in a preliminary assessment of exposure.
Note 3: The vibration emission during actual use of the
power tool can differ from the declared total value depending
on the ways in which the tool is used; and of the need to
identify safety measures to protect the operator that are
based on an estimation of exposure in the actual conditions
of use (taking account of all parts of the operating cycle such
as the times when the tool is switched off and when it is running idle in addition to the trigger time).
14.5 oz. (411 g)
10,000 psi (689 bar)
0 to 120 °F
(–18 to 50 °C)
(–6 to 54 °C)
(–6 to 54 °C)
(0,103 l/min.)
(0,162 l/min.)
4
To order call 1-800-548-1191 or visit www.partdeal.com - info@partdeal.com

Models
General description
Sales model Components included
1880 Grease gun with battery
1882 Grease gun with battery,
charger and carrying
case
1882E Grease gun with battery,
charger 230 V AC
European and carrying
case
1884 Grease gun with battery,
extra battery, charger
and carrying case.
1870E Charger 230 V AC
European
1871 Battery pack
1236 Hose, 36 in. (914 mm)
5852 Coupler, midget hydraulic
251-10124-7 Coupler (European)
The Lincoln PowerLuber is a lithium-ion
battery operated grease gun. The gun was
developed for manual lubrication of grease
points and includes a light emitting diode
(LED) and electronic control center.
The PowerLuber is driven by a small, low
voltage electric motor connected to a gear
transmission. The rotary motion of the
motor is converted into a reciprocating
motion of the plunger using a yoke
mechanism. The PowerLuber is a positive
displacement single acting pump.
Control center
Technology incorporated into the 1880
series PowerLuber includes:
• Motor protection preventing overload due
to excessive current draw. The display will
flash red when this occurs.
• An LCD showing battery charge, pump
speed and grease output.
• An illuminating LED light to help locate
grease fittings in dim light.
5
To order call 1-800-548-1191 or visit www.partdeal.com - info@partdeal.com
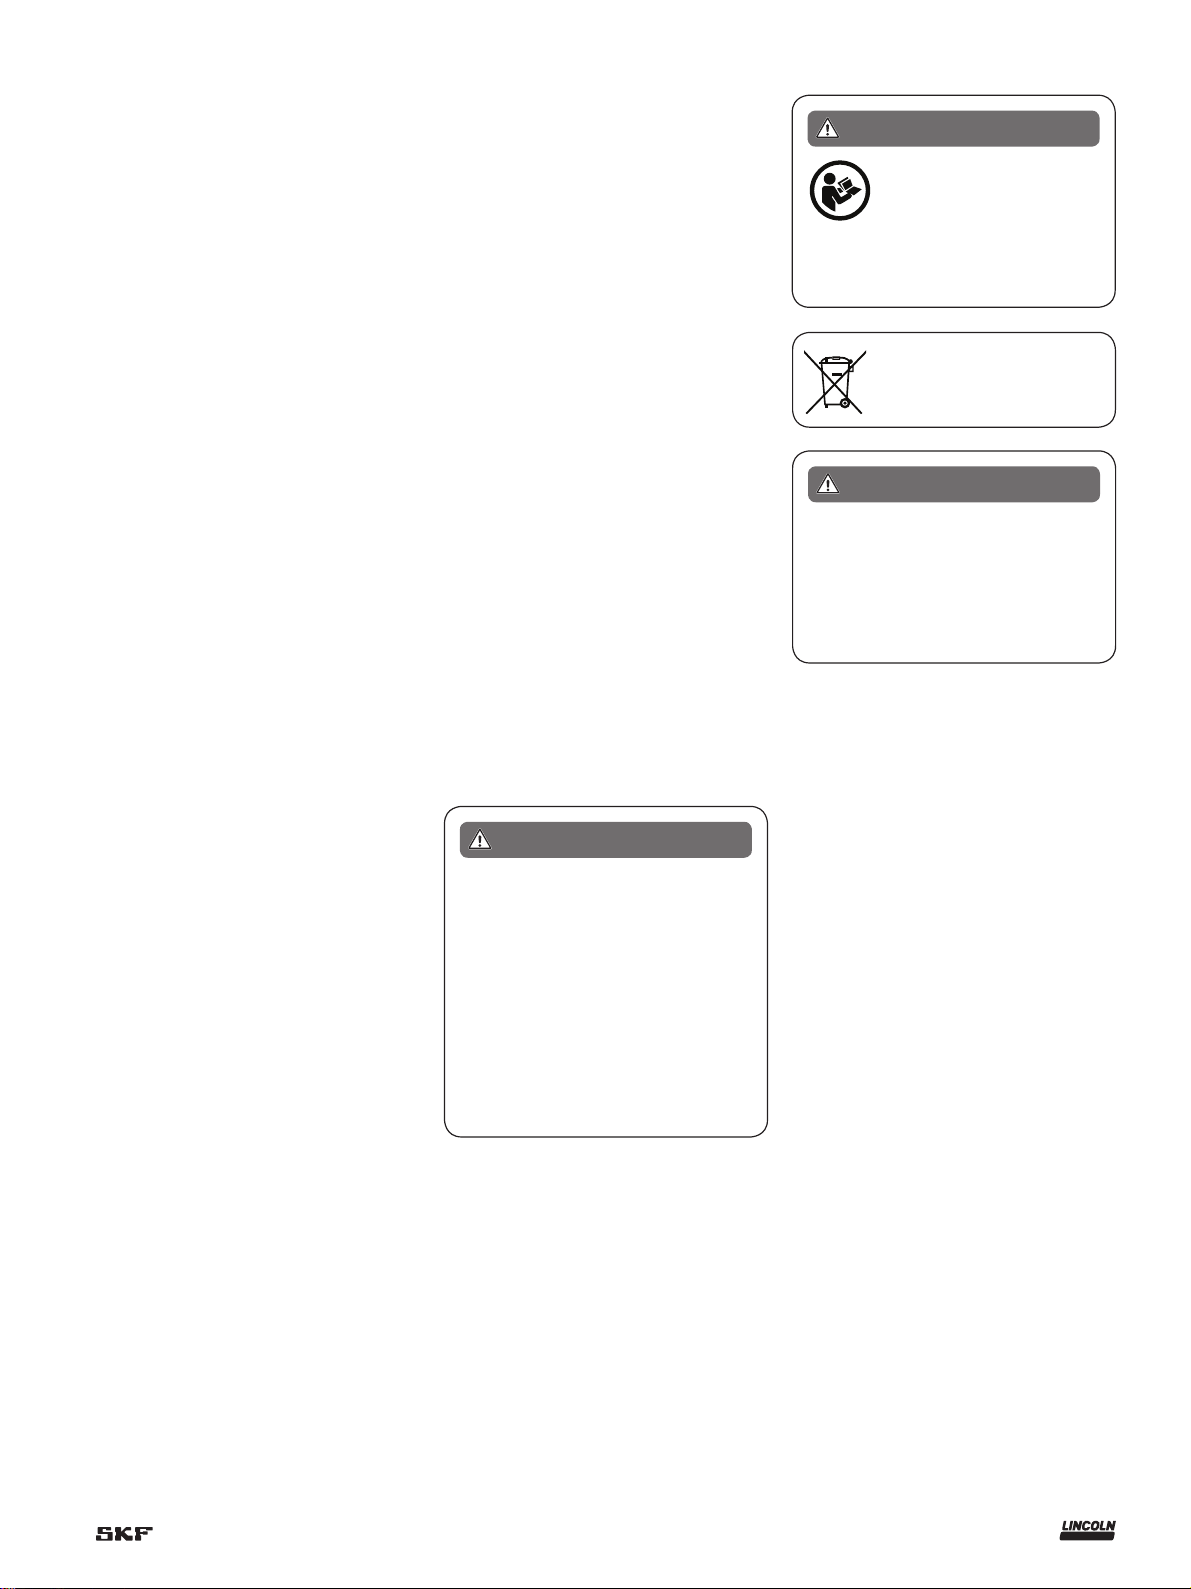
1880 Grease gun
Control
Button
Displ ay
Hose
LED ligh t
Bulk
valve
Vent valve
Suppo rt
Fig. 1
Inspection
Visually inspect for damaged, loose or missing parts. If equipment is worn or damaged,
remove from service. Contact an authorized
service center for damage assessment or
repair.
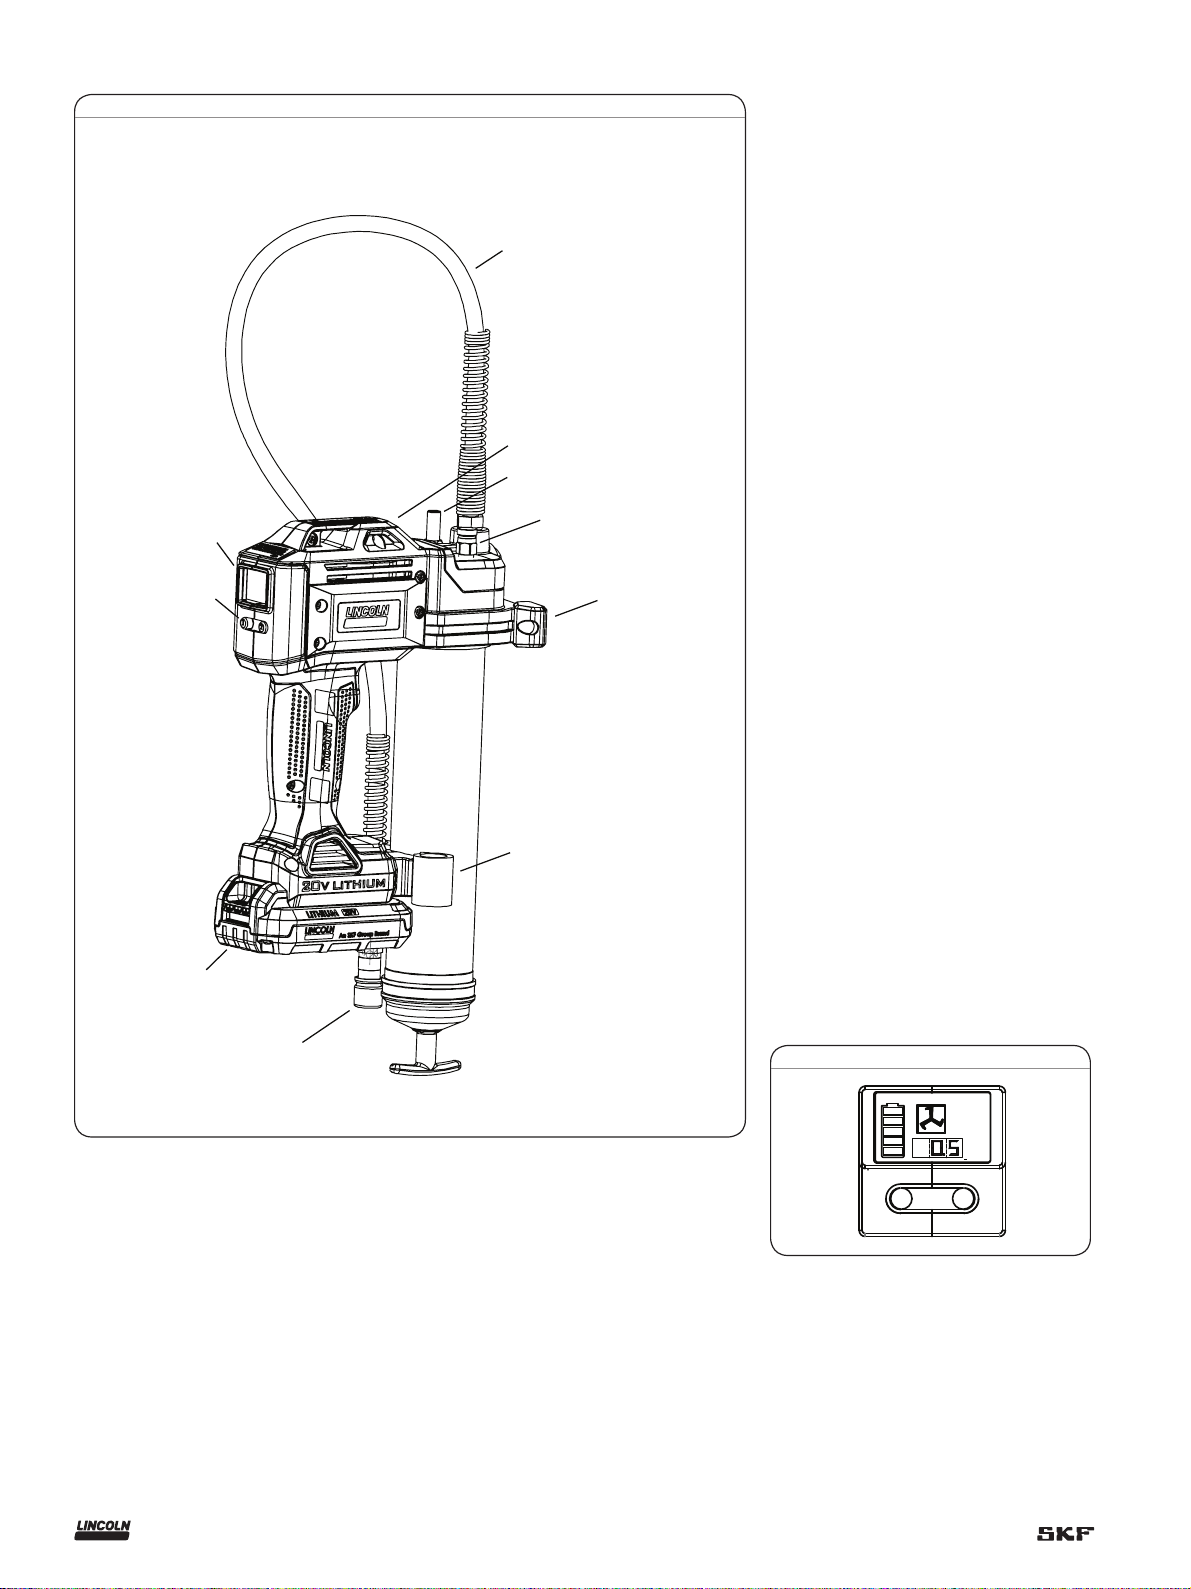
Operation
Speed selection
Pressing button 2 switches the tool between high and low pump speed. The letter
“L” or “H” will be displayed on the screen.
High delivers 5.5 ounces (0,162 l) per
minute at 1,000 psi (68 bar) back pressure.
Low delivers 3.5 oz. (0, 103 l) per minute
at 1,000 psi (68 bar) back pressure.
High output is recommended if the tool is
used to lubricate large bearings. Also, high
output is recommended if tool is used to refill small reservoirs.
Low output is recommended if the tool is
used in construction, mining applications
and general lubrication.
Battery
5852 or 251-10124-7
coupler
LCD display and LED
light
Hose hold er
• Button number 1 turns on/off the display
and LED:
• The tool’s trigger also turns on the display
and LED:
• The LCD and display will turn off after 30
seconds if not turned off manually.
Fig. 2
L
OZ
1
2
6
To order call 1-800-548-1191 or visit www.partdeal.com - info@partdeal.com
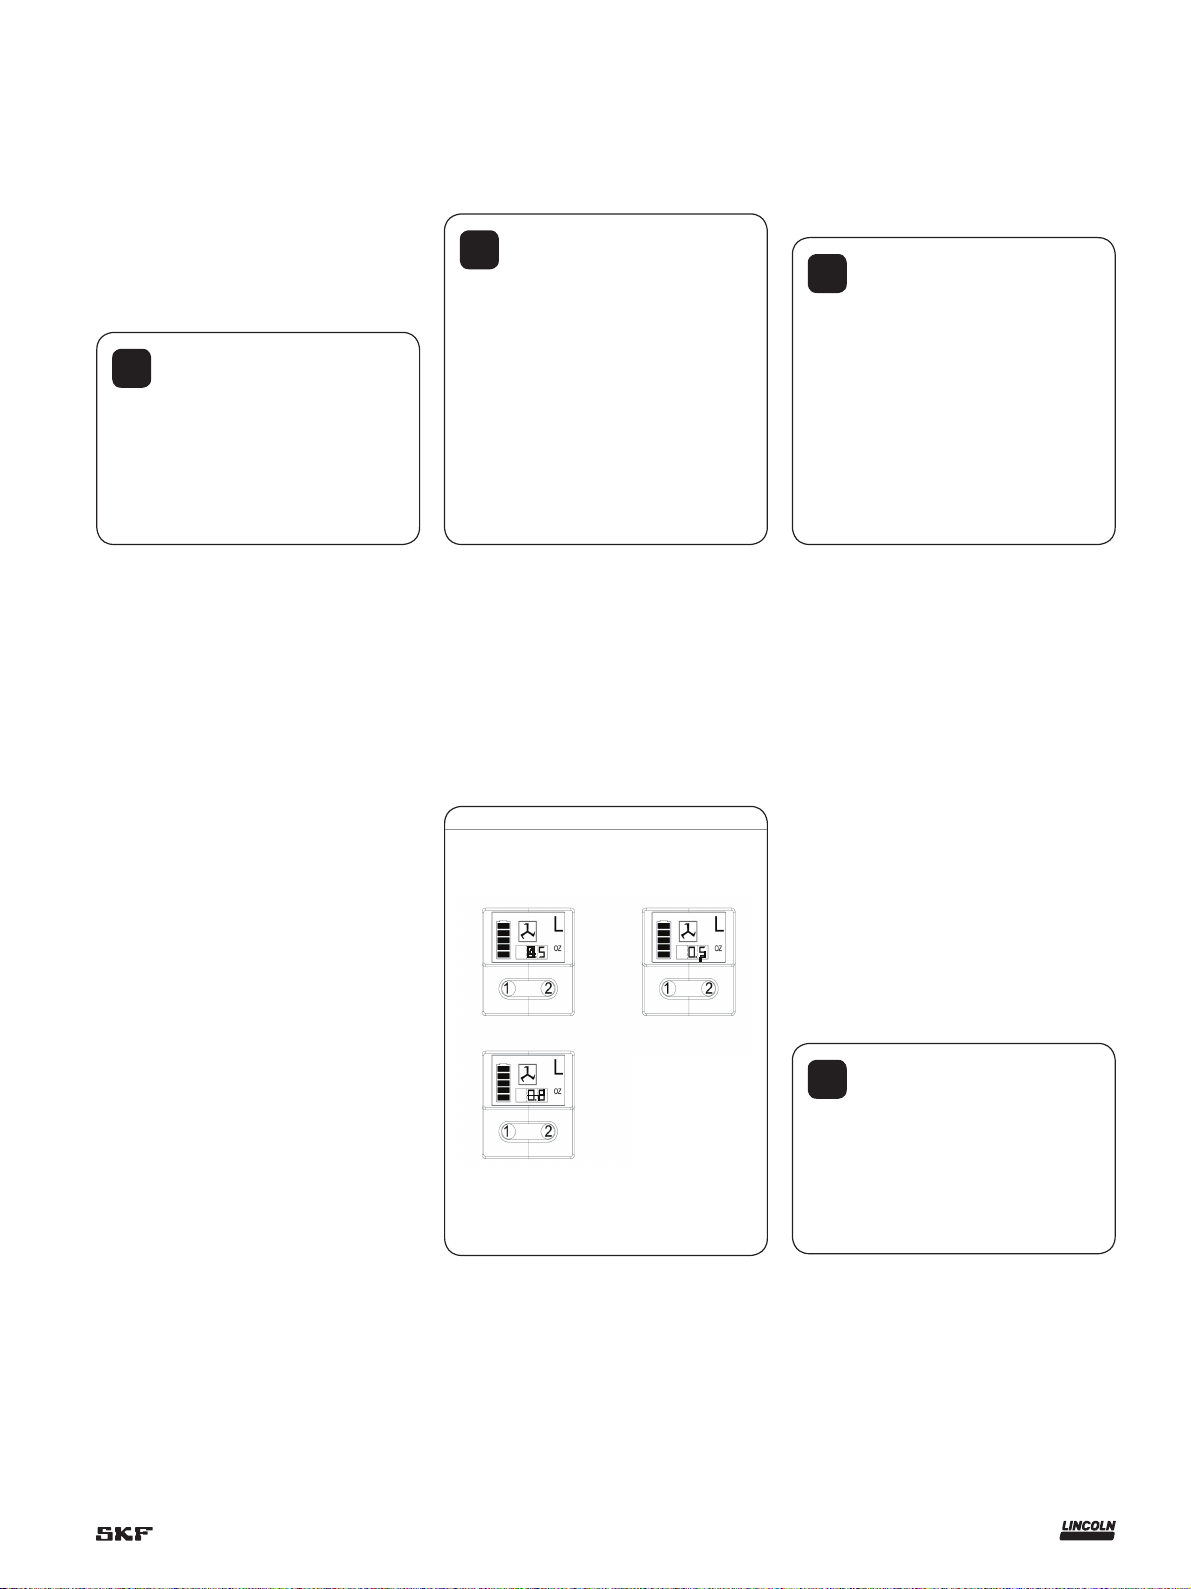
Grease flow
Priming instructions
Install grease
monitoring
• LCD shows the output of grease delivered
in ounces or grams.
• Clear grease output by holding button 1
for 3 seconds.
• Change grease output by holding button
1 for 15 seconds.
Notice
!
Grease meter is very accurate and
does not show output if prime is lost.
Replace grease
cartridge or refill tube
1 Prime the PowerLuber after each refill or
grease cartridge change. To prime, operate the gun until grease flows from hose.
Use vent valve († fig.1, page 4) to expel
air pockets.
2 Press set key 1 for 3 seconds to clear dis-
play of previous reading.
1 Open vent valve († fig.1, page 8).
Notice
!
Nach jedem Ersetzen der Kartusche das Entlüftungsventil öffnen.
Dadurch kann die Luft aus der Kartusche entweichen und die Fettpresse
vorgefüllt werden.
Den PowerLuber nach jeder Befüllung
bzw. jedem Wechsel der Fettkartusche
vorfüllen.
2 Operate the gun until grease flows from
the vent valve.
3 Close vent valve.
4 Press button “1” 3 seconds to clear dis-
play of previous reading.
Fig. 3
or
Current display
reading
Press 1 for 3 seconds
to clear display of
previous reading
cartridge
1 Unscrew the grease tube assembly from
the PowerLuber.
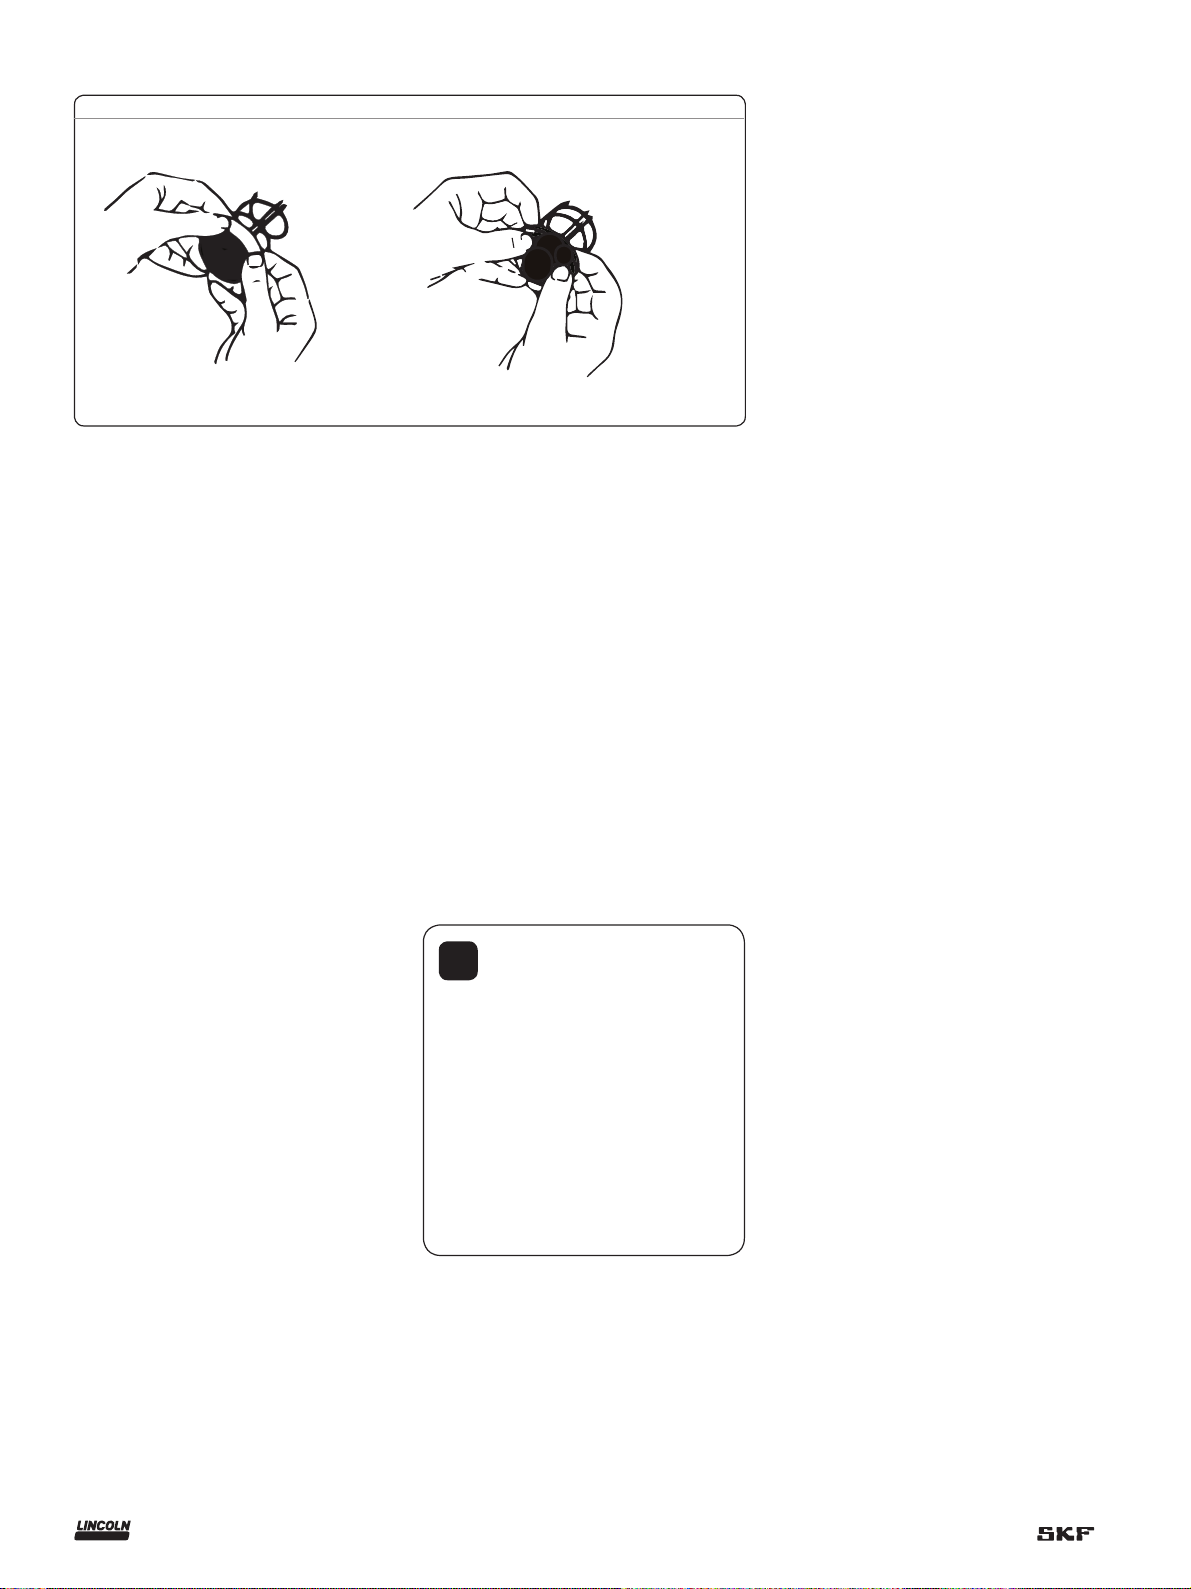
Notice
!
The follower seal lip must be directed toward the follower handle or
rear side for cartridge loading
(† figs. 4, page 12).
To change the direction of the follower
seal, unscrew tube cap from grease tube
assembly and pull on the handle to remove follower seal from tube. Flip follower seal over and reassemble.
2 Visually check the follower seal lip direc-
tion before loading a new cartridge.
3 Pull back on the follower handle and latch
the follower rod groove into the slot on
the tube cap.
4 Remove the plastic cap from the grease
cartridge and insert cartridge into the
container tube.
5 Remove the pull tab from the grease
cartridge and screw the grease tube
assembly into the pump assembly.
6 Thread grease tube assembly back onto
the power head.
7 Release follower rod from slot. Purge air
from pump. Refer to page 13 for air
purging instructions.
8 Reset display reading after purging air.
9 Refer to the section titled LCD display
and LED light, page 9.
Notice
!
Air pockets in the cartridge
lubricant will cause the gun to lose its
prime and will cause grease output
measurements and cartridge level
readings to be inaccurate.
7
To order call 1-800-548-1191 or visit www.partdeal.com - info@partdeal.com
To fill gun from bulk
container
1
Remove pump assembly from grease tube
assembly.
2 Pack lubricant into cavity of the pump
assembly.
3 Insert the open end of the grease tube
assembly into lubricant. Slowly pull the
follower handle back while pushing the
grease tube assembly deeper into the lubricant to prevent air pockets from being
pulled into the grease tube.
4 With the follower rod fully extended, pull it
sideways to latch the rod groove into the
slot in the grease tube assembly cap.
5 Loosely assemble the pump to the grease
tube assembly. Release the follower rod
from the grease tube assembly cap and
disengage the follower rod from the follower by rotating the follower handle.
6 Push the follower rod into the grease tube
assembly.
7 Unscrew the grease tube assembly from
the pump until lubricant oozes from the
interface. Tighten grease tube assembly
into the pump assembly.
8 Reset display reading after purging air.
9 Refer to the section titled
LCD display and LED light, († page 6).
Fig. 4
BulkCartridge
To fill gun with filler
pump
1 Engage the follower rod with the follower
by rotating the follower handle.
2 Insert the gun bulk fill valve into the filler
pump socket.
3 Operate the filler pump to fill the contain-
er. When the follower rod groove is exposed, the grease tube assembly is filled.
The follower rod will be extended approximately 20 cm (8 in.). Do not overfill!
4 Disengage the follower rod from the
follower by rotating the follower handle.
5 Push the follower rod into the grease tube
assembly.
6 Reset display reading after purging air.
Notice
!
Remove air pocket! Air pocket at
grease inlet will prevent grease from
being pumped. Unscrew the vent valve
three to four turns to remove small air
pockets trapped in this area. If the air
pocket is substantial and no grease
flows from coupler after trigger is pulled
for 15 seconds, refer to the following
steps.
To expel air pockets
(air purging)
1 Withdraw the follower rod from the
grease tube assembly cap and engage it
with the follower by rotating the follower
handle.
2 Unscrew the plug of vent valve 3 to 4
turns. Exert force on the follower handle
until grease flows through the small hole
in the side of the vent valve.
3 Tighten the vent valve.
4 Pull the trigger in short bursts to operate
gun until trapped air is expelled. Disengage the follower rod from the follower by
rotating the follower handle. Push the follower rod into the grease tube assembly.
5 If step 2 fails, unscrew the grease tube
assembly 3 turns from the pump
assembly.
6 Exert force on the follower handle until
lubricant oozes from the grease tube
assembly and pump assembly interface.
7 Retighten grease tube into the pump
assembly. Disengage the follower rod
from the follower by rotating the follower
handle. Push the follower rod into the
grease tube assembly.
Charger operation
Charging battery pack
Before using your PowerLuber for the first
time, the battery pack should be fully
charged. If the battery pack is installed in the
PowerLuber, remove it and follow charging
procedure below.
Lincoln chargers are designed to charge
Lincoln lithium-ion batteries in 30 to
90 minutes depending on the battery’s state
of charge and temperature.
8
To order call 1-800-548-1191 or visit www.partdeal.com - info@partdeal.com
Charging procedure
Make sure power circuit voltage is the same
as that shown on the charger specification
plate.
1 Plug the charger into an appropriate
outlet before inserting battery pack.
2 Insert the battery pack into the charger.
The green (charging) light will blink continuously indicating that the charging
process has started.
3 The completion of charge will be indicated
by the green light remaining on continuously. The pack is fully charged and may
be used at this time.
4 Disconnect charger from power source
when not in use.
CAUTION
Do not probe with conductive objects.
120/230 V AC present at charging terminals. Failure to comply may result in
death or personal injury.
Indicator light operation
The charge is complete (solid green).
Battery is charging (flashing green).
Red, at a fast rate. Replace battery.
Charger detected a weak or damaged
battery. Stop charging battery.
Hot/cold pack delay.
Charger detected a battery that is
excessively hot or cold. It
automatically starts a hot/cold pack
delay, suspending charging until
temperature of battery has
normalized. After this, charger
automatically switches to battery
charging mode.
Notice
!
Battery temperature will increase
during and shortly after use. Batteries
may not accept a full charge if they are
charged immediately after use. Allow the
battery pack to cool to room temperature before charging for best results.
Notice
!
Vent slots in top and bottom of
charger must not be obstructed.
Do not charge battery when temperature is below 5 °C (40 °F) or above 40 °C
(104 °F).
Important charging
Notices
Longest life and best performance can be
obtained if the battery is charged when the
air temperature is between 18 and 24 °C
(65 and 75 °F). Do not charge the battery in
an air temperature below 5 °C (40 °F) or
above 41 °C (105 °F). This is important and
will prevent serious damage to the battery.
1 The charger and battery may become
warm to the touch while charging. This is
a normal condition, and does not indicate
a problem.
2 If the battery does not charge properly:
2.1 Check current at receptacle by plug-
ging in a lamp or other appliance.
2.2 Check to see if the receptacle is con-
nected to a light switch which turns
power off when you turn out the
lights.
2.3 Move charger and battery to a loca-
tion where the surrounding air temperature is between approximately
18 to 24 °C (65 to 75° F).
2.4 If charging problems persist, take the
tool, battery and charger to your local
service center.
3 The battery should be recharged when it
fails to produce sufficient power on jobs.
Do not continue to use under these conditions. Follow the charging procedure.
You may also charge a partially used pack
whenever you desire with no adverse affect on the battery.
Under certain conditions, with the charger
4
plugged into the power supply, the exposed charging contacts of the charger
can be shorted by foreign material. Foreign materials of a conductive nature
such as, but not limited to, steel wool, aluminium foil, or any buildup of metallic
particles should be kept away from
charger cavities. Always unplug the
charger from the power supply when
there is no battery in the cavity. Unplug
charger before attempting to clean.
5 Do not freeze or immerse charger in
water or any other liquid.
WARNING
Do not allow any liquid to get inside
charger. Electric shock may result.
To facilitate cooling of battery pack after use, avoid placing charger or battery
pack in a warm environment such as a
metal shed or an un-insulated trailer.
Failure to comply may result in serious injury or death.
9
To order call 1-800-548-1191 or visit www.partdeal.com - info@partdeal.com

Safety instructions for charger
and batteries
Save these instructions
This manual contains important safety and
operating instruction for the Lincoln model
1870E battery charger.
DANGER
Do not probe with conductive objects.
Do not charge damaged battery.
Risk of Electric Shock 120 V AC or
230 V AC present at charger terminals.
Replace immediately.
Failure to comply may result in seri-
ous injury or death.
Read all instructions
• Do not incinerate the battery pack even if
it is severely damaged or is completely
worn out. The battery pack can explode in
a fire. Toxic fumes and materials are created when lithium ion battery packs are
burned.
• Do not charge or use battery in explosive
atmospheres, such as in the presence of
flammable liquids, gases or dust. Inserting or removing the battery from the
charger may ignite the dust or fumes.
• If battery contents come into contact with
the skin, immediately wash area with mild
soap and water. If battery liquid gets into
the eye, rinse water over the open eye for
15 minutes or until irritation stops.
If medical attention is needed, the battery
electrolyte for lithium-ion batteries is
composed of a mixture of liquid organic
carbonates and lithium salts.
• Contents of opened battery cells may
cause respiratory irritation. Provide fresh
air. If symptoms persists, see a doctor for
treatment.
DANGER
Do not expose battery to spark or flame.
Battery liquid may burn.
Do not splash or immerse in water or
other liquids. This may cause premature
cell failure.
Failure to comply may result in serious injury or death.
• Do not store or use the tool and battery in
locations where the temperature may
reach or exceed 40 °C (105 °F) such as
outside sheds or metal buildings in the
summer.
DANGER
Never attempt to open the battery pack
for any reason. If the plastic housing of
the battery pack breaks or cracks, return
to a service center for recycling.
Failure to comply may result in serious
injury or death.
1 Before using a battery charger, read all
instructions and cautionary markings on
battery charger, battery pack, and product using battery.
CAUTION
Do not charge Lincoln model 1871
battery packs with any other charger.
To reduce risk of injury, Lincoln model
1870 or 1870E chargers should only be
used to charge Lincoln battery pack
model 1871. Other types of batteries
may burst.
Failure to comply may result in
serious personal injury
2 Do not expose charger to rain, snow or
frost.
3 Do not abuse cord. Never carry charger
by cord or pull on it to disconnect from
receptacle. Pull by plug rather than cord
when disconnecting charger. Have damaged or worn power cord and strain reliever replaced immediately. Do not attempt to repair power cord.
4 Make sure cord is located so that it will
not be stepped on, tripped over, or otherwise subjected to damage or stress.
5 Do not use an extension cord unless ab-
solutely necessary. Use of improper extension cord could result in a risk of fire
and electric shock.
6 Do not operate charger with damaged
cord or plug. Replace immediately, to
avoid a hazard. Do not attempt to repair
power cord.
7 Do not operate charger if it has received
a sharp blow, been dropped, or otherwise damaged in any way, take it to a
qualified service center.
10
To order call 1-800-548-1191 or visit www.partdeal.com - info@partdeal.com

8 Do not disassemble charger or battery
pack. Take it to a qualified service centre
when service or repair is required. Incorrect reassembly may result in risk of
electrical shock or fire.
9 Unplug charger from outlet before
attempting any cleaning to reduce risk of
electric shock.
10 Charge the battery pack in a well venti-
lated place; do not cover the charger and
battery with anything while charging.
11 Do not store the charger or battery packs
in locations where the temperature may
reach or exceed 122 °F (50 °C) such as a
metal tool shed, or a car in the summer
which can lead to deterioration of the
storage battery.
12 Do not charge battery pack when the
temperature is below 40 °F (5 °C) or
above 105 °F (40 °C). This is very impor-
tant for proper operation.
13 Do not incinerate battery pack. It can
explode in a fire.
14 Do not charge battery in damp or wet
locations.
15 Do not attempt to charge any other
cordless tool or battery pack with the
Lincoln model 1870 series charger.
16 Do not short across the terminals of the
battery pack. Extremely high temperatures could cause personal injury or fire.
17 This appliance is not intended for use by
persons (including children) with reduced
physical, sensory or mental capabilities,
or lack of experience and knowledge.
18 Dispose of expended batteries properly.
The Lincoln model 1871 battery pack
contains rechargeable, lithium-ion batteries. These batteries must be recycled
or disposed of properly. Drop off
expended battery packs at your local replacement battery retailer, or your recycling centre.
11
To order call 1-800-548-1191 or visit www.partdeal.com - info@partdeal.com

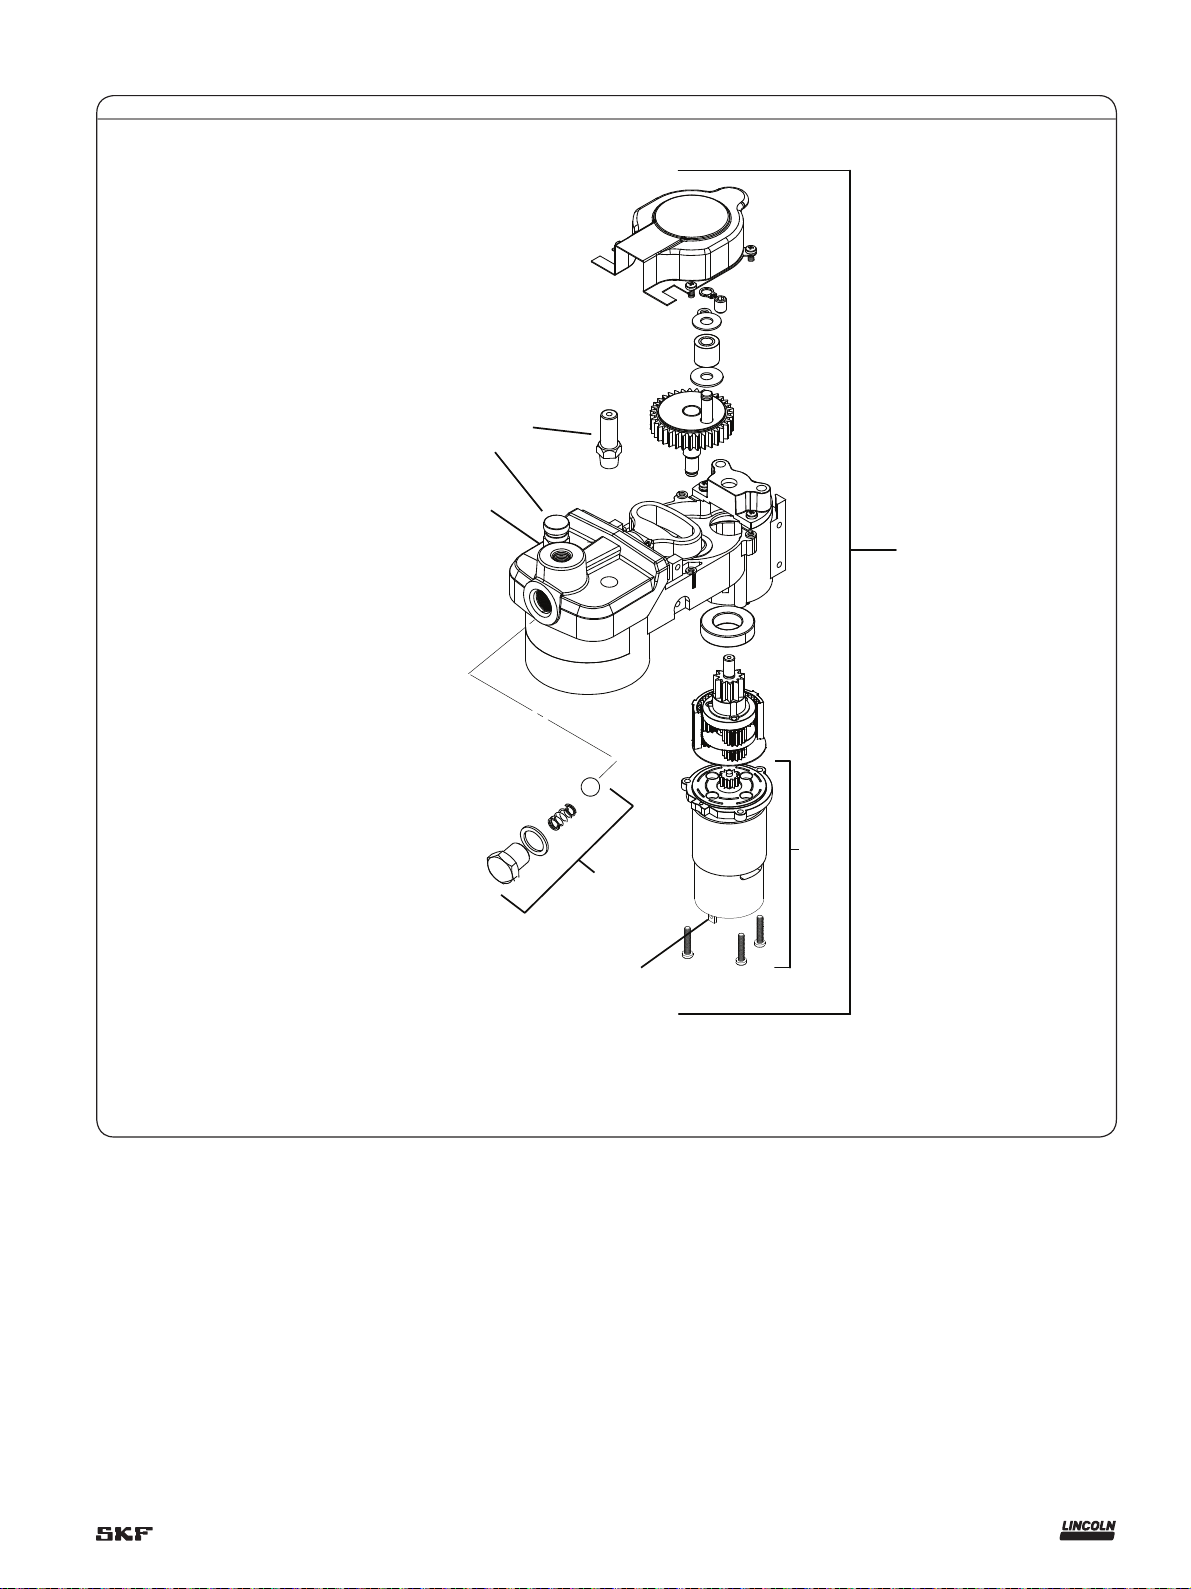
Fig. 6
1
6
11
9
4
3
12
5
13
8
17
10
2
7
12
To order call 1-800-548-1191 or visit www.partdeal.com - info@partdeal.com
7
16
/
UNEF thread
Fig. 7
18
16
- 28
13
14
Positive (red) wire must be
connected to the positive
terminal on the motor. A small
plastic dot identifies the positive
terminal.
15
13
To order call 1-800-548-1191 or visit www.partdeal.com - info@partdeal.com

Service parts list
Item Description Part number
1 Flexible hose 36 in.(914 mm)
with gasket
2 Coupler (model 1880) 5852
Coupler (model 1880E) 251-10124-7
3 Packing 34793
4 Follower assembly kit 272072
5 Grease tube assembly 271882
6 Gasket kit (hose) 271884
7 Coupler cap kit 286093
8 Electrical components kit 280067
9 Decal kit 280068
10 Handle with electrical
component kit
11 Handle with screw kit 280070
12 Switch kit 280071
13 Pump assembly kit 280072
14 Check valve kit 280073
15 Motor with adapter kit 280074
16 Vent valve kit 286315
17 Battery 18 V (lithium) 1871
18 Filler nipple 91108
Not shown Charger (lithium) 1870
Not shown Strap 1414
Not shown Case kit 280085
1236
280069
14
To order call 1-800-548-1191 or visit www.partdeal.com - info@partdeal.com

Troubleshooting
Condition Possible cause Corrective action
Motor fails to run. Battery needs charging. Recharge battery.
Faulty wiring to motor. Remove battery, disassemble handle and check
PowerLuber fails to dispense grease. Grease tube assembly is out of grease. Check that grease tube assembly has grease.
Loss of prime. Repeat priming operation.
Ball check (14) is not functioning. Remove ball check (14), clean and inspect ball
PowerLuber continues to lose prime. Air may be trapped in several locations in container
after bulk filling.
Follower may be binding in grease tube assembly. Replace grease tube assembly (5). Disassemble
Check ball seat and check ball dirty. Clean check ball and check ball seat.
Battery fails to take a charge. Charger may not have power. Check that receptacle has power.
Battery may be bad. Replace battery.
wiring for loose connection.
seat area.
Empty grease tube assembly, refill and repeat
priming instructions.
grease tube assembly and clean. Be sure that
follower has properly entered the grease
cartridge.
or
Verify that the follower is not caught on the rim
of the grease cartridge.
15
To order call 1-800-548-1191 or visit www.partdeal.com - info@partdeal.com

Declaration of Confomrity as defined by
Machinery Directive 2006/42/EC.
The manufacturer Lincoln Industrial, hereby
declares that the model of the PowerLuber
Grease Gun in the version supplied by us
complies with the provision of the above
mentioned directive.
Complies with the following EC-Directives
and standards
2006/42/EC, 2009/98/EC, 2004/108EC,
2006/66/E, EN ISO 12100:2011,
EN 55014-1, EN 55014-2, EN 61000-7,
EN 60745-1
St. Louis, MO January 2014 Paul Conley,
Chief Engineer
16
To order call 1-800-548-1191 or visit www.partdeal.com - info@partdeal.com

Lincoln industrial
standard warranty
Standard limited warranty
Lincoln warrants the equipment manufactured and supplied by Lincoln to be free
from defects in material and workmanship
for a period of one (1) year following the
date of purchase, excluding there from any
special, extended, or limited warranty published by Lincoln. If equipment is determined to be defective during this warranty
period, it will be repaired or replaced, within
Lincoln’s sole discretion, without charge.
This warranty is conditioned upon the
determination of a Lincoln authorized representative that the equipment is defective.
To obtain repair or replacement, you must
ship the equipment, transportation charges
prepaid, with proof of purchase to a Lincoln
Authorized Warranty and Service Center
within the warranty period.
This warranty is extended to the original
retail purchaser only. This warranty does not
apply to equipment damaged from accident,
overload, abuse, misuse, negligence, faulty
installation or abrasive or corrosive material,
equipment that has been altered, or equipment repaired by anyone not authorized by
Lincoln. This warranty applies only to equipment installed, operated and maintained in
strict accordance with the written specifications and recommendations provided by
Lincoln or its authorized field personnel.
This warranty is exclusive and is in lieu
of any other warranties, express or
implied, including, but not limited to, the
warranty of merchantability or warranty
of fitness for a particular purpose. War-
ranty on items sold by Lincoln, but not
manufactured by Lincoln are subject to
the warranty consideration, if any, of
their manufacturer (such as hoses,
hydraulic and electric motors, electrical
controllers, etc.) Assistance in making
such warranty claims can be offered as
required.
In no event shall Lincoln be liable for incidental or consequential damages. Lincoln’s
liability for any claim for loss or damages
arising out of the sale, resale or use of any
Lincoln equipment shall in no event exceed
the purchase price. Some jurisdictions do
not allow the exclusion or limitation of incidental or consequential damages, therefore
the above limitation or exclusion may not
apply to you.
This warranty gives you specific legal
rights. You may also have other rights that
vary by jurisdiction.
Customers not located in the Western
Hemisphere or East Asia: Please contact
Lincoln GmbH and Co. Kg, Walldorf,
Germany, for your warranty rights.
Special limited warranties
Special limited 2 year warranty
SL-V series, single injectors – 85772,
85782, and replacement injectors –
85771, 85781
Lincoln warrants the SL-V Injector series to
be free from defects in material and workmanship for two (2) years following the date
of purchase. If an injector model (single or
replacement) is determined to be defective
by Lincoln, in its sole discretion, during this
warranty period, it will be repaired or
replaced, at Lincoln’s discretion, without
charge.
Special limited 5 year warranty
series 20, 25, 40 bare pumps, pmv bare
pumps, heavy duty and 94000 series bare
reels
Lincoln warrants series 20, 25, 40 bare
pumps, PMV bare pumps, heavy duty
(82206), mini bench (81133, 81323), and
all 94000 LFR series (single arm and dual
arm) bare reels to be free from defects in
material and workmanship for five (5) years
following the date of purchase. If equipment
is determined by Lincoln, in its sole discretion, to be defective during the first year of
the warranty period, it will be repaired or
replaced at Lincoln’s discretion, without
charge. In years two (2) and three (3), the
warranty on this equipment is limited to repair with Lincoln paying parts and labor
only. In years four (4) and five (5), the warranty on this equipment is limited to repair
with Lincoln paying for parts only.
Special limited 5 year warranty
limited oil meters, limited fluid control
valves, aod (air-operated diaphragm
pumps)
Lincoln warrants the 712 series control
valves, 912 series lube meters, electronic
lube meters (980, 981, 982 series), our
universal inline digital meters (812/813
series), and our AOD pump offering to be
free from defects in material and workmanship for five (5) years following the date of
purchase. If either is determined to be
defective by Lincoln, in its sole discretion,
during the warranty period, they will be
repaired or replaced, at Lincoln’s discretion,
without charge.
Special DEF (diesel exhaust fluid) limited
warranty
DEF products are warranted to be free from
defects in material and workmanship for a
period of one (1) year following the date of
purchase. The following exceptions to the
standard warranty period are in effect:
• 85700-30/85700-50 DEF hose reels
(bare reel only),
277251/277252 AC DEF pumps, and
277256 and 277257 DEF meters are
warranted for two (2) years from date of
purchase.
• 85623 DEF AOD
(air operated diaphragm) pumps
are covered under the standard five (5)
year AOD pump warranty.
If either is determined to be defective by
Lincoln, in its sole discretion, during the
warranty period, they will be repaired or
replaced, at Lincoln’s discretion, without
charge.
Lincoln Industrial contact information
To find Lincoln Industrial’s nearest service
center call the following number;
customer service 314-679-4200
(international number 01-314-679-4200)
or you may also use our website
www.lincolnindustrial.com
17
To order call 1-800-548-1191 or visit www.partdeal.com - info@partdeal.com

This page left intentionally blank
18
To order call 1-800-548-1191 or visit www.partdeal.com - info@partdeal.com

This page left intentionally blank
19
To order call 1-800-548-1191 or visit www.partdeal.com - info@partdeal.com

® SKF is a registered trademark of the SKF Group.
® Lincoln is a registered trademark of Lincoln Industrial Corp.
© SKF Group 2014
The contents of this publication are the copyright of the publisher and may not be reproduced (even extracts) unless prior written permission is granted. Every care has been taken to ensure the accuracy of the information contained in this publication but no liability can be
accepted for any loss or damage whether direct, indirect or consequential arising out of the use of the information contained herein.
SKF PUB LS/I4 14386 EN · January 2014 · Form 423077A
lincolnindustrial.com skf.com/lubrication
To order call 1-800-548-1191 or visit www.partdeal.com - info@partdeal.com

Guide d’installation et de maintenance
Pistolet graisseur PowerLuber
(lithium-ion)
1880, 1882, 1882E, 1884 série « A »
Date de publication Janvier 2014
Numéro de publication 423077A
Section D7
Page 86A
DANGER
Lisez le manuel avant l’installation ou
l’utilisation de ce produit. Conserver le
manuel à proximité pour référence
future. Le non-respect des instructions et
des consignes de sécurité peut entraîner
la mort ou des blessures graves.
To order call 1-800-548-1191 or visit www.partdeal.com - info@partdeal.com

Table des matières
Consignes générales de sécurité .... 2
Consignes particulières de sécurité . . 3
Contrôle ....................... 5
Utilisation ...................... 5
Fonctionnement du chargeur ....... 8
Instructions de sécurité relatives au
chargeur et aux batteries .......... 11
Vue éclatée et liste des pièces ...... 13
Dépannage ..................... 15
Consignes générales
de sécurité pour
l’outillage électrique
AVERTISSEMENT
Lire toutes les consignes et instructions
de sécurité. Leur inobservation risque
d’entraîner une électrocution, un incendie et/ou des blessures graves.
Conserver toutes les consignes et instructions pour pouvoir s’y référer à l’avenir.
Le terme « outil électrique » mentionné
dans les consignes se réfère à un outil branché sur secteur (à fil) ou alimenté par batterie (sans fil)
Sécurité des lieux de
d’électrocution en cas de mise à la terre du
corps.
Ne pas exposer les outils électriques à la
pluie ni à l’humidité. La pénétration d’eau
dans un outil électrique accroîtra le risque
d’électrocution.
Ne pas maltraiter le cordon. Ne jamais se
servir du cordon pour transporter, tirer ou
débrancher l’outil électrique. Ne pas
approcher le cordon d’une source de
chaleur, de l’huile, des arêtes vives ou de
pièces mobiles. Un cordon endommagé ou
emmêlé accroît le risque d’électrocution.
Lorsqu’on se sert d’un outil électrique à
l’extérieur, utiliser un cordon prolongateur
conçu à cet effet. L’utilisation d’un tel cordon
réduit le risque d’électrocution.
Si on ne peut éviter d’utiliser un outil
électrique dans un endroit humide, employer une alimentation protégée par dispositif
différentiel résiduel (DDR).
Avis
!
Le terme « dispositif différentiel
résiduel (DRR) » peut être remplacé par
« disjoncteur différentiel de fuite à la
terre (DDFT) » ou « disjoncteur différentiel résiduel (DDR) ».
travail
Maintenir les lieux de travail propres et bien
éclairés. Les lieux encombrés ou sombres
invitent les accidents.
Ne pas utiliser d’outils électriques dans
les at¬mosphères explosibles, par exemple
en présence de liquides, gaz ou poussière
inflam¬mables. Les outils électriques produisent des étincelles pouvant enflammer la
poussière ou les vapeurs.
Ne pas laisser des enfants ni des spectateurs s’approcher lorsqu’on se sert d’un outil
électrique. Les distractions peuvent causer
une perte de contrôle.
Sécurité électrique
La fiche d’un outil électrique doit s’adapter à
la prise. Ne jamais modifier la fiche en quoi
que ce soit. N’utiliser aucun adaptateur avec
les outils électriques à mise à la terre.
Les fiches et prises correspondantes non
modifiées réduiront le risque d’électrocution.
Éviter tout contact du corps avec les surfaces mises à la terre telles que celles des
canalisations, radiateurs, cuisinières et
réfrigérateurs. Il y a un risque accru
Sécurité personnelle
Utiliser un équipement de protection
individuelle. Toujours porter des lunettes de
protection. L’utilisation d’un équipement de
protection, tel que masque antipoussière,
chaussures de sécurité à semelle antidérapante, casque de chantier ou protecteurs
d’oreilles, adapté aux conditions réduira le
risque de blessures.
Retirer toute clé de réglage avant de met-
tre l’outil en marche.
Utilisation et entretien d’un
outil électrique
Ne pas forcer l’outil électrique. Utiliser l’outil
électrique adapté à l’application. Un tel outil
fera mieux son travail plus en sécurité à la
vitesse pour laquelle il a été conçu.
Ne pas se servir de l’outil si le commutateur ne le met pas sous et hors tension. Tout
outil électrique qui ne peut être commandé
au moyen du commutateur est dangereux
et doit être réparé.
2
To order call 1-800-548-1191 or visit www.partdeal.com - info@partdeal.com
Débrancher la fiche de la prise et/ou la batterie de l’outil avant d’effectuer tout réglage,
de changer d’accessoire ou de ranger des
outils électriques.
Ranger les outils électriques inactifs hors
de la portée des enfants et ne laisser personne qui n’est pas familiarisé avec l’outil ou
ses instructions s’en servir.
Entretenir les outils électriques.
Vérifier les pièces mobiles pour voir si elles
sont désaxées ou grippées, les autres pièces
pour voir si elles sont cassées ou dans tout
autre état susceptible d’affecter le fonctionnement de l’outil.
Utiliser l’outil, ses accessoires et ses embouts conformément aux instructions.
Utilisation et entretien d’un
outil à batterie
Ne recharger les batteries qu’à l’aide du
chargeur spécifié par le fabricant.
N’utiliser les outils électriques qu’avec les
batteries spécifiées. L’emploi de toute autre
batterie peut créer un risque de blessures et
d’incendie.
Lorsqu’une batterie n’est pas en service,
ne pas l’approcher d’objets métalliques tels
que trombones, pièces de monnaie, clés,
clous, vis ou autres petits objets métalliques
pouvant relier une borne à une autre.
La mise en court-circuit des bornes de la
batterie peut entraîner des brûlures ou un
incendie.
Si la batterie est maltraitée, du liquide
peut en être expulsé ; éviter tout contact.
En cas de contact fortuit, rincer à l’eau. Si du
liquide touche les yeux, consulter un
médecin. Le liquide expulsé de la batterie
peut causer une irritation ou des brûlures.
Consignes
particulières de
sécurité
• Toujours porter des lunettes de protection. Le PowerLuber peut produire une
pression allant jusqu’à 689 bar
(10,000 psi).
• N’utiliser que des flexibles courts de sortie Lincoln 1218, 1224, 1230 ou 1236.
Les injections accidentelles de graisse
causent des blessures très graves.
Ne tenir le flexible que dans la zone de la
protection par ressort. Éviter une mise en
marche intempestive. Veiller à ne pas
appuyer sur le commutateur lors de
l’insertion de la batterie.
• Remplacer le flexible au premier signe
d’usure, de pincement ou
d’endommagement de la gaine
extérieure.
• Ne pas recourber le flexible pour qu’il ne
se pince pas.
• Remplacer le flexible au premier signe
d’usure, de pincement ou
d’endommagement de la gaine
extérieure.
• Ne pas trop se pencher en avant.
Garder un bon équilibre en permanence.
Cela permet un meilleur contrôle de l’outil
dans les situations imprévues.
• Utiliser un équipement de sécurité.
Toujours porter des lunettes de
protection.
• Porter un masque antipoussière, des
chaussures de sécurité à semelle antidérapante, un casque de chantier ou des
protecteurs d’oreilles adaptés aux
conditions.
AVERTISSEMENT
L’utilisateur doit lire de manuel
d’utilisation pour réduire les
risques de blessures
Collecte séparée. Ce produit ne
doit pas être ajouté aux ordures
ménagères normales.
AVERTISSEMENT
Le pistolet graisseur peut produire une
pression élevée - jusqu’à 689 bar
(10,000 psi). Porter des lunettes de sécurité et des gants pour se protéger
pendant l’utilisation. Ne pas approcher
les mains de la partie dénudée en caoutchouc du flexible.
Réparation
La réparation de l’outil ne doit être effectuée
que par des réparateurs qualifiés. Une réparation ou un entretien effectué par du personnel non qualifié peut annuler la garantie
et entraîner des risques de blessures.
Lors de la réparation d’un outil, n’utiliser
que des pièces de rechange identiques à
celles d’origine.
AVERTISSEMENT
N’utiliser aucun flexible non agréé par
Lincoln. Une pression très élevée risque
d’entraîner l’éclatement de la rallonge de
buse ou du flexible court.
Remplacer le tuyau au premier signe
d’usure, de déformation ou de détérioration enveloppe extérieure.
Suivre les instructions et les consignes concernant le flexible court. Leur
inobservation peut entraîner des blessures graves, voire mortelles.
3
To order call 1-800-548-1191 or visit www.partdeal.com - info@partdeal.com

Le pistolet utilise des lubrifiants qui peuvent
être inflammables et toxiques en cas
d’ingestion. Ne pas se servir du pistolet près
d’une flamme nue ni de quoi que soit d’autre
susceptible de présenter des risques
d’incendie.
Les graisses sont souvent commercialisées comme convenant aux hautes
tem¬pératures parce qu’elles doivent conserver leurs propriétés lubrifiantes dans les
endroits chauds mais les lubrifiants peuvent
être inflammables si la température est trop
élevée. Lire toutes les mises en garde figurant sur les contenants de lubrifiant avant
de se servir de ce pistolet. Ne pas utiliser
des graisses inflam¬mables avec ce pistolet
graisseur.
N’utiliser que des accessoires recommandés
par Lincoln.
N’utiliser que des accessoires capables
d’accepter une pression de 689 bar
(10,000 psi). Des accessoires adaptés à un
outil peuvent créer des risques de blessures
lorsqu’ils sont utilisés avec un autre outil.
Utilisation correcte
Le PowerLuber est spécialement conçu pour
pomper et distribuer du lubrifiant en étant
alimenté par batterie 18 volts. Ne pas dépasser les spécifications nominales maxima.
Caractéristiques techniques
Modèle PowerLuber 1880 de base
Tension de
fonctionnement
Pression maximum de fonctionnement
Bas débit 413 bar (6,000 psi)
Haut débit 413 bar (6,000 psi)
Contenance du
réservoir de graisse
Pression de crête
maximum
Plage de température
de fonctionnement
Intensité de
fonctionnement
Intensité nominale 5 A à –6 à 54 °C
Lubrifiant (graisse) jusqu’à NLGI n° 2
14,5 à 20,5 V c.c.
411 g (14,5 oz.)
689 bar (10,000 psi)
–18 à 50 °C
(0 à 120 °F)
4 A à –6 à 54 °C
(20 à 130 °F)
(20 à 130 °F)
Utilisation et entretien
de l’outil
Ne pas se servir de l’outil si son commutateur ne le met pas sous et hors tension.
Tout outil qui ne peut être commandé au
moyen du commutateur est dangereux et
doit être réparé.
Ne pas continuer à presser la détente si le
pistolet graisseur est bloqué. Cela pourrait
endommager le moteur ou causer un
incendie.
Débrancher la batterie de l’outil avant
d’effectuer tout réglage, de changer
d’accessoire ou de ranger l’outil. De telles
mesures préventives de sécurité réduisent
le risque de mise en marche intempestive
de l’outil.
Ranger les outils hors de la portée des
enfants ou d’autres personnes non formées
à leur emploi. Les outils sont dangereux
dans les mains des utilisateurs non formés.
Lorsqu’une batterie n’est pas en service,
ne pas l’approcher d’objets métalliques tels
que trombones, pièces de monnaie, clés,
clous, vis ou autres petits objets métalliques
pouvant relier une borne à une autre.
La mise en court-circuit des bornes de la
batterie peut entraîner des étincelles, des
brûlures ou un incendie.
Entretenir soigneusement les outils.
Vérifier les pièces mobiles pour voir si elles
sont désaxées ou grippées, les autres pièces
pour voir si elles sont cassées ou dans tout
autre état susceptible d’affecter le fonctionnement de l’outil. Si l’outil est endommagé, le faire réparer avant de s’en resservir. De nombreux accidents sont causés par
des outils mal entretenus.
Débit de graisse
Bas débit (l) 99 g/mn
Haut débit (h) 1 526 g/mn
Poids 4,0 kg (8.8 lbs.)
Accessories
Battery li-ion Modèle 1871
Tension de sortie 20 V c.c. maximum
Capacité 1,500 mAh
Chargeur de batterie Modèle 1870
Temps de charge 1,5 heure
Tension à l’entrée,
V c.a. (0,6 A)
Flexible de sortie Modèle 1236
Pression nominale 689 bar (10,000 psi)
Longueur du flexible 914 mm (36 po)
Note 1 : Données d’intensité de fonctionnement et de débi
de graisse à ().
Note 2 : La valeuNote 1 : r totale des vibrations déclarée a
été mesurée conformément à une méthode d’essai normalisée et peut être utilisée pour comparer un outil à un autre.
Elle peut également être utilisée dans une évaluation
préliminaire d’exposition.
Note 3 : L’émission de vibrations pendant l’utilisation effective de l’outil électrique peut différer de la valeur totale déclarée suivant les méthodes d’utilisation de l’outil ; elle
dépend également du besoin d’identifier les mesures de sécurité devant être prises pour protéger l’opérateur, qui sont
basées sur une estimation de l’exposition dans les conditions
réelles d’utilisation (en tenant compte de toutes les phases
du cycle de fonctionnement telles que les périodes pendant
lesquelles l’outil est hors tension et celles pendant lesquelles
il tourne à vide, en plus du temps de marche).
(3,5 oz./mn)
(5,5 oz./mn)
120 v, 60 hz
4
To order call 1-800-548-1191 or visit www.partdeal.com - info@partdeal.com
 Loading...