

Page 1
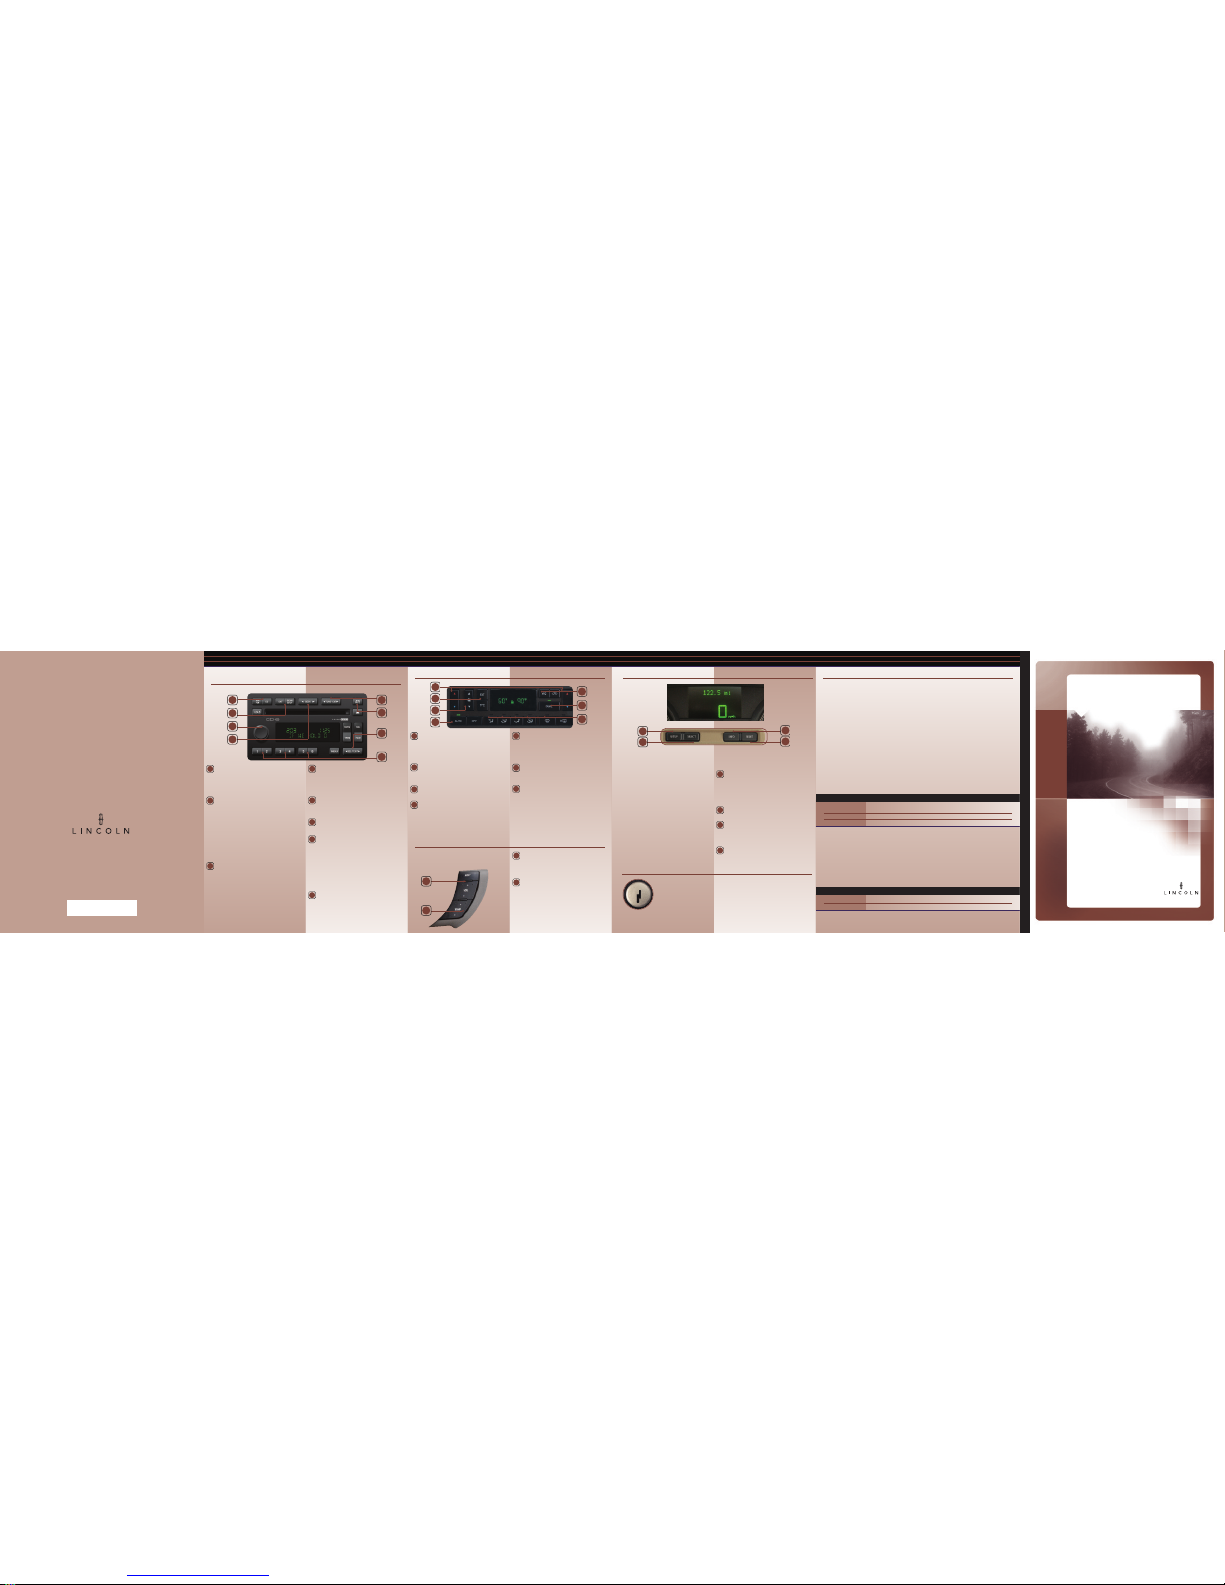
AM/FM and CD Select –In radio mode,
pressAM/FM to select AM, FM1 or FM2
frequencybands. In CD mode, press to
stopplay and begin radio play. PressCD to
enterCD mode and to play a CD already
inthe system.
SAT and SCAN/SHUF– In radio mode,
pressSCAN/SHUFto hear a samplingof all
listenablestations.In CD mode,press to hear
abrief samplingof all selections.Press again
tostop at the desiredselection.SAT is only
availablewhenequipped with Satelliteradio.
YourAudiophileradio maybe equipped with
Satellite-readycapability.The kit to enable
Satellitereceptionis availablethrough your
Lincolndealer.Detailed Satelliteinstructions
areincluded withthe dealer-installedkit.
DealerinstalledSatellite kitis available onlyin
thecontinentalUnited States.
Volume/PowerControl –
Pressthe
controlto turn the audio system on or off.
Turnthe control to raise or lower volume.To
engagespeed sensitive volume feature(if
equipped),press MENU and use SEL-TEXT to
adjustthe volume setting.
Seek Function –In radio mode, press to
find the next listenable station up or down
the band. In CD mode, press to select the
next/previoustrack on the current disc.
Press and hold to advance/reverse within
the current track.
TUNE-CAT– In radio mode, press to move
to the next frequency up or down the band.
CATis only available when equipped with
satellite radio.
Mute Mode –Press to mute the playing
media. Press again to return to the
playing media.
SEL-TEXT –Press to adjust sound output
and distribution after selecting BASS, TREB,
BAL or FADE. TEXT is only available when
equipped with Satellite radio. Your
Audiophile radio may be equipped with
Satellite-ready capability.The kit to enable
Satellite reception is available through your
Lincoln dealer.Detailed Satellite instructions
are included with the dealer-installed kit.
Dealer installed Satellite kit is available only
in the continental United States.
Setting Memory PresetStations –
Select AM, FM1 or FM2 band, then select a
station. Next, press and hold a control until
the sound returns.
TemperatureSelection –To control the
temperature for the driver and for the
passenger,select the desired temperature
by pressing the driver’s or passenger’s
temperature control.
Outside Temperature– Press to display
the outside air temperature. Press again to
disengage.
Fan Speed –To adjust manually, use the
control to raise or lower the fan speed.
Automatic Operation –In addition to
determining A/C on or off, fan speed and
airflow location, it also determines if the
system is to use outside or recirculated air to
heat or cool the interior.
A/C Control –Press to manually enable
or disable the air conditioning. Used in
conjunction with the recirculation control, it
will reduce the amount of time required to
cool the inside of the vehicle.
Dual Operation –Press DUAL to enable
or disable the dual zone temperature
feature.
Manual Override Controls –When
pressed, these five controls will override
automatic operation. All controls allow you
to determine where airflow is directed. To
return to automatic operation, press AUTO.
Auxiliary RadioControls –Depending
on the mode, press NEXT to select a preset
station or the next track on a disc.
Press VOL + or VOL – to adjust the volume.
Auxiliary ClimateControls
(if equipped)– Press TEMP + or – to adjust
the temperature.
6W1J-19G217-DA
February 2006
First Printing
Quick Reference Guide
TownCar
Litho in U.S.A.
Audio phil e AM/FM Satell ite Compat ible Ster eo
In-Da sh Six CD Sound System
(if equippe d)
C l i m a t e C o n t r o l S y s t e m E l e c t r o n i c M e s s a g e C e n t e r
R e m o t e T r u n k R e l e a s e C o n t r o l
O p t i o n a l S t e e r i n g W h e e l C o n t r o l s
A
F
G
A
B
H
G
F
E
B
C
A
B
C
D
The electronic message center, located on
your instrument cluster, displays important
vehicle information through a constant
monitor of vehicle systems. This system only
works when the ignition is in the ON
position. The message center allows you to
check trip elapsed drive time, monitor the
average fuel economy and instantaneous
fuel economy,check the on/off status of the
air suspension system, and see how many
kilometers/miles you can drive before
running out of fuel. The premium display
severity indicator helps you determine the
nature of the information being displayed:
Red for high severity, Amber for medium
severity and non-lit for information only.
Youcan select different features for the
message center to display by using the
message center controls located in the
center of the instrument panel. Please refer
to your Owner’s Guide for complete details
on the message center display features.
Setup –Press thiscontrolto displaySYSTEMS
CHECK,DISPLAY(odometer/speedometer),
TEXTSIZE (normal/large),UNITS
(english/metric),LANGUAGE,COMPASS
ZONE/CALIBRATION,OILMINDER
STARTVALUE.
Select –Press this control to select
functions in the SETUP menu.
Info –This controldisplays thetrip odometer,
tripelapseddrive time,distance toempty,
averagefueleconomy andthe instantaneous
fueleconomy.
Reset –Press to reset the functions shown
in the INFO and SETUP menus.
D
E
E s s e n t i a l I n f o r m a t i o n
E
H
F
Fuel TankCapacity –Your vehicle’s fuel tank can accommodate 71.9L (19 gallons) of gasoline.
Yourvehicle is designedto use "Regular"unleaded gasoline witha pump (R+M)/2 octanerating of 87
foroptimum performance.The use of gasoline withlower octane ratingsmay degrade performance.
Tire Pressure –Your tire pressure is properly set at the dealership according to the recommended
specifications found on the Safety Compliance Certification Label or Tire Label located on the front
door latch pillar on the driver’s side. Please check your tire pressure during routine maintenance
and seasonal changes. Warning: Improperlyinflated tires can affect vehicle handling and can fail
suddenly,possibly resulting in loss of vehicle control.
Fuses –If electrical components in the vehicle are not working, a fuse may have blown. For more
information about changing the fuse, please consult your Owner’s Guide.
Changing the Tires –If you get a flat tire while driving, do not apply the brake heavily. Instead,
gradually decrease your speed. Hold the steering wheel firmly and slowly move to a safe place on
the side of the road. Your vehicle is equipped with a temporary spare tire. The temporary spare is
designed for emergency use only. Replace this tire with a full-size tire as soon as possible. Also,
be sure to turn OFF the air suspension switch (if equipped) prior to jacking, hoisting, or towing
your vehicle.
Location of the Spare Tire and Tools
Item Location
TemporarySpare Atthe right-hand side of the trunk,
Tireand Jack ina holder bracket next to the wheel well
LugWrench Attachedto the jack
AirSuspension Switch Inthe trunk, on the left side
Roadside Emergencies – Tofully assist you if you should have a vehicle concern, Lincoln offers
a complimentary roadside assistance program. This program is separate from the New Vehicle
Limited Warranty.The service is available: 24 hours, seven days a week for the Basic Warranty
period (Canada) or New Vehicle Limited Warranty period (U.S.) of four years or 50,000 miles
(80,000 km). Roadside assistance will cover:
Roadside Assistance Centers
Country Phone Number
UnitedStates (800)521-4140
Canada (800)665-2006
For complete details on any roadside assistance concern, see the Roadside Emergencies chapter,
or the Customer Assistance chapter in your Owner’s Guide.
A
B
C
D
E
F
G
C
B
A
G
All information contained in the Lincoln Quick Reference Guide was accurate at
thetime of duplication. We reserve the right to change features, operation and/or
functionalityof any vehicle specification at any time. YourLincoln dealer is the best
sourcefor the most current information.
Fordetailed operating and safety information, please consult your Owner’sGuide.
The steering wheel controls are located on
the right-hand side of the steering wheel.
Thiscontrol is locatedon the
driver’sdoor trimpanel and
canbe operated at any
timeexcept when your
perimeteralarm system
isarmed.
Youmay alsoopen your trunkusing your key
fobor the optionalkeyless entrysystem.
Pressthe control to openthe trunk. If your
vehicleis equipped witha power trunk, press
thebutton again to closethe trunk. Youcan
renderthe switch inoperableby locking the
buttonwith your masterkey.
Toclose thetrunk, gently pushthe trunk down
untilyou feel itlatch. The powerdown latch will
thencomplete thefull closing ofthe trunk. Do
not"slam" your trunkor force itdownward.
D
C
B
A
D
D
C
A
B
*F6W1J19G217AB*
CAUTION: DONOT USE CD WITH ADHESIVE LABEL*
*CDswith adhesive labels and irregularlyshaped CDs may get stuckin the CD player.Homemade CDs
shouldbe identified with permanent felttip marker rather than adhesivelabels.
2007 MODEL TOWN CAR QUICK REFER ENCE GUIDE
quickreference guide
2007 MODE L TOW N CAR
B
A
■
Changing a flat tire■Jump-starts■Limited fuel delivery
■
Lockout assistance■Towingof your vehicle■Winch out
Page 2
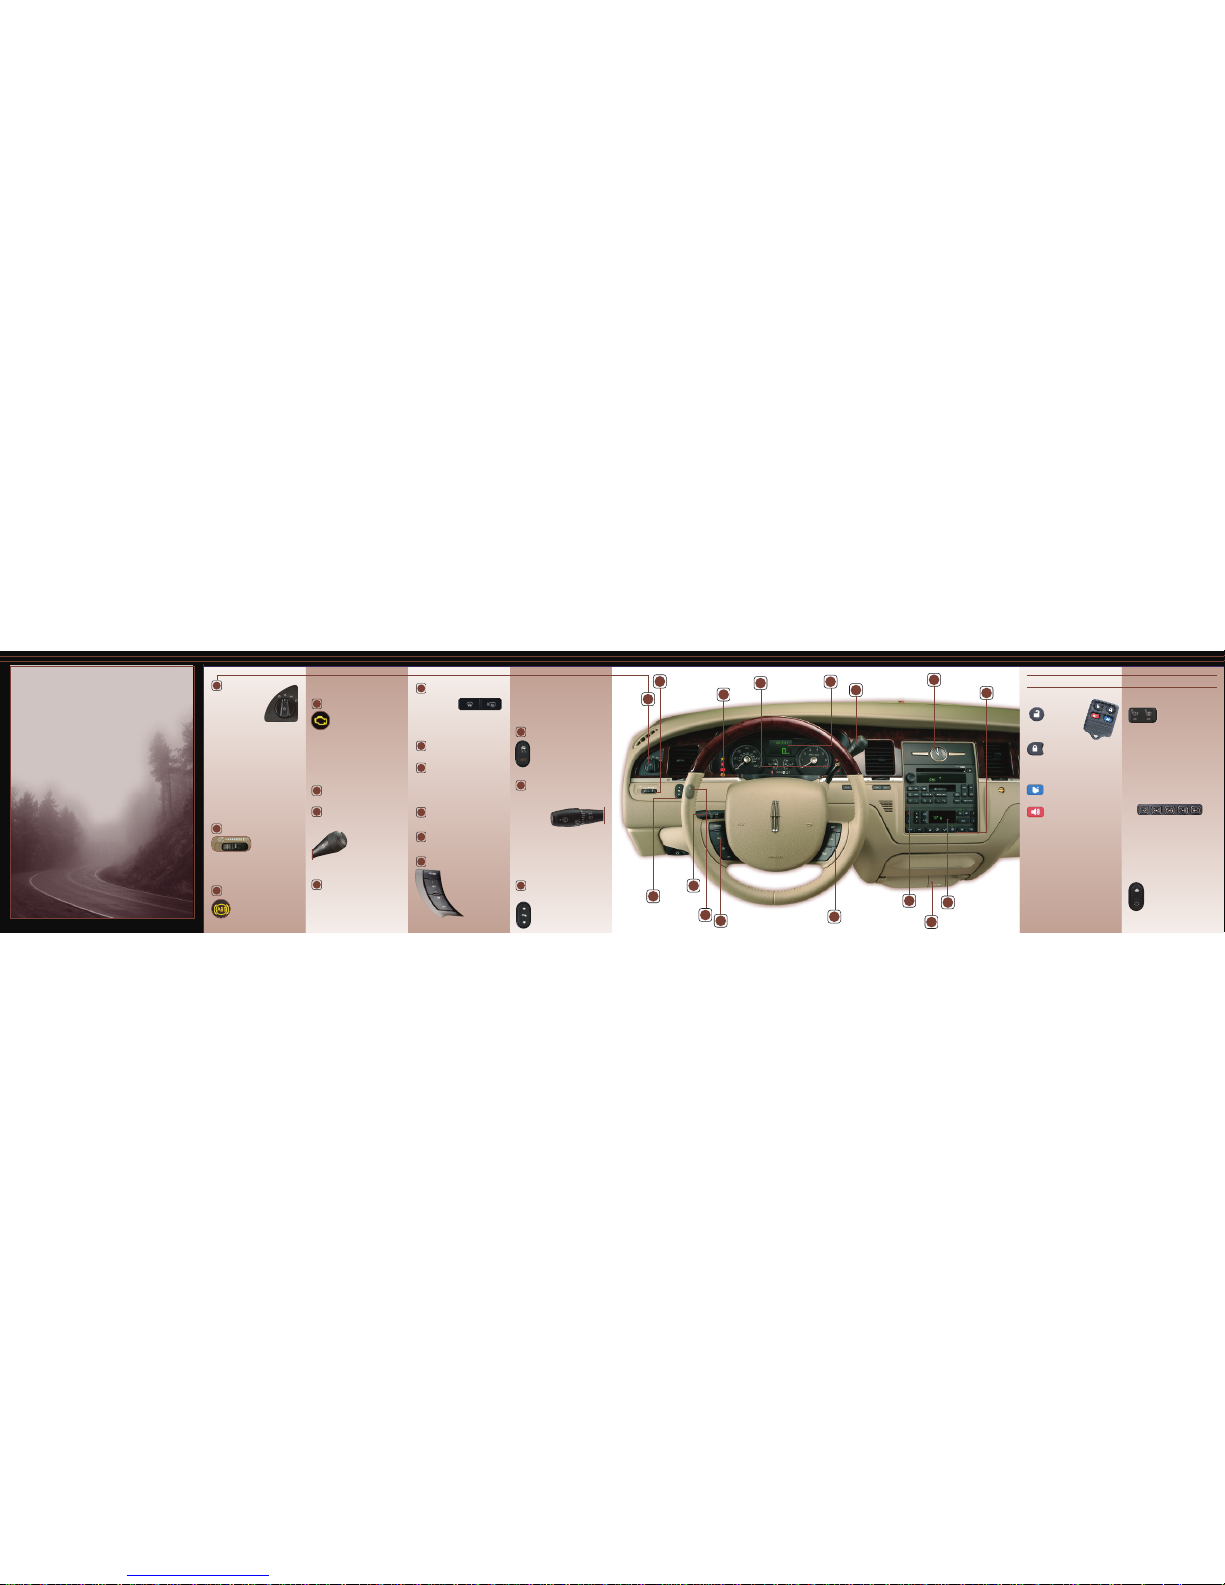
Frontand RearWindow
DefrosterControls
Press to clear the
front or rear window
of thin ice and fog.
The rear defroster also works to clear the
heated outside mirrors (if equipped). The rear
defroster turns off after a predetermined time,
or when the ignition is turned off.
Climate Control System
Please see reverse side for more details.
Auxiliary Power Point
Located under the instrument panel, the
auxiliary power point is an additional power
source for electrical accessories. Improper use
of the power outlet may cause damage not
covered by your warranty.
Six CD SoundSystem
Please see reverse side for more details.
Steering Wheel
Controls(if equipped)
Please see reverse side for more details.
Speed Control
Tooperate, the speedcontrol
mustbe ON and the vehicle’s
speedmust be at or above 30
mph(48 km/h). Toset a
speed,press SET+. Toset a
higherspeed, press and
holdSET+ until the
desiredspeed is
reached.Vehicle
speedcan also be increasedincrementally 1
mph(1.6 km/h) by brieflytapping SET+. Toset
alower speed, press andhold SET– until the
desiredspeed is reached.To disengagethe
speedcontrol withouterasing the previously
programmedset speed,depress the brake
pedal.Pressing RESUMEwill return to a
previouslyset speed.To turn the speedcontrol
off,press the OFF buttonor turn off the ignition.
Traction Control
TM
This system allows your vehicle to
make better use of available traction
on slippery surfaces. The system
defaults to ON; however, should
your vehicle become stuck, try
switching the traction control off.
Turn Signal and
Wiper/Washer Control
Rotatethe control to thedesired interval, low or
highspeed. The bars of
varyinglength
representthe wiper
speedfor
continuousand
intermittentwipers.Rotate up for fast intervalsand
downfor slow. Pushthe end of the stalk to activate
thewasher. With aquick push and hold, the
wiperswill swipe threetimes with washer fluid.
Pushand hold for a longerwash cycle.
Theexterior lamps willturn on with the ignition
on,headlamp control inthe autolamp position
andthe windshield wipersare turned on.
Power Adjustable
Foot Pedals (if equipped)
Pressand hold the rockercontrol to
adjustthe acceleratorand brake
pedaltoward you or awayfrom you.
Adjustthe pedals only whenthe
vehicleis stopped and thegearshift
Headlamp Control
Rotateclockwiseone positionto
turnon the parking,instrument
panel,licenseplate, and tail
lamps.Rotate tothe second
positionto alsoturn on the
headlamps.Rotate
counterclockwiseto activate autolamp,which
provideslight-sensitiveautomatic on-offcontrol of
theexteriorlights and keepsthem on fora short
periodof time afterthe ignitionis turned OFF.
Daytime Running Lamps Feature
(if equipped) This featureautomaticallyturns on
thehigh beam headlampswith reduced output
wheneverthe key is in theON position, the
transmissionis not in PARK,and is not turnedon
byanother feature, suchas, using the headlamp
controlor autolamp.
Fog Lamps (if equipped) Toturn on the fog
lamps,pull out the headlampswitch. Worksin
parkinglamps, low beamsand autolamp.
Panel Dimmer Control
Use to adjust the
brightness of the
instrument panel during
headlamp and park lamp
operation. Rotate to the right to brighten and
to the left to dim. Rotate fully to the right to
also turn on the dome lamp. To turn off the
dome lamp, rotate to the left.
ABS Warning Lamp
Thislamp illuminatesbrieflywhenthe
ignitionisturned to theON position.
Inan emergency,applycontinuous
forceon thebrake to preventwheel
lockwhen brakingon slipperysurfaces-
donot pumpyour brakes.Any pulsationor noise
youmay feelor hear is normal.
Service Engine SoonLamp
This lamp illuminates briefly to
ensure the system is functional. If
the light comes on after the engine
is started, please refer to your
Owner’sGuide. To help prevent activation,
always secure your fuel cap by turning it
clockwise 1/4 of a turn until it stops.
If the fuel cap is not properly secured,the
warning"Check Fuel Cap" will also be
displayedon the message center. The warning
willbe reset once the cap is properly tightened
and your vehicleis driven a short distance.
Electronic Message Center
Please see reverse side for more details.
Gearshift/OverdriveControl
Overdriveis the normaldrive position for the
bestfuel economy.Only
deactivate(OFF) overdrive
whendriving with a heavy
load,towing a trailer upor
downsteep hills, or when
additionalengine brakingis
desired.To deactivate,press the transmission
controlswitch (TCS) locatedon the end of the
gearshiftlever.
Clock
Toset the instrument panel mounted clock,
press the right or left control to increase or
decrease the time displayed.
1
2
3
4
6
7
Headlamp
Control
Panel
Dimmer
Control
ABS
Warning
Lamp
Electronic
Message
Center
Clock
Audiophile Six CD
Radio System
Auxiliary
Power Point
Front and
Rear Window
Defroster
Controls
Speed Control
Traction
Control
TM
Power
Adjustable
Foot Pedals
TurnSignal
and Wiper/
Washer
Control
Steering
Wheel Controls
(if equipped)
Remote Entry System
Press this control
once to unlock the
driver’sdoor,
and twice to
unlock all doors.
Press this control once
to lock all doors; the park lamps
will flash to confirm that all doors
are closed and locked. If you press a second
time, the horn will chirp and the park lamps
will flash.
Press this control to open the trunk. If
equipped with a power trunk, press
twice to open and twice to close.
Pressthis controlto activate thepanic
alarm.To deactivate,press the control
again,or turn the ignitionto the ACC,
ONor START position.
Memory Functions (ifequipped)
Each key fob corresponds to different memory
positions. Key fob 1 corresponds to memory
setting 1, while key fob 2 corresponds to
memory setting 2.
Youmay set the memory functions for the
driver’sseat, side view mirrors, and adjustable
pedalsby using the SET memorycontrol located
on the driver’s door. Todeactivate the memory
feature of your key fob, or to learn more about
any of your memory settings, please consult
your Owner’s Guide.
Heated Seats (ifequipped)
Push the right portion of the
control for maximum heat.
Push again to deactivate. Push
the left portion for minimum heat. Push again
to deactivate. The heated seats will activate
when the ignition is in the RUN position, and,
if activated, turn off automatically when the
ignition is switched off.
Keyless Entry System
Withthis controlyou canopen the trunkor
lock/unlockall doors withoutusinga key. First,
enteryour five-digitprogramcodeand then (within
5seconds) pressthe correspondingquickkey:
Open the trunk..........................5-6
Unlock all doors........................3-4
Lockall simultaneously.....7-8and 9-0
If your vehicle is equipped with a power trunk,
pressing the 5-6 control (within 5 seconds of
entering your access code) will close the trunk.
PowerLumbarSupport (if
equipped)
This control is located on the front
of the seat cushion on the inboard
side of the seat. Press the top side
of the control to adjust firmness.
Press the bottom side of the control
to adjust softness.
A d d i t i o n a l F e a t u r e s
Service
Engine Soon
Lamp
1
3
4
5
7
11
9
8
12
13
14
Gearshift/
Overdrive Control
6
15
16
8
9
Climate
Control
System
10
5
2
Congratulations on acquiring a Lincoln Town Car. Your
elegant new vehicle possesses many sophisticated features,
from steering wheel mounted controls to power a djustable
foot pedals. This Quick Reference Guide was designed to
acquaint youwith many of thefeatures you’ll be usingmost.
For detailed information,please consultyour Owner’sGuide.
10
12
13
11
14
15
16
 Loading...