

Page 1
CAUTION: DO NOT USE CD WITH ADHESIVE LABEL*
6L7J-19G217-AA
October 2005
Second Printing
Quick Reference Guide
Lincoln Navigator
Litho in U.S.A.
All information contained in this Lincoln Quick Reference Guide was accurate at
the time of duplication. We reserve the right to change features, operation and /
or functionality of any vehicle specification at any time. Your Lincoln dealer is the
best source for the most current information.
For detailed operating and safety information, please consult your Owner’s Guide.
*F
6L7J19G217AA
*
quick reference guidequick reference guide
2006 MODEL NAVIGATOR
I
J
K
L
H
G
A
B
C
D
E
F
Essential Information
H
2006 MODEL NAVIGATOR QUICK REFERENCE GUIDE
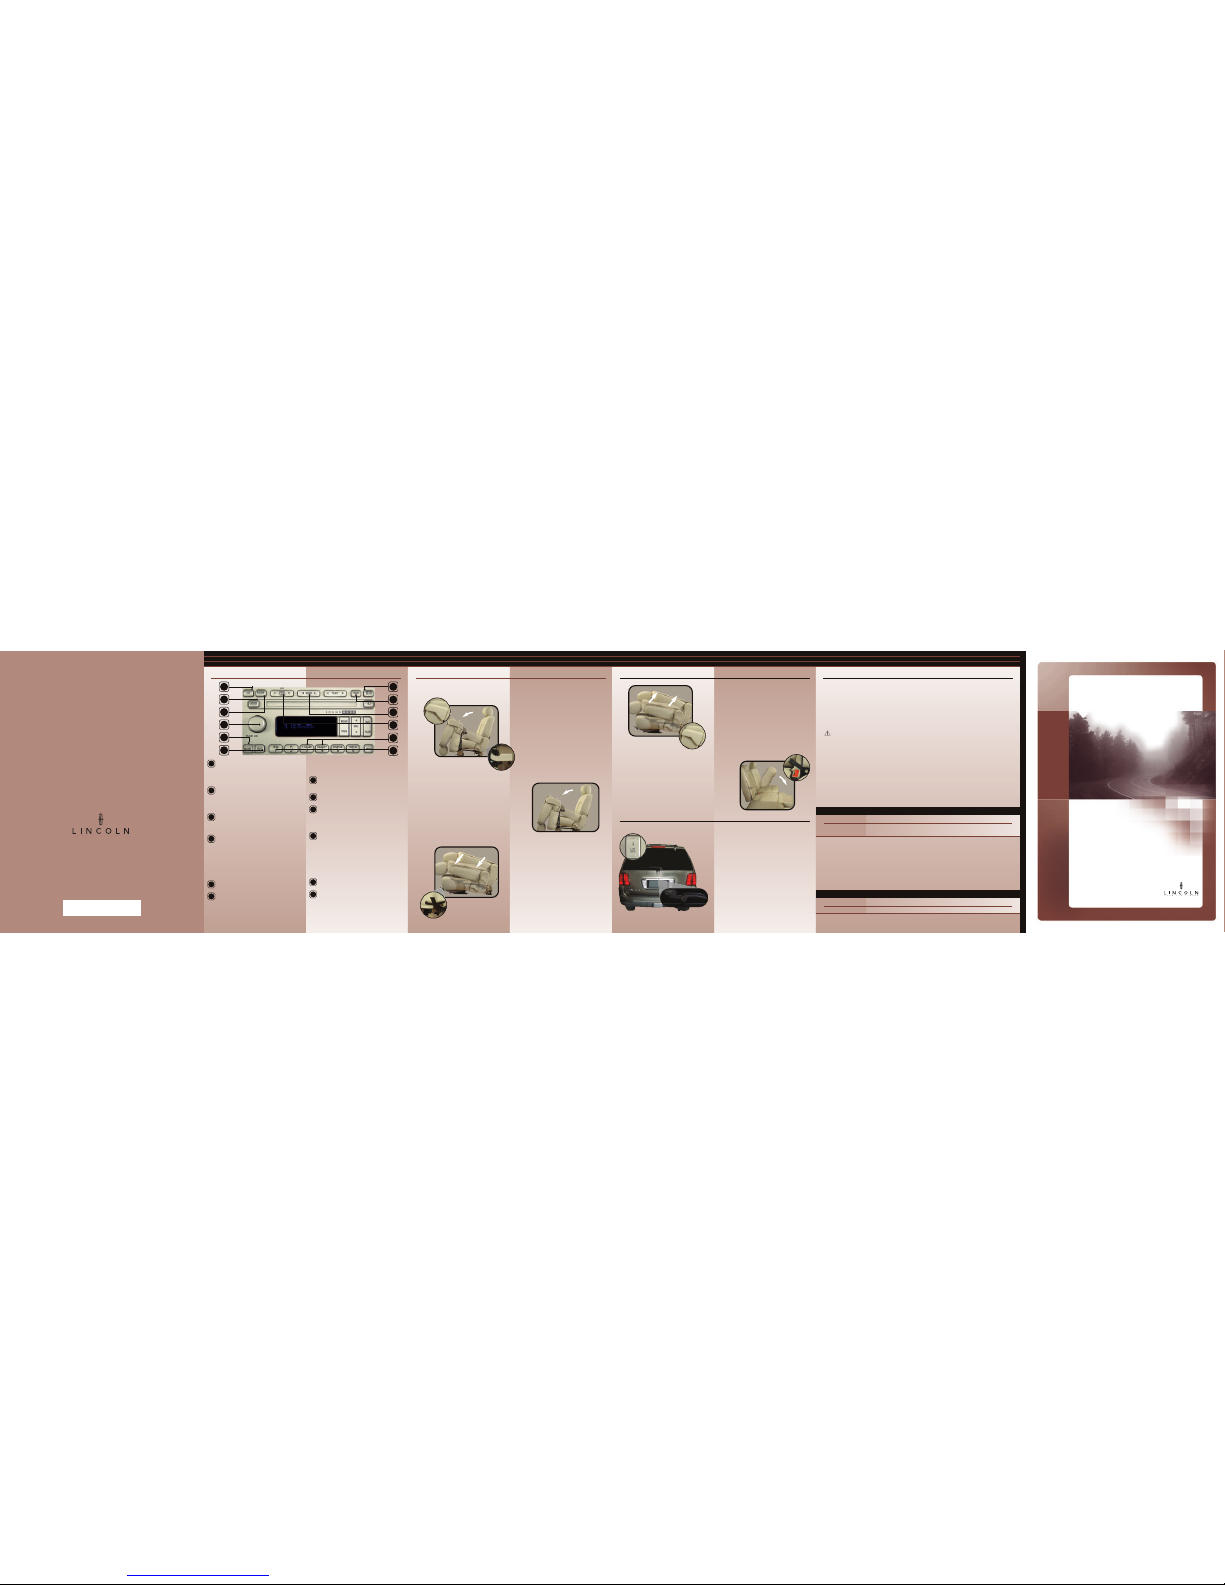
CD – Press to select CD mode. NO CD
will display if there is not a CD present in
the audio system. If a disc is loaded, there
will be a number (1-6) inside the circle on
the display.
Loading CDs –Press to open the CD door,
then load the CD into the player. Press LOAD
and then a preset number to select a slot. Press
and hold LOAD to activate autoload, for
loading up to six CDs.
Scan Function –In radio mode, press to
hear a sampling of all listenable stations. In
CD mode, press to hear a brief sampling of all
selections on the current CD / MP3.
Volume / Power Control– Push to turn
the audio system on or off. Turn the control to
raise or lower volume. To engage the speed
sensitive volume feature, which automatically
adjusts radio volume to compensate for road
and wind noise, press MENU until SPEED VOL
X appears in the display. Then press SEL to
increase or decrease the volume setting. The
level will appear in the display.
BAND –Press BAND to toggle between AM,
FM1 or FM2 frequency band.
SAT(if equipped) – Your Audiophile radio
comes equipped with Satellite ready
capability.The kit to enable Satellite reception
is available through your dealer. Detailed
Satellite instructions are included with the
dealer-installed kit.
Mute Mode – Press to mute the playing
media. Press again to return to the
playing media.
AUX – Press to toggle between the current
playing media and DVD (if equipped).
Seek Function – In radio mode, press to
move to the next listenable station up or
down the band. In CD mode, press to select
the next/previous track on the
current disc.
Disc / Tune / CAT– In radio mode, press
to move to the next frequency up or down
the band. In CD mode, press to play the
next / previous CD. CATis only available
when equipped with Satellite radio. The kit
to enable Satellite reception is available
through your dealer.Detailed Satellite
instructions are included with the
dealer-installed kit.
Folder – Press these buttons to access the
next or previous MP3 directory.
Setting Memory Preset Stations –
Select AM, FM1, or FM2 band, then select
a station. Next, press and hold a numbered
control until the sound returns.
Fuel Tank Capacity– Your vehicle’s fuel tank can accommodate 28 gallons (106 L) of gasoline. Your
vehicle is designed to use "Premium" unleaded gasoline with pump (R+M) / 2 octane rating of 91 for
optimum performance. The use of gasoline with lower octane ratings may degrade performance.
Tire Pressure – Your tire pressure is properly set at the dealership according to the recommended
specifications found on the Certification Label located on the front door latch pillar on the driver’s
side. Please check your tire pressure during routine maintenance and seasonal changes. The tire
pressure should also be checked if the Tire Pressure Monitoring System warning indicator
(if equipped) is illuminated. Please see “Additional Features” on reverse side for more information.
Warning: Improperly inflated tires can affect vehicle handling and can fail suddenly, possibly
resulting in loss of vehicle control.
Fuses – If electrical components in the vehicle are not working, a fuse may have blown. For more
information about changing a fuse, please consult your Owner’s Guide.
Fuel Pump Shut-Off Switch –After a collision, if the engine cranks but does not star t, the fuel pump
shut-off switch may have to be reset. The switch is located in the left rear quarter trim panel, near the
liftgate. For complete details on resetting the switch, please consult your Owner’s Guide.
Changing the Tires – If you get a flat tire while driving, do not apply the brake heavily. Instead,
gradually decrease your speed. Hold the steering wheel firmly and slowly move to a safe place on
the side of the road. Prior to jacking, hoisting, or towing your vehicle, be sure to turn OFF the
running boards (if equipped) and the air suspension switch.
Location of the Spare Tire and Tools
Item Location
Spare Tire Under the vehicle, just forward of the rear bumper
Jack Tools and Under the access panel, located in the floor
Jacking Instructions compartment behind the rear seat
Roadside Emergencies – To fully assist if you should have a vehicle concern, Lincoln offers a
complimentary roadside assistance program. This program is separate from the New Vehicle
Limited Warranty. The service is available 24 hours a day, seven days a week for the New Vehicle
Limited Warranty period (U.S.) or Basic Warranty period (Canada) of four years or 50,000 miles
(80,000 km). Roadside assistance will cover:
■
Changing a flat tire■Jump-starts■Limited fuel delivery
■
Lockout assistance ■Towing of your vehicle
Roadside Assistance Centers
Country Phone Number
United States (800) 521-4140
Canada (800) 665-2006
For complete details on any roadside assistance concern, consult the Roadside Emergencies section
or the Customer Assistance section in your Owner’s Guide.
B
D
E
F
I
J
C
K
L
G
To open the optional power liftgate, either push
the overhead console button (figure a), pull the
outside release handle (figure b), or press the LIFT
GATE button on your key fob.
To open the liftgate manually, pull the liftgate handle
(figure b) to release the liftgate from the vehicle.
The power system will take over when you release
the handle.
Toclose, make certain the rear window is closed,
and then pull down the liftgate a few inches to
activate power closing. Closing the gate rapidly or
more than a few inches may activate the obstacle
detection feature and stop the power system.
Tounlatch the liftgate glass, push the button (figure
b) under the center of the license plate lamp shield,
or press the REAR GLASS button on your key fob.
Do not open the liftgate or liftgate glass in a garage
or other enclosed area with a low ceiling.
Folding the Outboard
Seats to a Full-Lowered Floor Position
To fold the seats to a load floor position, lift the
lever (lever 1) located on the outboard side of
the seat to release the seat back. Ensure that
the seat back is locked in the down position by
applying pressure to it. To lower the seat further
to the full-lowered position for maximum cargo
capacity,locate the pull strap at the front of the
seat, then pull forward to release the seat into a
kneel-down load floor position. A moderate
force may be required to move the seat
for
ward and down.
Exiting the Third Row Seat
Pull up on the lever (lever 2) located at the back of the
second row seat. First, the seat back will fold forward
to the cushion, then the seat will flip forward.
To return the seat to the upright position, push the seat
down and back until it is latched to the floor.Then,
lift up on the lever (lever 1) and lift the seat back to the
upright position.
Folding the 20% Middle Seat (if equipped)
to a Load Floor Position
To fold the seat, pull the release strap located
between the seat cushion and the seat back to
release the folding seat latch. With the latch
released, the seat back can be lowered into the
load floor position.
Before folding the second row seats, ensure that the head restraints are fully lowered and
that all items have been removed from in front of and on the seats.
Entering the Third Row Seat
Pull up on the lever (lever 1) located on the side
of either outboard second row seat until the seat
back folds forward to the cushion. Pull up on the
lever (lever 2) located on the back of the seat. The
seat will then flip forward.
lever 1
release
strap
figure a
Returning the Seats to the Upright Position
From the Full-Lowered Floor Position
The seat back cannot be returned to the upright position
until the seat is returned from the kneel-down position. To
return the seat to the upright position, lift and pull the seat
rearward until the latch is engaged. Do not attempt to
unlatch the rear floor hooks while the seat is in the
kneel-down position.
With the seat in the flat back position, lift up on the
lever (lever 1) located on the side of the seat cushion.
This will allow the seat back to be lifted to the upright
locked position.
lever 1
lever 2
Audiophile Satellite Compatible AM / FM Stereo In-Dash Six CD / MP3 Radio (if equipped)
Second Row Seats (continued)
Power Liftgate (if equipped)
figure b
pull strap
The above functionality relates to the In-Dash Six CD Radio only. For information relating to the Stereo / Cassette / Single CD Radio, rear seat entertainment DVD
system, or Lincoln Navigation System, please consult your Owner’s Guide.
*CDs with adhesive labels and irregularly shaped CDs may get stuck in the CD player. Homemade CDs should be identified with permanent felt tip marker rather
than adhesive labels.
A
Second Row Seats
Page 2
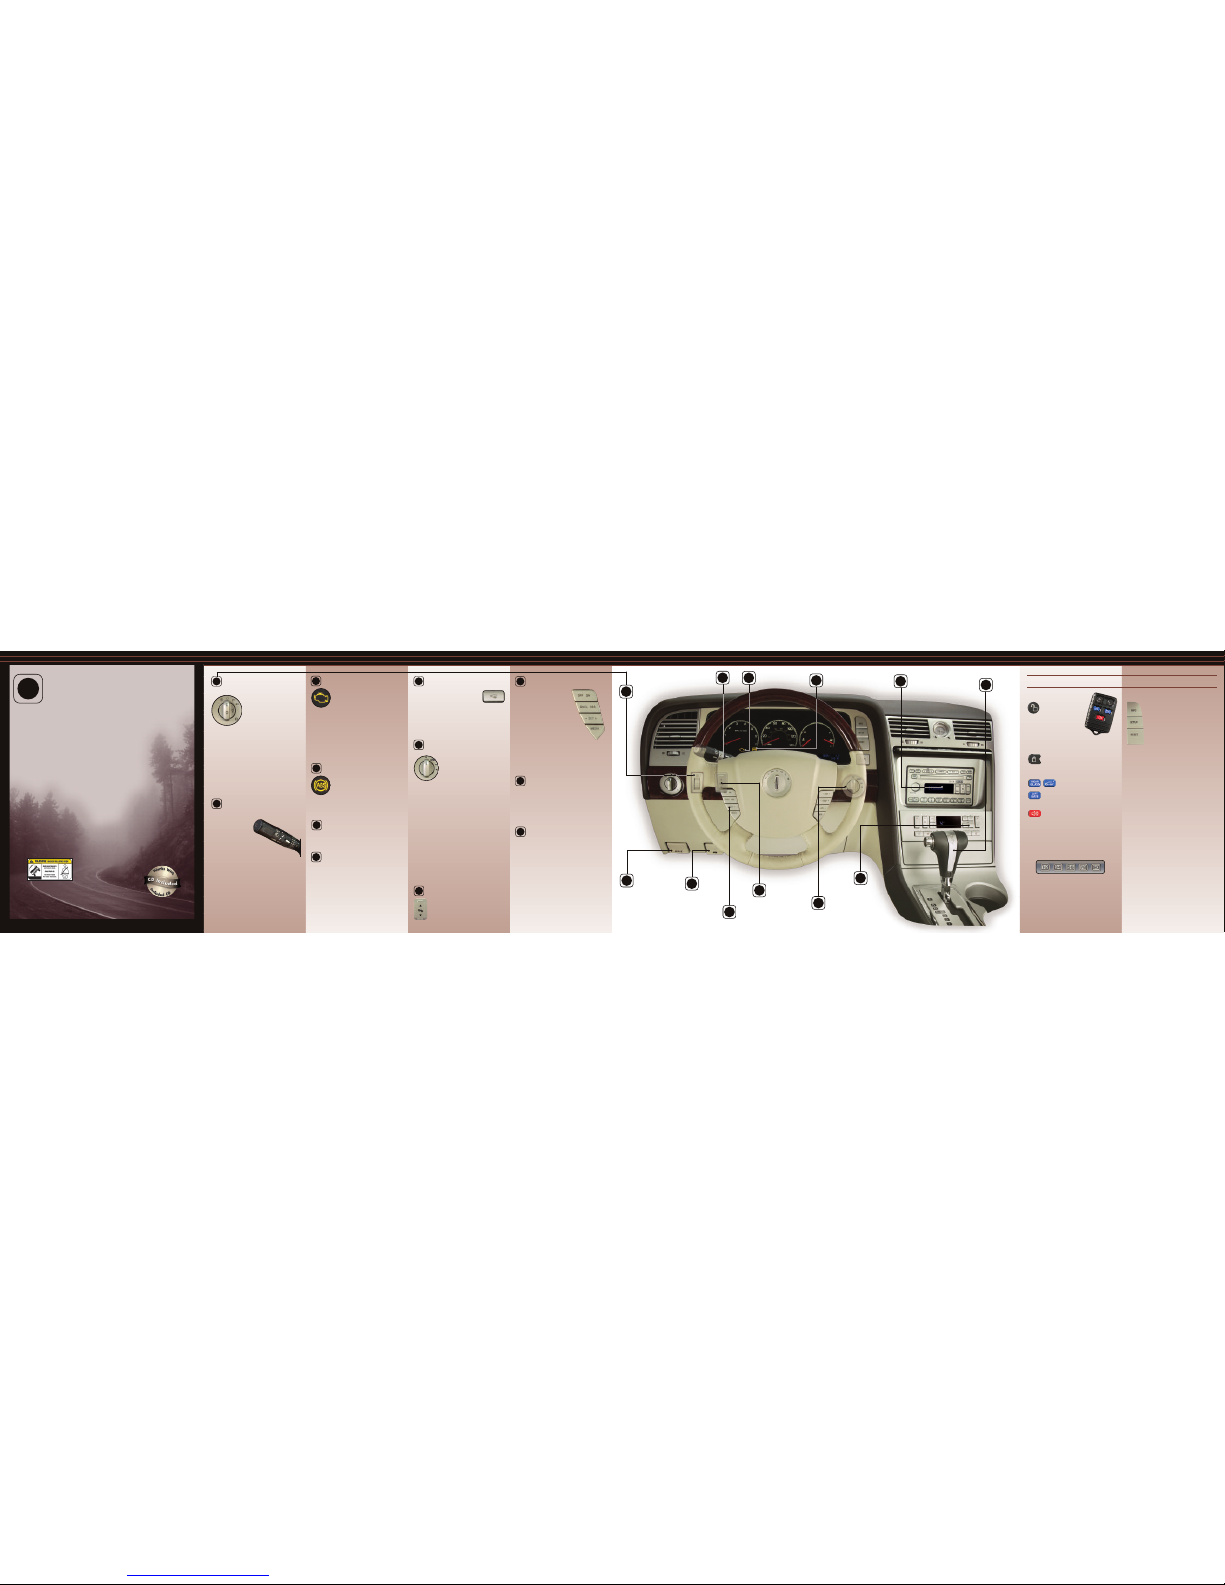
Rear Window Defroster
Press to activate rear window
defrost. The rear defrost indicator
will illuminate. When in operation,
the rear window defroster also defrosts the side
view mirrors. The rear window defroster will
automatically turn off after approximately 10
minutes of operation. Press the control again to
re-engage if needed.
Control Trac Four-Wheel
Drive Control
(if equipped)
2H (2WD HIGH) delivers power to
the rear wheels only and is the
optimal position for smoothness and
fuel economy. A4WD (4X4 AUTO)
automatically delivers power to all four
wheels, as required, for increased traction. 4H (4X4
HIGH) provides mechanically locked four-wheel
drive power to all four wheels. 4L (4X4 LOW)
provides mechanically locked four-wheel drive when
extra power at reduced speeds is required.
To shift from 2H to A4WD or 4H, move the control
at any forward speed up to 55 mph (88 km/h). To
shift from A4WD to 4H, move the control at a stop
or while driving at any speed. To shift to or from
4L, bring the vehicle to a stop and keep the brake
pedal depressed. Next, place the gearshift in N
(Neutral), and then move the control to or from 4L.
When shifting from one four-wheel drive position to
the next, a mechanical noise may be heard. This is
normal and no service should be required.
Power Adjustable Foot Pedals
Press and hold the rocker control to adjust
the accelerator and brake pedal toward
you or away from you. Adjust the pedals
only when the vehicle is stopped and the
gearshift lever is in the P (Park) position.
Speed Control
To operate, the speed control
must be ON and the vehicle
speed must be greater than
30 mph (48 km/h). To set a
speed, press SET +. Once the
system is engaged, an icon will
illuminate. To set a higher speed,
press SET + again. To set a lower
speed, press SET –. Pressing RES will
return to a previously set speed. To disengage the
speed control without erasing the previously
programmed set speed, press CNCL or depress the
brake pedal. To turn the speed control off, press the
OFF button or turn off the ignition.
Hood Release
Pull the hood release handle. Next, release the
auxiliary latch with the handle located under the
front of the hood, just above the passenger-side
headlamp. Slide the yellow handle away from the
center of the vehicle to release the auxiliary latch.
Lift the hood until the lift cylinders hold it open.
Parking Brake with
Auto-Release (if equipped)
To release the parking brake using the automatic
release feature, turn the ignition to the ON position
and then press the brake pedal. Move the gearshift
out of the P (Park) position with the brake pedal
depressed. If the parking brake fails to release after
this procedure is completed, pull the manual
parking brake release lever to release the brake.
Toset the parking brake, press the parking brake
pedal down until the pedal stops. The BRAKE
warning lamp in the instrument cluster will
illuminate (when the ignition is turned ON)
until the parking brake is released.
13
Service Engine Soon Lamp
Illuminates briefly when the ignition is
turned to the ON position to ensure the
system is functional. If the light comes on
after the engine is started, please consult
your Owner’s Guide. To help prevent activation,
always secure your fuel cap by turning it clockwise1/4
of a turn until at least a few clicks are heard.
If the fuel cap is not properly secured, the warning
"CHECK FUELCAP" will be displayed on the
message center. The warning will be reset once the
cap is properly tightened and your vehicle is
driven a short distance.
ABS Warning Lamp
Illuminates briefly when the ignition is
turned to the ON position. In an
emergency, apply continuous force on
the brake to prevent wheel lock when
braking on slippery surfaces – do not pump your
brakes. Any pulsation or noise you may feel or
hear is normal.
Audiophile Satellite
Compatible AM / FM Stereo
In-Dash Six CD / MP3 Radio
(if equipped)
Please see reverse side for more details.
Gearshift / Overdrive Control
D6 is the normal drive position for the best fuel
economy. Only deactivate overdrive when:
driving with a heavy load, towing a trailer up
or down steep hills, or when additional engine
braking is desired. To deactivate, move the
gearshift from the D6 detent to the D4 detent.
Note:The transmission shift strategy will slightly
delay transmission upshift in cold weather to
decrease the time required to warm up the engine
and produce heat in the passenger compar
tment.
4
Headlamp and
Panel Dimmer
Control
Turn Signal and
Wiper/Washer
Control
Service
Engine Soon
Lamp
Hood
Release
Rear
Window
Defroster
Control Trac
Four-Wheel Drive
Control (if equipped)
Speed
Control
Power
Adjustable
Foot Pedals
Remote Entry System
Press this control once to
unlock the driver’s door
and twice to unlock all
doors and liftgate. Pressing
this control will position all
programmable features to
the desired memory position,
depending on the remote being used.
To deactivate, please consult your Owner’s Guide.
Press this control once to lock all doors
and liftgate. Pressing the control a second
time will chirp the horn to confirm that all doors
are closed and locked.
Press this control to unlatch the
liftgate window.
Press this control (if equipped) twice to
automatically fully unlatch and open the
liftgate, or automatically close the liftgate.
Press this control to sound the panic
alarm. To silence, press the control again,
or turn the ignition ON.
Keyless Entry System
With this control you can lock or unlock all doors
without using a key.First, enter your five-digit
program code and then press the corresponding
quick key:
Unlock all doors = 3-4
Lock all doors = 7-8 and 9-0 simultaneously
AdvanceTrac®with RSC (if equipped)
The AdvanceTrac®with Roll Stability ControlTM(RSC)
system provides stability enhancement features for
certain driving situations when driver assistance is
needed. I
t helps your vehicle maintain traction when
driving on slippery and / or hilly road surfaces.
Message Center
With the ignition in the ON position, the
message center displays important vehicle
information through a constant monitor of
vehicle systems. The system will notify you
of potential vehicle problems by
displaying system warnings followed by
along indicator chime. You may select
the INFO button on the message center
to display trip odometer, odometer, compass,
distance to empty, average fuel economy, and
trip elapsed drive time. The RESET button may be
used to reset selected functions in the INFO and
SETUP menus.
For more information about your message center
functions, please consult your Owner’sGuide.
Extended Rear Park Assist
This sonar and radar system sounds a tone to warn
the driver of obstacles near the rear bumper when
the reverse gear is selected. Obstacles can be
detected within approximately 20 feet (6 m) behind
the rear bumper while the vehicle moves in reverse at
speeds less than 6 mph (10 km / h). The extended
rear park assist defaults to ON, but can be disabled
using the message center functions when the
ignition is ON, and the gearshift is in R (Reverse).
Tire Pressure
Monitoring System (if equipped)
Using radio-frequency pressure sensors, this system
monitors tire pressure on all road tires and provides
the driver with a yellow warning light when air
needs to be added. Message center equipped
vehicles provide additional warning messages.
The TPMS warning light will reset itself (turn off) after
the tires are set to specification and the vehicle is
either parked up to 1 hour or by driving the vehicle
above 20 mph
(30 km / h)
for at least 2 seconds.
Please Note:Outside temperature
affects tire
pressure. Please consult your Owner’s Guide.
ABS
Warning
Lamp
2
3
4
5
9
10
11
Gearshift/
Overdrive
Control
7
In-Dash
Six CD
Radio
(if equipped)
2
Headlamp and Panel
Dimmer Control
Rotate clockwise one position
from off to turn on the parking
lamps. Rotate two positions
from off to also turn on the
headlamps. Rotate
counterclockwise to activate the
autolamp, which provides light-sensitive automatic
on-off control of the exterior lights and keeps them
on for a short period of time after the ignition is
turned OFF. When the control is in any position
except high beams or off, pull the control toward
you to activate the foglamps.
Use the panel dimmer control, located to the right
of the headlamp control, to adjust the brightness
of the instrument panel during headlamp and
parklamp operation. Rotate to the full up position
to turn on interior lamps.
Turn Signal and
Wiper / Washer Control
For front wiper operation, rotate the outer ring to
the desired interval,
low- or high-speed
position. When in the
intermittent position, rotate
the control up for fast, or down for
slow wiping intervals. Also, when the
wiper control is set in the intermittent position, the
speed-sensitive feature automatically adjusts the
wipers as the vehicle’s speed changes. Push the
end of the stalk briefly for a single wipe (no
wash). Push and hold to activate the washer.
The inner ring on the right operates the rear
window wiper.Rotate the control to INT 1 (slow
interval), INT 2 (fast interval), or washer position.
For extended wiper blade quality,occasional
cleaning of the wiper blades is required.
6
8
10
12
3
5
6
7
8
9
11
12
13
Parking
Brake with
Auto-Release
(if equipped)
Additional Features
1
In order to help you fully appreciate the countless
features of your new Navigator, we invite you to
explore this easy-to-use Quick Reference Guide.
Using this Guide in conjunction with the Interactive
Owner Experience CD, you can briefly hear how to
operate the features listed to the right once you
place the CD into any audio CD player. Find the
numbered call-outs from the photograph of the
instrument panel located in the center of this Quick
Reference Guide, and then select the corresponding
numbered audio track on the CD. For more
comprehensive information, place the CD into any
computer,* or consult your Owner’s Guide.
*Refer to the minimum configuration requirements located on the back panel of the CD jacket.
This vehicle handles differently from an ordinarypassenger car in
driving conditions which may occur on streets and
highways and off-road. DRIVEWITH CARE
ANDWEAR A SAFETY BELT ATALL TIMES.
Lincoln urges you to read the Owners’ Guide
and Driving Y
our SUV or Truck Supplement for further information on safe driving
precautions and instructions.
 Loading...