

Page 1
ESSENTIAL INFORMATION
FUEL TANK CAPACITY/FUEL RECOMMENDATIONS:Your fuel tank can accommodate 18.0
gallons (68 L) of gasoline.Your vehicle is designed to use “Premium”unleaded gasoline only
with an (R+M)/2 octane rating of 91 or higher for optimum performance. The use of
gasolines with lower octane ratings may degrade performance.
FUSES:If electrical components in your vehicle stop working, a fuse may have blown.(You’ll
notice a broken wire within the fuse.) For information on changing fuses,please consult
your Owner’s Guide.
TIRE PRESSURE:Improperly inflated tires can affect vehicle handling and can fail suddenly,
possibly resulting in loss of vehicle control.Check your tires for proper air pressure at least
once a month and before long trips (including spare,if equipped). Always use an accurate
tire pressure gauge.Check the tire pressure when tires are cold, after the vehicle has been
parked for at least 3 hours or has been driven less than 3 miles (4.83 km).(As you drive, the
temperature in the tire warms up,increasing the tire pressure.) Adjust the tire pressure to the
recommended specifications found on the Safety Compliance Certification Label or Tire
Label which is located on the B-Pillar or the edge of the driver’s door.
CHANGING THE TIRES:Your spare tire, jack and lug nut wrench are located under your
trunk cargo cover.(On V8 Sport models,the lug nut wrench is attached to the jack assembly.
To use the wrench,remove it from the jack and extend the shaft.) Your vehicle may have a
temporaryor full-size spare tire. The temporary spare tire for your vehicle is labeled as such.
Itis smaller than a regular tire and is designed for emergency use only. Drive cautiously and
replace the temporary spare tire as soon as possible.
If you get a flat tire while driving,do not apply the brake heavily. Instead,gradually decrease
your speed. Hold the steering wheel firmly and slowly move to a safe place on the side of
the road.
ROADSIDE EMERGENCIES:To fully assist you if you should have a vehicle concern,Lincoln
offers a complimentary roadside assistance program.This program is separate from the New
Vehicle Limited Warranty.The service is available 24 hours a day,seven days a week for the
Basic Warranty Period (Canada),or New Vehicle Limited Warranty period (U.S.) of four years
or 50,000 miles (80,000 km).
Roadside assistance will cover: Country: Phone Number:
• Changing a flat tire United States (800) 521-4140
• Lockout assistance Canada (800) 665-2006
• Jump-starts
• Towing of your vehicle
• Limited fuel delivery
For complete details on any roadside assistance concern, please consult the Roadside
Emergencies or Customer Assistance chapters of your Owner’s Guide.
Ford Motor Company Customer Relationship Center
P.O.Box 6248,Dearborn,MI 48121
1-800-392-3673 (FORD)
(TDD for the hearing impaired:1-800-232-5952)
This Quick Reference Guide is not intended to replace your vehicle Owner’s Guide which contains more
detailed information concerning the features of your vehicle,as well as important safety warnings
designed t
ohelp reduce the risk of injury to you and your passengers.Please read your entire Owner ’s
Guide carefully as you begin learning about your new vehicle and refer to the appropriate sections when
questions arise.
6W4J-19G217-AA
*F6W4J19G217AA*
October 2005
Second Printing
Quick Reference Guide
Lincoln LS
Litho in U.S.A.
LINCOLN LS
2006 QUICK REFERENCE GUIDE
2006 MODEL LS QUICK REFERENCE GUIDE
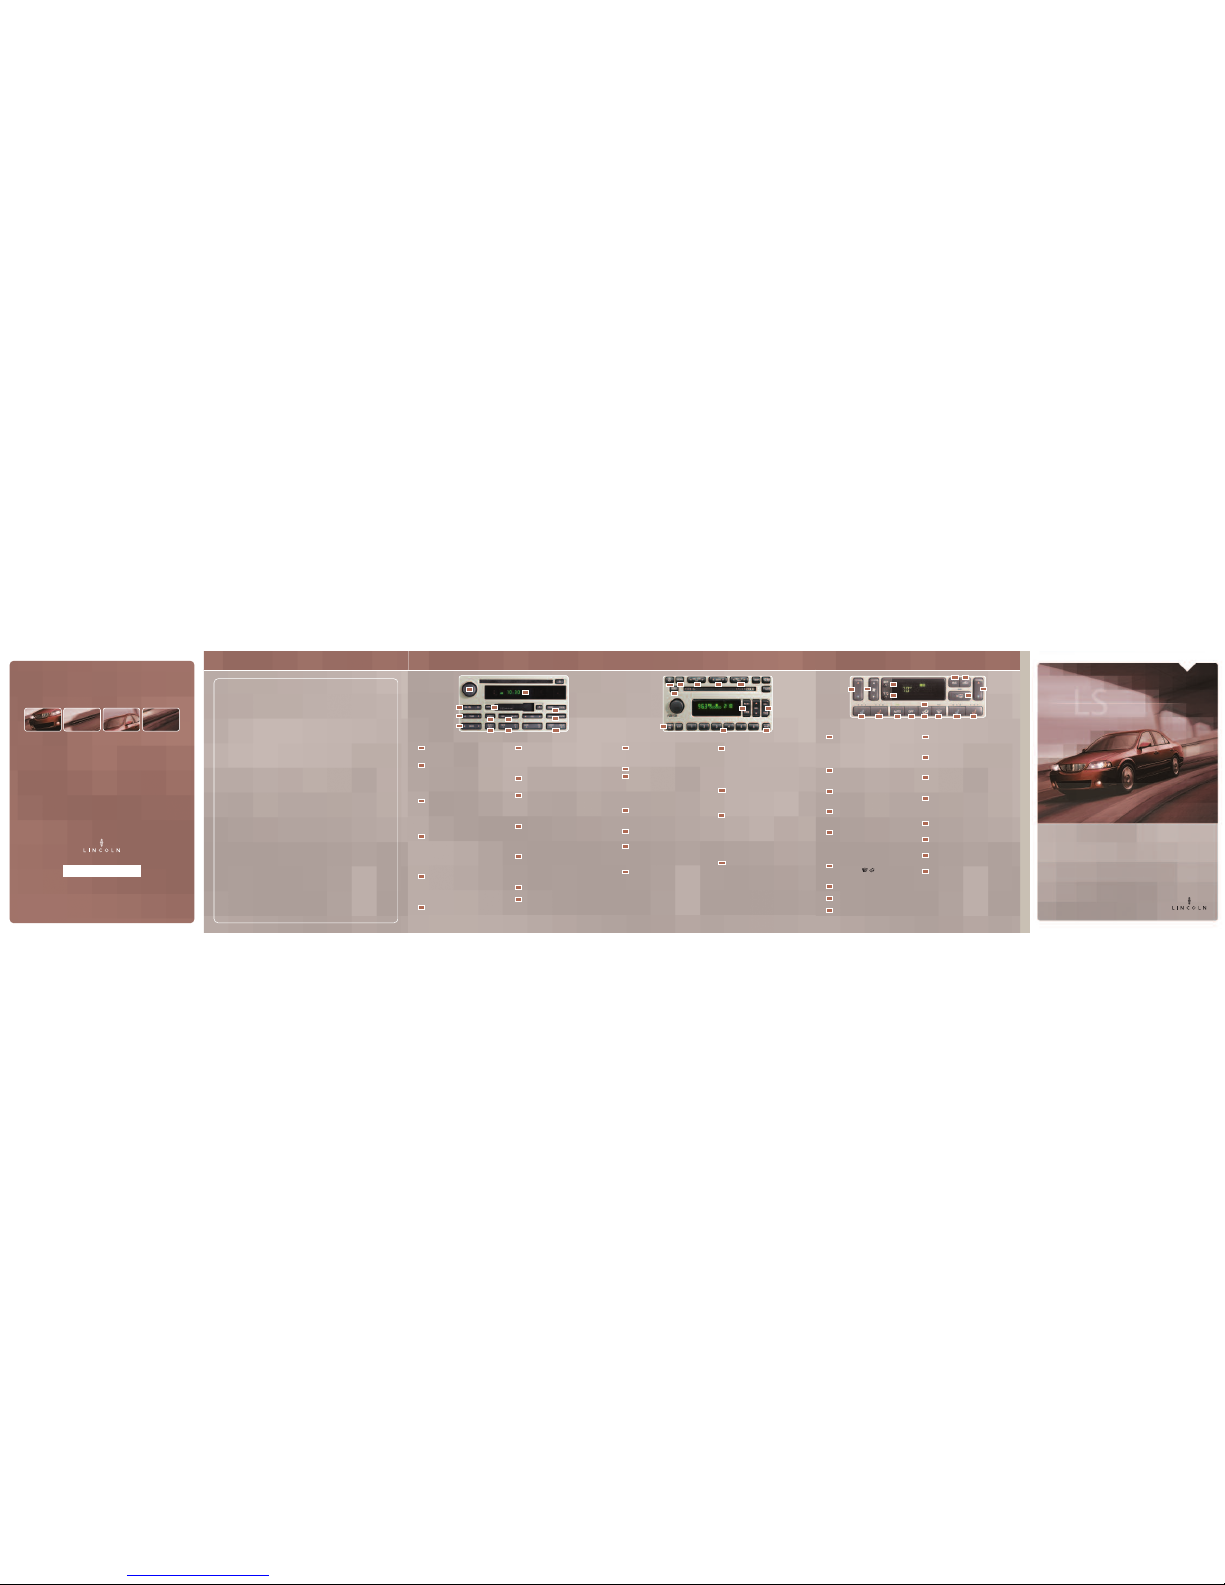
AUDIO SYSTEMS
PREMIUM AM/FM STEREO/CASSETTE SINGLE CD
POWER/VOLUME:Press the control to turn
the system on or off;turn the control to raise or
lower the volume.
AM/FM/CD:In radio mode,press this control
to switch between AM,FM1 or FM2 modes. In
tape or CD mode,press this control to stop
play and begin radio play.If you’re returning
from tape or radio play and have a CD in place,
press CD to begin play of the first CD track.The
CD will begin play where it stopped last.
TUNE:In radio mode, press the left arrow to
move to the next frequency down the
band;hold the arrow to move quickly through
the frequencies. Press the r
igh
t ar row to
move to the next frequency up the band;
hold the arrow to move quickly through
the frequencies.
SEEK: In radio mode, press the left arrow to
find the next listenable station down the
frequency band;press the right arrow to find
the next listenable station up the frequency
band.In
tapeor CD mode, press the left arrow
to listen to the previous selection or track;
press the right arrow to listen to the next
selection or track.
SCAN: In radio mode, press SCAN to hear a
brief sampling of all listenable stations;press
again to stop scan mode.In
tape or CD mode,
press SCAN to hear a brief sampling of all
selections or tracks. To stop on a par ticular
selection,press the control again.
AUTO SET:Auto Set allows you to set strong
radio stations without losing your original
manually set preset stations. Please consult
your Owner’s Guide for details.
A
B
C
D
EFG
H
I
J
K
L
A
B
C
D
E
F
RDS/MUTE:The Radio Data System allows your
audio system to receive station identification or
program type from RDS-equipped FM radio stations.
Please consult your Owner’s Guide for details.Press
MUTEto silence the playing media; press again to
return to normal levels.
REWIND/FF:Press REW to reverse in tape or
CD mode;press FF to fast-forward in tape or
CD mode.
COMPRESSION/SHUFFLE:To adjust the soft
and loud passages of a CD for a more
consistent listening level, press COMP; press
again to deactivate. Press SHUF to play all
CD tracks in random order; press again
todeactivate.
BALANCE/FADE:Press BAL and the left SEL
arrow to shift sound to the left speakers;press
the right arrow to shift sound to the right
sp
eak
ers.Press FADE and the right arrow of SEL
to shift the sound to the front; press the left
arrow to adjust the sound to the rear.
BASS/TREBLE: Press BASS,then use the
SEL c
ontrol left arrow to decrease or the
right arrow to increase the bass output.Press
TREB,then use the SEL control left arrow to
decrease or the right arrow to increase the
treble output.
TAPE:
If a tape is already loaded into the
system,
press TAPE to begin tape play.
CLOCK: Press the RDS control until SELECT
HOUR or SELECT MINS is displayed.Use the left
arrow of the SEL control to decrease
hours/minutes,or the right arrow of the SEL
control to increase hours/minutes.
G
H
I
J
K
L
M
M
AUDIOPHILE SATELLITE READY AM/FM STEREO IN-DASH SIX CD RADIO
AM/FM: In radio mode,press this control to
switch between AM,FM1 or FM2 frequency bands.
In CD mode,press this control to stop CD play and
begin radio play.
CD/AUX:Press to access CD or AUX mode.
RADIO MEMORY PRESETS:These controls can be
used to select up to six preset AM stations and
twelve FM stations (six in FM1 and six in FM2).Use
the AM/FM control to select the frequency band;
selectthe station of your choice. Press and hold a
memory preset control until the sound returns,
indicating the station has been stored.
BALANCE/FADE: Press BAL, then use the SEL
control to adjust sound between left and right
sp
eak
ers.Press FADE, then use SEL to adjust the
sound between the frontand rear speakers.
BASS/TREBLE: Press the BASS or TREB control,
then use the SEL c
on
tr
ol up ar
row to increase or
down arrowto decrease output.
CD REWIND/FF:
Press and hold the REW control
until the desired selection is reached; release
to disengage rewind. Press and hold FF until
the desired selection is reached; release to
disengage fast-forward.
SEEK:In radio mode,press the left arrow to find
the next listenable station down the frequency
band. Press the right arrow to find the next
listenable station up the frequency band.In
CD
mode,press the left arrow to move to the previous
track on the current disc;press the right arrow to
move to the next track on the current disc.
D
B
C
A
E
FGHI
J
K
A
B
C
D
E
F
TUNE: In radio mode, press the left arrow to
move to the next frequency down the band;
hold the arrow to move quickly through the
frequencies.Press the right arrow to move to the
next frequency up the band;hold the arrow to
move quickly through the frequencies. In
CD mode,press the left arrow to listen to the
previous disc; the right arrow to listen to the
ne
xt disc.
SCAN:In radio mode,press SCAN to hear a brief
sampling of all listenable stations;press again to
st
op scan mode.In
CD mode,press SCAN to
hear a brief sampling of all CD selections.To stop
on a particular selection,press the control again.
CD LOAD:Press the LOAD control and wait for
the CD door to open.(Never attempt to force the
door open manually.) You can choose which slot
you
’dlike to load by pressing the desired preset
number.(As an example – to load a CD into slot
2,press LOAD and then press preset 2.) If you
don’tspecify a location, the system will choose
the next available slot.The display will indicate
“LOAD CD#” until the CD is loaded and
“LOADING CD#”while the CD is loading.
CLOCK: Press MENU until SELECT HOUR or
SELECT MINS is displayed.Use the up arrow of
SEL toincrease, or the down arrow to decrease
the hours and minutes.
Your system comes equipped with SIRIUS
satellite ready capability. The kit to enable
satellite reception is available through your
Lincoln dealer.Detailed satellite instructions are
included with the dealer installed satellite kit.
Dealer installed satellite kit available only in the
c
ontinental United States.
G
H
I
J
K
CLIMATE CONTROL SYSTEM
DUAL AUTOMATIC TEMPERATURE CONTROL WITH HEATED AND COOLED SEATS (If Equipped)
DRIVER TEMP CONTROL:Press the up arrow
for a warmer temperature;the down arrow for a
cooler temperature.(In single zone operation,
this control manages the temperature of the
entire vehicle. In dual zone,it manages the
temperature of the driver’s side of the vehicle.
Press and hold AUTO to change zones.)
FAN SPEED:To adjust the fan speed manually,
press the up arrow to increase the speed;the
down arrow to decrease the speed.To return to
automatic fan operation,press AUTO.
COOL DRIVER SEAT:Press to cool the driver’s
seat.Press once for full cool, twice for medium
cool and a third time for low cool.Press a fourth
time todisengage.
HEATDRIVER SEAT: Press toheat the driver’s
seat.Press once for full heat, twice for medium
heat and a third time for low heat.Press a fourth
time todisengage.
AUTO (Automatic Temperature Control):Press
AUTO and select the temperature you find most
comfortable.The system will either heat or cool
the vehicle based on your temperature
selection.Press and hold AUTO for about two
seconds to toggle between single zone and
dual zone temperaturecontrol.
MANUAL OVERRIDE CONTROLS: These
3buttons OFF, , allow you to manually
direct airflow. To return to full automatic
control,press AUTO.
OFF: Press to disengage Automatic Temperature
Control.Press AUTO to resume automatic operation.
AIRFLOW DIRECTION CONTROL: Press to
toggle through various air distribution modes.
DEFROST:Press to clear ice or fog from the
windshield; the system will distribute outside
air thr
ough the windshield defr
oster ducts and
the demister outlets.
DBC
A
F
G
H
A
B
C
D
E
F
COOL PASSENGER SEAT:Press to cool the
front passenger seat. Press once for full cool,
twice for medium cool and a third time for low
cool.Press a fourth time to disengage.
HEAT PASSENGER SEAT:Press to heat the
front passenger seat.Press once for full heat,
twice for medium heat and a third time for low
heat.Press a fourth time to disengage.
PASSENGER TEMP CONTROL:When in Dual
zone mode,press the up arrow for a warmer
temperature; the down arrow for a cooler
temperature.
REAR WINDOW DEFROST:Press to clear the
rear window and side view mirrors of thin ice or
fog.Press again to turn the system off,or allow it
to turn off automatically after a predetermined
period of time.
RECIRCULATED AIR:Press tomanually engage
or disengage the operation of recirculated air in
all modes except defrost.
A/C: Press to manually con
trol the air
conditioning; press again to disengage.Press
AUTO for automatic operation.
DISPLAY OUTSIDE TEMP:Press EXT to display
the outside temperature. Press EXT again to
returnto interior temperature.
°F/°C: Press to switch between Fahrenheit
and Celsius.
The buttons for the rear heated seats are
located on each of the rear door armrests.Press
the top of the button for high heat,the bottom
of the button for low heat; push again
to deactivate.
G
H
J
K
L
M
N
O
P
Q
I
E
IJK
L
M
NO
P
Q
CAUTION: DO NOT USE CD WITH ADHESIVE LABEL*
*CDs with adhesive labels and irregularly shaped CDs may get stuck in the CD player.Homemade CDs
should be identified with permanent felt tip marker rather than adhesive labels.
Page 2
INTERIOR FEATURES
LINCOLN LS
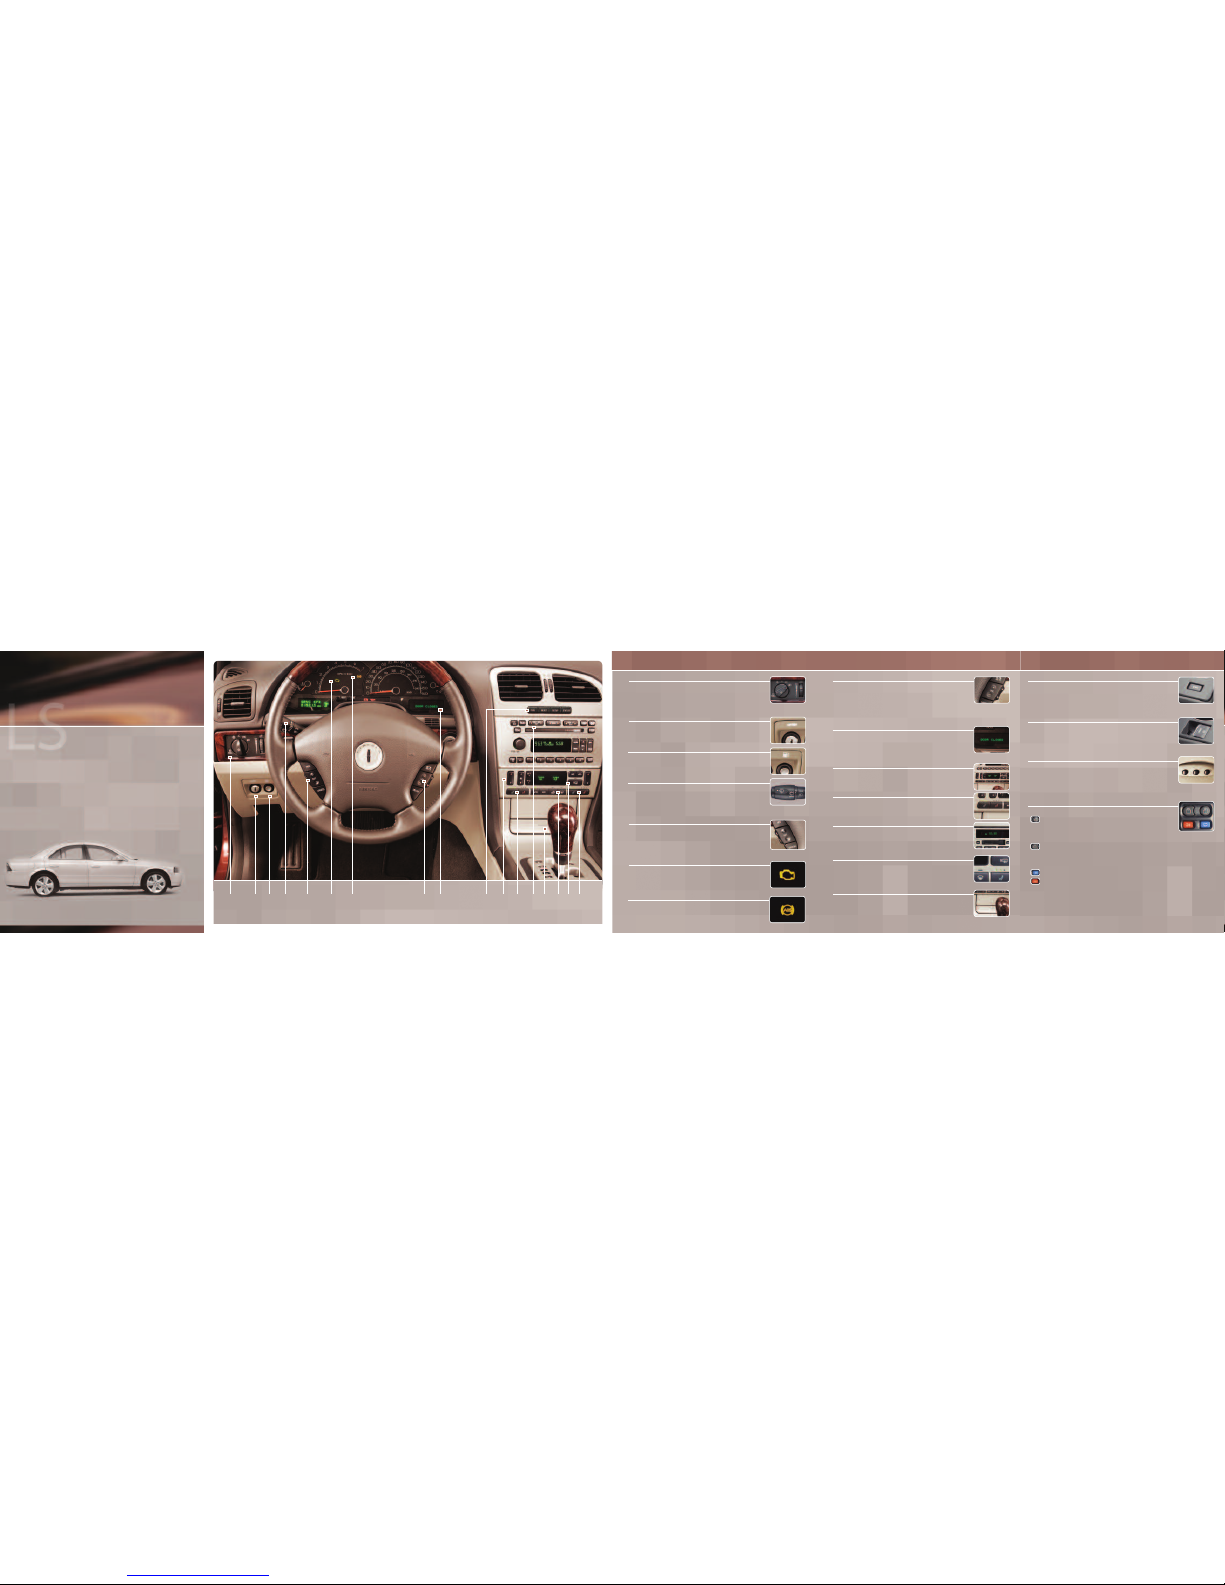
Congratulations on acquiring a Lincoln LS.Your elegant new vehicle possesses many
sophisticated features,from steering wheel mounted controls to the electronic parking
brake. This Quick Reference Guide was designed to acquaint you with many of the features
you’ll be using most.
Take a few minutes to use this Quick Reference Guide with the accompanying CD-ROM.
Insert the CD into any audio CD player;find the numbered call-outs on the instrument
panel portion of this guide,then select the corresponding number on the CD audio track
for a fast,convenient introduction to your sedan’s most-used features.
When you have more time,use the CD with your computer for an enjoyable interactive
introduction to your new vehicle. (The CD jacket identifies the minimum computer
configuration requirements.)
For detailed information,please consult your Owner’s Guide.
2
34
9
8
7
65
10
121314
14
12
4
FUEL DOOR RELEASE
Press the power fuel door release control on the instrument panel to open the
fuel door.
5
WIPER WASHER CONTROL
For a single wipe with no wash,tap the end of the stalk briefly. To increase the
speed of the wipers,rotate the end of the control away from you;to decrease the
speed,rotate the control toward you.To activate the washer, push and hold the
end of the stalk; the wash c
ycle will c
on
tinue for up to ten seconds or until
released.After release there will be three clearing wipes.(The windshield wiper won’t cycle automatically
if the washer fluid is low.)
6
SPEED CONTROL
Your speed controls are located on the steering wheel.Press ON (located on side
of SET button) to enable speed control.Accelerate to desired speed (You must be
traveling at or above 30 miles per hour.) Press SET+ and release to set a speed,
then pr
ess and hold + or – t
oincrease or decrease speed. Pressing RES will return
your vehicle toa previously set speed. To disengage speed control,press OFF or
depress the brake pedal.
HEADLAMP CONTROL
Turn the control clockwise to the first position to turn on the parking lamps,
license plate lamps and tail lamps.Turn to the second position to turn on the
headlamps.Turn the control counterclockwise to initiate the autolamp system,
which turns your exterior lamps on and off automatically,based on available
daylight;the system also keeps the lights on for a short time after the ignition switch is turned to the OFF
position.To turn on the foglamps,pull the headlamp control toward you.
2
3
INTERIOR TRUNK RELEASE
Press the power trunk release control on the instrument panel to open the trunk.
When valet parking,you can render the switch inoperable by locking the button
with your master key;also, lock your glove box before giving the attendant the
gray valet key.
7
CHECK ENGINE LIGHT
The Check Engine light illuminates when the ignition is first turned to the ON
position.If the light stays on or blinks,the On Board Diagnostics System has
detected a malfunction. Drive moderately (avoid heavy acceleration or
deceleration) and have your vehicle serviced immediately.
10
MESSAGE CENTER (If Equipped)
Your Message Center is located on your instrument cluster.With the ignition in
the “run”position,the Message Center will display important vehicle information
while constantly monitoring vehicle systems.It will also notify you of potential
vehicle problems by displaying a system warning message.Please consult your
Owner’s Guide for details.
11
CLIMATE CONTROL SYSTEM
Please see the reverse side for details.
9
STEERING WHEEL AUDIO CONTROLS
Press MEDIA to select AM,FM1, FM2,TAPE (if equipped), or CD.Radio Presets: In
AM,FM1 or FM2 mode, use the up or down arrow to select preset radio stations
within the selected radio band.
Tape Selection:In tape mode, press the up or
down arrow to select the next or previous selection on the tape.
CD Selection:In
CD mode,press the up or down arrow to select the next or previous CD track.
Volume:Press VOL + or –
in any mode to adjust the volume.
Mute:Press this control to silence the playing media; press again to
return to normal volume.(If your vehicle is equipped with the Navigation System, please refer to your
Owner’s Guide for information.)
ABS WARNING LIGHT
If this light remains on or continues to flash,it means a malfunction has been
detected;have the ABS serviced immediately.You can expect your normal braking
sy
stem to continue to function unless the brake warning light remains illuminated.
8
11
15
12
HEATED / COOLED SEATS (If Equipped)
Please see Climate Control system on the reverse side for details.
13
AUDIO SYSTEMS/CLOCKS
Please see the reverse side to review the Premium AM/FM stereo/cassette single CD
unit or the Audiophile Satellite Ready AM/FM stereo in-dash six-CD radio.If you have
the Navigation System,please consult the Entertainment chapter of your Owner’s
Guide for more information on navigation system features,or call 1-888-NAV-MAPS
(1-888-628-6277).
14
FRONT AND REAR WINDOW DEFROSTER CONTROLS
Press the defrost control to clear ice or fog from the windshield.Press the rear
defrost control to clear the rear window and side view mirrors of thin ice or fog.
Press again to turn the system off,or allow it to turn off automatically after a
predetermined period of time.
15
ASHTRAY
Your ashtray has an unusual feature - it has a drawer with a removable tray;the
tr
a
yc
an bedamaged if not used properly. To remove the tray,push the ashtray
face and slide it open;pull the tray from the drawer to remove.(You’ll notice that
the tray has a tight fit.Please take care not to damage the ashtray.) To install the
tr
ay,insert the tray into the drawer;push to close.
ADDITIONAL FEATURES
REMOTE ENTRY SYSTEM
ADVANCETRAC
®
(If Equipped)
The AdvanceTrac® system automatically turns on when the engine is started.
AdvanceTrac® enhances your vehicle’s stability during maneuvers that require all
available tire traction,like in wet/snowy/icy road conditions and/or when performing
emergency maneuvers.
ELECTRONIC PARKING BRAKE
Toset the parking brake, pull the lever up.To release the parking brake,make sure the
ignition is turned to ON,depress the brake pedal, then gently push the parking brake
lever down.
UNIVERSAL GARAGE DOOR OPENER
This control,located on the driver’s visor,provides a convenient way to replace up to
three hand-held transmitters with a single built-in device.This feature will learn the
radio frequency codes of most current transmitters to operate garage doors,entry
gates,security systems, entry door locks, and home or office lighting.Please consult
your Owner’s Guide for details.
Press and release the “unlock”icon to unlock the driver’s door.Press and release
again within five seconds to unlock all doors.Press and hold this control for
morethan two seconds in order to begin opening the windows and moonroof
(if equipped).The control can then be released and the windows and moonroof
will complete the opening operation.
Press and release the “lock”icon to lock all doors and arm the perimeter alarm
system.Press and release again within three seconds to confirm that all doors,
trunk and hood are closed and locked.One chirp will confirm that all doors,hood
and trunk are closed;two chirps will indicate that one or more access points
ha
veNO
Tbeen properly closed.
Press the “open trunk”icon to open the trunk.
Press the “alarm”icon to activate the alarm.Press it a second time to deactivate
the alarm.
10
 Loading...