

Page 1

User and Installation Instructions
Seal Refrigerated Showcases
SCR785 and SCR1085
IS392 ECN3621
Page 2
Dear Customer,
Thank you for purchasing this Lincat product.
NOTE
This is just one of over 450 different items of catering equipment available which is
constantly being extended and improved. Details are available from your local
distributor or direct from us.
Used for the purposes for which it is intended, and with careful maintenance as
outlined in this User Guide, your Lincat product will give years of trouble free use.
IMPORTANT INFORMATION
Please read all of the safety and operating instructions carefully before
using this product. Please pay particular attention to all sections of this
User Guide that carry warning symbols and notices.
WARNING!
This is a Warning symbol. This symbol is used throughout the user
guide whenever there is a risk of personal injury. Ensure that these
warnings are read and understood at all times.
CAUTION!
This is a Caution symbol. This symbol is used throughout the User Guide
whenever there is a risk damaging your Lincat product. Ensure that these
warnings are read and understood at all times.
NOTE:
This is a Note symbol. This symbol is used throughout the User Guide to provide
additional information, hints and tips.
IS392 ECN4127
Page 2
Page 3

CONTENTS
Contents Page
Safety instructions………………………………………………………4
Product specification………………………………………………….. 5
Features………………………………………………………………….. 5
Technical specification…………………………………………………5
Pack contents…………………………………………………….………6
Spare parts list………………………………………………………….. 6
Installation……………………………………………………………….. 7
Connecting to the electricity supply……………………………. 7
Operating instructions………………………………………………… 8
Temperature controller and fault finding……………….……… 9
Cleaning and maintenance…………………………………………….10
Cleaning the condenser………………………………………….10
Replacing the light tube…………………………………………..10
Service information…………………………………………………….. 11
Conditions of guarantee…..…………………………………….…….. 11
USE OF THE REFRIGERATED SHOWCASES
The Refrigerated Showcases are intended to be used on counter tops to display
pre-chilled food product.
IS392 ECN4127
Page 3
Page 4
SAFETY INSTRUCTIONS
WARNING!
Basic safety precautions, including the following, should be
followed to reduce the risk of personal injury and/or damage to
the showcase. Make sure you have fully read these instructions
before installing and switching on. Keep this User Guide in a safe
place for future reference for you and your staff.
REMOVAL OF PACKAGING
In the interest of hygiene, you should clean the product after unpacking and
ensure all plastic coatings are removed before use.
This unit is heavy. Be aware of the risks when lifting or moving it.
Always lift the showcase using the base, do not lift with any other
part. Do not pull the unit across your work surface as it may make a
mark.
The cabinet relies on the circulation of cold air, which must pass through
and around the shelf. Ensure circulation is not obstructed by food product
blocking the internal vents.
GENERAL
Do not try to modify this product.
Ensure that the electrical supply cable is not damaged.
If the supply cable is damaged, it should be replaced by Lincat Ltd or suitably
qualified persons, in order to avoid a hazard.
EQUIPOTENTIALITY
This equipment is provided with an equipotential bonding terminal to
allow earth cross-bonding with other equipment.
IS392 ECN4127
Page 4
Page 5
PRODUCT SPECIFICATION
FEATURES
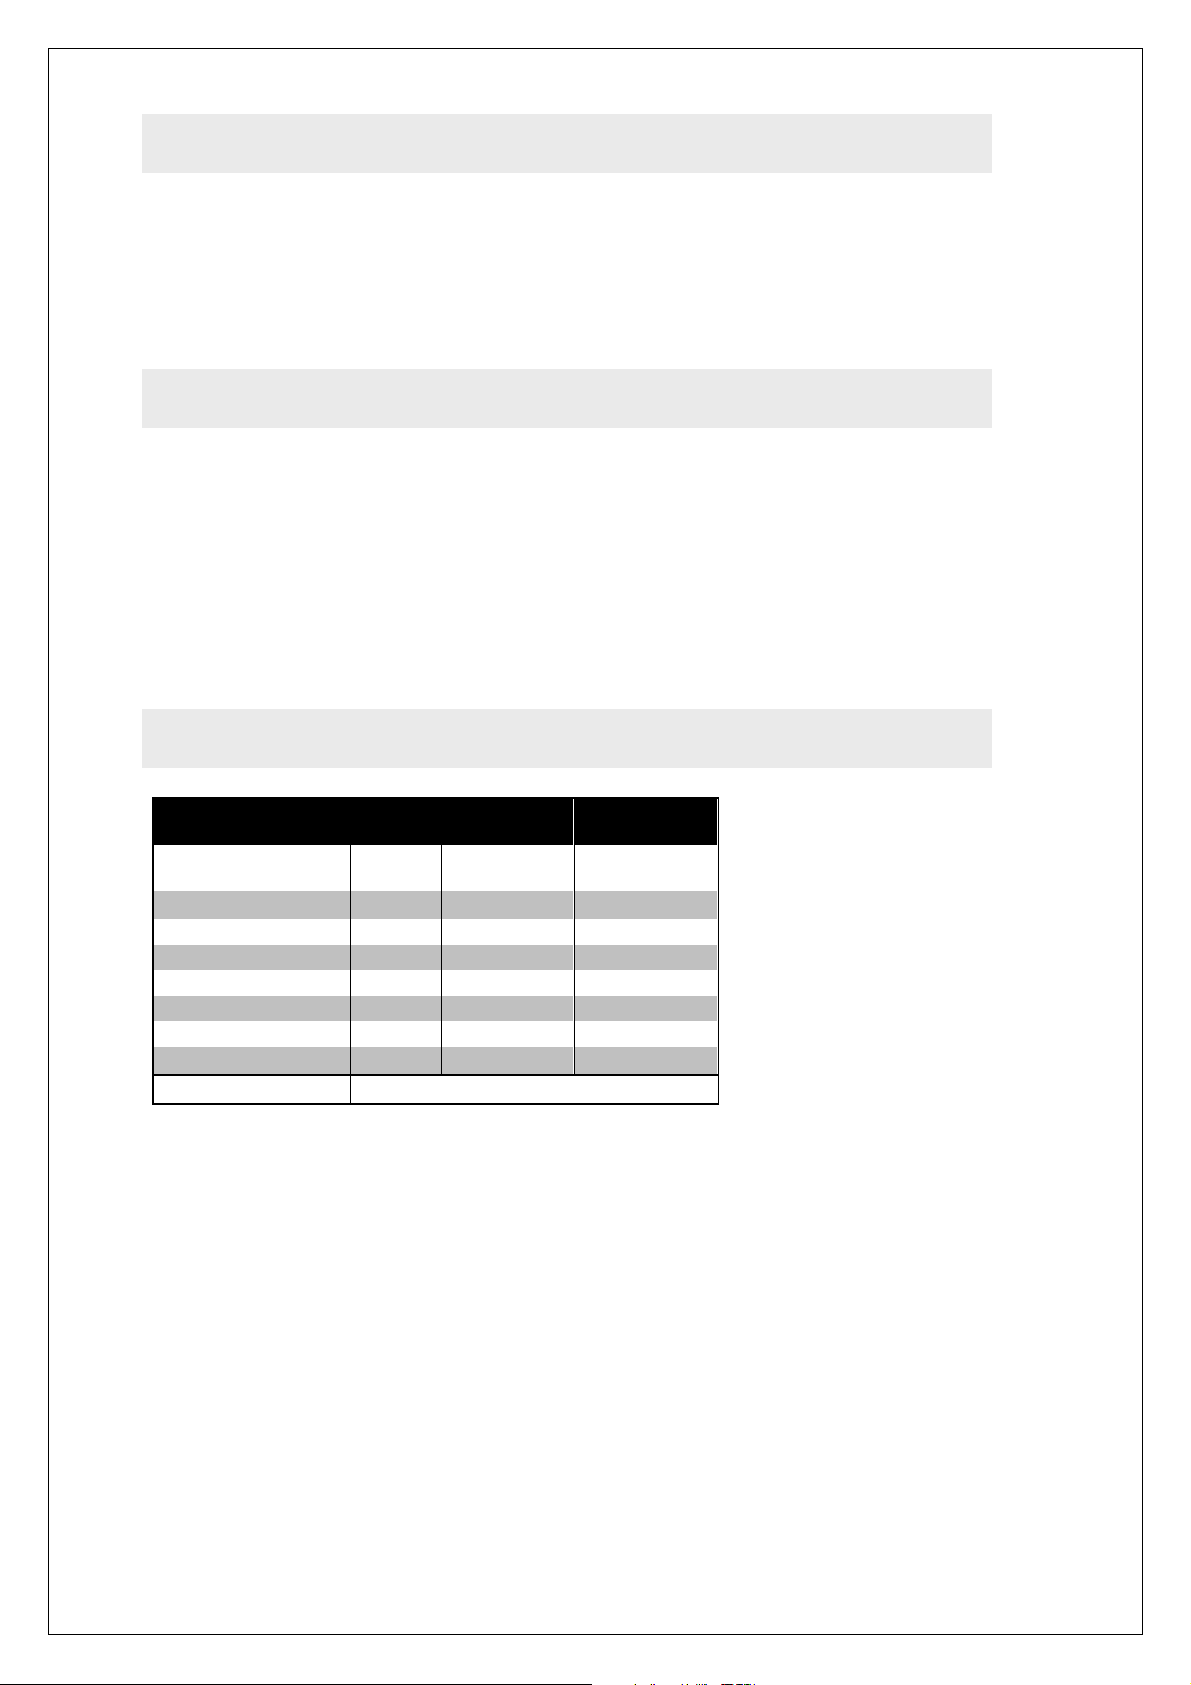
TECHNICAL SPECIFICATION
Max. Operating
Refrigerated Showcase – SCR785, SCR1085
Fan-assisted refrigeration
Toughened single glazed glass
Electronic control
Temperature alarm
Removable side glass & 230 Volt, 50 Hz, single phase
Sliding rear doors
Independently switchable light
Fixed shelf position
230 Volt, 50 Hz, single phase
Model SCR785 SCR1085
Temperature
Volume (gross) litres 140 190
Internal Dimensions mm 746x470x620 1046x470x620
Width mm 785 1085
Depth mm 750 750
Height mm 665 665
Power Rating Watt 360 440
Weight (net) kg 81.5 101.0
Refrigerant R452a
O
C 25 25
IS392 ECN4127
Page 5
Page 6
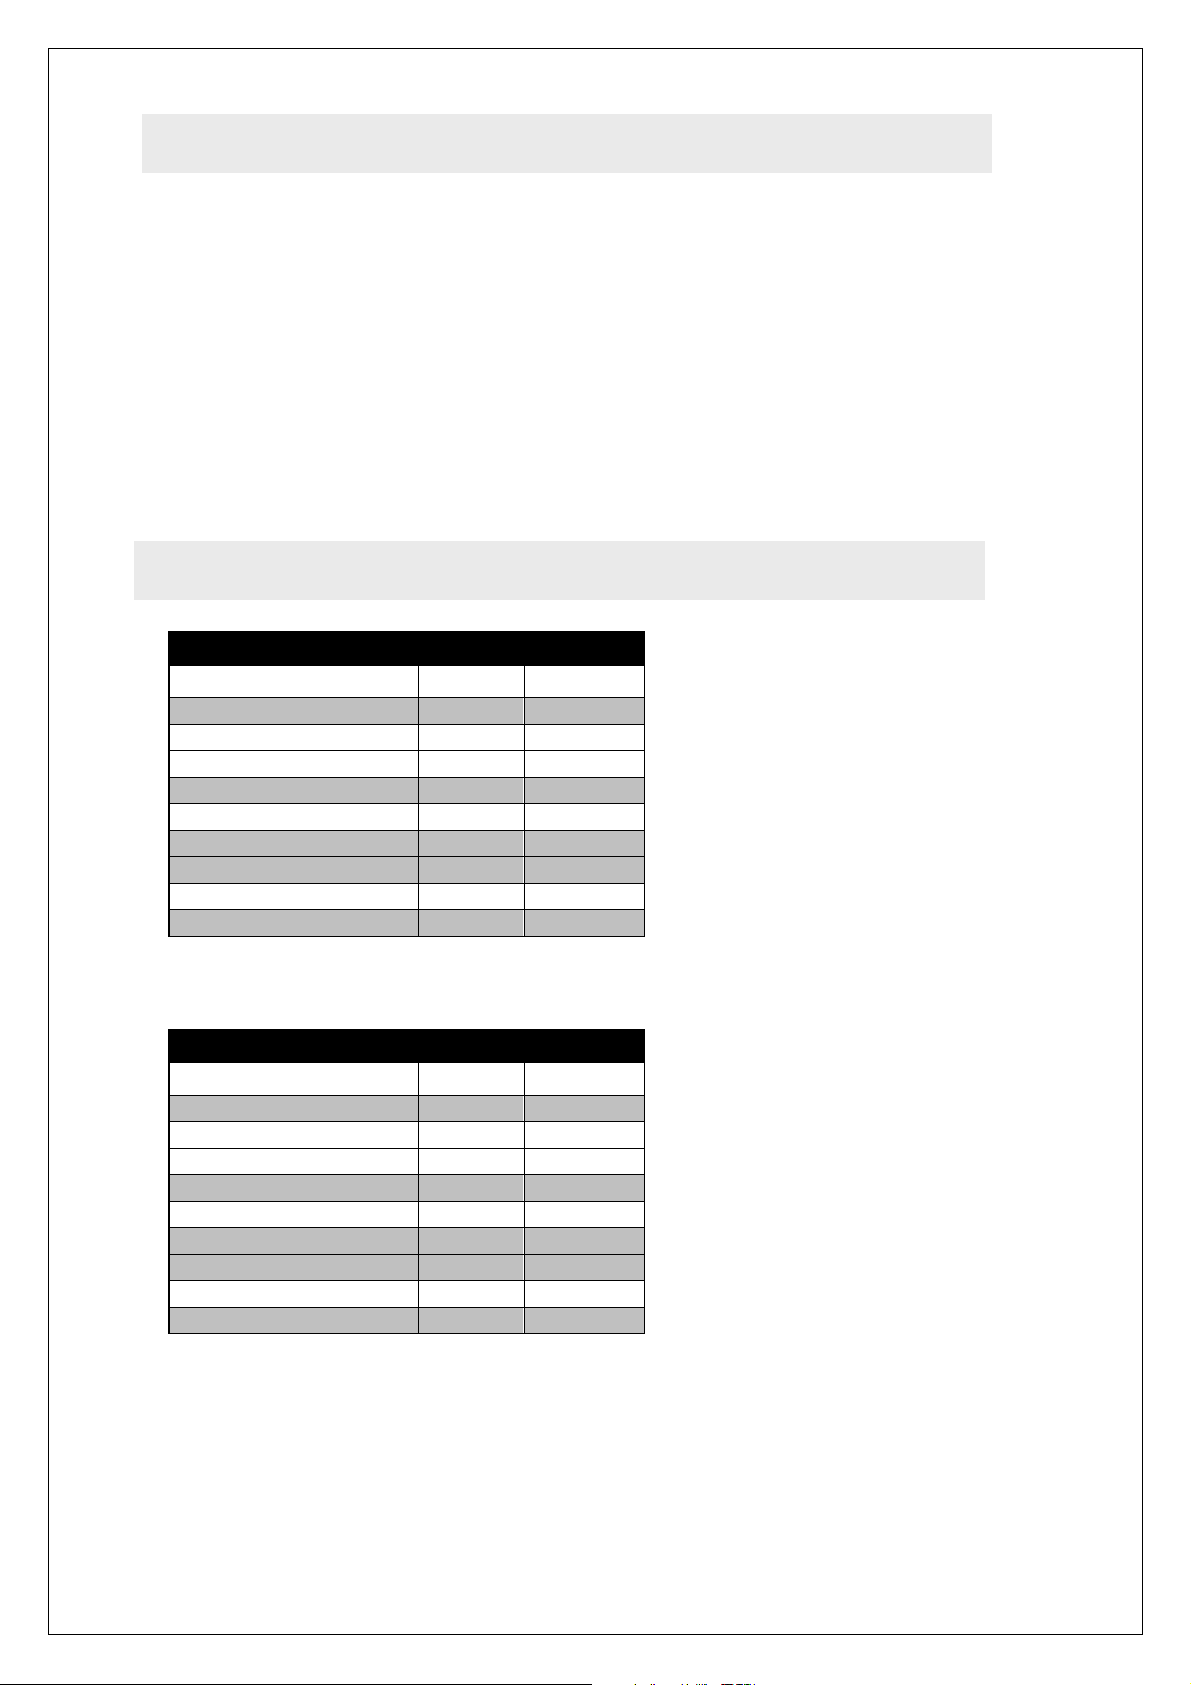
SPARE PARTS LIST
PACK C
ONTENTS
SCR785, SCR1085
Refrigerated Showcase (with
cable and 13amp plug)
1 x chrome-plated shelves
2 x sliding doors
Component Model 50Hz
SCR785 SCR1085
Light Tube BU173 BU172
Compressor CR08 CR07
Evaporator Fan S-R181 S-R181
Condenser Fan FA62 FA62
Shelf SH102 SH103
Temperature Controller EC16 EC16
Diffuser DI29 DI30
Starter GL68 GL68
Shelf Pin SP05 SP05
User Guide
Guarantee card
Component Model 60Hz
SCR785 SCR1085
Light Tube BU173 BU172
Compressor CR12 CR11
Evaporator Fan S-R181 S-R181
Condenser Fan FA62 FA62
Shelf SH102 SH103
Temperature Controller EC16 EC16
Diffuser DI29 DI30
Starter GL68 GL68
Shelf Pin SP05 SP05
IS392 ECN4127
Page 6
Page 7
INSTALLATION
NOTE
Ensure the unit is installed on a sound, level work surface. Check that
the side glass is secure then fit the shelf into position engaging the shelf
location pins to prevent movement of the shelf.
Do not install this showcase close to any source of heat which may result
in operating conditions exceeding its design limits. Locations close to
sources of moisture or steam will cause excessive condensation on the
outer surfaces of the cabinet and must be avoided.
Ambient temperature range; minimum 18oC, maximum 25oC,
Maximum relative humidity 60%
For safety regulations, the plug must always be accessible.
Leave the product to stand for three hours before connecting to the power
supply and switching on.
CONNECTING TO THE ELECTRICITY SUPPLY
Ensure that the voltage of your electricity supply corresponds to the serial
plate details. The product is supplied with a 13 Amp plug. To replace the
plug, follow these instructions:
• green and yellow wire to 'E' or (Earth)
• blue wire to 'N' (Neutral)
• brown wire to 'L' (Live)
THIS APPLIANCE MUST BE EARTHED
IS392 ECN4127
Page 7
Page 8

OPERATING INSTRUCTIONS
1. Cable
2. On/Off Switch
3. Light Switch
4. Temperature Controller
Ensure shelves are secure. Close the doors. To check operation of the unit,
connect it to the electricity supply, switch on the light (3), then switch on the
On/Off switch (2). The unit is factory set to 3o C ,when the unit has reached the
set point, load with pre-chilled food.
The temperature controller is factory set to maintain the temperature
inside at 3 to 5oC. The temperature displayed is the air inside the cabinet
and not the temperature of the food product.
The displayed temperature will fluctuate as the refrigeration system
cycles. At 4 hour intervals the system will automatically defrost. The
display will indicate that it is in defrost mode, refer to page 9.
34
2
LOADING
Load the cabinet with pre refrigerated products only, taking care to allow room
for the air to flow. Do not allow items to overhang the edges of the shelf.
Do not obstruct any of the ventilation grilles.
1
IS392 ECN4127
Page 8
Page 9

CLEANING AND MAINTENANCE
TEMPERATURE CONTROLLER AND FAULT FINDING
1. Numerical figure (e.g. 5.0) = Temperature (in oC) in the unit
2. DF = Defrost (Automatic cycle every 2 hours for 20 minutes)
3. The temperature controller is factory set to maintain the temperature inside at 30
to 50C. If cabinet temperature of the unit is higher than the factory setting, then
possible causes are:
• Doors left open
• Food product not pre-chilled
• Excessive ambient temperature (above 32 oC)
• Condenser obstructed (check & clean)
• Evaporator blocked by ice. If this is the case, manually defrost by pressing the
buttons marked for 2 seconds.
4. If cabinet temperature of the unit is lower than the factory setting, then possible
If necessary, also switch off the unit for 3 - 4 hours
causes can be:
• Faulty controller
• Faulty probe
IS392 ECN4127
Page 9
Page 10

CLEANING
Disconnect the unit from the electricity supply. Use a mild detergent in hot
water and a soft cloth. Do not use abrasive creams or scourers.
Slide the doors to the middle position; lift up and out of the runners to remove.
Remove the shelf by lifting at the back edge and lowering off the supports to a
diagonal position.
Remove the side glass panels by unscrewing the black plastic fastener and
carefully lift the glass from the channel.
Remove the fan diverters.
The shelf may be washed in a dishwasher.
MAINTENANCE
Regular cleaning of the unit is recommended. No other regular maintenance is
required, but it may be necessary to clean the condenser or replace a light tube.
CLEANING THE CONDENSER
Disconnect the unit from the electricity supply.
The condenser is located behind the rear panel, remove the screws holding this
panel in place and remove the panel to expose the condenser. Use a vacuum
cleaner to remove any debris from the face of the condenser. Replace
the panel and refit all of the screws.
REPLACING THE LIGHT TUBE
Disconnect the unit from the electricity supply.
Remove doors. Unclip the end caps from the light unit. Remove the diffuser
from its clips. To remove the tube, carefully rotate it 90o and slowly pull down
until it is released. It is recommended that the starter (a round cylinder
located at one end of the tube) is also replaced at the same time. To
remove the starter, rotate it anticlockwise. Fitting the new tube is the
reverse of the above sequence.
IS392 ECN4127
Page 10
Page 11

SERVICE INFORMATION
GUARANTEE
For help regarding the installation, maintenance and use of your Lincat
equipment, please contact our Service Department:
01522 875520
All service work, other than routine cleaning should be carried out by one of our
authorised service agents. We cannot accept responsibility for work carried out
by other persons.
To ensure your call is service enquiry is handled as efficiently as possible, you
need to have the following details available:
Brief details of problem
Product code, type number and serial number of unit (both on serial plate)
Code number of spare part (see spare parts list), if known
Lincat reserve the right to carry out any work under warranty during normal
working hours, i.e. Monday to Friday, 8.30 a.m. – 5.00 p.m.
This unit carries a comprehensive UK twelve-month warranty. The
guarantee is in addition to, and does not diminish, your statutory or legal
rights.
The guarantee does not cover: -
•
Accidental damage, misuse (or use not in accordance with the instructions in
this User Guide), or consumable items
•
Damage due to incorrect installation, modification or unauthorised service
work
•
The manufacturer disclaims any liability for incidental, or consequential
damages
IS392 ECN4127
Page 11
Page 12

This page is intentionally blank
IS392 ECN4127
Page 12
 Loading...