

Page 1
Please make a note of your product details for
future use:
Date Purchased:_________________________
Model Number:__________________________
Serial Number:__________________________
Dealer:_________________________________
_______________________________________
Installation, Operating and Servicing
Instructions
Panther Hot Cupboards
P6B2, P6B3, P6B4, P6B5, P6P2, P6P3,
P6P4, P6P5, P8B3,P8B3PT, P8B4, P8B4PT,
P8B5, P8B5PT, P8B6, P8B6PT, P8P3,
P8P3PT, P8P4, P8P4PT, P8P5, P8P5PT,
P8P6, P8P6PT
IS 464 ECN 4308 Page 1 of 14
Page 2
CONTENTS
Important Information
2
Warnings and Precautions
3
Technical Data
3 - 4
Checklist of Enclosures
5
Installation and Commissioning
5-8
Operating Instructions
8 - 10
Cleaning
10
Servicing, Maintenance and Component Replacement
11
Fault Finding
11
Spare Parts List
12-13
Accessories
13
Service Information and Guarantee
14
IMPORTANT INFORMATION
Read these instructions carefully before using this product, paying particular
attention to all sections that carry warning symbols, caution symbols and notices.
Ensure that these are understood at all times.
WARNING!
This symbol is used whenever there is a risk of personal injury.
CAUTION!
This symbol is used whenever there is a risk of damaging your Lincat product.
NOTE:
This symbol is used to provide additional information, hints and tips.
KEEP THIS MANUAL FOR FUTURE REFERENCE
IS 464 ECN 4308 Page 2 of 14
Page 3
WARNINGS AND PRECAUTIONS
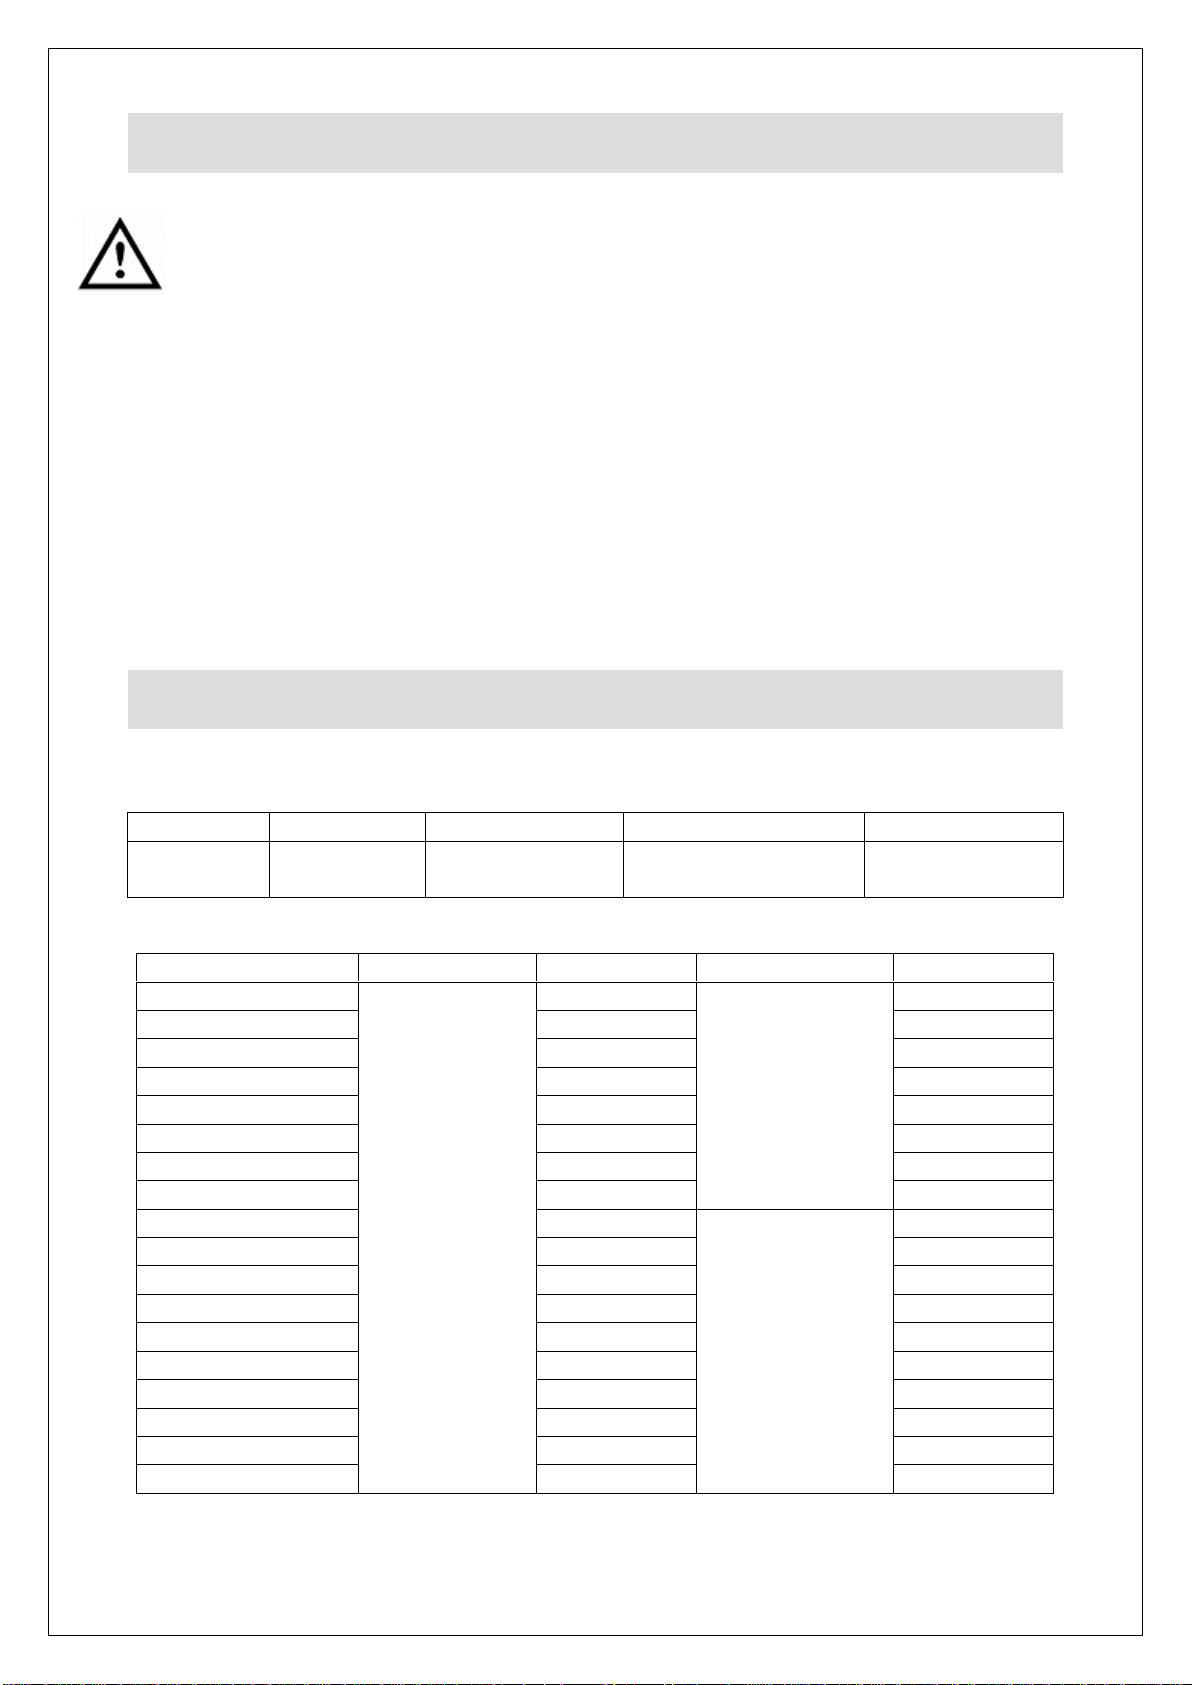
TECHNICAL DATA
P
6 or 8
B or P
2, 3, 4, 5 or 6
PT
Panther
Unit Depth
Bain Marie or
Plain top
Number of
1/1 Gastronorms
Pass - Through
model
Model
Height (mm)
Width (mm)
Depth (mm)
Weight (kg)
P6B2
900
900
670
80
P6B3
1125
95
P6B4
1450
116
P6B5
1775
136
P6P2
900
71
P6P3
1125
86
P6P4
1450
105
P6P5
1775
124
P8B3
1125
800
104
P8B3PT
1125
106
P8B4
1450
125
P8B4PT
1450
127
P8B5
1775
146
P8B5PT
1775
148
P8B6
2100
166
P8B6PT
2100
168
P8P3
1125
92
P8P3PT
1125
94
This appliance must be installed, commissioned and serviced by a qualified person
in accordance with national and local regulations in force in the country of
installation.
If the supply cord is damaged, it must be replaced by the manufacturer, its service
agent or similarly qualified person.
Ensure that the plug/socket is accessible at all times.
Strip plastic coating and clean the appliance before use.
During operation parts may become hot - avoid accidental contact.
Disconnect this appliance before servicing, maintenance or cleaning.
Codes Explained
IS 464 ECN 4308 Page 3 of 14
Page 4
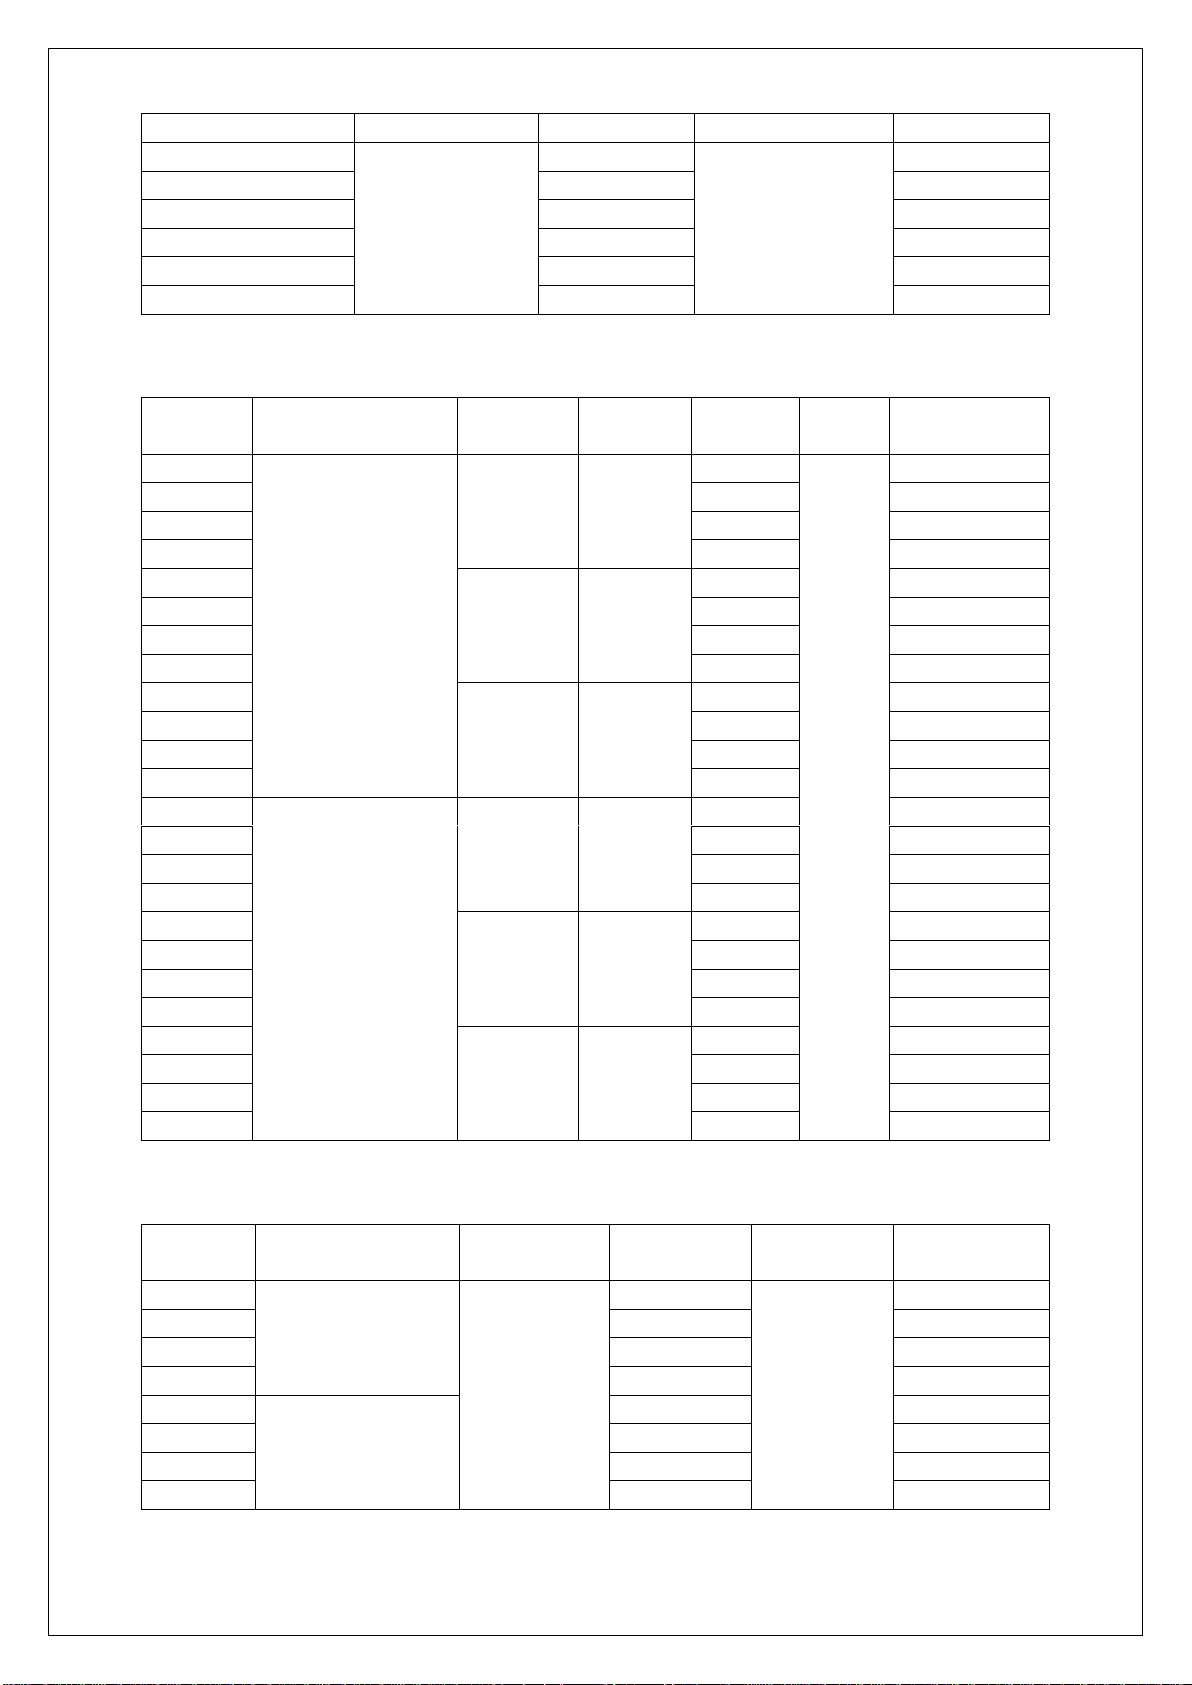
Model
Height (mm)
Width (mm)
Depth (mm)
Weight (kg)
P8P4
900
1450
800
114
P8P4PT
1450
116
P8P5
1775
136
P8P5PT
1775
138
P8P6
2100
158
P8P6PT
2100
160
Model
Heated/Ambient
No.
shelves
Height
(mm)
Width
(mm)
Depth
(mm)
Weight (kg)
PS83A1
A
1
325
1125
320
7
PS84A1
1450
9
PS85A1
1775
11
PS86A1
2100
13
PS83A2
2
615
1125
14
PS84A2
1450
18
PS85A2
1775
22
PS86A2
2100
26
PS83A3
3
905
1125
21
PS84A3
1450
27
PS85A3
1775
33
PS86A3
2100
39
PS83H1
H
1
325
1125
10
PS84H1
1450
13
PS85H1
1775
16
PS86H1
2100
19
PS83H2
2
615
1125
20
PS84H2
1450
26
PS85H2
1775
32
PS86H2
2100
38
PS83H3
3
905
1125
27
PS84H3
1450
35
PS85H3
1775
48
PS86H3
2100
57
Model
Heated/Ambient
Height
(mm)
Width
(mm)
Depth
(mm)
Weight (kg)
PG62A
A
520
900
460
9
PG63A
1125
12
PG64A
1450
16
PG65A
1775
20
PG62H
H
900
9
PG63H
1125
12
PG64H
1450
16
PG65H
1775
20
Overshelves
Gantries
IS 464 ECN 4308 Page 4 of 14
Page 5
CHECK LIST OF ENCLOSURES
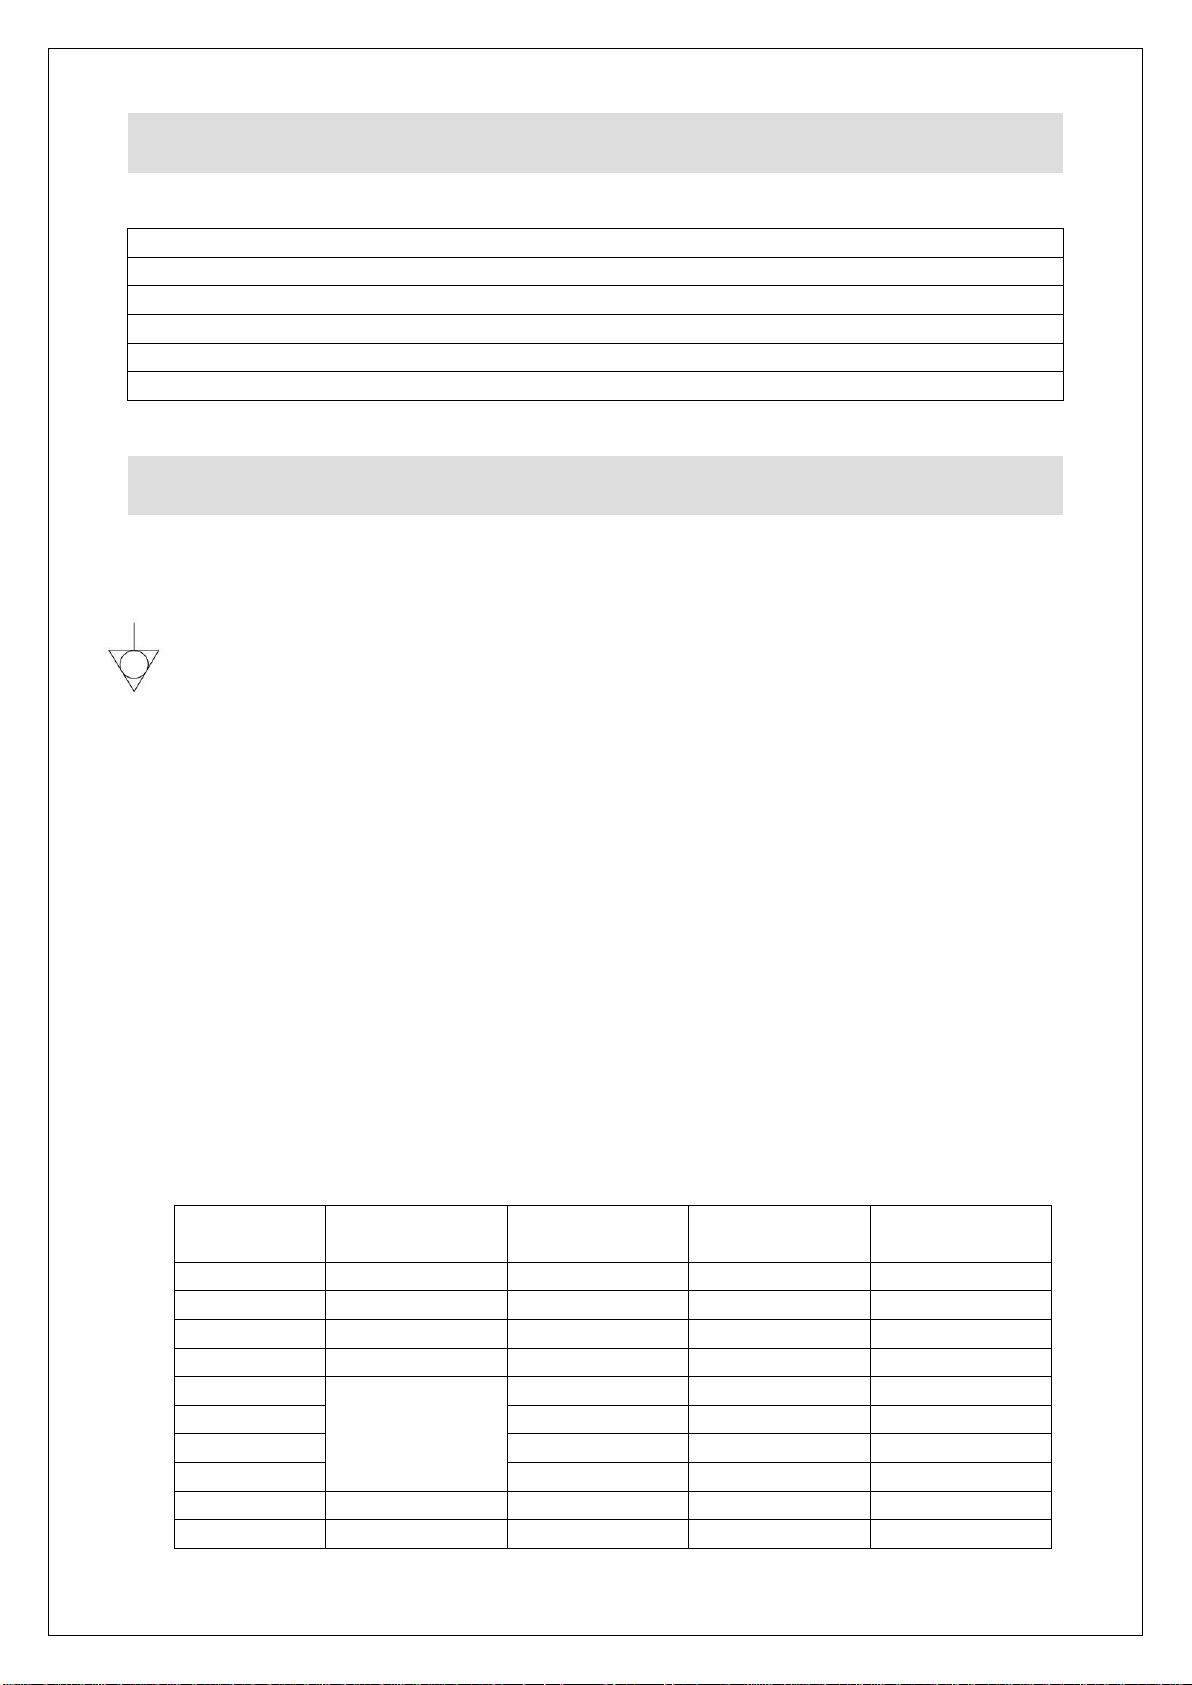
Warranty Card
Instructions Manual
Shelves – combinations to make 2 rows
Push bar handle kit
Gastronorm dividers (Bains Marie models only)
Drain tube (Bains Marie models only)
INSTALLATION AND COMMISSIONING
Model
Bains Marie
(kW)
Cupboard
(kW)
Total (kW)
Current (A) @
230V AC
P6B2
1.1
1.5
2.6
11.3
P6B3
1.35
1.5
2.85
12.4
P6B4
2.45
2.5
4.95
21.5
P6B5
2.7
2.5
5.2
22.6
P6P2
N/A
1.5
1.5
6.5
P6P3
1.5
1.5
6.5
P6P4
2.5
2.5
10.9
P6P5
2.5
2.5
10.9
P8B3
1.35
1.5
2.85
12.4
P8B3PT
1.35
1.5
2.85
12.4
This appliance must be earthed.
An equipotential bonding terminal is provided to allow cross bonding with other
equipment.
If replacing the plug connect the terminals as follows:
Green and Yellow wire Earth E
Blue wire Neutral N
Brown wire Live L
Means of isolation with at least 3mm contact separation in all poles must be
incorporated into the fixed wiring of this appliance.
The fixed wiring insulation must be protected by insulated sleeving having a
temperature rating of 60 Deg C.
Supply cords shall be oil resistant, sheathed flexible cable not lighter than ordinary
polychloroprene or equivalent elastomer sheathed cord (code 60245 IEC 57)
Install this appliance on a level surface ensuring all vents are unobstructed.
Power Ratings
IS 464 ECN 4308 Page 5 of 14
Page 6
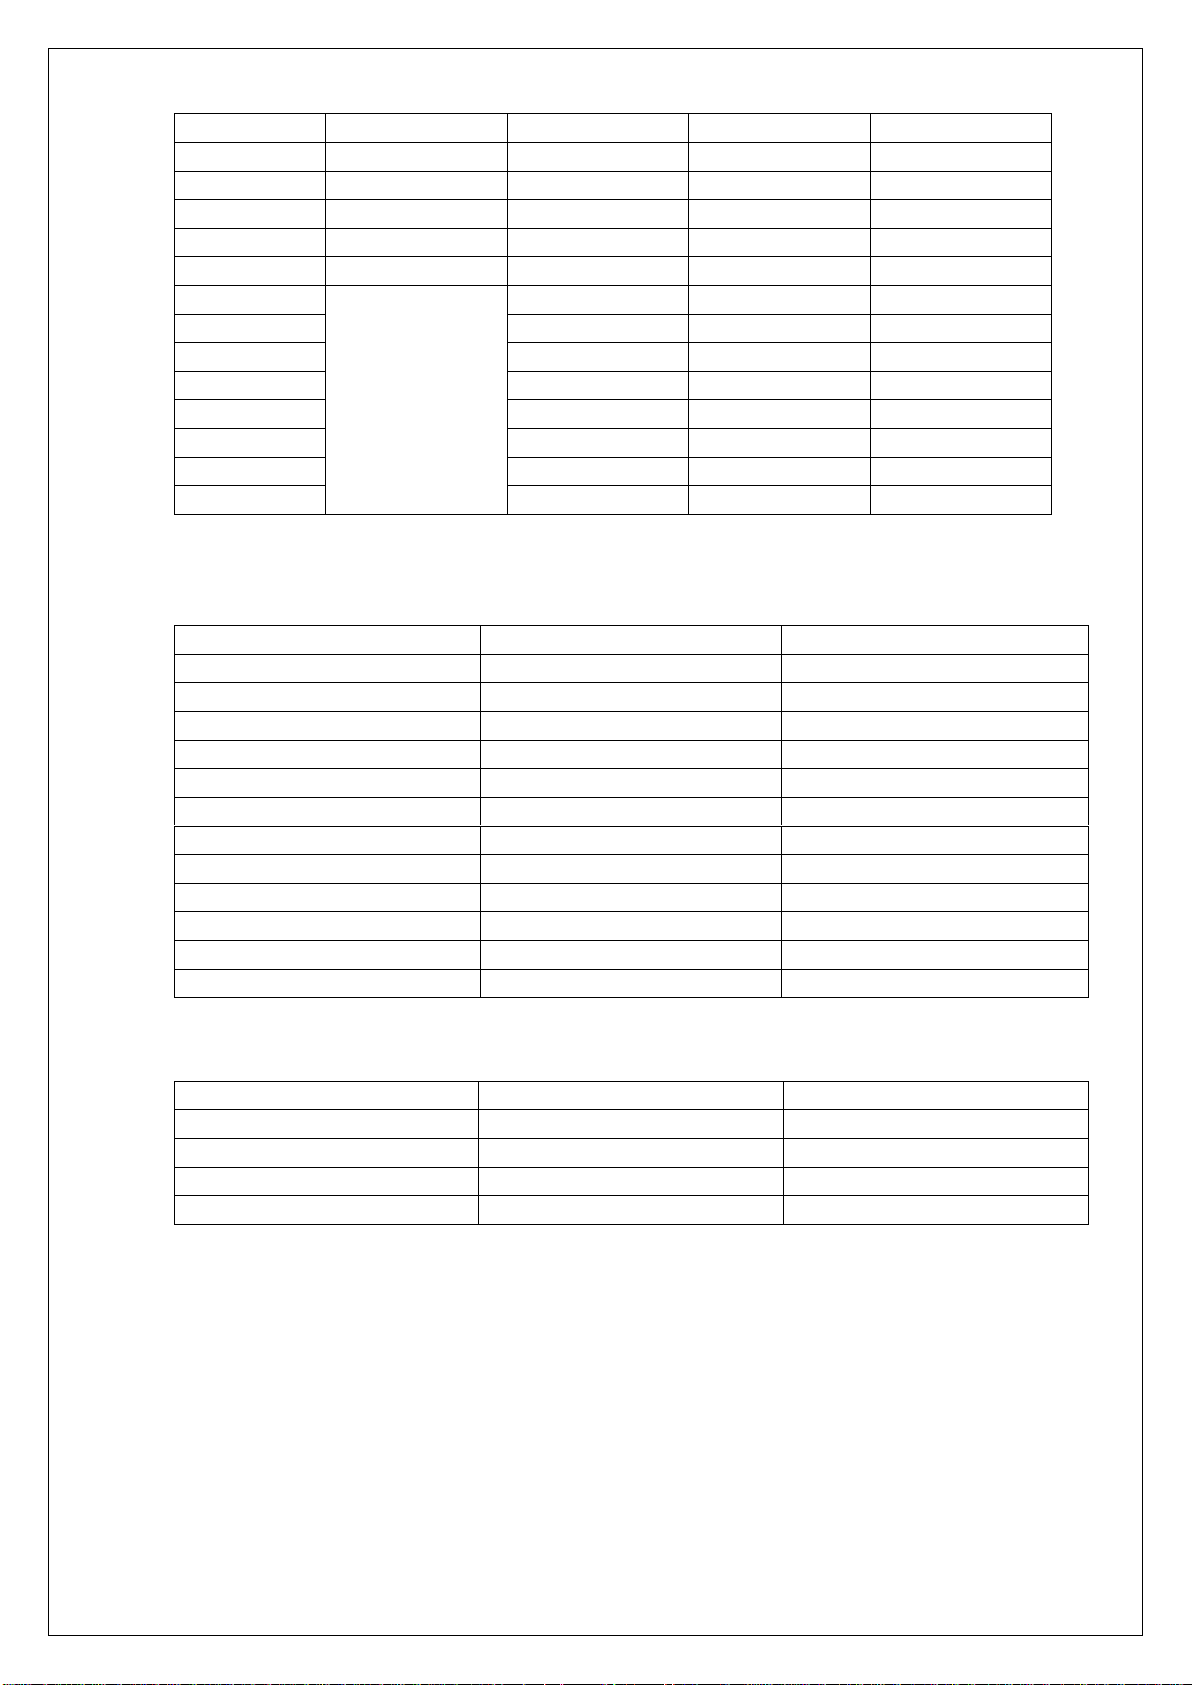
P8B4
2.45
2.5
4.95
21.5
P8B4PT
2.45
2.5
4.95
21.5
P8B5
2.7
2.5
5.2
22.6
P8B5PT
2.7
2.5
5.2
22.6
P8B6
2.7
2.5
5.2
22.6
P8B6PT
2.7
2.5
5.2
22.6
P8P3
N/A
1.5
1.5
6.5
P8P3PT
1.5
1.5
6.5
P8P4
2.5
2.5
10.9
P8P4PT
2.5
2.5
10.9
P8P5
2.5
2.5
10.9
P8P5PT
2.5
2.5
10.9
P8P6
2.5
2.5
10.9
P8P6PT
2.5
2.5
10.9
Model
Power (kW)
Current (A) @ 230V AC
PS83H1
0.6
2.6
PS84H1
0.8
3.5
PS85H1
1.0
4.3
PS86H1
1.2
5.2
PS83H2
1.8
7.8
PS84H2
1.2
5.2
PS85H2
2.0
8.7
PS86H2
2.4
10.4
PS83H3
1.8
7.8
PS84H3
2.4
10.4
PS85H3
3.0
13.0
PS86H3
3.6
15.7
Model
Power (kW)
Current (A) @ 230V AC
PG62H
0.4
1.7
PG63H
0.6
2.6
PG64H
0.8
3.5
PG65H
1.0
4.3
Heated Overshelves
Heated Gantries
When installing overshelf or gantry units, add additional power rating of overshelf /
gantry to allow for total installation requirement.
IS 464 ECN 4308 Page 6 of 14
Page 7
Connecting to supply
Models of 3kW or less may be connected to the electrical supply by means of the
fitted plug and lead. Models rated above 3kW, must be connected by a qualified
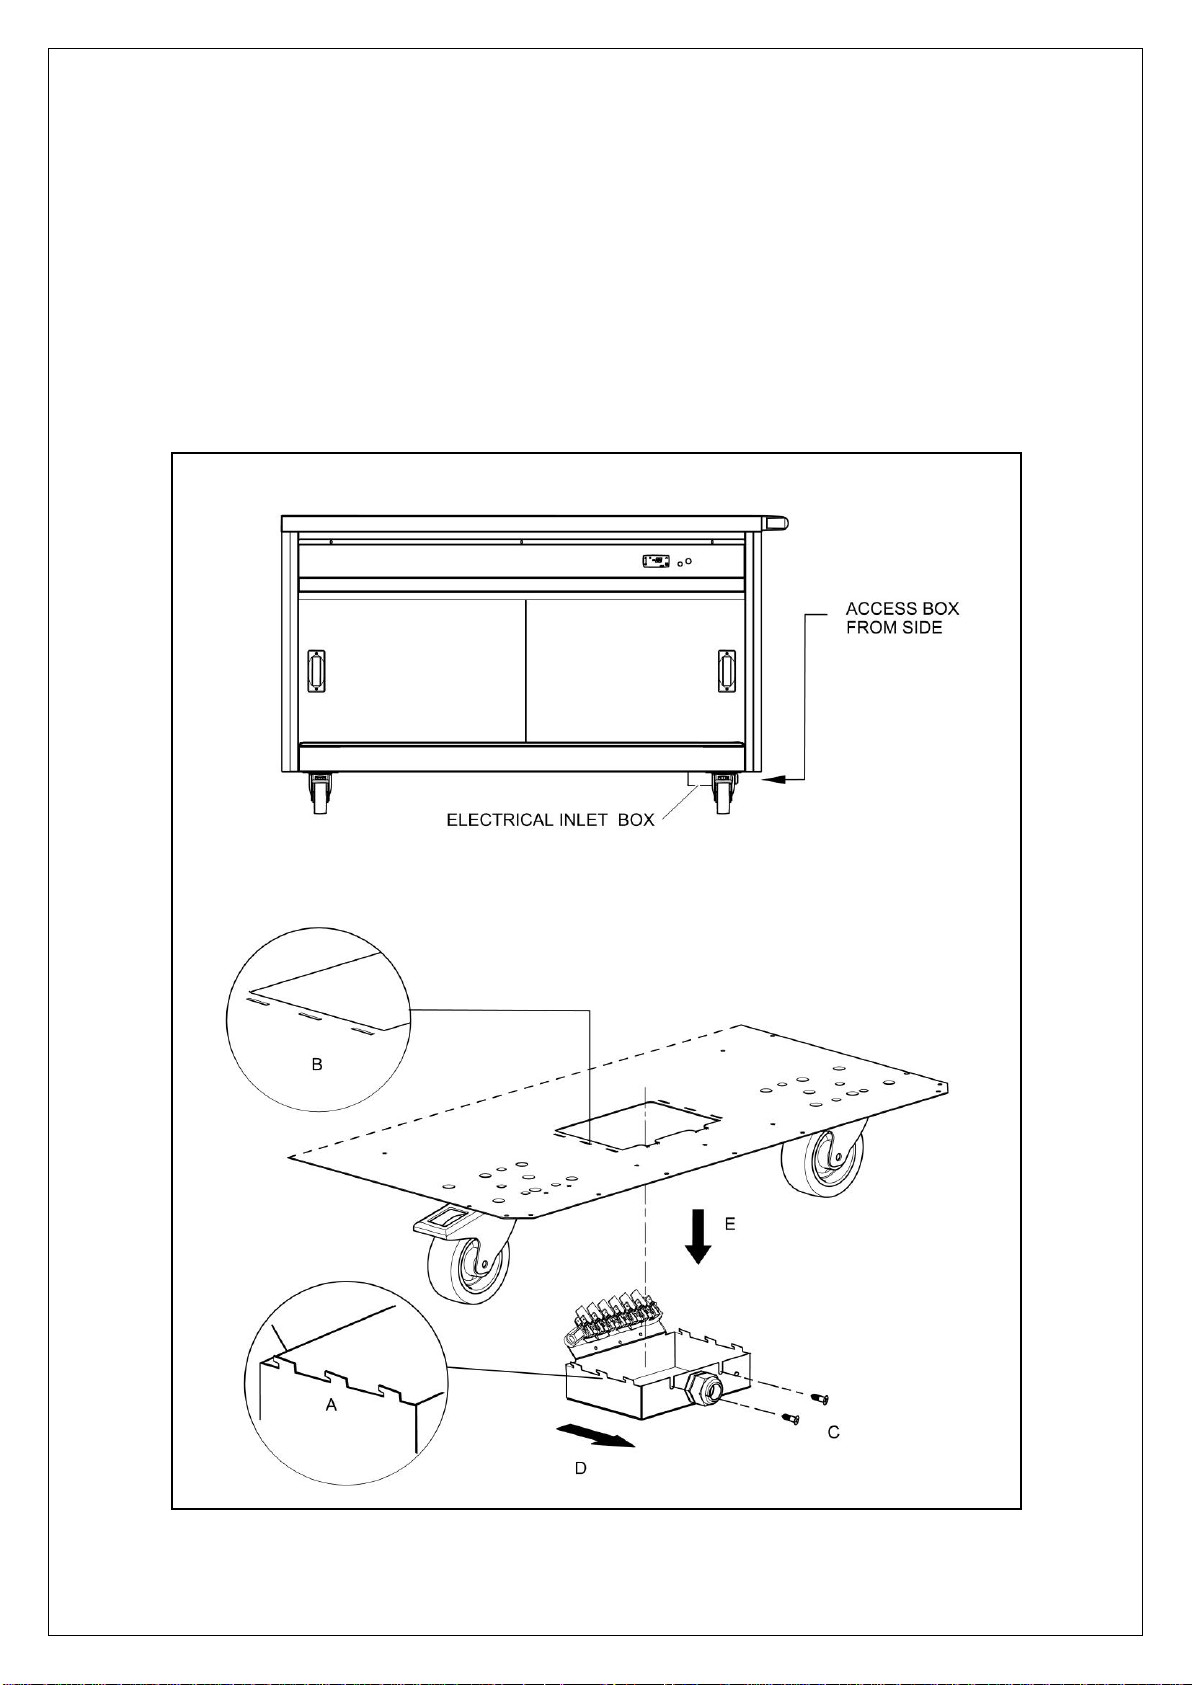
electrician as below (Fig 1).
The electrical inlet box is fitted to the base using a hook (A) and slot (B) method.
Access the box from the side and remove 2 screws (C). Pull the box towards you
(D), disengaging the hooks. Lower the box (E) to access the terminal block.
Disconnect and discard the attached test cables and connect the unit to a suitable
supply cable. Refit the box, ensuring no wires are trapped.
Fig 1
IS 464 ECN 4308 Page 7 of 14
Page 8
OPERATING INSTRUCTIONS
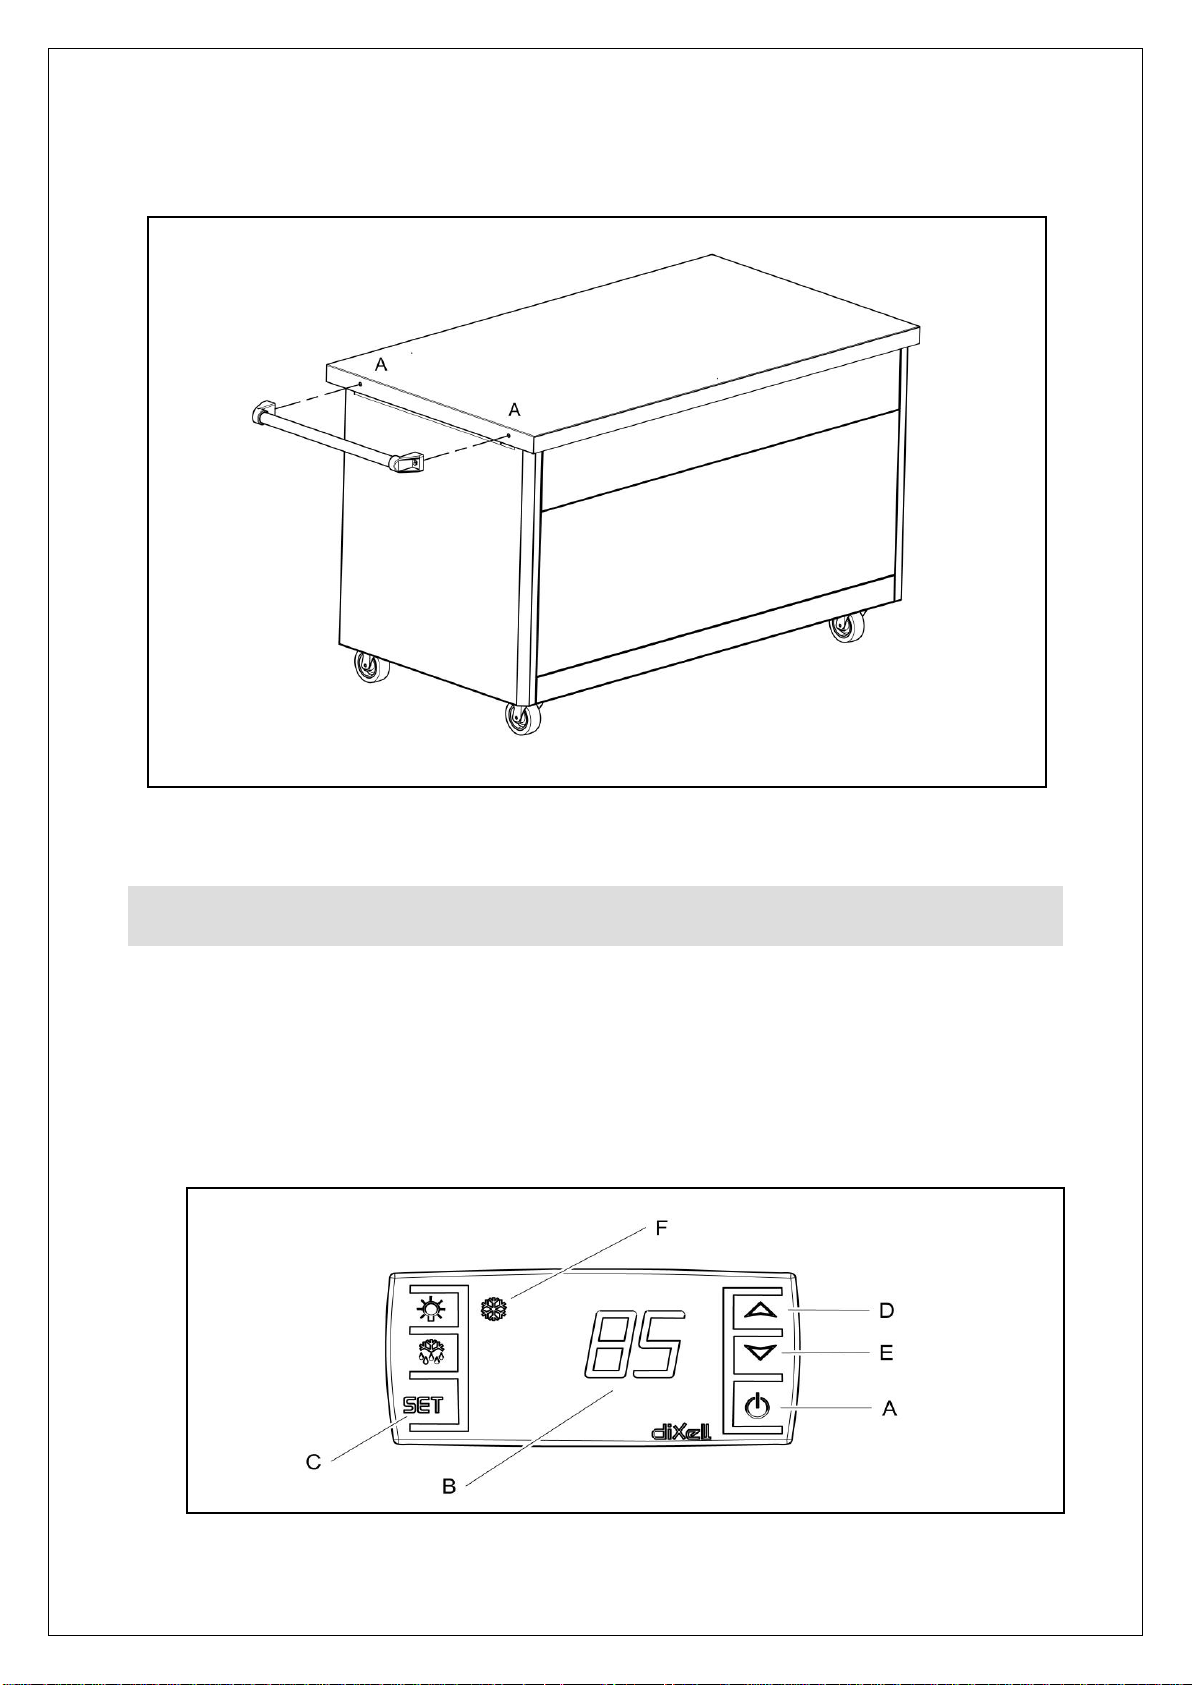
To fit push bar handle, using Allen keys provided firstly remove bolts at ‘A’ from the
side of the cupboard and discard. Fit handle using bolts provided in handle kit.
Fig 2
Only qualified or trained personnel should use this appliance.
Ensuring doors are closed, switch on the power at the mains supply. The green
neon illuminates to indicate power to the appliance.
Electronic controller
Fig 3
IS 464 ECN 4308 Page 8 of 14
Page 9
A On/Off button
B Digital readout
C ‘Set’ button
D Adjust ‘+’
E Adjust ‘-‘
F Element ‘On’ symbol
The electronic controller for the cupboard has a range of 20 Deg C to 99 Deg C,
and is factory set at 85 Deg C. On switching the unit on (A), the digital readout (B)
displays the current temperature within the cupboard. Pressing the ‘Set’ button (C)
once displays the temperature the cupboard is currently set to reach. To adjust this
temperature, hold down the ‘Set’ button for 3 seconds and then set the required
temperature by using the adjust buttons (D and E) on the controller. The digital
readout then returns to show the current temperature.
Pre-heat the cupboard - the element symbol (F) is extinguished when the required
temperature is reached.
Load the cupboard with heated food as required. The desired heat settings will be
found with practice, and will depend on the amount and temperature of the food in
the unit and the frequency of opening of the doors. Check food temperature
regularly.
Do not attempt to transport heavy volumes of stacked crockery in the cupboard.
Do not disconnect the cupboard from the supply until it is ready to be moved to the
distribution point. Re-connect as soon as the distribution point is reached.
Operation of gantries (selected models) is via the switch on the control panel (PG6
units) or the gantry overshelf (PS8 units).
To turn the unit off, switch off at the mains socket and ensure the green light has
gone out.
A small bowl of water placed on the bottom shelf once the appliance is stationary
will help prevent food drying out.
Additional instructions for Models with Bains Marie tops.
Bains Marie may be used either dry or wet – best results are obtained when used
wet. Temperature is controlled via 1-6 settings on the control knob.
For dry heat, ensure gastronorm dishes are in place then allow unit to heat up for
20 minutes on full before filling with hot food.
To use wet, fill the tank up to the high level mark with hot water (40 Deg C). With
gastronorm dishes in place, allow a further 60 minutes on full for the water to reach
optimum heat before filling with hot food. Maintain the water level above the
minimum mark.
After use and with the appliance turned off, allow the water to cool and use the
drain tube provided to empty the water well via the valve inside the cupboard.
Clean out the tank and refill with fresh water on a regularly.
IS 464 ECN 4308 Page 9 of 14
Page 10
CLEANING
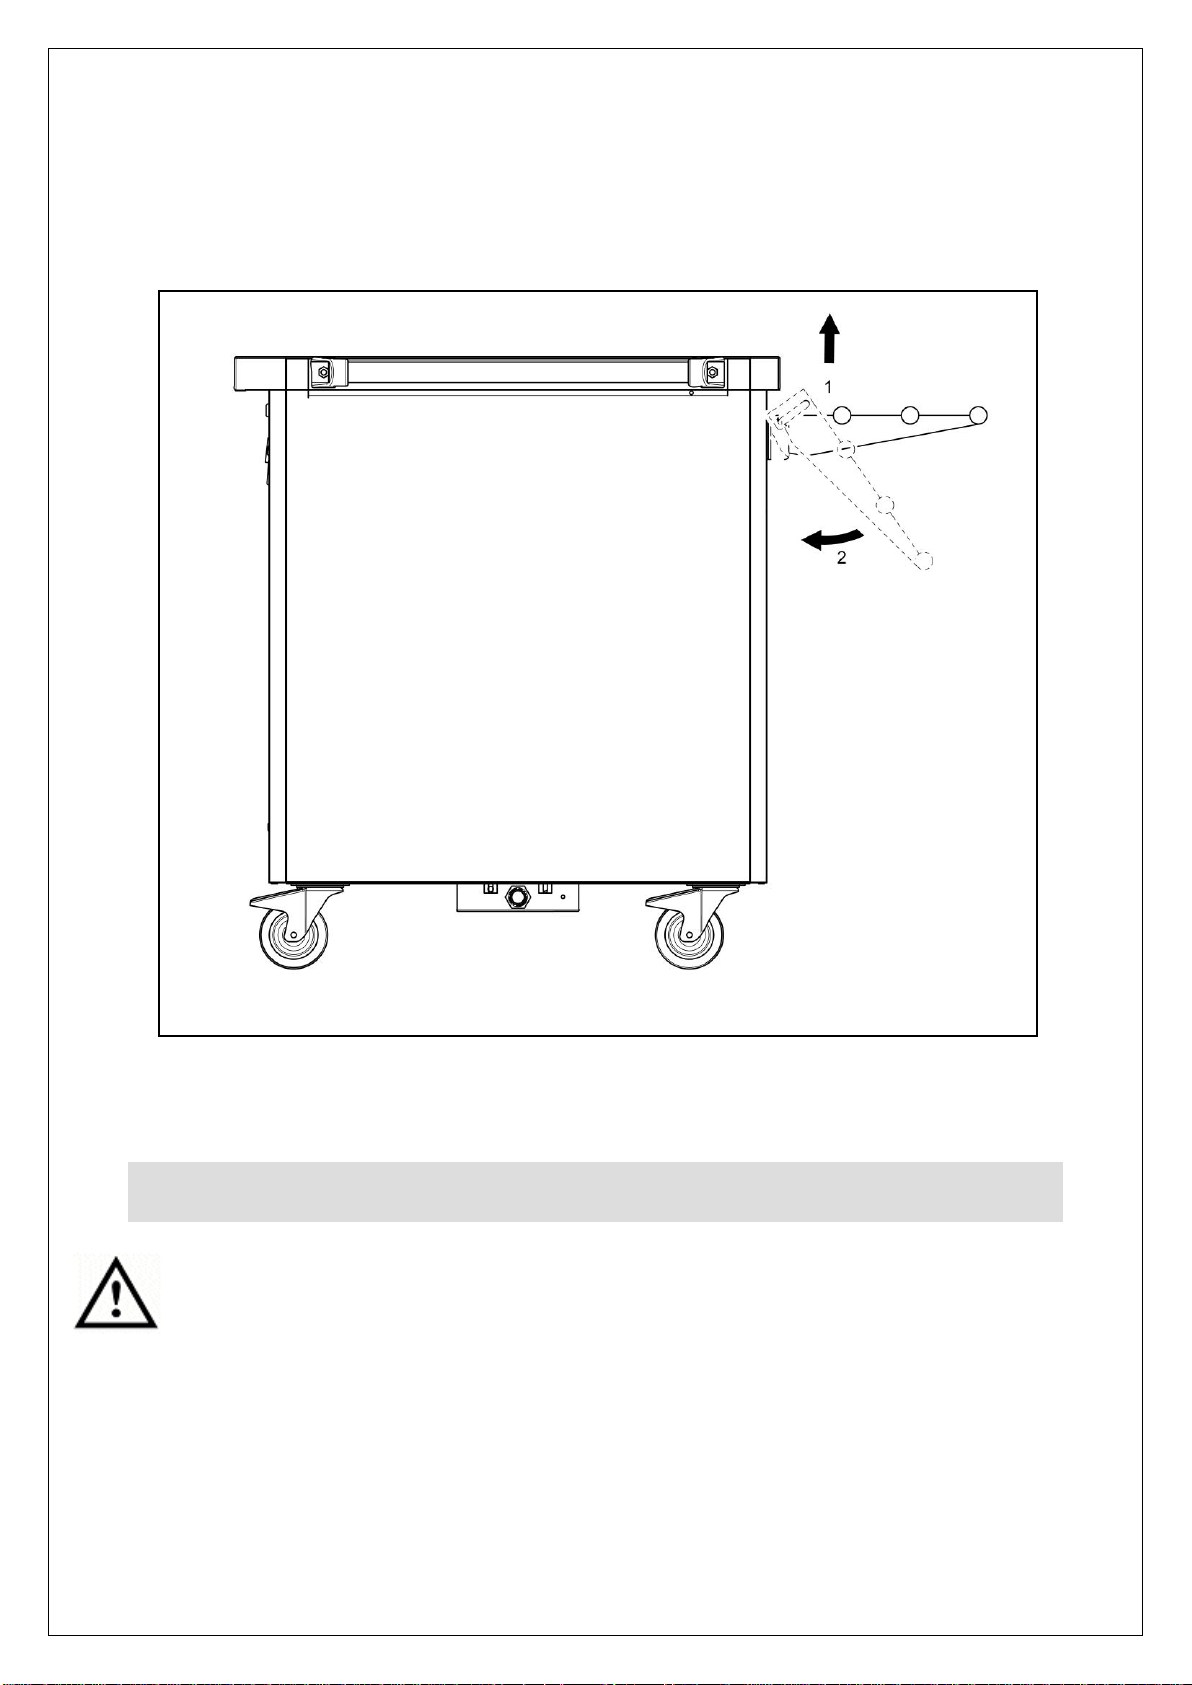
Operation of tray slide (Selected models only).
1. Lift up.
2. Rotate down.
Fig 4
Do not use a water jet or steam cleaner, and do not immerse this appliance.
Clean all panels with warm water and mild detergent; do not use abrasive materials.
Dry with a soft cloth.
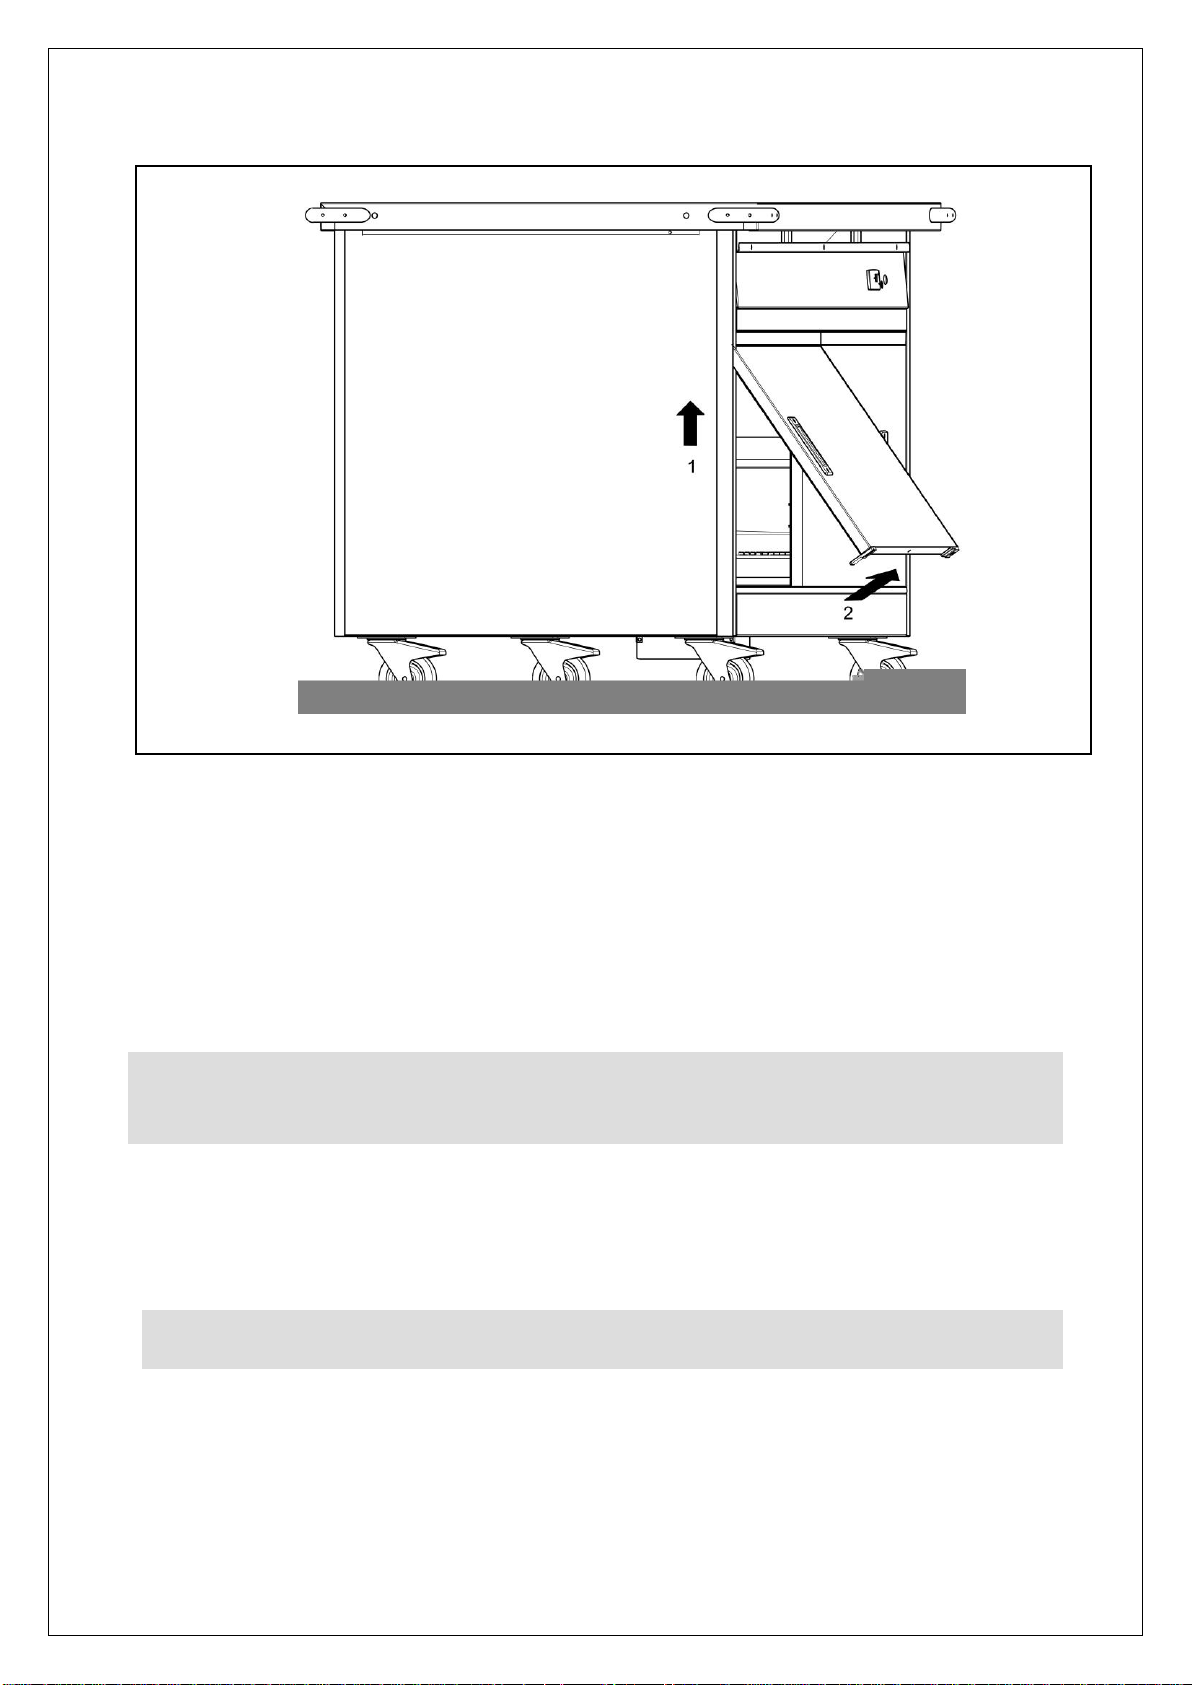
To access the inside of the cupboard for cleaning, remove the doors as shown
overleaf.
IS 464 ECN 4308 Page 10 of 14
Page 11
SERVICING, MAINTENANCE AND
COMPONENT REPLACEMENT
FAULT FINDING
Fig 5
1. Lift door up in to top guide.
2. Rotate door bottom to lift clear of bottom guide.
Reverse procedure to refit.
Clean the door sliders to ensure smooth operation of the doors.
All servicing, maintenance and component replacement on these appliances should
be carried out by one of our recommended service engineers.
Please refer to the Service Helpdesk number on the final page of this manual.
IS 464 ECN 4308 Page 11 of 14
Page 12
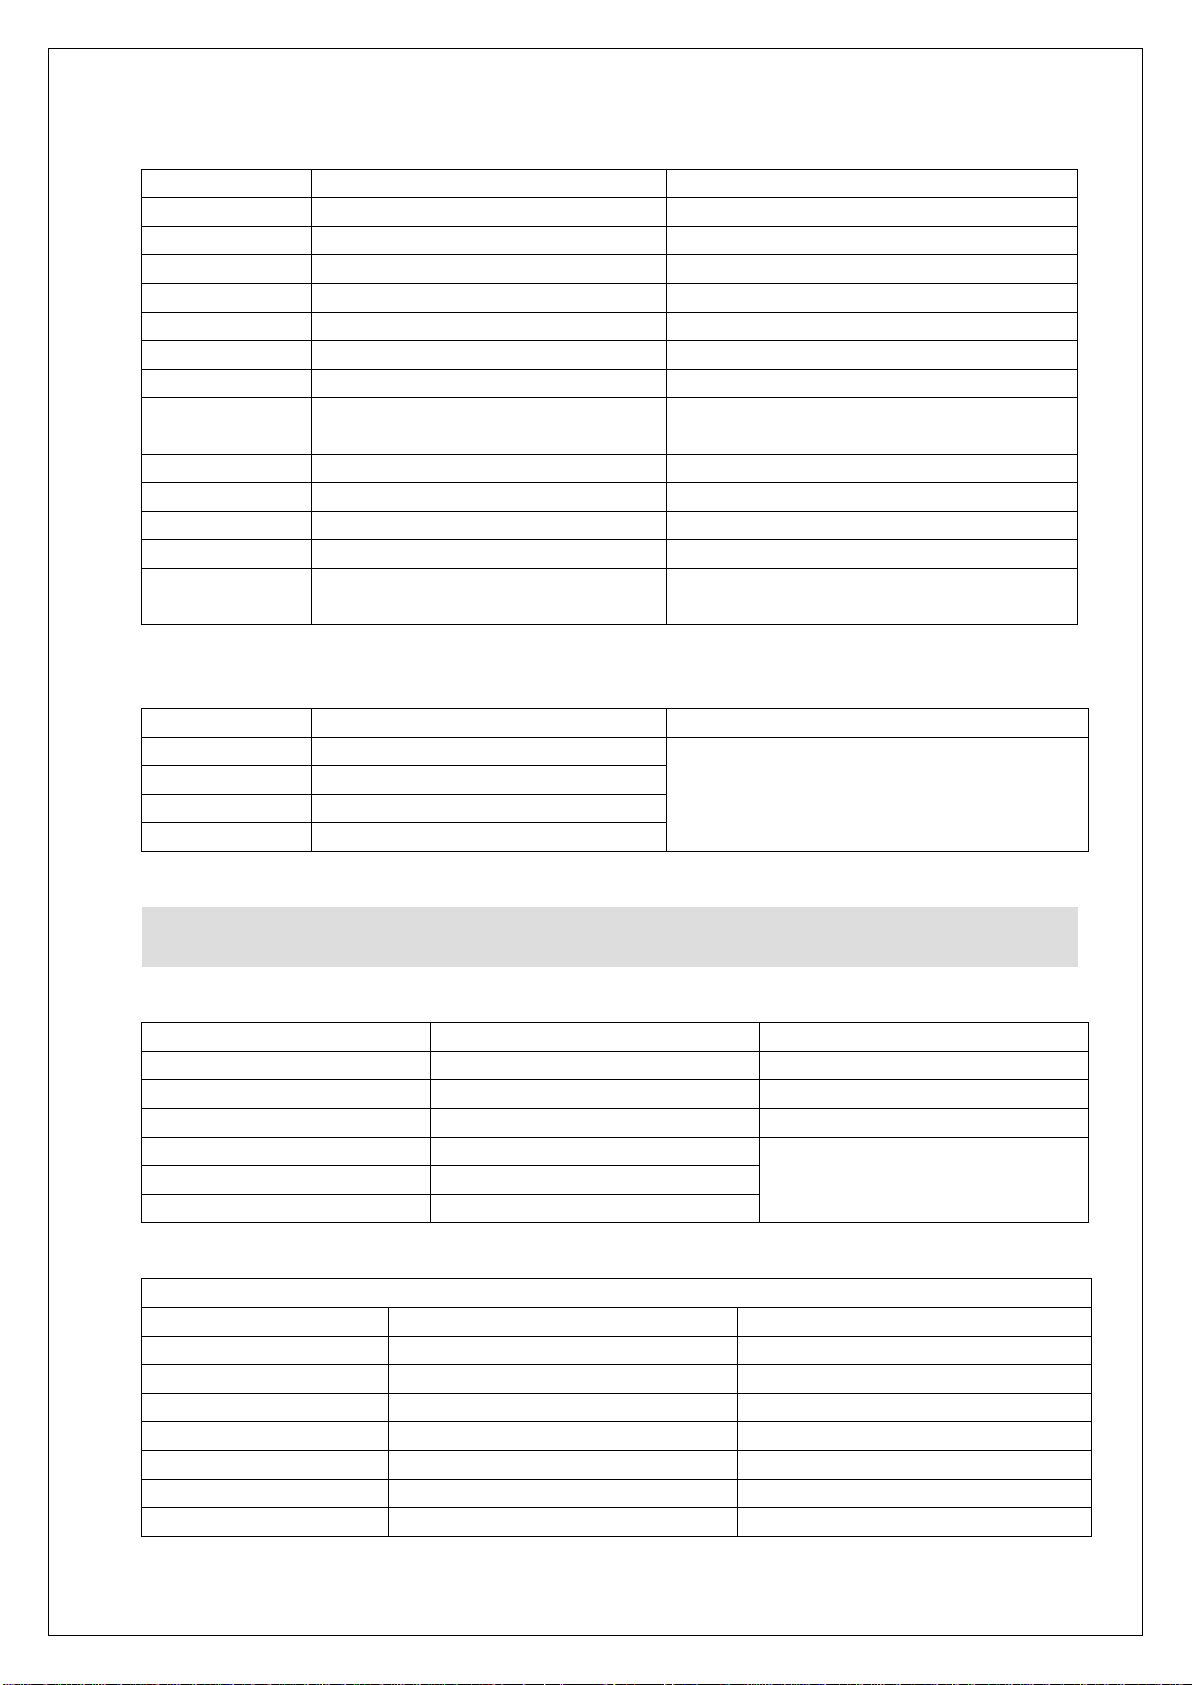
Spare Parts for gantries
Part Number
Description
Used on
GL517
Sneeze screen – 885mm
PG62A, PG62H
GL518
Sneeze screen – 1110mm
PG63A, PG63H
GL519
Sneeze screen – 1435mm
PG64A, PG64H
GL520
Sneeze screen – 1760mm
PG65A, PG65H
IN42
Plain insert
All PS8 models
IN82
Ribbed insert
PG64A, PG64H, PG65A, PG65H
LA211
Clip – in lamp holder
All PS8 heated models
LA324
200W Heat lamp
All PG6 heated models
All PS8 heated models
LA325
Lamp holder
PG62H, PG63H, PG64H, PG65H
LA326
Reflector for lamp
PG62H, PG63H, PG64H, PG65H
LE14
Lens cover for switch
All PS8 heated models
SW34
Switch
All PS8 heated models
TE02
Terminal block - ceramic
All PG6 heated models
All PS8 heated models
Part Number
Description
Used on
BU62
Bush – tray slide
All
EC03
End cap – tray slide
EC08
End cap – push bar
LO24
Door lock
Part Number
Description
Used on
PDL2,3,4,5
Door complete with lock
All – order width to suit
PPB6
Additional push bar handle
670 models
PPB8
Additional push bar handle
800 models
CP16
Carvery pad
All
PHTC
Ceramic hot tile
PHTG
Glass hot tile (factory fitted)
Gastronorm Kits
Code
No. 1/1 Gastronorms
No ½ Gastronorms
PGK1
2
0
PGK2
1
2
PGK3
0
4
PGK4
3
0
PGK5
2
2
PGK6
1
4
PGK7
0
6
ACCESSORIES
Spare parts for Accessories
IS 464 ECN 4308 Page 13 of 14
Page 13

Product code
All available on serial plate
Type number
Serial number
SERVICE INFORMATION
For help with the installation, maintenance and use of your Lincat equipment,
please contact our service department:
UK: 01522 875520
For non-UK customers, please contact your local Lincat dealer
All service work, other than routine cleaning should be carried out by one of our
authorised service agents. We cannot accept responsibility for work carried out by
other persons.
To ensure your service enquiry is handled as efficiently as possible, please tell us:
Brief details of the problem
Lincat reserve the right to carry out any work under warranty, given reasonable
access to the appliance, during normal working hours, Monday to Friday, 08:30 to
17:00.
GUARANTEE
This unit carries a comprehensive UK mainland 2 year warranty. The guarantee is
in addition to, and does not diminish your statutory or legal rights.
The guarantee does not cover:
Accidental damage, misuse or use not in accordance with the manufacturer’s
instructions
Consumable items (such as filters, glass, bulbs, slot toaster elements and door
seals.)
Damage due to incorrect installation, modification, unauthorised service work or
damage due to scale, food debris build-up, etc.
The manufacturer disclaims any liability for incidental, or consequential damages.
Attendance is based on reasonable access to the appliance to allow the authorised
technician to carry out the warranty work.
Service calls to equipment under warranty will be carried out in accordance with the
conditions of sale. Unless otherwise specified, a maximum of 15 minutes of
administrative time, not spent directly carrying out servicing work, is provided for
within the warranty. Any requirement for staff attending the call to spend greater time
than 15 minutes due to administrative requirements, such as on health and safety risk
assessments, will be chargeable at the prevailing rate.
IS 464 ECN 4308 Page 14 of 14
 Loading...