

Lincat Opus 800, OG8401, OG8402, OG8403 User, Installation, Servicing And Conversion Instructions
Page 1

Please make a note of your product details for
future use:
Date Purchased:_________________________
Model Number:__________________________
Serial Number:__________________________
Dealer:_________________________________
_______________________________________
User, Installation, Servicing and Conversion
Instructions
Opus 800 Gas Chargrills
OG8401, OG8402 & OG8403
IS589 ECN4504
1
Page 2
Dear Customer,
Thank you for purchasing this Lincat product.
This is just one of over 450 different items of catering equipment available
which is constantly being extended and improved. Details are available from
your local distributor or direct from us.
Used for the purposes for which it is intended, and with careful maintenance
as outlined in this User Guide, your Lincat product will give you years of
trouble free service.
For use in GB & IE
IMPORTANT INFORMATION
Please read all of the safety and operating instructions carefully before using this
product. Please pay particular attention to all sections of this User Guide that carry
warning symbols and notices.
WARNING!
This is a Warning symbol. This symbol is used throughout the user guide whenever
there is a risk of personal injury. Ensure that these warnings are read and understood
at all times.
CAUTION!
This is a Caution symbol. This symbol is used throughout the user guide whenever
there is a risk damaging your Lincat product. Ensure that these warnings are read and
understood at all times.
NOTE:
This is a Note symbol. This symbol is used throughout the user guide to provide additional
information, hints and tips.
IS589 ECN4504
2
Page 3
CONTENTS
WARNINGS AND PRECAUTIONS
Contents Page
Customer Information………………………………………………………. 2
Warnings and Precautions………………………………………………… 3
Technical Data……………………………………………………………….. 4
Commissioning………………………………………………………………. 5
Check List of Enclosures………………………………………………….. 5
Installation…………………………………………………….……………… 6-7
Conversion of Gas Types………………………………………………….. 8-10
User…………………………………………………………………………….. 11-12
Servicing ……………………………………………………………………… 13
Component Replacement ………………………………………….……… 14
Spare Parts List……………………………………………………………… 15
Fault Finding…………………………………………………………………. 16
Service information………………………………………………………….. 17
Guarantee………………………………………………………….………….. 17
It is mandatory that all appliances are installed, commissioned and serviced by a
qualified and competent person as defined by the regulations in force in the country of
installation.
Failure to comply will invalidate the warranty.
WARNING!
This appliance must be installed by a competent installation engineer in accordance with the
installation instructions, and should conform to the following requirements:
Do not obstruct or block the appliance flue.
Installation must include sufficient ventilation to prevent the occurrence of unacceptable
concentrations of substances harmful to health in the room in which they are installed.
It is recommended that this appliance is sited under an extraction canopy for the removal of
combustion products.
After operation, some parts of the appliance will remain hot for a period of time. Please take care
to avoid accidental burns.
CAUTION!
All equipment must be equi-potentially earth bonded.
Do not connect directly to any flue, ducting or mechanical extraction system.
Installation should allow for a sufficient flow of fresh air for gas combustion.
Parts which have been protected by the manufacturer or his agent must not be adjusted by the
installer or user.
The gas supply hose and or tubing shall comply with local regulations and periodically inspected
for conformity.
IS589 ECN4504
3
Page 4
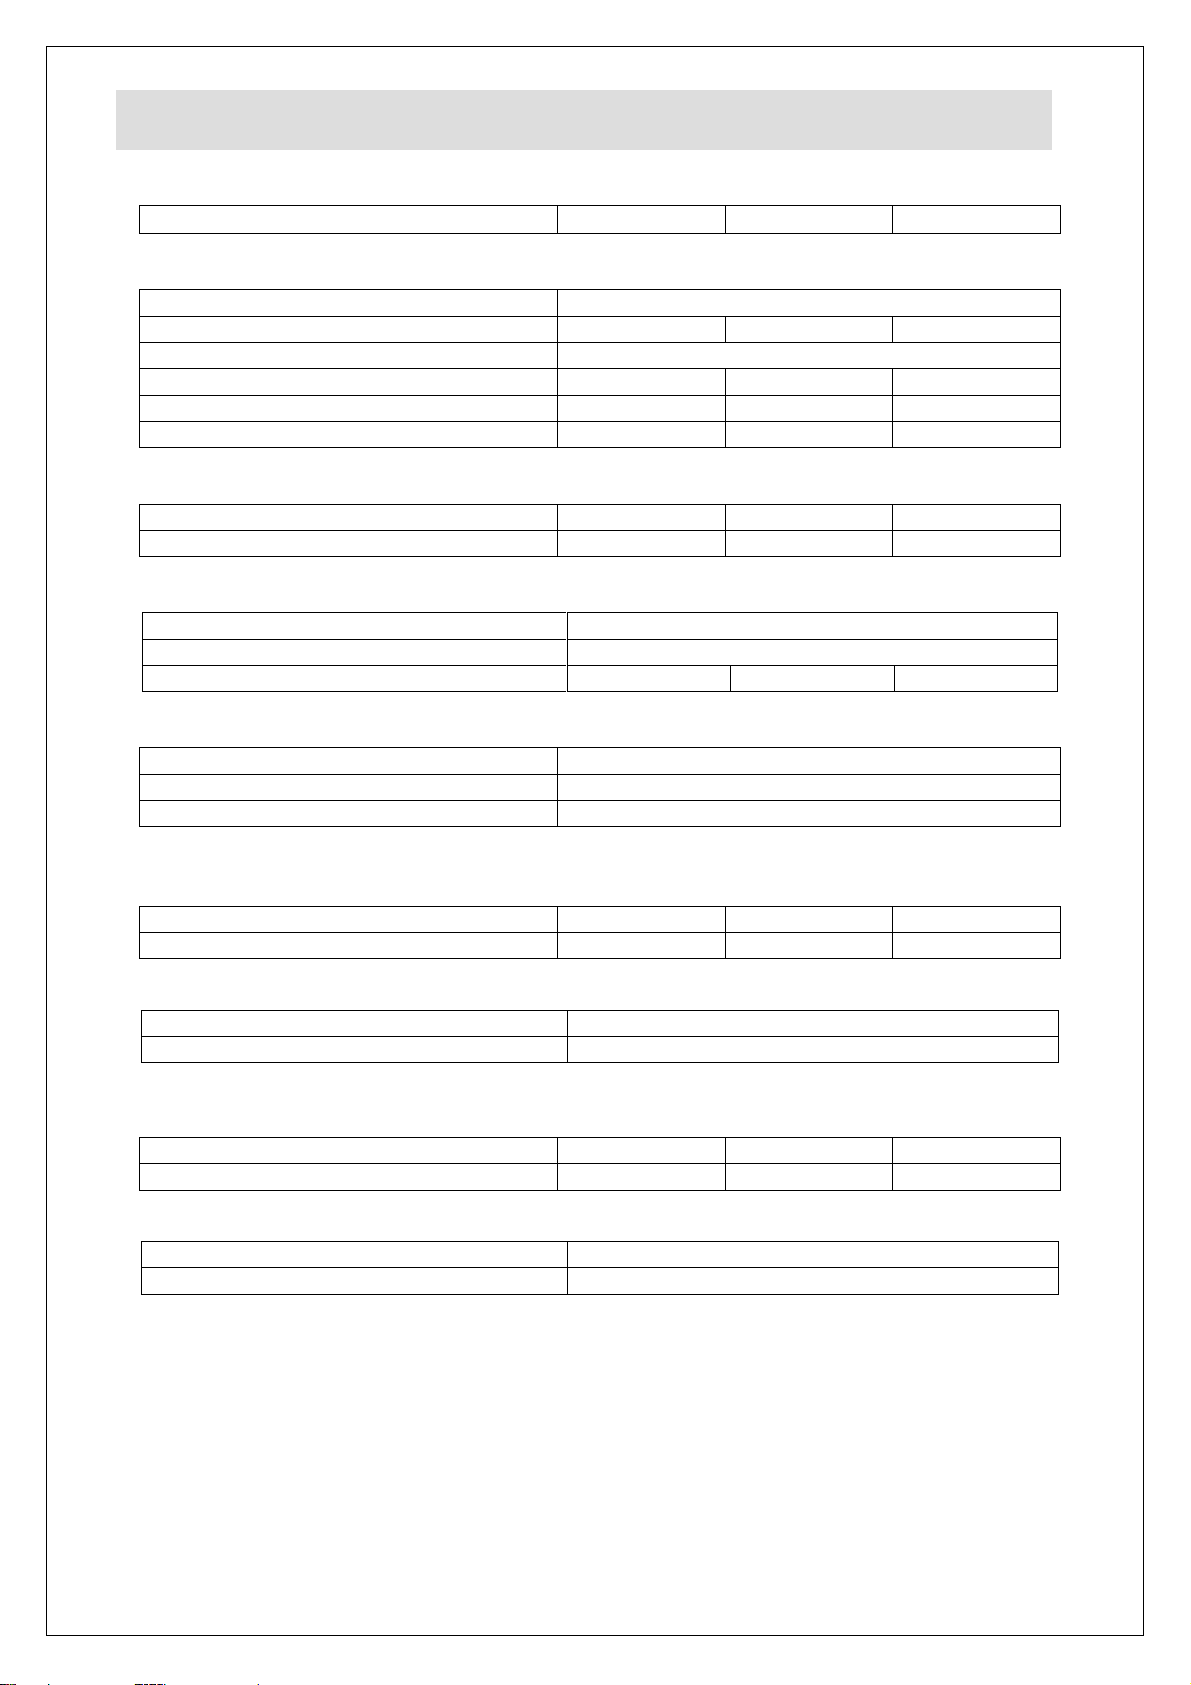
TECHNICAL DATA
Model
OG8401
OG8402
OG8403
Dimensions
Overall Height (mm)
650
Width (mm)
600
900
1200
Depth (mm)
800
Weight (kg)
160
Cooking Surface w x d (mm)
500 X 620
700 X 620
1100 X 620
Cooking Grid Area (m2)
0.31
0.43
0.68
Heat Input
Total Heat Input Natural (Gross)
13.8kW
23kW
32.2kW
Total Heat Input Propane (Gross)
12.6kW
21kW
29.4kW
Individual Burner Heat Input
Heat Input Natural (Gross)
4.6kW
Heat Input Propane (Gross)
4.2kW
Burners per appliance
3 5 7
Connection and Supply Pressures
Gas Inlet Connection
½" BSP (RP ½)
Supply Pressure - Natural
20mbar
Supply Pressure - Propane
37mbar
Note: Propane appliances are regulated – see page 7
Gas Consumption Full Rate
Total Gas Rate – Natural
1.31m3h-1
2.19m3h-1
3.07m3h-1
Total Gas Rate – Propane
0.9kgh-1
1.5kgh-1
2.1kgh-1
Gas Rate – Natural
0.44m3h-1
Gas Rate – Propane
0.30kgh-1
Gas Consumption Low Rate
Total Gas Rate – Natural
0.63m3h-1
1.05m3h-1
1.47m3h-1
Total Gas Rate – Propane
0.41kgh-1
0.68kgh-1
0.95kgh-1
Gas Rate – Natural
0.21m3h-1 (2.2kW)
Gas Rate – Propane
0.14kgh-1 (1.9kW)
Individual Burner Gas Consumption Full Rate
Individual Burner Gas Consumption Low Rate
IS589 ECN4504
4
Page 5
NOTE
COMMISSIONING
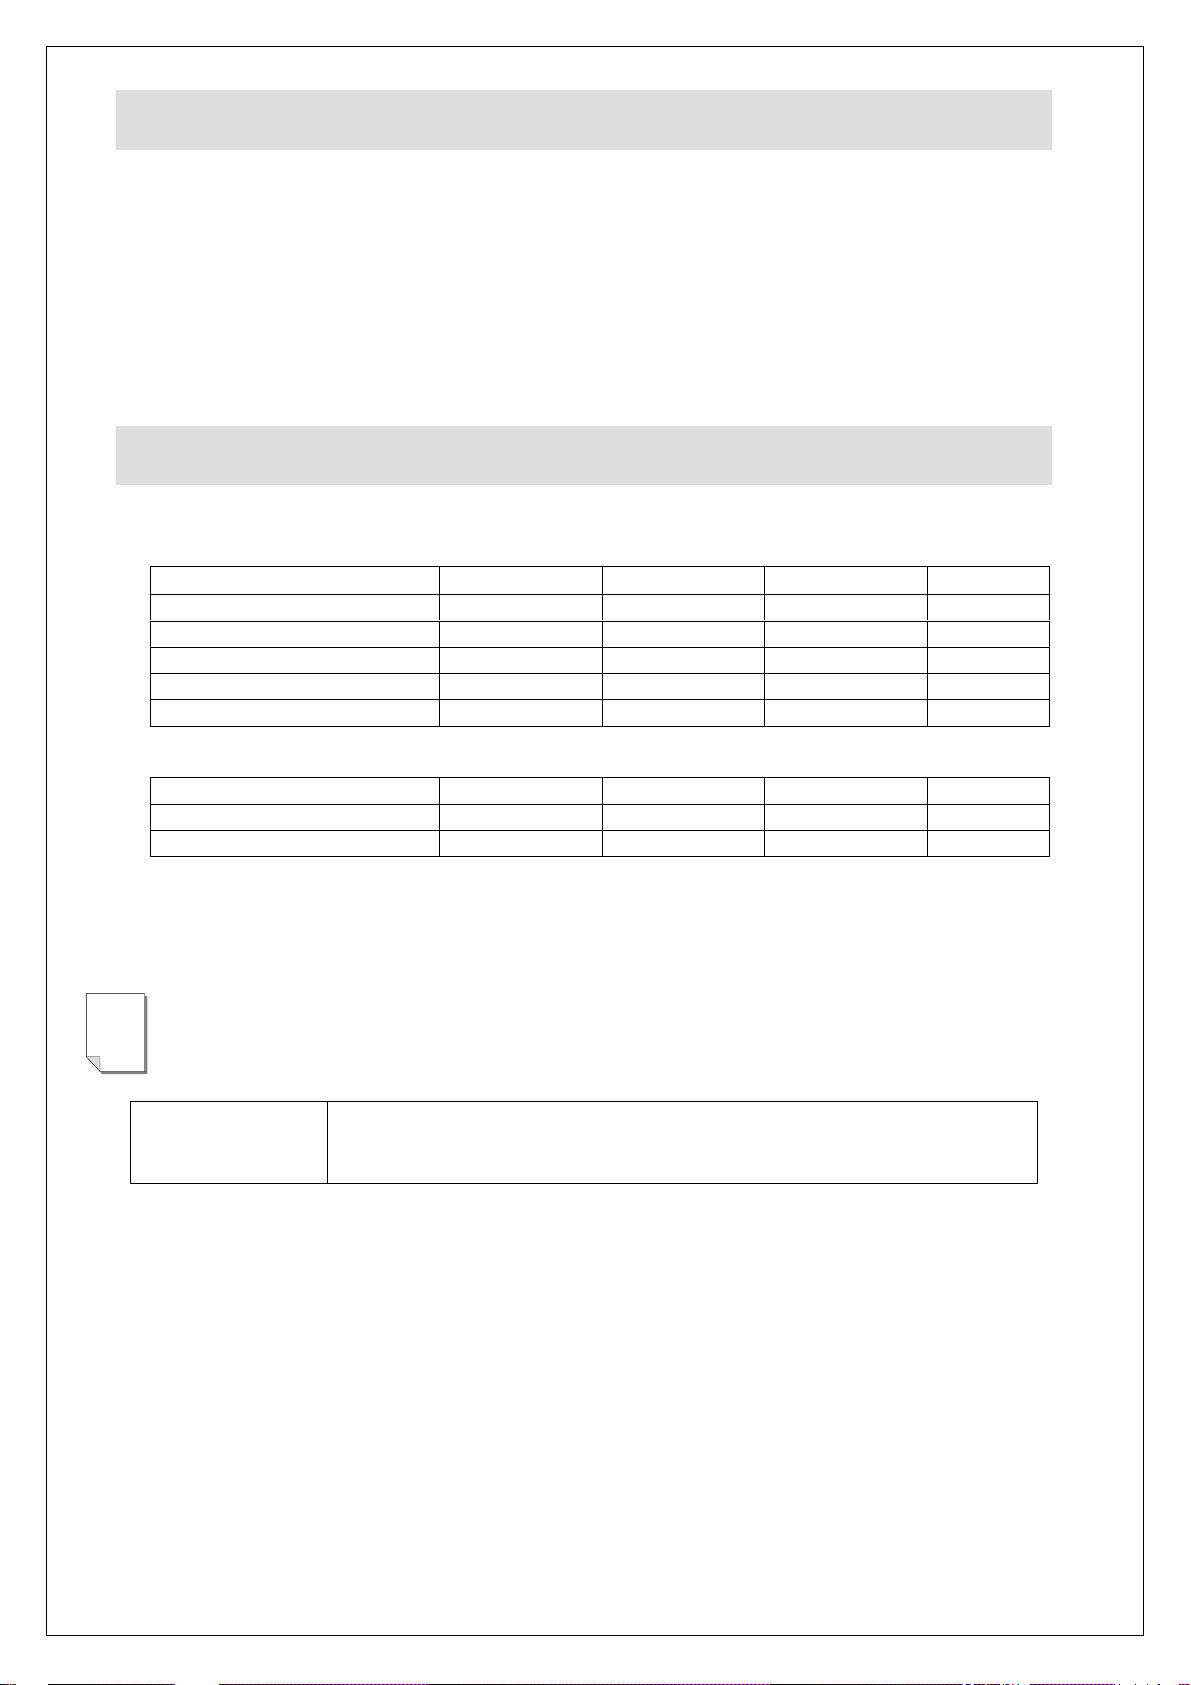
CHECK LIST OF ENCLOSURES
Model
OG8401
OG8402
OG8403
Tick
Warranty Card
1 1 1
Branding Grids
5 8 11
Grid Scraper
1 1 1
Spatula
1 1 1
User Instructions
1 1 1
Barrel Nipple
1 1 1
Male – Female Elbow
1 1 1
Pressure Regulator
1 1 1
Serial Number
PREPARATION
Remove all packaging and protective coatings prior to installation.
VENTILATION
The area in which this equipment is to be installed should have sufficient fixed ventilation to
comply with local legislation requirements. It is recommended that a room, or internal space,
be provided with a minimum free area of 4.5cm2 per kW of total heat input.
Please ensure the following items are included with this piece of equipment:
For LPG (Propane) Appliances only
SERIAL NUMBER
Each appliance manufactured at Lincat has a unique identifying number found in the
top right hand corner of the data plate attached at the rear of the appliance. Please
record that number in the space provided should it be required for future reference.
IS589 ECN4504
5
Page 6

INSTALLATION
SITING
The installer must ensure that all local regulations in force are met and that there is an
unobstructed minimum distance of 1000mm from the top of the cooking grid to the extraction
canopy, which must be of non-combustible material.
The appliance should be installed on a level surface ensuring the unit is stable and firmly
located.
Any partitions, walls or kitchen furniture in close proximity must be of non-combustible
materials and not be closer than 100mm from the sides and rear of the appliance.
There must be a minimum of 600mm clearance from the front of the appliance in which to
operate the appliance.
COUNTER TOP
If the appliance is to be installed on a counter top it shall be of a sturdy construction to hold
the weight of the appliance.
The counter top shall be of a non-combustible material.
The appliance when installed on a suitable countertop shall be level.
The surface of the grid shall be at a safe working height.
To level the appliance on the counter top the feet of the appliance can be rotated until the
appliance level is found.
The counter top and the appliance on which it is to be installed shall be beneath an extraction
canopy and shall comply with the conditions of SITING above.
GAS SUPPLY AND CONNECTION
The gas inlet connection is at the rear of the appliance on the right hand under side when
viewed from the front.
The gas inlet is ½" BSP (Rp ½)
It is recommended that the gas supply line for the OG8402 and OG8403 have a diameter not
less than 22mm or ¾" nominal bore.
The gas supply tubing or hose should be periodically inspected and replaced as necessary.
All joints made must be leak free.
Final gas connection to the appliance and gas supply shall comply with local regulations.
When making the connection to the appliance an isolating cock should be fitted into the
supply line for closing the gas supply in case of emergency shutdown or servicing purposes.
The isolating cock should have unrestricted access.
The appliances listed above have been designated Cat I & Cat II for 2nd and 3rd family gases.
They are flue type A1
IS589 ECN4504
6
Page 7

SUPPLY AND OPERATING PRESSURES
The appliance is connected directly to the gas supply where the gas supply pressure is
controlled at the source of inlet in the building or via the regulator attached to bottled gases.
Natural gas appliances are connected directly to the gas supply provided the inlet pressure is
regulated up stream to 20mbar.
Propane gas appliances require the fitting of a regulator at the inlet of the appliance where
the upstream pressure is regulated to 37mbar.
The set pressure for propane appliances is 30mbar with all burners in operation.
To gain access to the gas pressure test nipple the fascia panel requires removal. The test
nipple is situated at the left hand end of the manifold rail.
Remove the blanking screw and attach a pressure gauge to the boss of the test nipple to
check the supply pressure and/operating pressure.
FIRST TIME LIGHTING
The procedure for first time lighting may only be carried out by registered personnel.
To light any individual burner it may be necessary to purge all pipe work of air. To do this
through the pilots alone could take some considerable time. With the fascia panel removed
the test nipple plug can be removed to bleed the pipe work of air. When there is evidence of
gas flow at the test nipple the plug is to be refitted and made secure/leak free.
Refit the fascia panel and control knobs. A small amount of air will need to be purged from
each of the pilot lines.
IS589 ECN4504
7
Page 8
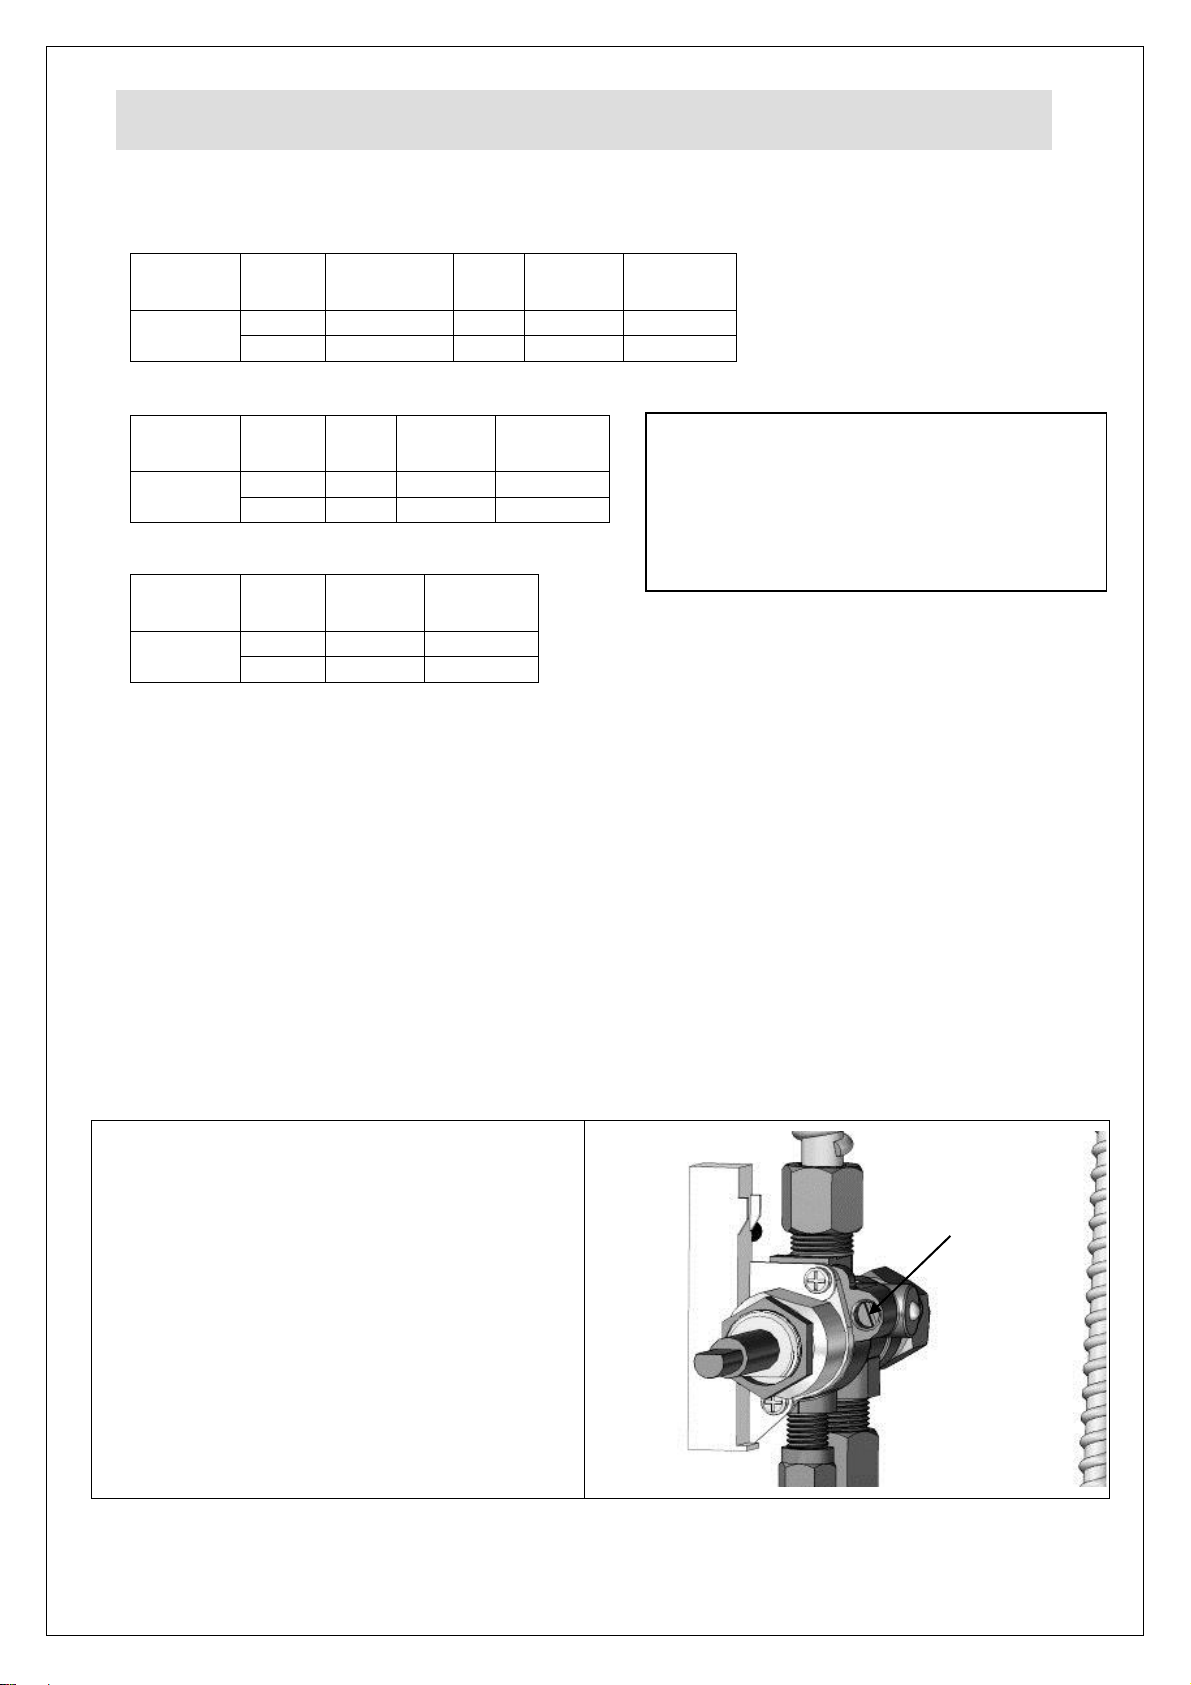
CONVERSION OF GAS TYPES
Model
Gas
Inlet
Pressure
Mark
Part
Number
All
G20
20mbar
1.51
310
JE45
G31
37mbar
1.06
150
JE34
Model
Gas Mark
Part
Number
All
G20
1.10 N JE136
G31
0.72 P JE137
Model
Gas
Mark
Part
Number
All
G20
27.2
JE19
G31
22.1
JE20
The valve by-pass injector is fitted to the right of the
valve spindle.
Remove the by-pass injector 'Y' by screwing
anti-clockwise.
The rubber 'O' ring fitted to the by-pass injector
will offer some resistance. It may be necessary
to complete the withdrawal of the by-pass
injector using long nose pliers.
Replace the by-pass injector applicable to the
relevant gas type. Ensure the by-pass injector is
screwed fully home
Y
When converting to Propane an external
regulator must be fitted to the appliance gas
inlet in conjunction with a barrel nipple and or ½”
BSP Male-Female 90o elbow
NP01 – Barrel nipple
CO136 – 90o male/female elbow
PG10 - Regulator
CONVERSION OF GAS TYPE
Burner Injector Changes
Valve Bypass Injector Changes
Pilot Assembly Changes
Conversion from One Gas Type to Another
To convert the appliance from one gas type to another it will be necessary to remove the
fascia panel.
Remove all the control knobs from the valve spindles. Ensure the control knob spring clips
are not dislodged and become lost.
The fixing screws for the fascia panel are located on the underside of the fascia panel.
Remove the fixing screws and pull the fascia panel free from its locating lugs.
Each burner will require 1 pilot injector, 1 burner injector and washers, 1 bypass injector.
Follow the step by step guide to changing the necessary components for the gas conversion
process.
When converting from Natural gas to Propane an external regulator must be fitted at the gas
inlet of the appliance.
Valve By-pass Injector
IS589 ECN4504
8
Page 9
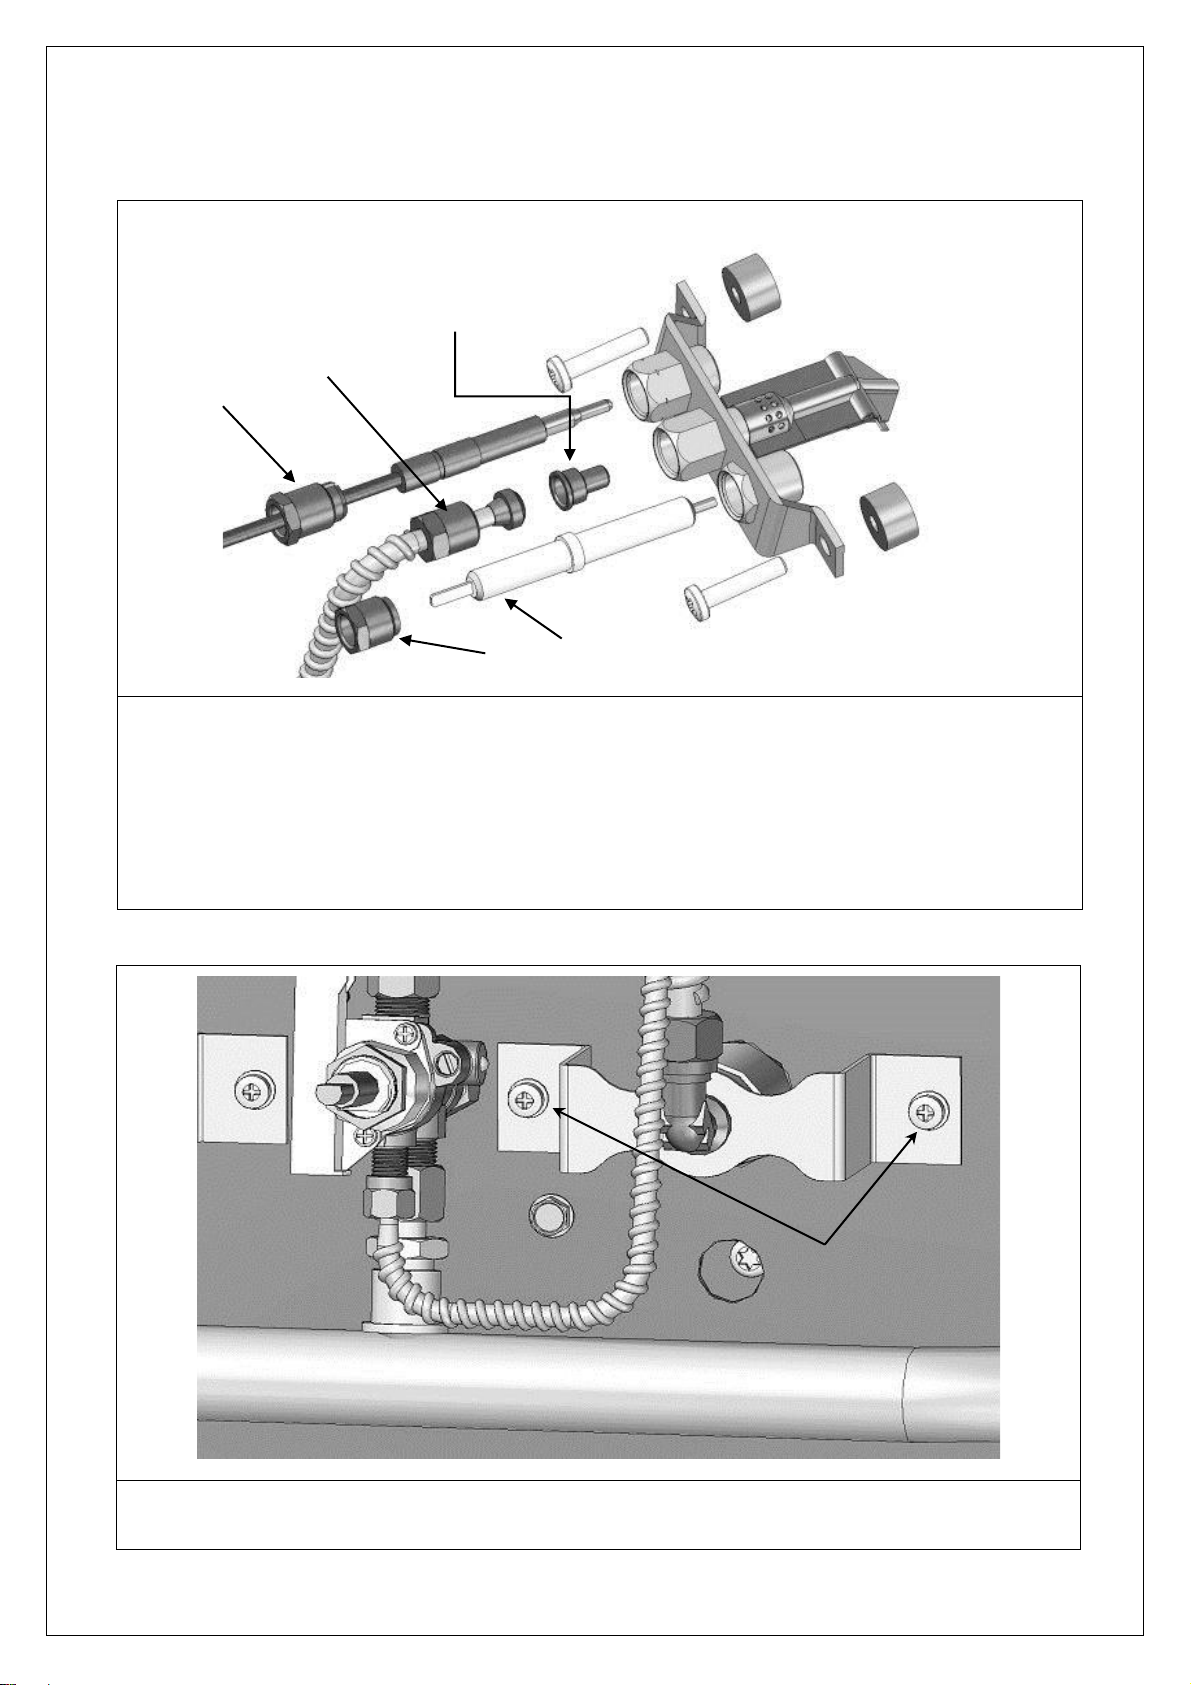
B
C
JExx
A
D
To change the pilot injector very carefully loosen the ignitor retaining nut A and withdraw the ignitor B
Loosen and the pilot feed pipe nut C and withdraw the pilot feed pipe from the pilot assembly
The pilot injector, JExx, can be removed and replaced with the appropriate injector applicable to gas type
Refit the pilot feed pipe and secure nut C
Refit the ignitor B
Secure the ignitor with the retaining nut A taking care as to not to over tighten.
Note: Over tightening nut A can lead t fracture of the ignitor, B
Remove the screws S from the bracket
Loosen the the burner feed pipe nut at the valve, this will allow the pipe and bracket to swivel
S
Pilot Injector Removal
Remove the fascia panel as detailed previously to gain access to the valves and pilot
assemblies.
Burner Injector
IS589 ECN4504
9
Page 10
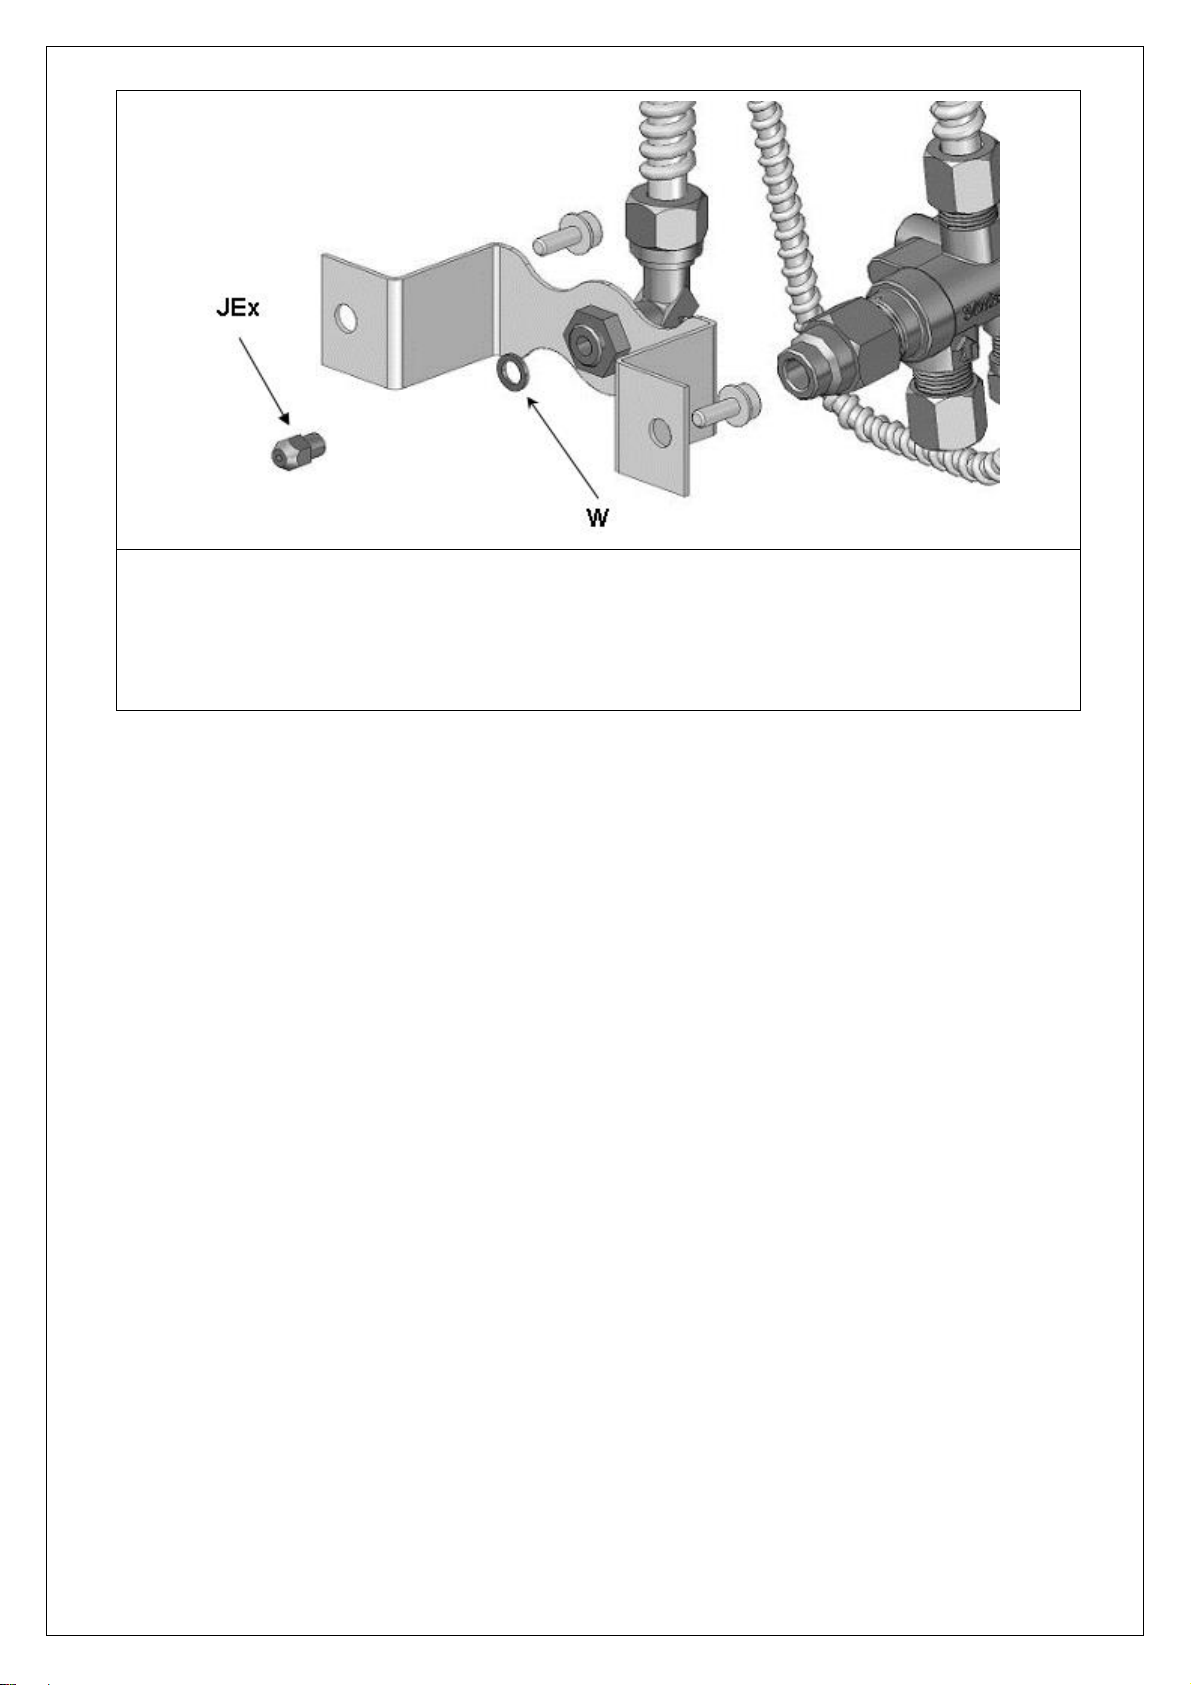
Remove the injector JEx together with the fibre washer (if applicable) and the copper washer W
Replace with the new injector applicable to the gas type being converted with a new copper washer, the
injector should be tightened to 2.5Nm and the thread should have a 0.5mm covering of Loctite 577.
Refit the bracket
Tighten the burner feed pipe nut
Check connections are leak free
IS589 ECN4504
10
Page 11

USER INSTRUCTION
APPLIANCE USE
This appliance is only for professional use and should only be used by qualified personnel.
Ensure that the person responsible understands how to light, safely operate, clean and shut
down the appliance and is made aware of the position and operation of the gas isolating cock
in the event of an emergency.
ROUTINE CLEANING
It is important that users of the appliance shall systematically check and clean down as
necessary areas of the grill that have accumulated oils, fats and other combustible
debris from previous cooking.
This is to prevent the potential risk of fire.
Cleaning of the appliance and its parts must be done when the appliance is cold and
before the start of service.
Areas to Check
Branding grids – The spaces between the grids may become clogged and will need
to be cleaned to ensure even and clean cooking. Regular use of the scraper supplied
with the appliance will help keep the tops and the spaces of the branding grid clean
and clear.
Radiant caps – The tops of the radiant caps will require brushing down to remove
build up of debris and ash that may have accumulated from previous cooking. They
may be removed to ease cleaning and must be refitted before use.
Debris Collection Drawers – The drawers will need to be emptied of debris and
cleaned from old fats and oils that may have accumulated from previous cooking.
LIGHTING SEQUENCE
The operation of each burner is identical. Each valve has its own built in piezo ignition.
To light the gas at a burner, select the corresponding control knob.
If the appliance has stood unused for any length of time it may be necessary to purge
the pilot lines of air. To purge the pilot lines of air depress and rotate a control knob
until spring tension is felt. Maintain the knob in the depressed position for 2030seconds and then fully rotate to the ignition position. Repeat as necessary until the
gas ignites at the pilot.
Depress the control knob and rotate 90o anti-clockwise to the position marked with a
stylized star to light the gas at the pilot.
Should the pilot not light the first time maintain the control knob in this position
for a few seconds to allow a free flow of gas through to the pilot. Return the
control knob to the 'OFF' position and repeat the lighting sequence.
A portion of the pilot flame can be seen through the viewing port on the fascia
panel.
After establishing the flame at the pilot; maintain the control knob in the depressed
position for approximately 15 seconds to retain the flame at the pilot. Confirmation of the
established flame is made by releasing the control knob.
IS589 ECN4504
11
Page 12

If the pilot flame goes out repeat the process until the flame is maintained.
Leave the pilot lit for a further 45-60 seconds to allow the flame failure sensing element to
heat to its full potential.
To light the gas at the corresponding burner rotate the control knob to any point between
the low rate and full rate as denoted by the small and large stylized flames on the control
knob. When lit a portion of the flame at the burner can be seen through the viewing port
on the fascia. After a few minutes there will be an evident glow radiating from the burner
through the radiant cap.
LIGHTING WHEN HOT
When a burner has become hot and the pilot has been extinguished ionization may occur at
the piezo ignition point when attempting to relight the pilot burner. In such a case then the
pilot in question should be allowed to cool for approximately 10 minutes or the pilot can be
relit using a taper provided the control knob is rotated to the ignition point and held in the
depressed state. Access to the pilot is through the viewing port on the fascia panel.
COOKING ZONES
Cooking zones are controlled by the gas valves. The cooking temperature can be controlled
at any point between the low rate and the full rate.
After lighting, each zone can be left on pilot standby.
DEBRIS COLLECTION DRAWERS
It is recommended that each drawer is filled with a small volume of water before the
start of service. Any fats or oils from the cooking process falling through to the drawers
will form a film on the water whilst heavier pieces of debris will lie on the base of the
drawer.
At regular intervals during quieter times of service the drawers should be periodically
checked for the level of water and emptied of collected debris as necessary.
USING THE APPLIANCE
For first time use it is recommended that the branding grids are 'seasoned'.
To season the grids, lightly coat the cooking surfaces with cooking oil. Place the grids back
on to the appliance and heat the grids to season.
Before the start of daily service flip the branding grids and heat at full power for 10 minutes to
carbonize the previous day's deposits. Remove debris using the scraper. Lower the
temperature of the zones to the desired cooking temperature.
Use of griddle plates or large pans covering a significant portion of the cooking grid is
not recommended.
12
IS589 ECN4504
Page 13

SERVICING
SERVICE
The only end user service operation permitted is the routine cleaning and inspection of
external parts of the appliance. The only maintenance operation permitted is the replacement
of parts by approved and qualified representatives appointed by Lincat Ltd.
Visual inspection shall determine that:
Branding grids are not clogged and excessive carbon build up has been removed
Debris collection drawers are in an acceptable clean condition including surge bars
Radiant caps are free from excessive build up of carbon
Splash back and hob top are in an acceptable clean condition
Equi-potential earth bond is attached
Flexible gas supply hose (where fitted) is of a sound condition and the safety restraint
chain/cable is attached
All gas taps function correctly in terms of lighting pilots and burners
13
IS589 ECN4504
Page 14
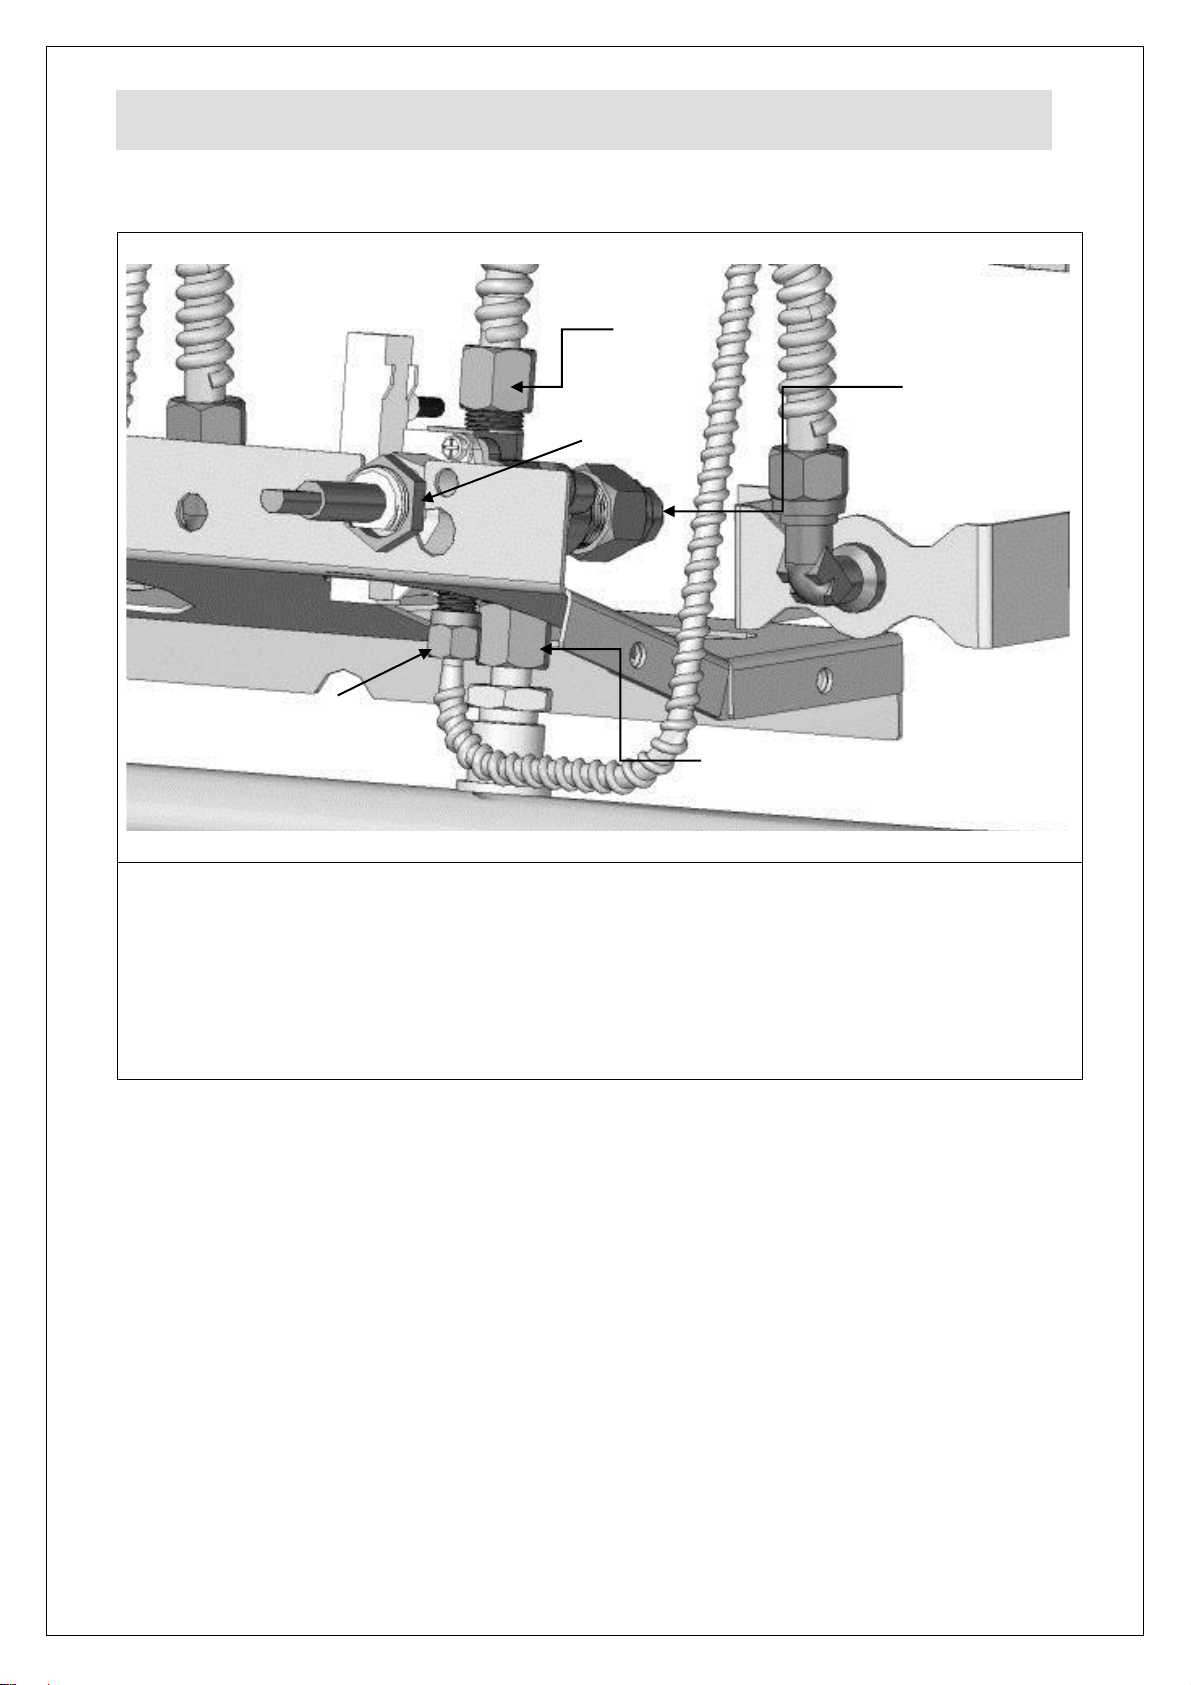
AA
BB
CC
DD
EE
COMPONENT REPLACEMENT
Loosen the pilot feed pipe nut AA and withdraw the pilot feed pipe from the valve body
Loosen the valve inlet nut BB
Loosen the burner feed pipe nut CC and free the burner feed pipe from the valve body
Loosen the valve body nut DD
Loosen and remove the thermocouple nut EE (not shown) at the rear of the valve
Disconnect the ignitor lead from the ignitor at the pilot assembly (not shown)
After the valve has been replaced and fitted all pipework connections must be checked and verified leak
free.
Valve Body
Thermocouple
To remove the thermocouple loosen the nut D as shown on the pilot injector change details
Loosen the thermocouple nut EE as detailed above.
The nut D is lightly crimped to the thermocouple body; it can be teased free of the
thermocouple and re-used.
Replace the new thermocouple and secure fittings.
Burner Replacement
Replacing the burner requires significant component disassembly; for details contact Service
Agent
IS589 ECN4504
14
Page 15

Part number
Part description
Used on
BP45
Cast Branding Grid
All
BU29/S
Ceramic Plaque Burner
All
CO113
Copper Washer
All
CO248
Olive 8mm
All
CO254
Tube Nut
All
CO52
Stud Elbow 8mm
All
CO53
Lock Nut
All
FE40
Adjustable Foot
All
IG03
Ignitor Electrode
All
IS571
User Manual
All
JE136
Bypass Injector Natural Gas
All
JE137
Bypass Injector Propane Gas
All
JE34
Burner Injector Propane Gas
All
JE45
Burner Injector Natural Gas
All
KN507
Control Knob
All
MA166
Manifold
OG8401
MA167
Manifold
OG8402
MA168
Manifold
OG8403
PI03A
Pilot Body
All
PI03B
Pilot Thermocouple Nut
All
PI03C
Ignitor Nut
All
PI03D
Olive Nut
All
PI03E
Olive
All
RC03M
Radiant Cap
All
SC06
Scraper
All
SP08
Pilot Spacer
All
TU05
Valve Inlet Tube
All
TU08
Flexi Tube 8 X 150
All
TU09
Flexi Tube 4 X 300
All
VA70
Control Valve (complete with fittings)
All
VA70A
Control Valve Body
All
VA70B
Lock Nut
All
VA70C
Compression Nut 8mm
All
VA70D
Compression Nut 4mm
All
VA70E
Olive 4mm
All
SPARE PARTS LIST
IS589 ECN4504
15
Page 16

FAULT FINDING
User Fault Finding
Pilot not lighting
Check gas supply is on
Turn on the gas supply
Gas supply is on but pilot not lighting
Check for spark at ignitor
The spark can be seen by looking through the inspection slots on the control
panel.
There is a spark at the ignitor
See note on lighting sequence
Spark cannot be seen at ignitor
Contact Service Agent
Service Agent Fault Finding
Gas supply is on but pilot not lighting
Check for short in ignitor lead or ignitor
Replace valve*
or
Replace ignitor electrode
*Ignitor lead is an integral part of the valve
Pilot lighting but will not stay lit
Check thermocouple integrity
Replace thermocouple
IS589 ECN4504
16
Page 17

Product code
All available on serial plate
Type number
Serial number
SERVICE INFORMATION
For help with the installation, maintenance and use of your Lincat equipment, please
contact our service department:
For non-UK customers, please contact your local Lincat dealer
All service work, other than routine cleaning MUST be carried out by qualified
personnel and a record kept of any remedial actions taken and at least cover the
requirements of the service schedule of this document. We cannot accept
responsibility for work carried out by other persons.
To ensure your service enquiry is handled as efficiently as possible, please tell us:
Brief details of the problem
Lincat reserve the right to carry out any work under warranty, given reasonable access
to the appliance, during normal working hours, Monday to Friday, 08:30 to 17:00.
DECLARATION
All Lincat products capable of burning gaseous fuels, satisfy the requirements of the
Gas Appliance Regulations 2016/426.
UK: 01522 875520
GUARANTEE
This unit carries a comprehensive UK mainland warranty. The guarantee is in addition
to, and does not diminish your statutory or legal rights. Contact Lincat for terms and
conditions
The guarantee does not cover:
Accidental damage, misuse or use not in accordance with the manufacturer’s
instructions
Consumable items (such as filters, glass, bulbs, slot toaster elements and door
seals.)
Damage due to incorrect installation, modification, unauthorised service work or
damage due to scale, food debris build-up, etc.
The manufacturer disclaims any liability for incidental, or consequential damages.
Attendance is based on reasonable access to the appliance to allow the authorised
personnel to carry out the warranty work.
Service calls to equipment under warranty will be carried out in accordance with the
conditions of sale. Unless otherwise specified, a maximum of 15 minutes of administrative
time, not spent directly carrying out servicing work, is provided for within the warranty. Any
requirement for staff attending the call to spend greater time than 15 minutes due to
administrative requirements, such as on health and safety risk assessments, will be
chargeable at the prevailing rate.
IS589 ECN4504
17
Page 18

IS589 ECN4504
18
Page 19

IS589 ECN4504
19
Page 20

IS589 ECN4504
20
 Loading...