

Page 1

OG7106 and OG7107 Gas Fryers
USER INSTRUCTIONS
Please read the following carefully before using this appliance.
Warnings and Precautions
Please ensure that all commissioning checks and initial start-up procedures have taken place.
Please ensure that the installation engineer has instructed the user how to light, safely operate and
shutdown the appliance, and that the user has been made aware of the position and operation of
the gas isolating cock for use in the event of an emergency.
Whilst in operation parts of the appliance become hot. Please take care to avoid accidental
burns. The flue outlet must not be blocked and must be kept clear at all times.
This manual should be kept in a safe and accessible place for future reference.
This appliance is designed for professional use and must only be operated by qualified personnel.
It is mandatory that all appliances are installed, commissioned and serviced by a qualified and
competent person as defined by the regulations in force in the country of installation. Failure to
comply will invalidate the warranty.
Please ensure that the appliance is serviced regularly by a competent and registered catering
equipment engineer.
WARNING
!
Do not move this appliance when the tank contains oil.
!
Hot oil can cause severe burns. Avoid direct physical contact.
!
Always drain food before frying.
!
Never put water into the oil, as this will cause splashing and possible overflow of the tank.
!
Never put anything other than food in to the oil.
! Parts of this unit may become hot in normal use; therefore suitable precautions must be taken to avoid
accidental contact.
!
Never leave the unit unsupervised whilst frying.
!
If the unit should begin to smoke, switch off immediately.
!
In the event of a fire occurring, water should not be used to extinguish it. It is advisable to install a fire
extinguisher and have a fire blanket within reach of the fryer.
!
Do not over fill the tank with oil.
!
Maintain the oil level above the minimum mark.
!
Before lighting the appliance please ensure that the tank is filled with oil to the specified capacity as
indicated below.
!
The flue outlet must not be blocked and must be kept clear at all times.
IS361 ECN3258 1
Page 2
Model No. Oil Capacity (litres)
OG7106 16
OG7107 20
Filling with oil
1. Remove the dust cover and locate it behind the wire basket support at the rear of the tank.
2. Check that the drain valve is closed.
3. Fill the tank of the fryer to the higher of the two level marks on the batter plate.
Always use good quality oil and maintain the level as above to avoid early deterioration.
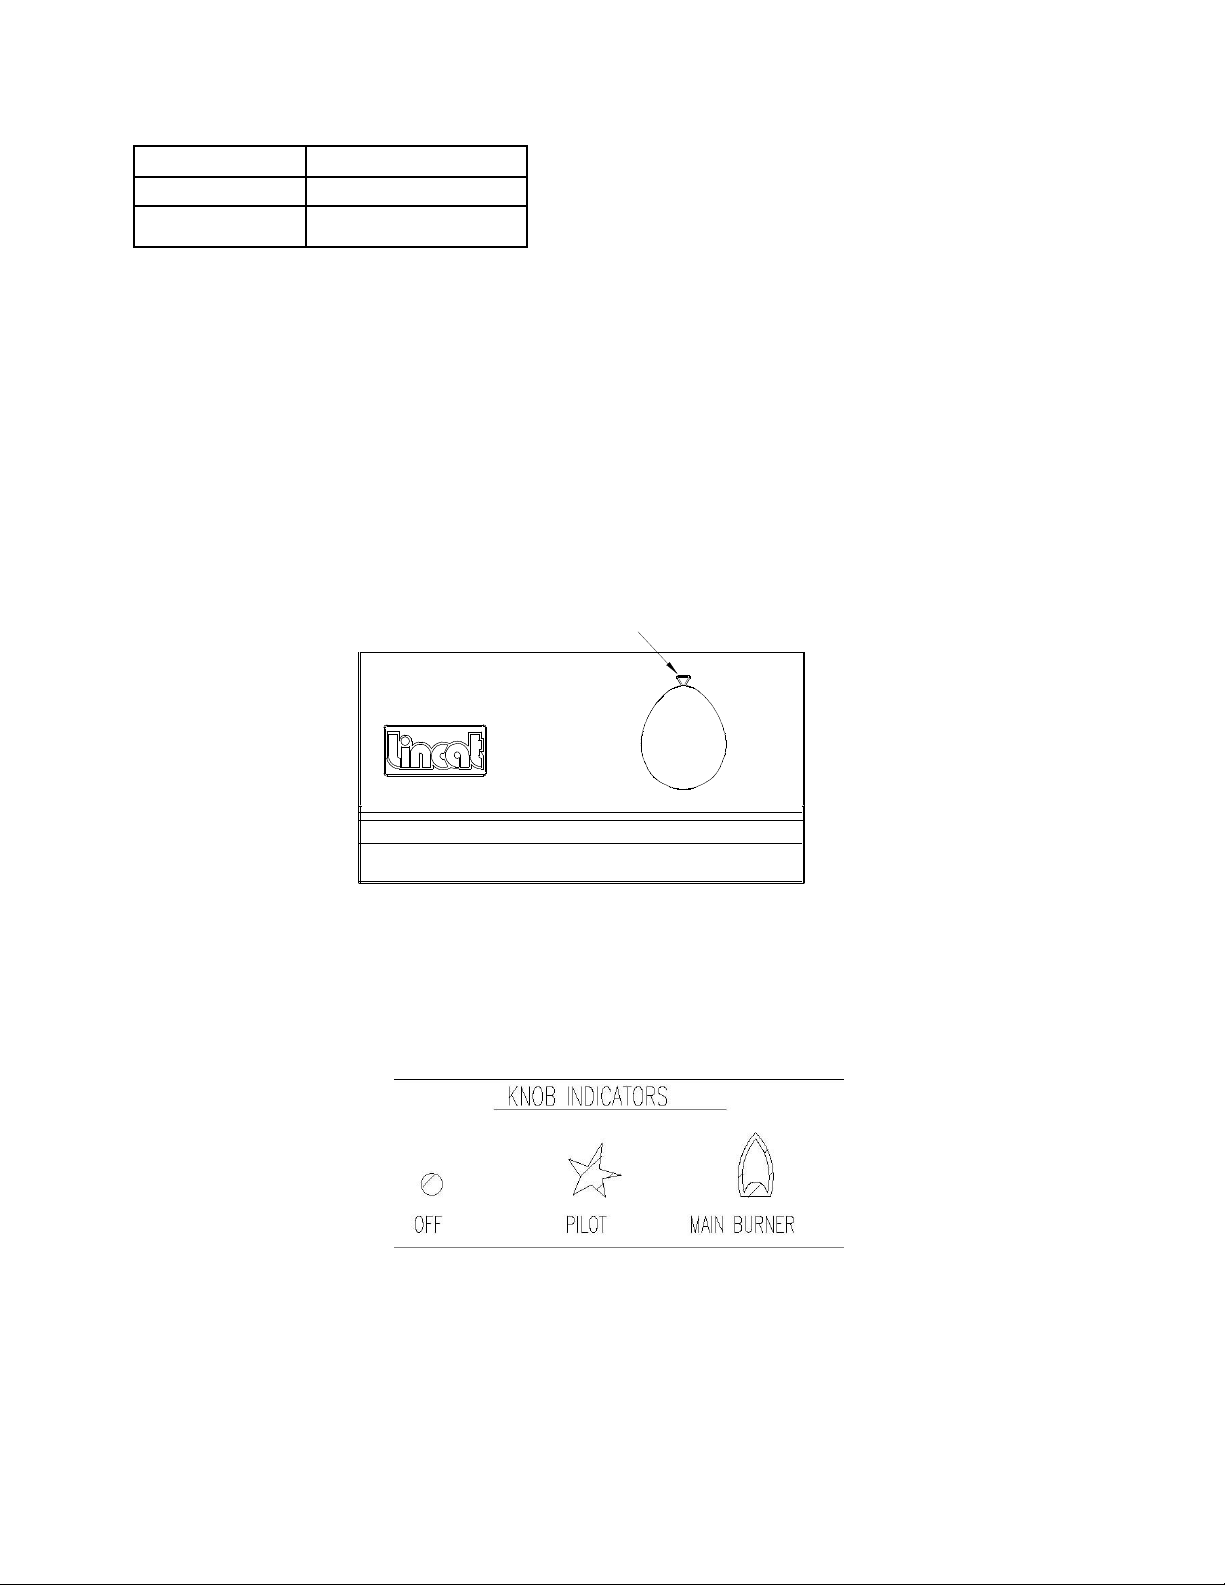
ControlPanel
Fig 1.
Fig 2.
IS361 ECN3258 2
Page 3
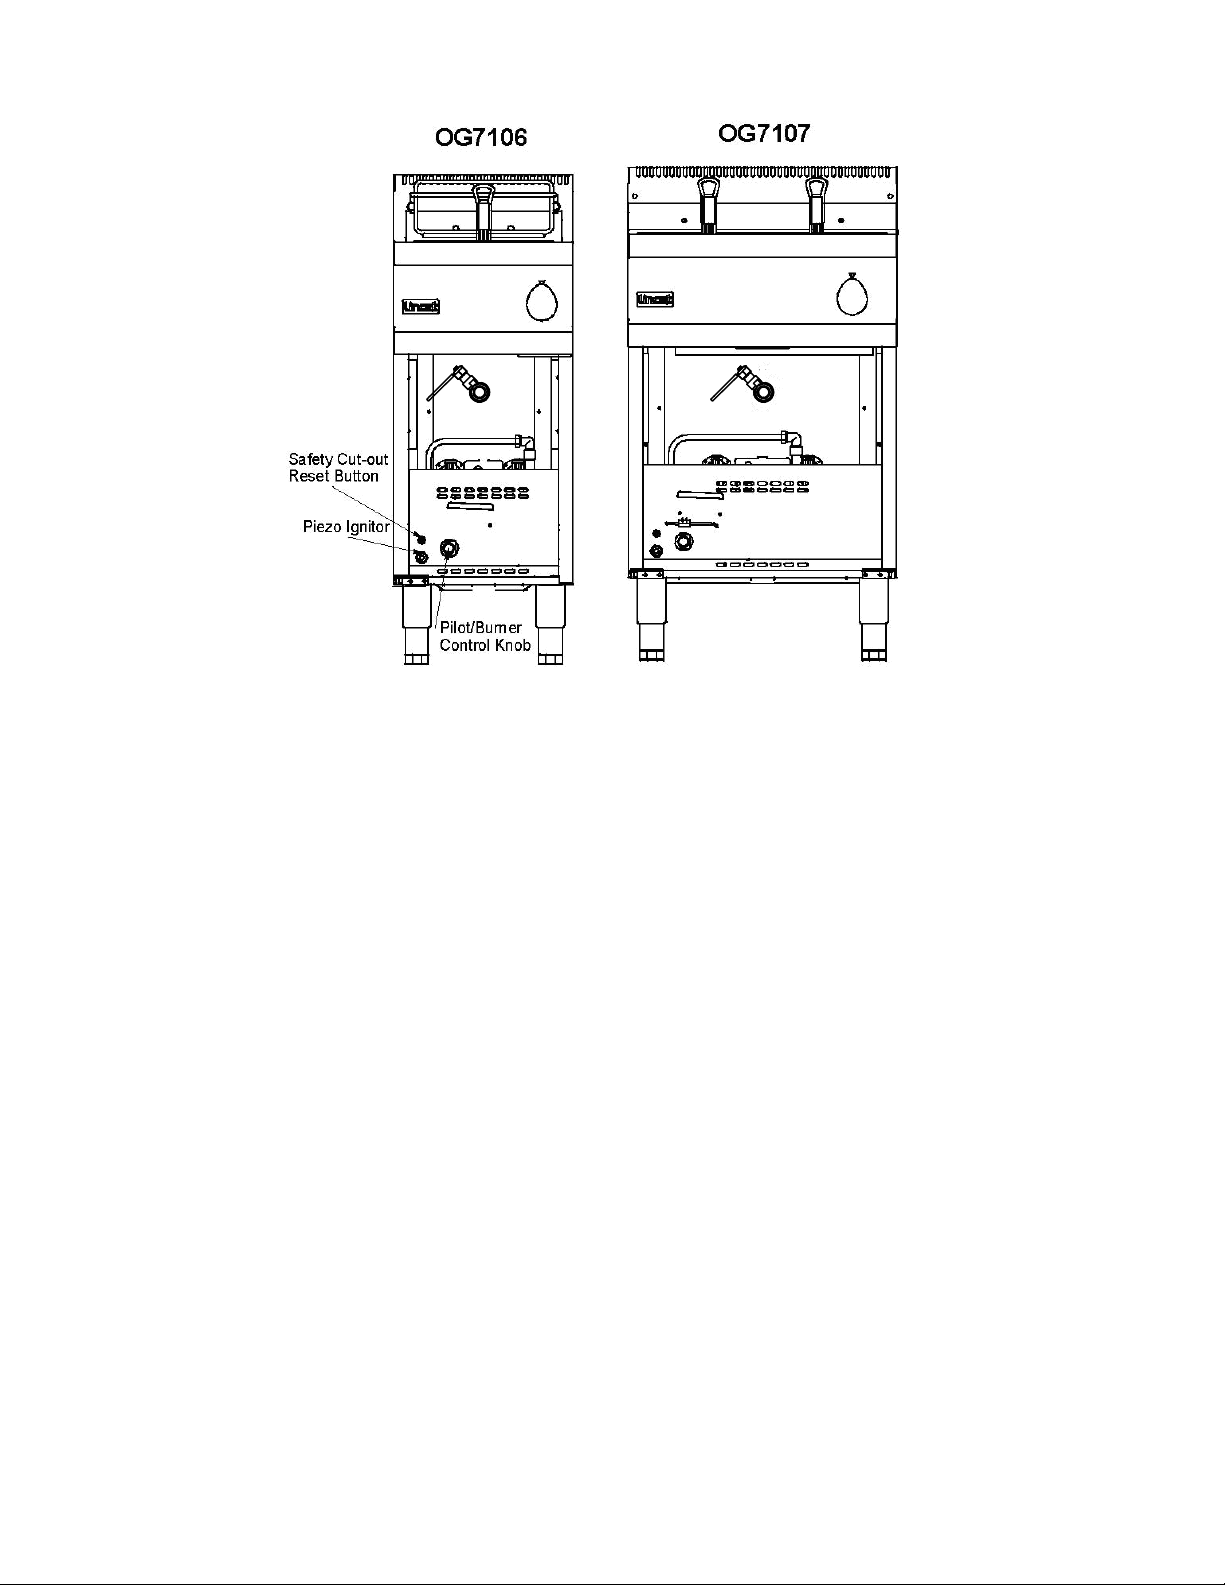
Fig 3
Lighting the Appliance
Please ensure that the gas isolation valve for the appliance is turned to the open position before
attempting to light this unit.
1. Ensure that the thermostat control knob (see fig 1.) is in the OFF position.
2. Press the pilot knob in and turn anticlockwise to the Pilot position (see fig 2.)
3. Keeping the pilot control knob depressed, press the piezo ignition button (see fig 3.)
4. Hold the pilot control knob in for 20 seconds to establish the pilot flame.
5. If the pilot flame fails to ignite, return the pilot control knob to the off position and repeat the process
allowing a short period of time for the control to reset.
6. When the pilot is lit, release the pilot control knob and turn fully anti-
clockwise to the ‘Main Burner’ position (see fig 2).
7. To operate the main burner, turn the thermostat control knob (see fig 1.) to the required
temperature setting.
Standby
Once the pilot is lit the appliance may be left on standby by leaving the pilot control knob in the pilot ign
ition position. When in this position the appliance cannot be operated from the thermostat control knob.
To re ignite the main burners follow steps 6 and 7 above.
Note: Should the safety cut out thermostat operate during normal use the unit will shut down.
To re-light the unit allow the oil to cooled to a temperature below 200oC. Reset the safety
thermostat by depressing the red reset button. (see fig 3). To reset the unit, open the door(s)
- the reset button(s) are located at the base of the left hand frame pillar. The button is in the
centre of the protruding threaded tube.
IS361 ECN3258 3
Page 4
Shutting down the appliance
To turn off the appliance completely:
1. Turn the thermostat knob fully anticlockwise to the OFF position.
2. Press the pilot control knob in and turn to the OFF position.
Warning: The surfaces behind the door(s) become hot during normal operation. Please take care
to avoid accidental burns.
Cleaning
Ensure gas supply is isolated before commencing cleaning.
Note:The baskets, batterplates, filter mesh and drain tube can all be cleaned using a commercial
dishwasher.
To maintain the condition of the oil it is recommended that it be filtered after every service period. Oil
should be replaced when it becomes dark brown in colour and it should be disposed of according to
local authority regulations.
Warning: Always allow oil to cool to a maximum 55ºC before draining. Always drain the unit
before cleaning or servicing.
Draining the oil
1. Turn the unit off and isolate from the gas supply.
2. Allow the oil to cool to a maximum of 55C.
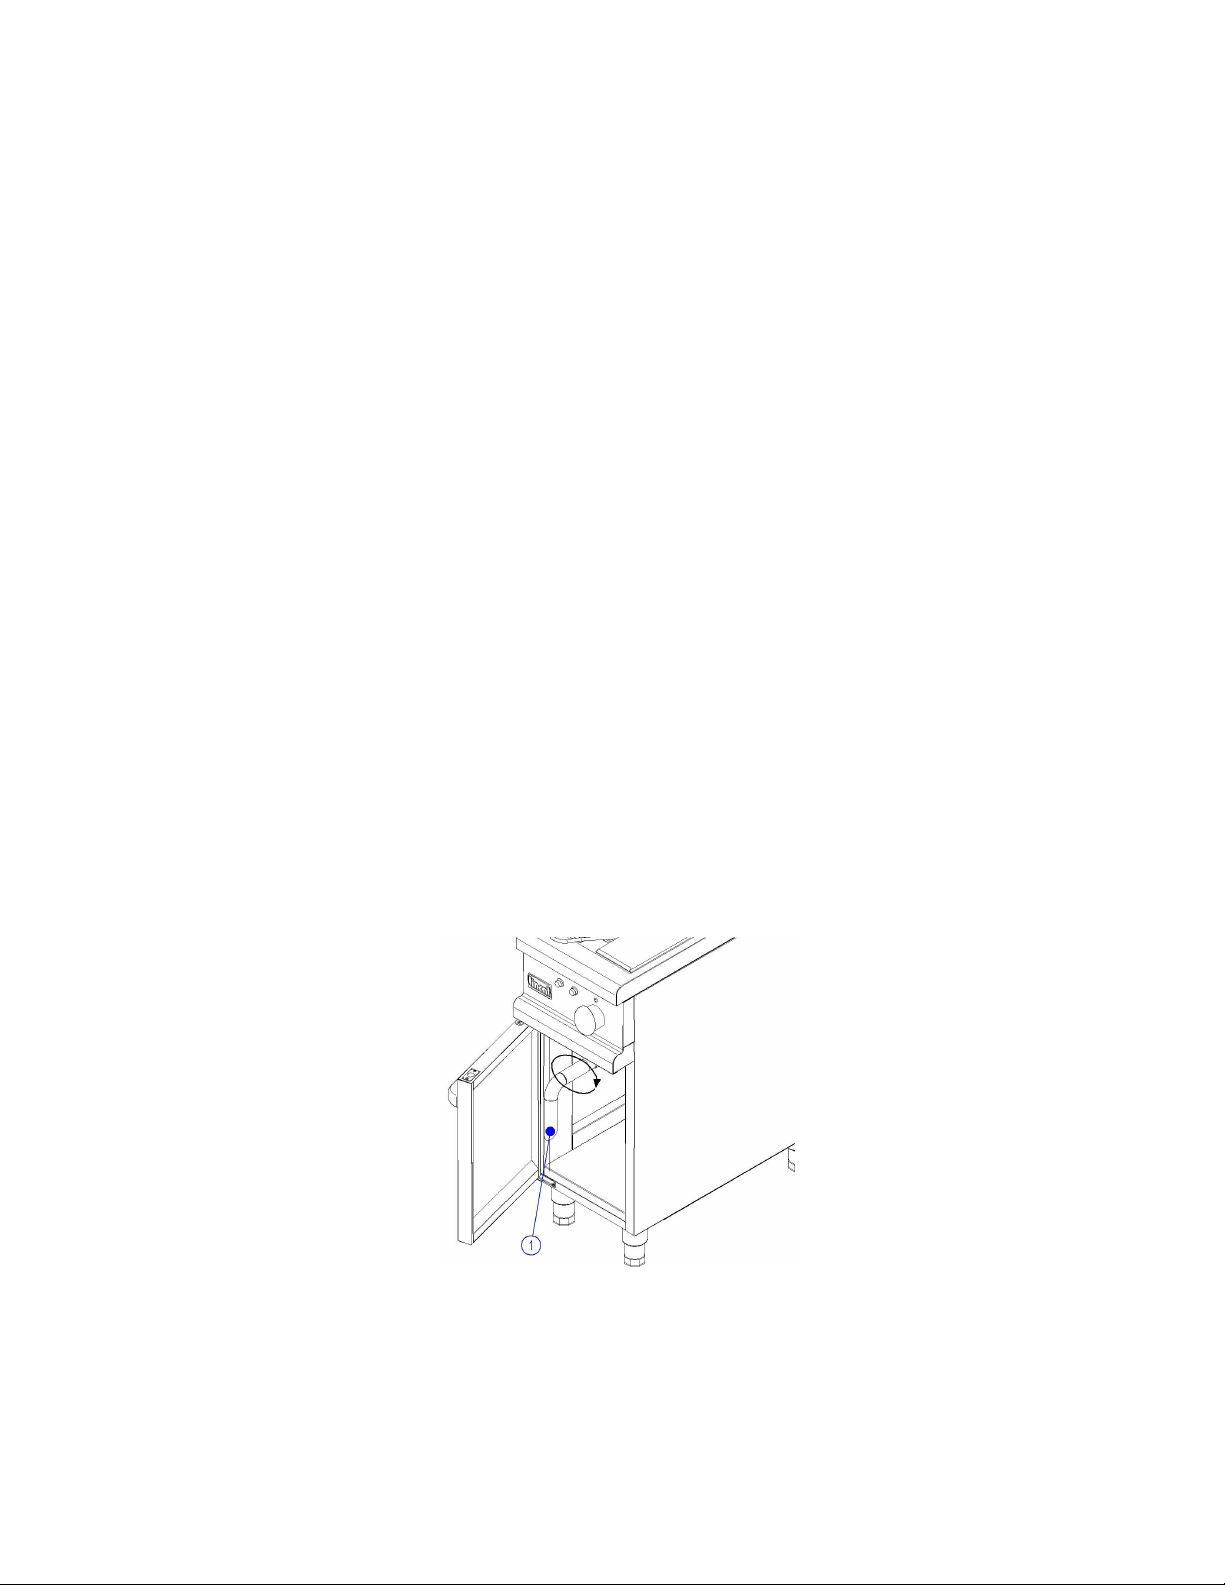
3. Screw the drainpipe (1) onto the drain valve and place the drain container under the outlet of the
pipe, making sure that the filter mesh is in place.
4. Open the tap and allow the oil to drain into the container taking care not to overfill it.
Fig 4.
IS361 ECN3258 4
Page 5

Cleaning the fryer tanks
.
1. Drain as per above instructions.
2. Lift the filter mesh from the oil receptacle and remove larger
particles before washing.
3. Wash the tank and the top surface of the fryer body using a
warm detergent solution.
4. With the drain tap in the open position using a tube or
suitable flue brush, clean the drain tube.
5. Wash all parts thoroughly.
6. Rinse and dry all parts thoroughly.
7. To ensure there is no water left in the drain tube, flush
thoroughly with a small a mount of clean cooking oil.
8. Reassemble the unit and refill with oil to the correct level.
Depress
Align squares,
press to engage,
turn to open and close.
Turn to Open
Turn to Open
Fig 5.
Flue Cleaning
Disassembly of the flue for cleaning.
1. Unscrew the two locking pins to release the spillage guard.
2. Lift the wire basket support from the mounting bosses.
3. Reassemble in reverse order.
IS361 ECN3258 5
Page 6

This appliance should be serviced and maintained regularly, according to the service instructions.
Before carrying out any maintenance on this appliance, isolate from the gas supply.
See “ServiceInformation” below.
SERVICE INFORMATION
Gascateringequipmentshouldberoutinelyservicedtoensurealongtroublefreelife.Itisrecommendedthatthisap
plianceisservicedevery6monthsbyacompetentgasengineer.Forhelpregardingtheinstallation,maintenancean
duseofyourLINCATequipment,pleasecall:
LINCAT GROUP SERVICE HELP DESK
01522 875520
AUTHORISED SERVICE AGENTS
We recommend that all servicing other than routine cleaning be carried out by our authorised service
agents we cannot accept responsibility for work carried out by other persons.
Please quote both the model and serial numbers from the data plate attached to the unit. Give brief
details of the service requirement.
If possible please quote the product code of the part number you require.
Work carried out under warranty will normally be undertaken only during normal working hours, i.e.
Monday to Friday, 8.30 a.m. - 5.30 p.m.
CONDITIONS OF GUARANTEE
The guarantee does not cover:-
1) Accidental breakage or damage
2) Operational misuse, wear and tear from normal usage, incorrect adjustment, or neglect.
3) Incorrect installation, maintenance, modification or unauthorised service work.
IS361 ECN3258 6
Page 7

SPARE PARTS LIST
The following components are listed with the Lincat reference number followed by a brief description.
PARTNUMBER DESCRIPTION
BA82 Basket
BA83 Halfbasket
WI09 Basket support (OG7107)
WI12 Basket support (OG7106)
BU77 Burner (OG7106/7)
JE31 Cross-light jet natural (OG7106)0.026”
JE32 Cross-light jet butane/propane (OG7106)0.016”
JE91 Cross-light jet natural (OG7107)0.65mm
JE92 Cross-light jet butane/propane (OG7107)0.35mm
JE97 Burner injector natural (OG7106)3.0mm
JE98 Burner injector butane/propane (OG7106)2.0mm
JE94 Burner injector natural (OG7107)3.15mm
JE95 Burner injector butane/propane (OG7107)2.15mm
JE86 Pilot injector natural (OG7106/7)0.51mm
JE87 Pilot injector butane/propane (OG7106/7)0.35mm
VA20 Control valve
PI25 Pilot body (OG7106)
PI18 Pilot body (OG7107)
TC40 Thermocouple (OG7107)
TC41 Thermopile
TH95 Control Thermostat
TH97 Safety thermostat
TA101 Drain valve
LE37 Adjustable leg
KN253 Control knob
IG39 Ignition lead
IG15 Igniter electrode
IG35 Piezo igniter
IG37 Igniter earth lead
IS361 ECN3258 7
 Loading...