

Page 1

IS 713 ECN 4386 Page 1 of 11
Installation, Operating and Servicing
Instructions
Wall Mounted Water Boiler
M3F, M5F AND M7F
Please make a note of your product details for
future use:
Date Purchased:_________________________
Model Number:__________________________
Serial Number:__________________________
Dealer:_________________________________
_______________________________________
Page 2

IS 713 ECN 4386 Page 2 of 11
CONTENTS
Important Information
2
Warnings and Precautions
3
Technical Data
3
Checklist of Enclosures
3
Installation and Commissioning
4-5
Operating Instructions
5-7
Cleaning
7
Servicing, Maintenance and Component Replacement
9
Fault Finding
9
Spare Parts List
10
Accessories
10
Service Information and Guarantee
11
IMPORTANT INFORMATION
Read these instructions carefully before using this product, paying particular
attention to all sections that carry warning symbols, caution symbols and notices.
Ensure that these are understood at all times.
WARNING!
This symbol is used whenever there is a risk of personal injury.
CAUTION!
This symbol is used whenever there is a risk of damaging your Lincat product.
NOTE:
This symbol is used to provide additional information, hints and tips.
KEEP THIS MANUAL FOR FUTURE REFERENCE
Page 3

IS 713 ECN 4386 Page 3 of 11
WARNINGS AND PRECAUTIONS
This appliance must be installed, commissioned and serviced by a qualified person
in accordance with national and local regulations in force in the country of
installation.
If the supply cord is damaged, it must be replaced by the manufacturer, its service
agent or similarly qualified person.
Ensure wall construction is suitable see Installation and commissioning.
Ensure that the plug/socket is accessible at all times.
Strip plastic coating and clean the appliance before use.
During operation parts may become hot - avoid accidental contact.
Disconnect this appliance before servicing, maintenance or cleaning.
This appliance is not suitable for outdoor use.
Waste connection to the condensate overflow pipe with use of a Tundish is
advisable.
TECHNICAL DATA
Model
Height
(mm)
Width
(mm)
Depth
(mm)
Weight
(kg)
Weight (kg)
Inc. full tank
M3F
362
300
203
8.9
12.1
M3F (inc fittings)
398
304
269
M5F
412
340
203
9.9
15.1
M5F (inc fittings)
448
344
269
M7F
527
340
203
11.6
19.4
M5F (inc fittings)
563
344
269
CHECK LIST OF ENCLOSURES
Instructions manual
Connection hose
Wall bracket
Page 4
IS 713 ECN 4386 Page 4 of 11
10
215
INSTALLATION AND COMMISSIONING
This appliance must be earthed.
If replacing the plug connect the terminals as follows:
Green and Yellow wire Earth E
Blue wire Neutral N
Brown wire Live L
Means of isolation with at least 3mm contact separation in all poles must be
incorporated into the fixed wiring of this appliance.
The fixed wiring insulation must be protected by insulated sleeving having a
temperature rating of at least 60°C.
Supply cords shall be oil resistant, sheathed flexible cable not lighter than ordinary
polychloroprene or equivalent elastomer sheathed cord (code 60245 IEC 57)
Do not re-use old hose sets.
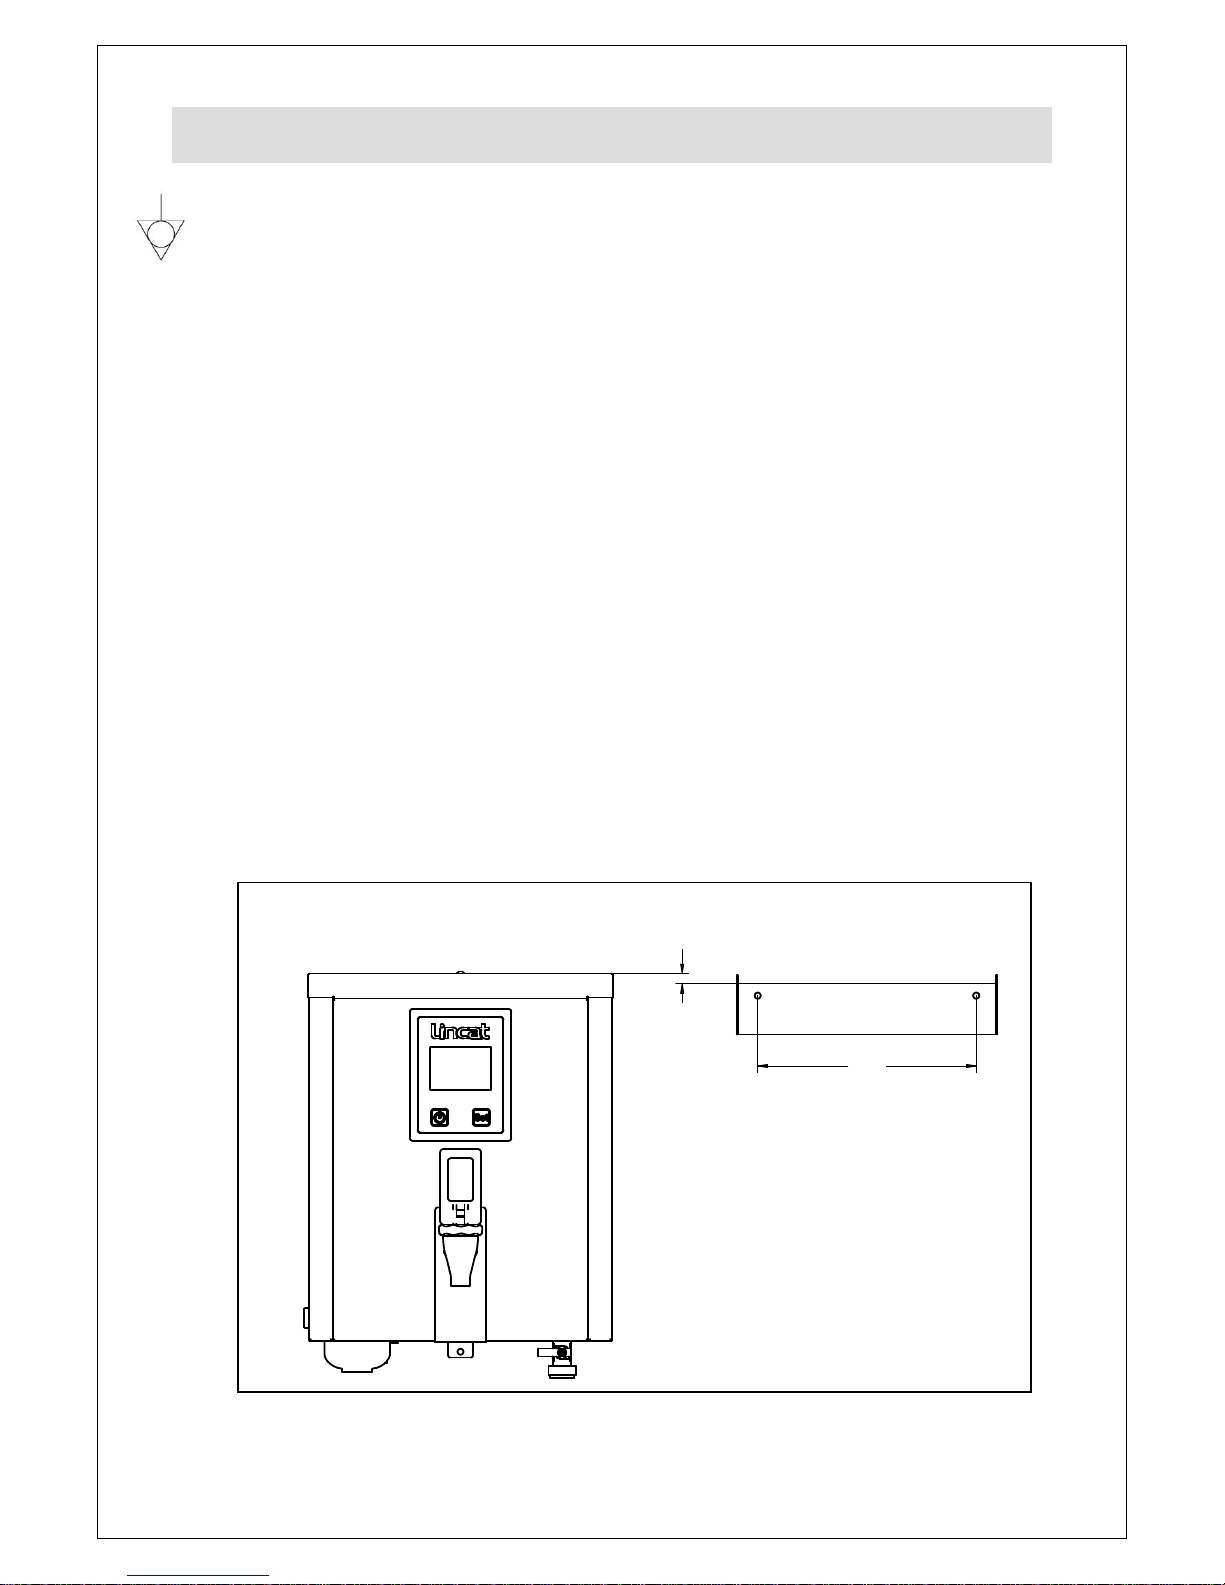
Wall installation
The boiler must be installed on a vertical concrete/brick wall with the base in a
horizontal position. The location must be frost free.
Using the wall bracket provided mark the position of the mounting holes. The top of
the wall bracket is 10mm below the height of the fitted unit lid (see Fig1). Drill the
holes and insert suitable wall plugs.
Fig1
Page 5

IS 713 ECN 4386 Page 5 of 11
Hang the unit onto the bracket and mark the position of the lower fixing screw on
the underside of the unit. Remove the boiler and drill the hole and insert suitable
wall plug. The water boiler is now ready to mount and connect services.
Please allow 200mm clear space above the unit to allow removal of the cover and
300mm below the unit to allow for filter removal.
Electrical supply
The MF wall mount series are supplied with a 13 amp plug to BS1363
Power Ratings
Model
kW
Amps
M3F
3.0
13.0
M5F
M7F
Water Installation
Connect the supplied white water inlet hose to the inlet connection point on the
base of the boiler and the other end to the mains supply via an accessible isolating
tap with a ¾” BSP thread.
Use the hose set supplied with the appliance – any previous hose set is not to be
re-used.
Connect the condensate/overflow pipe (Fig 2 B) to a suitable drain, considering any
applicable local water regulations.
Potable water. If solid particles are known to be in the supply, add an extra inline
filter or strainer.
Ambient temp Deg C
Water inlet pressure Bar
Water inlet pressure kPa
5 to 30
1 to 8
100 to 800
Turn on the water supply and check for leaks.
OPERATING INSTRUCTIONS
Only qualified or trained personnel should use this appliance.
First Use
Switch on both mains water and electricity supplies and leave the boiler to fill
completely. Unit will display READY when set temperature is reached.
Page 6

IS 713 ECN 4386 Page 6 of 11
A
B C
D
E
F
G
H
I
J
G
F
A Display
B Power button
C Set button
D Dispence tap
E Overflow reset
F Water filter
G Drain valve
H Condensate/overflow pi pe
I Inlet connection
J Mains connection
New filters have a small amount of loose, harmless, carbon particles. Drain off
approximately 3 litres of water when first setting up or replacing filter.
Regular operation
The appliance starts automatically shortly after the electrical supply is turned on,
filling with water and heating.
The unit will display ‘Wait’ whilst it fills and heats. It will display ‘Ready' when water
can be drawn off.
To ensure that water is always hot, only small quantities are added constantly
during the heating cycle. The appliance is designed to be left on permanently, only
to be turned off for descaling or maintenance.
Fig 2
Adjustment - water temperature, screen backlight and contrast.
Turn power off at the mains for 5 seconds and then back on again. When the
‘Filterflow’ screen is displayed, press and hold the power button (B) until the
software version is displayed. Press the Set button (C) and the temperature will be
displayed.
Press the power button to cycle through the values 70 to 96°C. Press the Set
button to select the required value.
Page 7

IS 713 ECN 4386 Page 7 of 11
The backlight adjustment screen is displayed next. Press the power button to cycle
through the values 1 to 25. Press the Set button to select the required value.
The contrast adjustment screen is displayed next. Press the power button to cycle
through the values 35 to 60. Press the Set button to select the required value.
Press the power button to exit.
Standby
If the appliance is to be left unused for any length of time, turn the element off by
pressing the power button.
Filter replacement
The filter display shows the estimated life left in the filter cartridge (Fig 3). A
reminder message is displayed when the filter needs changing.
Use of genuine
Fig 3
To replace the filter
Twist the base of the filter 90 degrees to the left and carefully lower the filter
cartridge out of the appliance. It will contain a small volume of water.
Re-insert new filter into the recess and lock into place by twisting to the right.
Press and hold the Set button for 5 seconds to reset the filter life.
Drain off approximately 3 litres of water to remove any loose carbon particles from
the filter.
The boiler will not fill if the filter is removed as the filter head incorporates a shut-off
valve.
FILTER
READY
STANDBY
CLEAR
CHANGE
FILTER
Page 8

IS 713 ECN 4386 Page 8 of 11
CLEANING
Do not use a water jet or steam cleaner, and do not immerse this appliance.
Clean all panels with warm water and mild detergent, do not use abrasive
materials. Dry with a soft cloth.
Wipe the dispensing nozzle daily to remove limescale deposits.
De-scaling
The boiler should be de-scaled regularly to maintain efficient operation and water
quality. The frequency depends on the hardness of the water and the timely
replacement of the filter.
In common with all water boiler manufacturers, service calls resulting from
limescale are not covered by warranty.
The de-scaling procedure must be performed by trained personnel as it
requires the removal of panels from the boiler giving access to live electrical
components.
De-scaling the boiler at the end of the working day gives the de-scaling agent
several hours to work. Lincat recommend our own de-scaling agent DP10, available
from our Spares department.
Wear protective clothing.
Isolate the boiler from the electrical supply.
Turn off the power and allow the water to cool to 60°C.
Remove the water boiler top cover.
Remove the insulation from the top of the tank, then unscrew and remove
the tank lid.
Add the de-scaling agent slowly to avoid eruption of the water. Follow the
manufacturer’s instructions.
Replace the tank lid and outer lid cover. Attach an ‘Out of Use’ notice to the
boiler to prevent use during de-scaling.
Turn on the electricity and allow the boiler to run normally for 30 minutes.
Isolate the boiler and allow the water to cool.
Remove the boiler lid cover and tank lid and inspect the tank and level
sensor housings for scale deposits. If necessary, repeat the de-scaling
process.
In hard water areas manual descale may be required. Remove as much scale as
possible by hand paying particular attention to the level sensors and element.
Drain and flush all de-scaling agent from the tank completely as follows:
Drain all the water out of the tank– (Fig 2 G)
Failure to descale a unit may result in the boiler overfilling and leaking from the
overflow
Page 9

IS 713 ECN 4386 Page 9 of 11
SERVICING, MAINTENANCE AND
COMPONENT REPLACEMENT
All servicing, maintenance and component replacement on this appliance should be
carried out by one of our recommended service engineers.
The control panel displays information that can help with fault diagnosis. Before
calling for service, draw off a litre of water, clear the fault code by pressing the Set
button and turn the boiler off and on again at the supply.
Please refer to the Service Help Desk number on the final page of this manual if
fault persists.
Message displayed
Possible causes
Corrective action
FILTER DESCALE
CAUTION
SEE MANUAL
STANDBY CLEAR
Scale on level sensors
Boiler overfilling
Leaking past the inlet
solenoid valve
Descale
Check water inlet valve
Clear fault code
pressing Set button
FILTER NO WATER
FAULT
SEE MANUAL
STANDBY CLEAR
Water turned off
Inlet hose kinked or
blocked
Water pressure too high or
low
Drain valve open
Filter blocked or not fitted
Check water supply and
drain valve
Clear fault code
pressing Set button
Call Lincat if fault
persists
FILTER NOT HEATING
FAULT
SEE MANUAL
STANDBY CLEAR
Boil dry/overheat protector
tripped
Temperature sensor fault
Element failed
PCB fault
Faulty or loose connection
Try overflow temp reset
fig2 (E)
Clear fault code
pressing Set button
Call Lincat if fault
persists
FILTER THERMISTOR
FAULT
SEE MANUAL
STANDBY CLEAR
Temperature sensor fault
Call Lincat
FAULT FINDING
Page 10

IS 713 ECN 4386 Page 10 of 11
Part Number
Description
Used on
EL277
Element
M3F, M5F and M7F
FH04
Filter head only
FC04
Water filter
GA82
Tank gasket
M3F
GA83
Tank gasket
M5F, M7F
LE57
Level sensor insulator
M3F, M5F and M7F
LE48
Upper level sensor
LE51
Lower level sensor
M3F, M5F and M7F
PR74
Circuit board
SI01
Sensor isolator
SL20
Tap nut
SL21
Tap circlip
SL34
Tap body
SO23
Solenoid
TH123
90 Deg cutout
TH88
120 Deg cutout
TH98
Thermistor
WL02
Sensor loom
Part Number
Description
DR94
M3F Drip tray
DR95
M5F & M7F Drip tray
FC04
Filter cartridge
DP10
De-scaler
SPARE PARTS LIST
ACCESSORIES
Page 11

IS 713 ECN 4386 Page 11 of 11
For help with the installation, maintenance and use of your Lincat equipment,
please contact our service department:
UK: 01522 875520
For non-UK customers, please contact your local Lincat dealer
All service work, other than routine cleaning should be carried out by one of our
authorised service agents. We cannot accept responsibility for work carried out by
other persons.
To ensure your service enquiry is handled as efficiently as possible, please tell us:
Brief details of the problem
Product code
All available on serial plate
Type number
Serial number
Lincat reserve the right to carry out any work under warranty, given reasonable
access to the appliance, during normal working hours, Monday to Friday, 08:30 to
17:00.
GUARANTEE
This unit carries a comprehensive UK mainland 2 year warranty. The guarantee is
in addition to, and does not diminish your statutory or legal rights.
The guarantee does not cover:
Accidental damage, misuse or use not in accordance with the manufacturer’s
instructions
Scale related issues
Consumable items (such as filters, glass, bulbs, slot toaster elements and door
seals.)
Damage due to incorrect installation, modification, unauthorised service work or
abuse
The manufacturer disclaims any liability for incidental, or consequential damages.
Attendance is based on reasonable access to the appliance to allow the authorised
technician to carry out the warranty work.
Service calls to equipment under warranty will be carried out in accordance with the
conditions of sale. Unless otherwise specified, a maximum of 15 minutes of
administrative time, not spent directly carrying out servicing work, is provided for
within the warranty. Any requirement for staff attending the call to spend greater time
than 15 minutes due to administrative requirements, such as on health and safety risk
assessments, will be chargeable at the prevailing rate.
SERVICE INFORMATION
 Loading...