

Page 1
IS 76 ECN 3607 Page 1 of 9
Installation, Operating and Servicing
Instructions
Manual Fill Water Boilers
LWB2, LWB4, LWB6
Please make a note of your product details for
future use:
Date Purchased:_________________________
Model Number:__________________________
Serial Number:__________________________
Dealer:_________________________________
_______________________________________
Page 2
IS 76 ECN 3607 Page 2 of 9
CONTENTS
Important Information
2
Warnings and Precautions
3
Technical Data
3
Checklist of Enclosures
3
Installation and Commissioning
3-4
Operating Instructions
5-6
Cleaning
6
Servicing, Maintenance and Component Replacement
7
Fault Finding
7
Spare Parts List
7
Service Information and Guarantee
8
IMPORTANT INFORMATION
Read these instructions carefully before using this product, paying particular
attention to all sections that carry warning symbols, caution symbols and notices.
Ensure that these are understood at all times.
WARNING!
This symbol is used whenever there is a risk of personal injury.
CAUTION!
This symbol is used whenever there is a risk of damaging your Lincat product.
NOTE:
This symbol is used to provide additional information, hints and tips.
KEEP THIS MANUAL FOR FUTURE REFERENCE
Page 3
IS 76 ECN 3607 Page 3 of 9
WARNINGS AND PRECAUTIONS
This appliance must be installed, commissioned and serviced by a qualified person
in accordance with national and local regulations in force in the country of
installation.
If the supply cord is damaged, it must be replaced by the manufacturer, its service
agent or similarly qualified person.
Ensure that the plug/socket is accessible at all times.
Strip plastic coating and clean the appliance before use.
During operation parts may become hot - avoid accidental contact.
Disconnect this appliance before servicing, maintenance or cleaning.
Never attempt to move this appliance whilst it is full of hot water.
TECHNICAL DATA
Model
Height (mm)
Diameter (mm)
Capacity (litres)
Weight (kg)
LWB2
380
300
9
6.0
LWB4
500
300
18
7.0
LWB6
500
365
27
9.0
CHECK LIST OF ENCLOSURES
Warranty card
Instructions manual
INSTALLATION AND COMMISSIONING
This appliance must be earthed.
If replacing the plug connect the terminals as follows:
Green and Yellow wire Earth E
Blue wire Neutral N
Brown wire Live L
Page 4
IS 76 ECN 3607 Page 4 of 9
Supply cords shall be oil resistant, sheathed flexible cable not lighter than ordinary
polychloroprene or equivalent elastomer sheathed cord (code 60245 IEC 57)
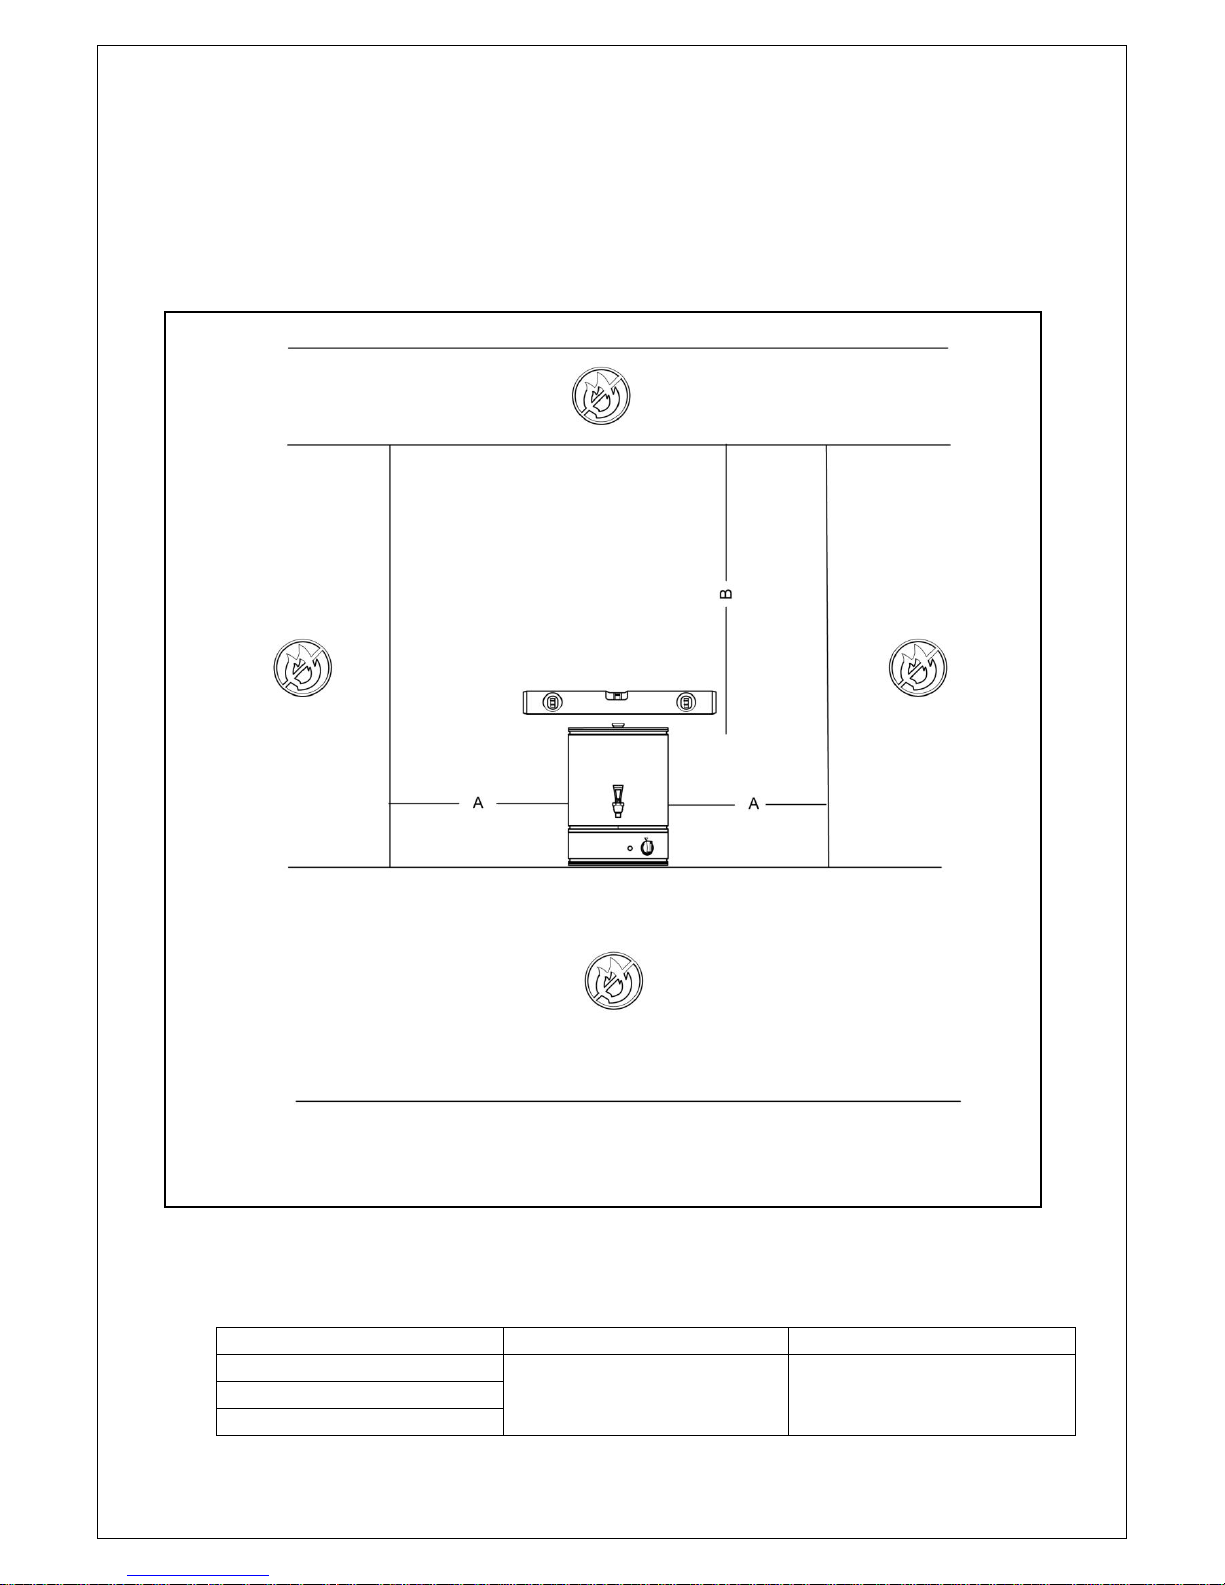
Install this appliance on a level surface ensuring all vents are unobstructed. Any
partitions, walls or furniture must be of non-combustible material. Minimum
distances A 100mm B 500mm – see Fig 1.
Fig 1
Power Ratings
Model
kW
Amps
LWB2
3.0
13.0
LWB4
LWB6
Page 5

IS 76 ECN 3607 Page 5 of 9
OPERATING INSTRUCTIONS
Only qualified or trained personnel should use this appliance.
Before first use, clean the inside of the tank with warm water and mild detergent.
Rinse thoroughly.
Connect the appliance to an electrical supply – the green neon illuminates to
indicate power to the boiler.
Fill to the maximum level, just below the top rib.
Position the lid and activate the boiler by turning the control knob fully clockwise.
At maximum power setting and full capacity the times taken to reach boiling point
are:
LWB2 – 30 minutes
LWB4 – 50 minutes
LWB6 – 75 minutes
Once boiling point is reached, reduce the power, as running continuously at full
power will cause the appliance to boil dry.
During use, as the volume of water drops, reduce the power further. Topping up by
adding small quantities of water at regular intervals and adjusting the control
accordingly will prove most efficient.
Never allow the water level to drop below the tap – if no water flows when operating
the tap, fill the boiler immediately.
To turn the appliance off, turn the control knob to the Off position and switch off at
the electrical supply point.
Boil dry protection
This appliance is fitted with a thermal cut-out device to protect the heating element.
Should the appliance boil dry, the cut-out will operate and disconnect all power to
the boiler. Remedy by disconnecting the appliance from the supply and following
the re-setting procedure below.
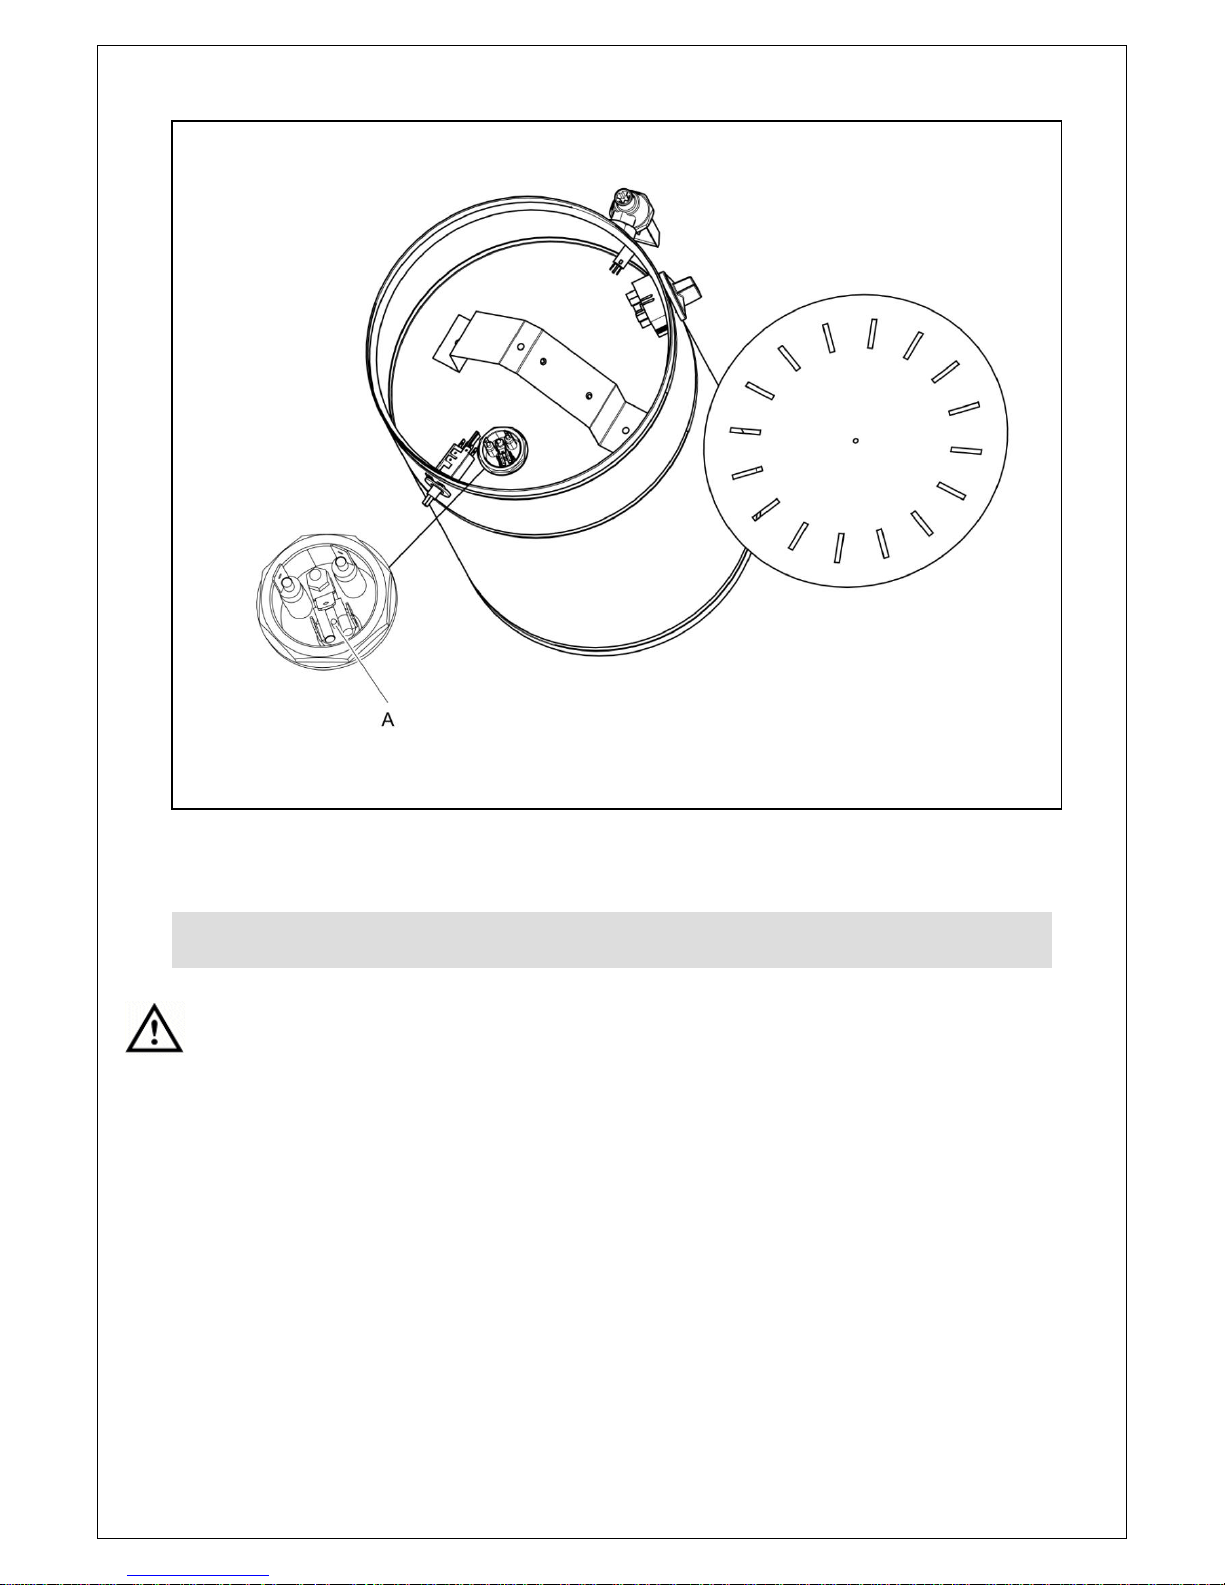
Empty any remaining water from the tank.
Invert the boiler and remove the single screw in the base plate to remove the base.
Press the re-set button located on the element Fig 2 (A).
Fully re-assemble the boiler and reconnect to the supply.
Page 6
IS 76 ECN 3607 Page 6 of 9
Fig 2
CLEANING
Do not use a water jet or steam cleaner, and do not immerse this appliance.
Do not allow lime scale to build up inside the tank, as this can impair performance
and lead to component failure. Use a proprietary de-scaling agent (or order MS19
from Lincat) and follow the manufacturer’s instructions. Always rinse the tank
thoroughly following de-scaling.
Clean all exterior panels with warm water and mild detergent, do not use abrasive
materials. Dry with a soft cloth.
Page 7
IS 76 ECN 3607 Page 7 of 9
SERVICING, MAINTENANCE AND
COMPONENT REPLACEMENT
Other than de-scaling, all servicing, maintenance and component replacement on
this appliance should be carried out by one of our recommended service engineers.
Please refer to the Service Help Desk number on the final page of this manual.
Part Number
Description
Used on
CO42
Backnut
LWB2, LWB4, LWB6
DI18
Element plate
LWB6
DI22
Element plate
LWB2, LWB4
EL01
Element
LWB2, LWB4, LWB6
EN10
Energy regulator
KN140
Lid knob
KN237
Control knob
LN04
Brass locknut
NE38
Neon
PL202
Mains cable
RE28
Relay
SL12
Tap shank
SL15
Faucet
WA09
Washer
FAULT FINDING
SPARE PARTS LIST
Page 8

IS 76 ECN 3607 Page 8 of 9
For help with the installation, maintenance and use of your Lincat equipment,
please contact our service department:
UK: 01522 875520
For non-UK customers, please contact your local Lincat dealer
All service work, other than routine cleaning should be carried out by one of our
authorised service agents. We cannot accept responsibility for work carried out by
other persons.
To ensure your service enquiry is handled as efficiently as possible, please tell us:
Brief details of the problem
Product code
All available on serial plate
Type number
Serial number
Lincat reserve the right to carry out any work under warranty, given reasonable
access to the appliance, during normal working hours, Monday to Friday, 08:30 to
17:00.
GUARANTEE
This unit carries a comprehensive UK mainland 2 year warranty. The guarantee is
in addition to, and does not diminish your statutory or legal rights.
The guarantee does not cover:
Accidental damage, misuse or use not in accordance with the manufacturer’s
instructions
Consumable items (such as filters, glass, bulbs, slot toaster elements and door
seals.)
Damage due to incorrect installation, modification, unauthorised service work or
damage due to scale, food debris build-up, etc.
The manufacturer disclaims any liability for incidental, or consequential damages.
Attendance is based on reasonable access to the appliance to allow the authorised
technician to carry out the warranty work.
Service calls to equipment under warranty will be carried out in accordance with the
conditions of sale. Unless otherwise specified, a maximum of 15 minutes of
administrative time, not spent directly carrying out servicing work, is provided for
within the warranty. Any requirement for staff attending the call to spend greater time
than 15 minutes due to administrative requirements, such as on health and safety risk
assessments, will be chargeable at the prevailing rate.
SERVICE INFORMATION
Page 9

IS 76 ECN 3607 Page 9 of 9
 Loading...