

Page 1
.
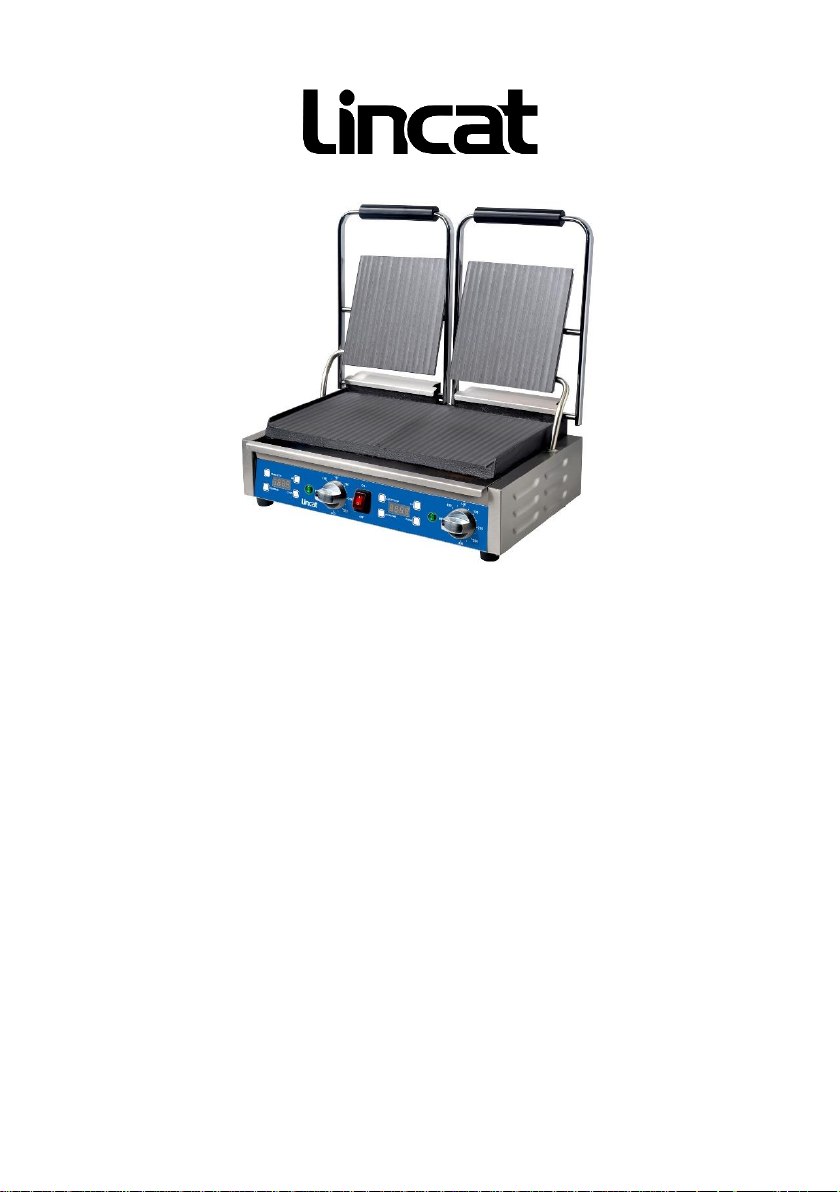
Electric Counter Top Contact Grill
Model: LPPGRRT LPCGFFT LPPG2RRT LPCG2FFT
LPPGRR LPCGFF LPPG2RR
Installation and Operation Instructions
NOTICE: This manual contains important safety instructions which
must be strictly followed when using this equipment.
CAUTION: These models are designed, built, and sold for commercial
use only. If these models are positioned so the general public can use the
equipment, make sure that cautions, warnings, and operating instructions
are clearly posted near each unit so that anyone using the equipment will
use it correctly and not injure themselves or harm the equipment.
Page 2
Installation and Operation Instructions
WARNING : Improper installation, adjustment,
alteration, service or maintenance can cause property damage,
injury, or death. Read the installation operating and maintenance
instructions thoroughly before installing or servicing this
equipment.
CAUTION: These models are designed, built, and sold
for commercial use only. If these models are positioned
so the general public can use the equipment, make sure that
cautions, warnings, and operating instructions are clearly posted
near each unit so that anyone using the equipment will use it
correctly and not injure themselves or harm the equipment.
WARNING:A factory authorised agent should handle
all maintenance and repair. Before doing any maintenance or
repair, contact LINCAT.
Congratulations on your purchase of LINCAT commercial cooking
equipment. LINCAT takes pride in the design and quality of our
products. When used as intended and with proper care and
maintenance, you will experience years of reliable operation from
this equipment. To ensure the best results, it is important that you
read and follow the instructions in this manual carefully.
Page 3

Installation and Operation Instructions
Catalogue
FOREWORD………………………………………………………4
SAFETY TIPS………………………………………………….… 5
INTRODUCTION …………………………………………………6
PACKAGING……………………………………………………… 6
INSTALLATION…………………………………………………… 7
OPERATION ………………………………………………………7
CLEANING AND MAINTENANCE………………………………9
USING THE TIMER………………………………………………10
TROUBLE SHOOTING …………………………………………12
COMPLIANCE……………………………………………………13
ELECTRICAL DIAGRAM ……………………………………… 14
EXPLOSION VIEW………………………………………………17
SPARE PART LIST………………………………………………23
SPECIFICATION…………………………………………………31
Page 4

Installation and Operation Instructions
4
LOCATION OF DATA PLATE
The data plate is located on the side panel.
IMMEDIATELY INSPECT FOR SHIPPING DAMAGE
All containers should be examined for damage before and during
unloading. The freight carrier has assumed responsibility for its
safe transit and delivery. If equipment is received damaged, either
apparent or concealed, a claim must be made with the delivering
carrier.
A) Apparent damage or loss must be noted on the freight bill at the
time of delivery. It must then be signed by the carrier
representative (Driver). If this is not done, the carrier may refuse
the claim. The carrier can supply the necessary forms.
B) Concealed damage or loss if not apparent until after equipment
is uncrated, a request for inspection must be made to the carrier
within 15 days. The carrier should arrange an inspection. Be
certain to hold all contents and packaging material.
Installation and should be performed by a qualified installer who
thoroughly reads, understands and follows this instruction.
If you have questions concerning the installation, operation,
maintenance or service of this product, contact LINCAT.
Page 5

Installation and Operation Instructions
5
Safety Tips
*The LINCAT Contact Grill does not contain any userserviceable parts. LINCAT Foodservice dealers or
recommended qualified technicians should carry out repairs if
necessary. Do not remove any components or service panels
on this product.
*LINCAT takes every care to ensure that all products are safe.
Steel cutting procedures used to manufacture these items
result in sharp edges. These sharp edges are removed to the
best of our ability however we insist the operator takes care
when in contact with this piece of equipment.
*During operation the contact grill reaches high temperatures
on the cooking surface, in turn heating the stainless-steel
surfaces. Only handle the contact grill with the black handles to
eliminate accidents.
*Switch off power to and disconnect from the mains whilst
cleaning.
*Allow the Contact Grill to cool down after use before
dismantling for cleaning; the unit will be too hot to handle
immediately after use.
*This unit has been equipped with a thermal cut-off safety
device to avoid overheating.
*This appliance is not intended for use by people (including
children) with reduced physical, sensory or mental capabilities, or
lack of experience and knowledge, unless they have been given
supervision or
instruction concerning use of the appliance by a person
responsible for their safety.
*Children should be supervised to ensure that they do not play
with the appliance.
Page 6

Installation and Operation Instructions
6
Introduction
Congratulations on your purchase of your LINCAT machine.
Please take time to carefully read through this manual to
ensure the machine is operated and maintained properly, to
ensure the best possible performance from the product for
many years.
LINCAT will not accept liability for the following:
*The instructions in this manual have not been followed
correctly.
*Non-authorised personnel have tampered with the machine.
*Non-original spare parts are used.
*The machine has not been handled and cleaned correctly.
*There is any use damage to the unit.
Packaging
LINCAT prides itself on quality and service, ensuring that at the
time of packing all of its products are supplied fully functional and
free of damage.
Provided in this package are the following:
*Contact Grill
*Waste Tray
*Manual
Should you find any damage as a result of freight, please
contact your LINCAT dealer immediately. No claims will be
accepted after 3 days of receipt.
Page 7

Installation and Operation Instructions
7
Installation
Remove your LINCAT Contact Grill from its packaging and be
certain that all protective plastics and residues are thoroughly
cleaned from its surface.
Locate your LINCAT Contact Grill on a firm level surface; the
adjustable feet can assist in leveling.
International standards and regulations should be consulted in
order to abide by standards set in relation to positioning,
spacing and ventilation. LINCAT recommended that you allow
no less than 100mm ventilated gap around the perimeter of this
unit. Common sense and initiative should be used when
choosing the position and operation of this product.
Once your Contact Grill has been placed into position, be sure
that the stainless-steel waste tray is correctly positioned.
Preparing the cooking surface:
Be sure the cooking surface is clean, then simply turn the unit
on and apply a generous amount of oil to the plates, allow for
the plates to heat up for 3 minutes and then switch off and with
care wipe the plates clean of excess oil.
Caution the grill and oil will be HOT!!!!!!
Operation
Your Contact Grill should be turned on prior to usage to allow the
cooking surface to warm up, 5 minutes are sufficient.
This unit has been factor set to operate at 220°C. Once the unit
Page 8
Installation and Operation Instructions
8
has been switched on using the Green On/Off rocker switch the
grill will automatically adjust to temperature and continue to
maintain temperatures during cooking cycles.
To get efficient use out of this unit while in intermittent use, it is
recommended that the grill plates remain closed when not
cooking. This will assist in reducing power consumption and
also allow for quicker heat response when needed.
LINCAT recommends that the cooking surface is lightly
greased, before each use.
Simply place the food products on the bottom grilling surface
and lower the top plate down and cook to your needs.
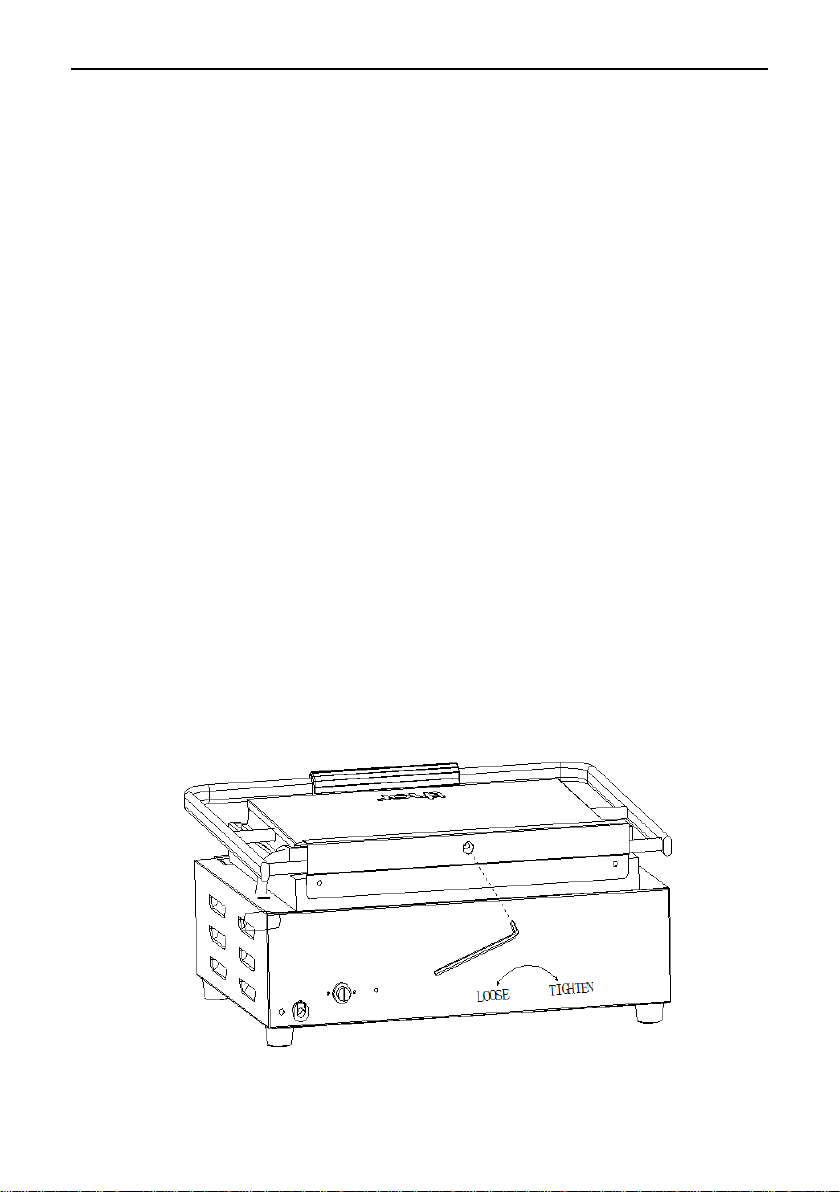
Use the Allen wrench supplied to adjust the tension of the top
plate.
Turn clockwise to tighten, anticlockwise to loosen.
We recommend the appliance is disconnected from the power
supplier and allowed to cool before any adjustments are made.
Page 9

Installation and Operation Instructions
9
Cleaning, Care and Maintenance
Switch the power off and disconnect from mains.
*The Contact Grill should be cleaned regularly throughout use,
and thoroughly cleaned after each meal period, regular cleaning
will result in easier cleaning, as the buildup will be less. Correct
preparation of the cooking surface when first used will assist in
keeping the plate clean, this will reduce the amount of food
wastage sticking to the plate.
*For best results clean the plate while still warm using warm
soapy water. A nylon cleaning cloth can be used, but it is
recommended that scrapers, steel wool etc. be avoided as they
will damage the plate. Do not use cold water on warm plates, a
buckling effect may occur.
*When scrubbing the plate take care not to clean back to far, if
you do you may have to prepare the cooking surface again
before use.
*Remove waste tray from unit and discard waste, clean in hot
soapy water.
*The remainder of the Contact Grill can be cleaned with a damp
cloth using hot, soapy water.
*Warm soapy water is recommended for cleaning, cleaning
agents after prolonged use can damage stainless steel.
* Do not immerse in water and do not use water jests to clean.
Page 10
Installation and Operation Instructions
10
Using the Timer
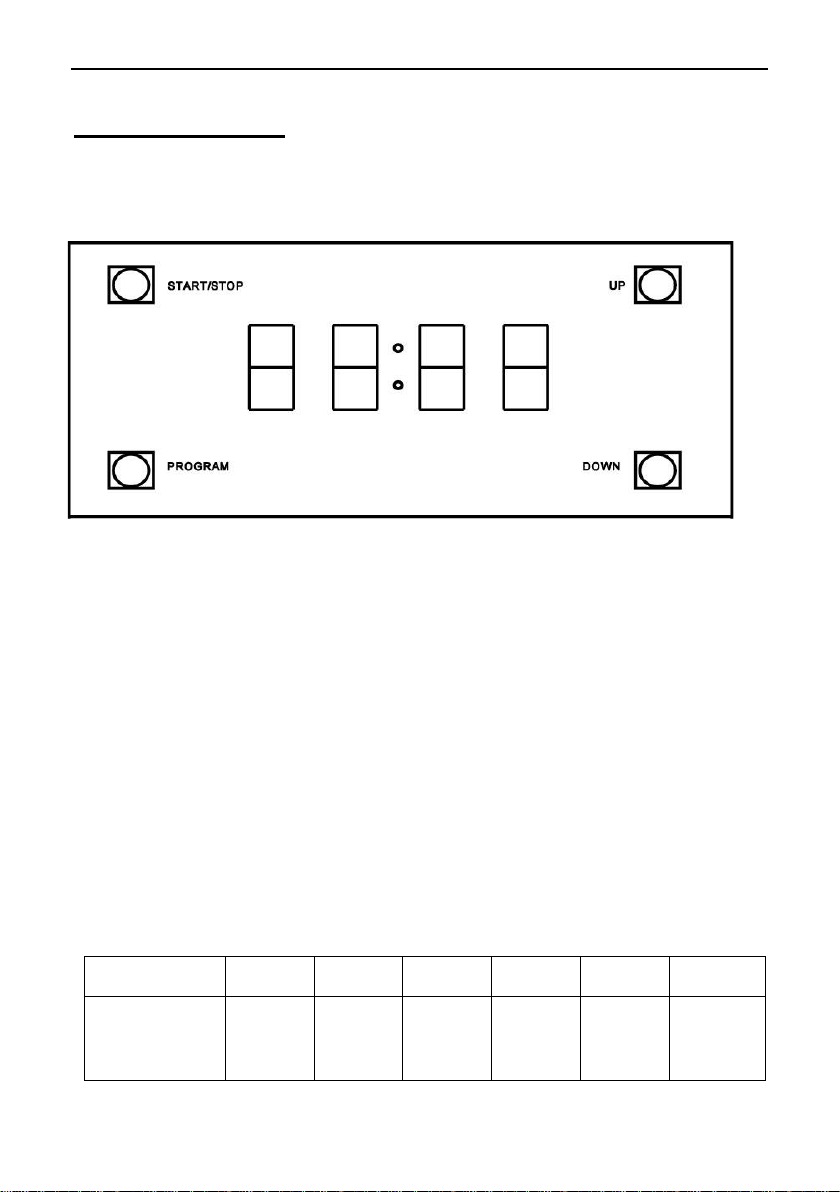
The digital timer with audible alarm can be set from 1 second
to 15 minutes
Note: The timer provides an audible alarm after the set time
expires. It provides no electrical control over the unit
START/STOP: Press START/STOP to start timer, press again
to stop. The timer will provide an audible alarm after the set
time. The alarm will beep 10 times, and the display will
continue to flash until the timer is reset (press the START/STOP
button)
UP: Press UP to add extra time
DOWN: Press DOWN to reduce time
PROGRAM: There are a total of 6 programmable timer settings.
The default factory program settings are given below
Program
1 2 3 4 5
6
Factory
Preset Time
00:30
01:00
01:30
02:00
02:30
03:00
Page 11

Installation and Operation Instructions
11
To change the length of a program, select the program you want
to change by scrolling using the PROGRAM button. Adjust the
program time by using the UP and DOWN buttons. Press
START/STOP to commence the countdown. The new program
time will be automatically stored.
If the unit is left without power for more than 24hrs
the timer settings will revert to the factory defaults
Page 12
Installation and Operation Instructions
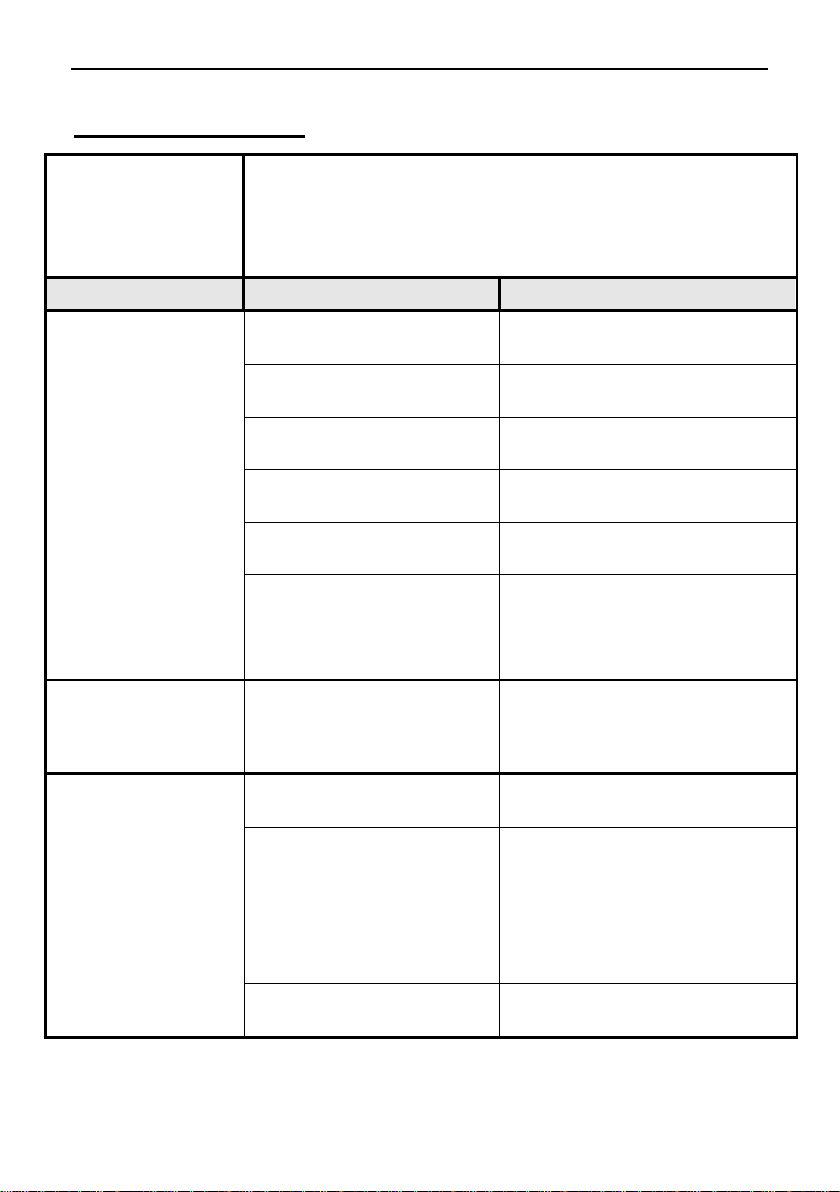
12
Trouble Shooting
Contact Grills
LPPGRRT LPCGFFT
LPPG2RRT LPCG2FFT
LPPGRR LPCGFF
LPPG2RR
Problem
Cause
Remedy
The unit is not
working, and the
indicator light is
not on
1.Mains power supply
1.Check mains power
supply
2.Power switch has not
been turned on
2.Check the unit is correctly
plugged in and turned on
3.On/off switch is faulty
3.Call service agent or
qualified technician
4.Plug and lead are
damaged
4.Call service agent or
qualified technician
5.Internal wiring fault
5.Call service agent or
qualified technician
6.Thermal cut-out has
activated
6.This is a safety device
that has disconnected the
power: call a service agent
or qualified technician
The unit is heating
but the indicator
light is not on
1.The indicator bulb
has blown
1.Replace the indicator
light: call a service agent or
qualified technician
Indicator light is
on, but the unit is
not heating
1.Faulty element(s)
1.Call service agent or
qualified technician
1.Operation of
thermostat
1.Ensure that the
thermostat is set correctly,
also ensure the dial is not
spinning on the thermostat
and giving the wrong
reading
2.Faulty thermostat
2.Call service agent or
qualified technician
Page 13
Installation and Operation Instructions
13
Slow heat up of
the cooking
surfaces
1.Carbon build up
1.Ensure that the plates are
kept clean and free of
carbon build up
2. Thermostat setting
2. Ensure that the
thermostat is set correctly,
also ensure the dial is not
spinning on the thermostat
and giving the wrong
reading
3. Faulty element(s)
3.Call service agent or
qualified technician
Compliance
The WEEE logo on this product or its documentation indicates
that the product must not be disposed of as household waste.
To help prevent possible harm to human health and/or the
environment, the product must be disposed of in an approved
and environmentally safe recycling process. For further
information on how to dispose of this product correctly, contact
the product supplier, or the local authority responsible for waste
disposal in your area.
LINCAT parts have undergone strict product testing in order to
comply with regulatory standards and specifications set by
international, independent, and federal authorities.
LINCAT products have been approved to carry the following
symbol:
Page 14
Installation and Operation Instructions
14
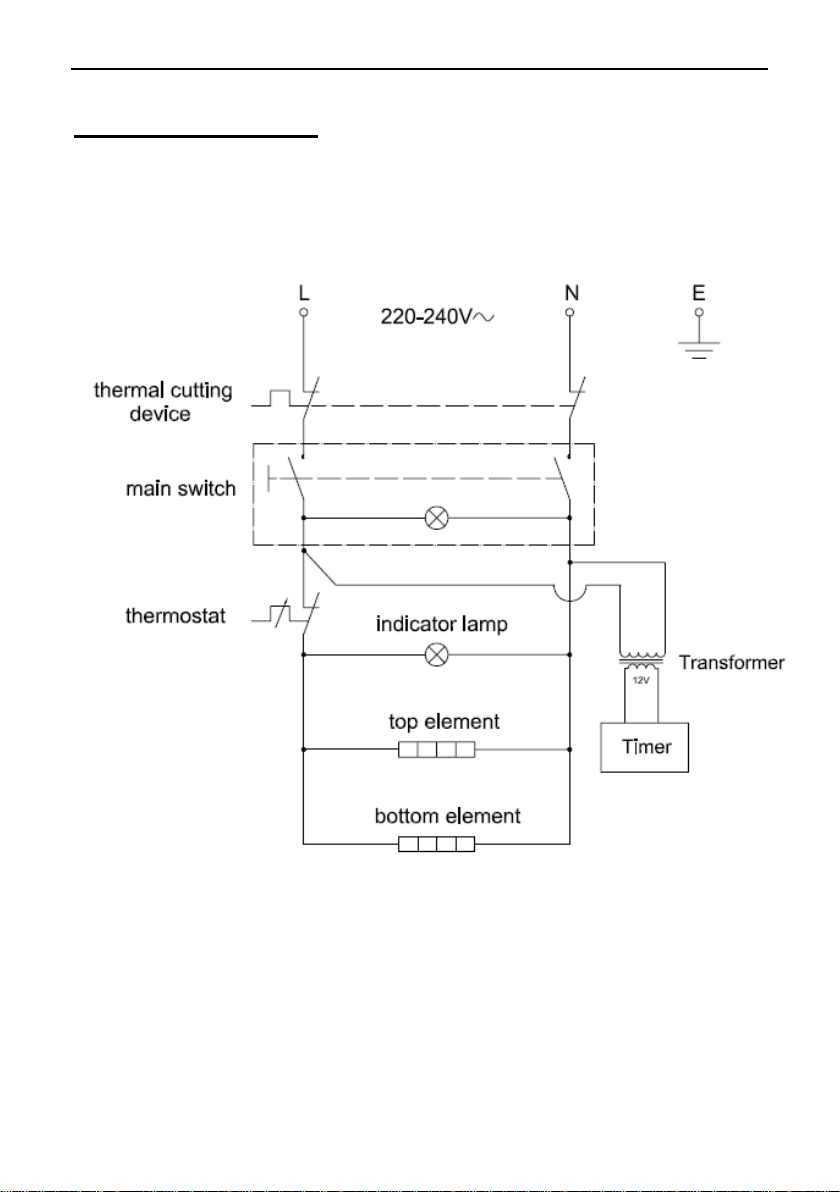
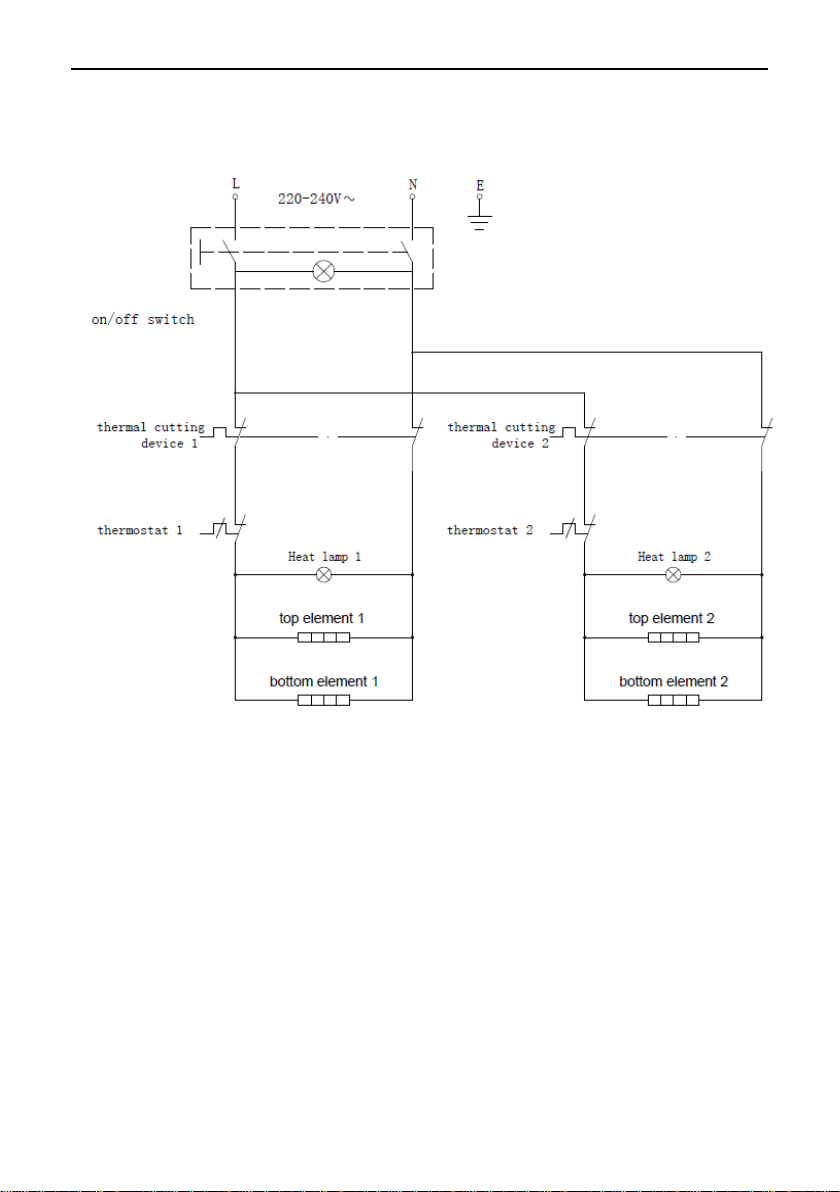
Electrical Diagram
Model:
LPPGRRT LPCGFFT
Page 15
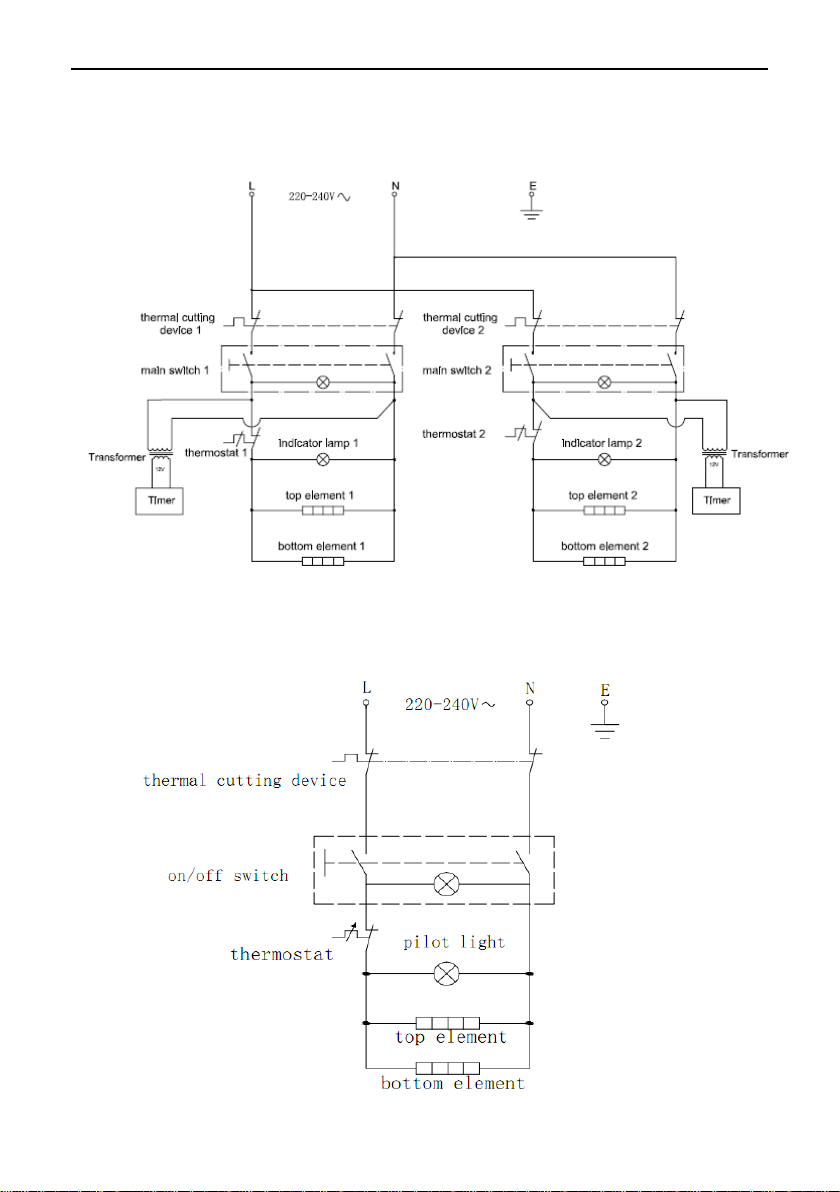
Installation and Operation Instructions
15
Model: LPPG2RRT LPCG2FFT
Model: LPPGRR LPCGFF
Page 16
Installation and Operation Instructions
16
Model: LPPG2RR
The above circuit diagram has been provided to assist qualified
technicians, LINCAT agents or Recommended Qualified
Technicians should carry out repairs if needed. Do not remove
any components or service panels on this product.
Page 17
Installation and Operation Instructions
17
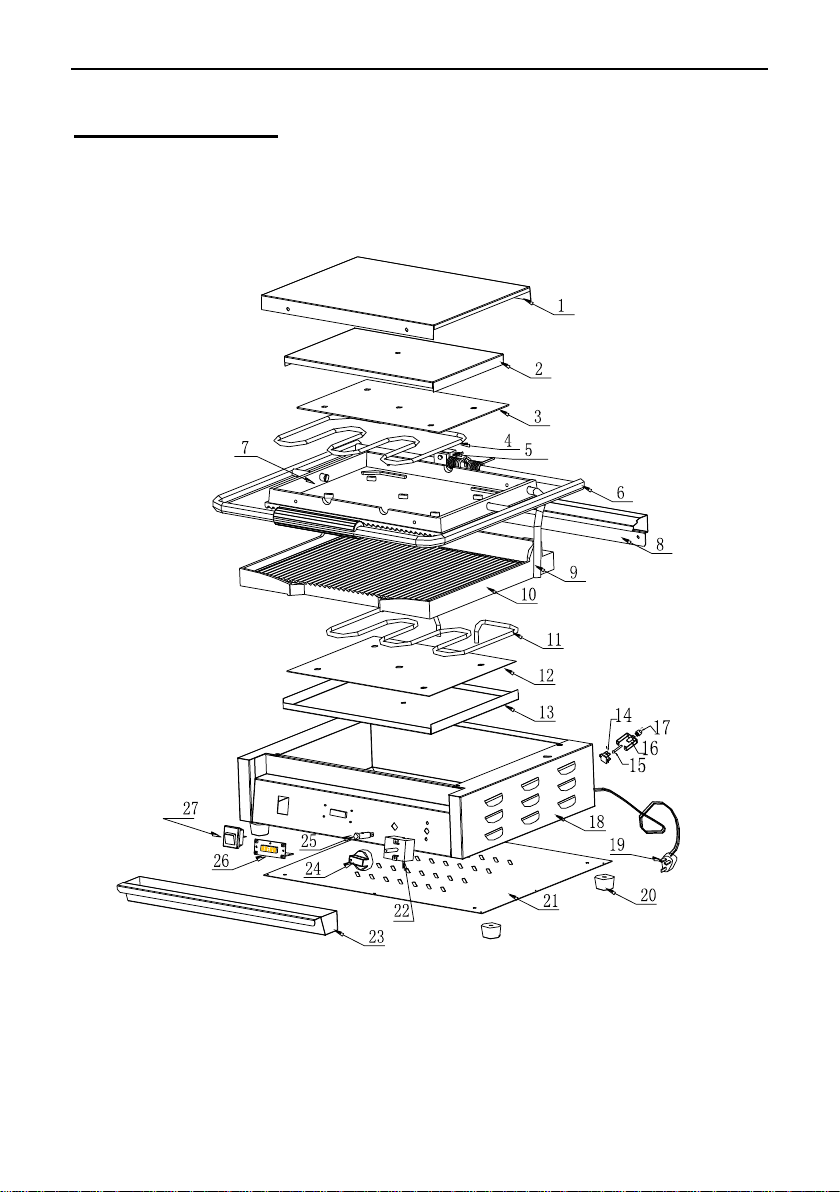
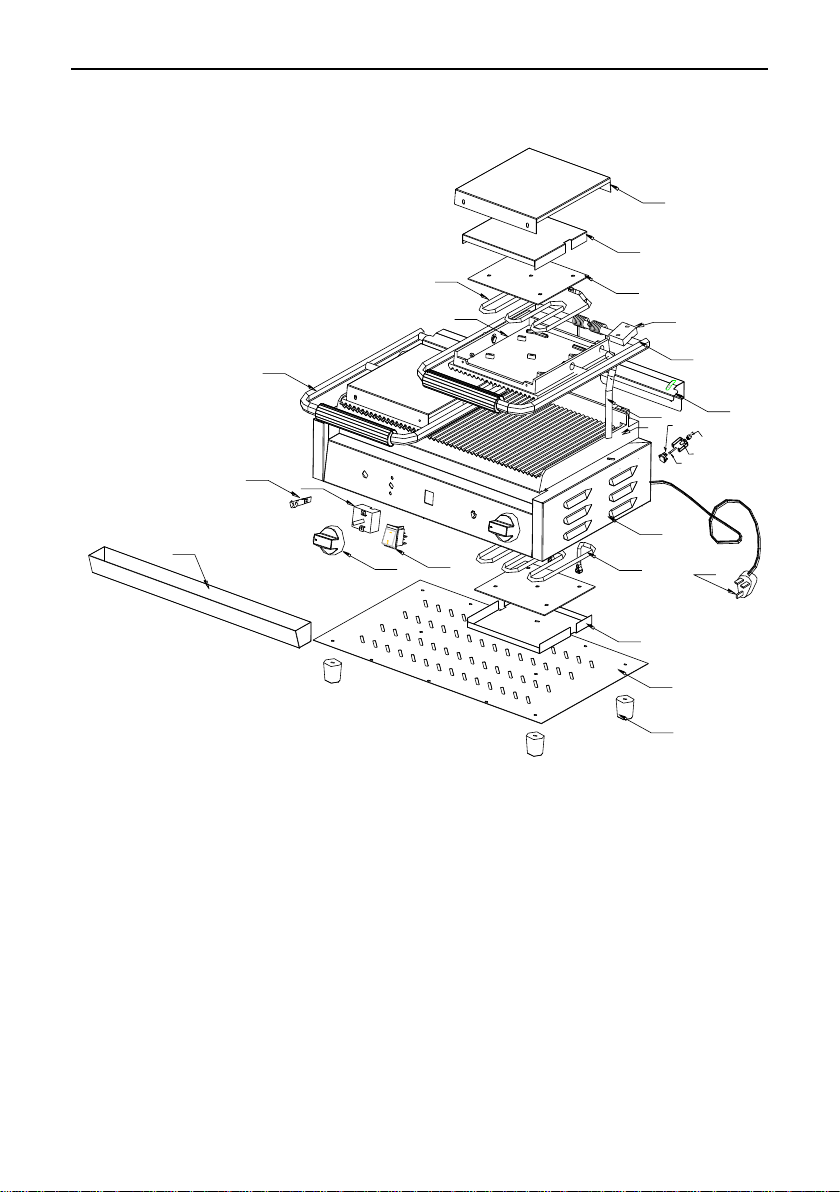
Explosion View
MODEL: LPPGRRT LPCGFFT
Page 18
Installation and Operation Instructions
18
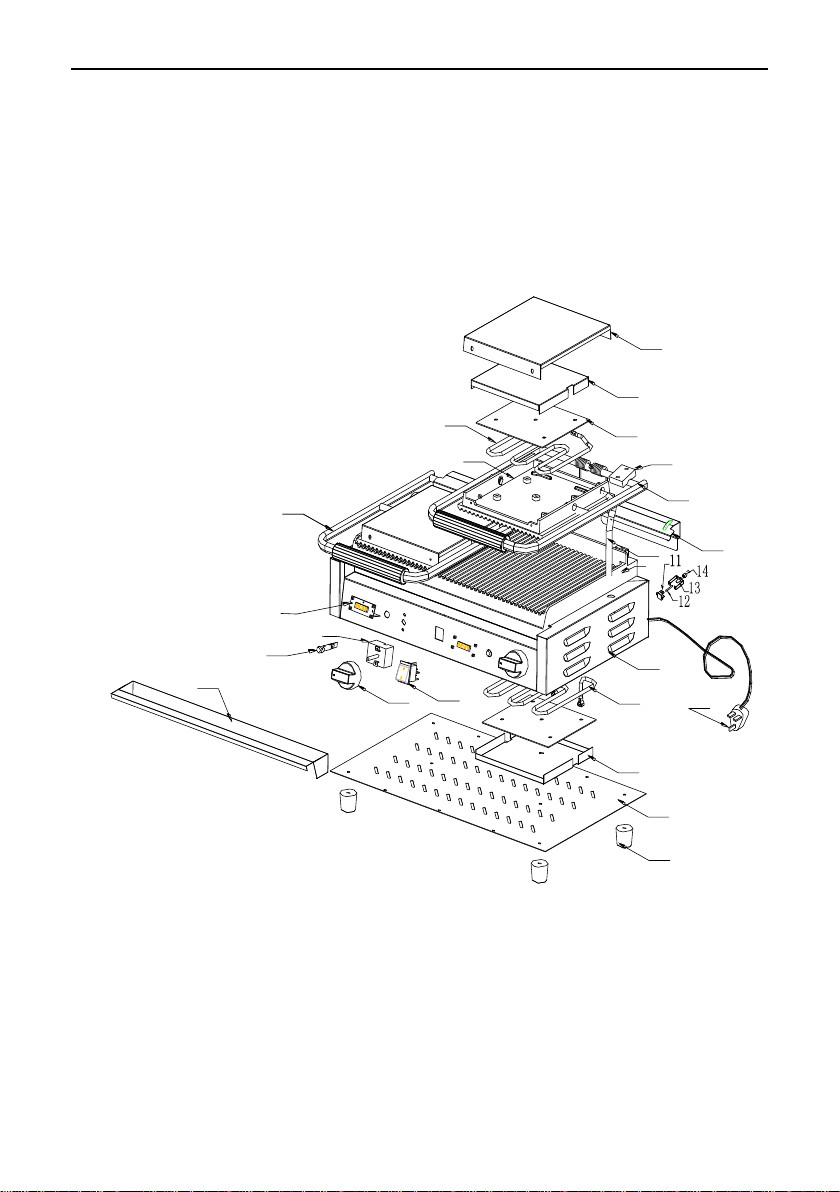
MODEL: LPPG2RRT LPCG2FFT
15
17
19
18
20
24
26
27
23
22
21
25
1
2
3
6
9
5
7
10
16
4
8
Page 19
Installation and Operation Instructions
19
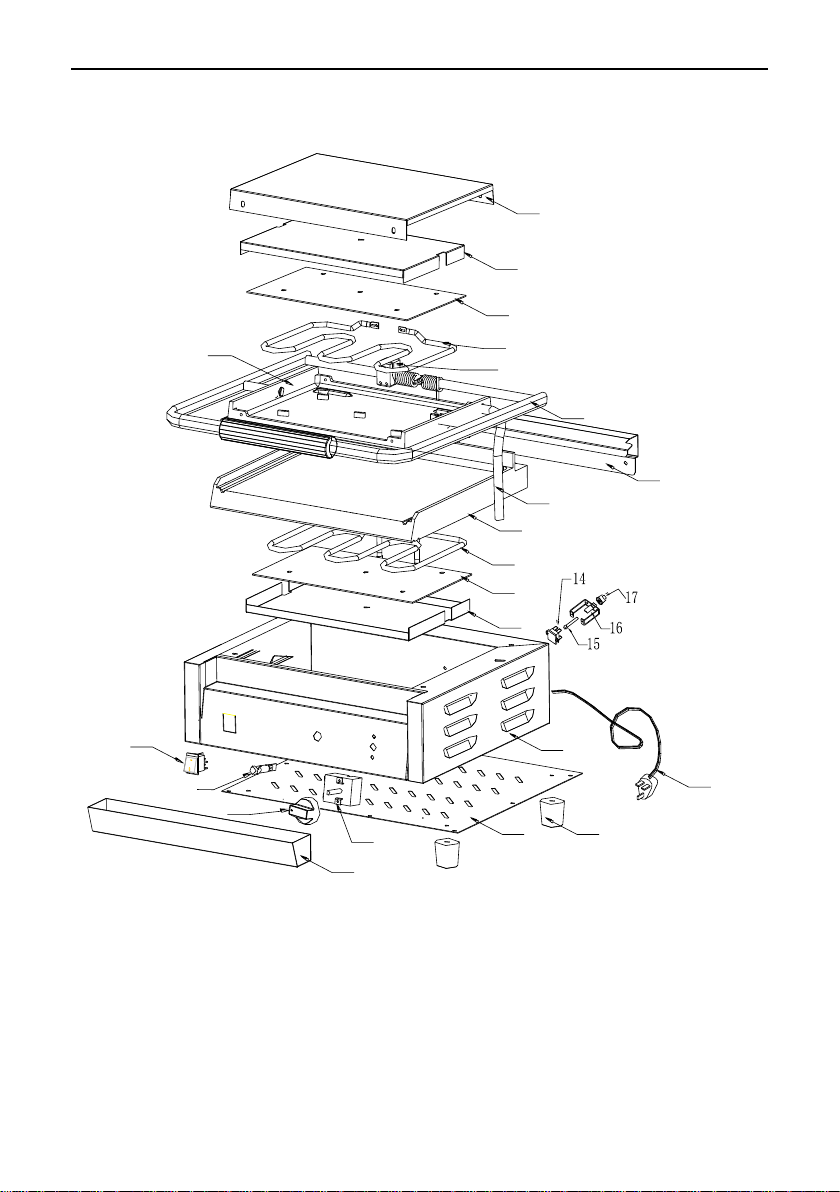
MODEL: LPPGRR LPCGFF
1
2
3
4
6
8
9
10
11
12
5
7
13
18
2021
25
24
22
23
26
19
Page 20
Installation and Operation Instructions
20
MODEL: LPPG2RR
1
2
3
6
9
5
7
12
11
14
13
10
15
17
19
18
20
24
25
26
23
22
21
16
4
8
Page 21
Installation and Operation Instructions
21
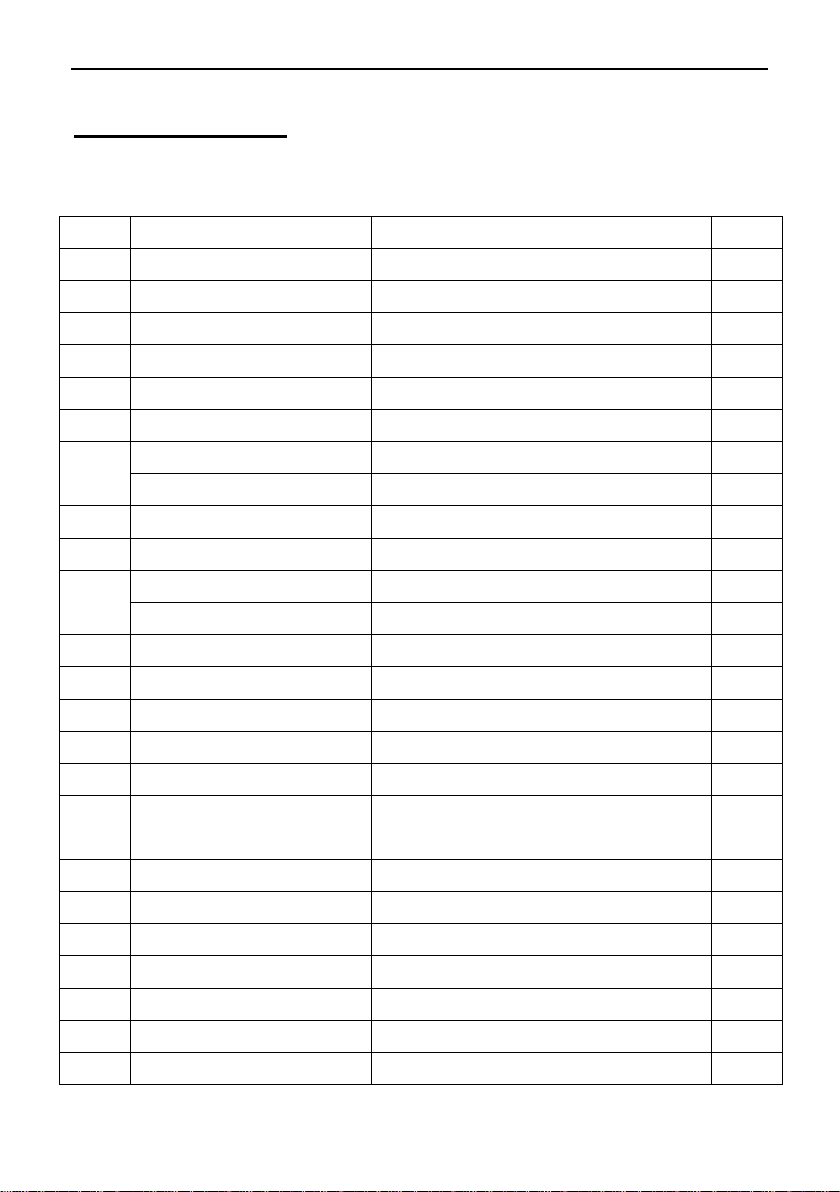
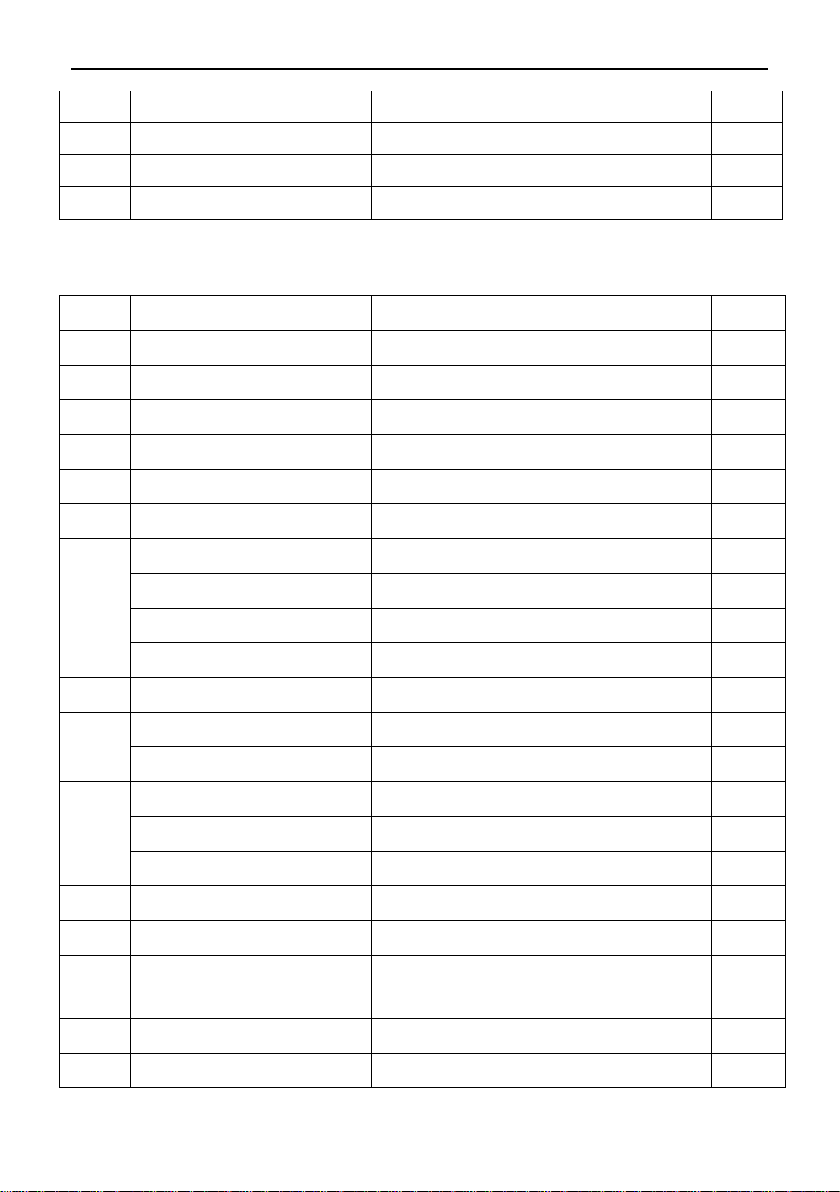
Spare Parts List
MODEL: LPPGRRT LPCGFFT
NO.
SUPPLIER CODE
DESCRIPTION
QTY. 1 20711.6270
Top Cover
1 2 20711.6191
Hardware Assembly(top)
1 3 20711.6206
Element Fixing Plate(top)
1 4 10901.6036
Heating Element(top)
1 5 10502.6012
ADUSTABLE BRACKET
1 6 10502.6053
Handle Assembly for
1 7 10401.6052
Cast Plate(top/flat)
1
10401.6062
Cast Plate(top/rib)
1 8 20711.6117
Back Panel Assy
1 9 10206.6004
Pipe
1
10
10401.6051
Cast Plate(below/flat)
1
10401.6061
Cast Plate(below/rib)
1
11
10901.6035
Element(below)
1
12
20711.6205
Element Fixing Plate(below)
1
13
20711.6187
Hardware Assembly (below)
1
14
10106.6003
Breaker
1
15
10704.6056
Stick
1
16
20711.6235
The breaker fixed plate
assembly
1
17
10704.6088
Plastic cover
1
18
20711.6261
Main Body Assy
1
19
20502.6012
Plug&Lead
1
20
10704.6162
Feet
4
21
20711.6197
Base Board
1
22
10108.6006
Thermostat
1
23
20711.6059
Oil Tank
1
Page 22
Installation and Operation Instructions
22
24
10704.6268
Dial
1
25
10107.6033
Indicator Light(green)
1
26
20302.6111
Time Assy
1
27
10105.6017
Switch
1
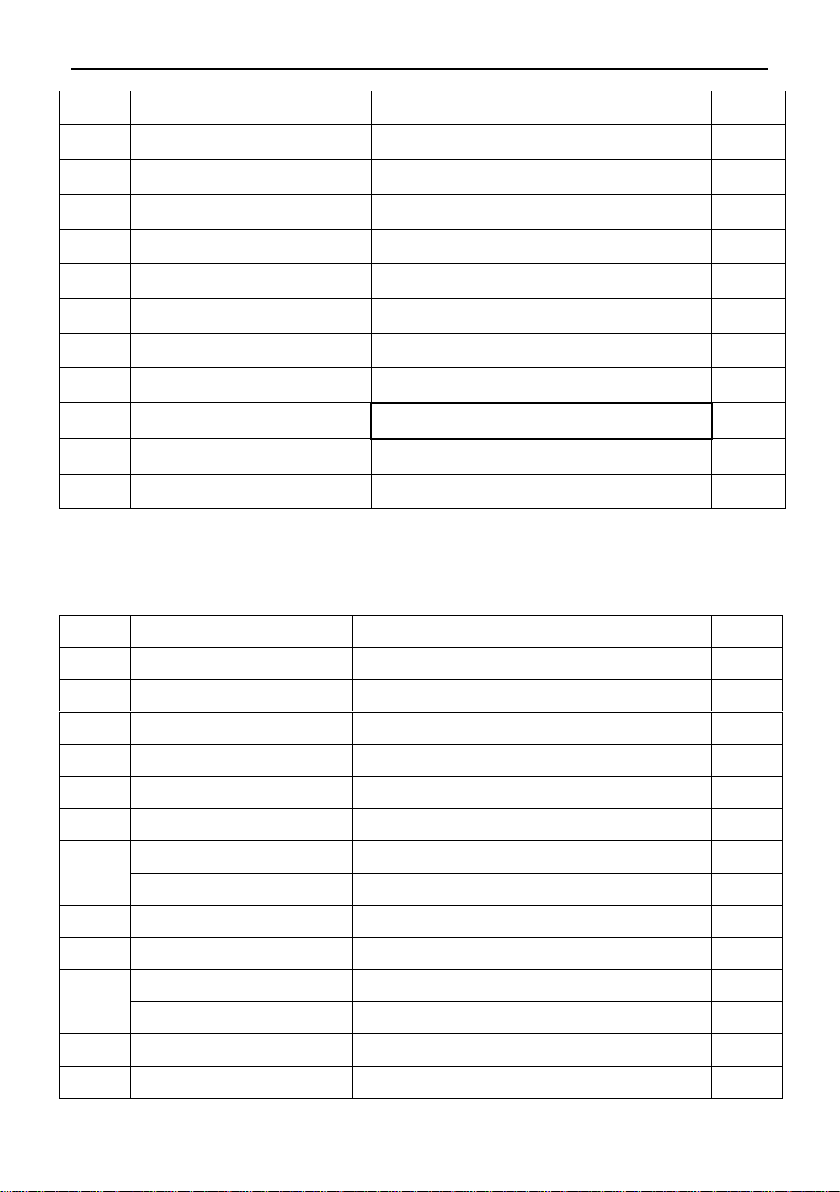
MODEL: LPPG2RRT LPCG2FFT
NO.
SUPPLIER CODE
DESCRIPTION
QTY. 1 20711.6271
Top Cover
2 2 20711.6184
Hardware Assembly
2 3 20711.6207
Element Fixing Plate
4
4
10502.6025
ADUSTABLE BRACKET
2
5
10901.6037
Heating Element(top)
2
6
10502.6054
Handle Right
1
7
10401.6043
Cast Plate(top/Left/rib)
1
10401.6039
Cast Plate(top/Right/rib)
1
10401.6057
Cast Plate(top/Left/flat)
1
10401.6056
Cast Plate(top/Right/flat)
1
8
20711.6126
Back Panel
2
9
10206.6005
Pipe (Left)
1
10206.6004
Pipe (Right)
1
10
10401.6070
Cast Plate(below/rib)
1
10401.6071
Cast Plate(below/flat)
1
10401.6069
Cast Plate(below/rib/flat)
1
11
10106.6003
Breaker
2
12
10704.6056
Stick
2
13
20711.6235
The breaker fixed plate
assembly
2
14
10704.6088
Plastic cover
2
15
20711.6262
Main Body Assy
1
Page 23
Installation and Operation Instructions
23
16
20801.6030
Plug&Lead
1
17
10901.6038
Element(below)
2
18
20711.6176
Hardware Assembly
2
19
20711.6194
Base Board
1
20
10704.6162
Feet
4
21
10105.6017
Switch
1
22
10704.6268
Dial
2
23
10108.6006
Thermostat
2
24
10107.6033
Indicator Light(green)
2
25
20302.6111
Time Assy
2
26
20711.6113
Oil Tank
1
27
10502.6055
Handle Left
1
MODEL:LPPGRR LPCGFF
NO.
SUPPLIER CODE
DESCRIPTION
QTY. 1 20711.6271
Top Cover
1 2 20711.6185
Hardware Assembly
1 3 20711.6046
Element Fixing Plate
2 4 10901.6037
Heating Element(top)
2 5 10502.6012
ADUSTABLE BRACKET
1
6
10502.6056
Handle Assembly
1
7
10401.6041
Cast Plate(below/rib)
1
10401.6066
Cast Plate(below/flat)
1 8 20711.6127
Back Panel Assy
1 9 10206.6004
Pipe
1
10
10401.6040
Cast Plate(below/rib)
1
10401.6067
Cast Plate(below/flat)
1
11
10901.6047
Element(below)
1
12
20711.6208
Element Fixing Plate(below)
1
Page 24
Installation and Operation Instructions
24
13
20711.6185
Hardware Assembly(below)
1
14
10106.6003
Breaker
1
15
10704.6056
Stick
1
16
20711.6235
The breaker fixed plate assembly
1
17
10704.6088
Plastic cover
1
18
20711.6237
Main Body Assy
1
19
20502.6019
Plug&Lead
1
20
10704.6162
Feet
1
21
20711.6195
Base Board
1
22
10108.6006
Thermostat
1
23
10704.6268
Dial
1
24
10107.6033
Indicator Light(green)
4
25
10105.6017
Switch
1
26
20711.6050
Oil Tank
1
MODEL: LPPG2RR
NO.
SUPPLIER CODE
DESCRIPTION
QTY. 1 20711.6260
Top Cover
2 2 20711.6176
Hardware Assembly
2 3 20711.6208
Element Fixing Plate
4 4 10502.6025
ADUSTABLE BRACKET
2 5 10901.6037
Heating Element(top)
2 6 10502.6054
Handle Right
1 7 10401.6043
Cast Plate(top/Left/rib)
1
10401.6039
Cast Plate(top/Right/rib)
1
10401.6057
Cast Plate(top/Left/flat)
1
10401.6056
Cast Plate(top/Right/flat)
1 8 20711.6126
Back Panel
2 9 10206.6005
Pipe (Left)
1
10206.6004
Pipe (Right)
1
Page 25
Installation and Operation Instructions
25
10
10401.6070
Cast Plate(below/rib)
1
10401.6071
Cast Plate(below/flat)
1
10401.6069
Cast Plate(below/rib/flat)
1
11
10106.6003
Breaker
2
12
10704.6056
Stick
2
13
20711.6235
The breaker fixed plate
assembly
2
14
10704.6088
Plastic cover
2
15
20711.6238
Main Body Assy
1
16
20801.6030
Plug&Lead
1
17
10901.6038
Element(below)
2
18
20711.6176
Hardware Assembly
2
19
20711.6194
Base Board
1
20
10704.6162
Feet
4
21
10105.6017
Switch
1
22
10704.6268
Dial
2
23
10108.6006
Thermostat
2
24
10107.6033
Indicator Light(green)
2
25
20711.6051
Oil Tank
1
26
10502.6055
Handle Left
1
Page 26

Installation and Operation Instructions
26
Specifications
MODEL
VOLTAGE
POWER
(W)
DIMENSIONS(MM)
GRILL TYPE
WIDTH
DEPTH
HEIGHT
TOP
BOTTOM
LPCGFFT
220-240V~
50HZ
2200
435
480
210
flat
flat
LPPGRRT
2200
435
480
210
rib
rib
LPPG2RRT
LPPG2RR
2900
540
395
210
rib/rib
rib/rib
LPCG2FFT
2900
540
395
210
flat/flat
flat/flat
LPPGRR
2200
380
395
210
rib
rib
LPCGFF
2200
380
395
210
flat
flat
Page 27

Page 28

PLEASE RETAIN THE MANUAL CAREFULLY FOR
REFERENCE
WARNING
Improper installation, adjustment, alteration, service or maintenance
can cause property damage, injury, or death. Read the installation
operating and maintenance instructions thoroughly before installing or
servicing this equipment.
ATTENTION
Under the warranty period of the appliance, all the parts must be
replaced by an authorised service provider which is approved by
Lincat, if not, the warranty may be void.
ATTENTION
Any parts that aren’t made by Lincat may void warranty.
ATTENTION
Lincat and manufacturer of Lincat keep the right to modify the product.
Lincat Limited
Whisby Road Lincoln LN6 3QZ United Kingdom
Version A
 Loading...