


BACHMANN EUROPE Plc BACHMANN EUROPE Plc BACHMANN EUROPE Plc
D
2
RGL34A
D
1
RGL34
A
D
4
R
G
L3
4
A
L
ED4
Y
L
1
2
2uH
L
2
22u
H
R
I
G
HTRA
ILWAY
LEFT RAIL
W
A
Y
1
2
3
4
8
7
6
5
H
1
LED2
Y
LED1
Y
L
ED3
Y
D
3
RG
L
3
4A
R1
1
.5
K
R2
1.5K
1
1
2
2
MOTOR
C
1
1
04
C
2
1
04
R3
470
R
L
M
+
M
-
Adaptation to the digital functioning
(figure see page 4)
The adaptation to the digital functioning is carried out through an 8-channel interface. Before the
adaptation, verify that everything is operating correctly during the direct current functioning.
Push softly on the back side, point B, and remove with caution the covering A (fig.3). Extract covering C. With a small screwdriver or tweezers, press with caution the levers D on both sides and
extract the element E.
It is possible to extract the bridge plug F from the 8-channel interface and insert the digital 8channel decoder. Conserve the bridge plug with care. Reassemble covering C on the frame. Pay
attention while, inserting the decoder and its main covering, no connecting cables will be squashed. Follow accurately the installation instructions provided by the decoder producer.
For any additional questions about functioning or installation, please contact directly the decoder producer.
Sollte Ihr LILIPUT-Modell einmal reparaturbedürftig sein,
so können Sie dies auch direkt an die Kundendienstabteilung
folgender Adresse schicken:
Bachmann Europe PLC
Niederlassung Deutschland
Am Umspannwerk 5
90518 Altdorf
Garantie: Dieses Modell hat ab Kaufdatum zwei Jahre Garantie
auf Reparaturen und Teile. Nur gültig, wenn dieses Zertifikat
beim Kauf vom Händler abgestempelt und das Kaufdatum eingetragen ist.
Warranty: This model has a warranty for repairs and spareparts
for two years from the date of purchasing. Valid only, if this certificate is stamped from the dealer and the day of purchasing is filled
in. We don’t accept any responsibility for any self installed parts
Circuit diagram Schaltplan
Betriebsanleitung
Instruction sheet
L2301xx -1
Diesellokomotive
verschiedener Privatbahn-Gesellschaften
Diesel loco
different railway companies
Die Firma „Antonio Badoni“ hat ihren Sitz in Lecco und entstand aus den früheren industriellen Erfahrungen der Familie, die bis ins 18. Jahrhundert zurückgehen. Das Unternehmen ist nicht nur auf die Metalltischlerei, sondern auch auf die Herstellung von Diesellokomotiven spezialisiert.
Die Dynamik der „Badoni“ sorgte schnell für eine unabhängige Planung, und bereits in der frühen Nachkriegszeit kamen zahlreiche Produkte aus dem Hause ABL auf den Bahnstrecken Italiens zum Einsatz.
Unter den vielen verschiedenen Modellen nimmt das Modell „VII“ einen wichtigen Platz ein. Es wurde in
verschiedenen Ausführungen hergestellt, Grund dafür waren weniger ästhetische als vielmehr leistungstechnische Gesichtspunkte, um das Projekt an die unterschiedlichen Anforderungen der verschiedenen
Kunden anzupassen.
In der ersten Hälfte der 50-er Jahre wurden der Ferrovie dello Stato (der italienischen Eisenbahngesellschaft) einige Prototypen angeboten, nach einer Test- und Erprobungsphase wurde die Lokomotive von
der Eisenbahngesellschaft angenommen. Die Modelle VII HT und VII700 wurden in die Flotte der FS aufgenommen, sie wurden jeweils als Gruppe 215 ( zu Beginn Gruppe 150) mit Kennzeichen von 001 bis
015 und Gruppe 218 mit Kennzeichen von 001 bis 007 klassifiziert. Das Modell VII 368 war dagegen speziell auf das Schienenverkehrsmanagement auf den privaten Rangiergleisen ausgerichtet und wurde
ebenfalls in verschiedenen Ausführungen entwickelt. Diese Lokomotiven waren der erste Schritt auf dem
Weg vom Dampfantrieb zum Dieselantrieb, auch im Manövrier- und Kurzstreckenbereich.
If model repairs are needed, please turn to the seller for technical assistance.
For logistic assistance, it is possible to turn to the following address:
Warning! For elements installed in a secondary moment (ex. decoder),
Bachmann Europe PLC
Moat Way
Barwell
GB-Leicerstershire LE 98 EY
we will assume any responsibility.
Enjoy yourself with the model!
5 6 1
Wichtig! Wir empfehlen die Originalverpackung aufzubewahren, sie ist der
beste Schutz für Ihr Modell, wenn dieses nicht gerade auf Ihrer Anlage
unterwegs ist. Beim Betrieb der Lok auf Teppichböden kann die feine Mechanik durch Fasern zerstört werden. Änderungen in Konstruktion und
Ausführung vorbehalten. Bitte bewahren Sie diese Beschreibung zum späteren Gebrauch auf. Dieses Produkt wurde nach Vorschriften der europäischen Spielzeugrichtlinien (CE) hergestellt. · Important! We recommend
that you keep the original box. It is the best place to store your model,
when it is not in use. Please be aware, that carpet fibres can destroy the
fine mechanism of the locomotive. Subject to changes in design, version
and technical data. Please retain these data and instructions for further reference. This product has been manufactured according to the European
toy Safety Directive (CE). Importante! Raccomandiamo di tenere la scatola
originale. E’ il posto migliore in cui tenere il tuo modello
quando non è in uso. Fibre di tappeti possono distruggere il
fine meccanismo della locomotiva. Preghiamo di conservare
questi dati ed istruzioni per altre informazioni. Quest’articolo
è stato prodotto in accordo con la Direttiva Europea Sicurezza giochi (CE).
Achtung! Bei unsachmäßigem Gebrauch besteht Verletzungsgefahr
durch funktionsbedingte scharfe Kanten und Spitzen • Attention! At an
incorrect use there exists danger of hurting becauseof cutting edges and
tips • Attention! Il y a danger de blessure à un emploi incorrect à cause
des aiguilles et arêtes vives! • Voorzichtig! Bij ondoelmatig gebruik bestaat verwondigsgevaar door scherpe zijkanten en uitsteeksels! • Attenzione! Un uso improprio comporta pericolo di ferimenti attraverso punte
e spigoli taglienti! • Atencion! Un empleo incorrecto puede causar heridas debido a las puntas y aristas agudas! • Atençao! Por utilizaçao incorrecta existe o perigo de estragos, em virtude de cortes nas abas e
nas pontas! •
ραυματιομων, εξ αιπαξ κοπτερων ακμων και προεξοχωθν
• Bemaerk! Ved ukorrekt brug kan de funktionsbetingede
skarpe kanter og spidser forfolde skade! • Attenzione! Un
inappropriato uso comporta pericolo di ferimenti attraverso punte e spigoli taglienti!
BACHMANN EUROPE PLC · MOAT WAY · BARWELL · LEICESTERSHIRE · LE 98 EY ENGLAND MADE IN CHINA
Händlerstempel / Dealer stampKaufdatum / Day of purchasing
Προξοχη!
Η ακαταλληλη χρηοη εγκλειει κινδυνουζ μκροτ
The “Antonio Badoni” company is from Lecco and was born after previous industrial experiences of the
family that go back to the eighteenth century. It specialized not only in metal carpentry, but also in Diesel
locomotive manufacturing.
The dynamism of “Badoni” brought independence to the planning very quickly and from the immediate
post-war period many ABL means were put to use on the Italian railroads.
Among the different developed types, the “VII” type deserves an important place. It was realized with several variants, not much from an aesthetic, as from a performance point of view, in order to relate the
project to the different customer demands.
During the first half of the 50’s some prototypes were proposed to the Ferrovie dello Stato (the Italian
State Railways), which after a period of tests and inspections accepted the locomotive. The VII HT and
VII 700 types entered the FS fleet, respectively classified as group 215 ( at the beginning group 150) with
registration numbers from 001 to 015 and group 218, from 001 to 007. The VII 368 type was particularly
addressed instead to the railway traffic management on the private sidetracks and it was also developed
with several variants. These locomotives represented the first step from the steam traction to the thermal
one, also in manoeuvre and short-range services.
BACHMANN EUROPE Plc BACHMANN EUROPE Plc BACHMANN EUROPE Plc
Inbetriebnahme Ihres Modells
Nehmen Sie die Lok im Blister vorsichtig aus dem Karton. Dann öffnen Sie bitte den Blister gemäß Abb.1, danach können Sie das Modell entnehmen und auf das Gleis stellen. Dieses Fahrzeug ist für Gleichstrom für eine Spannung bis 14 Volt und einem Gleisradius ab 355mm geeignet. Lassen Sie das Fahrzeug ein paar Minuten bei ca. halber Trafostellung vorwärts und rükkwärts fahren, danach ist die Lok betriebsbereit.
Abbildung 1
Figure 1
Start-up of your model:
Remove with extreme caution the locomotive in blister from the box.
Open the blister as shown in fig. 1. It is therefore possible to remove the model and put it on
the railroads. The model is designed to run on the railroads with up to 14 Volts direct current
and on bends of minimum 355 mm. Run the model forwards and backwards on a little segment of the railroads for some minutes; the locomotive is ready to operate.
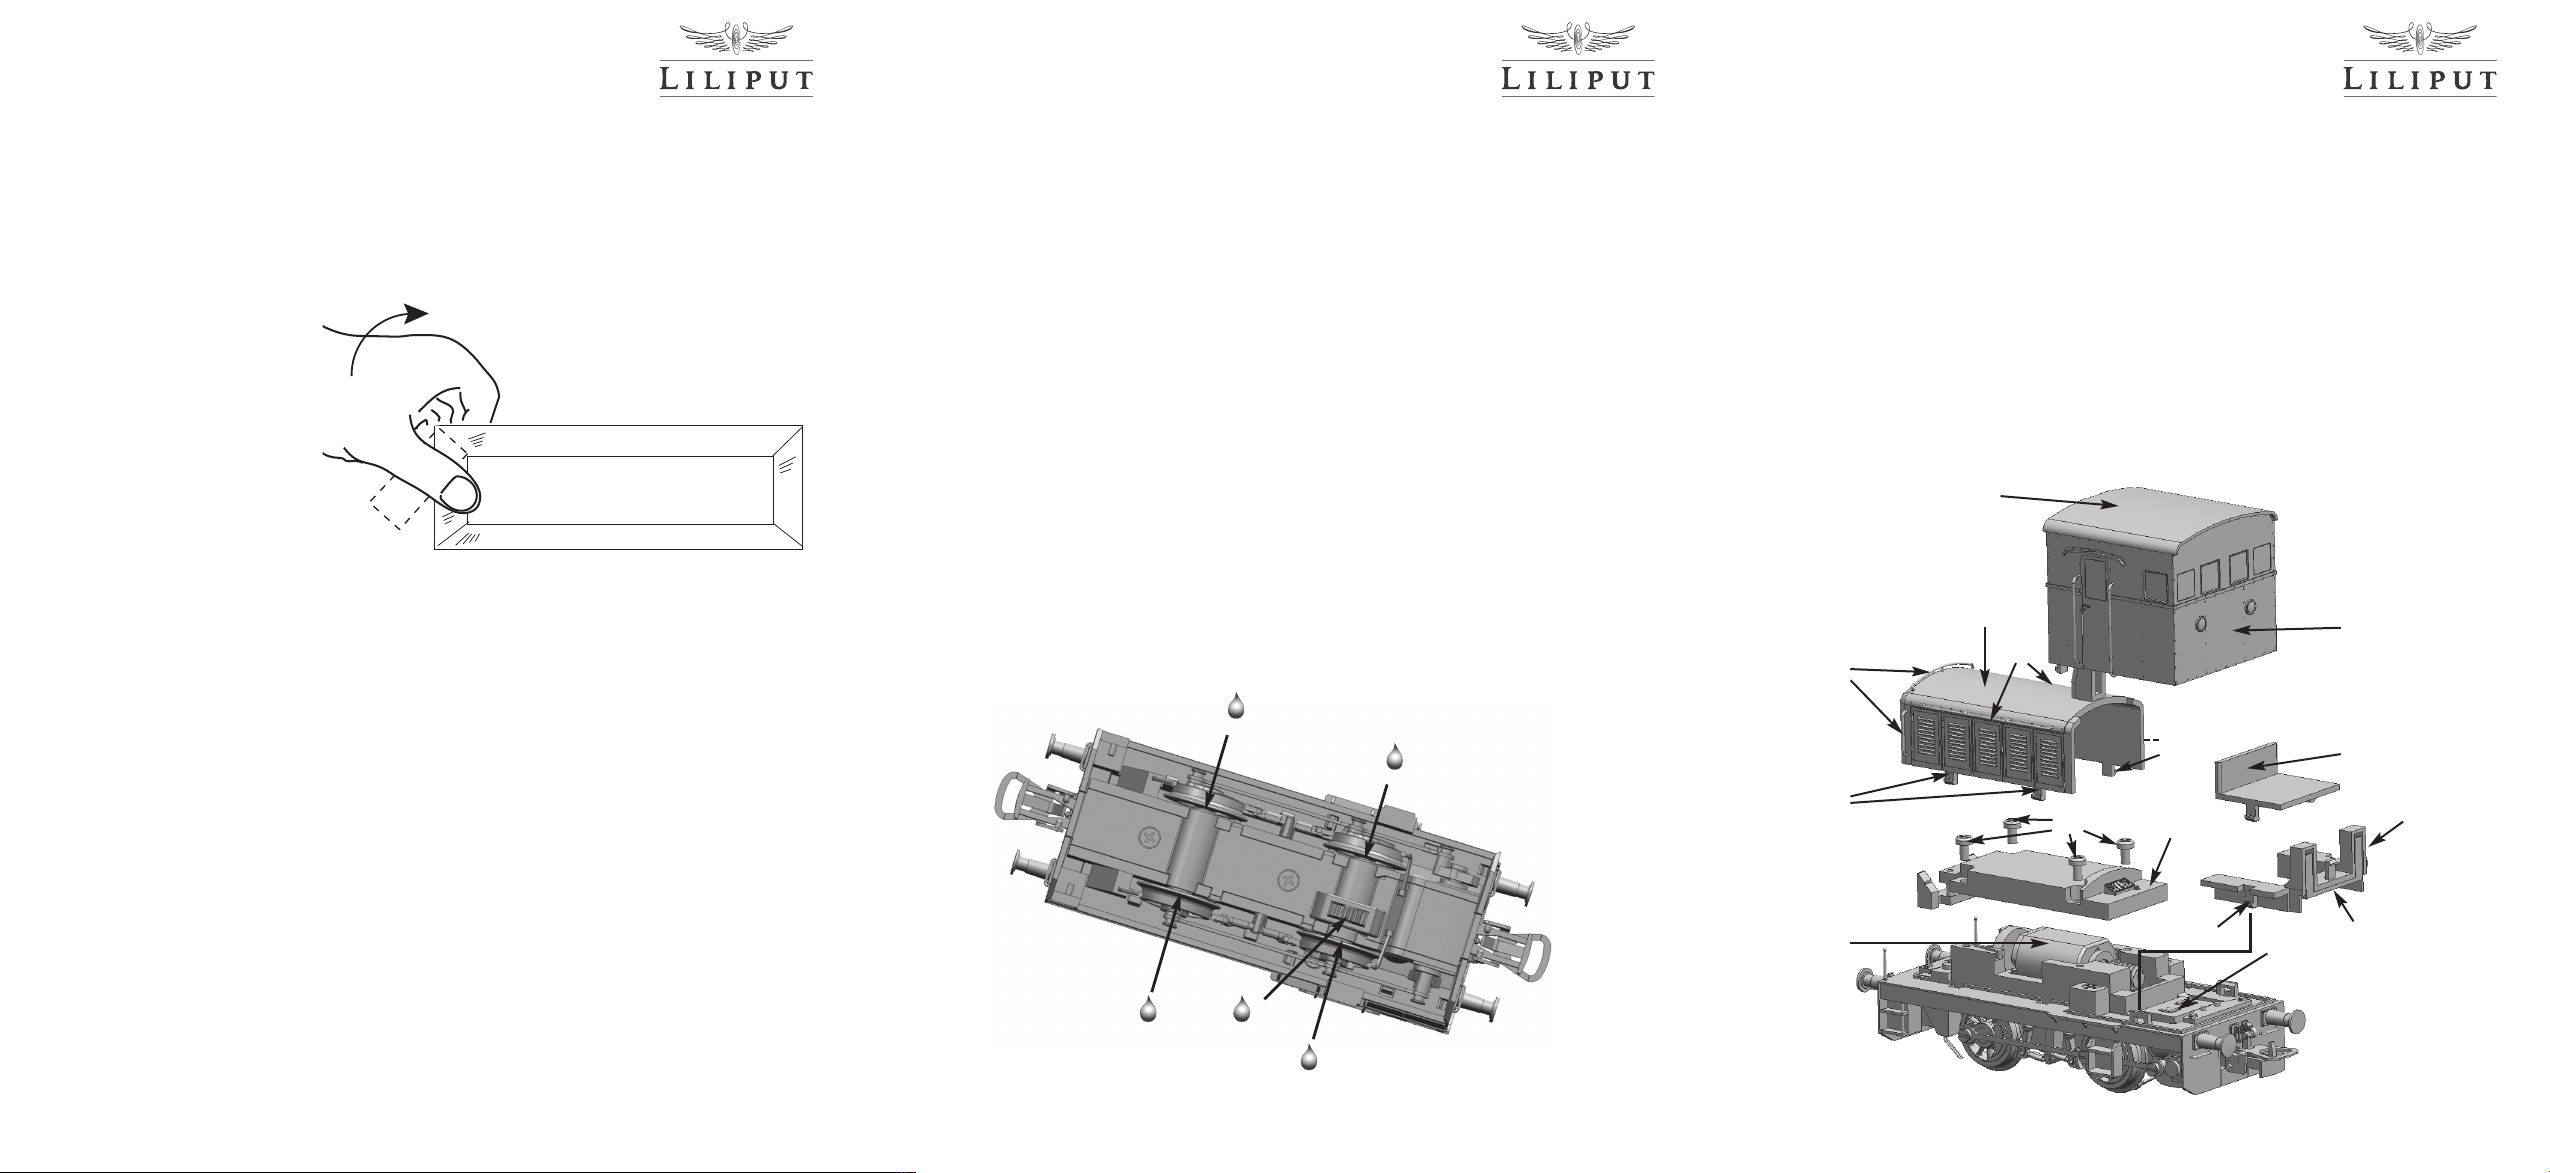
Rückwand an der mit B gekennzeichneten Stelle leicht nach innen und ziehen das Führerhaus
A vorsichtig nach oben ab. Nun wird der Vorbau G durch leichten Druck auf die mit H gekennzeichneten Stellen nach oben abgenommen, ohne die Griffstangen J zu beschädigen. Nach
dem Herausdrehen der vier Schrauben L kann die Motorabdeckung K abgenommen werden.
Der Motor M und das Getriebe sind nun zugänglich.
Periodic maintenance and care of your model
To assure a long duration of your model, constant maintenance is advisable. For ordinary
maintenance it is not necessary to open the model. It is sufficient to position, as shown in fig.
2, the back of the model on a soft surface and to clean the wheels’ contacts with a cotton
swab soaked with alcohol. Then clean the wheels. Do not let the driving wheel run in vain. After the cleaning, lubricate the bearings indicated in fig. 2 with a drop of machine oil. Put the
modelling oil with a little tube or a pin. Warning! Do not use cooking oil or skin cream. Then arrange the oil uniformly. It is suggested to practice this maintenance operation after every 30-40
hours of usage.
In case of maintenance of the motor or inner mechanisms, it is necessary to take apart the locomotive, see fig. 3. Push softly on the back, indicated as point B, and remove with caution
the covering A. Then remove the second lining, pushing softly on points indicated with H, without damaging the straps J. After taking away the screws indicated with L, it is possible to lift
the motor covering K, in order to enter the motor and the gears.
Abbildung 2
Figure 2
Umrüsten auf Digitalbetrieb
Zum Umrüsten auf Digitalbetrieb ist eine 8-polige Schnittstelle eingebaut. Bevor Sie umrüsten
überzeugen Sie sich bitte, ob im Gleichstrombetrieb alle Funktionen in Ordnung sind.
Drücken Sie bitte die Rückwand mit dem Daumen an der mit B gekennzeichneten Stelle leicht
nach innen und ziehen das Führerhaus A vorsichtig nach oben ab (Abb. 3). Entnehmen Sie nun
die Abdeckung C, indem Sie mit einem kleinen Schraubendreher oder einer Pinzette auf beiden Seiten die Rastnasen D leicht nach innen drücken und entfernen danach den Einsatz E.
Jetzt kann der Brückenstecker F aus der 8-poligen Schnittstelle herausgezogen und der 8-polige Digitaldecoder eingesteckt werden. Bewahren Sie den Brückenstecker bitte sorgfältig auf.
Die Abdeckung C wird nun wieder auf dem Fahrgestell montiert. Achten Sie beim Verstauen
des Decoders in der Lok und beim anschließenden Aufsetzen des Führerhauses darauf, keine
Decoder-Anschlußkabel zu quetschen. Beachten Sie bitte unbedingt auch exakt die Einbauanleitung des Decoderherstellers. Zu Fragen der Funktion und zum Einbau kontaktieren Sie bitte
Ihren Decoderlieferanten oder den Hersteller.
A
G
B
J
J
H
E
Wartung und Pflege Ihres Modells
Um eine lange Lebensdauer zu gewährleisten, sollte Ihr Modell in regelmäßigen Abständen gewartet werden. Für die kleine Wartung muss dazu das Modell nicht geöffnet werden. Vielmehr
genügt es, wie nach Abb.2, das Modell auf einer weichen Unterlage auf den Rücken zu legen
und mit einem in Spiritus getränkten Wattestäbchen die Radkontakte zu säubern. Danach reinigen Sie die Räder. Drehen Sie aber bitte auf keinen Fall die Antriebsräder von Hand durch.
Nach dem Reinigen schmieren Sie bitte die in Abb.2 bezeichneten Lagerstellen mit einem
Tropfen Maschinenöl. Verwenden Sie handelsübliche Öler mit feiner Kanüle oder eine Stecknadel. Achtung, kein Speiseöl oder Hautcreme verwenden. Fahren Sie mit der Lok anschließend
etwas vor und zurück, damit sich das Öl gleichmäßig verteilt.
Sinnvoll ist es, diese Wartungsarbeiten nach ca. 30-40 Stunden Betriebszeit durchzuführen.
Wenn Sie Wartungsarbeiten am Motor oder den inneren Getriebeteilen vornehmen wollen,
muss das Lokgehäuse nach Abb. 3 demontiert werden. Drücken Sie bitte mit dem Daumen die
2 3 4
Abbildung 3
Figure 3
H
M
DKL
CD F
 Loading...