

Bachmann Europe Plc
Operating Manual
Freight train locomotive with tender,
2-8
Class 56
and Austrian Type 656
L13156x
Note on original:
The Prussian freight train locomotive type G8 1, subsequent class 55
pusher axle (D h2), with approximately 5,000 units, was the most frequently built regional railway locomotive in general. The Deutsche Reichsbahn (German State Railways) had 3,122 of these in its inventory.
However, due to its lack of a pusher axle, it could only reach a top speed of 55 km/h and the heavy axle
load of 17.6 tons made it unsuitable for use on secondary lines. To eliminate these disadvantages, the DRG
decided to convert the machine. The locomotive was given a pusher axle in front, and the boiler and chassis were adapted so that the maximum speed was increased to 70 km/h and the locomotive could also be
used for passenger trains.
Between 1934 and 1941, 691 of these machines were converted in this way and, to distinguish them from
the original design, were reclassified as type 56
The Deutsche Bundesbahn (German Federal Railways) had 386 of these units in inventory.
2-8
(Pruss. G 8 1 with pusher axle).
25-56
, hot steam locomotive without
Taking Your Model into Operation
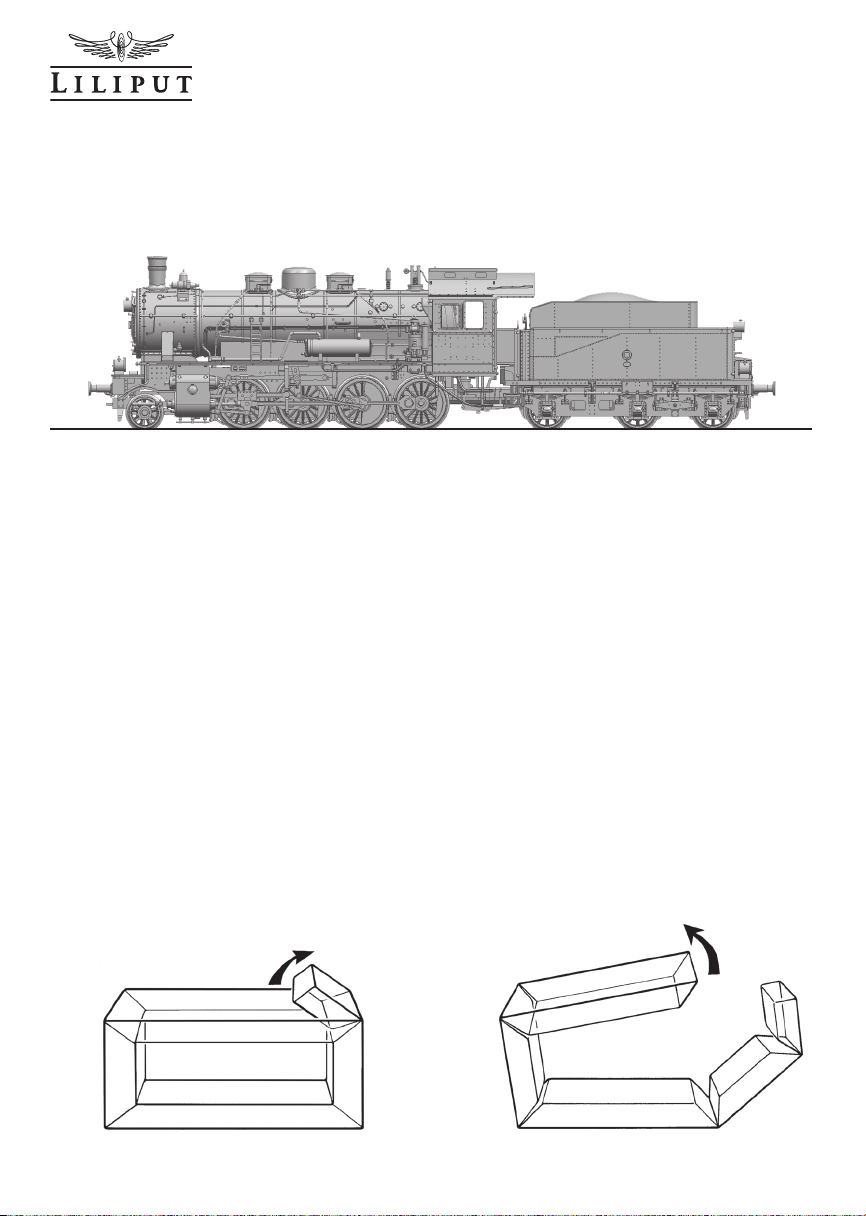
Remove your locomotive – encased in the blister pack – carefully from the box. Open the blister pack
according to the illustration in Fig. 1a / 1b, remove the locomotive, and place it on the track. The DC ver-
sion is designed for a maximum of 14 volts, and the AC model can be operated in analog mode with up to
16 volts, or digitally. First, allow the locomotive to drive forward and backward for a few minutes at about
half the voltage, and then it is ready for operation.
Fig. 1a Fig. 1b
6 H0 1:87

Bachmann Europe Plc
Refinement of Your Model
All of the components have already been assembled and installed for you.
Cornering Capability
This model is designed for track systems with even a narrow track radius – minimum radius R 356 mm.
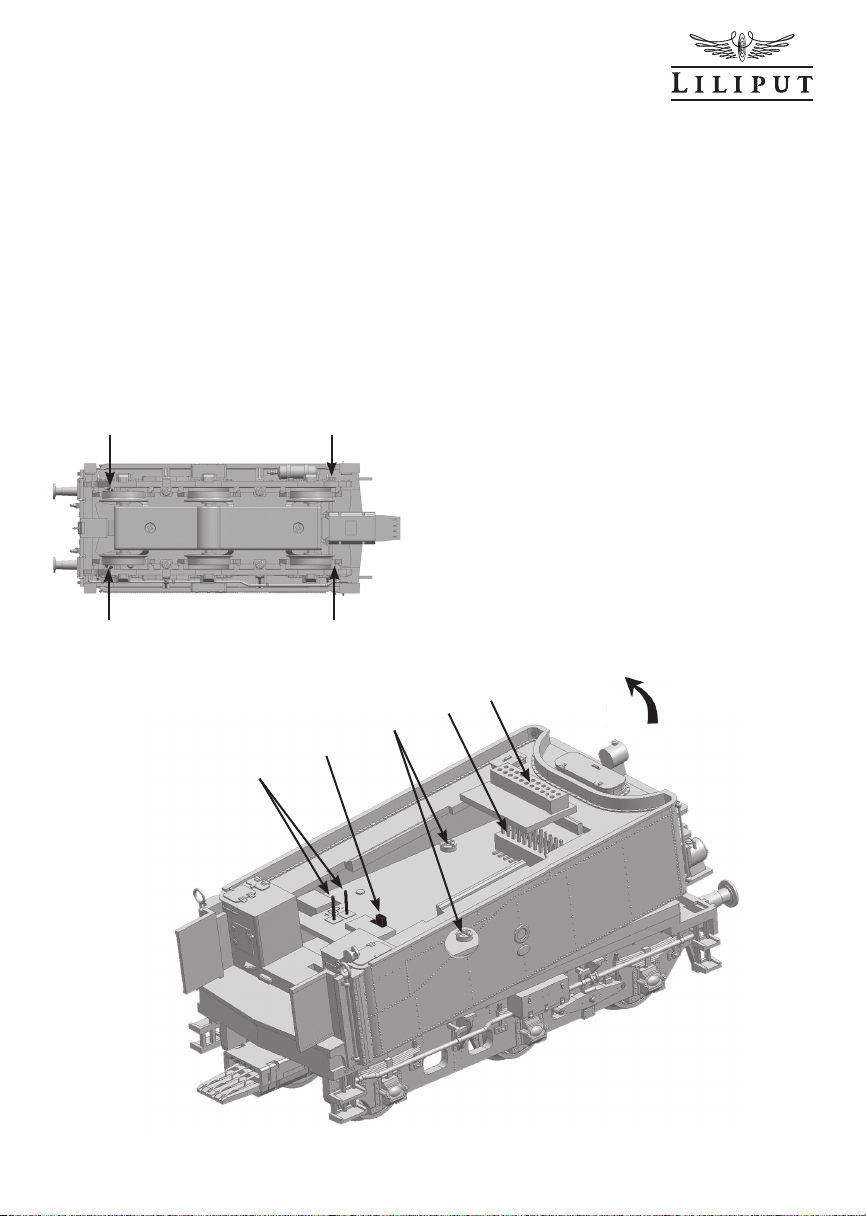
Maintenance and Care of Your Model
To ensure a long useful life, your model should be serviced regularly. For minor service, the model does
not need to be opened. Simply place the model on a soft surface as shown in Fig. 2, clean the wheel
contacts with a cotton swap dipped in denatured alcohol, and then clean the wheels. Under no circum-
stances should you turn the drive wheels of the locomotive by hand. After cleaning, apply a drop of
machine oil to the bearing points shown in Fig. 2. Use commercially available oils with a fine canula or a
pin. Caution: do not use cooking oils or skin creams.
S1
Fig. 2
S2
S3
R1
S3
R1
H0 1:87 7

Bachmann Europe Plc
Lubricating the Transmission
To lubricate the transmission, place the locomotive on a soft surface as shown in Fig. 2 and remove the
bottom cover after loosening the three S1 screws. Apply a commercially available oil with a fine canula
or pin. Afterward, move the model slightly forward and backward to distribute the oil to the transmission
components that are situated farther inside. Repeat this procedure as needed. We recommend this service after every 30 to 40 hours of operation.
Uncoupling the Locomotive and Tender
The locomotive and tender are fitted with special
couplings that transmit current and can, if required
– for example, for purposes of maintenance work
on individual vehicles or to install a smoke generator – be uncoupled.
To do this please gently press the retaining collar H
(Fig. 3) downwards with a screwdriver and pull the
tender from the locomotive.
Fig. 3
H
Coupling the Locomotive and Tender
Locomotive and tender are placed on the rails a little distanc from each other as in Fig. 3. Now carefully
push the tender up to the locomotive. The two coupling parts slide in each other and the retaining clip H
engages. At the same time connect all electrical contacts to each other.
Installing and Operating a Smoke Generator
The smoke generator – e.g. Seuthe No. 20 for
analog or No. 24 for digital operation – can be
3.
2.
B
1.
Fig. 4
8 H0 1:87
used.
Pull up the smokestack and remove the B bushing
underneath it with the fingernails. Insert the smoke
generator (see Fig. 4) into the designated hole until
it stops.
Follow the steps shown in Fig. 4.
Caution: If you plan to actuate the smoke generator with a digital decoder, please review the
operating instructions for the smoke generator and
the decoder first to ensure that the decoder is suitable for this operation with respect to current load
rating.
Bachmann Europe Plc
Opening the Locomotive
The locomotive should be opened only for repairs. Loosen the S2 and 2 x S3 screws (see Fig. 2), push in
the two R1 catch hooks under the driver’s cab, and carefully lift off the locomotive housing.
Activating and Deactivating the Smoke Generator
The smoke generator can be activated and deactivated using the Sw switch located on the tender board
(see Fig. 6).
Opening the Tender
S4 R2
Fig. 5
S4 R2
+SP-
Fig. 6
Sw
S5
Lift up the coal box. The tender box is secured on
the underside from below with the two S4 screws
and is held in the front with two R2 catch hooks
(see Fig. 5).
Now turn the tender box – as shown in Fig. 6 –
slightly and lift it up.
Jp
Pl
H0 1:87 9

Bachmann Europe Plc
21-Pole PI Interface
A 21-pole interface is integrated for converting to digital operation. This interface is accessible after lifting
off the coal box. Before converting, check to make sure all functions are in order in DC operation. Pull up
the Jp bridging plug vertically (Fig. 6) and keep it in a safe place. Next, attach the digital decoder, following the installation instructions from the manufacturer. For questions on the function or the installation,
contact the supplier or manufacturer of your decoder. Please note that no liability will be assumed for subsequently installed decoders.
Locomotive Sound
The tender is already fully prepped for locomotive sound operation. To install the loudspeaker, remove the
tender box (see section on „Opening the Tender“). Also, loosen the two S5 screws and carefully remove
the main board. Take care not to loosen any wires when doing this.
The empty sound capsule for securing the loudspeaker is fastened with 2 screws underneath the board.
Snap the loudspeaker – e.g. from ESU with d = 23 mm – into the sound capsule with the membrane
facing down.
The sound decoder can be attached vertically onto the 21-pole interface instead of the Jp bridging plug
or other decoder. There are two +SP- soldering pins on the circuit board for connecting the loudspeaker
(Fig. 6). Be sure to follow the instructions from the manufacturer of the decoder and loudspeaker
manufacturers.
Your Model in AC Version
Fig. 7 HA
A
10 H0 1:87
If you have decided on a LILIPUT model for a
three-rail AC system, please note the following:
This model has an integrated digital decoder
(ESU-Lokpilot) that allows you to operate your
vehicle in 16-volt analog AC mode, or digitally.
The accompanying operating instructions from
ESU contain information on the operation of the
decoder. For current pick-up by the center rail,
a collector is snapped into the chassis with an
HA holder as shown in Fig. 7. To change out
the collector, use a small screwdriver to push
arm A of the HA holder slightly out to the side.
This will release the retaining fit of the holder
and the collector can be removed.

Bachmann Europe Plc
Wiring diagram
M+
C7
MG1
105
MOTOR
C8
105
M-
LED: LEDXX+10183
MOTOR PCB:D3399+PCB14
R
L
21 Pin DCC Dummy Board
R
L
D2
D1
S1A
S1A
JUMP-3
SHORT PAD
OPTIONAL
D3800#PCB01
CON1
22
R
21
L
20
NC
19
Motor+
18
Motor-
17
NC
J1
16
LED+
15
14
13
12
AUX1
AUX2
NC
NC
CONNE#10341
Speaker+
Speaker-
LEDR
LEDF
J2
J3
4.7K
R10
4.7K
L1
4.7UH
C4
LED3
105
C9
105
WHITE
L2
4.7UH
R
L
MOT+
MOT-
1
NC
2
NC
3
NC
4
NC
5
NC
6
NC
7
8
9
10
R11
C5
105
LED4
WHITE
CON2
22
R
21
L
20
NC
19
Motor+
18
Motor-
17
NC
16
LED+
15
AUX1
14
AUX2
13
NC
12
NC
21PIN1.27
AUX2
1
AUX2
PAD
AUX1
R
L
Smoke Unit
1
NC
2
NC
3
NC
4
NC
5
NC
FLED-
6
NC
7
LEDR
8
LEDF
9
Speaker+
10
Speaker-
11
NG
LS1
SP+
SP-
1
SPEAKER
R Rear
FLMOT+
L ALL
MOT-
SMOKE+1
SMOKE-1
C6
LED+
104
D1
S1A
R1
220K
R3
R5
4.7K
470R
C1
1UF/0805
Q1
R4
8550
B+
470R
R2
D2
220K
S1A
RLED-
1
2
8
7
6
5
3
4
D3354 Plug
JP15A
JP15B
D3354 Plug
S1A
D3
LED+
R7
2K
LED1
WHITE
R8
R6
2K
4.7K
S1A
D4
Tender
C2
105
R Rear
1
FL-
2
MOT+
8
L ALL
7
MOT-
6
SMOKE+1
5
SMOKE-1
3
LED+
4
LED2
WHITE
C3
105
R9
4.7K
SW1
5
4
5
123 6
SW2-2(SWITC#10171)
Warranty Coupon GB
Should your LILIPUT model be faulty or not work properly or require repair, you can either
the dealer from whom you purchased the product or contact the customer services
directly of one of the following addresses below.
GREAT BRITAIN
Dealer’s stamp with day of purchasing
AND ALL OTHER COUNTRIES
(EXCEPT GERMAN SPEAKING COUNTRIES)
BACHMANN EUROPE PLC
MOAT WAY, BARWELL
GB - LEICESTERSHIRE LE9 8EY
Warranty Conditions:
This LILIPUT model has a warranty of two years from the date of purchase on repairs and parts, as long as it was purchased from an authorised dealer and if this certificate has been stamped with the address of the dealership and the date of
purchase has been entered. The warranty permits Bachmann Europe Plc either to rectify any fault or to replace the faulty
parts. Further claims are excluded.
Please note that no liability can be assumed for any parts subsequently fitted or for any damage caused thereby.
H0 1:87 11
contact
department

Bachmann Europe Plc
Garantie-Schein
Sollte Ihr LILIPUT-Modell einen Mangel oder eine Störung aufweisen oder einmal reparaturbedürftig sein, haben Sie die Möglichkeit, sich diesbezüglich entweder an den Händler, bei dem
Sie das Produkt gekauft haben oder direkt an die Kundendienstabteilung einer der nachfolgend
angegebenen Adressen zu wenden.
DEUTSCHLAND:
BACHMANN EUROPE PLC
NIEDERLASSUNG DEUTSCHLAND
AM UMSPANNWERK 5
D - 90518 ALTDORF BEI NÜRNBERG
ÖSTERREICH:
DOLISCHO MODELLSPIELWAREN
BAHNSTRASSE 4
A - 2340 MÖDLING
Garantiebedingungen:
Dieses LILIPUT-Modell hat ab Kaufdatum zwei Jahre
Garantie auf Reparaturen und Teile, sofern es bei einem
autorisierten Händler gekauft wurde und dieses Zertifikat
vom Händler abgestempelt und das Kaufdatum eingetragen worden ist. Die Garantie umfasst nach Wahl von
Bachmann Europe Plc entweder die Beseitigung eines
eventuellen Mangels oder den Ersatz schadhafter Teile.
Weitergehende Ansprüche sind ausgeschlossen.
Beachten Sie bitte, dass für nachträglich eingebaute Teile
(z.B. Decoder oder Lautsprecher) sowie für dadurch entstandene Schäden keine Haftung übernommen wird.
Wichtig! Wir empfehlen die Originalverpackung aufzubewahren,
sie ist der beste Schutz für Ihr Modell, wenn dieses nicht gerade
auf Ihrer Anlage unterwegs ist. Beim Betrieb der Lok auf Teppichböden kann die feine Mechanik durch Fasern zerstört werden. Änderungen in Konstruktion und Ausführung vorbehalten.
Bitte bewahren Sie diese Beschreibung zum späteren Gebrauch
auf. Dieses Produkt wurde nach Vorschriften der europäischen
Spielzeugrichtlinien (CE) hergestellt. • Important! We recom-
mend that you keep the original box. It is the best place to store
your model, when it is not in use. Please be aware, that carpet
fibres can destroy the fine mechanism of the locomotive. Subject to changes in design, version and technical data. Please
retain these data and instructions for further reference. This
product has been manufactured according to the
European toy Safety Directive (CE). • Importante!
Raccomandiamo di tenere la scatola originale. E’
il posto migliore in cui tenere il tuo modello quando non è in uso. Fibre di tappeti possono distrug-
SCHWEIZ:
TRAINS SERVICE
PHILIPPE MORISOD
15 CHEMIN DES PALETTES
CH - 1212 GRAND-LANCY
ALLE ANDEREN LÄNDER:
BACHMANN EUROPE PLC
MOAT WAY, BARWELL
GB - LEICESTERSHIRE LE9 8EY
Kaufdatum mit Händlerstempel
gere il fine meccanismo della locomotiva. Preghiamo di conservare
questi dati ed istruzioni per altre informazioni. Quest’articolo è stato
prodotto in accordo con la Direttiva Europea Sicurezza giochi (CE).
Achtung! Bei unsachmäßigem Gebrauch besteht Verletzungsgefahr
durch funktionsbedingte scharfe Kanten und Spitzen • Attention! At an
incorrect use there exists danger of hurting because of cutting edges
and tips • Attention! Il y a danger de blessure à un emploi incorrect
à cause des aiguilles et arêtes vives! • Voorzichtig! Bij ondoelmatig
gebruik bestaat verwondigsgevaar door scherpe zijkanten en uitsteek-
sels! • Attenzione! Un uso improprio comporta pericolo di ferimenti
attraverso punte e spigoli taglienti! • Atencion! Un empleo incorrecto
puede causar heridas debido a las puntas y aristas agudas! • Atençao!
Por utilizaçao incorrecta existe o perigo de estragos, em virtude de cor-
tes nas abas e nas pontas! • Προξοχη! Η ακαταλληλη
χρηοη εγκλειει κινδυνουζ μκροτ ραυματιομων, εξ
αιπαξ κοπτερων ακμων και προεξοχωθν • Bemaerk!
Ved ukorrekt brug kan de funktionsbetingede skarpe
kanter og spidser forfolde skade!
Bachmann Europe Plc · Moat Way · Barwell · Leicestershire · LE9 8EY · England Made in China
12 H0 1:87
 Loading...