


INSTRUCTION MANUAL
OUTDOOR D/N WDR 700TVL FAST DOME CAMERA
SP8264/8268 N/P & SP8364/8368 N/P
IPS8264/8268 N/P & IPS8364/8368 N/P
OUTDOOR D/N WDR 700TVL FAST DOME IP CAMERA
ST8264/8268 N/P & ST8364/8368 N/P
OUTDOOR HUMAN TRACKING FAST DOME CAMERA

3
4
6
7
8
8
10
14
16
18
19
19
21
22
23
25
25
25
26
26
26
27
27
27
29
29
29
30
30
31
32
34
34
34
34
35
35
39
40
CONTENTS
Pages
24
1
Preface
Features
Warnings & Cautions
Structural Element
Fast Dome Camera Set Up
RS-485 Protocol Switch Setting
Fast Dome ID Address Setting Refer Chart
Fast Dome Connection Jack and Cable Requirement
Installation
Outdoor AC24V Model (Easy Installation)
System Configuration
Fast Dome and Keyboard
Fast Dome, Matrix and Keyboard
Fast Dome with PC Control
Fast Dome, DVR and Keyboard
Fast Dome IP Camera with PC Control
Operation
Initial Power Up Inspection
Manual Operation (Pan/Tilt Control)
Fast Dome Selection
Zoom Lens Control
Focus Control
Iris Control
Horizontal 180° Instant Flip
Preset Positions Setting
Recalling Preset Positions
Setting Preset Group
Changing Preset Data
Activating Auto Pan
Deleting Preset Data
Reboot System
Alarm Management
Setup Menu Tree
Fast Dome Camera Function Setup
Setup Menu Display
Language Selection
Reboot System
Display System Information
Display Character Setup Menu
Display Dome Function Setup Menu
Camera Setting Menu Display
30

Display the Camera Setting Menu
Auto Focus Setting
Zoom Speed Setting
Focus Speed Setting
Auto Iris Setting
Advanced Setting
Shutter/AGC Setting
White Balance Setting
HLC (High Light Compensation) Setting
Day/Night Setting
Night Environment Setting
Synchronization Mode Setting
Image Setting
Pan/Tilt Setting Menu
Display the Pan/Tilt Setting Menu
Home Position Setting
Self Return Time Setting
Self Return Mode Setting
Auto Mode Setting
Auto Scan Mode Setting
Patrol Mode Setting
Preset Function Setting Menu
Tour Function Setting Menu
Privacy Zones Setting Menu
Alarms Setting Menu
Password Function Menu (IP Camera not Support)
Restore Factory Defaults
Schedule Setup Menu
Alarm Input Schedule Setting Menu
Startup Auto Options Menu
Daylight Saving Time Menu
Specification
Operational
Camera
Optical Lens
Electrical
Environmental
Mechanical
Appendix A Quick Reference Table
Appendix B Trouble Shooting
Appendix C Pelco Operation
40
41
43
45
45
46
48
48
48
49
49
49
50
50
51
54
55
56
57
59
60
60
61
62
63
63
63
64
64
64
64
65
66
2
46
40
40
40
40
40
46
67

PREFACE
SP8264/8268/8364/8368 & IPS8264/8268/8364/8368 & ST8264/8268/8364/8368 series fast
dome cameras with Super High resolution of 700TV lines offer significant enhancement and
refinements to bring you the most innovative surveillance solutions. SP8264/8268/8364/8368 &
IPS8264/8268/8364/8368 & ST8264/8268/8364/8368 series are the leading product in the
industry offering the most advanced features such as 26X or 36X optical zoom lens, 256x Digital
Zoom, Wide Dynamic Range, Digital Noise Reduction, High Light Compensation and Digital
Image Stabilizer.
LILIN's D/N WDR 700TVL Fast Dome series measure only 210mm in diameter and is capable
of making 360 degrees continuous rotation with a speed range of 0.15 to 360 degrees per second,
ensures direct and accurate target positioning. When required the dome can be quickly spun
through 180 degrees, an important feature when something passes directly under the camera.
Up to 128 preset positions can be programmed and recalled with an accuracy of 0.25 degrees.
First 16 presets can be divided into 4 groups for auto touring with individual setting for speed
and dwell time.
Each Fast Dome has 6 alarm inputs (expandable to 64) can drive the dome to any position in
under second. A local alarm output can be configured as NO or NC and two types of alarm
response mode provide flexible alarm management. RS-485 control interface makes our fast
dome cameras easy to fit into existing systems and compatible with other manufacturer's
control systems.
Outdoor D/N WDR 700TVL
LILIN's Outdoor Fast Dome series are fully-functional and user-friendly. It will meet your need
for a wide range of surveillance applications. The application for LILIN tracking dome are
(1) Access control area (Bank Chest, Military Magazine, Oil or Chemical tank...). (2) After hour
monitoring area (Warehouse, Archives, Parking exit...). (3) Educational Institution or Video
Conference. (4) Ceremony.
Fast Dome IP Camera H.264 AVC (Advanced Video Coding) video
compression engine provides high video quality, 960H resolution, bandwidth efficiency, and
real-time streaming. The cutting edge of H.264 AVC main profile encoding technology can
provide better compression rate and superior video quality at 56 Kbps to 3 Mbps bit rate. Dual
streaming design, JPEG and H.264 AVC allow to stream video at low bandwidth (Internet) and
high bandwidth (LAN) for optimizing video quality. Low latency design for both Intranet and
Internet is a key factor of operating PTZ. Four PTZ web interfaces including lens absolute
positioning are designed for easy-to-use purpose.
Outdoor Human Tracking Fast Dome Camera series with all the features and function of LILIN's
Outdoor D/N WDR 700TVL Fast Dome Camera and built-in intelligent video processing chip,
which enhances the moving object analysis, improves the human feature distinguishing accuracy,
and lowers the false action occurrence. Different from the other tracking system tying with
several cameras, our newly developed technology allows us to execute the motion tracking
function with single camera.
The system will auto-zoom on the size of the invader, and monitors the object on the screen center.
3

26X Auto Focus Lens
Build-in 26X optical zoom lens with focal length 3.2~83.2mm
36X Auto Focus Lens
Build-in 36X optical zoom lens with focal length 3.3~119mm
700 Horizontal TV lines
Automatic / Manual Iris Control
Preset ID / Name
Preset Background Environment File
Private Mask
360° continuous rotation
Up to 128 programmable preset positions
Preset positions auto scanning
High speed rotation and tilt, speed range varies from 0.15°/sec ~ 360°/sec
180° Horizontal Instant Flip
6 alarm inputs, 1 alarm output can be set as NO (normally open) or NC (normally close) for each
Fast Dome
Build in 1/4" CCD high resolution DSP color camera:
1. Color / Mono Switch (IR Cut Filter)
In → Color
Out → Mono
Auto → Switch from color to mono when light drops below 3 lux
Schedule → Switch from color to mono by time setup
2. 650 TV Lines (Color) ; 700 TV Lines (Mono)
3. 0.1Lux (Color) ; 0.05Lux (Mono)
4. On-Screen Setup Menu
5. White Balance Control : Auto Tracking , Auto Correction , Manual*2 , Anti Color Rolling
6. Wide Dynamic Range : On(60dB)/Off
7. Back Light Compensation : On/Off
8. Auto Gain Control : 0dB ~ 37dB
9. Brightness Adjustment
10. Flickerless : On/Off
RS-485 control interface
Up to 256 Fast Dome configuration
Compatible with PC control (protocol required)
Power supply options : 100 ~ 240VAC or 24VAC
Flexible Mounting: Outdoor type
True H.264 AVC/MPEG-4 part 10 real-time video compression (IPS826X/836X Series)
960H resolution at 960x480(NTSC)/960x576(PAL) in live monitoring (IPS826X/836X Series)
Full duplex H.264 AVC and JPEG streaming (IPS826X/836X Series)
FEATURES
4

5
Human Tracking Fast Dome Camera Function:(ST826X/836X series)
1. Human Tracking Fast Dome Camera series are smart sensor and built-in intelligent video
processing which has surveillance applications on,
(1) Moving object detection.
(2) Tracking and zooming moving object.
2. Human Tracking Fast Dome Camera series have two modes:
(1) Manual tracking mode (Keyboard mode).
(2) Auto tracking mode (user can setup the schedule to activate the auto tracking function
once a day).
3. If more than one moving object is available in the camera FOV (Field of View) then the
camera will track moving object that has highest priority. The highest priority means moving
object with largest motion or its position is nearest to the camera.
4. The speed of camera pan-tilt is automatically relative to the speed of moving object.
5. The zooming application will activate if,
Zoom-In
The position of moving object is near the center of FOV and its size is approximately
smaller than 1/6 of FOV.
Zoom-Out
.The size of moving object is approximately larger than 1/6 of FOV.
.The position of moving object at the outside of FOV, on the other hand the moving object
almost moving out of FOV.
6. Human Tracking Fast Dome Camera series uses the home position of auto tracking mode.
7. The auto tracking mode always checks the idle condition. Idle condition is where the moving
object does not appear in the camera view. When the system is on idle condition, it will check
the previous tracking condition, if it is idle, the camera will zoom out two steps and if remains
idle for approximately 10 seconds, then, camera will return to home position.
8. The limitation of tracking object moving speed
9. Tracking object must be larger than 50TV Lines.
Length of monitor area
(m)
6
12
25
50
Above data is for reference only
Limitation of tracking
speed (km/hr)
10
20
40
80
Tracking object possible location distance
(Wide side with view angle 39.2°)
5m
10m
20m
40m

Please read the manual before attempting installation or operation
1. Please be aware to the warnings and cautions notice.
2. Don't use any chemical detergent to clean the machine surface, use a damp cotton cloth
only. Regularly clean the dome cover to assure proper focus ability.
3. Please install the Fast Dome in a dry area, water and high humidity may cause damage on
internal parts. External housing should be used for outdoor installation.
4. Please use parts supplied by the manufacturer only, any unqualified part used in the
equipment may violate the warranty.
5. Avoid installing the equipment in an unstable area. Make sure the area is firm and stable.
Falling equipment may injure personnel and damage the equipment.
6. Do not install the equipment near any flammable gas. Violation may cause fire or injury.
7. Avoid running video cable and signal cable through or passing interference sources such
as video waves, broadcast station, power generator, elevator motor or high voltage area
..... etc. Violation may cause interference.
8. Make sure the power cable is properly fixed. Improperly fixed cable may cause serious
short circuit or fire.
9. Correct cable connection is important. Do not place any object on the connection cable
and change the cable if there is damage on cable. Violation may cause short circuit, fire
and injury.
10. Make sure ground is well connected to avoid damage caused by lightning.
11. Do not put any foreign objects inside the equipment and do not spray any liquid on
equipment. This will avoid short circuit damage.
12. Do not touch power connection with wet hands to avoid short circuit or electricity shock.
13. Do not apply smash-force on the equipment. Violation may cause damage.
14. Do not install the equipment in a location that may expose the equipment directly to
sunlight. Violation may cause colour fading or damage.
15. Do not install the equipment in high temperature or low temperature environment to
。 。
avoid damage. The normal operational temperature is between -10 C ~ +50 C.
16. Fast Dome contains high sensitive electric parts inside. Do not try to repair them without
qualified personnel.
17. Turn off the power immediately and contact the technician when the following occurs:
A. Damage on power cable or plug.
B. Water leak into the equipment.
C. Fast Dome can not be operated normally.
D. Equipment falling on ground or damage on external case.
E. Unusual occurrence.
18. Warning: Do not try to repair the equipment. Only a qualified technician may disassemble
and repair the equipment. Shut off the power before disassemble the equipment and don't
put power on unless the case is completely assembled.
WARNINGS & CAUTIONS
6
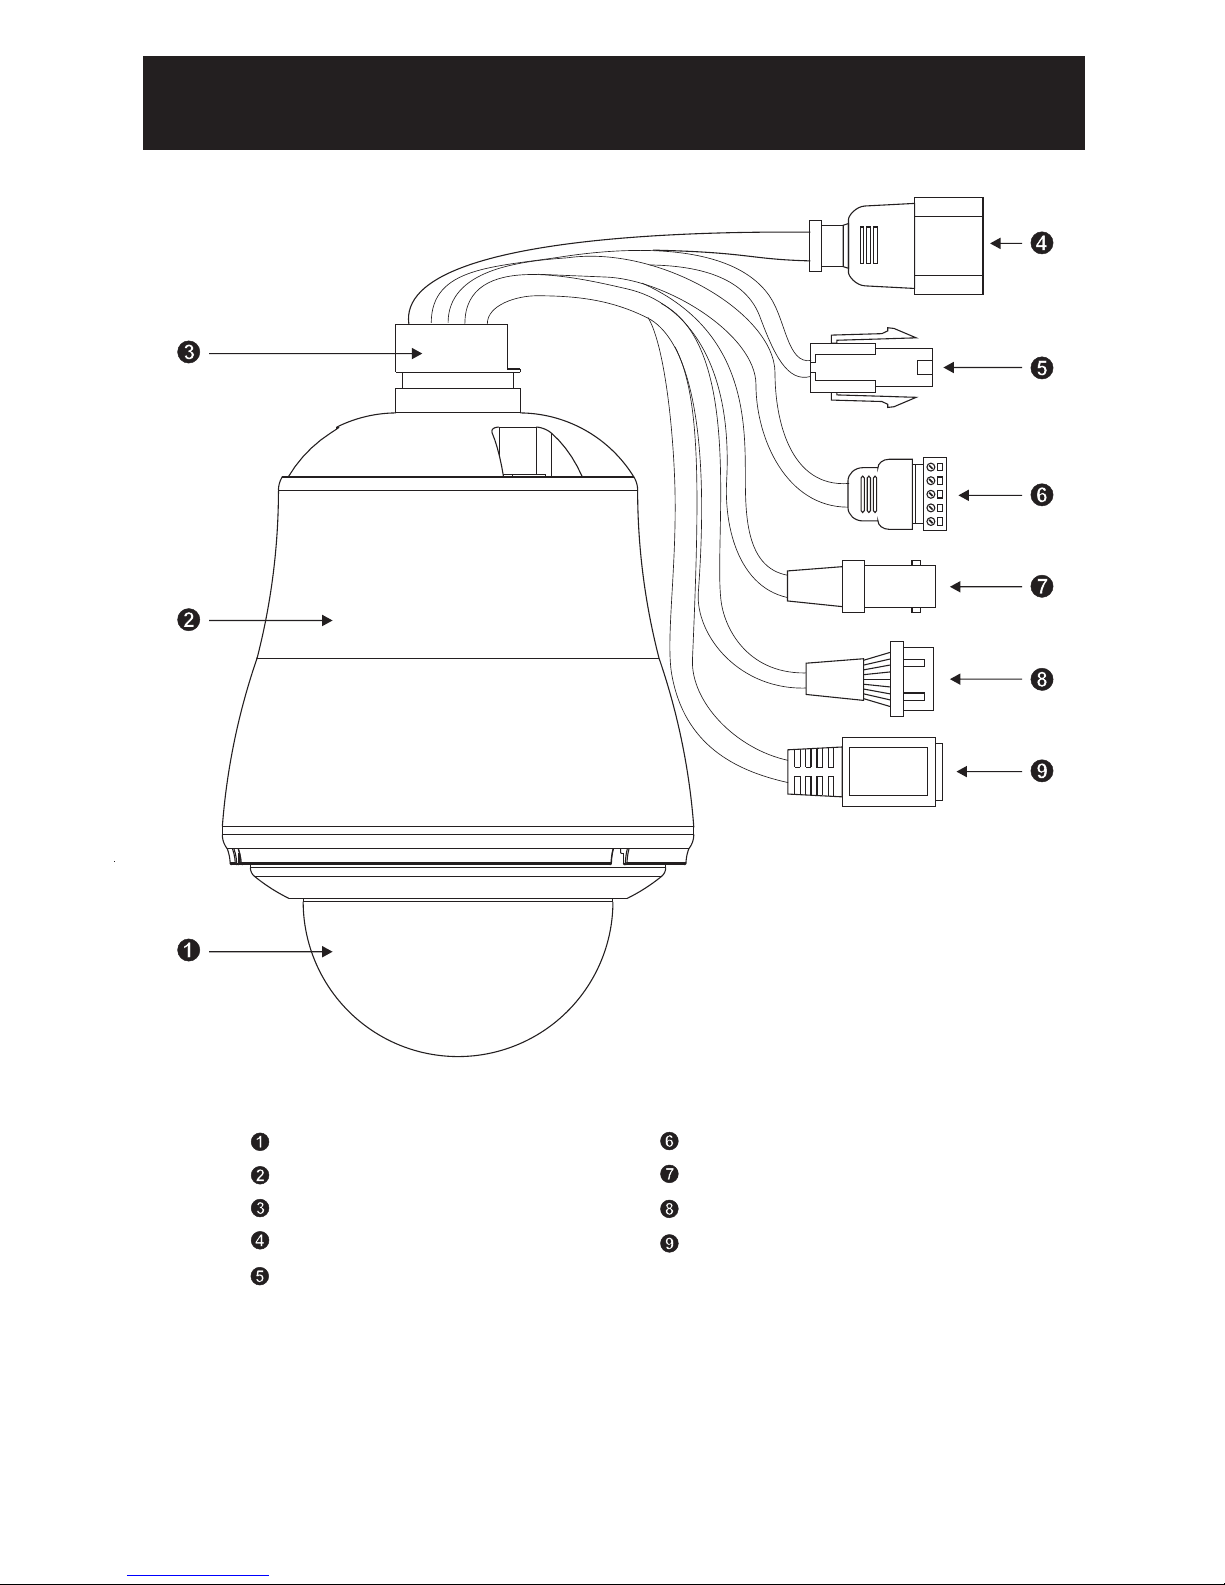
Dome Cover
Camera Case
Upper Base
Power In Jack (AC100 ~ 240V)
Power In Jack (AC24V)
RS-485 In/Out Terminal
Video Out Jack
Alarm In/Out connector
RJ45 Network Connector
[IPS826X/836X]
STRUCTURAL ELEMENT
7

DIP Switch Setting
RS-485 Protocol Switch Setting
Explanation of DIP Switch Setting :
1. RS-485 IN-TML RES.
2. RS-485 OUT-TML RES.
3. HALF / FULL
4. BAUD SEL 1
5. BAUD SEL 2
6. PROTOCOL SEL 1
7. PROTOCOL SEL 2
8. PROTOCOL SEL 3
9. PROTOCOL SEL 4
10. -
(Using Pelco D, Please contact your nearest agent.)
FAST DOME CAMERA SET UP
Camera ID Switch
RS-485 Protocol Switch
: RS-485 IN Terminal Resistor ON/OFF
: RS-485 OUT Terminal Resistor ON/OFF
: 2 wiring system (HALF duplex) or 4 wiring system (Full duplex)
: Transmission speed selection 1
: Transmission speed selection 2
: Protocol selection 1
: Protocol selection 2
: Protocol selection 3
: Protocol selection 4
: NA
RS-485 In/Out Terminal Resistor Setting
Daisy Connection: Set RS-485 In and Out terminal resistor as ON (Factory Initialize).
Parallel Connection: Set the front and last equipments terminal resistor as ON. The parallel
connection equipment in the middle set as OFF to keep the best transmitted status.
ON
PCB
OFF
1 2 3 4 5 6 7 8 9 10 1 2 3 4 5 6 7 8 9 10
8
Remark: Bl ack icon of the DIP Sw itc h bump.

6
ON
OFF
RS-485 Communication Mode Selection
DIP SWITCH
2 wiring system (HALF duplex)
4 wiring system (FULL duplex)
3
OFF
ON
Communication Mode of HALF: Most of systems use this mode because of low-cost and
easy setup, but this mode can't receive and transmit data simultaneously.
Communication Mode of FULL: This Mode can receive and transmit data simultaneously.
Transmission Speed Setting
Remark: LILIN Protocol control mode is N, 8, 1 Baud Rate: 9600bps
BAUD RATE SELECTION
DIP SWITCH
2400 bps
4800 bps
9600 bps
19200 bps
5
ON
ON
OFF
OFF
4
ON
ON
OFF
OFF
Protocol Setting
Remark: LILIN MLP1 (MERIT LILIN PROTOCOL 1) is same as PIH-717 Fast Dome Protocol
MLP2 (MERITLILIN PROTOCOL 2) is the new protocol for controlling fast
dome cameras. The protocol contains 7 bytes which include a check-
sum byte and extra control codes. The check-sum byte, for example,
can prevent RS-485 interference affecting a protocol. The extra control
codes, for example, can provide the feature of controlling absolute
position of a fast dome camera. Please refer to MERIT LILIN
PROTOCOL2 (MLP2) for detail of command format.
PROTOCOL SELECTION
DIP SWITCH
MLP2 (MERIT LILIN PROTOCOL 2) VERSION
MLP1 (MERIT LILIN PROTOCOL 1) VERSION
8
ON
9
ON
ONON
7
ON
ON
9
RS-485 Protocol DIP Switch of LILIN Outdoor D/N WDR 700TVL Fast Dome (IP) Camera /
Outdoor Human Tracking Fast Dome Camera Series Setting
3
OFF
OFF
1
ON
ON
ON
RS-485 Protocol DIP Switch Setting
DIP SWITCH
MLP2 Version
MLP1 Version
102 4 5 6 7 9
OFFON ON OFF ON ON
OFFON
8
ON
ONON OFF OFF ON ON

10
Fast Dome ID Address Setting Refer Chart
Up to 64 Fast Dome Camera can be serial linking in one system.
Therefore each dome is addressing by ID switch located at the base of the Fast Dome.
Remark: Black icon of the DIP Switch bump.
When select MLP1 (MERIT LILIN PROTOCOL 1), Camera ID setting as followings:
1 5432 76 8 9
9
9
9
9
9
9
9
9
9
9
9
9
9
9
9
0
0
0
0
0
0
0
0
0
0
0
0
0
0
0
0
ON
1 5432 76 8
ON
112 3 4 5ON86 7
5432 76 8
ON
ON
1
1
5432 76 8
2 3 4 5 86 7
ON
112 3 4 5ON86 7
5432 76 8
ON
76 854321
1 2 3 4 5ON86 7
ON
1
1
5432 76 8
ON
2 3 4 5 86 7
ON
1
1
5432
ON
76 8
2 3 4 5 86 7
ON
112 3 4 5ON86 7
5432 76 8
ON
1 2 3 4 5 86 7
1
1
5432 76 8
ON
5432
ON
76 8
1
1
ON
2 3 4 5 86 7
ON
5432
ON
76 8
1
1
1
86 72 3 4 5
2 3 4 5ON86 7
5432 76 8
ON
1
1
5432 76 8
ON
2 3 4 5ON86 7
1
1
ON
2 3 4 5ON86 7
5432
ON
76 8
1
1
1
76 85432
2 3 4 5ON86 7
5432 76 8
ON
1 2 3 4 5 8 9
9
9
9
9
9
9
9
9
9
9
9
9
9
9
9
0
0
0
0
0
0
0
0
0
0
0
0
0
0
0
0
6 7
ON
ON
1 5432 76 8
112 3 4 5ON86 7
2 3 4 5 86 7
ON
1
1
ON
5432
ON
76 8
2 3 4 5 86 7
ON
1
1
1
5432 76 8
5432 76 8
ON
2 3 4 5ON86 7
112 3 4 5ON86 7
5432 76 8
ON
1
1
ON
5432 76 8
ON
2 3 4 5 86 7
ON
1
1
1
2 3 4 5 86 7
5432 76 8
ON
2 3 4 5ON86 7
1 5432
ON
76 8 9
9
9
9
9
9
9
9
9
9
9
9
9
9
9
9
0
0
0
0
0
0
0
0
0
0
0
0
0
0
0
0
ON
17
33 49
1
2 18
34 50
5135
193
5236
204
5337
215
5438
226
5539
237
5640
248
64
63
62
61
60
57
59
58
48
47
46
45
44
41
43
42
32
31
30
29
28
25
27
26
16
15
14
13
12
9
11
10

When select MLP2 (MERIT LILIN PROTOCOL 2), Camera ID setting as followings:
22
43 64
1
2 23
44 65
6645
243
6746
254
6847
265
6948
276
7049
287
7150
298
79
78
77
76
75
72
74
73
58
57
56
55
54
51
53
52
37
36
35
34
33
30
32
31
16
15
14
13
12
9
11
10
84
83
82
81
80
63
62
61
60
59
42
41
40
39
38
21
20
19
18
17
1 5432 76 8 9 10
ON
1 5432 76 8 9 10
ON
1 5432 76 8 9 10
ON
1 5432 76 8 9 10
ON
1 5432 76 8 9 10
ON
1 5432 76 8 9 10
ON
1 5432 76 8 9 10
ON
1 5432 76 8 9 10
ON
1 5432 76 8 9 10
ON
1 5432 76 8 9 10
ON
1 5432 76 8 9 10
ON
1 5432 76 8 9 10
ON
1 5432 76 8 9 10
ON
1 5432 76 8 9 10
ON
1 5432 76 8 9 10
ON
1 5432 76 8 9 10
ON
1 5432 76 8 9 10
ON
1 5432 76 8 9 10
ON
1 5432 76 8 9 10
ON
1 5432 76 8 9 10
ON
1 5432 76 8 9 10
ON
1 5432 76 8 9 10
ON
1 5432 76 8 9 10
ON
1 5432 76 8 9 10
ON
1 5432 76 8 9 10
ON
1 5432 76 8 9 10
ON
1 5432 76 8 9 10
ON
1 5432 76 8 9 10
ON
1 5432 76 8 9 10
ON
1 5432 76 8 9 10
ON
1 5432 76 8 9 10
ON
1 5432 76 8 9 10
ON
1 5432 76 8 9 10
ON
1 5432 76 8 9 10
ON
1 5432 76 8 9 10
ON
1 5432 76 8 9 10
ON
1 5432 76 8 9 10
ON
1 5432 76 8 9 10
ON
1 5432 76 8 9 10
ON
1 5432 76 8 9 10
ON
1 5432 76 8 9 10
ON
1 5432 76 8 9 10
ON
1 5432 76 8 9 10
ON
1 5432 76 8 9 10
ON
1 5432 76 8 9 10
ON
1 5432 76 8 9 10
ON
1 5432 76 8 9 10
ON
1 5432 76 8 9 10
ON
1 5432 76 8 9 10
ON
1 5432 76 8 9 10
ON
1 5432 76 8 9 10
ON
1 5432 76 8 9 10
ON
1 5432 76 8 9 10
ON
1 5432 76 8 9 10
ON
1 5432 76 8 9 10
ON
1 5432 76 8 9 10
ON
1 5432 76 8 9 10
ON
1 5432 76 8 9 10
ON
1 5432 76 8 9 10
ON
1 5432 76 8 9 10
ON
1 5432 76 8 9 10
ON
1 5432 76 8 9 10
ON
1 5432 76 8 9 10
ON
1 5432 76 8 9 10
ON
1 5432 76 8 9 10
ON
1 5432 76 8 9 10
ON
1 5432 76 8 9 10
ON
1 5432 76 8 9 10
ON
1 5432 76 8 9 10
ON
1 5432 76 8 9 10
ON
1 5432 76 8 9 10
ON
1 5432 76 8 9 10
ON
1 5432 76 8 9 10
ON
1 5432 76 8 9 10
ON
1 5432 76 8 9 10
ON
1 5432 76 8 9 10
ON
1 5432 76 8 9 10
ON
1 5432 76 8 9 10
ON
1 5432 76 8 9 10
ON
1 5432 76 8 9 10
ON
1 5432 76 8 9 10
ON
1 5432 76 8 9 10
ON
1 5432 76 8 9 10
ON
1 5432 76 8 9 10
ON
11

106
127 148
85
86 107
128 149
150129
10887
151130
10988
152131
11089
153132
11190
154133
11291
155134
11392
163
162
161
160
159
156
158
157
142
141
140
139
138
135
137
136
121
120
119
118
117
114
116
115
100
99
98
97
96
93
95
94
168
167
166
165
164
147
146
145
144
143
126
125
124
123
122
105
104
103
102
101
1 5432 76 8 9 10
ON
1 5432 76 8 9 10
ON
1 5432 76 8 9 10
ON
1 5432 76 8 9 10
ON
1 5432 76 8 9 10
ON
1 5432 76 8 9 10
ON
1 5432 76 8 9 10
ON
1 5432 76 8 9 10
ON
1 5432 76 8 9 10
ON
1 5432 76 8 9 10
ON
1 5432 76 8 9 10
ON
1 5432 76 8 9 10
ON
1 5432 76 8 9 10
ON
1 5432 76 8 9 10
ON
1 5432 76 8 9 10
ON
1 5432 76 8 9 10
ON
1 5432 76 8 9 10
ON
1 5432 76 8 9 10
ON
1 5432 76 8 9 10
ON
1 5432 76 8 9 10
ON
1 5432 76 8 9 10
ON
1 5432 76 8 9 10
ON
1 5432 76 8 9 10
ON
1 5432 76 8 9 10
ON
1 5432 76 8 9 10
ON
1 5432 76 8 9 10
ON
1 5432 76 8 9 10
ON
1 5432 76 8 9 10
ON
1 5432 76 8 9 10
ON
1 5432 76 8 9 10
ON
1 5432 76 8 9 10
ON
1 5432 76 8 9 10
ON
1 5432 76 8 9 10
ON
1 5432 76 8 9 10
ON
1 5432 76 8 9 10
ON
1 5432 76 8 9 10
ON
1 5432 76 8 9 10
ON
1 5432 76 8 9 10
ON
1 5432 76 8 9 10
ON
1 5432 76 8 9 10
ON
1 5432 76 8 9 10
ON
1 5432 76 8 9 10
ON
1 5432 76 8 9 10
ON
1 5432 76 8 9 10
ON
1 5432 76 8 9 10
ON
1 5432 76 8 9 10
ON
1 5432 76 8 9 10
ON
1 5432 76 8 9 10
ON
1 5432 76 8 9 10
ON
1 5432 76 8 9 10
ON
1 5432 76 8 9 10
ON
1 5432 76 8 9 10
ON
1 5432 76 8 9 10
ON
1 5432 76 8 9 10
ON
1 5432 76 8 9 10
ON
1 5432 76 8 9 10
ON
1 5432 76 8 9 10
ON
1 5432 76 8 9 10
ON
1 5432 76 8 9 10
ON
1 5432 76 8 9 10
ON
1 5432 76 8 9 10
ON
1 5432 76 8 9 10
ON
1 5432 76 8 9 10
ON
1 5432 76 8 9 10
ON
1 5432 76 8 9 10
ON
1 5432 76 8 9 10
ON
1 5432 76 8 9 10
ON
1 5432 76 8 9 10
ON
1 5432 76 8 9 10
ON
1 5432 76 8 9 10
ON
1 5432 76 8 9 10
ON
1 5432 76 8 9 10
ON
1 5432 76 8 9 10
ON
1 5432 76 8 9 10
ON
1 5432 76 8 9 10
ON
1 5432 76 8 9 10
ON
1 5432 76 8 9 10
ON
1 5432 76 8 9 10
ON
1 5432 76 8 9 10
ON
1 5432 76 8 9 10
ON
1 5432 76 8 9 10
ON
1 5432 76 8 9 10
ON
1 5432 76 8 9 10
ON
1 5432 76 8 9 10
ON
12

191
213 235
169
170 192
214 236
237215
193171
238216
194172
239217
195173
240218
196174
241219
197175
242220
198176
250
249
248
247
246
243
245
244
228
227
226
225
224
221
223
222
206
205
204
203
202
199
201
200
184
183
182
181
180
177
179
178
255
254
253
252
251
233
232
231
230
229
211
210
209
208
207
189
188
187
186
185
256234
212
190
1 5432 76 8 9 10
ON
1 5432 76 8 9 10
ON
1 5432 76 8 9 10
ON
1 5432 76 8 9 10
ON
1 5432 76 8 9 10
ON
1 5432 76 8 9 10
ON
1 5432 76 8 9 10
ON
1 5432 76 8 9 10
ON
1 5432 76 8 9 10
ON
1 5432 76 8 9 10
ON
1 5432 76 8 9 10
ON
1 5432 76 8 9 10
ON
1 5432 76 8 9 10
ON
1 5432 76 8 9 10
ON
1 5432 76 8 9 10
ON
1 5432 76 8 9 10
ON
1 5432 76 8 9 10
ON
1 5432 76 8 9 10
ON
1 5432 76 8 9 10
ON
1 5432 76 8 9 10
ON
1 5432 76 8 9 10
ON
1 5432 76 8 9 10
ON
1 5432 76 8 9 10
ON
1 5432 76 8 9 10
ON
1 5432 76 8 9 10
ON
1 5432 76 8 9 10
ON
1 5432 76 8 9 10
ON
1 5432 76 8 9 10
ON
1 5432 76 8 9 10
ON
1 5432 76 8 9 10
ON
1 5432 76 8 9 10
ON
1 5432 76 8 9 10
ON
1 5432 76 8 9 10
ON
1 5432 76 8 9 10
ON
1 5432 76 8 9 10
ON
1 5432 76 8 9 10
ON
1 5432 76 8 9 10
ON
1 5432 76 8 9 10
ON
1 5432 76 8 9 10
ON
1 5432 76 8 9 10
ON
1 5432 76 8 9 10
ON
1 5432 76 8 9 10
ON
1 5432 76 8 9 10
ON
1 5432 76 8 9 10
ON
1 5432 76 8 9 10
ON
1 5432 76 8 9 10
ON
1 5432 76 8 9 10
ON
1 5432 76 8 9 10
ON
1 5432 76 8 9 10
ON
1 5432 76 8 9 10
ON
1 5432 76 8 9 10
ON
1 5432 76 8 9 10
ON
1 5432 76 8 9 10
ON
1 5432 76 8 9 10
ON
1 5432 76 8 9 10
ON
1 5432 76 8 9 10
ON
1 5432 76 8 9 10
ON
1 5432 76 8 9 10
ON
1 5432 76 8 9 10
ON
1 5432 76 8 9 10
ON
1 5432 76 8 9 10
ON
1 5432 76 8 9 10
ON
1 5432 76 8 9 10
ON
1 5432 76 8 9 10
ON
1 5432 76 8 9 10
ON
1 5432 76 8 9 10
ON
1 5432 76 8 9 10
ON
1 5432 76 8 9 10
ON
1 5432 76 8 9 10
ON
1 5432 76 8 9 10
ON
1 5432 76 8 9 10
ON
1 5432 76 8 9 10
ON
1 5432 76 8 9 10
ON
1 5432 76 8 9 10
ON
1 5432 76 8 9 10
ON
1 5432 76 8 9 10
ON
1 5432 76 8 9 10
ON
1 5432 76 8 9 10
ON
1 5432 76 8 9 10
ON
1 5432 76 8 9 10
ON
1 5432 76 8 9 10
ON
1 5432 76 8 9 10
ON
1 5432 76 8 9 10
ON
1 5432 76 8 9 10
ON
1 5432 76 8 9 10
ON
1 5432 76 8 9 10
ON
1 5432 76 8 9 10
ON
1 5432 76 8 9 10
ON
13

AC100~240V Power Cable
AC24V Power Cable
RS-485 Twist ed Pa ir Cable
Video Si gna l Cable
Alarm In/Out Cable
To Keyboard or Matrix
. ..etc.
To Monitor
To PIR
CAT5 N etw ork C able
1. AC100 ~ 240V Power Cable
2. AC24V Power Cable
Recommended Cable:
Fast Dome Connection Jack and Cable Requirement
Copper Wire (AWG)
Length of Cable
(approx.)
(m)
(ft)
#24
2
(0.22mm )
20
65
#22
2
(0.33mm )
30
100
#20
2
(0.52mm )
45
160
#18
2
(0.83mm )
75
260
Accessory Connector Information
Assemble the Cable with the Accessory Connector
a. Strip back the cable jacket approx. 3mm and separate the individual conductors.
3mm
Insert
Contact
UP
Electrical Wire
PIN
1
2
3
4
Power
AC24V Live (Black)
AC24V Neutral (White)
Earth (Green)
NA
12
34
14

b. Prepare the individual conductors for clamping. After clamping the contacts, push them
into the proper holes in the accessory connector of this camera until they snap in place.
CAUTIONS : CONNECT THIS TO 24V AC CLASS 2 POWER SUPPLY ONLY.
Contact
UP
3. RS-485 In/Out Terminal
RS-485 Input (TXDI+, TXDI-) to receiver signal from keyboard, matrix, DVR or multiplexer
through twisted pair cable.
RS-485 Output (TXDO+, TXDO-) sending out signal to next fast dome through twisted pair
cable.
Transmission Distance: Max. 1 Kilometer
4. Video Out BNC Jack
Video Signal Output CVBS 1.0Vp-p 75 BNC
Recommended Data Cable: 5C2V
5. Alarm In/Out Connector
Each fast dome contains 6 alarm inputs and 1 alarm output.
Alarm Input Voltage: 5.6V max.
Alarm Output: 1A 24VDC
Recommended Data Cable: UL26 AWG 80° 300V
UL24 AWG 80°C 300V
6. Network Connector RJ45 [IPS8364/8368]
LAN : 10/100Mbps
Recommended Data Cable : CAT5
Ω
C
TXDI+
TXDI TXDO+
TXDO GND
NO/NC
COM.
GND
IN6
IN5
IN4
IN3
IN2
IN1
Alarm Out:
Alarm In:
(Gray)
(White)
(Black)
(Red)
(Green)
(Orange)
(Blue)
(Yellow)
(Violet)
15
Remark: When u sing Fa st Dome IP Camera, only 3 alarm inputs.

Step 1 Separate bracket from base of bracket
16
60mm
70mm
Untighten four screws
from bracket
INSTALLATION
Separate bracket and
base of bracket from
top of bolt.
Drill holes on desired
location
Tig hten fo ur screws to
fix the base of bracket
(These four screws are
not supplied. User must
prepare their own
screws)
Step 2 Fix base of bracket on the wall
If this circle hole is
utilized, please use this
tool to knock at this
circle hole
Untighten two screws
from iron slice of fixed
cable in the bracket and
then pick off the iron
slice.
Attach outdoor fast
dome camera to
bracket, and tighten
three screws.
Put output cables of
outdoor fast dome
camera in sequence
through tube of bracket
to outlet of bracket.
(AC cable is preferred)
Step 3 Attach camera to bracket

TXD I+
TXD I TXD O+
TXD O GND
VID EO OUT
NO
NC
COM.
GND
IN6
IN5
IN4
IN3
IN2
IN1
Alar m Out:
Alar m In:
(Bro wn)
(Gra y)
(Whi te)
(Bla ck)
(Red )
(Gre en)
(Ora nge)
(Blu e)
(Yell ow)
(Vio let)
AC2 4V
AC1 00~24 0V
LAN
17
Untighten three screws
from dome cover
Setup ID numbers of
fast dome camera and
RS-485 protocol.
Separate the dome
cover from camera
case
Step 4 Fast Dome Camera Setting
Attach the dome cover
to camera case
Tig hten th ree screws
to fix the dome cover
Step 5 Connect Jack
Attach outdoor fast
dome camera including
bracket to base of
bracket
Connect video cableConnect RS-485 cable
Connect alarm out/
input cable
After connecting all of
cables, put all of cables
and jacks in the tube of
bracket
Put iron slice of fixed
cable on the bracket,
and tighten two screws
to fix the iron slice
Connect AC24V or
AC100~240V power
cable
Connect Network cable
[Fast Dome IP Camera]

18
Outdoor AC24V Model (Easy Installation)
Step 1 Unmounting the camera
[Installation Instruction]
Tig hten fo ur screws to
bracket
Complete outdoor
fast dome camera
installation
Use rubber cover to
chock outlet of un-use
cable
Step 6 Fix bracket and outdoor fast dome camera with base
Step 2 To install fast dome camera
Untighten three screws
from upper base
Tur n the cam era case
counter clockwise
Separate the camera
case from upper base
Attach camera case to
upper base
Tur n the cam era case
clockwise to tight
position
Tig hten th ree screws to
upper base to fix the
camera case
To take the camera case
into the hole of upper
base

19
LILIN's integrated Fast Dome Surveillance System is suitable for a wide range of surveillance
applications. The system can be as single fast dome with one keyboard or encompassing as 64 domes
with comprehensive matrix switching, PC control and even Digital Video Recording.
Such flexibility means future expansion is easily facilitated.
Fast Dome and Keyboard
Single dome configuration: One Fast Dome Camera connects to one PIH-931D/932T.
Telemetry control is sent via twisted pair between Dome and Keyboard.
Video signal from the dome is sent to monitor or multiplexer or quad or switcher.
RS-485 Connection
7th pin TXDI+ of Connector Box connects to TXDI+ of RS-485 jack on fast dome.
8th pin TXDI- of Connector Box connects to TXDI- of RS-485 jack on fast dome.
SYSTEM CONFIGURATION
DVR
Quad
Switcher
OR
VIDEO
OUT
VIDEO
OUT
OUT
VIDEO
VIDEO
OUT
IN
VIDEO
IN
VIDEO
IN
VIDEO
RS-485
IN
VIDEO
IN
VIDEO
IN
VIDEO
AC
(24VAC,100~240VAC)
Monitor
Monitor
Monitor
PIH-208AL
MUL
TIFUNCTION
SWITCHER
MENU
AUTO
1
2
3
4
5
6
7
8
ALARM
RESET
POWER
ON
OFF
PIH-624
COLOR QUAD
HIGH RESOLUTION
1
2
3
4
MENU
POWER
ON
OFF
ZOOM
AUTO
HOLD
4/4
Fas t Do me
VIDEO
Mon ito r
ADAPTOR
Key boa rd C ont rol ler
1 8
2 7
3 6
4 5
AC
GND
DC12V
TXDI+
TXDI-
TXDO-
TXDO+
GND
RS-48 5
TXDI+
TXDI-
TXDO-
TXDO+
GND
ADAPTOR
Key boa rd C ont rol ler
1 8
2 7
3 6
4 5
AC
GND
DC12V
AC
(24VAC,100~240VAC)

20
Multiple Domes means that more than one fast dome is linked in the system. Each dome connects
to next dome forming a serial linking. Each dome has an individual ID dip switch, which allows the
keyboard to identify each fast dome and make command. Sometimes it is more convenient to wire a
telemetry system in star configuration rather than daisy chain. To do this a PIH-804 data
distributor is necessary. It takes an output from a keyboard or a matrix and splits the single data line
into 4 separate data lines. One keyboard can control up to 64 camera.
Ⅲ
RS-485 Connection Between PIH-804 Data Distributor and Fast Dome
1st output TXDI1+ of PIH-804 connects to TXDI+ of 1st fast dome and TXDI1- of PIH-804 to
TXDI-of 1st fast dome.
Linking 2nd Fast Dome
TXDO+ of 1st fast dome connects to TXDI+ of 2nd dome and TXDO- of 1st dome to TXDI- of 2nd
dome.
RS-485 Connection Between PIH-804 Data Distributor and Keyboard
7th pin TXDI+ of Connector Box connects to TXDO+ on RS-485 OUT jack of PIH-804
8th pin TXDI- of Connector Box connects to TXDO- on RS-485 OUT jack of PIH-804
Ⅲ
Ⅲ Ⅲ
Ⅲ
Ⅲ
Ⅲ
Multiplexer
RS-485
ADAPTOR
AC
RS-485
DATA
CONTROL
CHAIN 1
CHAIN 2
CONTROL
CHAIN 4
CONTROL
CHAIN 3
CONTROL
(24VAC,100~240VAC)
AC
FAST
DOME
16
DOME
FAST
32
FAST
DOME
48
DOME
FAST
64
FAST
DOME
182
FAST
DOME DOME
FAST
34
FAST
DOME
50
AC
VIDEO
OUT
VIDEO
AC
OUT OUT
VIDEO
AC
VIDEO
AC
OUT
OUT
VIDEO
AC
VIDEO
AC
OUT OUT
VIDEO
AC
OUT
VIDEO
33
FAST
DOME
1
DOME
FAST
17
DOME
FAST
FAST
DOME
49
VIDEO
AC
OUT
O1+
O1-
GND
O2+
O2-
GND
GND
O3-
O3+
O4+
GND
O4-
OUT
VIDEO
AC
VIDEO
AC
OUT
VIDEO
AC
OUT
DISTRIBUTOR
PIH-804
DAISY CONFIGURA
TION DISTRIBUTER
DC 12V
OUT
TXDI+
TXDI-
TXDO-
TXDO+
GND
ADAPTOR
Ke yb oar d C ontro ll er
1 8
2 7
3 6
4 5
AC
GN D
DC 12 V
TXDI+
TXDI-

21
Matrix System is designed to process multiple video systems and video switching.
Its central process unit (CPU) can manage multiple video signals simultaneously and control other
linking system, such as fast dome or PIH-820 telemetry receiver.
All telemetry remote control and signal transmissions are through twisted pair. One matrix can
manage up to 64 fast domes.
Multiple keyboards can be used for matrix control. 1st keyboard is the master and rests are slaves.
Up to 8 keyboards can be used in one system. Each keyboard has a Dip Switch for ID setting.
(Please refer to keyboard's manual for detail)
Ⅲ
RS-485 Connection Between Matrix and Fast Dome
TXD+ of receiver jack on matrix connects to TXDI+ of 1st fast dome and TXD- of matrix to TXDI-
of 1st fast dome.
Linking 2nd Fast Dome
TXDO+ of 1st dome connects to TXDI+ of 2nd dome and TXDO- of 1st dome to TXDI- of 2nd
dome. 64 fast dome can be linked through the connection as shown.
RS-485 Connection Between Keyboards
5th pin TXDO+ of 1st keyboard's connector box connects to 7th pin TXDI+ of 2nd keyboard's
connector box.
6th pin TXDO- of 1st keyboard's connector box connects to 8th pin TXDI- of 2nd keyboard's
connector box.
RS-485 Connection Between Keyboard and Matrix
7th pin TXDI+ of 1st keyboard's connector box connects to 1st pin TXD+ of matrix's keyboard jack.
8th pin TXDI- of 1st keyboard's connector box connects to 2nd pin TXD- of matrix's keyboard jack.
Fast Dome, Matrix and Keyboard
Fast Dom es
Camera s
Pan/Tilt
PIH -820
Rec eiver
Ⅲ
AC
MONITOR 1 MONITOR 2
MATRIX
FAST
DOME
CAMERA
MATRIX
PAN/TITL
AC
MATRIX
PIH-864
RS-485
AC
AC
AC
RS-485
PIH -820
Rec eiver
Ⅲ
PIH -820
Rec eiver
Ⅲ
AC
AC
VID EO IN
TXDI+
TXDI-
TXDO-
TXDO+
GND
Ke yb oar d C ontro ll er 1
1 8
2 7
3 6
4 5
AC
GN D
DC 12 V
TXDI+
TXDI-
ADAPTOR
RS-485
Ke yb oar d C ontro ll er 2
1 8
2 7
3 6
4 5
AC
GN D
DC 12 V
TXDI+
TXDI-
ADAPTOR

22
RS-485 Connection Between Fast Dome and Conversion Interface
TXD+ of conversion interface RS-485 jack connects to TXDI+ of 1st fast dome and connect TXD-
to TXDI-.
Linking 2nd FastDome
TXDO+ of 1st dome RS-485 jack connects to TXDI+ of 2nd dome and TXDO- of 1st dome to TXDI-
of 2nd dome. 64 fast domes can linked through the connection as shown.
Fast Dome with PC Control
PC telemetry remote controls fast dome with standard RS-485 data format (format: N, 8, 1 Baud Rate
9600 bps). The PC control port RS-232 is converted to RS-485 format by interface.
User may use their own software (protocol) or software provided by LILIN to control the dome.
In this system up to 64 fast domes can be linked.
VIDEO
FAST
AC
PC
RS-232
OUT
RS-485
Interface
RS-232
RS-485
IN
VIDEO
DOME 1
AC
FAST
DOME 2 DOME 3
FAST
AC
OUT
VIDEO VIDEO
OUT
RS-485 RS-485
NEXT
DOME
VIDEO
IN
AC
VIDEO
IN
OUT
VIDEO
RS-232
RS-485
RS-232
RS-485
FAST DOME
PC
Interface
AC
RS-485
RS-232
RS-232
RS-485
VIDEO
IN
OUT
VIDEO
MONITOR
PC
FAST DOME
Interface
TXDI+
TXDI-
TXDO-
TXDO+
GND
TXDI+
TXDI-
TXDO-
TXDO+
GND
TXDI+
TXDI-
TXDO-
TXDO+
GND

23
RS-485 Connection Between Fast Dome and DVR
TXD+ of DVR RS-485 jack connects to TXDI+ of 1st fast dome and TXD- of DVR to TXDI- of
1st fast dome.
Linking 2nd FastDome
TXDO+ of 1st dome RS-485 jack connects to TXDI+ of 2nd dome and TXDO- of 1st dome to TXDI-
of 2nd dome.
RJ-45 Connection Between DVRs
"Keyboard Out" of 1st DVR pass out RJ-45 jack connects to "Keyboard In" of 2nd DVR's RJ-45
jack.
RJ-45 Connection Between DVR and Keyboard
"Keyboard In" of 1st DVR's RJ-45 jack connects to RJ-45 jack of keyboard.
Fast Dome, DVR and Keyboard
The DVR System is an advanced digital recording product, with long recording time and easy
searching features. Telemetry remote control is twisted pair for data transmission to the fast dome.
Fast Dome can be controlled directly from the control panel of the DVR, or from keyboard.
Each DVR (Digital Video Recorder) can manage 16 video signals and via RS-485 ot daisy connection
16 sets of fast dome camera.
AC
24VAC
100~240VAC
Key boa rd
Con tro lle r
RS-48 5
( )
Cam era
VIDEO
Mon ito r
AC 10 0 ~2 40 V
VIDE O
OUT
1 234
5 678
9 10
11 121314
15 16
ALA RM /r s48 5
CAME RA I N Au d io i n
S-VI DE O
Au d io
ou t
1
234
Lan
Pow e r
On
of f
VIDEO
1 16 1 8
RJ-45
DVR
TXDI+
TXDI-
TXDO-
TXDO+
GND

24
The Fast Dome IP Camera can be connected via RJ-45 Ethernet cable that provides both Internet and/
or Intranet access. Multiple Fast Dome IP Cameras can be connected with in a Hub or multiple Hubs.
Please consult your network administrator for network architecture and software settings.
Fast Dome IP Camera with PC Control
PC
AC
VIDEO OUT
VIDEO
IN
(24Vac,100~240Vac)
Monitor
Internet / Ethernet
Ethernet cable
Next Dome
ADAPTOR
Key boa rd C ont rol ler
1 8
2 7
3 6
4 5
AC
GND
DC12V
TXDI+
TXDI-
TXDO-
TXDO+
GND
RS-48 5
RS-48 5
RS-485 Connection
7th pin TXDI+ of RS-485 jack at back of the keyboard connects to TXDI+ of RS-485 jack on fast
dome.
8th pin TXDI- of RS-485 jack at back of the keyboard connects to TXDI- of RS-485 jack on fast
dome.
RJ-45 Connection
Ethernet cable to Fast Dome IP Camera and attach it to the network.
1
2
43
55
5 5
1
2
3
4
5
Figure 1
Relationship Between Joystick and D irection
Figure 2
Relationship Between Joystick and R otation Speed
1
2
43
55
5 5
OPERATION
Initial Power Up Inspection
After the power is first applied to a dome it will perform a self-test procedure. This calibrates and
checks the basic functions of the dome, control is not possible during this self-test period.
Once the camera has stopped moving, it will then be ready to control. If preset positions and tours
have been programmed into a dome and the power is turned off, the dome will enter the Auto Scan
mode once the power is turned on again (after self-test period). The dome will remain in Auto
Scan until an operator cancels it. (For setting Fast Dome IP Camera other features or functions,
please refer to IP instruction manual.)
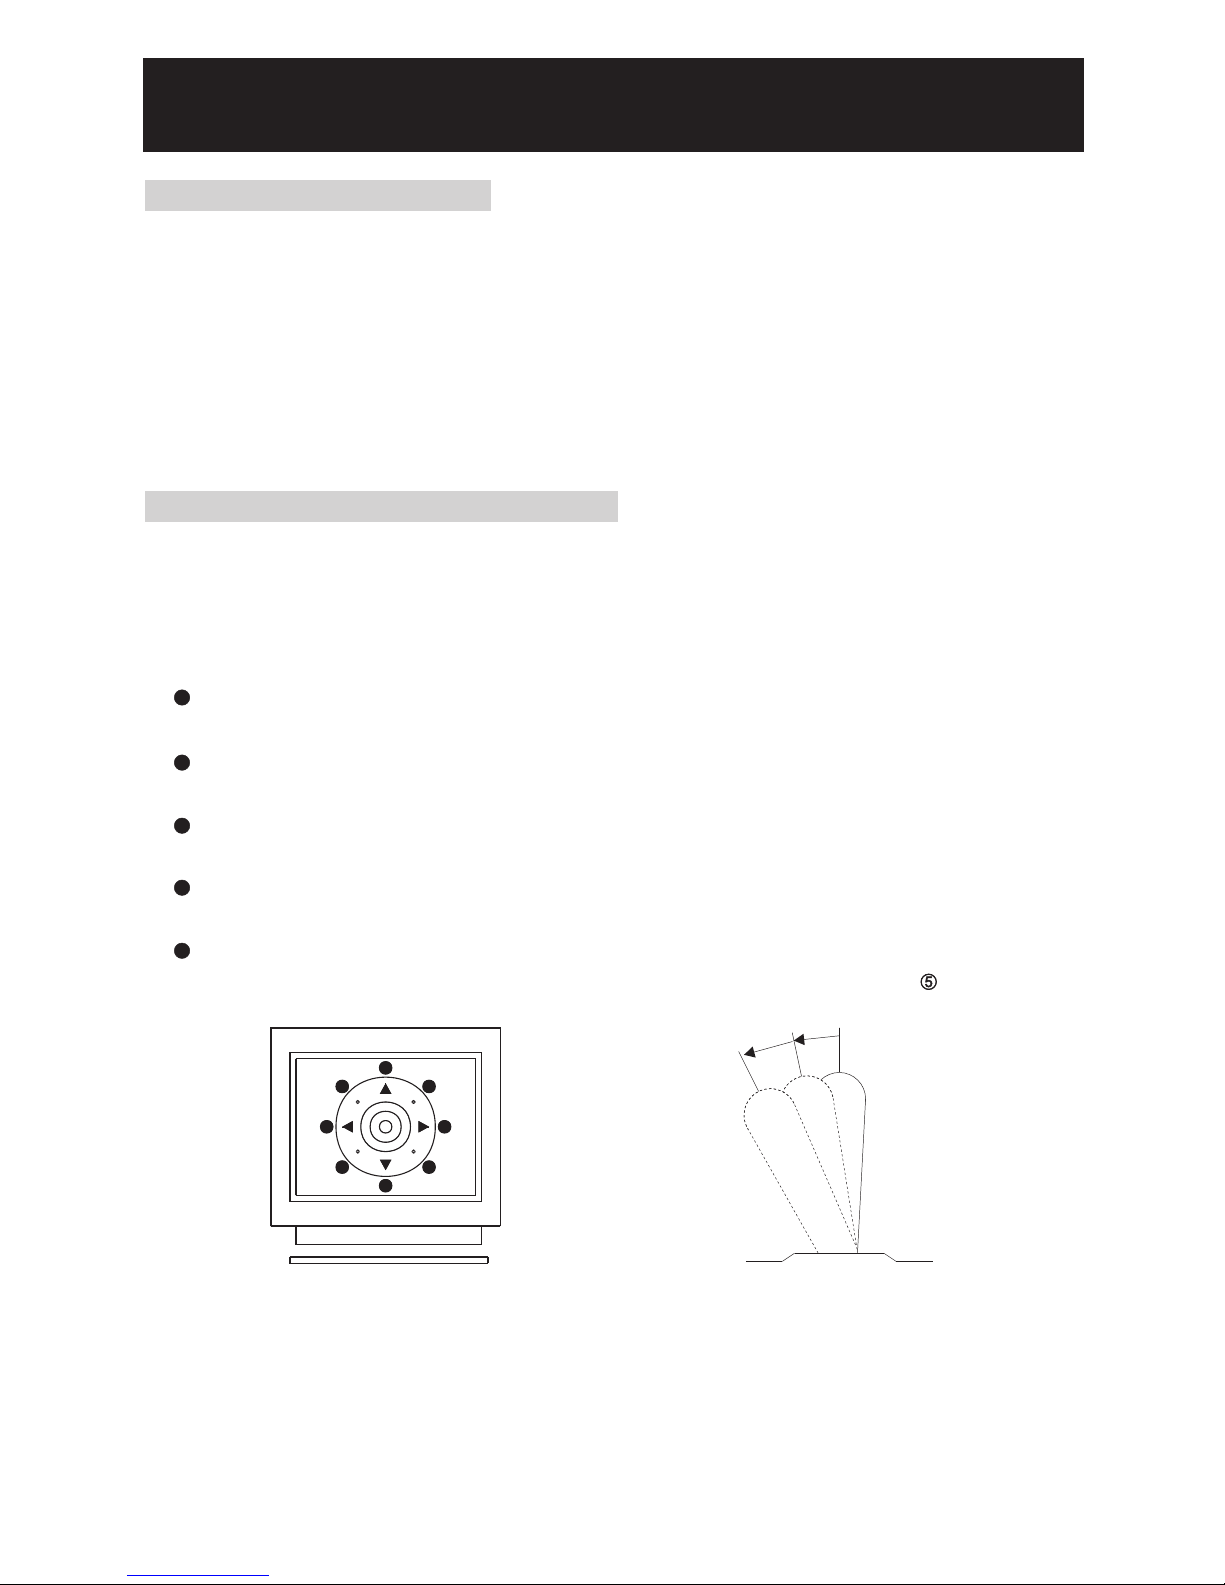
Manual Operation (Pan / Tilt Control)
To control the pan and tilt movement of the dome simply use the joystick on the keyboard; to
pan the camera left push the joystick to the left, to tilt down pull the joystick down (towards
you). To move the dome faster push the joystick further in the that direction, the joystick is
proportional to the speed of the dome; a small movement will move the dome slower.
UP
Push the joystick forward, the camera tilt up.
DOWN
Push the joystick down (towards you), the camera tilt down.
LEFT
Push the joystick left, the camera pan left.
RIGHT
Push the joystick right, the camera pan right.
DIAGONAL
Push the joystick diagonally, the camera moves to that direction (direction on figure 1)
25

Fast Dome Selection
To call out a dome controlling or setting
To select 1st Fast Dome
Push key followed by key.
To select 64th Fast Dome
Push key then followed by key.
* When matrix system is used, select monitor before
camera selection. Please refer to matrix system user
manual.
Zoom Lens Control
1. To Zoom In
Push key. The viewing angle becomes narrower and target will become enlarged on the
screen. Zooming will stop when the key is released.
2. To Zoom Out
Push key. The viewing angle becomes wider and target will become smaller on the screen.
Zooming will stop when the key is released.
Focus Control
The focus function on Fast Dome can be set as Auto Focus or Manual Focus.
1. Manual focus far
Push key.
The target will become farther. Focusing will stop when the key is released.
2. Manual focus near
Push key.
The target will become nearer. Focusing will stop when the key is released.
3. Auto Focus
Push key. The lens will automatically adjust itself for optimum focus.
1
2
3
4
5
6
7
8
9
0
CLR
ENT
FOCUS
FAR
ALARM
RESET
F1
F2
F3
F4
ESC
SET
DVR
MATRIX
MON
PRESET
SEARCH
CTRL2
。
180
SEQ
FOCUS
NEAR
AUTO
PAN
SHIFT
AUTO
FOCUS
AUTO
IRIS
CTRL1
C.SET
SPRAY
ICR
LIGHT
C.ESC
CAM
WIPER
LENS
1
6 4
CAM
1
2
3
4
5
6
7
8
9
0
CLR
ENT
FOCUS
FAR
ALARM
RESET
F1
F2
F3
F4
ESC
SET
DVR
MATRIX
MON
PRESET
SEARCH
CTRL2
。
180
SEQ
FOCUS
NEAR
AUTO
PAN
SHIFT
AUTO
FOCUS
AUTO
IRIS
CTRL1
C.SET
SPRAY
ICR
LIGHT
C.ESC
CAM
WIPER
LENS
1
2
3
4
5
6
7
8
9
0
CLR
ENT
FOCUS
FAR
ALARM
RESET
F1
F2
F3
F4
ESC
SET
DVR
MATRIX
MON
PRESET
SEARCH
CTRL2
。
180
SEQ
FOCUS
NEAR
AUTO
PAN
SHIFT
AUTO
FOCUS
AUTO
IRIS
CTRL1
C.SET
SPRAY
ICR
LIGHT
C.ESC
CAM
WIPER
LENS
FOCU S
FAR
FOCU S
NEAR
AUTO
FOCU S
26
CAM

PRE SET
Iris Control
The purpose of iris control is to adjust brightness on target. It can be set as Auto Iris or Manual Iris.
1. Iris Open
Push key, to open the iris and brighten the picture.
Iris will stop when the key is released.
2. Iris Close
Push key, to open the iris and reduce glare.
Iris will stop when the key is released.
3. Auto Iris
Push key, to select the Auto Iris mode.
Horizontal 180° Instant Flip
Some times it is hard to use the joystick to control the camera tracking the target directly under
the camera. The instant flip key can rotate the camera 180° instantly. This allows the camera
continue to track the target passing directly under the camera.
Two ways to operate 180° instant flip:
Push key on keyboard to flip the camera 180°
horizontally.
Push joystick down to bring the camera down to the
end, release the joystick and quickly push joystick
down twice to flip the camera 180° horizontally.
1
2
Preset Positions Setting
Each dome can have 128 individual preset positions. Each preset stores the exact position of
the camera and automatic pan, tilt ,zoom, focus and iris setting. Once the data is set, the preset
can be recalled for viewing, or the presets can be set for auto pan.
* Only the first 16 preset positions of fast dome can be set to auto pan mode and first 6 preset
positions are corresponding with the 6 alarm inputs.
Selecting Fast Dome
Push key followed by key, confirming that first camera is selected.
Ex. To select 1st fast dome
To select 64th fast dome
*
: keys
: keys
1
Selecting Preset Position
Push key followed by key, confirming that first preset position selected.
Ex. To select the 1st preset position
To select the 128th preset position
*
2
AUTO
IRIS
1
2
3
4
5
6
7
8
9
0
CLR
ENT
FOCUS
FAR
ALARM
RESET
F1
F2
F3
F4
ESC
SET
DVR
MATRIX
MON
PRESET
SEARCH
CTRL2
。
180
SEQ
FOCUS
NEAR
AUTO
PAN
SHIFT
AUTO
FOCUS
AUTO
IRIS
CTRL1
C.SET
SPRAY
ICR
LIGHT
C.ESC
CAM
WIPER
LENS
180
CTRL 2
。
1
2
3
4
5
6
7
8
9
0
CLR
ENT
FOCUS
FAR
ALARM
RESET
F1
F2
F3
F4
ESC
SET
DVR
MATRIX
MON
PRESET
SEARCH
CTRL2
。
180
SEQ
FOCUS
NEAR
AUTO
PAN
SHIFT
AUTO
FOCUS
AUTO
IRIS
CTRL1
C.SET
SPRAY
ICR
LIGHT
C.ESC
CAM
WIPER
LENS
1
CAM
1
CAM
6 4
1
CAM
: keys
: keys
1
PRE SET
8
PRE SET
21
27

Joystick Control
Move the Joystick to bring the camera to the desired
view position.
1
2
43
55
5 5
3
4
Adjusting Lens
ZOOM IN / OUT, FOCUS NEAR / FAR / AUTO and IRIS O / C / AUTO keys.
When set up preset point, using manual focus will
provide both clarity and stability of image.
5
Setting Preset Speed
The speed the dome travels to that preset position can be adjusted between 1° to 255° per
second (the factory default is 255°/sec).
To set speed as 10°/sec: Push key followed
by key, two beeps will be heard confirming that
speed is set.
Note: Push key again to confirm speed entered.
Setting Preset Dwell Time
The dwell time means the time user wants to view on certain preset position under Auto Pan.
The Preset Dwell Time can be set between 0 ~ 255 seconds. (The factory default is 0 second)
* If the dwell is set to 0 second then that position will be omitted from the Auto Scan Tour.
To set dwell to 5 seconds: Push key followed by
key.
Ex. To set dwell to 5 second
To set dwell to 10 second
*
: keys
: keys
6
Storing Preset Data
Once the above steps have been completed, the information must be stored or it will not be
memorized by the system.
Push key followed by key, two beeps will
be heard confirming that data is stored.
Note : For the first 16 presets on each dome, the above
steps must be repeated. For presets 17 ~ 128
there is a default speed and dwell setting so steps
5 and 6 are not required.
*
7
1
2
3
4
5
6
7
8
9
0
CLR
ENT
FOCUS
FAR
ALARM
RESET
F1
F2
F3
F4
ESC
SET
DVR
MATRIX
MON
PRESET
SEARCH
CTRL2
。
180
SEQ
FOCUS
NEAR
AUTO
PAN
SHIFT
AUTO
FOCUS
AUTO
IRIS
CTRL1
C.SET
SPRAY
ICR
LIGHT
C.ESC
CAM
WIPER
LENS
1
2
3
4
5
6
7
8
9
0
CLR
ENT
FOCUS
FAR
ALARM
RESET
F1
F2
F3
F4
ESC
SET
DVR
MATRIX
MON
PRESET
SEARCH
CTRL2
。
180
SEQ
FOCUS
NEAR
AUTO
PAN
SHIFT
AUTO
FOCUS
AUTO
IRIS
CTRL1
C.SET
SPRAY
ICR
LIGHT
C.ESC
CAM
WIPER
LENS
1 0
F1
F1
5
F2
5 F2
0 F21
1
2
3
4
5
6
7
8
9
0
CLR
ENT
FOCUS
FAR
ALARM
RESET
F1
F2
F3
F4
ESC
SET
DVR
MATRIX
MON
PRESET
SEARCH
CTRL2
。
180
SEQ
FOCUS
NEAR
AUTO
PAN
SHIFT
AUTO
FOCUS
AUTO
IRIS
CTRL1
C.SET
SPRAY
ICR
LIGHT
C.ESC
CAM
WIPER
LENS
1 F3
1
2
3
4
5
6
7
8
9
0
CLR
ENT
FOCUS
FAR
ALARM
RESET
F1
F2
F3
F4
ESC
SET
DVR
MATRIX
MON
PRESET
SEARCH
CTRL2
。
180
SEQ
FOCUS
NEAR
AUTO
PAN
SHIFT
AUTO
FOCUS
AUTO
IRIS
CTRL1
C.SET
SPRAY
ICR
LIGHT
C.ESC
CAM
WIPER
LENS
28

Recalling Preset Positions
Once the required preset positions have been stored in a dome, they may be quickly recalled,
returning the dome to exact position.
To recall 1st Preset Position: Push key followed by key.
。
The dome will move to that position in speed of 360 /sec.
Ex. To recall 1st preset position
To recall 128th preset position
Setting Preset Group
The purpose of setting preset group allows the management of the 16 preset positions before
Auto Scanning. The first 16 preset positions of each dome are separated into 4 groups. Preset
group must be set for the auto pan reference.
Group 1 includes: 1st 2nd 3rd and 4th preset positions.
Group 2 includes: 5th 6th 7th and 8th preset positions.
Group 3 includes: 9th 10th 11th and 12th preset positions.
Group 4 includes: 13th 14th 15th and 16th preset positions.
To set up group 1: Push key followed by key.
Ex.
To set Group 1
To set Group 2,3
To set Group 3,4
To set Group 1,2,3
To set Group 2,3,4
To set Group 1,2,3,4
1
2
3
4
5
6
7
Changing Preset Data
In order to change any preset position from the one stored, the dome must first be sent to that
preset position.
To change the 4th preset position of the Dome number 3, perform the following steps:
Push to select Dome 3
Push to go to 4th preset position
Move joystick to bring camera to the desired view position.
Adjusting lens
Setting preset speed
Setting dwell time
Store Data
(Please refer to preset position setting for step ~ )
: keys
: keys
1
PRE SET
8
PRE SET
21
1
PRE SET
1
2
3
4
5
6
7
8
9
0
CLR
ENT
FOCUS
FAR
ALARM
RESET
F1
F2
F3
F4
ESC
SET
DVR
MATRIX
MON
PRESET
SEARCH
CTRL2
。
180
SEQ
FOCUS
NEAR
AUTO
PAN
SHIFT
AUTO
FOCUS
AUTO
IRIS
CTRL1
C.SET
SPRAY
ICR
LIGHT
C.ESC
CAM
WIPER
LENS
321 F44
432 F4
321 F4
F443
F421
F41
F41
CAM
3
4
PRE SET
29

Activating Auto Pan
When the Auto Pan function is activated, the fast dome will auto touring the preset groups entered.
To activate Auto Pan:
Push key, confirming the activation of autopan.
(Auto Pan Led will be lit.)
To stop Auto Pan:
Push key again, confirming the stop of autopan.
(Auto Pan Led will be Off.)
* If the AUTO PAN is activated, no other commands can be sent to that dome, but other dome
can still be selected and operated manually.
To select (call out) another dome while it is under Auto Pan mode:
Simply push the numeric key followed by the key.
Push key followed by key, confirming the 2nd camera is selected.
Deleting Preset Data
Sometimes it is necessary to delete the stored data. All the data can be cleared from a dome by
pressing key , followed by the key.
All 128 preset data will be erased.
Push , followed by key.
1
2
3
4
5
6
7
8
9
0
CLR
ENT
FOCUS
FAR
ALARM
RESET
F1
F2
F3
F4
ESC
SET
DVR
MATRIX
MON
PRESET
SEARCH
CTRL2
。
180
SEQ
FOCUS
NEAR
AUTO
PAN
SHIFT
AUTO
FOCUS
AUTO
IRIS
CTRL1
C.SET
SPRAY
ICR
LIGHT
C.ESC
CAM
WIPER
LENS
AUTO
PAN
AUTO
PAN
CAM
2
CAM
1
2
3
4
5
6
7
8
9
0
CLR
ENT
FOCUS
FAR
ALARM
RESET
F1
F2
F3
F4
ESC
SET
DVR
MATRIX
MON
PRESET
SEARCH
CTRL2
。
180
SEQ
FOCUS
NEAR
AUTO
PAN
SHIFT
AUTO
FOCUS
AUTO
IRIS
CTRL1
C.SET
SPRAY
ICR
LIGHT
C.ESC
CAM
WIPER
LENS
CLR
1 19 0
CLR
1 19 0
30
1
2
3
4
5
6
7
8
9
0
CLR
ENT
FOCUS
FAR
ALARM
RESET
F1
F2
F3
F4
ESC
SET
DVR
MATRIX
MON
PRESET
SEARCH
CTRL2
。
180
SEQ
FOCUS
NEAR
AUTO
PAN
SHIFT
AUTO
FOCUS
AUTO
IRIS
CTRL1
C.SET
SPRAY
ICR
LIGHT
C.ESC
CAM
WIPER
LENS
Reboot System
Sometimes it is necessary to reboot the system
Push key , followed by the
key. Two beeps will be heard confirming reboot the
system.
CLR
1 39 0

31
Alarm Output
Each fast dome has 1 alarm output. A dip switch can program the alarm output for NO (normally
open) or NC (normally close), that can activate the linked devices.
When alarm triggers, disable alarm as follows:
Push the joystick up, down, left, right or adjust the lens to disable the alarm.
Push of the keyboard.
Recall preset position.
Push of the keyboard to start Auto Pan mode.
Alarm Release Setting
1
2
ALAR M
RESE T
1
2
3
4
AUTO
PAN
The 6 alarm inputs of each fast dome are corresponding with the first 6 preset positions. When
。
an alarm signal is triggered, the dome will go to the relevant position at 360 /sec. Make sure
the first 6 preset positions are set to desired alarm areas.
Alarm input can be set to NC (normally close) or NO (normally open) depends on alarm detector.
Relationship Between Alarm Inputs and First 6 Presets
Alarm Input 1 will send the dome to Preset Position 1
Alarm Input 2 will send the dome to Preset Position 2
Alarm Input 3 will send the dome to Preset Position 3
Alarm Input 4 will send the dome to Preset Position 4
Alarm Input 5 will send the dome to Preset Position 5
Alarm Input 6 will send the dome to Preset Position 6
Remark: When using Fast Dome IP Camera, only 3 alarm inputs.
Alarm Management

SETUP MENU TREE
32
SETUP
MENU
LANGUAGE
DISPLAY
SETUP
DOME
SETTINGS
PRESET ID
ENGLISH
CAMERA AUTO FOCUS
ZOOM RATIO
ALARM MESSAG E
DATE /TIME
AUTO PAN
AREA TITLE
PAN/ TILT ANGLE
TIME
DATE
DATE F ORMAT
ZOOM SPEED
FOCUS SPEED
AUTO IRIS LEVEL
ADVANCED
SETTING
EXPOSURE MOD E AUTO
INT
DIGITAL EFFECT
CONTRAST
SHARPNESS
HUB
R-GAIN
B-GAIN
CONTRAST
3D-NR
E-ZOOM
DIS
AUTO
HLC
ATW
DAY→NI GHT
ADJUST
B-GAIN
B-GAIN
SPEED
NIGHT→DAY
PRESET
R-GAIN
R-GAIN
DELAY CNT
ATW FR AME
ENVIRONMNT
MANUAL
SCHED.
DAY
NIGHT
LL
IR LIGHT
NORMAL
CLIP LEVEL
SCALE
AWC
USER1
USER2
ANTICR
WHITE BAL
HLC
DAY/ NIGHT
NIGHT ENV.
SYNC
IMAGE
ON
OFF
AUTO
ONE PUSH
HIGH LUM. MODE
LOW LUM. MODE
BLC
MODE
SHUT
AGC

33
PRIVACY
ZONES
FACTORY INITIA L
ALARMS
TOU RS
PASS WORD
CLEAR ABOVE NUM BER
CLEAR
EDIT TOUR
EDIT ZONE
MODE
NUMBER
NUMBER
IN 1
IN 2
IN 3
IN 4
IN 5
IN 6
DWELL TIME
SPEED
IN MODE
OUT
ENABLE PASSWORD
CAMERA
EDIT PASSW ORD
ALL
OUT TIME- OUT
SCHEDULE
SETUP
SYSTEM INFOR MATION
EXIT
REBOOT SYSTEM
BACK
STARTUP AUTO
OPTIONS
DAYL IGHT SAVING
TIME
ALARM IN
END
START
STARTUP
1. HH : MM
STARTUP
2. HH : MM
1. START
2. END
3. START
4. END
5. START
6. END
3. HH : MM
4. HH : MM
5. HH : MM
6. HH : MM
7. HH : MM
8. HH : MM
PRESETS PR ESET NUMBER
PRESET MAP
EDIT POSITION
EDIT ID
SCENE FILES
DWELL TIME
SPEED
CLR PRESET
ON EXPOSUR E MODE
WHITE BALANC E
PAN/ TILT HOME POS ITION
SELF RETURN TIME
SELF RETURN MO DE
AUTO MODE
AUTO EDIT POSIT ION
LEARN
DWELL TIME
CLEAR
SCAN SPEED
PATROL

Reboot System
Press key into Setup Menu.
Push joystick down to select <REBOOT SYSTEM>, and then press key to restart the fast
dome system.
Press key to exit setup menu or push joystick down to select <EXIT>, and then press
key to exit setup menu.
Restart the fast dome system to perform initial setting and operation.
C.SE T
CTRL 1
ESC
C.SE T
CTRL 1
C.SE T
CTRL 1
SP826X/836X & IPS826X/836X & ST826X/836X (build-in 25X/36X optical zoom lens) series
provide on-screen display (OSD) setup menu, all functions can be selected and set via OSD Setup
Menu.
Setup Menu Display
Press key on the keyboard to recall Setup Menu.
Press key to exit setup menu or push joystick down to select <EXIT>, and then press
key to exit setup menu.
Language Selection
Press key into Setup Menu.
Push joystick down to select <LANGUAGE>, and then push joystick left or right to select
language.
Press key to exit setup menu or push joystick down to select <EXIT>, and then press
key to exit setup menu.
Fast Dome Camera Function Setup
C.SE T
CTRL 1
ESC
C.SE T
CTRL 1
C.SE T
CTRL 1
ESC
C.SE T
CTRL 1
34
MER IT LILI N FAST DOME
LAN GUAGE
<DI SPLAY SETUP>
<DO ME SETT INGS>
<SC HEDUL E SETUP >
<SY STEM IN FORMAT ION>
<RE BOOT SY STEM >
EXI T
ENG LISH
Buttons Description
PIH-931D/932T
MLP1
PIH-800III
Enter
Setup Menu
Exit
Setup Menu
C. ES C
LIG HT
MLP2
NOTE
PIH-931D/932T
PIH-800III
C. SE T
CTR L 1
CAM S ETUP
CTR L 1
CAM E SC
LIG HT
ESCSET
ESCSET UP

35
Display System Information
Press key into Setup Menu.
Push joystick down to select <SYSTEM INFORMATION>, and then press key to display
current system information.
Push joystick down to select <BACK>, and then press key to go back or push joystick
down to select <EXIT>, and then press key to exit setup menu.
MER IT LILI N FAST DOME
LAN GUAGE
<DI SPLAY SETUP>
<DO ME SETT INGS>
<SC HEDUL E SETUP >
<SY STEM IN FORMAT ION>
<RE BOOT SY STEM >
EXI T
ENG LISH
SYS TEM INF ORMATI ON
DOM E MODEL
CAM ERA VER.
PAN/ TILT VER .
REC EIVER V ER.
FON T V ER.
COM M
DOM E AD DR.
PRO TOCOL
BAC K EXIT
36X
01. 05.01
01. 02.00
02. 05.01
01. 00.00
960 0, n, 8, 1
1
LIL IN MLP 2
Display system information:
1. Fast dome model number
2. Camera, Pan/Tilt, Receiver version
3. Font of OSD version
4. Protocol rate and format
5. Fast dome ID number
6. Protocol version, LILIN717 (LILIN MLP1), LILIN MLP2
Display Character Setup Menu
Press key into Setup Menu.
Push joystick down to select <DISPLAY SETUP>, and then press key to display character
setup menu.
Push joystick down to select <BACK>, and then press key to go back or push joystick
down to select <EXIT>, and then press key to exit setup menu.
1. Display Character Setup Menu
C.SE T
CTRL 1
C.SE T
CTRL 1
C.SE T
CTRL 1
C.SE T
CTRL 1
C.SE T
CTRL 1
C.SE T
CTRL 1
C.SE T
CTRL 1
C.SE T
CTRL 1
MER IT LILI N FAST DOME
LAN GUAGE
<DI SPLAY SETUP>
<DO ME SETT INGS>
<SC HEDUL E SETUP >
<SY STEM IN FORMAT ION>
<RE BOOT SY STEM >
EXI T
ENG LISH
DIS PLAY SETUP
PRE SET ID
ZOO M RATIO
ALA RM MESS AGE
DATE /TIM E
PAN/ TILE AN GLE
AUT O PAN
ARE A TI TLE
BAC K EXIT
OFF
5SE C
ON
OFF
OFF
5SE C
OFF
Push joystick down to select <PRESET ID>, and then push joystick left or right to make selection:
OFF : No Preset ID on the monitor screen.
ON : Preset ID on the monitor screen.
5~30 sec: Display elapsed time. Preset ID will have been displayed on the monitor screen until
elapsed time stops, when Preset ID is recalled.(5, 10, 15, 20, 25, 30sec. can be selected.)
2. Preset ID setting

36
DIS PLAY SETUP
PRE SET ID
ZOO M RATIO
ALA RM MESS AGE
DATE /TIM E
PAN/ TILE AN GLE
AUT O PAN
ARE A TI TLE
BAC K EXIT
OFF
5SE C
ON
<ON >
OFF
5SE C
OFF
Push joystick down to select <ZOOM RATIO>, and then push joystick left or right to make
selection:
OFF : No Zoom Ratio on the monitor screen.
ON : Zoom Ratio on the monitor screen.
5~30 sec : Display elapsed time. Zoom Ratio will have been displayed on the monitor screen
until elapsed time stops, when Zoom Ratio is operated.
(5, 10, 15, 20, 25, 30sec. can be selected.)
3. Zoom Ratio Setting
Push joystick down to select <ALARM MESSAGE>, and then push joystick left or right to
make selection:
OFF : No Alarm Message on the monitor screen.
ON : Alarm Message on the monitor screen.
5~30 sec : Display elapsed time. Alarm Message will have been displayed on the monitor
screen until elapsed time stops, when Alarm Input is triggered.
(5, 10, 15, 20, 25, 30sec. can be selected.)
4. Alarm Message Setting
Push joystick down to select <DATE/TIME>, and then push joystick left or right to make
selection:
OFF : No Date/Time on the monitor screen.
ON : Display Date/Time on the monitor screen. When selection is open, and then press
key, date/time will be set.
5. Date and Time Setting
C.SE T
CTRL 1
DATE /TIM E
TIM E
DATE
DATE F ORMAT
BAC K EXIT
12 : 00 : 0 1
12 / 01 / 0 2
yy / mm / d d
(1) Time Adjustment
Push joystick down to select <TIME>, and then press key to setup time.
Push joystick left or right to adjust time, and then press key to next item of time.
12 : 00 : 01 → → 12 : 00 : 01 → → 12 : 00 : 01 → → 12 : 00 : 01
(2) Date Adjustment
Push joystick down to select <DATE>, and then press key to setup date.
Push joystick left or right to adjust date, and then press key to next item of date.
12 : 01 : 02 → → 12 : 01 : 02 → → 12 : 01 : 02 → → 12 : 01 : 02
C.SE T
CTRL 1
C.SE T
CTRL 1
C.SE T
CTRL 1
C.SE T
CTRL 1
C.SE T
CTRL 1
C.SE T
CTRL 1
C.SE T
CTRL 1
C.SE T
CTRL 1
C.SE T
CTRL 1
C.SE T
CTRL 1

37
Push joystick down to select <DATE FORMAT>, and then push joystick left or right to
adjust format of date.
(3) Date Format Setting
yy / mm / dd → mm / dd / yy → dd / mm / yy
Push joystick down to select <PAN/TILT ANGLE>, and then push joystick left or right to select
pan/tilt setup:
OFF : No Pan/Tilt Angle on the monitor screen.
ON : Pan/Tilt Angle on the monitor screen.
6. Pan/Tilt Angle Setting
Push joystick down to select <AUTO PAN>, and then push joystick left or right to select auto pan
setup:
OFF : No Auto Pan mode on the monitor screen.
ON : Auto Pan mode on the monitor screen.
5~30 sec : Display elapsed time. Auto pan will have been displayed on the monitor screen until
elapsed time stops, when auto pan is operated.
(5, 10, 15, 20, 25, 30sec. can be selected.)
7. Auto Pan Setting
8. Area Title Setting
The area title function lets you display a direction indicator that appears in the picture to indicate
the direction of the location being shown on the screen. Text can also be displayed in the place of
the direction indicators, if desired. The direction indicators are N(north), NE(northeast), E(east),
SE(south east), S(south), SW(southwest), W(west) and NW(northwest).
Push joystick down to select <AREA TITLE>, and then push joystick left or right to select area
title setup.
OFF : Turn off display of area title direction indicators and text.
NESW : Displays direction indicators. Select(NESW) and pressing the button will display
the position(NESW) setting menu. Which you can use for configuring detailed settings.
USER : Display user input text. Selecting(USER) and pressing the button will display the
area title(USER) selection menu, which you can use for configuring detailed settings.
(1) When NESW is selected
After selecting NESW, you can use the joystick to configure detailed setting. Once you set
the northerly(N) direction for camera, all other directions are displayed automatically.
(2) When USER is selected
After selecting USER, you can use the area title USER setting menu to configure detailed
settings. You can use following procedure to configure direction settings, and to input text
associated with a particular direction indicator.
C.SE T
CTRL 1
C.SE T
CTRL 1

USE R AR EA
ARE A NU MBER
<ED IT POSI TION >
<ED IT TITLE>
CLR AR EA
BAC K EXIT
1
ABO VE NUM
1. Push joystick down to select <AREA NUMBER>, and then push joystick left or right to
select area number. (1~6)
2. Push joystick down to select <EDIT POSITION>, and then press key into Area Position
setting.
Push joystick left, right, up or down to start position, and , to adjust zoom, then
press key to confirm.
3. Push joystick down to select <EDIT TITLE>, and then press key into title setup.
C.SE T
CTRL 1
C.SE T
CTRL 1
C.SE T
CTRL 1
ID FO R AR EA NUM. 01
01 234 56 78 9
AB CDE FG HI JK LM
NO PQR ST UV WX YZ
ab cde fg hi jk lm
no pqr st uv wx yz
., :'" /# *= () <>
AR EA / -- -- -- -- -
SPAC E BACK SPACE
COP Y
OK CA NCEL
CHARACTER
EDIT AREA
COMMAND
(1) New Area Title Editing
Push joystick down to select character, and press key to confirm. The character
selected will be showed in edit area. If you need space, push joystick down to select
<SPACE> and press key to confirm.
Press or to switch to next character list.
Repeat all steps to complete Area Title.
(2) Copy Area Title to Another Area
Push joystick down to select [EDIT AREA], and push joystick left or right to select
first copy of characters.
Push joystick down to <COPY>, and press key to confirm. At this time first
character of Area ID will be copy to first character position of another Area Title,
and press key to do next copy.
Push joystick down to <OK>, and press key for exit. Select another area on the
area menu, and get into area title setting. Then push joystick down to [EDIT AREA]
and press key for copy. At this time edit area will show area title that was copied.
C.SE T
CTRL 1
C.SE T
CTRL 1
C.SE T
CTRL 1
C.SE T
CTRL 1
C.SE T
CTRL 1
C.SE T
CTRL 1
38

(3) Modify Area title
Push joystick down to select [EDIT AREA] on the area title setting, and push joystick
right to select modifiable characters.
Push joystick down to select new characters, and press key to chose.
(4) Cancel Area Title
Push joystick down to <CANCEL>, and then press key to cancel area title.
(5) Return Preset Menu
Push joystick down to <OK>, and then press key to back to user area menu.
C.SE T
CTRL 1
4. Clear Area Title
Push joystick down to select <CLR AREA>, and then push joystick left or right to select
<ABOVE NUM> or <ALL>. Then press key to confirm.
ABOVE NUM : Only clear character of allotted area.
ALL : Clear character off all area.
C.SE T
CTRL 1
8. Character Location
201 2/01/ 01 00:0 0:01
CAM 0 01 Outd oor
Ala rm Mess age Inp ut 1
350 deg 90d eg 1.0x
Date / Time
Preset ID
Auto Pan / Alarm Message
Horizontal Angle
Zoom Ratio
Vertical Angle
Display Dome Function Setup Menu
Press key into Setup Menu.
Push joystick down to select <DOME SETTINGS>, and then press key into dome setting
menu.
FAST D OME
LAN GUAGE
<DI SPLAY SETUP>
<DO ME SETT INGS>
<SC HEDUL E SETUP >
<SY STEM IN FORMAT ION>
<RE BOOT SY STEM >
EXI T
ENG LISH
DOM E SETTI NG
<CA MERA>
<PAN /TILT>
<PR ESETS >
<TO URS>
<PR IVACY ZONES>
<AL ARMS>
<PAS SWOR D>
<FAC TORY INI TIAL>
BAC K EXIT
C.SE T
CTRL 1
C.SE T
CTRL 1
39
C.SE T
CTRL 1
C.SE T
CTRL 1

40
Camera Setting Menu Display
After getting in dome setting menu, push joystick down to select <CAMERA>, and then press
key into camera setting menu.
1. Display the Camera Setting Menu
CAM ERA
AUT O FOCU S
ZOO M SPEED
FOC US SPEE D
AUT O IRIS L EVEL
<AD VA NCED S ETTI NG>
BAC K EXIT
AUT O
07
MID .
---
C.SE T
CTRL 1
(1) Auto Focus Setting
Push joystick down to select <AUTO FOCUS>, and then push joystick left or right to
select auto focus mode:
Note: When manual focus switched to auto focus or lens zooming stop, then the camera
will perform One Push focus with the target image.
(2) Zoom Speed Setting
Push joystick down to select <ZOOM SPEED>, and then push joystick left or right to
adjust zoom speed setting.
Zoom speed ranges are 00 ~ 07.
(3) Focus Speed Setting
Push joystick down to select <FOCUS SPEED>, and then push joystick left or right to
adjust focus speed setting.
(4) Auto Iris Setting
Push joystick down to select <AUTO IRIS LEVEL>, and then push joystick left or right
to adjust auto iris level.
Auto iris levels are 00 ~ 15.
Note: The <SHUTTER/AGC> option needs to be set to MANUAL.
SLOW → MID. → FAST
AUTO → ONE PUSH
After getting in camera setting menu, push joystick down to select <ADVANCED SETTING>,
and then press key into advanced setting.
2. Advanced Setting
C.SE T
CTRL 1

41
ADVA NCED S ETTING
SHU TTER/ AGC
WHI TE BAL
<HL C>
DAY/ NIGH T
NIG HT ENV.
SYN C
<IM AGE>
BAC K EXIT
<MA NUAL>
<ATW >
AUT O
NOR MAL
INT
Push joystick down to select <SHUTTER/AGC>, and then push joystick left or right
to setup auto mode or manual mode.
1. AUTO EXPOSURE SETUP:
1- 1. High Luminance Mode:
Push joystick down to select <HIGH LUM. MODE>, and then push joystick left
or right to select SHUT or WDR+SHUT mode.
BRIGHTNESS:
Push joystick down to select <BRIGHTNESS> , and then push joystick left or
right to adjust light level.
Brightness levels are 0 ~ 127.
1- 2. Low Luminance Mode:
Push joystick down to select <LOW LUM. MODE>, and then push joystick left
or right to make selection.
(1) SHUTTER/AGC Setting
AUTO S ETUP
HIG H LUM. MO DE
BRI GHTNE SS
LOW L UM. MOD E
GAI N
SHU T
BRI GHTNE SS
BLC
BAC K EXIT
SHU T
40
AGC
25d B
--- -
x0. 50
OFF
1-2-1. AGC: Auto Gain Control.
GAIN: Push joystick down to select <GAIN>,
and then push joystick left or right to make
selection. (Gain Control ranges are 20dB ~
36dB.)
SHUT: No adjustment when in AGC mode.
1-2-2. SLOW: Slow Shutter Mode.
GAIN: No adjustment when in SLOW mode.
SHUT: Push joystick down to select <SHUT>,
and then push joystick left or right to make
selection. (Shut control ranges are 05 ~
15FLD.)
1-2-3. AGC-SLOW: AGC+SLOW Mode.
GAIN: Push joystick down to select <GAIN>, and then push joystick left or
right to make selection. (Gain Control ranges are 20dB ~ 36dB.)
SHUT: Push joystick down to select <SHUT>, and then push joystick left or
right to make selection. (Shut control ranges are 05 ~ 15 FLD.)
1-2-4. OFF
AGC → SLOW → AGC+SLOW → OFF
AUTO S ETUP
HIG H LUM. MO DE
BRI GHTNE SS
LOW L UM. MOD E
GAI N
SHU T
BRI GHTNE SS
BLC
BAC K EXIT
SLO W
---
0.6 FLD
x0. 50
OFF
AUTO S ETUP
HIG H LUM. MO DE
BRI GHTNE SS
LOW L UM. MOD E
GAI N
SHU T
BRI GHTNE SS
BLC
BAC K EXIT
AGC +SLOW
25d B
0.6 FLD
x0. 50
OFF

Push joystick down to select <BRIGHTNESS> , and then push joystick left or
right to adjust brightness level of darker part.
BRIGHTNESS:
When “AUTO” is selected, the brightness gain is automatically controlled for
backlight compensation in response to the light intensity detection window.
Push joystick down to select <BLC>, and then push joystick left or right to select
“AUTO” or “OFF”.
Note: The backlight compensation function setting is available only when high
luminance mode is set to electronic shutter(HIGH LUM. MODE=SHUT).
1- 4. ATR-EX Contrast: Adaptive Tone Reproduction - EX panded
The ATR-EX function provides gradation compensation to improve the contrast.
The Loss of dark detail and overexposure improve.
Push joystick down to select <ATR-EX CONTRAST>, and then push joystick left
or right to make selection.
Note: The ATR-EX function setting is available only when high luminance mode is
set to wide dynamic range(HIGH LUM. MODE=WDR+SHUT).
1- 3. BLC Setting:
AUTO S ETUP
HIG H LUM. MO DE
BRI GHTNE SS
LOW L UM. MOD E
GAI N
SHU T
BRI GHTNE SS
AT R-E X CO NT RA ST
BAC K EXIT
WDR +SHUT
99
AGC
25d B
--- -
--- -
MID
LOW → MIDLOW → MID → MIDHIGH → HIGH
2
Push joystick down to select <MODE>, and then push joystick left or right to select
SHUT mode or WDR+SHUT mode.
2- 1. SHUT Mode:
This mode can set a fixed shutter speed with iris
to exhibit image effect.
Push joystick down to select <SHUT>, and then
push joystick left or right to make selection.
. MANUAL EXPOSURE SETUP:
1/53(63) → 1/120(100) → 1/250 → 1/500
1/10000 ← 1/4000 ← 1/2000 ← 1/1000
42
MAN UAL SETUP
MOD E
SHU T
AG C
BA CK EXIT
SHU T
1/5 3
20d B
x0.25 → x0.50 → x0.75 → x1.00

Push joystick down to select <WD SHUT>, and
then push joystick left or right to make selection.
1/53(63) → 1/120(100) → 1/250 → 1/500
1/10000 ← 1/4000 ← 1/2000 ← 1/1000
1/976(1351) → 1/2000 → 1/4000 → 1/6000
1/25000 ← 1/20000 ← 1/15000 ← 1/10000
Push joystick down to select <WHITE BAL>, and then push joystick left or right to select
white balance mode.
(2) WHITE BALANCE Setting
ATW → AWC → USER1 → USER2 → ANTICR
ADVA NCED S ETTING
SHU TTER/ AGC
WHI TE BAL
<HL C>
DAY/ NIGH T
SYN C
<IM AGE>
BAC K EXIT
<MA NUAL>
<ATW >
AUT O
INT
ATW SET UP
SPE ED
DEL AY CNT
ATW FR AME
ENV IRONM ENT
BAC K EXIT
16
16
x0. 5
IND OOR
Auto Tracing White Balance, suitable for 1800 ~ 10500K color temperature environment.
1- 1. SPEED:
Push joystick down to select <SPEED>, and then push joystick left or right to
make selection.
ATW speed ranges are 0 ~ 255 (fast ~ slow).
1. ATW (Auto Trace White Balance) SETUP:
43
This mode can set a fixed WDR and shutter speed with iris to exhibit image effect.
Push joystick down to select <SHUT>, and then
push joystick left or right to make selection.
2- 2. WDR+SHUT Mode:
MAN UAL SETUP
MOD E
SHU T
WD SH UT
AG C
BA CK EXIT
WDR +SHUT
1/5 3
1/9 76
20d B
10dB → 20dB → 25dB → 30dB
2- 3. AGC
Push joystick down to select <AGC>, and then push joystick left or right to make
selection.
Push joystick down to select <DELAY CNT>, and then push joystick left or right
to make selection.
ATW delay time ranges are 0 ~ 255 (short ~ long).
1- 2. DELAY CNT:

1- 4. ENVIRONMENT:
Push joystick down to select <ENVIRONMENT>, and then push joystick left or
right to select INDOOR mode or OUTDOOR mode.
ATW delay time ranges are 0 ~ 255 (short ~ long).
Note: In indoor mode the color temperature is fixed at approximately 3200K.
In outdoor mode the color temperature is fixed at approximately 6300K.
1
2
2
Auto White Balance Control mode, suitable for any color temperature environment.
Note: This function adjusts the white balance regardless of the subject conditions.
Pull-in control is exercised at all times independently of the pull-in frame which
was set by the pre-white balance adjustment.
3. USER1:
Manual White Balance mode 1, suitable for 1800 ~ 10500K color temperature
environment.
Select <USER1>, and press key into USER1
WB adjustment image.
Push joystick down to select <R-GAIN>, and then
push joystick left or right to adjust white balance to
lower color temperature, and push joystick down to
select <B-GAIN>, and then push joystick left or right
to adjust white balance to higher color temperature.
Confirm color temperature, and then press key to
record data in the memory.
4. USER2:
Manual White Balance mode 2, suitable for 1800 ~ 10500K color temperature
environment.
Select <USER2>, and press key into USER2 WB adjustment image.
. AWC (Auto White balance Control):
C.SE T
CTRL 1
USE R1 WB
R-G AIN
B-G AIN
BAC K EXIT
30
20
C.SE T
CTRL 1
C.SE T
CTRL 1
44
Push joystick down to select <ATW FRAME>, and then push joystick left or right
to make selection.
1- 3. ATW FRAME:
X0.5 → X1.0 → X1.5 → X2.0
push joystick left or right to adjust white balance to
lower color temperature, and push joystick down to
select <B-GAIN>, and then push joystick left or right
to adjust white balance to higher color temperature.
Confirm color temperature, and then press key to
record data in the memory.
Push joystick down to select <R-GAIN>, and then
USE R2 WB
R-G AIN
B-G AIN
BAC K EXIT
20
40
C.SE T
CTRL 1

Pull-in control is exercised at all times independently of the pull-in frame which
was set by the pre-white balance adjustment.
(3) HLC Setting (High Light Compensation):
Push joystick down to select <HLC>, and then press key into HLC setting menu.
1. HLC (High Light Compensation):
Push joystick down to select <HLC>, and then
push joystick left or right to make selection.
2. CLIP LEVEL:
Push joystick down to select <CLIP LEVEL>, and then push joystick left or right to
make selection.
Clip level ranges are 0 ~ 255 (Black ~ White).
3. SCALE:
Push joystick down to select <SCALE>, and then push joystick left or right to make
selection.
Scale control ranges are 0 ~ 14 (Low ~ High).
Note: Color rolling suppression (HIGH LUM. MODE = SHUT).
HLC S ETTIN G
HLC
CLI P L EVEL
SCA LE
BAC K EXIT
OFF
0
10
C.SE T
CTRL 1
AUTO → OFF
Push joystick down to select <DAY/NIGHT>, and then push joystick left or right to select
mode.
(4) Day/Night Setting
AUTO → SCHED. → DAY → NIGHT
45
This mode suppresses the color rolling which arises when there are slight deviations
between blinking frequency of non-inverter fluorescent lights and the drive frequency
of the image sensor devices.
5. ANTICR:
C.SE T
CTRL 1
C.SE T
CTRL 1
C.SE T
CTRL 1
C.SE T
CTRL 1
C.SE T
CTRL 1
produce color image. When light drops below 5 lux, camera switches NIGHT
automatically to produce monochrome image. Under monochrome mode,
sensitivity is increased to 0.01 lux and can be used with IR illuminators.
SCHED.: DAY/NIGHT switches automatically between Day mode and Night mode by
schedule of time setting.
When selection is <SCHED.>, press key into DAY/NIGHT Setting menu.
Push joystick down to select <DAY→NIGHT>, and then press key into time
setting. Push joystick left or right to select time of DAY→NIGHT. Then press
key again to next item.
18 : 00 → → 18 : 00 → → 18 : 00
AUTO: When light level is over 10 lux, camera switches DAY automatically to

Push joystick down to select <NIGHT ENV.>, and then move joystick left or right to
select <NORMAL> mode or <IR LIGHT> mode.
Note:NORMAL: suitable in mostly night scene mode.
IR LIGHT: suitable in infrared (IR) illuminated night scene mode, can increase the
images under infrared lighting.
(5) Night Environment Setting
DAY/ NIGH T SCHED ULE
DAY→NI GHT
NIG HT→DAY
BAC K EXIT
18: 00
06: 00
C.SE T
CTRL 1
C.SE T
CTRL 1
setting. Push joystick left or right to select time of NIGHT→DAY. Then press
key again to next item.
06 : 00 → → 06 : 00 → → 06 : 00
DAY: Set to DAY mode and always produce constant color image.
NIGHT: Set to NIGHT mode and always produce constant monochrome image.
Push joystick down to select <NIGHT→DAY>, and then press key into time
C.SE T
CTRL 1
C.SE T
CTRL 1
Push joystick down to select <SYNC>, and then move
joystick left or right to select
<INT> mode or <LL> mode.
INT : Use synchronization signal of internal camera.
LL : Synchronize synchronization signal of camera
and AC signal of external power.
(6) Synchronization Mode Setting
ADVA NCED S ETTING
SHU TTER/ AGC
WHI TE BAL
<HL C>
DAY/ NIGH T
NIG HT ENV.
SYN C
<IM AGE>
BAC K EXIT
<MA NUAL>
<ATW >
AUT O
NOR MAL
INT
46
menu.
1. ADJUST:
Push joystick down to select <ADJUST>, and then
move joystick left or right to adjust LL phase.
2. PRESET:
Push joystick down to select <PRESET>, and then
press key to preset LL phase.
Select <LL>, and press key into Line Lock setup
LI NE LO CK SE TTING
ADJ UST
PRE SET
BAC K EXIT
UP / DO WN
PUS H ENTER
C.SE T
CTRL 1
C.SE T
CTRL 1
After getting in advanced setting menu, push joystick down to select <IMAGE>, and
then press key into image setting menu.
(7) Image Setting
C.SE T
CTRL 1

IMA GE-1
DIG ITAL EFFE CT
CON TRAST
SHA RPNES S
HUE
R-G AIN
B-G AIN
<NE XT>
BAC K EXIT
OFF
32
08
58
168
192
ADVA NCED S ETTING
SHU TTER/ AGC
WHI TE BAL
<HL C>
DAY/ NIGH T
NIG HT ENV.
SYN C
<IM AGE>
BAC K EXIT
<MA NUAL>
<ATW >
AUT O
NOR MAL
INT
The flip function enables the analogue output’s image to flip from top/bottom, left/
right or to spin 180°.
Push joystick down to select <DIGITAL EFFECT>, and then push joystick left or right
to select mode.
1. DIGITAL EFFECT:
OFF → V-FLIP → H-FLIP → HV-FLIP
Push joystick down to select <CONTRAST>, and then push joystick left or right to
adjust contrast setting.
Contrast control ranges are 0 ~ 255.
3. SHARPNESS:
Push joystick down to select <SHARPNESS>, and then push joystick left or right to
adjust sharpness setting.
Sharpness control ranges are 0 ~ 15.
4. HUE:
Push joystick down to select <HUE>, and then push joystick left or right to adjust hue
setting.
HUE control ranges are 0 ~ 100.
2. CONTRAST:
47
Able to control Red Gain.
Push joystick down to select <R-GAIN>, and then push joystick left or right to adjust
R-gain setting.
R-gain control ranges are 0 ~ 255.
6. B-GAIN:
Able to control Blue Gain.
Push joystick down to select <B-GAIN>, and then push joystick left or right to adjust
B-gain setting.
B-gain control ranges are 0 ~ 255.
5. R-GAIN:

Push joystick down to select <3D-NR>, and then push joystick left or right to select
“ON” or “OFF” mode.
7. 3D-NR (3D Noise Reduction):
IMA GE-2
3D- NR
E-Z OOM
DIS
BAC K EXIT
OFF
OFF
OFF
IMA GE-1
DIG ITAL EFFE CT
CON TRAST
SHA RPNES S
HUE
R-G AIN
B-G AIN
<NE XT>
BAC K EXIT
OFF
32
08
36
80
138
Push joystick down to select <E-ZOOM>, and then push joystick left or right to select
“ON” or “OFF” mode.
ON: 256x electronic zoom is enabled with the zoom switch on the controller.
OFF: The electronic zoom function is disabled.
Note: When the electronic digital zoom function is set to On(E-ZOOM = ON), e-zoom
will start once lens reach maximum optical zoom in.
9. DIS (Digital Image Stabilizer):
Push joystick down to select <DIS>, and then push joystick left or right to select “ON”
or “OFF” mode.
Note: If a camera shake or vibrate and the DIS is set to ON, it will continue to show
stable image or vibration is reduced.
8. E-ZOOM:
Pan/Tilt Setting Menu
After getting in dome setting menu, push joystick down to select <PAN/TILT>, and then press
key into pan/tilt setting menu.
1. Display the Pan/Tilt Setting Menu
C.SE T
CTRL 1
48
PAN/ TILT
HOM E POSIT ION
SEL F RETUR N T IME
SEL F RETUR N MODE
AUT O MODE
BAC K EXIT
OFF
OFF
OFF
SEQ .
Push joystick down to select <HOME POSITION>, and then
push joystick left or right to select home position.
2. Home Position Setting
OFF: NO action.
1 ~ 128: Home positions are preset position from fast dome.
Note: When keyboard control isn't used, "Return Mode" is set
for "HOME" and "Return Time" is over, "Return Mode"
function will be started.

Push joystick down to select <SELF RETURN TIME>, and then push joystick left or right to
select return time:
Note: When keyboard control isn't used, "Return Time" is also over, "Return Mode" function
will be started.
3. Self Return Time Setting
OFF → 3sec → 4sec → ............ → 9sec → 10sec → 20sec → 30sec → 40sec → 50sec
60min ← 30min ← 20min ← 10min ← 5min ← 3min ← 2min ← 1min
Push joystick down to select <SELF RETURN MODE>, and then push joystick left or right to
select return mode.
OFF: NO action.
HOME: Perform return home position mode.
SCAN: Perform auto scan mode.
SEQ.: Perform preset group mode.
TOUR1: Perform tour1 list mode.
TOUR2: Perform tour2 list mode.
PATROL: Perform memory patrol mode.
TRACK: Perform human tracking mode.
(The tracking functions are only for tracking models - ST826X/836X)
Note: When keyboard control isn't used and "Return Time" is also over, "Return Mode" function
will be started.
4. Self Return Mode Setting
OFF → HOME → SCAN → SEQ. → TOUR1 → TOUR2 → PATROL → TRACK
Push joystick down to select <AUTO MODE>, and then push joystick left or right to select mode.
OFF: NO action.
SCAN: Perform auto scan mode.
SEQ.: Perform preset group mode.
TOUR1: Perform tour1 list mode.
TOUR2: Perform tour2 list mode.
5. Auto Mode Setting
OFF → SCAN → SEQ. → TOUR1 → TOUR2 → PATROL → TRACK
49
PATROL: Perform memory patrol mode.
TRACK: Perform human tracking mode.
(The tracking functions are only for tracking models - ST826X/836X)
Note: 1. Press key on the keyboard to perform Auto mode function.
2. On tracking mode, once the object move out the traceable or discriminable area, the
fast dome camera will back to the preset 1 to continue doing tracking function after
10 sec..
AUTO
PAN

Push joystick down to select <SELF RET. MODE> or <AUTO MODE>, and then push joystick
left or right to select <AUTO>, then press key into auto scan mode setting.
6. Auto Scan Mode Setting
C.SE T
CTRL 1
AUT O SCAN
<ED IT POSI TION >
DWE LL TIME
SCA N SPEED
BAC K EXIT
5 Sec
10 de g/sec
(2) Dwell Time Setting
Push joystick down to select <DWELL TIME>, and then push joystick left or right to
select dwell time. (1 ~ 255 sec)
(3) Scan Speed Setting
Push joystick down to select <SCAN SPEED>, and then push joystick left or right to
select scan speed. (1 ~ 40 deg/sec)
Push joystick down to select <SELF RET. MODE> or <AUTO MODE>, and then push joystick
left or right to select <PATROL>, then press key to enter patrol mode setting menu.
7. Patrol Mode Setting
PATROL
<LE ARN>
<CL EAR>
BAC K EXIT
C.SE T
CTRL 1
(1) Position of Auto Pan Setting
Push joystick down to select <EDIT POSITION>, and then press key into setting
menu.
Push joystick left, right, up or down to select start position, and then press , ,
, , , to adjust zoom, focus, iris, then press key to confirm.
Push joystick left, or right to select end position, and then press key to confirm.
C.SE T
CTRL 1
FOCU S
FAR
FOCU S
NEAR
C.SE T
CTRL 1
C.SE T
CTRL 1
50
(1) Patrol Learn Setting
Push joystick down to select <LEARN>, and then press key into setting menu.
Control joystick or press lens control key to start patrol learn mode. (Count down time
from 100% ~ 1%)
Press key to end patrol learn mode.
Note: Patrol mode can record all action of keyboard, and when Auto Pan Mode is selected,
camera will automatically move according to keyboard’s action stored in memory.
C.SE T
CTRL 1
C.SE T
CTRL 1

51
PATROL L EARN
MEM ORY 100 PERCENT
(2) Clear Memory of Patrol
Push joystick down to select <CLEAR>, and then press key to clear all memory of
patrol.
C.SE T
CTRL 1
Preset Function Setting Menu
After getting in dome setting menu, push joystick down to select <PRESETS>, and then press
key into presets setting menu.
1. Display the Preset Setting Menu
PRE SETS
PRE SET NUM BER
<PR ESET MA P>
<ED IT POSI TION >
<ED IT ID>
SCE NE FILE S
DWE LL TIME
SPE ED
CLR P RESET
BAC K EXIT
1
OFF
0 sec
255 d eg/se c
ABO VE NUM.
(1) Select number by PRESET NUMBER
Push joystick down to select <PRESET NUMBER>, and then push joystick left or right
to select preset number. (1 ~ 128)
(2) Select number by PRESET MAP
Push joystick down to select <PRESET MAP>, and then press key into preset map.
Push joystick left, right, up or down to select preset number, and then press key into
preset setting menu.
If need to select preset numbers 33~64, push joystick down to <33~64>, and then press
key into preset numbers 33~64.
2. Select Preset Numbers
C.SE T
CTRL 1
C.SE T
CTRL 1
C.SE T
CTRL 1
C.SE T
CTRL 1
PRE SETS
PRE SET NUM BER
<PR ESET MA P>
<ED IT POSI TION >
<ED IT ID>
SCE NE FILE S
DWE LL TIME
SPE ED
CLR P RESET
BAC K EXIT
2
OFF
0 sec
255 d eg/se c
ABO VE NUM.
1
5
9
13
17
21
25
29
2
6
10
14
18
22
26
30
3
7
11
15
19
23
27
31
4
8
12
16
20
24
28
32
<33 -64> <6 5-96> < 97-12 8>
PRE SET POS ITIO N
BAC K EXIT

52
Push joystick down to select <EDIT POSITION>, and then press key into preset position
setting.
Push joystick left, right, up, or down to start position, and then press , , , ,
, to adjust zoom, focus, iris, then press key to confirm.
3. Preset Position Setting
C.SE T
CTRL 1
FOCU S
FAR
FOCU S
NEAR
C.SE T
CTRL 1
Push joystick down to select <EDIT ID>, and then press key into preset ID setup.
4. Preset ID Setting
C.SE T
CTRL 1
ID FO R PRESE T N UM. 00 1
01 234 56 78 9
AB CDE FG HI JK LM
NO PQR ST UV WX YZ
ab cde fg hi jk lm
no pqr st uv wx yz
., :'" /# *= () <>
PRE SET- -- -- -- --SPAC E BACK SPACE
POS I COPY
OK CA NCEL
CHARACTER
EDIT AREA
COMMAND
(1) New Preset ID Editing
Push joystick down to select character, and press key to confirm. The character
selected will be showed in edit area. If you need space, push joystick down to select
<SPACE> and press key to confirm.
Press or to switch to next character list.
Repeat all steps to complete preset ID.
(2) Copy preset ID to Another Preset
Push joystick down to select [EDIT AREA], and push joystick left or right to select first
copy of characters.
Push joystick down to <COPY>, and press key to confirm. At this time first character
of preset ID will be copy to first character position of another preset ID, and press
key to do next copy.
Push joystick down to <OK>, and press key for exit. Select another preset on the
preset menu, and get into preset ID setting. Then push joystick down to [EDIT AREA]
and press key for copy. At this time edit area will show preset ID that was copied.
C.SE T
CTRL 1
C.SE T
CTRL 1
C.SE T
CTRL 1
C.SE T
CTRL 1
C.SE T
CTRL 1
C.SE T
CTRL 1
Push joystick down to select [EDIT AREA] on the preset ID setting, and push joystick
right to select modifiable characters.
Push joystick down to select new characters, and press key to chose.
(4) Cancel Preset ID
Push joystick down to <CANCEL>, and then press key to cancel preset ID.
(3) Modify Preset ID
C.SE T
CTRL 1
C.SE T
CTRL 1

53
Push joystick down to <POSI>, and then press key to get in.
Push joystick to move preset ID to needful position of frame, and then push key to
confirm.
(6) Return Preset Menu
Push joystick down to <OK>, and then press key to back to preset menu.
(5) Preset ID Position Setting
C.SE T
CTRL 1
C.SE T
CTRL 1
C.SE T
CTRL 1
Push joystick down to select <SCENE FILES>, and then push joystick left or right to select
scene file mode. (OFF or ON)
Select <ON>, press key into scene file of preset menu.
5. Scene File of Preset Setting
SCE NE FILE
EXP OSURE M ODE
WHI TE BALA NCE
BAC K EXIT
AUT O
ATW
EXPOSURE MODE: AUTO / MANUAL
WHITE BALANCE: ATW/ AWC/ USER1/ USER2/ ANTICR
Note: When scene file of preset is "ON", it will be part
of preset parameters.
C.SE T
CTRL 1
Push joystick down to select <DWELL TIME>, and then push joystick left or right to select
needful dwell time. (1 ~ 255 sec)
Note: Only preset No.1~16 can set dwell time, because group of auto pan can only edit preset
No.1~16. Other preset numbers can't set dwell time.
6. Dwell Time Setting
Push joystick down to select <SPEED>, and then push joystick left or right to select speed of
preset. (1 ~ 255 deg/sec)
Note: Only preset No.1~16 can set speed, because group of auto pan can only edit preset No.
1~16. Other preset numbers can't set speed.
7. Speed Setting
Push joystick down to select <CLR PRESET>, and then push joystick left or right to select
<ABOVE NUM> or <ALL>. Then press key to confirm.
ABOVE NUM.: Only cancel parameter of allotted preset
ALL: Cancel parameters of all presets (1~128)
Note : When clear the setting value of preset, the name of preset will be set PRESET XXX.
(XXX: 1~128)
8. Cancel Preset
C.SE T
CTRL 1

54
Tour Function Setting Menu
After getting in dome setting menu, push joystick down to select <TOURS>, and then press
key into tours setting menu.
1. Display the Tour Setting Menu
TOU RS
NUM BER
<ED IT TOUR>
<CL EAR ABOV E NUMBE R>
DWE LL TIME
SPE ED
BAC K EXIT
1
5 sec
255 d eg/se c
Push joystick down to select <NUMBER>, and then push
joystick left or right to select Tour1 or 2.
2. Tour Number Selection
C.SE T
CTRL 1
TOU R TABLE 1 - 1/ 4
1. PR ESET 1
2. PR ESET 6
3. PR ESET 8
4.
5.
6.
7.
8.
BAC K EXIT
Push joystick down to select <EDIT TOUR>, and then press key into edit tour setting.
Push joystick up or down to select number. When joystick down to last line, push joystick
down again to get in next table of page. Each tour table can edit 32 presets.
Push joystick left or right to select preset. (1~128)
Press key to confirm, and push joystick to select <BACK>, then press key again to
back to tours setting, or push joystick to select <EXIT>, and press key to exit setting menu.
3. Edit Tour
Push joystick down to select <CLEAR ABOVE NUMBER>, and then press key to cancel
tour.
4. Cancel Tour
Push joystick down to select <DWELL TIME>, and then push joystick left or right to select
dwell time of tour. (1~255 sec)
Note: When Self Return Mode or Auto Mode is Tour, dwell time of Auto Pan will be dwell time
setting of tour.
5. Dwell Time Setting
Push joystick down to select <SPEED>, and then push joystick left or right to select preset
speed. (1~255 deg/sec)
Note: When Self Return Mode or Auto Mode is Tour, speed of Auto Pan will be speed setting
of tour.
6. Speed Setting
TOU R TABLE 1 - 1/ 4
1.
2.
3.
4.
5.
6.
7.
8.
BAC K EXIT
C.SE T
CTRL 1
C.SE T
CTRL 1
C.SE T
CTRL 1
C.SE T
CTRL 1
C.SE T
CTRL 1

55
Privacy Zones Setting Menu
After getting in dome setting menu, push joystick down to select <PRIVACY ZONES>, and
then press key into privacy zones setting menu.
1. Display the Privacy Zones Setting Menu
PRI VA CY ZONES
NUM BER
MOD E
<ED IT ZONE >
CLE AR
BAC K EXIT
OFF
---
---
C.SE T
CTRL 1
Push joystick down to select <NUMBER>, and then push joystick left or right to select number.
(1~8)
Note: If privacy zones is "OFF", privacy zones setting won't be edited.
2. Privacy Zones Number Setting
Push joystick down to select <EDIT ZONE>, and then press key into Edit Zone mode.
Also middle of monitor will display privacy zone mask area.
Push joystick left or right to adjust privacy mask position.
Adjust optical zoom lens and auto focus lens, and then press key to confirm and get into
privacy zone mask area for editing.
Press key, and then push joystick left, right, up, or down to extend privacy zone mask area.
Press key, and then push joystick left, right, up, or down to reduce privacy zone mask area.
After completing setting, press key to confirm and back to privacy zones setting menu.
Note: Optical lens can just adjust 1X to 10X in edit zone mode.
3. Edit Privacy Zones
EDI T P RIVACY ZONE MA SK
EDI T P OSIT ION
PRE SS CONF IRM RET URN
EDI T P RIVACY ZONE MA SK
EDI T S CALE
PRE SS CONF IRM RET URN
Push joystick down to select <CLEAR>, and then push joystick left or right to select <ABOVE
NUM.> or <ALL>. Then press key to confirm.
ABOVE NUM.: Only cancel parameter of allotted privacy zone.
ALL: Cancel parameters of all privacy zone. (1~8)
4. Cancel Privacy Zone Mask
C.SE T
CTRL 1
C.SE T
CTRL 1
C.SE T
CTRL 1
C.SE T
CTRL 1

56
Alarms Setting Menu
After getting in dome setting menu, push joystick down to select <ALARMS>, and then press
key into alarms setting.
1. Display the Alarms Setting Menu
ALAR MS
IN1
IN2
IN3
IN4
IN5
IN6
IN MO DE
OUT
OUT TIME-OUT
BAC K EXIT
POS I 1
POS I 2
POS I 3
POS I 4
POS I 5
POS I 6
NO
OFF
100 M S
C.SE T
CTRL 1
Push joystick down to select <IN1> to <IN6>, and then push joystick left or right to select the
connection function:
2. Connection Function of Alarm Input Setting
OFF → POSI → SCAN → SEQ. → TOUR1 → TOUR2 → PATROL → TRACK
Push joystick down to select <IN MODE>, and then push joystick left or right to select <NO>
or <NC>.
NO mode: Contact of input alarm is normally open. If contact is short, alarm will be triggered.
NC mode: Contact of input alarm is normally short. If contact is open, alarm will be triggered.
3. Input of Alarm Mode Setting
OFF: NO action.
POSI: Alarm corresponding preset positions mode.
SCAN: Perform auto scan mode.
SEQ.: Perform preset group mode.
TOUR1: Perform tour1 list mode.
TOUR2: Perform tour2 list mode.
PATROL: Perform memory patrol mode.
TRACK: Perform human tracking mode.
(The tracking functions are only for tracking models - ST826X/836X)
Note: 1. When alarm input is tracking mode, if alarm happen, the fast dome camera will
implement the <IN 1> ~ <IN 6>, and then start the tracking function.
2. On tracking mode, once the object move out the traceable or discriminable area, the
fast dome camera will back to the alarm corresponding preset positions 1~6 to
continue doing tracking function after 10 sec..

Push joystick down to select <OUT>, and then push joystick left or right to select alarm output
mode:
4. Alarm Output Control Setting
Push joystick down to select <OUT TIME-OUT>, and then push joystick left or right to select
return time of alarm output:
5. Alarm Output Return Time Setting
Password Function Menu
After getting in dome setting menu, push joystick down to select <PASSWORD>, and then
press key into password function menu.
1. Display the Password Setting Menu
PASS WORD
ENA BLE PASS WORD
<ED IT PASSWORD>
BAC K EXIT
OFF
Push joystick down to select <ENABLE PASSWORD>, and then push joystick left or right to
select <ON> or <OFF>.
2. Password Setting
Push joystick down to select <EDIT PASSWORD>, and then press key into edit password
setting.
Push joystick left or right to select number 1~9, and then press key to confirm. The number
that is selected will be displayed on the edit column.
Repeat above steps until password setting has been completed.
3. Edit Password Setting
C.SE T
CTRL 1
C.SE T
CTRL 1
C.SE T
CTRL 1
(Fast Dome IP Camera not support)
OFF → IN 1 → IN 2 → IN 3 → IN 4 → IN 5 → IN 6 → ANY
OFF: NO action.
IN 1: Only alarm input 1 will be start.
IN 2: Only alarm input 2 will be start.
IN 3: Only alarm input 3 will be start.
IN 4: Only alarm input 4 will be start.
IN 5: Only alarm input 5 will be start.
IN 6: Only alarm input 6 will be start.
ANY: All of alarm input <1~6> will be start.
Remark: When using Fast Dome IP Camera, only 3 alarm(in1~3) inputs.
100MS → 200MS → 300MS → 400MS → 500MS → 1000MS
5000MS ← 4000MS ← 3000MS ← 2000MS
57

Push joystick down to select <OK>, and then press key to confirm and back to password
function menu, or push joystick down to select <CANCEL>, and then press key to cancel
password. These numbers of Edit column will be reset to "1111".
Note: When edit password setting and camera recording function are simultaneously performed,
please stop recording function first; otherwise frame of password setting will be recorded,
too.
EDI T THE PASSW ORD
0 1 2 3 4 5 6 7 8 9
1 1 1 1
OK
CAN CEL
To modify password after editing password completed, please get in <EDIT PASSWORD>
again to edit.
If password function is ON, previous passwords have to enter on the setting menu first, and
then do modifying password.
4. Modify Password
C.SE T
CTRL 1
C.SE T
CTRL 1
After password function is ON, press key to display frame of input password on the screen.
When protocol is MLP1, push joystick up or down to select number 0~9 and press key to
confirm. Select numbers will become to "*".
Repeat above steps until passwords have been completed. If password is correct, setting menu
will be displayed.
When protocol is MLP2, press number ~ key on the keyboard to input, and then press
key to confirm. If password is correct, setting menu will be displayed.
Note: If not enter password within 10 sec or input password is wrong, "Invalid password" will
be show on the screen. Primary password is "1111".
5. Input Password
ENT ER PASSW ORD
* * * *
C.SE T
CTRL 1
ENT
0 9
58

Restore Factory Defaults
After getting in dome setting menu, push joystick down to select <FACTORY INITIAL>, and
then press key into factory initial setting.
1. Display the Restore Function Initialization Menu
RES TORE FAC TORY DE FAULTS
RES TORE
BAC K EXIT
ALL
Push joystick down to select <RESTORE>, and then push joystick left or right to select <ALL>.
Press key to confirm, and "Are you sure continue" will be displayed on the screen.
Press key again, and then to do factory initialization for all.
Note: "PLEASE WAITING FACTORY INITIALIZATION"will show on the screen after
confirmation.
2. Factory Initial for All
C.SE T
CTRL 1
C.SE T
CTRL 1
C.SE T
CTRL 1
PLE ASE WAITING
FACT ORY INI TIALI ZATION
Push joystick down to select <RESTORE>, and then push joystick left or right to select
<CAMERA>.
Press key to confirm, and "Are you sure continue" will display on the screen.
Press key again, and then to do factory initialization for camera.
Note: Check again. If not press key to confirm within 3 sec, this command will be canceled.
3. Factory Initial for Camera
RES TORE FAC TORY DE FAULTS
RES TORE
BAC K EXIT
CAM ERA
C.SE T
CTRL 1
C.SE T
CTRL 1
C.SE T
CTRL 1
59

Schedule Setup Menu
Press key into setup menu.
Push joystick down to select <SCHEDULE SETUP>, and then press key into schedule
setting.
MER IT LILI N FAST DOME
LAN GUAGE
<DI SPLAY SETUP>
<DO ME SETT INGS>
<SC HEDUL E SETUP >
<SY STEM IN FORMAT ION>
<RE BOOT SY STEM >
EXI T
ENG LISH
SCH EDULE S ETUP
<AL ARM IN>
<STA RTUP AUT O OPTI ONS>
<DAY LIGH T SAVING T IME>
BAC K EXIT
C.SE T
CTRL 1
C.SE T
CTRL 1
Alarm Input Schedule Setting Menu
After getting into schedule setting menu, push joystick down to select <ALARM IN>, and then
press key into alarm input schedule setting menu.
1. Display the Alarm Input Schedule Setting Menu
ALA RM IN
STARTUP
START
END
BAC K EXIT
OFF
00 : 00
00 : 00
Push joystick down to select <STARTUP>, and then push joystick left or right to select <ON>
or <OFF>.
OFF: Alarm input schedule function is OFF, alarm input trigger will not be limited by schedule
time.
ON: Alarm input schedule function is ON, alarm input trigger will be limited by schedule time.
2. Start Alarm Input Schedule Setting
Push joystick down to select <START>, and then press key into time setting. Then
push joystick left or right to select start time and press key for next item.
18 : 00 → → 18 : 00 → → 18 : 00
Note: When alarm input schedule function is ON and start time is also beginning, alarm input
trigger will be performed.
3. Start Time Setting
C.SE T
CTRL 1
C.SE T
CTRL 1
C.SE T
CTRL 1
C.SE T
CTRL 1
C.SE T
CTRL 1
60

Push joystick down to select <END>, and then press key into time setting. Then push
joystick left or right to select end time and press key for next item.
08 : 00 → → 08 : 00 → → 08 : 00
Note: When alarm input schedule function is ON and end time is also arrived, alarm input
trigger will be stopped.
4. End Time Setting
C.SE T
CTRL 1
C.SE T
CTRL 1
C.SE T
CTRL 1
C.SE T
CTRL 1
Startup Auto Options Menu
After getting into schedule setting menu, push joystick down to select <STARTUP AUTO
OPTIONS>, and then press key into startup auto options setting menu.
1. Display the Startup Auto Options Setting Menu
STARTUP AUTO O PTIO NS
1. 00 :00 OFF
2. 00 :00 OFF
3. 00 :00 OFF
4. 00 :00 OFF
5. 00 :00 OFF
6. 00 :00 OFF
7. 00 :00 OFF
8. 00 :00 OFF
BAC K EXIT
Push joystick down to item 1 to 8, and then press key into time setting and push joystick
left or right to select time. Then press key to next item.
01 : 00 → → 01 : 00 → → 01 : 00
2. Schedule Time Setting
Push joystick down to item 1 to 8 and complete time setting, and then get into auto setting. Then
push joystick left or right to select auto mode and press key to confirm.
OFF: NO action
STOP: Stop the auto mode.
SCAN: Perform auto scan mode.
SEQ.: Perform preset group mode.
TOUR1: Perform tour1 list mode.
TOUR2: Perform tour2 list mode.
PATROL: Perform memory patrol mode.
TRACK: Perform human tracking mode.
(The tracking functions are only for tracking models - ST826X/836X)
Note: 1. When start time is beginning, auto setting mode will be start.
2. While schedule is performing, if power supply occurs that power is failed and then
restored, schedule won't be continue to perform until next schedule time starts.
3. While schedule is STOP mode, if camera is set for "self return mode" and "self return
time" is also arrived, camera will be performed "self return mode" until next schedule
time starts.
3. Auto Options Setting
OFF → STOP → SCAN → SEQ. → TOUR1 → TOUR2 → PATROL → TRACK
C.SE T
CTRL 1
C.SE T
CTRL 1
C.SE T
CTRL 1
C.SE T
CTRL 1
C.SE T
CTRL 1
61
C.SE T
CTRL 1

OFF
12/ 03/25 0 2 : 00
12/ 10/28 0 3 : 00
13/ 03/31 0 2 : 00
13/ 10/27 0 2 : 00
14/ 03/30 0 2 : 00
14/ 10/26 0 3 : 00
1. 12:00, perform SEQ. Mode
2. 13:00, STOP (If "self return mode" is home, "home position setting" is 1, and "self return
time" is 10 min, camera will be performed "self return mode" function and recall
preset position 1 by 13:10.)
3. 20:00, perform TOUR1 mode
4. 09:00, STOP (perform "self return mode" at 09:10)
Example:
STARTUP AUTO O PTIO NS
1. 12 :00 SEQ .
2. 13 :00 STO P
3. 20 :00 TOUR1
4. 09 :00 STO P
5. 00 :00 OFF
6. 00 :00 OFF
7. 00 :00 OFF
8. 00 :00 OFF
BAC K EXIT
Daylight Saving Time Menu
After getting into schedule setting menu, push joystick down to select <DAYLIGHT SAVING
TIME>, and then press key into daylight saving time setting menu.
1. Display the Daylight Saving Time Setting Menu
DAYL IGHT SAVING TI ME
STARTUP
1. STA RT
2. EN D
3. STA RT
4. EN D
5. STA RT
6. EN D
BAC K EXIT
Push joystick down to select <STARTUP>, and then push joystick left or right to select <ON>
or <OFF>.
2. Start Daylight Saving Time Function Setting
Push joystick down to select <START>, and press key into setting mode, and then push
joystick left or right to select start time. Then press key for next item.
12 / 03 / 25 → → 12 / 03 / 25 → → 12 / 03 / 25 → → 02 : 00 → → 14 : 00
→ → 12 / 03 / 25 02 : 00
3. Start Time Setting
Push joystick down to select <END>, and press key into setting mode, and then push
joystick left or right to select end time. Then press key for next item.
12 / 10 / 28 → → 12 / 10 / 28 → → 12 / 10 / 28 → → 03 : 00 → → 03 : 00
→ → 12 / 10 / 28 03 : 00
4. End Time Setting
C.SE T
CTRL 1
C.SE T
CTRL 1
C.SE T
CTRL 1
C.SE T
CTRL 1
C.SE T
CTRL 1
C.SE T
CTRL 1
C.SE T
CTRL 1
C.SE T
CTRL 1
C.SE T
CTRL 1
C.SE T
CTRL 1
C.SE T
CTRL 1
C.SE T
CTRL 1
C.SE T
CTRL 1
C.SE T
CTRL 1
C.SE T
CTRL 1
62

SPECIFICATION
Operational
Manual Pan / Tilt Speed
Preset Position Pan / Tilt Speed
Preset Position Dwell Time
Recall Preset Position Pan / Tilt Speed
。
180 Instant Flip Rotation Speed
Pan Rotation
Tilt Rotation
Pan / Tilt Accuracy
Preset Position
Preset Group
Address Setting
0.15° ~ 120°/sec (8 stages)
1° ~ 255°/sec
1 ~ 255 sec
360°/sec
360°/sec
360° Continuous
-6° ~ +96°
+ 0.25
128 preset positions (memory)
4 Group
(Corresponding with first 16 presets)
1 ~ 64 ID setting (Protocol is MLP1)
1 ~ 256 ID setting (Protocol is MLP2)
Camera
Image Device
Horizontal & Vertical Pixel
Scanning System
Horizontal Resolution
Minimum Illumination
S / N Ratio
Synchronization
Horizontal & Vertical Synchronization
Auto Gain Control
Back Light Compensation
White Balance
Video Output
1/4 Inch Interline Transfer CCD
976 x 494 (NTSC)
976 x 582 (PAL)
2:1 Interlace
700 TV Lines (Monochrome)
650 TV Lines (Color)
0.05Lux at F1.4 (Monochrome)
0.1Lux at F1.4 (Color)
>50dB (AGC OFF)
Internal / Line Lock
15.734KHz/59.94Hz (NTSC)
15.625KHz/50Hz (PAL)
0 ~ 37 dB
ON / OFF
2 Auto mode / 2 Manual mode / Anti-CR mode
CVBS 1.0Vp-p / 75 BNCΩ
63

Optical Lens
Focal Length
Aperture Max
View of Angle
36X Lens
Focal Length
Aperture Max
View of Angle
Focus Control
Iris Control
Zoom In / Out
Zoom In / Out Accuracy
26X Lens
f = 3.2 ~ 83.2mm
F1.6 (wide) ~ F3.8 (telephoto)
W: 74.8°(D) 61.2°(H) 46.5°(V)
T : 3.1°(D) 2.5°(H) 1.8°(V)
f = 3.3 ~ 119mm
F1.4 (wide) ~ F4.2 (telephoto)
W: 72.5°(D) 60.1°(H) 46.3°(V)
T : 2.13°(D) 1.47°(H) 1.20°(V)
2 Auto mode / Manual
Auto / Manual
Manual Control
±5%
Electrical
Power Supply
Power Consumption (Heater: ON)
Control Interface
RS-485 Voltage
Alarm Input
Alarm Input Voltage
Alarm Output
Alarm Output Voltage
24VAC or 100VAC ~ 240VAC (Option)
22W
RS-485 (1 Input / 1 Output)
5.6V
6 Inputs (Pull up)
3 Inputs (Pull up) [Fast Dome IP Camera]
5.6V
1 Output (NC or NO mode)
1A 24VDC
Environmental
Operation Temperature
Operation Humidity
-10 C ~ +50 C
0% ~ 90%
。 。
Mechanical
Height
Diameter
Weight
332mm (13.07")
210mm (8.26")
3200g [SP826X/836X]
[ST826X/836X]
3300g [IPS826X/836X]
64

APPENDIX A
65
Function
Operation
Quick Reference Table
Pan / Tilt Control
To Tilt Up
Dome Selection
To Tilt Down
To Pan Left
To Pan Right
Zoom In
Zoom Out
Manually Bring The Object Farther
Manually Bring The Object Closer
Auto Focus
Open Iris
Close Iris
Auto Iris
180 Horizontal Instant Flip
。
Set or Recall Preset Position
Set Preset Speed
Set Preset Dwell
Store Preset Data
Set Preset Group
Activate Auto Pan
Stop Auto Pan
Delete 128 Preset position Data
Reset Alarm
Select Return Time
Select Return Mode
Select Auto Mode
Reboot System
Activate Patrol Learn Mode
Stop patrol Learn Mode
Stop Password
Activate Password
Edit Password
Single Preset Position Delete
Numeric Key + CAM
ZOOM IN
ZOOM OUT
FOCUS FAR
FOCUS NEAR
AUTO FOCUS
IRIS O
IRIS C
AUTO IRIS
180 REV
。
Numeric Key + PRESET
Numeric Key + F1
Numeric Key + F2
1 + F3
5 1 + F4
5 2 + F4
5 3 + F4
5 4 + F4
5 5 + F4
1 + KEY LOCK
2 + KEY LOCK
3 + KEY LOCK
SHIFT + Numeric Keys + PRESET + ENT
SHIFT + Numeric Keys + PRESET + CLR
Numeric 1,2,3,4 + F4
AUTO PAN
AUTO PAN
9 0 1 1 + CLR
9 0 1 3 + CLR
ALARM RESET
Push Joystick Forward
Push Joystick Down
Push Joystick Left
Push Joystick Right
(Auto Focus LED off)
(Auto Focus LED off)
(Auto Focus LED on)
(Auto Iris LED off)
(Auto Iris LED off)
(Auto Iris LED on)
(128 preset position)
(1 ~ 255 /sec)
。 。
(0 ~ 255 sec)
(4 Group)
(Auto Pan LED on)
(Auto Pan LED off)
Single Preset Position Saving

APPENDIX B
Trouble Shooting
1. No Power
1-1. Check power input connection
1-2. Check connection between camera body and upper base (AC24V Model)
2. No Video
2-1. Check camera video output on camera
2-2. Check cable (damaged cable)
2-3. Check video input connection on monitor
2-4. Check connection between camera body and upper base (AC24V Model)
3. No Telemetry
3-1. Check camera ID switch setting
3-2. Check RS-485 cable IN / OUT connection on camera
3-3. Check RS-485 cable IN / OUT connection on keyboard
3-4. Check if the fast dome is under Auto Pan mode Please deactivate the Auto Pan
3-5. Check if alarm is triggered, Cancel triggered alarm
4. Poor Focusing
4-1. Dusts on dome cover or housing cover. Clean the cover with cotton cloth
Power Cable x 1
Installation Kit
66

67
PELCO OPERATION
RS-485 Protocol Setting and DIP SWITCH Selection
In parallel system, MUST turn the resistance of the first and last terminal to ON position, and
the resistance of nodes in-between to OFF position. This will insure the transmission interface
in best condition.
RS-485 Terminal Resistance Setting (PELCO D/P for parallel system)
RS-485 Transmission Mode Selection
DIP SWITCH
2-Line HALF DUPLEX (HALF)
4-Line HALF DUPLEX (FULL)
3
OFF
ON
Transmission Rate Selection
BAUD RATE SELECTION
DIP SWITCH
2400 bps
4800 bps
9600 bps
19200 bps
5
ON
ON
OFF
OFF
4
ON
ON
OFF
OFF
DIP SWITCH 1 2
ON ON
Fast Dome of the first and last terminal
Fast Dome of nodes in-between
OFF OFF
OFF
OFFOFF
3
ON
ON
1
OFF
OFF
ON
DIP SWITCH
PELCO D
PELCO P
102 4 5 6 7 9
ON
ON
ONON
8
Protocol Selection
6
ON
OFF
PROTOCOL SELECTION
DIP SWITCH
PELCO D
PELCO P
8
ON
9
ON
ONON
7
OFF
OFF
RS-485 Interface ON/OFF Setting
Please refer to the above instruction

68
PELCO D Camera ID Switch Setting
OFF
3
ON
ONON
ON
ON
ON
ON
ON
ON
ON
1
OFF
OFF
OFF OFF
OFF
OFF
OFF
OFF
OFF OFF OFF OFF OFF OFF
OFF OFF OFF OFF OFF OFF
ON
ON
ON
ON
ON
DIP SWITCH
CAMERA ID 1
CAMERA ID 2
CAMERA ID 3
CAMERA ID 4
CAMERA ID 5
CAMERA ID 253
CAMERA ID 254
102 4 5 6 7 9
ON
ON
ON
ON ON ON
ON ON ON
ON
ON
ON
ON
ON
ON
ON
ON
ON
ON
ON
ON
ON
ON
ON
ON
ON
ON
ON
ON
ON
ON
ON
ON
ON
8
OFF
OFF OFF
3
ON
ONON
ONON
ON
ON
ON
ON
ON
1
OFF
OFFOFF
OFF
OFFOFF OFF OFF
OFF OFF OFF
ON
ON
ON
ON
ON
DIP SWITCH
CAMERA ID 1
CAMERA ID 2
CAMERA ID 3
CAMERA ID 4
CAMERA ID 5
CAMERA ID 31
CAMERA ID 32
102 4 5 6 7 9
ONON
ON
ONON
ON ONONONON ON
ONONONON ON
ON
ON
ON
ON
ON
ON
ON
ON
ON
ON
ON
ON
ON
ON
ON
ON
ON
ON
ON
ON
ON
ON
ON
ON
ON
8
PELCO D MPT9500 Keyboard to Control Fast Dome Camera:
1. First enter the CAMERA ID to be called: [Number] + [RECV ADDRS]
2. MANUAL OPERATION
Joystick Control: Move the Joystick to bring the PTZ to desired view position.
ZOOM Control:
Push [ZOOM WIDE]: Zoom out(View angle becomes wider), stops when the key released.
Push [ZOOM TELE]: Zoom in(View angle becomes narrower), stops when the key released.
PELCO P Camera ID Switch Setting
OPERATION
FOCUS Control:
Push [FOCUS NEAR]: The target will become nearer. Focusing stops when the key released.
Push [FOCUS FAR]: The target will become farer. Focusing stops when the key released.
IRIS Control:
Push [IRIS OPEN]: Open the iris and brighten the picture. Iris will stop when the key
released.
Push [IRIS CLOSE]: Close the iris and reduce glare. Iris will stop when the key released.

69
3. RETURNING TO A PRESET
Push [Preset position number + PRESET GO], PTZ will move to the preset position.
4. SETTING A PRESET:
Push [Preset position number + PRESET SET], PTZ will store the current position and lens
condition into memory.
5. Startup Auto-Pan:
Push [PAN AUTO] to execute auto mode item.
6. STOP Auto-Pan:
Move [JOYSTICK] to stop Auto-Pan function or push [MANU PAN].
7. MENU MODE:
Push [Number 95 + PRESET SET] to enter PTZ menu to do the setting.
Move the joystick “up” and “down” to selection function. Move the joystick “right” and “left”
to change the settings. Push [IRIS OPEN] in menu homepage to store the setting changes or
continue to another page. Push [IRIS CLOSE] in menu homepage to leave the settings.
8. Other settings please refer to LILIN instruction manual.

70
66-SP836CSE-2
PELCO D/P FUNCTION TABLE
PELCO D Set or Recall Preset Position (1~32)
PELCO P Set or Recall Preset Position (1~32/ 41~90/ 106~128)
180° Horizontal Instant Flip
Return Home Position
Perform Auto Scan mode (SCAN)
Perform Auto Preset group mode (SEQ.)
Perform Auto Tour1 list mode (TOUR 1)
Perform Auto Tour2 list mode (TOUR 2)
Perform Auto Memory Patrol mode (PATROL)
Perform Auto Human Tracking mode (TRACK)
Reset Alarm
Activate Patrol Learn Mode
Stop Patrol Learn Mode
Reboot the System
Enter Setting Menu Mode
Stop Auto Pan mode
Start Auto Pan mode
Exit Setting Menu mode
Into Auto Scan Setting Menu
Into Preset Setting Menu
Into Tour Setting Menu
Into Patrol Setting Menu
Into Track Setting Menu
Function
Operation
Keyboard
Number + PRESET
Number + PRESET
Number 3 3 + PRESET
Number 3 4 + PRESET
Number 3 5 + PRESET
Number 3 6 + PRESET
Number 3 7 + PRESET
Number 3 8 + PRESET
Number 3 9 + PRESET
Number 4 0 + PRESET
Number 9 1 + PRESET
Number 9 2 + PRESET
Number 9 3 + PRESET
Number 9 4 + PRESET
Number 9 5 + PRESET
Number 9 6 + PRESET
Number 9 9 + PRESET
Number 1 0 0 + PRESET
Number 1 0 1 + PRESET
Number 1 0 2 + PRESET
Number 1 0 3 + PRESET
Number 1 0 4 + PRESET
Number 1 0 5 + PRESET

MERIT LILIN ENT. CO., LTD
http://www.me ritli lin.c om 66-SP836CSE
OUTDOOR D/N WDR 700TVL FAST DOME CAMERA
SP8264/8268 N/P & SP8364/8368 N/P
IPS8264/8268 N/P & IPS8364/8368 N/P
OUTDOOR D/N WDR 700TVL FAST DOME IP CAMERA
ST8264/8268 N/P & ST8364/8368 N/P
OUTDOOR HUMAN TRACKING FAST DOME CAMERA
 Loading...