

Page 1
User Manual
H.264
Analog High Definition
Digital Video Recorder
DHD204/208/216
DHD204A/208A/216A
DHD304A/308A/316A
DHD504A/508A/516A
Page 2

Trademarks and registered
trademarks
Microsoft, Windows, Internet Explorer are registered trademarks of Microsoft
corporation in the U.S and/or
other countries
.
Adobe and Adobe PDF are registered trademarks of Adobe Systems Incorporated in the U.S
and/or other countries.JavaScript and all Java-based trademarks and logos are trademarks or registered
trademarks of Sun Micro systems, Inc. in the U.S and/or other countries.Linux, Macintosh, Mozilla, and
Netscape Navigator are registered trademarks of the respective holders.Other names of companies and their
products mentioned in this manual may be trademarks or registered trademarks of their respective owners.
Caution
Do not drop or strike the equipment
Do not install the equipment near naked flames or heat sources
Do not expose this unit to rain, moisture, smoke or dusty environments
Do not cover the opening of the cabinet with cloth or plastic or install this unit in a ventilated place. Allow
10cm between this unit and its surroundings
Do not continue to operate the unit under abnormal conditions such as detection of smoke, strange smell
or no display on screen whilst power is turned on
Do not touch the power connection with wet hands
Do not damage the power cord or leave it under pressure
To avoid unnecessary magnetic interference, do not operate this unit near magnets,speaker system, etc
.
All connection cables must be grounded properly
This symbol on the product or on its packaging indicates that this product shall not be treated as
household waste. Instead it shall be handed over to the applicable collection point for the recycling
of electrical and electronic equipment. By ensuring this product is disposed of correctly, you will
help prevent potential negative consequences for the environment and human health, which could
otherwise be caused by inappropriate waste handling of this product. The recycling of materials will
help to conserve natural resources. For more detailed information about recycling of this product,
please contact your local city office, your household waste disposal service or the shop where you
purchased the product.
Page 3

Table of Contents
Chapter 1: Live Mode Operations
....................................................................................................................................
1
Chapter 2: Main Menu....................................................................................................................................................... 2
2-1 Auto Sequential................................................................................................................................................... 4
2-2 Backup.................................................................................................................................................................. 4
2-2-1 Selection................................................................................................................................................... 4
2-2-2 Select Backup Device
..............................................................................................................................
5
2-3 Configurations
.....................................................................................................................................................
6
2-4 Time Search..........................................................................................................................................................6
2-4-1 Playback Mode........................................................................................................................................ 7
2-5 System Logs......................................................................................................................................................... 8
2-5-1 Criteria.......................................................................................................................................................9
2-6 PTZ Operation
...................................................................................................................................................
10
3-4 Account Setup
...................................................................................................................................................
35
3-4-1 Administrator......................................................................................................................................... 35
3-4-2 Other Users............................................................................................................................................ 36
3-4-2-1 Permission.................................................................................................................................. 36
3-5 Network Setup...................................................................................................................................................37
3-5-1 WAN
........................................................................................................................................................
37
3-5-1-1 DHCP
...........................................................................................................................................
37
3-5-1-2 Static IP....................................................................................................................................... 38
3-5-1-3 PPPoE.......................................................................................................................................... 38
3-5-2 HTTP........................................................................................................................................................39
3-5-3 DDNS...................................................................................................................................................... 39
3-5-4 NTP
..........................................................................................................................................................
40
3-5-5 Mail Setup
..............................................................................................................................................
41
3-6 Storage Setup.................................................................................................................................................... 42
3-6-1 HDD Setup............................................................................................................................................. 42
3-6-2 USB Flash Drive Setup.......................................................................................................................... 43
3-7 System Setup..................................................................................................................................................... 44
3-7-1 Auto Lock
...............................................................................................................................................
44
3-7-2 Auto Reboot
...........................................................................................................................................
44
3-7-3 Date / Time Setup................................................................................................................................. 45
3-7-3-1 Time Zone...................................................................................................................................45
3-7-3-2 Daylight Saving Time................................................................................................................ 45
3-7-3-3 Change Date and Time............................................................................................................. 46
3-7-4 Monitor Setup
........................................................................................................................................
46
3-7-4-1 Resolution Setup
.......................................................................................................................
47
3-7-4-2 Composite video output adjust............................................................................................... 47
3-7-5 Input Setup.............................................................................................................................................48
3-7-5-1 IR Setup ( Depending on DVR model )...................................................................................48
3-7-4-1 Mouse Setup.............................................................................................................................. 48
3-7-6 Utility Setup
............................................................................................................................................
49
3-7-6-1 Export Configuration
.................................................................................................................
49
3-7-6-2 Import Configuration................................................................................................................ 50
3-7-6-3 Reset Configuration.................................................................................................................. 51
3-7-6-4 Export Logs.................................................................................................................................51
3-7-6-5 Clear Logs................................................................................................................................... 52
3-7-6-6 Upgrade Firmware
.....................................................................................................................
53
3-8 System Information
...........................................................................................................................................
54
3-8-1 DVR Information....................................................................................................................................54
3-8-2 Network Information............................................................................................................................ 54
3-8-3 HDD Information................................................................................................................................... 54
Page 4

3-8-4 S.M.A.R.T Information........................................................................................................................... 55
Chapter 4: Remote Software
...........................................................................................................................................
56
4-1 Application Software
........................................................................................................................................
56
4-2 Internet Explorer................................................................................................................................................58
Appendix........................................................................................................................................................................... 59
Appendix 1 Specification........................................................................................................................................ 59
Appendix 1-1 DHD 5A Series Specification..........................................................................................................59
Appendix 1-2 DHD 3A Series Specification
..........................................................................................................
62
Appendix 1-3 DHD 2A Series Specification
..........................................................................................................
65
Appendix 1-4 DHD 2 Series Specification............................................................................................................ 68
Appendix 2 Remote Control Manual.....................................................................................................................70
Appendix 2-1 Remote Control............................................................................................................................... 70
Appendix 2-2 Playback Remote Control Functions............................................................................................. 71
Appendix 2-4 Digital Zoom Remote Controller Functions
.................................................................................
73
Appendix 2-5 PTZ Mode Remote Controller Functions
.....................................................................................
74
Appendix 3 AHD Camera Resolution.................................................................................................................... 75
Appendix 3-1 Switch Resolution From 1080p to 720p....................................................................................... 75
Appendix 3-2 Switch Resolution From 1080p to D1...........................................................................................78
Appendix 4 Hard Drive Compatibility List............................................................................................................ 79
Page 5
1
Chapter 1: Live Mode Operations
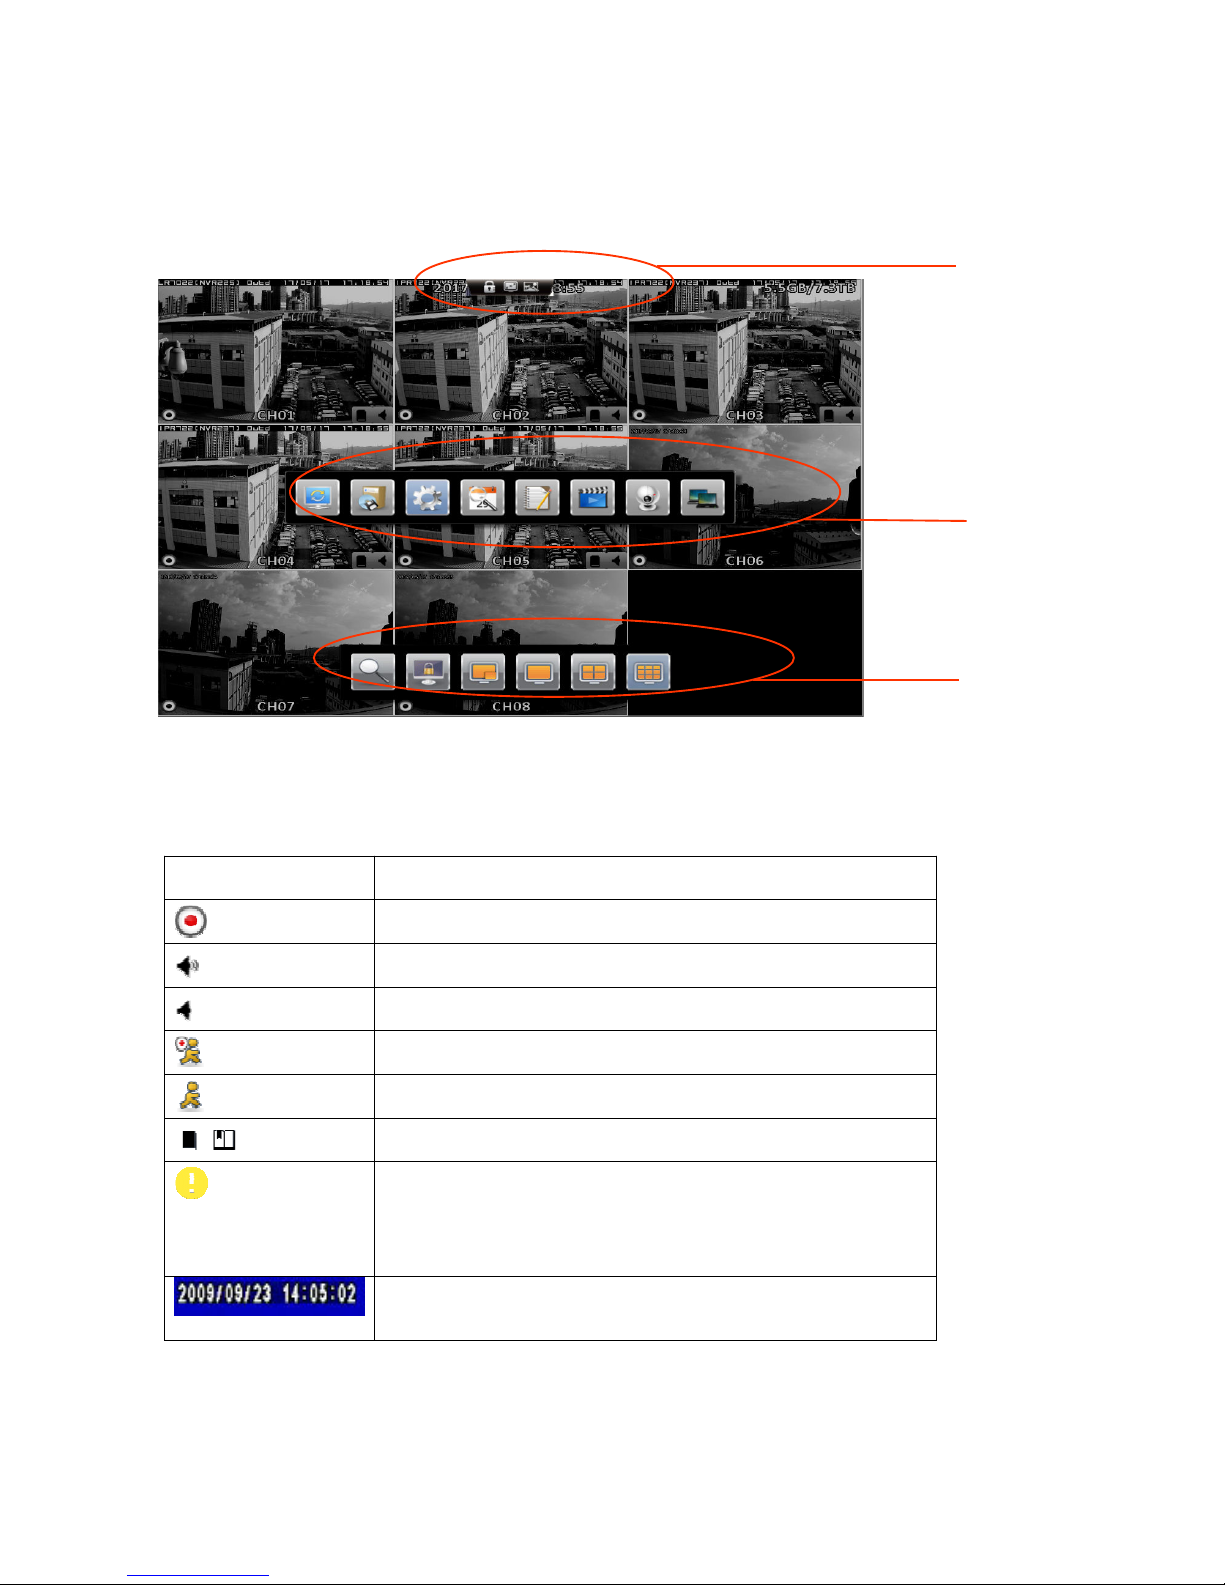
In the Live Mode, user can monitor all channels of the DVR and change the division, user can
access the configuration panel by right-clicking the mouse, and a Division Control panel will appear
when the mouse cursor moves to the bottom of the live video.
Note: The number of channels, split screen, and resolution in following images are for reference only. The
actual screen is subject to different models.
Table 1-1 Icon descriptions in Live Mode
Icon Description
Channel recording is activated.
Live audio of current channel is on.
Live audio of current channel is off.
Event recording of current channel is activated.
Motion detection of current channel is triggered.
IP camera status, click to setup.
1. Simulate HD: Video input resolution is
1280×1440, click prompt to open UTC control menu, and turn
on camera NRT function to correct.
2. IP camera: Sub stream resolution is higher than main stream.
Time stamp for each channel, appears in the event of local
playback, remote live screen, remote playback, and backup video.
Division control
Main Menu
Toolbar
Page 6
2
Chapter 2: Main Menu
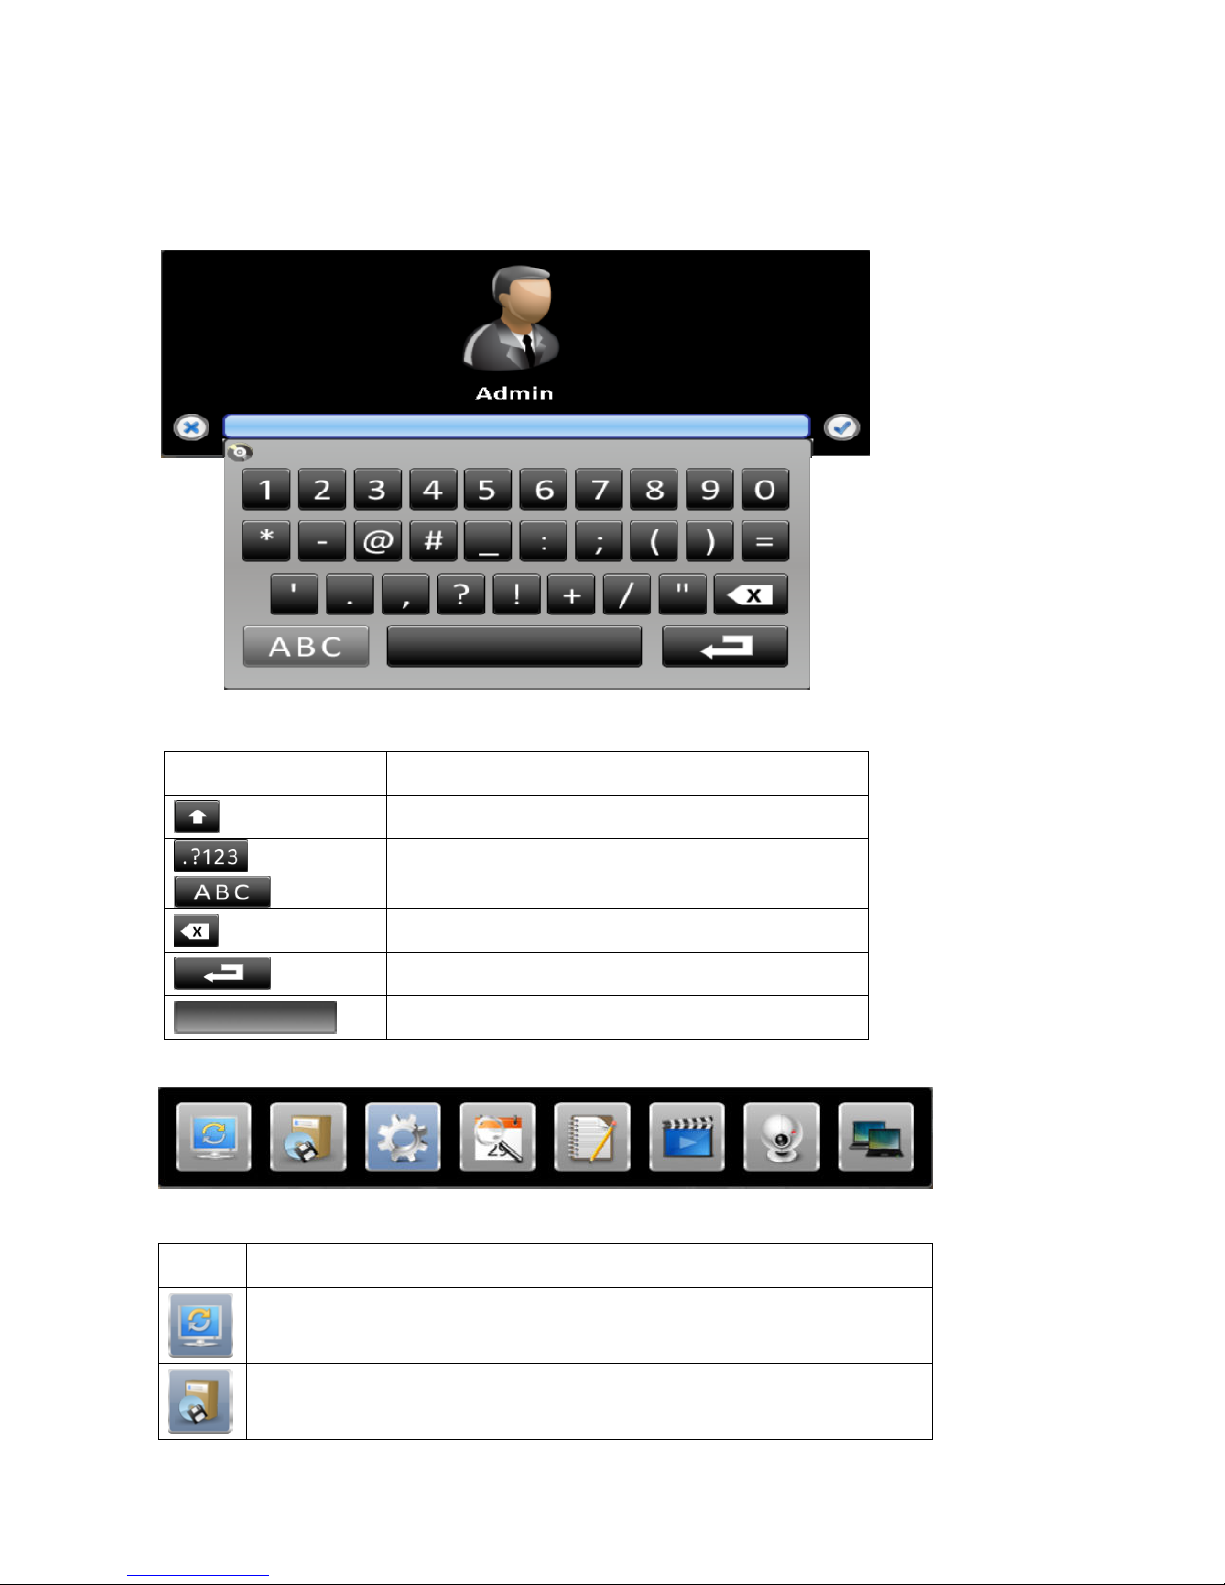
To enter the Main Menu and set up the DVR, log-in account and user password are required.
The default password of the administrator is 1111, please check the Account Setup for managing other users.
Table 2-1 Definition of virtual keyboard
Icon Description
Switch letters input between capital or lower-case.
or
Switch input mode between numbers or letters.
Delete last character.
Enter.
Space.
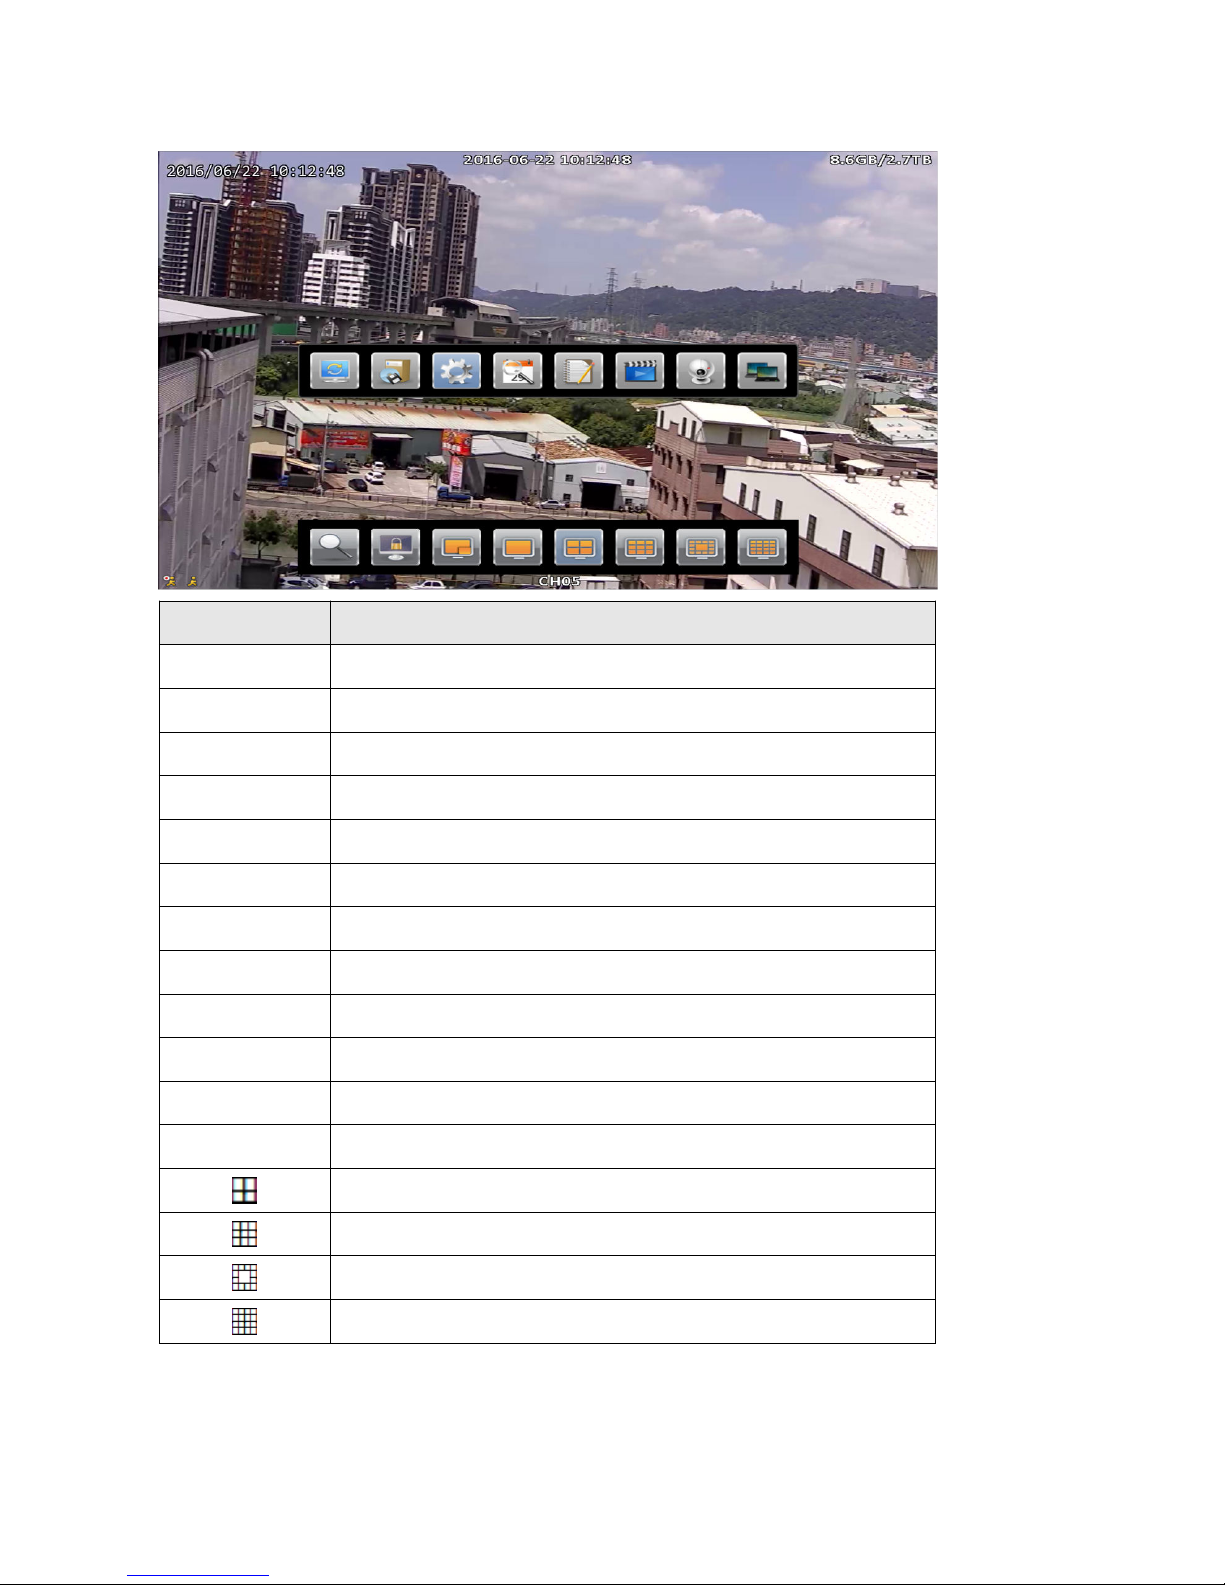
Right-click on the screen to display the Main Menu.
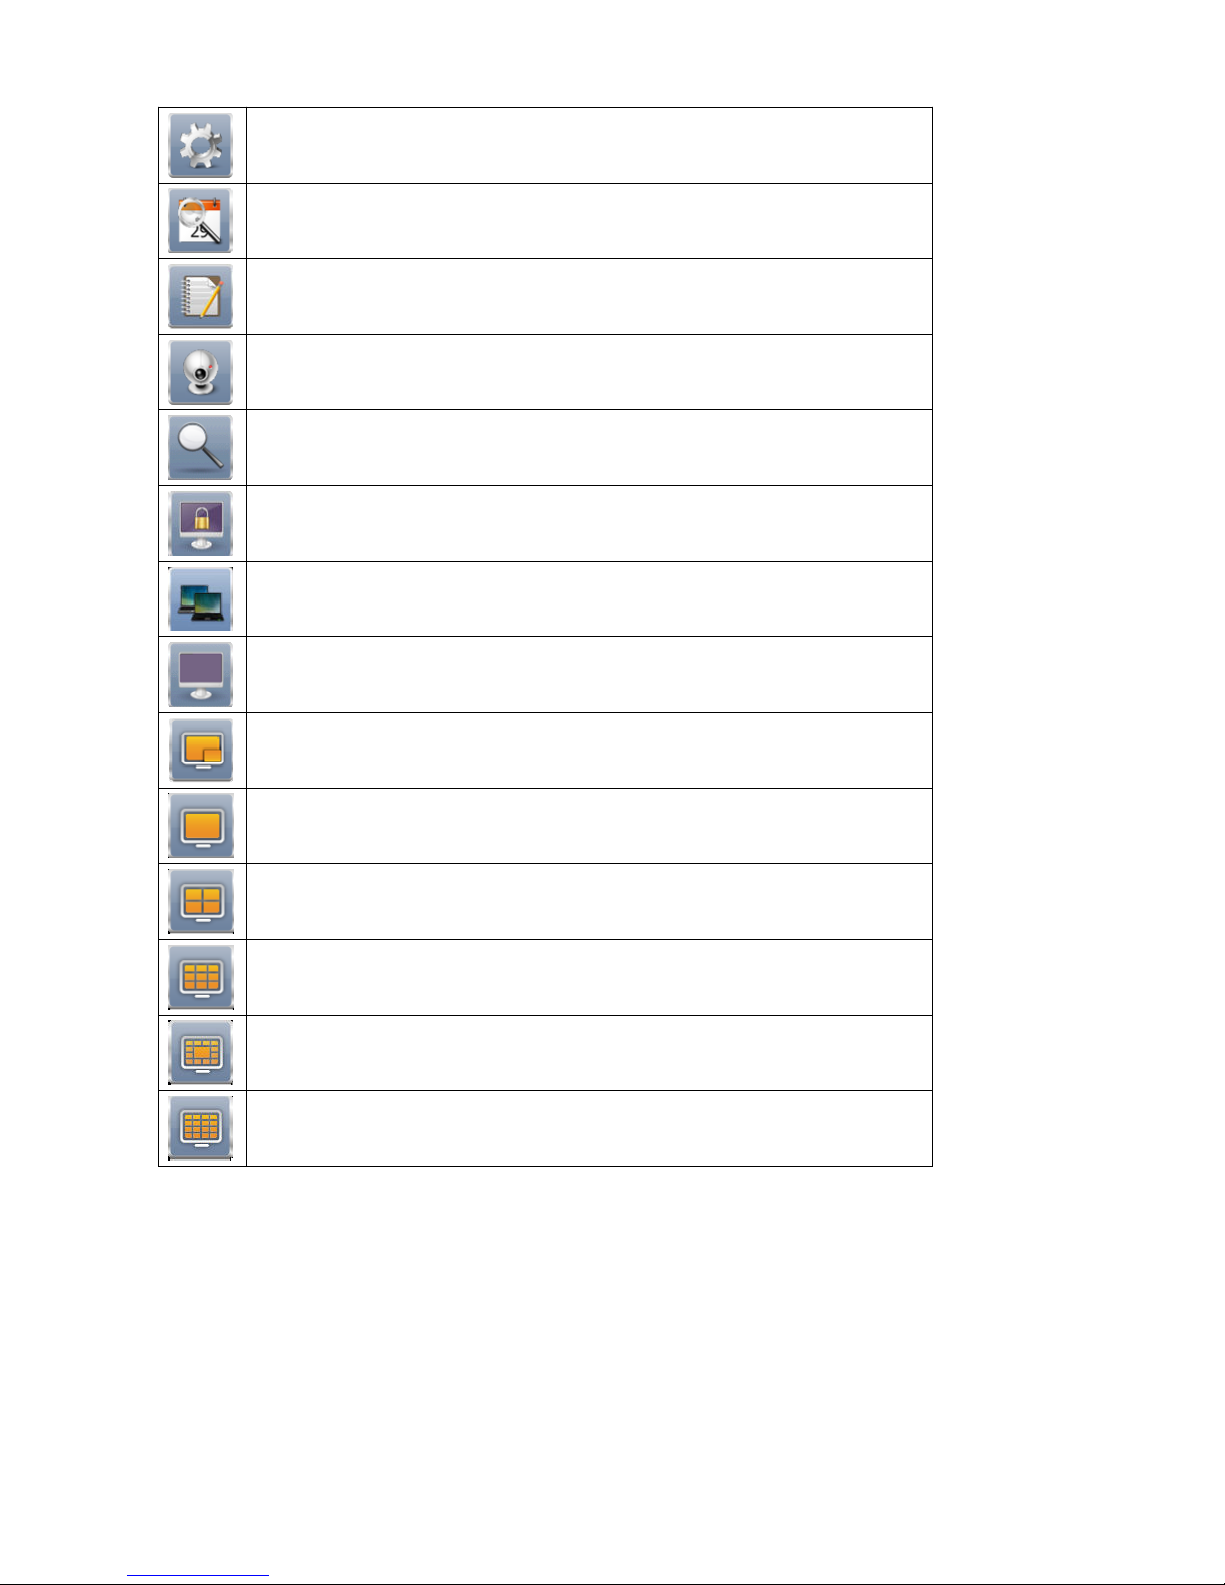
Table 2- 3 Description of Main Menu and Division Control icons
Icon Description
Auto Sequential menu.
Backup menu, for exporting video data in the DVR to a backup file.
Page 7
3
Enter Configurations menu, eight different options for configurations.
Time Search menu, for playing recordings of specific time.
System Logs, for automatically generating an event report, which shows time,
type and channel of the event.
PTZ Operation menu.
Digital Zoom ( 2 to 8 times ).
Freeze.
Smart Search, for searching events triggered in specific channel, area, and time.
Unfreeze.
PIP.
Single split.
4 division.
9 division.
13 division.
Hex division.
Note: Division control may be different according to models.
Page 8
4
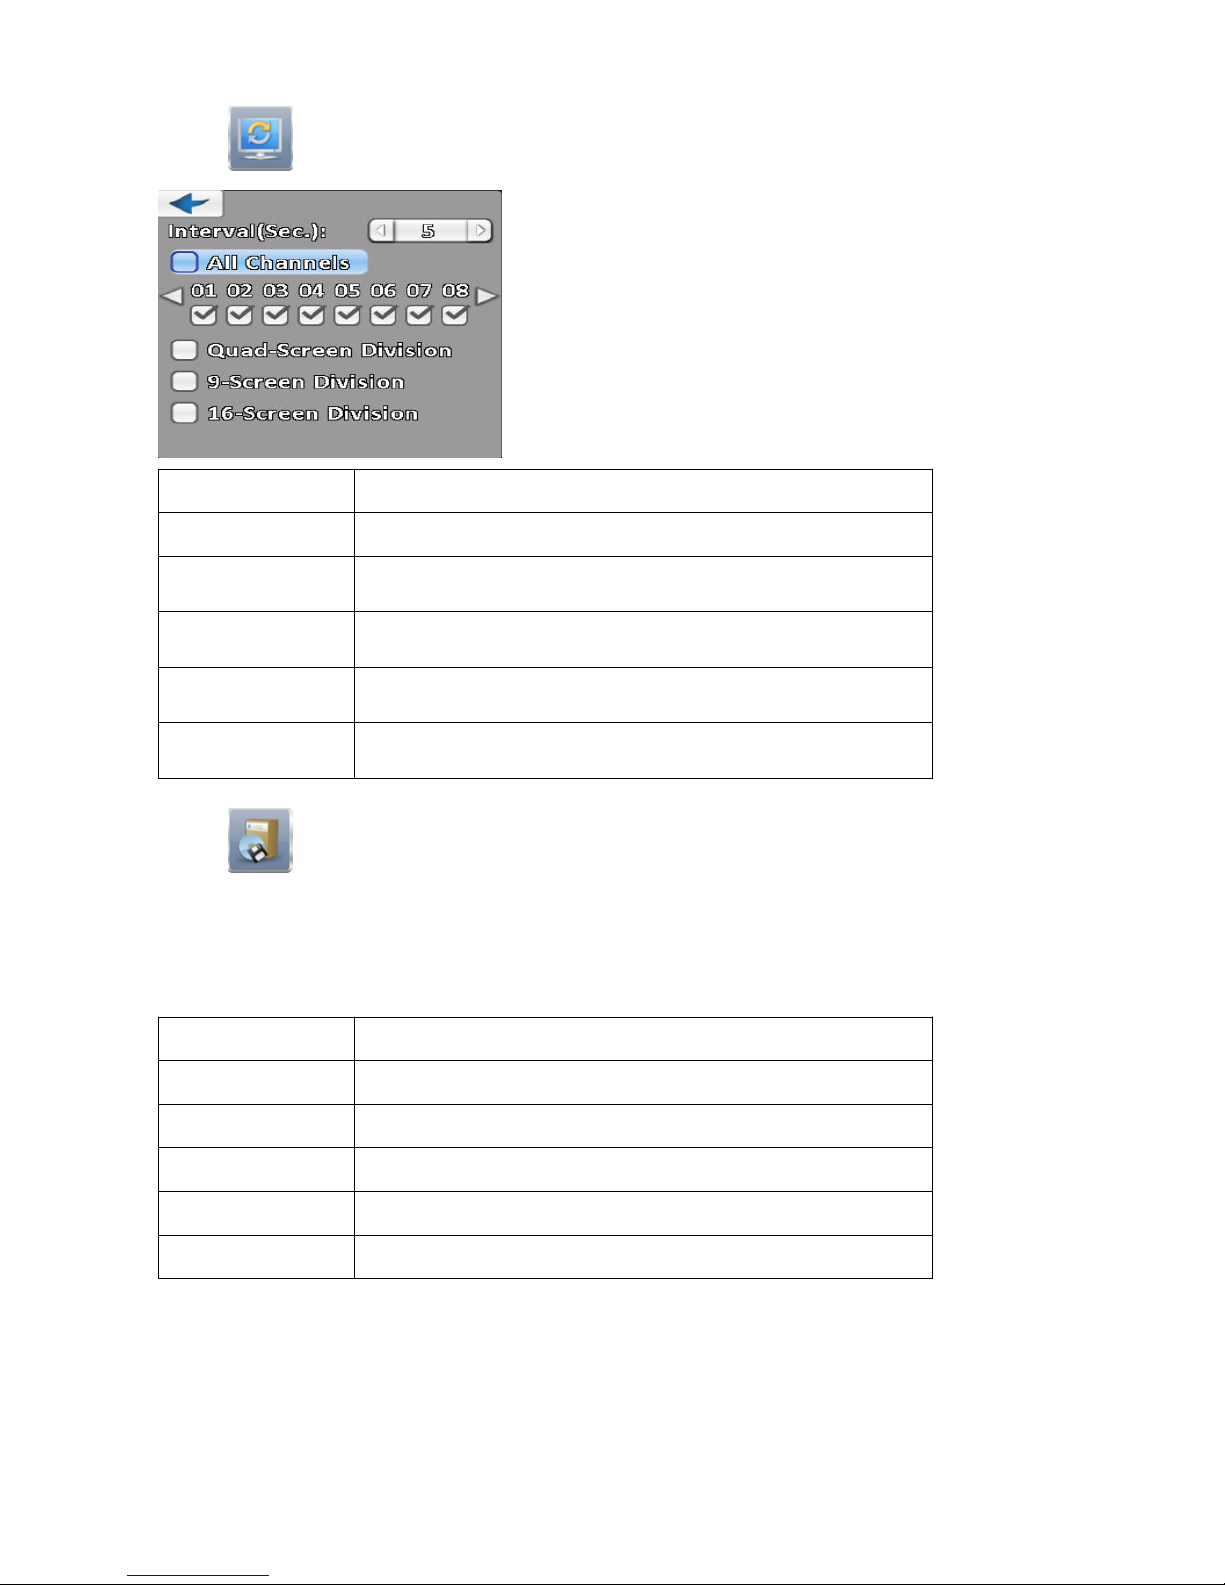
2-1 Auto Sequential
Item Description
Interval
The time interval of channel switching.
All Channels
The DVR automatically switches channels with the designated
interval. All channels display in a single-split view.
Quad Division
The DVR automatically switches channels and display all channels in
a 4-split view.
9 Division
The DVR automatically switches channels and display all channels in
a 9-split view.
16 Division
The DVR automatically switches channels and display all channels in
a 16-split view.
2-2 Backup
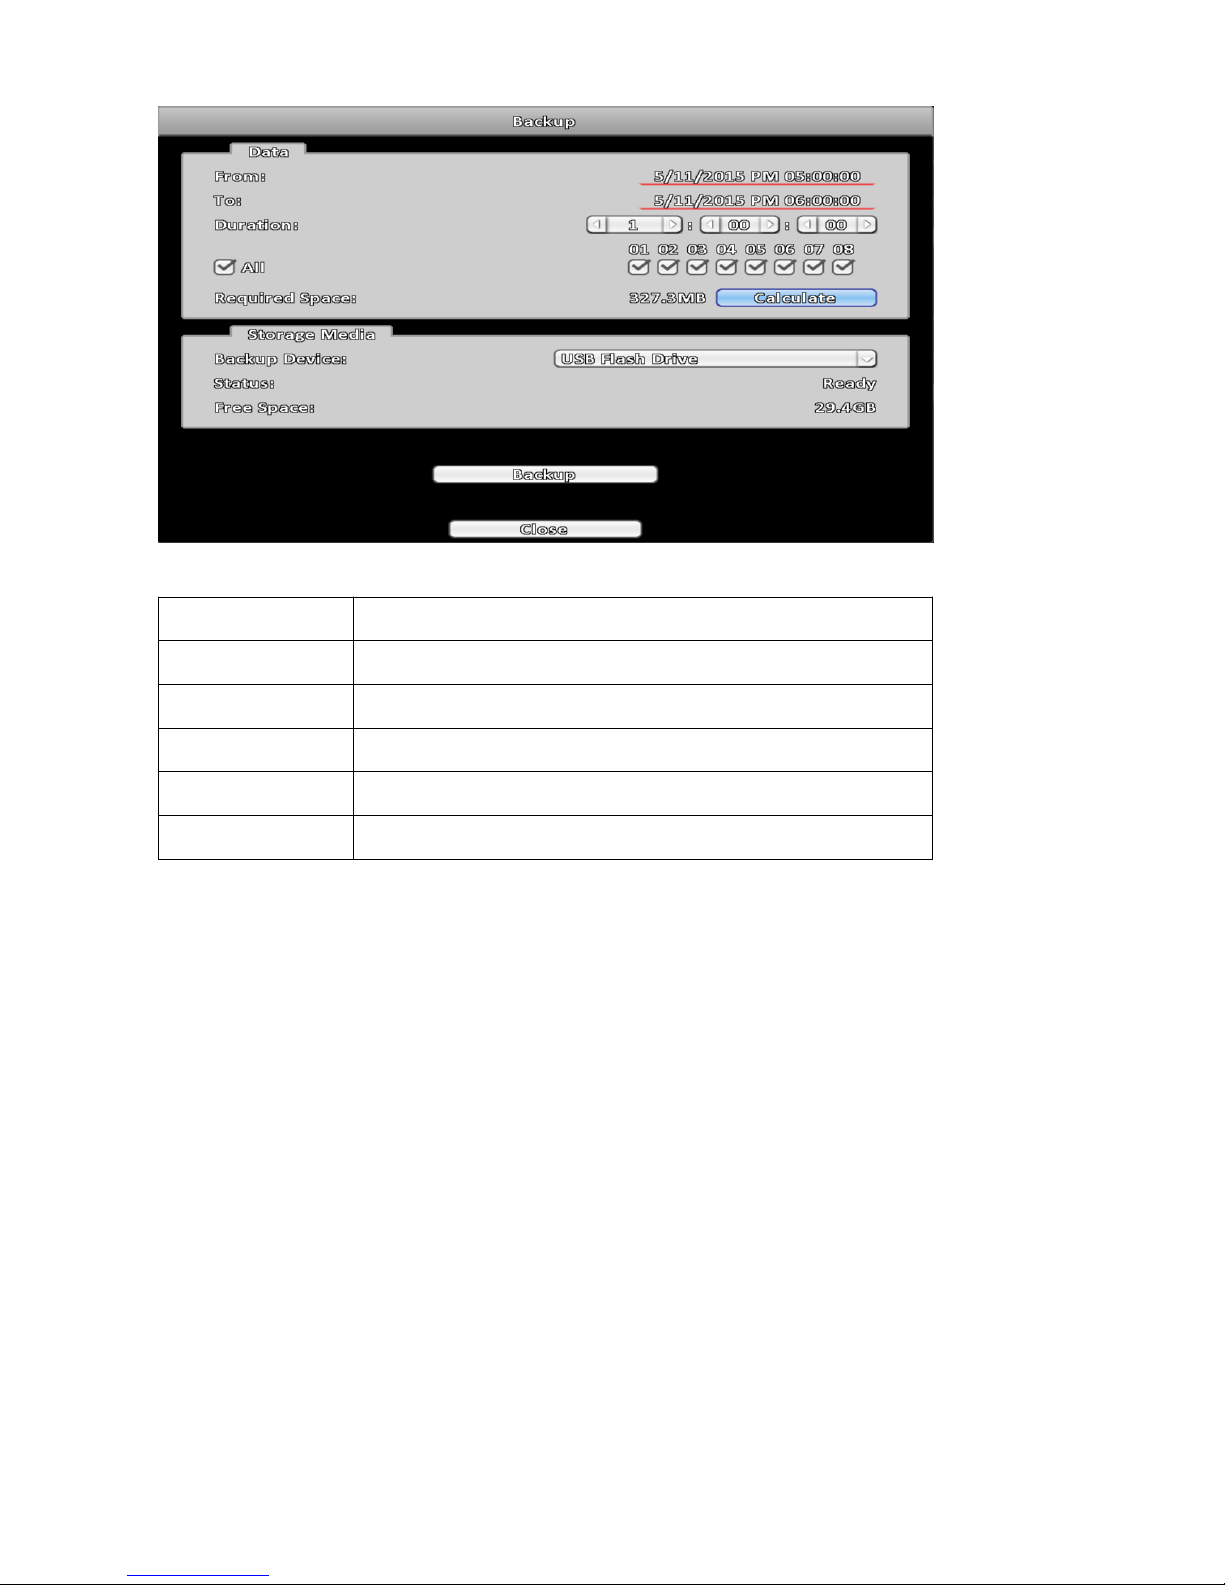
User can back up recorded video data of a specified time to either direct-attached storage, such as a USB flash
drive, or a remote folder on a PC.
2-2-1 Selection
Item Description
From The start time of data to back up.
To The end time of data to back up.
Duration The duration of back up data.
All Select all channels or clear all selected channels to back up.
Required Space Show the size of the backup file.
Page 9
5
2-2-2 Select Backup Device
Item Description
Backup Start backup operation.
Back Device Select backup target device.
Status Status of target device.
Free Space Free space of target device.
Backup Start backup operation.
Note:
1. Be sure to Calculate the size of backup data before starting the backup operation.
2. Do not remove backup target device or turn off the power during the backup operation.
3. If required remote backup, please execute browser with administrator privileges.
Page 10
6
2-3 Configurations
Please refer to Chapter 3 for more detail about the Configurations menu.
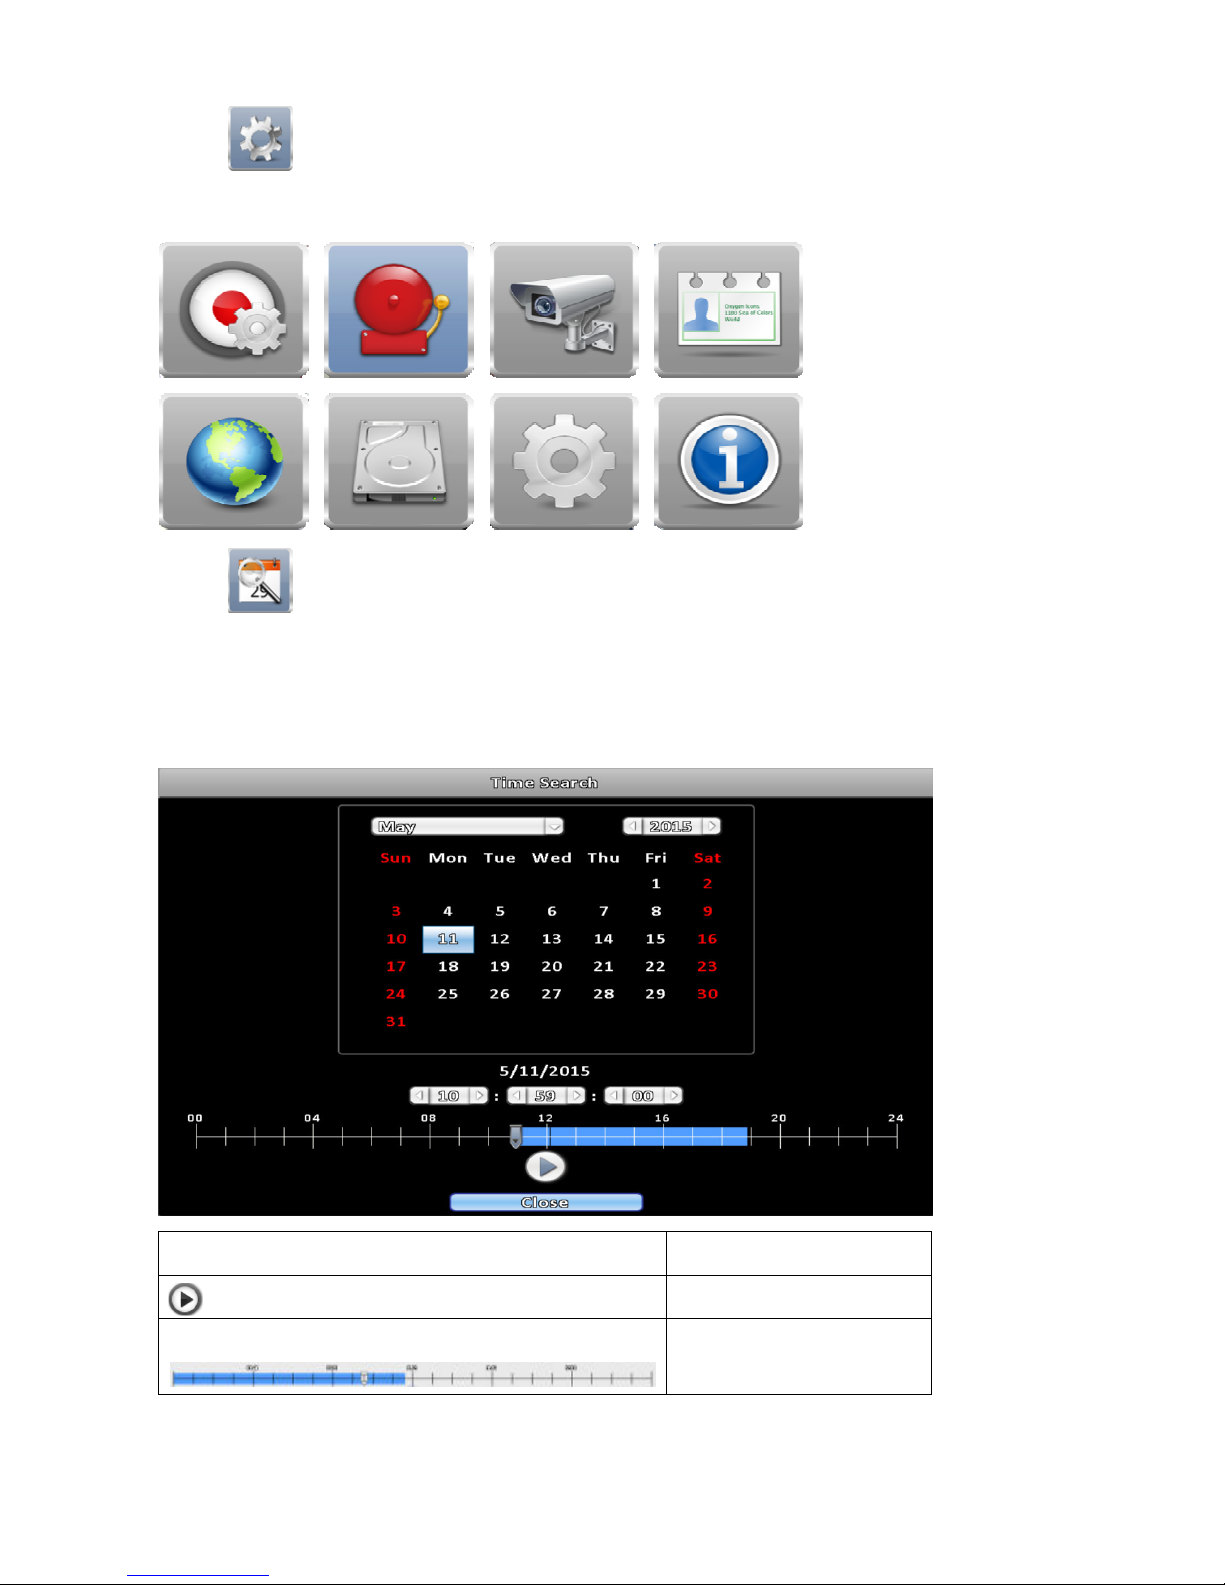
2-4 Time Search
You can search and playback recorded data of specific dates and time. Dates including recordings are
highlighted by a blue rectangle. Click the date to show recording time on that specific day with a time bar. You
can select specific time ( hour / minute / second ) by clicking the time bar, and press OK to playback the
recorded data of the specific date and time.
Icon
Description
Playback button.
Select playback time by
sliding the position of the
cursor on the time bar.
Page 11
7
2-4-1 Playback Mode
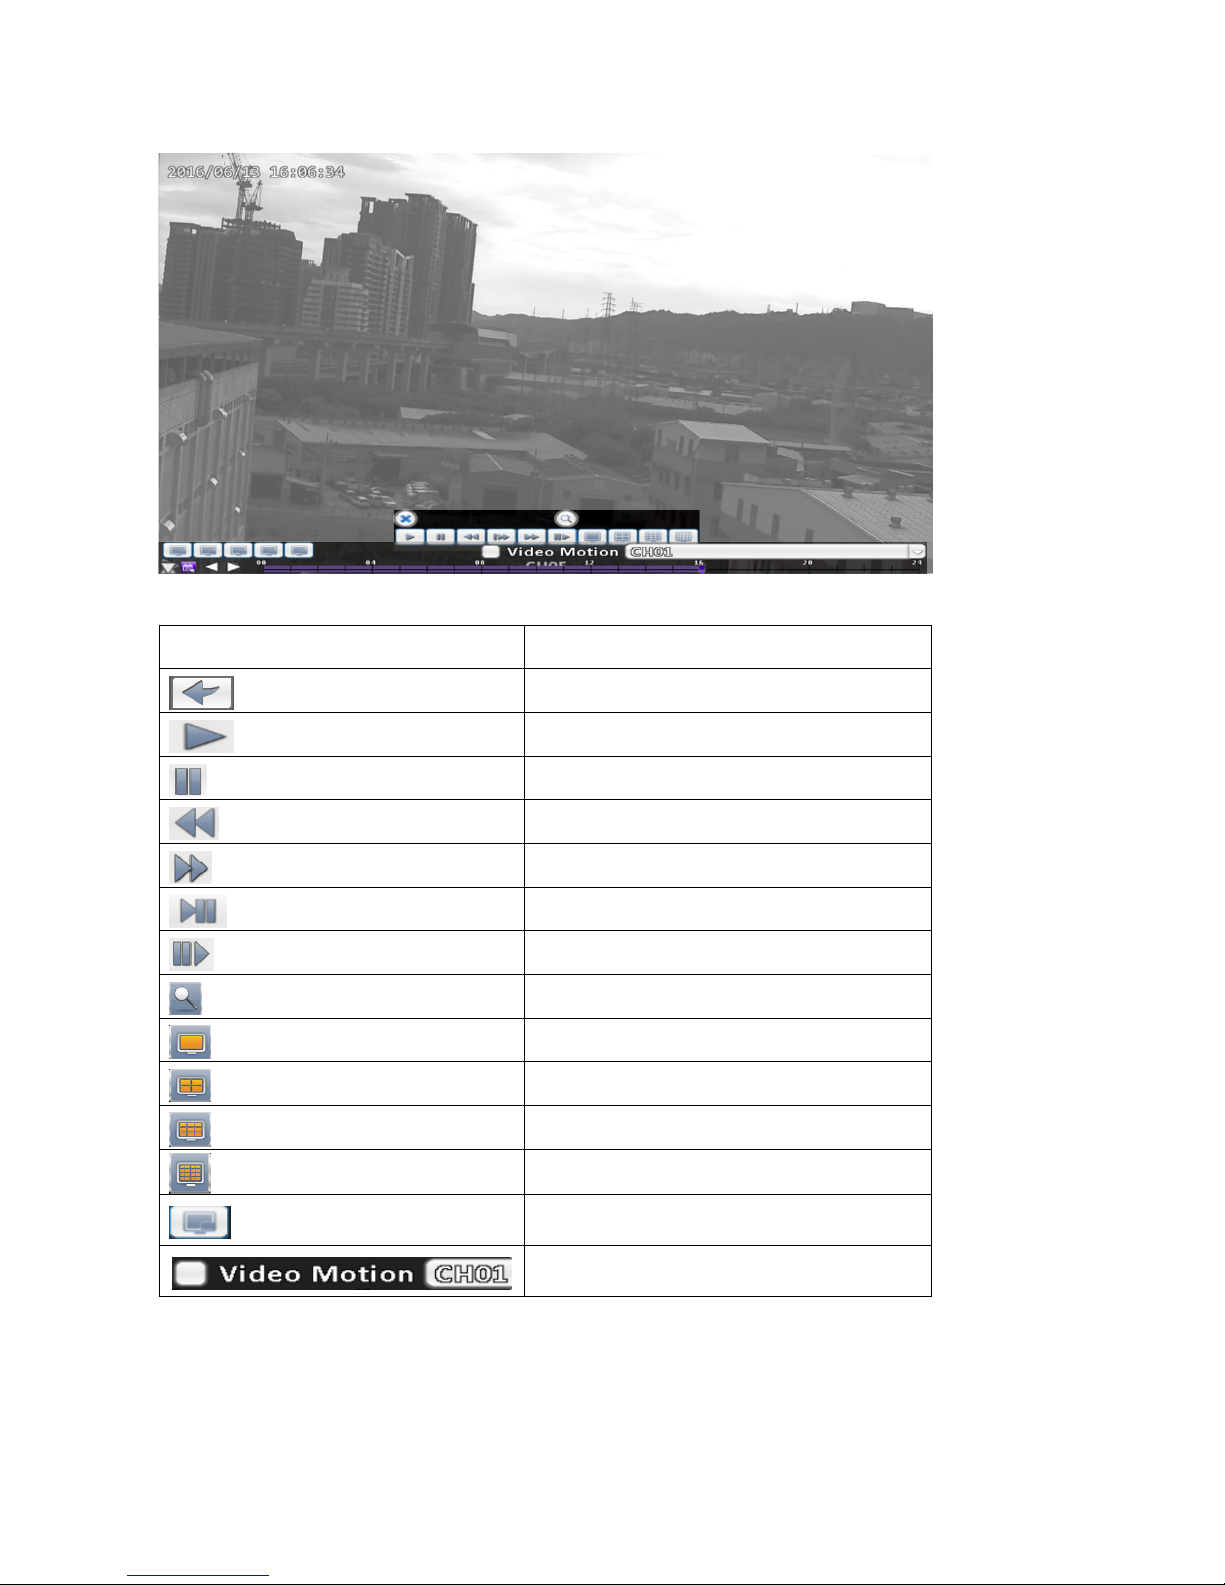
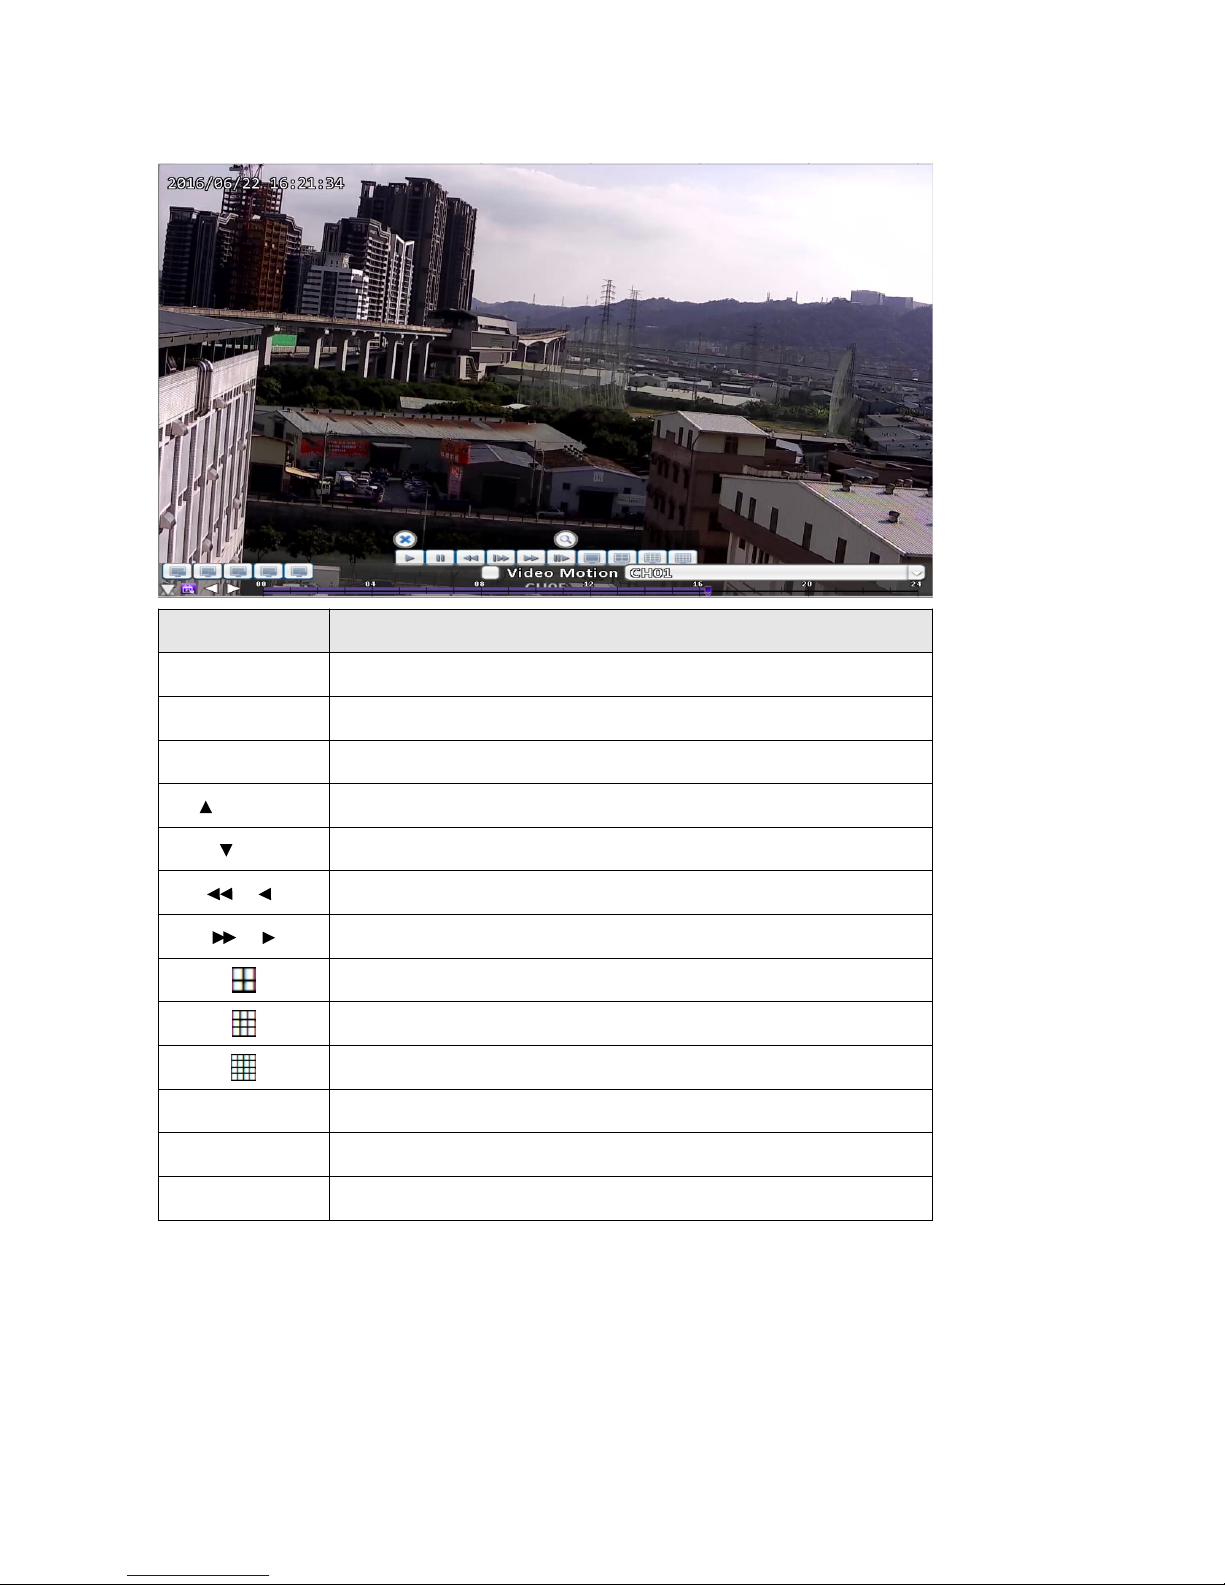
Table 2-4 Playback mode icon description
Icon
Description
Stop playback, and go to the previous page.
Play.
Pause.
Fast rewind.
Fast forward.
Slow play.
Step play.
Digital zoom.
Single split.
4 division.
9 division.
16 division.
Time interval for the timeline (1, 4, 6, 12, or 24
hours).
Determines the time range where events can
be triggered.
Note: Double-click the preferred channel to view in single split.
Page 12
8
2-5 System Logs
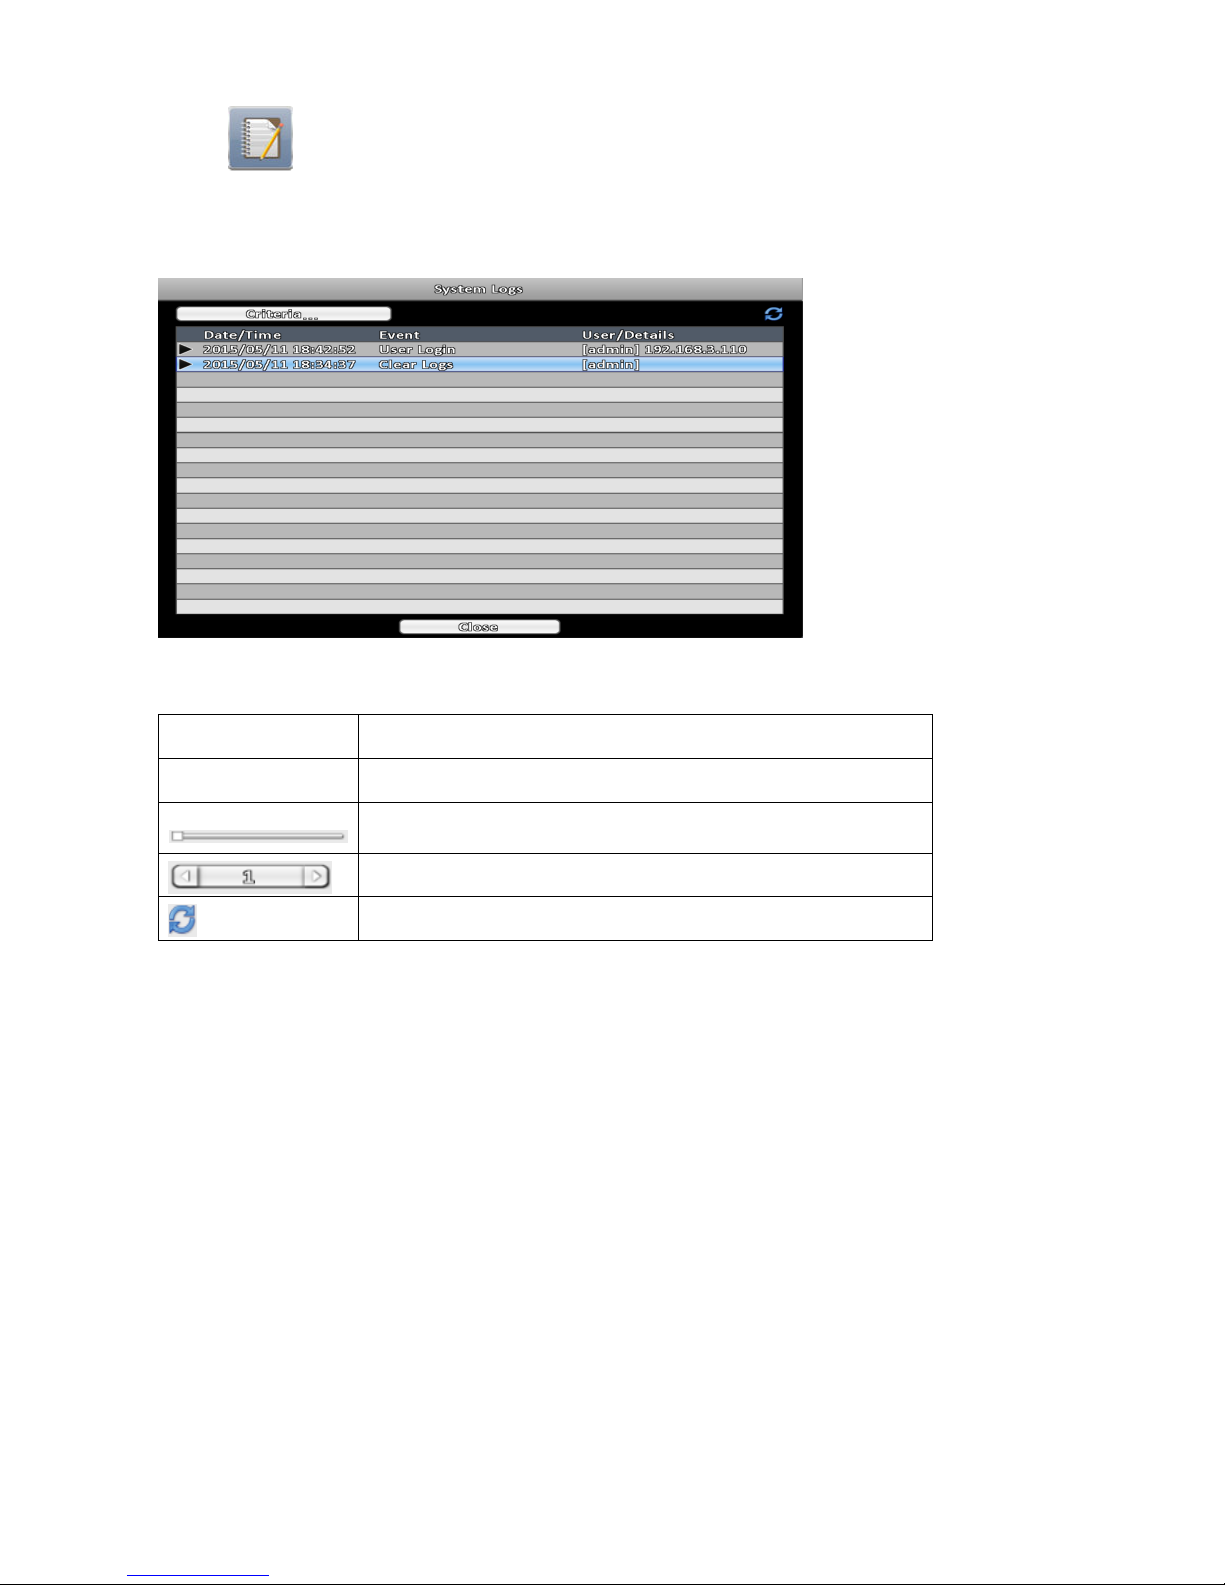
The event list shows all login events, event types, event details, and filtered events. Double-click the gray video
symbol ► on the left of the event to play recordings related to the event.
Note:
If no HDD is installed, or no recorded data exist, the DVR will not play the video even double-click the event.
Icon Description
Criteria Set the conditions for the event search
Slide to jump to a page of the event list. The number shows on the
right side is the current page number
Press left or right arrow to change the page number directly.
Refresh the system logs.
Page 13
9
2-5-1 Criteria
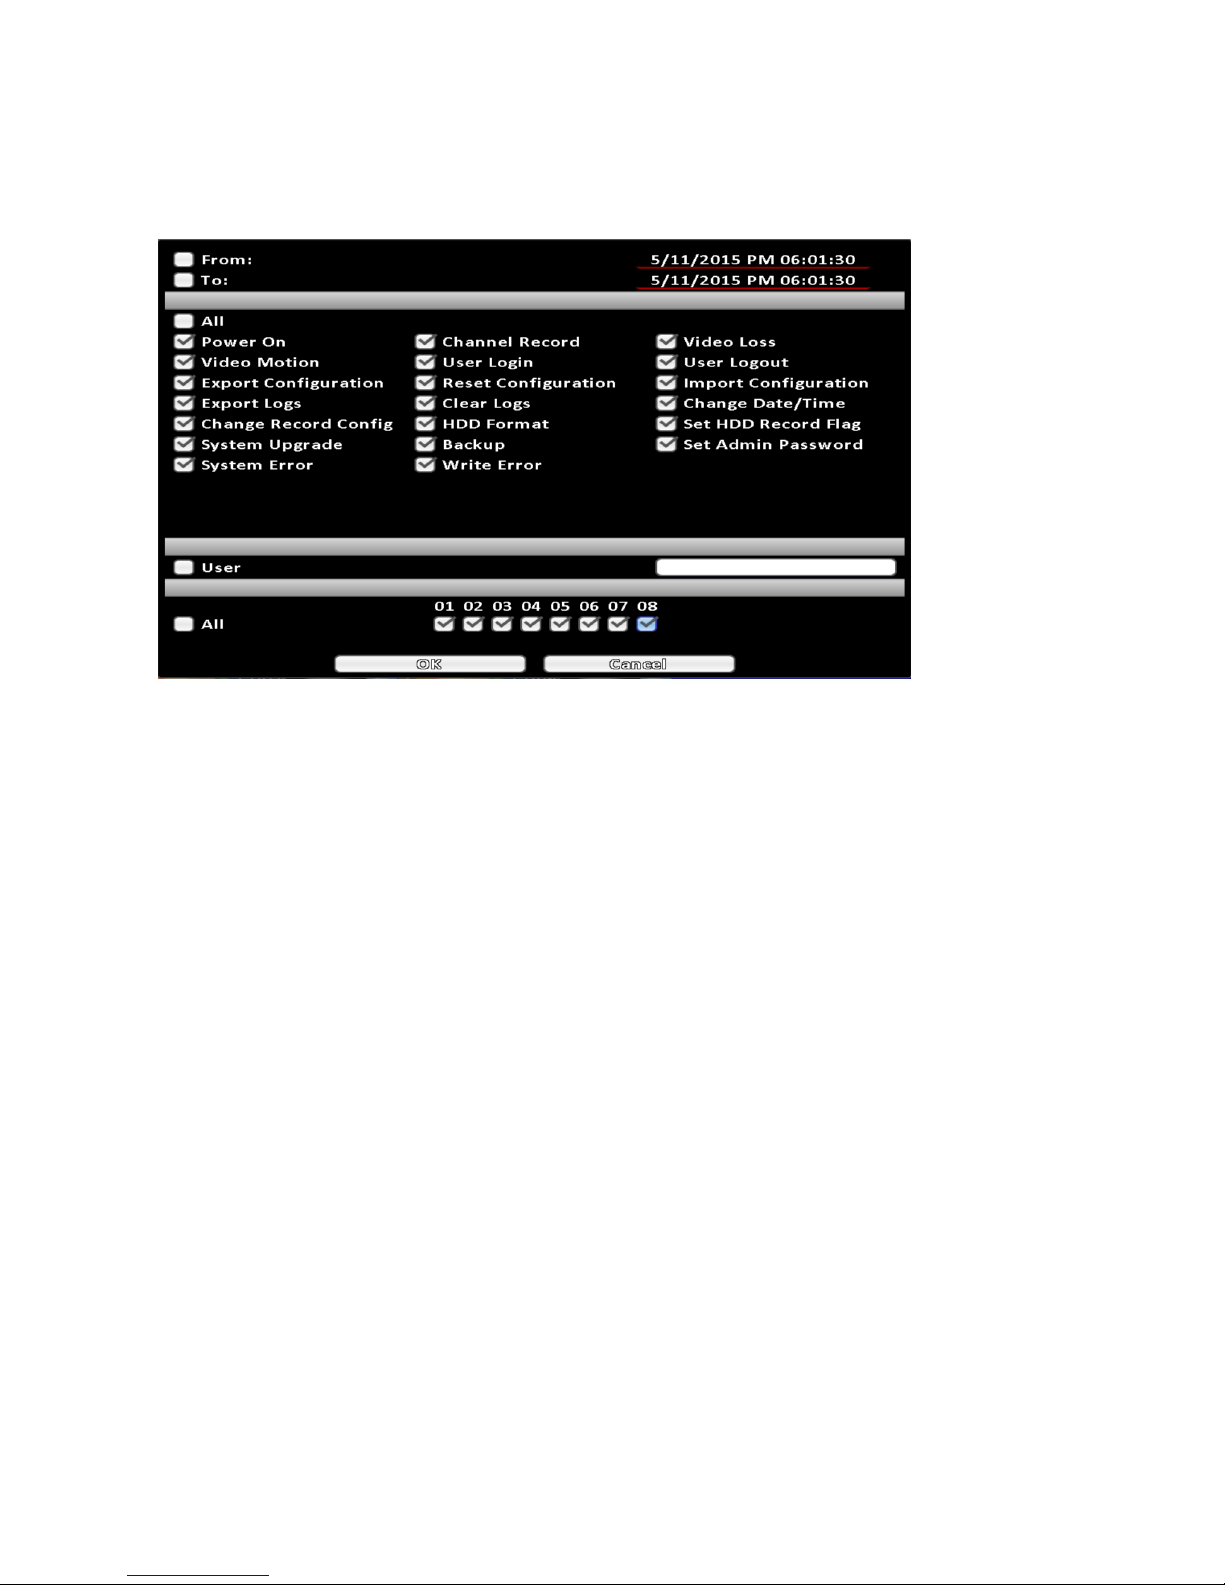
Using Criteria to find events quicker. If start time and end time is checked, the event list will only display the
events within the specific time period. If the user uncheck some events and press OK, the lists will only show
checked events. If you uncheck the channels, videos from unchecked channels will be filtered out.
Page 14
10
2-6 PTZ Operation
PTZ Settings ( RS-485, UTC, and IP camera control ) can be configured in Camera Setup( refer to Chapter 3-3 ).
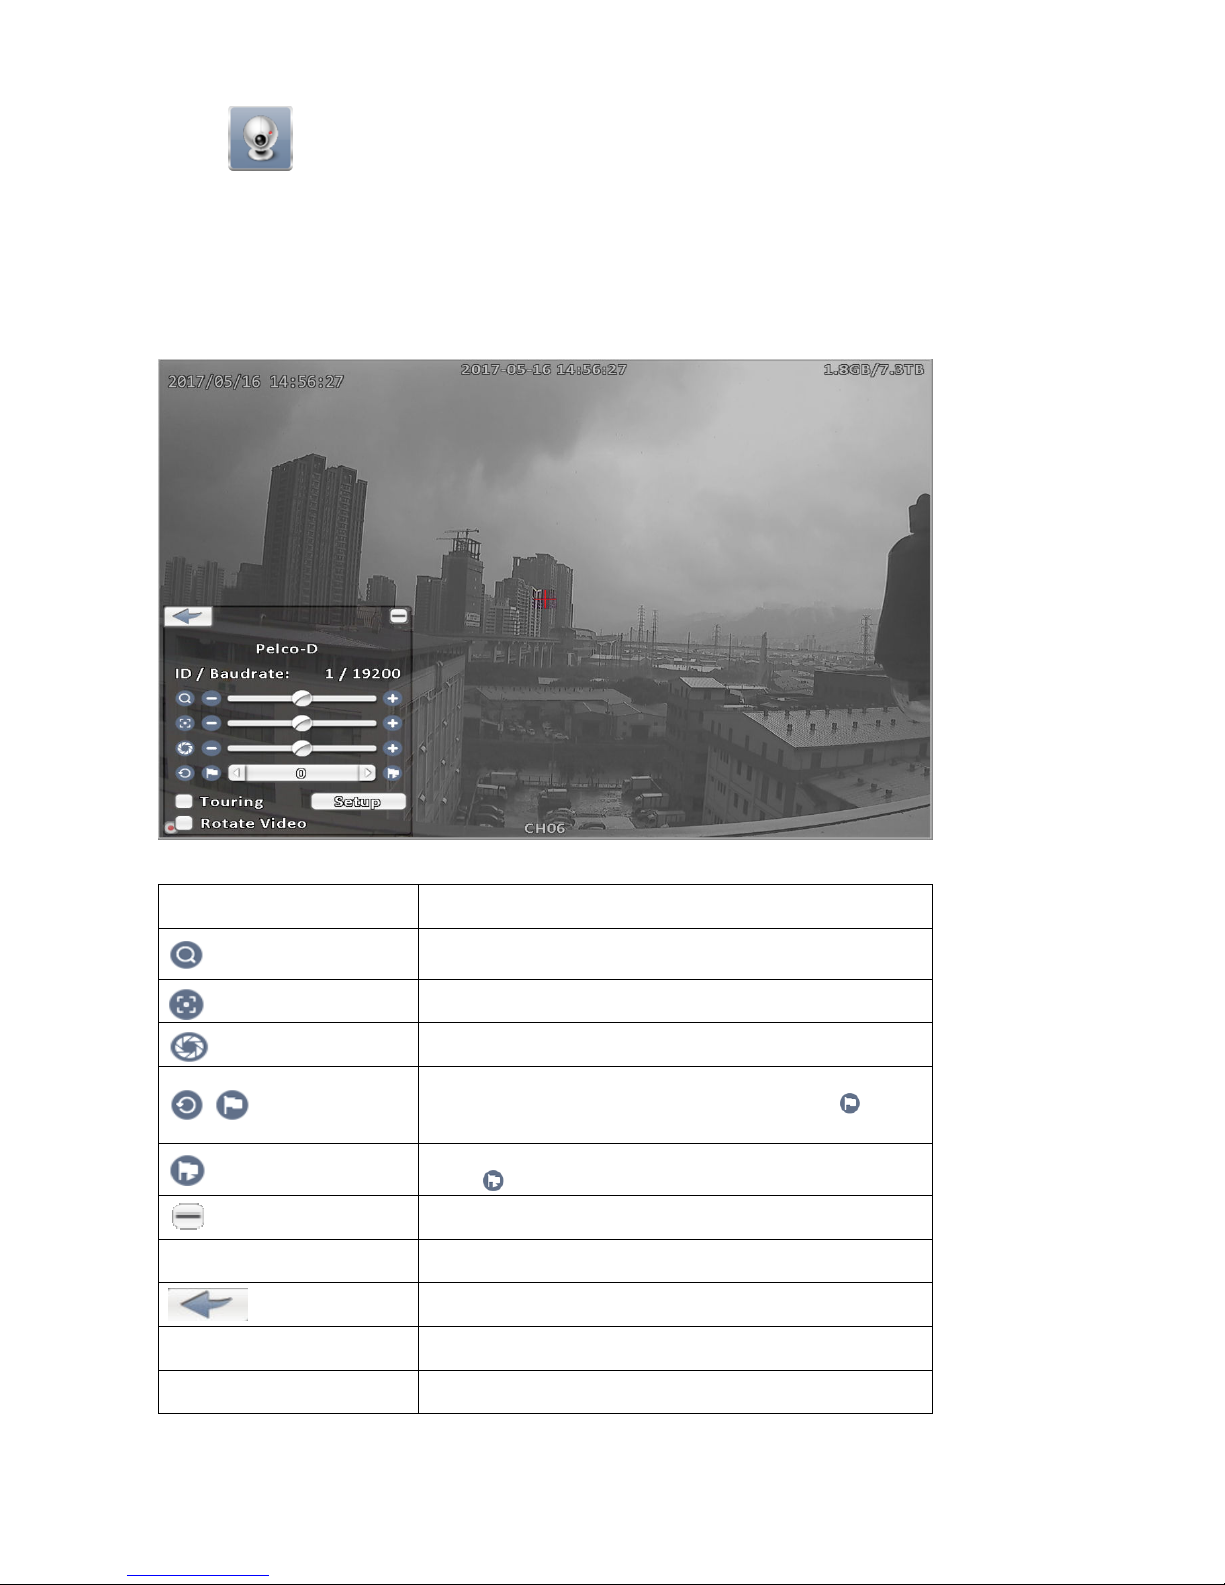
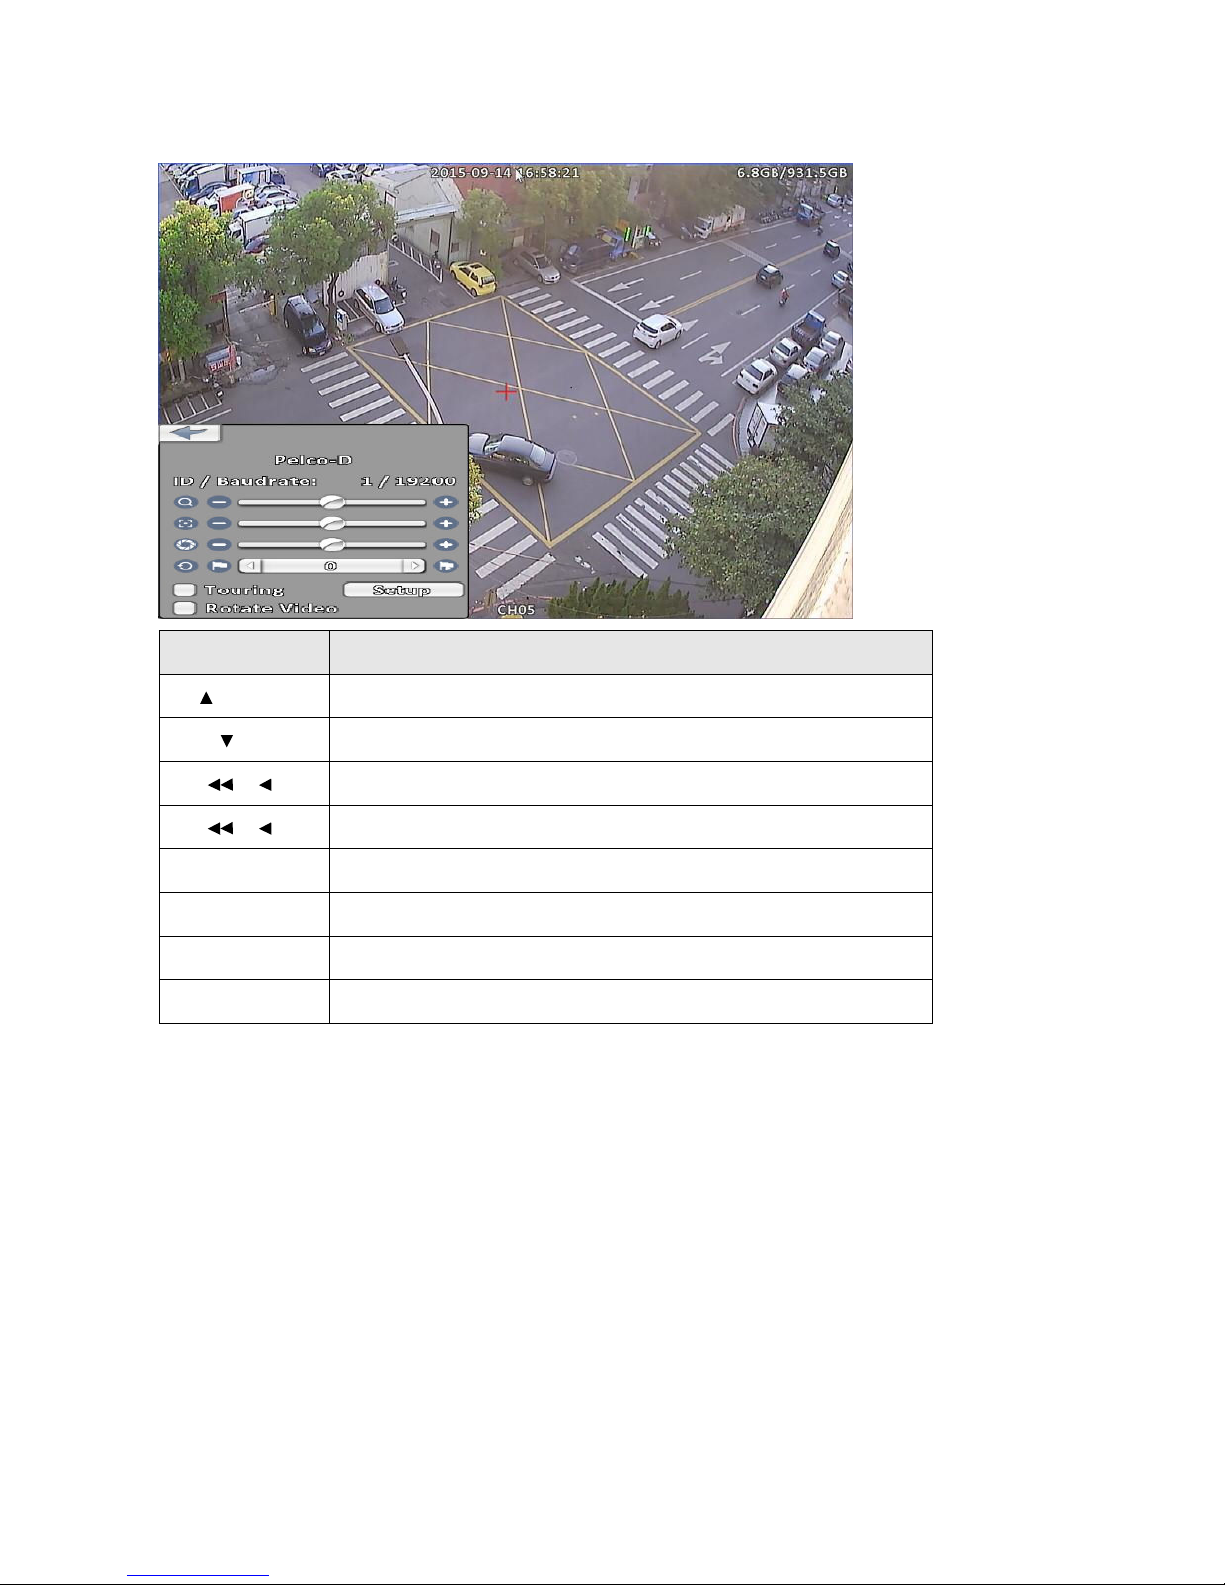
2-6-1 RS-485 PTZ control
In RS-485 PTZ control mode, a Red Cross appears in the center of the screen. In the window hold down the
left mouse button and drag that can control pan and tilt, the view of the PTZ camera will move to the desired
position accordingly.
RS-485 PTZ control icon description
Icon Description
ZOOM. Press + / - or move the slider to adjust the zoom
level.
FOCUS. Press + / - or move the slider to adjust the focus
IRIS. Press + / - or move the slider to adjust the iris
Press left or right arrow keys to select desired preset point,
adjust view to appropriate position then press to set
the current position as the preset point.
Press left or right arrow keys to select the preset point, and
press to move the view to the selected preset point.
Minimize the PTZ menu.
Rotate Video Make the video upside down.
Exit
Touring Checked, enable auto pan.
Setup Refer to Chapter 2-6-3.
Page 15
11
2-6-2 UTC Control
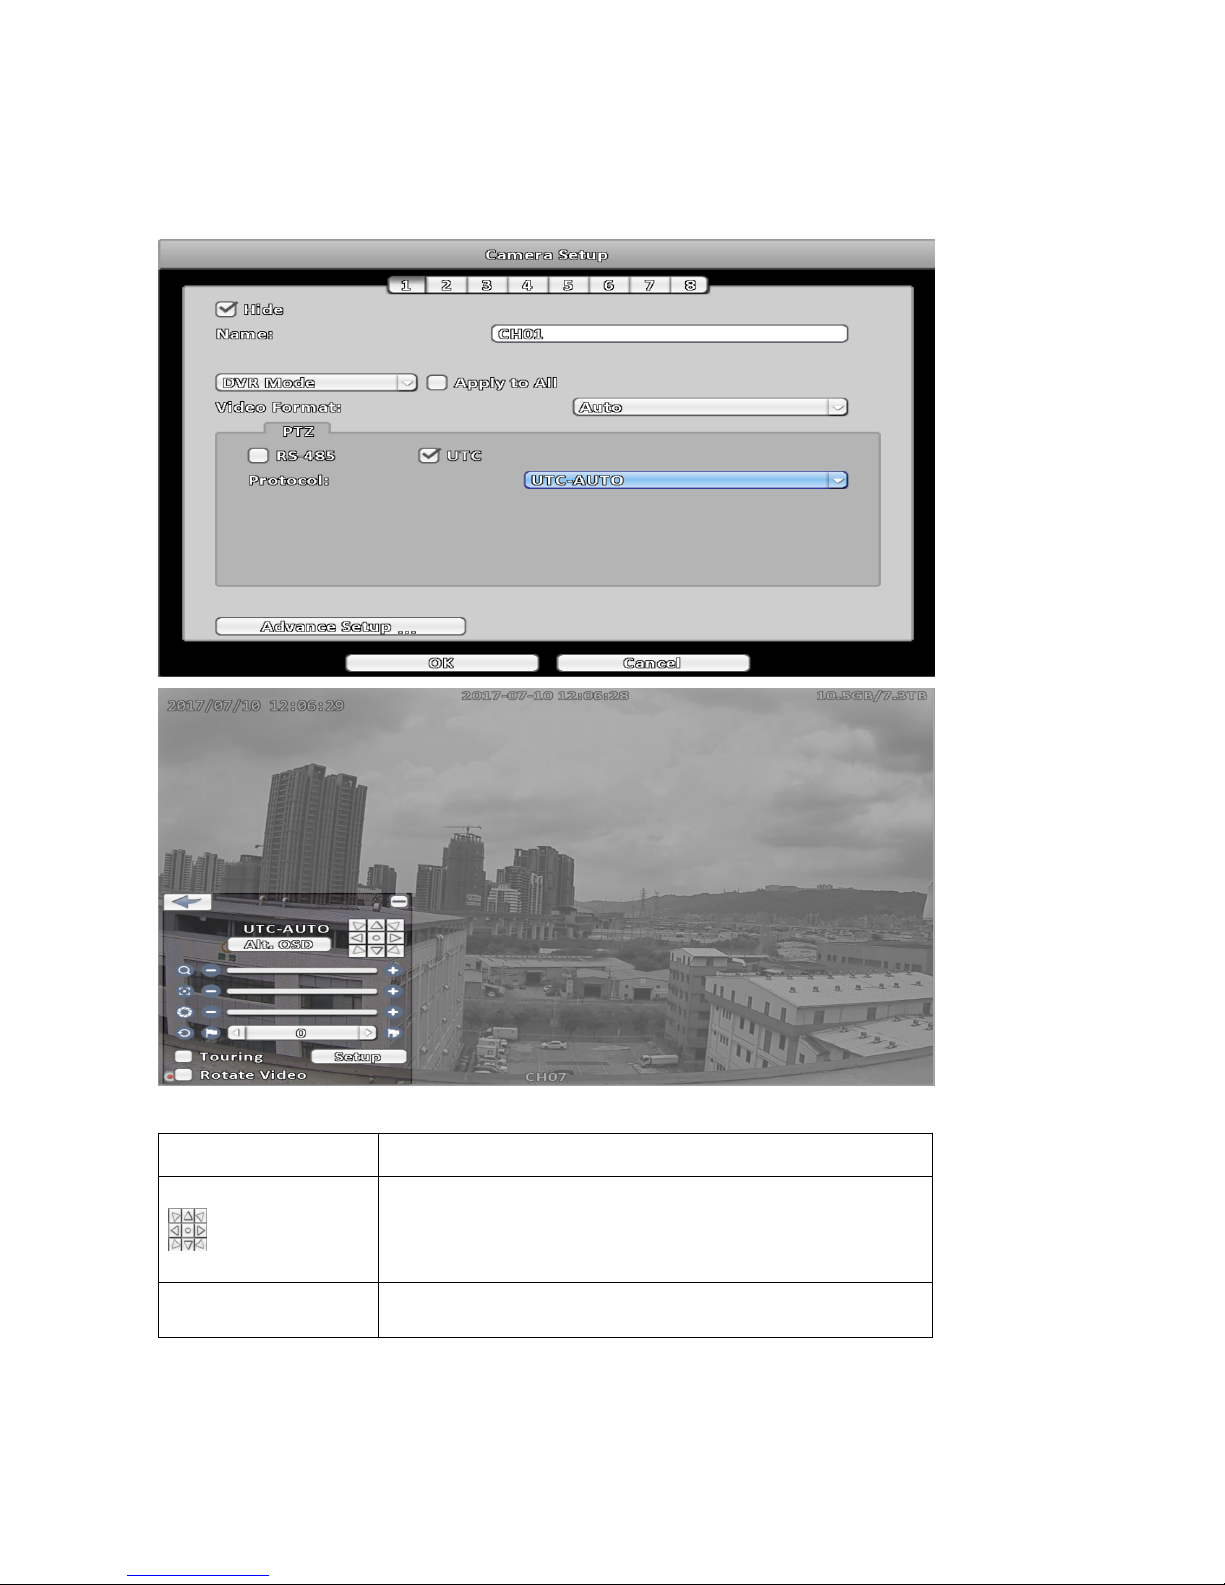
DVR supports UTC( Up The Coax ) function that can control UTC supported camera via coaxial cable
without any other equipment. Follow below steps to enable UTC control, enter Camera Setup menu,
in PTZ field chosen UTC option and Protocol select UTC-AUTO.
UTC control icon description
Item Description
Direction and enter, click at center that can turn on UTC camera
OSD function, when OSD is activated click at center that same as
Enter key and click direction key to select camera different
function.
Std.OSD/Alt.OSD
Standard OSD/Alternate OSD.Click to select appropriate protocol
to operate UTC camera.
Note:
1. If the resolution of the UTC camera is D1 or 960h, please switch the UTC protocol to
UTC-720P for further operations.
Page 16
12
2. If the resolution of the UTC camera is 4Mega Simulation HD, please switch the UTC
protocol to UTC-AUTO or UTC-1080P for further operations.
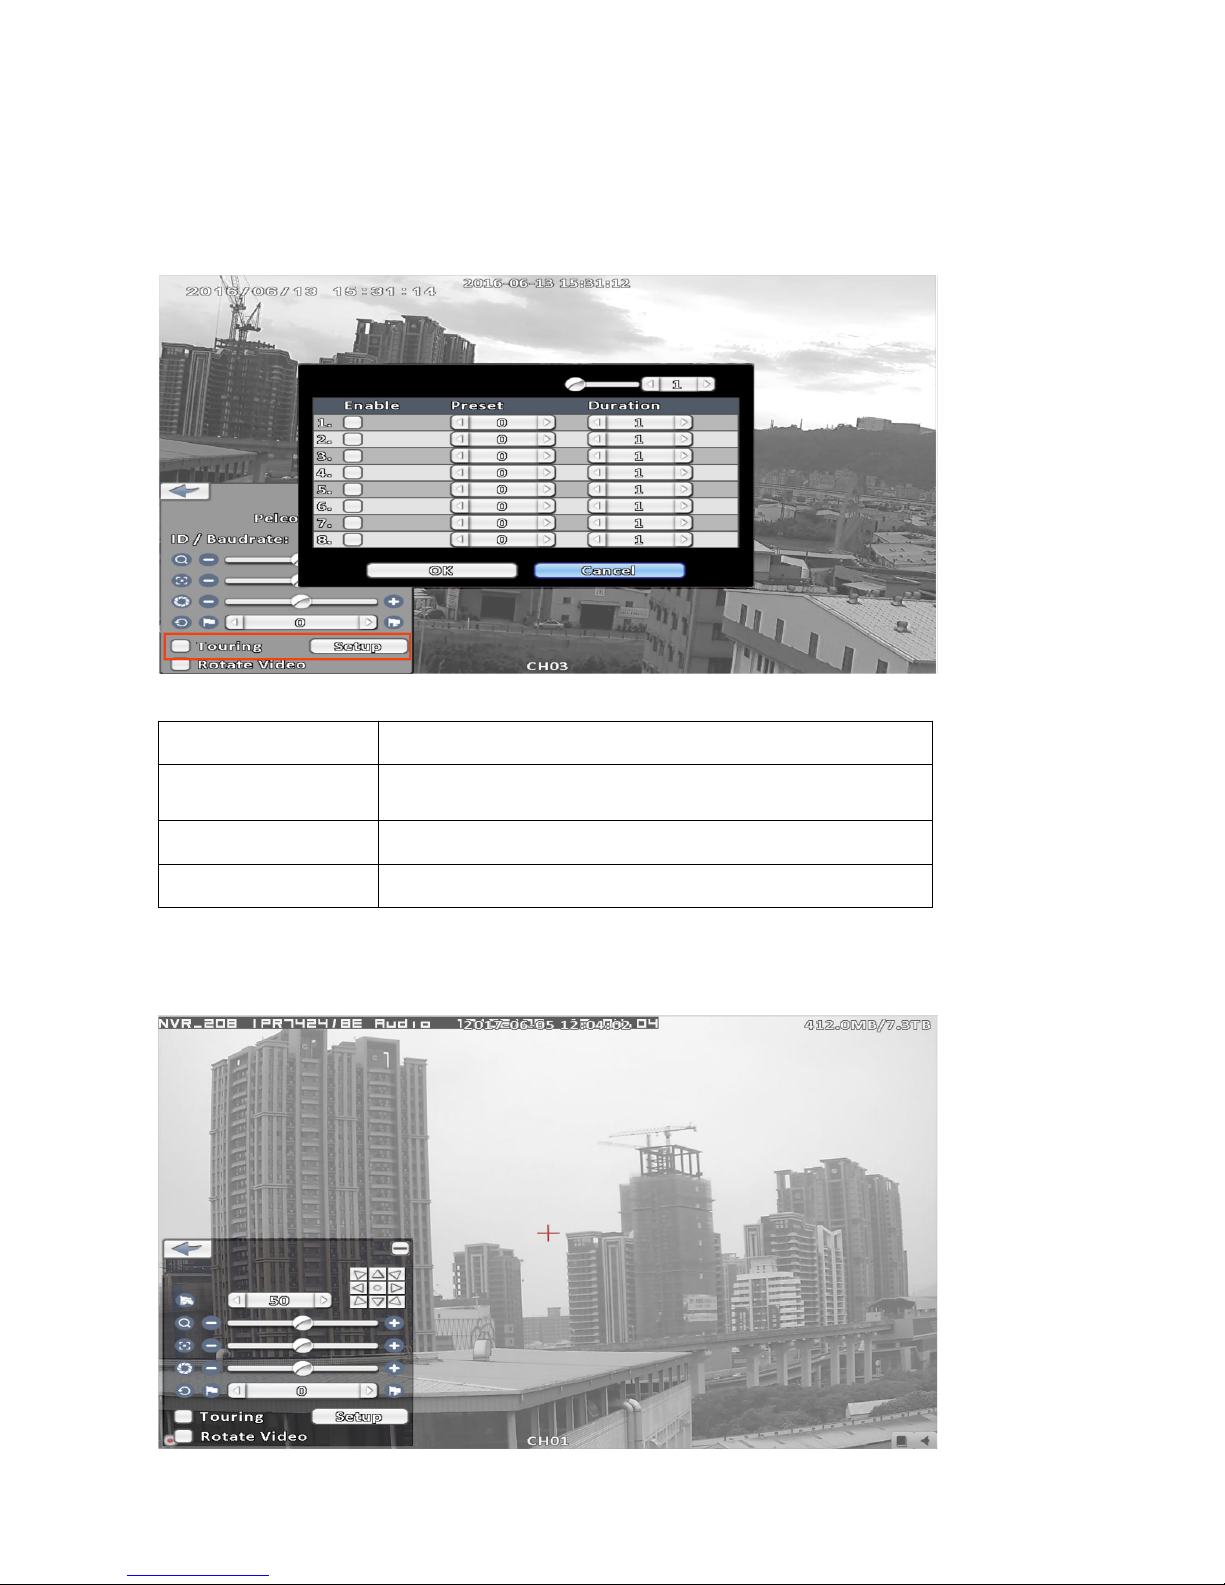
2-6-3 Touring( Auto Pan ) Setup
Click Setup to open preset point dialog.
Preset point dialog description
Item Description
Enable
Checked, when enable Touring, PTZ will tour through these
checked preset points.
Preset Select preset point, up to 32 points.
Duration Preset point dwell time.
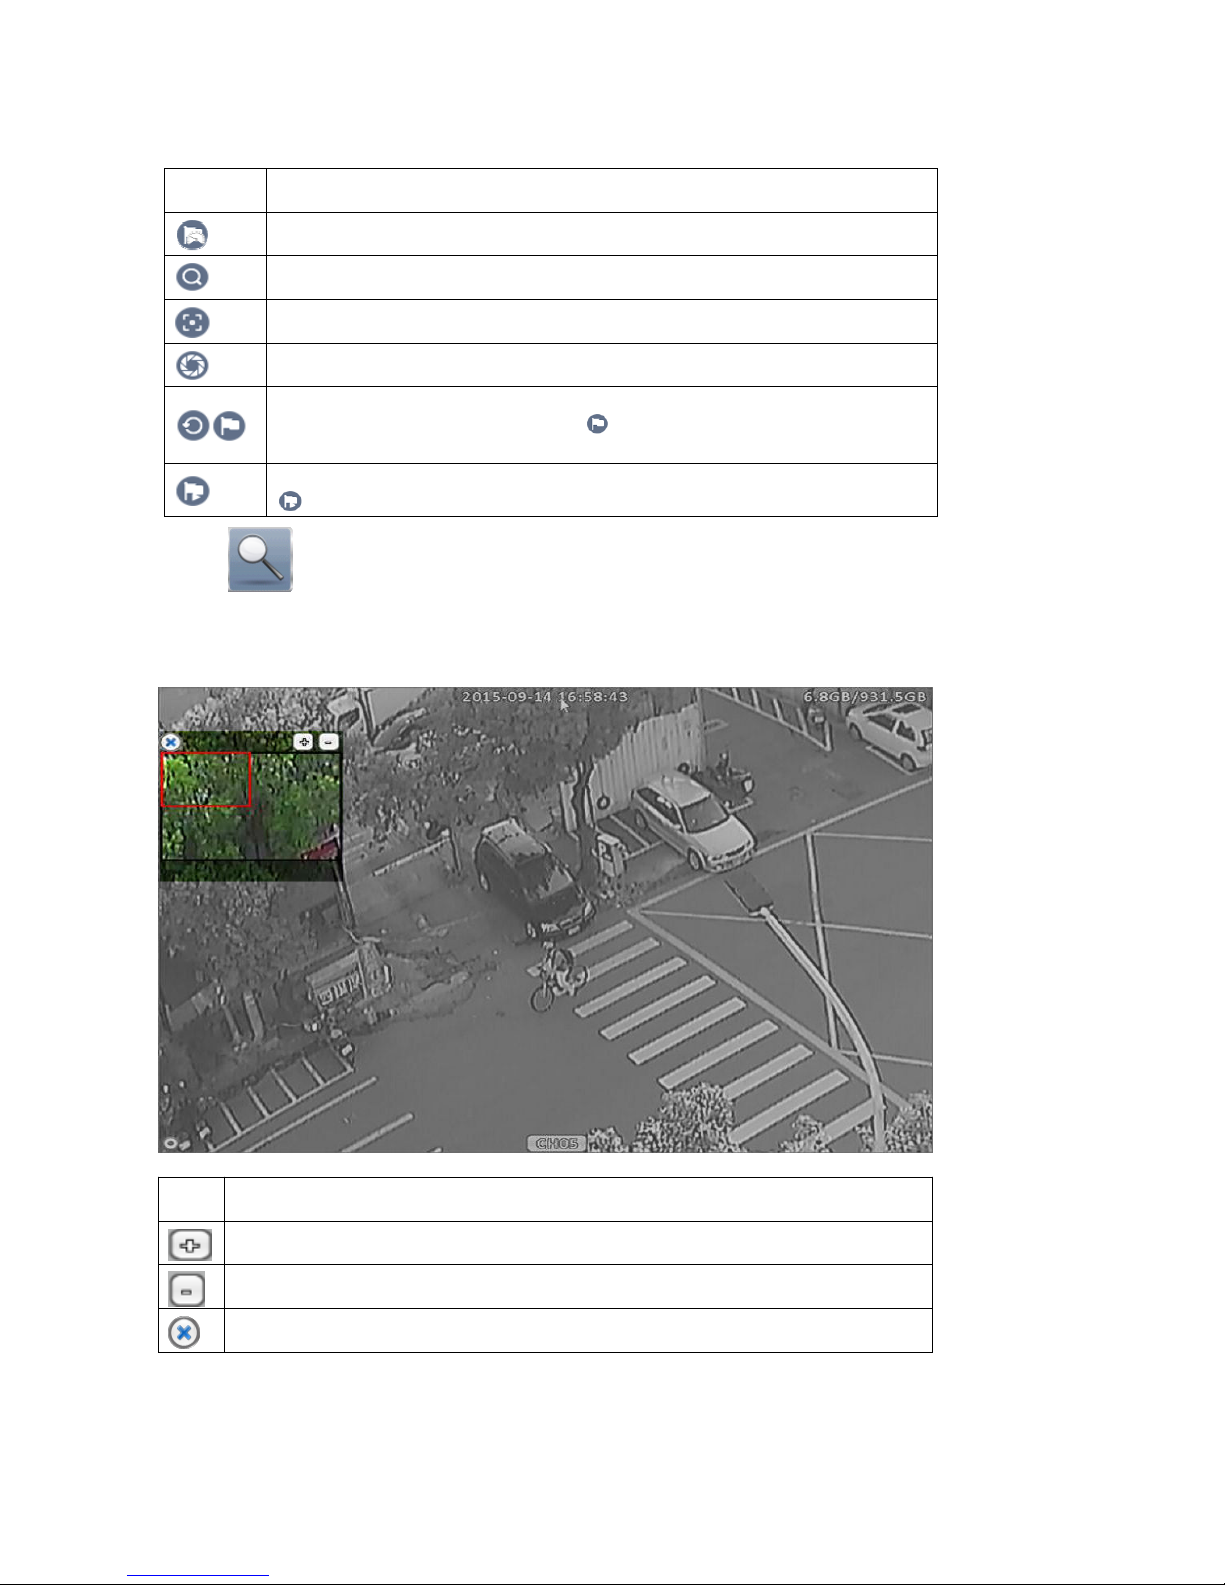
2-6-4 IP Camera Control
IP Camera Control menu, shown as below:
Page 17
13
IP Camera Control icon description
Item Description
Pan and tilt speed.
ZOOM. Press +/- or move the slider to adjust.
FOCUS. Press +/- or move the slider to adjust.
IRIS. Press +/- or move the slider to adjust.
Press left or right arrow keys to select desired preset point, adjust view
to appropriate position then press to set the current position as the
preset point.
Press left or right arrow keys to select desired preset point, then press
to move the view to the selected preset point.
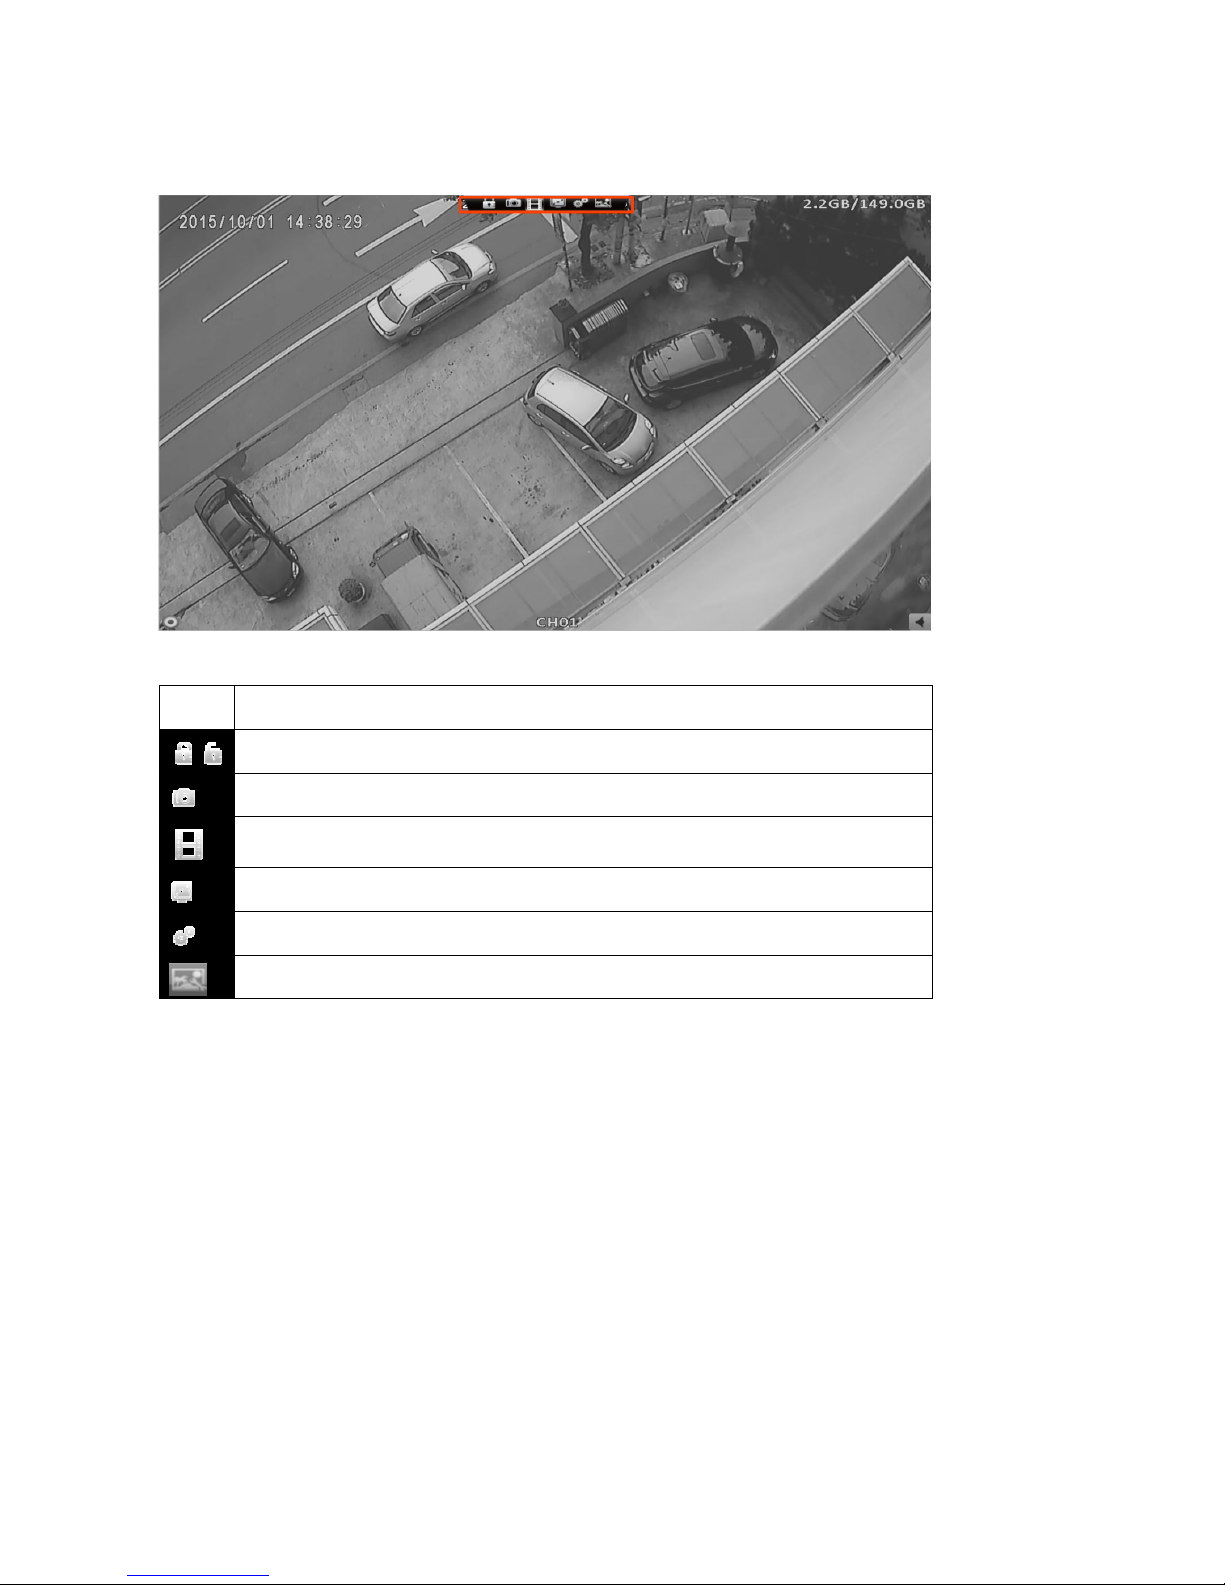
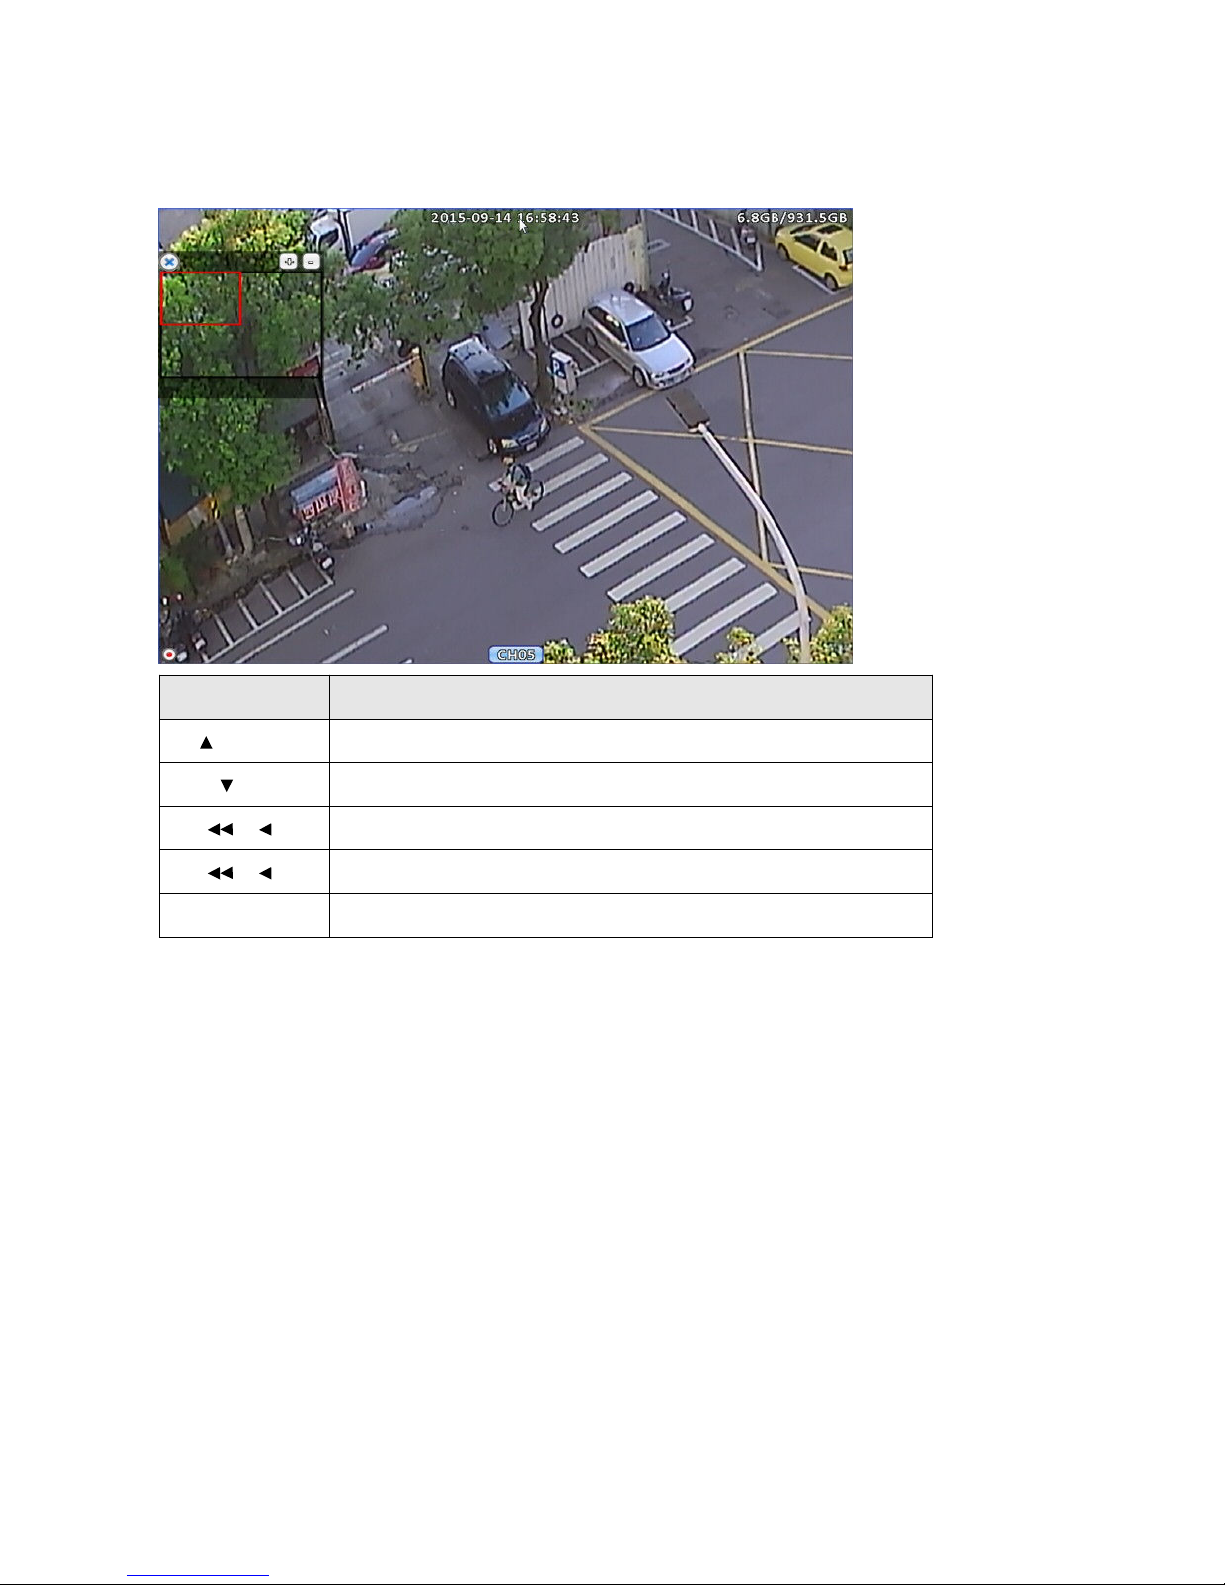
2-7 Zoom
In the digital zoom mode, user can move the zoom area by dragging the red rectangle.
Digital zoom operation show as below:
Icon Description
Zoom-in the area specified by the red rectangle.
Zoom-out the area specified by the red rectangle.
Exit digital zoom mode.
Page 18
14
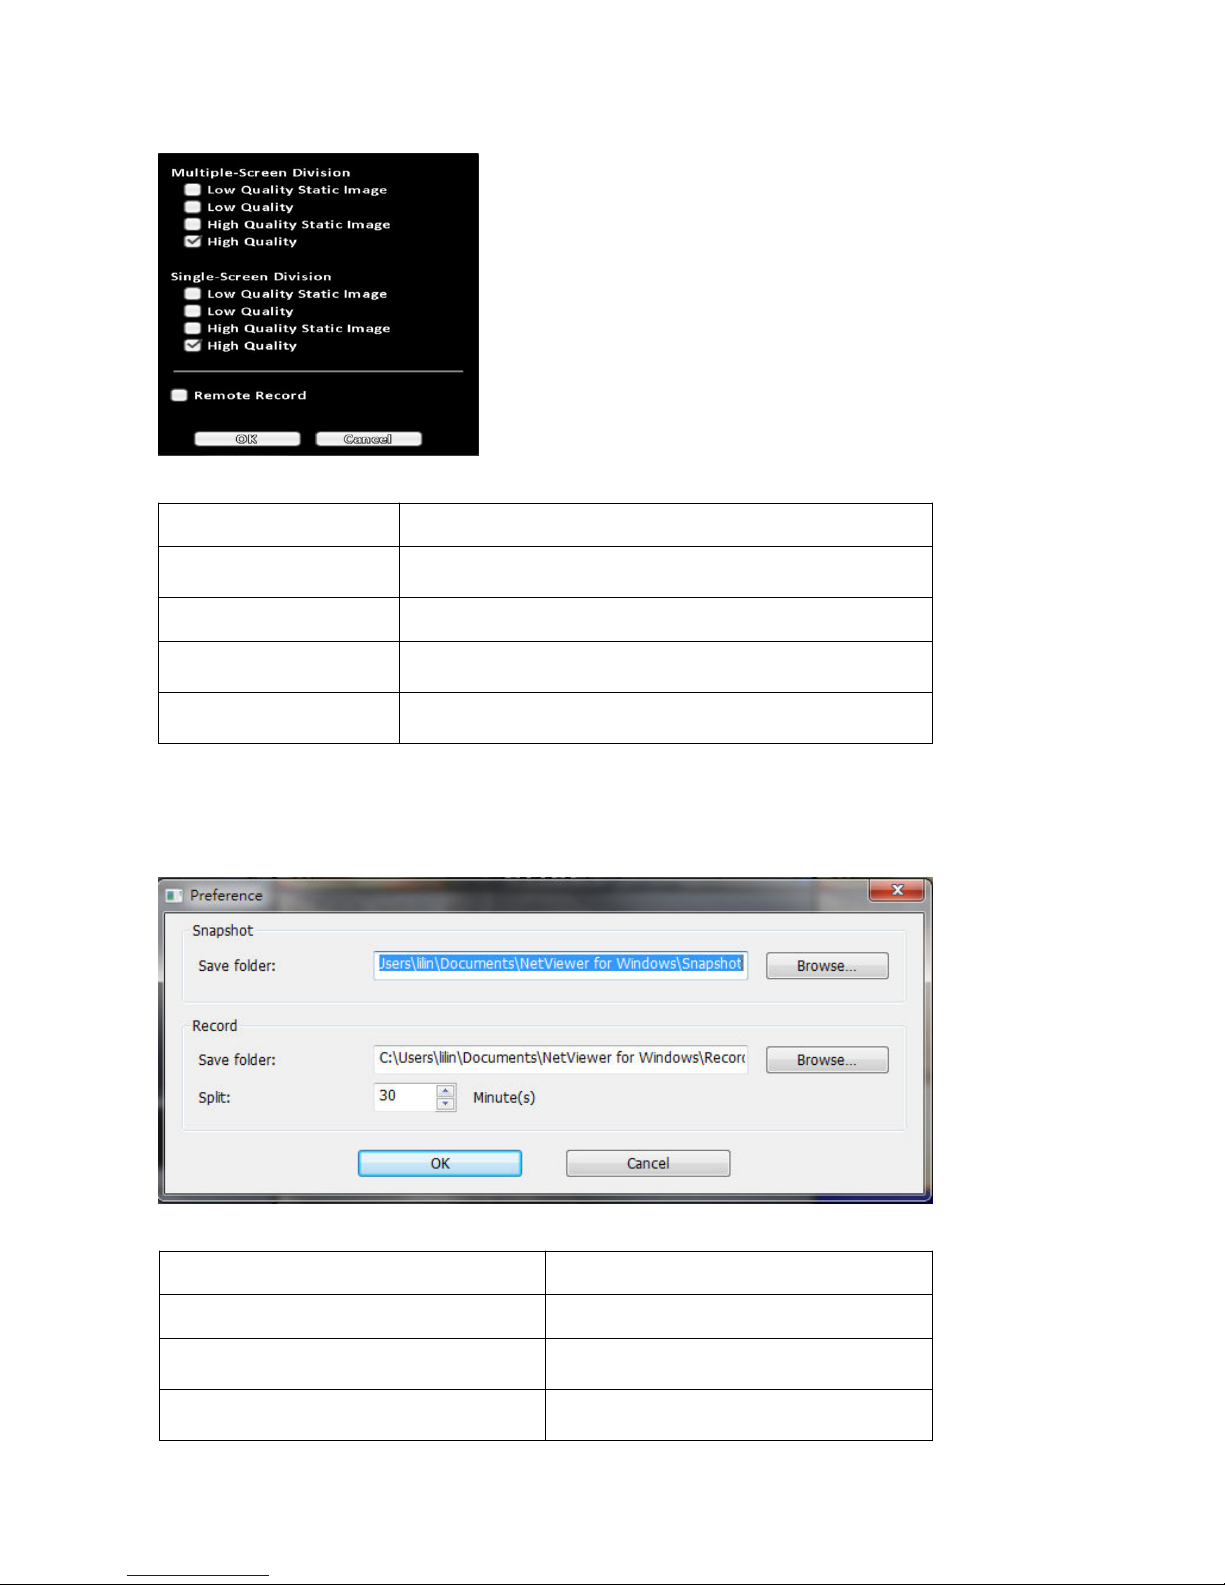
2-8 Toolbar
In the Live Mode, move cursor to the top of window Toolbar will show up.
Toolbar icon description:
Icon Description
User login / logout: Auto lock is used.
Snapshot.
Video recording, click to turn on or off, when turning on, the video will be
recorded in selected folder.
Full screen.
Preference, save folder setting. Refer to Chapter 2-8-2.
Netviewer video quality. Refer to Chapter 2-8-1.
Note:
1. Functions including Screenshot, Video recording are only available in Netviewer.
2. Netviewer is remote control and view software.
Page 19
15
2-8-1 Netviewer Video Quality
Netviewer video quality option description:
Item Description
Low Quality Static Image
Send static low quality images with 1 to 2 frames per second,
suitable for low bandwidth environments.
Low Quality Send low quality images according to DVR recording setting.
High Quality Statue Image
Send static high definition images with 1 to 2 frame per
second, suitable for low bandwidth environments.
High Quality
Send high definition images according to DVR recording
settings.
Note:
Video stability is subject to the actual speed of your network connection.
2-8-2 Preference
Preference option description:
Item Description
Snapshot Saver Folder The path of folder to save the snapshot.
Record Save Folder
The path of folder to save the recording
video.
Split
How long( in minutes ) to switch the
recording video file.
Page 20
16
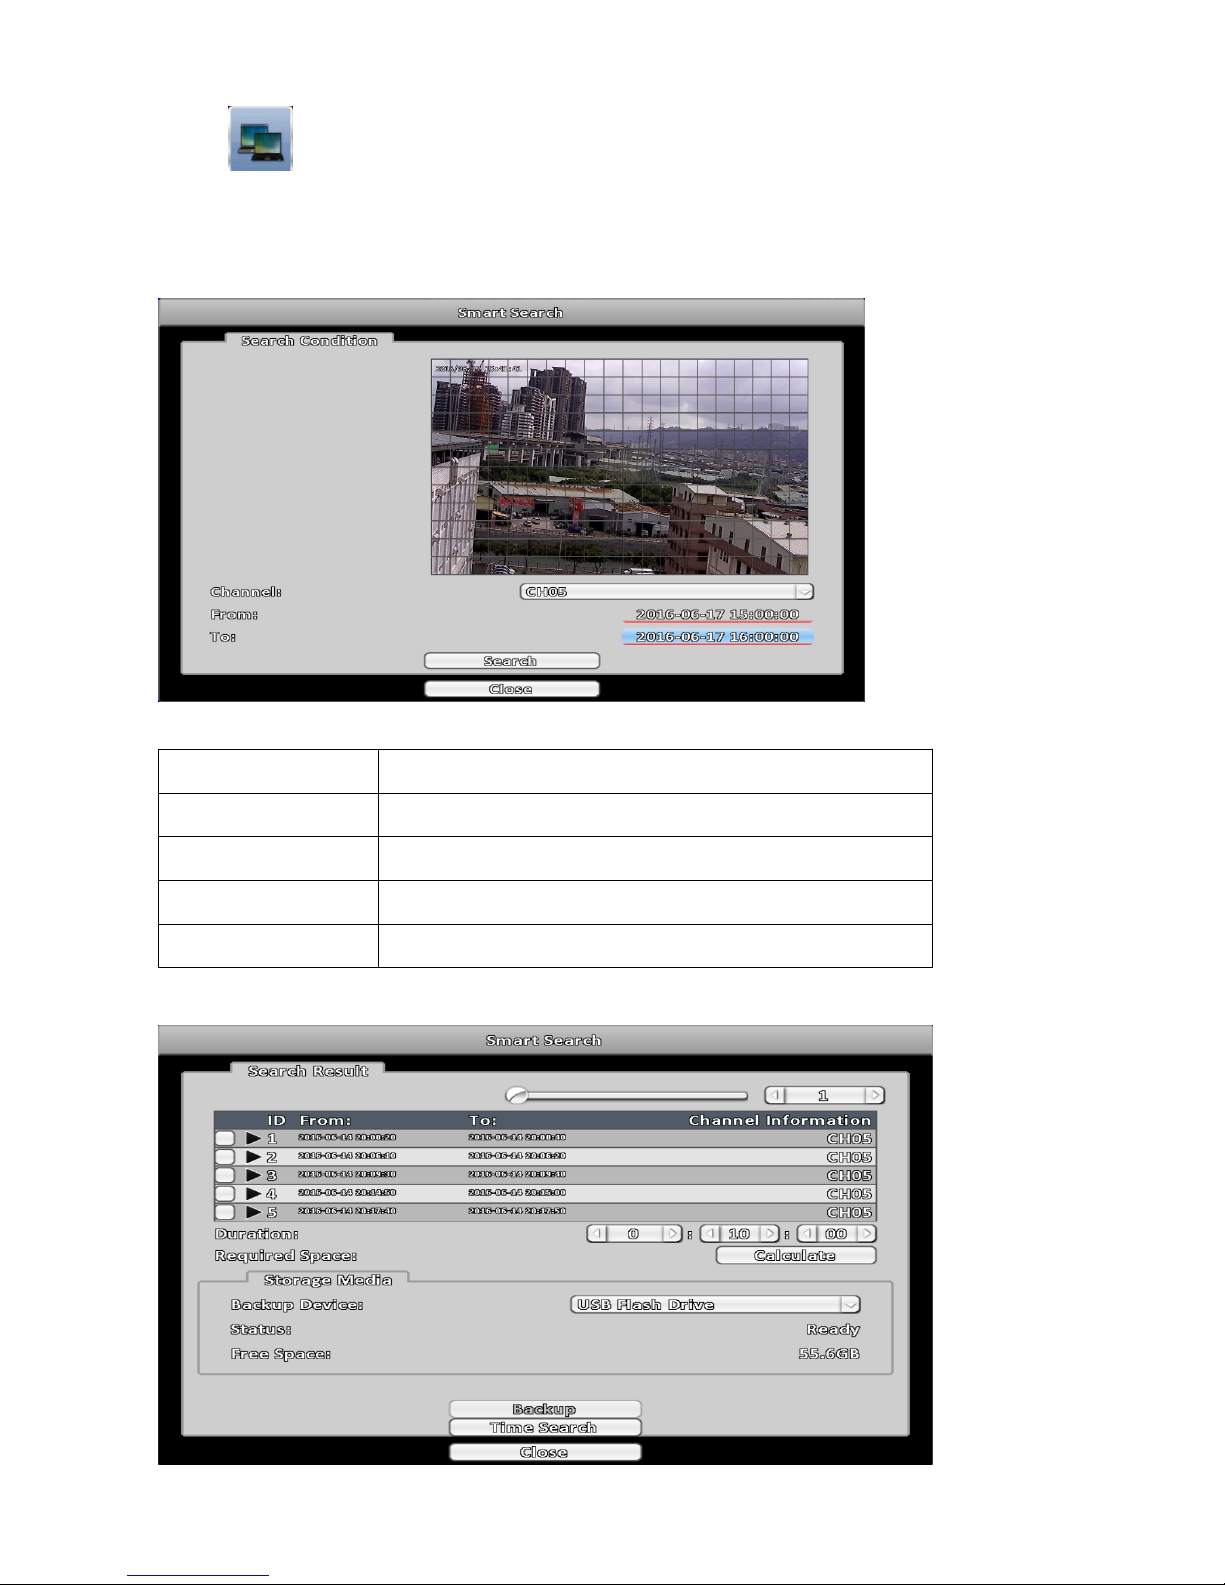
2-9 Smart Search
( Only analog camera supported )
Smart Search is capable of searching for image change time in specific areas and time period. Adjust
searching area and time period, searching results will appear matchable recorded video.
Search Condition
Search condition menu item description:
Item Description
Detection Area Chosen searching area by click split block.
Channel Searching channel selection.
From Set searching start time.
To Set searching end time.
Search Result
Page 21

17
Search result menu item description:
Item Description
Backup Select search result to backup.
Duration Length of backup time.
Required Space Calculate required space to backup.
Free Space Capacity size in the target device.
Playback recorded video.
Note:
Smart Search not required turning on motion detection.
Page 22
18
Chapter 3: Configurations Menu
Note:
The initialization of new-installed HDD is required before starting record. Please refer to Utility Setup for
details.
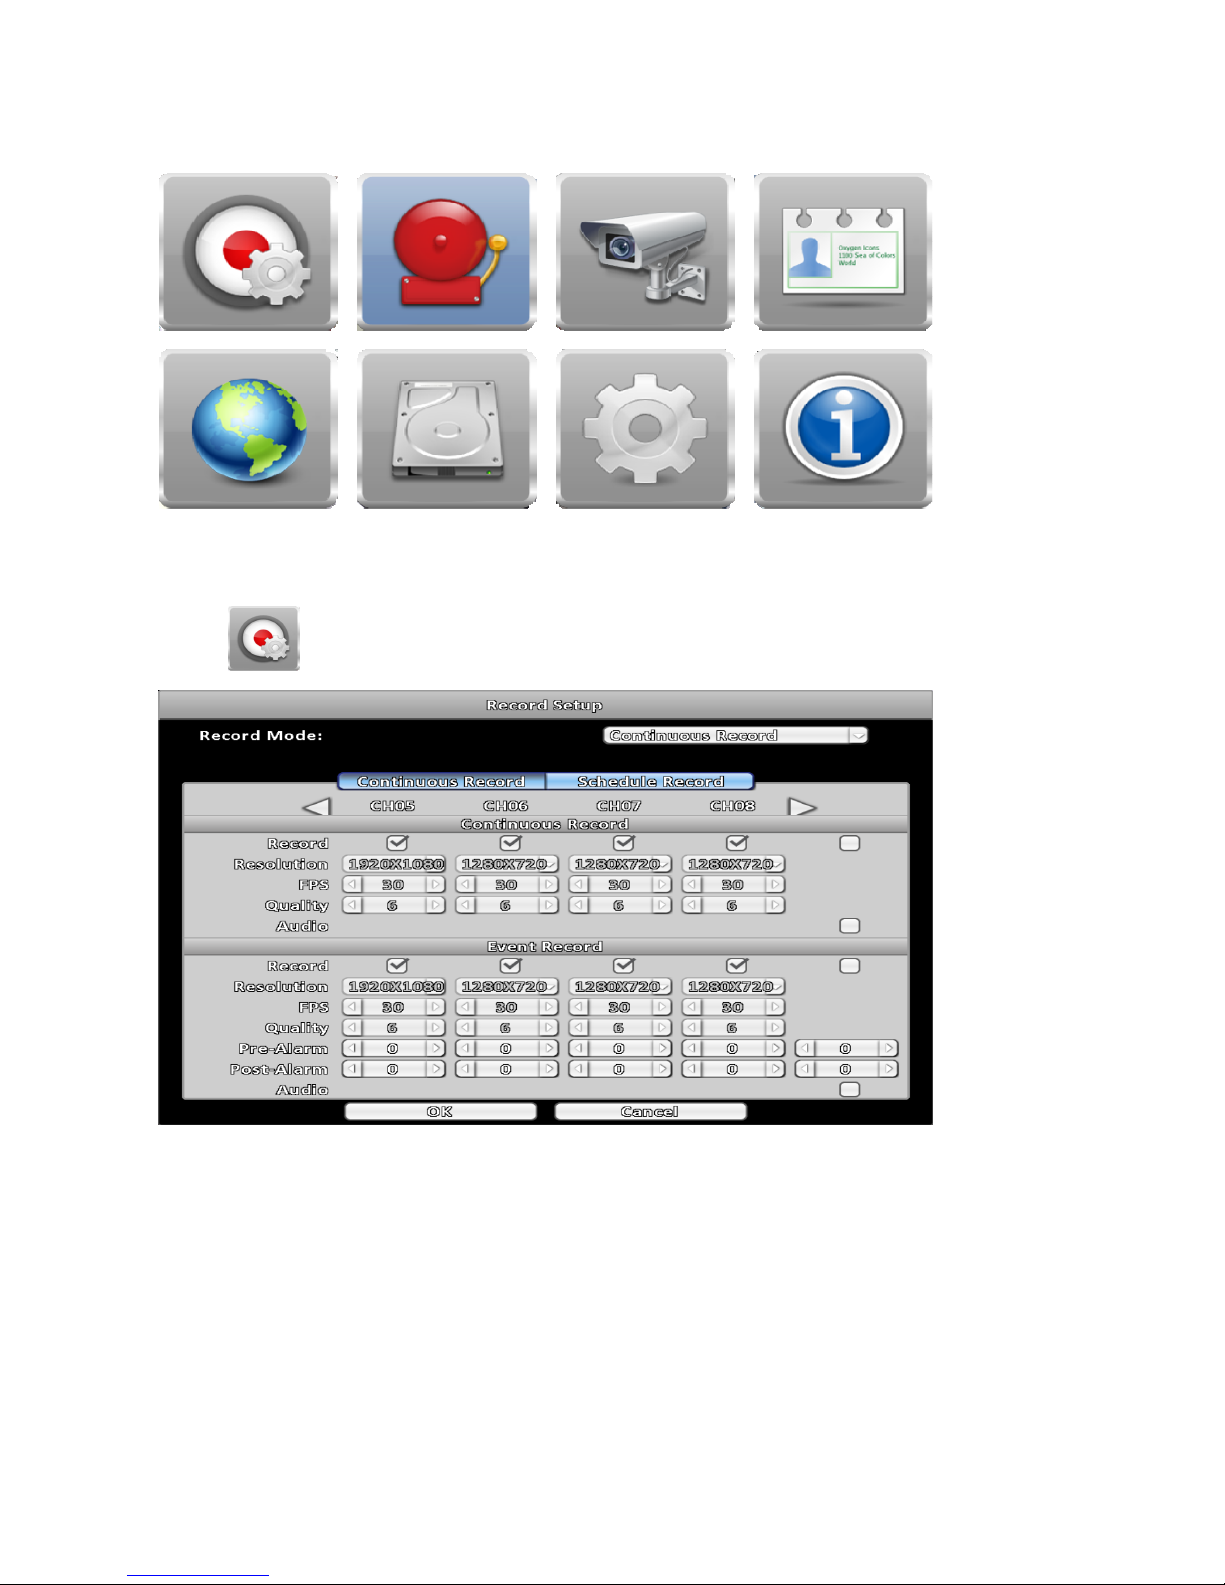
3-1 Record Setup
Note:
1. DHD 2 and 2A series DVR required input camera in pairs, for example, if CH01 connected with AHD 720p
camera, then CH02 must be the same resolution AHD 720p camera, otherwise the both video won't be show.
2. DHD 5A series DVR supported resolution: From analog camera D1/960H or AHD 720p/1080p/4Mega, from
IP camera1080p/3Mega/4Mega.
3. Please use 5C-FB coaxial cable or above.
4. Refer to Chapter 3-3-2-1 for camera image setting.
Page 23
19
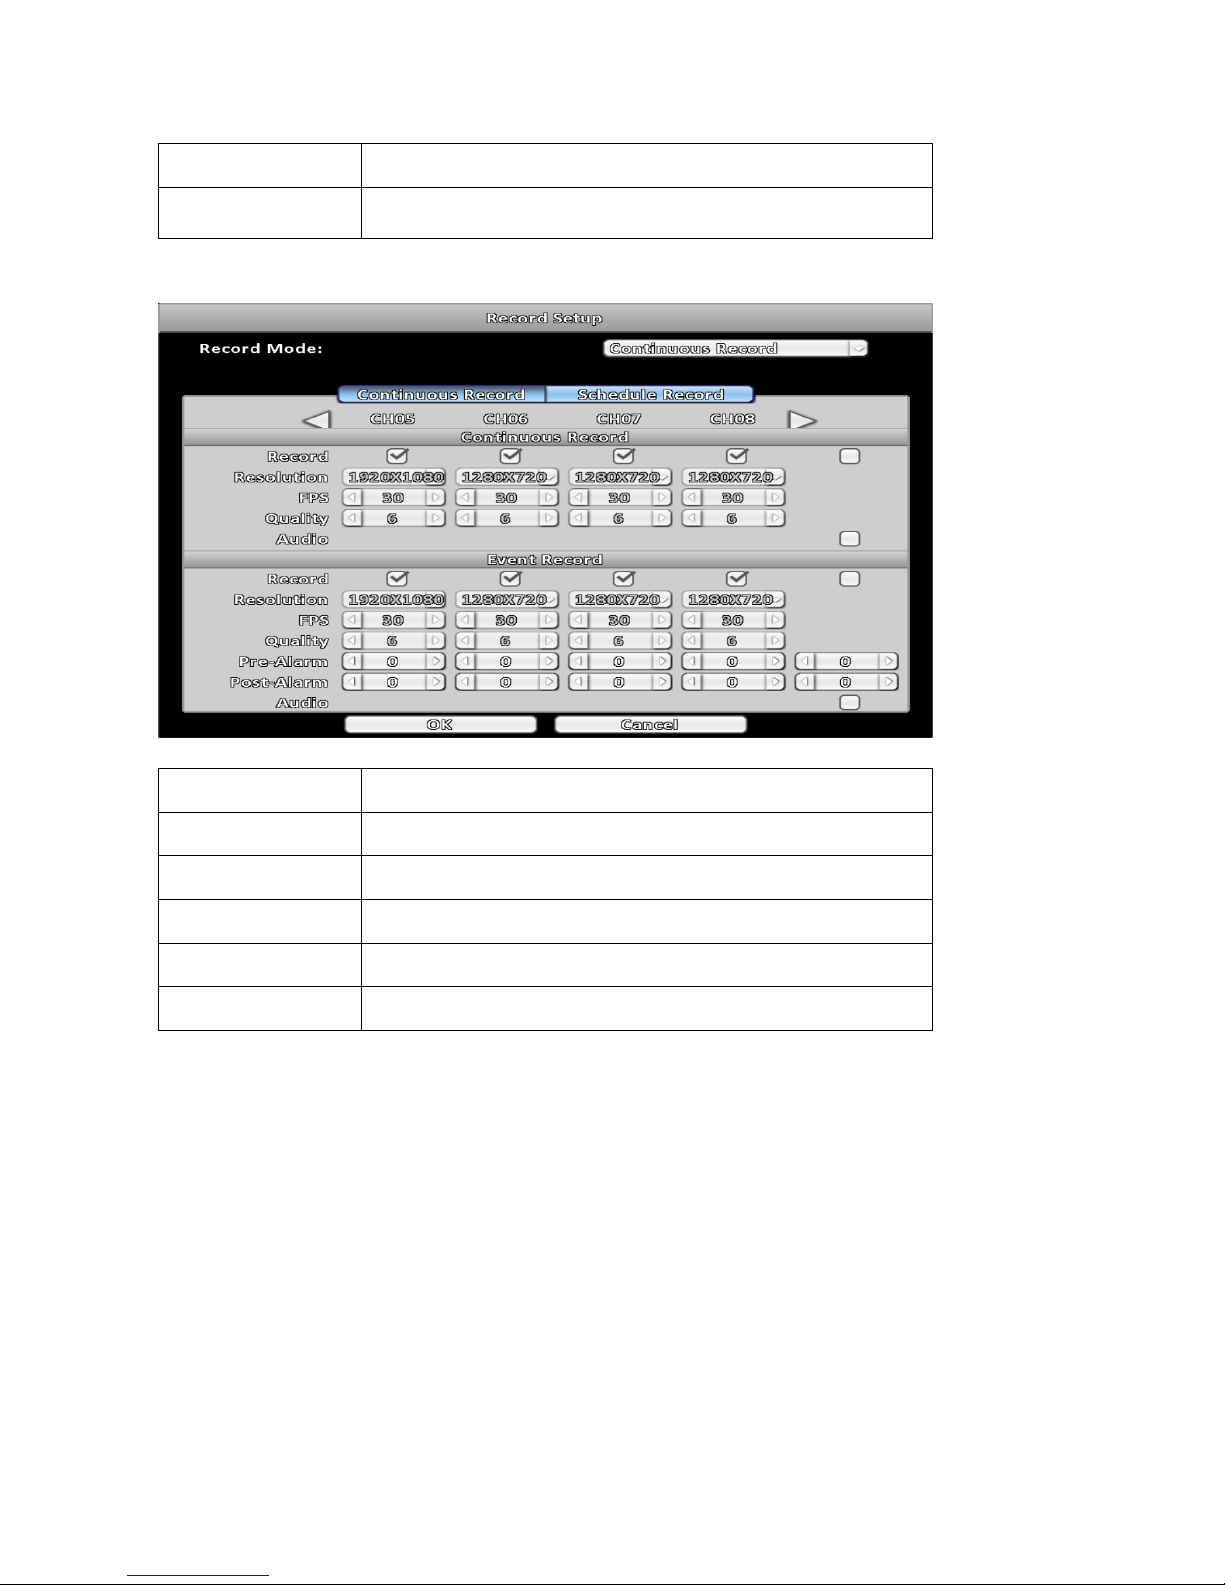
Record Mode options description:
Item Description
Record Mode
Chosen DVR using different recording scheme, there are
Continuous Record / Schedule Record / Stop Record.
3-1-1 Continuous Record
Item Description
Record Enable / Disable recording of channel.
Resolution Recording resolution.
FPS Recording frame rate.
Quality Recording video quality.
Audio Enable / Disable recording audio.
Page 24
20
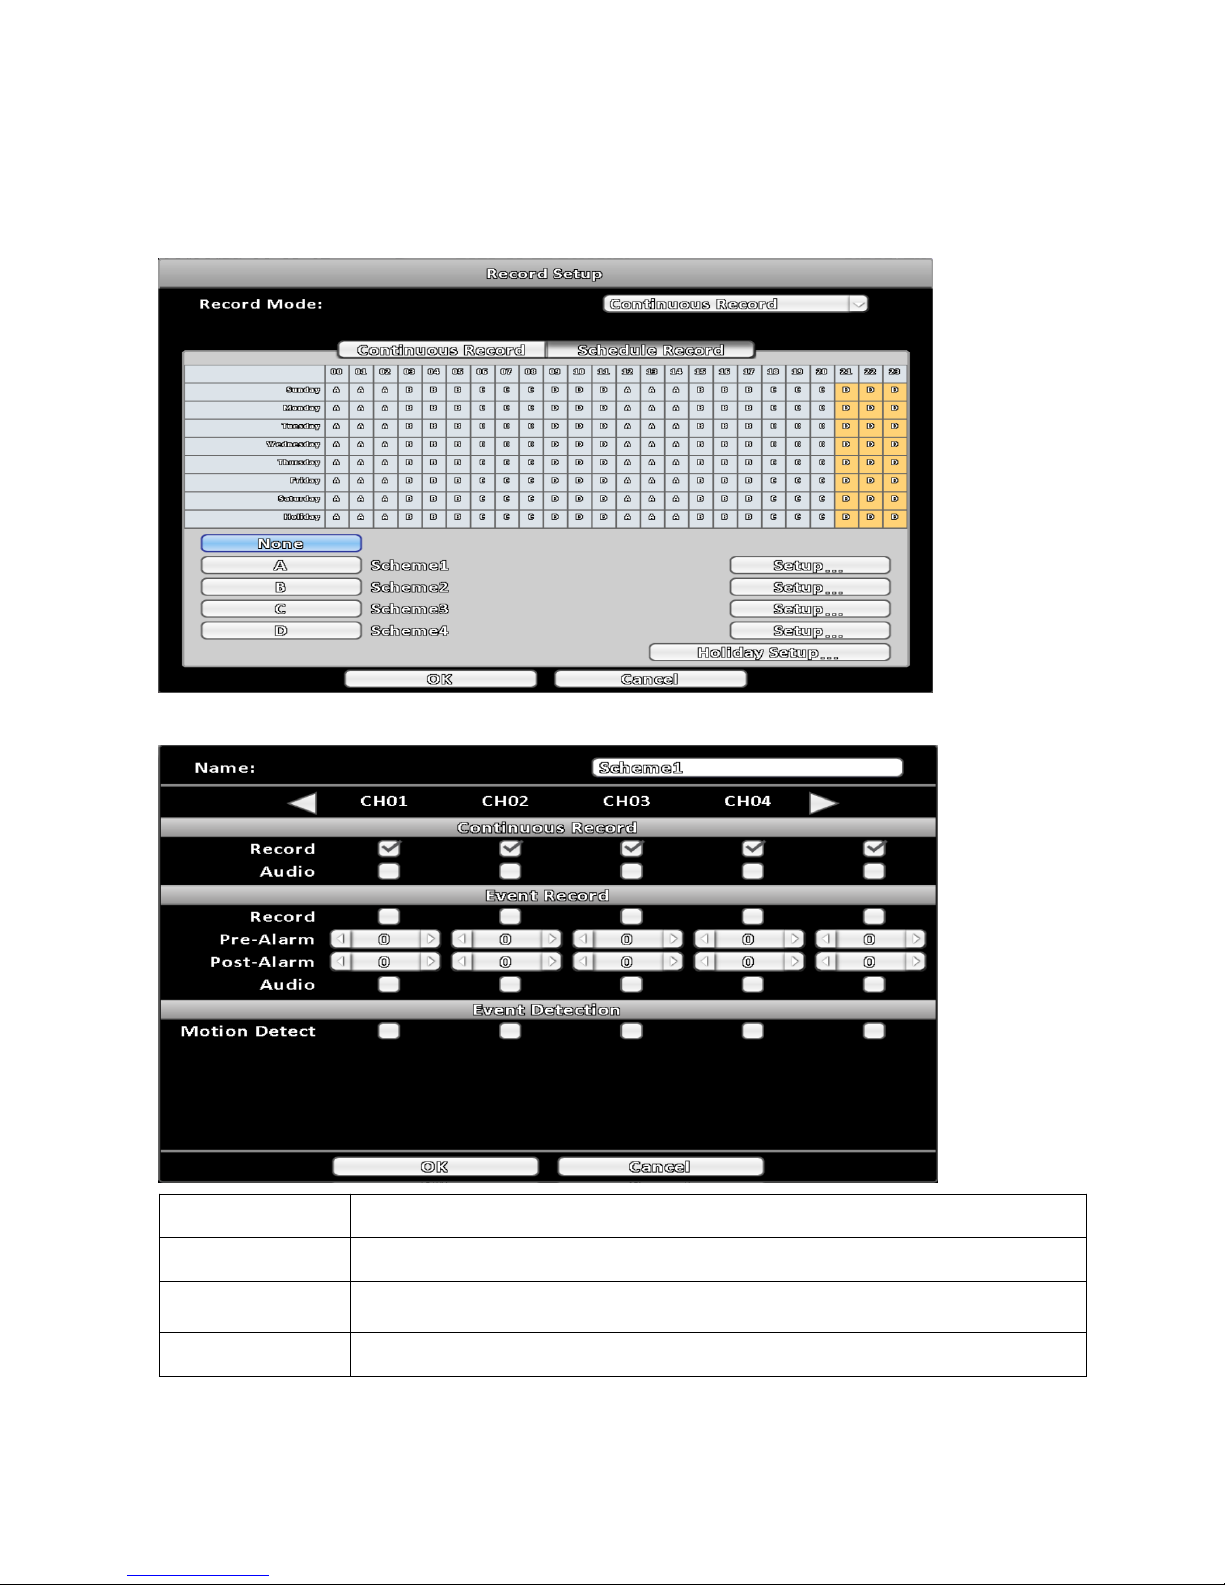
3-1-2 Schedule Record
Recordings can be scheduled to days and time of a week. With the A, B, C, D four settings, users can set
different recording scheme according to different needs. In the day and time grid map, select the schedule
table, then press one of the A, B, C, D buttons to specify the settings.
3-1-2-1 Scheme Configuration
Item Description
Continuous Record Always recording.
Event Record
Start recording when event detected, adjust recording period that before and
after event occur.
Event Detection Chosen required condition to perform event detection.
Page 25
21
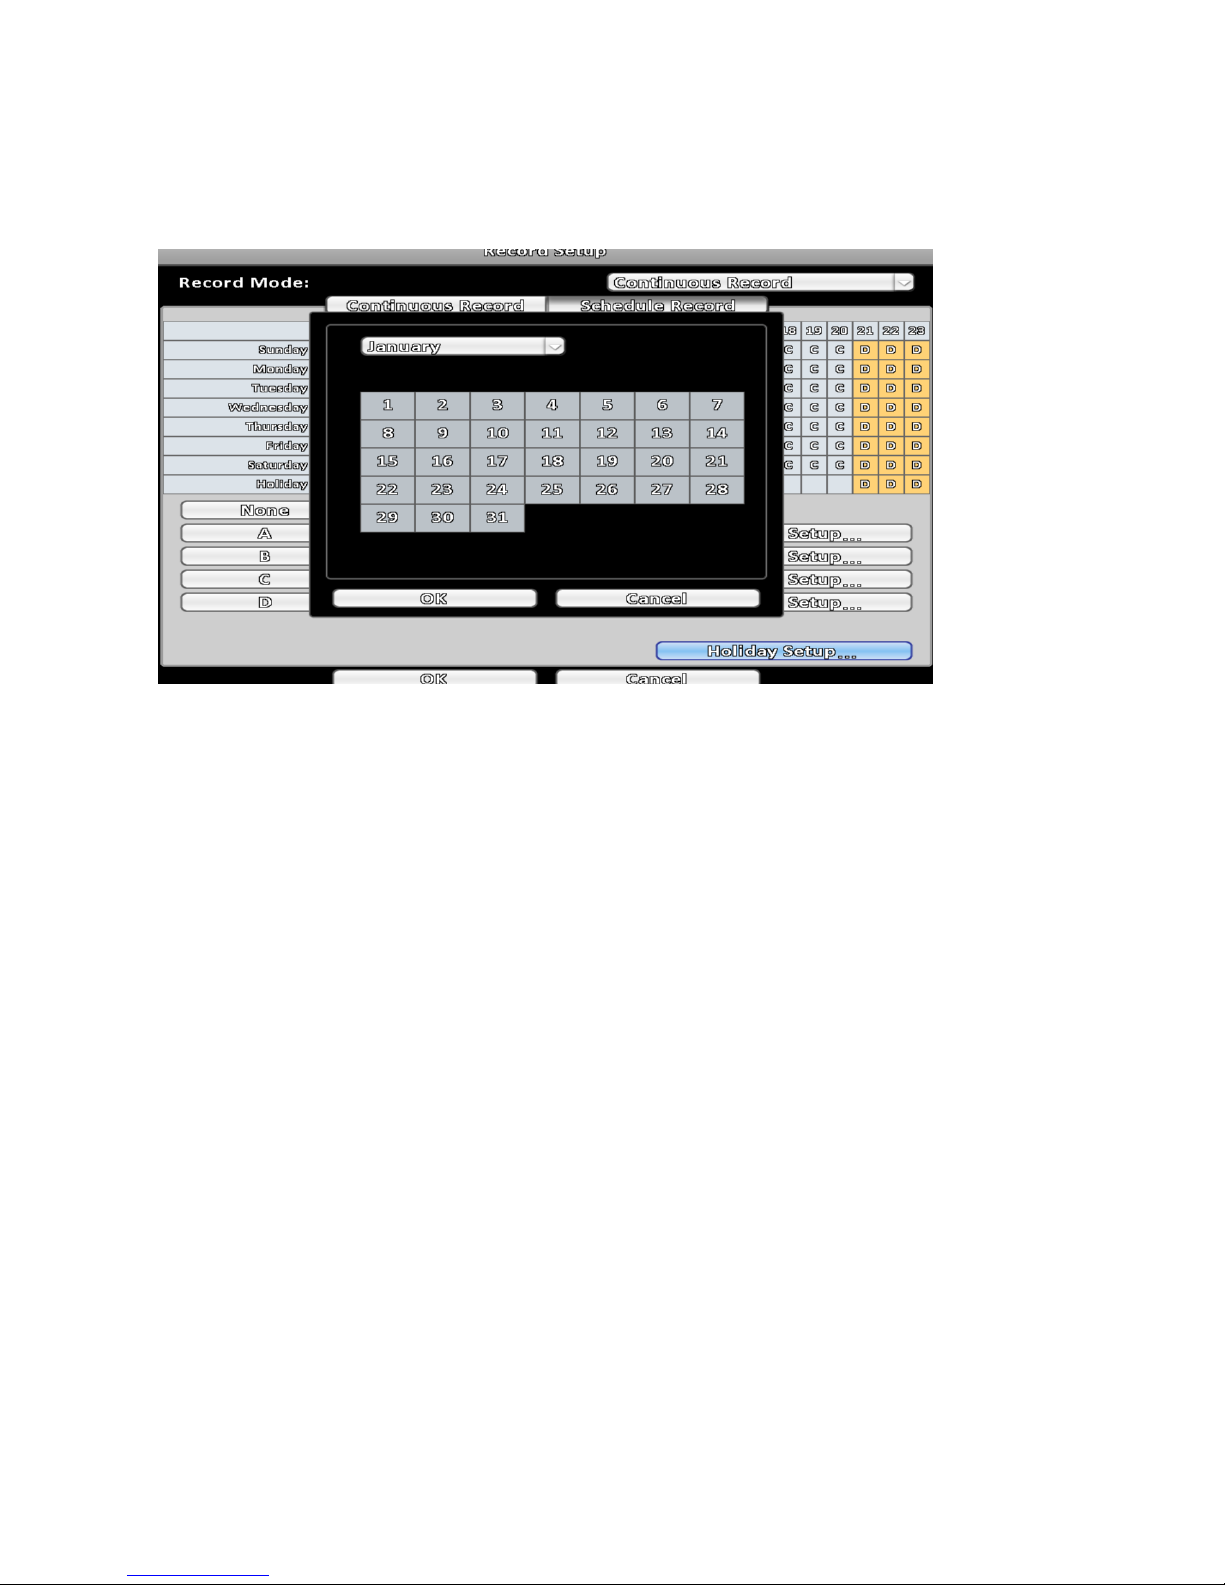
3-1-2-2 Holiday Configuration
The number of customized holidays is up to 50. When the specified holiday arrives, the DVR will start
recording according to holiday configuration.
Since holidays are different by countries and regions, users can set up holidays according to specific needs.
Page 26
22
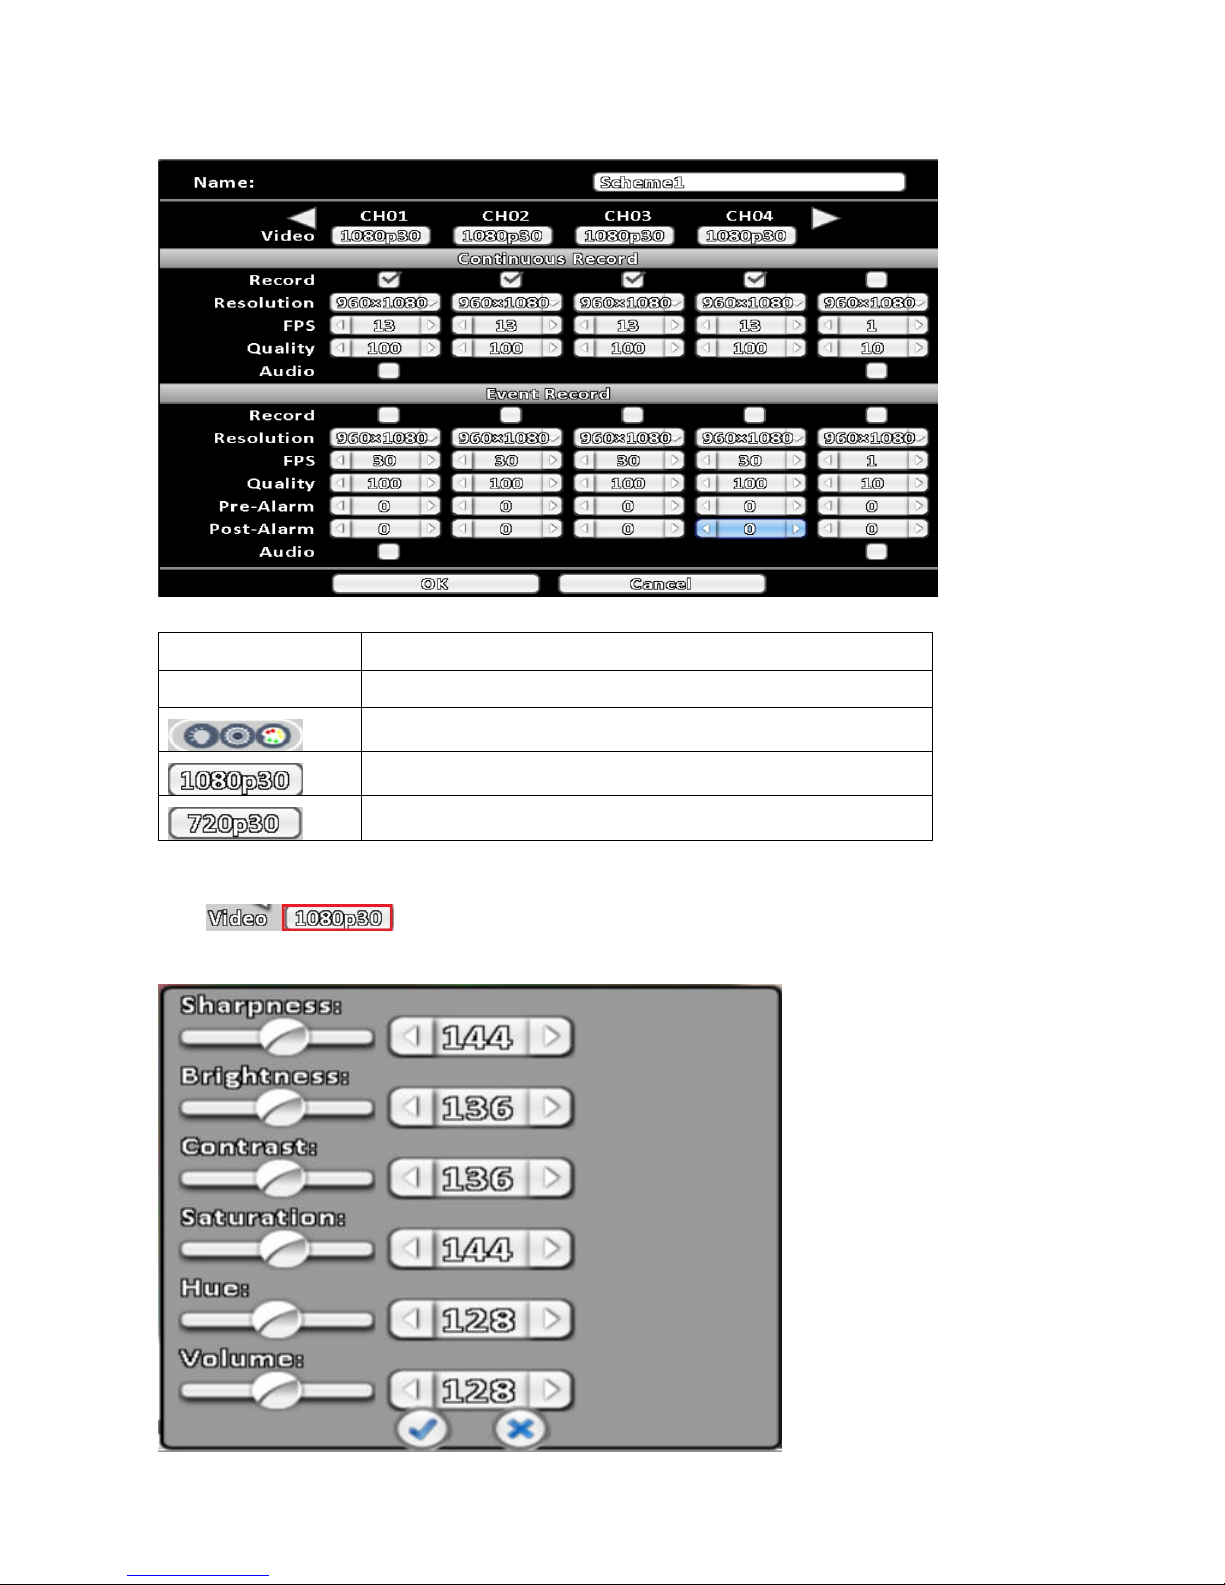
3-1-3 DHD 2A/2 Series Configuration
Item Description
Name Change the recording name of channel.
D1/960H analog camera.
1920×1080,30fps AHD camera.
1280×720,30fps AHD camera.
3-1-3-1 DHD 2A/2 Series image setup
Click to open the video menu, where you can the image display and volume of your
DVR.
Page 27
23
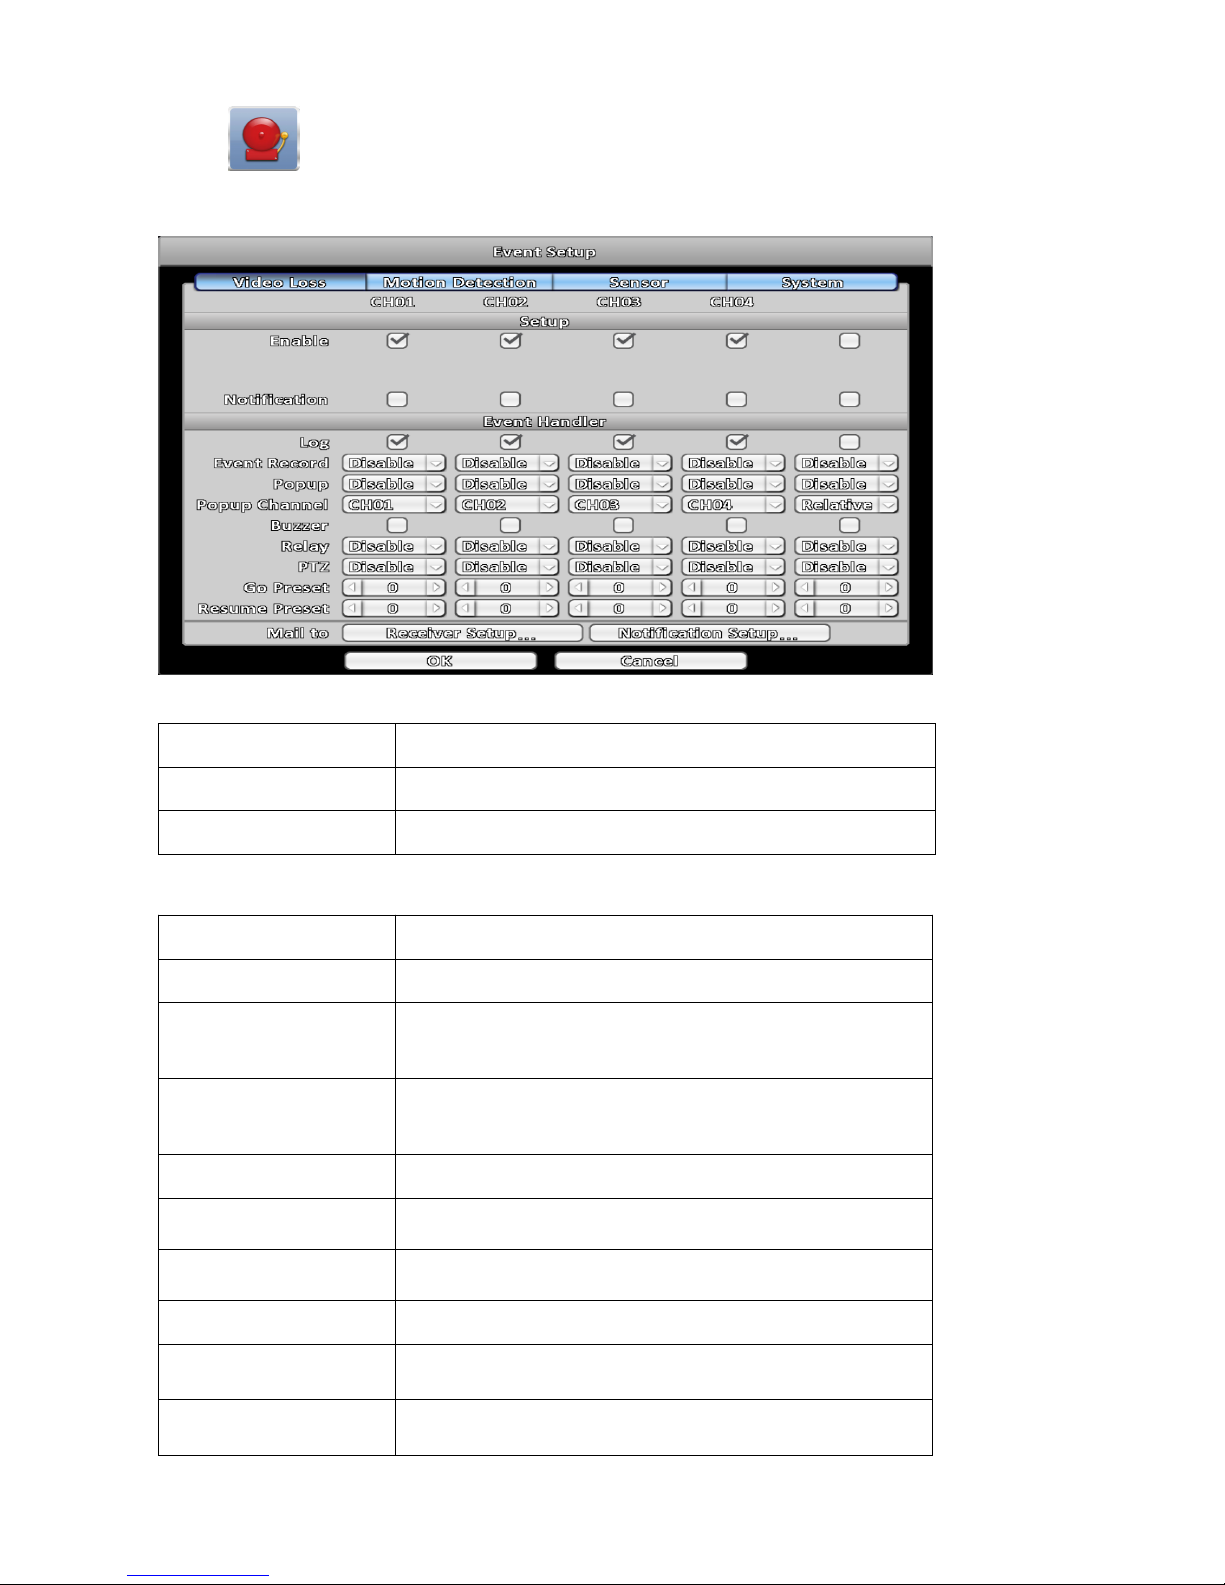
3-2 Event Setup
3-2-1 Video Loss
3-2-1-1 Setup
Item Description
Enable Enable / Disable video loss detection.
Notification Enable / Disable notify when video loss.
3-2-1-2 Event Handler
Item Description
Logs The event is logged in the system log.
Event Record
Select channel for event recording when an event occurs. The
video setup corresponds to the Configurations > Record
Setups > Event Record ( refer to 3-1-1-2 Event Record ).
Pop up
In the live mode, if video loss of a channel is detected, the
channel will enter the full screen mode. You can specify a
warning window display.
Pop up Channel
When an event occurs, the specified channel pops up.
Buzzer
Specify whether the DVR should activate the buzzer when an
event occurs.
Relay
When an event occurs, enable or disable relay function.
(Depending on the DVR’s model)
PTZ
When an event occurs, enable or disable PTZ function.
Go Preset
Moves the camera to the specified preset point when an event
occurs.
Resume Preset
Moves the camera back to the specified preset point when an
event is finished.
Page 28
24
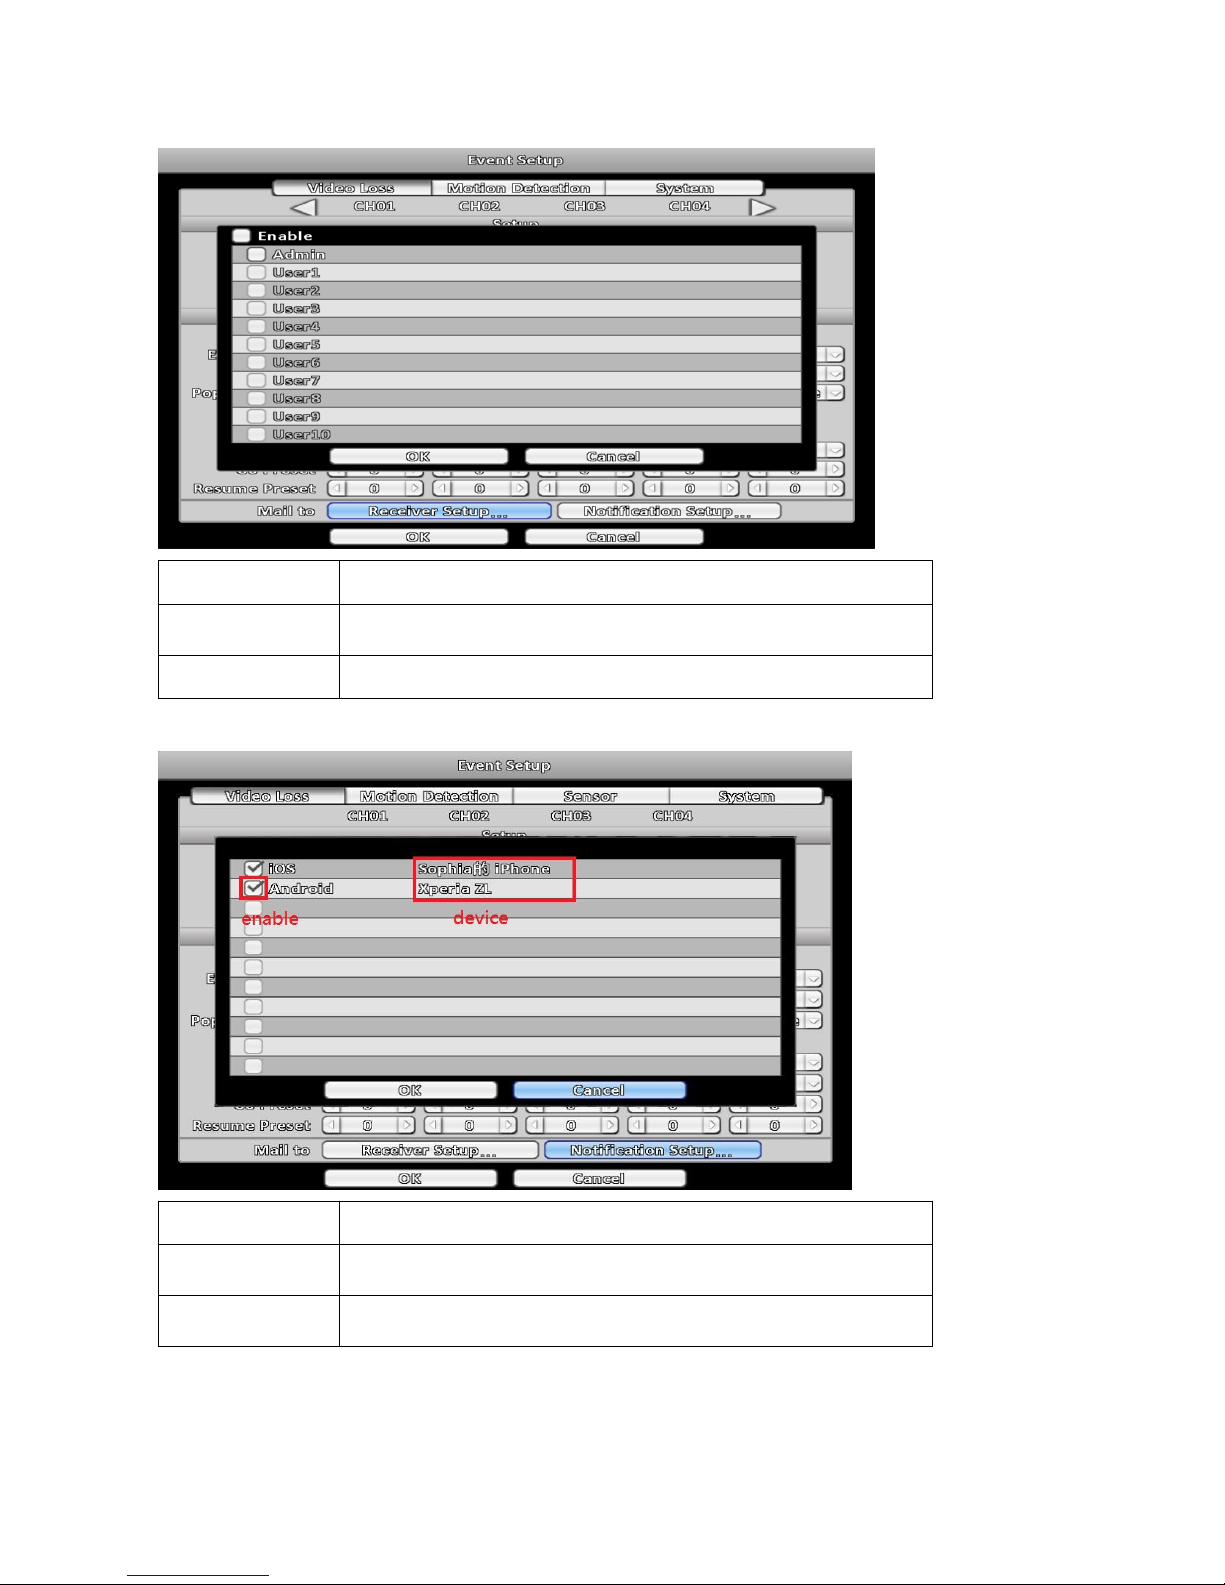
3-2-1-3 Receiver Setup
Item Description
Enable
Enable / Disable the DVR to send an e-mail notice to specified users
when an event occurs.
Admin / Users Specify the users who will receive e-mail notices.
3-2-1-4 Notification Setup
Item Description
Enable
Enable/Disable the DVR to push notifications to specified device(s)
when an event occurs.
Device(s)
List of the registered devices ( which who enable the notification
function in APP ).
Page 29
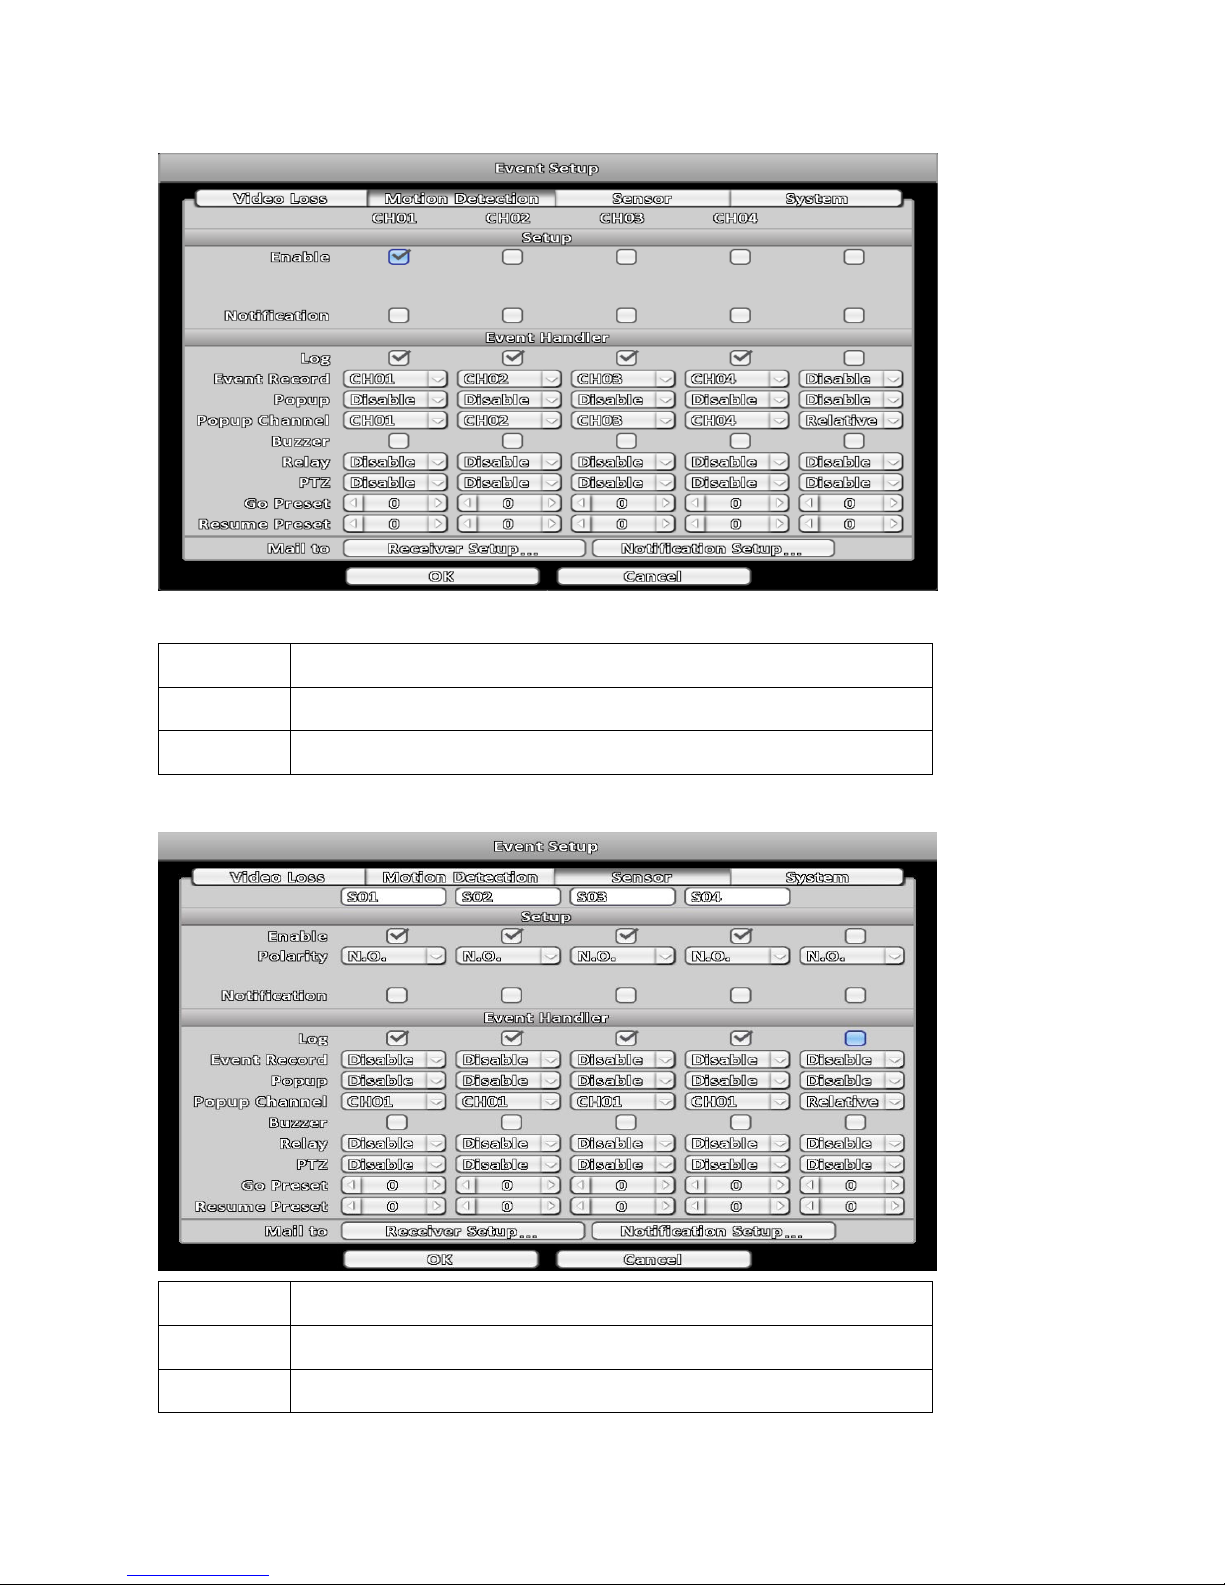
25
3-2-2 Motion Detection
3-2-2-1 Setup
Item Description
Enable Enable / Disable the motion detection function for channels
Notification Enable / Disable notify when motion detected.
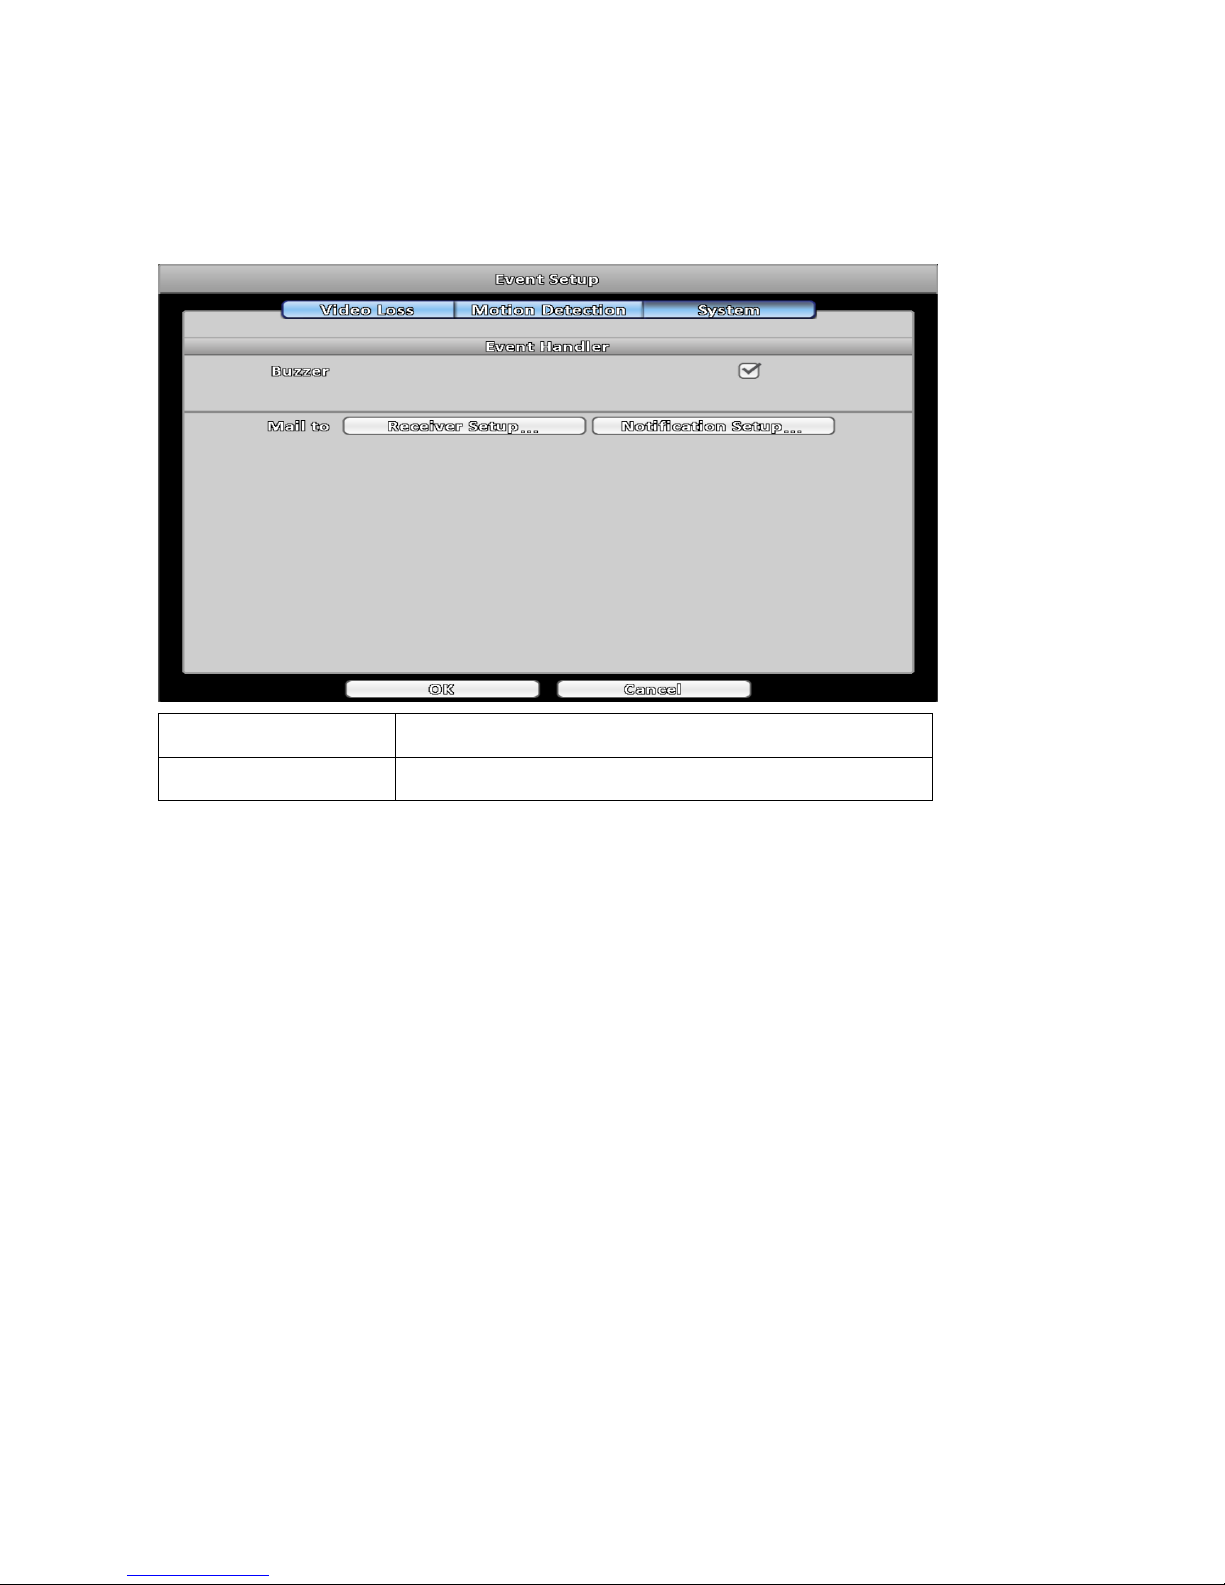
3-2-3 Sensor
( depending on models )
Item Description
Name Set the name of sensor’s function.
Polarity Specify the polarity to normally open (N.O.) or normally closed (N.C.).
Page 30
26
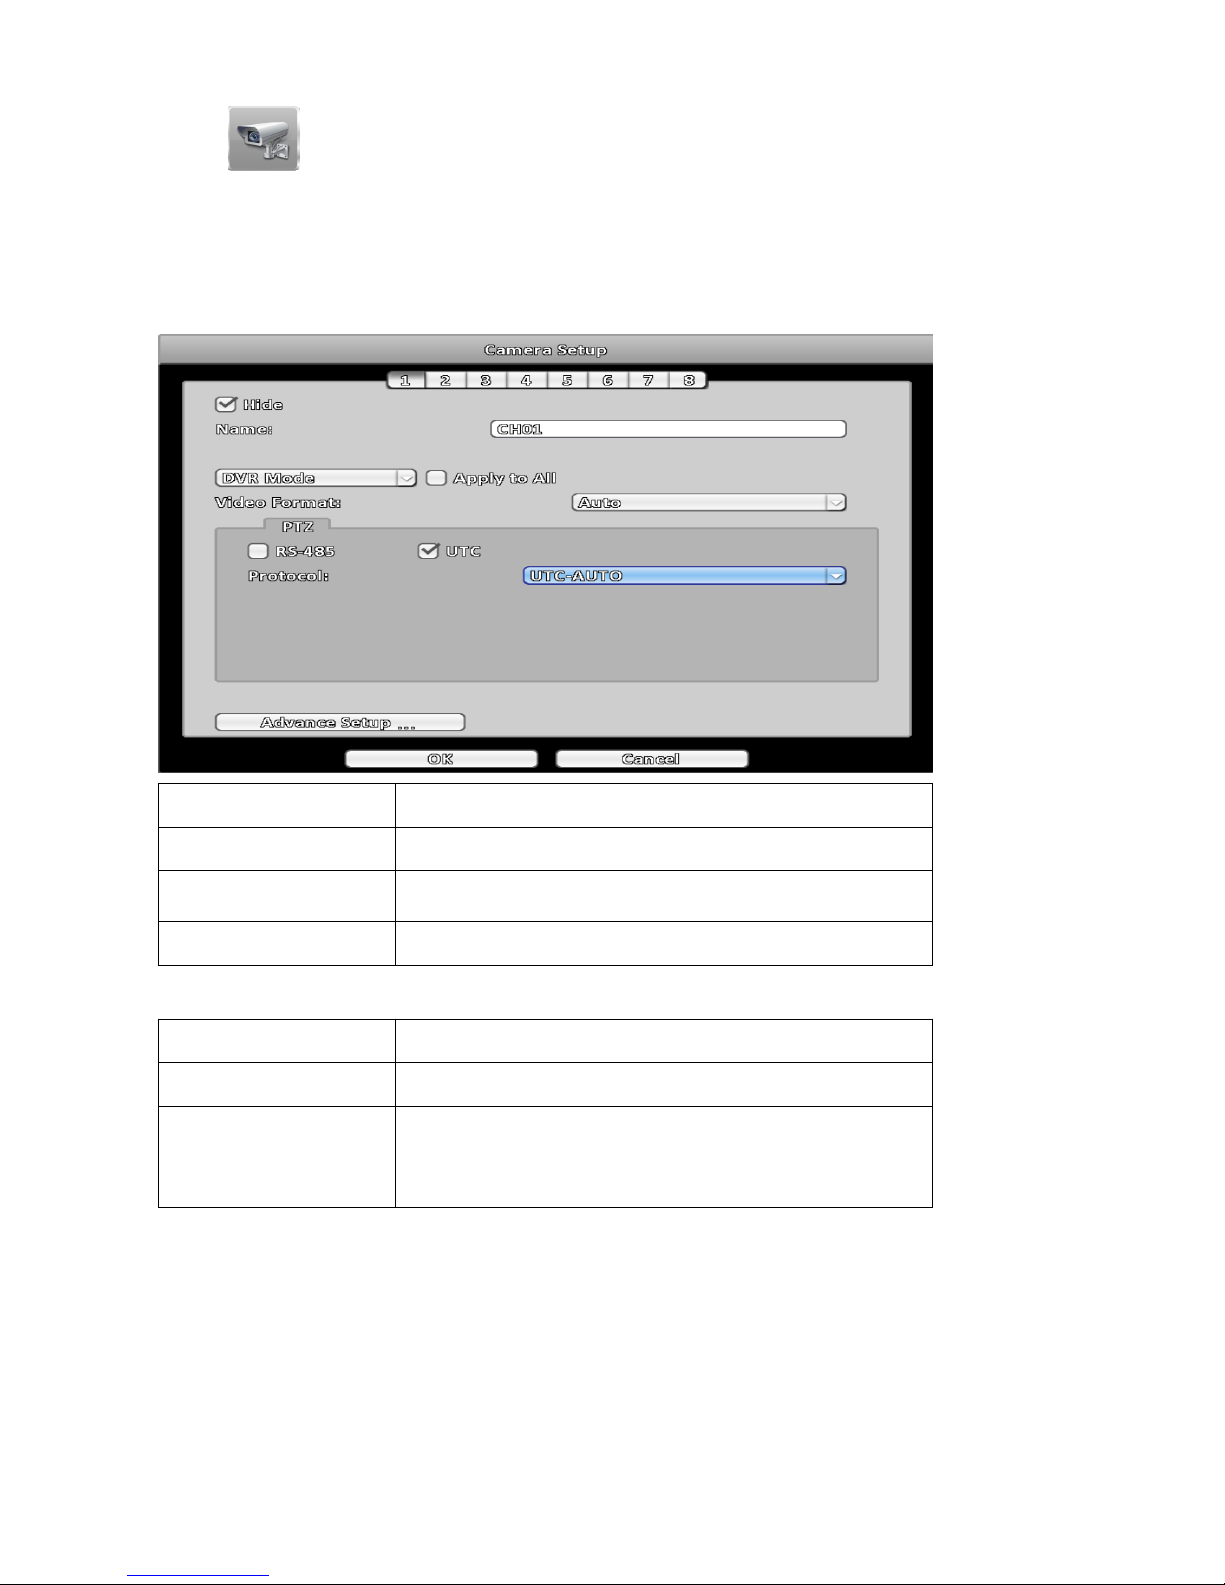
3-2-4 System
When a system event occurs, the DVR will send a notice or warning according to the settings of buzzer and
receiver. If the buzzer checkbox is selected, the buzzer continually buzzes for errors related to the video (such
as hard drives can’t write or no hard drive is installed). The buzzer does not buzz for other system events, such
as login, logout, booting, etc.
Item Description
Buzzer Specify buzzer buzzes when hard drive is write error.
Page 31
27
3-3 Camera Setup
Hybrid DVR series can select DVR mode or IP Mode for each channel input. Standard DVR series
only DVR Mode.
3-3-1 DVR Mode
Analog or simulate HD camera as channel input.
Item Description
Name Change the name of the camera.
Video Format
AUTO: Automatically detect input source.
AHD: Only detect AHD input source.
Hide Disable the video function of the selected channel.
3-3-1-1 PTZ
Item Description
RS-485 Checked, selected channel using RS-485 control PTZ.
UTC
Checked, using UTC control the selected channel.
UTC-AUTO: Automatically detect input source.
UTC-1080p: Detect AHD 1080p and AHD 4Mp input source.
UTC-720p: Detect AHD 720p and Analog input source.
Page 32
28
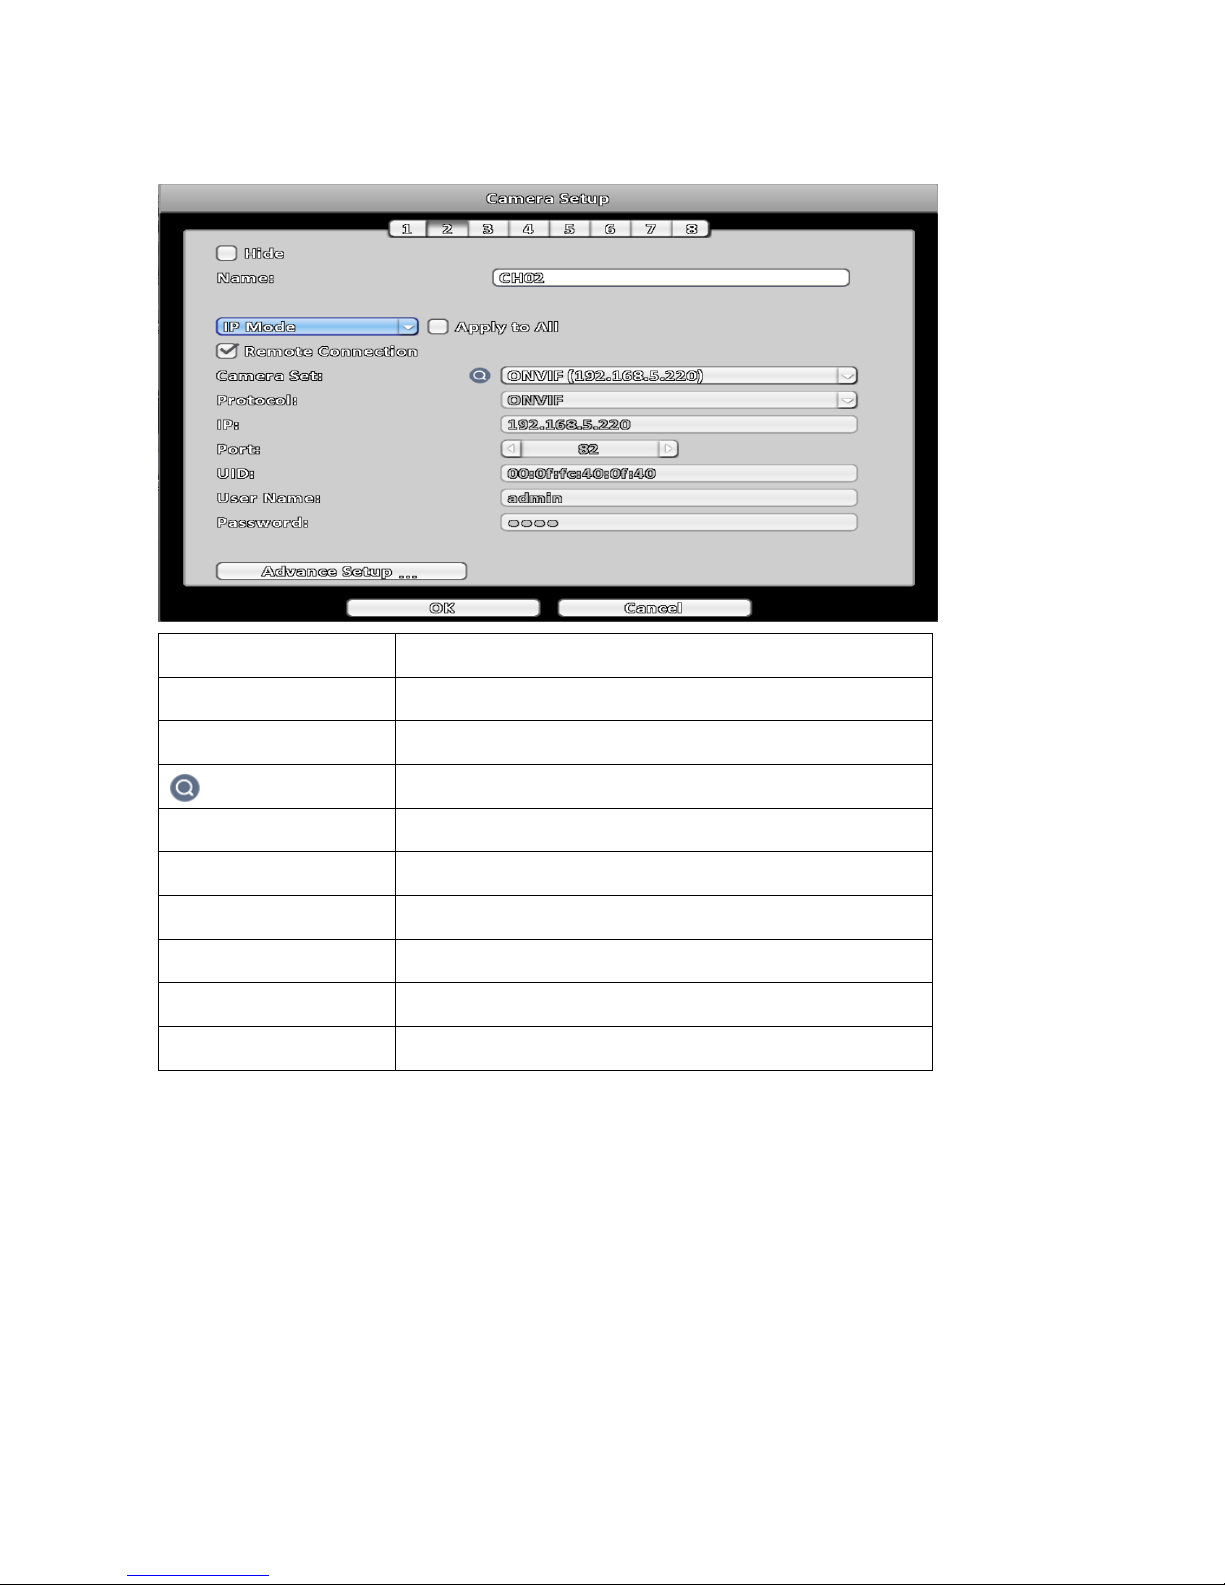
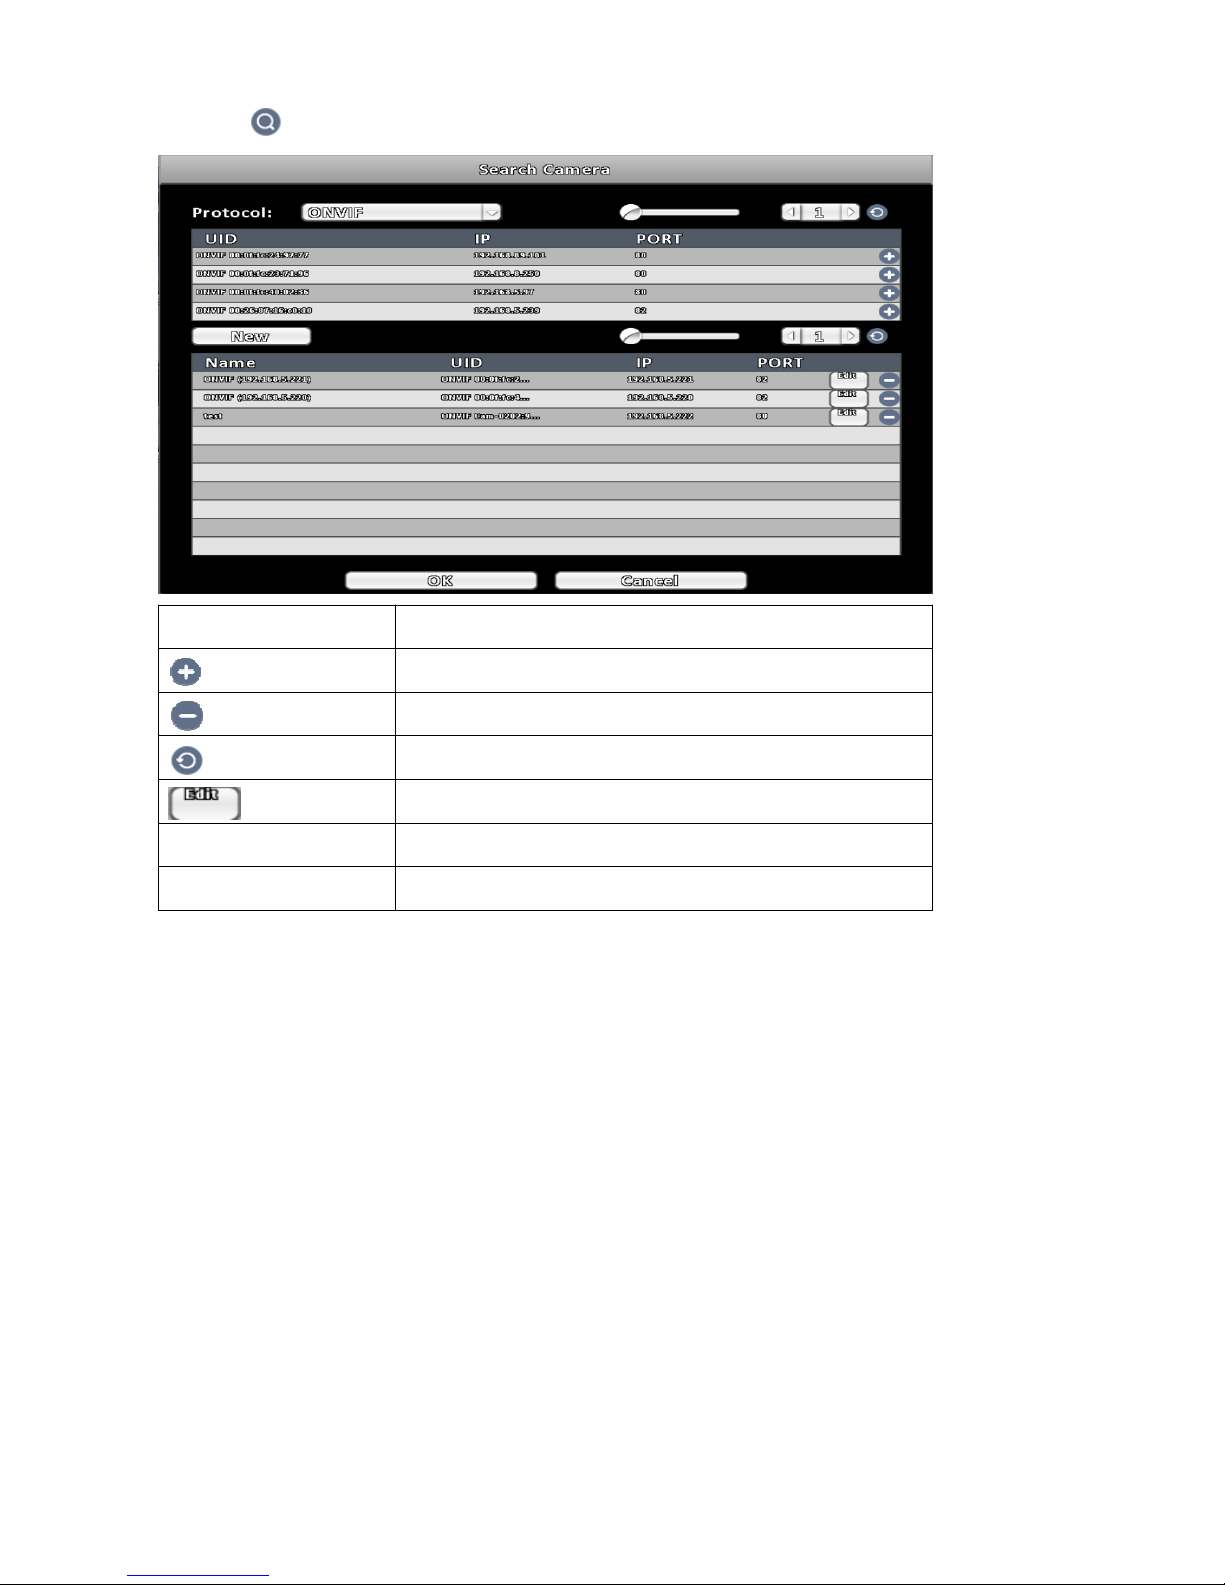
3-3-1-2 IP Mode
( Only hybrid series )
Onvif compatible IP camera as channel input.
Item Description
Remote Connection Enable / Disable remote connection.
Camera Set Name of IP camera.
Search IP camera.
Protocol IP camera protocol standard.
IP IP address of camera.
Port Network connection port of camera.
UID Unique id of camera.
User Name
Enter the username required for camera authorization.
Password
Enter the password required for camera authorization.
Page 33
29
3-3-1-3 Search IP Camera
Item Description
Add to registered camera list.
Delete from registered camera list.
Research camera / Back to home page.
Edit camera information.
New Add required camera manually.
Protocol Select searching protocol for camera or DVR.
Page 34
30
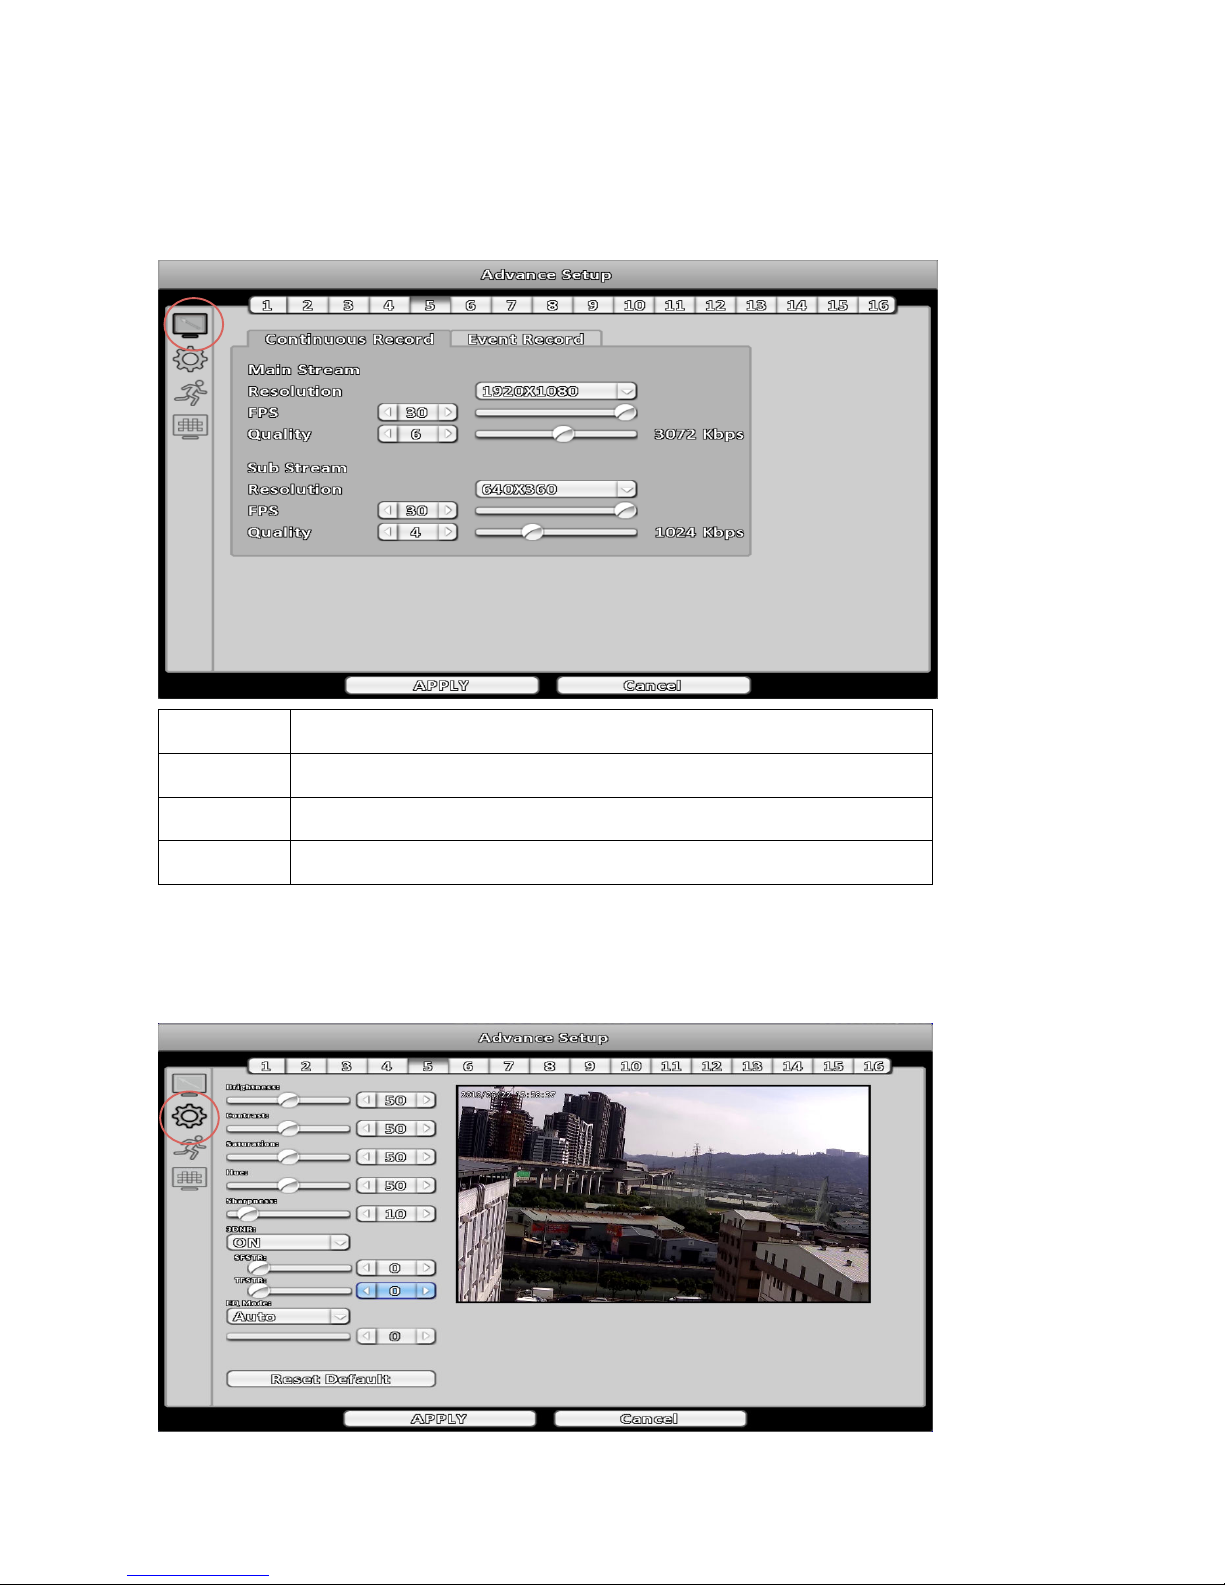
3-3-2 Advance Setup
3-3-2-1 DVR Mode Advance Setup
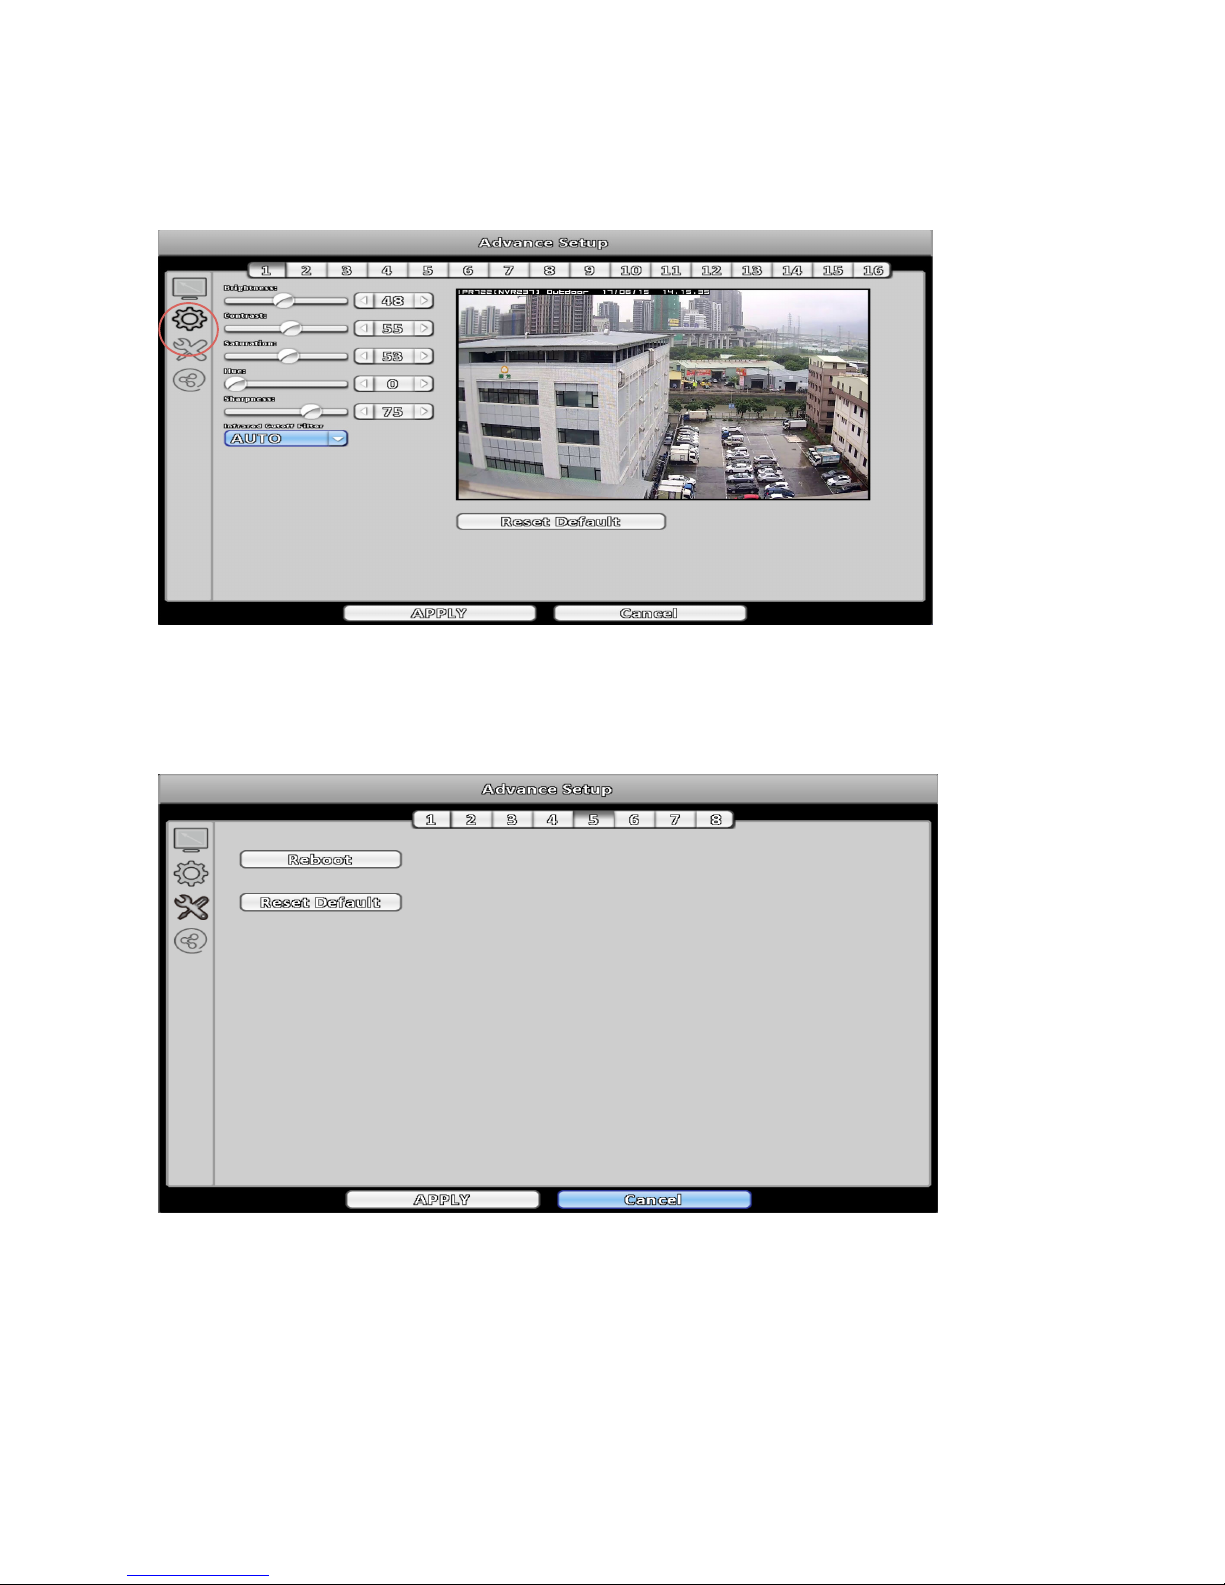
Click on left side icon to perform detail setting.
3-3-2-1-1 Record Setup
Item Description
Resolution Recording resolution.
FPS Recording frame rate.
Quality Recording quality (128-7168 Kbps).
Note:
Recording setup will affect playback and remote live view. Higher quality required higher network
bandwidth.
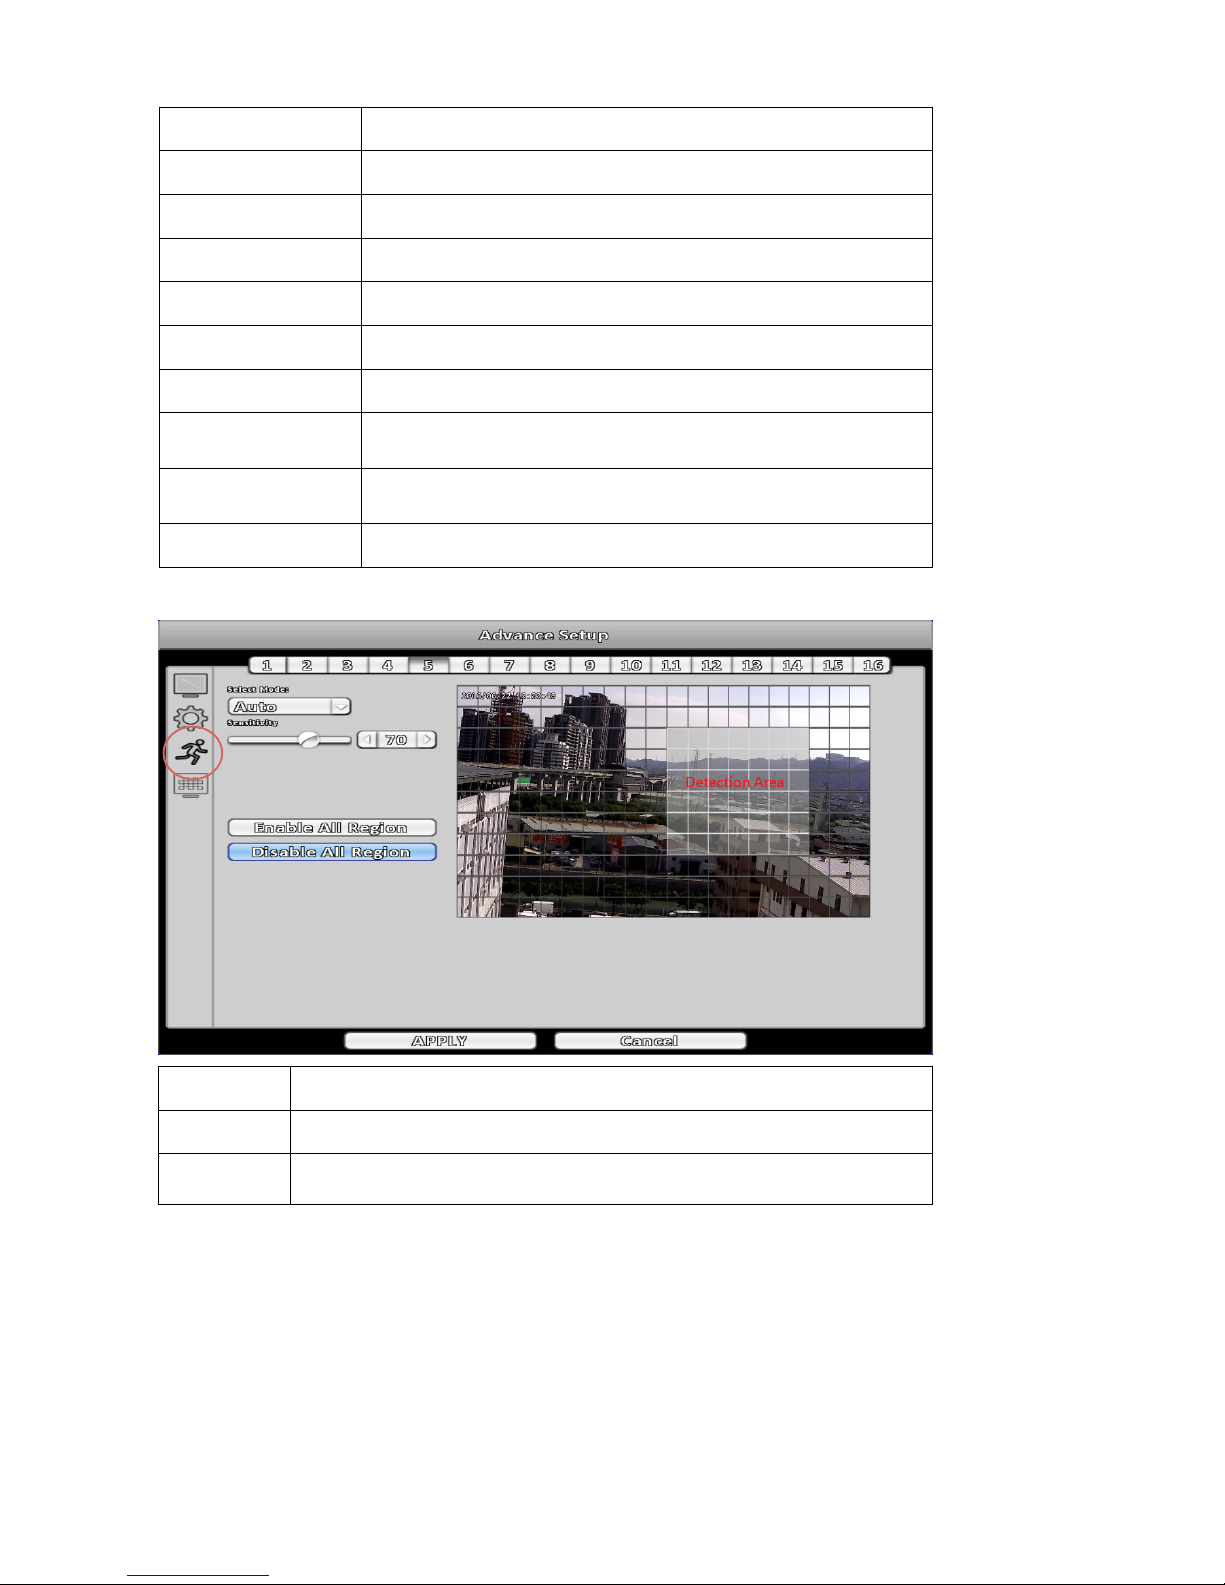
3-3-2-1-2 Image Setup
Page 35
31
Item Description
Sharpness Channel sharpness, from 0 to 255.
Brightness Channel brightness, from 0 to 255.
Contrast Channel contrast, from 0 to 255.
Saturation Channel saturation, from 0 to 255.
Hue Channel hue, from 0 to 255.
NR Turn ON / OFF noise reduction.
SF Stream
This value affects the strength of spatial-domain filtering ( When
NR is ON ).
TF Stream
This value affects the strength of time-domain filtering ( When NR
is ON ).
Volume out Setting volume gain to provide a volume boost.
3-3-2-1-3 Motion Detection Setup
Item Description
Select Mode Set the detection area mode.
Sensitivity
The sensitivity value ranges from 0 to 100. Higher value means higher
sensitivity.
Page 36
32
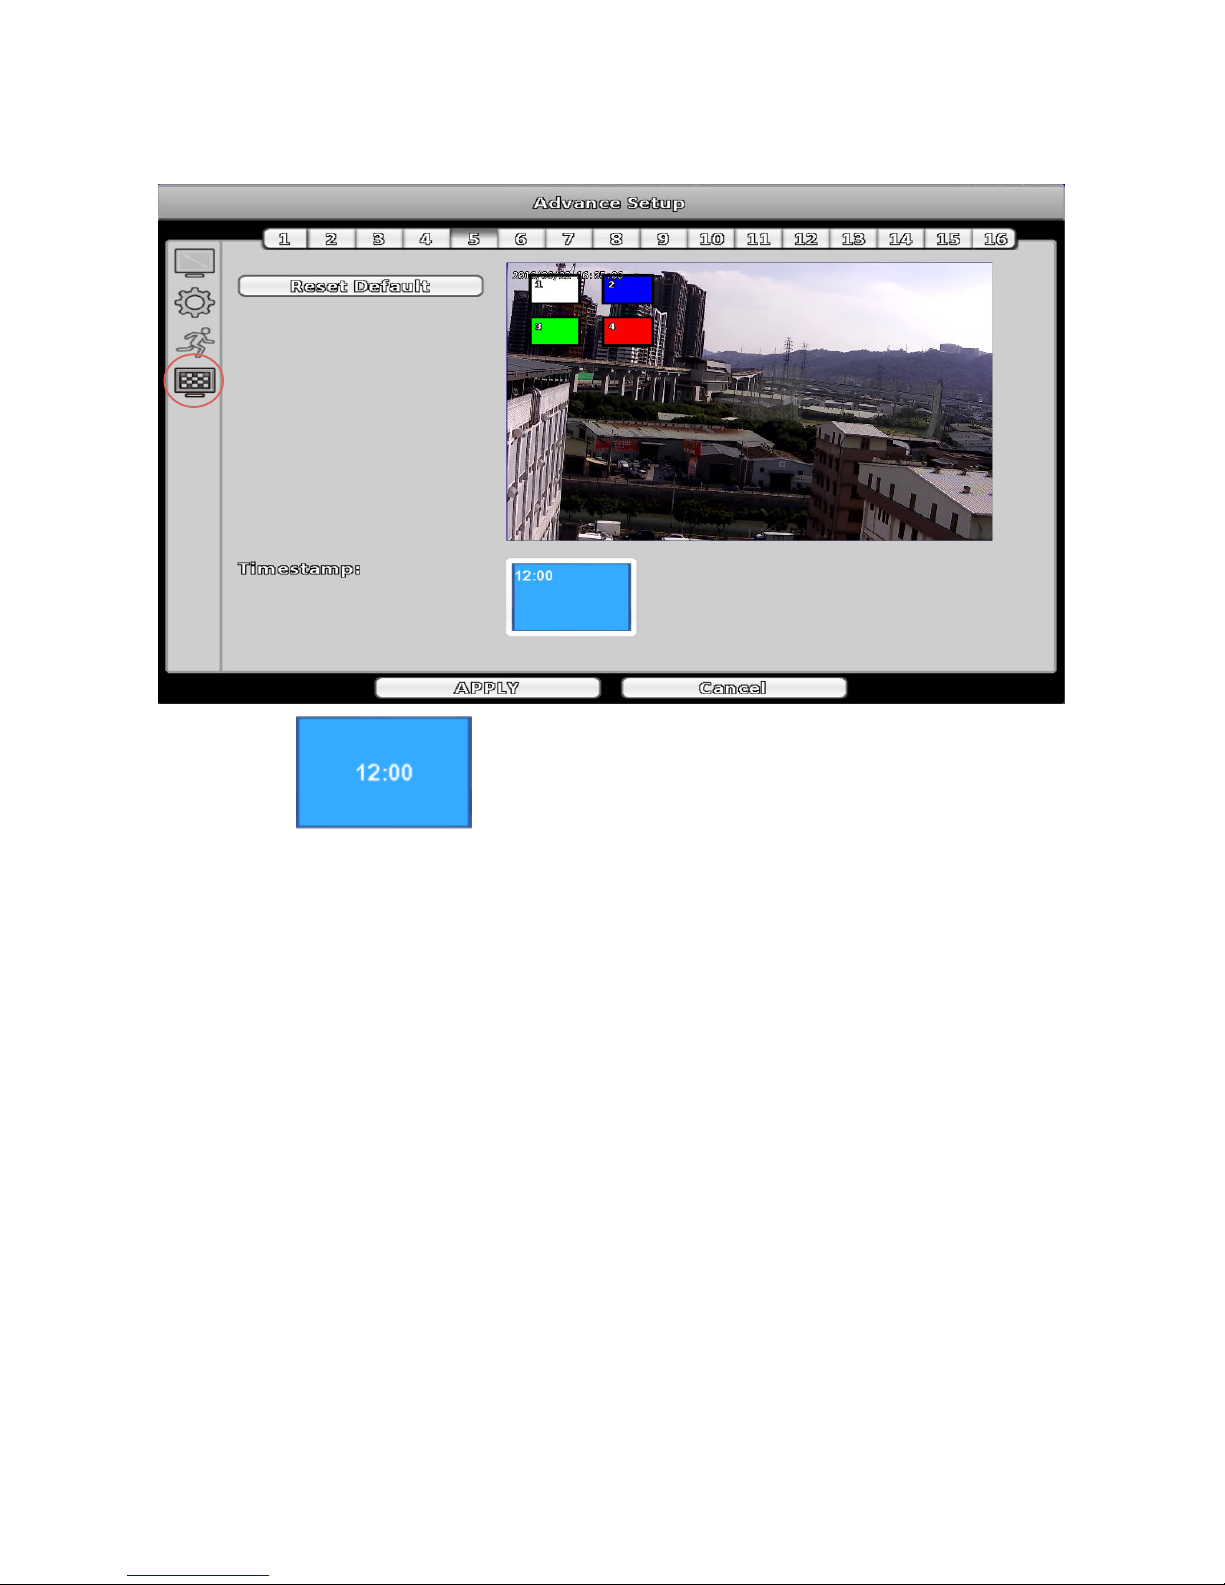
3-3-2-1-4 Mask and Time Stamp
DVR supports 4 customized masks to hide areas of live view.
Time Stamp
In time stamp setup , you can set the position of the time stamp shown in different mode such as
playback, remote live, and backup file.
Page 37
33
3-3-2-2 IP Mode Advance Setup
3-3-2-2-1 Image Setup
Adjust Onvif compatible image parameters of camera.
Note:
Not every Onvif compatible camera support image setup and parameters may be different.
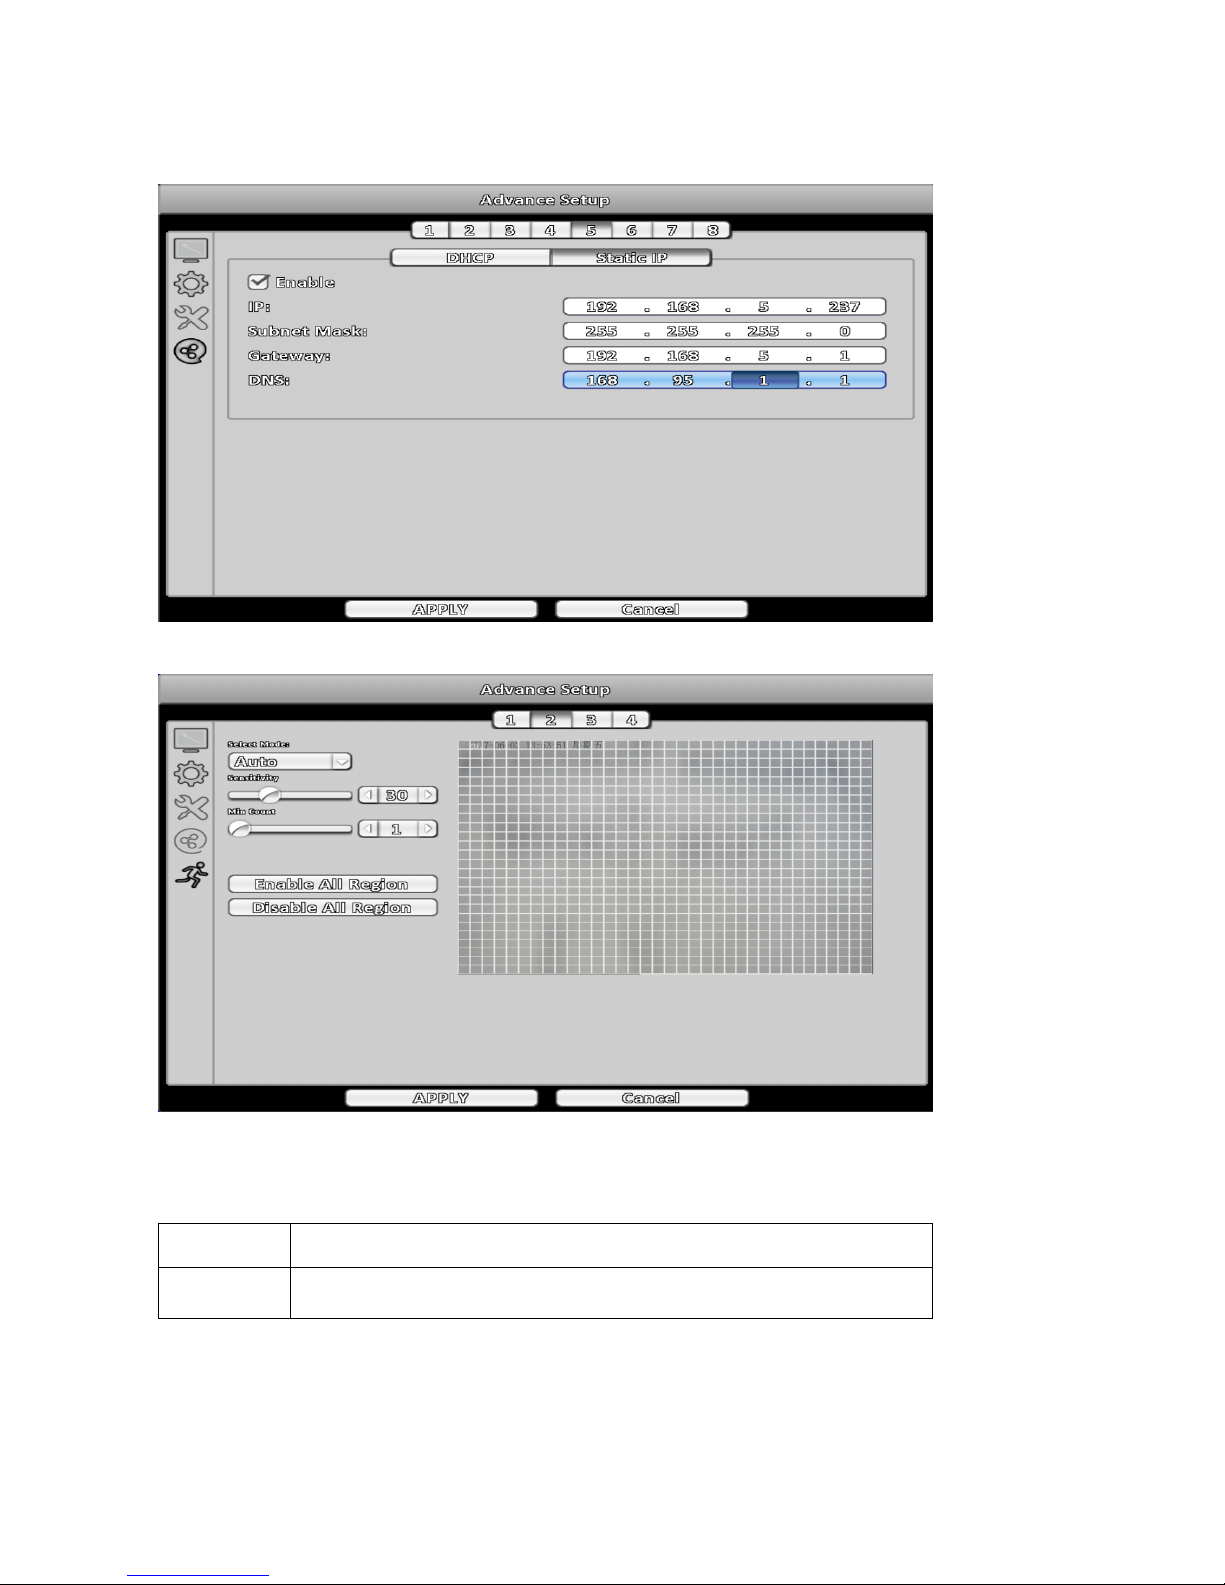
3-3-2-2-2 Maintenance Setup
Reboot or default the camera through Onvif protocol.
Page 38
34
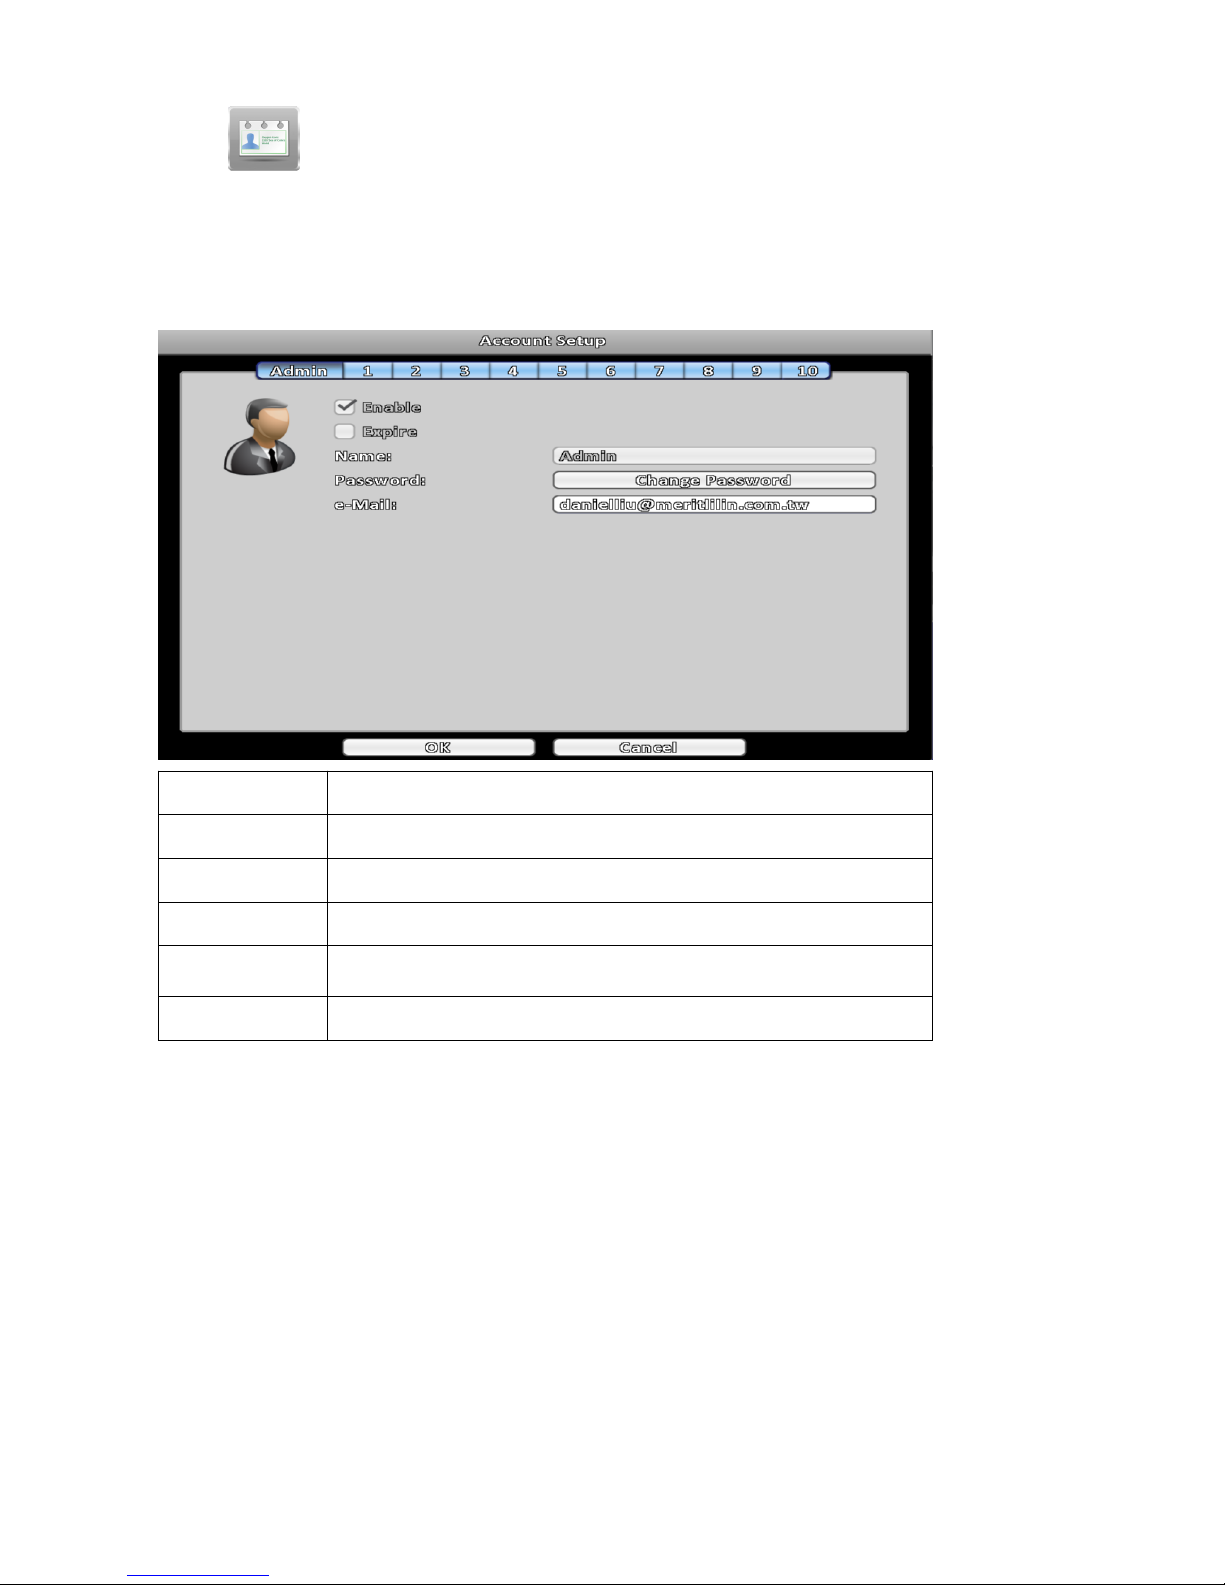
3-3-2-2-3 Network Setup
Setup IP mode of camera through Onvif Protocol, there is DHCP or Static IP.
3-3-2-2-4 Motion Detection Setup
Adjust motion detection sensitivity and area through Onvif protocol.
Note:
Not every Onvif compatible camera support motion detection.
Item Description
Min Count
Trigger condition that how many block detected video variation at the
same time.
Page 39
35
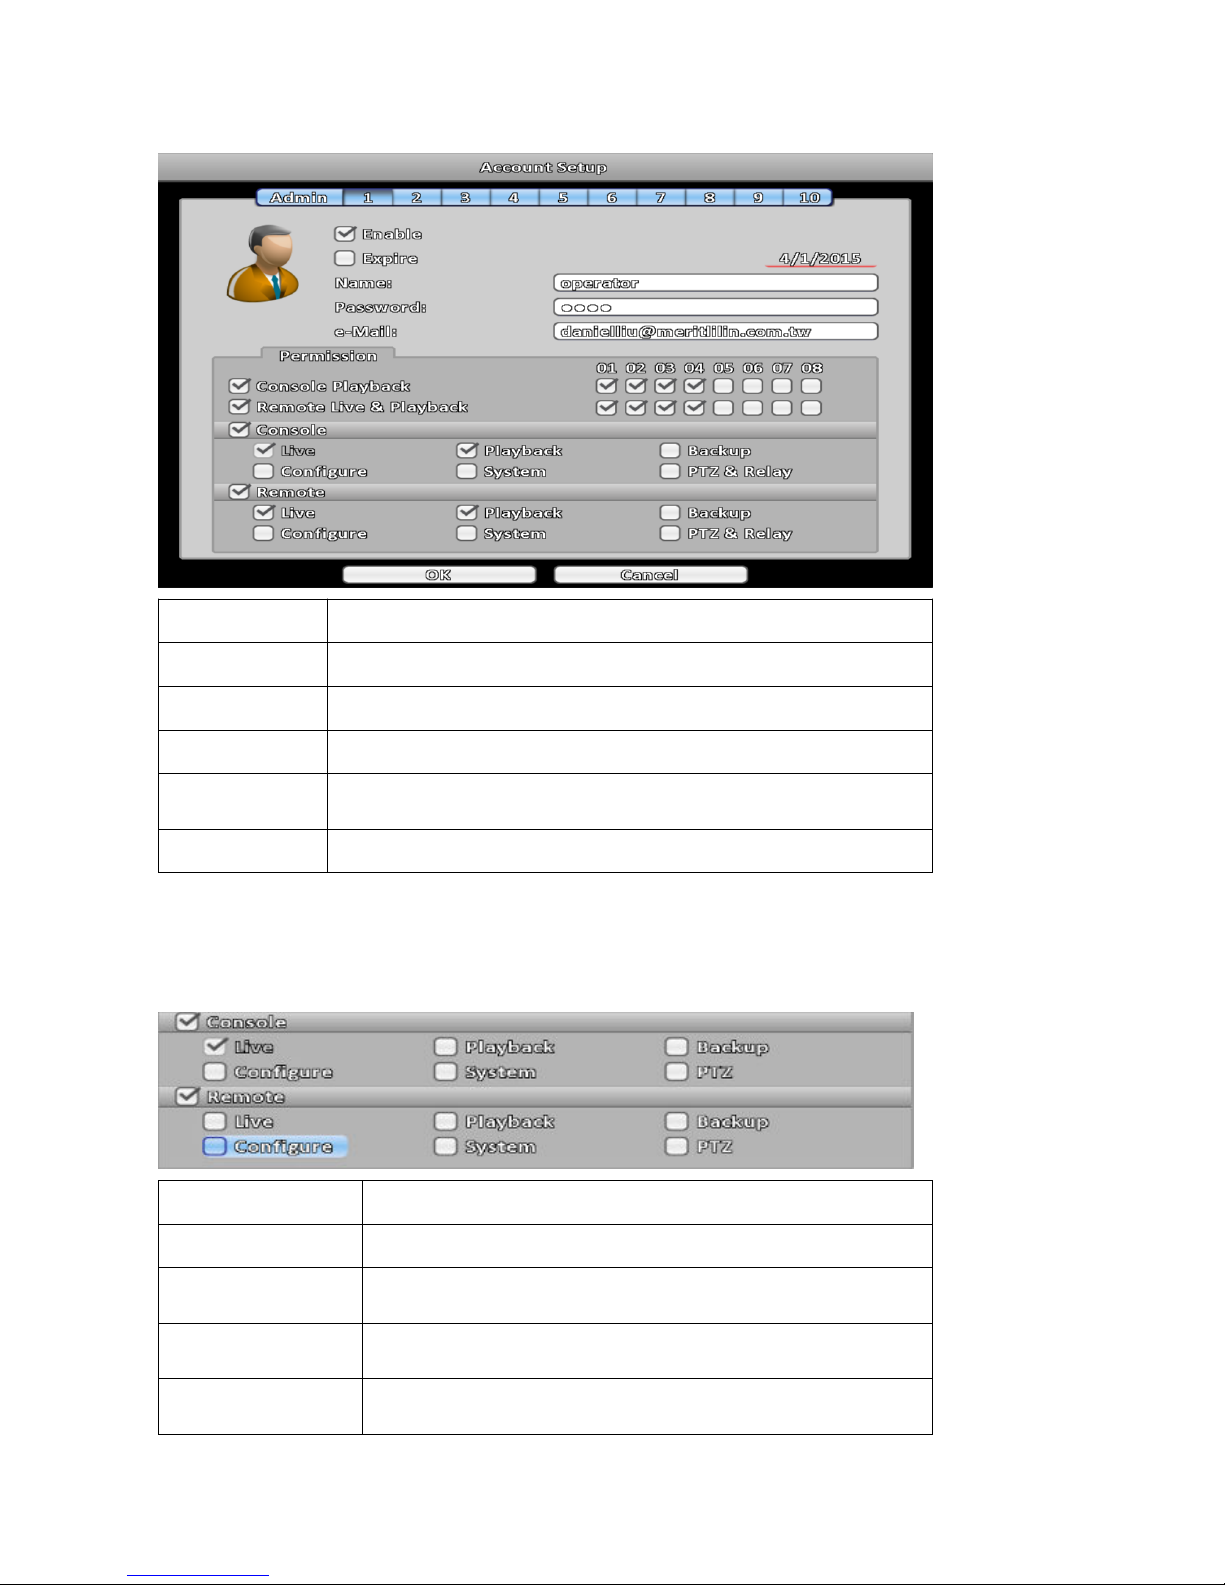
3-4 Account Setup
You can set the user password and permissions of 11 user accounts (1 admin + 10 users). These different
accounts give users different permissions of DVR features.
3-4-1 Administrator
The default admin account and password is admin and 1111.
Item Description
Enable Check to activate the user’s account.
Expire Set the expire date of the user account.
Name Username.
Password
The password can be mixed of letters and numbers and is
case-sensitive.
e-Mail User ’s email.
Page 40
36
3-4-2 Other Users
Item Description
Enable Check to activate the user’s account.
Expire Set the expire date of the user account.
Name Username.
Password
The password can be mixed of letters and numbers and is
case-sensitive.
e-Mail User ’s email.
3-4-2-1 Permission
The Account Setup is set to provide individual user role-based permissions, including access to Setup menu,
Network operation, PTZ function, Playback, Utility, Backup, Password expiration date and hide on specific
channels while playing back.
Item Description
Console Playback Allow the permissions to playback channel in local side
Remote Live and
Playback
Allow the permissions to live monitor/playback channel in remote
side
Console
Allows the permissions to operate in local side (Live, Playback,
Backup, Configure, System, PTZ)
Remote
Allow the permissions to operate in remote side (Live, Playback,
Backup, Configure, System, PTZ)
Note: Local and remote permissions are separately.
Page 41
37
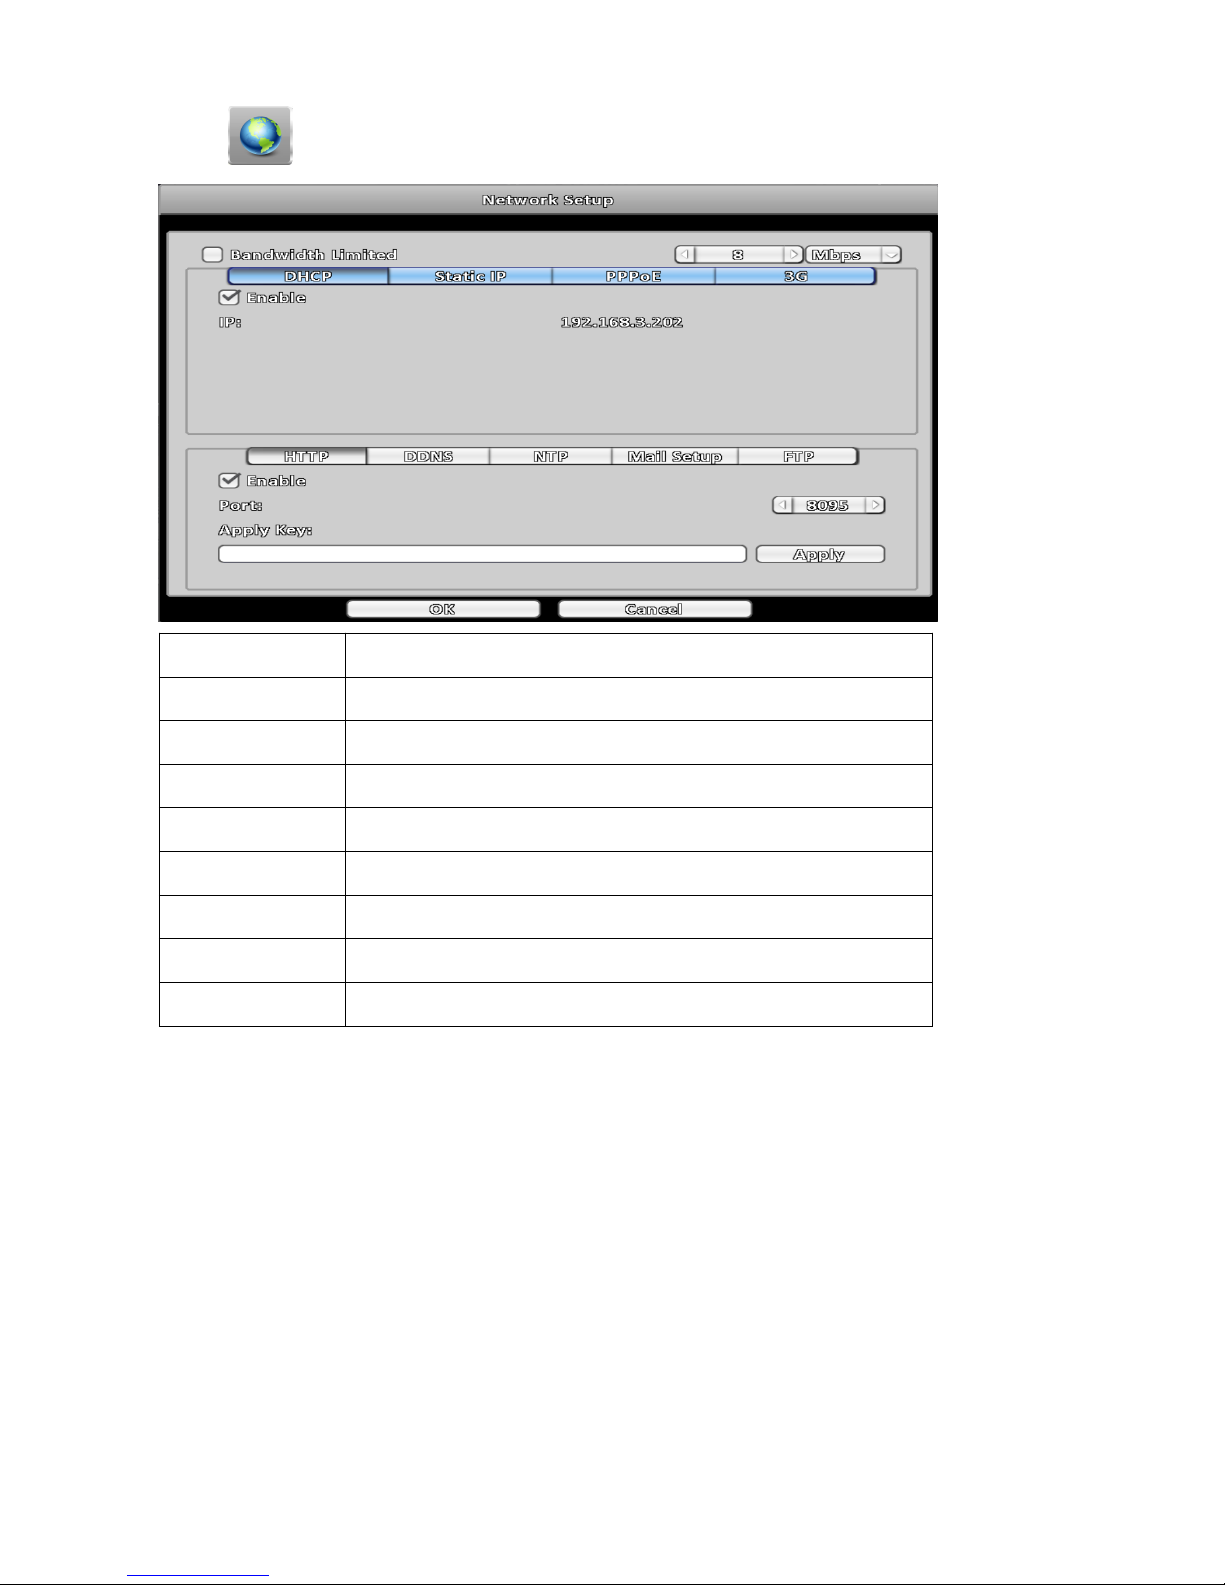
3-5 Network Setup
Item Description
DHCP The DVR retrieves IP from a DHCP server.
Static IP Set up a static IP address of the DVR.
PPPoE
Set up the username and password for PPPOE connection.
HTTP Set up the HTTP configuration for remote access.
DDNS Set up the DDNS configuration.
NTP Set up the NTP configuration.
Mail Setup Set up the mail sending configuration.
FTP Set up the FTP configuration.
3-5-1 WAN
There are three ways to connect to the network, there is DHCP, Static IP and PPPoE.
3-5-1-1 DHCP
When DHCP is selected, IP address will be assigned by DHCP server automatically.
Page 42
38
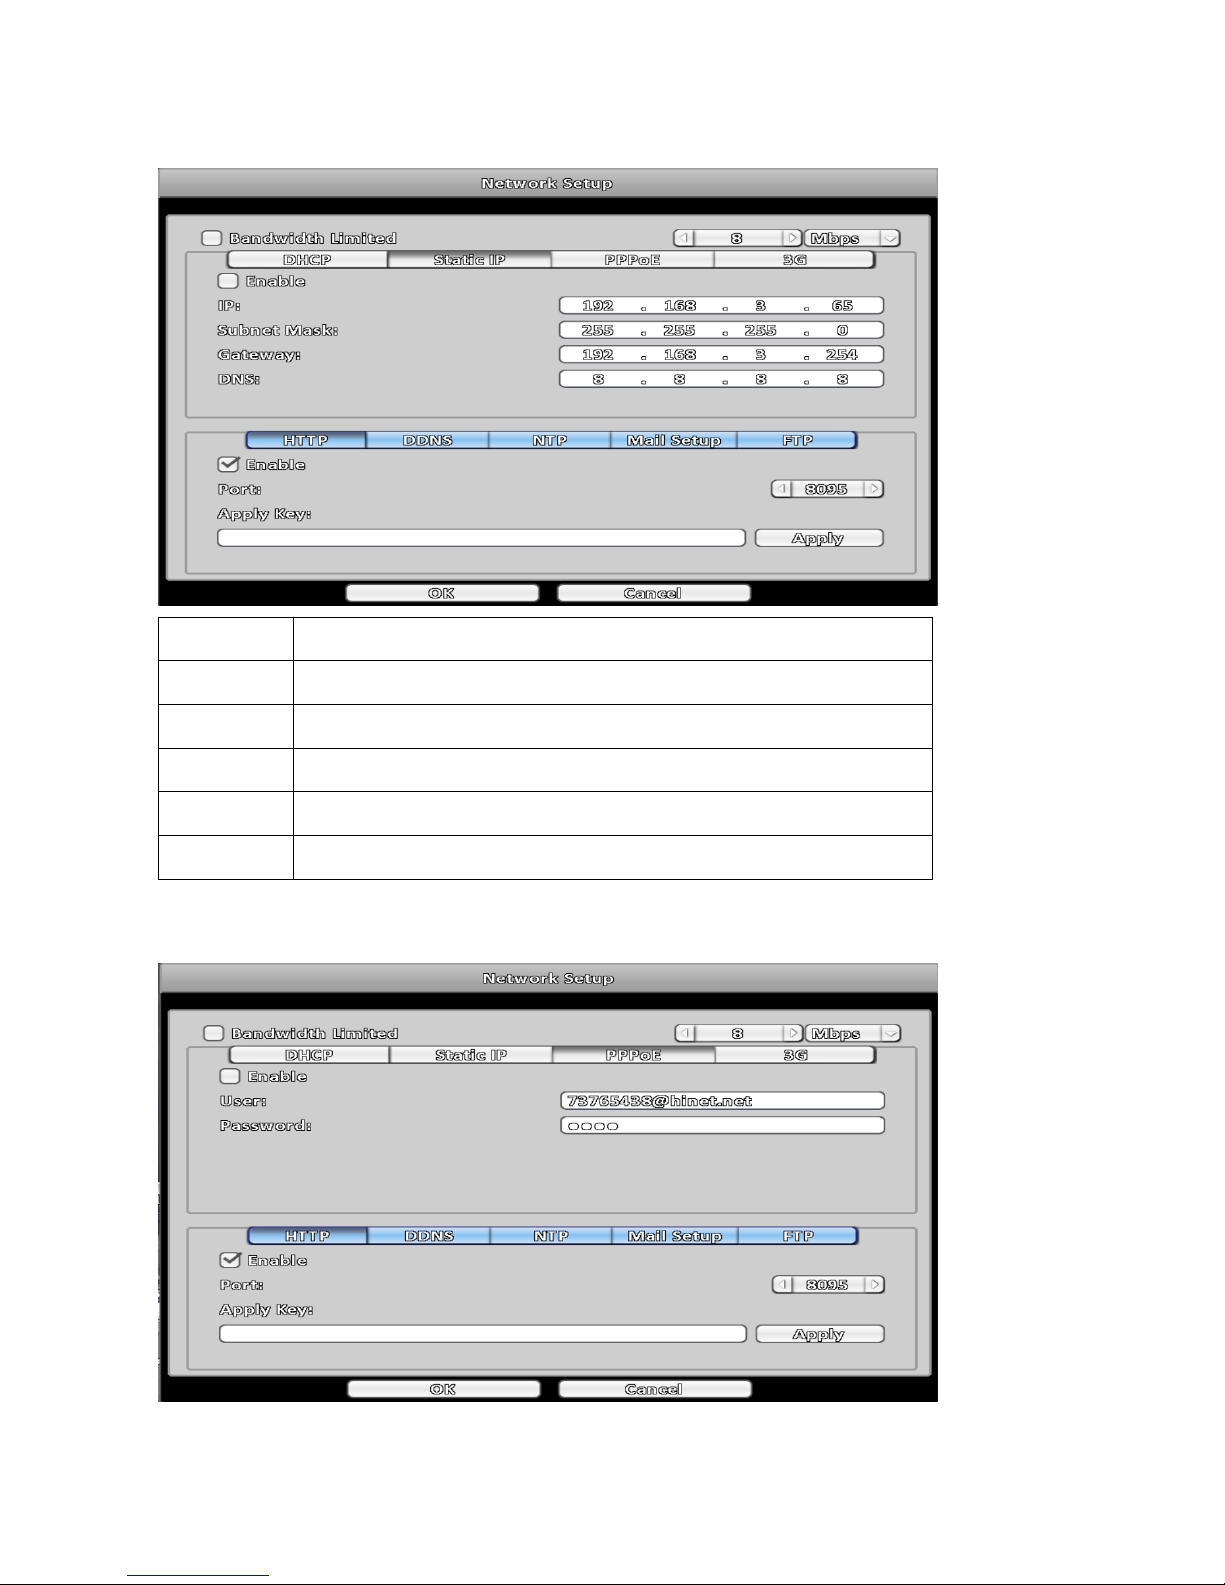
3-5-1-2 Static IP
Setup Static IP for network connection, the following information is required.
Item Description
Enable Enable Static IP function.
IP Enter the static IP address provided by ISP.
Subnet Mask
Enter IP address of Subnet Mask provided by ISP.
Gateway
Enter IP address of the Gateway provided by ISP.
DNS
Enter the DNS address provided by ISP.
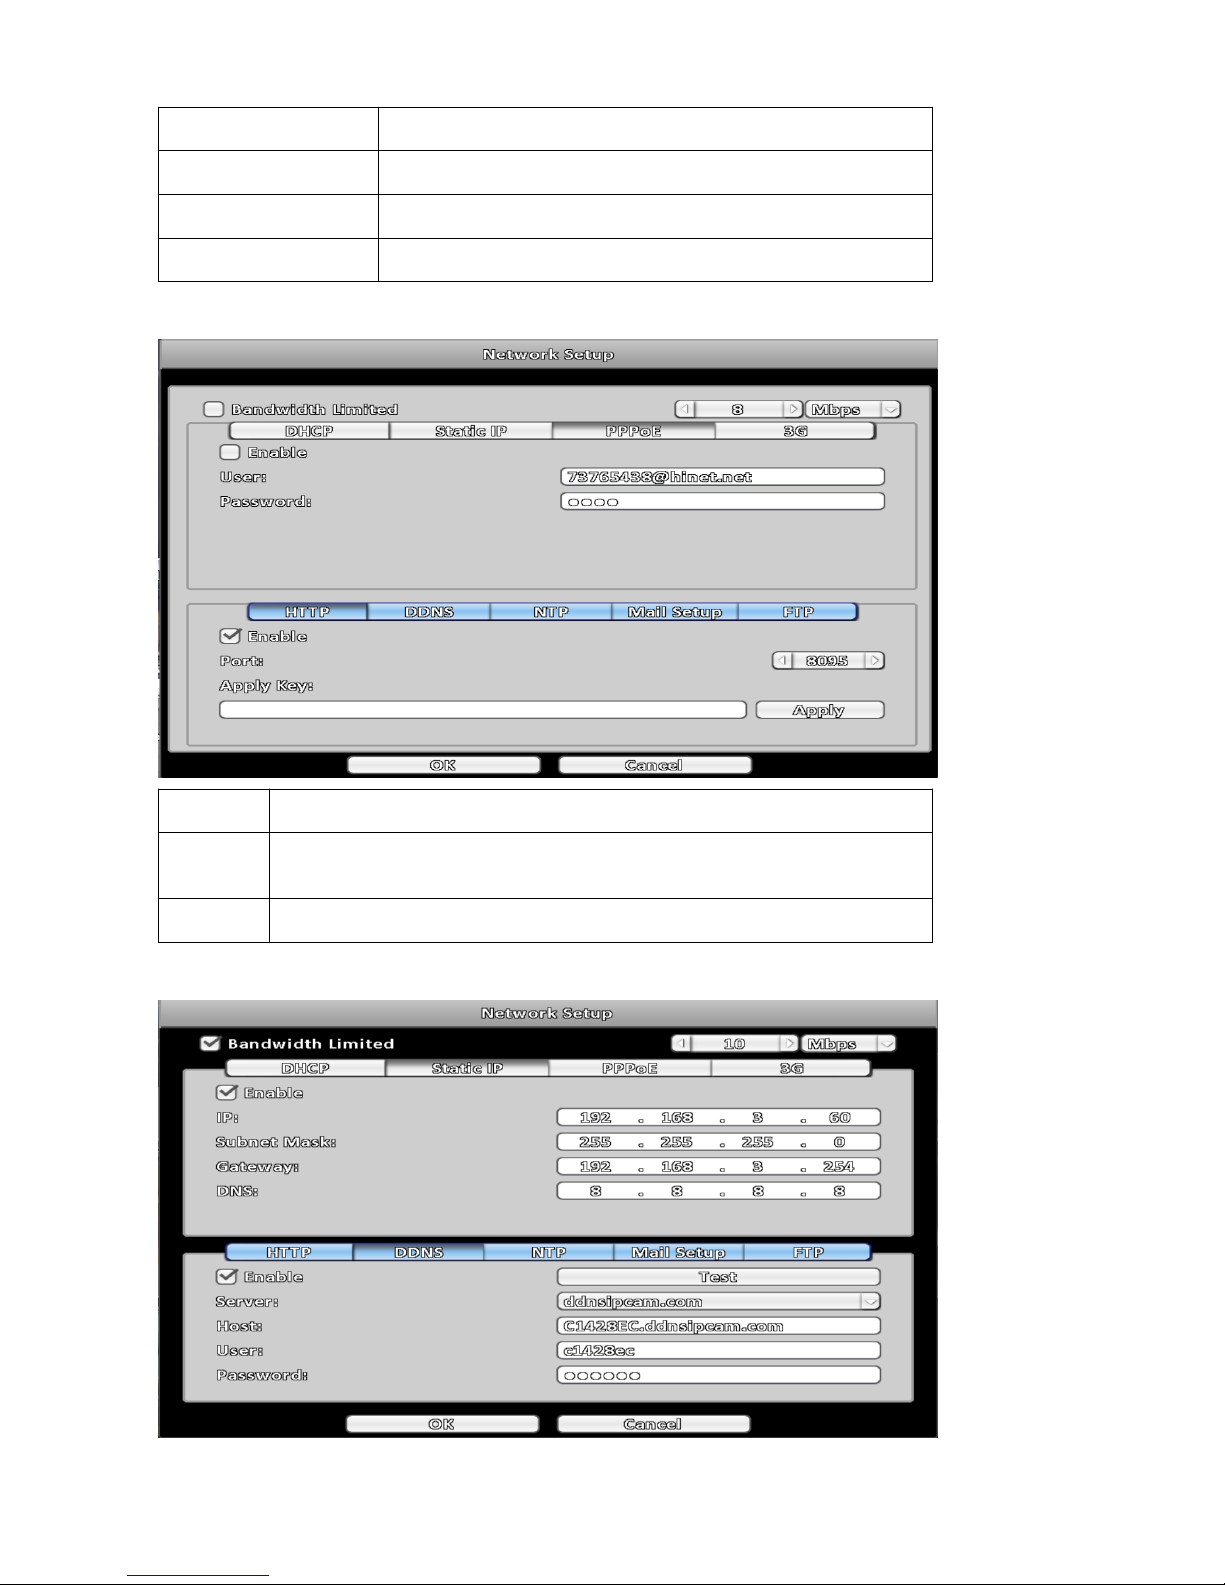
3-5-1-3 PPPoE
Select PPPOE for network connection, the following information is required.
Page 43
39
Item Description
Enable
Enable / Disable PPPOE function.
User
Enter user name provided by ISP.
Password
Enter password provided by ISP.
3-5-2 HTTP
Item Description
Enable
Check to enable HTTP server. Users can remotely access into the DVR over the
network if the HTTP function is activated.
Port
Enter a valid port value from 1 up to 65535. The default value is 80.
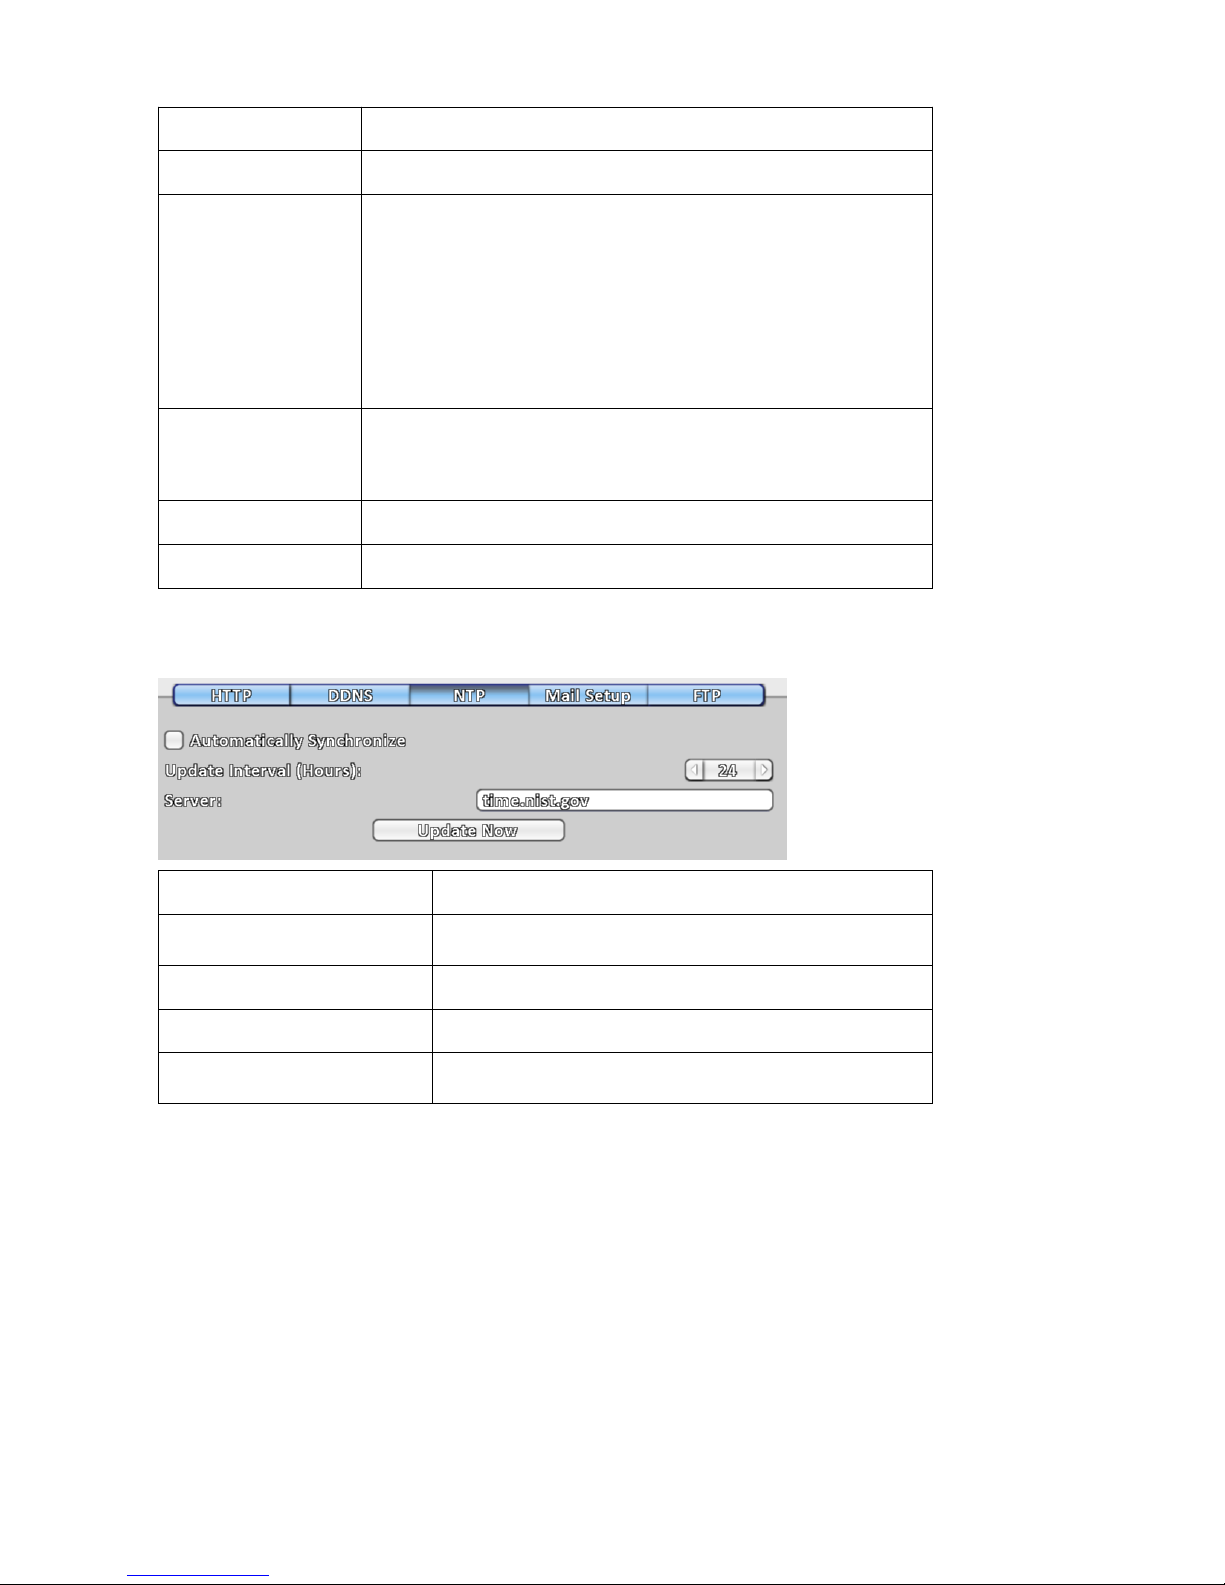
3-5-3 DDNS
Page 44
40
Item Description
Enable Enable / Disable DDNS function.
Server
Enter
the
registered
DDNS
server:
ddnsipcam.com, noip.com, ez- dns.com, dyndns.org
When select ddnsipcam DDNS service,
The system will automatically bring up to C + DVR Mac Address
last six yards at the beginning of a host site,
Such as the Mac end of the six yards of 0FEEDD,
Then bring out the host site at C0FEEDD.ddnsipcam.com .
Host
Enter
the
full
DDNS
address.
If the user name is h.264 and you choose ddnsipcam.com as your
server, you should enter: h.264.ddnsipcam.com.
User Enter user name.
Password Enter password.
3-5-4 NTP
This feature allows your DVR to synchronize its time with a time server.
Item Description
Automatically Synchronize
Synchronize the time of your DVR according to the
interval you set.
Update Interval Interval for time synchronization.
Server Time server address.
Update Now
Update the time information from the NTP server.
immediately.
Page 45
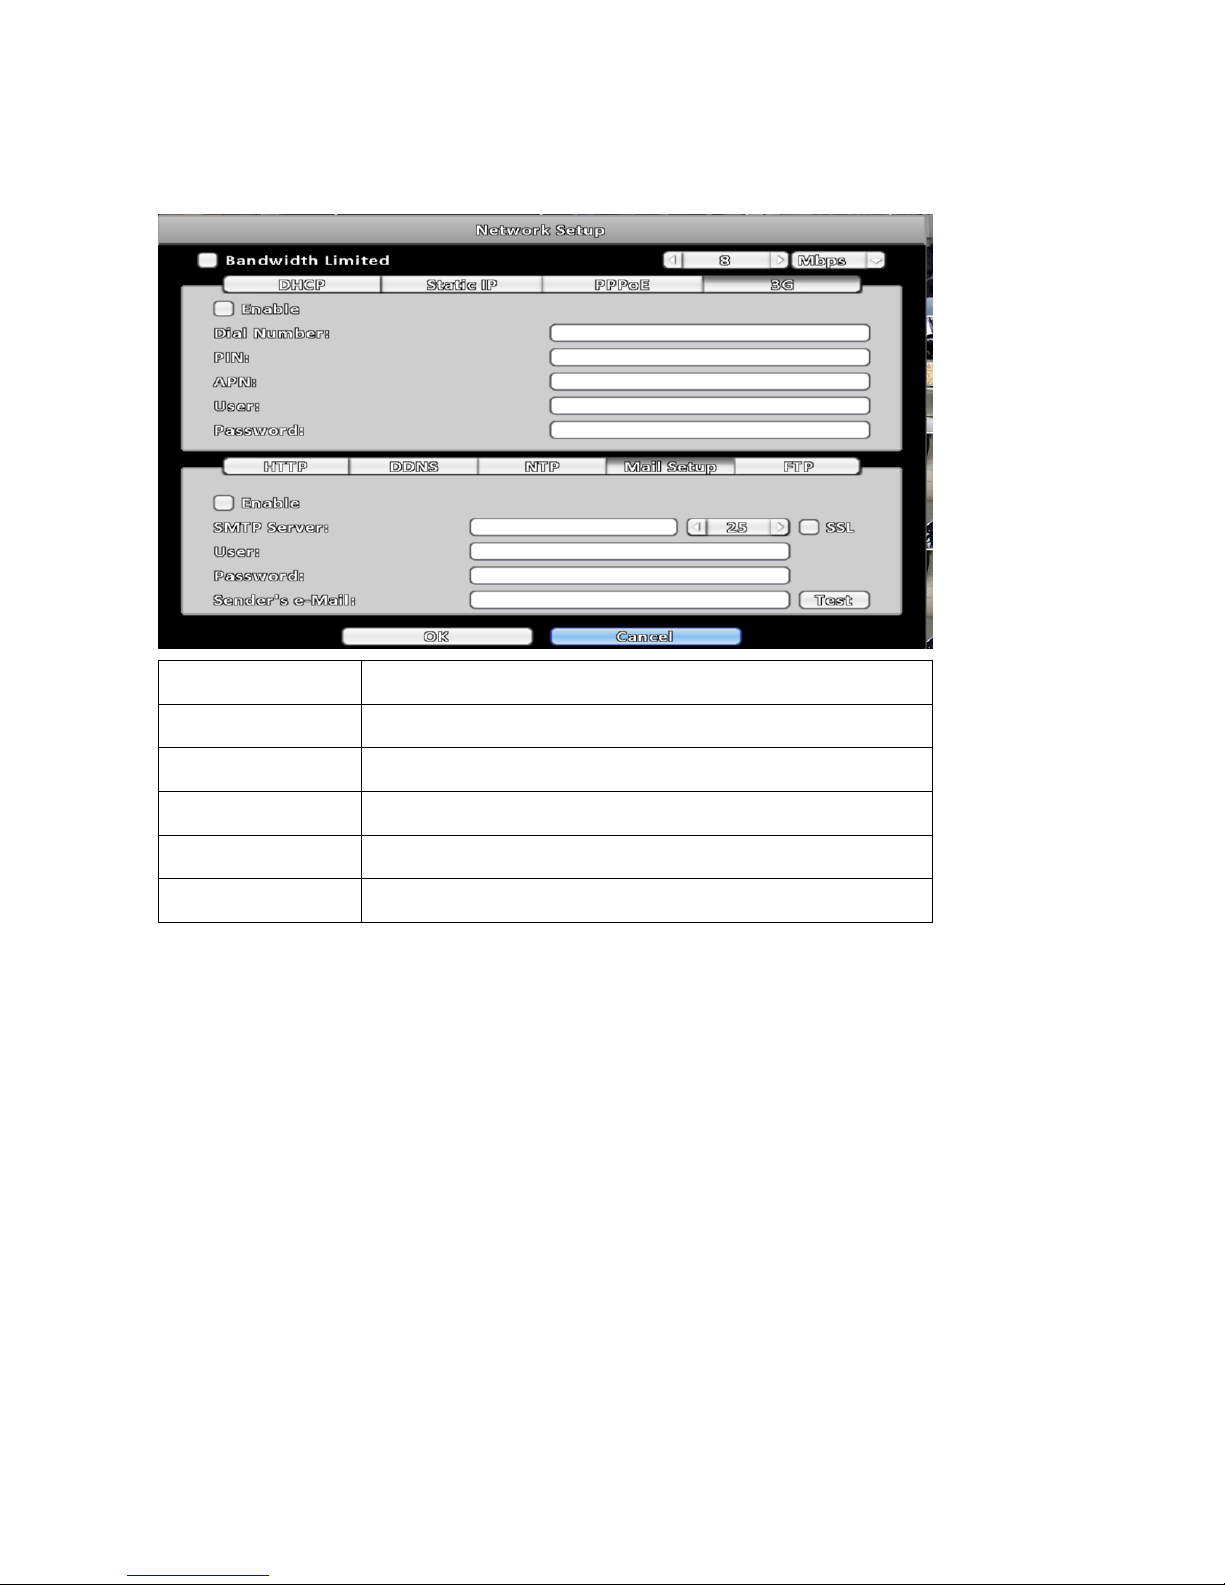
41
3-5-5 Mail Setup
The Mail Setup tab controls the email-sending configuration for the DVR needs to send e-mail to specified
users when an event is triggered.
Item Description
Enable Enable/disable E-mail Notification function.
SMTP Server Set up SMTP server address and port.
User Enter the username.
Password Enter the password.
Sender’s e-Mail Enter the e-mail address of the sender.
Page 46
42
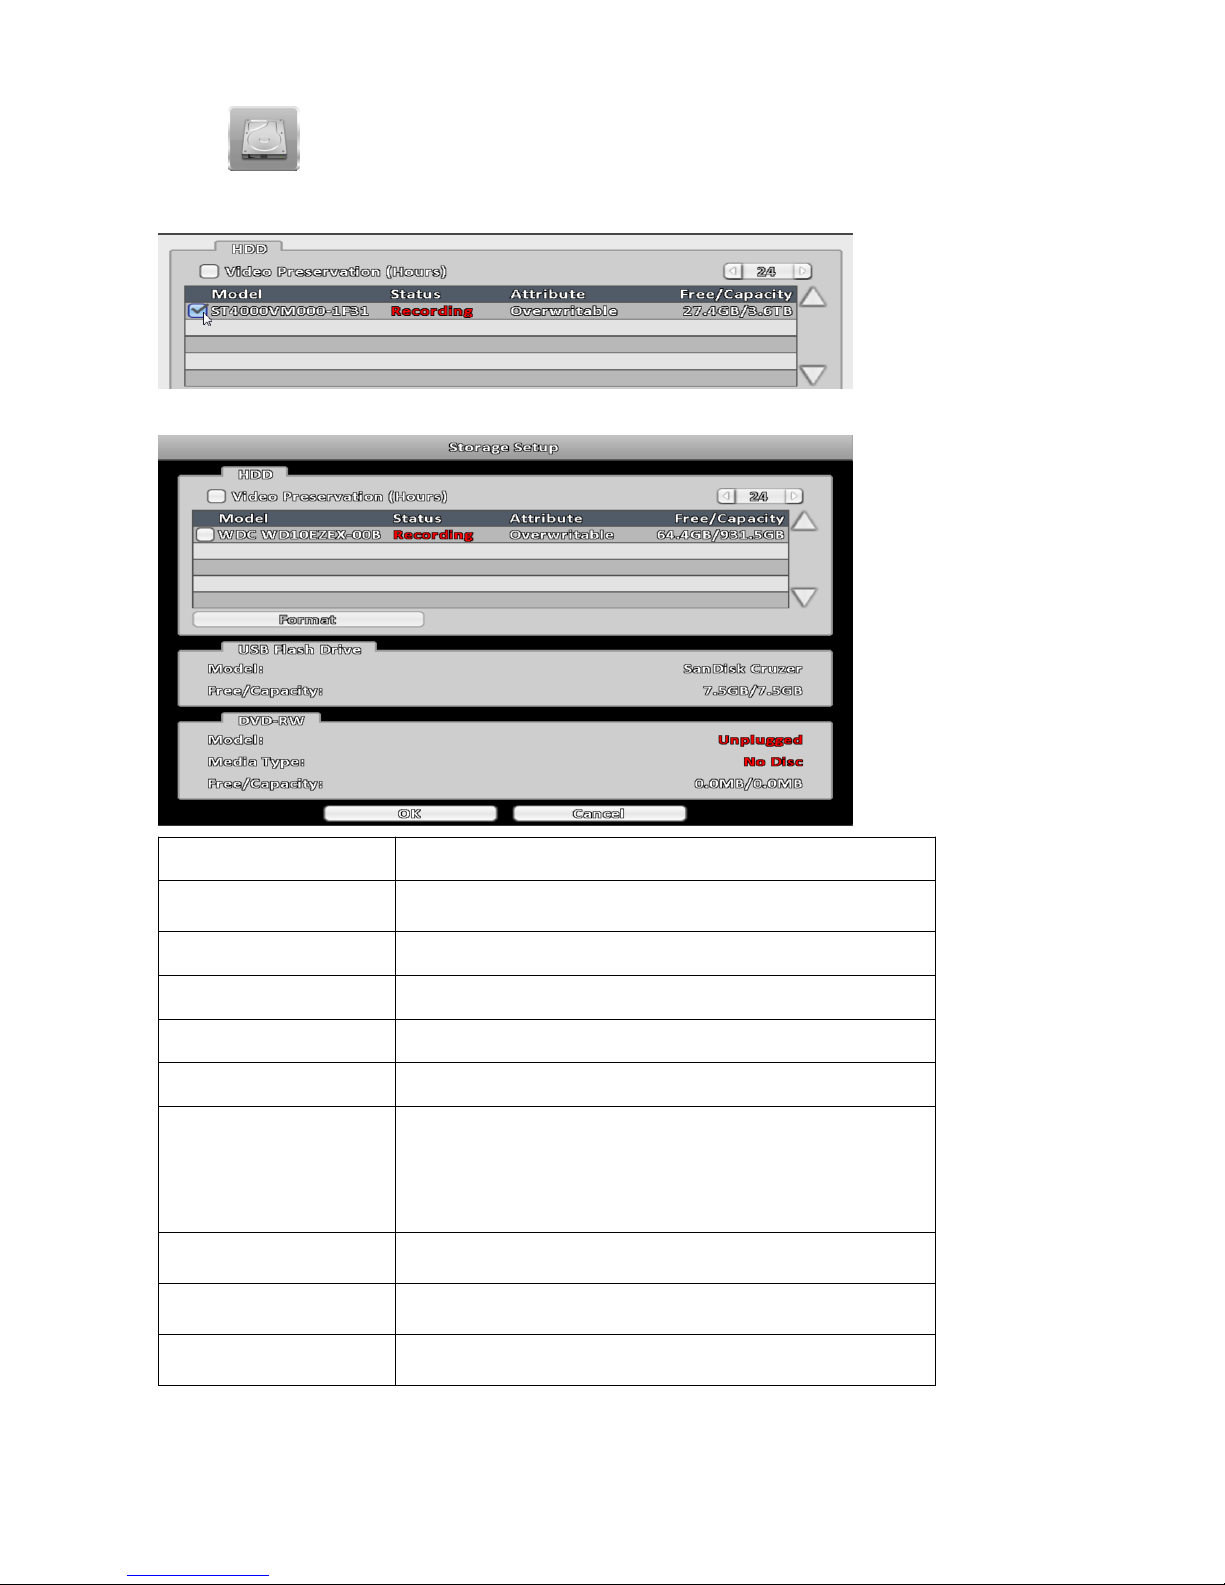
3-6 Storage Setup
3-6-1 HDD Setup
Note: Click the status bar to change the attributes of the hard disk
Item Description
Video Preservation
Setup the video preservation period. Recorded video will be
deleted automatically after expiry of preservation period.
Model Display HDD model.
Status Display HDD status (Recording/Error).
Attribute Display HDD Attribute ( Over writable/Writable/Read-Only).
Free/Capacity Display HDD capacity (Free/Capacity ).
Format
Check the hard disk drive and press "Format", there are four
options to set the HDD.
Start Format HDD DVR. Status bar "successful" HDD
initialization! Enter the menu, there will be all of the hard disk
information (model, capacity).
Over writable
Set the hard disk to be replicated state will start to overwrite
the hard disk is full.
Writable
Set the hard disk as writable state, after the hard disk is full
stop writing.
Read Only
Set the hard disk is read-only, read-only cannot be written to
the hard disk.
Page 47
43
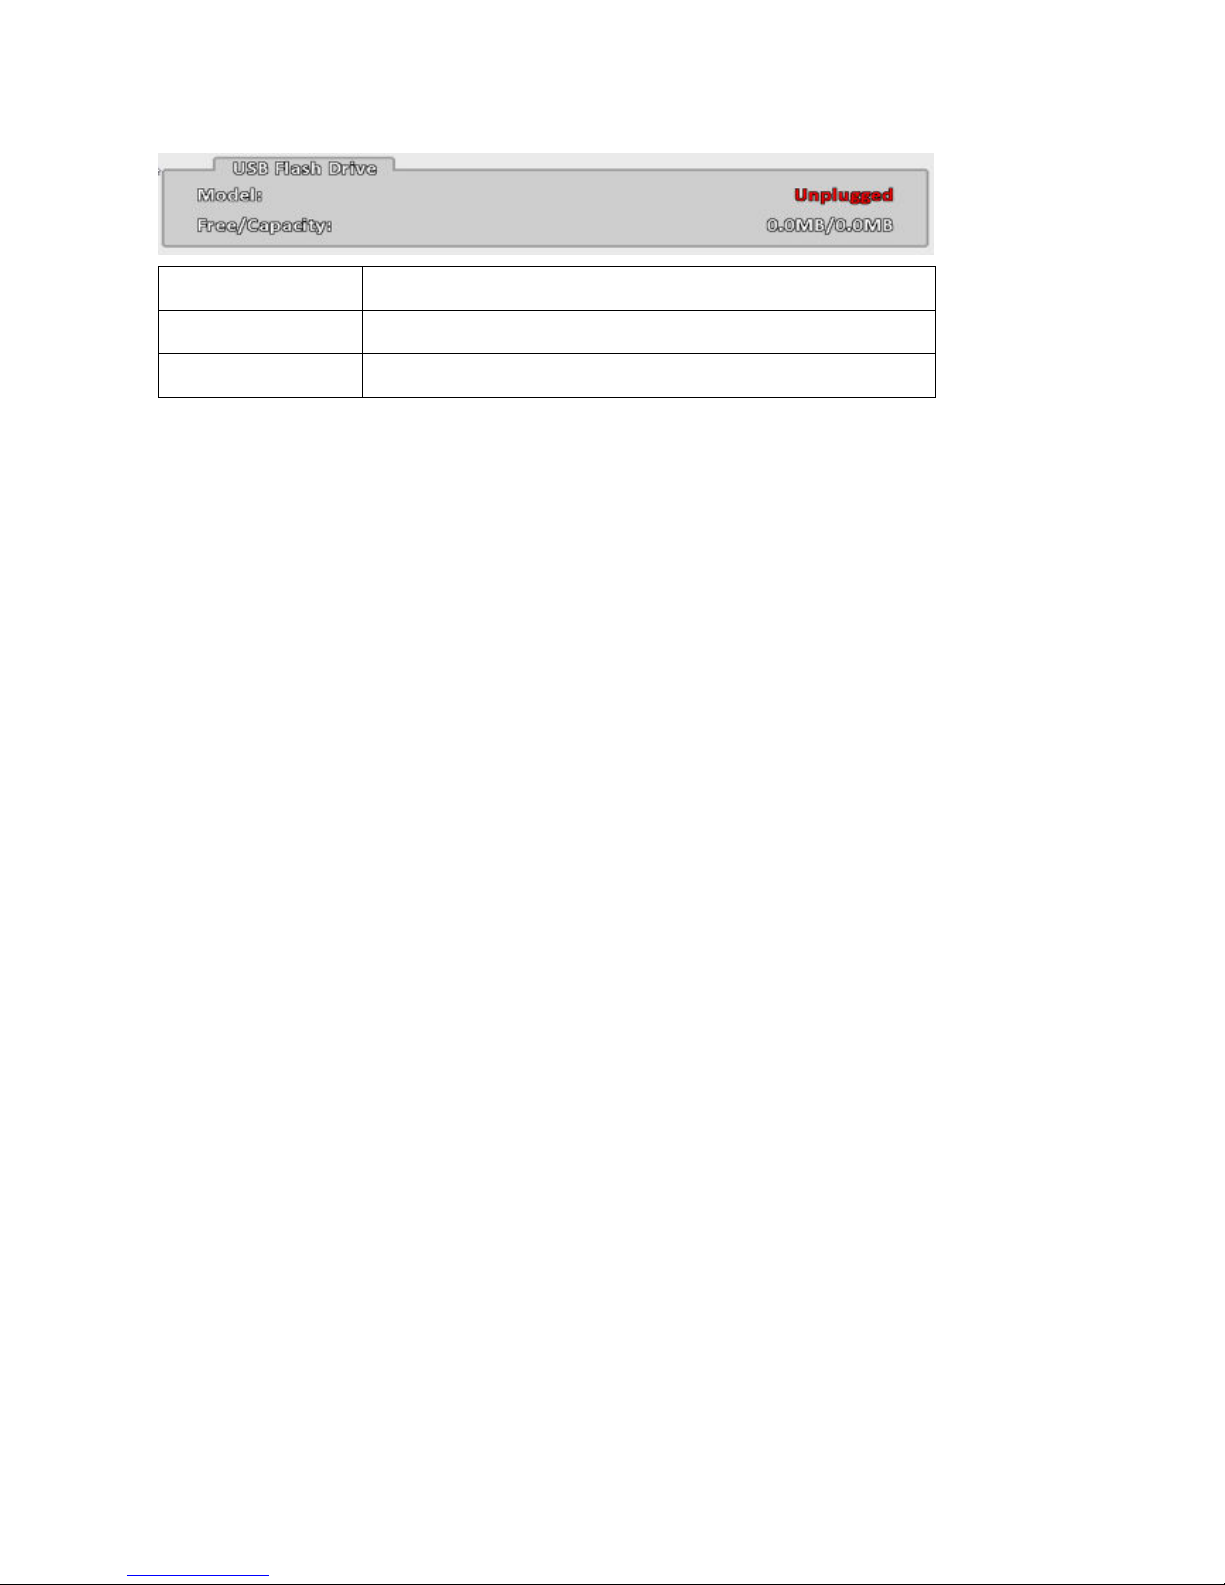
3-6-2 USB Flash Drive Setup
Item Description
Model Display USB flash drive model.
Free/Capacity Display USB flash drive capacity (Free / Capacity ).
Page 48
44
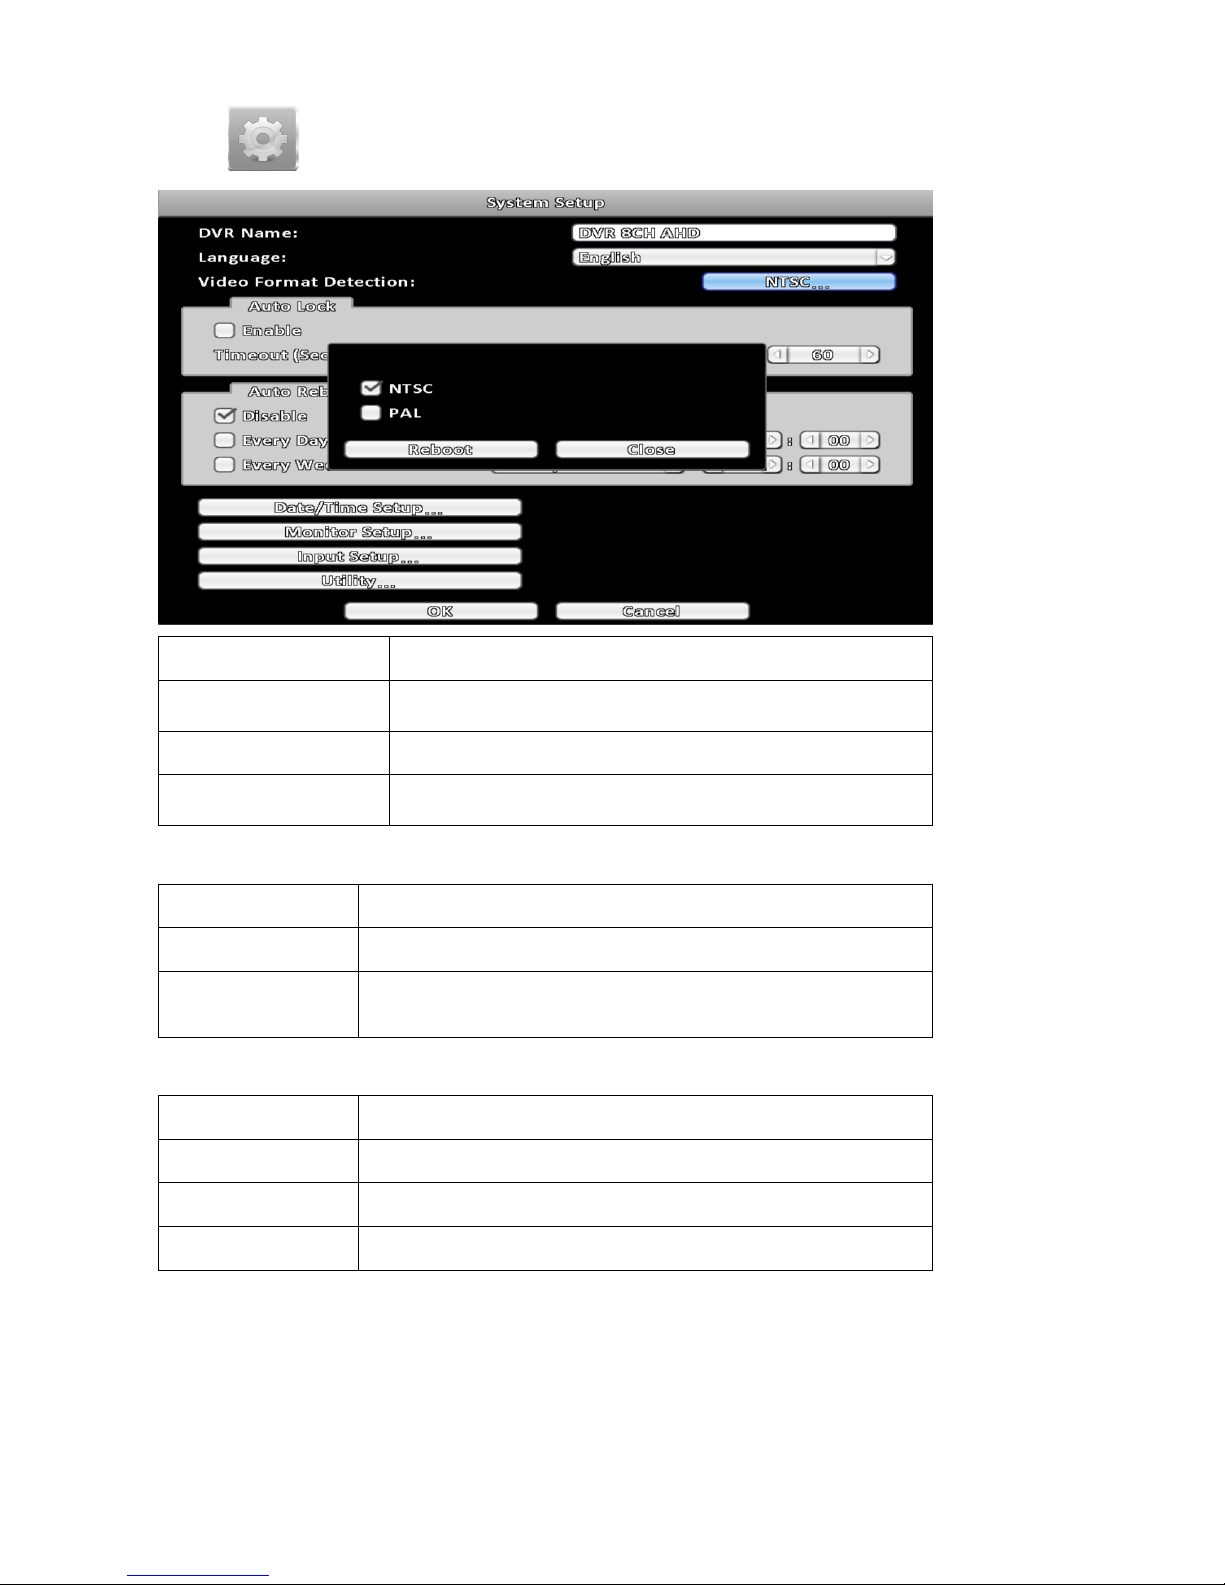
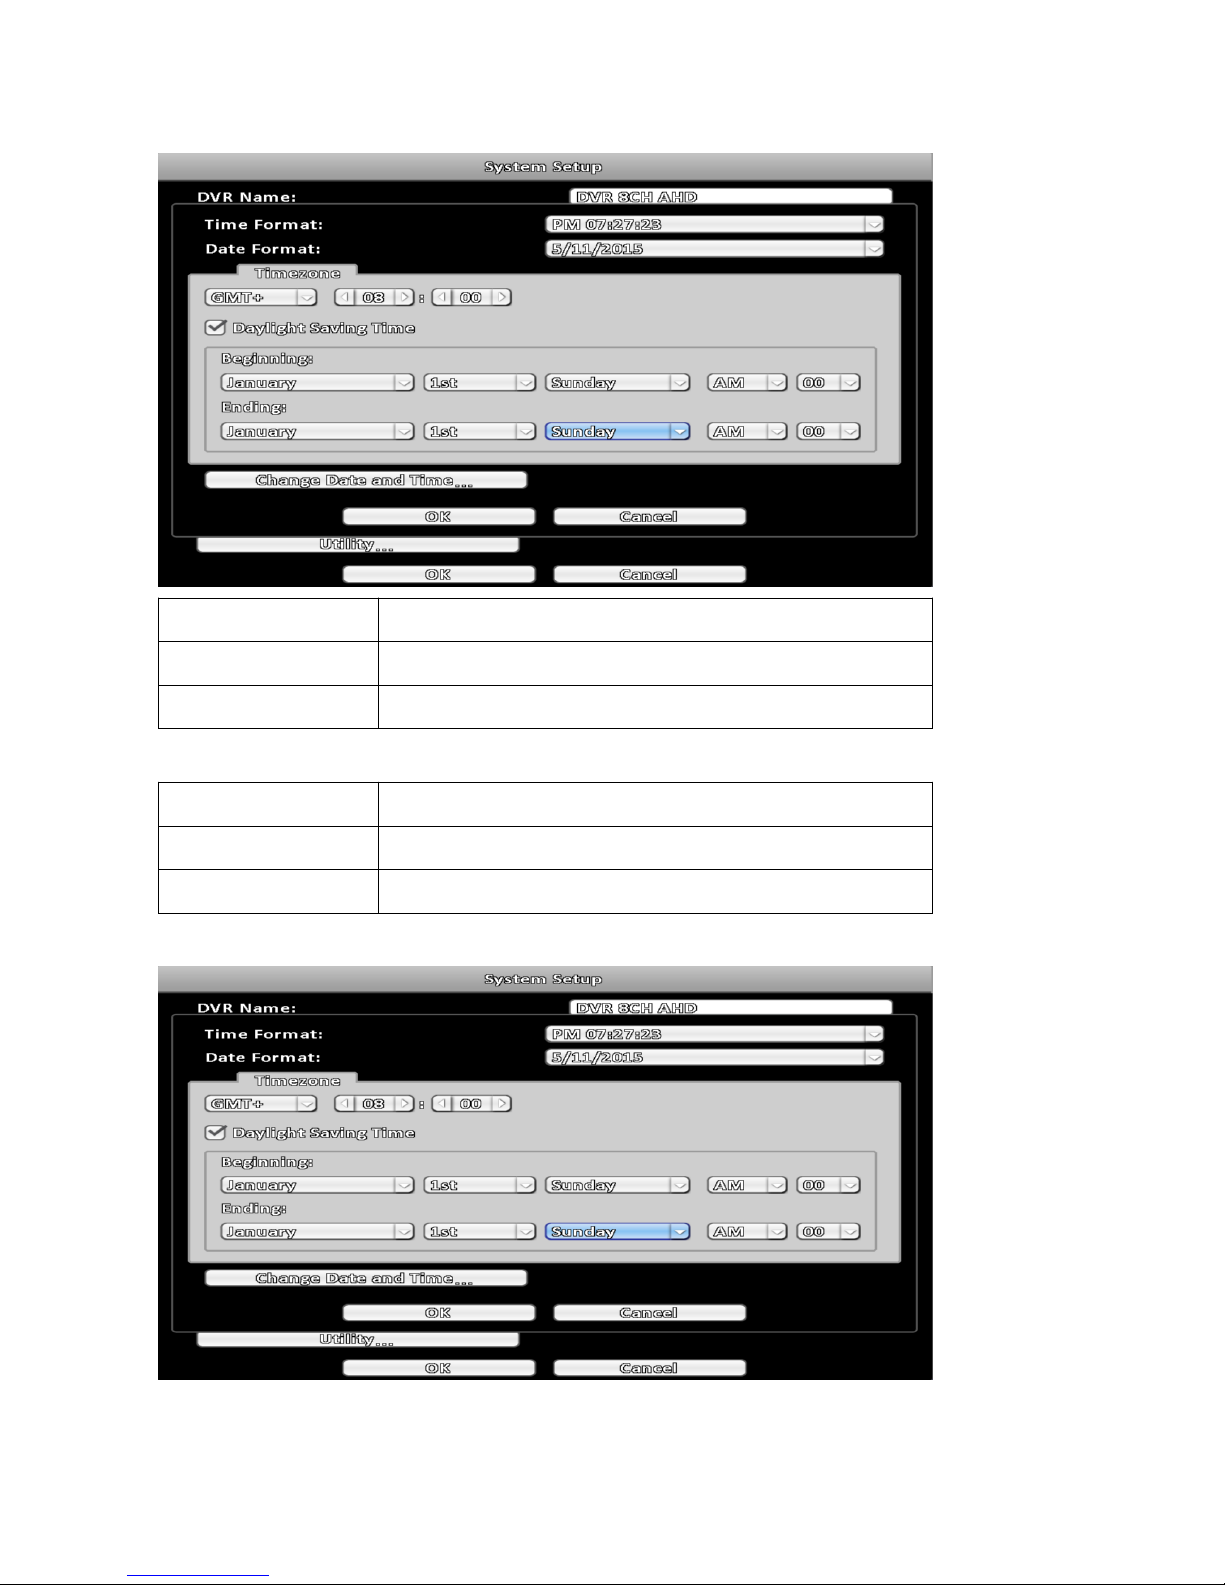
3-7 System Setup
Item Description
DVR Name
The name of DVR to be shown while users login from remote
site.
Language Specify the OSD language.
Video Format Detection
Specify the format of video signal ( NTSC, PAL). The
configuration requires a reboot to take effect.
3-7-1 Auto Lock
Item Description
Enable Enable / Disable Auto Lock.
Timeout(Seconds)
Set the number of seconds to wait. It there is no action, the panel
will be automatically locked.
3-7-2 Auto Reboot
Item Description
Disable Enable / Disable Auto Reboot.
Every day Setup the time of daily auto-reboot.
Every Week Setup the time of weekly auto-reboot.
Page 49
45
3-7-3 Date / Time Setup
Item Description
Hour Format 12HOURS / 24HOURS
Date Format MM-DD-YYYY / DD-MM-YYYY / YYYY-MM-DD
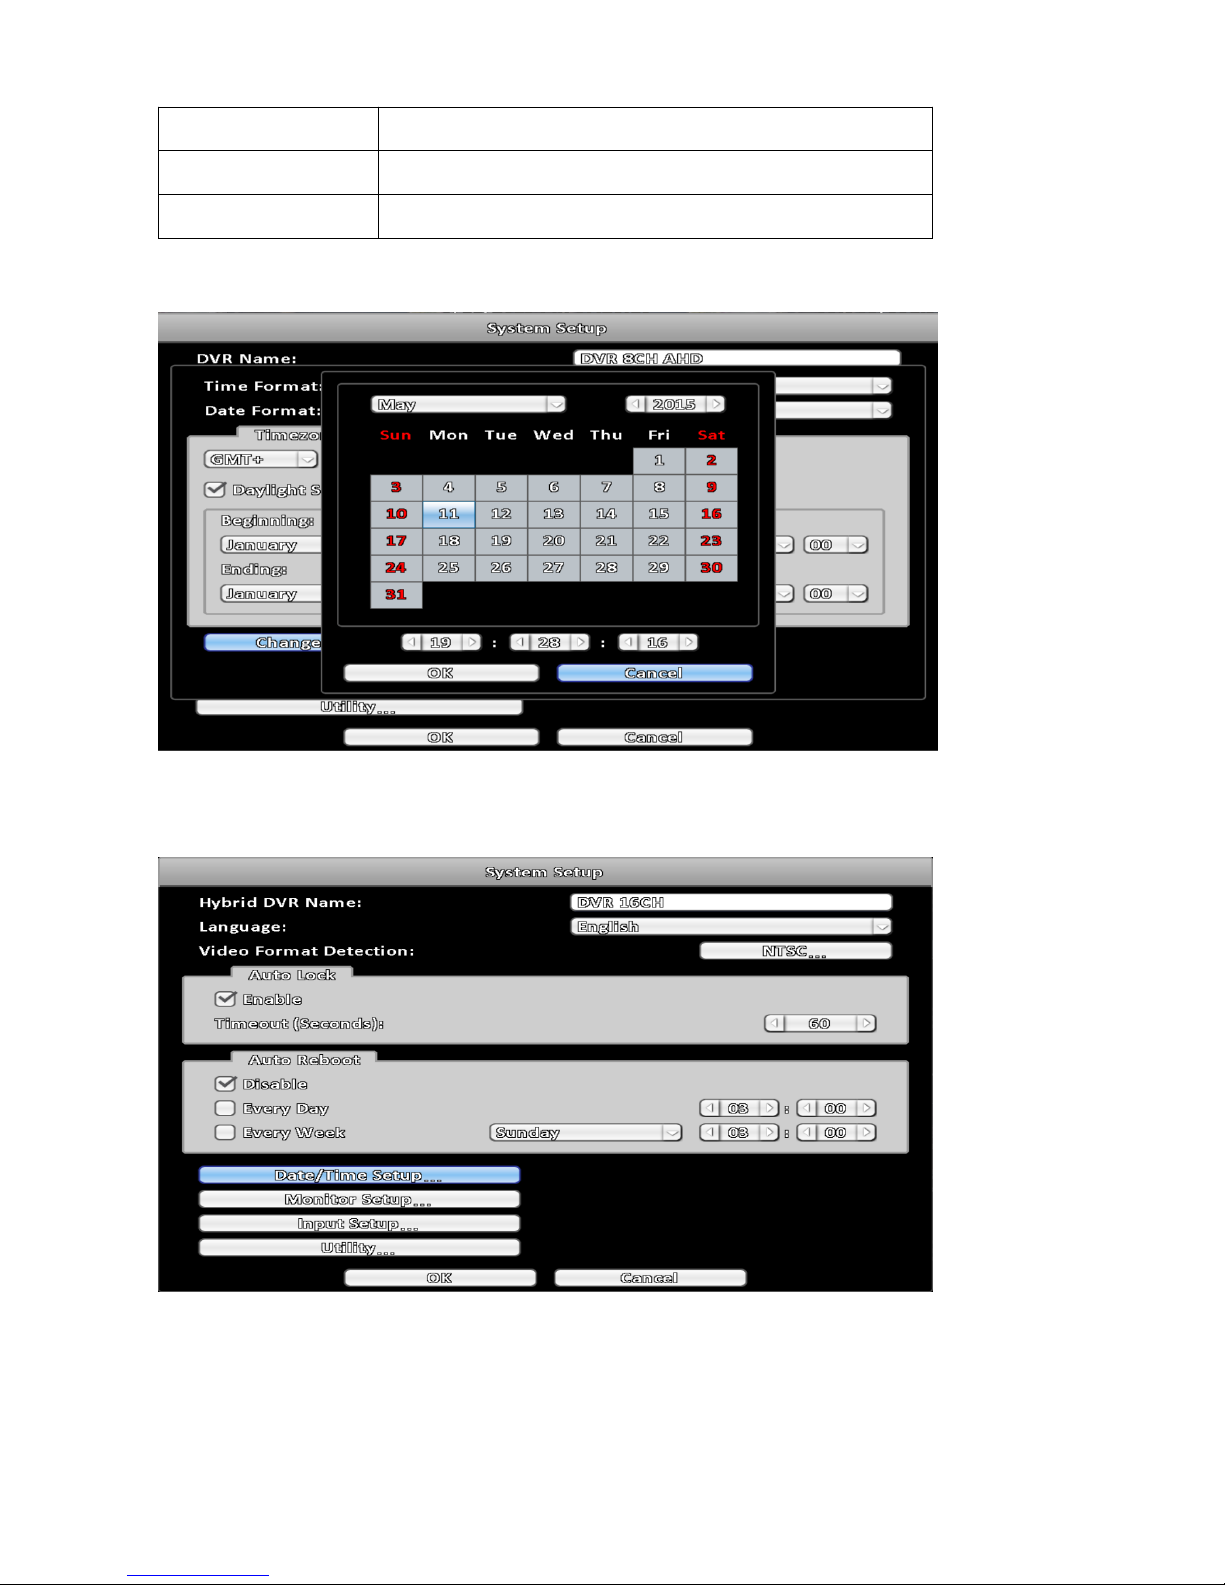
3-7-3-1 Time Zone
Item Description
Time Zone Setup Set up the time zone of the DVR, from GMT-13 to GMT+13.
Daylight Saving Time Enable / Disable daylight saving time.
3-7-3-2 Daylight Saving Time
Page 50
46
Item Description
Beginning Setup the beginning time of daylight saving time.
Ending Setup the ending time of daylight saving time.
3-7-3-3 Change Date and Time
Setup date and time of the DVR.
3-7-4 Monitor Setup
The setting options include three configurations.
In the duplicate mode, both monitors display the same content.
Page 51
47
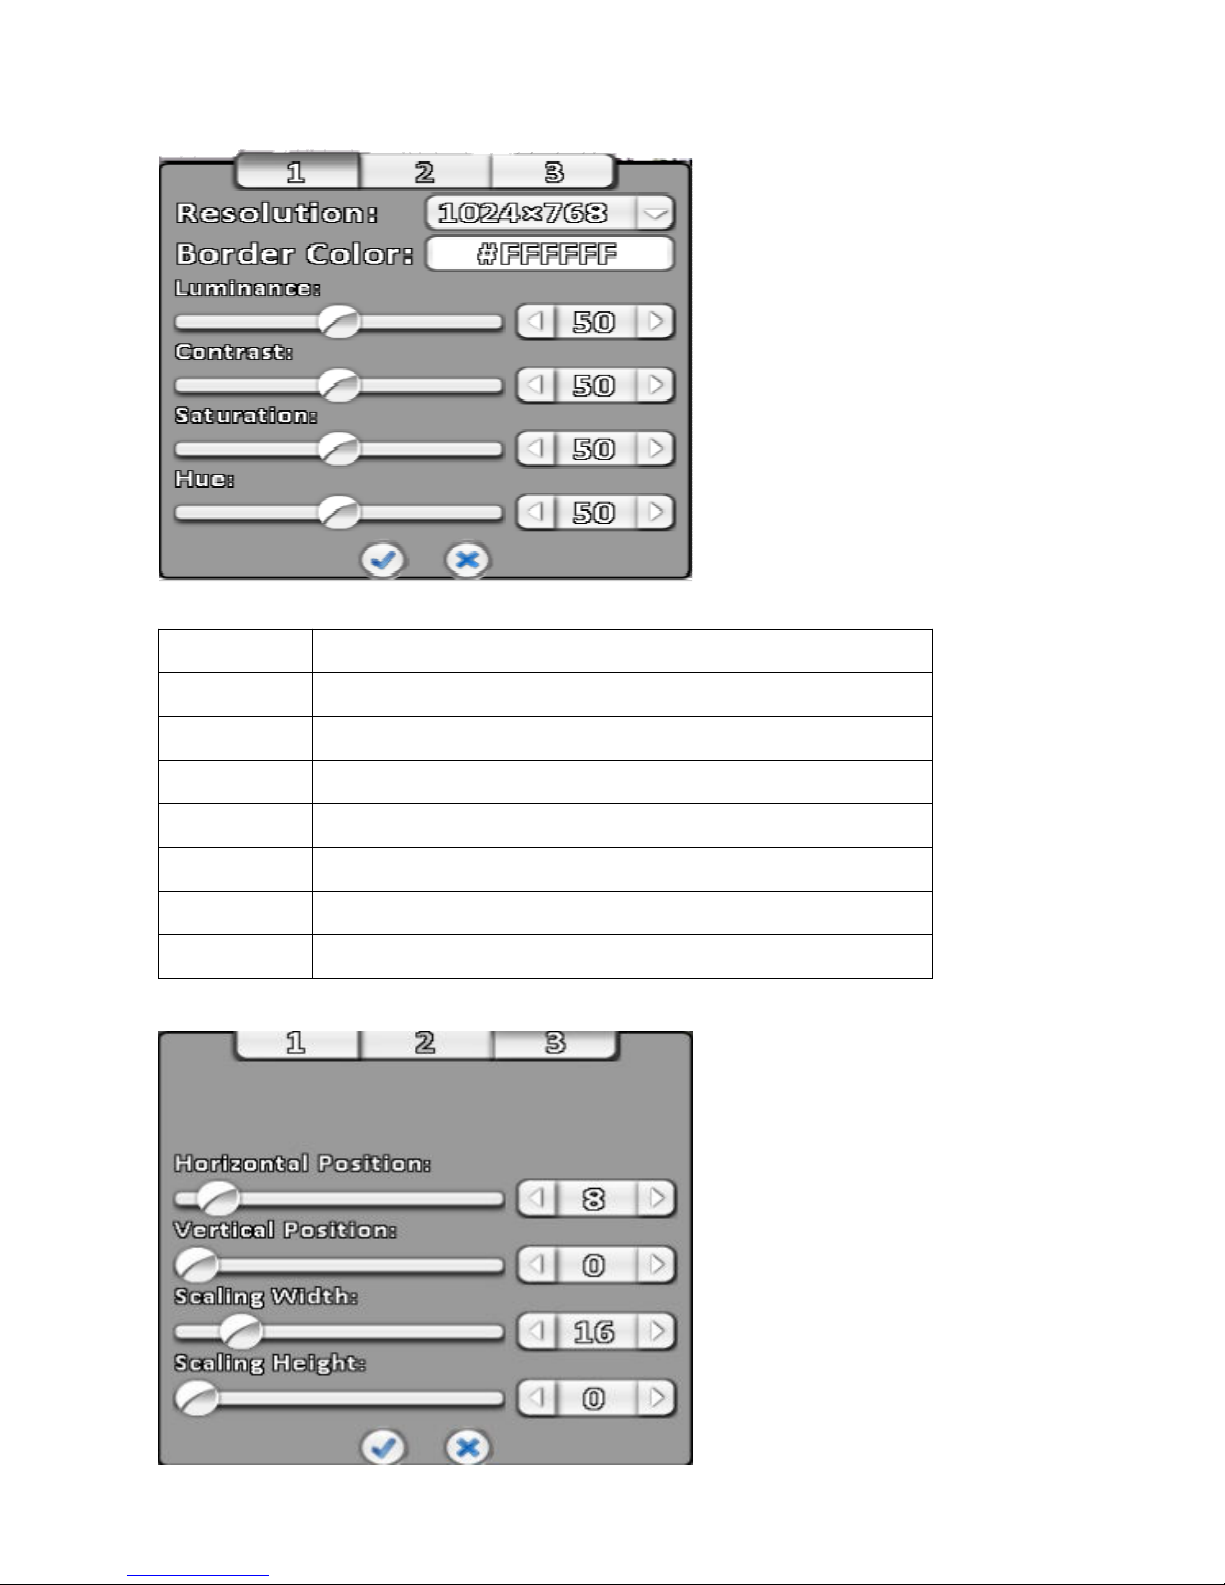
3-7-4-1 Resolution Setup
Note: Please confirm whether the screen supports resolution.
Item Description
1, 3 Setting monitor resolution/BNC output.
Resolution Select the screen resolution.
Border Color Set the color of border.
Luminance Setting brightness, from 0 to 100.
Contract Setting screen display color contrast, from 0 to 100.
Saturation Setting screen display color saturation from 0 to 100.
Hue Tone color tone setting screen displayed from 0 to 100.
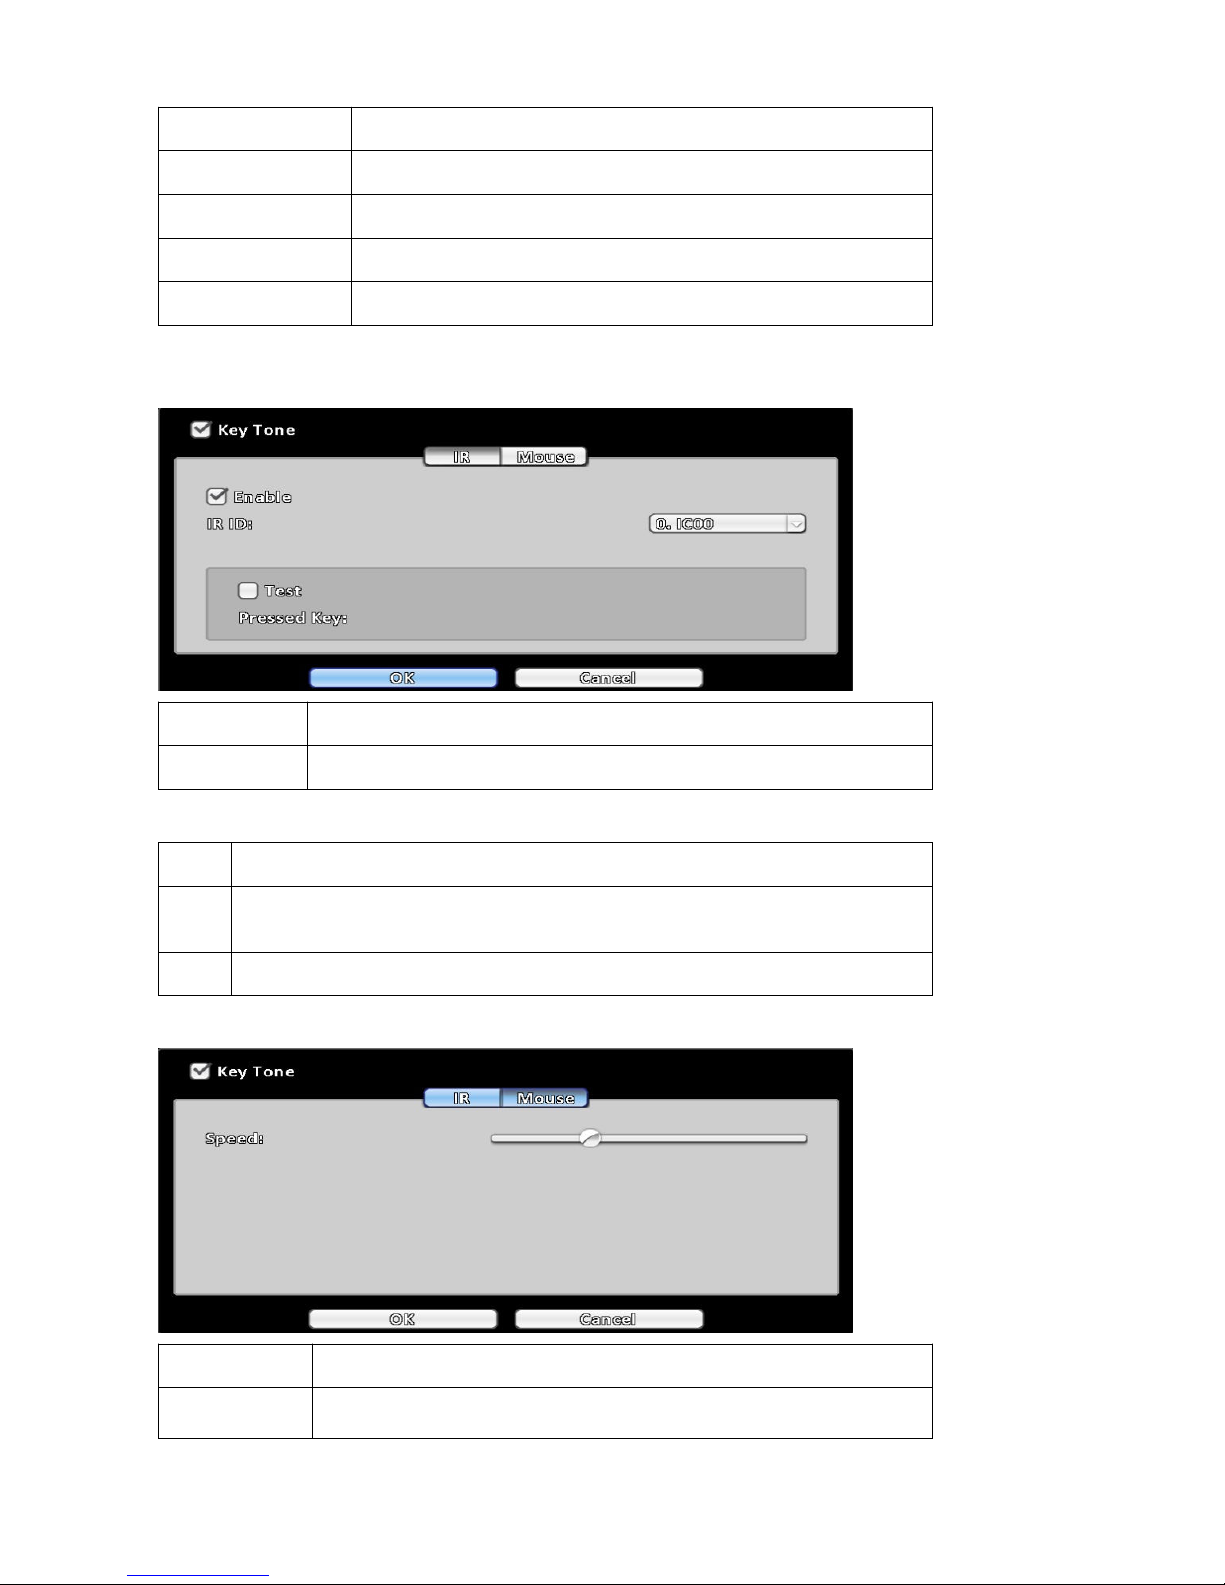
3-7-4-2 Composite video output adjust
Page 52
48
Item Description
Horizontal Position Setting video signal horizontal position.
Vertical Position Setting video signal vertical position.
Scaling Width Setting video signal scaling width.
Scaling Height Setting video signal scaling height.
3-7-5 Input Setup
The Input Setup allows users’ setup input device
Item Description
Key Tone Enable / Disable Key Tone.
3-7-5-1 IR Setup ( Depending on DVR model )
Item Description
IR ID
Normal remote control ID is IC00.If you have one to multiple remote controls, you
can set your ID for your DVR to control different DVRs. (DVR1→IC01,DVR2→IC02).
Test Test your remote control.
3-7-4-1 Mouse Setup
Item Description
Speed
Setup the mouse cursor speed. The right side of the slider means
faster mouse speed (Only valid for local configuration).
Page 53
49
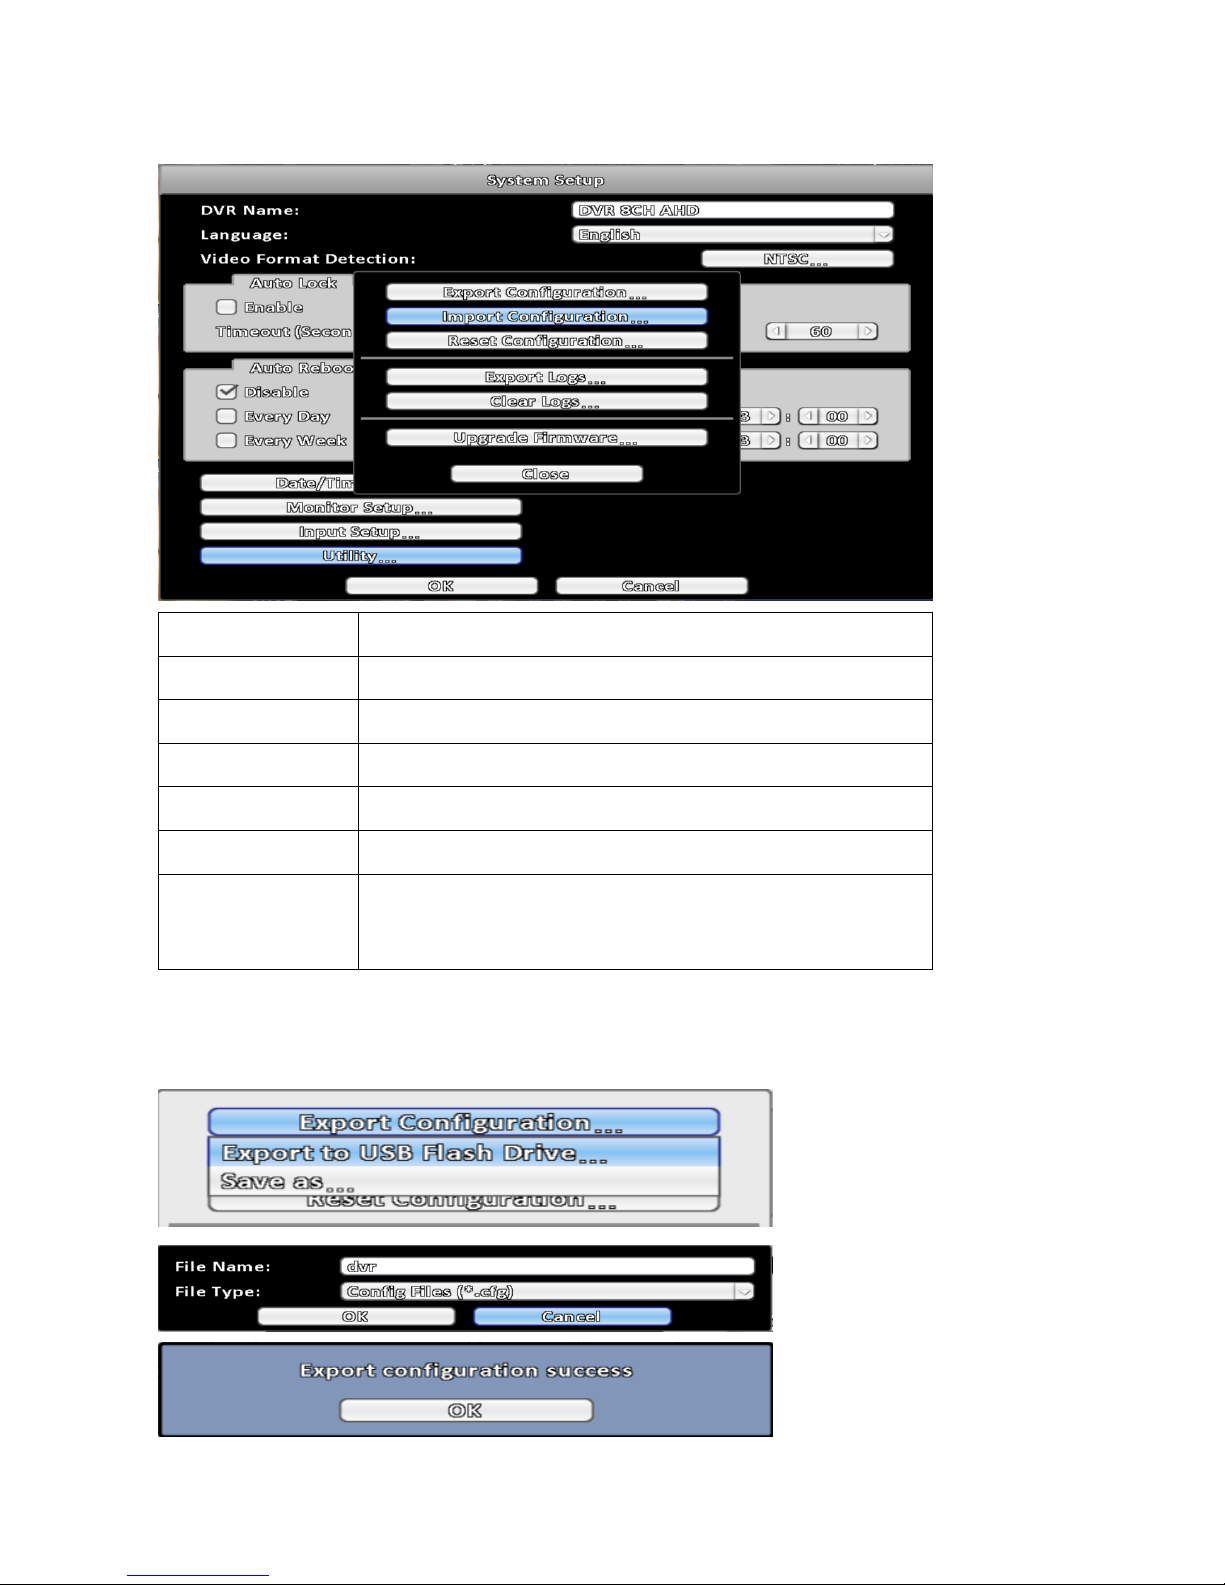
3-7-6 Utility Setup
Item Description
Export Configuration Export DVR configuration to a USB flash drive or a remote PC.
Import Configuration Import configuration from a USB flash drive or a remote PC to DVR.
Reset Configuration Reset system configuration.
Export Logs Save DVR system log to a USB flash drive or a remote PC.
Clear Logs Clear all DVR system log.
Upgrade Firmware
Upgrade DVR firmware through a USB drive, please stop recording
and backup DVR configuration before upgrading, System will
reboot automatically when the upgrade is done.
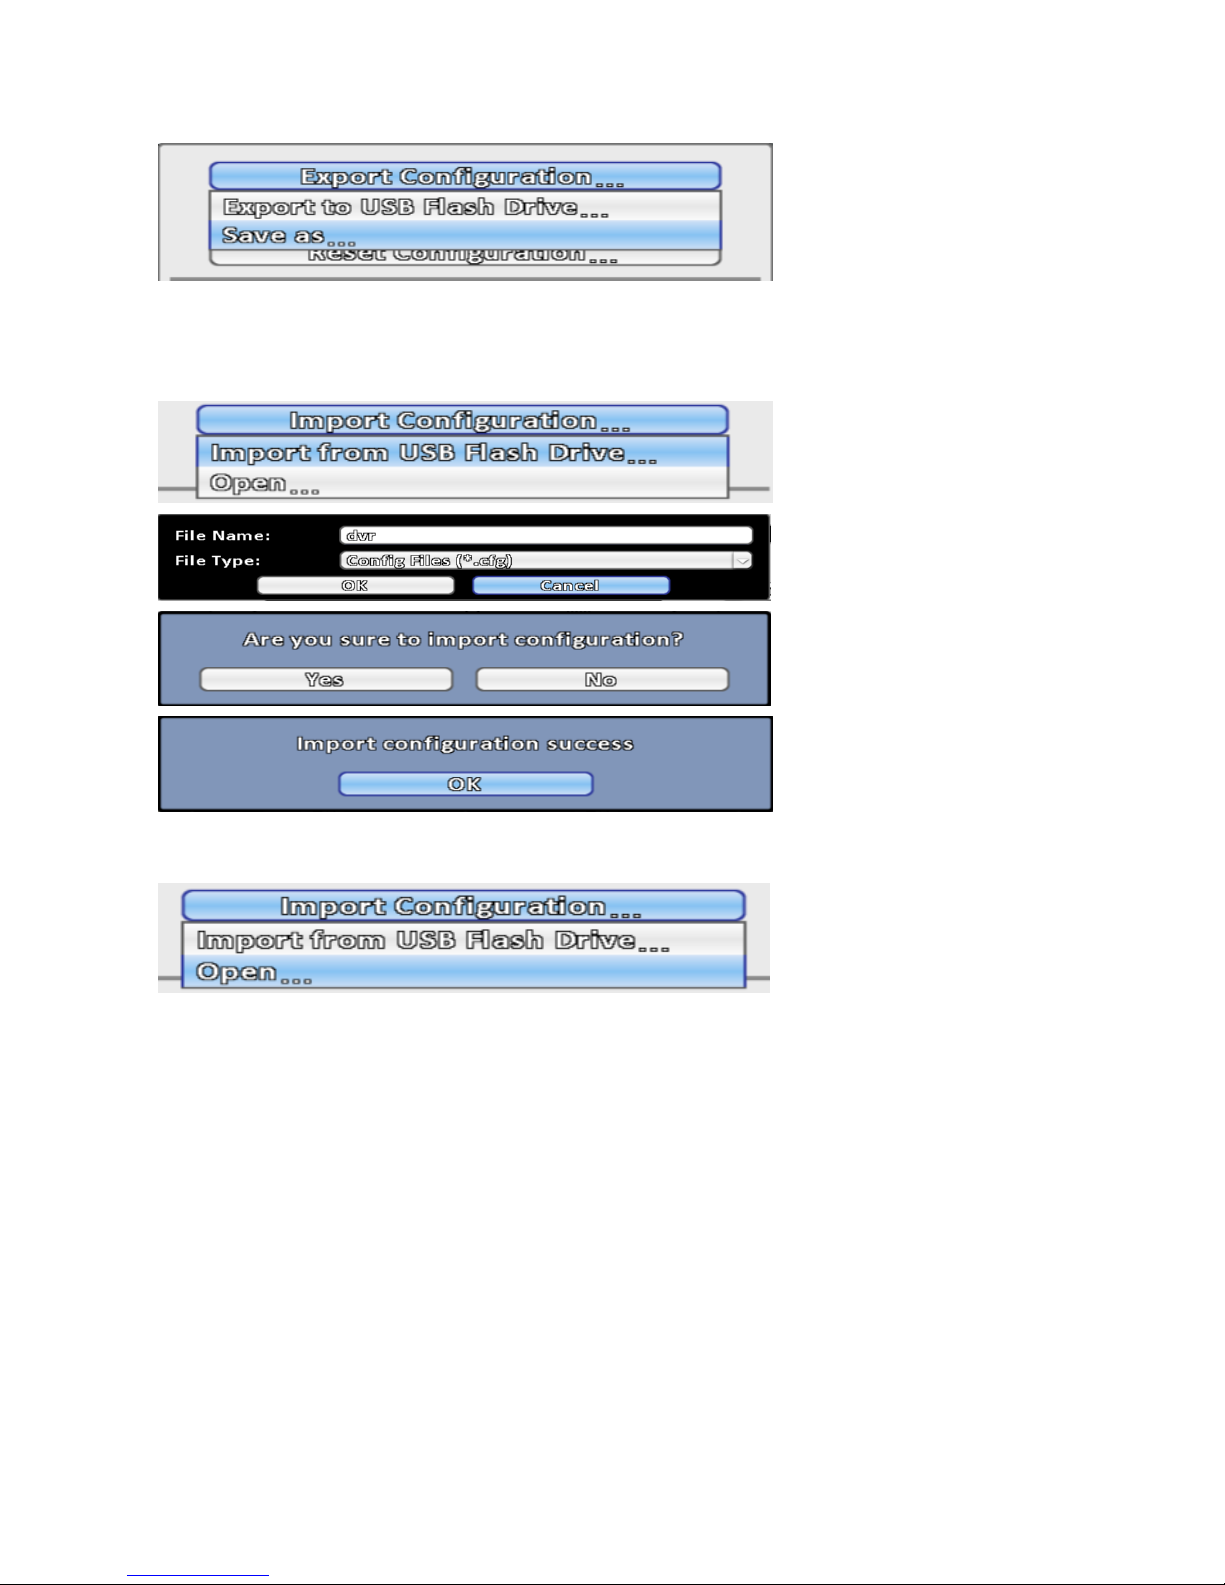
3-7-6-1 Export Configuration
There are two way to export DVR configuration.
First, export to a USB flash storage at local, the export default filename is DVR.cfg.
Page 54
50
Save configuration file to computer through Netviewer.
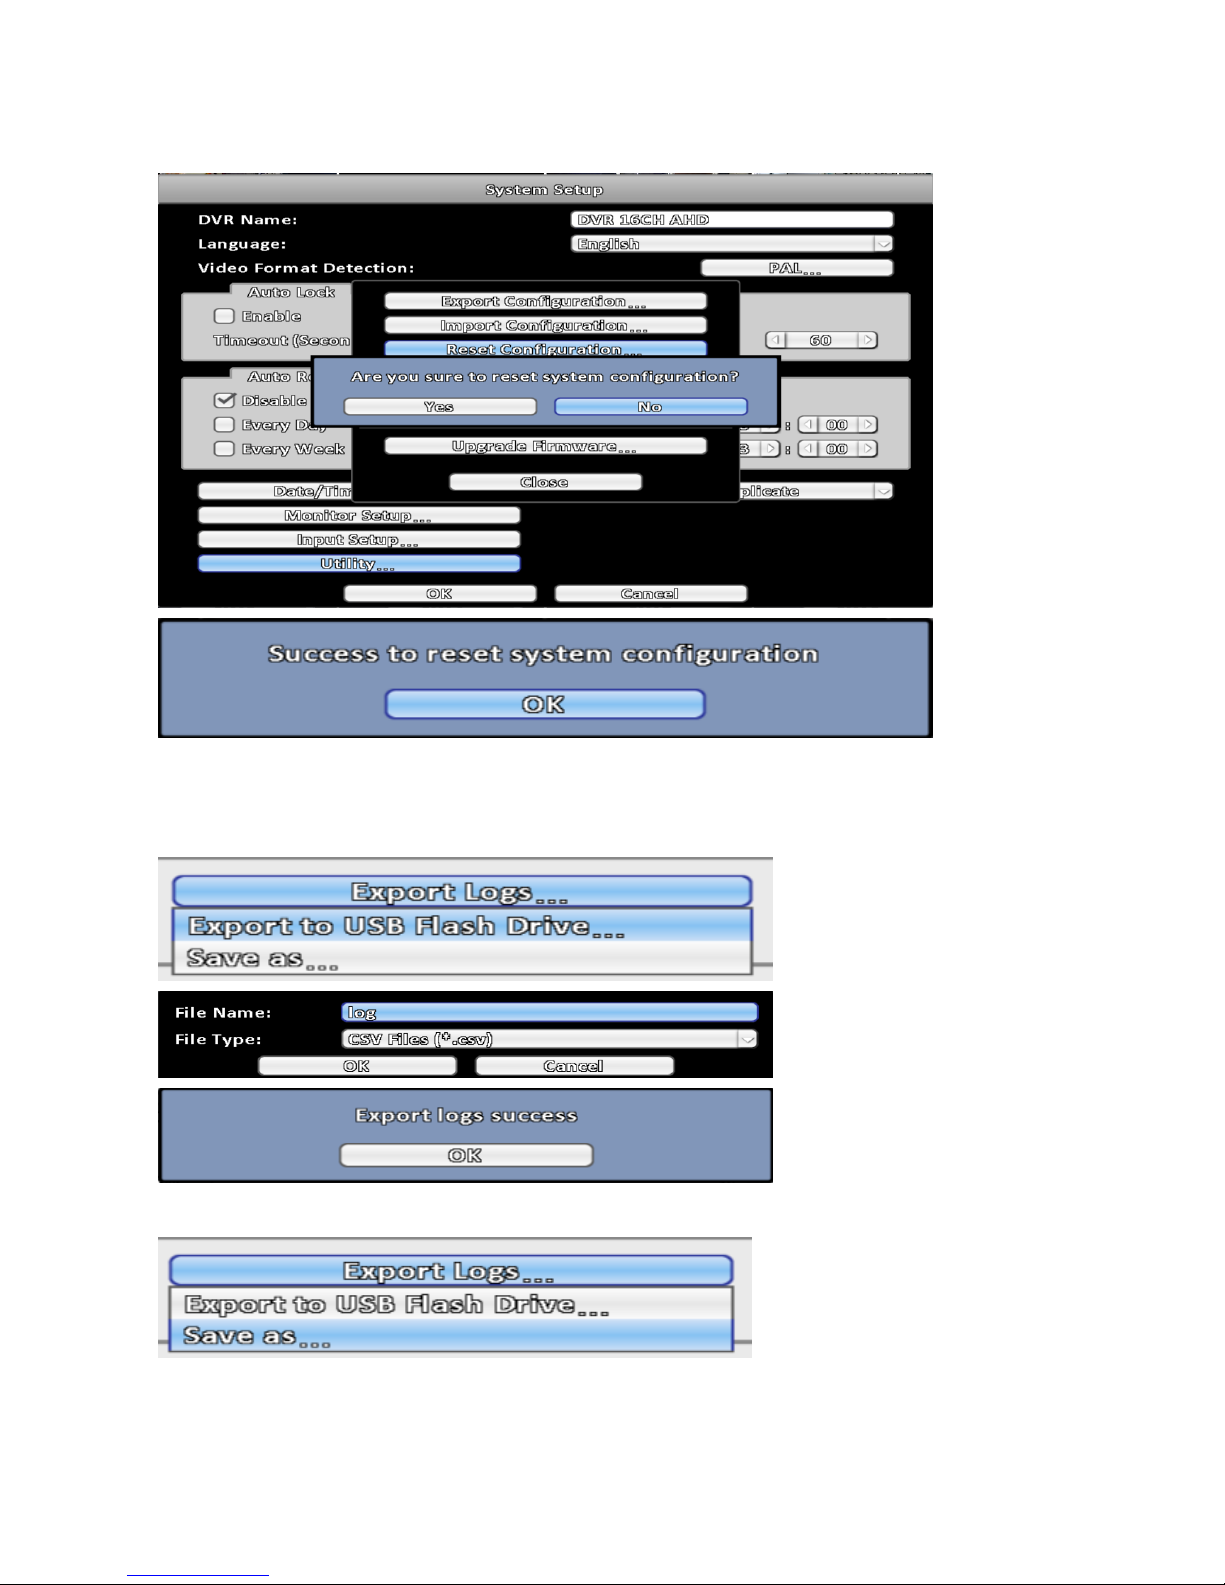
3-7-6-2 Import Configuration
Import configuration to the DVR from a USB flash storage or a remote computer.
Via USB flash storage at local side:
Upload desired configuration file from PC:
Click Open..., select required *.cfg.
Page 55
51
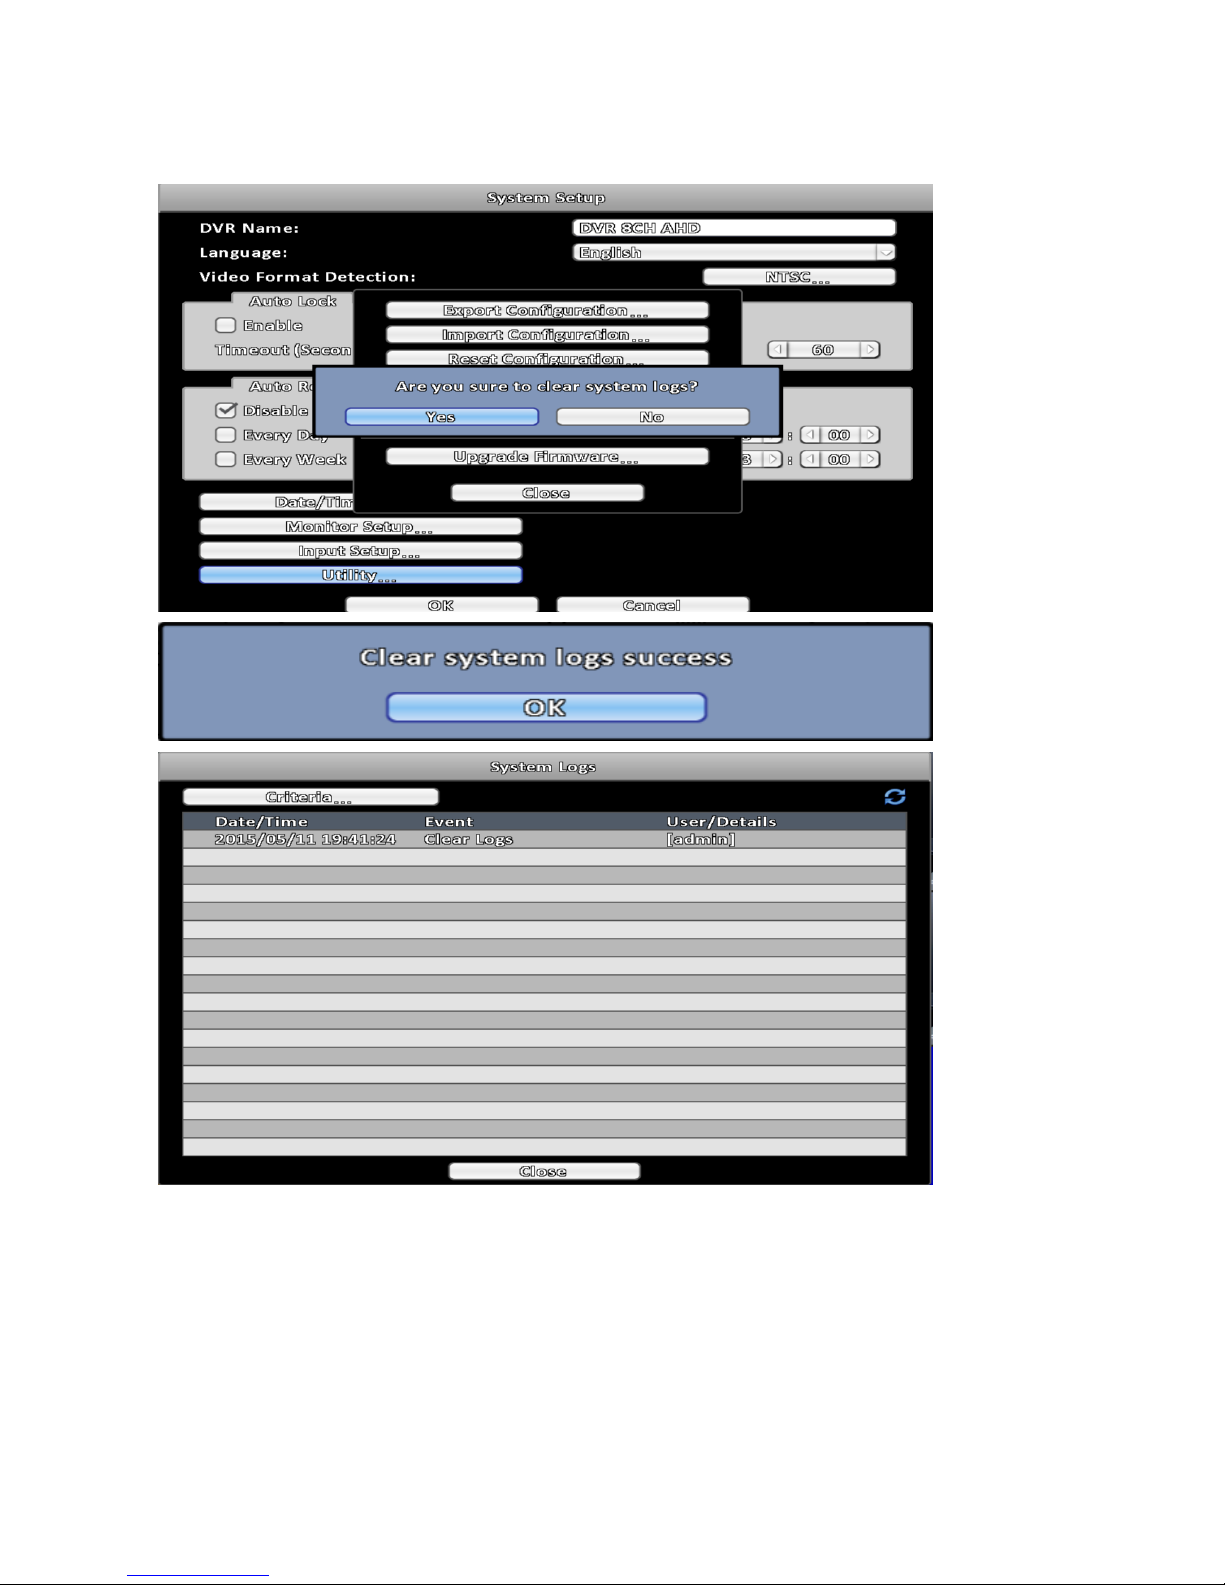
3-7-6-3 Reset Configuration
Reset the DVR to factory default.
3-7-6-4 Export Logs
Export DVR log to USB flash storage or remote computer.
To USB flash storage at local side, the default file name is log.csv.
To remote computer through Netviewer.
Page 56
52
3-7-6-5 Clear Logs
Clear system logs, follow below steps.
Page 57
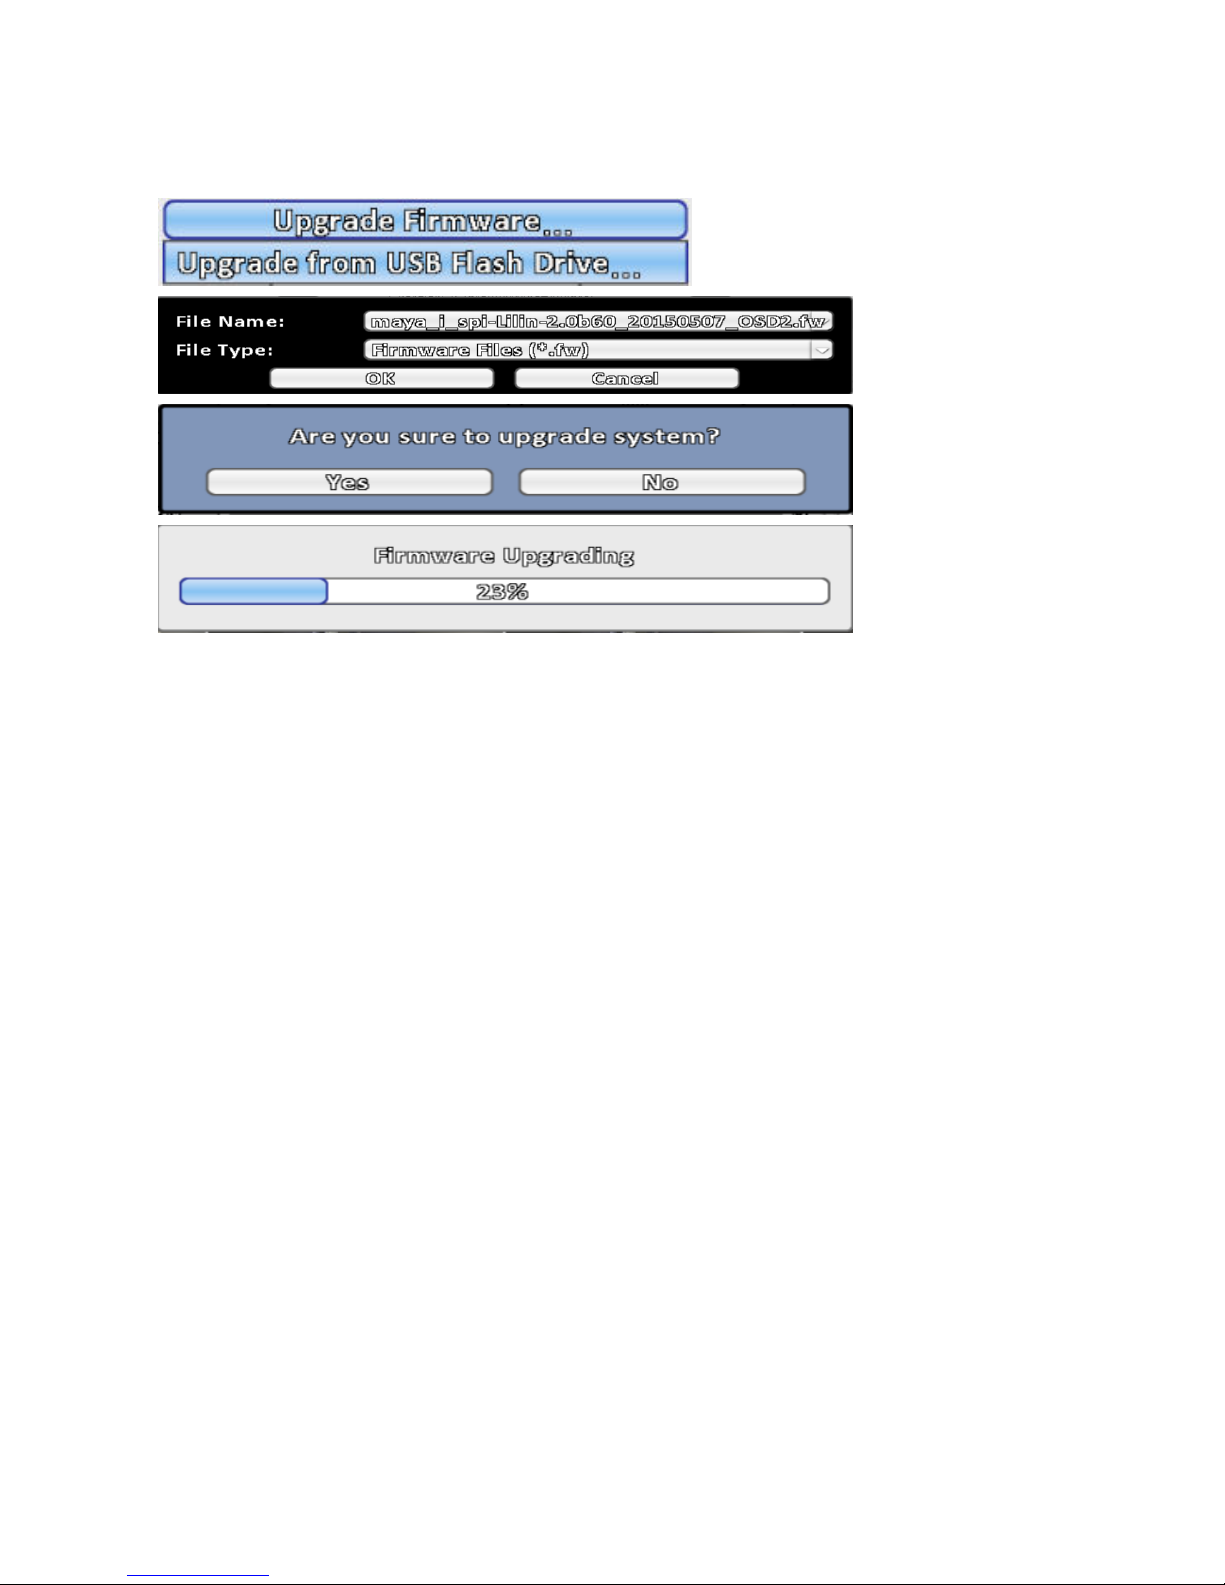
53
3-7-6-6 Upgrade Firmware
Upgrade from USB flash storage, follow below steps, click Upgrade Firmware... , select Upgrade from USB
Flash Drive... , choose the correct firmware at USB flash storage.
Note: Don’t turn off the power or unplug the USB flash drive when upgrade processing, avoid damage DVR.
Page 58
54
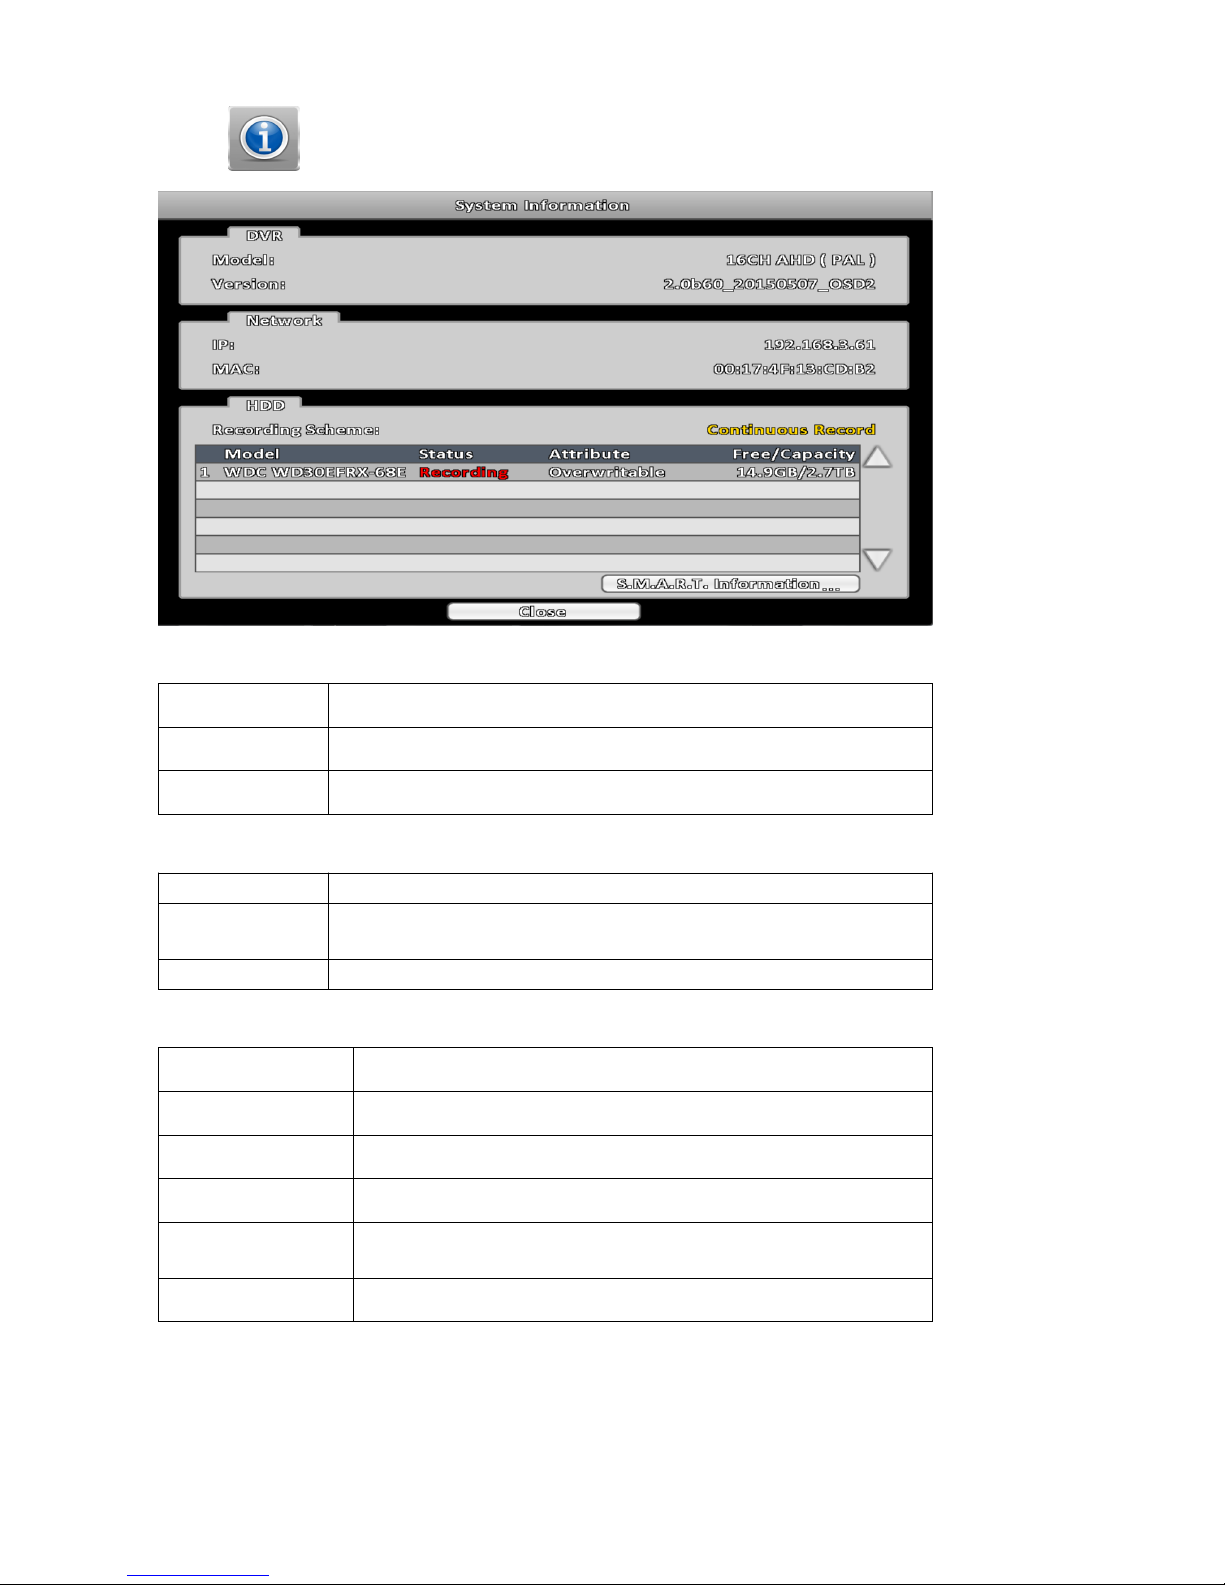
3-8 System Information
3-8-1 DVR Information
Item Description
Model DVR model and video format.
Version Firmware version.
3-8-2 Network Information
Item Description
IP
DVR’s IP address. If there is no network connection, it will show
"Network is not connected.
MAC The DVR MAC address.
3-8-3 HDD Information
Item Description
Recording Scheme Display installed HDD recording type.
Model Display installed HDD model.
Status Display installed HDD recording status.
Attribute
Display installed HDD attribute ( Overwritable / Writable /
Read-only ).
Free/Capacity Display installed HDD capacity ( Free / Capacity ).
Page 59
55
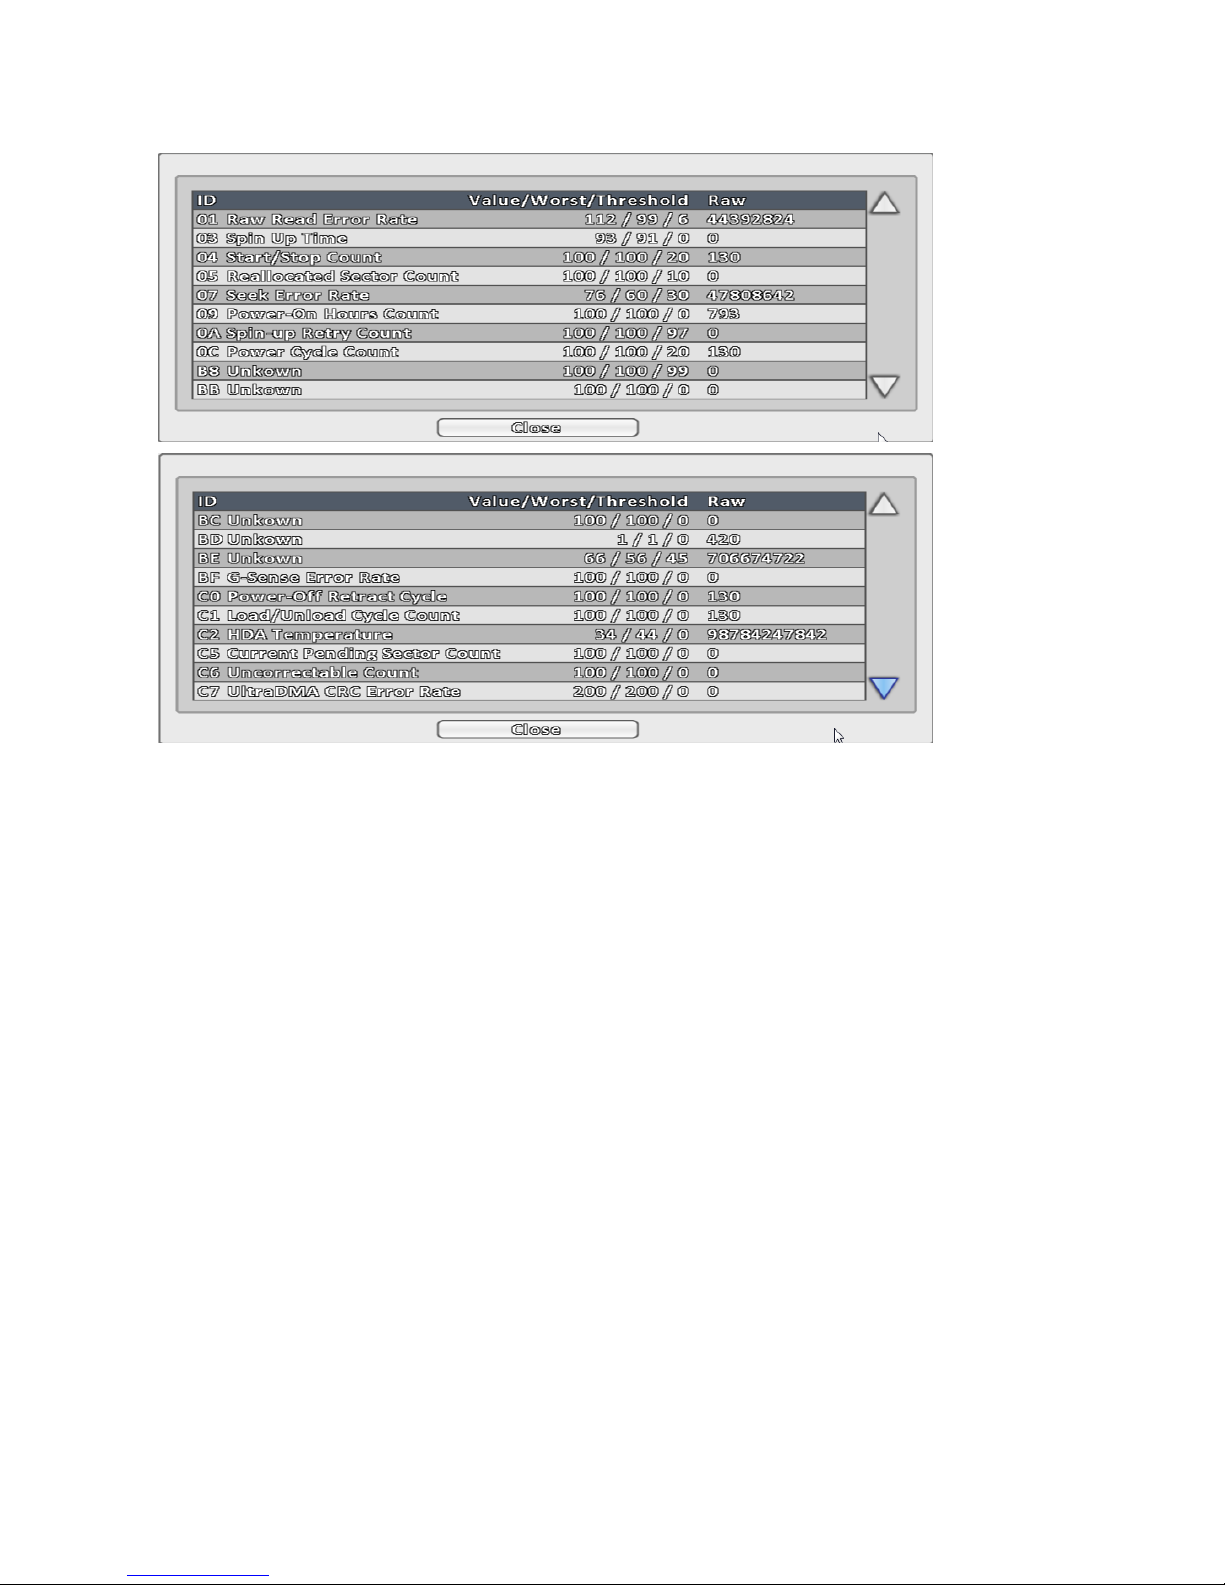
3-8-4 S.M.A.R.T Information
Page 60
56
Chapter 4: Remote Software
The DVR allows users remotely access and control the DVR from a computer by Netviewer or IE v6.0 or
above.
Note: Netviewer supports Windows XP SP2, Windows Vista, Windows 7, Windows 8, and Windows 10.
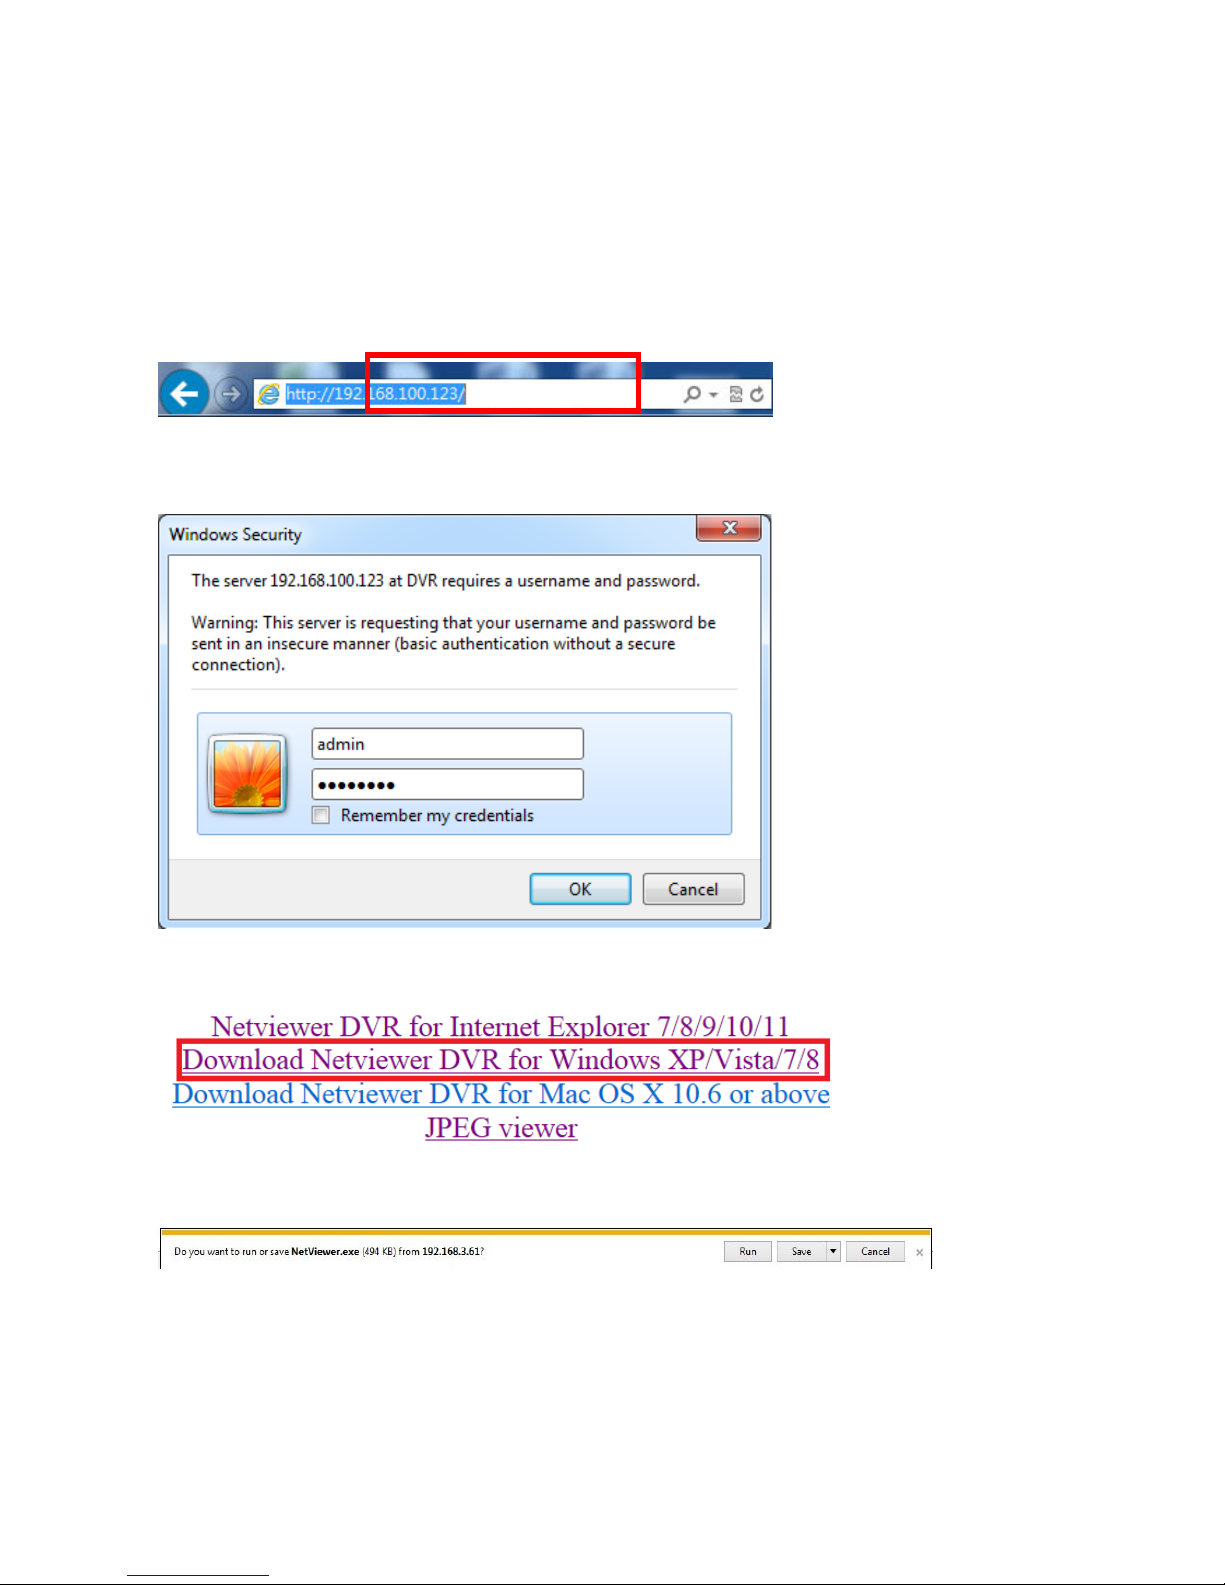
4-1 Application Software
Step 1:
Type the IP address of DVR in IE browser.
Step 2:
Windows as below will show up. Please type the user name and password. Default user name and Password
is admin and 1111. Other related setup about user account and password, please refer to Account Setup.
Step 3:
Click the link NetViewer for Windows XP/Vista/7/8 to download software.
Step 4:
Run the program directly, or save the program to the PC then execute.
Page 61
57
Step 5:
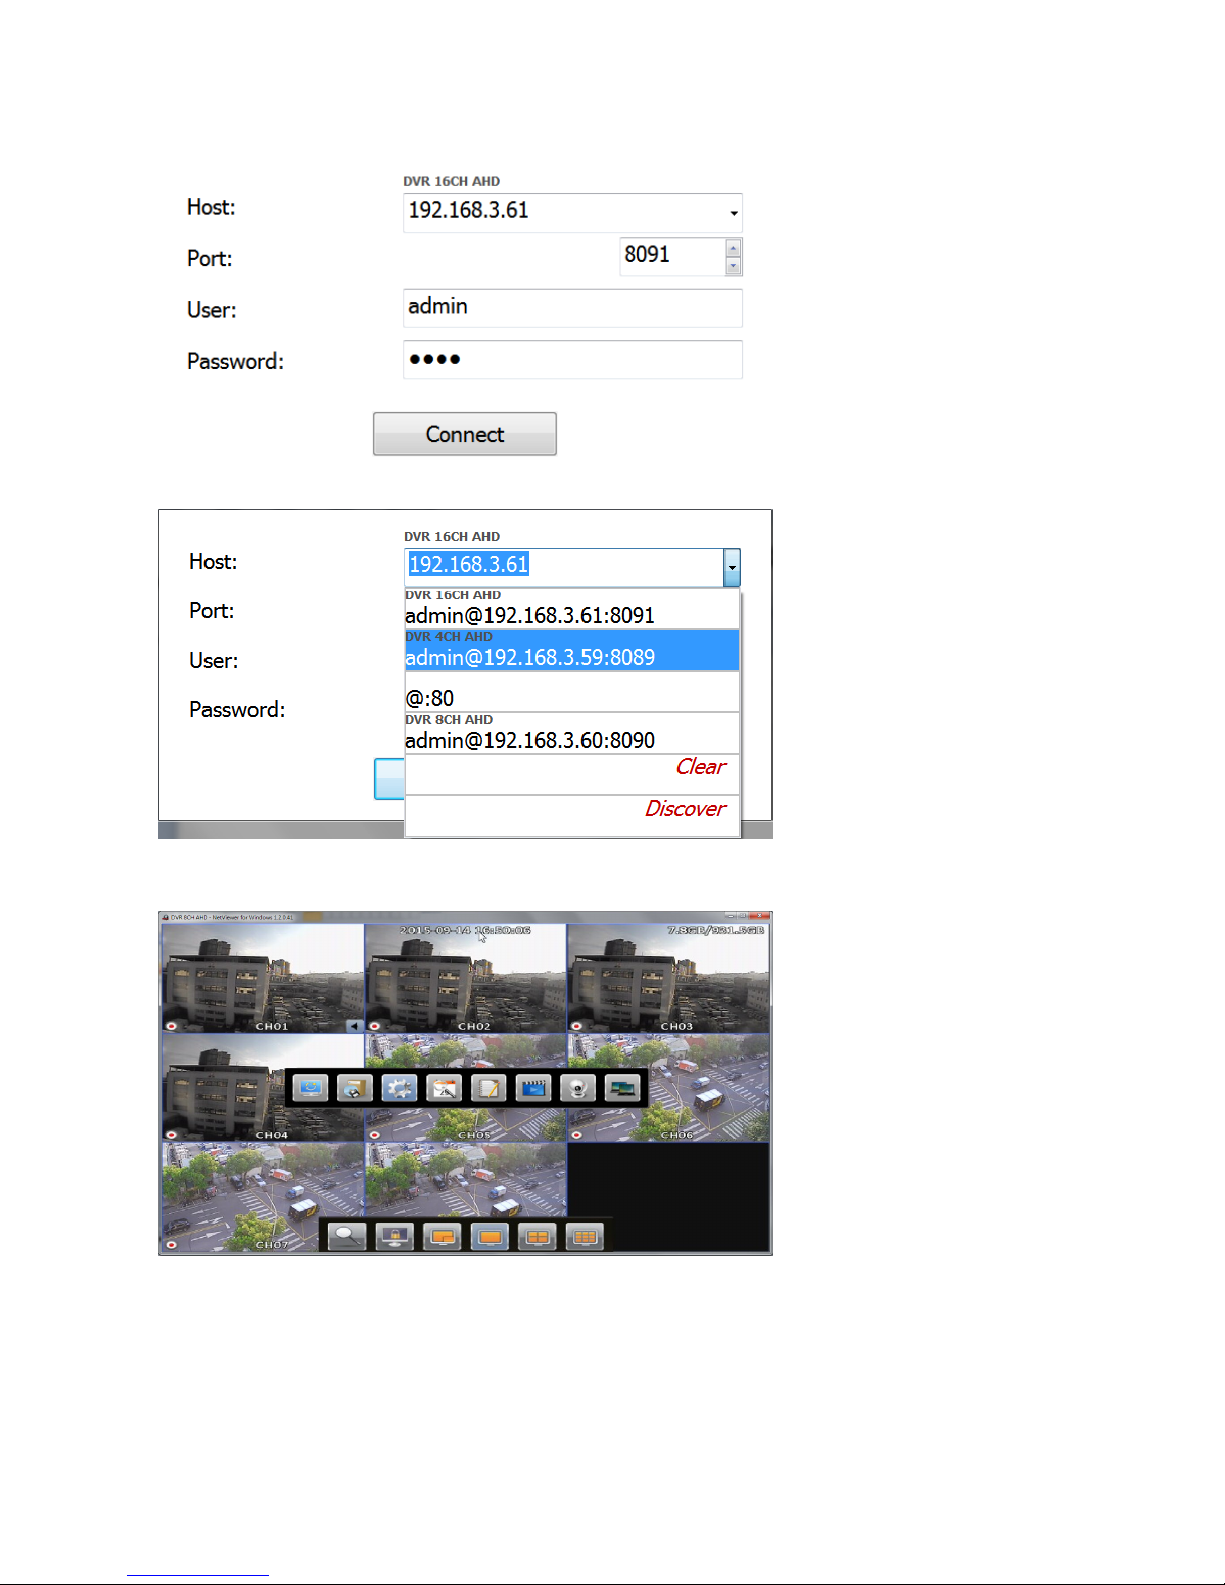
Please type required information to login DVR, included IP, port, username and password.
The drop-down menu stored used IP address. Press Clear to clear IP address.
Step 6:
Logged into the DVR.
Page 62
58
4-2 Internet Explorer
Step 1:
Same as Application Software, type the IP address of DVR in IE browser.
Step 2:
Windows as below will show up. Please type the user name and password. Default user name and password
is admin and 1111. Other related setup about user account and password, please refer to Account Setup.
Step 3:
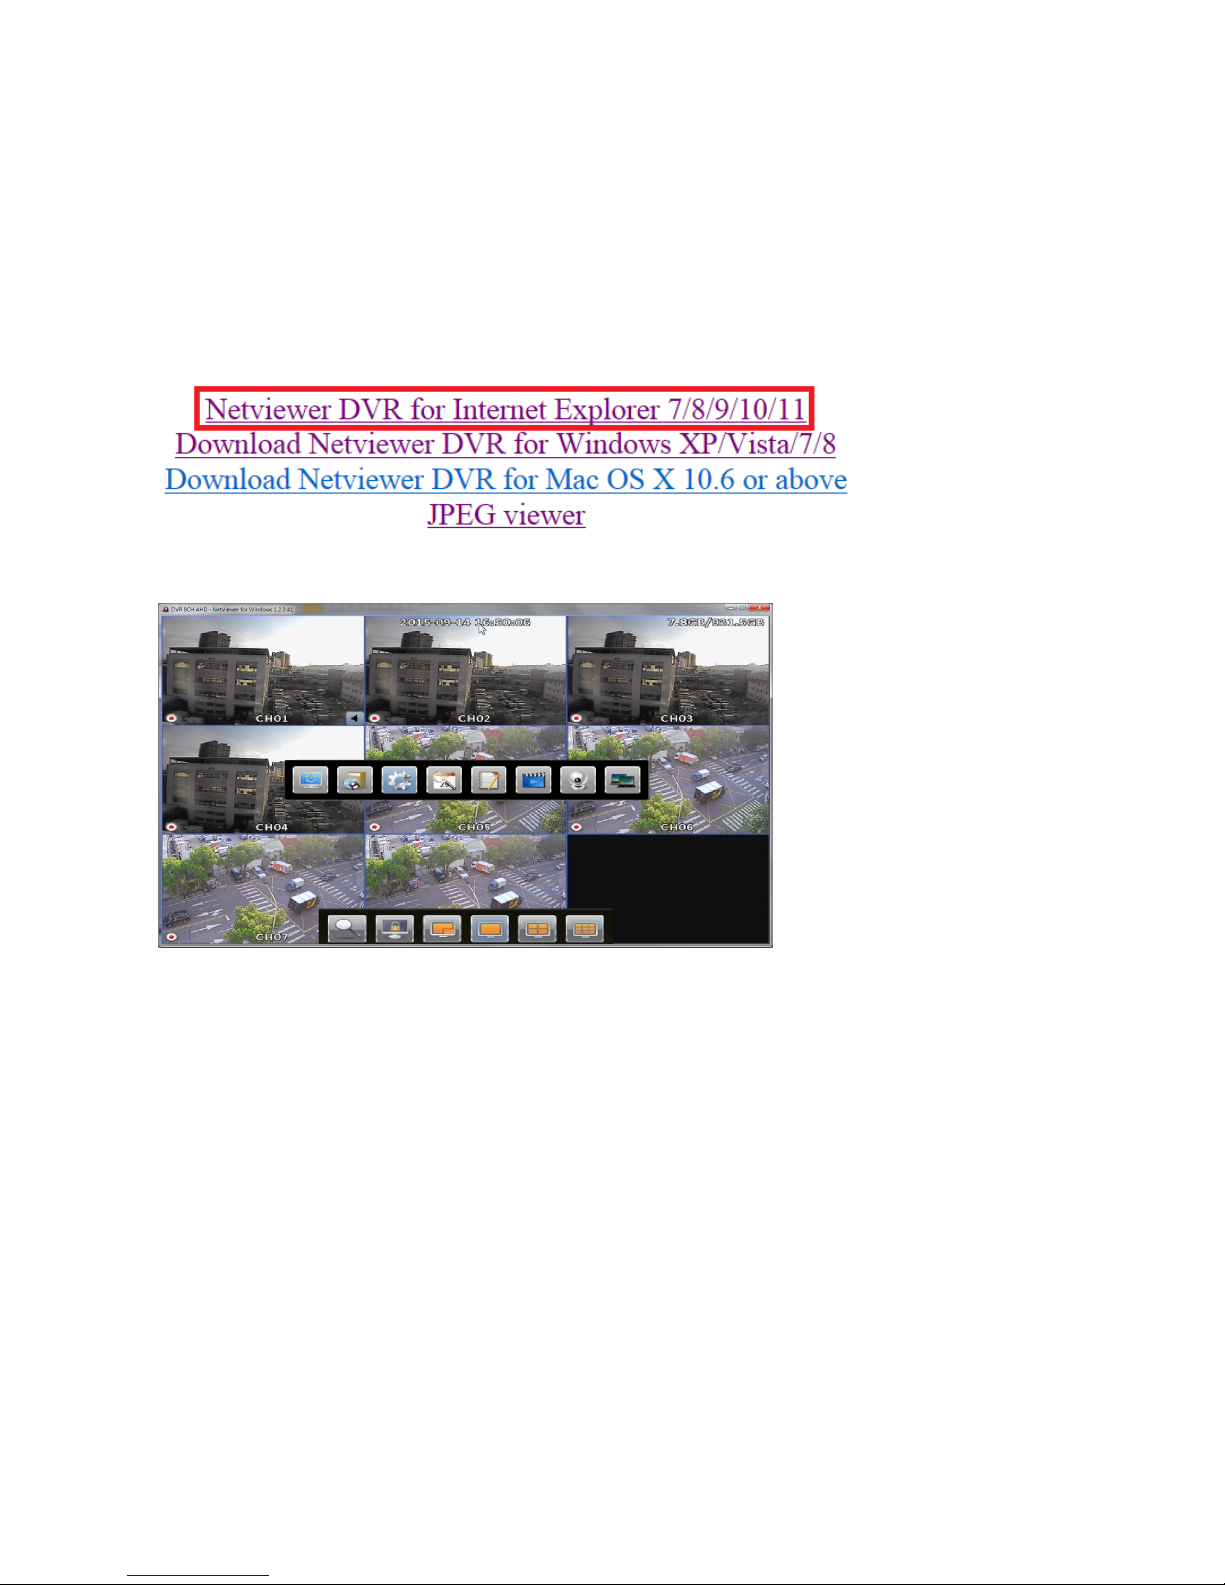
The links as below will show up, click the link Netviewer DVR for Internet Explorer 7/8/9/10/11 to
download the ActiveX, follow the instructions to finish installation.
Step 4:
DVR images appear.
Page 63

59
Appendix
Appendix 1 Specification
Appendix 1-1 DHD 5A Series Specification
4444 //// 8888 //// 16
1616
16 CH
CHCH
CH Hybrid
HybridHybrid
Hybrid High
HighHigh
High Definition
DefinitionDefinition
Definition Standalone
StandaloneStandalone
Standalone Digital
DigitalDigital
Digital Video
VideoVideo
Video Recorder
RecorderRecorder
Recorder
Model DHD504A DHD508A DHD516A
Video input
Supports AHD / CVI / TVI / Analog camera / Network camera
Input 4 CH 8 CH 16 CH
Simulation HD / Analog Camera
Input Resolution
TVI, CVI, AHD 4MP / 1080P / 720P and analog camera D1 / 960H
( Simulation HD / Analog Camera
Maximum Input Frame Rate )
Display Format: resolution NTSC/PAL FPS
4M 60 / 50 FPS 4M 120 / 100 FPS 4M 240 / 200 FPS
1080P 120 / 100 FPS 1080P 240 / 200 FPS 1080P 480 / 400 FPS
720P 120 / 100 FPS 720P 240 / 200 FPS 720P 480 / 400 FPS
960H 120 / 100 FPS 960H 240 / 200 FPS 960H 480 / 400 FPS
Network Camera Resolution 4M / 3M / 1080P / 720P
Network Camera
Maximum Input Frame Rate
Single Channel 4M 15 FPS / 3M 15 FPS / 1080P 30 FPS
Video output
Output HDMI / VGA 1080P, CVBS
HDMI 4K, VGA 1080P,
CVBS
Split Screen
1 / 4 split division,
sequence mode, freeze )
1 / 4 / 9 split division,
sequence mode, freeze
1 / 4 / 9 / 13 / 16
split division,
sequence mode, freeze
Digital Zoom Up to 5× on live and playback
Privacy Mask Each channel 4 privacy mask supported
Recording
Encode Format ) H.264
Resolution CIF ~ 4Mega
Simulation HD / Analog Camera
Maximum Recording Frame Rate
Display Format: resolution NTSC/PAL FPS )
4M 30 / 25 FPS 4MP 60 / 50 FPS 4MP 120 / 100 FPS
1080P 60 / 50 FPS 1080P 120 / 100 FPS 1080P 240 / 200 FPS
720P 120 / 100 FPS 720P 240 / 200 FPS 720P 480 / 400 FPS
960H 120 / 100 FPS 960H 240 / 200 FPS
960H 480 / 400 FPS
Maximum Network Camera
Input Throughput
20Mbps 40Mbps 80Mbps
Network Camera Maximum
Recording Frame Rate
4M 60 FPS 4M 120 FPS 4M 240 FPS
3M 60 FPS 3M 120 FPS 3M 240 FPS
1080P 120 FPS 1080P 240 FPS 1080P 480 FPS
Page 64

60
Recording Mode Continue, Schedule, Event
Recording Schedule 4 schedule, 7day × 24 hours time table
Alarm Event Actions Adjustable motion area (100 level sensitivities) / System / Video loss
Alarm Notification Alarm notification iOS、android / E-Mail / FTP / Buzzer
Playback
Search Event / Time / Smart search
Display
4CH
synchronous playback
8CH
synchronous playback
16CH
synchronous playback
Resolution CIF ~ 4Mega
Speed Fast rewind 4×~32× / Fast forward 4×~32× / Step Forward / Slow motion 1/2~1/8
Storage
Internal HDD 1 × 3.5”HDD, 8TB supported
2 × 3.5”HDD,
each up to 8TB supported
Backup
USB Flash Disk Up to 32 GB supported
Network Backup Via HTTP
Audio
Analog Audio Input 1 CH, RCA × 1 4 CH, RCA × 1
Audio Output RCA × 1 ( 0.7Vp-p, 300 Hz to 3KHz )
Network
Ports RJ-45 100Mbps × 1 RJ-45 Gigabit Ethernet × 1
Protocols
ARP / TCP/IP / UDP / HTTP / SMTP / FTP / DDNS / PPPoE / NTP / DHCP/
Onvif Profile S
Web Direct internet browser access / Multiple users access
Mobile Phone iOS / Android supported
P2P QR Code APP scan / UID connection( Need additional option )
Software
VMS CMS
Backup / Playback IE / Remote control software
System
Reports Alarm event, operation and configuration log full reports exporting over HTTP or USB
Authentication User authentication with feature configurable
Language
Arabic / Bulgarian / Chinese( Simplified ) / Chinese ( Traditional ) / Croatian / Czech /
Dutch / English / French / German / Greek / Hebrew / Indonesian / Italian / Japanese /
Korean / Latvia / Persian / Polski / Portuguese / Romanian / Russian / Spanish / Thai /
Turkish / Vietnamese
HDD Inspection
S.M.A.R.T monitoring
Recorded Reserve Time Adjustable 1~9999 hours
Time Daylight saving / NTP
Page 65
61
Accessories
PTZ Protocols
RS-485 × 1, MLP1、MLP2、PELCO D、PELCO P、SAMSUNG、LG-MULTIX ,
Network camera via ONVIF
Remote Control IR Remote controller( Need additional option )
Mouse Mouse click, drag and scroll
UTC
Up
UpUp
Up The
TheThe
The Coax
CoaxCoax
Coax
AHD camera supported
Others
CPU ARM Cortex A9 Dual Core
OS Embedded Linux Kernel 3.1
WDT Hardware watchdog timer
Power and working environment
Power
Adapter DC 12V, 2.5A,
30W × 1
Adapter DC 12V, 3A,
36W × 1
Adapter DC 12V, 5A,
60W × 1
Operating Temperature 0℃ ~ 45℃
Operating Humidity 5% ~ 80%
Dimension
(W×L×H)
360× 316× 60 mm
Weight ≈3 kg ( Without hard drive )
Page 66

62
Appendix 1-2 DHD 3A Series Specification
4444 //// 8888 //// 16
1616
16 CH
CHCH
CH 2M
2M2M
2M 2.0
2.02.0
2.0 High
HighHigh
High Definition
DefinitionDefinition
Definition Analog
AnalogAnalog
Analog Digital
DigitalDigital
Digital Video
VideoVideo
Video Recoder
RecoderRecoder
Recoder
Model DHD304A DHD308A DHD316A
Video input
Supports AHD / Analog camera
Input 4 CH 8 CH 16 CH
Simulation HD / Analog Camera
Input Resolution
AHD 1080P / 720P and analog camera D1 / 960H
Simulation HD / Analog Camera
Maximum Input Frame Rate )
Display Format: resolution NTSC/PAL FPS
1080P 120 / 100 FPS 1080P 240 / 200 FPS 1080P 480 / 400 FPS
720P 120 / 100 FPS 720P 240 / 200 FPS 720P 480 / 400 FPS
960H 120 / 100 FPS 960H 240 / 200 FPS 960H 480 / 400 FPS
Video output
Output HDMI / VGA 1080P, CVBS
HDMI 4K, VGA 1080P,
CVBS
Split Screen
1 / 4 split division,
sequence mode, freeze
1 / 4 / 9 split division,
sequence mode, freeze )
1 / 4 / 9 / 13 / 16
split division,
sequence mode, freeze
Digital Zoom Up to 5× on live and playback
Privacy Mask Each channel 4 privacy mask supported
Recording
Encode Format H.264
Resolution CIF ~ 1080P
Simulation HD / Analog Camera
Maximum Recording Frame Rate
Display Format: resolution NTSC/PAL FPS
1080P 60 / 50 FPS 1080P 120 / 100 FPS 1080P 240 / 200 FPS
720P 120 / 100 FPS 720P 240 / 200 FPS 720P 480 / 400 FPS
960H 120 / 100 FPS 960H 240 / 200 FPS
960H 480 / 400 FPS
Recording Mode Continue, Schedule, Event
Recording Schedule 4 schedule, 7day × 24 hours time table
Alarm Event Actions Adjustable motion area (100 level sensitivities) / System / Video loss
Alarm Notification Alarm notification iOS、android / E-Mail / FTP / Buzzer
Playback
Search Event / Time / Smart search
Display
4CH
synchronous playback
8CH
synchronous playback
16CH
synchronous playback
Resolution CIF ~ 1080P
Speed Fast rewind 4×~32× / Fast forward 4×~32× / Step Forward / Slow motion 1/2~1/8
Storage
Internal HDD 1 × 3.5”HDD, 6TB supported
2 × 3.5”HDD,
each up to 6TB supported
Page 67

63
Backup
USB Flash Disk Up to 32 GB supported
Network Backup Via HTTP
Audio
Analog Audio Input 1 CH, RCA × 1 4 CH, RCA × 1
Audio Output RCA × 1 ( 0.7Vp-p, 300 Hz to 3KHz )
Network
Ports RJ-45 100Mbps × 1 RJ-45 Gigabit Ethernet × 1
Protocols TCP/IP, SMTP, HTTP, DHCP, PPPoE, NTP, DDNS
Web Direct internet browser access / Multiple users access
Mobile Phone iOS / Android supported
P2P QR Code APP scan / UID connection( Need additional option )
Software
VMS CMS
Backup / Playback IE / Remote control software
System
Reports Alarm event, operation and configuration log full reports exporting over HTTP or USB
Authentication User authentication with feature configurable
Language
Arabic / Bulgarian / Chinese( Simplified ) / Chinese ( Traditional ) / Croatian / Czech /
Dutch / English / French / German / Greek / Hebrew / Indonesian / Italian / Japanese /
Korean / Latvia / Persian / Polski / Portuguese / Romanian / Russian / Spanish / Thai /
Turkish / Vietnamese
HDD Inspection
S.M.A.R.T monitoring
Recorded Reserve Time Adjustable 1~9999 hours
Time Daylight saving / NTP
Accessories
PTZ Protocols RS-485 × 1, MLP1、MLP2、PELCO D、PELCO P、SAMSUNG、LG-MULTIX
Remote Control IR Remote controller( Need additional option )
Mouse Mouse click, drag and scroll
UTC
Up
UpUp
Up The
TheThe
The Coax
CoaxCoax
Coax
AHD camera supported
Others
CPU ARM Cortex A9 Dual Core
OS Embedded Linux Kernel 3.1
WDT Hardware watchdog timer
Power and working environment
Power
Adapter DC 12V, 2.5A,
30W × 1
Adapter DC 12V, 3A,
36W × 1
Adapter DC 12V, 5A,
60W × 1
Operating Temperature 0℃ ~ 45℃
Operating Humidity 5% ~ 80%
Page 68

64
Dimension
(W×L×H)
360× 316× 60 mm
Weight ≈3 kg ( Without hard drive )
Page 69

65
Appendix 1-3 DHD 2A Series Specification
4444 //// 8888 //// 16
1616
16 CH
CHCH
CH 2M
2M2M
2M 1.0
1.01.0
1.0 High
HighHigh
High Definition
DefinitionDefinition
Definition Analog
AnalogAnalog
Analog Digital
DigitalDigital
Digital Video
VideoVideo
Video Recoder
RecoderRecoder
Recoder
Model DHD204A DHD208A DHD216A
Video input
Supports AHD / Analog camera
Input 4 CH 8 CH 16 CH
Simulation HD / Analog Camera
Input Resolution
AHD 1080P / 720P and analog camera D1 / 960H
Simulation HD / Analog Camera
Maximum Input Frame Rate
Display Format: resolution NTSC/PAL FPS
1080P 120 / 100 FPS 1080P 240 / 200 FPS 1080P 480 / 400 FPS
720P 120 / 100 FPS 720P 240 / 200 FPS 720P 480 / 400 FPS
960H 120 / 100 FPS 960H 240 / 200 FPS 960H 480 / 400 FPS
Video output
Output HDMI / VGA 1080P, CVBS
Split Screen
1 / 4 split division,
sequence mode, freeze
1 / 4 / 9 split division,
sequence mode, freeze
1 / 4 / 9 / 13 / 16
split division,
sequence mode, freeze
Digital Zoom Up to 5× on live and playback
Privacy Mask Each channel 4 privacy mask supported
Recording
Encode Format H.264
Resolution CIF 至 1080P ( 944×1080 )
Simulation HD / Analog Camera
Maximum Recording Frame Rate
Display Format: resolution NTSC/PAL FPS
1080P 60 / 50 FPS 1080P 120 / 100 FPS 1080P 240 / 200 FPS
720P 120 / 100 FPS 720P 240 / 200 FPS 720P 480 / 400 FPS
960H 120 / 100 FPS 960H 240 / 200 FPS
960H 480 / 400 FPS
Recording Mode Continue, Schedule, Event
Recording Schedule 4 schedule, 7day × 24 hours time table
Alarm Event Actions Adjustable motion area (100 level sensitivities) / System / Video loss
Alarm Notification Alarm notification iOS、android / E-Mail / FTP / Buzzer
Playback
Search Event / Time
Display
4CH
synchronous playback )
8CH
synchronous playback
16CH
synchronous playback
Resolution CIF ~ 1080P
Speed Fast rewind 4×~32× / Fast forward 4×~32× / Step Forward / Slow motion 1/2~1/8
Storage
Internal HDD 1 × 3.5”HDD, 6TB supported
2 × 3.5”HDD,
each up to 6TB supported
Backup
Page 70

66
USB Flash Disk Up to 32 GB supported
Network Backup Via HTTP
Audio
Analog Audio Input 1 CH, RCA × 1 4 CH, RCA × 1
Audio Output RCA × 1 ( 0.7Vp-p, 300 Hz to 3KHz )
Network
Ports RJ-45 100Mbps × 1 RJ-45 Gigabit Ethernet × 1
Protocols TCP/IP, SMTP, HTTP, DHCP, PPPoE, NTP, DDNS
Web Direct internet browser access / Multiple users access
Mobile Phone iOS / Android supported
P2P QR Code APP scan / UID connection( Need additional option )
Software
VMS CMS
Backup / Playback IE / Remote control software
System
Reports Alarm event, operation and configuration log full reports exporting over HTTP or USB
Authentication User authentication with feature configurable
Language
Arabic / Bulgarian / Chinese( Simplified ) / Chinese ( Traditional ) / Croatian / Czech /
Dutch / English / French / German / Greek / Hebrew / Indonesian / Italian / Japanese /
Korean / Latvia / Persian / Polski / Portuguese / Romanian / Russian / Spanish / Thai /
Turkish / Vietnamese
HDD Inspection
S.M.A.R.T monitoring
Recorded Reserve Time Adjustable 1~9999 hours
Time Daylight saving / NTP
Accessories
PTZ Protocols RS-485 × 1, MLP1、MLP2、PELCO D、PELCO P、SAMSUNG、LG-MULTIX
Remote Control IR Remote controller( Need additional option )
Mouse Mouse click, drag and scroll
UTC
Up
UpUp
Up The
TheThe
The Coax
CoaxCoax
Coax
AHD camera supported
Others
CPU ARMv7 Processor
OS Embedded Linux Kernel 3.0
WDT Hardware watchdog timer
Power and working environment
Power
Adapter DC 12V, 2.5A,
30W × 1
Adapter DC 12V, 3A,
36W × 1
Adapter DC 12V, 5A,
60W × 1
Operating Temperature 0℃ ~ 45℃
Operating Humidity 5% ~ 80%
Dimension (W×L×H) 360× 316× 60 mm
Page 71

67
Weight
≈
3 kg ( Without hard drive )
Page 72

68
Appendix 1-4 DHD 2 Series Specification
4444 //// 8888 //// 16
1616
16 CH
CHCH
CH 720P
720P720P
720P High
HighHigh
High Definition
DefinitionDefinition
Definition Analog
AnalogAnalog
Analog Digital
DigitalDigital
Digital Video
VideoVideo
Video Recoder
RecoderRecoder
Recoder
Model DHD 204 DHD 208 DHD 216
Video input
Supports AHD / Analog camera
Input 4 CH 8 CH 16 CH
Simulation HD / Analog Camera
Input Resolution
AHD 720P and analog camera D1 / 960H
Simulation HD / Analog Camera
Maximum Input Frame Rate )
Display Format: resolution NTSC/PAL FPS
720P 120 / 100 FPS 720P 240 / 200 FPS 720P 480 / 400 FPS
960H 120 / 100 FPS 960H 240 / 200 FPS 960H 480 / 400 FPS
Video output
Output HDMI / VGA 1080P HDMI / VGA 1080P, CVBS HDMI / VGA 1080P, CVBS
Split Screen
1 / 4 split division,
sequence mode, freeze
1 / 4 / 9 split division,
sequence mode, freeze
1 / 4 / 9 / 13 / 16
split division,
sequence mode, freeze
Digital Zoom Up to 5× on live and playback
Privacy Mask Each channel 4 privacy mask supported
Recording
Encode Format H.264
Resolution CIF ~ 720P
Simulation HD / Analog Camera
Maximum Recording Frame Rate
Display Format: resolution NTSC/PAL FPS
720P 120 / 100 FPS 720P 240 / 200 FPS 720P 480 / 400 FPS
960H 120 / 100 FPS 960H 240 / 200 FPS
960H 480 / 400 FPS
Recording Mode Continue, Schedule, Event
Recording Schedule 4 schedule, 7day × 24 hours time table
Alarm Event Actions Adjustable motion area (100 level sensitivities) / System / Video loss
Alarm Notification Alarm notification iOS、android / E-Mail / FTP / Buzzer
Playback
Search Event / Time
Display
4CH
synchronous playback
8CH
synchronous playback
16CH
synchronous playback
Resolution CIF ~ 720P
Speed Fast rewind 4×~32× / Fast forward 4×~32× / Step Forward / Slow motion 1/2~1/8
Storage
Internal HDD 1 × 3.5”HDD, 6TB supported
2 × 3.5”HDD,
each up to 6TB supported
Backup
USB Flash Disk Up to 32 GB supported
Page 73

69
Network Backup Via HTTP
Audio
Analog Audio Input 1 CH, RCA × 1 4 CH, RCA × 1
Audio Output RCA × 1 ( 0.7Vp-p, 300 Hz to 3KHz )
Network
Ports RJ-45 100Mbps × 1 RJ-45 Gigabit Ethernet × 1
Protocols TCP/IP, SMTP, HTTP, DHCP, PPPoE, NTP, DDNS
Web Direct internet browser access / Multiple users access
Mobile Phone iOS / Android supported
P2P
QR Code APP scan / UID connection( Need additional option ,only for 8ch,16ch DVR
supported)
Software
VMS CMS
Backup / Playback IE / Remote control software
System
Reports Alarm event, operation and configuration log full reports exporting over HTTP or USB )
Authentication User authentication with feature configurable
Language
Arabic / Bulgarian / Chinese( Simplified ) / Chinese ( Traditional ) / Croatian / Czech /
Dutch / English / French / German / Greek / Hebrew / Indonesian / Italian / Japanese /
Korean / Latvia / Persian / Polski / Portuguese / Romanian / Russian / Spanish / Thai /
Turkish / Vietnamese
HDD Inspection
S.M.A.R.T monitoring
Recorded Reserve Time Adjustable 1~9999 hours
Time Daylight saving / NTP
Accessories
PTZ Protocols RS-485 × 1, MLP1、MLP2、PELCO D、PELCO P、SAMSUNG、LG-MULTIX
Remote Control IR Remote controller( Need additional option ) )
Mouse Mouse click, drag and scroll
Others
CPU ARMv5TE FA6 Processor ARMv7 Processor
OS Embedded Linux Kernel 3.3 Embedded Linux Kernel 3.0
WDT Hardware watchdog timer
Power and working environment
Power
Adapter DC 12V, 2.5A,
30W × 1
Adapter DC 12V, 3A,
36W × 1
Adapter DC 12V, 5A,
60W × 1
Operating Temperature 0℃ ~ 45℃
Operating Humidity ) 5% ~ 80%
Dimension (W×L×H) ) 360× 316× 60 mm
Weight ≈3 kg ( Without hard drive )
Page 74
70
Appendix 2 Remote Control Manual
Appendix 2-1 Remote Control
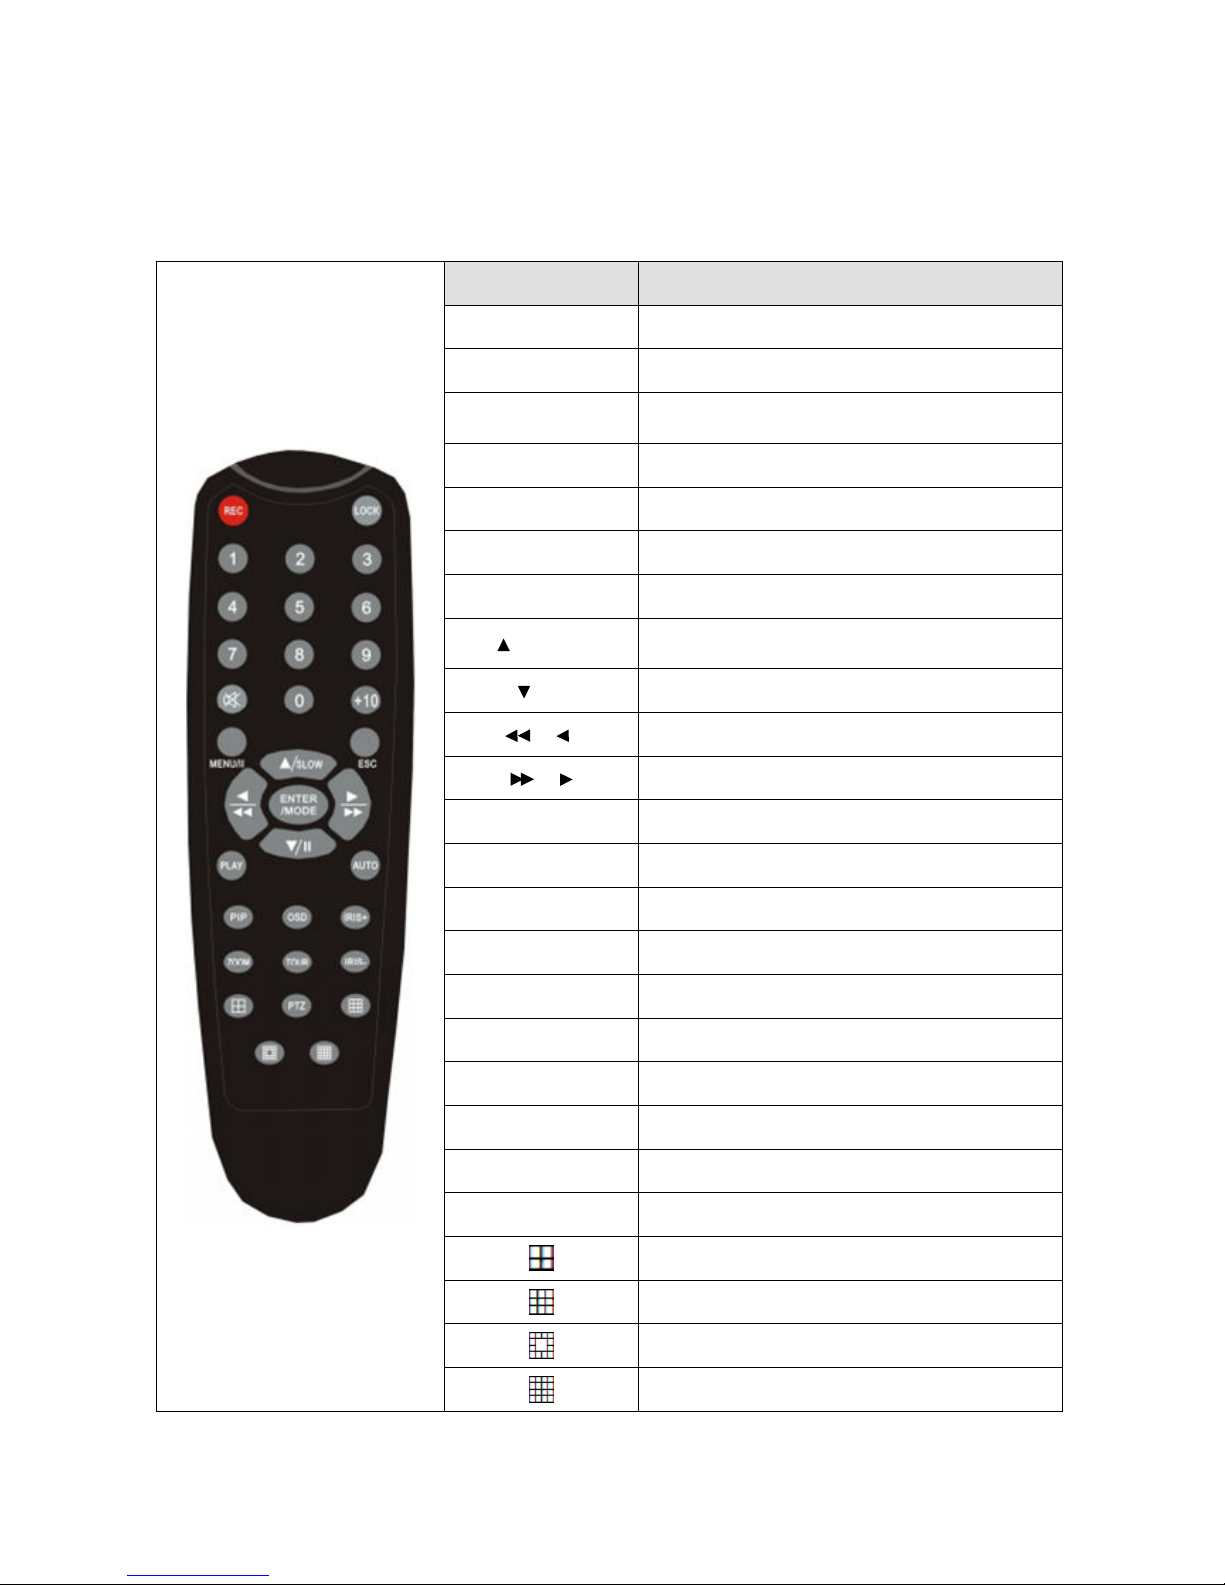
Keys and functions of the remote control are described as follows
Key Description
REC Enable record setup
LOCK Enable/Disable password protection
NUMBER KEY
Enter 0~9 to change channel / Enter
Password
+10 Plus 10 to the number you input
AUDIO Audio/mute
NENU/ ll Enable menu / Pause button when playback
ESC Exit menu
/ SLOW
Up / Slow motion switcher 1/2, 1/4, 1/8
when playback
/ ll Down / Stop and exit playback
/ Left / Rewind
/ Right / Forward
ENTER / MODE Enter / Full screen switch channel
PLAY Playback menu / Play button when playback
AUTO Enable sequence switch channel
PIP Picture in picture
OSD No function
IRIS+ IRIS large
IRIS- IRIS small
ZOOM Enable digital zoom
TOUR No function
PTZ Enable PTZ control
4 division
9 division
13 division
16 division
Page 75
71
Appendix 2-2 Playback Remote Control Functions
Key
Description
ENTER / MODE Full screen switch channel
MENU / ll Pause
PLAY Play button
/ SLOW Up / Slow motion switcher
/ ll Down / Stop and exit playback
/ Left / Rewind
/ Right / Forward
4 division
9 division
16 division
AUDIO Enable sequence switch channel
ESC Stop and exit playback
NUMBER KEY Enter 0–9 to switch channel
Page 76
72
Appendix 2-3 Live Mode Remote Controller Functions
Key Description
REC Enable record setup.
LOCK Enable/Disable password protection.
NUMBER KEY Enter 0–9 to change channel / Enter password.
MENU / ll Enable menu
ESC Exit menu
ENTER / MODE Enter / Full screen switch channel.
PLAY Playback menu
AUTO Enable sequence switch channel.
ZOOM Enable digital zoom
PIP Picture in picture.
PTZ Enable PTZ control.
AUDIO Audio/mute.
4 division
9 division
13 division
16 division
Page 77
73
Appendix 2-4 Digital Zoom Remote Controller Functi
ons
Key Description
/ SLOW Move up
/ ll Move down
/ Move left
/ Move left
ESC Exit menu
Note: Mouse scroll wheel supports zoom in / out.
Page 78
74
Appendix 2-5 PTZ Mode Remote Controller Functions
Button Description
/ SLOW Tilt up
/ ll Tilt down
/ Pan left
/ Pan right
ENTER / MODE Switch channel
ESC Exit PTZ
IRIS+ Expand iris
IRIS- narrow iris
Page 79
75
Appendix 3 AHD Camera Resolution
Appendix 3-1 Switch Resolution From 1080p to 720p
Step 1:
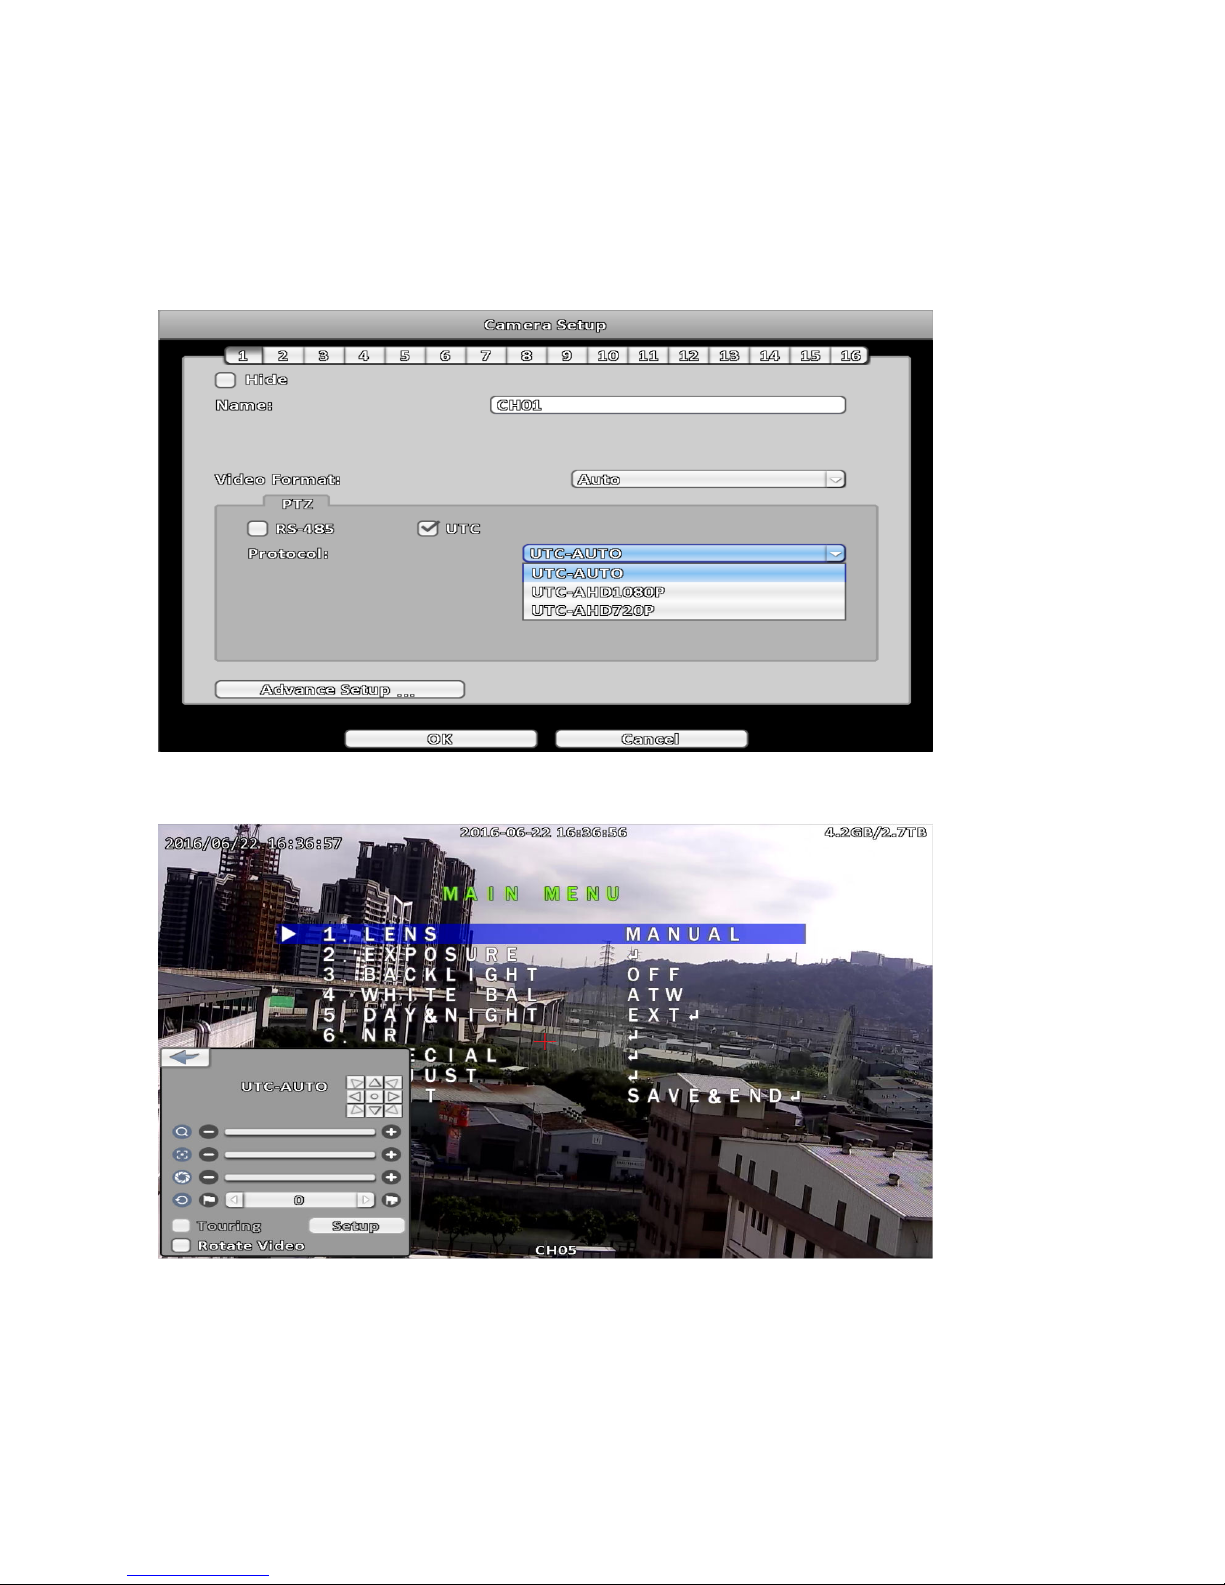
Turn on UTC control, in Camera setup menu, PTZ select UTC, Protocol select UTC-AUTO or
UTC1080p, enter PTZ Operation menu, using the directional keys to control the camera.
Step 2:
Click the center of the directional keys, turn on OSD of camera( refer to Chapter PTZ Operation ).
Page 80
76
Step 3:
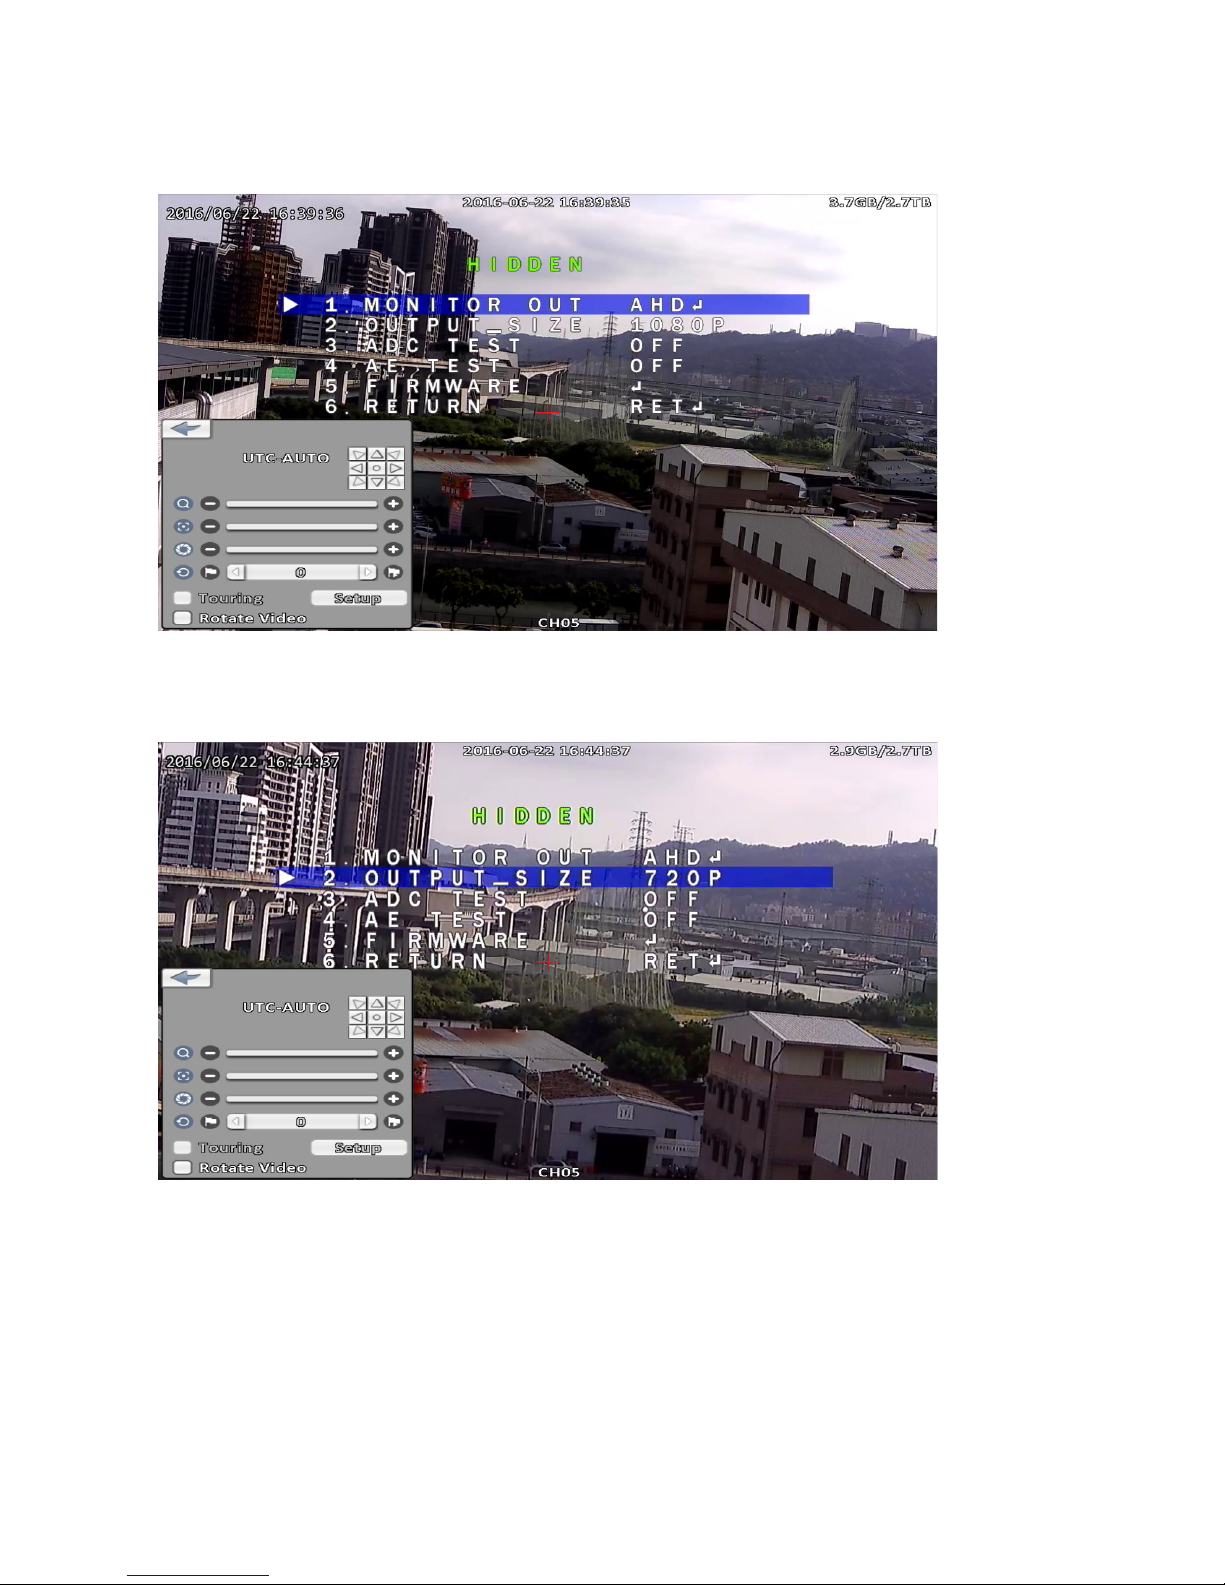
Seek to EXPOSURE option in OSD of camera, click the right directional key 3 times, then enter
the HIDDEN menu.
Step 4:
Move to OUTPUT_SIZE option in HIDDEN menu of camera, click right direction key to switch
resolution.
Page 81
77
Step 5:
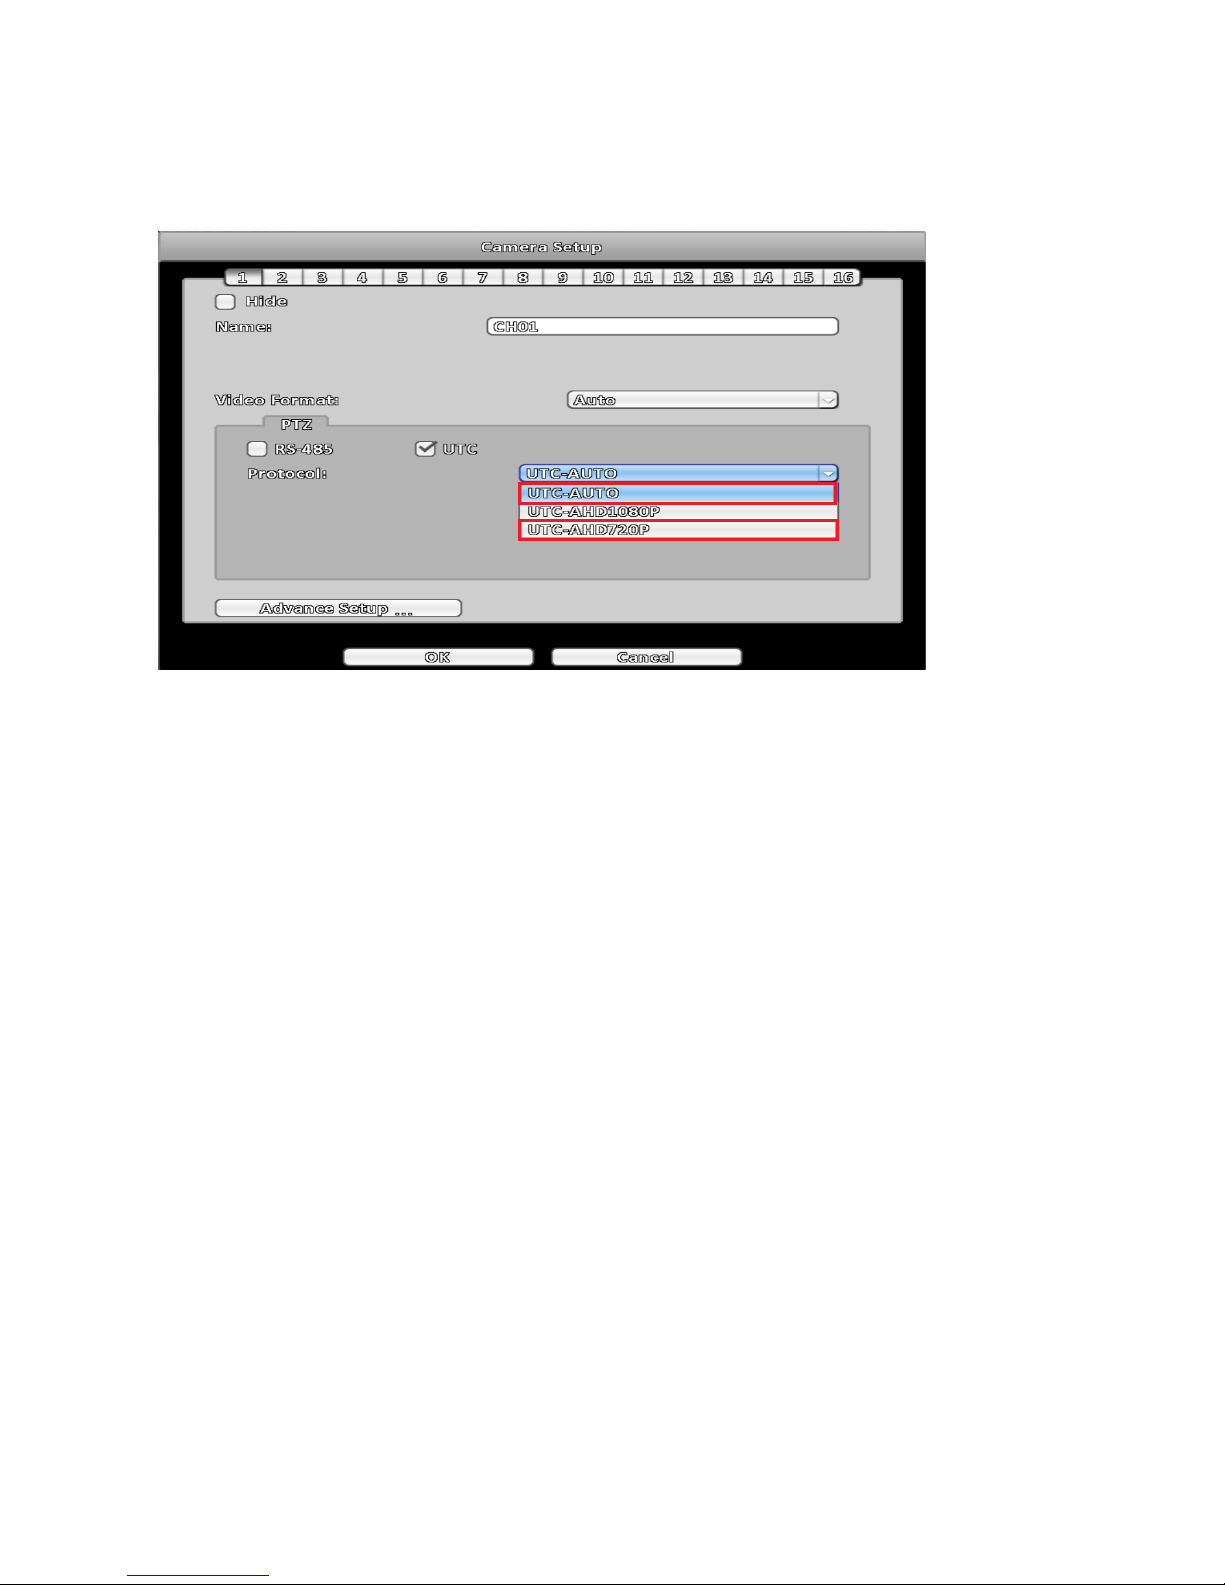
Now camera output resolution has been changed to 720p, If in Step 1 protocol chosen UTC-AHD 1080P ,
back to the Camera Setup and change the protocol to UTC-AHD720P or UTC-AUTO, if UTC control still
required.
Note: Don’t change the resolution when camera Mirror function is enabled.
Page 82
78
Appendix 3-2 Switch Resolution From 1080p to D1
Step 1:
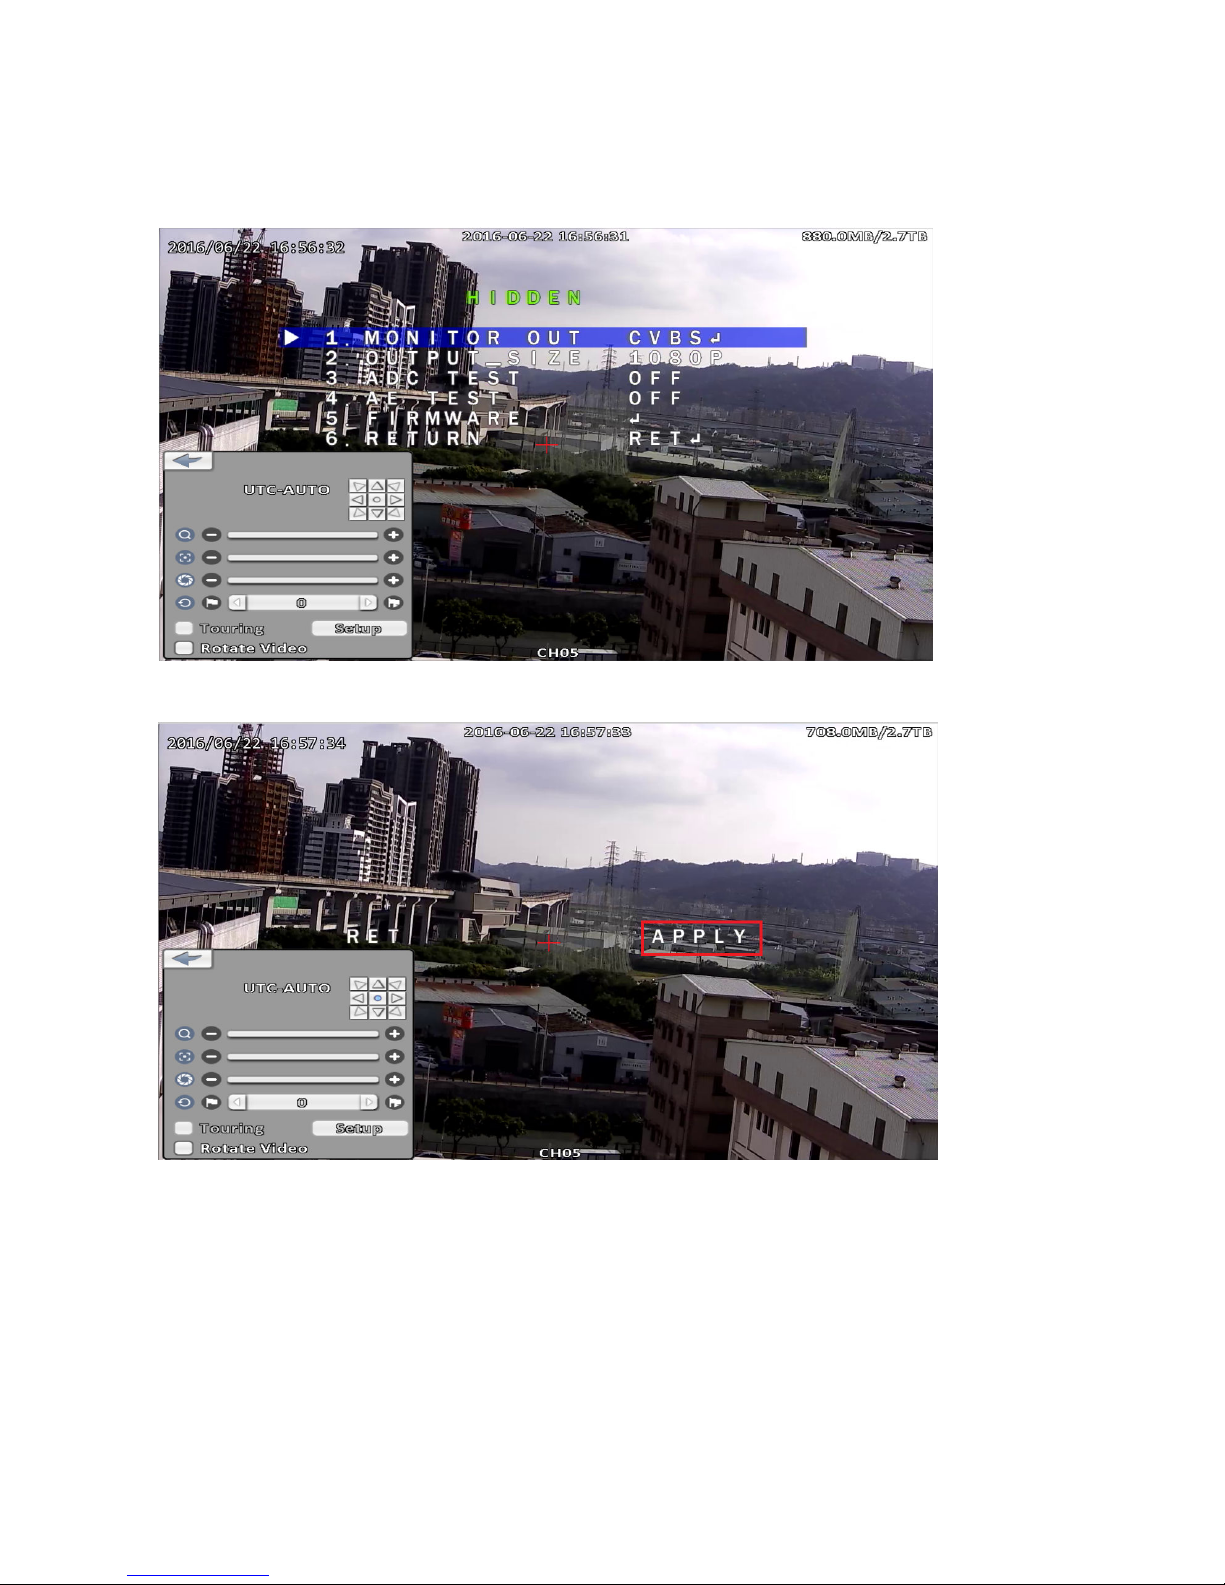
In the HIDDEN menu of camera, select MONITOR OUT option then click right direction key, switch’
the option value to CVBS.
Step 2:
Click APPLY to perform the changed.
Note:
If a coaxial cable length over 200m and that used to connect a DVR, not suggest
using UTC control in that environment.
Page 83

79
Appendix 4 Hard Drive Compatibility List
Confirmed Date Brand Size Model
2016.6.24 Seagate 500GB ST500DM002
2016.3.16 Seagate 2.0TB ST2000VX000
2016.3.16 Seagate 1.0TB ST1000VX000
2016.3.16 Seagate 1.0TB ST1000DM003
2016.6.7 Seagate 500GB ST500VT000
2016.6.7 Seagate 320GB ST3320613AS
2016.6.12 Seagate 500GB ST3500312CS
2016.6.12 Seagate 2.0TB ST2000VM000
2016.6.12 Seagate 2.0TB ST2000DM001
2016.6.12 Seagate 3.0TB ST3000DM001
2016.6.12 Seagate 4.0TB ST4000VM000
2016.6.12 Seagate 2.0TB ST2000VM003
2016.6.12 Seagate 2.0TB ST2000VM003
2016.6.12 Seagate 3.0TB ST3000VX002
2016.6.12 Seagate 4.0TB ST4000VX000
2016.5.11 Seagate 1.0TB ST1000VX001
2016.5.11 Seagate 2.0TB ST2000VX003
2016.5.11 Seagate 5.0TB ST5000VX001
2016.6.29 Seagate 5.0TB ST5000VX0001
2016.4.11 Seagate 6.0TB ST6000VX001
2016.4.11 Seagate 6.0TB ST6000VX0001
2016.4.26 WD 500GB WD5000A VDS-63U7B1
2016.4.26 WD 500GB WD5000AAKX
2016.4.26 WD 500GB WD5000AZRX
2016.6.20 WD 1.0TB WD10PURX
2016.6.20 WD 2.0TB WD20PURX
2016.6.20 WD 3.0TB WD30PURX
2016.6.20 WD 4.0TB WD40PURX
Page 84

80
2016.6.20 WD 5.0TB WD50PURX
2016.4.10 WD 6.0TB WD60PURX
2016.6.20 WD 1.0TB WD10EZRX
2016.6.20 WD 2.0TB WD20EZRX
2016.6.20 WD 3.0TB WD30EZRX
2016.6.20 WD 1.0TB WD10EZEX
2016.6.20 WD 3.0TB WD30EZRZ
2016.6.20 WD 4.0TB WD40EZRZ
2016.6.20 WD 6.0TB WD60EZRZ
2016.6.20 WD 3.0TB WD30EFRX
2017.5.15 WD 8.0TB WD80PUZX
2016.3.16 TOSHIBA 500GB DT01ABA050V
2016.3.16 TOSHIBA 1.0TB DT01ABA100V
2016.3.16 TOSHIBA 2.0TB DT01ABA200V
2016.3.16 TOSHIBA 3.0TB DT01ABA300V
2016.4.26 TOSHIBA 2.0TB MD03ACA200V
2016.4.26 TOSHIBA 3.0TB MD03ACA300V
2016.4.26 TOSHIBA 4.0TB MD03ACA400V
2016.6.20 TOSHIBA 5.0TB MD04ACA500V
2016.4.11 TOSHIBA 4.0TB MD04ABA400V
2016.4.11 TOSHIBA 5.0TB MD04ABA500V
Note:
1. WD 3.5” Black Label SATA HDD not suggestion.
2. DHD 2 and 2A Series DVR not support 8.0TB HDD.
 Loading...