


INSTRUCTION MANUAL
CMD6182X/6186X3.6 N/P
D/N VANDAL RESISTANT ATR 700TVL VARI-FOCAL DOME CAMERA
CMR6182X/6186X3.6 N/P
D/N VANDAL RESISTANT ATR 700TVL VARI-FOCAL IR DOME CAMERA

IMPORTANT SAFEGUARDS
GRAPHIC SYMBOL EXPLANATION
The lightning flash with arrowhead symbol, within an equilateral
triangle, is intended to alert the user to the presence of
uninsulated "dangerous voltage" within the product's enclosure
that may be of sufficient magnitude to constitute a risk of electric
The exclamation point within an equilateral triangle is intended
to alert the user to the presence of important operating and
maintenance (servicing) instructions in the literature
shock to persons.
accompanying the unit.
CAUTION
RISK OF ELECTRIC SHOCK
DO NOT OPEN
CAUTION:
TO REDUCE THE RISK OF ELECTRIC SHOCK,
DO NOT REMOVE COVER (OR BACK)
NO USER SERVICEABLE PARTS INSIDE.
REFER SERVICING TO QUALIFIED
SERVICE PERSONNEL.
CAUTION
RISK OF EXPLOSION IF BATTERY IS REPLACED
BY AN INCORRECT TYPE.
DISPOSE OF USED BATTERIES ACCORDING
TO THE INSTRUCTIONS
(CMR6182X/6186X3.6N/P)
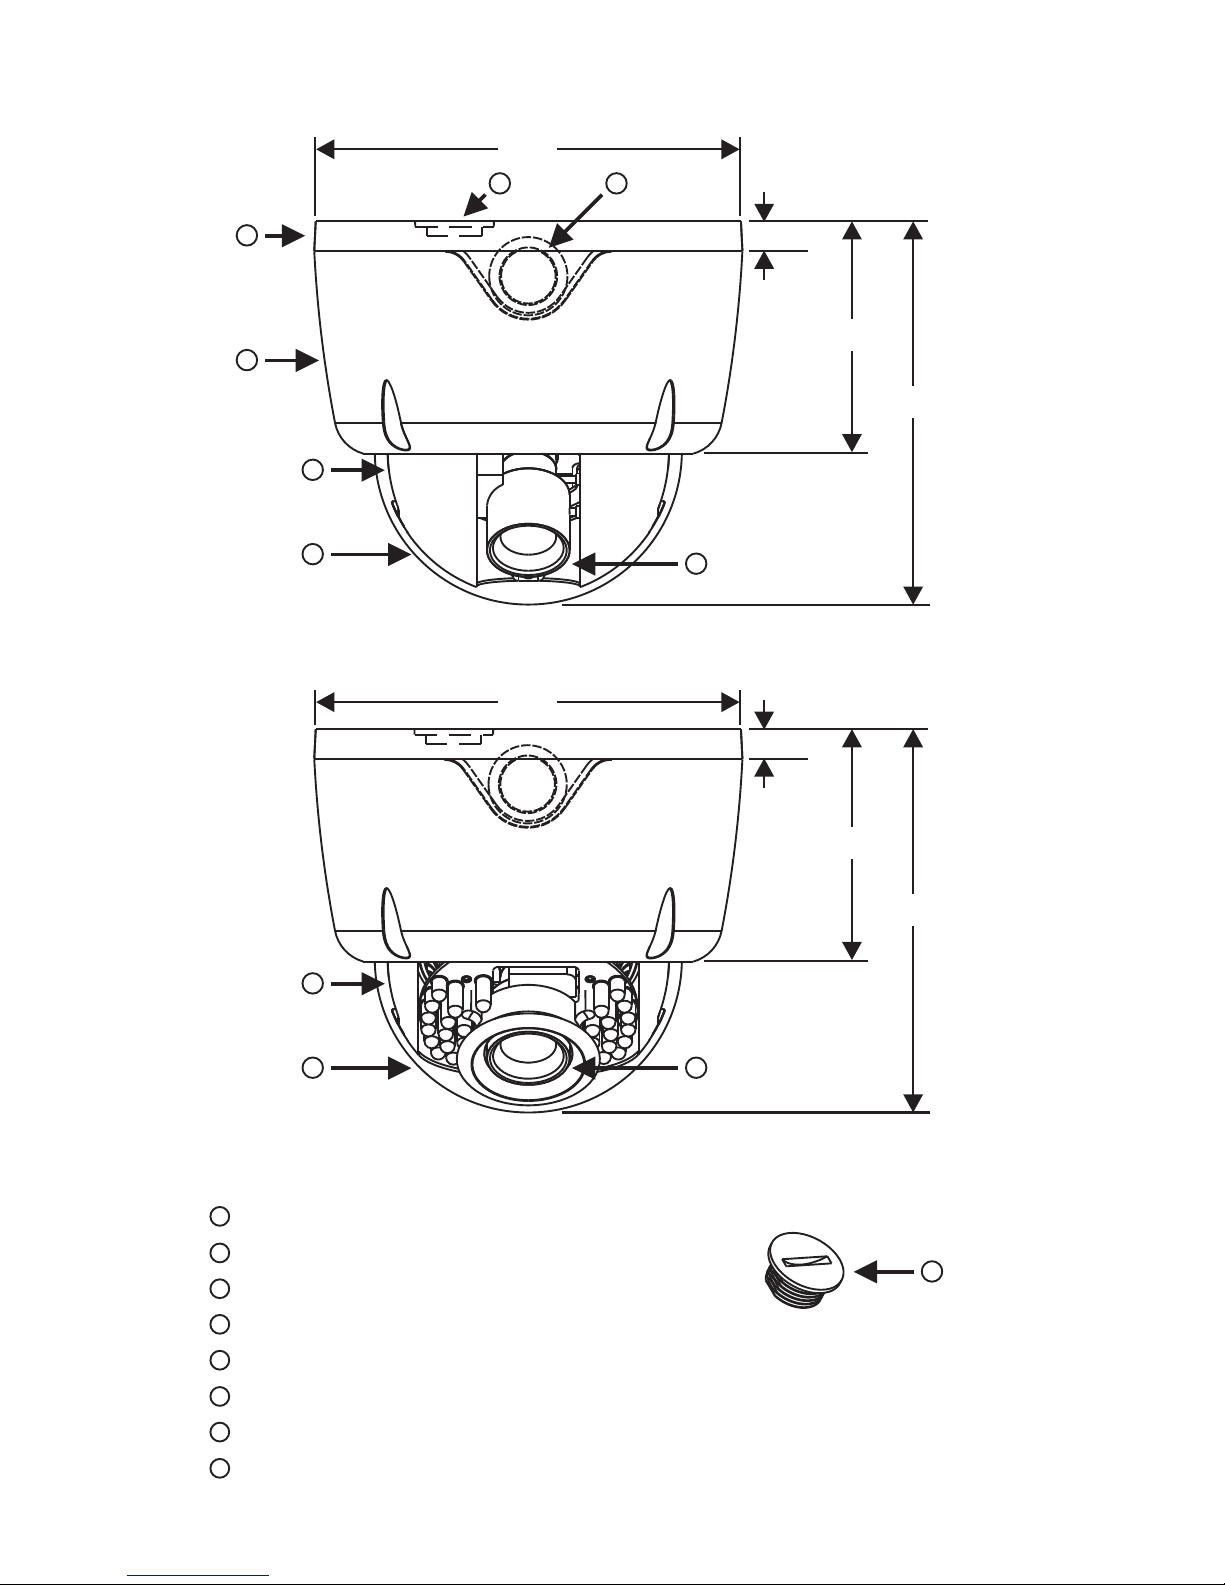
PART DESCRIPTION & DIMENSION
BOTTOM CHASSIS
TOP COVER
BOTTOM HOLE
SIDE HOLE
INNER COVER
DOME COVER
LENS
HOLE PLUG
1
2
3
4
5
6
7
8
1
Unit: mm
2
5
6
145.0
3 4
10.0
78.7
130.0
10.0
78.7
130.0
145.0
5
6 7
(CMD6182X/6186X3.6N/P)
8
7

(CMR6182X/6186X3.6N/P)
INSTALLATION
1. Please use the enclosed hexagon screw driver to untighten the 4 screws on the top cover
(FIG.1).
3. Fix the safety rope on the bottom chassis with screw driver (FIG.4). Put the provided
screws (M3.0x25, wooden screw) through the holes marked as “a” , and fix the bottom
chassis in the desired area (FIG.5 & FIG.6).
FIG.1
2. Using screw drive to untighten the 3 screws on the camera module (FIG.2 & FIG.3).
FIG.2 FIG.3
Camera Module
Camera Module
(CMD6182X/6186X3.6N/P)

FIG.4
FIG.5 FIG.6
a
66mm
120°
a a
4. Firstly, put video cable and power cable through a pipe with 1/2" PT at one end (FIG.7),
and then screw the pipe to the side hole or bottom hole (FIG.8, please make sure the
connection between the pipe and the side hole or bottom hole is watertight.).
NOTE: Pipe is not provided.
FIG.7 FIG.8
5. Using the screw driver to screw camera module into bottom chassis (FIG.9 & FIG.10).

CMD6182X3.6N/P
CMR6182X3.6N/P
CMD6186X3.6N/P
CMR6186X3.6N/P
( )( )
(CMR6182X/6186X3.6N/P)(CMD6182X/6186X3.6N/P)
FIG.9 FIG.10
Camera Module
Camera Module
6. Plug and fix the power cable to the jack or terminal block and plug the video cable to video
output of the camera (FIG.11 & FIG.12). For the safety reason, when plug video cable to
video output, please use the cable tubing to cover the bare part to avoid danger of electric
shock or electric leakage (FIG.13).
Video Outpu t
Video Cable
FIG.11
FIG.13
FIG.12

(CMR6182X/6186X3.6N/P)(CMD6182X/6186X3.6N/P)
(CMD6182X/6186X3.6N/P) (CMR6182X/6186X3.6N/P)(CMD6182X/6186X3.6N/P)
7. Take down the inner cover from the camera module (FIG.14, CMD6182X/6186X3.6N/P),
and then adjust the direction of the lens through the adjustable Pan/Tilt bracket and
rotatable round bracket for Azimuth (FIG.15 & FIG.16).
FIG.15 FIG.16FIG.14
TILT
PAN
Press inward
and pull down.
TILT
PAN
AZIMUTH AZIMUTH
8. Adjust the lens on focus and zoom to form the optimal video image after that tighten the
screws (FIG.17 & FIG.18). Then adjust the OSD menu to form the optimal image. Please
refer to Page 8 ~ Page 10.
FIG.17 FIG.18
FO C US
ZO O M
OSD
KEY
OSD
KEY
ZO O M
FO C US
8-1. USER OSD SETTING
Setting switches and Functions.
A. (UP)
B. (LEFT)
: Press to move the cursor upwards or to select
items.
: Press to move the cursor to the left and to select
or adjust the parameters of the selected item.
The parameters changes each time this button is pressed.
RIGHT
LEFT
UP
DOWN
SET

(CMD6182X/6186X3.6N/P) (CMR6182X/6186X3.6N/P)(CMR6182X/6186X3.6N/P)
C. (RIGHT)
D. (DOWN)
E. SET : Executes selections and displays a submenu for an
item with the mark.
: Press to move the cursor to the right and to select or adjust the
parameters of the selected item. The parameters changes each time
this button is pressed.
: Press to move the cursor downwards or to select items.
9. Put on the inner cover (FIG.19, CMD6182X/6186X3.6N/P). Adjust the position of the inner
cover inside the dome cover, so that the opening of the inner cover align with the direction
of the lens (FIG.20 & FIG.21, CMR6182X/6186X3.6N/P).
FIG.19 FIG.20 FIG.21
Press and turn
10. Fix the safety rope on the top cover with screw driver (FIG.22). Replace the top cover
and tighten the screws (FIG.23).
FIG.22 FIG.23

Alternative Cabling positions
1. Untighten the hole plug on the bottom hole of the bottom chassis and screw it to the side
hole.
2. Put the video cable and power cable through the bottom hole. Then connect them to
video output and power input of the camera. Please refer to INSTALLATION Step 4 for
water resistant installation.

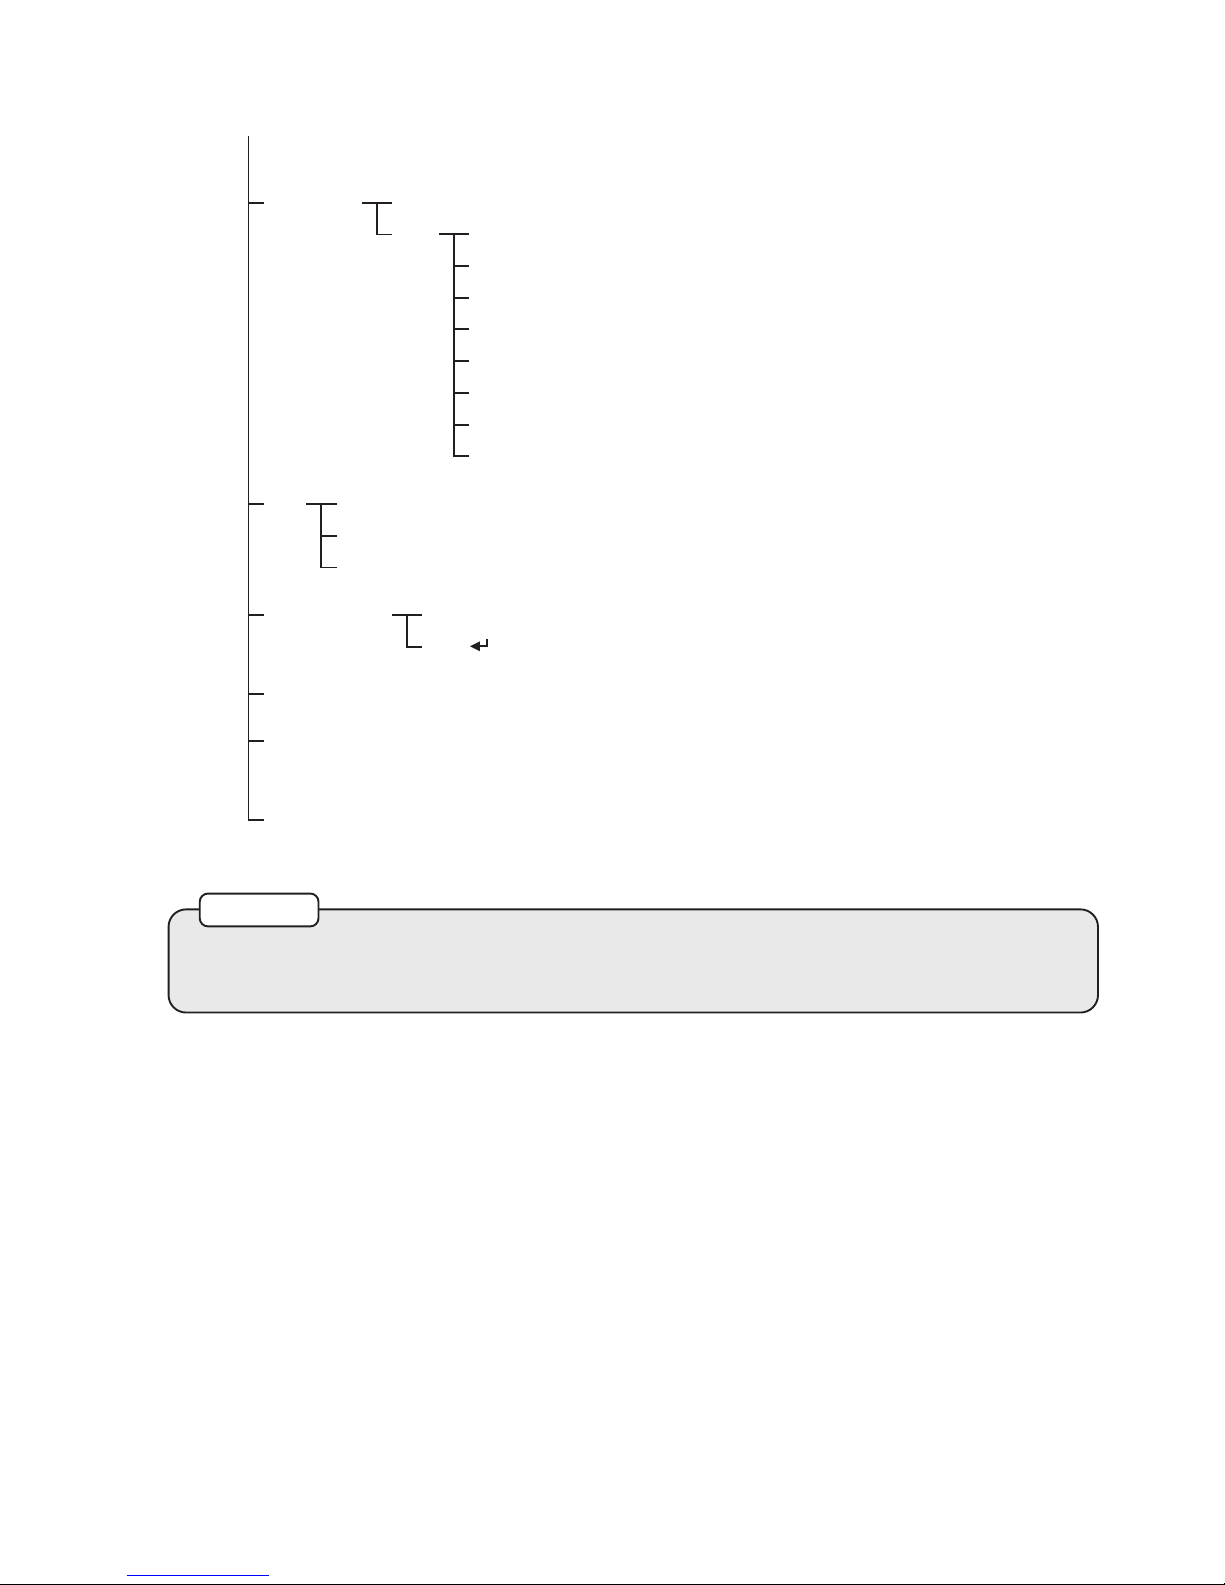
CONFIGURATION OF THE MENU
SETUP
MENU
LENS
SHUTTER/
AGC
AUTO
AUTO
MANUAL
MANUAL
HIGH LUMINANCE
LOW LUMINANCE
MODE SHUT+AGC-
SHUTTER 1/60(1/50) 1/100(1/120) 1/250~1/10000-
/ /
AGC 6.00 12.00 18.00 24.00 30.00 36.00 42.00 44.80- / / / / / / /
MODE
MODE AGC OFF-
/
BRIGHTNESS(000~255)
BRIGHTNESS x0.25 x0.50 x0.75 x1.00-
/ / /
AUTO IRIS/ SHUT+AUTO IRIS
SHUT(NOTES*2)
MODE AUTO OPEN CLOSE- / /
SPEED(000~255)
TYPE DC-
(NOTES*1)
WHITE BAL
ATR
PICT ADJUST
BACKLIGHT BLC HLC OFF-
/ /
ATW
OFF
MIRROR OFF/ ON-
B-GAIN(000~255)
B-GAIN(000~255)
LUMINANCE LOW MID HIGH-
/ /
SPEED(000~255)
PUSH
ON
BRIGHTNESS(000~255)
CONTRAST(000~255)
SHARPNESS(000~255)
HUE(000~255)
GAIN(000~255)
R-GAIN(000~255)
R-GAIN(000~255)
CONTRAST LOW MIDLOW MID MIDHIGH HIGH-
/ / / /
DELAY CNT(000~255)
USER 1
USER 2
ANTI CR
MANUAL LEVEL(000~255)-
PUSH LOCK
ATW FRAME x0.50 x1.00 x1.50 x2.00-
/ / /
ENVIRONMENT INDOOR OUTDOOR- /
PRIVACY
OFF
AREA SEL 1/8~8/8-
ON
TOP [000~244(NTSC), 000~288(PAL)]
BOTTOM [000~244(NTSC), 000~288(PAL)]
LEFT [000~474(NTSC), 000~468(PAL)]
RIGHT [000~474(NTSC), 000~468(PAL)]
COLOR(1~8)
TRANSP 0.00 0.50 0.75 1.00-
/ / /
MOSAIC OFF ON- /
NR
NR MODE Y/C OFF/ Y/ C-
/
Y LEVEL(000~015)
C LEVEL(000~015)
CAMERA ID
SYNC INT-
LANGUAGE ENGLISH-
/ / / / / /
/
"#$
&'
DEUTSCH FRANCAIS PYCCK PORTUGUES
ESPANOL
OFF
ON
NN
^
~
^
CAMERA RESET
*1: Set the LENS mode to AUTO on the SETUP MENU menu.
*2: Set the LENS mode to MANUAL on the SETUP MENU menu.
NOTES
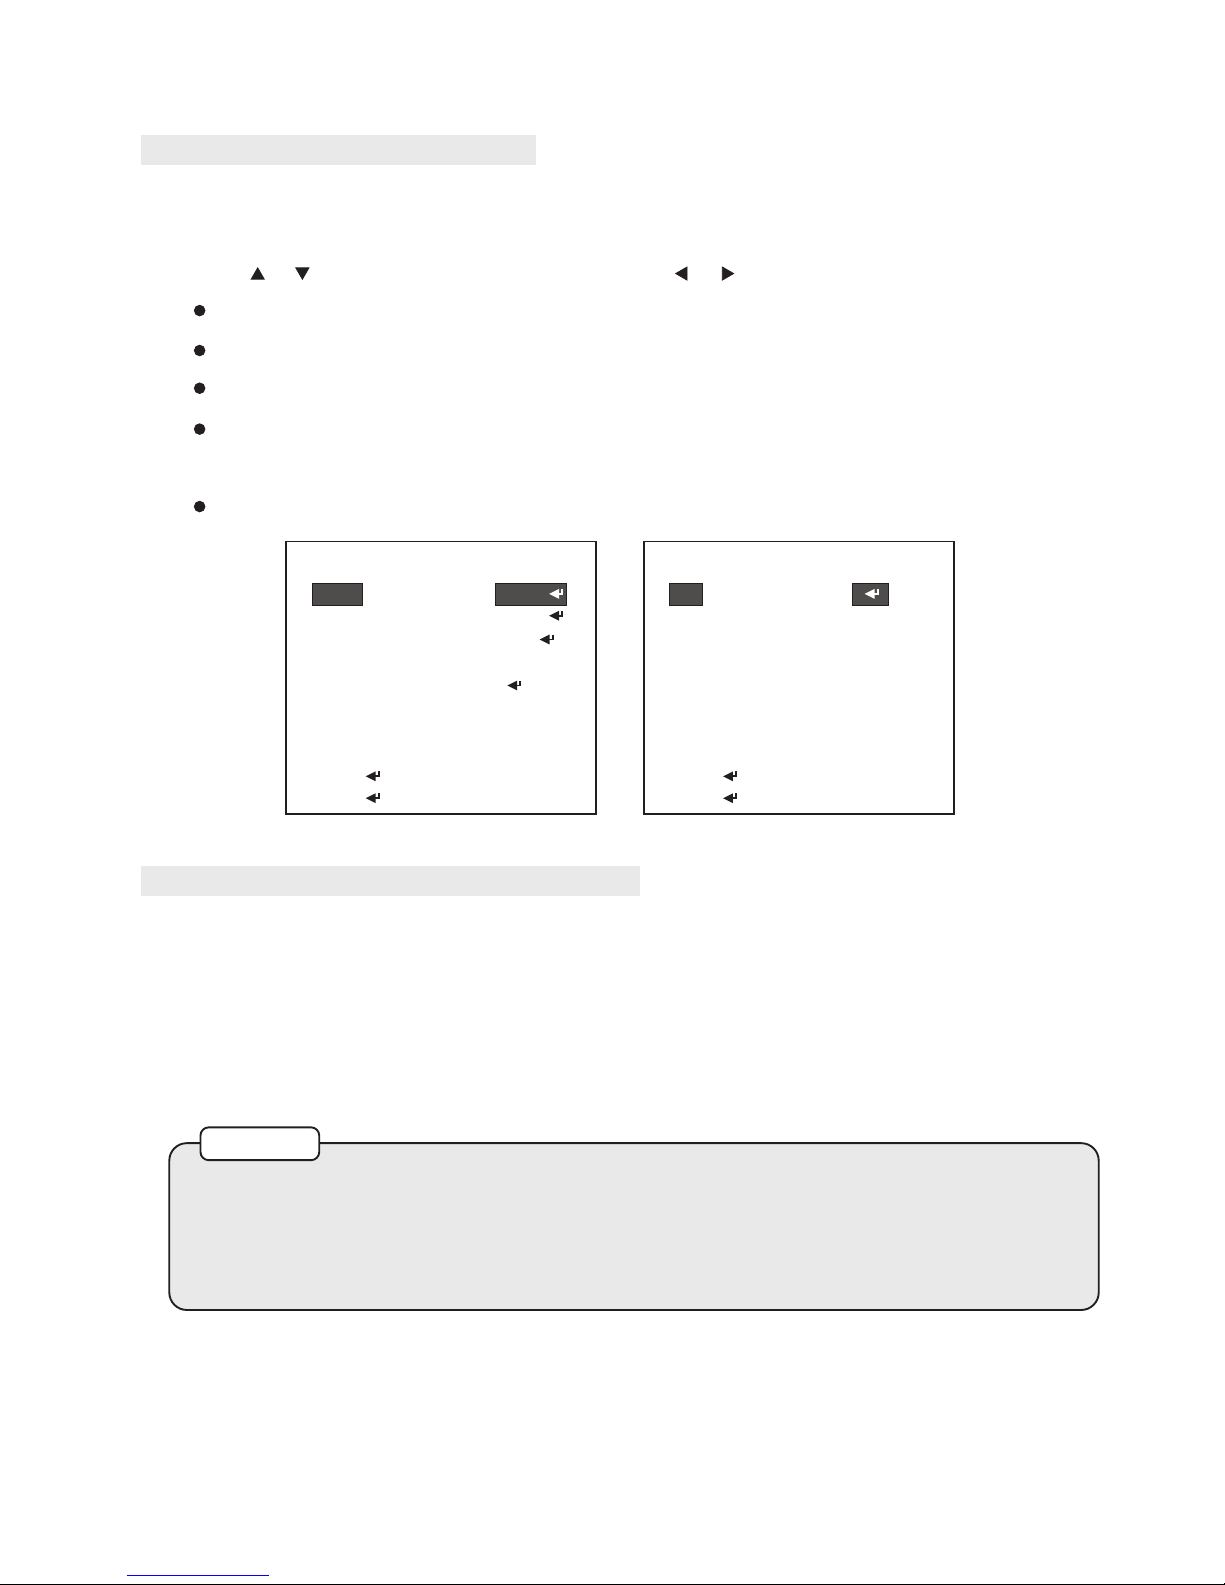
TO O pen and Exi t th e Me nu s cree n
1. Press "SET" button.
The Menu screen appears on the monitor. Check the current settings on the menu.
2. Push or button to select the options then use or button to select a mode.
NEXT: To the next setup menu.
BACK: Return to the previous.
RETURN: Return to the previous.
SAVE ALL: Used to save the various setting of the internal OSD menu
in the EEPROM together.
EXIT: Exit the setup menu.
SETUP MENU
AUTO
AUTO
ATW
BLC
OFF
OFF
LENS
SHUTTER/AGC
WHITE BAL
BACKLIGHT
PICT ADJUST
ATR
PRIVACY
NEXT
EXIT SAVE ALL
SETUP MENU
OFF
INT
ENGLISH
NR
CAMERA ID
SYNC
LANGUAGE
CAMERA RESET
BACK
EXIT SAVE ALL
Se tti ng o f sh utte r sp eed of AU TO IR IS m ode
Please set-up proper shutter speed for AUTO IRIS mode as below:
SHUTTER/AGC: AUTO[SETUP MENU] SET MODE: AUTO IRIS[AUTO SETUP]
RETURN SHUTTER/AGC: MANUAL[SETUP MENU] SET SHUTTER:1/60(1/50) or
1/100(1/120) or 1/250.....[MANUAL SETUP] RETURN SHUTTER/AGC: AUTO[SETUP
MENU] SAVE ALL SET EXIT
→ → →
→ → →
→ →
→ → →
1. Only DC mode on the TYPE option. Because a DC auto iris lens is used with the
vari-focal lens camera.
2. Please select AUTO mode on the SHUTTER/AGC option. If you select MANUAL
mode, the over exposure may occur.
NOTES
SETTING MENU AND FUNCTION

SPECIFICATIONS
Mode l No.
Lens
Powe r Inp u t Volta g e
Syst e m
Sync . Mod e
Menu Cont r o l
Pick Up El eme n t
Effec t i v e P i xe l s
Chip Size
Hori z o nt a l & Ver t i ca l
Sync . Fre q u en c y
Scan n i ng Syst e m
Infr a r ed Cut Fi lte r
Reso l u ti o n
Mini m u m I l lu m i n ati o n
Shut t e r
Adap t i ve Ton e
Repr o d uc t i o n
S/N Ratio
Auto Gain Cont r o l
Whit e Bal a n ce
Nois e Red u c ti o n
Pict u r e Adj u s t
Priv a c y M a sk i n g
Priv a c y M a sk i n g Z o n e
OSD Langu a g e
Powe r Con s u mp t i o n
Back Ligh t Com p e ns a t i on
Video Outp u t
Oper a t in g Tempe r a t ur e
Gamm a Cha r a ct e r i sti c
IP Ra t in g
Va n d a l P r o of
Foca l Len g t h
Iris
Angl e of view
H
Colo r
Auto
Lumi n a nc e
V
Mono
Manu a l
Cont r a st
D
CMD6 1 8 2X 3 . 6 N/ P
0.04 5 L ux / F1 . 4
1/60 ( 1 /5 0 ) S ~ 1/10 0 , 0 00 S
LOW / MI D / HIGH
0.00 9 L ux / F1 . 4
1/60(1/50)S, 1/100(1/120)S, 1/250S, 1/500S, 1/1,000S, 1/2,000S, 1/4,000S, 1/10,000S
LOW / MI D L OW / M I D / M I DHI G H / H I GH
NTSC or PAL
DC12 V ( 1 0 % )±
Inte r n al
OSD C on t r o l
1/3" Exvi e w HA D CCD Sens o r
976( H ) x 4 94 ( V ) [ N T S C]
976( H ) x 5 82 ( V ) [ PA L]
5.58 m m (H ) x 4 . 6 7mm ( V )
15.7 3 4 KH z / 5 9 .9 4 H z [ N T S C]
15.6 2 5 KH z / 5 0 Hz [ PAL ]
2:1 I nt e r l ace
Colo r : 70 0 T V L i ne s , Mo n o : 7 5 0 T V L i n es
More T he n 50d B (AG C - O FF )
Auto Sele c t ab l e , A u tom a t ic S wi t c h F r o m C o l o r M o d e t o Mo n o ch r o m e
AUTO / MA N U A L
AT W / P U S H / USE R 1 / U S ER2 / A NTI C R / MAN U A L / P U S H L O C K
Y / C / Y / C / O FF
MIRR O R / B RI G H T NE S S / C O NTR A S T / S H ARP N E S S / HUE / G A I N
ON / OFF
8 Z o n es
ENGLISH/JAPANESE/GERMANS/FRENCH/RUSSIAN/PORTUGUESE/SPANISH/SIMPLY CHINESE
3.5W (DC1 2 V )
3.0W (AC2 4 V )
BLC / HL C ( Hi g h Li g h t C o m p en s a t ion ) / O F F
IP67
Withstand a blow from a 10 lbs sledgehammer
CVBS 1.0V p - p, 7 5o h m
-10 ~ + 5 0℃ ℃ ℉ ℉(14 ~ 1 2 2 )
γ=0.45
D/N VAND A L R ESI S TANT AT R 70 0 T V L VA R I -FO C A L DO M E CA M E R A
3.3 ~ 12 m m
F1.4
89.8 ~ 2 3 . 9° °
63.6 ~ 1 7 . 9° °
125. 7 ~ 2 9 .9° °
Dime n s io n
Weigh t
ψ145(D) x 130mm(H)
970g
Desi g n an d spe c i fi c a t ion s are s ubj e c t t o c h a n ge w ith o u t n o t i ce.
CMD6 1 8 6X 3 . 6 N/ P
DC12 V ( 1 0 % )
AC24 V ( )
±
±1 0 %
2.3W
990g

66-C M R 61 8 C S E- 2
Mode l No.
Lens
Powe r Inp u t Vo lta g e
Syst e m
Sync . Mod e
Menu Cont r o l
Pick Up E l em e n t
Effec t i v e P i xe l s
Chip Size
Hori z o nt a l & Ver t i c al
Sync . Fre q u en c y
Scan n i ng S yst e m
Infr a r ed C ut F i lte r
Reso l u ti o n
Mini m u m I l lu m i n ati o n
Shut t e r
Adap t i ve To n e
Repr o d uc t i o n
S/N R at i o
Auto Gain Cont r o l
Whit e Bal a n ce
Nois e Red u c ti o n
Pict u r e Adj u s t
Priv a c y M a sk i n g
Priv a c y M a sk i n g Z o n e
OSD L an g u a ge
Powe r Con s u mp t i o n
Back Ligh t Com p e ns a t i on
Video O ut p u t
Oper a t in g Te mp e r a tur e
Gamm a Cha r a ct e r i sti c
IP R a t i ng
Va n d a l P r o of
Infr a r ed
LED
Beam Spre a d
Peak Wa ve l e n gth
Foca l Len g t h
Iris
Angl e of v ie w
H
Colo r
Auto
Lumi n a nc e
V
Mono
Manu a l
Cont r a st
D
IR O n
CMR6 1 8 2X 3 . 6 N/ P
0.04 5 L ux / F 1 . 4
1/60 ( 1 /5 0 ) S ~ 1 /10 0 , 0 00S
LOW / MI D / H I GH
0.00 9 L ux / F 1 . 4
1/60(1/50)S, 1/100(1/120)S, 1/250S, 1/500S, 1/1,000S, 1/2,000S, 1/4,000S, 1/10,000S
LOW / MI D L OW / M I D / M I DHI G H / H I GH
NTSC or PAL
DC12 V ( 1 0 % )±
Inte r n al
OSD C on t r o l
1/3" Exvi e w HA D CCD Sens o r
976( H ) x 4 94 ( V ) [ N T S C]
976( H ) x 5 82 ( V ) [ PA L]
5.58 m m (H ) x 4 . 6 7mm ( V )
15.7 3 4 KH z / 5 9 .9 4 H z [ N T S C]
15.6 2 5 KH z / 5 0 Hz [ PAL ]
2:1 I nt e r l ace
Colo r : 70 0 T V L i ne s , Mo n o : 7 5 0 T V L i n es
0Lux
More T he n 50d B (AG C - O FF )
Auto Sele c t ab l e , A u tom a t ic S wi t c h F r o m C o l o r M o d e t o Mo n o ch r o m e
AUTO / MA N U A L
AT W / P U S H / USE R 1 / U S ER2 / A NTI C R / MAN U A L / P U S H L O C K
Y / C / Y / C / O FF
MIRR O R / B RI G H T NE S S / C O NTR A S T / S H ARP N E S S / HUE / G A I N
ON / OFF
8 Z o n es
ENGLISH/JAPANESE/GERMANS/FRENCH/RUSSIAN/PORTUGUESE/SPANISH/SIMPLY CHINESE
8.8W (DC1 2 V )
7.0W (AC2 4 V )
BLC / HL C ( Hi g h Li g h t C o m p en s a t ion ) / O F F
IP67
Withstand a blow from a 10 lbs sledgehammer
850n m
30°
CVBS 1.0V p - p, 7 5o h m
-10 ~ + 5 0℃ ℃ ℉ ℉(14 ~ 1 2 2 )
γ=0.45
D/N VAND A L R ESI S TANT AT R 70 0 T V L VA R I -FO C A L IR D OM E CAME R A
3.3 ~ 12 m m
F1.4
89.8 ~ 2 3 . 9° °
63.6 ~ 1 7 . 9° °
125. 7 ~ 2 9 .9° °
Radi a n t D i st a n c e
Dime n s io n
Weigh t
25M
ψ145(D) x 130mm(H)
1000 g
Desi g n an d spe c i fi c a t ion s are s ubj e c t t o c h a n ge w ith o u t n o t i ce.
CMR6 1 8 6X 3 . 6 N/ P
DC12 V ( 1 0 % )
AC24 V ( )
±
±1 0 %
6.1W
1020 g

MERIT LILIN ENT. CO., LTD
http://www.meritlilin.com
66-CMR618CSE
CMD6182X/6186X3.6 N/P
D/N VANDAL RESISTANT ATR 700TVL VARI-FOCAL DOME CAMERA
CMR6182X/6186X3.6 N/P
D/N VANDAL RESISTANT ATR 700TVL VARI-FOCAL IR DOME CAMERA
 Loading...